eddssii tttiimmee trraacckkeerr - edsiintranet.edsisolutions.com/emponly/intranet/tutorials/tt...
TRANSCRIPT

EEDDSSII TTiimmee TTrraacckkeerr End User Documentation
Versatile Systems, Inc.

Table of Contents
1 Introduction ............................................................................... 4
2 Basics ......................................................................................... 5 2.1 Accessing Time Tracker............................................................................ 5 2.2 Logging In ............................................................................................. 6 2.3 The Desktop ........................................................................................... 8 2.4 Help! I'm Lost and I Need to Go Back to the Desktop ................................. 8 2.5 Changing Your Password .......................................................................... 9 2.6 Accessing Full Screen Applications ............................................................ 9 2.7 EDSI Roles And Actions Document ........................................................... 10 2.8 Logging Out .......................................................................................... 12
3 Client Management ................................................................... 13 3.1 Enrollment ............................................................................................ 13 3.2 Modify Client ......................................................................................... 19 3.3 Assigned Activities ................................................................................. 20 3.4 Employment Verifications ........................................................................ 22 3.5 Hours Entry .......................................................................................... 24 3.6 Bulk Hours Entry ................................................................................... 26 3.7 Hours Approval ...................................................................................... 29 3.8 Temporary Activity Assignment ................................................................ 30 3.9 Call Log ................................................................................................ 31 3.10 Add Personalized Message When Client Uses the Kiosk ............................. 32 3.11 Marking the Client as K-Closing .............................................................. 33 3.12 Pause the Client's TANF Days Timer ........................................................ 33 3.13 Reset the Client's PIN ........................................................................... 33 3.14 Lock/Unlock Client ............................................................................... 34 3.15 Terminate Client .................................................................................. 34
4 Reports ..................................................................................... 38 4.1 Absent Clients Report ............................................................................. 38 4.2 Call Log Report ...................................................................................... 39 4.3 Client Child Report ................................................................................. 39 4.4 Clients Clocked In .................................................................................. 40 4.5 Cumulative Report ................................................................................. 41 4.6 Enrollment Report .................................................................................. 42 4.7 EVF Report ............................................................................................ 43 4.8 Excused Absence Report ......................................................................... 44 4.9 Hours By Activity Report ......................................................................... 45 4.10 Job Search Report ................................................................................ 46 4.11 Participation ........................................................................................ 47 4.12 Suspect Hours Report ........................................................................... 50 4.13 TANF Days Report ................................................................................ 50 4.14 Termination Report ............................................................................... 51 4.15 Time Sheet Report ............................................................................... 51 4.16 Unapproved Terminations ...................................................................... 53 4.17 Zero Hours Report ................................................................................ 54
5 Administration .......................................................................... 55

5.1 Desktop Management ............................................................................. 55 5.2 Group Manager ...................................................................................... 59 5.3 User Manager ........................................................................................ 61 5.4 Application Information .......................................................................... 63 5.5 Activity Management .............................................................................. 64 5.6 Holiday Management .............................................................................. 66 5.7 Work Location Management .................................................................... 68 5.8 Setting the Location-Wide Kiosk Message.................................................. 70 5.9 Transfer Clients From One EC to Another EC .............................................. 71 5.10 Termination Code Management .............................................................. 72
6 Kiosk Interface ......................................................................... 74

4
1 Introduction
Time Tracker provides a comprehensive suite of applications and reporting to facilitate client management, hours tracking, and participation
monitoring. It is customized to suit the needs of EDSI with the ultimate
goal of reducing time spent on data collection in order to focus more time on clients' education and needs.
This document provides a detailed tour of Time Tracker and elaborates on how to use the various features. Many screen captures of the actual
system are provided for better understanding. Some of the sensitive data
shown on the screen captures has been blurred out for security reasons.
This guide is intended to be used by all roles within the EDSI Corporation,
from administrators to directors to job developers.

5
2 Basics
2.1 Accessing Time Tracker
Time Tracker is access over the internet using a web browser. The supported web browsers are Microsoft Internet Explorer versions 6 and 7 and Mozilla Firefox
versions 1 and 2.
Launched a web browser and type the following URL in to the browser's location
bar:
PA Users - https://edsi.versatile.com MI Users – https://mi.edsi.versatile.com
DE USERS- https://de.edsi.versatile.com
The system will display a login page.

6
2.2 Logging In
At the login screen, enter a User Name and Password and click the Log In button. Employees will use their employee number for their User Name. The Time
Tracker administrator is responsible for setting up User Names and Password.
The system will display the message “Logging into EDSI...” above the EDSI logo while it is establishing a connection.

7
Users who are using the system for first time should change their passwords as
soon as possible because the default password provided by the administrator is
not secure. This is discussed in the section “Changing Your Password”.

8
2.3 The Desktop
Once logged in to the portal, the user will see a Desktop similar to what is
pictured below. The information that is displayed on the Desktop varies based on the User's Role. For example, the Desktop pictured here is customized for users
who belong to the “Admin” Role.
Each rectangular box on the desktop is referred to as a portlet. The portlets
shown in the image above are “Message of The Day”, “Clients Last Seen”, and “Switch Location”. Portlets can be thought of as a small window into the
application that provide a quick summary of what is happening. For example, the “Clients Last Seen” portlet might only show the last 20 clients seen; however, the
full screen application, discussed later, displays all of the clients seen for the day
2.4 Help! I'm Lost and I Need to Go Back to the Desktop
The Desktop is always one click away. At any time, the user can click the “Show the Desktop” link which is located at the top of all the screens. This link returns
the user to the Desktop.

9
2.5 Changing Your Password
To change the account password, click the “Manage Account” link at the top right
corner of the desktop.
The account information is displayed:
Click on the “Change Password” button, and enter the new password in the fields provided, and press the “Update” button.
2.6 Accessing Full Screen Applications
Full screen applications provide detailed information and features specific to
various parts of the system. Some full screen applications are launched directly from a desktop portlet. All of the applications are available via the “Jump To
Applications...” drop-down list located at the top of the screen.

10
2.7 EDSI Roles And Actions Document
The “EDSI Roles and Actions” document describes all the actions provided by
Time Tracker and the Roles authorized to perform each action. For example, a Manager can terminate a client but a EC cannot. Access this document by using
the “Jump To Applications...” drop-down list at the top of the screen.
Each Role is described briefly at the top of the document. The remainder of the document lists each Action and the Roles that are authorized to perform them.
An “X” is displayed in the column that corresponds to the Role(s) that are
authorized perform the action.
On some of the actions are “Restricted by role”. This means that some data is filtered by the Role of the user. For example, an EC can access data that is
derived from only the Clients for which they are responsible. The Directors and Managers, can access data that is derived from a larger set of Clients aggregated
from EC's they manage.

11

12
2.8 Logging Out
Click the “Log Out” link located at the top-right of the screen to log out of the
system.
Users should log out of Time Tracker whenever they plan on leaving their
computer unattended for any amount of time. The system contains a large amount of personal information that must be kept as secure as possible. Users
are automatically logged out of the system after 30 minutes of inactivity.

13
3 Client Management
3.1 Enrollment
Enroll a new Client by clicking the “New Client” link in the “Client Directory”
portlet or application. The “Client Directory” application is available via the “Jump to Applications” drop-down list.
PA Users – Please enter the client's participant id. If you want the system to choose a participant id, leave the participant id field blank and click on “suggest
Participant Id Instead”. Note: Administrators and Directors, can also choose the Client's location from the drop-down list of locations.

14
MI Users – Please enter the client's first name, last name, and date of birth.
Note: Administrators and Directors, can also choose the Client's location from the drop-down list of locations.
Once after pressing the “Next” or “Go” button, the user is taken to the full enrollment page where they can enter all the information about the client and the
specifics of the enrollment.
The Client Enrollment page is organized into five sections: Personal Info, Contact Info, Emergency Contact, Program Info, and Hours Expectations. The data fields
with asterisks (*) beside the field name are required.
The Personal Info section contains all the general information about the client. The information that was entered on the previous screen is automatically filled in.
If the Child Under 6 field is set to 'Yes', the Date of Birth (Youngest Child)
field appears.
MI – Personal Information Section

15
PA – Personal Information Section
The Contact Info section contains the information for the various ways to contact
the client.
The Emergency Contact section contains the name and phone number of another individual who is to be notified in the event of an emergency.

16
The Program Info section is located at the top of the second column. This section
contains the information regarding the client's enrollment in an EDSI program.
The Responsible EC and Instructor fields are populated with ECs and
Instructors from the client's new location. The list of EC's and Instructors contain
only the those who work at the client EDSI location. Be sure to select a Program
before selecting a RFID Activity. Selecting a program will populate the RFID
Activity menu with the activities that are allowed for the select program.
PA – Program Information
PA – Program Information

17
The RFID activity is the activity that will be recorded by the system when hours
are logged as a result of the client logging in at the kiosk.
The Hours Expectations section contains the expected hours for the client under normal circumstances. If the client has a child who is under 6 years old a second
set of expected hours is displayed. The Child Under 6 Hours Expectations section contains the expected hours for the client while their child remains under the age
of 6. On the child's 6th birthday the expected hours returns 'normal'.
Client the 'Add Client' button after entering the all of client's information.
The Client Summary page is displayed after a successful enrollment. The Client

18
Profile tab on this page displays all of the information entered by the user on the
previous page.

19
3.2 Modify Client
A client's information can easily be updated by navigating to the Client's Profile.
This can be accomplished by searching for the client in the Client Directory application. Search for the client by name, participant id, or ssn. In the results
panel, click on the client name to open the client summary page.
The information for the client is set up in a number of tabs. The first tab is the
Client Profile. Click the Edit link, which is located at the bottom of the page,
to modify the client information.
After changing the necessary information, click on the Update Client button at
the bottom of the screen. The system will save the changes and return to the
Client Profile tab.

20
3.3 Assigned Activities
To manage the activities of a client, go to the Assigned Activities tab in the
client's summary page. The list of activities assigned displayed on this tab
contains activities that were previously assigned and activities that are assigned
to the client in the future.
Activities can be deleted from a client if no hours are associated with that activity.
To delete a client's activity, click on the Delete link in the Actions column.
Click on the Edit link, which is also located in the Actions column, to edit an
activity. This will open the window below which contains the activity's
information. The check box for the RFID Activity for Enrollment field will
associate this activity with the reads from the RFID tag assigned to the user. The

21
Same as Enrollment Dates field will set the Start Date to the client's
enrollment's start date. Meeting Required Hours and Completed fields are two
fields used in the Cumulative Report. Make sure to keep this up to date so the report will be accurate. If the activity requires a work location, the list of work
locations will be enabled. In that case, select a work location in the list on the
left and click the add button. This will move the location from the Available
Work Locations to the Selected Work Locations list. Finally, at the bottom of
the screen is the Assignments Matching Selected Activity list. This list is
updated any time the Activity Code is change to help identify any overlaps with
other activities during the chosen time range.
To assign a new activity to a client, click on the Assign Activity For This
Client button. After entering all the information for the client, click the Assign
Activity button.

22
3.4 Employment Verifications
Certain assigned activities support associating employment verification forms. If an EVF is associated it will look like the following in the Assigned Activities tab.
To add an EVF, click the Add EVF link. You will be presented with the following
screen:
All the required information as an asterisk (*) next to the field name. Once all the information is entered, click the Save EVF button.
The EVF column on the Assigned Activities tab will now have an entry with the name and phone number of the employer as well as a printer icon. You can click

23
on the printer icon to download a PDF of the EVF. You can click on the
name/phone number of the employer to go to a more detailed summary of the
EVF that looks like the following:
You can click the EDIT EVF button to go to the edit screen and update any
information that you wish. You can click the Delete EVF button to remove the EVF from the activity. Clicking the Exit button will take you back to the Assigned
Activities tab. Clicking the PDF button will download a PDF that looks similar to the following:

24
3.5 Hours Entry
To enter or view hours for a specific client, go to the Activity Hours tab on the
client summary page. If the client has no hours entered, then the window below
is displayed. To manually enter hours click the Add Hours link at the top of the
screen.
On the form used to manually enter hours, specify the exact number of hours and
minutes for the entry or allow the application to calculate the number of hours by
specifying in start and end times. Use the Absence Type drop down list to
specify the type of absence if any such as Holiday, or Excused.

25
After clicking the Create button, the new entered time entry appears in the
Hours Detail list. The Hours Summary also keeps a running total of the number
of hours throughout the enrollment for all of the active activities.

26
3.6 Bulk Hours Entry
Entering the many time entries for the Unsubsidized Employment activity can be
very tedious. Use the Bulk Hours Entry to enter hours for clients who are
assigned the Unsubsidized Employment activity. In the Hours Entry application
and click on the Bulk Hours Entry button at the top of the screen.
In the bulk hours entry form set the start, end date, and activity to add. Only Unsubsidized Employment activity is configured to be used in Bulk Entry. Be sure
to enter the number hours for normal clients and for clients with children under 6
years of age. Click the Create Hours button to add the hours to the clients.
Please use Monday to Friday dates only for this feature or the system will upload hours on Saturday and Sunday. It will take you four entries to load a months
worth of time.

27

28
Before navigating to another screen the user has the option to undo this bulk
hours entry.

29
3.7 Hours Approval
All hours must be approved by an employee with an Admin, Director, Manager, or
QCC role. The other roles in the system do not have the ability to approve hours.
Hours can be approved on the Activity Hours tab in the client summary page,
which is the same tab used to manually enter hours. The Hours Detail section,
found near the bottom of the page, shows all of the hours entered for the client.
Click the Approve link in the Actions column to approve individual time entries.
Approve all of the hours for the client by clicking on the Approve all Hours link
in the upper right corner.
Use the Hours Approval application to approve hours for many clients at once.
This application shows all of the clients and their hours that need to be approved
in the current location. The features are similar to those outlined above. Approve individual time entries or all of the time entries for a single client. This is
a very helpful application when approving many client hours at the same time.

30
3.8 Temporary Activity Assignment
Another option available in the Actions tab of the client's summary page is
the ability to temporarily switch the RFID Activity for the remainder of the
Day. Click the Switch RFID Activities for the Remainder of the Day
link, to display the form below. After selecting the temporary RFID activity,
the application will associate any of the hours generated by kiosk login to the new activity for the rest of that day.
After a temporary activity has been specified, the user can return to this
form to view the previously selected activity or activities. These previous
assignments can be edited or removed by clicking on the Edit or Remove
links, respectively.

31
3.9 Call Log
Store case notes for a client using the Call Log. This feature is located on the Call
Log tab on the client summary page. This screen shows all of the current entries. If no entries exist, the screen will show a message like the one below.
Click the Add Entry link in the top left corner to add a new entry. In entry form
choose the entry type, scheduled date, actual date, and any comments. Click the
Create button to save the entry.

32
Once the entry is created, it is displayed in the call log list. Click the Edit link to
modify the entry. Click the Print View link to display the Call Log entries in a
format that is suitable for printing.
3.10 Add Personalized Message When Client Uses the Kiosk
To add a personalized message that is displayed when the client uses the kiosk, go to the Actions tab of the client summary screen and click on Add personalized message. On the popup, type in the message you want the client to see and then click Add. The next time the client uses the kiosk, they should see the personalized message.

33
3.11 Marking the Client as K-Closing
You can mark the client as K-Closing by going to the Actions tab of the client's summary screen and click on the Mark Client as K-Closing link. The client is now
in K-closing. When the client is no longer in K-Closing go back to the Actions tab and click on Unmark Client as K-Closing. This is an optional operation that is not
supported in all states.
3.12 Pause the Client's TANF Days Timer
Normally, a client's TANF days continue to run throughout the client's entire enrollment. However, a client's TANF days may be paused by going to the Actions
tab of the client's summary screen and clicking on Pause TANF Days Timer. The TANF days will no longer accumulate until you click on Resume TANF Days Timer.
Pausing and resuming TANF days is an optional operation that is not supported in all states.
3.13 Reset the Client's PIN
For security protection, the kiosk requires the client have a 4-digit PIN in order to
clock-in and clock-out of the kiosk. This is similar to when you withdraw money from an ATM machine. Occasionally, the client will forget their PIN. In this case,
you can go into the client's summary screen and in the Actions tab, you can click on the Reset Pin. Simply click on that link and then click OK on the confirm
window and the client's PIN will be reset within a minute or two.

34
3.14 Lock/Unlock Client
If the client enters the wrong PIN three times at the kiosk, their account will be locked. This means that they will not be able to log in via the kiosk until a user
goes into the time tracker and unlocks their account. To unlock a client's account navigate to the Actions tab of the client's summary page and click on the Unlock
Client link. After a minute or so, the client will be able to log into the kiosk.
You make lock a client's account at any time by going into the same Actions tab
and clicking on Lock Client. This is a good strategy to use if a client is purely at an employment site and should not clock-in via the kiosk.
3.15 Terminate Client
To terminate a client, click the Terminate link in the Actions tab on client
summary page.
Fill the specifics of the termination is in form provided.

35
This form has two required fields: Termination Date and Termination Code.
The termination date defaults to the current date, however, it can be changed. It
must be after the enrollment start date. The application will also display a warning message if the termination date is before the current date.
As long as there are no hours after the termination date, then it is fine to terminate a client using a past date. However, errors will exist in the application
if there are hours entered which are after the current date.

36
After all of the data for the termination has is entered, click the Proceed with
Termination button at the bottom of the screen.
After terminating a client, click the Edit Termination link to edit the termination
information. Terminations can also be undone by clicking Unterminate link.

37
Just like the time entries, terminations must be approved as well. Admins,
Directors, Managers, and QCCs can all approve the termination of clients. Click
the Approve Termination link to approve a termination. Terminations can also
be approved via the Unapproved Terminations Report which is described in the
next section.

38
4 Reports
4.1 Absent Clients Report
The Absent Clients Report is available to all users. This report shows the clients that were absent for a
given day or week. By default it shows the current day. You can change the day by selecting the Day
option and then selecting the day in the calendar popup. The following image shows an example of the
day report.
You can also run the report for a week by clicking the week link and selecting a day within the week on
the calendar popup. Those days with an X in the column are the days that the client was absent.

39
4.2 Call Log Report
The Call Log Report is available to ECs and RECs to show which clients have not
had any call log entries in over a week. The report shows information about the
last entry, if there is one. Add or update an entry by clicking on the Add or
Update links located in the Actions column. Finally, there is also a Print View
link which will open a window with the report in a format suitable for printing.
4.3 Client Child Report
The Client Child Report is available to Admins, ECs, and RECs. This report shows which enrolled clients at a location had a child under 6 when they were enrolled
but the child is no longer under 6 years old. The client's name on the report will
take you to the client's summary page. Users with the Admin role can change your default location, then the report will show the clients for the chosen location.

40
4.4 Clients Clocked In
The Clients Clocked In report is available to all users. It shows all of the clients who have logged in through the kiosk. The report shows the client's name, the
case record number, the key fob number, and the time that the client clocked in. To go to the a client summary page, click on a client name.

41
4.5 Cumulative Report
The Cumulative Report is available to Admins, Directors, and Managers. This
report generates a Microsoft Excel spreadsheet document with all enrollment reports for each of the EDSI programs. After going to the application, you have
several options. Most of the time you can just click the Create button because the report will show information about all programs at your current location by
default. However, there are a couple things you can do to change what information is reported.
You can customize which locations are shown by selecting the locations in the
Available Locations box and moving them to the Selected Locations box by
clicking the add button.
You can customize which programs are shown by clicking the Select Program radio. I new set of boxes will appear (shown below) that work in a similar fashion
to the location boxes.

42
4.6 Enrollment Report
The Enrollment Report is available to everyone. This report shows all of the new
Enrollments in a selected date range. Use the Month, Week, and Single Date
link at the top left of the application to automatically select dates to run the
report. After selecting the dates for the report, click the Update button to update
the report so that it displays the new enrollments for the given dates

43
4.7 EVF Report
The EVF Report is available to Admins, Directors, and Managers. This report shows the employment
verifications for a given time range. By default, the range shows the current week. You can run the
report by Week or by Month by clicking the respective Week or Month links and choosing a date in the
calendar popup. Below is a partial screenshot of the report.

44
4.8 Excused Absence Report
The Excused Absence Report is available to all users except the Job Developers.
This report shows all of the excused absences in your at a location for the month
or week selected. Use the Month and Week links to select the date range. Click
on the Activity name to go to the Assigned Activities tab of the client summary page. Click on the client name to go to the client summary page.

45
4.9 Hours By Activity Report
The Hours By Activity Report is available to all users. The report shows all hours for actively enrolled clients for a given time period. The hours are broken down
by each client's assigned activity. Change the week or month being viewed by clicking the week or month links at the top of the report. Click on the client name
to go to the client summary page.

46
4.10 Job Search Report
The Job Search Report is available to Admins, ECs, and RECs. This report shows
all of the the clients who are close to or over the limit of weeks spent on the Job Search Activity during the past year. There are currently different maximums for
different programs. The CDC program has a maximum of 6 weeks while the WP program has a maximum of 8 weeks. The report shows the total number of
weeks that the client has been assigned to the activity. Using the maximum, the report calculates and displays the completion percentage for the client and
whether the client is still actively enrolled in the activity. Click on the client name to go to the client summary page.

47
4.11 Participation
The Participation Report is available to all roles. Participation is calculated every
night so participation rates won't be updated until the following day if hours have changed. This application is a series of reports that breaks down the participation
of a client over a certain date range. This range can be a month or week and is
set by using the Month and Week links in the top left corner. Limit the report to a
specific activity by Click on the Activity link to limit the report by a specific
activity. Click the By Location link to group the report by EDSI locations. Click
the By EC link to group the report by all of the ECs for the default location. To
see rates of ECs at other locations, first click on the By Locations link and select
a location name. Click the My Clients link to only display the participation of
any clients responsible by the current user. Click the By Activity link to show
the overall participation of clients in each activity.

48
When the By Location link is click the following participation report is displayed.
Click on the location name to go to the the participation report specific location.
Once a location is chosen, all of the ECs and the rates of their clients are
displayed for the selected location. Click the an EC name to view the client participation rates for just one EC.
49
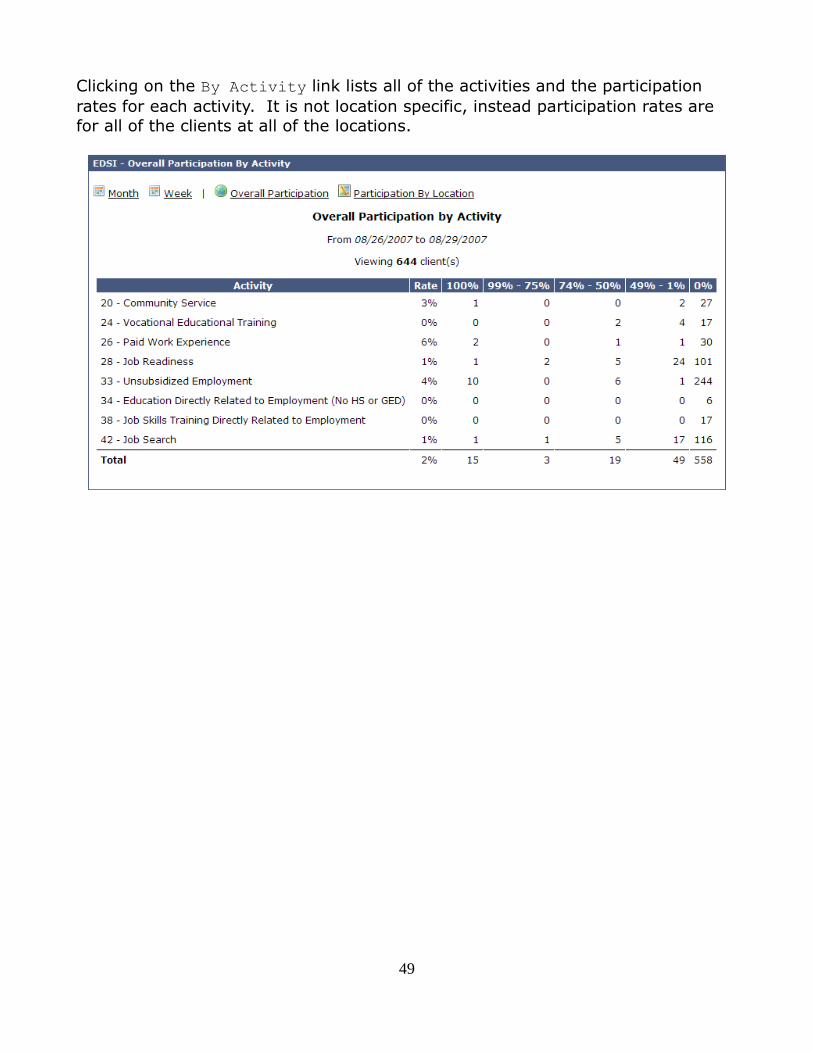
Clicking on the By Activity link lists all of the activities and the participation
rates for each activity. It is not location specific, instead participation rates are
for all of the clients at all of the locations.

50
4.12 Suspect Hours Report
The Suspect Hours Report is available to all users except Job Developers. This
report shows all of the “suspect hours” for the user's location. A suspect hours entry happens when client never logs out of the kiosk and the time tracker
automatically logs them out at midnight. To validate the hours, click the Edit
link in the Actions column to edit the time entry. When the time entry is
corrected, select the Fixed check box and then click the Update button. This will
remove the entry in the Suspect Hours Report. The user can also delete the time
entry by clicking the Remove link in the Actions column.
4.13 TANF Days Report
The TANF Days Report is available to all users of the time tracker. This report
shows all of the enrolled clients at your location who are approaching the TANF Days limit. It will display all clients who have at least 1800 days. Clicking on the
client's name will take you to the client's summary page while clicking on the
activity link will take you to the list of assigned activities for the client.

51
4.14 Termination Report
The Termination Report is available to all users. This report shows all of the
terminations of client's enrollments in a specific date range. Pick a start and end
date and click the Update button to view the terminations. Or use the Month,
Week, or Single Date links to auto fill the date range. Use the By EC and By
Term Code buttons to sort the results table.
4.15 Time Sheet Report
The Time Sheet Report is available to all users. The output of the time sheet reports is PDF file, which enables the system to better format the time sheets for
printing.
Click the Week link to specify the date range for the report. Once a week is
selected, a list of clients grouped by EC is displayed. The user is only shown the clients and EC's for whom they are responsible.
Click the Generate PDF link to generate a time sheet for an individual client.
This can be tedious if the user is responsible for many clients. Click the Generate
All link to generate time sheet for all of the displayed in the list. The Generate
All link will generate all of the reports of the selected EC's clients into one file.

52
Time sheet can only be generated for client who have all of their hours approved.
For this reason, some clients displayed in the list may have an Approval Needed
link instead of a Generate PDF link. Click the Approval Needed link to approve
the hours for a client.
Click on the client name to go to the client summary page.
When a Generate All or Generate PDF link is click the web browser opens a new
window to display the PDF file. If Adobe Reader is not installed already, please
visit the following site and download the latest version:
http://www.adobe.com/products/acrobat/readstep2.html
You can also print time sheets for clients with zero hours by clicking on the Show Clients With Zero Hours link.

53
4.16 Unapproved Terminations
The Unapproved Terminations Report is available to all users. This report shows
all of the enrollments that have been terminated but have not yet been approved. Click the Approve link to approve a termination for a client. A client can only
enroll in another program if their previous terminations have been approved. Click on the client name to go to the client summary page.

54
4.17 Zero Hours Report
The Zero Hours Report is available to all users. This report shows all of the
clients who have no time entries or time entries with a sum of zero hours for each assigned activity during the specified date range. The date range can be changed
using the Month and Week links in the top left corner of the screen. Click on the Activity name to go to the list of Assigned activities for the client. Click on the
client name to go to the client summary page.

55
5 Administration
5.1 Desktop Management
Desktops can be customized for an individual user, group, or for everyone. Each desktop is assigned any number of available portlets in a various layouts. Only
the members of the Admin role can create and edit desktops.
To start modifying desktops, click on the Manager Desktops link which is the first
link in a list of links just below the Desktop name in the right hand corner.
When first navigating to the Desktop List, it contains a list of all of the Desktops associated with your account. From this screen there are many options available.
The Delete button will delete the current desktop from your profile as well as
any other profiles associated with that desktop. The New Desktop button allows
the user create a new Desktop by giving it a name, an owner, and layout. My
Desktops will take you back to the Desktop List for your account. Finally, the
Display Desktops for a User/Group link will open a window and allow the
user to select a Group or User. By selecting a User or Group, you are able to view
and edit the desktops owned by the selected user or group.
The EDSI Desktop displayed above has a few options associated with it. Click the
Edit link to change any of the options associated with the desktop, such as its

56
name and the owner. Click the Layout link to assign and order portlets on the
desktop. Finally, click the Set as My Default to set the desktop as selected
user or group's desktop. After making that change, users from the selected group will see the new desktop whenever they log into system.
The following screen is displayed after clicking on New Desktop. This screen
allows the user to enter information about the New Desktop.
After clicking OK, click on Layout and be taken to a screen to add and remove
portlets.

57
There are six different layouts for a desktop: Thin-Wide-Thin, Single Column, Two Column Wide Right, Two Column Even, Two Column Wide Left, and Three Column
Even. In the Available Portlets box, all of the portlets that can be added to a
desktop are listed. To add a portlet, you should select the desired portlet in the
list, then click the add button on the column where you want to add the portlet.
The portlets in a column can then be organized using the up and down buttons.
The Storage Bin allows keeps the portlets the user may want to use later,
allowing the user to quickly add a portlet onto a desktop instead of looking through the long list of portlets. To store a portlet, select the desired portlet from
the Available Portlets box or from a column in the layout. Then click the
store button. This will move the portlet into the Storage Bin. To remove the
portlet, select the portlet in the Storage Bin and click the remove button.
To change the desktop for a User or Group, click on the Display Desktops for a
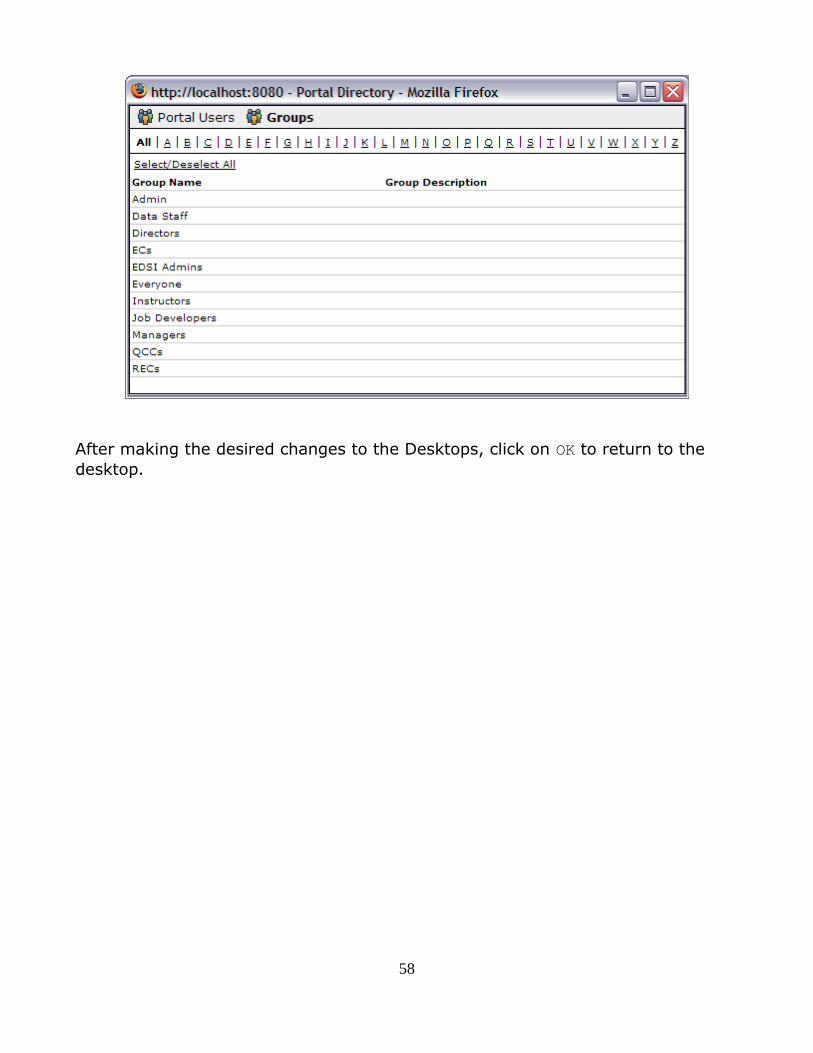
User/Group link. Clicking on this link will open a pop-up window with a list of the
groups. NOTE, if you don't see a pop-up window, you may have a pop-up blocker
installed. You will need to disable it for edsi.versatile.com. Selecting a group will populate the Desktop list with all of the desktops owned by that group. To show
the Desktops for a specific user, click on the Portal Users button instead of the
Groups button at the top of the pop-up window. The user can then search for a
person by Last Name, First Name, Username, or Email.
58
After making the desired changes to the Desktops, click on OK to return to the
desktop.
59
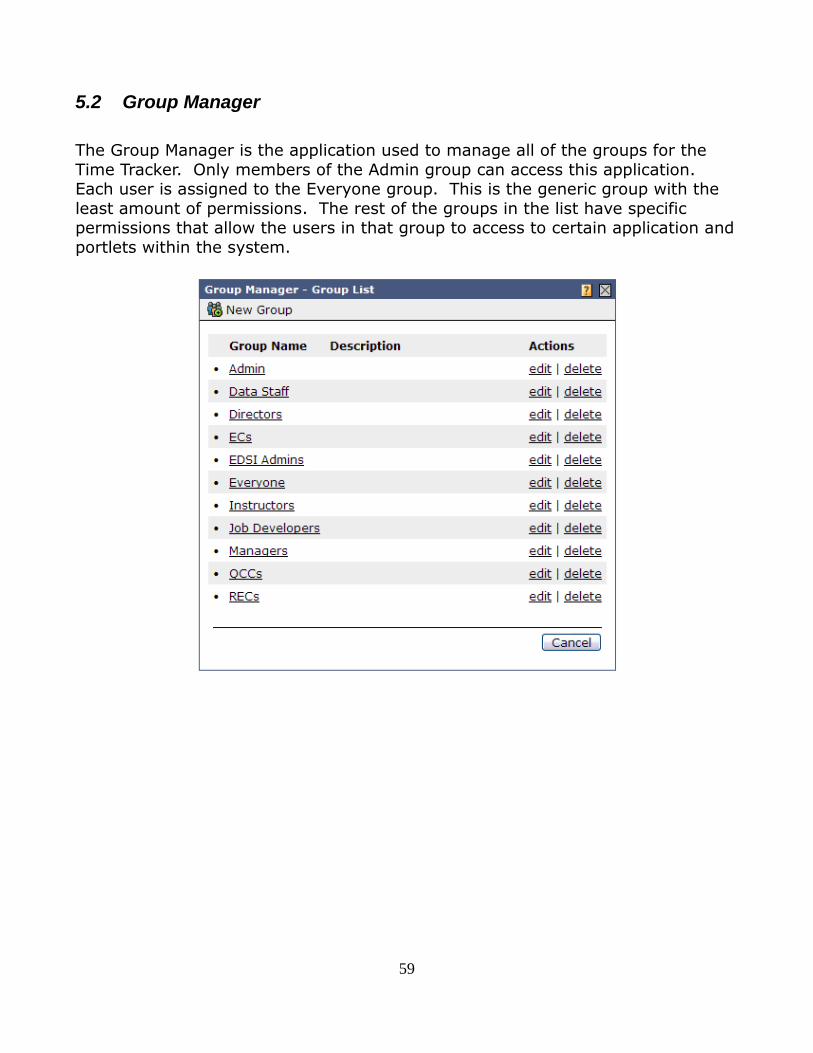
5.2 Group Manager
The Group Manager is the application used to manage all of the groups for the
Time Tracker. Only members of the Admin group can access this application. Each user is assigned to the Everyone group. This is the generic group with the
least amount of permissions. The rest of the groups in the list have specific permissions that allow the users in that group to access to certain application and
portlets within the system.

60
To create a new Group, click on the New Group button in the top left corner of the
application. This will bring up the following window, allowing you to enter the
Group Name, Description, and the number of Minutes before a Timeout.
To edit an already existing group, click on the Edit button. This will bring up a
window similar to the one above with the data for that group populated in the
fields. Below the information is a list of the users who are currently assigned to
that group. Selected any of these users and clicking on the Remove User button
at the top of the application will remove that user from the group.

61
To add a Member to the group, click on the Add Member button. This will open a
pop-up window used to search for and add a user or group.
After adding the member, select any number of Administrators for the group
using the check box list on the right. After the desired changes have been made,
click the OK button to return to the Group Manager List.
5.3 User Manager
The User Manager application controls all of the users who can log into the
application. Only the Admin can access this application. The first page shows a
list of all the Active users. Click the drop down list Show and click on Inactive,
the list is populated with all of the Inactive users. Search the list of users by
Username, First Name, or Last Name and results of the search can be sorted by the Username or Last Name. This is extremely helpful over time as the list of
users becomes larger. Click the New User button in the top left corner of the application and enter the user information is the form. To view a current user's
information, click on the user's Username or to edit it, click the Edit link under
the Actions column. Finally, to keep a username from being used to log into the
application, click the Set Inactive link in the selected user's row. This will keep
the user from authenticating into the system.

62
To view a user's information, click on the username in the User List. It will bring up a window like the one below.

63
Edit the user's information by clicking the Edit button at the bottom of the
information screen, or by clicking the Edit link in the Actions column of the User
List table. On the Edit screen, modify any of the information, including the user's password. Notice the Groups at the bottom of the screen. Be sure to add the
user in the correct group because access to the system is controlled by the group associated with the user.
5.4 Application Information
There are many customizable features within the system. The information is all stored in a database, which allows information to be added, modified, and
deleted. Activities, Holidays, and Work Locations are all categories of information that will change over time. This next section will step through how to modify
information for each category.

64
5.5 Activity Management
To change the activities available in the Time Tracker, go to the Activities
application. This application displays a list of activities. In the Action column,
you can set any of the activity's status as Inactive if currently Active or Active if currently Inactive. Setting an activity as Inactive will not allow it to be an option
when a user is assigning an activity to a client. It will not, however, affect a client who already has the selected activity assigned. To edit an activity's information,
click on the Edit link in the Actions column. Finally, if you want to add an
activity that is not currently in the list, click on the Add New Activity button in
the top right hand corner of the application.

65
Click the Add New Activity button to open the window to add an activity to the
list. At the bottom of the screen, be sure to associate this activity with correct
programs. If no programs are selected, then the activity will not be populated in the list of RFID Activities when enrolling a client.

66
5.6 Holiday Management
Managing holidays is extremely important to the functioning of the application. The list of holidays comes already populated with many of the major holidays
observed in the United States and many other countries. However, you may want
to set a holiday to inactivate. This can easily be done by clicking Inactivate
link found in the Actions column of the list table. Click the Edit link to change
the name of a Holiday. Click the Manage Instances link to add or edit the dates
that the holiday actually occurs. Finally, if a specific holiday is not in the list, add
it by clicking on the New Holiday link in the top right corner of the application.
Enter the name of the new holiday and click Submit. A window very similar to
this is used when editing a holiday name as well.

67
Manage Instances bring up a list of all the dates that are stored in the database
for that holiday. Use this screen to Edit, Delete, or create a new Holiday
Instance.
Click on the New Holiday Instance button on the top left of the screen and
enter a new date for the holiday and click create. A window very similar to this
one is used when editing a holiday instance as well.

68
5.7 Work Location Management
One of the options when adding an activity is the Work location required field. If
this is set to Yes, then one or more work locations must be added when assigning an activity to a client. Work locations can be added, edited, and inactivated. The
Work Locations application,lists of all the work locations at current user's EDSI
location.
Click the Add Work Location button located in the top right corner of the
application to add a new location.
Enter all of the data for the new work location and click Submit. A form similar to
this is used when editing a work location as well.

69

70
5.8 Setting the Location-Wide Kiosk Message
You can set a message that displays on the kiosk for all clients at your location by selecting Kiosk Message from the Jump to Application.. drop-down. When you do
this, you will be presented with the following screen.
You may update the kiosk message by clicking Update Message. Once you do
this, you will be presented with the following screen.
Simply fill in the message with the desired text and click Update Message. Within a couple minutes, the message will display on the kiosk. Updating the kiosk
message is available to all users.

71
5.9 Transfer Clients From One EC to Another EC
In order to transfer clients from one EC to another EC, select the Bulk Actions
menu item from the Jump To Application... menu. You will be presented with the following screen:
The next step is to click on the Transfer Clients from One EC to Another EC link. When you do this you will be presented with the following screen:
Simply select the EC to Transfer From and the EC to Transfer To and then click the
Transfer All Enrolled Clients button. If you wish to select only some clients to transfer, click the Select Individual Clients button. When you do this, you will be
presented with another screen where you can select the clients. This new screen
looks like the following:

72
Once you select the clients by clicking the checkbox next to the clients' names,
you can click the Transfer Clients button, which will complete the transfer.
5.10 Termination Code Management
Termination codes may be managed through the system by selecting the
Termination Codes menu item from the Jump to Application... drop down. Once this is selected you will be presented with a listing of all the existing termination
codes. This looks like the following.
You may edit a termination code by clicking the Edit button next to the
termination code's row. You can also remove a termination code by clicking the Remove button. To add a new termination code, select the Add Termination Code
link. You will be presented with the following screen.

73
The code and the name are required fields. The outcome is the general outcome of the termination (positive, negative, neutral). Once all the information is filled,
click the Submit button to create the termination. Termination code management is available to directors and admins.

74
6 Kiosk Interface
A number of clients will record their hours using the kiosk. The kiosk is a touch-screen computer usually located in a central area such as the receptionist desk.
When the client first approaches the kiosk, a splash screen like the following will be displayed.
The client can touch the screen and the kiosk will display the following screen:
Any personalized messages will appear at the top of the screen. From here, the

75
client can touch “Continue”. Once the client does this a couple things can
happen.
If this is the client's first time logging in or the client's PIN has been reset by a user, the client will be prompted to set a pin. This screen looks like the following:
The client can use the number pad to enter their 4-digit pin. Once they enter
their pin in both boxes, they can touch the Change button and the following screen will be displayed:

76
If the client already has a PIN, the following screen will be displayed:
The client can use the number pad and enter the PIN and then touch the LOG IN button.
If you are not yet clocked in, the following screen will be displayed.
Most of the time the client will click the Clock In button and they will be done. However, if the client is actually leaving they can touch Report a Problem. This
screen also shows the client's current hours for the week, current activity, and provides a button for the client to change their PIN.

77
Once the client clicks the Clock In button, the following screen will be displayed:
Just for completeness, if the client is already clocked-in, when the client logs in the following screen will be displayed:

78
Other locations, will ask for the client's participant id. In this case, the client can use the touch screen keyboard to enter number and letters into the Participant ID
field.