eca team project portal user manual - · pdf filemanaging projects ... the eca knowledge hub...
TRANSCRIPT

The ECA Team Project Portal user manual
UNITED NATIONS ECONOMIC COMMISION FOR AFRICA , Addis Ababa, Ethiopia
ECA TEAM PROJECT PORTAL USER MANUAL

The ECA Team Project Portal User Manual
Page | i
Contents
Version .................................................................................................................................................... ii
Chapter I: Introduction ........................................................................................................................... 1
Exploring the ECA Knowledge Hub Site .............................................................................................. 1
CHAPTER II: ECA Project Management Portal ........................................................................................ 4
Managing projects .............................................................................................................................. 6
Creating a New Project ................................................................................................................... 6
Viewing existing projects ................................................................................................................ 8
Adding new task to a project .......................................................................................................... 9
Viewing existing tasks ................................................................................................................... 11
Managing task groups, versions and Phases ................................................................................ 12
Associating groups, version and phases to a task ......................................................................... 15
Commenting on tasks ................................................................................................................... 16
Tickets ............................................................................................................................................... 16
Adding a new ticket ...................................................................................................................... 17
Viewing existing tickets ................................................................................................................. 18
Managing Users ................................................................................................................................ 19
Adding a new user......................................................................................................................... 19
Managing existing users ................................................................................................................ 20
Sending Emails .............................................................................................................................. 20
Reports .............................................................................................................................................. 21
Profile Management ......................................................................................................................... 23
Managing Schedules ..................................................................................................................... 24

The ECA Team Project Portal User Manual
Page | ii
Version No Author Role Version Date Status
1 Yishak Ibrahim Document Writer 1.0 May 15,2016 DRAFT
2 Ahmed Al-Awah Document Approval 1.0

The ECA Team Project Portal User Manual
Page | 1
Chapter I: Introduction This user manual is prepared to address the usage of the collaboration features present on the ECA
knowledge hub site. Currently there are three collaboration functionalities present on the site. This
manual address the Team Project Portal.
The ECA Team Project Portal is an ECA service allowing ECA staff, conference participants,
development partners/practitioners and policy makers to come together and manage a joint-project
using standard project management tools. The ECA Shared Project portal allows multiple stakeholders
to have visibility across a shared project with features such as task assignment, notifications,
reporting, Gantt charts, etc
Exploring the ECA Knowledge Hub Site The ECA Knowledge hub is one stop-shop to information on the latest social and economic
development issues in Africa. The site can be reached by typing the site address (URL)
http://knowledge.uneca.org/ at your browser. The site shown in Figure 1 appears.
Figure 1 : The ECA Knowledge Hub home page
To access feature of the site, click on the “Menu” link at the top left corner of the screen shown in
yellow background or click on the “Access ECA Knowledge” button in the middle of the screen also
shown in yellow background (refer to Figure 2 bellow)

The ECA Team Project Portal User Manual
Page | 2
Figure 2: ECA Knowledge hub menu links
Upon clicking on the links the screen shown in Figure 3 appears
Figure 3: ECA Knowledge Hub main menu items lists
Since our interest is in the collaborate feature, clicking on the menu item link “Collaborate” shown in
red circle in Figure 3 above will take us to the collaborate page shown in Figure 4 bellow
The ECA Team Project Portal User Manual
Page | 3
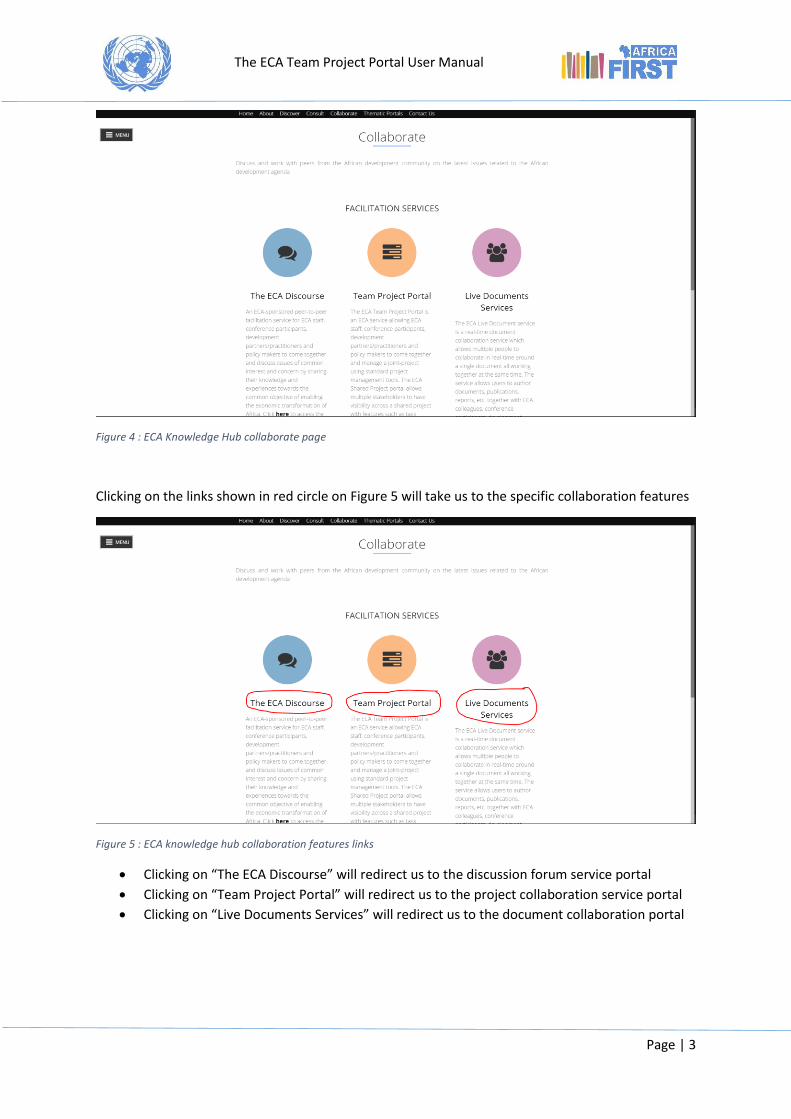
Figure 4 : ECA Knowledge Hub collaborate page
Clicking on the links shown in red circle on Figure 5 will take us to the specific collaboration features
Figure 5 : ECA knowledge hub collaboration features links
Clicking on “The ECA Discourse” will redirect us to the discussion forum service portal
Clicking on “Team Project Portal” will redirect us to the project collaboration service portal
Clicking on “Live Documents Services” will redirect us to the document collaboration portal
The ECA Team Project Portal User Manual
Page | 4
CHAPTER II: ECA Team Project Portal
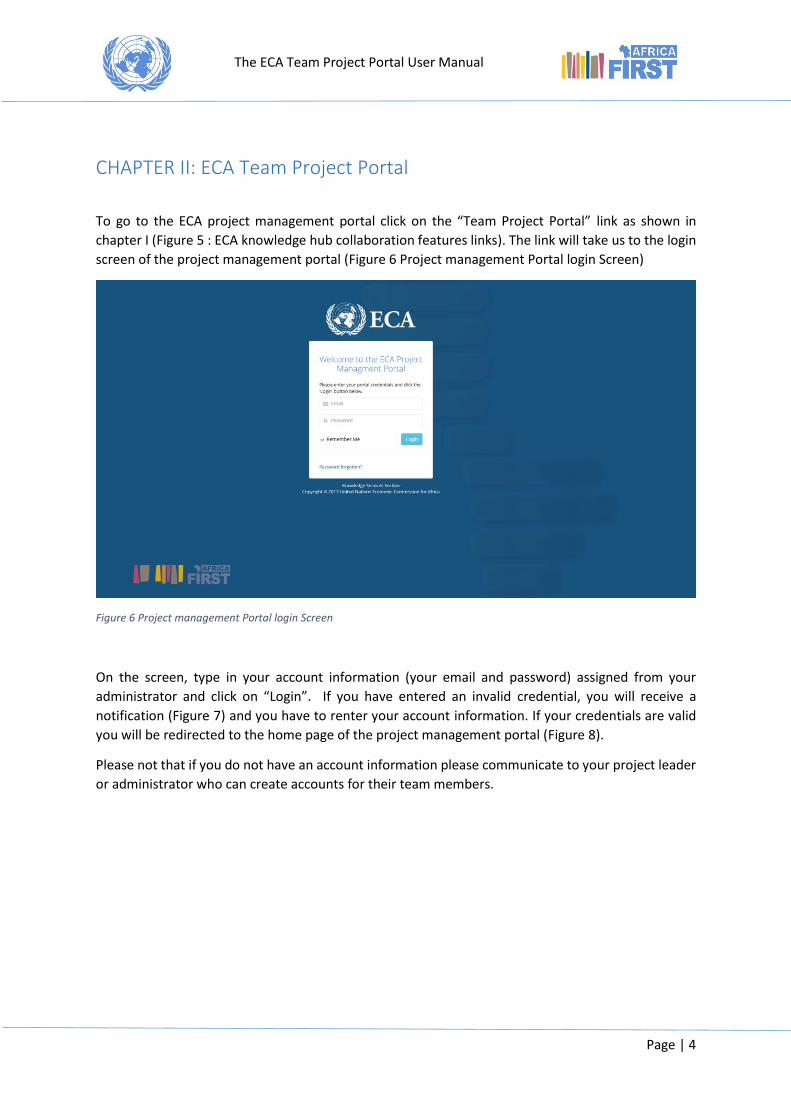
To go to the ECA project management portal click on the “Team Project Portal” link as shown in
chapter I (Figure 5 : ECA knowledge hub collaboration features links). The link will take us to the login
screen of the project management portal (Figure 6 Project management Portal login Screen)
Figure 6 Project management Portal login Screen
On the screen, type in your account information (your email and password) assigned from your
administrator and click on “Login”. If you have entered an invalid credential, you will receive a
notification (Figure 7) and you have to renter your account information. If your credentials are valid
you will be redirected to the home page of the project management portal (Figure 8).
Please not that if you do not have an account information please communicate to your project leader
or administrator who can create accounts for their team members.

The ECA Team Project Portal User Manual
Page | 5
Figure 7 Project Management portal invalid login message
Figure 8 Project management portal home screen

The ECA Team Project Portal User Manual
Page | 6
The project management portal has three sections:
1. Left Pane: This area hosts application menus where a user can select to perform specific
activity
2. Top Pane: This hosts the application name, which when clicked will take you to the home
page, and on the right side of it shows the logged in user name. Clicking on the user name
will enable you to set personal profiles as well as provide you functionality to log out.
3. Middle Pane: This area presents information or data entry form based on the functionality
selected from the Left Pane.
Managing projects
Creating a New Project Users can view their project or create new projects. To perform tasks related to new project expand
the projects menu (Figure 9)
Figure 9 Project management portal project management features
To create a new project, click on “Add Project”. The screen shown in Figure 10 appears. The popup
page has three sections of data to be filled:
1. General Information: Project Name, Type, Status, Project Site, Project Phases (Figure 10)
2. Team Information: Area to select team member who will participate on the project (Figure
11). If your team member does not exist on the list, then an account has to be created for
the user (Adding a new user)
3. Attachments: If there are any documents to be attached, by clicking on the attachment tab
a feature to upload documents will be visible (Figure 12)

The ECA Team Project Portal User Manual
Page | 7
Figure 10 Project management portal project creation
Figure 11 Project management portal team selection

The ECA Team Project Portal User Manual
Page | 8
Figure 12 Project management portal document attachment
After making any changes to the data entry forms please do not forget to click on “Save” so that the
data will be persisted.
Viewing existing projects To view or edit created project clicking on the “View All” button under the project menu (Figure 9)
will take us to project view page (Figure 13). Under the action column, the user can either edit or
delete the project.
Figure 13 Project management portal projects view page
While viewing a project list we can use filters to shorten the result displayed (Figure 14). Project can
be filtered by status, project type or team members

The ECA Team Project Portal User Manual
Page | 9
Figure 14 Project management portal project list filter
Adding new task to a project Once a project is created, the next logical step is to create a task for it. To do so expand the task
menu on the left pane and click on “Add task” (Figure 15). Then the task management screen shown
in Figure 16 appears.
Figure 15 Project management portal task menu items
On the new task creation page three basic information has to be filled
1. General Information: This will enable entry of task name, status, to whom it is assigned,
priority etc.
2. Time Information: This will enable entry for task start and end time, progress and estimated
time to complete the task (Figure 17)
3. Attachments: If there are any documents to be attached, by clicking on the attachment tab
a feature to upload documents will be visible (Figure 18Figure 12)

The ECA Team Project Portal User Manual
Page | 10
Whenever a task is assigned to a team member, the system will automatically send an email
reminder to the team member.
Figure 16 Project management portal new task creation

The ECA Team Project Portal User Manual
Page | 11
Figure 17 Project Management Portal task time range input
Figure 18 Project management portal task document attachment page
Viewing existing tasks
Once a new task is created, it can be visible in the task view all page (Figure 15). To view all task
under a given project, click on “View All” button under the task menu (Figure 19)
The ECA Team Project Portal User Manual
Page | 12
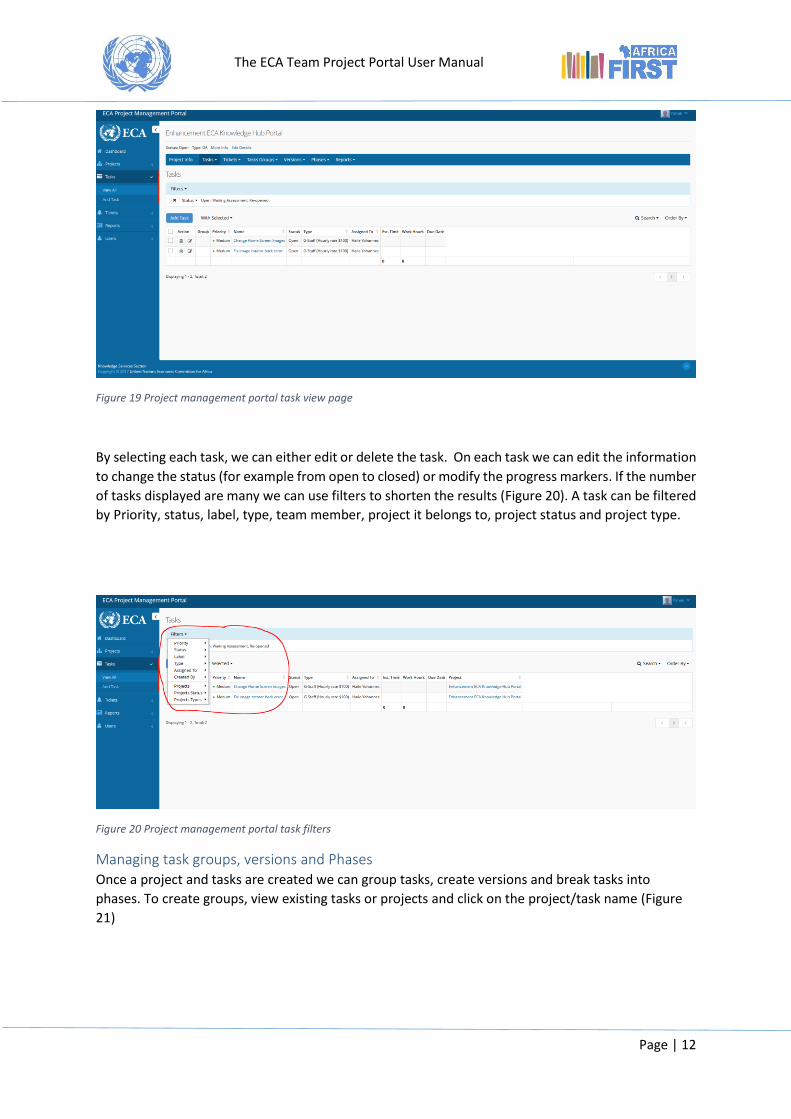
Figure 19 Project management portal task view page
By selecting each task, we can either edit or delete the task. On each task we can edit the information
to change the status (for example from open to closed) or modify the progress markers. If the number
of tasks displayed are many we can use filters to shorten the results (Figure 20). A task can be filtered
by Priority, status, label, type, team member, project it belongs to, project status and project type.
Figure 20 Project management portal task filters
Managing task groups, versions and Phases Once a project and tasks are created we can group tasks, create versions and break tasks into
phases. To create groups, view existing tasks or projects and click on the project/task name (Figure
21)

The ECA Team Project Portal User Manual
Page | 13
Figure 21 Project management portal viewing detail of each task
Clicking on a specific task will take us to the detail page as shown in
Figure 22 Project management portal task detail page
From the menu bar highlighted in red circle in Figure 22 we can use:
1. Task Groups menu link to create and view groups
2. Versions menu link to create and view versions
3. Phases menu link to create and view phases
To create a new group, click on Task Groups - > Add Group, the page shown Figure 23 appears, type
the group name and save.

The ECA Team Project Portal User Manual
Page | 14
Figure 23 Project management portal group creation
To create a new version, click on Version - > Add Version, the page shown Figure 24 appears, type
the status, version name, description and due date and click on save.
Figure 24 Project management portal version creation
To create a new phase, click on Phase - > Add Phase, the page shown Figure 25 appears, type the
status, version name, description and due date and click on save.

The ECA Team Project Portal User Manual
Page | 15
Figure 25 Project management portal creating a new phase
Once a group, version or phase is created, we can edit or delete them by viewing them to do so we
can click on “View All” from their respective menus (Figure 22 ).
1. To view groups: Task Groups - > View All
2. To view versions: Versions - > View All
3. To view Phases: Phases - > View All
Clicking on the “View All” link will take us to the detail page were we can see groups. Figure 26
Shows the view all page for phases.
Figure 26 Project management portal phase view page
Associating groups, version and phases to a task To associate a task to a given group, version or phase we have to start by Viewing existing tasks.
Once a list of existing tasks appear, we have to edit the specific task. On the popup page that

The ECA Team Project Portal User Manual
Page | 16
appears (Figure 27) we can associate the task to groups, phases and version. After associating click
on save.
Figure 27 Project management portal associating task to group, version and phases
Commenting on tasks To comment on existing task, you have to view the existing tasks as described in the previous topics
(Viewing existing tasks). Once the list of tasks appears click on the name of the task you want to
comment on. This will take you the screen shown below (Figure 28)
Figure 28 Project management portal commenting on a task
Tickets Tickets are used to raise some point/question that needs attention by a service desk or admin
personnel. This could be a simple raising question or reporting a bug to name a few.

The ECA Team Project Portal User Manual
Page | 17
Adding a new ticket To create a new ticket, expand the ticket menu and click on “Add Ticket” (Figure 29). The ticket data
entry form appears (Figure 30)
Figure 29 Project management portal ticket menu item
Figure 30 Project management portal ticket data entry

The ECA Team Project Portal User Manual
Page | 18
On the new ticket creation page two basic information has to be filled
1. General Information: This will enable entry of department raising the ticket, type of ticket,
status, subject and description for the ticket
2. Attachments: If there are any documents to be attached, by clicking on the attachment tab
a feature to upload documents will be visible (Figure 31Figure 18Figure 12)
Figure 31 Project management portal ticket document attachment screen
Viewing existing tickets To view or edit existing tickets clicking on the “View All” button under the ticket menu (Figure 9) will
take us to ticket view page (Figure 32). Under the action column, the user can either edit or delete
the ticket.
Figure 32 Project management portal ticket list view page
The ECA Team Project Portal User Manual
Page | 19
Managing Users
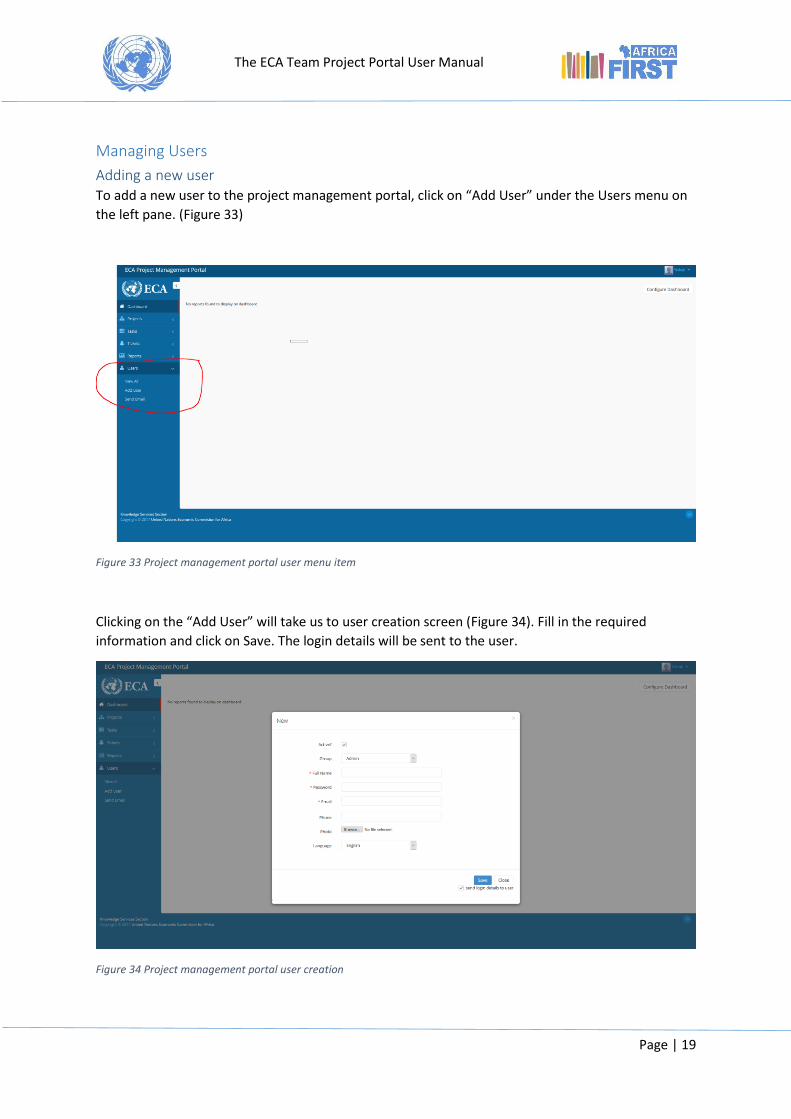
Adding a new user To add a new user to the project management portal, click on “Add User” under the Users menu on
the left pane. (Figure 33)
Figure 33 Project management portal user menu item
Clicking on the “Add User” will take us to user creation screen (Figure 34). Fill in the required
information and click on Save. The login details will be sent to the user.
Figure 34 Project management portal user creation

The ECA Team Project Portal User Manual
Page | 20
Managing existing users
To manage existing user, click on the “View All” button under the Users menu item. The screen
shown in Figure 35 appears. We can either edit the details of the user or delete the user if not
longer required.
Figure 35 Project management portal existing users view page
Sending Emails The project management portal enables us to send email to existing users. To do that click on the
“Send Email” options under the Users menu item. This action will present us the send email page
shown in Figure 36
The ECA Team Project Portal User Manual
Page | 21
Figure 36 Project management portal email sending page
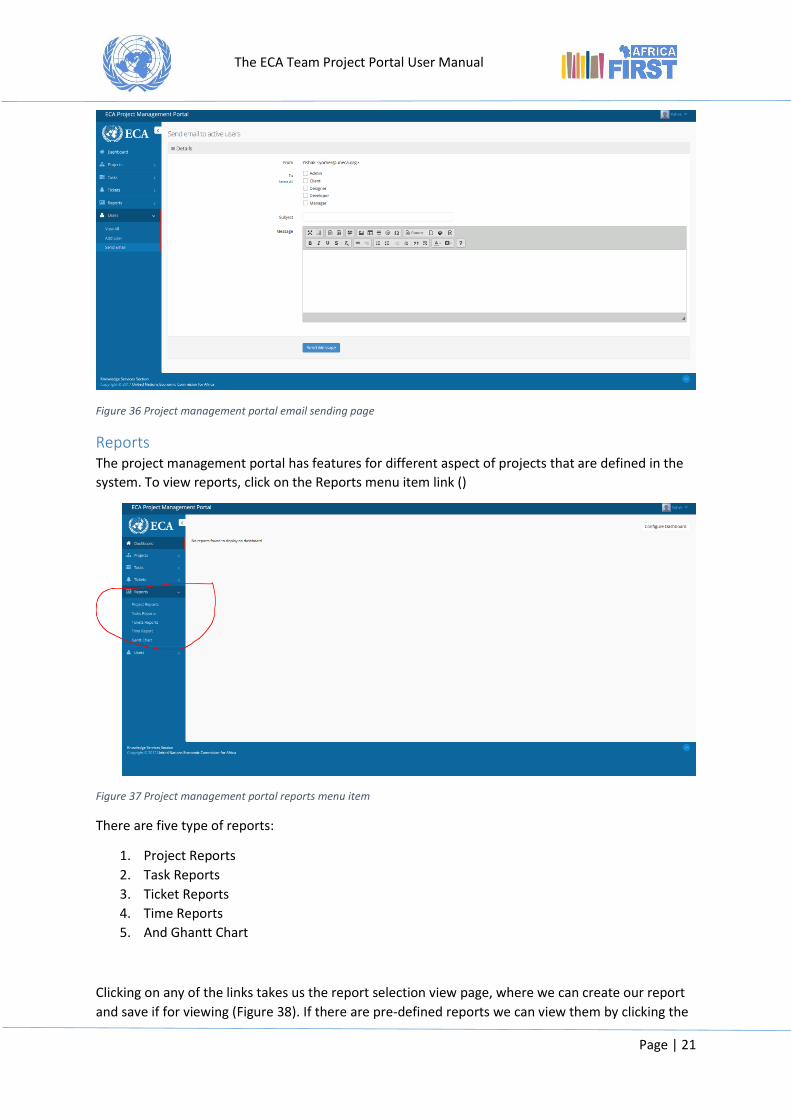
Reports The project management portal has features for different aspect of projects that are defined in the
system. To view reports, click on the Reports menu item link ()
Figure 37 Project management portal reports menu item
There are five type of reports:
1. Project Reports
2. Task Reports
3. Ticket Reports
4. Time Reports
5. And Ghantt Chart
Clicking on any of the links takes us the report selection view page, where we can create our report
and save if for viewing (Figure 38). If there are pre-defined reports we can view them by clicking the

The ECA Team Project Portal User Manual
Page | 22
name of the report (for example in Figure 38 we can click on “Task by Type” exiting report resulting
in the report shown in Figure 39 ). Once a report is opened we can analyse it or if we can edit it by
clicking on the “Edit Report” button.
Figure 38 Project management portal report view page
Figure 39 Project management portal sample report
If we do not see the kind of report we want we can create our own report by clicking on “Add Report
“ (Figure 38). This will take us to the project creation page shown in Figure 40

The ECA Team Project Portal User Manual
Page | 23
Figure 40 Project management portal new report creation page
Once we select parameters for our report, we can type a descriptive name for the report and save it.
Once saved the report appears in the report view page (Figure 41) for its type (project, task, ticket
etc…).
Figure 41 Project management portal report list view page after adding a second report
Profile Management Each user of the system can manage their own personal profile by clicking on the drop down link
from their user name (Figure 42)

The ECA Team Project Portal User Manual
Page | 24
Figure 42 Project management portal personal profile
From the drop down menu user can manage:
1. Personal Details: The link will enable user to change their password, upload photo or change
system language setting (Figure 43)
2. My Time Report: Enable users to see their performance report
3. My Scheduler: Enable users to set their calendar and schedules
4. Change Skin: Enable users to change the skin/colour of the software to fit their preference
5. Log Off: Enables the user to sign out of the system
Figure 43 Project management portal personal details page
Managing Schedules To manage personal schedules click on “My Scheduler” link (Figure 42). The page shown on Figure 44
appears. On this page, any schedules you have saved will show up. To enter new schedule, click on
any cell. The screen shown in Figure 45 appears.

The ECA Team Project Portal User Manual
Page | 25
Figure 44 Project management portal schedule view page
Figure 45 Project management portal new event registration
Fill in the subject, start date, end date and details. If there are document attachments upload the
document. Finally click on save. The saved detail will appear on the schedule viewer (Figure 46)

The ECA Team Project Portal User Manual
Page | 26
Figure 46 Project management portal registered event view