dvd 29 digital versatile disc player - hifigear · dvd 29 digital versatile disc player owner’s...
TRANSCRIPT

ENG
LISH
DVD 29 Digital Versatile Disc PlayerOWNER’S MANUAL
ENG
LISH
33908_DVD29_ENG 18/07/07 16:43 Side 1

2 TABLE OF CONTENTS
3 Introduction3 Terminology5 Features, Packing List6 Front Panel Controls7 Front Panel Information Display8 Remote Control
10 Rear Panel Connections11 Setup and Connections11 Connecting to a TV Only12 to a Dolby Digital/DTS Amplifier/Receiver13 Remote Control14 Digital Audio Connections15 Playback Basics15 Basic Play15 Playback Features15 About DivX Movie Files16 System Set-up16 System Defaults16 Set Up Menu17 System Settings17 Audio Settings18 Audio Adjustments Submenu19 Video Settings20 Test Screen20 Test Screen20 TV Picture Adjustment21 Player Menu21 Using the Player Information Menu21 Using the On-Screen Status Display22 CD Playback24 MP3, Windows Media and JPEG Playback26 Troubleshooting Guide27 Specifications
Table of Contents
2
NOTE: This player is designed and manu-factured for compatibility with RegionManagement Information that is encoded onmost DVD discs. This player is designed only for
playback of discs with Region Code 2, or fordiscs that do not contain Region Code infor-mation. If there is any other Region Code on adisc, that disc will not play on the DVD.
Declaration of Conformity
We, Harman Consumer Group, Inc.2, Route de Tours72500 Château-du-Loir,FRANCE
declare in own responsibility, that the product described inthis owner’s manual is in compliance with technicalstandards:
EN 55013:2001
EN 55020:2002
EN 61000-3-2:2000
EN 61000-3-3:1995+A1:2001
EN 60065:2002
Jurjen AmsterdamHarman Consumer Group, Inc.
07/07
33908_DVD29_ENG 18/07/07 16:43 Side 2

INTRODUCTION 3
ENG
LISH
Introduction
Thank you for choosing the Harman Kardon DVDThe DVD 29 is a state-of-the-art optical disc play-er that can play almost every music, movie andstill-image disc in your library with the highestfidelity available today. Along with conventionalVideo and CD audio discs, the DVD 29 lets youenjoy the latest high-resolution DVD-Audio discs,with HDMI™ (High-Definition MultimediaInterface™) output of pure, uncompressed digitalaudio and video as well as DivX® and VCD discs.
To enable you to get the maximum quality fromDVDs, the DVD is equipped with the latest indesign techniques, including advanced 10-bitvideo digital-to-analog converters (DAC) andVideo (composite), S-Video and RGB video (RGBvia SCART) outputs, to ensure that you get all thequality inherent in today’s DVD medium.For optimum playback of NTSC and PAL DVDwith compatible high-definition display devices,DVD is equipped with progressive componentvideo outputs.
When used with an HDMI-compatibleaudio/video receiver and video display, the pro-gram quality is preserved.By passing an uncompressed signal, degradationis virtually nonexistent. And the single-cableconnection eliminates the problem of wiremanagement.
If you have not yet upgraded to an HDMI videodisplay, you may still enjoy pristine picture qualitywith the DVD 29’s precision video DACs, whichoutput a Y/Pr/Pb progressive-scan componentsignal and composite and S-video. Thus, no mat-ter what type of video display used, you will seeimages that are the closest thing to the originalfilm or performance this side of your localtheater. To further fine-tune the video output, abuilt-in test pattern may be used in conjunctionwith either the controls on your display, or thevideo output adjustments on the DVD 29.
In addition, Harman Kardon’s audio heritagecontinues into the digital video era withaudiophile-grade DACs to ensure that the audioquality matches the superb video. Of course, bothcoaxial and optical digital audio outputs areavailable for direct connection to A/V receivers orprocessors so that you may take advantage ofDolby Digital* and DTS® soundtracks. The analogoutputs for down-mixed stereo or DVD-Audioplayback use audiophile-grade digital-to-analogconverters for crystal-clear outputs. When playingaudio CDs, the playback quality is state-of-the-art, matching that of the finest players available.
A wide range of programming features makes iteasy to program an evening’s worth ofentertainment. When playing DVDs, easy-to-understand on-screen menus and icons make itsimple to change languages, soundtracks,subtitles or aspect ratio.
DVD players are among the fastest growingconsumer electronics products ever brought tomarket, but this may, nevertheless, be the firstDVD player you’ve owned. Although many of thefeatures of the DVD resemble those of standardCD players, there are a number of functions thatyou may be unfamiliar with. To ensure that youare able to take advantage of all the power andflexibility the DVD has to offer, we encourage youto review this quick setup manual. That smallinvestment of your time will pay major dividendsin the enjoyment you will get from proper use ofthe DVD.
If you have additional questions about this product or its installation or operation that arenot answered in this manual, please contact yourdealer, as he is your best source of local infor-mation.
■ Plays a Wide Range of Video and AudioFormats, Including DVD-Video Discs,DVD-Audio discs, VCD, Standard CDAudio Discs, CD-R/RW, DVD-R/RW,DVD+R/RW, Audio Discs and MP3 Discs
■ HDMI™ 1.0 port with HDCP outputsuncompressed high-definition digitalvideo (720p and 1080i) and up to sixchannels of Dolby Digital, DTS or PCMdigital audio, depending on the sourcedisc
■ High-quality video reproduction withpixel-by-pixel processing, progressivescan output and 3/2 pull-downreconstruction
■ Simultaneous composite andcomponent or S-video video outputs
■ Complete bass management for DVD-Audio playback
■ High-Quality Video Playback 10-BitDACs, Progressive Scan and ComponentVideo Outputs
■ Dolby Digital and DTS Data SignalOutput Through Both Optical andCoaxial Digital Audio Connections
■ Audiophile-Grade Output DACs for theFinest Audio reproduction
■ Easy-to-Use On-Screen NavigationSystem
■ Playback of MP3 and Windows® WMAAudio Discs and JPEG image files
■ Parental Lock Controls PreventUnauthorized Viewing of RestrictedMovies
■ Playback of DivX compressed video files
■ Extensive Programming Capability forAudio and Video Discs
■ Multiple Options for Language,Soundtrack and Subtitle Selection
■ Multiple-Angle Capabilities WithSpecially Encoded DVD Discs
■ Backlit, Ergonomically Designed Remote Control
READ THIS BEFORE OPERATINGYOUR UNIT.Install this DVD-Player in a well ventilated, cool,dry, clean place with at least 10 cm on the top,10 cm on the left and right, and 10 cm at theback – away from direct sunlight, heat sources,vibration, dust, moisture, and/or cold.Avoid installing this unit where foreign objectmay fall onto this unit and/or this unit may beexposed to liquid dripping or splashing. On thetop of this unit, do not place:
– Burning objects (i.e. candles), as they maycause fire, damage to this unit, and/or personalinjury.
– Containers with liquid in them, as they may falland liquid may cause electrical shock to theuser and/or damage to this unit.
Do not cover this unit with a newspaper, table-cloth, curtain, etc. in order not to obstruct heatradiation. If the temperature inside this unit rises,it may cause fire, damage to this unit, and/or per-sonal injury.
Install this unit near the AC outlet and where theAC power plug can be reached easily.
This unit is not disconnected from the AC powersource as long as it is connected to the wall out-let, even if this unit itself is turned off. This stateis called the standby mode. In this state, this unitis designed to consume a very small quantity ofpower.
WARNINGTO REDUCE THE RISK OF FIRE OR ELECTRICSHOCK, DO NOT EXPOSE THIS APPLIANCETO RAIN OR MOISTURE.
33908_DVD29_ENG 18/07/07 16:43 Side 3

4 TERMINOLOGY
TerminologySince they share some of the characteristics andtechnology of CD players, many of the terms andoperational concepts used in a DVD player aresimilar to what you may be familiar with from CDplayers and changers, or older video disc formatssuch as Laser Disc. However, if this is your firstDVD product, some of the terms used to describethe features of a DVD player may be unfamiliar.The following explanations should solve some ofthe mysteries of DVD, and help you to enjoy allthe power and flexibility of the DVD format andthe DVD.
With the arrival of DVD, disc data capacity hasincreased dramatically. On a DVD Video disc mostof this capacity is taken up by MPEG 2 video andthe multichannel movie soundtrack in DolbyDigital and/or DTS. This information iscompressed.
Aspect Ratio: This is a description of the widthof a video image in relation to its height.A conventional video screen is four units wide forevery three units of height, that’s why the ratio iscalled ”4:3”. Newer wide aspect ratio videodisplays are 16 units wide for every nine units ofheight, making them more like the screen in amovie theater. The program material on a DVDmay be recorded in either format and, inaddition, you may configure the DVD to playback in either format, depending on the featuresrecorded on a disc.
Component Video: This form of video signaleliminates many of the artifacts of traditionalcomposite video signals by splitting the signalinto a separate luminance channel (the “Y” sig-nal channel) and two color-difference signals (thePr and Pb signal channels). With a componentvideo connection, you will see greater pictureresolution and eliminate many picture imperfec-tions such as the moiré patterns often seen oncheck-patterned cloth. However, in order to ben-efit from component video, you must have avideo display with Y/Pr/Pb component videoinputs. Do not connect the component video out-puts of the DVD 29 to the standard composite orS-video inputs of a TV or recorder.
Group: The individual tracks on a DVD-Audiodisc may be combined into Groups. There may bemore than one Group on a disc. Depending onthe way a disc’s producers create the program,the Groups can contain different program materi-al, or they may repeat the disc’s content in differ-ent audio formats, such as 5.1 audio or high-res-olution stereo.
HDCP (High-Bandwidth Digital ContentProtection): HDCP is the specification for pro-tecting digitally encoded content from unautho-rized copying when it is transmitted from a DVDplayer (or other video source) to a video displayusing HDMI or DVI connections. In order to takeadvantage of the high-resolution output of theDVD 29 via its HDMI output, your display mustbe HDCP-compliant. Virtually all displays with
HDMI inputs are HDCP-compliant, but not allDVI-equipped displays are. If you are using theDVD 29 with an optional HDMI-to-DVI cable oradapter, check the owner’s manual for your dis-play to determine whether it is HDCP-compliant.
HDMI™ (High-Definition MultimediaInterface™): HDMI is a serial-bus form of com-munication between the DVD player and thevideo display or audio/video receiver. With 5Gbpsof bandwidth, it is capable of passing uncom-pressed digital audio and high-definition digitalvideo using a single cable. With HDMI, the DVD 29 is capable of outputting high-resolution(720p or 1080i) video and 5.1-channel DolbyDigital or DTS digital audio, with the convenienceof just a single cable connection.
JPEG Files: JPEG stands for the JointPhotographic Experts Group, which developed astandard for compressing still images, such asphotographs. JPEG files may be created on apersonal computer by importing images from adigital camera, or scanning printed photographs.These files may be burned onto a compact disc.The DVD 29 is capable of recognizing JPEG filesand enabling you to view them on your videoscreen.
Title: For a DVD, a title is defined as an entiremovie or program. There can be as many chapterswithin a title as the producers decide to include.Most discs include only one title, but some mayhave more than one, to give you a “DoubleFeature” presentation.
Chapter: DVD programs are divided intochapters and titles. Chapters are the sub-sectionsprogrammed into a single title on a disc.Chapters may be compared to the individualtracks on an audio CD.
RGB Video: This is a new form of video signalthat eliminates many of the artifacts of tradition-al composite video signals by splitting the signalinto the three fundamental colors Red, Greenand Blue (RGB). With an RGB connection (viaSCART), you will see greater picture resolutionand eliminate many picture imperfections such asthe moiré patterns often seen on checkeredpatterned cloths. However, in order to benefitfrom RGB video, you must have a video displaywith an RGB compatible SCART input.
Progressive Scan: Due to the immense datastorage capacity of DVD, images are nowadaysstored progressively (intact, rather than inter-laced). This allow all of the lines in each frame(odd and even) to be shown at the same time.Harman Kardon Cinema Lounge comes with trueprogressive scan video output resulting in a 40%greater light output than a conventional TV anda stunningly detailed, high definition image withabsence of visible scanlines and motion artifacts.
WMA Files: WMA (Windows Media® Audio) isan audio compression format that was developedby the Microsoft® Corporation for use with itsWindows Media Player. WMA files can be evensmaller in size than MP3 files, while maintaining
similar quality. The DVD 29 is among those DVDplayers capable of playing discs containing WMAfiles. Note that Windows Media Player uses otherfile formats; however, the DVD 29 is only capableof playing files that end in the “.wma” extension.See page 5 for more information on WMA filesupport.
Multiple Angle: DVDs have the capability toshow up to four different views of the samescene in a program. When a disc is encoded withmultiple-angle information, pressing the Anglebutton will enable you to switch between thesedifferent views. Note that at present, few discstake advantage of this capability and, when theydo, the multiple-angle technology may only bepresent for short periods of time within the disc.Producers will usually insert some sort of icon orgraphic in the picture to alert you to theavailability of multiple viewing angles.
Reading: This is a message that you will seeafter you´ve loaded the disc and the tray hasclosed. It refers to the fact that the player mustfirst examine the contents of the disc to see if itis a CD or DVD, and then extract the informationabout the type of material on the disc, such aslanguages, aspect ratios, subtitles, number oftitles and more. The slight delay while thecontents of the disc are read is normal.
Resume: The operation of the Stop Button onthe DVD works differently from what you areused to on CD players. On a traditional CDplayer, when you press the Stop button, the unitdoes just that: it stops playback. On a CD player,when you press the start button again, the discstarts from the beginning. With the DVD,however, you have two options when playingDVD discs. Pressing Stop once will stop playback,but it actually puts the unit in the Resume mode.This means that you can turn the machine offand, when you press play the next time, the discwill resume or continue from the point on thedisc where the Stop button was pressed. This ishelpful if you are watching a movie and mustinterrupt your viewing session but wish to pickup where you left off. Pressing the Stop buttontwice will stop the machine in a traditionalmanner and, when the disc is played again, it willstart from the beginning.
In resume mode, the cover of the DVD will be displayed, if available. Otherwise, the Harman Kardon screen will appear.
DivXDivX is the name of a revolutionary new videocodec which is based on the MPEG-4 compres-sion standard for video. This DVD player will play-back discs created with DivX software. The DVDplayer’s playback functionalities of DivX videodiscs will vary depending on the DivX softwareversion used for creating your movies. For moreinformation about the different software versionsof DivX, please go to www.divx.com.
Terminology
33908_DVD29_ENG 18/07/07 16:43 Side 4

FEATURES 5
ENG
LISH
Features
High quality video• High Definition Multimedia Interface (HDMI)
for a single wire, digital connection to yourHD-Ready screen.
• Advanced sophisticated 10-bit MPEG-2 videodecoding circuits.
• Direct RGB output via SCART (selectable) foroptimum video performance. SCART connectoralso configurable for Composite Video output.
• Test screen videos available for testing videoperformance and setup.
• Pure PAL with NTSC disc due to trueNTSC/PAL conversion.
• Dual-layer compatibility for extended playDVD.
• Progressive Scan component video ouputs(NTSC and PAL)
• Playback of JPEG image files
High quality digital audio• Built-in DVD-Audio decoder for improved
musical realism.
• By connecting a DTS (Digital Theater Systems)or a Dolby Digital decoder, you can enjoy highquality 5.1 digital surround sound from DTS orDolby Digital discs.
• With linear PCM audio at 16-24 bits and 44-96 kHz (also on digital output, see tablepage 14), audio quality exceeding that of CDbecomes possible.
• Optical and coaxial digital audio output.
Many convenient features• On-Screen Menu lcons for disc information or
player information and access to many majorfunctions of this unit.
• Subtitles may be displayed in one of numerouslanguages*.
• The multi-angle function allows you to choosethe viewing angle of scenes which were shotfrom a number of different angles (Limited toDVD’s recorded with multiple camera angles.)
• Multiple options for dialog language andsoundtrack selection (limited to DVD’srecorded with multiple dialog languages orsoundtracks).
• Intuitive menu operating system.
• 4 step Zoom during play and pause.
• Backlit, ergonomically designed remotecontrol.
• Future software upgrades accessible viaInternet. (See information below.)
* The number of languages recorded dependson the software.
Compatible with CD as well as DVD• The DVD 29 will play any conventional Audio
CD or recordable (CD-R) or erasable CD (CD-RW), MP3, WMA (v8) or any DivX or VCDor DVD/Video with the region code 0 or 2.
Disc formats supported by this playerThe unit can play the following disc formats (8 cm and 12 cm size):• DVD-AUDIO• DVD• DVD-R• DVD-RW• DVD+R• DVD+RW• CD• CD-R• CD-RW• VCD• WMA (v8)
NOTE: Due to differences in the format of certain discs, it is possible that some discs mayinclude a mix of features that are not compatiblewith the DVD. Similarly, although the DVD iscapable of a wide range of features, not all discsinclude every capability of the DVD system. Forexample, although the DVD is compatible withmulti-angle discs, that feature is only possiblewhen the disc is specially encoded for multi-pleangle play. In addition, the DVD is capable ofplaying back both Dolby Digital and DTS sound-tracks, but the number and types of tracksavailable will vary from disc to disc. To makecertain that a specific feature or soundtrackoption is available, please check the optionsnoted on the disc jacket.
■ Playback capability for CD-R, CD-RW, WMA,JPEG, MP3, DivX, VCD/SVCD, DVD-R, DVD+R,DVD-RW and DVD+RW discs may vary due tovariations in the quality of the disc and therecorder used to create the disc.
■ The DVD 29 is compatible with most discsrecorded with files encoded using MP3 orWindows Media 8, as well as JPEG stillimages. However, note that variations in theencoder or codec used and the bit rate of theencoding may affect the DVD 29’s ability toplay back a specific disc. As a result, we can-not guarantee complete compatibility with allencoders and versions of the codecs. For bestresults, we recommend that MP3 files beencoded at bit rates ranging between 32kbpsand 320kbps. WMA files should be encodedat bit rates between 64kbps and 320kbps.Although the DVD 29 is capable of playingsome WMA 9 files, not all features of version9 are supported. JPEG files should contain nomore than 5 megapixels, and the file sizeshould be no larger than 5Mb.
The DVD 29 will NOT play the following:• DVD discs with a Region Code other than 2
• DVD-ROM data discs
• DVD-RAM discs
• CD-I discs
• CD-G discs
• SVCD discs
• Kodak Photo CD™ discs (Kodak Picture CDdiscs, available to consumers, may be viewedusing the DVD 29).
• Discs intended for use in video game consoles
• Discs recorded in the “VR” mode or at anyspeed other than “SP”
• High-definition optical discs such as WMVHD,HD-DVD and Blu-ray
Upgradeability via InternetThe ”firmware” controlling the functionality ofthe Harman Kardon DVD is fully upgradeable. Inthe event of future improvements to itsoperations and features, it will be possible todownload firmware upgrades from www.harmankardon.com/International/All you have to do is create a CD-R with thedata and insert it in the DVD for an automaticupgrade.
Packing List1 Harman Kardon DVD Player
1 Remote control
2 AAA batteries
1 A/V cable for stereo analog audio andcomposite video
1 S-Video cable
1 HDMI cable
1 owner's manual
33908_DVD29_ENG 18/07/07 16:43 Side 5

6 FRONT PANEL CONTROLS
Front Panel Controls
� Main Information Display: This displaydelivers messages and status indications to helpyou operate the DVD player.
1 Power On/Off (Standby): Press the buttononce to turn the DVD player on, press it again toput the unit in the Standby mode.
2 Open/Close: Press this button to open orclose the Disc Tray.
3 Play/Pause: Press to initiate playback or toresume playback after Pause has been pressed.Press this button to momentarily pause play-back. To resume playback, press the buttonagain. If a DVD is playing, action will freeze anda still picture will be displayed when the buttonis pressed.
4 SETUP: Press this button to use the DVD 29’s on-screen menu system to adjust theplayer’s configuration settings. Note that theInfo Button A must be pressed to access theDVD 29’s Player Information menu to obtaindetailed disc information, and to configure theplayback mode of the disc.
5 Stop: Press this button once to place thedisc in the Resume mode, which means thatplayback will stop, but as long as the tray is notopened or the disc changed, DVD playback willcontinue from the same point on the disc whenthe Play Button is pressed again. Resume willalso work if the unit was turned off. To stop adisc and have play start from the beginning,press the button twice.
6 Skip/Search (Previous): Press this buttonto move backward through the music tracks ona CD disc or the chapters on a DVD disc. Keepthe button pressed to search backwards at oneof the available speeds.
7 Skip/Search (Next): Press to move forwardthrough the music tracks on a CD or thechapters on a DVD disc. Keep the button pressedto search forwards at one of the availablespeeds.
8 Dimmer: Press this button to reduce thebrightness of the Information Display by 50% orto turn the display off completely in the following order: FULL BRIGHTNESS ➔ HALFBRIGHTNESS ➔ OFF ➔ FULL BRIGHTNESS.
9 ARROW buttons (M /N ): Use to move thecursor in the OSD.
A ENTER: Press this button to activate asetting or option.
B ARROW buttons (K/L): Use to movethe cursor in the OSD.
� Main Information Display1 Power On/Off (Standby)2 Open/Close3 Play/Pause
4 Setup5 Stop6 Skip/Search (Previous)7 Skip/Search (Next)
8 Dimmer9 Arrows left and rightA EnterB Arrows up and down
1 3 9 A B45 6 7 8
2 �
33908_DVD29_ENG 18/07/07 16:43 Side 6
FRONT PANEL INFORMATION DISPLAY 7
ENG
LISH
Front Panel Information Display
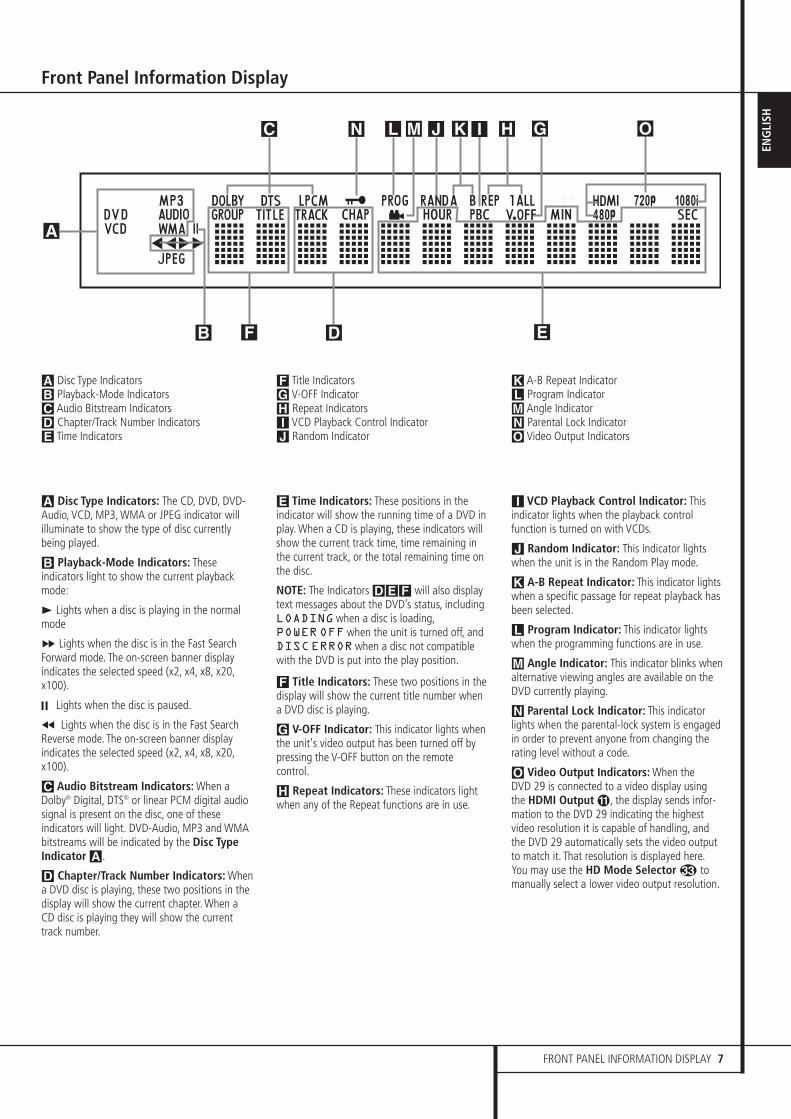
A
L
B
C
D EF
GHIJ KMN O
A Disc Type IndicatorsB Playback-Mode IndicatorsC Audio Bitstream IndicatorsD Chapter/Track Number IndicatorsE Time Indicators
F Title IndicatorsG V-OFF IndicatorH Repeat IndicatorsI VCD Playback Control IndicatorJ Random Indicator
K A-B Repeat IndicatorL Program IndicatorM Angle IndicatorN Parental Lock IndicatorO Video Output Indicators
A Disc Type Indicators: The CD, DVD, DVD-Audio, VCD, MP3, WMA or JPEG indicator willilluminate to show the type of disc currentlybeing played.
B Playback-Mode Indicators: Theseindicators light to show the current playbackmode:
B Lights when a disc is playing in the normalmode
H Lights when the disc is in the Fast SearchForward mode. The on-screen banner displayindicates the selected speed (x2, x4, x8, x20,x100).
1 Lights when the disc is paused.
G Lights when the disc is in the Fast SearchReverse mode. The on-screen banner displayindicates the selected speed (x2, x4, x8, x20,x100).
C Audio Bitstream Indicators: When aDolby® Digital, DTS® or linear PCM digital audiosignal is present on the disc, one of theseindicators will light. DVD-Audio, MP3 and WMAbitstreams will be indicated by the Disc TypeIndicator A.
D Chapter/Track Number Indicators: Whena DVD disc is playing, these two positions in thedisplay will show the current chapter. When aCD disc is playing they will show the currenttrack number.
E Time Indicators: These positions in theindicator will show the running time of a DVD inplay. When a CD is playing, these indicators willshow the current track time, time remaining inthe current track, or the total remaining time onthe disc.
NOTE: The Indicators DEF will also displaytext messages about the DVD’s status, includingLOADING when a disc is loading,POWER OFF when the unit is turned off, andDISC ERROR when a disc not compatiblewith the DVD is put into the play position.
F Title Indicators: These two positions in thedisplay will show the current title number whena DVD disc is playing.
G V-OFF Indicator: This indicator lights whenthe unit's video output has been turned off bypressing the V-OFF button on the remotecontrol.
H Repeat Indicators: These indicators lightwhen any of the Repeat functions are in use.
I VCD Playback Control Indicator: Thisindicator lights when the playback controlfunction is turned on with VCDs.
J Random Indicator: This indicator lightswhen the unit is in the Random Play mode.
K A-B Repeat Indicator: This indicator lightswhen a specific passage for repeat playback hasbeen selected.
L Program Indicator: This indicator lightswhen the programming functions are in use.
M Angle Indicator: This indicator blinks whenalternative viewing angles are available on theDVD currently playing.
N Parental Lock Indicator: This indicatorlights when the parental-lock system is engagedin order to prevent anyone from changing therating level without a code.
O Video Output Indicators: When the DVD 29 is connected to a video display usingthe HDMI Output �, the display sends infor-mation to the DVD 29 indicating the highestvideo resolution it is capable of handling, andthe DVD 29 automatically sets the video outputto match it. That resolution is displayed here.You may use the HD Mode Selector � tomanually select a lower video output resolution.
33908_DVD29_ENG 18/07/07 16:43 Side 7

8 REMOTE CONTROL FUNCTIONS
Remote Control Functions
��O
8
H
9D
F
I
M
G
6
C
0
5
6
G
8
O
5
C
ND
P
M
A
E
4
9
� �
F
�
L
�
I
�
�
3
1
2
�
J
Q
K
7
B
0
1
2
3
4
5
6
7
8
9
A
B
C
D
E
F
G
H
I
J
K
L
M
N
O
P
Q
�
�
�
�
�
�
�
POWER ON
POWER OFF
SUBTITLE
TITLE
ANGLE
AUDIO
ENTER
OPEN/CLOSE
SETUP
ARROWS
INFO
MENU
PAUSE
STATUS
SKIP/STEP (PREVIOUS)
SKIP/STEP (NEXT)
PLAY
SEARCH/SLOW REVERSE
STOP
SEARCH/SLOW FORWARD
DIMMER
PROGRESSIVE SCAN/INTERLACED
ZOOM
PLAYLIST
RANDOM
A-B Repeat
V.OFF
LIGHT
NUMERIC KEYS
REPEAT
CLEAR
IR EMITTER
HD Mode Selecto
Audio Mode
33908_DVD29_ENG 18/07/07 16:43 Side 8

REMOTE CONTROL FUNCTIONS 9
ENG
LISH
Remote Control Functions
0 POWER ON: Turns on the player when it isin standby mode (Harman Kardon logo appearson screen).
1 POWER OFF: Turns off the player to stand-by mode.
2 SUBTITLE: When a DVD is playing, press toselect a subtitle language or to turn subtitles off.
Note: Due to the variations in how DVD discsare authored, the subtitle languages displayedby the DVD 29 may not accurately reflect theactual languages available on the disc. It isrecommended that subtitles be selected usingthe disc’s menu.
3 TITLE: When a disc is playing, press tomake the player go back to the first section ofthe disc. If you are playing a DVD-Audio discthat contains other formats the DVD 29 iscapable of playing, such as linear PCM or DolbyDigital 5.1, pressing this button may enable youto switch playback from one audio format toanother.
4 ANGLE: Press to access various cameraangles on a DVD (If the DVD contains multiplecamera angles) or to rotate JPEG images.
5 AUDIO: Press to access various audio languages on a DVD (If the DVD contains multiple audio streams).
6 ENTER: Press this button to activate asetting or option
7 OPEN/CLOSE: Press to open or close thedisc tray.
8 SETUP: Press this button to use the DVD 29’s on-screen menu system to adjust theplayer’s configuration settings. Note that theInfo Button A must be pressed to access theDVD 29’s Player Information menu to obtaindetailed disc information, and to configure theplayback mode of the disc.
9 ARROW buttons (M /N /K/L): Use tomove the cursor in the OSD.
A INFO: Press for detailed informations onthe disc playing (Video/Audio Bit rate, Movieaspect ratio and others), and for current playersettings made. Note that the unit doesn’t reacton any transport button as long as the infomenu is displayed. Press again to removeinformation from screen.
B MENU: Displays the actual DVD Disc Menuon the TV screen in play mode.When playing discs with JPEG images, pressingthis button will access the thumbnails.
C PAUSE: Freezes a picture (with DVD/VCD)and pauses the playback signal (CD) when a discis playing. Press again for normal playback.
D STATUS: Press while a disc is playing toview banner display. Use the ARROW buttons tomove through the different features in theBanner Display. When a symbol is highlighted,press ENTER on the remote to select it.
E SKIP/STEP (Previous): Press to go tobeginning of current track. Press again quickly togo to beginning of previous track. After pressingthe PAUSE button, each press of this button willmove the image in reverse frame by frame.
F SKIP/STEP (Next): Press to go tobeginning of next track. After pressing thePAUSE button, each press of this button willmove the image forwards frame by frame.
G PLAY: Begins to play disc (closes disc trayfirst, if it is open.)
H SEARCH/SLOW (REV): Allows you tosearch in reverse through a disc while it is inplay mode. Each time you press this button, thesearch speed changes as indicated by a numberof arrows on the right top of your screen.After pressing the PAUSE button, each press ofthis button will change the slow down speedindicated by a number of arrows in the right topof the screen.
I STOP: Stops playing a disc. When a disc isplaying, if you press STOP and PLAY, the disc willresume play, i.e. it will start from the same pointon the disc where the unit was stopped. If youpress STOP twice and the PLAY button, the discwill start play from the beginning.
J SEARCH/SLOW (FWD): Allows you tosearch forward through a disc while it is in playmode. Each time you press this button, thesearch speed changes as indicated by a numberof arrows on the right top of your screen.After pressing the PAUSE button, each press ofthis button will change the slow down speed asindicated by a number of arrows in the right topof the screen.
K DIMMER: Press to change the brightnessof the front panel display or to turn the displayoff completely in the following order: FULLBRIGHTNESS ➜ HALF BRIGHTNESS ➜ OFF ➜FULL BRIGHTNESS
L PROGRESSIVE SCAN/INTERLACED:Press this button to change the resolution of theComponent Video Output between standarddefinition and progressive definition (PAL inter-laced and PAL progressive; NTSC interlaced andNTSC progressive).The new setting will become effective afterquitting the Setup menu.
M ZOOM: When a DVD or VCD is playing,press this button to zoom the picture so that it isenlarged. There are 4 steps to the zoomfunction, each progressively larger. Press througheach of the zoom stages to return to a normalpicture.
N PLAYLIST: Press this button to change theplayback order of the disc.
O RANDOM: Press for RANDOM playback inrandom order.
PA-B: Press to select section A-B and to playrepeatedly.
Q V.OFF: Press to turn off video output forimproved performance from audio-only discs.Press again to restore video output.
� LIGHT: Press to illuminate remote controller.
� NUMERIC KEYS: Select numbers by pressing these buttons.
� REPEAT: Each press of this button changesthe playback mode to repeat a chapter or trackor the entire disc. A repeat icon will appear inthe upper right corner of the screen indicatingthe current repeat mode. If the PlayerInformation Screen is active, the changes will bedisplayed on screen.
� CLEAR: Press to remove the Banner menufrom the screen.In Stop mode and with all menus and bannersremoved from the display, press and hold thisbutton for five seconds to reset all settings totheir factory defaults.
� IR EMITTER: This small, clear button-likedevice sends the IR commands from the remotecontrol to the DVD 29. To ensure properperformance of the remote control, be sure topoint it toward the unit and do not cover it withyour fingers when sending remote commands.
� HD Mode Selector: When the DVD 29 isconnected to a video display using the HDMIOutput �, the display sends information tothe DVD 29 indicating the highest videoresolution it is capable of handling, and the DVD 29 automatically sets the video output tomatch it. Pressing this button allows you tomanually change the output resolution, withyour selection indicated by the Video OutputIndicators O.The DVD 29 will not allow you to select aresolution beyond the capabilities of yourdisplay, and if you try to do so, an on-screenerror message will appear to alert you to theselection of an incompatible video format.Changes made with this button remain activeuntil the DVD 29 or the display is turned off.When either is turned off, and then on again, theDVD 29 will revert to the default settingtransmitted by the display.
33908_DVD29_ENG 18/07/07 16:43 Side 9

10 REAR PANEL CONNECTIONS
Rear Panel Connections
��
�
�
�
�
��
�
� �
� Optical Digital Output� Coaxial Digital Output� AC Power Cord� Composite Video Output
� S-Video Output� Component Video Outputs Scart TV Output Remote Control Output
� Remote Control Input� Analog Audio Output� HDMI Output 6-Channel Audio Outputs
� Optical Digital Output: Connect this jackto the optical digital input of an A/V receiver orsurround processor for Dolby Digital, DTS orPCM audio playback.
� Coaxial Digital Output: Connect this jackto the coaxial digital input of an A/V receiver orsurround processor for Dolby Digital, DTS orPCM audio playback.
NOTE: The coaxial digital output should only beconnected to a digital input. Even though it isthe same RCA-type connector as standardanalog audio connections, DO NOT connect it toa conventional analog input jack.
Connect either the Optical Digital AudioOutput � or the Coaxial Digital AudioOutput � to a corresponding digital audioinput on your receiver or processor, but not both.
� AC Power Cord: Connect this plug to anAC outlet. If the outlet is controlled by a switch,make certain that it is in the ON position.
� Composite Video Output: Connect thisjack to the video input on a television or videoprojector, or to a video input on an A/V receiveror processor if you are using that type of devicefor video input switching.
� S-Video Output: Connect this jack to theS-Video input on a television or video projector,or to an S-Video input on an A/V receiver orprocessor if you are using that type of device forS-Video input switching.
� Component Video Outputs: These out-puts carry the component video signals forconnection to display monitors with componentvideo inputs. For standard analog TV's orprojectors with inputs marked Y/Pr/Pb orY/Cr/Cb, connect these outputs to the correspon-ding inputs. If you have a high-definition televi-sion or projector that is compatible with highscan rate progressive video, connect these jacksto the “HD Component” inputs. Note that if youare using a progressive scan display device, then”Progressive” must be selected in the Video Set-up Menu in order to take advantage of theprogressive scan circuitry. See page 19 for moreinformation on progressive scan video.
IMPORTANT: These jacks should NOT beconnected to standard composite video inputs.
SCART OUT (TV): If your TV has a SCARTsocket, you can connect a SCART cable to yourTV and to your DVD Player for improved videoquality. The SCART cable carries both audio andvideo. You can select Composite Video or RGBvideo for that SCART connector’s video outputsignal.
Remote Control Output: Connect thisjack to the infrared (IR) input jack of anothercompatible Harman Kardon remote controlledproduct to have the built-in Remote Sensor onthe DVD provide IR signals to other compatibleproducts.
� Remote Control Input: Connect theoutput of a remote infrared sensor, or theremote control output of another compatible Harman Kardon product, to this jack. This willenable the remote control to operate even whenthe front panel Remote Sensor on the DVD isblocked. This jack may also be used withcompatible IR remote control-based automationsystems.
� Analog Audio Output: Connect thesejacks to an audio input on an A/V receiver orsurround processor for analog audio playback.
� HDMI Output: If you have an HDMI-com-patible receiver or video display device, connectthis output to an HDMI input on the receiver orvideo display for the highest-quality uncom-pressed digital audio and video available. Even ifyour receiver is not capable of processing audioin the HDMI format, you may still experience thesuperb reproduction of HDMI video.
If your video display has a DVI input, you mayuse an optional HDMI-to-DVI cable or adapterfor the connection to the display. In all cases, thevideo display must be HDCP-compliant in orderto use the HDMI output. For best results, we donot recommend HDMI connections in excess often feet.
The following audio formats may be output viathe HDMI connection:
Audio CD – 2-Channel PCM or 5.1-channel DTS
DVD-Audio – 2-Channel PCM
DVD-Video – Up to 5.1-channel Dolby Digital orDTS
Note: To hear the high-resolution surroundsound recorded on DVD-Audio discs, you needto connect the 6-Channel Audio Outputs to the corresponding input jacks on your receiveror processor. These formats are not output digi-tally.
6-Channel Audio Outputs: Connect theseoutputs to the matching 6-channel analog audioinputs on your receiver or surround soundprocessor. This connection is required to listen tothe multichannel tracks on DVD-Audio discs. Ifthe disc also contains a linear PCM, DolbyDigital or DTS track, you may listen to it usingthe HDMI �, Optical � or Coaxial DgitalAudio Output � or the Analog AudioOutputs �.
Note: You’ll find more details about allAudio/Video connections under Setup andConnections on the following pages.
33908_DVD29_ENG 18/07/07 16:43 Side 10
SETUP AND CONNECTIONS 11
ENG
LISH
Setup and Connections
Before connecting your DVD 29, please:■ Ensure that the power switch of this unit and
other equipment to be connected is set to offbefore commencing connection.
■ Do not block ventilation holes of any of theequipment and arrange them so that air cancirculate freely.
■ Read through the instructions before connecting other equipment.
■ Ensure that you observe the color codingwhen connecting audio and video cables.
For the best quality, if your receiver or processor and/or video display are HDMI-capable, we rec-ommend using the HDMI output. With a singlecable connection between components, HDMI isable to deliver uncompressed high-definitiondigital video and digital audio programming.
Note: If your video display has a DVI input, youmay use an optional HDMI-to-DVI cable oradapter for the connection to the display. In allcases, the video display must be HDCP-compli-ant in order to use the HDMI output.
If your equipment is not HDMI-ready, werecommend the use of component video forhigher quality pictures.
If you are using a television or video display thatis compatible with high-resolution 576P videosignals, make sure to use the input jacks on thevideo display marked “HD Component,” if avail-able. Also, make sure to configure the display’sinput settings for use with “576P” video signals.You will also need to change the scan type inthe DVD 29’s Video Setup menu from“Interlaced” to “Progressive.” See page 19.
The Video output (yellow) combines the com-plete video signal (composite) and sends it tothe TV (or to the AV Receiver) by one line only.Use the Video output, when your TV set isequipped with a Video input jack only.
The S (separate) video output connector sepa-rates the color (C) and luminance (Y) signals
before transmitting them to the TV set in orderto achieve a sharper picture. Use the S-videocable when connecting the player to a TVequipped with an S-video inputfor improvedpicture clarity. Never connect both outputs,Video and S-Video, to your TV or AV Receiver,only one of them.
Most European TV´s are equipped with SCARTconnectors rather than with a normal videoinput (yellow cinch). In that case the SCARTconnection should be used, providing the audiosignal too. Separate analog audio connections toTV are needed only if your TV is connected tothe video or S-video output.
You may also use the standard S-video orcomposite video connection if your TV does nothave component video inputs. The componentand S-video outputs are not availablesimultaneously.
• Modern audio/video receivers are capable ofconnection to several video source devices,such as the DVD 29 and a VCR, cabletelevision set-top box, HDTV tuner or otherdevice. The receiver is equipped with videomonitor outputs for connection to your televi-sion, projector or plasma display. As you selectany input source device, the receiver selectsthe correct video input and routes it to thecorrect video monitor output to your televi-sion. It is recommended that you connect one
of the video outputs from the DVD 29 to thecorresponding input on your receiver tosimplify operation of your home entertainmentsystem. Refer to the owner’s guide for yourreceiver for more information.
• If your receiver is capable of multiroom opera-tion, it is recommended that you connect boththe component (or HDMI) and compositevideo outputs of the DVD 29 to the receiver.This enables the highest-quality picture (com-ponent video) for viewing in the main listeningroom, while enabling the multiroom system, ifit is video-capable, to distribute the compositevideo signal to the remote zone. Consult theowner’s guide for your receiver to determinewhether it has video multiroom capability.
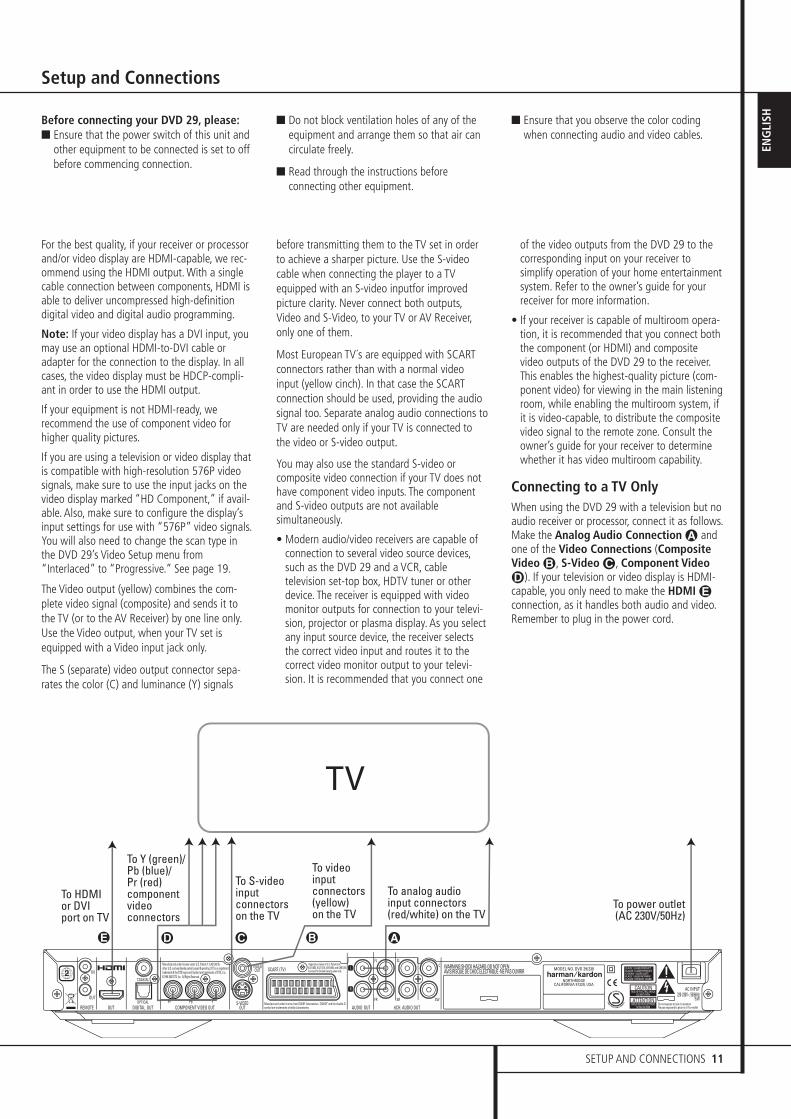
Connecting to a TV OnlyWhen using the DVD 29 with a television but noaudio receiver or processor, connect it as follows.Make the Analog Audio Connection A andone of the Video Connections (CompositeVideo B, S-Video C, Component VideoD). If your television or video display is HDMI-capable, you only need to make the HDMI Econnection, as it handles both audio and video.Remember to plug in the power cord.
TV
E
To Y (green)/Pb (blue)/Pr (red)component videoconnectors
To HDMIor DVI port on TV
To S-videoinputconnectorson the TV
To analog audioinput connectors(red/white) on the TV
To videoinput connectors(yellow)on the TV
To power outlet(AC 230V/50Hz)
D C B A
33908_DVD29_ENG 18/07/07 16:43 Side 11

12 SETUP AND CONNECTIONS
Setup and Connections
Important Notes on SCART and RGB format:■ Your DVD is equipped with a SCART connec-
tor for direct connection to the TV.
■ The SCART connector provides the video signal as well as audio (stereo L/R) signals.
■ The SCART connector for the TV provides thecomposite video signal or the direct RGBsignal, delivering the best video performancepossible, selectable in the Setup menu.
To view RGB video on your TV, the RGBcompatible SCART connector on the TV mustbe used and the DVD´s TV SCART connectormust be set to ”RGB”.
Note that with RGB video the color intensitycannot be adjusted with most TVs.
■ When the RGB video signal is used, DVD´srecorded with the NTSC format (with regionalcode 0 or 2) can be viewed even on non-NTSC compatible TVs.
EFGH D C B A
To Y (green)/Pb (blue)/Pr (red)component videoconnectors
To S-videoinputconnectors
To coaxialdigital audio inputconnectors
To opticaldigitalaudioinput
connectors
To analog audioinput connectors(red/white) on the TVor receiver (see above)
To 6-channelanalog audioinputs onreceiver
To videoinput connectors(yellow)
To power outlet(AC 230V/50Hz)
Dolby Digital/DTS A/V Receiver or Processor
Front Speakers(Left/Right)
Surround Speakers(Left/Right)
Center Speaker
SubwooferHDMI, DVI, Component, S-video and/or Composite video monitor outputs TV
ToHDMIor DVI
port
Connecting to a Receiver/AmplifierWith a Dolby Digital or DTSDecoderOne of the major advantages of the DVD formatis its ability to use a variety of digital audio for-mats for the ultimate in sonic performance.However, in order to enjoy the benefits of digitalaudio, you must use a receiver or processor thathas digital audio decoding capabilities and makean optical or coaxial digital audio connectionbetween the DVD 29 and your home theatersystem. This simple connection is made as shownbelow with an optional coax or optical cable.Only one of these connections is required, andboth should not be made at the same time.
In order to take advantage of the high-resolution DVD-Audio output of the DVD 29, you mustconnect the 6-Channel Audio Outputs tothe matching 6-channel inputs on your receiveror processor.
NOTES FOR ANALOG AUDIO:• If you wish to use the DVD 29 as the input for
a multiroom system, the Analog AudioOutputs � should be connected to thestandard analog left/right DVD or CD inputs onyour digital receiver or processor.
• The connection from the Analog AudioOutputs � to the TV is optional.
• When the audio signal is to be fed to ananalog receiver rather than to the TV, connectthe Analog Audio Outputs � to any analogaudio inputs on your receiver or processor.
• The analog audio connection should also bemade if you wish to play high-resolution 96kHzPCM audio discs where your receiver does notsupport 96kHz processing.
NOTES ON VIDEO:■ Note: With multiple video sources, your
Audio/Video device can be used for selectingthe video signal and routing it to the TV.Connect the video or S-video output of theDVD player (whatever is provided with yourdevice) to the video or S-video input on yourdevice and the video/S-video output of thisdevice to your TV. For more details, see themanual of your Audio/Video amplifier/receiver.
■ Note for Analog Audio: The connection fromAudio Out to the TV is optional only. Normallyyou´ll hear the sound from your AV-system´sspeakers, so the TV volume should becompletely turned down. If you plan to useyour DVD player also without having to turnon your complete system, this connectionmust exist, then you can turn up the TV´svolume as needed.
Connecting to a ReceiverWhen using the DVD 29 with an audio/videoreceiver or processor, connect it as follows. First,make one of the video connections (CompositeVideo C, S-Video D, Component Video Eor HDMI H) to the video input jacks on the A/Vreceiver, and then connect the receiver’s videomonitor output to the TV. In addition, to benefitfrom the high-resolution surround sound formatsrecorded on DVD-Audio discs, which are not out-put via the HDMI connection, you will need tomake the 6-Channel Audio Connection A toyour receiver or processor.
Second, if your receiver or processor is not HDMI-capable, make either the Optical Digital AudioConnection G or the Coaxial Digital AudioConnection F, to the receiver or processor.
IMPORTANT NOTE: Make certain that anydevice being connected, including the DVD 29,your receiver or processor and your TV or videodisplay, is turned off whenever you makeconnections between products.
33908_DVD29_ENG 18/07/07 16:43 Side 12

REMOTE CONTROL 13
ENG
LISH
Remote Control
Battery installationInsert the batteries supplied while observing thecorrect (+) and (–) polarities.
Service life of batteries■ The batteries normally last for about one year,
although this depends on how often, and forwhat operations, the remote control is used.
■ If the remote control unit fails to work evenwhen it is operated near the player, replacethe batteries.
■ Use size “AA” batteries.
Notes:■ Do not attempt to recharge, short-circuit,
disassemble, heat or throw the batteries intofire.
■ Do not drop, step on or otherwise impact theremote control unit. This may damage theparts or lead to malfunction.
■ Do not mix old and new batteries.
■ Wipe away any leakage inside the remotecontrol unit, and install new batteries.
■ If leakage should come into contact withparts of your body, wash it off thoroughlywith water.
■ Batteries contain chemical substances and werecommend that you dispose of them properlyand in compliance with any local regulations.Do not simply throw them away but return toyour dealer or special battery disposal centers.
Remote control operation rangePoint the remote control unit from no more thanabout 7 m from the remote control sensor andwithin about 60 degrees of the front of the unit.
■ The operating distance may vary according tothe brightness of the room.
Notes:■ Do not point bright lights at the remote
control sensor.
■ Do not place objects between the remotecontrol unit and the remote control sensor.
■ Do not use this remote control unit whilesimultaneously operating the remote controlunit of any other equipment.
33908_DVD29_ENG 18/07/07 16:43 Side 13

14 DIGITAL AUDIO CONNECTIONS
Digital Audio Connections
Audio output from the unit’s optical/coaxial digital audio output connectorGently push the cable plug through the built-inshutter that covers the optical digital audio out-put and connect the cable firmly so that the con-figurations of both the cable and the connectormatch.
Disc Sound recording Optical/coaxial digitalformat audio output
DVD Dolby Digital Dolby Digital bitstream (2-5.1ch) or PCM (2ch, 48kHz, 16-bit)††
Linear PCM Linear PCM (2ch) (48/96kHz, (48/96kHz,16/20/24-bit) 16/20/24-bit)
DTS Bitstream or no output*
MPEG (2.0) MPEG bitstream (2ch)or linear PCM(2ch, 48kHz)
VCD MPEG-1 Linear PCM*CD-DA
CD Linear PCM Linear PCM (44.1kHz sampling)
MP3 Linear PCMMPEG-1 (44.1–48kHz,Audio depending onLayer 3) source, if digital
output formatselected as“Bitstream”).(48kHz if digital output format selected as “PCM”)
WMA Linear PCM(Windows (32–48kHz)Media Audio)
* Digital Format must be selected as “ORIGINAL“ or ”PCM” respectively in Menu
For your reference:■ Dolby Digital (AC-3) is a digital sound com-
pression technique developed by the DolbyLaboratories Licensing Corporation,supporting 5.1-channel surround sound, aswell as stereo (2-channel) sound, thistechnique enables a large quantity of sounddata to be efficiently recorded on a disc.
■ Linear PCM is a signal recording format usedin CDs. While CDs are recorded in 44.1kHz/16 bit, DVDs are recorded in 48kHz/16 bit up to 96kHz /24 bit.
■ If you have a Dolby Pro Logic Surrounddecoder connected to the DVD’s analogAUDIO OUT connectors, thanks to the”Downmix” function of the DVD you willobtain the full benefit of Pro Logic from thesame DVD movies that provide full 5.1-chan-nel Dolby Digital soundtracks, as well as fromtitles encoded with Dolby Surround.
■ The DVD is designed to digitally output 96kHz-PCM audio with a 96kHz samplingrate. However, some 96kHz DVD's mayinclude copy protection codes that do notpermit digital output. For full 96kHz fidelityfrom these discs, use the analog outputs ofthe DVD.
IMPORTANT: If your surround processor/D/Aconverter does not support 96kHz PCM audio,you must use the DVD analog outputs for full 96kHz fidelity with these discs.
Caution for the optical/coaxialdigital audio outputs:■ When connecting an amplifier (with an
optical/coaxial digital input ) which does notcontain a Dolby Digital (AC-3) or DTSdecoder, be sure to select ”PCM” as initialsetting in the ”Digital Output” menu (seealso page 18).Otherwise, any attempt to play a DVD maycause such a high level of noise that it maybe harmful to your ears and damage yourspeakers.
■ CD’s can be played as they would normally be played.
Note:■ Some first generation DTS decoders which do
not support DVD-DTS interface may not workproperly with the DVD/CD player.
■ Dolby Digital, DTS and PCM signals arepassed through the HDMI Output �.However, DVD-Audio signals are not carriedvia the HDMI connection. You must connectthe 6-Channel Audio Outputs to thecorresponding input jacks on your receiver or processor in order to enjoy DVD-Audiomaterials.
Notes when connecting the optical digital audio cable(optional)■ Gently push the cable plug through the
built-in shutter that covers the optical digitalaudio output and connect the cable firmly sothat the configurations of both the cable andthe connector match.
Dolby Digital and DTSBoth Dolby Digital and DTS are audio formatsused to record 5.1-channel audio signals ontothe digital track of film. Both of these formatsprovide six separate channels: left, right, center,left rear, right rear, and common subwoofer.The latest 6.1-formats, Dolby Digital EX and DTS ES, even one (or two) additional "SurroundBack" channel for a center between the rears.
Remember, that Dolby Digital or DTS will onlyplay 5.1-channel sound if you’ve connected theoptical or coaxial output of the DVD player to aDTS or Dolby Digital receiver or decoder and ifthe disc was recorded in the Dolby Digital or DTSformat.
DVD-AudioThe high-resolution output of DVD-Audio discs isonly available as an analog signal. For thatreason, it is necessary to make direct analogconnections between the 6-Channel AudioOutputs on the DVD 29 and the matching6-channel inputs on your receiver or surroundprocessor.
33908_DVD29_ENG 18/07/07 16:43 Side 14

PLAYBACK BASICS 15
ENG
LISH
Playback Basics
Basic PlayPreparation1. Switch the TV ON and select its video input
connected to the DVD.
2. Press POWER to turn on the unit, the DVDharman/kardon logo should appear now onthe screen. If that logo appears distorted onthe screen or without any color, change theappropriate settings at the Video Setting Sub-menu according to your TV set and to the con-nection used between the DVD and your TV.
3. When you see no video at all, not even the harman/kardon logo, check the setting of thevideo input used on your TV (most SCARTinputs on TVs can be configured in the TV´smenu). When you don´t succeed, connect yourTV with different cables to the DVD, e.g. viaComposite (yellow jacks) or S-Video cables,rather than per SCART to view the setupmenus until all appropriate ”Video menu”settings are made properly.
4. Switch on your A/V system’s power, if theplayer has been connected to such a system.
5. Press OPEN/CLOSE to open the disc tray.
6. Place a disc on the disc tray.
Hold the disc without touching either of its surfaces, position it with the side you wish to playfacing down, align it with the guides, and place itin its proper position.
■ 3" (8 cm) discs or 5" (12 cm) discs can beused.
7. Press PLAY. The disc tray is automatically closedand play begins.
■ When the disc tray is closed by pressingOPEN/CLOSE, play will start automatically.
■ With most DVD’s, a Disc Menu appears on thescreen. Select specific menu item by usingARROW buttons on the remote, then pressENTER.
Disc Playback FeaturesSkipping tracks or titles/chaptersTo move forward or backward through the trackson a CD or the titles or chapters on a DVD, pressskip on the front panel or Previous/Next on theremote.
Fast Motion Playback/Fast Search1. To move forward or backward through the
DVD or CD disc being played at fast speed,press SEARCH on the remote. Once one ofthese buttons is pressed, the fast search willcontinue until PLAY is pressed.
There are four fast-play speeds. Each press of theSEARCH Buttons will cycle to the next speed inthe following order: x2, x4, x8, x20, x100,indicated by a number of arrow indicators on theright top of the screen.
2. Press PLAY at any time to resume normalplayback.
Note that there will be no audio playback duringfast-forward or -reverse play of DVD discs. This isnormal for DVD, as A/V receivers and surroundprocessors cannot process the digital audiostreams during fast-play modes; audio will beheard during fast-play of conventional CD’s.
Freeze Frame and Frame Advance (with DVD only)1. Press PAUSE when a DVD is playing to freeze
the picture.
2. Each time you press one of the STEP (FWD orREV) buttons, the picture advances one frame.
3. Press PLAY to resume normal playback.
Slow Motion Playback (with DVD only)1. When a DVD disc is in pause or freeze frame
mode, you may move slowly forward or back-ward through the program being played at oneof the speeds by pressing the Play Buttons onthe remote. Each press of the buttons willmove to the next speed, indicated by a numberof arrow indicators on the right top of thescreen.
2. Press PLAY to resume normal playback.
Note that there will be no audio playback duringslow-forward or -reverse play of DVD discs. This isnormal for DVD, as A/V receivers and surroundprocessors cannot process the digital audiostreams during slow modes. Slow play is notavailable for CD.
Notes: Playback features may not be availableduring the opening credits of a movie. This isintended by the disc author and is not a failure ofthe DVD.
Playback of a DVD with 96kHz/24-bit audiorequires the use of circuitry normally used forother features. Accordingly, Slow Play Reverseand Step Advance features are not available withthese discs.
Depending on the structure of a VCD disc, thefunctions Slow Reverse and Step Reverse may beprohibited or have no function and Fast Playback(Search) may not function.
About DivX Movie Files The DivX disc compatibility of this DVD player islimited by the following:
• the available resolution size of the DivX fileshould be below 720x576 (W x H) pixels.
• the total number of files and folders on the discshould be less than 999.
• the number of screen frames per second shouldbe below 29.97 frames per second.
• the video and audio structure of recorded fileshould be interleaved.
The player is capable of playing DivX files withthe extensions “.avi”.
The player is capable of playing subtitle files withthe extensions “.smi”, “.srt”, “.sub (Micro DVDformat only)” or "ssa". Other subtitle files won’tbe displayed. Subtitle files need to carry the samename as the movie file (but with either one of theabove extensions) and should be located in thesame directory.
Playing a DivX Movie DiscBefore playing DivX movie discs, please note thefollowing:
• multi session DVD containing Windows MediaAudio files may not be supported.
• open session discs are not supported.
• the DVD player does not support PC data.
• this DVD player does not support anunfinalized disc with a closed session.
1. Insert a disc and close the tray.
2. Press the OSD button of the remote controland select a folder by pressing the up/downcursor buttons and press ENTER. A list of filesin the folder appears. If you are in a file list andwant to return to the Folder list, use theup/down buttons on the remote to highlightand press ENTER.
3. If you want to view a particular file, press theup/down buttons to highlight a file and pressPLAY.
When playing back a DivX movie you can usevariable playback functions like fast and slowbackward and forward, as well as step forwardand step backward.
4. Press STOP to stop the playback.
The DVD player’s playback functionalities of DivXvideo discs will vary depending on the DivXversion used for creating your movies.
33908_DVD29_ENG 18/07/07 16:43 Side 15

16 SYSTEM SETUP
System Setup
System DefaultsThe final step of the installation is to establishthe system’s defaults. It is helpful to take a fewminutes to familiarize yourself with thesesettings, as they may require change before thefirst use and later from time to time.
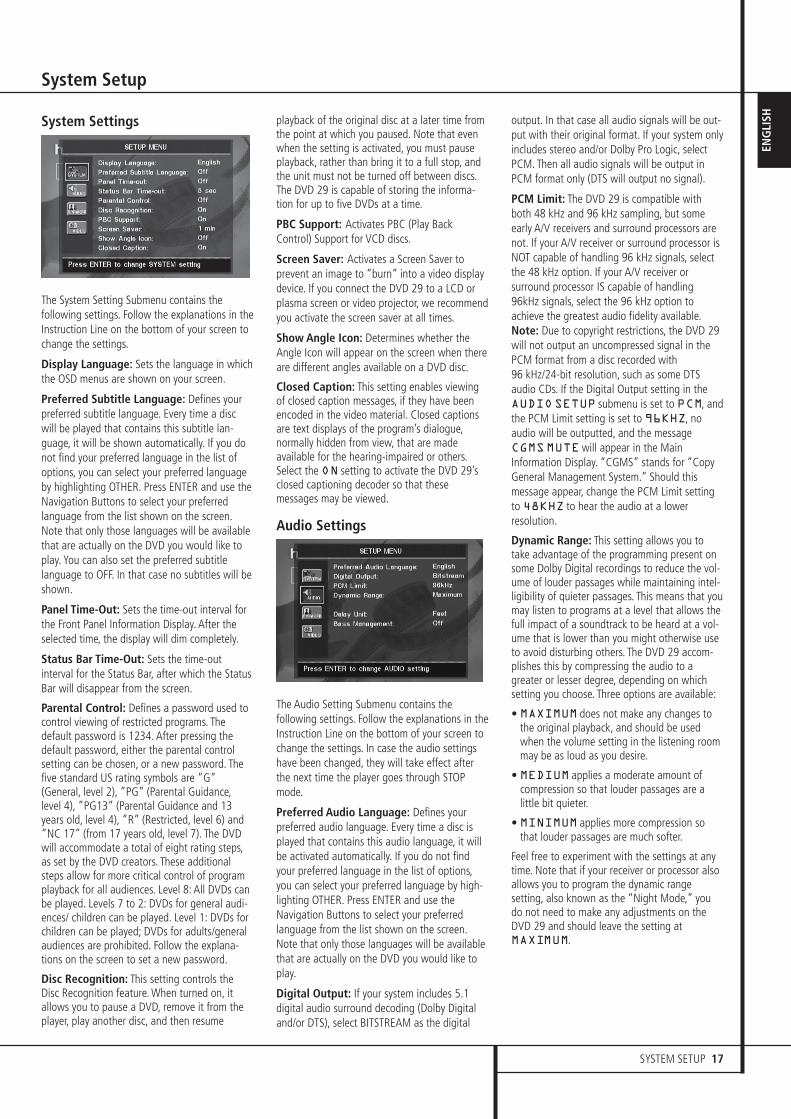
General Functionality of the OSD MenuThe complete setup and control of the DVD 29takes place in an advanced user-guided OnScreen Display (OSD) menu system. The OSD canbe activated by pressing the SETUP button on theremote control. Pressing this button againdeactivates the OSD.
The main menu consists of a PLAYERINFORMATION Menu and a SET-UP Menu. ThePLAYER INFORMATION Menu will show allinformation and options available for the disccurrently playing. The SET-UP Menu will help youconfigure all audio and video settings which arenormally only made once.
Each Main Menu contains Submenus. These sub-menus are shown as icons on the left side of themenu. They can be highlighted by a white squarearound the icon by moving the cursor with theARROW buttons. Icons can be activated bypressing ENTER as soon as an icon is high-lighted. When ENTER has been pressed, the colorof the icon will change to dark blue and you willsee that the Actual Settings of this submenu willappear on the right side of the menu.
Although each Menu has various Submenus andSettings, navigating through menus, submenusand settings goes the same way. All submenus,settings and options can be accessed with thehelp of the ARROW (KLNM ) and ENTERbuttons on the remote control.
To change a setting, simply move the cursor tothe setting you wish to change. This setting willbe highlighted in light blue, and a brief explana-tion will appear in the Instruction Line on thebottom of your screen.Next, press the Enter Button 6 and adropdown menu will appear that contains theavailable options for that setting. Press theKL Navigation Buttons 9 until thedesired option is highlighted, then press theEnter Button 6 to select that option.
A Main Menu Line
B Submenus
C Actual Settings
D Instruction Line
Most DVDs are created to allow setup menus tobe displayed while the disc is playing, super-imposed over the video playback. However, somediscs are authored in a way that does not allowthis. If you see the icon displayed on thescreen after pressing the Setup Button 8 orthe Info Button A, press the Stop ButtonI and then press the Setup or Info Button8A again.
Set Up MenuThe first step in checking or changing the systemdefaults is to access the Setup Menu. First, makecertain that the DVD is properly connected to avideo display, and that power is connected. Forthis process, however, you do not need to loadany discs into the unit.
During STOP, PAUSE or PLAY mode, if you pressSETUP on the remote, the Set Up Menu appears onthe screen.
This Main Menu and all menus in the followingsection may look different, listing the settingswith different languages, depending on the set-tings made previously. With the factory defaultsetting all languages are set to ”English”, that´swhy with all menus the English version is shownin the manual.
In the SET-UP Menu you will find submenus formaking or changing all settings and adjustmentsfor both Audio and Video handling of your DVD 29.
33908_DVD29_ENG 18/07/07 16:43 Side 16
SYSTEM SETUP 17
ENG
LISH
System Setup
System Settings
The System Setting Submenu contains thefollowing settings. Follow the explanations in theInstruction Line on the bottom of your screen tochange the settings.
Display Language: Sets the language in whichthe OSD menus are shown on your screen.
Preferred Subtitle Language: Defines yourpreferred subtitle language. Every time a discwill be played that contains this subtitle lan-guage, it will be shown automatically. If you donot find your preferred language in the list ofoptions, you can select your preferred languageby highlighting OTHER. Press ENTER and use theNavigation Buttons to select your preferredlanguage from the list shown on the screen.Note that only those languages will be availablethat are actually on the DVD you would like toplay. You can also set the preferred subtitlelanguage to OFF. In that case no subtitles will beshown.
Panel Time-Out: Sets the time-out interval forthe Front Panel Information Display. After theselected time, the display will dim completely.
Status Bar Time-Out: Sets the time-outinterval for the Status Bar, after which the StatusBar will disappear from the screen.
Parental Control: Defines a password used tocontrol viewing of restricted programs. Thedefault password is 1234. After pressing thedefault password, either the parental controlsetting can be chosen, or a new password. Thefive standard US rating symbols are ”G”(General, level 2), ”PG” (Parental Guidance,level 4), ”PG13” (Parental Guidance and 13years old, level 4), ”R” (Restricted, level 6) and”NC 17” (from 17 years old, level 7). The DVDwill accommodate a total of eight rating steps,as set by the DVD creators. These additionalsteps allow for more critical control of programplayback for all audiences. Level 8: All DVDs canbe played. Levels 7 to 2: DVDs for general audi-ences/ children can be played. Level 1: DVDs forchildren can be played; DVDs for adults/generalaudiences are prohibited. Follow the explana-tions on the screen to set a new password.
Disc Recognition: This setting controls theDisc Recognition feature. When turned on, itallows you to pause a DVD, remove it from theplayer, play another disc, and then resume
playback of the original disc at a later time fromthe point at which you paused. Note that evenwhen the setting is activated, you must pauseplayback, rather than bring it to a full stop, andthe unit must not be turned off between discs.The DVD 29 is capable of storing the informa-tion for up to five DVDs at a time.
PBC Support: Activates PBC (Play BackControl) Support for VCD discs.
Screen Saver: Activates a Screen Saver toprevent an image to “burn” into a video displaydevice. If you connect the DVD 29 to a LCD orplasma screen or video projector, we recommendyou activate the screen saver at all times.
Show Angle Icon: Determines whether theAngle Icon will appear on the screen when thereare different angles available on a DVD disc.
Closed Caption: This setting enables viewingof closed caption messages, if they have beenencoded in the video material. Closed captionsare text displays of the program’s dialogue,normally hidden from view, that are madeavailable for the hearing-impaired or others.Select the ON setting to activate the DVD 29’sclosed captioning decoder so that thesemessages may be viewed.
Audio Settings
The Audio Setting Submenu contains thefollowing settings. Follow the explanations in theInstruction Line on the bottom of your screen tochange the settings. In case the audio settingshave been changed, they will take effect afterthe next time the player goes through STOPmode.
Preferred Audio Language: Defines yourpreferred audio language. Every time a disc isplayed that contains this audio language, it willbe activated automatically. If you do not findyour preferred language in the list of options,you can select your preferred language by high-lighting OTHER. Press ENTER and use theNavigation Buttons to select your preferredlanguage from the list shown on the screen.Note that only those languages will be availablethat are actually on the DVD you would like toplay.
Digital Output: If your system includes 5.1digital audio surround decoding (Dolby Digitaland/or DTS), select BITSTREAM as the digital
output. In that case all audio signals will be out-put with their original format. If your system onlyincludes stereo and/or Dolby Pro Logic, selectPCM. Then all audio signals will be output inPCM format only (DTS will output no signal).
PCM Limit: The DVD 29 is compatible withboth 48 kHz and 96 kHz sampling, but someearly A/V receivers and surround processors arenot. If your A/V receiver or surround processor isNOT capable of handling 96 kHz signals, selectthe 48 kHz option. If your A/V receiver orsurround processor IS capable of handling96kHz signals, select the 96 kHz option toachieve the greatest audio fidelity available.Note: Due to copyright restrictions, the DVD 29will not output an uncompressed signal in thePCM format from a disc recorded with 96 kHz/24-bit resolution, such as some DTSaudio CDs. If the Digital Output setting in theAUDIO SETUP submenu is set to PCM, andthe PCM Limit setting is set to 96KHZ, noaudio will be outputted, and the messageCGMS MUTE will appear in the MainInformation Display. “CGMS” stands for “CopyGeneral Management System.” Should thismessage appear, change the PCM Limit settingto 48KHZ to hear the audio at a lowerresolution.
Dynamic Range: This setting allows you totake advantage of the programming present onsome Dolby Digital recordings to reduce the vol-ume of louder passages while maintaining intel-ligibility of quieter passages. This means that youmay listen to programs at a level that allows thefull impact of a soundtrack to be heard at a vol-ume that is lower than you might otherwise useto avoid disturbing others. The DVD 29 accom-plishes this by compressing the audio to agreater or lesser degree, depending on whichsetting you choose. Three options are available:
• MAXIMUM does not make any changes tothe original playback, and should be usedwhen the volume setting in the listening roommay be as loud as you desire.
• MEDIUM applies a moderate amount ofcompression so that louder passages are alittle bit quieter.
• MINIMUM applies more compression sothat louder passages are much softer.
Feel free to experiment with the settings at anytime. Note that if your receiver or processor alsoallows you to program the dynamic rangesetting, also known as the “Night Mode,” youdo not need to make any adjustments on theDVD 29 and should leave the setting atMAXIMUM.
33908_DVD29_ENG 18/07/07 16:43 Side 17

18 SYSTEM SETUP
While DVD-Audio also is output only in analogform, many discs also contain PCM, Dolby Digitalor DTS digital tracks and may be played throughthe Digital Audio Outputs ��.
Delay Unit: This setting selects the unit ofdistance used for calculating delay times whenthe AUDIO ADJUSTMENTSmenu isactivated. The default unit is feet, but you mayselect meters.
Bass Management: This setting activates theAUDIO ADJUSTMENTSmenu’s bassmanagement settings, to optimize playback ofDVD-Audio discs through the Analog AudioOutputs � . Three settings are available:
• On: This is the default setting. If your receiveror processor is equipped with “direct” 6-chan-nel inputs and the receiver is not capable ofperforming bass management on these inputs,then leave this setting on the DVD 29 at thedefault of ON, and proceed to the AUDIOADJUSTMENTSmenu to program thebass management settings.
• Bypass: If your receiver or processor isequipped with 6-channel inputs and is capableof adjusting the bass management settings(speaker size, output levels and delay times)for its 6-channel analog inputs, then Harman Kardon recommends that you changethis setting to Bypass, and adjust the bassmanagement settings on your receiver.
• Stereo: If your receiver or processor is notequipped with 6-channel inputs at all, thenchange this setting to Stereo, which willsend a downmixed 2-channel signal to theAnalog Audio Outputs �, for use with any2-channel analog input on your receiver.You may then select an analog surround modeavailable on your receiver.
Audio Adjustments SubmenuThis menu allows you to adjust bass manage-ment settings that control the audio output ofthe 6-Channel Audio Outputs for speakersize, output level and delay times. The properadjustment of these settings is key to optimalreproduction of DVD-Audio discs, when the DVD 29 is used with a receiver or processor thatdoes not have audio adjustment capabilities forthe direct inputs.
Important Note: In order to avoid audioproblems, when the DVD 29 is connected to areceiver or processor that does have thecapability to adjust bass managementparameters for its multichannel inputs, you havethe option to either use that capability or adjustthe settings in the DVD 29. The preferred methodof operation is to use the receiver for theseadjustments. In that case, remember to set theBass Management setting in theAUDIO SETUPmenu to Bypass. If youmake the adjustments using the DVD 29'ssettings, it is important that the receiver'ssettings for the multichannel direct inputs bedisabled, or set to “Large” for the speaker sizesand “0” for the level adjustments and delaytimes, unless these settings are also used for thereceiver’s other source inputs, in which case theyshould be left the way you set them when youconfigured your receiver. If you have anyquestions about the capabilities of your receiveror processor, we recommend that you consult itsowner’s manual or the manufacturer’s Web sitefor further information.
If your receiver or processor does not have 6-channel analog inputs, make sure to selectStereo for the Bass Managementsetting in the AUDIO SETUPmenu. Thenconnect the Analog Audio Outputs � to any2-channel analog inputs on your receiver.
Before proceeding with the DVD 29’s audiosetup adjustments, we recommend that you firstuse the menu system in your receiver or proces-sor to ascertain the settings already establishedfor “Speaker Size,” “Output Level” and “DelayTime,” which may be set as a distance. Writethese settings down to refer to during theconfiguration process.
Press the Setup Button 8 to activate theSetup menu; then use the KL NavigationButtons 9 until the AUDIO ADJUST-MENTS submenu is highlighted within a whiteoutline box, and press the Enter Button 6.
The following adjustments are available on theAUDIO ADJUSTMENTSmenu for eachspeaker position. It is recommended that youcycle through the adjustments for each speakerposition using the KLM N NavigationButtons 9 to enter the settings that areappropriate for your system. Pressing the EnterButton 6 displays a dropdown menu with theselections available for that setting. Use theKL Navigation Buttons 9 to highlightthe appropriate setting, and then press theEnter Button 6 to select it.
You will notice that the adjustments for speakersize and distance (used to calculate delay times)are set in tandem for the front left and rightspeaker pair, and for the surround left and rightspeaker pair. Changing the settings for eitherspeaker in these pairs also affects that setting forthe other speaker in that pair. For this reason, itis important to select the same brand and modelfor both speakers in each pair, and also to placethem at about the same distance from thelistening position.
Speaker Size: Speaker size is part of the bassmanagement system which determines whichfrequencies are sent to the specific speakerposition, and which are sent to the subwoofer.The designation of “size” does not refer to thespeaker’s physical size, but rather to the lowestfrequency a speaker can handle. For this purpose,“full-range” speakers are considered “large,”while those not capable of reproduction below100Hz are considered “small.” In general, if youare using a packaged speaker system withsmaller satellite-type speakers and a subwoofer,you should select Small for all five speakers.Large should only be selected if you arecertain that your speakers are capable ofhandling extreme low-frequency sounds.
At the subwoofer setting, you can select the fre-quency under which bass information is directedto the Subwoofer Output and above whichthe remaining signal is directed to all otherspeakers. When making these selections, choosethe crossover frequency that is closest to thelower frequency limit of your "SMALL" speakers.This figure is normally printed in the owner’smanual or data sheet for the speakers; or consultthe speaker’s manufacturer.
System Setup
33908_DVD29_ENG 18/07/07 16:43 Side 18

SYSTEM SETUP 19
ENG
LISH
System Setup
DelayDue the different distances between the listeningposition for the front channel speakers and thesurround speakers, the amount of time it takesfor sound to reach your ears from the front orsurround speakers is different. You maycompensate for this difference through the use ofthe delay settings to adjust the timing for thespecific speaker placement and acoustic con-ditions in your listening room or home theater.Measure the distance from the listening positionto each of the individual loudspeakers. Oncedone, select per loudspeaker the distance that isclosest to the one measured.
Output level adjustmentOutput level adjustment is a key part of theconfiguration process for any surround soundproduct. It is particularly important for DVD-Audio, as correct outputs will ensure that youhear sound tracks with the proper directionalityand intensity.
NOTE: Listeners are often confused about theoperation of the surround channels. While someassume that sound should always be comingfrom each speaker, most of the time there will belittle or no sound in the surround channels. This isbecause they are only used when a movie direc-tor or sound mixer specifically places sound thereto create ambiance, a special effect or to contin-ue action from the front of the room to the rear.When the output levels are properly set it isnormal for surround speakers to operate onlyoccasionally. Artificially increasing the volume tothe rear speakers may destroy the illusion of anenveloping sound field that duplicates the wayyou hear sound in a movie theater or concerthall.
The default settings of the DVD player is 0dB forall channels. In case you feel adjustments arenecessary in your setup, we advise you to copythe settings currently in use with 5.1 surroundmodes (for instance Dolby Prol Logic II) of yourAV receiver to the DVD player.
Video Settings
The Video Setting Submenu contains thefollowing settings. Follow the explanations in theInstruction Line on the bottom of your screen tochange the settings.
Aspect Ratio: This step selects the TV aspectratio, conventional screen shape (4:3) orwidescreen (16:9), according to your TV.
When the HDMI Output � is used, the aspectratio will automatically be set appropriately forthe specific display. However, you may select analternate view.
Video Standard: Sets the output video formati.e. NTSC, PAL or SECAM, of the DVD player. Ifyou have a multi standard TV, we recommend theAUTO setting for optimal picture quality.
Video Output: Sets the video output type to S-Video, Component or SCART. Scart will be usedfor most TV’s. Component will be used for mostLCD, Plasma and projectors.
Scan Type: This setting allows you to selectbetween progressive and interlaced scanning forthe Component Video Outputs � to maxi-mize the image resolution for the type of videodisplay in use. The output at the S-Video � andComposite Video � outputs will always bestandard-rate video that is compatible with anytelevision set or video display. Two choices areavailable:
Progressive: Select this option if you have avideo display that is compatible with inputsources of 480P or greater. Displays labeled as“HDTV Ready,” including virtually all large-screenLCD and plasma displays, are compatible withprogressive scan.
Interlaced: Select this option when you areusing an older video display that has Y/Pr/Pbcomponent inputs, but which is not capable ofdisplaying high scan rate, or “HD” signals.
NOTES:
1. The Scan Type may only be changed when theVideo Output setting has been set toComponent.
2. If you have connected the DVD 29 to a videodisplay that is not capable of displayingprogressive scan video using the Component(Y/Pr/Pb) Video Outputs �, and you haveinadvertently changed the Video OutputSetting to Component and the Scan Typesetting to Progressive, you may reset the scantype to interlaced by pressing theProgressive Scan/Interlaced Button L.The display will blink, indicating that the scantype has been reset to interlaced mode.
Scart Output: Selects which kind of videooutput signals will be routed over the scart.RGB will be used for most TV’s and is thereforerecommended.
Video Adjustment: The Video AdjustmentSubmenu contains access to the Test Screen. Firstadjust the video display device (TV) with the helpof the Test Screen. After that the output settingsof the player can be fine-tuned with theBrightness, Sharpness and Black Level settings. Inorder to change the settings, move the cursor tothe “+“ or “-“ icon on the same line as the
setting. Once one of the icons is highlighted,pressing ENTER will increase or decrease thevalue of the setting, as will be shown in the barbehind the setting. To exit the Video AdjustmentMenu, move the cursor to DONE, and pressENTER.
DivX Subtitle: This setting selects the desiredsubtitle language for DivX movies.
Below the menu items you will find your personalDivX Video On Demand (VOD) code.
This code allows you to rent and purchase videosusing the DivX VOD service. For more infor-mation, visit www.divx.com/vod. Follow theinstructions and download the video onto a discfor playback on this unit. Note that all thedownloaded videos from DivX VOD can only beplayed back on this unit.
Once the DivX icon is highlighted, press ENTERto access your personal DivX VOD code.
HDMI Settings: This setting displays thecharacteristics of the video output signal at theHDMI Output �. When the DVD 29 isconnected to a video display using the HDMIOutput �, the display sends information to theDVD 29 that indicates the highest videoresolution it is capable of handling, and the DVD 29 automatically sets the video output tomatch it. That resolution is displayed here. Youmay use this setting to manually select a lowervideo output resolution. Changes made hereremain active until the DVD 29 or the display isturned off. When either is turned off, and then onagain, the DVD 29 will revert to the defaultsetting transmitted by the display. Make sureyour video display or other video switchingequipment (such as an HDMI-capable receiver) iscapable of handling the DVD 29’s HDMI outputsignal.
33908_DVD29_ENG 18/07/07 16:43 Side 19

20 TEST SCREEN
Test Screen
Test ScreenWhen you activate the Test Screen via the OSDyou can activate a still image to test all settingsand the video performance of your TV. With thevertical color bars you can test the following:
■ proper color intensity setting on your TV,
■ the proper color of each bar, showing if theproper video standard is turned on: the colorsshould be (left to right): black, white, yellow,cyan (turquoise), green, magenta (purple), red,blue, black.
■ proper color transition, seen as sharp separation of the bars, S-Video will be betterthan Video, RGB best of all.
■ the performance of the color filter in your TV(with ”Video” signals), bar edges should showno vertical crawling dots. Here S-Video andRGB formats usually give no problems.
With the grey scale and the black/white fieldsbelow the color bars the brightness and contrastof your screen can be adjusted optimally, seechapter ”TV Picture Adjustment” below.
TV Picture Adjustment with Test Screen
These adjustments may be done now, but youcan also make them after setup has been finalized.
Brightness adjustment:1. Turn down the color control on your TV until
the color bars are visible in black and white.
2. Adjust the contrast to the lowest level whereyou still can see all bars within the grey scalein the test picture separately and clearly.
3. Adjust the Brightness so that the bars in thegrey scale are all visible. The bar furtherst tothe left has to be as black as possible ratherthan grey but the next aside must clearly bedifferable. All the bars in the grey scale have tobe gradually and evenly changing from blackto whiter, going from left to right.
Contrast adjustment:1. Adjust the contrast on your TV until you see a
bright white bar in the right low corner of thescreen and a deep dark black bar at the left.The optimal contrast setting will depend fromyour preference and the surrounding light inthe TV room.
2. If the brightness of the white bar will no moreincrease while turning up the contrast or whenthe borders of the white ”harman/kardon” textletters on top will bloom (overlight) into theblack areas, what drasticly will decrease thesharpness of the script, then the Contrast hasbeen turned up too much. Reduce the contrastuntil these effects will disappear and the videostill looks realistic.
3. If you are watching TV with a usual surround-ing daylight, adjust the Contrast so that a nor-mal video picture has about the same lookingas the surroundings in your room. By that waythe eye is relazed when watching the TV pic-ture. This contrast setting may be reducedwhen the surrounding light is dimmed, usuallyimproving the sharpness of a video a lot thereby.
4. The grey scale in the middle line needs to havethe same clear difference between each bar asbefore the contrast adjustment. If not, go backto the brightness adjustment and repeat step 3and then the contrast adjustments, makingonly minor adjustments each time for optimisation.
Color adjustment.1. When the Brightness and the Contrast are set
optimally, turn up the color control to the levelof your perference. Adjust to the level wherethe colors look strong but still natural, notoverdone. If the color level is too high,depending from the TV used some of the barswill seem wider or the color intensity will notincrease while the control is turned up. Thenthe color control must be reduced again. At theend you should test the color intensity alsowith a video, e.g. pictures of natural faces,flowers, fruit and vegetables and other wellknown natural articles of our life most usefullfor an optimal setting of the color intensity.
2. If your TV has a Tint option (with mostEuropean TVs this is available or effective onlywith NTSC signals, not with PAL), use the largewhite bar below the Greyscale to tweak thewarmth of the picture. Every viewer has a difference in preference as how the glow ofthe picture should be. Some prefer a little colder picture, some a warmer glow. The Tintfunction on your TV and the white bar can beused to control this. Adjust the Tint to the levelwhere you feel the white color has the toneyou prefer.
Color Bars
Grey Scale
100%Black/Whitefields
Sharpness AdjustmentContrary to intuition, the picture will appearsharper and clearer with the sharpness, or Edges,setting backed off from the maximum setting.Reduce the sharpness setting on your television,and the Edges setting on the DVD 29 videoadjustments menu if necessary, to minimize theappearance of any white lines between the barsin the gray scale portion of the test screen.
Convergence and Edge FocusThe crosshatch pattern that surrounds the testscreen may be used to evaluate edge focus andconvergence in front- or rear-projection videodisplays. However, the controls used to adjustthese parameters are often not user-accessible.In any event, these adjustments are extremelycomplex, and require proper training andexperience to avoid worsening the situation.Therefore, it is recommended that if you areunable to improve the picture using the availablecontrols, contact the video display manufacturer’sauthorized service representative for assistance.
When all desired setup and configuration entrieshave been made, use the KL NavigationButtons 9 until “Done” is highlighted at thebottom of the Video Adjustments submenu. Pressthe Enter Button 6 to select it to return tothe on-screen menu system. Then, press theSetup Button 8 to remove the menu displaysfrom the screen. The unit will return to normaloperation and you are ready to enjoy the finest inDVD or CD playback!
33908_DVD29_ENG 18/07/07 16:43 Side 20

PLAYER MENU 21
ENG
LISH■ Disc: This line displays the disc type.
■ Disc ID: If the disc is encoded with anidentification label, it will appear here.
■ Aspect Ratio: This line displays the aspectratio of the video content on the disc, and theformat in which it is being played backaccording to the setting established in theVIDEO SETUP submenu as shown onpage 19. Some discs may contain two versionsof the same program with a widescreenaspect ratio on one side of the disc, and astandard aspect ratio on the other.
■ Video Standard: The disc’s format is shown here. For Region 2 players, this will normallybe PAL, although some DVDs that are openregion (playable in all regions) may be in theNTSC format.
■ Scan Type: This line displays whether thevideo program on the DVD was recorded witha progressive or interlaced scan rate. It alsodisplays how the program is being playedback, based on the setting established in theVIDEO SETUP submenu as shown onpage 19.
■ Audio Resolution: This line displays thesample rate and bit rate for the current audioformat.
■ Audio Format: This line displays the currentaudio track, such as Dolby Digital 5.1 or linearPCM.
■ Video Bit Rate: This line displays the videobit rate up to the limit of 10 Mbps. This indica-tion will vary as a disc is played in response tochanges in the amount of compression thatwas applied to the video signal when the discwas created. Thus, when the disc is stopped orpaused, this line will remain blank.
When you have finished viewing the Playermenus, press the Info Button A to removethe displays from the screen and return to normalplay.
Using the On-Screen StatusDisplayWhen a DVD is playing, you may press theStatus Button D at any time to view a quicksummary of the disc’s playback status. The StatusBar not only gives you a snapshot of the unit’scurrent state; it also provides an easy way toselect a different title, chapter or track, or use thetime search feature.
• Title: This displays the current title on the left, and the total number of titles on the discon the right.
• Chapter: This displays the current chapter onthe left, and the total number of chapters onthe disc on the right.
• Play Mode Icon: This displays the currentplay mode icon: e.g. Play B, Pause 1,Stop 0.
• Time Display: This section of the displayshows the time corresponding to the type ofdisplay indicated in the Time Display Type.The Time Search function enables you to startplayback at any point in the program. Use theM N Navigation Buttons 9 to highlightthis display, and the numbers will change todashes. You may then use the Numeric Keysto enter the numbers corresponding to thetime on the disc at which you wish play tocommence. Press the Enter Button 6, andplay will immediately begin at the selectedtime position.
• Time Bar: This display is a graphic representa-tion of the time elapsed for the title beingplayed. As the disc plays, the number of barswill increase to reflect approximately whatpercentage of the title has been played thusfar.
• Time Display Type: This section identifies thetype of information in the Time Displaysection of the display. Use the KLM N
Navigation Buttons 9 to select thissetting, and each subsequent press of theEnter Button 6 will change the timedisplay from Title Elapsed, to Title Remaining,to Chapter Elapsed to Chapter Remaining, andcycle back to Title Elapsed. The time displayedon screen and in the front-panel InformationDisplay � will change accordingly.
Player Menu
Using the Player Information MenuThe DVD 29’s Player Information menu displaysdisc information and enables you to programplayback modes. Press the Info Button A todisplay the Player Information menu.
The Player Information menu has two submenuswhich may be accessed by using the KL Navigation Buttons 9 to highlightthe submenu’s icon, and pressing the EnterButton 6 to select it. These submenus aredifferent from the Setup menus in that manyitems are for display only and cannot be changedusing the menu system.
PLAYBACK INFO Submenu: This submenudisplays basic disc and playback mode informa-tion. You may not make any changes to the itemsshown in this submenu, except for the Repeatmode.
■ Disc: This line displays the disc type, such asDVD-Video.
■ Disc ID: If the disc is encoded with an identifi-cation label, such as a movie title, it willappear here.
■ Playlist: For DVDs, this line will reflect thatplayback will occur in the disc’s order.Programmable playlists are not available whena DVD is loaded.
■ Repeat: This line displays the current repeatmode, or Off if Repeat mode is not active.
PROGRAM submenu: The PROGRAMsubmenu is not accessible for DVDs.
DISC INFO Submenu: This submenu dis-plays detailed information about the disc content.You will not be able to make any changes to theitems on this submenu. However, you may usethe SETUPmenu system as described on page19 to change the DVD 29 player settings forvideo aspect ratio or scan type.
33908_DVD29_ENG 18/07/07 16:43 Side 21
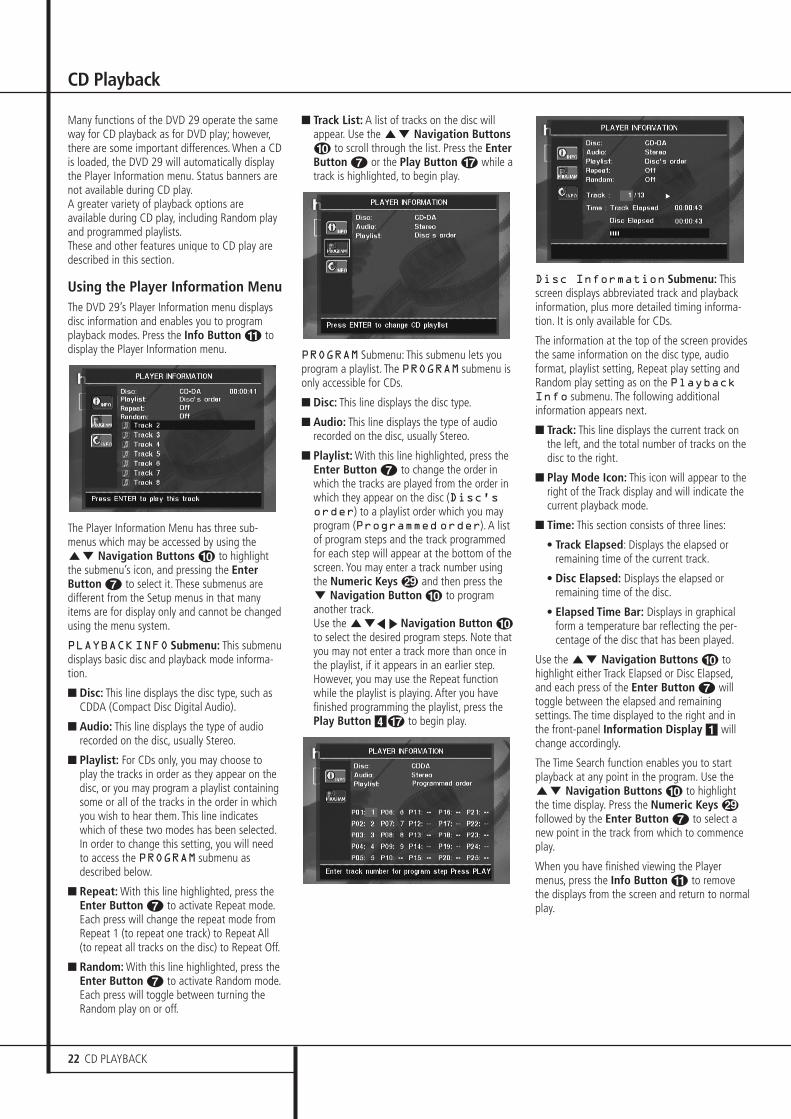
22 CD PLAYBACK
CD Playback
Many functions of the DVD 29 operate the sameway for CD playback as for DVD play; however,there are some important differences. When a CDis loaded, the DVD 29 will automatically displaythe Player Information menu. Status banners arenot available during CD play.A greater variety of playback options areavailable during CD play, including Random playand programmed playlists.These and other features unique to CD play aredescribed in this section.
Using the Player Information MenuThe DVD 29’s Player Information menu displaysdisc information and enables you to programplayback modes. Press the Info Button A todisplay the Player Information menu.
The Player Information Menu has three sub-menus which may be accessed by using theKL Navigation Buttons 9 to highlightthe submenu’s icon, and pressing the EnterButton 6 to select it. These submenus aredifferent from the Setup menus in that manyitems are for display only and cannot be changedusing the menu system.
PLAYBACK INFO Submenu: This submenudisplays basic disc and playback mode informa-tion.
■ Disc: This line displays the disc type, such asCDDA (Compact Disc Digital Audio).
■ Audio: This line displays the type of audiorecorded on the disc, usually Stereo.
■ Playlist: For CDs only, you may choose toplay the tracks in order as they appear on thedisc, or you may program a playlist containingsome or all of the tracks in the order in whichyou wish to hear them. This line indicateswhich of these two modes has been selected.In order to change this setting, you will needto access the PROGRAM submenu asdescribed below.
■ Repeat: With this line highlighted, press the Enter Button 6 to activate Repeat mode.Each press will change the repeat mode fromRepeat 1 (to repeat one track) to Repeat All(to repeat all tracks on the disc) to Repeat Off.
■ Random: With this line highlighted, press theEnter Button 6 to activate Random mode.Each press will toggle between turning theRandom play on or off.
■ Track List: A list of tracks on the disc willappear. Use the KL Navigation Buttons9 to scroll through the list. Press the EnterButton 6 or the Play Button G while atrack is highlighted, to begin play.
PROGRAM Submenu: This submenu lets youprogram a playlist. The PROGRAM submenu isonly accessible for CDs.
■ Disc: This line displays the disc type.
■ Audio: This line displays the type of audiorecorded on the disc, usually Stereo.
■ Playlist: With this line highlighted, press theEnter Button 6 to change the order inwhich the tracks are played from the order inwhich they appear on the disc (Disc’sorder) to a playlist order which you mayprogram (Programmed order). A listof program steps and the track programmedfor each step will appear at the bottom of thescreen. You may enter a track number usingthe Numeric Keys � and then press theL Navigation Button 9 to programanother track.Use the KLM N Navigation Button 9to select the desired program steps. Note thatyou may not enter a track more than once inthe playlist, if it appears in an earlier step.However, you may use the Repeat functionwhile the playlist is playing. After you havefinished programming the playlist, press thePlay Button 3G to begin play.
Disc Information Submenu: Thisscreen displays abbreviated track and playbackinformation, plus more detailed timing informa-tion. It is only available for CDs.
The information at the top of the screen provides the same information on the disc type, audioformat, playlist setting, Repeat play setting andRandom play setting as on the PlaybackInfo submenu. The following additionalinformation appears next.
■ Track: This line displays the current track onthe left, and the total number of tracks on thedisc to the right.
■ Play Mode Icon: This icon will appear to theright of the Track display and will indicate thecurrent playback mode.
■ Time: This section consists of three lines:
• Track Elapsed: Displays the elapsed orremaining time of the current track.
• Disc Elapsed: Displays the elapsed orremaining time of the disc.
• Elapsed Time Bar: Displays in graphicalform a temperature bar reflecting the per-centage of the disc that has been played.
Use the KL Navigation Buttons 9 tohighlight either Track Elapsed or Disc Elapsed,and each press of the Enter Button 6 willtoggle between the elapsed and remainingsettings. The time displayed to the right and inthe front-panel Information Display � willchange accordingly.
The Time Search function enables you to startplayback at any point in the program. Use theKL Navigation Buttons 9 to highlightthe time display. Press the Numeric Keys �followed by the Enter Button 6 to select anew point in the track from which to commenceplay.
When you have finished viewing the Playermenus, press the Info Button A to removethe displays from the screen and return to normalplay.
33908_DVD29_ENG 18/07/07 16:43 Side 22

CD PLAYBACK 23
ENG
LISH
CD Playback
Selecting a TrackTo select a track, make sure the PlayerInformation menu is on screen. Press the InfoButton A to activate it if necessary. Next,press the KLM N Navigation Button 9so that the Track Number is highlighted. Use theNumeric Keys � to enter the desired track,and press the Enter Button 6 to beginplaying the new track.
To select a specific track on a CD at any timeduring playback, simply press the numbercorresponding to the track you wish to listen tousing the Numeric Keys �. You may alsomove one by one through the chapters at anytime by pressing the Skip Reverse (Previous)/Skip Forward (Next) Buttons 67EF.When you press the Previous E or SkipReverse 6 button once, the player will returnto the start of the current track. Additionalpresses of either button will step back throughthe available tracks, one at a time.
Note: When a JPEG, MP3 or Windows Mediadisc is playing, a special screen will appear.
Repeat PlayThe DVD 29 offers several repeat functions forCDs that allow you to take advantage of thecapacity of the unit for unattended playback:
• Repeat Program: Repeats the current playlistif Programmed Order has been selected at thePlaylist setting.
• Repeat 1 Track: For CDs, VCDs, MP3s andWMAs, repeats the track or file currently beingplayed until the disc is manually stopped. TheRepeat and 1 indicators will light in the front-panel display, and the REPEAT 1 icon willappear on screen.
• Repeat Disc: For CDs, VCDs, MP3s, WMAs,and JPEGs, repeats the entire disc until play ismanually stopped. The Repeat and Allindicators will light in the front-panel display,and the REPEAT ALL icon will appear inthe Status Bar.
• Repeat Folder: For MP3s, WMAs and JPEGs,repeats all tracks within the current folder untilplay is manually stopped. The Repeat Hindicator will light in the front-panel display,and the REPEAT FOLDER icon willappear on screen.
• Repeat A-B: Repeats any selected portion ofthe disc until the disc is manually stopped (seebelow for more information).
To select any Repeat mode (other than Repeat A-B):
While a disc is playing, press the RepeatButton � on the remote. The Repeat icon willappear on screen, indicating the new repeatmode. Each press of the Repeat Button �will cycle through the available repeat modes. Toend Repeat play, continue pressing the RepeatButton � until the Off mode is selected.
A-B Repeat PlayThe Repeat A-B function allows you to select anyportion of a CD and have it repeat continuallyuntil the unit is manually stopped.
To initiate a Repeat A-B playback sequence,follow these steps while a disc is playing:
1. Press the A-B Repeat Button P on theremote when you want to choose thebeginning point; the Repeat icon appears inthe upper right corner of the screen, followedby A- to indicate the beginning of thepassage to be repeated.
2. Press the A-B Repeat Button P again tochoose the end point. Repeat A-B has beenset, and the A-B section will be playedcontinuously.
3. Press the A-B Repeat Button P on theremote again to cancel Repeat A-B mode.
Random PlayThe Random Play function will play all of thetracks on a CD in a random order, as selected bythe DVD 29. Once the DVD 29 has played all ofthe tracks on the disc once, it will stop.
You may select the random mode by pressing theRandom Button O on the remote. Each pressof the Random Button O will toggle thesetting between “Off” and “On”, meaning thatthe remaining tracks on the disc will be played inrandom order.
The Random Indicator J in the Front-PanelInformation Display � will light any time theRandom setting is on.
Video Off FeatureDuring CD playback, some listeners may prefer toturn off the DVD 29’s video circuitry. Althoughthe video section is electrically isolated from theaudio section, some users may prefer to turn thevideo displays off during audio playback toprevent any possibility of interference betweenaudio and video. You may also wish to turn thevideo display off if you find the menu systemdistracting or unnecessary during CD playback.
IMPORTANT NOTE: It is strongly recommendedthat plasma video display owners use the VideoOff feature to avoid burn-in.
To turn the video displays off while a CD isplaying, simply press the Video Off ButtonQ. Press the button again to restore the videooutput. The V-Off Indicator G will light toremind you that the video displays have beenturned off. Note that the video output willautomatically be restored each time the DVD 29is turned on.
33908_DVD29_ENG 18/07/07 16:43 Side 23

24 MP3, WINDOWS MEDIA AND JPEG PLAYBACK
MP3, Windows Media and JPEG Playback
MP3, Windows Media and JPEGPlaybackThe DVD 29 will recognize data from CD-ROMdiscs recorded in the MP3, Windows Media 8(WMA) or JPEG formats, including images storedon Kodak Picture CDs. You may also play discswith more than one of the three formats.
The Specific File Types That May be Playedon the DVD 29 Are:• MP3 Files: MP3 is a popular audio compres-
sion format that was developed by the MotionPicture Experts Group as part of the MPEG-1video compression format. Depending on thespecific MP3 encoder used, file size is greatlyreduced so that you store many more songs onone compact disc than in the standard audioCD format. MP3 is also used to downloadaudio files to computers for home use. Note,however, that in order to play an MP3 file onthe DVD 29, the disc may not contain anyencryption or coding that prevents playback.Always be certain that you have, or havepurchased, the proper rights or authorizationbefore creating a CD-ROM with MP3 or anyother codec format. Due to variations in thedifferent encoders and variations of the MP3codec and the different bit rates used to recordMP3 discs, the DVD 29 may not be able to playall discs with MP3 files. We cannot guaranteecomplete compatibility with MP3 discs, eventhough they may play on a computer. This isnormal and does not indicate a problem withthe DVD 29. Note, also, that when a multi-session disc with both standard CD audio andMP3 (or WMA) content is used, the DVD 29will only play the CD audio sections of the disc.
• WMA Files: WMA (Windows Media Audio) isan audio compression format developed by theMicrosoft® Corporation for use with itsWindows Media Player. WMA files may becreated with greater compression than MP3without sacrificing audio quality so that evenmore songs may be recorded on a disc. Notethat there have been a number of versions ofWindows Media, and the DVD 29 is compatibleonly with files that end in the “wma”extension and that were recorded using theWindows Media Series 8 encoding.
• JPEG Files: “JPEG” is the acronym used toidentify image files recorded according tospecifications established by JointPhotographic Experts Group for compressingstill images. Identified by the file extension“jpg” when they are recorded on most com-puters, JPEG files may be created by a digitalstill camera and then edited and “burned” to adisc in your personal computer, recorded on aCD-ROM disc from film images by a photoprocessor, or scanned from printed photos intoyour personal computer and then burned ontoa CD-ROM.
Discs containing MP3, WMA or JPEG files arenavigated and controlled differently fromstandard DVDs and CDs. When a disc containingone or more of these types of files is loaded inthe DVD 29, the Player Information menu screenwill appear.
This screen will display a list of the main folderscontained on the disc The elapsed time willappear in the upper right corner of the screen. Itisn’t possible to change the time display, and theTime Search function is not available.
MP3 or WMA Disc PlaybackMP3 and WMA discs may contain 200 tracks oreven more. To get the best overview about alltracks on the disc and their names and to selectthem comfortably, use the on-screen displayrather than the front-panel display. The front-panel display will only show the number and theelapsed time of the track being played for WMAfiles.
The supported bit rate for WMA files is between64k bits and 320k bits. The supported bit rate forMP3 files is between 32k bits and 320k bits.
• To select a folder (if any), press the KL Navigation Buttons 9 until thedesired folder name is high-lighted, then pressthe Enter Button 6.
• To select a track, press the KL NavigationButtons 9 until the desired track name ishighlighted. To start play of the track selectedon the list, press the Enter Button 6 orPlay Button 3G.
During MP3/WMA playback, some of thestandard CD/DVD playback controls operate intheir normal fashion:
• You may skip forward to the next track on thedisc by pressing the Skip/Next Button7F.
• You may skip back to the previous track on thedisc by pressing the Skip/Prev Button6E.
• Press the Pause Button 4C to momentarily stop playback. Press the PlayButton 3G to resume play. Press the StopButton 5I to enter stop mode.
• Press the Search Forward 7F or SearchReverse 6E buttons, for fast search of atrack. Press the Play 3G, Pause 4C orStop Button 5I to end fast play.
• Slow-play is not available during MP3/WMAplayback.
• You may play an MP3 or WMA disc in randommode like a normal CD. You may also accessthe Random function while an MP3 or WMAdisc is playing by pressing the RandomButton O.
• The Repeat function may be accessed duringplayback of an MP3 or WMA disc by pressingthe Repeat Button � on the remote.Repeatedly press the Repeat Button � toscroll through the options of Repeat 1 (repeatone file), Repeat All (repeat all files) or RepeatFolder (repeat all files within the currentfolder). The next press will turn the repeatfunction off. Repeat A-B is not available duringMP3/WMA playback.
NOTES ON MP3 AND WMA PLAYBACK• During playback, the front-panel display and
the time indicator on the screen above the listwill show the elapsed time of the track beingplayed. Other time display options are notavailable with MP3/WMA playback.
• The DVD 29 is only compatible with standardMP3- and WMA-encoded discs. Othercompressed audio formats used for Internetaudio downloads will not play on the DVD 29.
• Due to the differences in various versions ofthe MP3 and WMA formats, and the manydifferences between the CD-R machines usedto record discs on a computer, it is possiblethat some discs may not play on the DVD 29even though they will work on a computer. Thisis normal and does not indicate a fault withthe unit.
• When a multisession disc with both standardCD audio and MP3 or WMA content is in use,the DVD 29 will play only the CD audio sec-tions of the disc. Track numbers will be visiblein the display, but the files will not be decoded.
• If a disc containing MP3, WMA and/or JPEGfiles is created in more than one session, theDVD 29 may not recognize files added duringthe later sessions, especially if the disc wasfinalized after the first session.
33908_DVD29_ENG 18/07/07 16:43 Side 24

MP3, WINDOWS MEDIA AND JPEG PLAYBACK 25
ENG
LISH
MP3, Windows Media and JPEG Playback
• When a disc with multiple folders is playing,only tracks from one folder can be displayedand played at a time. Select the desired folderand press the Play Button 3G or Enter Button 6 to start the first track.To see and play tracks from other folders, youmust first select the root folder using theKL Navigation Buttons 9, and pressthe Enter Button 6 to open or close thatfolder. You may then navigate an open folderand select the desired folder. Press the EnterButton 6 to open the folder, and select thedesired track. Then press the Play Button3G.
• Only stereo audio playback is available for MP3and WMA discs.
• Programmed playlists are not available forMP3/ WMA discs.
• Use the KLM N Navigation Buttons 9to select the DISC INFO Submenu icon onthe left side of the screen, and press the EnterButton 6 to view it. If the disc contains ID3tag information, then the current MP3 trackinformation will appear: song title, artist,album, year, genre, and any comments. ForWMA and JPEG files, only the file name willappear.
JPEG PlaybackThe DVD 29 is capable of recognizing JPEG still-image files and displaying them. When a disc orfolder containing JPEG files is loaded, the JPEGDisc-Type Indicator A will light in the MainInformation Display �. The disc willimmediately begin displaying the images on thedisc in order.
When viewing JPEG images, the Angle Button4 may be used to rotate the image. With theimage on-screen, press the Angle Button 4once to display the current orientation of theimage, usually +0. Press the Angle Button 4again within one second to rotate the imageclockwise 90 degrees. The new orientation of+90 will be displayed. Each additional press ofthe Angle Button 4 will continue to rotatethe image clockwise by 90 degrees.
You may use the Zoom Button M to enlargea JPEG image, and the KLM N NavigationButtons 9 to explore the enlarged image.
You may view thumbnails of the images in theselected folder by pressing the Disc MenuButton B. When the images appear onscreen, you may use the KLM N NavigationButtons 9 to move the picture frame arounduntil the desired image is selected. Press theEnter Button 6 to display a full-size view ofthat image.
33908_DVD29_ENG 18/07/07 16:43 Side 25

26 TROUBLESHOOTING GUIDE
Troubleshooting Guide
TroubleShooting GuideSymptom Possible Cause Solution
Unit does not turn on • No AC power • Check AC power plug and make certain any switchedoutlet is turned on.
Disc does not play • Disc loaded improperly • Load disc label-side up; align the disc with the guides and place it in its proper position.
• Incorrect disc type• Check to see that disc is CD, CD-R, CD-RW, DivX, VCD, MP3, WMA,
JPEG, DVD-R, DVD-RW, DVD+R, DVD+RW (standard conforming),DVD-Audio or DVD-Video; other types will not play.
• Invalid Region Code• Use Region 2 or Open Region (0) disc only.• Rating is above parental preset• Enter password to override or change rating settings.
No picture • Intermittent connections • Check all video connections.• Wrong input • Check input selection of TV or receiver.• Progressive Scan output selected • Use Progressive Scan mode only with compatible TV. If needed, press
the Progressive Scan/Interlaced Button L to toggle to the correct mode.
• Video Off feature active • Press Video Off Button Q to reactivate video circuitry (see page 23)• HDMI Output � is connected to a • The HDMI Output � may not be used with video displays that are not
video display that is not HDCP-compliant HDCP-compliant. Unplug the cable and select another audio and video connection (see pages 11 through 12).
No sound • Intermittent connections • Check all audio connections.• Incorrect digital audio selection • Check digital audio settings.• DVD disc is in fast or slow mode • There is no audio playback on DVD discs during fast or slow modes.• Surround receiver not compatible • Use analog audio outputs.
with 96kHz PCM audio• DVD Audio disc is loaded without • Use 6-Channel Audio Outputs or Analog Audio Outputs �.
using analog audio connection
Picture is distorted or jumps during • MPEG-2 decoding • It is a normal artifact of DVD playback for pictures to jump or show fast forward or reverse play some distortion during rapid play.
Some remote buttons do not operate • Function not permitted at this time • With most discs, some functions are not permitted at certain during DVD play; prohibited symbol times (e.g., Track Skip) or at all (e.g., direct audio track selection).appears (see below)
The OSD menu is in a foreign language • Incorrect OSD language • Change the display language selection.
The symbol appears • Requested function not available at • Certain functions may be disabled by the DVD itself during this time passages of a disc.
Picture is displayed in the • Incorrect match of aspect ratio settings • Change aspect ratio settings.wrong aspect ratio to disc
Remote control inoperative • Weak batteries • Change both batteries.• Sensor is blocked • Clear path to sensor or use optional outboard remote sensor.
Disc will not copy to VCR • Copy protection • Many DVDs are encoded with copy protection to prevent copying to VCR.
Password not accepted • Incorrect password being used or • Stop play of disc. Press and hold the Clear Button � until the displaypassword has been forgotten blinks. This resets the password and all settings to their defaults.
33908_DVD29_ENG 18/07/07 16:43 Side 26

TECHNICAL SPECIFICATIONS 27
ENG
LISH
Technical Specifications
Applicable Disc: Disc formats: 5 inch (12 cm) or 3 inch (8 cm) DVD Video, DVD-Audio, Standard conforming DVD+RW, DVD+R, DVD-R,DVD-RW, DivX, VCD, CD, CD-R, MP3, WMA, JPEG or CD-RW discs,Regio code: DVD Movie disc with Code 2 or 0 only.DVD-Layers: Single Side/Single Layer, Single Side/Dual Layer, Dual Side/Single Layer, Dual Side/Dual LayerAudio formats: DVD-Audio MLP lossless, Linear PCM, MPEG, Windows Media® 9,Dolby Digital or DTS Audio discsStill-image format: JPEG
Video Signal System: PAL /NTSC
HDMI™ Output: Video: 576p, 720p, 1080iHDMI Version 1.0-compliantHDCP Version 1.1-compliant
Composite Video Output: 1 Vp-p/75 Ohms, sync negative polarity
S Video Output: Y/Luminance: 1 Vp-p/75 Ohms, sync negative polarityC/Chrominance: 0.286 Vp-p
Component Video Output: Y: 1 Vp-p/75 Ohms, sync negative polarity
Cr: 0.7 Vp-p/75 Ohms
Cb: 0.7 Vp-p/75 Ohms
Analog Audio Output: 2 Vrms max
Frequency Response: DVD (Linear PCM): 2Hz - 22kHz (48kHz sampling)2Hz - 44kHz (96kHz sampling)
CD: 2Hz - 20kHz
Signal/Noise Ratio (SNR): 105 dB (A-weighted)
Dynamic Range: DVD: 100dB (18 Bit) / 105dB (20 Bit)CD/DVD: 96dB (16 Bit)
THD/1kHz: DVD/CD: 0.0025 %
Wow & Flutter: Below Measurable Limits
AC Power: 100 - 240 V/50 ~ 60 Hz
Power Consumption: 1 Watts (Standby) /13 Watts (Max)
Dimensions (WxHxD): 440 x 50 x 285 mm
Weight: 4.0 kg
Depth measurement includes knobs and connectors.
Height measurement includes feet and chassis.
All specifications subject to change without notice.
Harman Kardon and Harman International are registered trademarks of Harman International Industries, Incorporated.Manufactured under license from Dolby Laboratories. Dolby, Dolby Digital, ProLogic and the double-D symbol are trademarks of Dolby Laboratories. Confidential.Unpublished Work. © 1992-1997 Dolby Laboratories, Inc. All rights reserved.Manufactured under license under U.S. Patent #: 5,451,942 & other U.S. and worldwide patents issued & pending.DTS and DTS Digital Out are registered trademarks and the DTS logos and Symbol are trademarks of DTS, Inc. © 1996-2007 DTS, Inc. All Rights Reserved.Microsoft, Windows and WMA are either registered trademarks or trademarks of Microsoft Corporation in the United States and/or other countries.HDMI, the HDMI logo and High-Definition Multimedia Interface are trademarks or registered trademarks of HDMI Licensing LLC.
DivX, DivX Certified, and associated logos are trademarks of DivX Networks, Inc and are used under license.
This product incorporates copyright protection technology that is protected by method claims of certain U.S. patents and other intellectual property rightsowned by Macrovision Corporation and other rights owners. Use of this copyright protection technology must be authorized by Macrovision Corporation andis intended for home and other limited viewing uses only unless otherwise authorized by Macrovision Corporation. Reverse engineering or diassembly is prohibited.
33908_DVD29_ENG 18/07/07 16:43 Side 27

250 Crossways Park Drive, Woodbury, New York 11797www.harmankardon.comHarman Consumer Group, Inc.:2, Route de Tours, 72500 Château-du-Loir, France© 2007 Harman Kardon, Incorporated Partnumber: CQX1A1294Z
33908_DVD29_ENG 18/07/07 16:43 Side 28