drawing professionally · 6.good quality drawing paper, 18 x 24 in. 7.good quality drawing paper, 9...
TRANSCRIPT

Created June 2018 *Please note that this is a copy and therefore has not been updated since its creation date. If you find a link issue or typo here, please check the actual course before bringing it to our attention. Thank you.*
Drawing Professionally
Please review the FAQs and contact us if you find a problem
Credits: 1-2 (This course is set up to be done at your own pace, not in a certain number of days. It is recommended you spend at least an hour a day drawing. Some assignments can be done in minutes, some will take weeks.)
Prerequisite: Students should have some drawing experience before beginning this course, but do not need to have taken any art lessons before.
Recommended: Ages 10 – adult, for people who are passionate about art
Course Description: This couse is divided into two parts. Part 1 teaches drawing with pencil. Part 2 teaches drawing with other mediums. Part 1 is a foundational drawing course in which students will draw still lifes, landscapes, interior spaces, portraits, and clothed figures and will learn some basic perspective and anatomy. In Part 2, students will draw with charcoal, pastel, colored pencil, and conte crayon and will also learn basic calligraphy. Students will learn many different techniques and will be encouraged to develop their own techniques and methods, and to be creative and mix different media to create the effects they desire.
Students will post their completed artwork to EP’s Drawing Professionally flickr group and offerconstructive comments to the other artists. This site allows for discussion, which is not fully moderated. Please only submit artwork to Flickr that is for this course.
Notes: Students will work at their own pace, so the course is divided into lessons instead of days. This course is divided into two parts. Part 1 teaches drawing with pencil. Part 2 teaches drawing with other mediums. There are 170 lessons altogether. You don’t need to finish the whole course in one year. At the beginning of the course you should complete the lessons in the order that they are listed, but as you progress farther along, feel free to skip around between different parts of the course if you want to. This course is for students who are passionate about art and will put a lot of time into it.
This course was created in its entirety by my daughter. Here is a link to her website: https://rebeccagilesart.wixsite.com/rebeccagilesart. This course is unlike other EP courses in that it does require the purchase of materials that can cost a lot of money. You don’t need it all to begin the course.
Materials List
For Part 1:
1.graphite pencils – HB, 2B, 4B, 6B, 8B2.a vinyl eraser3.a kneaded eraser4.ordinary printer paper5.sketch paper, 18 x 24 in.
Allinonehighschool.com

6.good quality drawing paper, 18 x 24 in.7.good quality drawing paper, 9 x 12 in.8.a pencil sharpener9.a razor blade or X-Acto knife10.a ruler11.paper towels or tissues or napkins12.a chamois13.a sketchbook14.a drawing board big enough to hold an 18 x 24 sheet of paper15.tortillons
For Part 2:
1.good quality drawing paper2.good quality watercolor paper3.good quality colored pencils4.good quality chalk pastels5.pastel pencils6.vine charcoal7.charcoal pencils8.compressed charcoal9.conte crayons10.calligraphy paper11.a calligraphy pen, and ink12.fixative
Part 1 – Drawing with Pencil
Lesson 1
1.Practice drawing circles, squares, and triangles until you can draw these shapes quicklyand easily. You can draw shapes on top of each other. Use a HB or a 2B pencil. Draw quickly and freely – don’t worry about making mistakes!2.Here’s an example.
Lesson 2
1.Read how to sharpen a pencil with a knife. Watch the video if you want to.2.Carefully practice sharpening a pencil using a razor blade or X-Acto knife.3.With a HB or 2B pencil, practice drawing spheres, cones, cylinders, and cubes. Use a large, blank piece of paper. Always keep your pencil sharp.4.To create the illusion of depth, add some shading. Draw a copy of the shading chart in the corner of my example page, and then shade the shapes you drew.
Allinonehighschool.com

Lesson 3
1.For five minutes, draw circles, squares, and triangles with a HB pencil. You can use ordinary printer paper for this. Sketch quickly and don’t worry about making mistakes. This is just to train your hand.2.For five minutes, move your pencil around in circles on a piece of 18 x 24 sketch paper without taking the pencil off the paper. Fill the whole paper.3.This is what the paper should look like when you are done.
•4.On ordinary printer paper, draw copies of at least three of the drawings below.
•one•two•three•four
Allinonehighschool.com

•five5.Post your drawing to EP’s drawing flickr group when you’re finished. You can make constructive comments on other people’s artwork. Tell what you think is good about the drawing and give a suggestion for improving it.6.Whenever you post a drawing to EP’s drawing flickr group, give the drawing a description. Tell what lesson you are on and whether you are on Part 1 or Part 2. Tell whether you copied your drawing from another drawing, copied it from a photograph, or drew it from life. Tell whether you traced anything in your drawing or whether you drew it freehand, and give an estimate of how long it took you to complete the drawing.7.You can ask questions on EP’s drawing flickr group and answer other people’s questions. Only post drawings that have been assigned in the course and that I ask you toshare.
Lesson 4
1.On ordinary printer paper, draw circles, squares, and triangles with a HB or 2B pencil for five minutes. Draw them as quickly as you can. You can draw them on top of each other.2.Read about line.3.Draw copies of at least seven of the pencil drawings below. Pay attention to how thick or thin and how dark or light the lines are and try to copy them as accurately as you can. You can draw on ordinary printer paper. Post your drawings to EP’s drawing flickr group when you’re finished. You can make constructive comments on other’s artwork. Tell what you think is good about the other person’s drawing and give a suggestion for improving it.
•one•two•three•four•five•six•seven•eight•nine•ten
Lesson 5
1.Watch this video about ways to hold a pencil. A charcoal pencil is being used for this demonstration, but you can still learn from it. Don’t click on the videos around it – just watch what you’re supposed to.2.Find a mug and set it on a table in front of you in a room that has plenty of light. Draw a picture of the mug on a piece of ordinary printer paper. Do not shade your drawing. If you mug has any writing, pictures or decoration on it, don’t draw that.3.Put the paper on your drawing board instead of directly on the tabletop. Hold the drawing board on your lap and lean it up against the table, like this, so that you are not drawing on a horizontal surface. If your paper is flat on the tabletop, it won’t be directly facing your eyes – you will be looking at it from an angle. You should tilt your drawing board so that you are looking at the paper straight on.
Allinonehighschool.com

4.Now, watch this video on how to measure with your pencil.5.Find a plain, simple bottle or vase or ceramic pot in your house. Set it on a table in front of you and draw a picture of it on a second piece of paper. This time, use what you’ve learned from the video to help you make a more accurate drawing. Hold your pencil out at arm’s length and measure the height of the object compared to it’s width, then check your drawing to make sure it has those same proportions. This won’t work if you don’t hold your pencil out at arm’s length every time.6.Post your drawings to EP’s drawing flickr group when you’re finished.
Lesson 6
1.Practice drawing circles for five minutes.2.Watch this video on how to draw a still life accurately, part 1.3.Watch this video on how to draw a still life accurately, part 2.4.Print out this painting (black and white is fine). Tape it to your drawing board, and tape another piece of printer paper right next to it or right below it. Make sure the two sheets of paper are perfectly aligned. You just need to tape down the four corners of each sheet.5.On the blank sheet of paper, carefully draw the outlines of the objects in this painting. Use what you learned from the two videos above to draw as accurately as you can. Measure with your pencil, and try to make the objects in your drawing exactly the same size as they are in the painting that you are copying. Do not shade your drawing. Sit in front of a table, and hold the drawing board on your lap and lean it up against the table.6.Post your drawing to EP’s drawing flickr group when you’re finished.
Lesson 7
1.Read about still lifes.2.Set up three objects on the table in front of you. Choose objects that are simple and freeof decoration.3.Tape or clip a piece of 18 x 12 in. sketch paper onto your drawing board. Draw the still life using a HB pencil. Draw as accurately as possible. Stop frequently to measure with your pencil and check the proportions in your drawing. Don’t shade your drawing.4.You can lean your drawing board up against the table, or you can put your feet up on a stool so that your knees are high and then lean your drawing board against your knees.5.Are there any diagonal lines in your still life? You can use your pencil to check the accuracy of diagonal lines that you have drawn. Hold out your pencil at arm’s length towards the diagonal line that you see in your setup. Turn the pencil slightly to the side until it lines up perfectly with the angle in your setup, and then carefully set your pencil against the line that you drew to see whether they are both at the same angle.6.Post your drawing to EP’s drawing flickr group when you’re finished.
Lesson 8
1.Read the definition of perspective.2.Read about one-point perspective and follow the directions. Use a sharp HB pencil on apiece of ordinary printer paper. Use a ruler to draw straight lines. Don’t press down too hard with your pencil – if your lines are dark, they will be hard to erase.3.Read some more about one-point perspective. Copy the examples if you want to.4.Watch this video.5.Here are some pictures showing one-point perspective. Choose one of them and copy
Allinonehighschool.com

it. one two three four
Lesson 9
1.Read about two-point perspective and follow the directions.2.Read some more about two-point perspective. Copy the example.3.Watch this video.4.Here are some pictures showing two-point perspective. Choose one of them and copy it. Post your drawing to EP’s drawing flickr group.
•one•two•three•four•five
Lesson 10
1.Pencils are graded in a decreasing scale from 9H (the hardest one) to H, and in an increasing scale from B to 9B (the softest one). HB is the medium grade. It is not too hard or too soft. Pencils with hard leads draw light, clean, even lines, and soft leads are darker and crumble more.2.You can make dark tones in a drawing by using a pencil with a softer lead, by pressing the paper harder with your pencil, or by drawing close lines on top of each other (cross-hatching).3.You can blend pencil strokes together by smudging them with your finger, a tortillon, a paper towel or napkin, or a chamois. If you use your finger for blending, make sure it is very clean and dry, not oily.4.Read about shading techniques.5.Read about shading and make the shading guide (on drawing paper).6.Read about blending and blend your shading guide.7.On the sheet of paper that has your shading guide, experiment with different pencils and different shading techniques. Try using different things to blend your pencil strokes.
Lesson 11
1.Look at these drawings of spheres.•one•two•three•four•five
2.The lightest part on the sphere is called the highlight. The highlight is actually a reflection of the light that is shining on the sphere.3.The part of the sphere that is between the darkest part and the lightest part is called the middletone.4.The darkest part on the sphere is called the core shadow.5.The shadow that the sphere makes on the tabletop is called the cast shadow.6.Light reflects off the table and onto the bottom of the sphere. This light is called reflected light.7.Some of the reflected light on the sphere reflects back off the sphere into the cast
Allinonehighschool.com

shadow. This is called double-reflected light.
•8.Print out the first of the five drawings of spheres that you saw above. Carefully draw a copy of it, being as accurate as you can. Don’t trace the circle. Draw it yourself. Make sure your pencil is sharp, and don’t press down too hard with it. To draw the circle, I suggest that you begin by lightly and quickly drawing circles over and over again on top of each other without lifting your pencil off the paper. Then, carefully draw an even round circle on top of that, and then erase the unnecessary lines.9.Post your drawing to EP’s drawing flickr group when you’re finished. You can make constructive comments on other’s artwork. Tell what you think is good about the drawing and tell any suggestion for improving it.10.Look for the highlight, middletone, core shadow, reflected light, cast shadow, and double-reflected light in this photograph.11.Look at this drawing.
Lesson 12
1.Find a cylinder, a cube, a sphere, and a cone. You can twist a piece of paper into a cone and tape it in place. Tape the bottom of the sphere to the table so it doesn’t roll away. Set these shapes up on a table a little below your eye level. Make sure there is enough light in the room.2.With a HB pencil, draw your setup on a sheet of 18 x 24 drawing paper. Draw the outlines of the cast shadows too. Don’t make the drawing too small; it should fill the paper.3.Take great care to make your drawing as accurate as possible. Check for correct perspective. Use your pencil to measure the proportions and to check angles.4.Shade your drawing. Use straight lines when shading flat things, like the cube and the tabletop. Use curved lines when shading round things, like the sphere and the cone.5.When you’re finished, post your drawing to EP’s drawing flickr group. You can make constructive comments on other’s artwork. Tell what you think is good about the drawing and tell any suggestion for improving it.6.Here’s an example.
Allinonehighschool.com
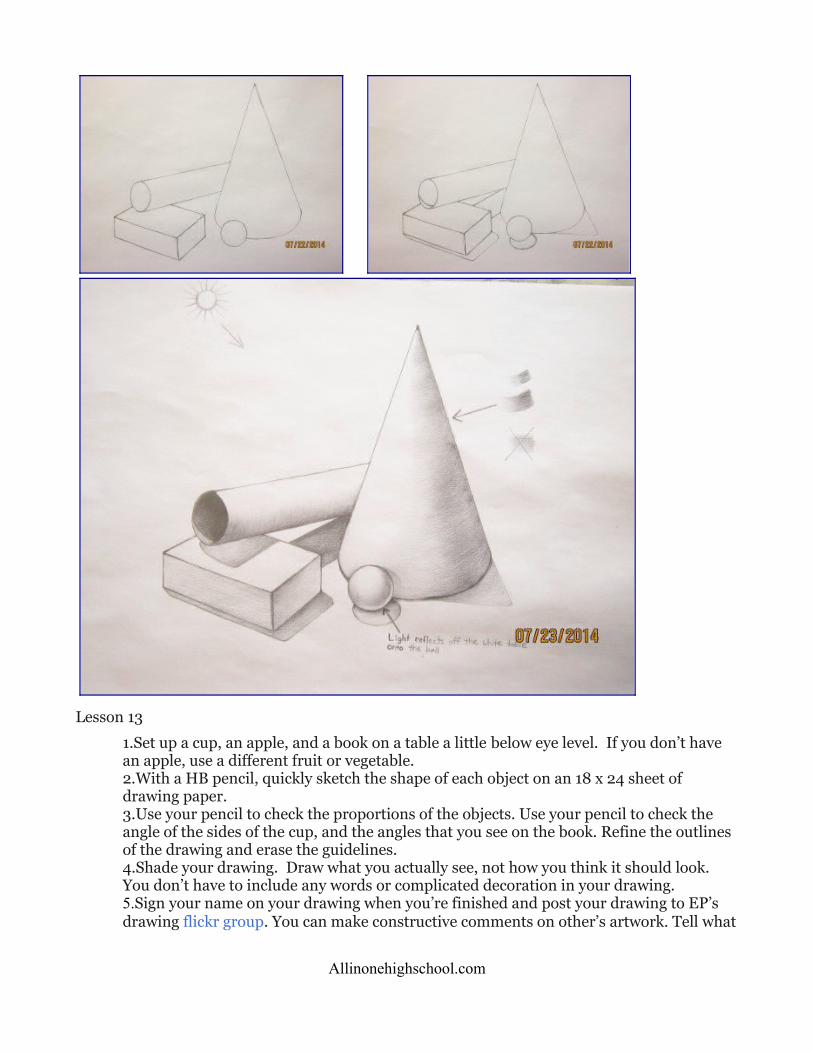
Lesson 13
1.Set up a cup, an apple, and a book on a table a little below eye level. If you don’t have an apple, use a different fruit or vegetable.2.With a HB pencil, quickly sketch the shape of each object on an 18 x 24 sheet of drawing paper.3.Use your pencil to check the proportions of the objects. Use your pencil to check the angle of the sides of the cup, and the angles that you see on the book. Refine the outlines of the drawing and erase the guidelines.4.Shade your drawing. Draw what you actually see, not how you think it should look. You don’t have to include any words or complicated decoration in your drawing.5.Sign your name on your drawing when you’re finished and post your drawing to EP’s drawing flickr group. You can make constructive comments on other’s artwork. Tell what
Allinonehighschool.com

you think is good about the drawing and tell any suggestion for improving it.6.Here’s an example.
Lesson 14
1.Find two small boxes and set them on top of each other on a table just below eye level. If you can’t find boxes, use thick books or building blocks or bricks instead.2.Draw them on an 18 x 24 sheet of drawing paper, using a HB pencil. As you draw, constantly stop and use your pencil to check the proportions and the angles. Check for correct perspective. Take great care to draw as accurately as possible.3.In order to help you draw more accurately, you may want to draw the boxes at first as ifthe sides were transparent, so that you can see the inside of the boxes, and then afterwards erase what you can’t actually see.4.Shade the boxes using straight lines. Don’t blend your pencil strokes together. When you’re finished, sign your name on your drawing and post your drawing to EP’s drawing flickr group. You can make constructive comments on other’s artwork. Tell whatyou think is good about the drawing and tell any suggestion for improving it.5.Here’s an example.
Allinonehighschool.com

Lesson 15
1.Read the definition of foreshorten.2.Here are some examples of foreshortening. Draw copies of some of them if you want to.
• one• two• three• four• five
3.An ellipse is a circle that is viewed at an angle. When you look across the face of a circle, it is foreshortened, and you see an ellipse.4.Here are some examples of ellipses that you can copy if you want to.
•one•two•three•four•five
5.Read about drawing ellipses.6.Look at these drawings. Choose one of them and draw a copy of it. Post your drawing to EP’s drawing flickr group. You can always cut your drawing paper to make it whatever size you want.
•one•two•three•four•five
7.Quickly sketch some objects in your house. Use a sharp HB pencil on a sheet of 18 x 24 sketch paper.8.Here are some examples.
Allinonehighschool.com

Lesson 16
1.Find some objects that have a variety of different shapes and arrange them on a table a little below eye level.2.Draw them quickly without looking at your paper. Use an 18 x 24 sheet of sketch paper.3.Get out a piece of 18 x 24 drawing paper. You can look at your paper while you draw this time. Quickly sketch the outlines of the objects, and then check with your pencil to make sure the proportions and angles in your drawing are correct.4.Refine the drawing and erase the guidelines. Strive to make your drawing as accurate as possible.5.You don’t need to shade your drawing.6.Sign your name on your drawing when you’re finished, and post it to EP’s drawing flickr group. You can make constructive comments on other’s artwork. Tell whatyou think is good about the drawing and tell any suggestion for improving it.
Lesson 17
1.Try drawing the outline of your hand without looking at the paper.2.Sketch some objects in your house without looking at the paper while you draw.3.Study an object for a few minutes. Hold the image in your memory and try to sketch it with your eyes closed.4.Read this article, and then draw a still life. Set up an object or group of objects in your house and draw your setup. Check your drawing carefully for accuracy.5.Shade your drawing. Use pencils with hard leads like H and HB for shading light areas and soft 2B and 3B leads for darker areas. You can build darkness by shading in layers. The more layers you apply, the darker the area becomes.6.Sign your drawing when you’re finished.7.Post your drawing to EP’s drawing flickr group when you’re finished. You can make constructive comments on other’s artwork. Tell what you think is good about the drawing and tell any suggestion for improving it.
Lesson 18
1.Read this article and this article.2.Look at these five drawings.
•one•two•three•four
Allinonehighschool.com

•five3.Find a smooth metal or glass object and draw a picture of it. Shade your drawing.4.Post your drawing to EP’s drawing flickr group when you’re finished. You can make constructive comments on other’s artwork. Tell what you think is good about the drawing and tell any suggestion for improving it.
Lesson 19
1.Read this and follow the directions.2.Look at all of the ten drawings below. Choose two of them and draw copies of them.3.Post your drawing to EP’s drawing flickr group when you’re finished. You can make constructive comments on other’s artwork. Tell what you think is good about the drawing and tell any suggestion for improving it.
1.one2.two3.three4.four5.five6.six7.seven8.eight9.nine10.ten
Lesson 20
1.Draw a copy of one of these landscapes.1.one2.two3.three
2.Look at these artworks. Choose one and draw a picture of it.3.Post your drawings to EP’s drawing flickr group when you’re finished. You can make constructive comments on other’s artwork. Tell what you think is good about the drawing and tell any suggestion for improving it.4.You should carry a sketchbook with you and draw landscapes when you go outside.5.Read this.6.Read about keeping a sketchbook.7.Look through the gallery on Stephen Wiltshire’s website. He is famous for his detailed panoramic cityscapes. He has autism. He began to sell his artwork when he was 7 years old, and at age 8 he was commissioned by the British Prime Minister to create a drawing of Salisbury Cathedral.
Lesson 21
1.Throw a sheet or tablecloth over a chair and draw it. Keep checking to make sure your drawing is accurate. Shade your drawing.2.Post your drawing to EP’s drawing flickr group when you’re finished. You can make constructive comments on other’s artwork. Tell what you think is good about the drawing and tell any suggestion for improving it.3.Look through Kehinde Wiley’s website. Read about the artist and his work, and look
Allinonehighschool.com

through the images.
Lesson 22
1.Look out a window and draw what you see. Use a HB pencil on 18 x 24 drawing paper. Keep checking for correct angles and correct proportions. Check the perspective. Do not shade your drawing.2.Don’t forget to sign your drawing when you’re finished.3.Post your drawing to EP’s drawing flickr group when you’re finished. You can make constructive comments on other’s artwork. Tell what you think is good about the drawing and tell any suggestion for improving it.4.Look at these drawings.
•one•two•three•four•five
5.Read about keeping a sketchbook.6.Read about artist Nick Cave and watch the video. Nick Cave is famous for his “Soundsuits”, which are sculptures that can be worn.
Lesson 23
1.Draw a picture of one of the paintings below. You don’t need to shade the drawing.2.Post your drawing to EP’s drawing flickr group when you’re finished. You can make constructive comments on other’s artwork. Tell what you think is good about the drawing and tell any suggestion for improving it.
1.one2.two3.three4.four5.five
Lesson 24
1.Read about how to set up a still life for drawing.2.Set up a still life and draw it. Strive to get your drawing as accurate as possible. Use whatever size drawing paper you want to. You can shade your drawing or not; whichever you prefer.3.Post your drawing to EP’s drawing flickr group when you’re finished. You can make constructive comments on other’s artwork. Tell what you think is good about the drawing and tell any suggestion for improving it.4.Look at this still life drawing.5.Look at the still life drawings below. You can draw copies of some of them if you want to.
1.one2.two3.three4.four5.five
Allinonehighschool.com
6.six7.seven8.eight9.nine10.ten
Lesson 25
1.Copy this photo as accurately as you can. Don’t trace anything.2.Post your drawing to EP’s drawing flickr group when you’re finished. You can make constructive comments on other’s artwork. Tell what you think is good about the drawing and tell any suggestion for improving it.3.Look through this gallery of work by Mary Cassatt. She was an American painter and printmaker who lived from 1844-1926. She is famous for her paintings of mothers and children.
Lesson 26
1.Find an object that is just one color, and set it on a table where light is shining on it.2.Draw the outline of the object, and then look for the darkest areas on the object.3.Draw outlines of the darkest areas, and then look for the lightest areas on the object. Draw outlines of the lightest areas.4.Now you have drawn lines to separate the darkest areas, the lightest areas, and the middletones. Fill in the darkest areas with a dark tone. Fill in the middletones with a lighter tone, and leave the lightest areas white. You are simplifying this drawing by shading it using only two even tones – a dark gray and a light gray – with no gradation ortransitions.5.Post your drawing to EP’s drawing flickr group.
Lesson 27
1.Using a pencil with a soft lead, draw sketches of three of the paintings below showing the dark and light areas. Don’t draw outlines of the objects in the paintings, just show the dark and light areas. Draw these sketches in your sketchbook.
•one•two•three•four•five•six•seven
2.Here’s an example. This is the painting I sketched.
Allinonehighschool.com
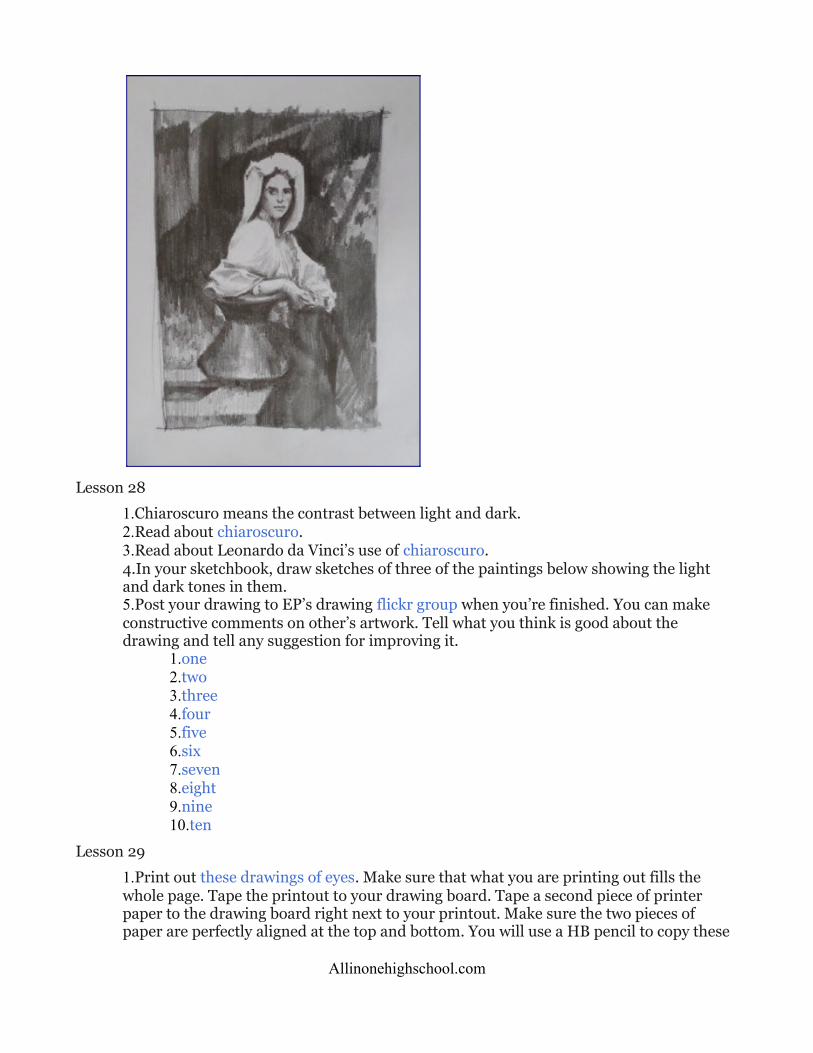
Lesson 28
1.Chiaroscuro means the contrast between light and dark.2.Read about chiaroscuro.3.Read about Leonardo da Vinci’s use of chiaroscuro.4.In your sketchbook, draw sketches of three of the paintings below showing the light and dark tones in them.5.Post your drawing to EP’s drawing flickr group when you’re finished. You can make constructive comments on other’s artwork. Tell what you think is good about the drawing and tell any suggestion for improving it.
1.one2.two3.three4.four5.five6.six7.seven8.eight9.nine10.ten
Lesson 29
1.Print out these drawings of eyes. Make sure that what you are printing out fills the whole page. Tape the printout to your drawing board. Tape a second piece of printer paper to the drawing board right next to your printout. Make sure the two pieces of paper are perfectly aligned at the top and bottom. You will use a HB pencil to copy these
Allinonehighschool.com

drawings of eyes as accurately as possible.2.You may find it helpful to have the two sheets of paper overlap so you can have your drawing be as near as possible to the drawing that you are copying. Make sure that your drawing board is not laying flat against the tabletop – you should sit with the board tiltedup towards your eyes.3.This is called Bargue drawing. These drawings of eyes are part of a famous drawing course that was created in the 1800s by a French artist named Charles Bargue.4.Your drawings should be exactly the same size as the originals. Follow these steps as you copy each eye:
1.There is a horizontal and a vertical line drawn on top of each eye. These are reference points that you will take all your measurements from to check the accuracy of your drawings. Begin by drawing those two lines.2.On top of the cross that you drew, loosely and lightly sketch the general shapes and lines of the eye.3.Use your pencil to carefully measure every part of your sketch and check for mistakes. Expect to find lots of mistakes – mistakes are part of the learning process and should not be viewed as failure. If you’re not making mistakes, you’re not learning anything! Correct every mistake that you can spot and refine your drawing and erase any unnecessary lines. Every line in your drawing should be at exactly the same length and angle as it is in the original.
5.Bargue drawing requires a lot of patience. Do not move on to the next eye until you are unable to find any mistakes in the last eye that you drew. If you don’t strive for accuracy, you’re missing the point of this practice. Try to draw the lines with the same thickness as the lines you see in the printout.6.As you draw, try not to think of them as eyes. Instead, try to think of them as abstract shapes and lines. Turn your board upside down occasionally and draw an eye upside down. This will give you a fresh perspective and help you to see the shapes more abstractly instead of thinking of them as eyes. You should frequently stop and set your drawing board against a wall and step back and look at your drawings from a distance. This can help you get a fresh perspective and notice mistakes that you might not have noticed up close.7.When you’re finished copying the whole page, take a photo of your drawing board with both pieces of paper on it. Post the photo to EP’s drawing flickr group so that others can compare your copies to the originals and check how accurate your drawings are. You can check others’ drawings too and leave comments on their work.
Lesson 30
1.We will do some more Bargue drawing today. Print out these drawings of earsand copy them in the same way that you copied the eyes in Lesson 29. This time, don’t draw on printer paper. Instead, measure and cut a piece of good drawing paper so that it is exactly the same size as your printout. You can use a 2B pencil for shading.2.When you’re finished copying the whole page, take a photo of your drawing board with both pieces of paper on it. Post the photo to EP’s drawing flickr group so that others can compare your copies to the originals and check how accurate your drawings are. You can check others’ drawings too and leave comments on their work.
Lesson 31
1.We are progressing to slightly more complicated Bargue drawing today. Print out these
Allinonehighschool.com
drawings of faces in profile and copy them as accurately as possible in the same way that you copied the other pages of Bargue drawings. Draw on good drawing paper, and use a 2B pencil. Don’t press down too hard, because you need to be able to erase a lot.2.When you’re finished copying the whole page, take a photo of your drawing board with both pieces of paper on it. Post the photo to EP’s drawing flickr group so that others can compare your copies to the originals and check how accurate your drawings are. Leave a comment under your photo telling us what you think of Bargue drawing and how your experience doing it has been. Is it easy? hard? helpful?3.You can check others’ drawings too and leave comments on their work.
Lesson 32
1.Look at these sculptures. Choose one and draw a picture of it.2.If you have any sculptures in your house, draw them.3.Find a plain white smooth object such as an egg or a ceramic jug. Set it on the table in front of you and light it from one side with a single strong light source, such as a desk lamp. Draw the outlines of the object with a HB pencil on good drawing paper. Review Lesson 11 with the drawing of the sphere, and then carefully shade your drawing using whatever pencils you think would work best. As you draw, squint at the object so that you can more easily see the masses of light and dark.4.Post your drawings to EP’s drawing flickr group when you’re finished. You can make constructive comments on other’s artwork. Tell what you think is good about the drawing and tell any suggestion for improving it.
Lesson 33
1.Crumple up a piece of white paper and put it on a table in front of you.2.Draw a picture of it on a sheet of 9 x 12 drawing paper. It will be easier if you shine a bright light on the crumpled paper from one side. Keep measuring with your pencil to make the drawing as accurately as possible. Think of the crumpled-up paper as a group of abstract shapes put together.3.Shade your drawing carefully. Squint at the crumpled-up paper so that you don’t notice the details and all you see are the masses of light and dark. This will help you judge the tones more accurately. Strive to make the tones in your drawing match the tones you actually see on the paper.4.Don’t draw dark outlines if you don’t actually see them around the object you are drawing.5.Post your drawing to EP’s drawing flickr group when you’re finished. You can make constructive comments on other’s artwork. Tell what you think is good about the drawing and tell any suggestion for improving it.
Lesson 34
1.Put an object in a piece of aluminum foil or in a metal pot or pan.2.On a sheet of 9 x 12 drawing paper, draw the outlines of what you see in the setup. Carefully draw the outline of every single reflection that you see. Instead of thinking about what the objects in your setup are, just think of your setup as a group of abstract shapes, and try to copy every little shape exactly as you see it. Thinking this way will end up making your drawing much more realistic.3.Shade your drawing carefully. Squint at the setup so that all you see are masses of light and dark. This will help you judge the shapes and tones more accurately.
Allinonehighschool.com

4.Post your drawing to EP’s drawing flickr group when you’re finished. You can make constructive comments on other’s artwork. Tell what you think is good about the drawing and tell any suggestion for improving it.5.Look at this drawing.
Lesson 35
1.Pour a glass of water and set it on a table where light is shining on it.2.On a sheet of 9 x 12 drawing paper, draw the glass and water and use your pencil to check the proportions. Draw the outline of every single reflection that you see. Don’t think of what you are drawing as being glass and water – with all of its reflections, think of it as being abstract shapes.3.Shade your drawing carefully. Squint at the setup so that you can’t see the details and all you see are masses of light and dark. This will help you judge the shapes and tones more accurately.4.Post your drawing to EP’s drawing flickr group when you’re finished. You can make constructive comments on other’s artwork. Tell what you think is good about the drawing and tell any suggestion for improving it.5.Look at this drawing and this drawing.
Lesson 36
1.Read about how to make a viewfinder. The rectangular hole in a viewfinder represents your paper. You can use a viewfinder by holding it up in front of the scene that you are drawing a picture of and looking through the hole to see what will be on your paper, how much of the scene will be included in your drawing.2.Make your own viewfinder. Use a piece of thin smooth cardboard from a cereal box, or use a piece of thick cardstock. Use a ruler and marker to measure a rectangle in the center of the viewfinder that has the same proportions as an 18 x 24 sheet of drawing paper, so that the rectangle represents the shape of your paper. Use a razor blade or X-Acto knife to carefully cut the rectangle out.3.This is my own viewfinder:
Allinonehighschool.com

•4.Look at these five drawings of interior spaces.
•one•two•three•four•five
5.Now you will draw an interior space. Use an 18 x 24 sheet of drawing paper and a HB pencil and a ruler. Choose an area in your house (or another building) to draw, and sit down with your drawing board tilted up towards your eyes. (Or, if you have an easel that you can stand at, put your drawing board on the easel and stand up to draw.)6.Before you begin drawing, hold out your viewfinder and look through it to decide what will be included in your drawing. Then draw everything that you see in the viewfinder. Your drawing should fill the whole sheet of paper and go all the way to the edges. Make sure that you hold out your viewfinder in the same place and at the same distance from your face each time that you look through it.7.You can use a ruler to draw straight lines. Use what you learned about one-point perspective and two-point perspective to help you make a more realistic drawing. Keep using your pencil to check the proportions of objects in relationship to one another and to check angles.8.Don’t shade your drawing. Post your drawing to EP’s drawing flickr group when you’re finished.
Lesson 37
1.Look at all of these drawings of interior spaces.•one•two•three
Allinonehighschool.com
•four•five•six•seven•eight This drawing was done with charcoal.
2.Draw another interior space in your home or another building, like what you drew for Lesson 36. Use a HB pencil on 18 x 24 drawing paper. Use your viewfinder. Be sure to choose a scene that has objects up close as well as objects that are far away. Try to conveya sense of depth and distance and space in your drawing. If you can, include a staircase in your drawing.3.If you have an easel that you can stand at, then put your drawing board on the easel and stand up to draw the picture. But if you don’t have an easel, just make sure that your drawing board is tilted up towards your eyes, not laying flat on a tabletop. Put the drawing board on your lap and lean it up against a tabletop, or put a stool under your feet so that your knees are raised and lean the drawing board against your knees.4.Take great care to make your drawing as accurate as possible. Keep using your pencil to check the proportions of objects in relationship to one another and to check angles. Use what you learned about one-point perspective and two-point perspective to help you make a more realistic drawing. But be sure that you draw exactly what you see in front of you. If you’re trying to follow the rules of perspective and you end up with a drawing that has different angles than the ones that you see in real life in front of you, then just draw what you’re seeing in front of you.5.Post your drawing to EP’s drawing flickr group when you’re finished.
Lesson 38
1.Draw another interior space in your home or in another building. Use a HB pencil on 18 x 24 drawing paper, and use your viewfinder, and use a ruler to draw straight lines.2.Be sure to choose a scene that has objects up close as well as objects that are far away. Include walls in your drawing, as well as doors or arches or windows. Try to convey a sense of depth and distance and space in your drawing.3.You used your knowledge of perspective to create your other two drawings, but in this drawing, don’t use your knowledge of perspective. Instead, just use your pencil to measure the different angles and sizes and distances that you see in front of you. When you were drawing still lifes, you didn’t use perspective. You just used your pencil to measure what you saw and check your drawing. Think of this interior space as one huge still life. If you use your pencil to measure and check the diagonal lines in your drawing correctly, and if you correctly measure how tall and wide things look in relationship to one another from the vantage point that you’re at, then everything in your drawing will end up in correct perspective, because you’ve drawn it the way it actually looks in real life.4.Post your drawing to EP’s drawing flickr group when you’re finished.5.Look at this drawing. When I was fourteen years old, I drew this picture of the view from my bedroom window. I was living in a city in the middle east.
Lesson 39
1.Draw a picture of your hand. You don’t need to shade your drawing.2.Post your drawing to EP’s drawing flickr group when you’re finished. You can make constructive comments on other’s artwork. Tell what you think is good about the
Allinonehighschool.com
drawing and tell any suggestion for improving it.3.Look at all of the pencil drawings below and see if one of them gives you an idea for a new drawing that you can create yourself. Then draw a picture of whatever you want to.4.Post your drawing to EP’s drawing flickr group when you’re finished. You can make constructive comments on other’s artwork. Tell what you think is good about the drawing and tell any suggestion for improving it.
1.one2.two3.three4.four5.five6.six7.seven8.eight9.nine10.ten 11.eleven12.twelve13.thirteen14.fourteen15.fifteen16.sixteen17.seventeen18.eighteen19.nineteen20.twenty
Lesson 40
1.Read this and draw the car.2.Post your drawing to EP’s drawing flickr group when you’re finished. You can make constructive comments on other’s artwork. Tell what you think is good about the drawing and tell any suggestion for improving it.
Lesson 41
1.Read about drawing with powdered graphite and follow the directions.2.Look at this drawing of a hand. Notice that there are no visible lines anywhere. The hand is not outlined.
Lesson 42
1.Read about drawing landscapes.2.Read about drawing realistic trees.3.When you’re drawing landscapes, remember that the objects in the foreground (the closest objects to the viewer) are clear and easier to see and the colors and tones are more intense. Objects in the background appear lighter and cannot be seen as clearly. This is called atmospheric perspective (or aerial perspective).4.Look at this image that illustrates atmospheric perspective.5.Draw a landscape on a 9 x 12 sheet of paper. Shade your drawing. Use both hard and
Allinonehighschool.com

soft pencils. You can draw either from life or from a photo that you took yourself. For this drawing, it isn’t necessary to draw an exact copy of what you see – you can “edit” what you see in real life.6.You can do a google search for more information and tutorials that would help you with this drawing. For example, if there is a river in your drawing, you may want to google “techniques for drawing realistic moving water in pencil”. You can always search the internet for information or inspiration to help you with a drawing. If there is something in a lesson that you don’t understand or are having difficulty with, you could try looking for YouTube tutorials to explain it.7. Post your drawing to EP’s drawing flickr group when you’re finished. You can make constructive comments on other’s artwork. Tell what you think is good about the drawing and tell any suggestion for improving it.
Lesson 43
1.Draw a sketch of your hand using a pen.2.Post your drawing to EP’s drawing flickr group when you’re finished. You can make constructive comments on other’s artwork. Tell what you think is good about the drawing and tell any suggestion for improving it.3.Draw pictures of these feet.
•one•two•three
4.If you can get somebody to pose for you, draw his or her feet.5.Post your drawings to EP’s drawing flickr group when you’re finished. You can make constructive comments on other’s artwork. Tell what you think is good about the drawing and tell any suggestion for improving it.6.Look at this drawing.
Lesson 44
1.Draw all of these skulls. Your drawings only need to be simple sketches, but strive to make your proportions as correct as possible.
1.one2.two3.three4.four5.five
2.Post your drawings to EP’s drawing flickr group when you’re finished. You can make constructive comments on other’s artwork. Tell what you think is good about the drawing and tell any suggestion for improving it.
Lesson 45
1.When you are drawing a head, you need to make sure that the proportions are correct.2.Read this and study the illustrations carefully.3.Read this and follow the directions. Don’t shade the face. The face that you draw should be better than the example drawing.4.Post your drawing to EP’s drawing flickr group when you’re finished. You can make constructive comments on other’s artwork. Tell what you think is good about the drawing and tell any suggestion for improving it.
Allinonehighschool.com

5.Copy this.6.Copy these sketches of heads.
Lesson 46
1.Try to draw a face with correct proportions from your imagination.2.When you are finished drawing, check to make sure the facial proportions you drew were correct. Correct any mistakes that you find in your drawing.3.Post your drawing to EP’s drawing flickr group when you’re finished. I’m going to stop giving you flickr directions, but continue to always post your drawings for this course to EP’s drawing flickr group. Bookmark the link or find it at the top of the course page. Comment on other people’s drawings to help them, and always say something positive and try to help by giving a suggestion.
Lesson 47
1.Print out these two diagrams that show the skull inside of the head. Hang them up on a wall where you can look at them every day. Draw copies of them.
•side view•front view
Lesson 48
1.Complete ALL of these pencil shading exercises. Don’t blend your shading. You can make your shading smooth without blending by gradually building up many layers of light, soft, even strokes. This exercise will require a lot of patience, but it will be worth it! Post your work to EP’s drawing flickr group when you’re finished.
Lesson 49
1.Find a white or light-colored object in your house to draw. It should be free of surface decoration. It should be complex, like a sculpture of a person – not something simple and smooth like a ceramic jug.2.Shine a strong light on the object. There should be only one light source.3.Draw the outlines of the object, and then look for the outlines of the shadows that are on the object. Draw the outlines of the shadows.4.Fill in the shadow areas using only one tone. Here is an example that I did. It is a drawing of a sculpture. It was done with charcoal.5.Post your drawing to EP’s drawing flickr group when you’re finished.
Lesson 50
1.Set up an egg on a table in front of you and draw a picture of it. Shade your drawing carefully. This is an exercise to practice realistic shading. Post your drawing to EP’s drawing flickr group when you’re finished.
Lesson 51
1.It’s time for some more Bargue drawing! Print out this drawing of a bust of a bearded man. Make sure that what you are printing out fills the whole page. Tape the printout to your drawing board.2.Tape a piece of 9 x 12 drawing paper to the drawing board right next to your printout. Make sure the two pieces of paper are perfectly aligned at the top.3.You may find it helpful to have the two sheets of paper overlap so you can have your
Allinonehighschool.com

drawing be as near as possible to the drawing that you are copying. Make sure that you tilt your drawing board up towards your eyes, or draw at an easel.4.Copy both the simple drawing on the left and the finished, fully shaded drawing on the right. Use only a HB pencil for the drawing on the left, but for the drawing on the right you can use a 2B for shading.5.Your drawings should be exactly the same size as the originals. Copy the drawing on the left first. Then, follow these steps as you copy the finished shaded drawing:
1.Begin by loosely sketching the outlines of the head, like the drawing on the left. Your drawing should be parallel to the drawing that you are copying, because this will make it easier to measure and check for mistakes.2.Use a ruler to draw a vertical line down the center of your drawing. You will use this as a reference point to take measurements from to check the accuracy of your drawing.3.Using your pencil or a ruler, measure the height of the drawing on the printout. Then, check to be sure that your drawing is exactly the same height. Draw lines or dots to indicate where the top and bottom of your drawing should be, and be careful not to pass those, or your drawing will be too big.4.Use your pencil to measure the width of every part of your drawing and check for mistakes. Correct every mistake that you can find. Continue to refine your drawing.5.Measure to see where the eyes, nose and mouth should be placed. Draw lines to indicate exactly where they should be placed, and then correct your drawing.6.Continue using your pencil to carefully measure and check the proportions of every part of your drawing and check for mistakes. Expect to find lots of mistakes – mistakes are part of the learning process and should not be viewed as failure. If you’re not making mistakes, you’re not learning anything! Correct every mistake that you can spot and refine your drawing and erase any unnecessary lines. Every line in your drawing should be at exactly the same length and angle as it is in the original. 7.Once you are satisfied that your drawing is as correct as you can make it, shade it. There are basically two shades in this drawing: dark gray and light gray. Before you begin shading, squint at the printout in order to see the masses of light and dark. As you are shading, keep pausing to squint at the printout and then at your drawing, to see whether the masses of light and dark have the same shapes and tones in both images. If not, correct your drawing.
6.Bargue drawing requires a lot of time, energy and patience. But if you don’t strive for accuracy, you’re missing the point of this practice.7.In the simple drawing on the left side of the printout, the head is broken down into its abstract shapes and lines. You should think of your drawing in this way. Try to forget that it is a head. Pretend that you have no idea what it is and that all you’re seeing is a group of abstract shapes and lines, and then just try to copy them exactly. This is helpful for drawing realistically because you’re drawing what you see in front of you, not what you know.8.Turn your board upside down occasionally and work on your drawing while it is upside down. This will give you a fresh perspective and help you to see the shapes more abstractly instead of thinking of them as a head. You should frequently stop and set your drawing board against a wall and step back and look at your drawing from a distance. This can help you get a fresh perspective and notice mistakes that you might not have
Allinonehighschool.com

noticed up close.9.When you’re finished copying the whole page, take a photo of your drawing board with both pieces of paper on it. Post the photo to EP’s drawing flickr group so that others can compare your copy to the original and check how accurate your drawing is. You can check others’ drawings too and leave comments on their work.
Lesson 52
1.Print out this drawing of a bust of a young man. If you want your drawing to be larger, you can print it out on two pieces of paper, so that the sketch on the left fills one page and the finished drawing on the right fills another page.2.Copy this drawing in the same way that you copied the drawing in Lesson 48. Follow the directions from Lesson 48 to complete the drawing in the correct way. Post a photo of your drawing board to EP’s drawing flickr group when you’re finished.3.Look at Rembrandt’s paintings and etchings.
Lesson 53
1.Print out this drawing of a bust of a young woman. Copy the drawing carefully in the same way that you copied the drawing of the bearded man in Lesson 48. Follow the directions from Lesson 48 in order to complete the drawing in the correct way.2.Notice that the woman’s head is tilted slightly, so the line down the center must be diagonal rather than vertical. The lines that show the location of her eyebrows, eyes, nose, and mouth are diagonal rather than horizontal.3.Post a photo of your drawing board to EP’s drawing flickr group when you’re finished.
Lesson 54
1.Read this carefully.2.Read this and follow the directions. You don’t need to use exactly the same tools.3.When I draw eyes, I usually use HB and 2B pencils for the iris and an 8B pencil for the pupil.4.Draw a copy of this diagram of an eye if you want to.5.Look at these drawings of eyes. Copy some of these drawings if you want to.
1.one2.two3.three4.four5.five6.six7.seven
6.Draw the eyes in these photos. one two three four five
Lesson 55
1.Read this and follow the directions.2.Read this carefully. Keep clicking Next until you get to page four.3.Look at these drawings of noses. Copy some of these drawings if you want to.
1.one2.two3.three4.four
Allinonehighschool.com

4.Draw the noses in these photos. one two three four5.Look in a mirror and draw your nose.
Lesson 56
1.Read this carefully and follow the directions.2.Read this and draw the mouth.3.Look at these drawings of mouths. Copy some of them if you want to.
1.one2.two3.three4.four
4.Draw the mouths in these photos. one two three four
Lesson 57
1. Read this and draw the ear.2. Read this carefully.3. Look at these drawings of ears and copy some of them if you want to.
1.one2.two 3.three4.four
4.Draw the ears in these photos. one two three four five5.If you can, get someone to pose for you and draw their ears.6.Look at these sketches.
1.one2.two3.three
Lesson 58
1.Read this carefully.2.Read this carefully.3.Read this carefully.4.Copy this drawing of hair.5.Copy this drawing of hair.6.Look at the hair in these pencil drawings.
1.one2.two3.three4.four5.five6.six7.seven8.eight9.nine10.ten11.eleven12.twelve
Allinonehighschool.com
Lesson 59
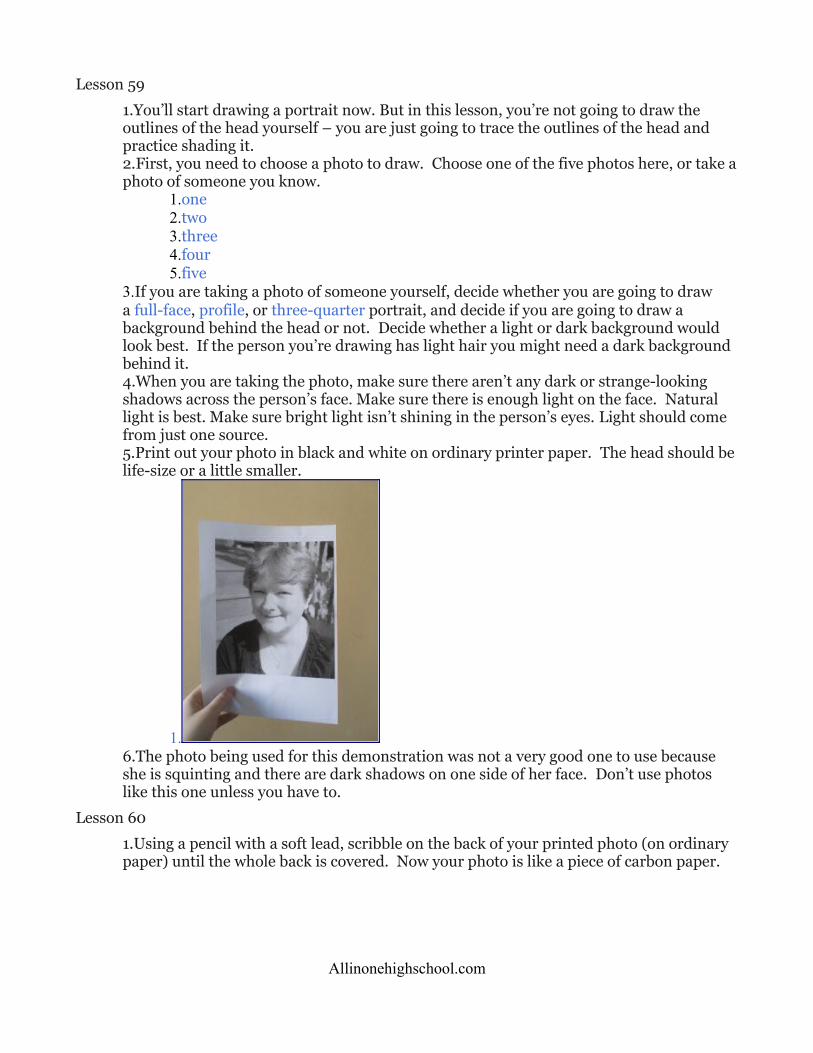
1.You’ll start drawing a portrait now. But in this lesson, you’re not going to draw the outlines of the head yourself – you are just going to trace the outlines of the head and practice shading it.2.First, you need to choose a photo to draw. Choose one of the five photos here, or take aphoto of someone you know.
1.one2.two3.three4.four5.five
3.If you are taking a photo of someone yourself, decide whether you are going to draw a full-face, profile, or three-quarter portrait, and decide if you are going to draw a background behind the head or not. Decide whether a light or dark background would look best. If the person you’re drawing has light hair you might need a dark background behind it.4.When you are taking the photo, make sure there aren’t any dark or strange-looking shadows across the person’s face. Make sure there is enough light on the face. Natural light is best. Make sure bright light isn’t shining in the person’s eyes. Light should come from just one source.5.Print out your photo in black and white on ordinary printer paper. The head should be life-size or a little smaller.
1.6.The photo being used for this demonstration was not a very good one to use because she is squinting and there are dark shadows on one side of her face. Don’t use photos like this one unless you have to.
Lesson 60
1.Using a pencil with a soft lead, scribble on the back of your printed photo (on ordinary paper) until the whole back is covered. Now your photo is like a piece of carbon paper.
Allinonehighschool.com

•
2.Place your photo right side up on top of the piece of paper you are going to draw the portrait on.
Allinonehighschool.com

•3.If you are doing a full-face portrait, you should not place the head in the exact center ofthe paper. Place it a little higher, leaving about the same amount of space at the sides. But make sure the top of the head doesn’t get too close to the edge of the paper.4.If you are doing a three-quarter portrait, you should leave more room between the front of the face and the edge of the paper than at the back.5.If you are doing a profile portrait, you should leave lots of space in front of the face.6.When you have positioned the head on the paper, hold your photo down and trace the outlines of the face carefully with a sharp pencil. Be careful not to let the photo move until you are finished tracing. Trace the outlines of the shadows too.
Allinonehighschool.com

•
•
•
Allinonehighschool.com
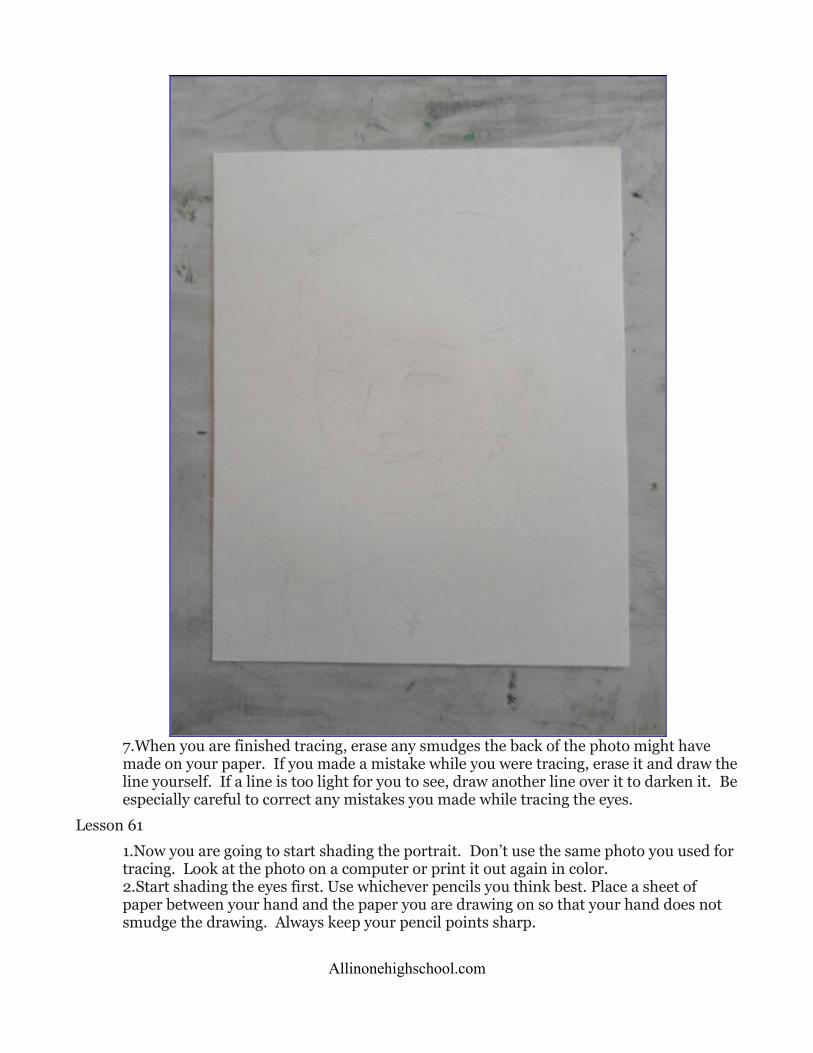
7.When you are finished tracing, erase any smudges the back of the photo might have made on your paper. If you made a mistake while you were tracing, erase it and draw theline yourself. If a line is too light for you to see, draw another line over it to darken it. Beespecially careful to correct any mistakes you made while tracing the eyes.
Lesson 61
1.Now you are going to start shading the portrait. Don’t use the same photo you used for tracing. Look at the photo on a computer or print it out again in color.2.Start shading the eyes first. Use whichever pencils you think best. Place a sheet of paper between your hand and the paper you are drawing on so that your hand does not smudge the drawing. Always keep your pencil points sharp.
Allinonehighschool.com

3.When you are finished shading the eyes, post your drawing to EP’s drawing flickr group.4.After you have received feedback on the eyes you drew and have corrected any mistakes, move on to the next lesson.5.Look at this drawing of a little girl.
Lesson 62
1.Next, shade the forehead, cheeks, nose, and mouth. Then, shade the eyebrows, the ears and the hair.2.When you are finished, post your drawing to EP’s drawing flickr group. After you have received feedback on your drawing and have corrected any mistakes, move on to the nextlesson.
Lesson 63
1.Shade the neck and the top of the shirt, if you are going to include some of the shirt in the portrait. You should probably make the shirt get lighter and lighter as it gets closer to the edge of the paper until it fades into the paper.2.If you are including a background, shade it now.3.Sign your name on your drawing when you’re finished and post your finished drawing to EP’s drawing flickr group.
Lesson 64
1.Draw another portrait like you just learned how to do. Use a different photo this time.
Lesson 65
1.Read this and draw the horse.
Lesson 66
1.Learn how to draw a portrait using a grid.2.Read this.3.Read this.4.Draw a portrait using a grid instead of tracing.5.If you don’t want to take your own photo, here are some photos you can choose from.
1.one2.two3.three4.four5.five
6.Look at this abstract drawing.
Lesson 67
1.Look at this portrait.2.Read this.3.Explore this artist’s website and look at all of the drawings.4.Draw another portrait using a grid. First, look at these portraits. Maybe you can learn something from looking at them, or maybe some of them will give you ideas for your owndrawing.
1.one
Allinonehighschool.com

2.two3.three4.four5.five6.six7.seven8.eight9.nine10.ten11.eleven12.twelve
Lesson 68
1.Look at this portrait.2.Explore this artist’s website and look at all of the artwork.3.Read this article about drawing mistakes.4.Read these drawing tips.5.Draw a portrait of yourself. This is called a self-portrait. Use a grid to help you draw correctly.6.Look at this pencil drawing that was drawn only by shading.
Lesson 69
1.Read this.2.Draw these heads.3.Read about negative drawing.4.Choose one of these photos of animals, or take a photo yourself if you want to.
1.one2.two3.three4.four
5.Draw a portrait of the animal you chose. Don’t trace the outlines; draw everything yourself.6.During the ages of 12 and 13, I earned money by drawing portraits of people’s pets. Youcould make some money that way too. Start selling your artwork as soon as you can! If you are selling your artwork regularly, you’re a professional artist, no matter how young you might be.
Lesson 70
1.Read this.2.Look at this portrait.3.Now that you have gotten plenty of practice with shading portraits, you should not trace them anymore. It’s okay to trace at first to help you learn to shade portraits in pencil, but once you can shade a traced portrait well, don’t trace any more unless you are making a portrait for somebody else and you are under a time limit. Tracing is easier, butif you continue tracing, your drawing skills won’t improve!4.Take a look at the paintings below to see what teens can do:5.Michelangelo is thought to have painted this picture, The Torment of Saint Anthony,
Allinonehighschool.com
when he was 12 or 13 years old.6.Picasso painted this picture of a barefoot girl when he was 14 years old. When he was young he painted in a realistic style.7.Picasso painted all of these pictures when he was only 15 years old. Click on each one tosee it up close.
Lesson 71
1.Read this. Find two forks, two knives, and two spoons. Tie them together and place them on a table below your eye level. Shine light on them.2.Draw them as accurately as you can. Shade your drawing.
Lesson 72
1.Read about drawing portraits.2.Look at these pictures.3.Read this.4.Find a clear glass cup or jar or vase. If you can’t find any glass, use clear plastic instead. Fill it halfway with water and set it on a table below your eye level. Put one metal fork, one metal spoon, one metal knife and one other small metal object into the water. Shine light on your setup.5.Draw your setup as accurately as you can. Shade it carefully.6.Look at this drawing.
Lesson 73
1.It’s very important that you teach yourself to draw freehand. You have to learn how to draw the whole portrait yourself, without tracing anything or using a grid.2.Carefully study this diagram showing the proportions of the head.3.Study this diagram showing how to draw the head in three-quarter view.4.Study this diagram carefully.5.Study this picture carefully.6.Study these pictures carefully.7.Look at these drawings showing proportions of babies’ heads.8.Read this.9.Look at these drawings.
•one•two•three
Lesson 74
1.Read this article about facial proportions.2.Look at these pictures.
•one•two•three•four•five•six
3.Choose a photo of a face to draw. You can take a photo yourself or use one from
Allinonehighschool.com
another lesson. Print the photo out in color.4.Lightly sketch the outlines of the face, following the directions in this tutorial.5.Check your drawing for mistakes. Erase the mistakes and keep trying to draw those areas until you draw them correctly.6.Post your drawing to EP’s drawing flickr group. After you have received feedback on your drawing and have improved it, shade your drawing, following this tutorial. Charcoalpencils were used for this tutorial, but you can still learn from it.7.Post your finished drawing to EP’s drawing flickr group.
Lesson 75
1.You read this before, but read it again.2.Sketch five portraits without tracing or using a grid. You don’t need to shade your sketches, but you can if you want to. These don’t need to be nice-looking drawings; they are just for practice.3.Once you feel like you’re able to draw an accurate portrait freehand from a photograph,you need to force yourself to stop using photographic reference and teach yourself to draw from life. Take every opportunity to practice drawing portraits from life. Whenever somebody in your family is watching TV, working at a computer, or taking a nap, you can quickly draw a portrait of them. The portraits don’t have to be more than sketches.4.Look at these drawings of hair.5.Look at this drawing of a tree house that was done with a pen.
Lesson 76
1.Read about observation.2.Read this article on how to draw hair. Charcoal pencils were used for this tutorial, but you can still learn from it.3.Draw another portrait. You can draw from photographic reference, or you can try to find a patient person to pose for you while you draw their portrait. Try to make this one somehow different from your previous portraits.
Lesson 77
1.Print out these diagrams of skeletons. Hang them up on a wall where you will see them often, and leave them there. Draw copies of them. Your drawings don’t need to be detailed – for example, you can draw the ribcages as solid shapes instead of drawing individual ribs. However, make sure that all proportions are correct. Post your drawings to EP’s Drawing Flickr group to get feedback.
•one•two•three•four
2.Print out this diagram. Hang it up with your other printouts so that you see it every day. Draw a copy of it if you want to.
Lesson 78
1.Read about sketching people in public.2.Watch this video on sketching people in public.3.When you go to public places like parks or restaurants, you should always bring your
Allinonehighschool.com

sketchbook and practice making quick sketches of people.
Lesson 79
1.Watch this video on how to sketch the head from any angle.2.Watch this video on drawing the head, and draw along as you watch.3.Draw several small quick sketches of people’s heads from life. Get your friends and family members to pose for you for a few minutes at a time.
Lesson 80
1.Your skeleton printouts are still hanging up on the wall, right?2.Print out these three photos showing people from the front, side and back. Each photo should fill a whole sheet of paper.
•one•two•three
3.Using your skeleton printouts as reference, draw the skeleton that is inside of each person. There are two different ways that you could do this: 1) Tape a piece of tracing paper over the image of the person and draw the skeleton on the sheet of tracing paper. 2) Tape the image of the person to one side of your drawing board and a blank piece of paper to the other side. Draw the skeleton on the blank piece of paper, taking care to make it the same size and give it the same position as the person.4.Post your skeleton drawings to EP’s drawing flickr group to get feedback.
Lesson 81
1.Watch this video on drawing hands.2.Use your non-dominant hand to draw a picture of your dominant hand. So, if you’re right-handed, you would draw the picture with your left hand. Drawing with your non-dominant hand is a great way to make your lines more loose and fluid.3.Read this.
Lesson 82
1.Set up a still life with at least 7 objects, some very large and some small. Draw the outlines. Read this article first.
Lesson 83
1.Draw the space around an object instead of drawing the object, as shown in these examples:
•one•two
Lesson 84
1.Watch this video on drawing people in different poses. Find some photos of people in different poses and draw them using simplified block forms like this.2.Watch this video on drawing simplified skeletons.
Lesson 85
1.Watch this video on drawing a portrait from life. Get a family member or friend to posefor you and draw their portrait quickly. In this video he’s using a charcoal pencil, but you
Allinonehighschool.com
can use an ordinary pencil if you want to.
Part 2 – Drawing with Other Mediums
There are lessons on drawing with charcoal, pastels, colored pencils, and mixed media. There are also calligraphy lessons. Feel free to skip to whichever section you want to start with first, and to skip around between sections.
Lesson 86 – Drawing with Charcoal
1.Experiment with using charcoal. Try drawing on different kinds of paper, try using different types of charcoal, try using different materials to blend the charcoal, and try using different erasers on different kinds of charcoal.2.Read this and follow the directions.3.Read about how to draw with charcoal.4.Follow the directions. Draw the portrait, still life, and the view from your window.5.Use vine charcoal, and after you’ve turned the whole paper black, rub the whole paper with a paper towel or napkin using a circular motion. This will make the paper a little lighter.6.Cover the paper in charcoal again and rub it a second time. Start drawing.7.Use both a hard eraser and a kneaded eraser. After you’ve finished using the erasers, you can add some darker spots to your drawings with a piece of charcoal.8.Sign your drawings when you’re finished.9.You can spray your charcoal drawings with fixative when you’re finished, but the fixative might smear the drawings or make some areas darker or lighter than they were before.
Lesson 87
1.Read this and draw the rhinoceros. If you don’t have brown paper, use a different colorof paper or try covering a piece of paper in light brown pastel and rubbing the pastel into the paper with a paper towel until the whole paper is a smooth, even tone.2.For drawing the light tones, you can use a white pastel, a piece of white chalk, a white Conte crayon, or a piece of white compressed charcoal.3.Post your drawing to EP’s drawing flickr group.
Lesson 88
1.Read about drawing with charcoal.2.Draw a still life using charcoal. This time, instead of creating highlights with an eraser,use a white pastel or a piece of white chalk or a white Conte crayon or a piece of white compressed charcoal. Draw from life.3.Add the highlights last. Don’t use charcoal after you’ve added highlights. Don’t blend the highlights with the charcoal.4.Look at this portrait.5.Look at this charcoal drawing.6.Look at this charcoal drawing.
Lesson 89
1.Read about charcoal.2.Click on each of the questions to read the answers.3.Read this.
Allinonehighschool.com

4.Read this and draw the eye.5.Look at this portrait.
Lesson 90
1.Look at this charcoal portrait.2.Draw a portrait using charcoal. Don’t trace the outlines of the face or use a grid to helpyou draw. Use a photo that you took yourself.3.Leave the paper white this time and draw with the charcoal. Don’t darken the paper with charcoal first and then draw with an eraser.4.Draw the outlines of the face using vine charcoal, because it’s easy to erase. Use compressed charcoal for very dark areas. Use charcoal pencils for drawing small details.5.Look at this portrait.6.Now draw another portrait from life, using charcoal. When somebody in your family is watching TV, working at a computer, or taking a nap, you can quickly draw their portrait. The portrait doesn’t have to be more than a sketch.7.Take every opportunity to draw portraits from life. Charcoal is the best tool to use for drawing portraits from life, because it is quick and erases easily.
Lesson 91
1.Look at all of these charcoal drawings and draw copies of some of them.•one•two•three•four•five•six•seven•eight•nine•ten•eleven•twelve•thirteen•fourteen•fifteen•sixteen•seventeen•eighteen•nineteen•twenty
Lesson 92
1.Using charcoal, draw sketches of some of these paintings in your sketchbook. Post your sketches to EP’s drawing flickr group.
•one•two
Allinonehighschool.com
•three•four•five•six•seven•eight•nine•ten•eleven•twelve•thirteen•fourteen•fifteen•sixteen•seventeen•eighteen•nineteen•twenty
2.Choose a favorite painting from this list and write a paragraph explaining why it is yourfavorite painting.
Lesson 93
1.Using charcoal, draw sketches of these sculptures in your sketchbook. Post your sketches to EP’s drawing flickr group.
•one•two•three•four•five
2.Watch this video.
Lesson 94
1.Look at this charcoal portrait.2.If you can get someone to pose for you, draw his or her hands using charcoal.3.Draw on gray paper and use white pastel or white conte crayon or white chalk or white compressed charcoal for the highlights.4.If you can’t get anybody to pose for you, draw from this photograph.5.Look at this drawing.6.Look at this beautiful drawing done with vine charcoal on white paper.7.Look at this charcoal drawing of a man’s knees.8.Look at this charcoal drawing of three feet.
Lesson 95
1.If you have a full-length mirror in your house, sit or stand in front of the mirror and draw a sketch of your whole body. Start by drawing a tiny sketch to plan the composition for a larger sketch, and then use vine charcoal to draw a large sketch of yourself on the
Allinonehighschool.com

biggest piece of paper that you have available. If you have a tall easel, it will be helpful to use that.2.Do image searches for “Hope Gangloff illustration” and “Alphonse Mucha illustration”.Choose a few illustrations to draw copies of. Learn more about these famous illustrators on Wikipedia.
Lesson 96
1.If you have any sculptures in your house, draw them using charcoal and white chalk on gray paper.2.Draw these sculptures using charcoal and white chalk on gray paper.
1.one2.two3.three4.four
3.Look at this drawing.4.Look at this portrait.
Lesson 97
1.Read this.2.Read this.3.Draw a landscape or cityscape or seascape or skyscape using charcoal. Use a photograph that you took yourself. Don’t make a small drawing. Use a very big piece of paper, or divide the photograph into four or six parts and draw your landscape on four orsix different pieces of paper and hang all of them on the wall together.4.Look at this drawing.
Lesson 98
1.Read about how to draw fabric folds.2.Draw at least ten of the figures in these pictures. Use charcoal or graphite pencil. You don’t need to shade your drawings if you don’t want to.
•one•two •three•four•five•six•seven•eight•nine•ten •eleven•twelve•thirteen•fourteen•fifteen•sixteen
Allinonehighschool.com

•seventeen•eighteen•nineteen•twenty
3.Post your drawings to EP’s drawing flickr group.
Lesson 99
1.Practice figure drawing from life whenever you can get somebody to pose for you.2.Maybe you can draw people while they’re asleep or while they are working on the computer or watching TV. Carry a sketchbook with you whenever you ride the train or subway or go to a restaurant or a park, and draw quick sketches of the people around you.3.Look at these figure drawings.
•one•two•three•four•five•six•seven•eight•nine•ten
4.Look at this drawing.
Lesson 100 – About Color
1.You need to memorize this information:2.Red, yellow, and blue are called primary colors. You can’t make these colors by mixing other colors. Every other color is made by mixing these colors.3.Green, purple and orange are called secondary colors. A secondary color is made by mixing two primary colors.4.Blue-green, blue-purple, red-purple, red-orange, yellow-orange and yellow-green are called tertiary colors. A tertiary color is made by mixing a primary color with a secondary color.5.Yellow-green, yellow, yellow-orange, orange, red-orange, red, and red-purple are calledwarm colors. Warm colors are colors associated with things that are warm.6.Green, blue-green, blue, blue-purple, and purple are called cool colors. Cool colors are colors associated with things that are cold.
Lesson 101
1.You need to memorize this information:2.The word “hue” refers to the color itself, “value” is the lightness or darkness of a color, and “intensity” is the strength of a color.3.Complimentary colors are two colors that are opposites of each other. Red is the compliment of green, yellow is the compliment of purple, and orange is the compliment of blue.4.The compliment of a warm color is always a cool color. Using two complimentary
Allinonehighschool.com
colors next to each other in a drawing or painting will create the greatest contrast possible. To draw attention to a certain color, use some of its compliment next to it. Two complimentary colors mixed with each other make brown.5.Click on each color on this color wheel and all the words at the bottom.
Lesson 102
1.Read about color as symbol.2.Read about color as light.3.Read about color as emotion.4.Read about color terms.5.Read some more about color terms.6.Take this quiz. If you got more than three questions wrong, take the quiz a second time.
Lesson 103 – Pastels
1.Now you’re going to begin learning how to draw using pastels.2.Experiment with using pastels before you begin drawing with them. Try drawing on different kinds of paper, try using different materials to blend the pastel, try to erase pastel, try layering different colors on top of each other and try mixing colors together in different ways.3.Read this and draw the still life if you want to. You don’t need to use exactly the same materials.4.Read about how to use pastels.5.Read this and draw the eye.6.Read this.
Lesson 104
1.Read this and draw the lighthouse. You don’t have to use exactly the same pastels or paper. If you don’t have gray paper, you can use white paper or paint a piece of white paper gray with watercolor paint.2.If you have any questions about using pastels look at this.3.For preliminary drawing, use hard pastels, colored pencils or graphite pencils. Use hard pastels for drawing small details.4.You can spray your pastel drawings with fixative when you’re finished drawing, but it might change the colors. If you don’t have fixative, you can use hairspray instead. Hairspray will change the colors more than fixative will.5.Look at this drawing.
Lesson 105
1.Read this and draw the tiger. You don’t have to use the same color of paper. You can use a different kind of pastel if you don’t have oil pastels.2.Read this.3.Look at this drawing.4.Read this and draw the fish. You can use a different kind of pastel if you don’t have chalk pastels.5.Look at these drawings. Click on each one to see them up close.
Lesson 106
Allinonehighschool.com

1.Read about the visual elements of art.2.Draw copies of some of these pastel drawings.
•one•two•three•four•five•six•seven•eight•nine•ten•eleven•twelve•thirteen•fourteen•fifteen•sixteen•seventeen
3.You can crush leftover fragments of pastel and pick up the powder with a cloth or cotton ball and use it for drawing smooth areas.4.Look at this drawing.
Lesson 107
1.Explore this artist’s website and look at all of the artwork.2.Explore Janet Fish’s artwork on this website.3.Look at this drawing that was done with pastels and colored pencils.4.Read this and draw a still life. Draw it from life, but take a photo of your setup before you begin so that you can put things back in the right place if they get moved. You can use a different kind of pastel if you don’t have oil pastels.5.Oil pastels can be diluted with turpentine and used like paint.
Lesson 108
1.Using pastels, draw pictures of two of these paintings.•one•two•three•four•five•six
Lesson 109
1.Read about how to make a drawing machine.2.Read about these other drawing machines.
Lesson 110
Allinonehighschool.com

1.Draw a portrait using pastels. Don’t trace anything or use a grid. Draw everything yourself. Use a photo that you took yourself, or draw from life.2.Look at this portrait.3.Look at this portrait.4.Look at this drawing.
Lesson 111
1.Draw another portrait using pastels. Do not use a photograph! Draw the portrait from life. When somebody in your family is watching TV, working at a computer, or taking a nap, you can quickly draw their portrait. The portrait doesn’t have to look beautiful or bevery detailed or realistic. Just draw sketchily and focus on making the colors accurate. Take every opportunity to sketch portraits from life and your drawing skills will improve drastically. Drawing from life will teach you far more than drawing from a photograph, even if your drawing doesn’t turn out as nice.2.Look at all of these pastel portraits. Maybe some of them will give you ideas for your portrait. You can draw copies of some of these portraits if you want to.
•one•two•three•four•five•six•seven•eight•nine•ten•eleven•twelve•thirteen•fourteen•fifteen•sixteen•seventeen•eighteen•nineteen•twenty
Lesson 112
1.To keep certain parts of the drawing from getting pastel on them, you can cut shapes out of tape and stick them on the parts of the drawing that you want to keep clean. You can also use tape for making straight edges.2.You should rub a little powdered pastel on your fingertip before you use it for blending.3.Hairspray may turn colors more brown or gray than they should be.4.You can draw with pastel on top of hairspray almost as well as you can without hairspray.5.In a pastel drawing, hairspray may darken colors and make it seem as if there were
Allinonehighschool.com
finger smudges in the drawing and colors were not blended well.6.Look at this portrait.
Lesson 113
1.Read about The Chocolate Girl.2.Study The Chocolate Girl carefully. Click on it to see it up close.3.Write a paragraph about The Chocolate Girl. Don’t write about the artist, or the subject matter. Write about the technique.4.Acrylic paint can be used for underpaintings and to change the color of the paper. You can draw with white and black pastel on gray paper. You can paint a piece of white papergray with watercolor and then draw with white and black pastel on that.5.Look at this portrait.
Lesson 114
1.Draw another portrait using pastels. Don’t trace the outlines of the face or use a grid tohelp you draw. Use a photograph that you took yourself.2.If you have watercolor paints, watercolor paper and brushes that work well with watercolor, try painting with watercolor first and then drawing with pastel on top of the painting after it is completely dry. Here is an example of a portraitthat was done with watercolor paints and pastel.3.White areas should not be covered in a dark underpainting.4.If a watercolor underpainting is used in a pastel drawing, the colors should be more vivid and a little bit darker in the underpainting than they will be in the final drawing. That will make the colors glow and be more realistic. The watercolor underpainting should be realistic, but not detailed.
Lesson 115
1.Look at this portrait.2.Look at this portrait.3.Read this.4.You can use paintbrushes to blend colors together, dilute pastel with water and paint with it, or brush particles of eraser or pigment off the paper.5.Pastel is difficult to mix. One way to mix pastel is to crush bits of different colored pastel sticks into a bowl, grind the pastel fragments into powder and apply the powder tothe paper with a tissue or a bit of cotton.6.Powdered pastel can be mixed with water and used like watercolor paint. It is more opaque and grainy than watercolor paint.7.You can use powdered pastel pigment mixed with water to paint a picture and then draw on top of it after it is dry.
Lesson 116
1.In a pastel drawing, the emphasis can be on line and form, on color, on chiaroscuro, on action, on texture, on light, on the natural qualities of the pastel, or on the natural qualities of the support used.2.Here is an example of a drawing that emphasizes line and form.3.Here is an example of a drawing that emphasizes color.4.Here is an example of a drawing that emphasizes chiaroscuro.5.Here is an example of a drawing that emphasizes light.
Allinonehighschool.com

6.Here is an example of a drawing that emphasizes the natural qualities of the pastel.7.Here is an example of a drawing that emphasizes texture.8.Here is an example of a drawing that emphasizes the natural qualities of the support used.9.Here is an example of a drawing that emphasizes action.10.What do you tend to emphasize in your drawings?11.Read about painting on grounds.12.Read this.13.In pastel drawings that emphasize texture, spraying each layer of pastel with hairspray before moving on to the next layer will make the drawing more textured, but not using hairspray will make the drawing softer.
Lesson 117
1.Draw another portrait using pastels. Don’t trace the outlines of the face or use a grid tohelp you draw. Use a photo that you took yourself.2.Read about surfaces for drawing with pastels.3.Read about using pastels on canvas.4.If you have a canvas, try drawing your portrait on that instead of a piece of paper.5.Here is an example of a drawing that was done with pastels on canvas.6.Look at this portrait.7.Look at this portrait.8.You can draw with pastel on many different surfaces. You should experiment with drawing on cardboard, sandpaper, handmade paper, newspaper, bricks, fabric, wood, painted walls, concrete, the front of a canvas, and the back of a stretched canvas.9.You can glue sand or sawdust or small rocks onto paper, wood, or cardboard to create atextured support for a pastel drawing. Texture attracts the eye and adds visual interest to drawings.10.Smooth, flat, thick cardboard is best for pastel drawing. Textured cardboard does not work well. Smooth wood is best for pastel drawing.
Lesson 118
1.Draw another portrait using pastels. If you can, glue a piece of thick, rough, light colored cloth to a thin board and try drawing the portrait on that. Use a photo that you took yourself.
Allinonehighschool.com

•
2.Look at these pastel drawings.3.Before you draw on a wall, you need to wash it. Drawing on concrete uses up pastel much more quickly than drawing on paper does. The rough surface of bricks holds pastel well.4.Fabric needs to be attached to a firm, hard surface before it is used as a support for pastel drawing. Light colored fabric is best.
Allinonehighschool.com
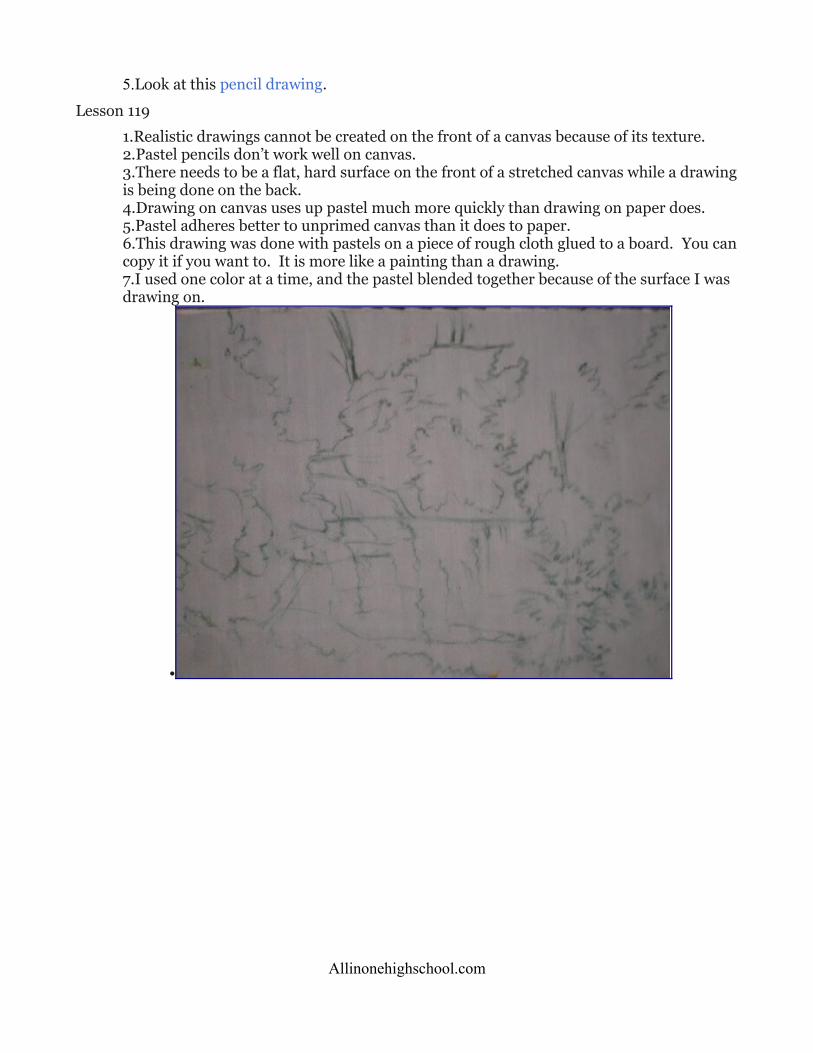
5.Look at this pencil drawing.
Lesson 119
1.Realistic drawings cannot be created on the front of a canvas because of its texture.2.Pastel pencils don’t work well on canvas.3.There needs to be a flat, hard surface on the front of a stretched canvas while a drawingis being done on the back.4.Drawing on canvas uses up pastel much more quickly than drawing on paper does.5.Pastel adheres better to unprimed canvas than it does to paper.6.This drawing was done with pastels on a piece of rough cloth glued to a board. You cancopy it if you want to. It is more like a painting than a drawing.7.I used one color at a time, and the pastel blended together because of the surface I was drawing on.
•
Allinonehighschool.com

Allinonehighschool.com
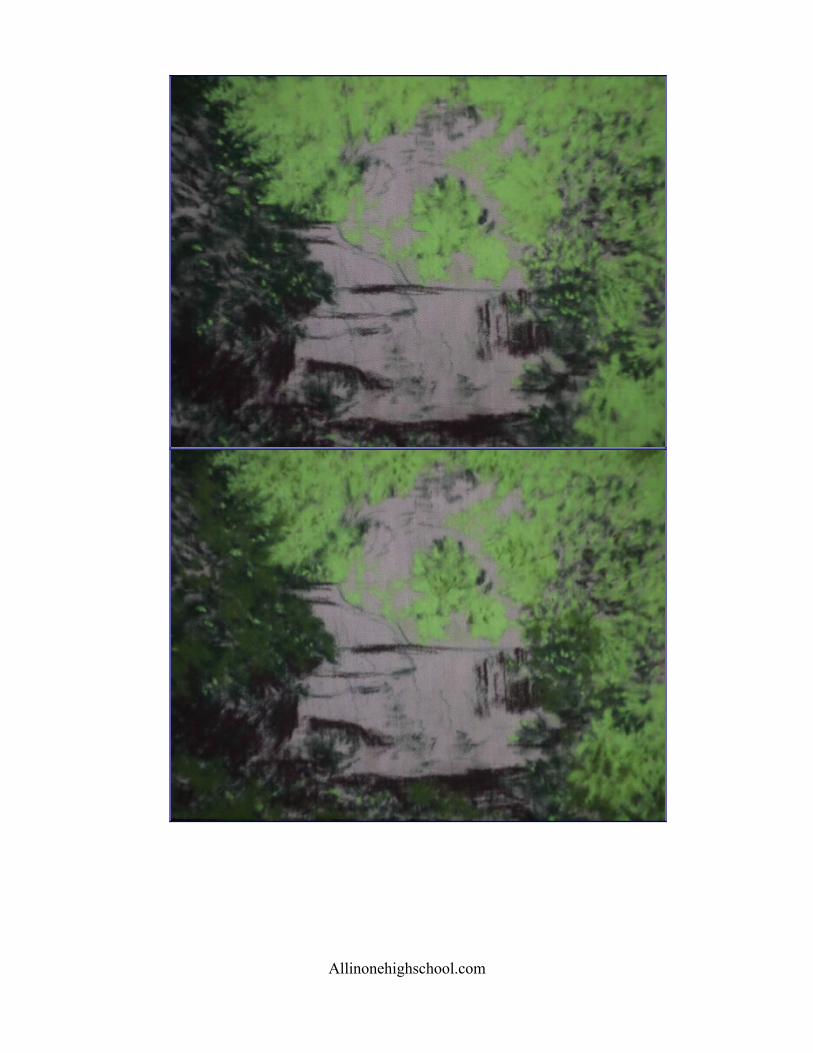
Allinonehighschool.com
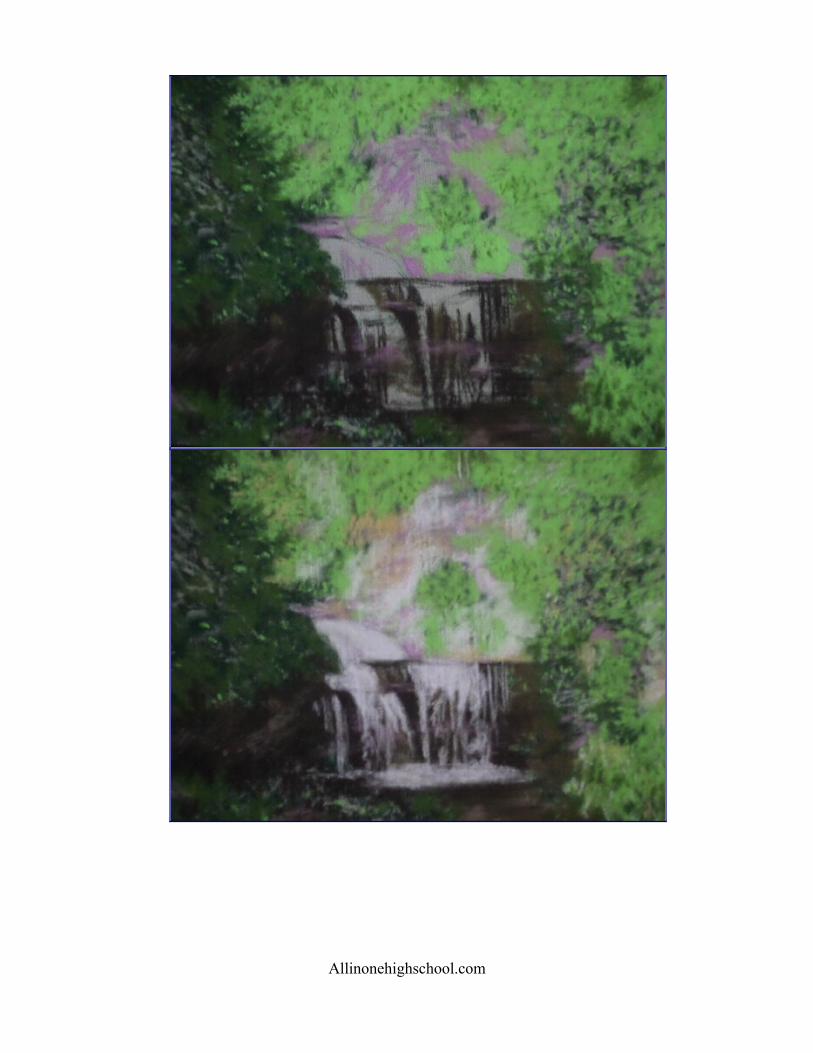
Allinonehighschool.com

Allinonehighschool.com

Allinonehighschool.com

Lesson 120 – Colored Pencils
1.Read about colored pencil drawing techniques.2.Experiment with using colored pencils. Try to blend the pencil strokes together using different materials, try erasing the pencil strokes, try layering different colors on top of each other to create new colors, and try using different papers.
Allinonehighschool.com
3.Read about drawing with colored pencils.4.Read about colored pencil drawing techniques.5.Read this and draw the apple. You don’t have to use exactly the same pencils.6.Read about colored pencil drawing techniques. Keep clicking next until you get to the last page.7.Read about different kinds of paper.
Lesson 121
1.Draw a copy of one of these colored pencil drawings.1.one2.two3.three4.four5.five
2.If you want to, choose one of these abstract colored pencil drawings and draw a copy ofit.
1.one2.two3.three
Lesson 122
1.Read about removing wax bloom.2.Read about materials for colored pencil drawing.3.Read about improving color intensity.4.Read about blending colored pencil.5.Read about different brands of colored pencils.6.Look at these colored pencil portraits.7.Draw a portrait using colored pencils. Draw everything yourself. Don’t trace the outlines or use a grid.8.Remember to always keep your pencil points sharp.9.Look at this drawing.
Lesson 123
1.Look at these colored pencil drawings. Draw copies of some of them if you want to.
1.one2.two3.three4.four5.five6.six7.seven8.eight9.nine10.ten11.eleven12.twelve
Allinonehighschool.com

13.thirteen14.fourteen15.fifteen16.sixteen17.seventeen
Lesson 124
1.Draw a portrait using colored pencils. Do not use a grid or trace.2.If you have watercolor paper, watercolor paints and brushes that work well with watercolor, try painting with watercolor first and then drawing with colored pencils on top of the painting after the paint is completely dry.3.Look at this colored pencil landscape drawing.4.Watch this video.5.Look at this abstract colored pencil drawing.6.If you haven’t taken the art appreciation course yet, you should start taking it now. Youshould make a habit of looking at artwork and writing or talking about it.
Lesson 125
1.Set up a still life and draw it using colored pencils. Take a photo of your setup before you start drawing so that if something gets moved before you are finished you can put it back in the right place, but don’t draw from the photograph. Draw from life.
Lesson 126
1.Read this. Click on each drawing to see it up close.2.Read this. If you want to, draw this picture and post your drawing to EP’s drawing flickr group.3.Grisaille means a painting or drawing done in shades of only one color, usually grey.4.Look at this portrait.5.Look at this painting that was done with ink.
Lesson 127 – Mixed Media
1.Read this.2.Draw some of the people in these paintings. Use charcoal, pencil, pastel or conte crayon.
•one•two•three•four•five•six•seven•eight•nine•ten•eleven•twelve•thirteen
Allinonehighschool.com

•fourteen•fifteen
Lesson 128
1.You can mix charcoal and graphite pencil together in a drawing. You might want to usegraphite pencil for light areas and charcoal for dark areas because charcoal does not reflect light like graphite pencil does.2.Experiment with mixing charcoal and graphite pencil together on a separate piece of paper before you use them together in a drawing.3.Read this.4.Draw a portrait using pencils and charcoal. Draw it the same way you would if you were drawing with just pencils, but use charcoal instead of pencil for very dark areas like the pupils in the eyes. Use a photo that you took yourself.5.Look at this drawing.
Lesson 129
1.Look at these drawings. Click on each drawing to see it close up.2.Look at these drawings. Click on each drawing to see it close up.3.Look at these drawings. Click on each drawing to see it close up.4.Set up a still life and take a photograph of it. Draw the still life using charcoal and graphite pencil together. You can draw it from life, or you can draw it from the photograph you took, or both. Make your drawing as realistic and detailed as possible.
Lesson 130
1.A trompe l’oeil drawing is a drawing that is so realistic that when people look at it they usually think the objects in the drawing are really there.2.The objects in these drawings must have a depth that appears to be no more than two or three inches because objects with too much depth would only look real when viewed from one angle. The goal of trompe l’oeil drawing is to trick the viewer into thinking the objects in the drawing are real.3.Read about trompe l’oeil art.4.The Old Violin by William Harnett is a famous trompe l’oeil painting. Read about this painting. Keep clicking next until you get to the last page.5.Look at these trompe l’oeil drawings.6.Set up a still life for a trompe l’oeil drawing. For trompe l’oeil drawing, choose objects that are almost flat for your setup, like photographs, cards, newspapers, letters, sheet music, money, pencils, tape, pins, stickers, or string.7.Don’t include living objects in your setup. People will expect them to move and that will destroy the illusion of reality. Attach the objects to a board, wall or door and light them strongly with a single light source.8.It’s better to use artificial light to light your setup instead of natural light because natural light changes a lot. Take a photograph of your still life setup.
Lesson 131
1.Draw your trompe l’oeil still life using charcoal and graphite pencils. Draw all the objects in your still life setup life size. It’s best to draw from life because then you will be able to see more detail and the drawing will look more realistic, but if the light changes or something in your setup gets moved you can draw from your photograph too.
Allinonehighschool.com

2.Draw everything as realistically as possible. How realistic your drawing is depends on how accurately you depict the different textures in your setup.3.Not all highlights are pure white. Remember not to draw outlines around objects if you don’t actually see outlines in your setup.4.Trompe l’oeil drawing takes a long time and it’s difficult to do. A successful trompe l’oeil drawing is more realistic than a photograph. All the tones in the setup need to be reproduced exactly in order to trick viewers into thinking the objects in the drawing are really there.5.Look at this drawing.
Lesson 132
1.Read this. Experiment with using conte crayons.2.Read about conte crayons and follow the directions.3.Read this and watch the videos.4.Read about conte crayons.
Lesson 133
1.Read this. Keep clicking next page until the portrait is finished.2.Take a photo to draw, and draw a portrait using conte crayon the way you just read about it being drawn.3.Look at this portrait.
Lesson 134
1.Read this. Click on Drawing a Portrait of Verna when you get to the bottom of the page.2.Draw a portrait using either conte crayon or charcoal. Don’t trace the outlines of the face or use a grid to help you draw. Use a photograph that you took yourself, or draw from life.3.Look at all of these pictures drawn using conte crayons. Draw a copy of one of them.
1.one2.two3.three4.four5.five6.six7.seven8.eight9.nine10.ten
Lesson 135
1.Read about shading.2.You can mix conte crayon and pastel together.3.Draw a picture using both conte crayon and pastel. Draw it from life or use a photo that you took yourself.4.Look at this drawing.
Lesson 136 – Calligraphy
Allinonehighschool.com
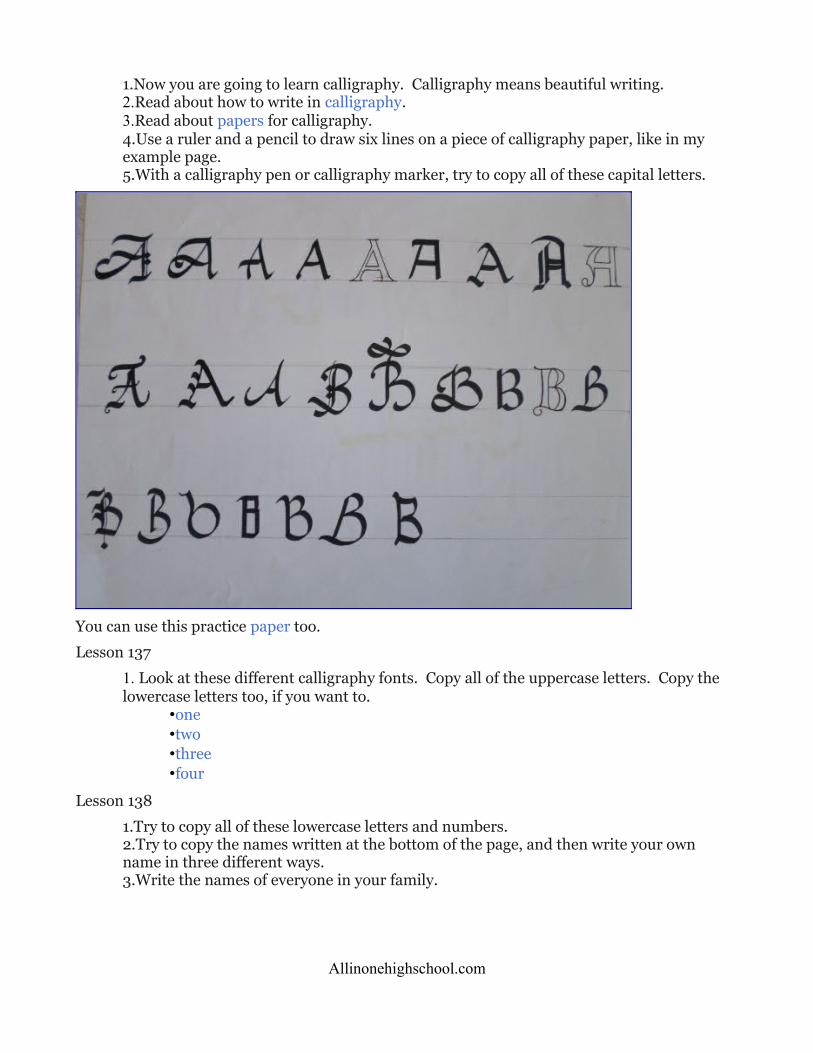
1.Now you are going to learn calligraphy. Calligraphy means beautiful writing.2.Read about how to write in calligraphy.3.Read about papers for calligraphy.4.Use a ruler and a pencil to draw six lines on a piece of calligraphy paper, like in my example page.5.With a calligraphy pen or calligraphy marker, try to copy all of these capital letters.
You can use this practice paper too.
Lesson 137
1. Look at these different calligraphy fonts. Copy all of the uppercase letters. Copy the lowercase letters too, if you want to.
•one•two•three•four
Lesson 138
1.Try to copy all of these lowercase letters and numbers.2.Try to copy the names written at the bottom of the page, and then write your own name in three different ways.3.Write the names of everyone in your family.
Allinonehighschool.com
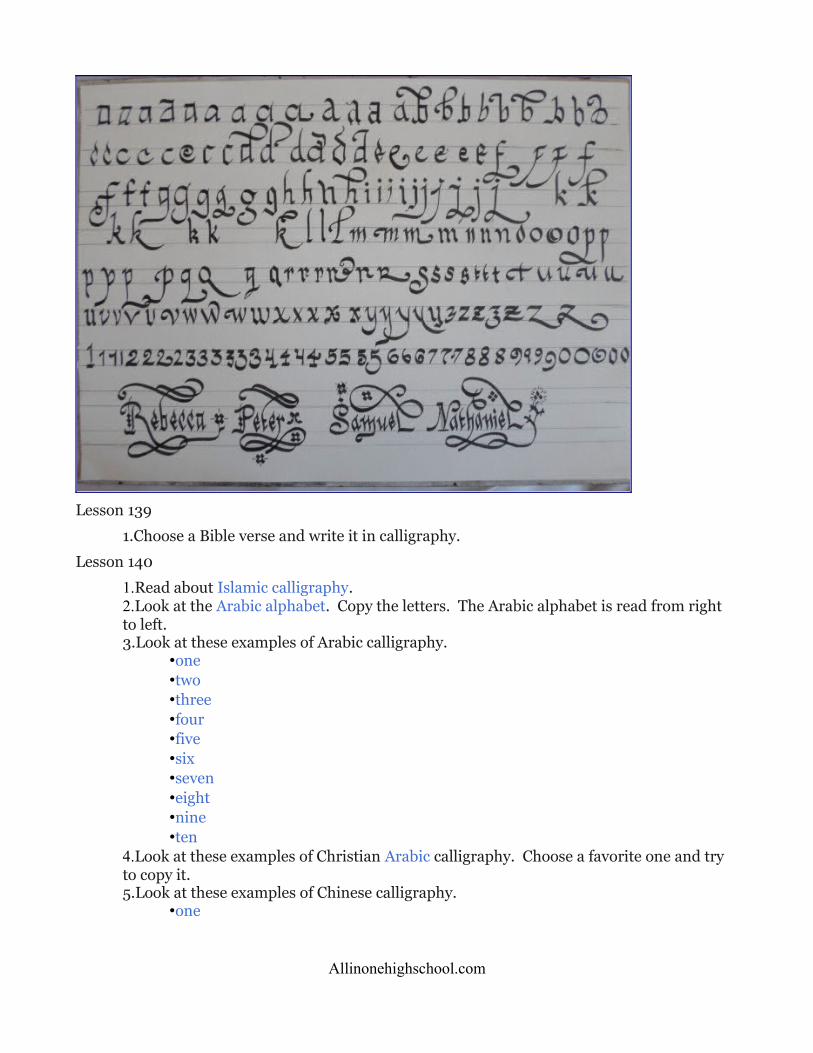
Lesson 139
1.Choose a Bible verse and write it in calligraphy.
Lesson 140
1.Read about Islamic calligraphy.2.Look at the Arabic alphabet. Copy the letters. The Arabic alphabet is read from right to left.3.Look at these examples of Arabic calligraphy.
•one•two•three•four•five•six•seven•eight•nine•ten
4.Look at these examples of Christian Arabic calligraphy. Choose a favorite one and try to copy it.5.Look at these examples of Chinese calligraphy.
•one
Allinonehighschool.com

•two•three•four•five•six•seven•eight•nine•ten
6.Look at the Hebrew alphabet. Copy the letters.7.Look at these examples of Hebrew calligraphy.
•one•two•three•four•five•six•seven•eight•nine•ten
Lesson 141
1.Choose ten different Bible verses and write each one on a separate piece of paper. Decorate the paper.2.Here’s an example. I drew the design around the verse with a pencil, traced the pencil lines with black ink, erased the pencil and then filled the design in with gold paint.
Allinonehighschool.com

•3. Look at these Bible verses for ideas.
1.one2.two3.three4.four5.five6.six
Lesson 142
1.Try to copy all of these capital letters.2.Try to copy these swashes.
Lesson 143
1.Try to copy all of these capital and lowercase letters if you want to.2.Try to copy all of these letters.
Lesson 144
1.Look at these calligraphy fonts. Copy some letters if you want to.2.Look at these examples of calligraphy. Copy some of them if you want to.
1.one2.two3.three 4.four5.five 6.six7.seven
Allinonehighschool.com

8.eight9.nine10.ten11.eleven12.twelve13.thirteen14.fourteen 15.fifteen16.sixteen17.seventeen18.eighteen19.nineteen20.twenty
3.Read about creating an ink and gold border.
Lesson 145
1.You can make pictures with the words you write.2.Look at these examples. Copy some of them if you want to.
1.one2.two3.three4.four5.five6.six7.seven8.eight9.nine10.ten
Lesson 146
1.Look at these bible verses written in calligraphy. Copy some of them if you want to.1.one2.two3.three4.four5.five6.six7.seven8.eight9.nine10.ten11.eleven12.twelve13.thirteen14.fourteen15.fifteen16.sixteen
Allinonehighschool.com
17.seventeen18.eighteen19.nineteen20.twenty
2.Read about drawn and painted borders.3.Read about acanthus leaves.
Lesson 147
1.Look at these cards written in calligraphy.1.one2.two3.three4.four5.five6.six7.seven8.eight9.nine10.ten
Lesson 148
1.Look at these paintings. Choose five favorite paintings and draw copies of them using any medium or mixture of mediums that you want to.
•one Keep clicking Next at the bottom of the page until you get to the end.•two Keep clicking Next at the bottom of the page until you get to the end.•three Keep clicking Next at the bottom of the page until you get to the end.•four Keep clicking Next at the bottom of the page until you get to the end.
2.Look at this drawing.3.Explore these three websites and look at all of the artwork.
•one•two•three
Lesson 149
1.Read about mixed media.2.Read about mixed media.3.Look at this mixed media drawing that was done with ink, graphite, marker and pencil on paper.4.Draw a self portrait using at least three different drawing mediums. If you have paints,you can use those too if you want. You can also use yarn, fabric, stones, feathers, cardboard, sand, or anything else you want to use. Be creative!5.Sign your name on the portrait in calligraphy.6.Write a paragraph describing your self portrait and how you created it.7.Read about how to make paper.8.Look at this portrait.9.Explore this artist’s website. This is not drawing or painting, it is embroidery.
Allinonehighschool.com
Lesson 150
1.Look at all of these pictures of mixed media art.1.one2.two3.three4.four5.five6.six7.seven8.eight9.nine10.ten11.eleven12.twelve13.thirteen14.fourteen15.fifteen16.sixteen17.seventeen18.eighteen19.nineteen20.twenty
2.Watch this video.3.Look at this drawing.
Lesson 151
1.Look at this artwork and click “view larger”.2.Look at all of these examples of 3D mixed media art.
•one•two•three•four•five•six•seven•eight•nine•ten•eleven
Lesson 152
1.Look at these websites for ideas for creating mixed media art.1.one2.two3.three4.four
Allinonehighschool.com

2.Look at this drawing.3.Look at this mixed media painting.4.Look at this painting that was done with gouache. Gouache is similar to watercolor, butunlike watercolor, gouache is opaque.
Lesson 153
1.Look at all of these mixed media drawings. Click next at the top of each page until you have looked at all of the drawings. There are more than a hundred. Many of them are trompe l’oeil drawings.2.If you like trompe l’oeil drawing, draw a trompe l’oeil still life in color.3.Look at this drawing. Write a paragraph describing it.4.Watch this video.5.Look at this portrait.
Lesson 154
1.Look at these abstract drawings and write a paragraph explaining why you like or dislike abstract art.
1.one2.two3.three4.four5.five6.six7.seven8.eight9.nine10.ten11.eleven12.twelve13.thirteen14.fourteen15.fifteen16.sixteen17.seventeen18.eighteen19.nineteen20.twenty
2.Create an abstract drawing inspired by one or more of the drawings above.
Lesson 155
1.Look at these trompe l’oeil drawings. Write a paragraph explaining why you like or dislike trompe l’oeil art.
1.one2.two3.three4.four5.five
Allinonehighschool.com

6.six7.seven8.eight9.nine10.ten11.eleven12.twelve13.thirteen14.fourteen15.fifteen16.sixteen17.seventeen18.eighteen19.nineteen20.twenty
Lesson 156
1.Look at these sketchbook pages for ideas.2.Here are some more photos of sketchbook pages.
Allinonehighschool.com


Lesson 157
1.Look at these abstract drawings.1.one2.two3.three4.four5.five6.six7.seven8.eight
Allinonehighschool.com
9.nine10.ten
Lesson 158
1.Look at these drawings.
Lesson 159
1.Read about photorealism.2.Read some more about photorealism.3.Read these answers to the question “What’s the point of photo-realism, when you can take a picture of it?”4.Write a paragraph about this style.5.Look at all of these examples of photorealistic paintings.
•one•two•three•four•five•six•seven•eight•nine•ten•eleven•twelve•thirteen•fourteen•fifteen•sixteen•seventeen•eighteen•nineteen•twenty
6.Choose one favorite painting from the examples above and fill out this artwork critique form.7.Draw a copy of your favorite painting from the examples above.8.Write a paragraph about your favorite painting from the examples above.9.Watch this time-lapse video of a hyper-realistic drawing of a bag of M&Ms.
Lesson 160
1.Read about trompe l’oeil paintings and drawings.2.Read some more about trompe l’oeil art.3.Write a paragraph about this style.4.Look at all of these examples of trompe l’oeil art.
•one•two
Allinonehighschool.com

•three•four•five•six•seven•eight•nine•ten•eleven•twelve•thirteen•fourteen•fifteen•sixteen•seventeen•eighteen•nineteen•twenty
5.Choose a favorite painting from the examples above and fill out the artwork critique form.6.Draw a copy of your favorite painting from the examples above.7.Write a paragraph about your favorite painting from the examples above.
Lesson 161
1.Read about Classical Realism.2.Read about realism.3.Write a paragraph about this style.4.Look at all these examples of traditional realistic drawings and paintings.
•one•two•three•four•five•six•seven•eight•nine•ten•eleven•twelve•thirteen•fourteen•fifteen•sixteen •seventeen
Allinonehighschool.com

•eighteen•nineteen•twenty
5.Choose one favorite drawing or painting from the examples above and fill out the artwork critique form.6.Draw a copy of your favorite painting or drawing from the examples above.7.Write a paragraph about your favorite painting or drawing from the examples above.
Lesson 162
1.Read about painterliness.2.Read about how to paint in an expressive or painterly style.3.Write a paragraph about this style.4.Look at all of these examples of painterly paintings.
•one•two•three•four•five•six•seven•eight•nine•ten•eleven•twelve•thirteen•fourteen•fifteen•sixteen•seventeen•eighteen•nineteen•twenty
5.Choose one favorite painting from the examples above and fill out the artwork critique form.6.Draw a copy of your favorite painting from the examples above.7.Write a paragraph about your favorite painting from the examples above.8.Watch this time-lapse video of a portrait being painted in this style.
Lesson 163
1.Read about impressionism.2.Read some more about impressionism.3.Write a paragraph about this style.4.Look at all of these examples of impressionist paintings.
•one
Allinonehighschool.com

•two•three•four•five•six•seven•eight•nine•ten•eleven•twelve•thirteen•fourteen•fifteen•sixteen•seventeen•eighteen•nineteen•twenty
5.Choose one favorite painting from the examples above and fill out the artwork critique form.6.Draw a copy of your favorite painting from the examples above.7.Write a paragraph about your favorite painting from the examples above.
Lesson 164
1.Read about expressionism.2.Read some more about expressionism.3.Write a paragraph about this style.4.Look at all of these examples of expressionist art.
•one•two•three•four•five•six•seven•eight•nine•ten•eleven•twelve•thirteen•fourteen•fifteen•sixteen
Allinonehighschool.com

•seventeen•eighteen•nineteen•twenty
5.Choose one favorite painting from the examples above and fill out this artwork critique form.6.Draw a copy of your favorite painting from the examples above.7.Write a paragraph about your favorite painting from the examples above.
Lesson 165
1.Read about surrealism.2.Read some more about surrealism.3.Write a paragraph about this style.4.Look at all of these examples of surrealistic artwork.
•one•two•three•four•five•six•seven•eight•nine•ten•eleven•twelve•thirteen•fourteen•fifteen•sixteen•seventeen•eighteen•nineteen•twenty
5.Choose one favorite painting from the examples above and fill out the artwork critique form.6.Draw a copy of your favorite painting from the examples above.
Lesson 166
1.Read about cubism.2.Read some more about cubism.3.Write a paragraph about this style.4.Look at all of these examples of cubist artwork.
•one•two
Allinonehighschool.com

•three•four•five•six•seven•eight•nine•ten•eleven•twelve•thirteen•fourteen•fifteen•sixteen•seventeen•eighteen•nineteen•twenty
5.Choose a favorite painting from the examples above and fill out this artwork critique form.6.Draw a copy of your favorite painting from the examples above.7.Write a paragraph about your favorite painting from the examples above.
Lesson 167
1.Read about abstract art.2.Read some more about abstract art.3.Write a paragraph about this style.4.Look at all of these examples of abstract drawings and paintings.
•one•two•three•four•five•six•seven•eight•nine•ten•eleven•twelve•thirteen•fourteen•fifteen•sixteen•seventeen
Allinonehighschool.com

•eighteen•nineteen•twenty
5.Choose one favorite drawing or painting from the examples above and fill out this artwork critique form.6.Draw a copy of your favorite painting from the examples above.7.Write a paragraph describing your favorite painting from the examples above.8.Watch this time-lapse video of an abstract painting being painted.
Lesson 168
1.Write a paragraph describing the best drawing you have ever done.
Lesson 169
1.Write an essay about your favorite artist and draw a copy of one of his/her artworks.
Lesson 170
1.Write an essay about your favorite drawing or painting style. Explain why you prefer it over the others you’ve learned about.2.God gave you the ability to draw for a reason. Ask him how he wants you to use your talent.
Congratulations, you’re finished!
Allinonehighschool.com