dp-c405 / c305 / c265 (for scanner and email) - itec · before operating this machine, please...
TRANSCRIPT
Before operating this machine, please carefully read this manual
and keep this documentation in a safe place for future reference.
(Illustration shows optional accessories that may not be installed on your machine.)English
Digital Colour Imaging Systems
Operating Instructions(For Scanner and Email)
Model No. DP-C405 / C305 / C265
2
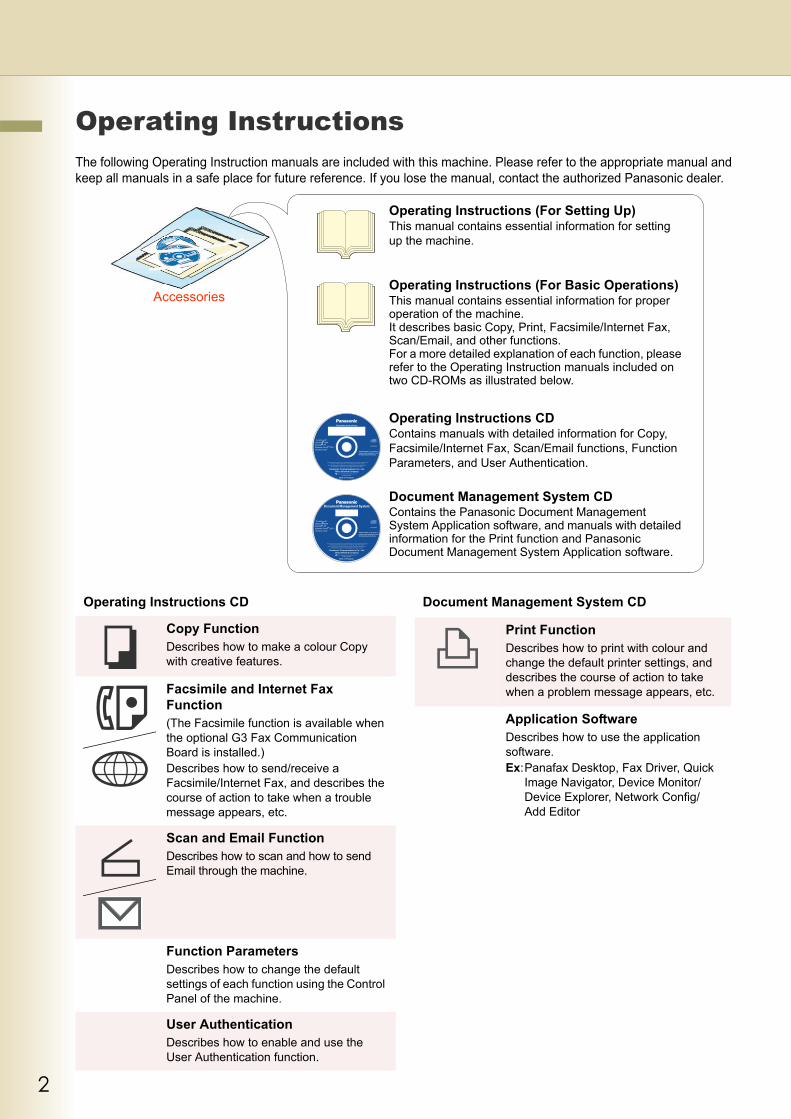
Operating InstructionsThe following Operating Instruction manuals are included with this machine. Please refer to the appropriate manual and keep all manuals in a safe place for future reference. If you lose the manual, contact the authorized Panasonic dealer.
Accessories
Operating Instructions (For Setting Up)This manual contains essential information for setting up the machine.
Operating Instructions (For Basic Operations)This manual contains essential information for proper operation of the machine.It describes basic Copy, Print, Facsimile/Internet Fax, Scan/Email, and other functions.For a more detailed explanation of each function, please refer to the Operating Instruction manuals included on two CD-ROMs as illustrated below.
Operating Instructions CDContains manuals with detailed information for Copy, Facsimile/Internet Fax, Scan/Email functions, Function Parameters, and User Authentication.
Document Management System CDContains the Panasonic Document Management System Application software, and manuals with detailed information for the Print function and Panasonic Document Management System Application software.
Operating Instructions CD
Copy FunctionDescribes how to make a colour Copy with creative features.
Facsimile and Internet Fax Function(The Facsimile function is available when the optional G3 Fax Communication Board is installed.)Describes how to send/receive a Facsimile/Internet Fax, and describes the course of action to take when a trouble message appears, etc.
Scan and Email FunctionDescribes how to scan and how to send Email through the machine.
Function ParametersDescribes how to change the default settings of each function using the Control Panel of the machine.
User AuthenticationDescribes how to enable and use the User Authentication function.
Document Management System CD
Print FunctionDescribes how to print with colour and change the default printer settings, and describes the course of action to take when a problem message appears, etc.
Application SoftwareDescribes how to use the application software.Ex:Panafax Desktop, Fax Driver, Quick
Image Navigator, Device Monitor/Device Explorer, Network Config/Add Editor
3
Conventions
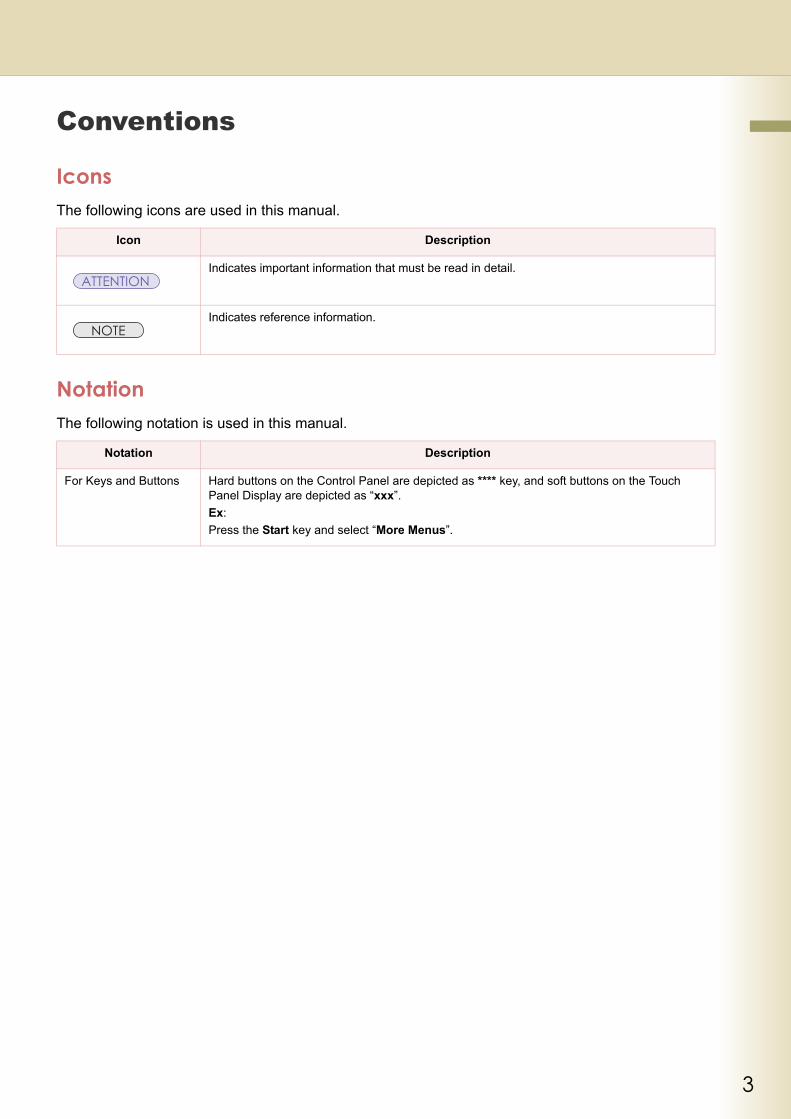
IconsThe following icons are used in this manual.
NotationThe following notation is used in this manual.
Icon Description
Indicates important information that must be read in detail.
Indicates reference information.
Notation Description
For Keys and Buttons Hard buttons on the Control Panel are depicted as **** key, and soft buttons on the Touch Panel Display are depicted as “xxx”.Ex:Press the Start key and select “More Menus”.

4
Table of Contents
Chapter 1 Getting To Know Your Machine
Basic Operation Procedure ................................................................................................. 6Sending an Email ................................................................................................................ 8
Chapter 2 Scan/Email Operations
Scan to the SD Memory Card.............................................................................. “SD Card” 10Scan to the PCMCIA/PC Card............................................................................. “PC Card” 12Scan to the Internal Hard Disk Drive ................................................................................... 14
Retrieving Scanned Image from Hard Disk Drive ........................................................... 16Scan to a Computer............................................................................................................. 18Scan to Email .......................................................................................................... “Email” 20
Searching LDAP Server for Email Address........................................................ “Global” 23Adding an Email Address to the Address Book ...................................... “Add to Local” 25
Sending an Email with Image File Attachment .............................................. “Attachment” 28Attaching an Image File from the SD Memory Card ....................................... “SD Card” 28Attaching an Image File from the PCMCIA/PC Card ...................................... “PC Card” 32Attaching an Image File from the Internal Hard Disk Drive ............................................. 36
Receiving an Email.............................................................................................................. 38Configuring to Receive Email .......................................................................................... 38Receiving Email Automatically ........................................................................................ 38Receiving Email Manually ............................................................................ “Get Email” 39
Chapter 3 Scanner Settings
Setting the Scanning Quality ......................................................................... “Basic Menu” 40Quality Adjustment .......................................................................................................... 40
Setting Original Type and Scanning Density ....................................................................... 41Selecting Original Type ................................................................................................... 41Adjusting Scanning Density ............................................................................................ 41
Scanning Resolution............................................................................................................ 42Advanced Colour Quality Settings................................................................. “Adjustment” 44
Compression (Full Colour) ...............................................“Compression (Full Colour)” 44Compression (Grey Scale) ............................................... “Compression (Grey Scale)” 46Compression (Black)................................................................. “Compression (Black)” 46Background Removal ............................................................... “Background Removal” 47Contrast.......................................................................................................... “Contrast” 47
Setting the File Type and/or File Name............................................“File Type and Name” 48
5
Scanning Special Originals.................................................................................................. 50Scanning 2-Sided Originals ............................................................. “2-Sided Originals” 50Scanning Special Originals (Thin Paper, etc.) from ADF ........... “Job Build and SADF” 52
Chapter 4 Adding to the Address Book
Editing the Address Book .................................................................................................... 54Editing an Email Address ................................................................................................ 54Deleting an Email Address .............................................................................................. 56
Editing Image Box Name..................................................................................................... 58
Chapter 5 Appendix
Index .................................................................................................................................... 60
6
Chapter 1 G
etting To Know
Your M
achine
Chapter 1Getting To Know Your Machine
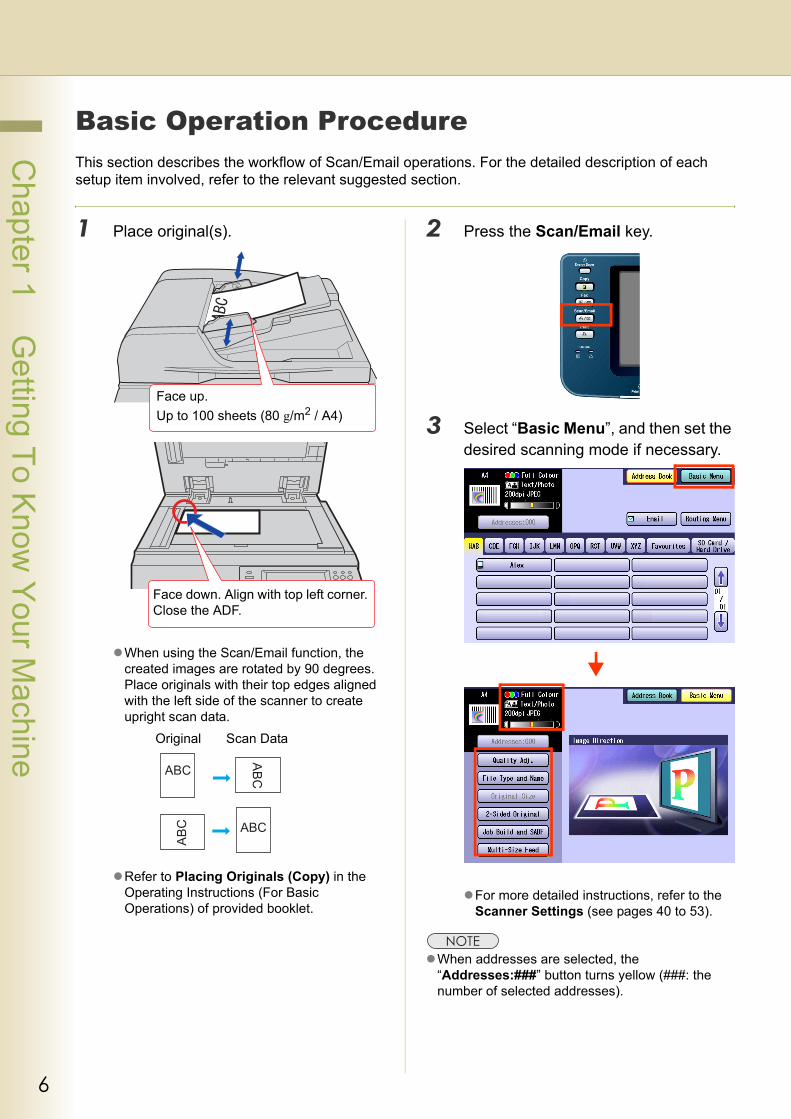
Basic Operation ProcedureThis section describes the workflow of Scan/Email operations. For the detailed description of each setup item involved, refer to the relevant suggested section.
1 Place original(s).
When using the Scan/Email function, the created images are rotated by 90 degrees. Place originals with their top edges aligned with the left side of the scanner to create upright scan data.
Refer to Placing Originals (Copy) in the Operating Instructions (For Basic Operations) of provided booklet.
2 Press the Scan/Email key.
3 Select “Basic Menu”, and then set the desired scanning mode if necessary.
For more detailed instructions, refer to the Scanner Settings (see pages 40 to 53).
When addresses are selected, the “Addresses:###” button turns yellow (###: the number of selected addresses).
Face up. Up to 100 sheets (80 g/m2 / A4)
Face down. Align with top left corner. Close the ADF.
ABC
ABC
ABC ABC
Original Scan Data
7
Chapter 1 G
etting To Know
Your M
achine
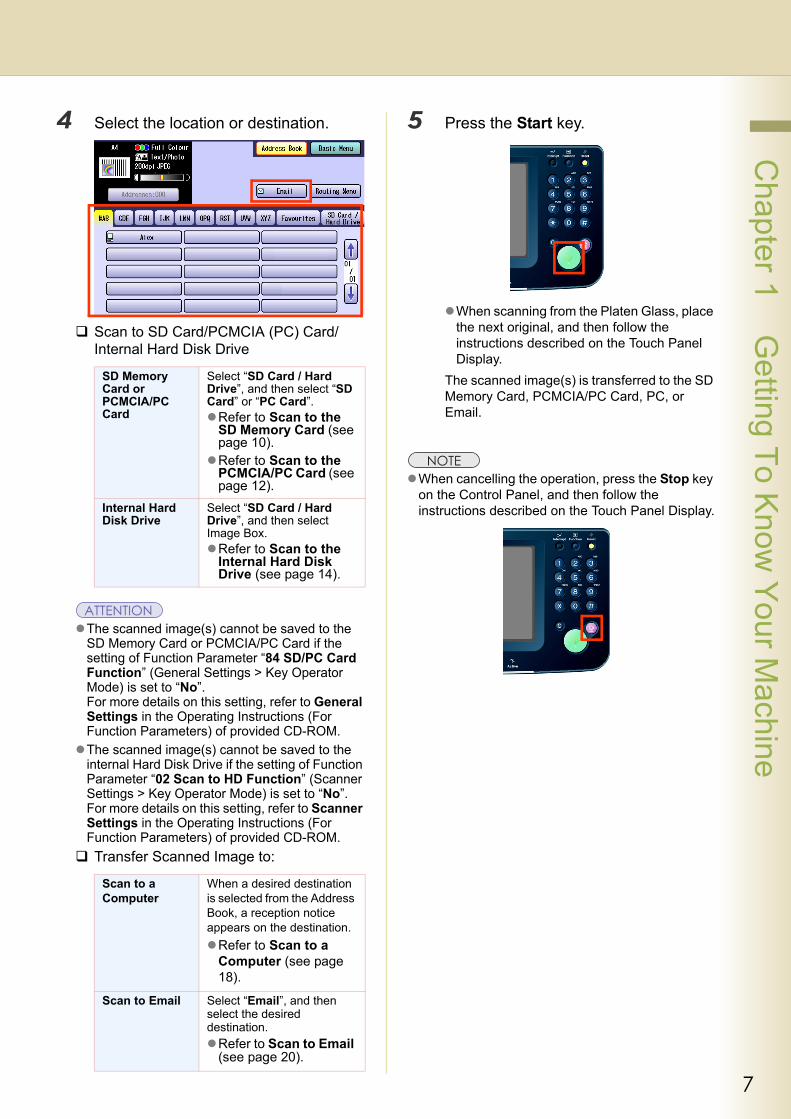
4 Select the location or destination.
Scan to SD Card/PCMCIA (PC) Card/Internal Hard Disk Drive
The scanned image(s) cannot be saved to the SD Memory Card or PCMCIA/PC Card if the setting of Function Parameter “84 SD/PC Card Function” (General Settings > Key Operator Mode) is set to “No”. For more details on this setting, refer to General Settings in the Operating Instructions (For Function Parameters) of provided CD-ROM.The scanned image(s) cannot be saved to the internal Hard Disk Drive if the setting of Function Parameter “02 Scan to HD Function” (Scanner Settings > Key Operator Mode) is set to “No”.For more details on this setting, refer to Scanner Settings in the Operating Instructions (For Function Parameters) of provided CD-ROM.Transfer Scanned Image to:
5 Press the Start key.
When scanning from the Platen Glass, place the next original, and then follow the instructions described on the Touch Panel Display.
The scanned image(s) is transferred to the SD Memory Card, PCMCIA/PC Card, PC, or Email.
When cancelling the operation, press the Stop key on the Control Panel, and then follow the instructions described on the Touch Panel Display.
SD Memory Card or PCMCIA/PC Card
Select “SD Card / Hard Drive”, and then select “SD Card” or “PC Card”.
Refer to Scan to the SD Memory Card (see page 10).Refer to Scan to the PCMCIA/PC Card (see page 12).
Internal Hard Disk Drive
Select “SD Card / Hard Drive”, and then select Image Box.
Refer to Scan to the Internal Hard Disk Drive (see page 14).
Scan to a Computer
When a desired destination is selected from the Address Book, a reception notice appears on the destination.
Refer to Scan to a Computer (see page 18).
Scan to Email Select “Email”, and then select the desired destination.
Refer to Scan to Email (see page 20).
8
Chapter 1 G
etting To Know
Your M
achine
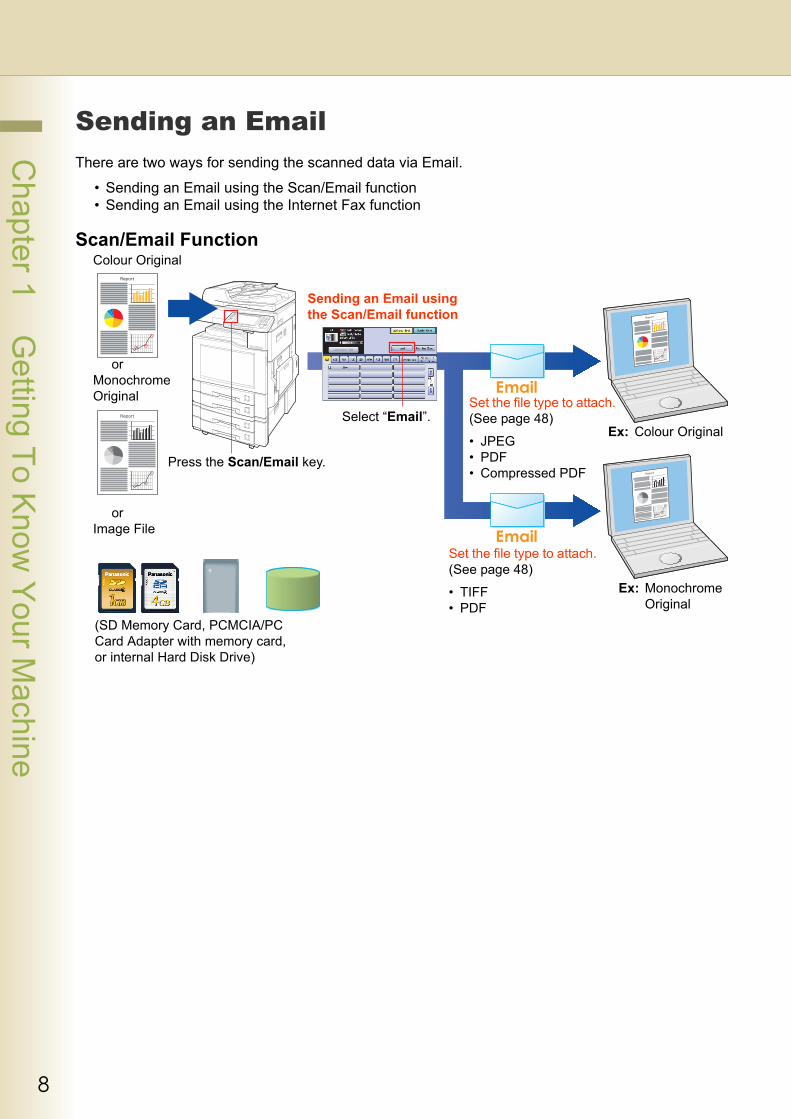
Sending an EmailThere are two ways for sending the scanned data via Email.
• Sending an Email using the Scan/Email function• Sending an Email using the Internet Fax function
Scan/Email FunctionColour Original
orMonochrome Original
Press the Scan/Email key.
Sending an Email using the Scan/Email function
Select “Email”.Set the file type to attach. (See page 48)
• JPEG• PDF• Compressed PDF
Ex: Colour Original
Ex: Monochrome Original
Set the file type to attach. (See page 48)
• TIFF• PDF
orImage File
(SD Memory Card, PCMCIA/PC Card Adapter with memory card, or internal Hard Disk Drive)

9
Chapter 1 G
etting To Know
Your M
achine
Internet Fax FunctionMonochrome Original
Press the Fax key.
Select “Email”.
Sending an Email using the Internet Fax function
Set the file type to attach. (Refer to Setting a File Type and a File Name in the Operating Instructions (For Facsimile and Internet Fax) of provided CD-ROM.)• TIFF• PDF
Internet Fax Device
Monochrome
Each Email function can be set in the “Fax/Email Settings”. Refer to Fax/Email Settings in the Operating Instructions (For Function Parameters) of provided CD-ROM.
10
Chapter 2 S
can/Em
ail Operations
Chapter 2Scan/Email Operations
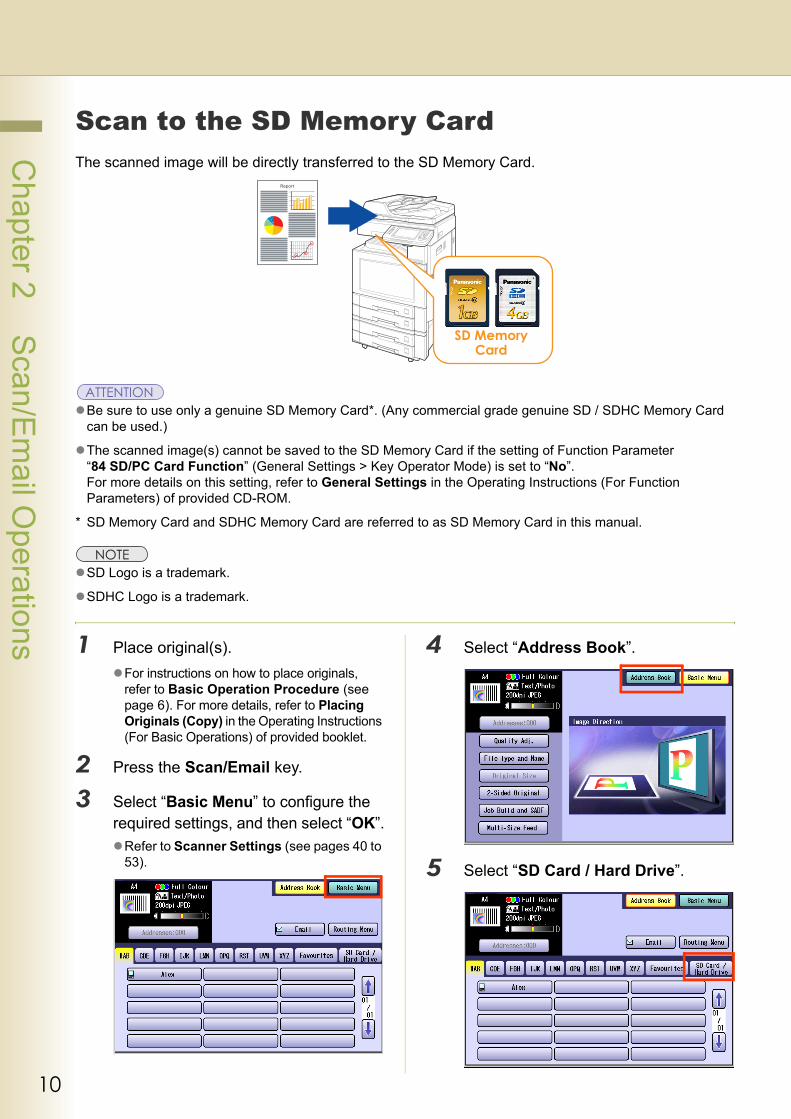
Scan to the SD Memory CardThe scanned image will be directly transferred to the SD Memory Card.
Be sure to use only a genuine SD Memory Card*. (Any commercial grade genuine SD / SDHC Memory Card can be used.)
The scanned image(s) cannot be saved to the SD Memory Card if the setting of Function Parameter “84 SD/PC Card Function” (General Settings > Key Operator Mode) is set to “No”.For more details on this setting, refer to General Settings in the Operating Instructions (For Function Parameters) of provided CD-ROM.
* SD Memory Card and SDHC Memory Card are referred to as SD Memory Card in this manual.
SD Logo is a trademark.
SDHC Logo is a trademark.
1 Place original(s).For instructions on how to place originals, refer to Basic Operation Procedure (see page 6). For more details, refer to Placing Originals (Copy) in the Operating Instructions (For Basic Operations) of provided booklet.
2 Press the Scan/Email key.
3 Select “Basic Menu” to configure the required settings, and then select “OK”.
Refer to Scanner Settings (see pages 40 to 53).
4 Select “Address Book”.
5 Select “SD Card / Hard Drive”.
11
Chapter 2 S
can/Em
ail Operations
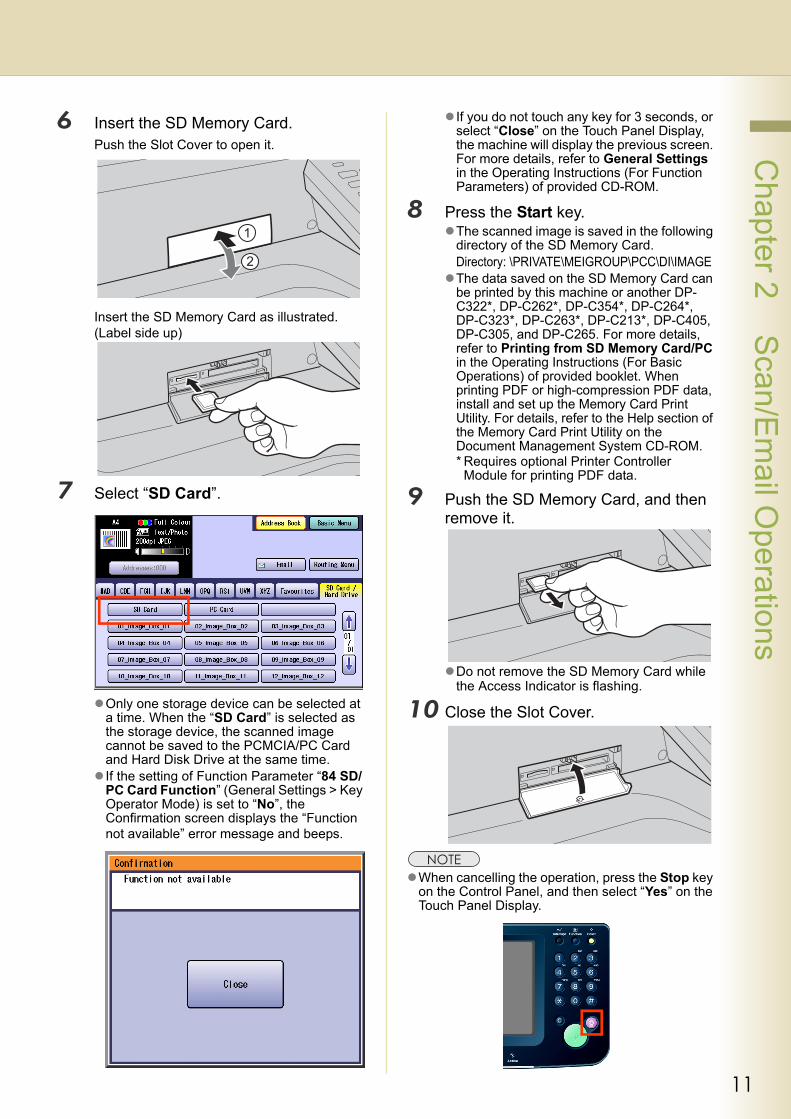
6 Insert the SD Memory Card.Push the Slot Cover to open it.
Insert the SD Memory Card as illustrated. (Label side up)
7 Select “SD Card”.
Only one storage device can be selected at a time. When the “SD Card” is selected as the storage device, the scanned image cannot be saved to the PCMCIA/PC Card and Hard Disk Drive at the same time.If the setting of Function Parameter “84 SD/PC Card Function” (General Settings > Key Operator Mode) is set to “No”, the Confirmation screen displays the “Function not available” error message and beeps.
If you do not touch any key for 3 seconds, or select “Close” on the Touch Panel Display, the machine will display the previous screen. For more details, refer to General Settings in the Operating Instructions (For Function Parameters) of provided CD-ROM.
8 Press the Start key.The scanned image is saved in the following directory of the SD Memory Card.Directory: \PRIVATE\MEIGROUP\PCC\DI\IMAGEThe data saved on the SD Memory Card can be printed by this machine or another DP-C322*, DP-C262*, DP-C354*, DP-C264*, DP-C323*, DP-C263*, DP-C213*, DP-C405, DP-C305, and DP-C265. For more details, refer to Printing from SD Memory Card/PC in the Operating Instructions (For Basic Operations) of provided booklet. When printing PDF or high-compression PDF data, install and set up the Memory Card Print Utility. For details, refer to the Help section of the Memory Card Print Utility on the Document Management System CD-ROM.* Requires optional Printer Controller
Module for printing PDF data.
9 Push the SD Memory Card, and then remove it.
Do not remove the SD Memory Card while the Access Indicator is flashing.
10 Close the Slot Cover.
When cancelling the operation, press the Stop key on the Control Panel, and then select “Yes” on the Touch Panel Display.
12
Chapter 2 S
can/Em
ail Operations
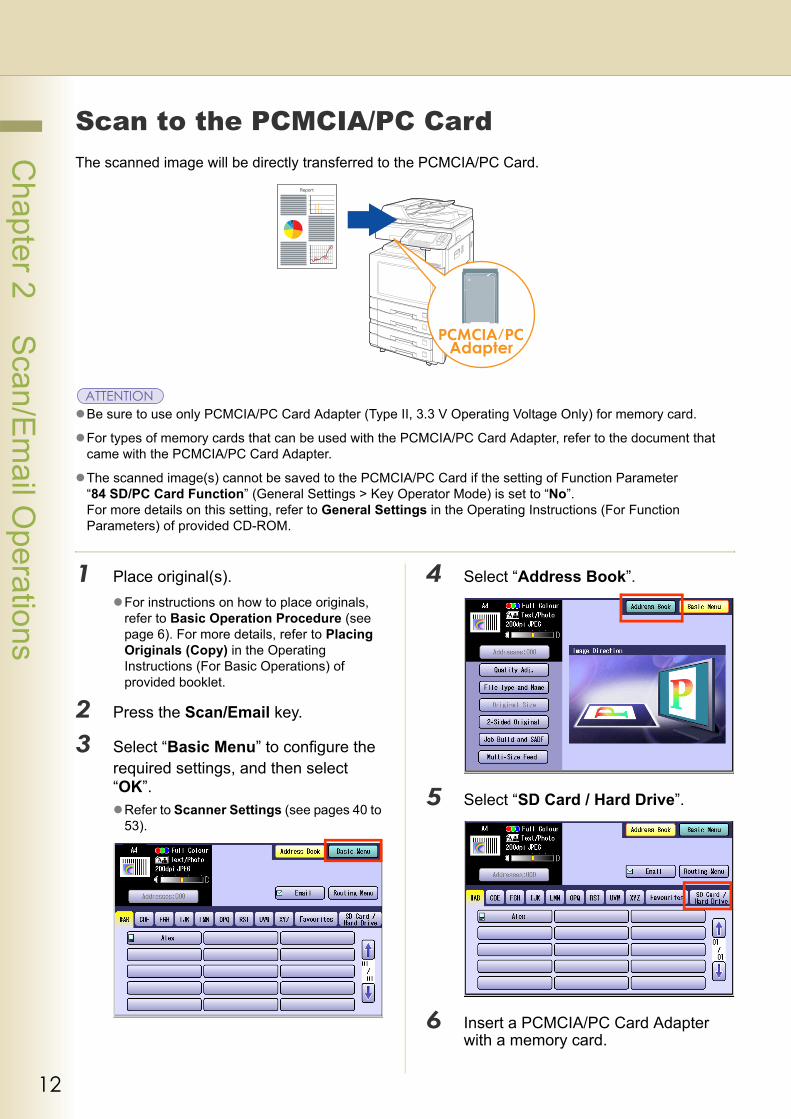
Scan to the PCMCIA/PC CardThe scanned image will be directly transferred to the PCMCIA/PC Card.
Be sure to use only PCMCIA/PC Card Adapter (Type II, 3.3 V Operating Voltage Only) for memory card.
For types of memory cards that can be used with the PCMCIA/PC Card Adapter, refer to the document that came with the PCMCIA/PC Card Adapter.
The scanned image(s) cannot be saved to the PCMCIA/PC Card if the setting of Function Parameter “84 SD/PC Card Function” (General Settings > Key Operator Mode) is set to “No”.For more details on this setting, refer to General Settings in the Operating Instructions (For Function Parameters) of provided CD-ROM.
1 Place original(s).For instructions on how to place originals, refer to Basic Operation Procedure (see page 6). For more details, refer to Placing Originals (Copy) in the Operating Instructions (For Basic Operations) of provided booklet.
2 Press the Scan/Email key.
3 Select “Basic Menu” to configure the required settings, and then select “OK”.
Refer to Scanner Settings (see pages 40 to 53).
4 Select “Address Book”.
5 Select “SD Card / Hard Drive”.
6 Insert a PCMCIA/PC Card Adapter with a memory card.
13
Chapter 2 S
can/Em
ail Operations
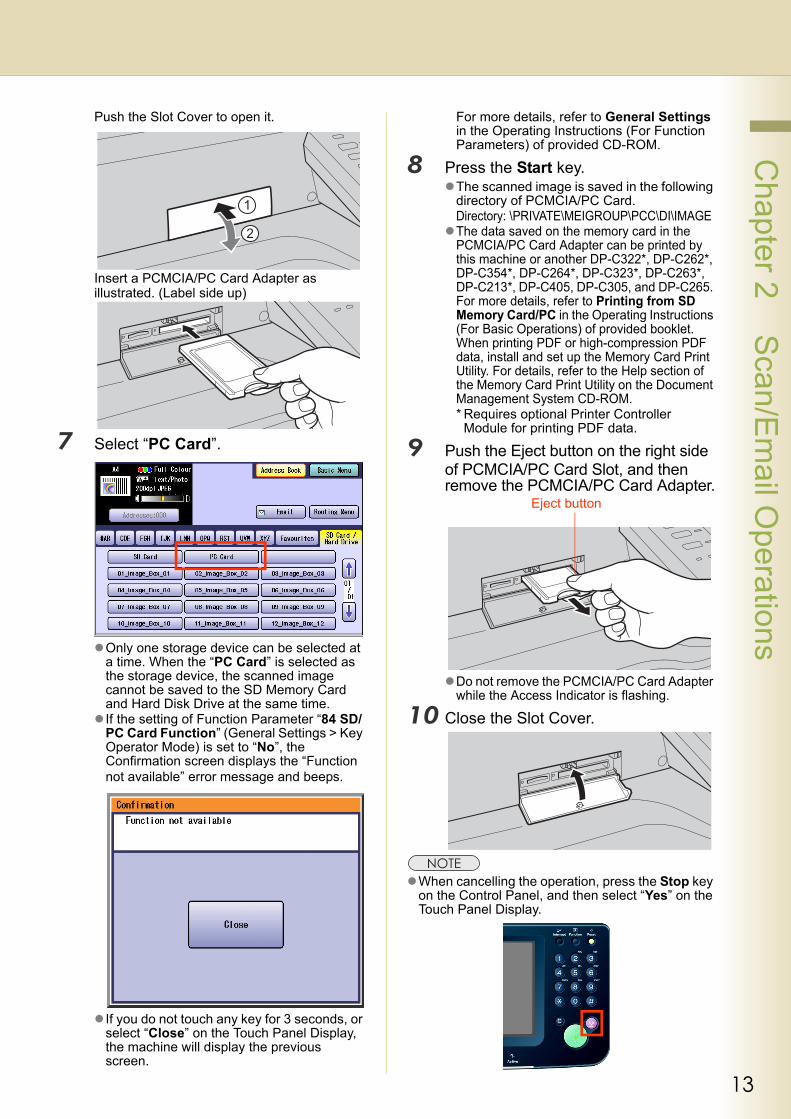
Push the Slot Cover to open it.
Insert a PCMCIA/PC Card Adapter as illustrated. (Label side up)
7 Select “PC Card”.
Only one storage device can be selected at a time. When the “PC Card” is selected as the storage device, the scanned image cannot be saved to the SD Memory Card and Hard Disk Drive at the same time.If the setting of Function Parameter “84 SD/PC Card Function” (General Settings > Key Operator Mode) is set to “No”, the Confirmation screen displays the “Function not available” error message and beeps.
If you do not touch any key for 3 seconds, or select “Close” on the Touch Panel Display, the machine will display the previous screen.
For more details, refer to General Settings in the Operating Instructions (For Function Parameters) of provided CD-ROM.
8 Press the Start key.The scanned image is saved in the following directory of PCMCIA/PC Card.Directory: \PRIVATE\MEIGROUP\PCC\DI\IMAGEThe data saved on the memory card in the PCMCIA/PC Card Adapter can be printed by this machine or another DP-C322*, DP-C262*, DP-C354*, DP-C264*, DP-C323*, DP-C263*, DP-C213*, DP-C405, DP-C305, and DP-C265. For more details, refer to Printing from SD Memory Card/PC in the Operating Instructions (For Basic Operations) of provided booklet. When printing PDF or high-compression PDF data, install and set up the Memory Card Print Utility. For details, refer to the Help section of the Memory Card Print Utility on the Document Management System CD-ROM.* Requires optional Printer Controller
Module for printing PDF data.
9 Push the Eject button on the right side of PCMCIA/PC Card Slot, and then remove the PCMCIA/PC Card Adapter.
Do not remove the PCMCIA/PC Card Adapter while the Access Indicator is flashing.
10 Close the Slot Cover.
When cancelling the operation, press the Stop key on the Control Panel, and then select “Yes” on the Touch Panel Display.
Eject button
14
Chapter 2 S
can/Em
ail Operations
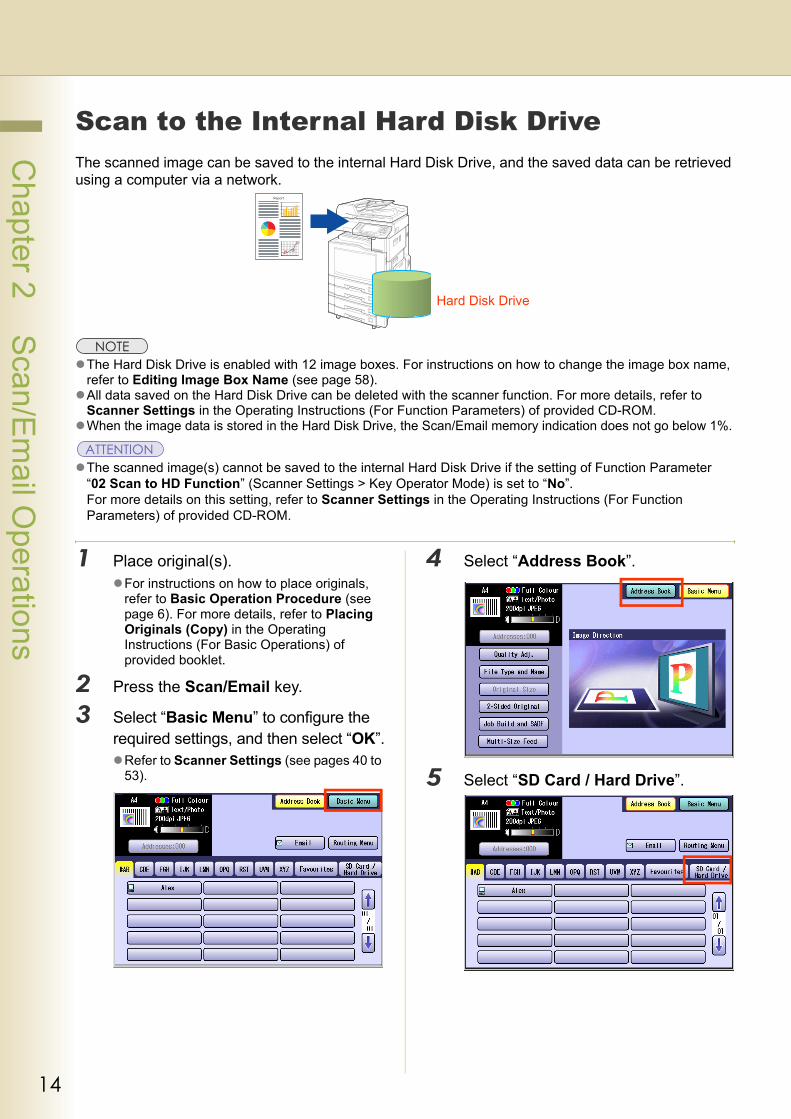
Scan to the Internal Hard Disk DriveThe scanned image can be saved to the internal Hard Disk Drive, and the saved data can be retrieved using a computer via a network.
The Hard Disk Drive is enabled with 12 image boxes. For instructions on how to change the image box name, refer to Editing Image Box Name (see page 58).All data saved on the Hard Disk Drive can be deleted with the scanner function. For more details, refer to Scanner Settings in the Operating Instructions (For Function Parameters) of provided CD-ROM.When the image data is stored in the Hard Disk Drive, the Scan/Email memory indication does not go below 1%.
The scanned image(s) cannot be saved to the internal Hard Disk Drive if the setting of Function Parameter “02 Scan to HD Function” (Scanner Settings > Key Operator Mode) is set to “No”.For more details on this setting, refer to Scanner Settings in the Operating Instructions (For Function Parameters) of provided CD-ROM.
1 Place original(s).For instructions on how to place originals, refer to Basic Operation Procedure (see page 6). For more details, refer to Placing Originals (Copy) in the Operating Instructions (For Basic Operations) of provided booklet.
2 Press the Scan/Email key.
3 Select “Basic Menu” to configure the required settings, and then select “OK”.
Refer to Scanner Settings (see pages 40 to 53).
4 Select “Address Book”.
5 Select “SD Card / Hard Drive”.
Hard Disk Drive
15
Chapter 2 S
can/Em
ail Operations
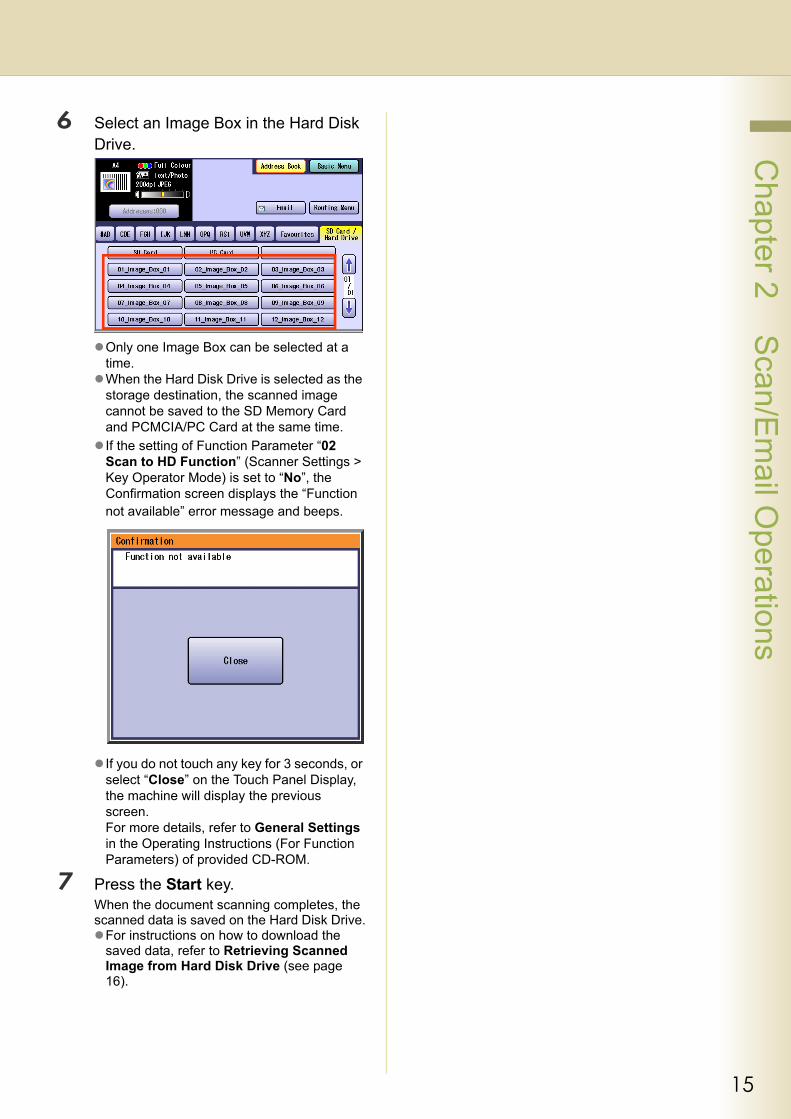
6 Select an Image Box in the Hard Disk Drive.
Only one Image Box can be selected at a time.When the Hard Disk Drive is selected as the storage destination, the scanned image cannot be saved to the SD Memory Card and PCMCIA/PC Card at the same time.If the setting of Function Parameter “02 Scan to HD Function” (Scanner Settings > Key Operator Mode) is set to “No”, the Confirmation screen displays the “Function not available” error message and beeps.
If you do not touch any key for 3 seconds, or select “Close” on the Touch Panel Display, the machine will display the previous screen. For more details, refer to General Settings in the Operating Instructions (For Function Parameters) of provided CD-ROM.
7 Press the Start key.When the document scanning completes, the scanned data is saved on the Hard Disk Drive.
For instructions on how to download the saved data, refer to Retrieving Scanned Image from Hard Disk Drive (see page 16).

16
Chapter 2 S
can/Em
ail Operations
Retrieving Scanned Image from Hard Disk Drive
1 Start a Web browser, such as Internet Explorer®, on your computer.
2 Enter the IP Address that has been set on this machine.Ex: http://10.74.232.130
The machine status will be displayed on the Web browser.
3 Select an Image Box from the Scanner Image Box list, and then download the image data from the Image Box onto the computer.Click “Scanner Image Box”.
Select an Image Box where image data is saved.
Select a file where image data is saved.Open it with a left-click, and save it with a right-click of your PC mouse.
17
Chapter 2 S
can/Em
ail Operations
Memo

18
Chapter 2 S
can/Em
ail Operations
Scan to a ComputerThe scanned image will be transferred to the desired computer.
Before transferring the scanned image to your computer, it is necessary first to install the Panasonic Document Management System software, and then set up the scanner configuration on your computer.Refer to the Operating Instructions (For Setting Up) of provided booklet.
Computers (with the following settings) on the network are automatically displayed in the Address Book. (They are not displayed in “Favourites” on the Search tab.)
• The scanner settings are made with the Panasonic Communication Utility.
• The Panasonic Communication Utility has been activated. (The Panasonic Communication Utility is automatically activated when Windows® starts.)
The Panasonic Communication Utility can display up to 120 computers in the Address Book.
The computer is automatically deleted from the Address Book under the following cases:
• When the computer is logged off from the network
• When the Panasonic Communication Utility is terminated
1 Place original(s).For instructions on how to place originals, refer to Basic Operation Procedure (see page 6). For more details, refer to Placing Originals (Copy) in the Operating Instructions (For Basic Operations) of provided booklet.
2 Press the Scan/Email key.
3 Select “Basic Menu” to configure the required settings, and then select “OK”.
Refer to Scanner Settings (see pages 40 to 53).
19
Chapter 2 S
can/Em
ail Operations
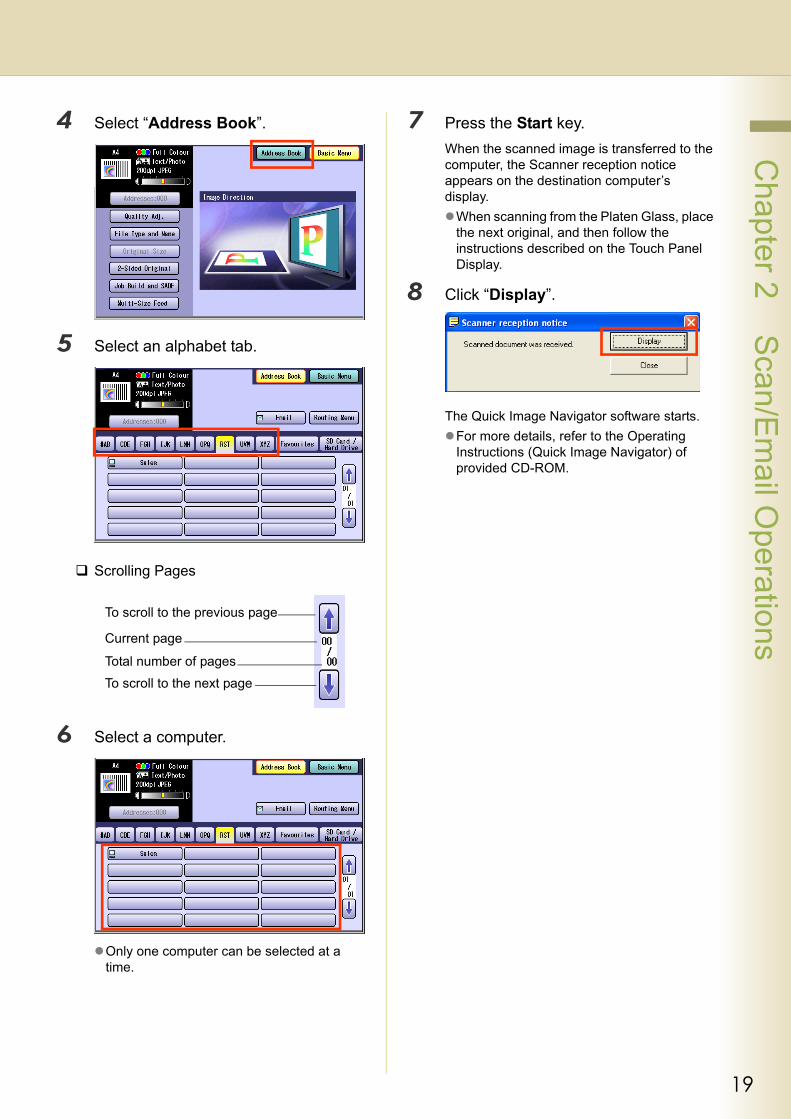
4 Select “Address Book”.
5 Select an alphabet tab.
Scrolling Pages
6 Select a computer.
Only one computer can be selected at a time.
7 Press the Start key.When the scanned image is transferred to the computer, the Scanner reception notice appears on the destination computer’s display.
When scanning from the Platen Glass, place the next original, and then follow the instructions described on the Touch Panel Display.
8 Click “Display”.
The Quick Image Navigator software starts.For more details, refer to the Operating Instructions (Quick Image Navigator) of provided CD-ROM.
To scroll to the previous page
Current page
Total number of pagesTo scroll to the next page

20
Chapter 2 S
can/Em
ail Operations
Scan to EmailThe scanned image can be emailed to network connected computers.
JPEG (jpg) file is not available for multiple pages.JPEG (jpg) file is only available in the Colour/Grey Scale mode.TIFF file is only available in the Monochrome mode.
When sending a multi-page colour document:
<To a Single Address>When attaching a multi-page colour document in JPEG/PDF (except Compressed PDF) file, the machine sends an individual Email for each scanned page. If you scan more than one page, the same number of Emails will be sent.To send a multi-page document as a single Email attachment, change the Fax Parameter “183 Colour Attachment” to “Multi”.For more details, refer to Fax/Email Settings in the Operating Instructions (For Function Parameters) of provided CD-ROM.
<To Multiple Addresses>By default, the machine will send an Email with a multi-page (PDF) file or multi-files (JPEG) colour document.
A multi-page colour scanned JPEG/PDF document tends to become very large in size.If the attachment exceeds the maximum allowed data size for your network environment, send each page at a time.
1 Place original(s).For instructions on how to place originals, refer to Basic Operation Procedure (see page 6). For more details, refer to Placing Originals (Copy) in the Operating Instructions (For Basic Operations) of provided booklet.
2 Press the Scan/Email key.
3 Select “Email”.
or Attachment Image File (see pages 28 to 37)
21
Chapter 2 S
can/Em
ail Operations
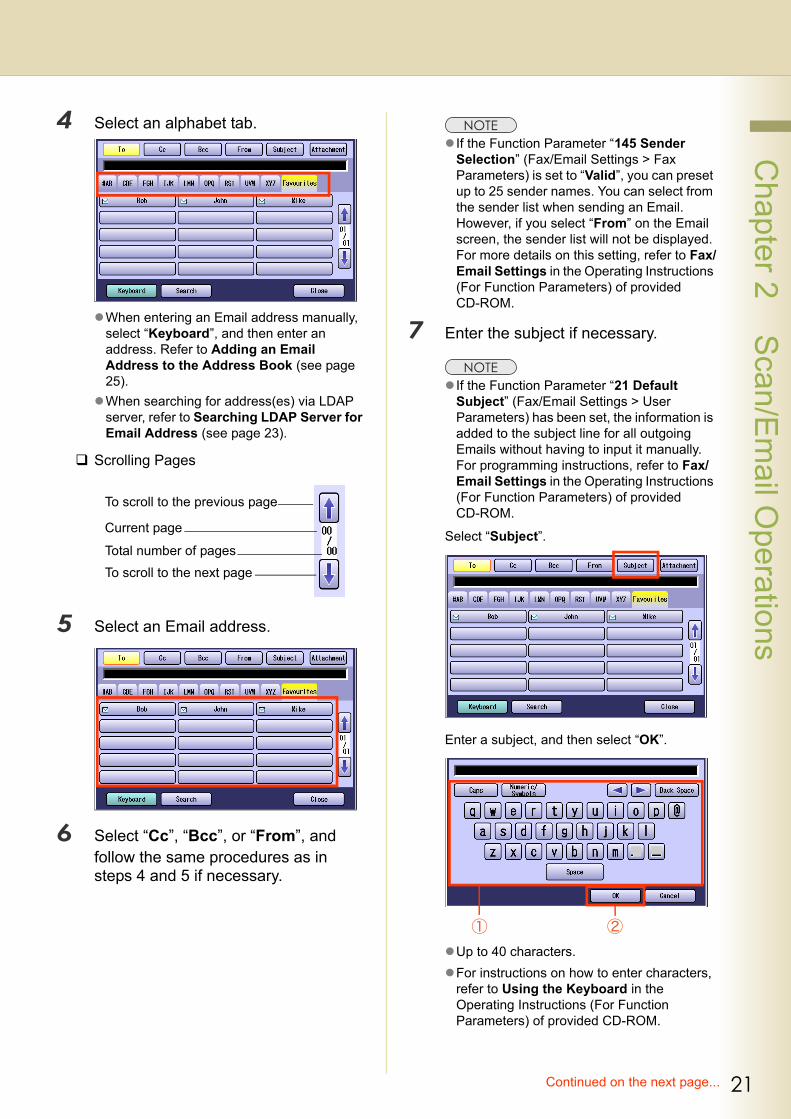
4 Select an alphabet tab.
When entering an Email address manually, select “Keyboard”, and then enter an address. Refer to Adding an Email Address to the Address Book (see page 25).When searching for address(es) via LDAP server, refer to Searching LDAP Server for Email Address (see page 23).
Scrolling Pages
5 Select an Email address.
6 Select “Cc”, “Bcc”, or “From”, and follow the same procedures as in steps 4 and 5 if necessary.
If the Function Parameter “145 Sender Selection” (Fax/Email Settings > Fax Parameters) is set to “Valid”, you can preset up to 25 sender names. You can select from the sender list when sending an Email. However, if you select “From” on the Email screen, the sender list will not be displayed.For more details on this setting, refer to Fax/Email Settings in the Operating Instructions (For Function Parameters) of provided CD-ROM.
7 Enter the subject if necessary.
If the Function Parameter “21 Default Subject” (Fax/Email Settings > User Parameters) has been set, the information is added to the subject line for all outgoing Emails without having to input it manually. For programming instructions, refer to Fax/Email Settings in the Operating Instructions (For Function Parameters) of provided CD-ROM.
Select “Subject”.
Enter a subject, and then select “OK”.
Up to 40 characters.For instructions on how to enter characters, refer to Using the Keyboard in the Operating Instructions (For Function Parameters) of provided CD-ROM.
To scroll to the previous page
Current page
Total number of pagesTo scroll to the next page
Continued on the next page...

22
Chapter 2 S
can/Em
ail Operations
8 Select “Close”.
9 Confirm the selected or inputted Email address.Select “Addresses:###”.(###: Number of selected Email addresses)
Select “OK”.
10 Select “Basic Menu” to configure the required settings, and then select “OK”.
Refer to Scanner Settings (see pages 40 to 53).
11 Press the Start key.The scanned image(s) is transferred as Email.
When scanned image transfer fails, a transfer error message is printed out.
23
Chapter 2 S
can/Em
ail Operations
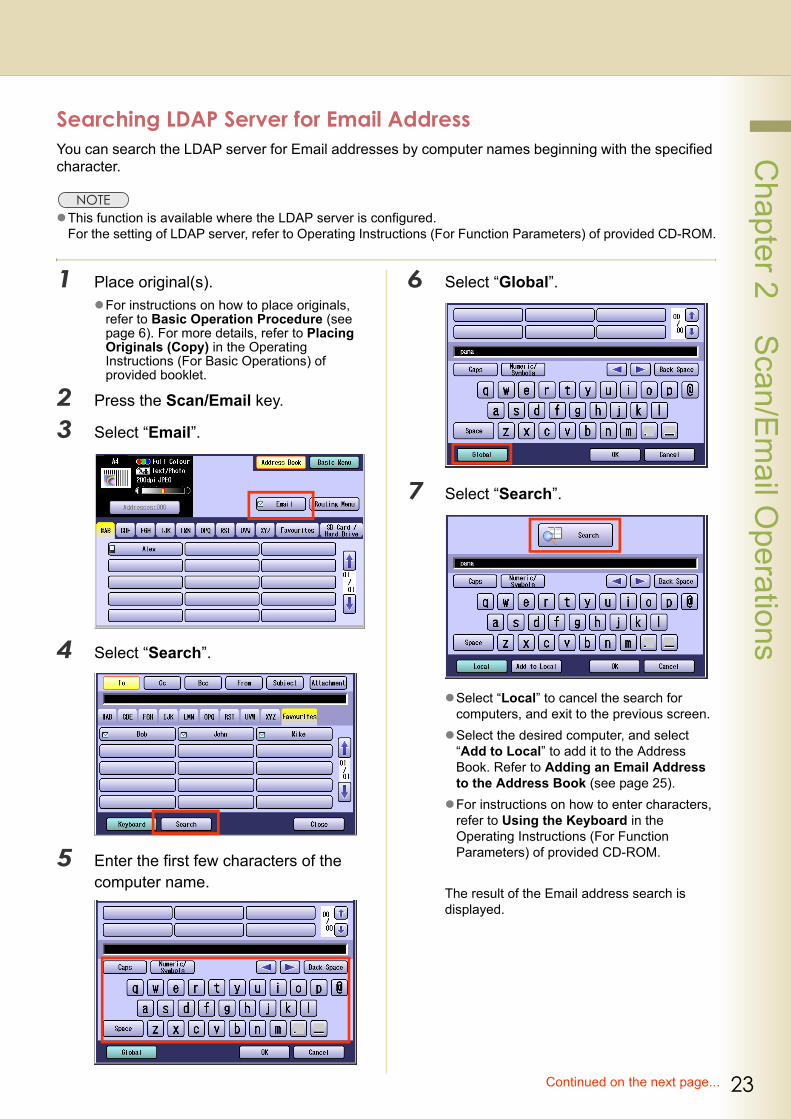
Searching LDAP Server for Email AddressYou can search the LDAP server for Email addresses by computer names beginning with the specified character.
This function is available where the LDAP server is configured.For the setting of LDAP server, refer to Operating Instructions (For Function Parameters) of provided CD-ROM.
1 Place original(s).For instructions on how to place originals, refer to Basic Operation Procedure (see page 6). For more details, refer to Placing Originals (Copy) in the Operating Instructions (For Basic Operations) of provided booklet.
2 Press the Scan/Email key.
3 Select “Email”.
4 Select “Search”.
5 Enter the first few characters of the computer name.
6 Select “Global”.
7 Select “Search”.
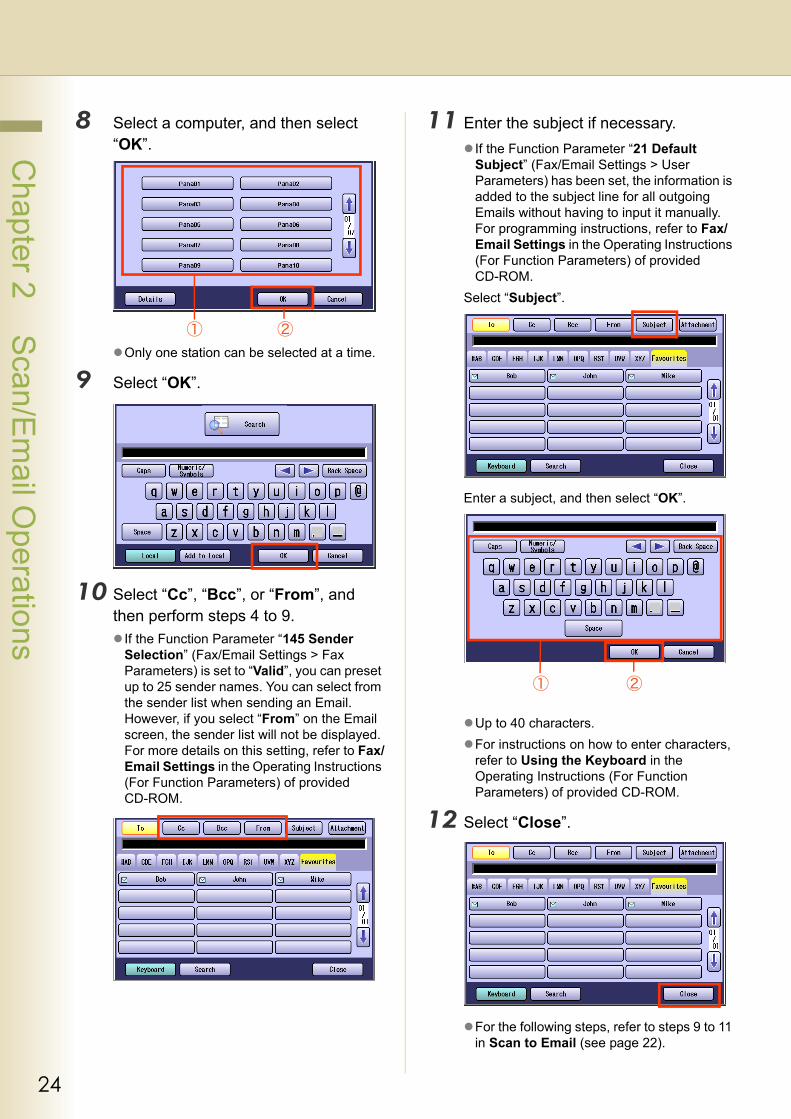
Select “Local” to cancel the search for computers, and exit to the previous screen.Select the desired computer, and select “Add to Local” to add it to the Address Book. Refer to Adding an Email Address to the Address Book (see page 25).For instructions on how to enter characters, refer to Using the Keyboard in the Operating Instructions (For Function Parameters) of provided CD-ROM.
The result of the Email address search is displayed.
Continued on the next page...
24
Chapter 2 S
can/Em
ail Operations
8 Select a computer, and then select “OK”.
Only one station can be selected at a time.
9 Select “OK”.
10 Select “Cc”, “Bcc”, or “From”, and then perform steps 4 to 9.
If the Function Parameter “145 Sender Selection” (Fax/Email Settings > Fax Parameters) is set to “Valid”, you can preset up to 25 sender names. You can select from the sender list when sending an Email. However, if you select “From” on the Email screen, the sender list will not be displayed.For more details on this setting, refer to Fax/Email Settings in the Operating Instructions (For Function Parameters) of provided CD-ROM.
11 Enter the subject if necessary.If the Function Parameter “21 Default Subject” (Fax/Email Settings > User Parameters) has been set, the information is added to the subject line for all outgoing Emails without having to input it manually. For programming instructions, refer to Fax/Email Settings in the Operating Instructions (For Function Parameters) of provided CD-ROM.
Select “Subject”.
Enter a subject, and then select “OK”.
Up to 40 characters.For instructions on how to enter characters, refer to Using the Keyboard in the Operating Instructions (For Function Parameters) of provided CD-ROM.
12 Select “Close”.
For the following steps, refer to steps 9 to 11 in Scan to Email (see page 22).
25
Chapter 2 S
can/Em
ail Operations
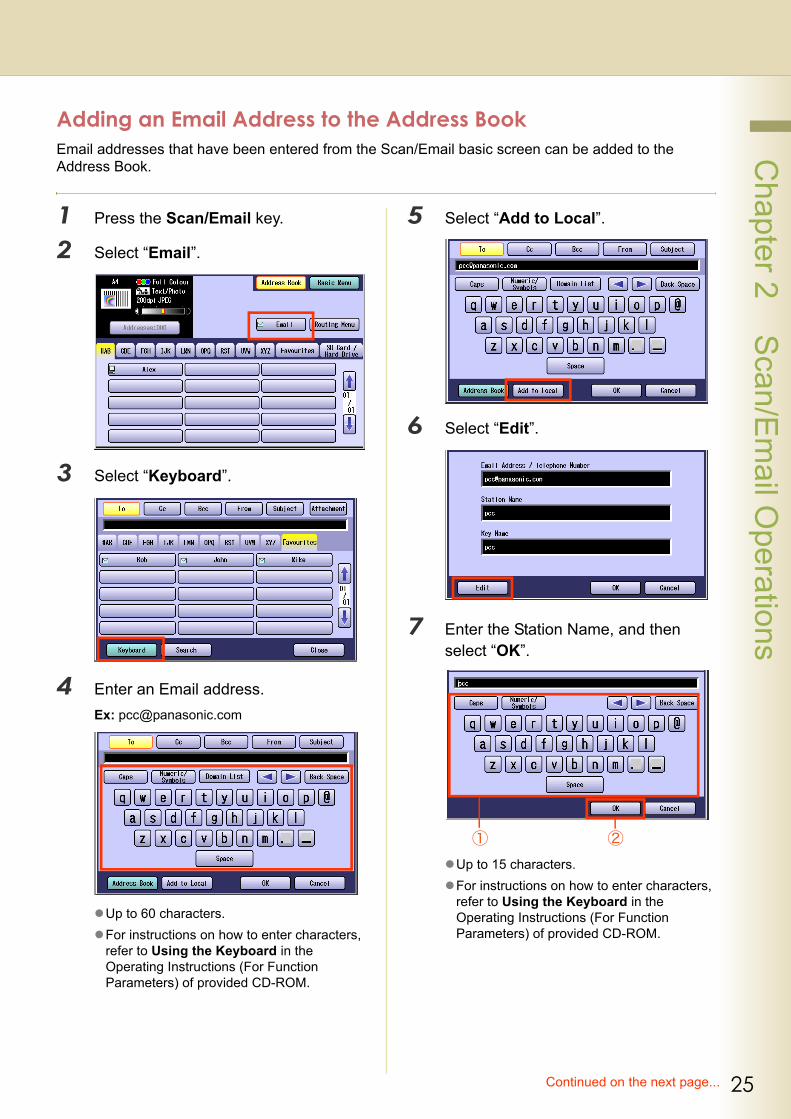
Adding an Email Address to the Address BookEmail addresses that have been entered from the Scan/Email basic screen can be added to the Address Book.
1 Press the Scan/Email key.
2 Select “Email”.
3 Select “Keyboard”.
4 Enter an Email address.Ex: [email protected]
Up to 60 characters.For instructions on how to enter characters, refer to Using the Keyboard in the Operating Instructions (For Function Parameters) of provided CD-ROM.
5 Select “Add to Local”.
6 Select “Edit”.
7 Enter the Station Name, and then select “OK”.
Up to 15 characters.For instructions on how to enter characters, refer to Using the Keyboard in the Operating Instructions (For Function Parameters) of provided CD-ROM.
Continued on the next page...
26
Chapter 2 S
can/Em
ail Operations
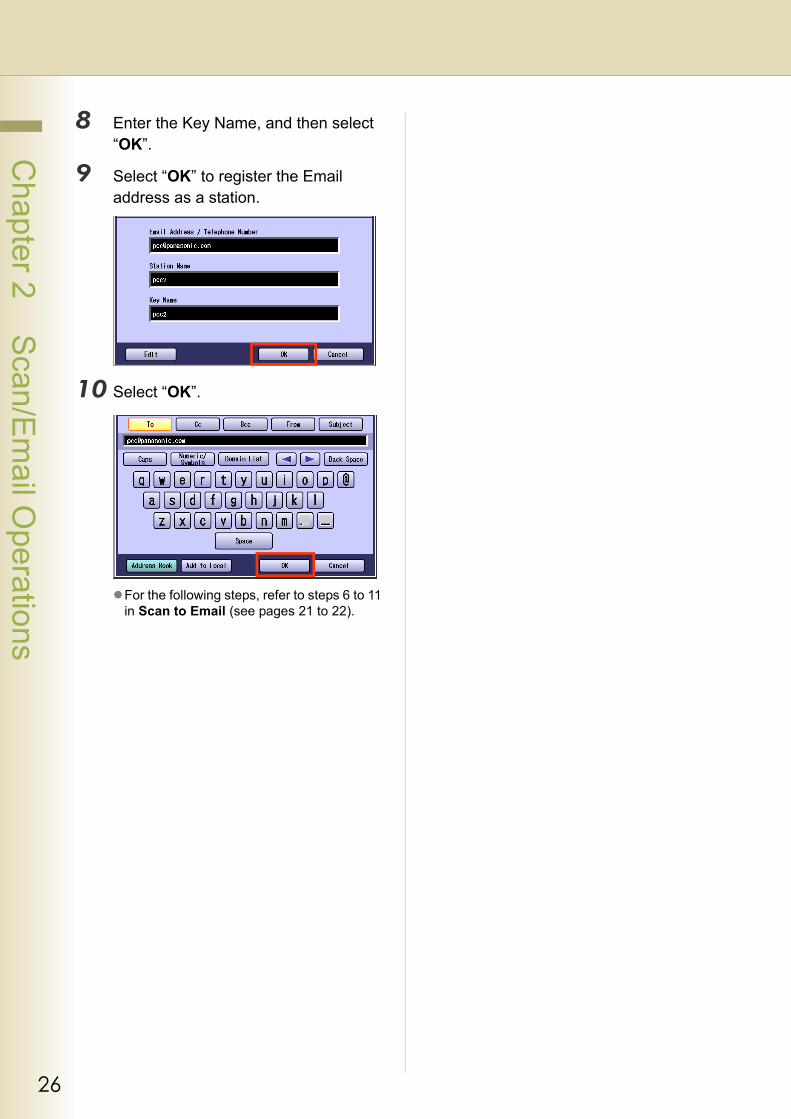
8 Enter the Key Name, and then select “OK”.
9 Select “OK” to register the Email address as a station.
10 Select “OK”.
For the following steps, refer to steps 6 to 11 in Scan to Email (see pages 21 to 22).

27
Chapter 2 S
can/Em
ail Operations
Memo
28
Chapter 2 S
can/Em
ail Operations
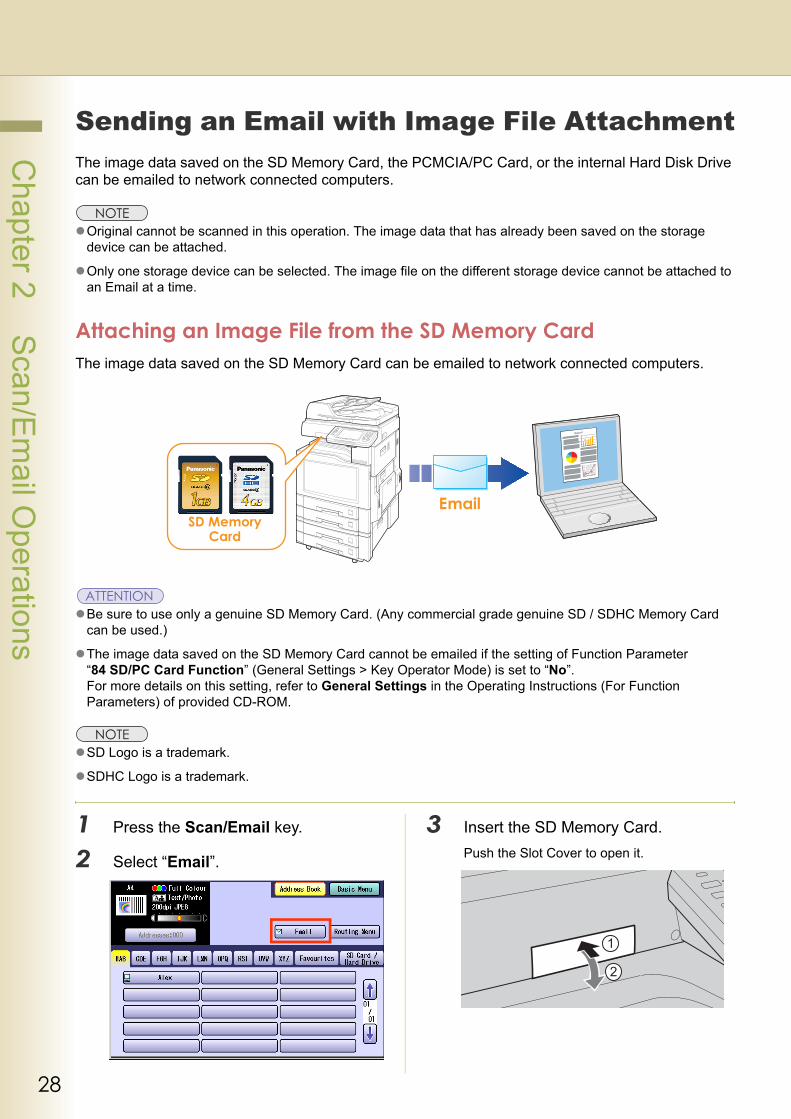
Sending an Email with Image File AttachmentThe image data saved on the SD Memory Card, the PCMCIA/PC Card, or the internal Hard Disk Drive can be emailed to network connected computers.
Original cannot be scanned in this operation. The image data that has already been saved on the storage device can be attached.
Only one storage device can be selected. The image file on the different storage device cannot be attached to an Email at a time.
Attaching an Image File from the SD Memory CardThe image data saved on the SD Memory Card can be emailed to network connected computers.
Be sure to use only a genuine SD Memory Card. (Any commercial grade genuine SD / SDHC Memory Card can be used.)
The image data saved on the SD Memory Card cannot be emailed if the setting of Function Parameter “84 SD/PC Card Function” (General Settings > Key Operator Mode) is set to “No”.For more details on this setting, refer to General Settings in the Operating Instructions (For Function Parameters) of provided CD-ROM.
SD Logo is a trademark.
SDHC Logo is a trademark.
1 Press the Scan/Email key.
2 Select “Email”.
3 Insert the SD Memory Card.Push the Slot Cover to open it.
29
Chapter 2 S
can/Em
ail Operations
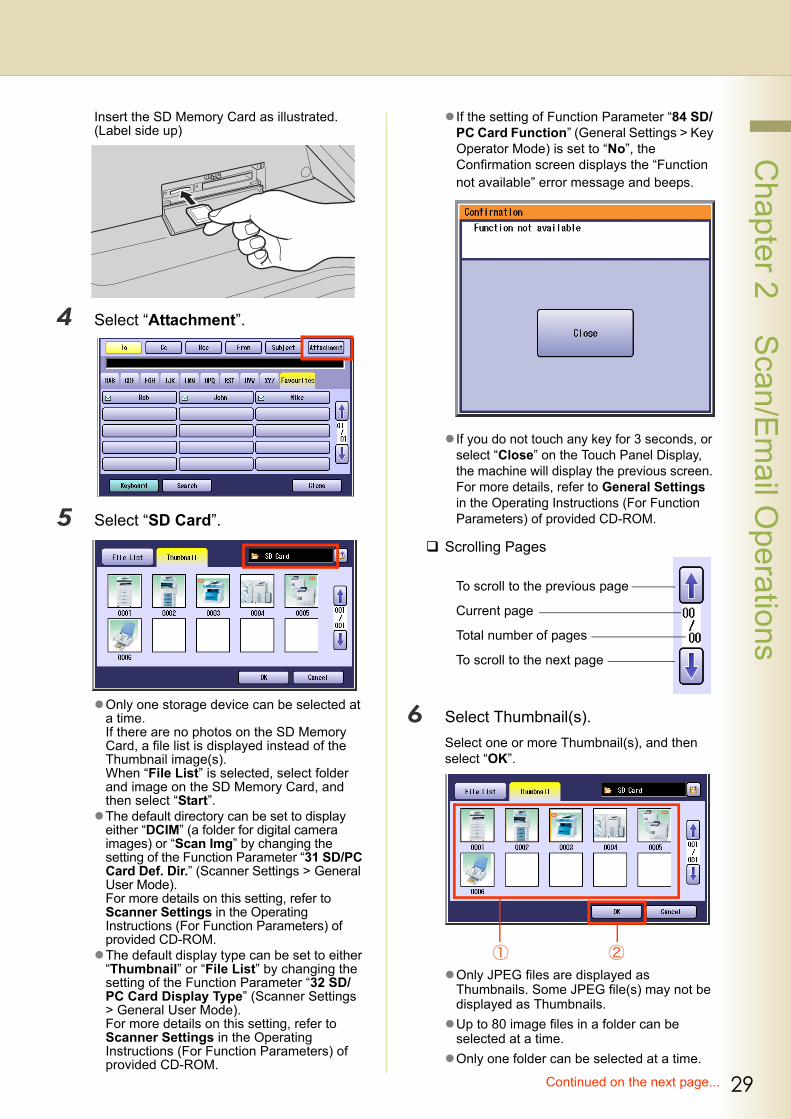
Insert the SD Memory Card as illustrated. (Label side up)
4 Select “Attachment”.
5 Select “SD Card”.
Only one storage device can be selected at a time.If there are no photos on the SD Memory Card, a file list is displayed instead of the Thumbnail image(s).When “File List” is selected, select folder and image on the SD Memory Card, and then select “Start”.The default directory can be set to display either “DCIM” (a folder for digital camera images) or “Scan Img” by changing the setting of the Function Parameter “31 SD/PC Card Def. Dir.” (Scanner Settings > General User Mode).For more details on this setting, refer to Scanner Settings in the Operating Instructions (For Function Parameters) of provided CD-ROM.The default display type can be set to either “Thumbnail” or “File List” by changing the setting of the Function Parameter “32 SD/PC Card Display Type” (Scanner Settings > General User Mode).For more details on this setting, refer to Scanner Settings in the Operating Instructions (For Function Parameters) of provided CD-ROM.
If the setting of Function Parameter “84 SD/PC Card Function” (General Settings > Key Operator Mode) is set to “No”, the Confirmation screen displays the “Function not available” error message and beeps.
If you do not touch any key for 3 seconds, or select “Close” on the Touch Panel Display, the machine will display the previous screen. For more details, refer to General Settings in the Operating Instructions (For Function Parameters) of provided CD-ROM.
Scrolling Pages
6 Select Thumbnail(s).Select one or more Thumbnail(s), and then select “OK”.
Only JPEG files are displayed as Thumbnails. Some JPEG file(s) may not be displayed as Thumbnails.Up to 80 image files in a folder can be selected at a time.Only one folder can be selected at a time.
To scroll to the previous page
Current page
Total number of pages
To scroll to the next page
Continued on the next page...
30
Chapter 2 S
can/Em
ail Operations
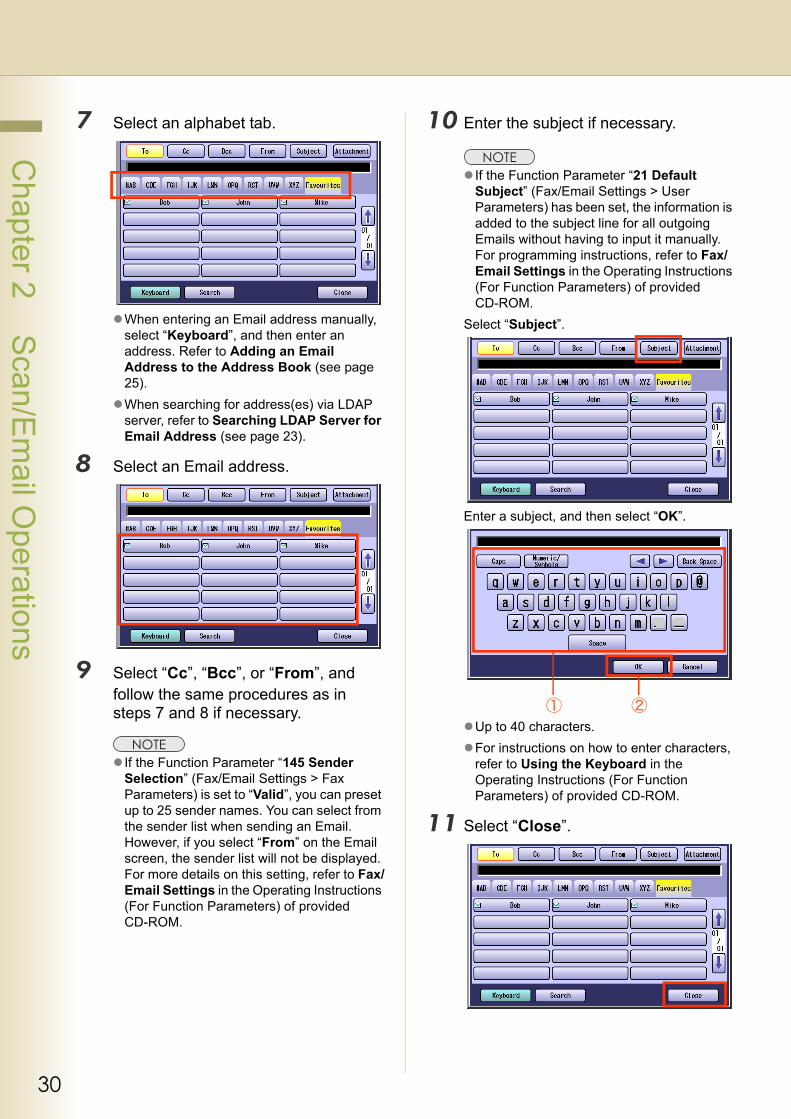
7 Select an alphabet tab.
When entering an Email address manually, select “Keyboard”, and then enter an address. Refer to Adding an Email Address to the Address Book (see page 25).When searching for address(es) via LDAP server, refer to Searching LDAP Server for Email Address (see page 23).
8 Select an Email address.
9 Select “Cc”, “Bcc”, or “From”, and follow the same procedures as in steps 7 and 8 if necessary.
If the Function Parameter “145 Sender Selection” (Fax/Email Settings > Fax Parameters) is set to “Valid”, you can preset up to 25 sender names. You can select from the sender list when sending an Email. However, if you select “From” on the Email screen, the sender list will not be displayed. For more details on this setting, refer to Fax/Email Settings in the Operating Instructions (For Function Parameters) of provided CD-ROM.
10 Enter the subject if necessary.
If the Function Parameter “21 Default Subject” (Fax/Email Settings > User Parameters) has been set, the information is added to the subject line for all outgoing Emails without having to input it manually. For programming instructions, refer to Fax/Email Settings in the Operating Instructions (For Function Parameters) of provided CD-ROM.
Select “Subject”.
Enter a subject, and then select “OK”.
Up to 40 characters.For instructions on how to enter characters, refer to Using the Keyboard in the Operating Instructions (For Function Parameters) of provided CD-ROM.
11 Select “Close”.
31
Chapter 2 S
can/Em
ail Operations
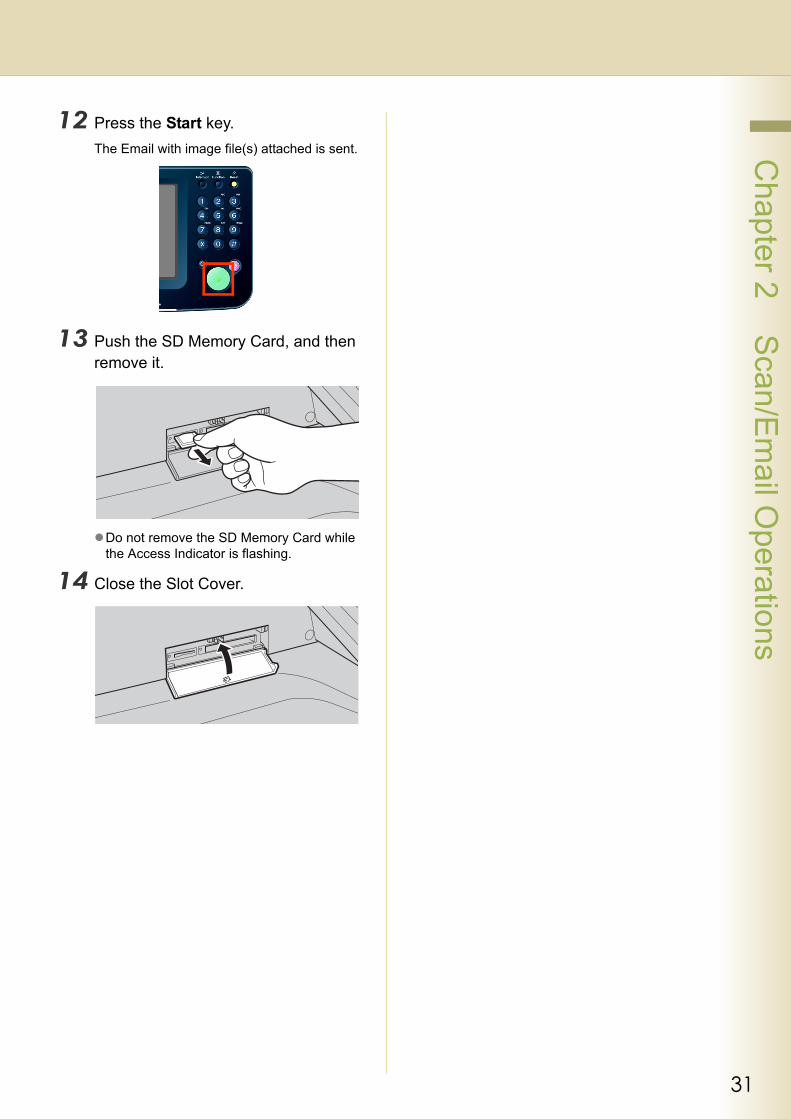
12 Press the Start key.The Email with image file(s) attached is sent.
13 Push the SD Memory Card, and then remove it.
Do not remove the SD Memory Card while the Access Indicator is flashing.
14 Close the Slot Cover.
32
Chapter 2 S
can/Em
ail Operations
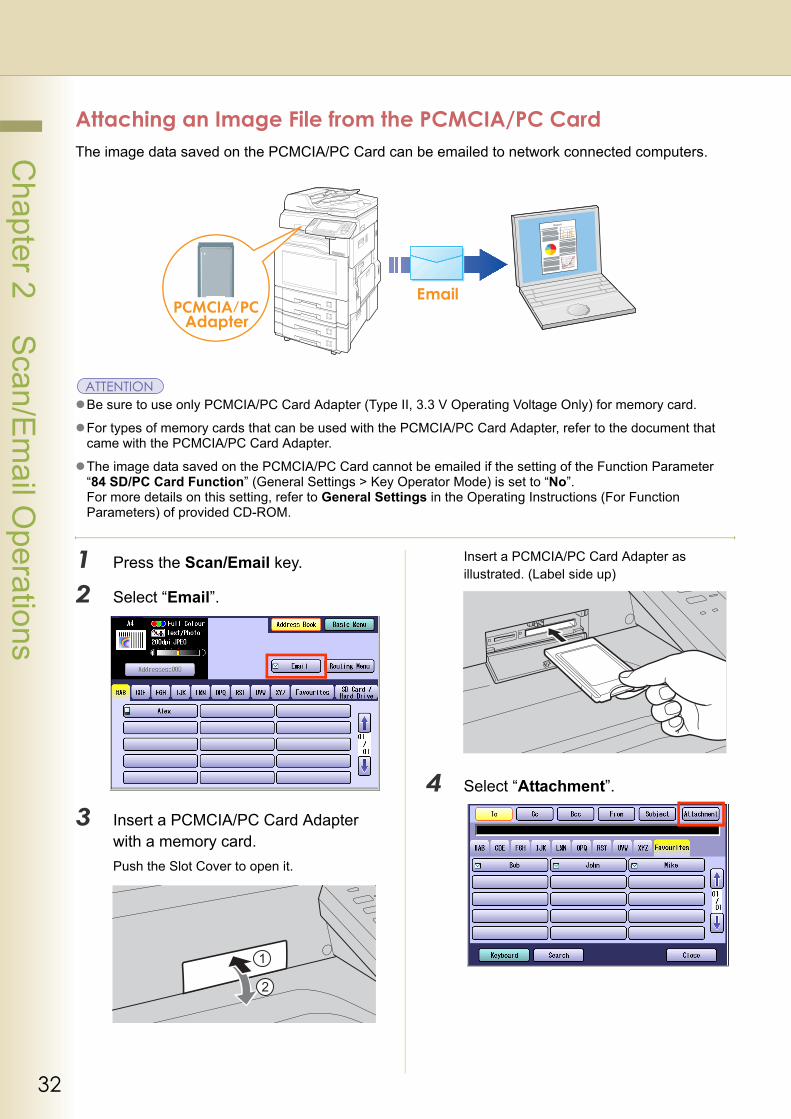
Attaching an Image File from the PCMCIA/PC CardThe image data saved on the PCMCIA/PC Card can be emailed to network connected computers.
Be sure to use only PCMCIA/PC Card Adapter (Type II, 3.3 V Operating Voltage Only) for memory card.
For types of memory cards that can be used with the PCMCIA/PC Card Adapter, refer to the document that came with the PCMCIA/PC Card Adapter.
The image data saved on the PCMCIA/PC Card cannot be emailed if the setting of the Function Parameter “84 SD/PC Card Function” (General Settings > Key Operator Mode) is set to “No”.For more details on this setting, refer to General Settings in the Operating Instructions (For Function Parameters) of provided CD-ROM.
1 Press the Scan/Email key.
2 Select “Email”.
3 Insert a PCMCIA/PC Card Adapter with a memory card.Push the Slot Cover to open it.
Insert a PCMCIA/PC Card Adapter as illustrated. (Label side up)
4 Select “Attachment”.
33
Chapter 2 S
can/Em
ail Operations
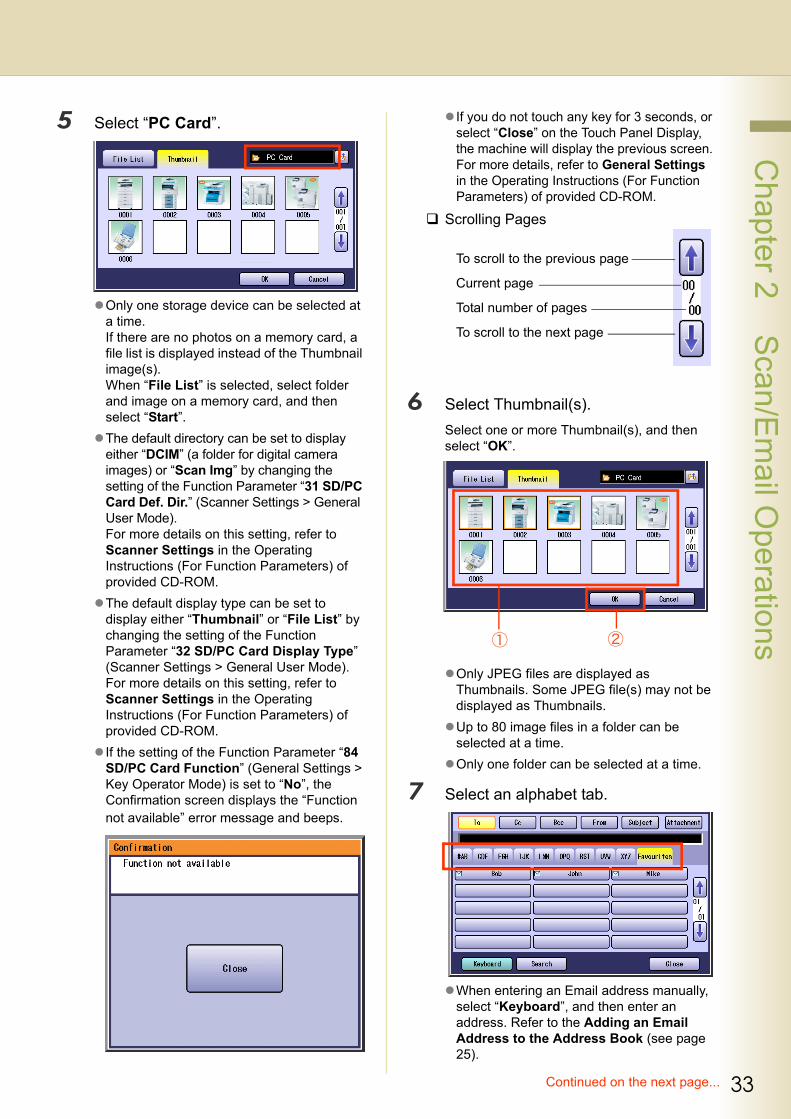
5 Select “PC Card”.
Only one storage device can be selected at a time.If there are no photos on a memory card, a file list is displayed instead of the Thumbnail image(s).When “File List” is selected, select folder and image on a memory card, and then select “Start”.The default directory can be set to display either “DCIM” (a folder for digital camera images) or “Scan Img” by changing the setting of the Function Parameter “31 SD/PC Card Def. Dir.” (Scanner Settings > General User Mode).For more details on this setting, refer to Scanner Settings in the Operating Instructions (For Function Parameters) of provided CD-ROM.The default display type can be set to display either “Thumbnail” or “File List” by changing the setting of the Function Parameter “32 SD/PC Card Display Type” (Scanner Settings > General User Mode).For more details on this setting, refer to Scanner Settings in the Operating Instructions (For Function Parameters) of provided CD-ROM.If the setting of the Function Parameter “84 SD/PC Card Function” (General Settings > Key Operator Mode) is set to “No”, the Confirmation screen displays the “Function not available” error message and beeps.
If you do not touch any key for 3 seconds, or select “Close” on the Touch Panel Display, the machine will display the previous screen. For more details, refer to General Settings in the Operating Instructions (For Function Parameters) of provided CD-ROM.
Scrolling Pages
6 Select Thumbnail(s).Select one or more Thumbnail(s), and then select “OK”.
Only JPEG files are displayed as Thumbnails. Some JPEG file(s) may not be displayed as Thumbnails.Up to 80 image files in a folder can be selected at a time.Only one folder can be selected at a time.
7 Select an alphabet tab.
When entering an Email address manually, select “Keyboard”, and then enter an address. Refer to the Adding an Email Address to the Address Book (see page 25).
To scroll to the previous page
Current page
Total number of pages
To scroll to the next page
Continued on the next page...
34
Chapter 2 S
can/Em
ail Operations
When searching for address(es) via LDAP server, refer to Searching LDAP Server for Email Address (see page 23).
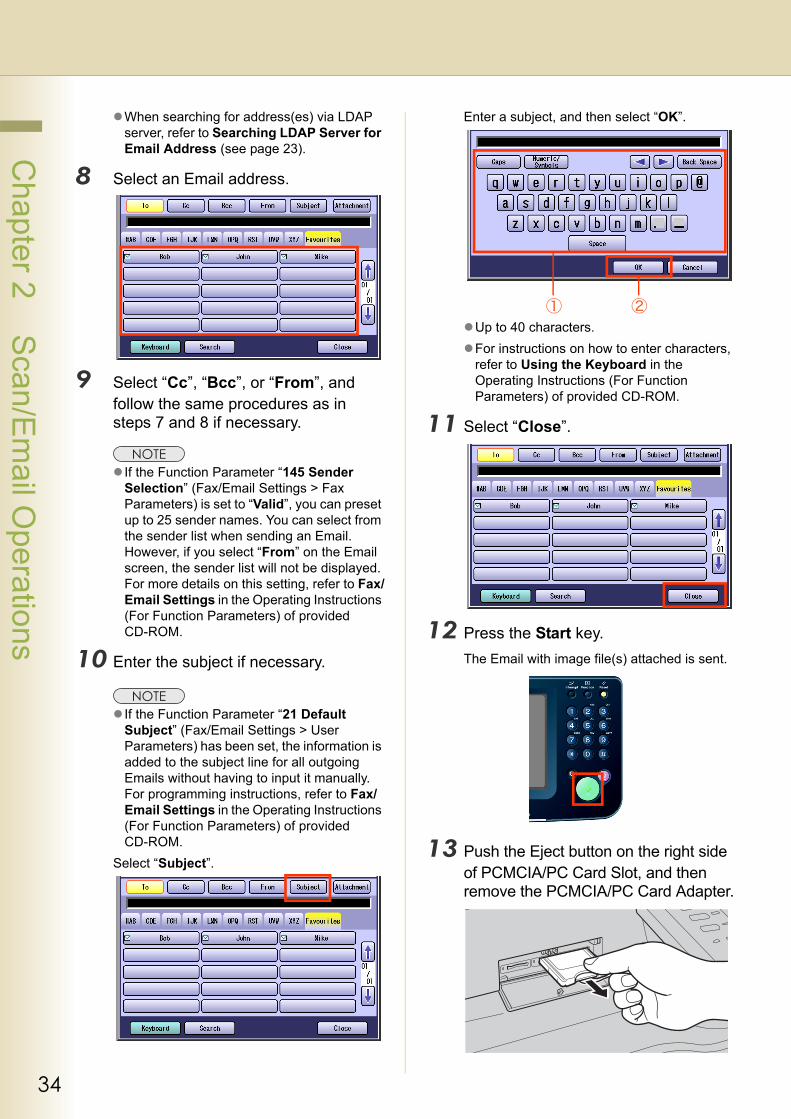
8 Select an Email address.
9 Select “Cc”, “Bcc”, or “From”, and follow the same procedures as in steps 7 and 8 if necessary.
If the Function Parameter “145 Sender Selection” (Fax/Email Settings > Fax Parameters) is set to “Valid”, you can preset up to 25 sender names. You can select from the sender list when sending an Email. However, if you select “From” on the Email screen, the sender list will not be displayed.For more details on this setting, refer to Fax/Email Settings in the Operating Instructions (For Function Parameters) of provided CD-ROM.
10 Enter the subject if necessary.
If the Function Parameter “21 Default Subject” (Fax/Email Settings > User Parameters) has been set, the information is added to the subject line for all outgoing Emails without having to input it manually. For programming instructions, refer to Fax/Email Settings in the Operating Instructions (For Function Parameters) of provided CD-ROM.
Select “Subject”.
Enter a subject, and then select “OK”.
Up to 40 characters.For instructions on how to enter characters, refer to Using the Keyboard in the Operating Instructions (For Function Parameters) of provided CD-ROM.
11 Select “Close”.
12 Press the Start key.The Email with image file(s) attached is sent.
13 Push the Eject button on the right side of PCMCIA/PC Card Slot, and then remove the PCMCIA/PC Card Adapter.
35
Chapter 2 S
can/Em
ail Operations
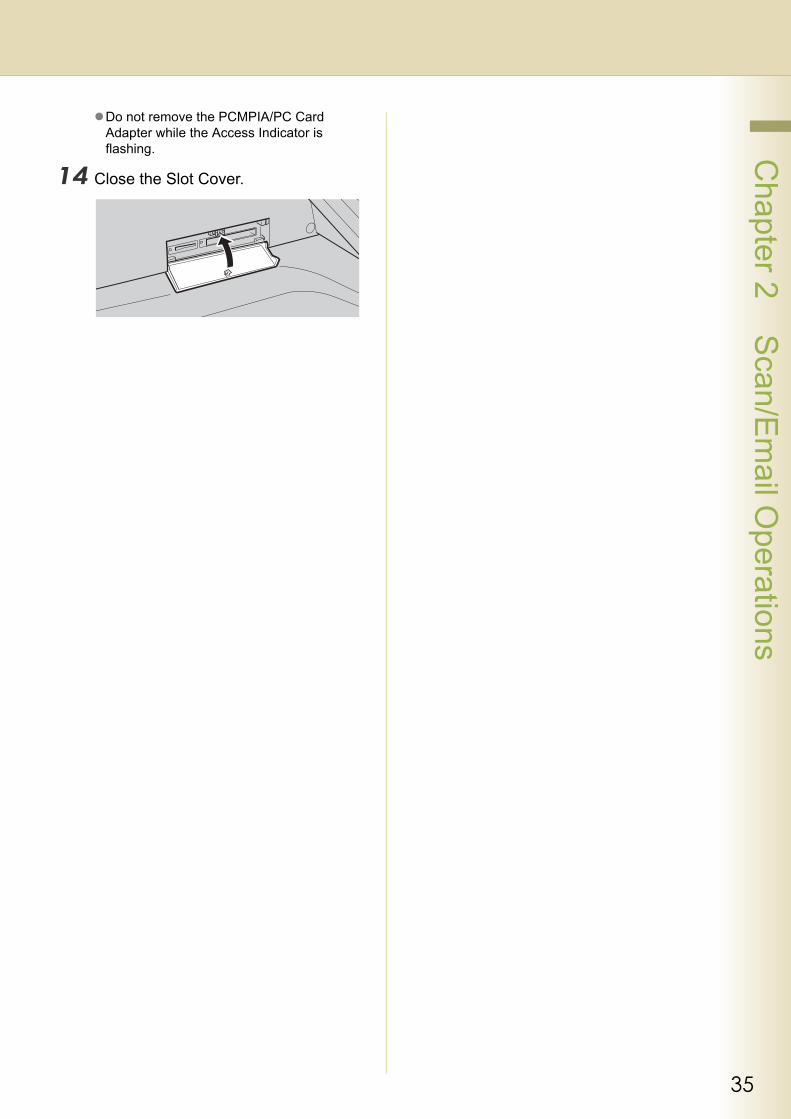
Do not remove the PCMPIA/PC Card Adapter while the Access Indicator is flashing.
14 Close the Slot Cover.
36
Chapter 2 S
can/Em
ail Operations
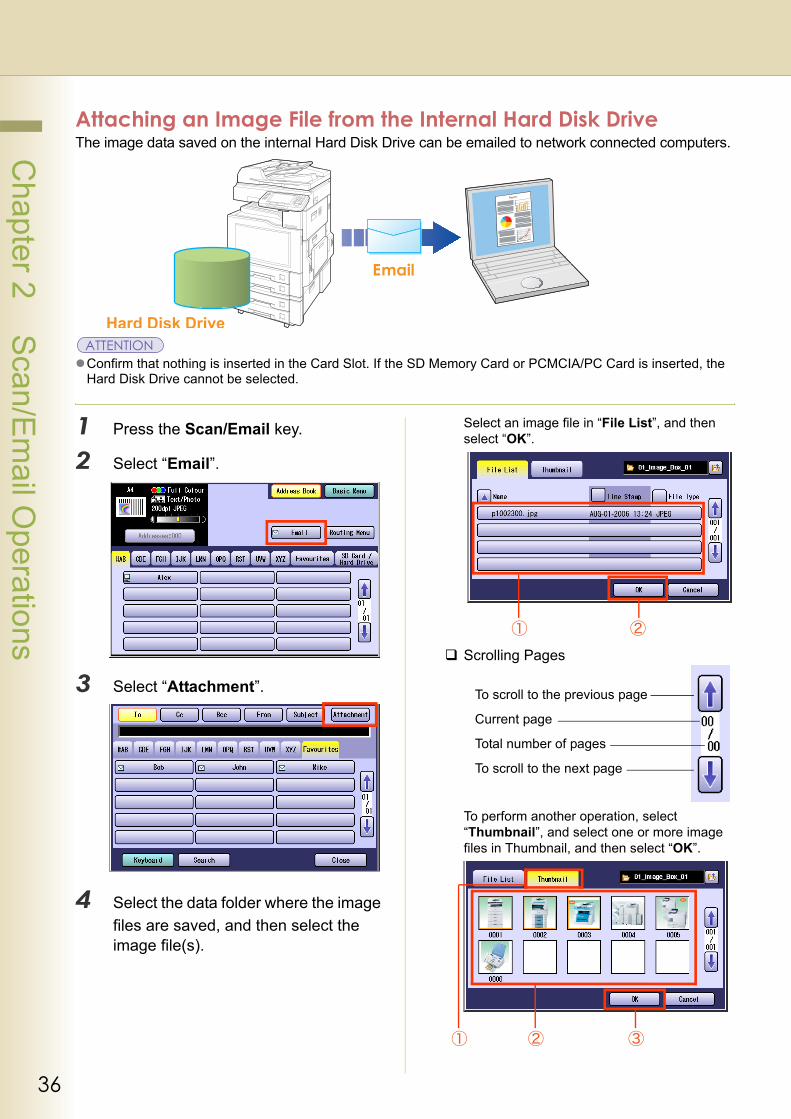
Attaching an Image File from the Internal Hard Disk DriveThe image data saved on the internal Hard Disk Drive can be emailed to network connected computers.
Confirm that nothing is inserted in the Card Slot. If the SD Memory Card or PCMCIA/PC Card is inserted, the Hard Disk Drive cannot be selected.
1 Press the Scan/Email key.
2 Select “Email”.
3 Select “Attachment”.
4 Select the data folder where the image files are saved, and then select the image file(s).
Select an image file in “File List”, and then select “OK”.
Scrolling Pages
To perform another operation, select “Thumbnail”, and select one or more image files in Thumbnail, and then select “OK”.
To scroll to the previous page
Current page
Total number of pages
To scroll to the next page
37
Chapter 2 S
can/Em
ail Operations
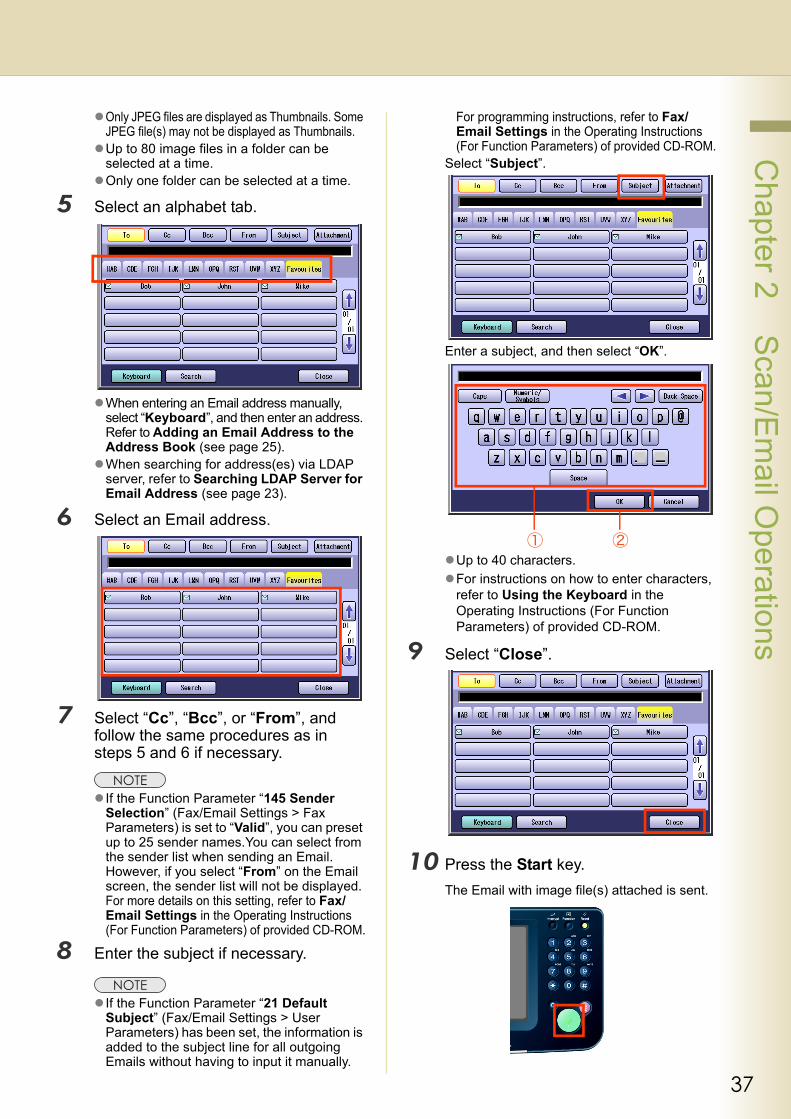
Only JPEG files are displayed as Thumbnails. Some JPEG file(s) may not be displayed as Thumbnails.Up to 80 image files in a folder can be selected at a time.Only one folder can be selected at a time.
5 Select an alphabet tab.
When entering an Email address manually, select “Keyboard”, and then enter an address. Refer to Adding an Email Address to the Address Book (see page 25).When searching for address(es) via LDAP server, refer to Searching LDAP Server for Email Address (see page 23).
6 Select an Email address.
7 Select “Cc”, “Bcc”, or “From”, and follow the same procedures as in steps 5 and 6 if necessary.
If the Function Parameter “145 Sender Selection” (Fax/Email Settings > Fax Parameters) is set to “Valid”, you can preset up to 25 sender names.You can select from the sender list when sending an Email. However, if you select “From” on the Email screen, the sender list will not be displayed. For more details on this setting, refer to Fax/Email Settings in the Operating Instructions (For Function Parameters) of provided CD-ROM.
8 Enter the subject if necessary.
If the Function Parameter “21 Default Subject” (Fax/Email Settings > User Parameters) has been set, the information is added to the subject line for all outgoing Emails without having to input it manually.
For programming instructions, refer to Fax/Email Settings in the Operating Instructions (For Function Parameters) of provided CD-ROM.
Select “Subject”.
Enter a subject, and then select “OK”.
Up to 40 characters.For instructions on how to enter characters, refer to Using the Keyboard in the Operating Instructions (For Function Parameters) of provided CD-ROM.
9 Select “Close”.
10 Press the Start key.The Email with image file(s) attached is sent.
38
Chapter 2 S
can/Em
ail Operations
Receiving an EmailIf the machine connects to a network as a POP client, it can receive an Email and print the attached file either automatically or manually. The Email reception method from a POP server varies depending on the POP settings programmed in Function Parameters.
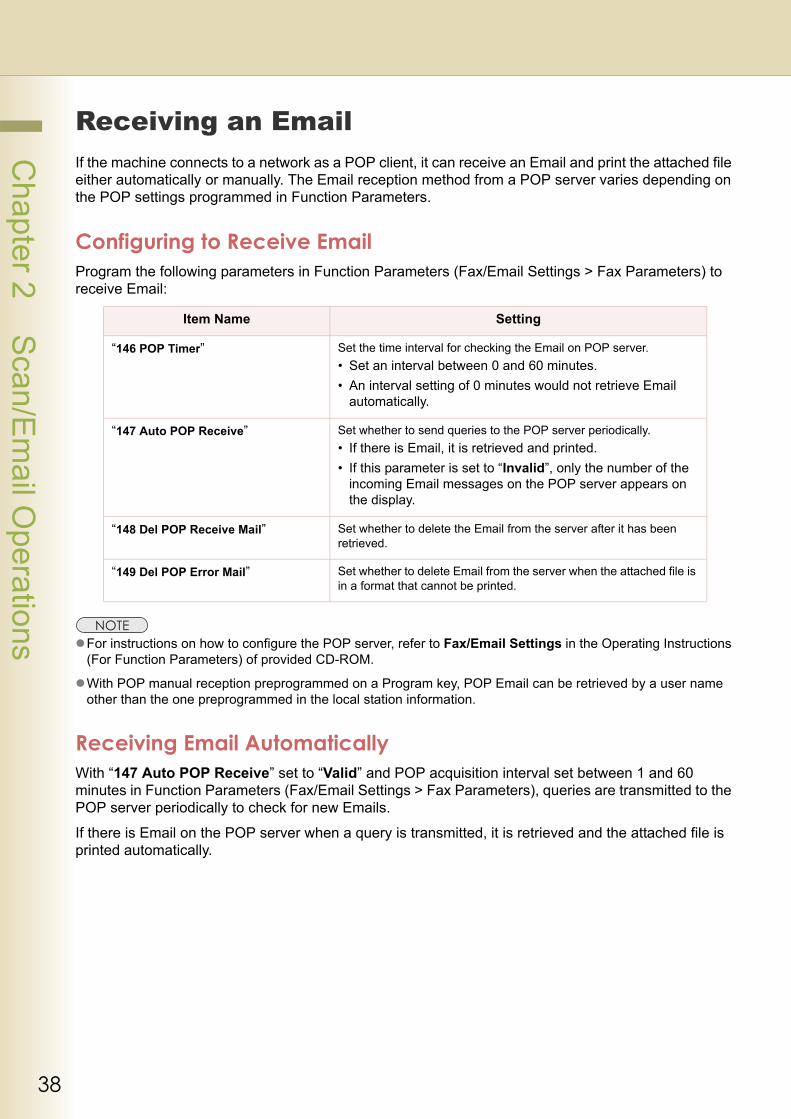
Configuring to Receive EmailProgram the following parameters in Function Parameters (Fax/Email Settings > Fax Parameters) to receive Email:
For instructions on how to configure the POP server, refer to Fax/Email Settings in the Operating Instructions (For Function Parameters) of provided CD-ROM.
With POP manual reception preprogrammed on a Program key, POP Email can be retrieved by a user name other than the one preprogrammed in the local station information.
Receiving Email AutomaticallyWith “147 Auto POP Receive” set to “Valid” and POP acquisition interval set between 1 and 60 minutes in Function Parameters (Fax/Email Settings > Fax Parameters), queries are transmitted to the POP server periodically to check for new Emails.
If there is Email on the POP server when a query is transmitted, it is retrieved and the attached file is printed automatically.
Item Name Setting
“146 POP Timer” Set the time interval for checking the Email on POP server.• Set an interval between 0 and 60 minutes.• An interval setting of 0 minutes would not retrieve Email
automatically.
“147 Auto POP Receive” Set whether to send queries to the POP server periodically.• If there is Email, it is retrieved and printed.• If this parameter is set to “Invalid”, only the number of the
incoming Email messages on the POP server appears on the display.
“148 Del POP Receive Mail” Set whether to delete the Email from the server after it has been retrieved.
“149 Del POP Error Mail” Set whether to delete Email from the server when the attached file is in a format that cannot be printed.
39
Chapter 2 S
can/Em
ail Operations
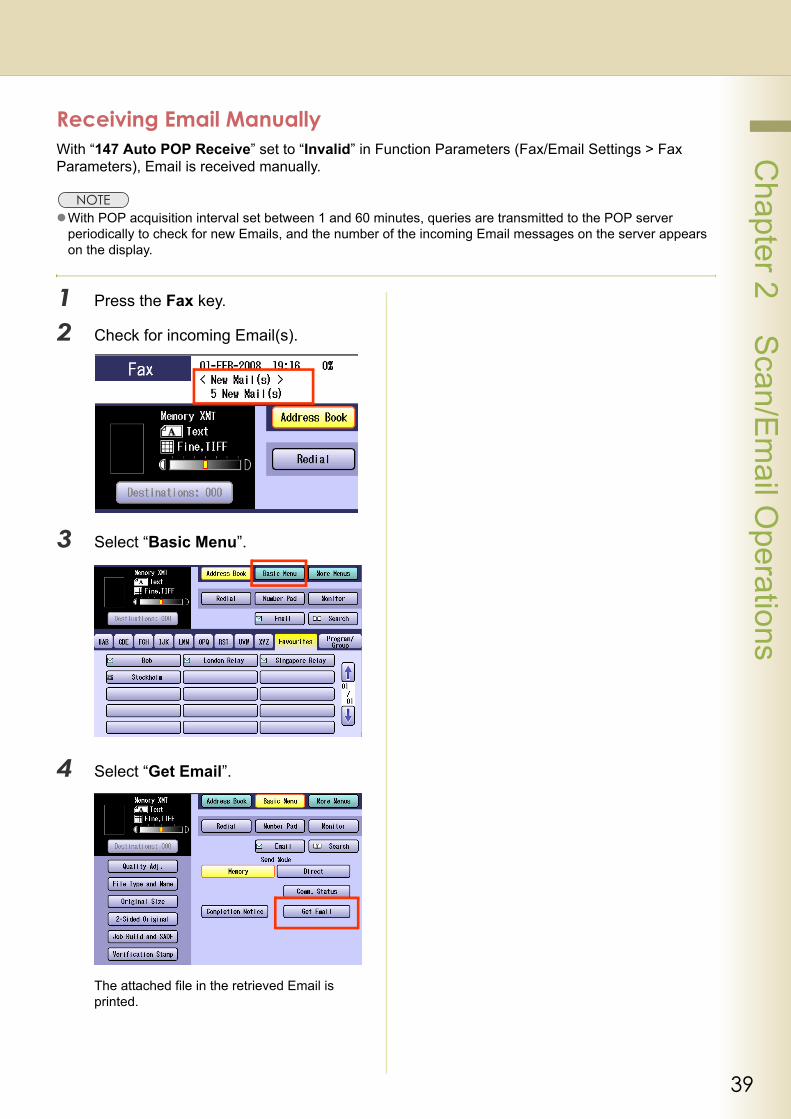
Receiving Email ManuallyWith “147 Auto POP Receive” set to “Invalid” in Function Parameters (Fax/Email Settings > Fax Parameters), Email is received manually.
With POP acquisition interval set between 1 and 60 minutes, queries are transmitted to the POP server periodically to check for new Emails, and the number of the incoming Email messages on the server appears on the display.
1 Press the Fax key.
2 Check for incoming Email(s).
3 Select “Basic Menu”.
4 Select “Get Email”.
The attached file in the retrieved Email is printed.
40
Chapter 3 S
canner Settings
Chapter 3Scanner Settings
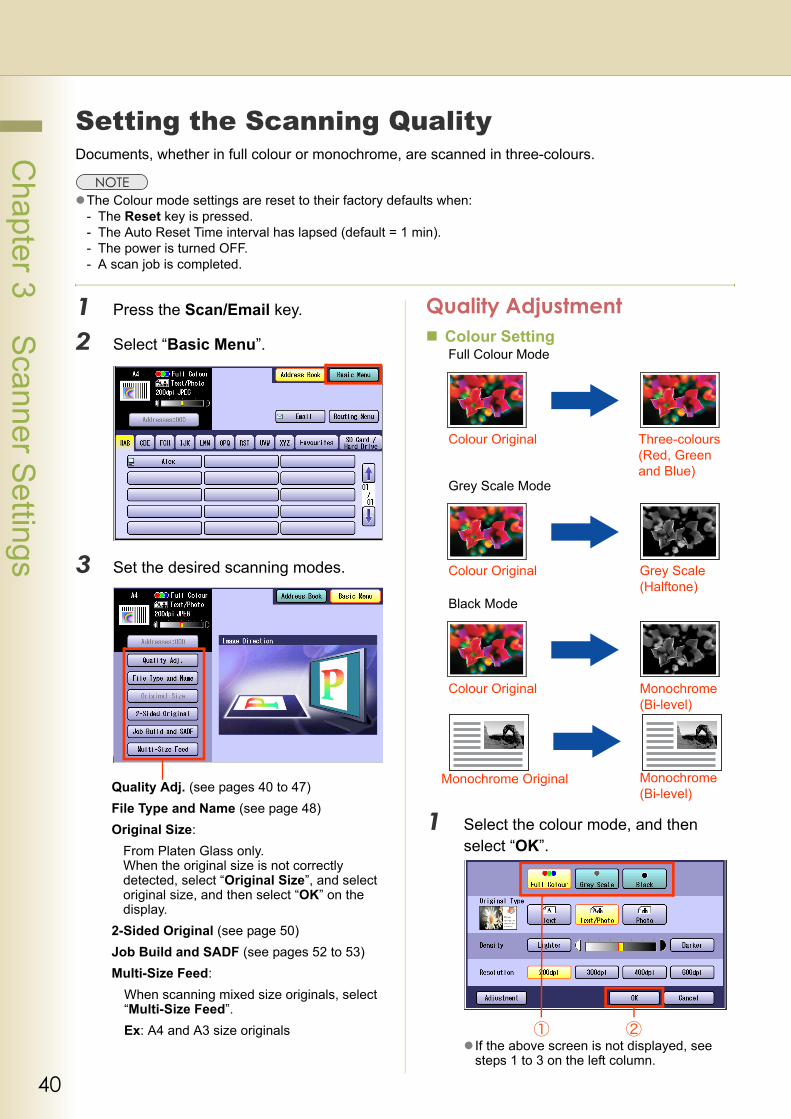
Setting the Scanning QualityDocuments, whether in full colour or monochrome, are scanned in three-colours.
The Colour mode settings are reset to their factory defaults when:- The Reset key is pressed.- The Auto Reset Time interval has lapsed (default = 1 min).- The power is turned OFF.- A scan job is completed.
1 Press the Scan/Email key.
2 Select “Basic Menu”.
3 Set the desired scanning modes.
Quality AdjustmentColour Setting
1 Select the colour mode, and then select “OK”.
If the above screen is not displayed, see steps 1 to 3 on the left column.
Quality Adj. (see pages 40 to 47)File Type and Name (see page 48)Original Size:
From Platen Glass only.When the original size is not correctly detected, select “Original Size”, and select original size, and then select “OK” on the display.
2-Sided Original (see page 50)Job Build and SADF (see pages 52 to 53)Multi-Size Feed:
When scanning mixed size originals, select “Multi-Size Feed”.Ex: A4 and A3 size originals
Full Colour Mode
Colour Original Three-colours(Red, Green and Blue)
Grey Scale Mode
Colour Original Grey Scale (Halftone)
Black Mode
Colour Original Monochrome (Bi-level)
Monochrome Original Monochrome (Bi-level)

41
Chapter 3 S
canner Settings
Setting Original Type and Scanning DensitySelecting Original Type
Adjusting Scanning Density
The standard setting of “Original Type” and “Density” can be changed. Refer to Scanner Settings in the Operating Instructions (For Function Parameters) of provided CD-ROM.
Selecting Original Type1 Select the Original Type, and then
select “OK”.
If the above screen is not displayed, see steps 1 to 3 on page 40.
Adjusting Scanning Density1 Adjust the scanning density with
“Lighter” or “Darker”, and then select “OK”.
If the above screen is not displayed, see steps 1 to 3 on page 40.
Text Text/Photo Photo
Lighter Darker
Text Mainly a Text original
Text/Photo
Text and Photo combined original
Photo Mainly a Photo original
Lighter For dark image originals
Darker For light image originals
42
Chapter 3 S
canner Settings
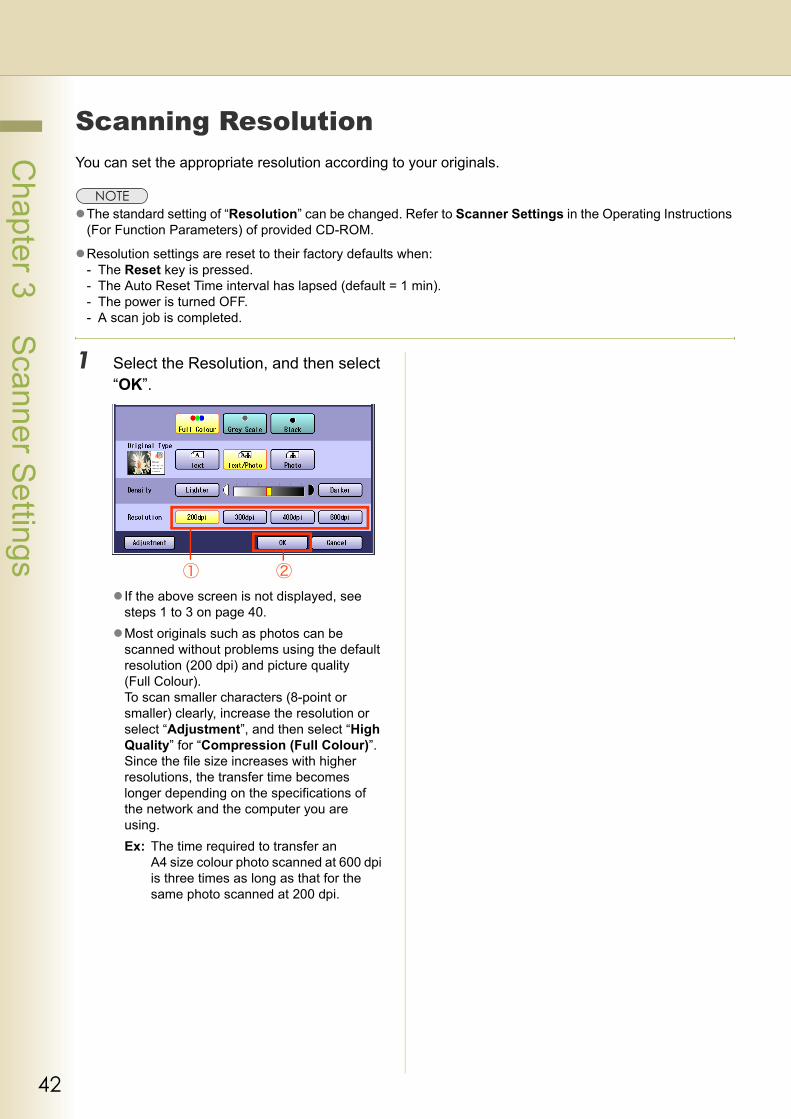
Scanning ResolutionYou can set the appropriate resolution according to your originals.
The standard setting of “Resolution” can be changed. Refer to Scanner Settings in the Operating Instructions (For Function Parameters) of provided CD-ROM.
Resolution settings are reset to their factory defaults when:- The Reset key is pressed.- The Auto Reset Time interval has lapsed (default = 1 min).- The power is turned OFF.- A scan job is completed.
1 Select the Resolution, and then select “OK”.
If the above screen is not displayed, see steps 1 to 3 on page 40.Most originals such as photos can be scanned without problems using the default resolution (200 dpi) and picture quality (Full Colour). To scan smaller characters (8-point or smaller) clearly, increase the resolution or select “Adjustment”, and then select “High Quality” for “Compression (Full Colour)”.Since the file size increases with higher resolutions, the transfer time becomes longer depending on the specifications of the network and the computer you are using. Ex: The time required to transfer an
A4 size colour photo scanned at 600 dpi is three times as long as that for the same photo scanned at 200 dpi.
43
Chapter 3 S
canner Settings
Memo
44
Chapter 3 S
canner Settings
Advanced Colour Quality SettingsThe following picture qualities can be adjusted:
• Compression (Full Colour)
• Compression (Grey Scale)
• Compression (Black)
• Background Removal
• Contrast
The standard setting of “Compression (Full Colour)”, “Compression (Grey Scale)”, “Compression (Black)”, “Background Removal”, and “Contrast” can be changed. Refer to Scanner Settings in the Operating Instructions (For Function Parameters) of provided CD-ROM.
The picture quality settings are reset to their default settings when:- The Reset key is pressed.- The Auto Reset Time interval has lapsed (default = 1 min).- The power is turned OFF.- A scan job is completed.
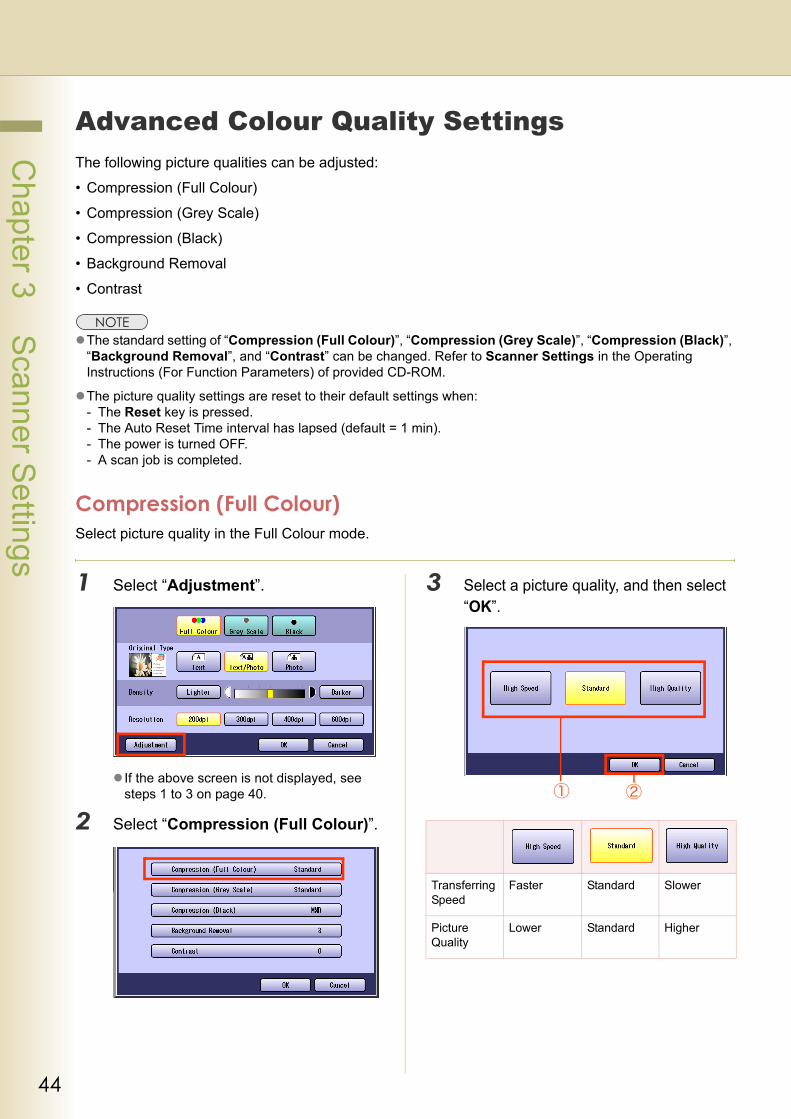
Compression (Full Colour)Select picture quality in the Full Colour mode.
1 Select “Adjustment”.
If the above screen is not displayed, see steps 1 to 3 on page 40.
2 Select “Compression (Full Colour)”.
3 Select a picture quality, and then select “OK”.
Transferring Speed
Faster Standard Slower
Picture Quality
Lower Standard Higher

45
Chapter 3 S
canner Settings
4 Select “OK”.
46
Chapter 3 S
canner Settings
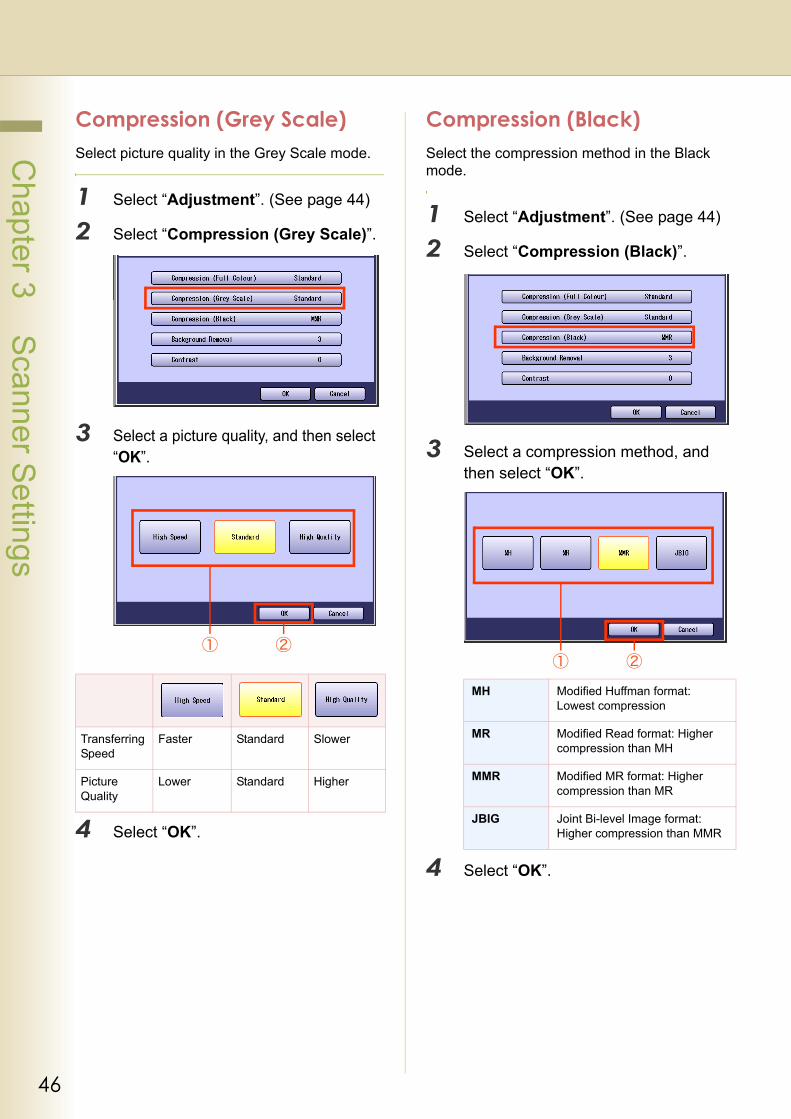
Compression (Grey Scale)Select picture quality in the Grey Scale mode.
1 Select “Adjustment”. (See page 44)
2 Select “Compression (Grey Scale)”.
3 Select a picture quality, and then select “OK”.
4 Select “OK”.
Compression (Black)Select the compression method in the Black mode.
1 Select “Adjustment”. (See page 44)
2 Select “Compression (Black)”.
3 Select a compression method, and then select “OK”.
4 Select “OK”.
Transferring Speed
Faster Standard Slower
Picture Quality
Lower Standard Higher
MH Modified Huffman format: Lowest compression
MR Modified Read format: Higher compression than MH
MMR Modified MR format: Higher compression than MR
JBIG Joint Bi-level Image format: Higher compression than MMR
47
Chapter 3 S
canner Settings
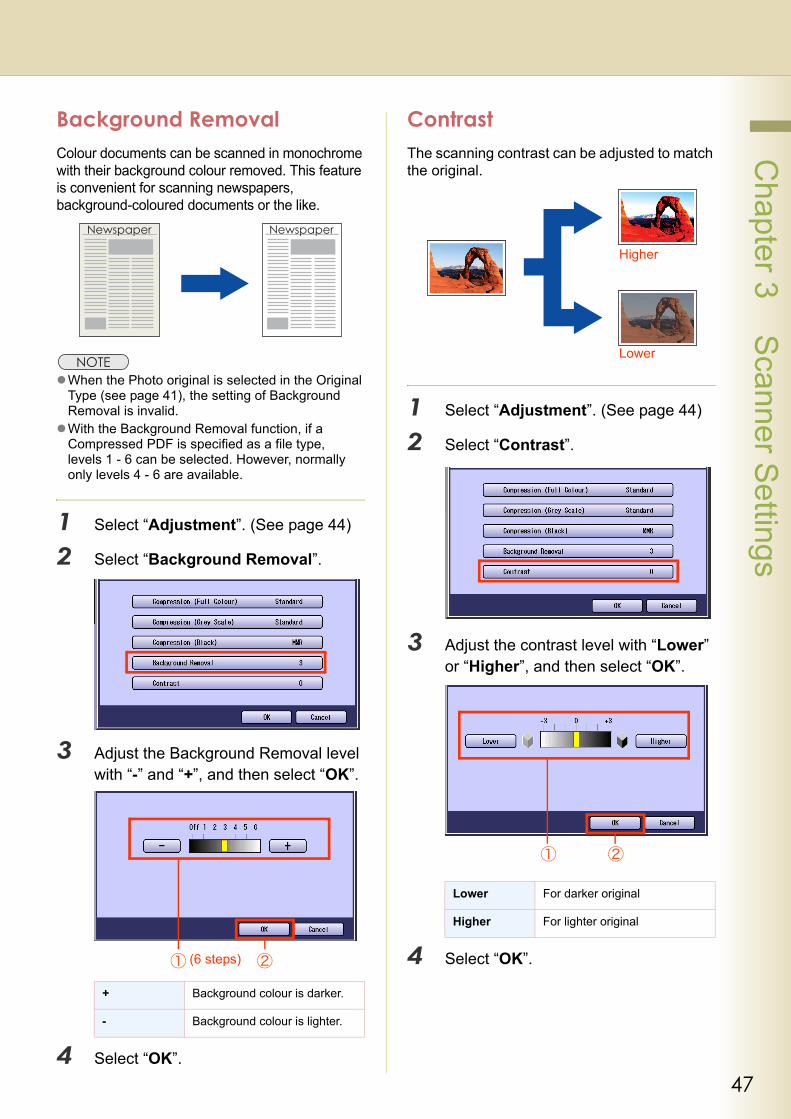
Background RemovalColour documents can be scanned in monochrome with their background colour removed. This feature is convenient for scanning newspapers, background-coloured documents or the like.
When the Photo original is selected in the Original Type (see page 41), the setting of Background Removal is invalid.With the Background Removal function, if a Compressed PDF is specified as a file type, levels 1 - 6 can be selected. However, normally only levels 4 - 6 are available.
1 Select “Adjustment”. (See page 44)
2 Select “Background Removal”.
3 Adjust the Background Removal level with “-” and “+”, and then select “OK”.
4 Select “OK”.
ContrastThe scanning contrast can be adjusted to match the original.
1 Select “Adjustment”. (See page 44)
2 Select “Contrast”.
3 Adjust the contrast level with “Lower” or “Higher”, and then select “OK”.
4 Select “OK”.
+ Background colour is darker.
- Background colour is lighter.
(6 steps)
Lower For darker original
Higher For lighter original
Higher
Lower
48
Chapter 3 S
canner Settings
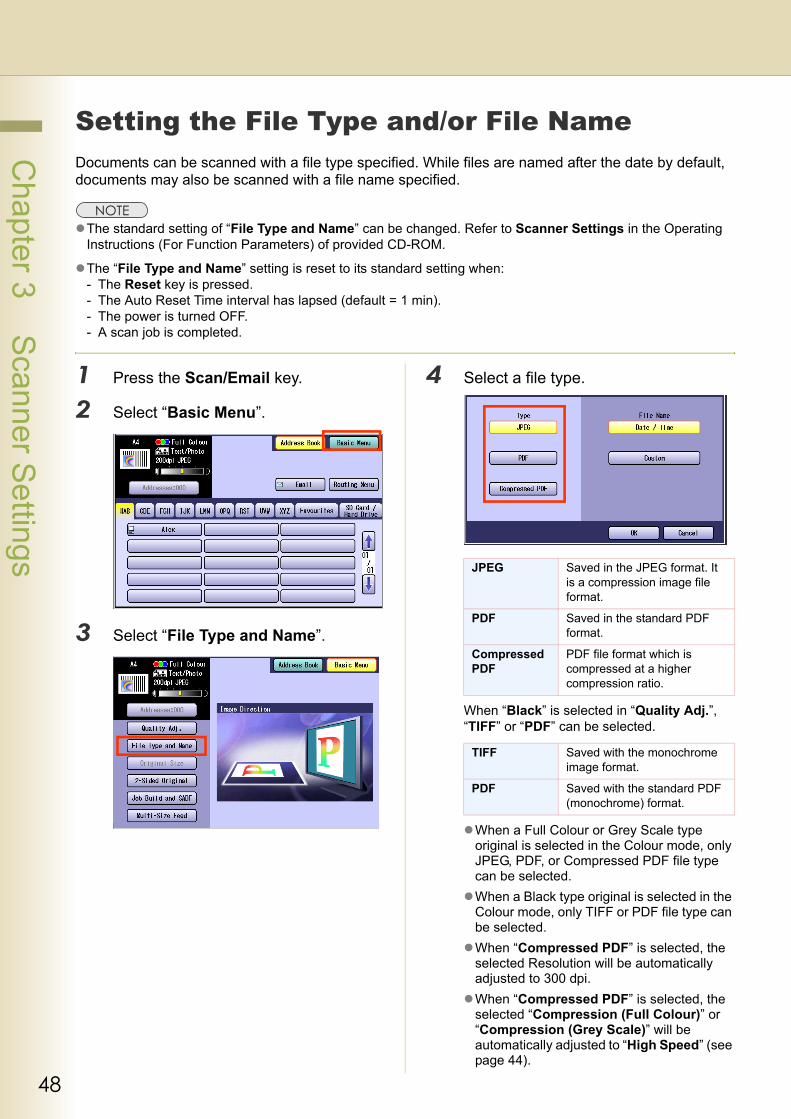
Setting the File Type and/or File NameDocuments can be scanned with a file type specified. While files are named after the date by default, documents may also be scanned with a file name specified.
The standard setting of “File Type and Name” can be changed. Refer to Scanner Settings in the Operating Instructions (For Function Parameters) of provided CD-ROM.
The “File Type and Name” setting is reset to its standard setting when:- The Reset key is pressed.- The Auto Reset Time interval has lapsed (default = 1 min).- The power is turned OFF.- A scan job is completed.
1 Press the Scan/Email key.
2 Select “Basic Menu”.
3 Select “File Type and Name”.
4 Select a file type.
When “Black” is selected in “Quality Adj.”, “TIFF” or “PDF” can be selected.
When a Full Colour or Grey Scale type original is selected in the Colour mode, only JPEG, PDF, or Compressed PDF file type can be selected.When a Black type original is selected in the Colour mode, only TIFF or PDF file type can be selected.When “Compressed PDF” is selected, the selected Resolution will be automatically adjusted to 300 dpi.When “Compressed PDF” is selected, the selected “Compression (Full Colour)” or “Compression (Grey Scale)” will be automatically adjusted to “High Speed” (see page 44).
JPEG Saved in the JPEG format. It is a compression image file format.
PDF Saved in the standard PDF format.
Compressed PDF
PDF file format which is compressed at a higher compression ratio.
TIFF Saved with the monochrome image format.
PDF Saved with the standard PDF (monochrome) format.
49
Chapter 3 S
canner Settings
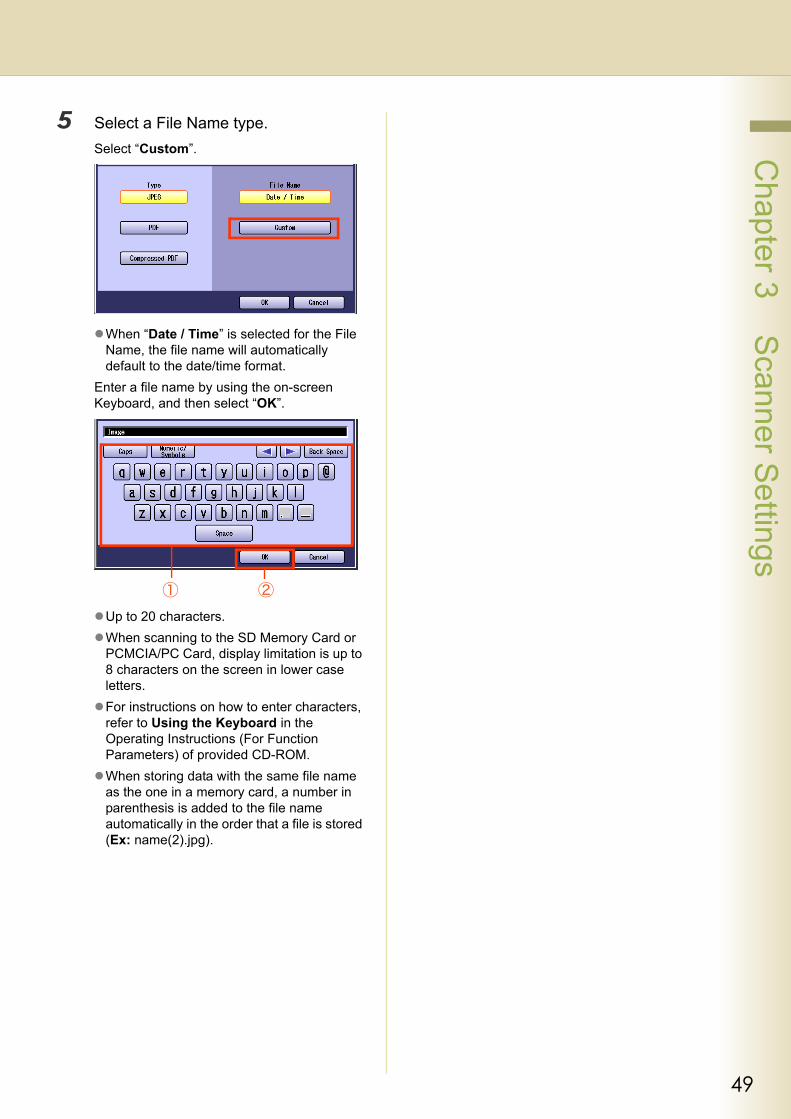
5 Select a File Name type.Select “Custom”.
When “Date / Time” is selected for the File Name, the file name will automatically default to the date/time format.
Enter a file name by using the on-screen Keyboard, and then select “OK”.
Up to 20 characters.When scanning to the SD Memory Card or PCMCIA/PC Card, display limitation is up to 8 characters on the screen in lower case letters.For instructions on how to enter characters, refer to Using the Keyboard in the Operating Instructions (For Function Parameters) of provided CD-ROM.When storing data with the same file name as the one in a memory card, a number in parenthesis is added to the file name automatically in the order that a file is stored (Ex: name(2).jpg).
50
Chapter 3 S
canner Settings
Scanning Special Originals
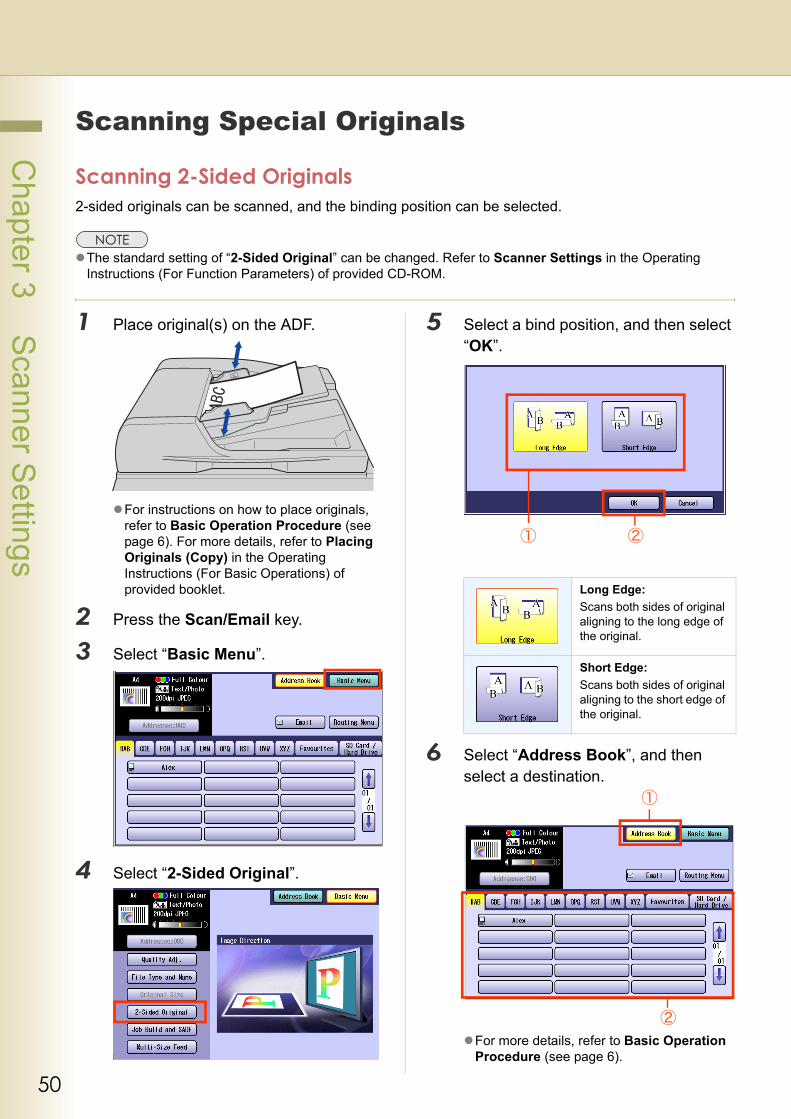
Scanning 2-Sided Originals2-sided originals can be scanned, and the binding position can be selected.
The standard setting of “2-Sided Original” can be changed. Refer to Scanner Settings in the Operating Instructions (For Function Parameters) of provided CD-ROM.
1 Place original(s) on the ADF.
For instructions on how to place originals, refer to Basic Operation Procedure (see page 6). For more details, refer to Placing Originals (Copy) in the Operating Instructions (For Basic Operations) of provided booklet.
2 Press the Scan/Email key.
3 Select “Basic Menu”.
4 Select “2-Sided Original”.
5 Select a bind position, and then select “OK”.
6 Select “Address Book”, and then select a destination.
For more details, refer to Basic Operation Procedure (see page 6).
Long Edge:Scans both sides of original aligning to the long edge of the original.
Short Edge:Scans both sides of original aligning to the short edge of the original.
51
Chapter 3 S
canner Settings
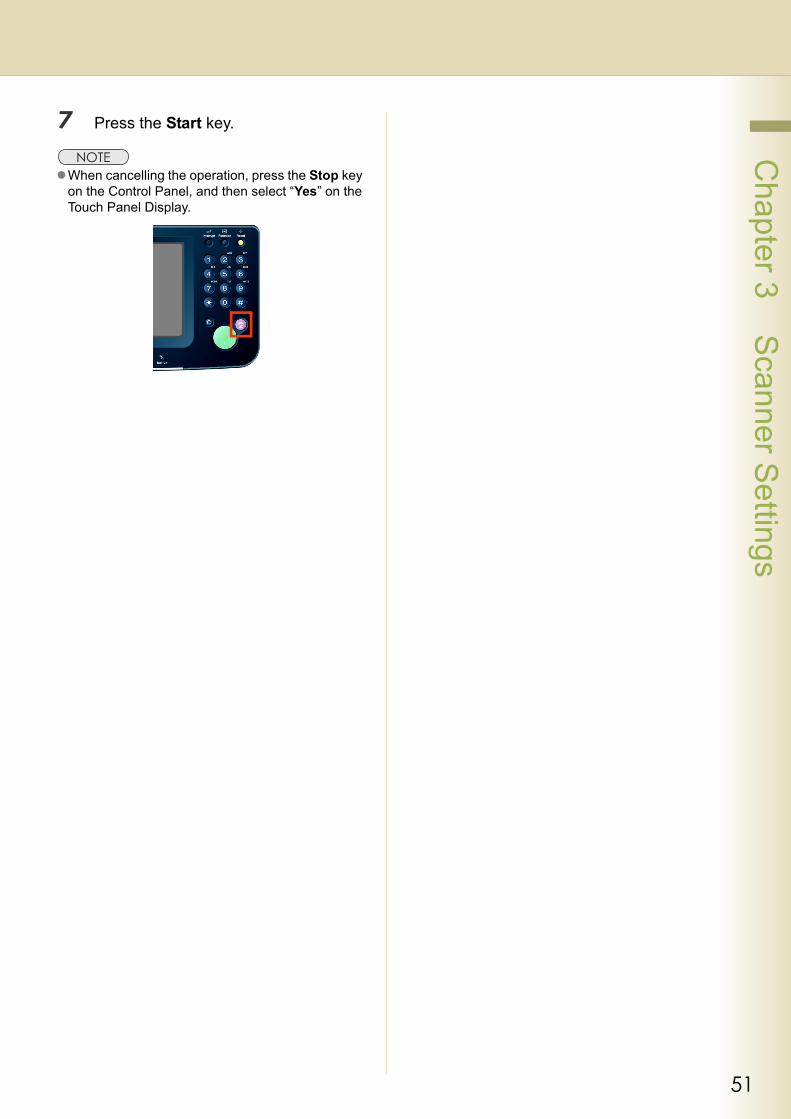
7 Press the Start key.
When cancelling the operation, press the Stop key on the Control Panel, and then select “Yes” on the Touch Panel Display.
52
Chapter 3 S
canner Settings
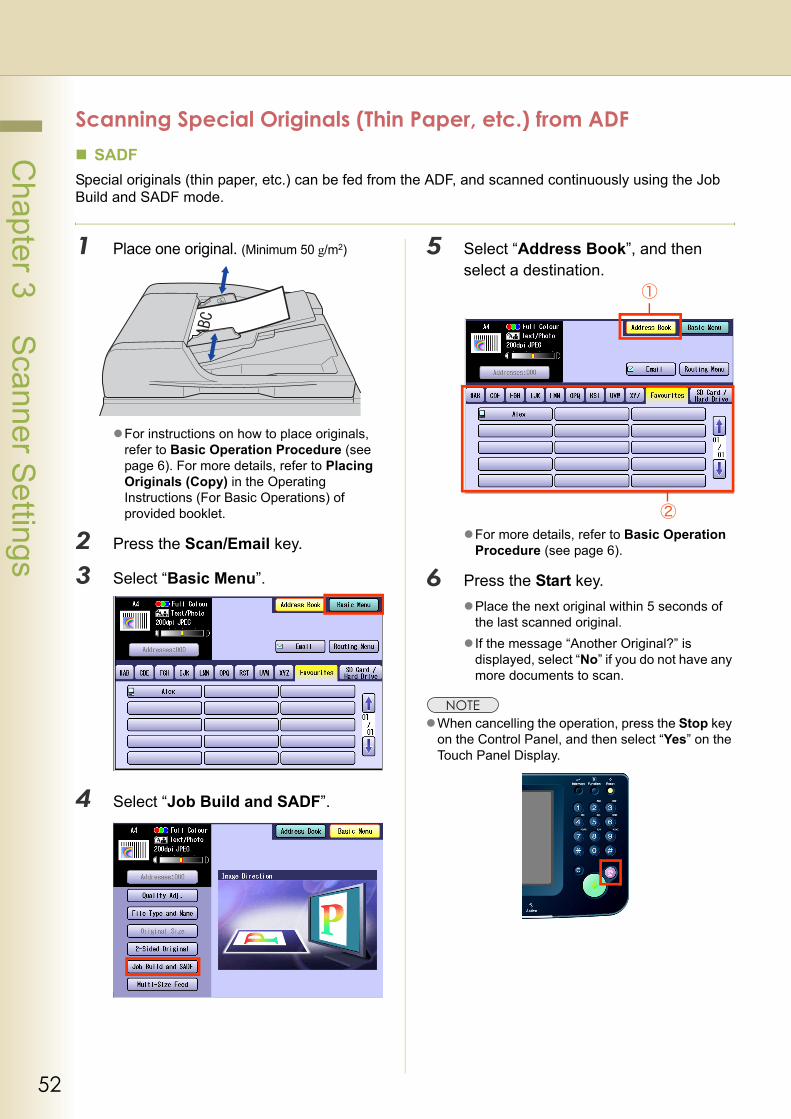
Scanning Special Originals (Thin Paper, etc.) from ADFSADF
Special originals (thin paper, etc.) can be fed from the ADF, and scanned continuously using the Job Build and SADF mode.
1 Place one original. (Minimum 50 g/m2)
For instructions on how to place originals, refer to Basic Operation Procedure (see page 6). For more details, refer to Placing Originals (Copy) in the Operating Instructions (For Basic Operations) of provided booklet.
2 Press the Scan/Email key.
3 Select “Basic Menu”.
4 Select “Job Build and SADF”.
5 Select “Address Book”, and then select a destination.
For more details, refer to Basic Operation Procedure (see page 6).
6 Press the Start key.Place the next original within 5 seconds of the last scanned original.If the message “Another Original?” is displayed, select “No” if you do not have any more documents to scan.
When cancelling the operation, press the Stop key on the Control Panel, and then select “Yes” on the Touch Panel Display.
53
Chapter 3 S
canner Settings
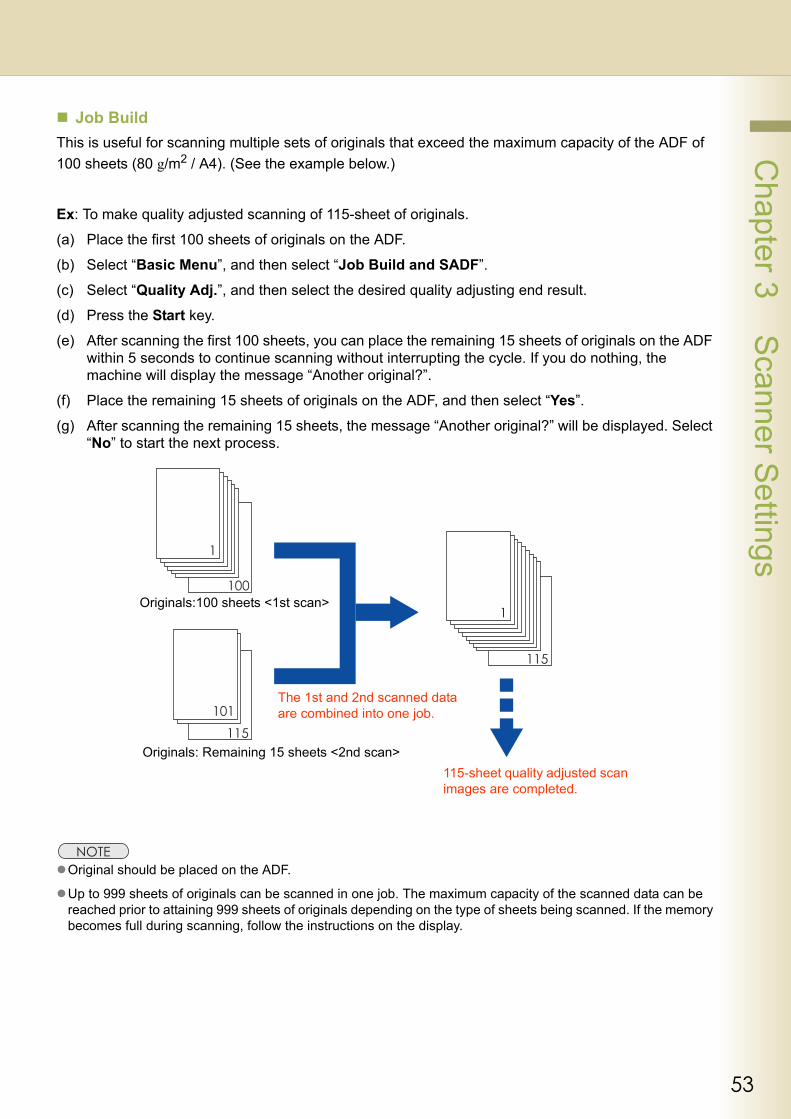
Job BuildThis is useful for scanning multiple sets of originals that exceed the maximum capacity of the ADF of 100 sheets (80 g/m2 / A4). (See the example below.)
Ex: To make quality adjusted scanning of 115-sheet of originals.
(a) Place the first 100 sheets of originals on the ADF.
(b) Select “Basic Menu”, and then select “Job Build and SADF”.
(c) Select “Quality Adj.”, and then select the desired quality adjusting end result.
(d) Press the Start key.
(e) After scanning the first 100 sheets, you can place the remaining 15 sheets of originals on the ADF within 5 seconds to continue scanning without interrupting the cycle. If you do nothing, the machine will display the message “Another original?”.
(f) Place the remaining 15 sheets of originals on the ADF, and then select “Yes”.
(g) After scanning the remaining 15 sheets, the message “Another original?” will be displayed. Select “No” to start the next process.
Original should be placed on the ADF.
Up to 999 sheets of originals can be scanned in one job. The maximum capacity of the scanned data can be reached prior to attaining 999 sheets of originals depending on the type of sheets being scanned. If the memory becomes full during scanning, follow the instructions on the display.
100
1
115
1
115
101
Originals:100 sheets <1st scan>
Originals: Remaining 15 sheets <2nd scan>
The 1st and 2nd scanned data are combined into one job.
115-sheet quality adjusted scan images are completed.
54
Chapter 4 A
dding to the Address B
ook
Chapter 4Adding to the Address Book
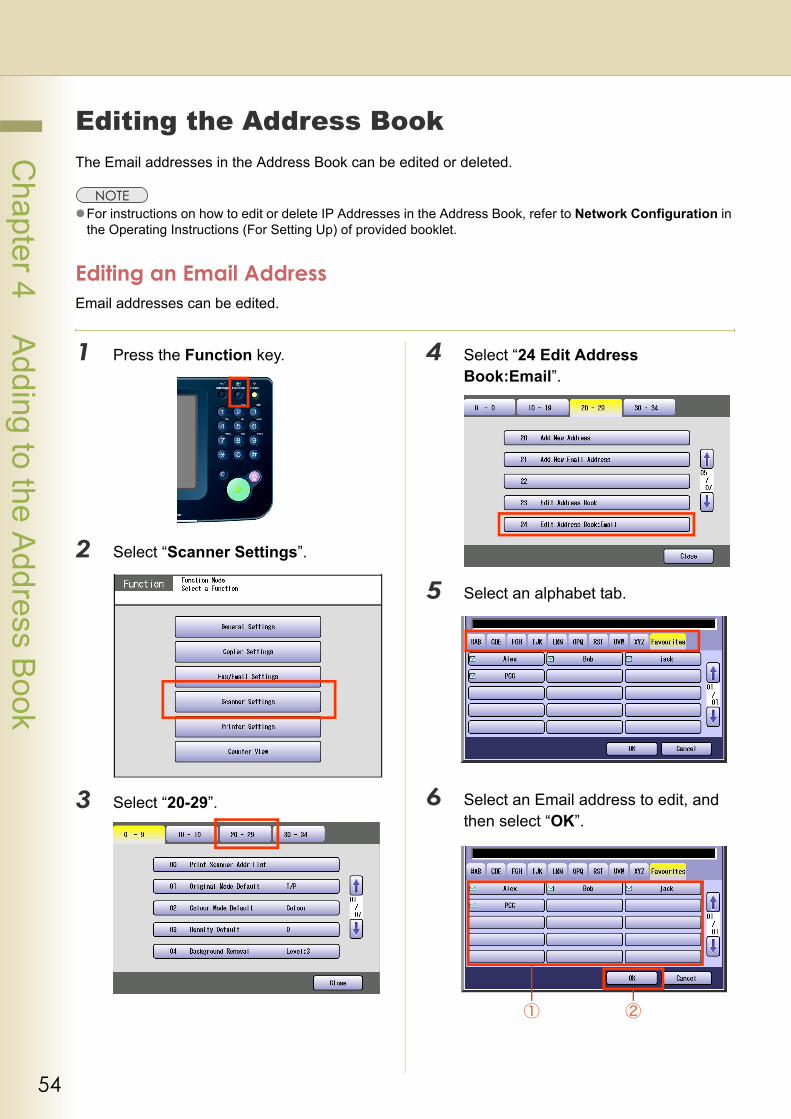
Editing the Address BookThe Email addresses in the Address Book can be edited or deleted.
For instructions on how to edit or delete IP Addresses in the Address Book, refer to Network Configuration in the Operating Instructions (For Setting Up) of provided booklet.
Editing an Email AddressEmail addresses can be edited.
1 Press the Function key.
2 Select “Scanner Settings”.
3 Select “20-29”.
4 Select “24 Edit Address Book:Email”.
5 Select an alphabet tab.
6 Select an Email address to edit, and then select “OK”.
55
Chapter 4 A
dding to the Address B
ook
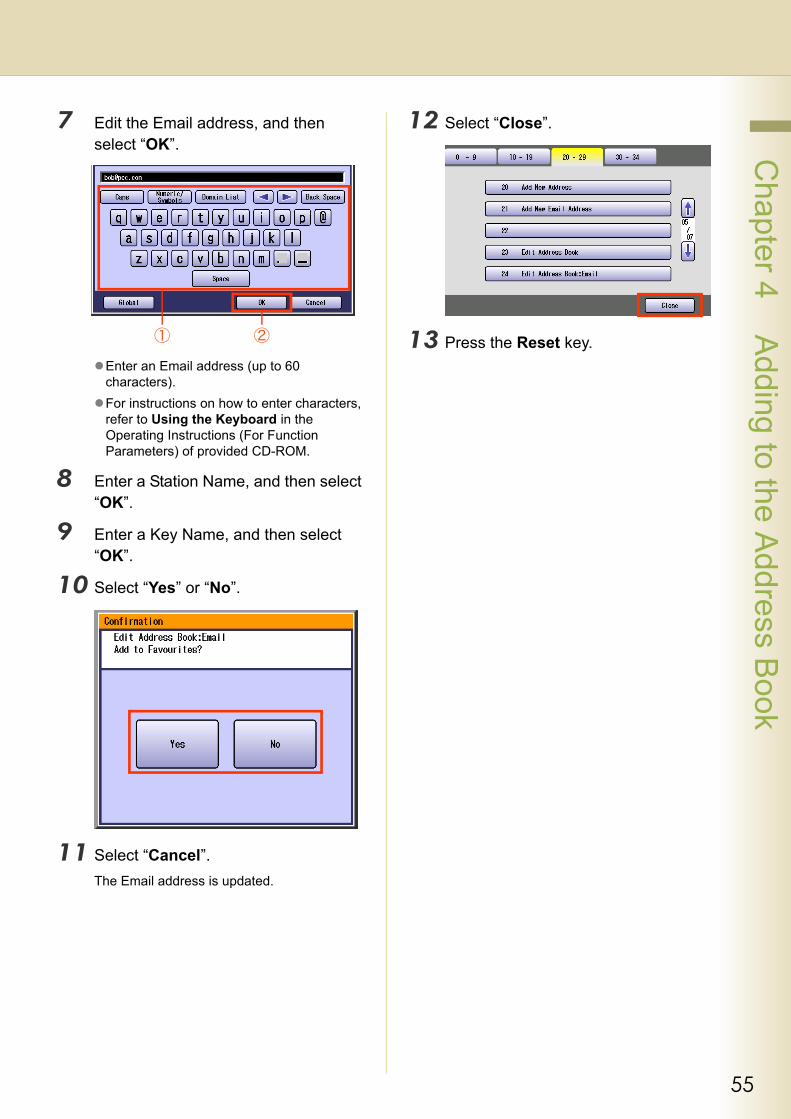
7 Edit the Email address, and then select “OK”.
Enter an Email address (up to 60 characters).For instructions on how to enter characters, refer to Using the Keyboard in the Operating Instructions (For Function Parameters) of provided CD-ROM.
8 Enter a Station Name, and then select “OK”.
9 Enter a Key Name, and then select “OK”.
10 Select “Yes” or “No”.
11 Select “Cancel”.The Email address is updated.
12 Select “Close”.
13 Press the Reset key.
56
Chapter 4 A
dding to the Address B
ook
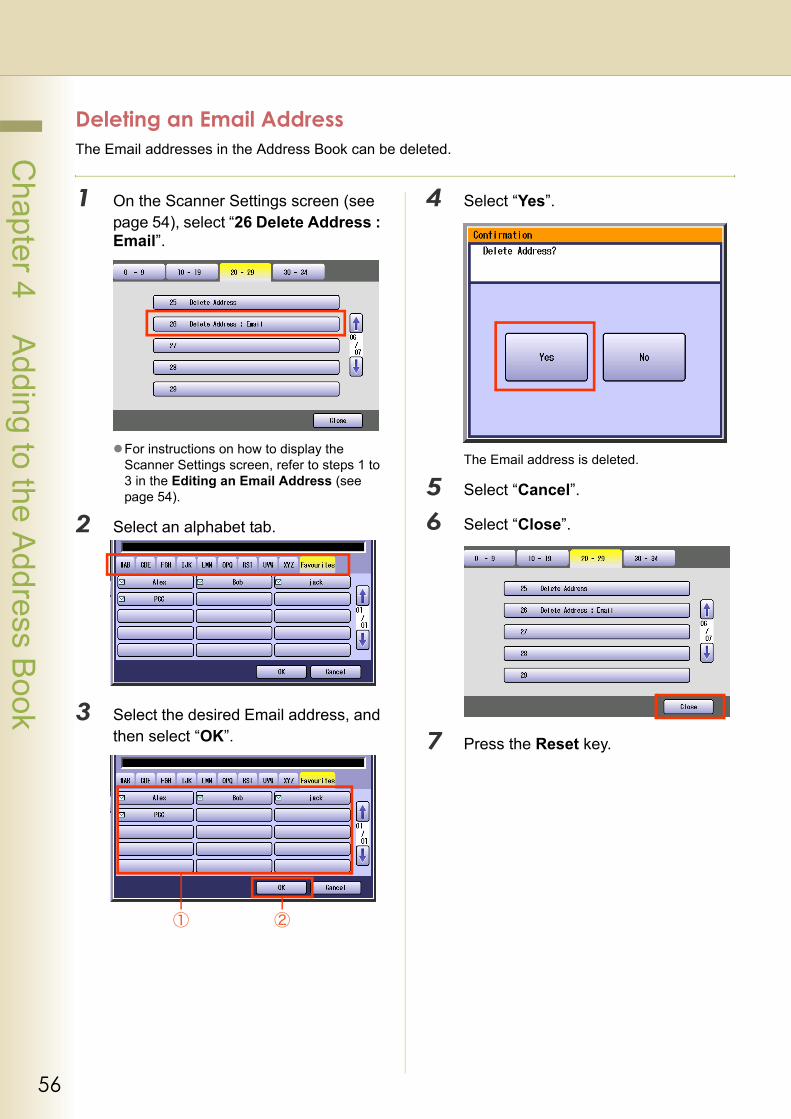
Deleting an Email AddressThe Email addresses in the Address Book can be deleted.
1 On the Scanner Settings screen (see page 54), select “26 Delete Address : Email”.
For instructions on how to display the Scanner Settings screen, refer to steps 1 to 3 in the Editing an Email Address (see page 54).
2 Select an alphabet tab.
3 Select the desired Email address, and then select “OK”.
4 Select “Yes”.
The Email address is deleted.
5 Select “Cancel”.
6 Select “Close”.
7 Press the Reset key.

57
Chapter 4 A
dding to the Address B
ook
Memo
58
Chapter 4 A
dding to the Address B
ook
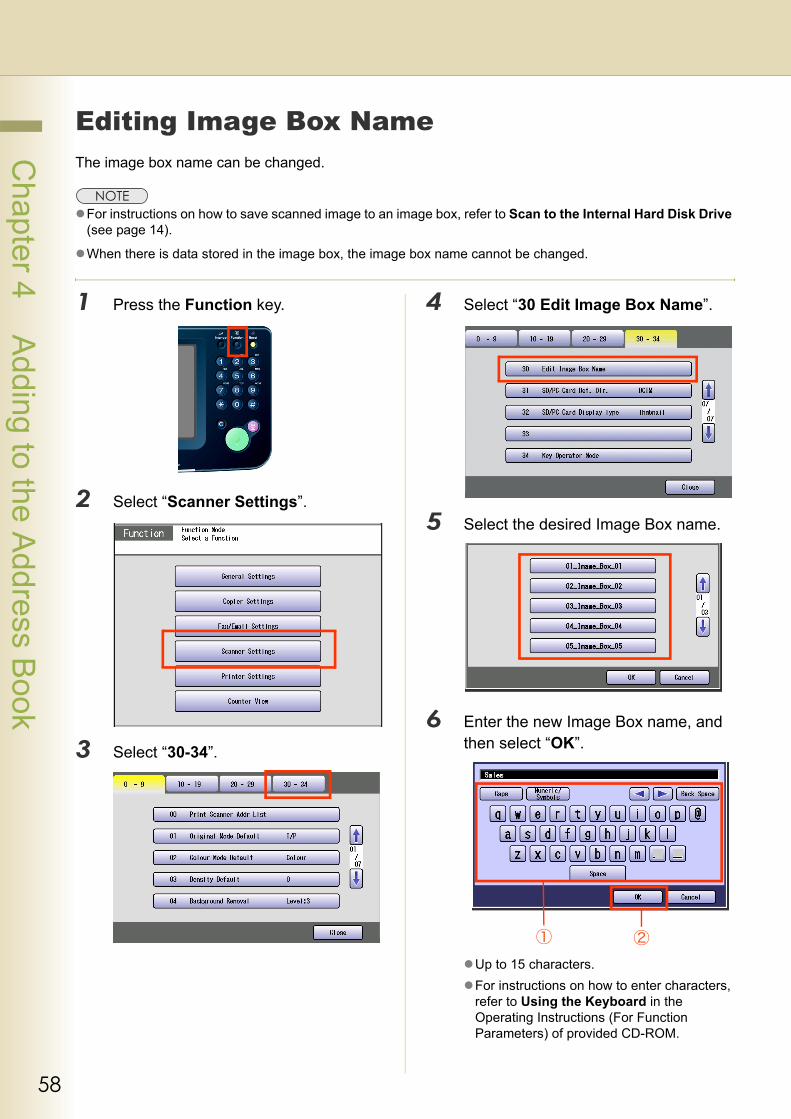
Editing Image Box NameThe image box name can be changed.
For instructions on how to save scanned image to an image box, refer to Scan to the Internal Hard Disk Drive (see page 14).
When there is data stored in the image box, the image box name cannot be changed.
1 Press the Function key.
2 Select “Scanner Settings”.
3 Select “30-34”.
4 Select “30 Edit Image Box Name”.
5 Select the desired Image Box name.
6 Enter the new Image Box name, and then select “OK”.
Up to 15 characters.For instructions on how to enter characters, refer to Using the Keyboard in the Operating Instructions (For Function Parameters) of provided CD-ROM.
59
Chapter 4 A
dding to the Address B
ook
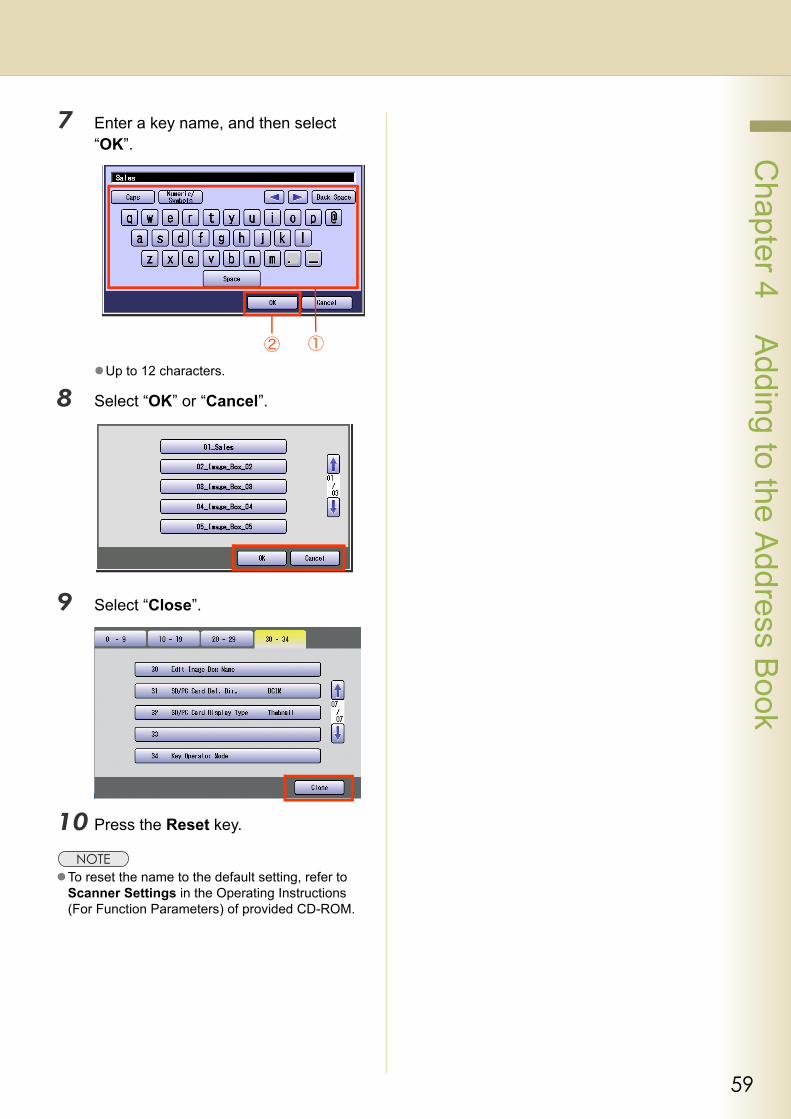
7 Enter a key name, and then select “OK”.
Up to 12 characters.
8 Select “OK” or “Cancel”.
9 Select “Close”.
10 Press the Reset key.
To reset the name to the default setting, refer to Scanner Settings in the Operating Instructions (For Function Parameters) of provided CD-ROM.
60
Chapter 5 A
ppendix
Chapter 5Appendix
Index
Numerics145 Sender Selection .................................................... 21146 POP Timer .............................................................. 38147 Auto POP Receive ............................................ 38, 39148 Del POP Receive Mail ............................................ 38149 Del POP Error Mail ................................................. 38183 Colour Attachment .................................................. 2021 Default Subject ......................................................... 2124 Edit Address Book:Email .......................................... 5426 Delete Address : Email ............................................. 562-Sided Original ............................................................. 402-Sided Originals ........................................................... 5030 Edit Image Box Name ............................................... 58
AAccess Indicator ............................................................ 11Add to Local ................................................................... 25Address Book .......................................................... 25, 54ADF ................................................................................ 52Alphabet Tab ................................................................. 19Attachment ............................................................... 29, 36
BBackground Removal .................................................... 47Basic Menu ...................................................................... 6Basic Operation Procedure .............................................. 6Bcc ................................................................................. 24Black .............................................................................. 46Black Mode .................................................................... 40Box Name ...................................................................... 58
CCc .................................................................................. 24Close ........................................................................ 22, 30Colour Mode .................................................................. 40Colour Original ................................................................. 8Colour Quality ................................................................ 44Compressed PDF .......................................................... 48Contrast ......................................................................... 47
DDarker ............................................................................ 41Date / Time .................................................................... 49Density ........................................................................... 41Display ........................................................................... 19
EEdit ................................................................................. 25Email ................................................................................ 7Email Address ................................................................ 54
FFavourites ...................................................................... 18Fax key .......................................................................... 39
File Name .......................................................................48File Type .........................................................................48File Type and Name .......................................................40From ...............................................................................24Full Colour ................................................................40, 44Full Colour Mode ............................................................40Function Parameters ................................................20, 38
GGet Email ........................................................................39Global .............................................................................23Grey Scale ......................................................................46Grey Scale Mode ............................................................40
HHard Disk Drive ..................................................14, 16, 36High Quality ........................................................42, 44, 46High Speed ...............................................................44, 46Higher .............................................................................47
IImage Box ............................................................7, 16, 58Internet Fax Function .......................................................9Invalid .............................................................................39IP Address ......................................................................16
JJob Build and SADF .................................................40, 52JPEG ..............................................................................48
KKey Name .......................................................................55Keyboard ........................................................................21
LLighter ............................................................................41Local ...............................................................................23Lower ..............................................................................47
MMonochrome ..................................................................40Monochrome Original .......................................................8Multi ................................................................................20Multi-page Colour Document ..........................................20Multiple Addresses .........................................................20Multi-Size Feed ..............................................................40
OOriginal Size ...................................................................40Original Type ..................................................................41
PPanasonic Communication Utility ...................................18
61
Chapter 5 A
ppendix
Panasonic Document Management System ..................18PC Card ....................................................................13, 33PCMCIA/PC Card .....................................................12, 32PCMCIA/PC Card Adapter .......................................12, 32PCMCIA/PC Card Adapter (Type II) .........................12, 32PCMCIA/PC Card Slot ..............................................13, 34PDF ................................................................................48Photo ..............................................................................41POP server .....................................................................38
QQuality Adj. .....................................................................40
RResolution ......................................................................42
SScan to the SD Memory Card .........................................10Scan/Email Function ........................................................8Scan/Email key .................................................................6Scanner Image Box ........................................................16SD Card ......................................................................7, 11SD Card / Hard Drive ........................................................7SD Memory Card ......................................................10, 28Search ............................................................................23Single Address ...............................................................20Special Originals ............................................................52Standard ...................................................................44, 46Start key ...........................................................................7Station Name ..................................................................55Stop key ...........................................................................7Subject ...........................................................................21
TText ................................................................................41Text/Photo ......................................................................41Thin Paper ......................................................................52Three-Colours ................................................................40Thumbnail .......................................................................29TIFF ................................................................................48
VValid ...............................................................................21
WWeb Browser ..................................................................16
For Service, Call:
The following trademarks and registered trademarks are used throughout this manual:
Microsoft, Windows, Windows Server, Windows Vista, Excel, PowerPoint, Outlook & Windows logo are either registered trademarks or trademarks of Microsoft Corporation in the USA and other countries.Microsoft product screen shot(s) reprinted with permission from Microsoft Corporation.Adobe, Acrobat Reader & Adobe logo are either registered trademarks or trademarks of Adobe Systems Incorporated.All other trademarks identified herein are the property of their respective owners.
Eudora is a registered trademark of QUALCOMM Incorporated.
PEERLESSPageTM is a trademark of the PEERLESS Systems Corporation; and, PEERLESSPrintTM and Memory Reduction Technology® are registered trademarks PEERLESS Systems Corporation; and, COPYRIGHT © 2002 PEERLESS Systems Corporation
Universal Font Scaling Technology (UFST) and all typefaces have been licensed from Monotype Imaging Inc.
Monotype® is a registered trademark of Monotype Imaging Inc. registered in the U.S. Patent and Trademark Office and may be registered in other jurisdictions.ColorSetTM is a registered trademark of Monotype Imaging Inc. registered in the U.S. Patent and Trademark Office and may be registered in other jurisdictions. ColorSetTM Profile Tool Kit, Profile Studio and Profile Optimizer are trademarks of Monotype Imaging Inc. and may be registered in certain jurisdictions.Copyright © 2005 Monotype Imaging Inc. All rights reserved.
Captaris and RightFax are trademarks of Captaris, Inc.
Novell and NetWare are registered trademarks of Novell, Inc. in the United States and other countries.
libtiff is a software written by Sam Leffler while working for Silicon Graphics.Copyright © 1988-1997 Sam LefflerCopyright © 1991-1997 Silicon Graphics, Inc.
zlib is a library written by Jean-loup Gailly and Mark Adler.Copyright © 1995-2005 Jean-loup Gailly and Mark Adler
libjpeg is a library maintained by the Independent JPEG Group.Copyright © 1991-1998, Thomas G. Lane
Tr1207-1018 (01)PJQMC1091ZBJanuary 2008Published in Japan
For Customer Support:Panasonic Communications Co., Ltd.Fukuoka, Japanhttp://panasonic.net
© 2007 Panasonic Communications Co., Ltd. All Rights Reserved.Unauthorized copying and distribution is a violation of law.The contents of these Operating Instructions are subject to change without notice.