Download - WAFL BAFL Installation - Non Lit - Frasch

frasch.co | 682.200.3005
Tools Needed
WAFL BAFL Installation - Non LitAcoustical Box BaflThese installation suggestions consist of a common process for WAFL BAFL installation. Installers should rely upon their own professional experience and understanding of their unique requirements to ensure a successful install.
Items Included
01 of 07Rev 04-2021
Hanger Bolt Aircraft Cable Coupling Nut
Hanger Bolt Driver(IVY classic)Drill Cable Cutter & Crimper
Soldering IronRatchet Rivets Glue gun with Glue sticks
Cable Ferrule
WAFL BAFL Type 1 WAFL BAFL Type 2

frasch.co | 682.200.3005
1. Check the total quantity of the WAFL BAFL before assembly. Each WAFL BAFL will be labeled as Type 1 or Type 2. Arrange each WAFL BAFL on the floor according to the design.
Type 1
Type 1
Type 1
Type 1Type 2
Type 2
Type 2
Type 2
2. Ensure each WAFL BAFL is placed with the double layer strip facing the ceiling. This is needed to install the hardwareto hang each WAFL BAFL.
02 of 07Rev 04-2021
WAFL BAFL Installation - Non LitAcoustical Box Bafl

frasch.co | 682.200.3005
3. The double layered strips will be the location to install the hardware. Each WAFL BAFL has 8 locations - 2 on eachside. Use the soldering iron to make holes on each double layered strip location.
4. Make a hole in the center of each strip location. Ensure the depth of the hole is 18mm-20mm, do NOT pass throughall layers of the strips.
03 of 07Rev 04-2021
WAFL BAFL Installation - Non LitAcoustical Box Bafl
2
3
4
8
7
1
56

frasch.co | 682.200.3005
04 of 07Rev 04-2021
5. Fill the hole with glue using the hot glue gun.
WAFL BAFL Installation - Non LitAcoustical Box Bafl
6. Attach the hanger bolt driver on the drill. Insert the hanger bolt on the hanger bolt driver, then drill the hanger boltthrough the hole until it reaches half way. Repeat with all 8 locations on the WAFL BAFL.

frasch.co | 682.200.3005
05 of 07Rev 04-2021
WAFL BAFL Installation - Non LitAcoustical Box Bafl
7. Insert the aircraft cable through the Cable Ferrule and Griplock. Screw the Griplock head to secure the cable.
Aircraft Cable
Griplock
2. Press down to
insert cable
1. Unscrew safety cap
3. Screw down safety cap
Coupling Nut
Griplock
Aircraft Cable
8. Insert and screw the Coupling Nut on the Hanger Bolt that has been installed onto the WAFL BAFL. Take the Griplock andAircraft Cable and insert onto the Coupling Nut, twist to secure.

frasch.co | 682.200.3005
06 of 07Rev 04-2021
WAFL BAFL Installation - Non LitAcoustical Box Bafl
9. Once the hardware has been placed, install each WAFL BAFL one at a time to the ceiling. Ensure each WAFL BAFL isarranged to match the pattern from step 1.
To attach two WAFL BAFLs together, find the yellow labels on each side of the WAFL BAFL. Take off the yellow labels on both WAFL BAFLs and push out the material from the hole.
10. Take a pair of the Ratchet Rivets and align the threaded rib perpendicular to each other before inserting it into the hole.Use both hands to insert the two pieces together and push it tightly to secure the WAFL BAFLs together.

frasch.co | 682.200.3005
07 of 07Rev 04-2021
WAFL BAFL Installation - Non LitAcoustical Box Bafl
11. Repeat this process with the rest of the WAFL BAFLs until all are installed on the ceiling, then connected and securedon every side with the Ratchet Rivets.
12. Finish the installation.

frasch.co | 682.200.3005
Tools Needed
WAFL BAFL Installation - LitAcoustical Box BaflThese installation suggestions consist of a common process for WAFL BAFL installation. Installers should rely upon their own professional experience and understanding of their unique requirements to ensure a successful install.
Items Included
01 of 08Rev 04-2021
Hanger Bolt Aircraft Cable Coupling Nut
Hanger Bolt Driver(IVY classic)Drill Cable Cutter & Crimper
Soldering Iron
WAFL BAFL Non-Lit WAFL BAFL Lit
Ratchet Rivets Glue gun with Glue sticks
Cable Ferrule
Light Fixtures

frasch.co | 682.200.3005
1. Check the total quantity of the WAFL BAFL before assembly. Each WAFL BAFL will be labeled as LIT or NON-LIT. Arrange each WAFL BAFL on the floor according to the design.
2. Ensure each WAFL BAFL is placed with the double layer strip facing the ceiling. This is needed to install the hardwareto hang each WAFL BAFL.
02 of 08Rev 04-2021
WAFL BAFL Installation - LitAcoustical Box Bafl
LIT
NON-LIT
NON-LIT
NON-LIT
NON-LIT
LITLIT
LIT
LIT
LIT
NON-LIT
NON-LIT

frasch.co | 682.200.3005
3. The double layered strips will be the location to install the hardware. Each WAFL BAFL has 8 locations - 2 on eachside. Use the soldering iron to make holes on each double layered strip location.
4. Make a hole in the center of each strip location. Ensure the depth of the hole is 18mm-20mm, do NOT pass throughall layers of the strips.
03 of 08Rev 04-2021
WAFL BAFL Installation - LitAcoustical Box Bafl
2
3
4
8
7
1
56

frasch.co | 682.200.3005
04 of 08Rev 04-2021
5. Fill the hole with glue using the hot glue gun.
WAFL BAFL Installation - LitAcoustical Box Bafl
6. Attach the hanger bolt driver on the drill. Insert the hanger bolt on the hanger bolt driver, then drill the hanger boltthrough the hole until it reaches half way. Repeat with all 8 locations on the WAFL BAFL.

frasch.co | 682.200.3005
05 of 08Rev 04-2021
WAFL BAFL Installation - LitAcoustical Box Bafl
7. Insert the aircraft cable through the Cable Ferrule and Griplock. Screw the Griplock head to secure the cable.
Aircraft Cable
Griplock
2. Press down to
insert cable
1. Unscrew safety cap
3. Screw down safety cap
Coupling Nut
Griplock
Aircraft Cable
8. Insert and screw the Coupling Nut on the Hanger Bolt that has been installed onto the WAFL BAFL. Take the Griplock andAircraft Cable and insert onto the Coupling Nut, twist to secure.
frasch.co | 682.200.3005
06 of 08Rev 04-2021
WAFL BAFL Installation - LitAcoustical Box Bafl
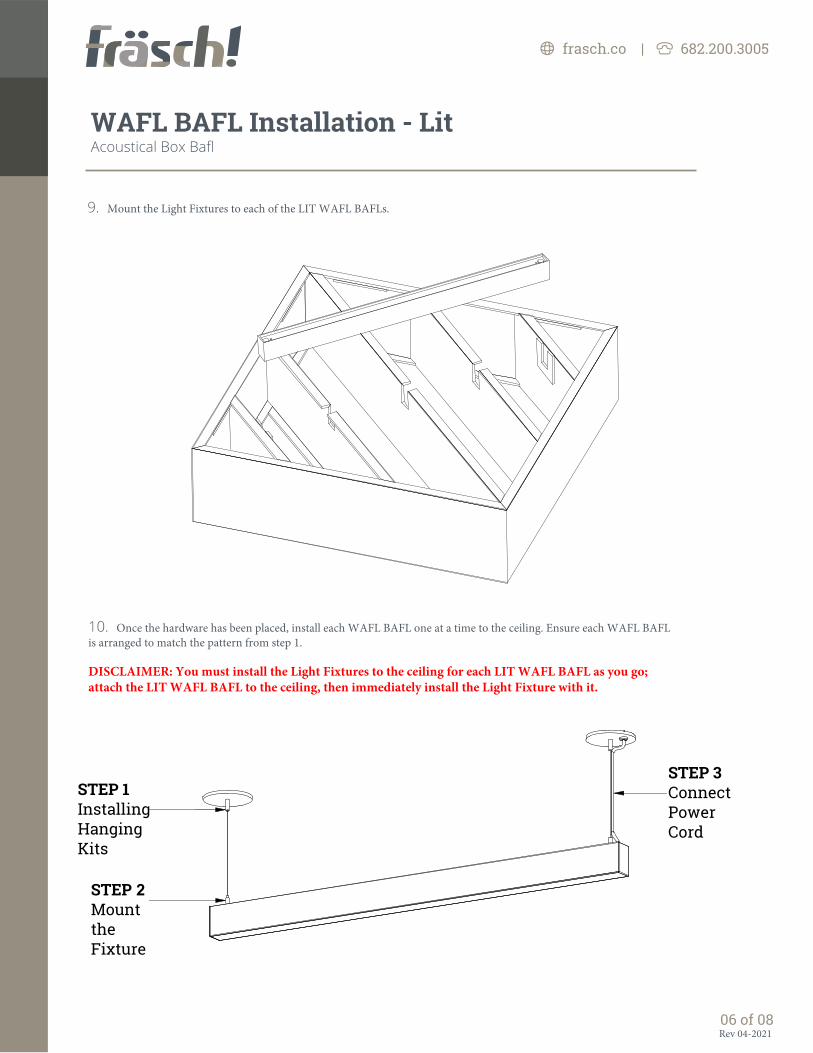
9. Mount the Light Fixtures to each of the LIT WAFL BAFLs.
10. Once the hardware has been placed, install each WAFL BAFL one at a time to the ceiling. Ensure each WAFL BAFLis arranged to match the pattern from step 1.
DISCLAIMER: You must install the Light Fixtures to the ceiling for each LIT WAFL BAFL as you go; attach the LIT WAFL BAFL to the ceiling, then immediately install the Light Fixture with it.
STEP 1Installing Hanging Kits
STEP 2Mount the Fixture
STEP 3Connect Power Cord

frasch.co | 682.200.3005
07 of 08Rev 04-2021
WAFL BAFL Installation - LitAcoustical Box Bafl
11. As you install each WAFL BAFL to the ceiling, begin to attach and secure each of them together on the sides.
To attach two WAFL BAFLs together, find the yellow labels on each side of the WAFL BAFL. Take off the yellow labels on both WAFL BAFLs and push out the material from the hole.
12. Take a pair of the Ratchet Rivets and align the threaded rib perpendicular to each other before inserting it into the hole. Use both hands to insert the two pieces together and push it tightly to secure the WAFL BAFLs together.

frasch.co | 682.200.3005
08 of 08Rev 04-2021
WAFL BAFL Installation - LitAcoustical Box Bafl
13. Repeat this process with the rest of the WAFL BAFLs until all are installed on the ceiling, then connected and securedon every side with the Ratchet Rivets.
14. Finish the installation.


