Instruction Bulletin 5.37
Release L, Effective March 2014 (Replaces K, Nov 13)See Bulletin Change Summary at end of Bulletin
A Guide to Understanding and Applying Graphics to Common Smooth and Textured Wall Surfaces
Why you'll want to read this Bulletinbefore you wrap another wall!
It's all about a successful installation.
Low VOC paints are driving change in wall film applications. The chemistry of paints has been
changing over the years to drive down the level of Volatile Organic Compounds, VOCs, due to both sus
tainability efforts and regulatory requirements. These new paint formulations have changed how the
painted surface interacts with the adhesive on films, affecting the films' ability to adhere to the paint.
Simple steps can maximize film adhesion. Because the paint formulations are protected by trade
secrets, it is difficult for any film manufacturer to understand how film adhesives interact with these
paints. We have found through extensive testing that there is no single film or adhesive that works
“best” on each paint tested. In fact, one film can perform well on one paint and poorly on another paint.
However, by using the new 3M™ Enhanced Adhesion Cleaning Method and testing the film's adhesion
to the walls, which are covered in this Bulletin, you can quickly, easily and successfully adhere almost
any 3M wall film to nearly any paint.
Reading and following the techniques in this Bulletin can be the difference between a successful
installation and a happy customer, and a graphic that falls off the wall prematurely.
Important Considerations
• Due to the wide variety of surface types and surface finishes, including low VOC paints, 3M
provides only a Basic Product Warranty for unused material; no warranty is implied or offered
for the adhesion, printed or applied appearance, durability or removability. See details on page
4.
• A change in gloss or wall staining after film removal is possible. It is usually the result of one or
more of the following: the initial wall cleaning process, paint and pigment quality, exposure to
heat and light, migrating particles in the paint, and/or adhesive residue. See details on page
8.
Instruction Bulletin 5.37 - 2
Table of Contents
1. Information for Designers, Specifiers, Graphics Manufacturers and Installers 3. . . . . . . . . . . . . . . . . . . . . . . . . . . . . . . . .
2. Worksheet for Walls 5. . . . . . . . . . . . . . . . . . . . . . . . . . . .
3. Wall Textures and Composition 6. . . . . . . . . . . . . . . . . . . .
A. Definitions 6. . . . . . . . . . . . . . . . . . . . . . . . . . . . . . . .
B. Common Indoor Wall Composition 6. . . . . . . . . . . . . . . .
C. Common Wall Finishes 6. . . . . . . . . . . . . . . . . . . . . . .
D. Photos of Textures 6. . . . . . . . . . . . . . . . . . . . . . . . . .
4. Understanding Paints and Wall Finishes 8. . . . . . . . . . . . . .
5. Film Adhesion Characteristics and Testing: Smooth and Textured 8. . . . . . . . . . . . . . . . . . . . . . . . . . .
A. All Walls - Adhesion Characteristics 8. . . . . . . . . . . . . . .
B. Effect of Overlaminate on Adhesion 8. . . . . . . . . . . . . . .
6. 3M Wall Film Adhesion Test for SMOOTH Walls 9. . . . . . . . .
A. Purpose of Wall Film Adhesion Test 9. . . . . . . . . . . . . . .
B. Limitations of Test and Cleaning Method 9. . . . . . . . . . .
C. Before Doing the Test 9. . . . . . . . . . . . . . . . . . . . . . . .
D. Test Conditions 9. . . . . . . . . . . . . . . . . . . . . . . . . . . . .
E. Supplies Needed 9. . . . . . . . . . . . . . . . . . . . . . . . . . . .
F. Prepare the Film Test Strips 9. . . . . . . . . . . . . . . . . . . .
G. Film Adhesion Test Procedure 10. . . . . . . . . . . . . . . . . .
H. Test Evaluation - Smooth Walls Only 10. . . . . . . . . . . . . .
I. Options for Film That Must Be Removed or Changed 11. . .
7. 3M Wall Film Adhesion Test for TEXTURED Walls 12. . . . . . . .
A. Purpose of Wall Film Adhesion Test 12. . . . . . . . . . . . . . .
B. Limitations of Test and Cleaning Method 12. . . . . . . . . . .
C. Before Doing the Test 12. . . . . . . . . . . . . . . . . . . . . . . .
D. Supplies Needed 12. . . . . . . . . . . . . . . . . . . . . . . . . . . .
E. Substrate Considerations 12. . . . . . . . . . . . . . . . . . . . . .
F. Film Adhesion Test Procedure 12. . . . . . . . . . . . . . . . . .
G. Test Evaluation - Textured Walls Only 12. . . . . . . . . . . . .
8. Health and Safety 13. . . . . . . . . . . . . . . . . . . . . . . . . . . . . .
9. 3M™ Enhanced Adhesion Cleaning Method 14. . . . . . . . . . .
A. Cleaning Procedure 14. . . . . . . . . . . . . . . . . . . . . . . . . .
B. Establish this Best Practice 14. . . . . . . . . . . . . . . . . . . . .
C. Time Study for Job Estimating 14. . . . . . . . . . . . . . . . . .
10. Installation to Smooth Indoor Walls - General Instructions 15. .
A. Tools and Supplies 15. . . . . . . . . . . . . . . . . . . . . . . . . .
B. About Application Tape 15. . . . . . . . . . . . . . . . . . . . . . .
C. Plan the Layout 15. . . . . . . . . . . . . . . . . . . . . . . . . . . . .
D. Hinge Methods 15. . . . . . . . . . . . . . . . . . . . . . . . . . . . .
E. General Installation Procedure 16. . . . . . . . . . . . . . . . . .
11. Installation to Textured Walls - General Instructions 18. . . . . .
A.Tips for a Good Installation 18. . . . . . . . . . . . . . . . . . . . . .
B. Using the 3M™ Two-Handled Textured Surface Applicator TSA-4 19. . . . . . . . . . . . . . . . . . . . . . . . . . . .
C. Textured Wall Film Installation Procedure 20. . . . . . . . . . .
D. Mosaic Graphic Technique 22. . . . . . . . . . . . . . . . . . . . .
E. Working Around an Obstruction 23. . . . . . . . . . . . . . . . . .
12. Graphic Maintenance, Repair, Removal: Smooth and Textured 24. . . . . . . . . . . . . . . . . . . . . . . . . . .
A. Edge Lifting: Causes and Repair 24. . . . . . . . . . . . . . . . .
B. Disposal of Film Liners and Used Film 24. . . . . . . . . . . . .
C. Cleaning 24. . . . . . . . . . . . . . . . . . . . . . . . . . . . . . . . .
D. Removal Risks 24. . . . . . . . . . . . . . . . . . . . . . . . . . . . .
E. Basic Removal Techniques 24. . . . . . . . . . . . . . . . . . . . .
13. Troubleshooting 25. . . . . . . . . . . . . . . . . . . . . . . . . . . . . . .
14. Disclaimer 28. . . . . . . . . . . . . . . . . . . . . . . . . . . . . . . . . . .
15. Limitation of Liability 28. . . . . . . . . . . . . . . . . . . . . . . . . . . .
16. Technical Service 28. . . . . . . . . . . . . . . . . . . . . . . . . . . . . .
17. 3M Related Literature 28. . . . . . . . . . . . . . . . . . . . . . . . . . .
18. Bulletin Change Summary 28. . . . . . . . . . . . . . . . . . . . . . . .
19. Measured Reference Guide 29. . . . . . . . . . . . . . . . . . . . . . .
Films Mentioned in This Bulletin
3M™ Envision™ Print Wrap Film 480Cv3
3M™ Envision™ Gloss Wrap Overlaminate 8548G
3M™ Controltac™ Graphic Film with Comply™ V3 Adhesive IJ180Cv3-10
3M™ Scotchcal™ Luster Overlaminate 8524
3M™ Scotchcal™ High Tack Graphic Film IJ39-20
Instruction Bulletin 5.37 - 3
1. Information for Designers, Specifiers, Graphics Manufacturers and Installers
1. Your Role in a Successful Installation
A successful installation is the result of a collaboration between de
signers, specifiers, graphics manufacturers (or convertors) and in
stallers in order to meet the needs of the customer. Being aware of the
details of the installation will help ensure success.
2. Understand the Customer's Expectations
• Length of time the film must remain on the wall.
• Whether removability is a requirement. See Step 10, page 4.
• Expectations of wall appearance upon removing film.
3. Know the characteristics of each application surface (wall) andthe environment to which the film will be exposed.
• Jobs that include multiple walls. Consider the characteristics of
each wall, which may have various textures, exposures or finishes.
If there are multiple types of walls, the graphics manufacturer may
need to select more than one 3M film to complete the job.
• Wall soundness. The soundness of any wall may vary from spot
to spot and no test can ensure consistent results over the entire
application area.
• Paint. “Paint” includes all wall finishes. Some finishes may have
silicone, graffiti-resistance or texturizing additives that can make
film adhesion even more difficult.
• Physical contact. Exposure to physical contact with people, an
imals or equipment.
• Indoor smooth walls
– Constant or variable temperature and/or humidity.
– Direct or indirect sunlight.
– Wallboard that conceals heating or cooling ducts, pipes or
water source, behind or in close proximity. Moisture that
seeps into wallboard, even if it has been sealed on the face,
will likely result in further wall damage if the film is removed
from it.
– Block walls in front of equipment such as a pool. If well
sealed and cured, may not cause a problem.
• Outdoor textured walls
– Excessive texture. More than 1/8 inch (3 mm) variation in
high and low spots of substrate texture and grout lines, as
well as square cut or undercut grout lines, may result in
lifting.
– Insufficient adhesion. If installed film can be easily removed
from a textured wall using a force of <2 pound/lineal inch
(0.36 kg/cm), it is unlikely to be durable in an outdoor
application.
– Exposure to moisture. Film exposed to water from rain or
irrigation systems can be trapped behind film applied out
doors, leading to lifting as well as the creation of mold. Apply
ing a bead of sealant along the top of the film helps reduce
these issues.
! Caution
Mold or mildew on top of or behind the film may be a health concern for
some individuals, especially during film removal.
– Excessive temperatures.
– Substrates that reach temperatures higher than 115°F
(46°C) may exhibit lifting, especially in grout lines.
– Freezing and thawing cycles. For a textured masonry wall
that has both an indoor facing side and an outdoor facing
side and no effective moisture barrier, moisture vapor trans
mission occurs naturally when the indoor wall has a room
environment that is warmer and moister than the outdoor
wall. When film is applied to the outdoor wall and there are
cycles of freezing and thawing, moisture can be trapped
between the wall and result in film lifting, as well as in
spalling both within the wall and on the outdoor facing wall.
Such damage can be unsightly and costly to repair.
Salts passing through masonry may be trapped behind the
film. Salt collection on the masonry wall for extended periods
may cause staining or discoloration.
Always check and follow your local building codes. 3M is not
responsible for damage caused by using this product for any
wall application.
4. Graphics Manufacturing Considerations
• Smooth Walls. Film must retain some flexibility in order to
achieve maximum adhesion. Do not use a stiff or thick overlami
nate (over 3 mils) on the base film.
• Textured Walls. 3M film applied to a textured wall requires using
the recommended overlaminate: Film IJ8624 with overlaminate
8524, or film 480Cv3 with overlaminate 8548G.
• Imaging method. Use only the inks recommended for the film
you use and follow the ink's Product & Instruction Bulletin for
proper use. Solvent inkjet printed film must have sufficient time for
all solvent to evaporate before the graphics manufacturer applies
the overlaminate (3M recommends 24 hours for best results).
Failure to do so may result in outgassing when the film is applied,
which can contribute to poor or inconsistent film adhesion.
• Inform the installer. The graphics manufacturer needs to convey
details about the graphic construction to the installer.
5. Perform a 3M Wall Film Adhesion Test on the Walls and with theFilms You Plan to Use
ImportantNote
Smooth walls: Testing the film adhesion on smooth
walls takes less than 30 minutes.
Textured walls: Testing film adhesion on textured walls
takes about 30 minutes to perform, but must stay in
place for one week (recommended) to get an accurate
assessment of adhesion strength. Plan ahead so you
can complete this important test!
• Either the graphics manufacturer or the installer can do film
adhesion tests. It's important to test both the films you plan to
use and the walls that will receive film before the full job is prin
ted. In many cases, the graphics manufacturer may be in the best
position to do the adhesion tests. If testing is done by the installer,
they need to report the results to the graphics manufacturer.
• Test the film(s) on each wall to receive film. The paint used on
different walls may look the same but have a different paint chem
istry or cure time—factors that affect adhesion.
– 3M Smooth Walls Film Adhesion Test: see page 9.
– 3M Textured Walls Film Adhesion Test: see page 12.

Instruction Bulletin 5.37 - 4
6. Examining Job Site Walls
At some point before the installation, it is a good practice to contact
the property or building maintenance manager for the installation site
to determine the following.
• Will any wall repairs be made in time to dry properly?
• Will any new finishes have the proper time to cure? Cure time
varies greatly and can be as long as 30 days.
ImportantNote
It is critical that the paint be allowed to cure for the entire
time period stated by the paint manufacturer.
• Does the wall show poor paint-to-substrate bond?
– Obvious: peeling, lifting or bubbling of the paint.
– Less obvious: multiple layers of paint on the substrate. The
bond of one or more layers to another layer may not be ad
equate. The weight of the film on such a wall may contribute
to the separation of paint layers, resulting in paint and film
falling off the wall.
7. Considerations in Bidding a Job
• Include time for doing the 3M Wall Film Adhesion Tests. The wall
test must include travel time and testing time. The following are
estimates only based on 3M experience performing tests.
– Testing 3 different films on 1 smooth wall: 30 minutes
– Testing 1 film on 1 textured wall: 45 minutes. Remember, the
film must be left in place for 1 week, so consider the time
needed to return to the job site.
– Cleaning a wall prior to installing the job: 30 minutes for 125
square feet (11.6 square meters)
8. Proper Wall Cleaning is an Essential Step to Good Adhesion
Using the 3M™ Enhanced Adhesion Cleaning Method on page 14
helps make sure the wall is ready to receive and hold film. Adopting
this as a best practice for every installation can make the difference
between success and failure.
9. Using the Proper Installation Techniques
Installers must use the proper tools and installation techniques, as
described in this Bulletin and any others recommended by 3M.
10. Limitations and Warranty
• 3M provides only a Basic Product Warranty only for unused ma
terial; no warranty is implied or offered for the adhesion, printed or
applied appearance, or durability.
• 3M does not warrant easy or clean removal of any film, even film
described as removable or changeable, from indoor or outdoor
walls. Removal may damage the substrate by removing small to
large amounts of paint, changing the gloss of the paint, or pulling
the paper off the wallboard. The bond of a paint to the wall is
often less than the bond of the film to the paint. Proper removal
techniques may help minimize damage.
• The 3M Wall Film Adhesion Tests (smooth walls, page 9, or
textured walls, page 12) may not detect problems with pre-exist
ing variations in the substrate, poor paint-to-substrate bond, poor
bond between multiple layers of paint on a substrate, or insuffi
ciently cured paint.
• Film applied to contaminated walls, or walls that exhibit visible
signs of peeling, lifting, bubbling, or dampness are likely to fail.
• The color and/or shape of any underlying film or image may be
visible after application of a new film. Films with a gray adhesive
increase have increased hiding power.
• Under-cured paint may continue to outgas and cause bubbles in
film that appears to be well applied right after application.
Instruction Bulletin 5.37 - 5
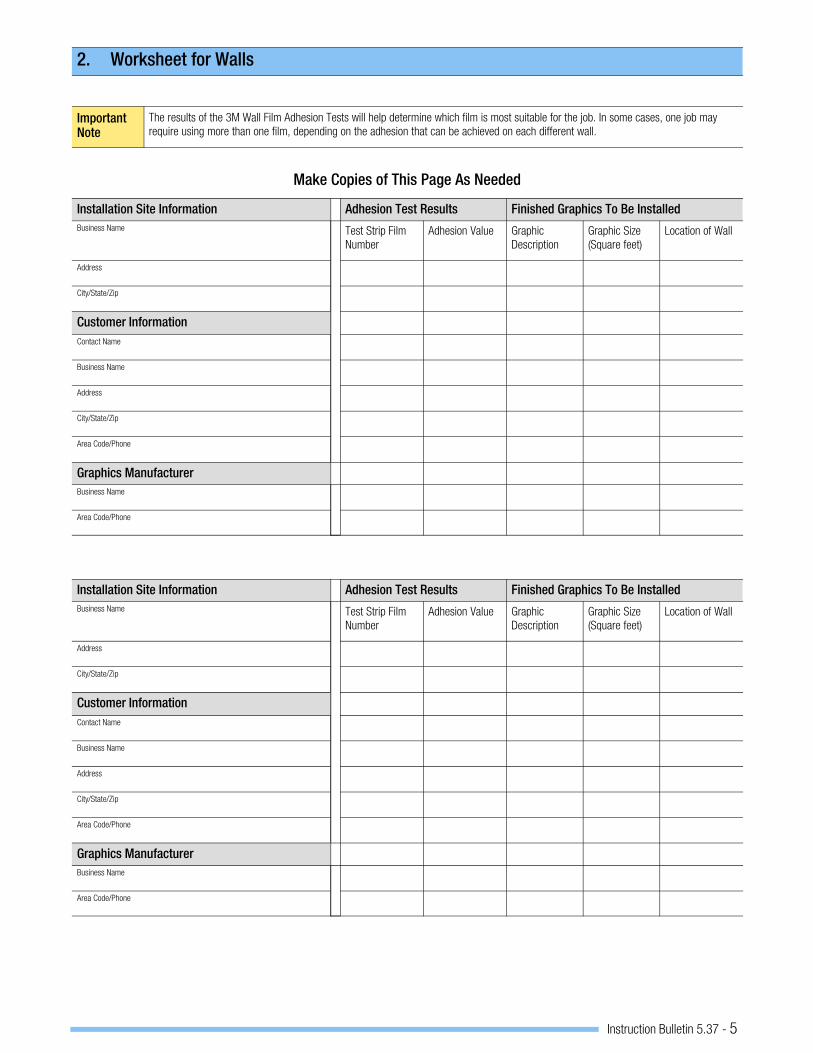
2. Worksheet for Walls
ImportantNote
The results of the 3M Wall Film Adhesion Tests will help determine which film is most suitable for the job. In some cases, one job may
require using more than one film, depending on the adhesion that can be achieved on each different wall.
Make Copies of This Page As Needed
Installation Site Information Adhesion Test Results Finished Graphics To Be Installed
Business Name Test Strip Film
Number
Adhesion Value Graphic
Description
Graphic Size
(Square feet)
Location of Wall
Address
City/State/Zip
Customer Information
Contact Name
Business Name
Address
City/State/Zip
Area Code/Phone
Graphics Manufacturer
Business Name
Area Code/Phone
Instruction Bulletin 5.37 - 6
3. Wall Textures and Composition
A. Definitions
Application surface. The actual surface to which a film is applied.
This may be the finish (paint, varnish, wallpaper), a high tack film
applied to the substrate, a composite material or the bare substrate.
The application surface is simply called a wall in this Bulletin.
Substrate. The supporting structure of a wall, such as wood framing
members covered by wallboard, or hard surfaces such as brick, con
crete block, stucco, etc.
Texture. This is the tactile feeling that every wall has. Texture can be
as smooth as glass or as rough as heavily textured concrete—and
everything in between. Whether it is smooth or rough, texture has a
significant affect on film choice, ease of application, film adhesion and
removal. These descriptions provide a way to generally categorize
texture but are subject to interpretation. Use them in combination with
the photos of textures on the next page to better understand the tex
ture of your walls, and make the right film choices and use the proper
installation techniques.
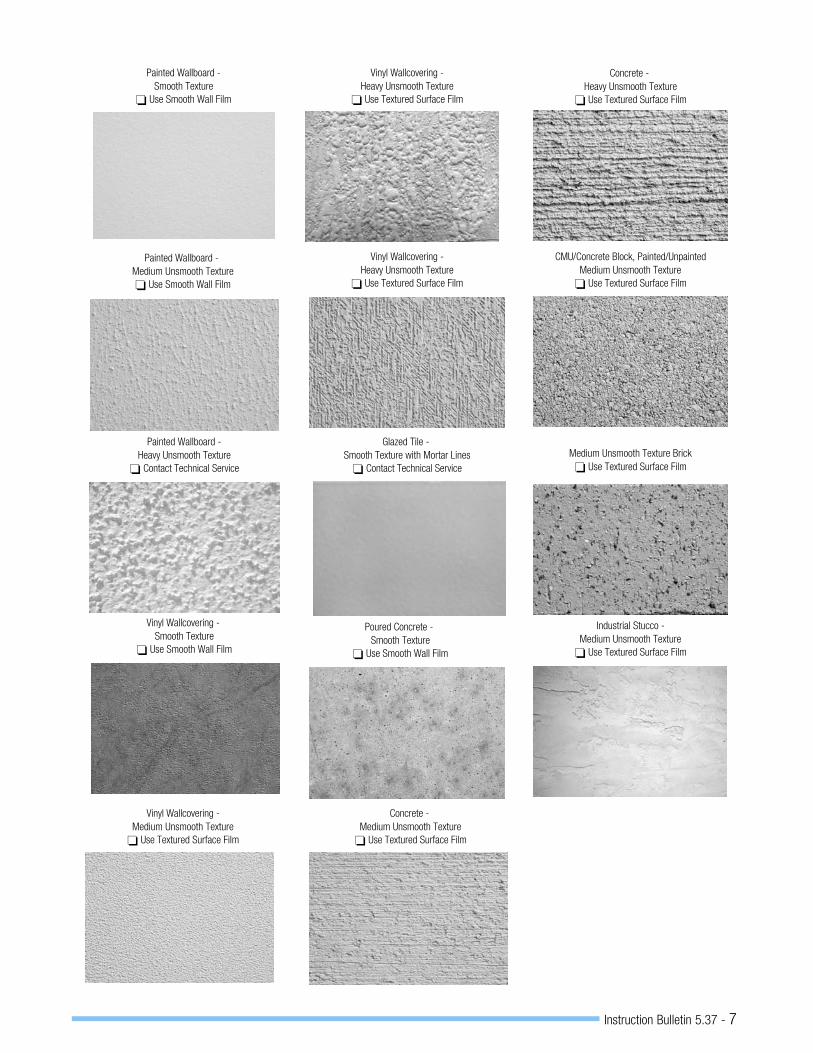
• Smooth texture. Little or no surface variation. Allows the easiest
application since the adhesive can make contact with the entire
surface.
Painted wallboard has more texture than you might expect. See
page FIGURE 19, page 17, for details.
Film IJ8624/8524 is intended only for use on textured surfaces.
Film 480Cv3/8548G may be used on smooth walls or textured
walls.
• Unsmooth texture. Has moderate high spots and low spots,
which range from just a little texture (like fine sandpaper) to heavy
texture (like brick). Extra effort and more time‐consuming applica
tion techniques are needed to conform the film to the texture. The
amount of variation in texture changes throughout any given tex
tured substrate, and your results using the same measuring tool
could vary. These descriptions help differentiate textures using the
terms related to 3M film recommendations.
– Medium unsmooth texture. Relatively equal distribution of
moderately high and low spots.
– Heavy unsmooth texture. Irregular and severe high spots
and/or low spots.
ImportantNote
Do not use 3M's films for textured walls on substrates
with loose surfaces, such as loose sand-textured block.
The textured should be more firmly anchored, like sand
paper.
B. Common Indoor Wall Composition
This describes the wall's substrate material.
Brick. A kiln‐dried, hard clay surfacing material, thicker than tile, for
indoor or outdoor walls. Inherently smooth, but may be patterned or
textured before firing. Usually has grout lines.
Concrete. A building material made from a mixture of portland ce
ment, water, fine and coarse particles. Texture can range from smooth
to heavy.
Concrete masonry (CMU). A usually hollow building block made with
concrete. May be painted or unpainted. Texture is usually medium.
Usually has grout lines.
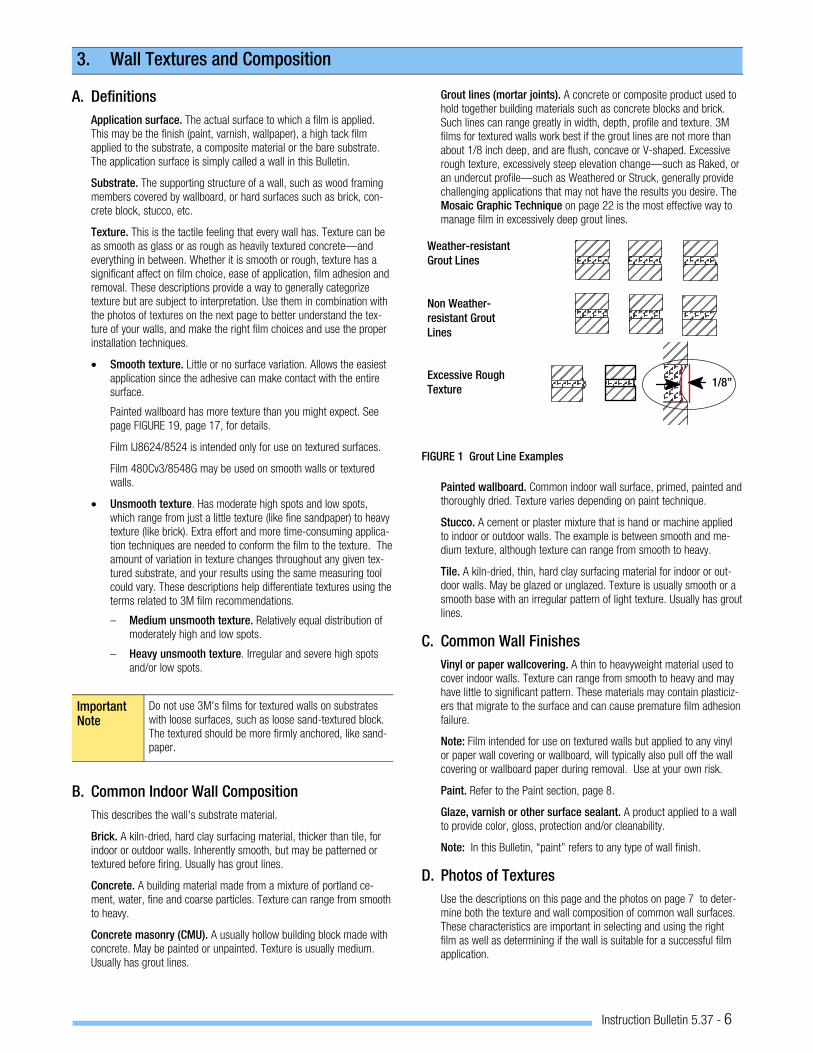
Grout lines (mortar joints). A concrete or composite product used to
hold together building materials such as concrete blocks and brick.
Such lines can range greatly in width, depth, profile and texture. 3M
films for textured walls work best if the grout lines are not more than
about 1/8 inch deep, and are flush, concave or V-shaped. Excessive
rough texture, excessively steep elevation change—such as Raked, or
an undercut profile—such as Weathered or Struck, generally provide
challenging applications that may not have the results you desire. The
Mosaic Graphic Technique on page 22 is the most effective way to
manage film in excessively deep grout lines.
ÉÉÉÉÄÄÄÄÄÄÉÉÉÉ
ÉÉÉÉÉÉÉÉÄÄ
ÉÉÉÉÉÉÉÉÉÉÉÉÄÄÄ
ÉÉÉÉÉÉÉÉÉÉÉÉÄÄÄ
ÉÉÉÉÉÉÉÉÉÉÉÉÄÄÄ
ÉÉÉÉÉÉÉÉÄÄ ÉÉÉ
ÉÉÉ
ÉÉÉÉÉÉÄÄÄ
ÉÉÉÉÉÉÉÉÄÄÄÄ
Weather-resistant
Grout Lines
Non Weather-
resistant Grout
Lines
Excessive Rough
Texture
ÉÉÉÉÉÉÉÉÉÉÉÉÄÄÄ 1/8”
FIGURE 1 Grout Line Examples
Painted wallboard. Common indoor wall surface, primed, painted and
thoroughly dried. Texture varies depending on paint technique.
Stucco. A cement or plaster mixture that is hand or machine applied
to indoor or outdoor walls. The example is between smooth and me
dium texture, although texture can range from smooth to heavy.
Tile. A kiln‐dried, thin, hard clay surfacing material for indoor or out
door walls. May be glazed or unglazed. Texture is usually smooth or a
smooth base with an irregular pattern of light texture. Usually has grout
lines.
C. Common Wall Finishes
Vinyl or paper wallcovering. A thin to heavyweight material used to
cover indoor walls. Texture can range from smooth to heavy and may
have little to significant pattern. These materials may contain plasticiz
ers that migrate to the surface and can cause premature film adhesion
failure.
Note: Film intended for use on textured walls but applied to any vinyl
or paper wall covering or wallboard, will typically also pull off the wall
covering or wallboard paper during removal. Use at your own risk.
Paint. Refer to the Paint section, page 8.
Glaze, varnish or other surface sealant. A product applied to a wall
to provide color, gloss, protection and/or cleanability.
Note: In this Bulletin, “paint” refers to any type of wall finish.
D. Photos of Textures
Use the descriptions on this page and the photos on page 7 to deter
mine both the texture and wall composition of common wall surfaces.
These characteristics are important in selecting and using the right
film as well as determining if the wall is suitable for a successful film
application.
Instruction Bulletin 5.37 - 7
Painted Wallboard -
Smooth Texture
� Use Smooth Wall Film
Vinyl Wallcovering -
Medium Unsmooth Texture
� Use Textured Surface Film
Painted Wallboard -
Medium Unsmooth Texture
� Use Smooth Wall Film
Vinyl Wallcovering -
Smooth Texture
� Use Smooth Wall Film
Painted Wallboard -
Heavy Unsmooth Texture
� Contact Technical Service
Concrete -
Medium Unsmooth Texture
� Use Textured Surface Film
Poured Concrete -
Smooth Texture
� Use Smooth Wall Film
Glazed Tile -
Smooth Texture with Mortar Lines
� Contact Technical Service
Vinyl Wallcovering -
Heavy Unsmooth Texture
� Use Textured Surface Film
Vinyl Wallcovering -
Heavy Unsmooth Texture
� Use Textured Surface Film
Concrete -
Heavy Unsmooth Texture
� Use Textured Surface Film
CMU/Concrete Block, Painted/Unpainted
Medium Unsmooth Texture
� Use Textured Surface Film
Medium Unsmooth Texture Brick
� Use Textured Surface Film
Industrial Stucco -
Medium Unsmooth Texture
� Use Textured Surface Film
Instruction Bulletin 5.37 - 8
4. Understanding Paints and Wall Finishes
ImportantNote
Low VOC paints are driving change in wall film ap
plications. The chemistry of paints and wall finishes
has been changing over the years to drive down the
level of Volatile Organic Compounds, VOCs, due to both
sustainability efforts and regulatory requirements. These
newer paint formulations have changed how the painted
surface interacts with the adhesive on all films, affecting
the films' ability to adhere to the paint.
Simple steps can maximize film adhesion. Because
the paint formulations are protected by trade secrets, it
is difficult for any film manufacturer to understand how
film adhesives interact with these paints. 3M has found
through recent testing with many low VOC paints that
there is no single film or adhesive that works “best” on
each paint tested. One film can perform well on one
paint and poorly on another paint. However, by using
the cleaning and testing procedures described in this
Bulletin, you can quickly and easily determine how well
the films you want to use will adhere, and then suc
cessfully install the job.
1. Outgassing resulting from uncured paint
As paint dries, it releases certain gases until it is fully dried and cured.
Applying a film before the paint has fully cured can result in lifting,
bubbles and a premature installation failure. Unfortunately, there is no
way to test for this. Cure time varies greatly and can be as long as 30
days.
ImportantNote
It is critical that the paint be allowed to cure for the entire
time period stated by the paint manufacturer.
2. Paint particle migration
Particles in the paint can migrate to the surface over time. The first
time you clean the wall with the Isopropyl Alcohol mixture (you'll do it
twice), you may notice a powdery substance on the cleaning cloth, the
same color as the paint. See FIGURE 7, page 14, for an example of
particles that have migrated to the surface.
Migrated particles not only affect initial adhesion if the wall is not prop
erly cleaned, but can also affect film removal later on.
3. Differences in paint finishes
While films have historically adhered best to semi-gloss finishes,
proper testing and preparation of every type of painted wall is now
required to ensure success.
4. Textured paints or surfaces
3M offers films designed for use on smooth surfaces or textured walls.
Performing the 3M Wall Film Adhesion Test helps ensure that the
correct films are chosen for a job.
5. Change in surface gloss or appearance after film is removed
The cleaning procedure, heat, environmental exposure, natural fading
of uncovered areas, and other factors can contribute to a change in
the appearance of the paint's original gloss or staining on the wall.
5. Film Adhesion Characteristics and Testing: Smooth and Textured
A. All Walls - Adhesion Characteristics
Adhesion is the ability of the film's adhesive to bond to the wall. The
amount of both initial and final adhesion varies with the type of adhe
sive used on the film, the texture of the wall, the paint characteristics,
the application temperature and the application techniques. The adhe
sive bond builds with time. The film may never achieve its full bond if it
is poorly applied or you are using the wrong film/adhesive combination
for the wall and its paint.
• Adhesion, final. The maximum amount of bond achieved by a
film, usually in 24 to 48 hours after installation except in cool
temperatures or textured walls.
• Adhesion, initial. The amount of bond needed to hold the film in
place during application.
• Size of film. The larger the piece of film, the greater the initial
and final adhesive bond to the wall must be to support the weight
of the film.
• Imaging method. Use only the inks recommended for the film
you use and follow the ink's Product & Instruction Bulletin for
proper use. Solvent inkjet printed film must have sufficient time for
all solvent to evaporate before the graphics manufacturer applies
the overlaminate (3M recommends 24 hours for best results).
Failure to do so may result in outgassing when the film is applied,
which can contribute to poor or inconsistent film adhesion.
• Stretching the film. Film stretched during application may later
shrink. This affects the film's adhesion to the wall and may result
in premature failure.
B. Effect of Overlaminate on Adhesion
Film must retain some flexibility in order to achieve maximum adhe
sion. Do not use a stiff or thick overlaminate (over 3 mils).
Films that will be applied to textured walls using heat need the recom
mended overlaminate. The overlaminate is critical in helping conform
the film to the texture.
Refer to the base film's Product Bulletin for the recommended graphic
protection options. The most common constructions are:
• Smooth walls
– One of the recommended films with overlaminate luster 8519
and matte 8520.
• Textured walls
– Textured walls: Film IJ8624 with overlaminate 8524.
– Textured walls: Film 480Cv3 with overlaminate 8548G.
Instruction Bulletin 5.37 - 9
6. 3M Wall Film Adhesion Test for SMOOTH Walls
A. Purpose of Wall Film Adhesion Test
This test is designed to show initial adhesion capability measured in
grams, of the wall film you plan to use when the wall is cleaned ac
cording to 3M's recommendations and the film is applied to a fairly
smooth indoor wall surface.
B. Limitations of Test and Cleaning Method
This test cannot detect problems with pre-existing variations in the wall
or poor paint-to-wall bond. Such problems may result in poor film
adhesion as well as wall damage upon attempted removal of the film.
3M is not responsible for the results of film installed on walls.
ImportantNote
Removal of any film from a painted wallboard wall al
ways has a risk of pulling paint off the wall or even
damaging the wall. Increasing the initial adhesion of film
by using the processes described in this Bulletin may
actually make attempted removal more challenging. If
this is a concern for your customer, please see some
Options on page 11.
C. Before Doing the Test
1. Review and use the Walls Worksheet, page 5.
2. Read and understand the types of wall surfaces and the variablesthat influence film adhesion. See Wall Textures andComposition, page 6.
D. Test Conditions
• Perform the adhesion tests in an inconspicuous area of the same
wall on which you will be applying the actual job.
• If you will be applying film to more than one wall, perform the
tests on each wall. While one wall may look the same as another
in color and gloss, they may have been painted at different times
and with different paint, which can affect the adhesion test res
ults. Performing the test on a different wall/paint than will be used
in the job will not give you the adhesion values and information
you need to make a good evaluation.
ImportantNote
For each film being considered you will be testing
THREE samples of the same film on the same wall and
comparing the results.
E. Supplies Needed
• Spring scale
– Scales are available from: Ohaus 29 Hanover Rd.,
Florham Park, N.J. 07932; 1-800-672-7722,
www.ohaus.com.
– 0-500 grams, part number 8002-MA
0-1000 grams, part number 8003-MN
0-2000 grams, part number 8004-MA
• 3M™ Rivet Brush RBA-1
• Copy or cut out the Measured Reference Guide from page 29.
This will be used during the test to help you gage how fast to pull
the film strip.
• Hole punch
• Strips of each film you plan to test
Note: See 3M™ Enhanced Adhesion Cleaning Method on page 14
for other supplies that will be needed.
F. Prepare the Film Test Strips
1. Cut three, 1 inch by 10 inch (2.5 cm x 25 cm) strips of each filmyou plan to test on a given wall.
2. Note the film name or number on each test strip and on the WallsWorksheet, page 5.
3. Remove about 2 inches (5 cm) of liner and fold over the film,adhesive to adhesive, to make a tab.
4. Punch a hole in the tab.
FIGURE 2 Preparing Film Strips
Instruction Bulletin 5.37 - 10
G. Film Adhesion Test Procedure
1. Clean the area of the wall you will be testing using the 3M™Enhanced Adhesion Cleaning Method on page 14.
2. Use your thumb to initially adhere the film strip (punched hole atthe top) to the cleaned wall.
ImportantNote
You will test three strips of the same film on the same
wall. You may apply all of them at one time, leaving a
few inches between each.
3. Working in the long direction of the test strip and using the RBA-1rivet brush, use firm pressure and a circular motion to go over thestrip three times to firmly adhere it to the wall. See FIGURE 3.
FIGURE 3 Adhering Film Strips
4. Tape the Measured Reference Guide next to the film strip youare testing. See FIGURE 5.
5. Wait a full 15 minutes before proceeding with the test to allowsome adhesion to build.
6. Make sure the scale is zeroed out per the scale manufacturer'srecommendations.
FIGURE 4 Zeroing Scale
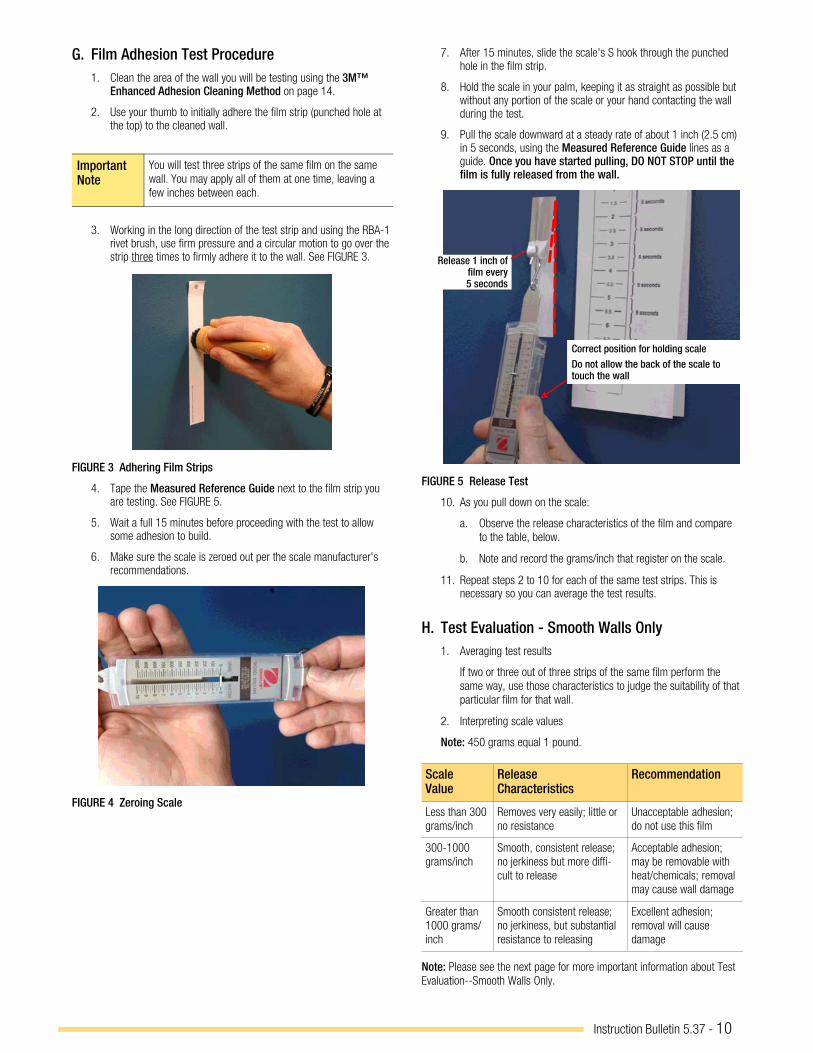
7. After 15 minutes, slide the scale's S hook through the punchedhole in the film strip.
8. Hold the scale in your palm, keeping it as straight as possible butwithout any portion of the scale or your hand contacting the wallduring the test.
9. Pull the scale downward at a steady rate of about 1 inch (2.5 cm)in 5 seconds, using the Measured Reference Guide lines as aguide. Once you have started pulling, DO NOT STOP until thefilm is fully released from the wall.
Release 1 inch offilm every5 seconds
Correct position for holding scale
Do not allow the back of the scale totouch the wall
FIGURE 5 Release Test
10. As you pull down on the scale:
a. Observe the release characteristics of the film and compare
to the table, below.
b. Note and record the grams/inch that register on the scale.
11. Repeat steps 2 to 10 for each of the same test strips. This isnecessary so you can average the test results.
H. Test Evaluation - Smooth Walls Only
1. Averaging test results
If two or three out of three strips of the same film perform the
same way, use those characteristics to judge the suitability of that
particular film for that wall.
2. Interpreting scale values
Note: 450 grams equal 1 pound.
Scale Value
Release Characteristics
Recommendation
Less than 300
grams/inch
Removes very easily; little or
no resistance
Unacceptable adhesion;
do not use this film
300-1000
grams/inch
Smooth, consistent release;
no jerkiness but more diffi
cult to release
Acceptable adhesion;
may be removable with
heat/chemicals; removal
may cause wall damage
Greater than
1000 grams/
inch
Smooth consistent release;
no jerkiness, but substantial
resistance to releasing
Excellent adhesion;
removal will cause
damage
Note: Please see the next page for more important information about Test
Evaluation--Smooth Walls Only.
Instruction Bulletin 5.37 - 11
H. Test Evaluation—Smooth Walls Only continued
3. Factors in unsatisfactory test results.
a. Test strip removes jerkily, unevenly.
– Inconsistent or low adhesion value; due to high and low
spots in the surface texture, the film's adhesive does not
make full contact.
– Cold wall and air temperature, which doesn't allow adhe
sive to flow or make full contact.
b. Test strip pulls paint off wall.
If any paint is pulled off with the test strip, the paint is not
sufficiently bonded to the wall and film should not be applied
until the problem is corrected, a new paint is fully cured, and
the 3M Wall Film Adhesion Test is performed again with sat
isfactory results.
c. Poor film choice for the job.
All films being considered for a job should be tested before
printing to ensure it is the right choice.
d. Films with Comply™ Adhesive (air release channels)
Films with Comply adhesive (e.g., film IJ180Cv3, 480Cv3),
which have air release channels to ease installation, may be
used for walls. However, if their tested adhesion values are
too low, 3M recommends trying a film without Comply adhes
ive; such films typically have higher adhesion values.
4. Films that require greater adhesion level:
• Films exposed to indoor environmental changes, such as
direct sunlight or close proximity heat sources.
• Overlaminated film (which adds weight).
• Large pieces of film (which adds weight).
I. Options for Film That Must Be Removed or
Changed
3M testing shows that using the 3M™ Enhanced Adhesion Cleaning
Method substantially improves film adhesion for almost every wall
film. However, the higher adhesion means the film will be more difficult
to remove and is likely to pull paint off the wall or damage the surface
of the wallboard. There is no ideal solution, but the following options
can be considered.
1. Construct a false wall.
Consider constructing a false wall and securing it to the original
wall. Be sure to properly prime and paint the false wall and allow
the paint to cure for the length of time specified by the paint man
ufacturer. Then, before installing the film, follow the cleaning and
testing procedures described in this Bulletin. When the film is no
longer needed, remove the false wall and repair any mounting
holes.
2. Apply a new surface to an existing wall.
Some customers, such as at construction sites, may need to
change film often. This option can be used on a false wall or on a
wall that does not need to be reused at a later time.
Apply an aggressive film such as 3M™ Scotchcal™ High Tack
Graphic Film IJ3920 to the wall. Most removable or changeable
3M wall films will adhere very well to film IJ39-20 and remove
reasonably well. Permanent adhesive films will not remove easily
and may damage film IJ39-20. You can also apply one film over
another if the new film has a gray pigmented adhesive, which
offers good hiding power. Before installing the film that will be
applied over film IJ39-20, follow the cleaning and testing proced
ures described in this Bulletin.

Instruction Bulletin 5.37 - 12
7. 3M Wall Film Adhesion Test for TEXTURED Walls
A. Purpose of Wall Film Adhesion Test
This test is designed to show whether a film for textured walls, when
applied with heat and pressure, will continue to build adhesion during
a one week (3M recommended) test period, or if it will peel off easily,
indicating insufficient adhesive bond.
B. Limitations of Test and Cleaning Method
This test cannot detect problems with pre-existing variations in the
substrate or poor paint-to-substrate bond. Such problems may result
in insufficient film adhesion as well as wall damage if removing the
film. 3M cannot be responsible for the results of wall installations.
ImportantNote
Removal of any film from a painted and/or textured wall
has a risk of pulling paint, finish or texture off the wall.
Increasing the film's initial adhesion by using the pro
cesses described in this Bulletin may increase potential
damage to the substrate if removal is attempted.
C. Before Doing the Test
1. Review and use the Walls Worksheet, page 5.
2. Read and understand the types of wall surfaces and the variablesthat influence film adhesion. See Wall Textures andComposition, page 6.
D. Supplies Needed
• Industrial heat gun with electronic readout, capable of achieving
and sustaining 1000°F (538°C). Models you may want to consider
are:
– Steinel® HL 2010 E LCD Display IntelliTemp™ Heat Gun*
– Milwaukee® 8988-20 Variable Temperature Heat Gun*
– Bosch BOS1944LCDK Programmable Heat Gun Kit*
*Other heat guns may meet your requirements. 3M is not respon
sible for the performance or suitability of these products.
• 3M™ Two-Handled Textured Surface Applicator TSA-4
• Heat resistant gloves
• Film/overlaminate IJ8624/8524 and/or 480Cv3/8548G
– Option 1, preferred for most accurate results: A 2 feet x 2 feet
(61 cm x 61 cm) piece of film/overlaminate, printed with the
ink that will be used for the job
– Option 2: A 2 feet x 2 feet (61 cm x 61 cm) piece of film/
overlaminate, unprinted
– Option 3: A 8 inch x 11 inch (18 cm x 28 cm) piece of film/
overlaminate, unprinted—at least large enough to cover most
of two blocks and one grout line
ImportantNote
Use the 3M recommended tools and procedures for this
test. Any other methods will not result in accurate test
results.
! CAUTION
When using any equipment or chemicals, always follow the manufactur
er's instructions for safe operation.
E. Substrate Considerations
• Pre-cast concrete material. This material can have an oily sur
face and be speckled with dust because of the production pro
cess. These characteristics inhibit good film adhesion.
• Greasy or sooty substrate. Consider using TSP (tri-sodium phos
phate) and water according to the manufacturer's instructions, or
use 3M™ All Purpose Cleaner and Degreaser, diluted as recom
mended. Scrub the wall with a brush. Vacuum with a wet-dry
vacuum, then allow to dry until it both looks and feels dry to the
touch. Drying can take at least 24 hours and more in humid envir
onments.
• Outdoor unsealed surfaces such as concrete can trap moisture,
which may lead to film lifting or the growth of mold under the film.
See Step 9, page 21, for a possible solution.
ImportantNote
Always check with the property or building maintenance
manager before using any strong cleaning chemicals or
harsh cleaning procedures.
F. Film Adhesion Test Procedure
1. Follow the 3M™ Enhanced Adhesion Cleaning Method onpage 14 to prepare the area where you will apply the film.
2. Apply the film with the TSA-4 tool. See pages 18-21 for specificinstallation instructions.
a. For film IJ8624/8524, move at a rate of 2 inches/second
(50 mm/second).
b. For film 480Cv3/8548G, move at a rate of 3 inches/second
(75 mm/second.
3. 3M recommends leaving the film in place for one week to achievefull adhesion and to accurately assess adhesion.
4. After one week, inspect the film for obvious signs of lifting, andthen try to remove the film. Loosen a corner and pull the filmdiagonally across itself (180 degree angle), holding it close to thewall. Compare your results to the following table.
G. Test Evaluation - Textured Walls Only
Release Characteristics Conclusions
Film removes with some resist
ance; pulls off little or no paint
The film should perform satisfactory on
this wall.
Film removes easily No increase in adhesive bond; may
result in premature graphic failure.
Removing the film pulls off
substantial paint/finish/texture
No paint primer; insufficient paint cur
ing.
Film popped out of grout lines If the grout lines are deeper than 1/8
inch (3.2 mm) raked or under cut, but
adhesion is otherwise good, trim the
installed film using the Mosaic Graph
ic Technique on page 22, for the best
results.

Instruction Bulletin 5.37 - 13
8. Health and Safety
! CAUTION Safety Data Sheets (SDS)
When handling any chemical products, read the manufacturers' container labels and the Safety Data Sheets (SDS) for import
ant health, safety and environmental information. To obtain SDS sheets for 3M products go to 3M.com/MSDS, or by mail or in
case of an emergency, call 1-800-364-3577 or 1-651-737-6501.
When using any equipment, always follow the manufacturers' instructions for safe operation.
! WARNING Physical Comfort
Any activity performed for a long period of time in an awkward position or with a high amount of force is potentially a risk for
causing musculoskeletal strain, pain or injury. When applying graphics, follow these practices to improve comfort and avoid
injury:
• Alternative your tasks during the application.
• Schedule regular breaks.
• Perform stretches or do exercises to improve circulation.
• Avoid awkward reaching.
! WARNING Risks of Using Heat Sources
• Read, understand and follow the safety instructions contained in both this 3M Instruction Bulletin as well as the heat-gun
manufacturer's manual.
• Wear a heat-resistant glove on the hand(s) holding the applicator.
• Do not use heat sources near solvent mixtures or residues, or in areas where solvent vapors may be present at hazardous
levels.
• Never use an open-flame heat source in this process.
! CAUTION Ventilation
Always provide adequate ventilation to remove emissions that may result from the use of heat. Failure to provide adequate
ventilation can result in operator exposure.
Important Note High Heat May Degrade Foam Rollers and Damage Substrate
High heat directed at the foam may degrade the foam. Always direct the heat toward the film, not the foam roller.
High heat may also damage the substrate: use with caution.
Important Note Air Quality Regulations
State Volatile Organic Compound (VOC) regulations may prohibit the use of certain cleaning solutions. For example, the Califor
nia South Coast Air Quality Management District prohibits use of certain solvent-based solutions without a permit and other
California AQMD's prohibit use of certain solutions without a permit or a regulatory exemption. You should check with your
State environmental authorities to determine whether use of this solution is restricted or prohibited.
Instruction Bulletin 5.37 - 14
9. 3M™ Enhanced Adhesion Cleaning Method
ImportantNote
For your safety, always wear protective eye wear and
disposable gloves when cleaning walls.
Note: This cleaning procedure is also available in a one-page document.
Look for Instruction Bulletin Clean at www.3Mgraphics.com.
A. Cleaning Procedure
1. Clean stubborn grease and grime with your preferred method.
2. Prepare a cleaning solution with 70% Isopropyl Alcohol (IPA) and30% water in a spray bottle.
3. Soak a clean, lint-free cloth with the cleaning solution until it isdripping wet.
FIGURE 6 Soaking a Lint-free Cloth
4. Clean the test (or application) area with overlapping strokes. Youmay notice some migrated paint particles on the cloth.
FIGURE 7 Paint Particles After First Cleaning
ImportantNote
Change cleaning cloths often to avoid redepositing con
taminants on another part of the wall. Soak each new
cloth with the cleaning solution.
5. Thoroughly soak another clean, lint-free cloth with the cleaningsolution and wash the wall again.
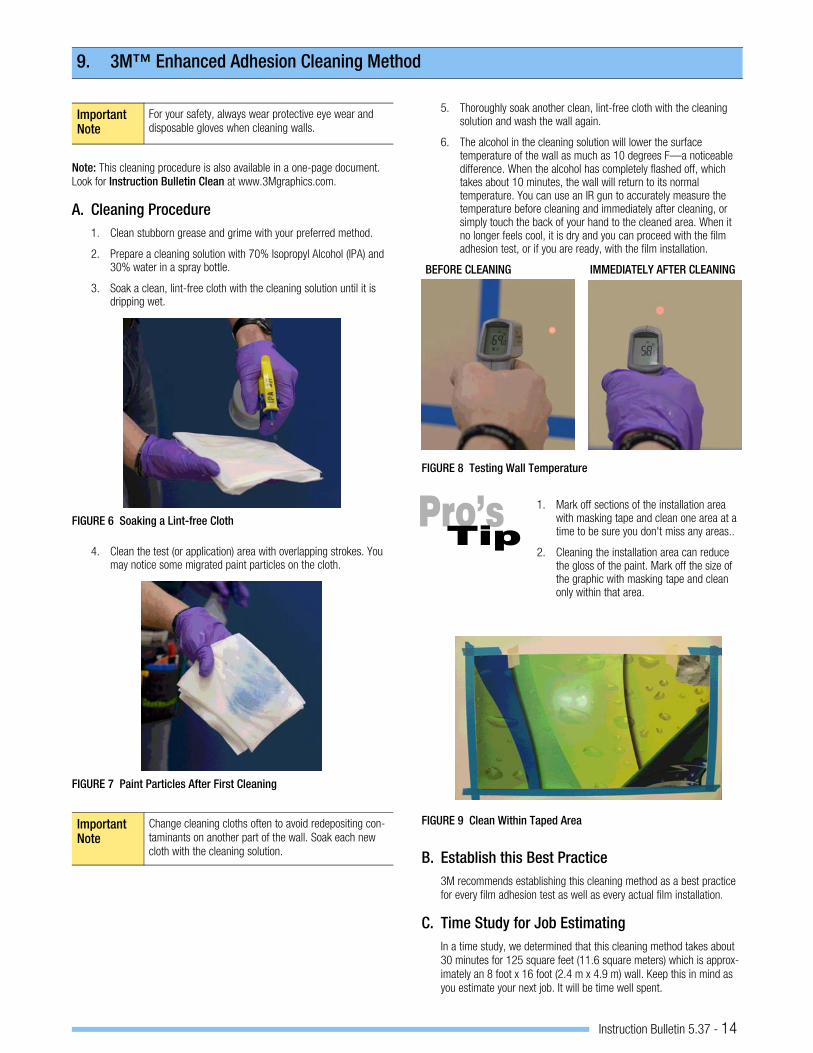
6. The alcohol in the cleaning solution will lower the surfacetemperature of the wall as much as 10 degrees F—a noticeabledifference. When the alcohol has completely flashed off, whichtakes about 10 minutes, the wall will return to its normaltemperature. You can use an IR gun to accurately measure thetemperature before cleaning and immediately after cleaning, orsimply touch the back of your hand to the cleaned area. When itno longer feels cool, it is dry and you can proceed with the filmadhesion test, or if you are ready, with the film installation.
BEFORE CLEANING IMMEDIATELY AFTER CLEANING
FIGURE 8 Testing Wall Temperature
1. Mark off sections of the installation areawith masking tape and clean one area at atime to be sure you don't miss any areas..
2. Cleaning the installation area can reducethe gloss of the paint. Mark off the size ofthe graphic with masking tape and cleanonly within that area.
FIGURE 9 Clean Within Taped Area
B. Establish this Best Practice
3M recommends establishing this cleaning method as a best practice
for every film adhesion test as well as every actual film installation.
C. Time Study for Job Estimating
In a time study, we determined that this cleaning method takes about
30 minutes for 125 square feet (11.6 square meters) which is approx
imately an 8 foot x 16 foot (2.4 m x 4.9 m) wall. Keep this in mind as
you estimate your next job. It will be time well spent.
Instruction Bulletin 5.37 - 15
10. Installation to Smooth Indoor Walls - General Instructions
A. Tools and Supplies
• Scotch™ Masking Tape, 2 inch wide*
• 3M™ Power Grip Applicator CPA-1
• 3M™ Plastic Applicator PA-1 Gold Squeegee
– Protect one edge with the loop side of 3M's Hook and Loop
Tape
• 3M™ Rivet Brush RBA-1* and RBA-3*
• 3M™ Air Release Tool 391X*
• Cutting tools, such as a razor blade with a safety holder
• Liner cutter. This tool has a guide under the blade that slips
between the film and liner so you cut through only the liner. This
is sometimes called a wallpaper cutter. One option is “Seam
Buster”, a product from Advance Equipment Manufacturing. It is
available online and at many hardware and home improvement
stores.
• Industrial heat gun; must be capable of attaining 500° to 750°F
(260° to 399°C), or equivalent
*Available from 3M Commercial Solutions
B. About Application Tape
An application tape is not recommended. Application tape may have a
greater adhesive bond to the film than the film has to the wall surface.
Removing the application tape generally lifts the film from the wall
surface and compromises the adhesive bond of the film. If application
tape is used on smooth surfaces, you must thoroughly rework the
entire graphic and all edges after removing it.
C. Plan the Layout
To minimize application problems, which waste time, test your layout
by temporarily positioning the film on the wall using masking tape.
• Certain areas of your film installationss are more prone to damage
than others from people or equipment rubbing against the edges.
This includes areas around doors, openings such as vents, out
side corners of walls and inside corners.
• Plan so the film edges are in the least vulnerable place possible.
• To reduce the risk of damage and lifting, trim the film 1/8 to 1/4
inch from the edge rather than wrapping the vulnerable edges.
Note: Knifeless™ Tape may be applied to the wall before the film
to aid in cutting and trimming. See www.KnifelessTechSystems.
com for details.
• Always plan time in your installation to rework all edges of the film
to help ensure good edge adhesion.
Inside corner
Around openings such as doorways
Outside corners
FIGURE 10 Planning the Layout
D. Hinge Methods
ImportantNote
Select the Hinge Method you prefer to use, review the
procedure, but do not install the film until you review
and follow the General Installation Procedure, page
16, which includes using the 3M™ Enhanced Adhe
sion Cleaning Method on page 14
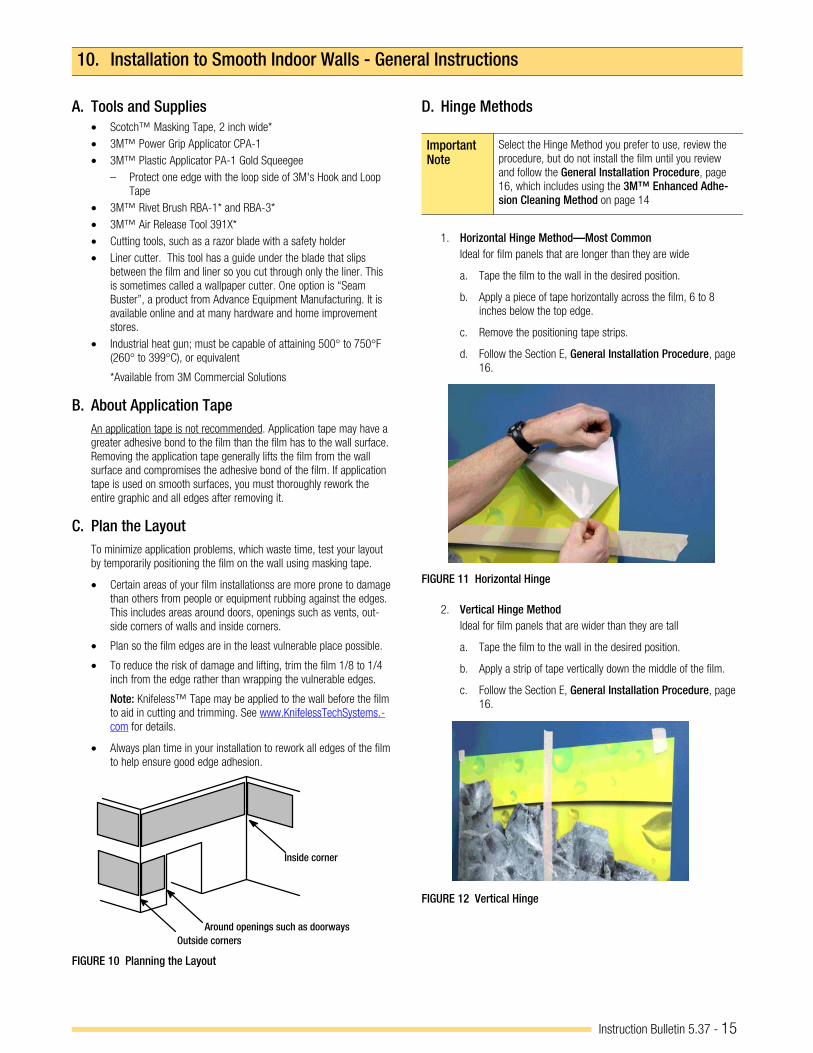
1. Horizontal Hinge Method—Most Common
Ideal for film panels that are longer than they are wide
a. Tape the film to the wall in the desired position.
b. Apply a piece of tape horizontally across the film, 6 to 8
inches below the top edge.
c. Remove the positioning tape strips.
d. Follow the Section E, General Installation Procedure, page
16.
FIGURE 11 Horizontal Hinge
2. Vertical Hinge Method
Ideal for film panels that are wider than they are tall
a. Tape the film to the wall in the desired position.
b. Apply a strip of tape vertically down the middle of the film.
c. Follow the Section E, General Installation Procedure, page
16.
FIGURE 12 Vertical Hinge
Instruction Bulletin 5.37 - 16
3. Self Hinge Method
Ideal for smaller film panels; self hinge can be made at the top of
the film or in the center of it (as shown)
a. Lay the film side down on a clean work table.
b. Using a liner cutter, cut through just the liner going across the
shortest width of the film.
c. Make another liner cut about four inches from the first, and
remove the strip of liner.
FIGURE 13 Cutting Out Section of Liner for Self Hinge
d. Position the film on the wall and use your fingers to lightly
adhere the film to the wall in the area of the exposed
adhesive.
e. Squeegee the film along the exposed adhesive working
toward the nearest edge.
f. Follow Section E, General Installation Procedure, page 16.
FIGURE 14 Squeegeeing Exposed Adhesive for Self Hinge
E. General Installation Procedure
1. Follow the 3M™ Enhanced Adhesion Cleaning Method onpage 14.
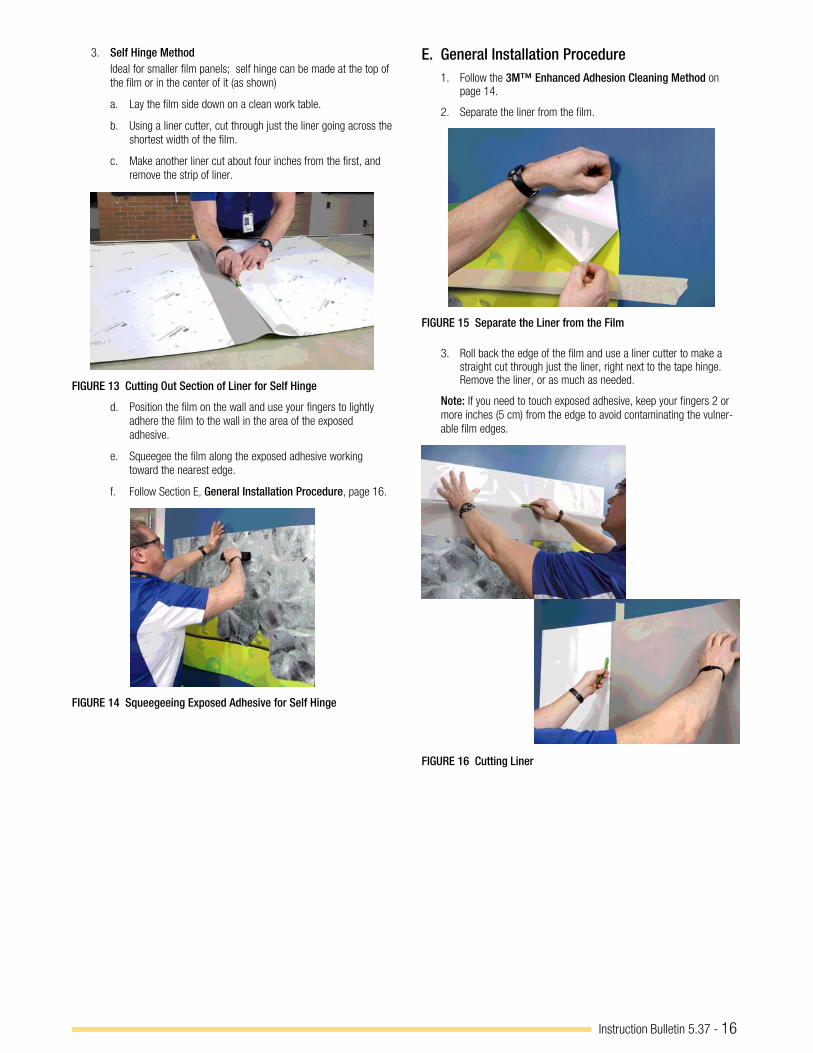
2. Separate the liner from the film.
FIGURE 15 Separate the Liner from the Film
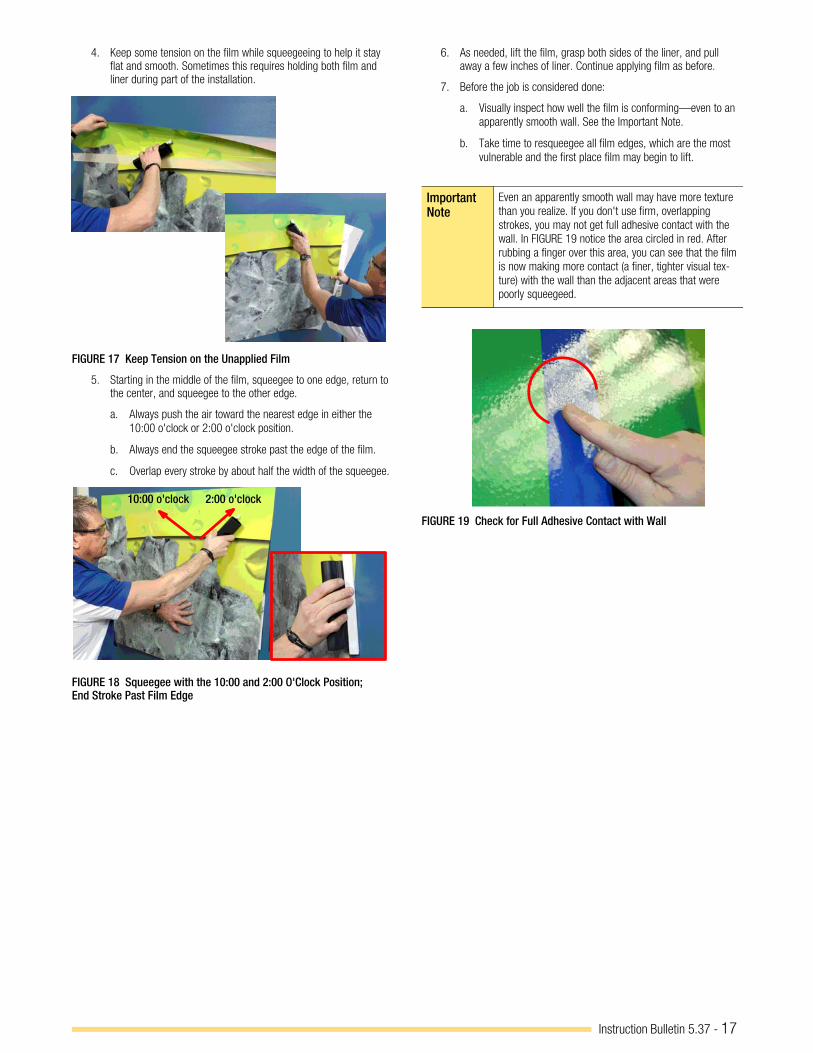
3. Roll back the edge of the film and use a liner cutter to make astraight cut through just the liner, right next to the tape hinge.Remove the liner, or as much as needed.
Note: If you need to touch exposed adhesive, keep your fingers 2 or
more inches (5 cm) from the edge to avoid contaminating the vulner
able film edges.
FIGURE 16 Cutting Liner
Instruction Bulletin 5.37 - 17
4. Keep some tension on the film while squeegeeing to help it stayflat and smooth. Sometimes this requires holding both film andliner during part of the installation.
FIGURE 17 Keep Tension on the Unapplied Film
5. Starting in the middle of the film, squeegee to one edge, return tothe center, and squeegee to the other edge.
a. Always push the air toward the nearest edge in either the
10:00 o'clock or 2:00 o'clock position.
b. Always end the squeegee stroke past the edge of the film.
c. Overlap every stroke by about half the width of the squeegee.
10:00 o'clock 2:00 o'clock
FIGURE 18 Squeegee with the 10:00 and 2:00 O'Clock Position;End Stroke Past Film Edge
6. As needed, lift the film, grasp both sides of the liner, and pullaway a few inches of liner. Continue applying film as before.
7. Before the job is considered done:
a. Visually inspect how well the film is conforming—even to an
apparently smooth wall. See the Important Note.
b. Take time to resqueegee all film edges, which are the most
vulnerable and the first place film may begin to lift.
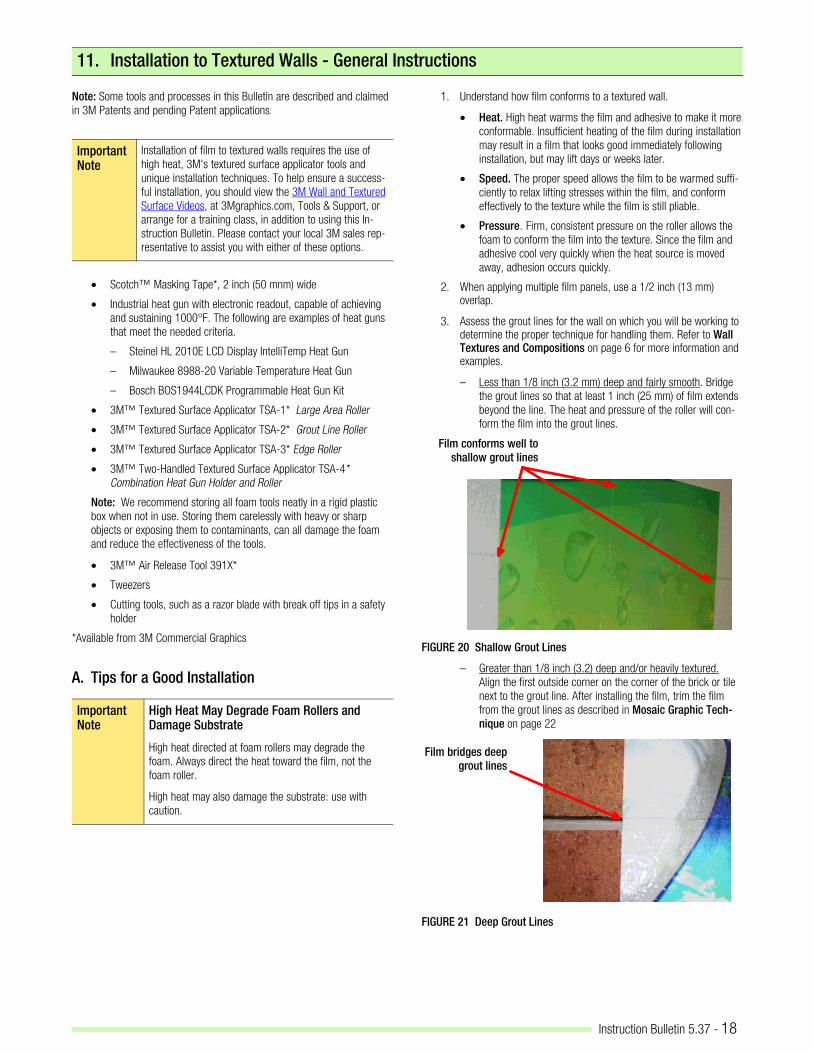
ImportantNote
Even an apparently smooth wall may have more texture
than you realize. If you don't use firm, overlapping
strokes, you may not get full adhesive contact with the
wall. In FIGURE 19 notice the area circled in red. After
rubbing a finger over this area, you can see that the film
is now making more contact (a finer, tighter visual tex
ture) with the wall than the adjacent areas that were
poorly squeegeed.
FIGURE 19 Check for Full Adhesive Contact with Wall
Instruction Bulletin 5.37 - 18
11. Installation to Textured Walls - General Instructions
Note: Some tools and processes in this Bulletin are described and claimed
in 3M Patents and pending Patent applications.
ImportantNote
Installation of film to textured walls requires the use of
high heat, 3M's textured surface applicator tools and
unique installation techniques. To help ensure a success
ful installation, you should view the 3M Wall and Textured
Surface Videos, at 3Mgraphics.com, Tools & Support, or
arrange for a training class, in addition to using this In
struction Bulletin. Please contact your local 3M sales rep
resentative to assist you with either of these options.
• Scotch™ Masking Tape*, 2 inch (50 mnm) wide
• Industrial heat gun with electronic readout, capable of achieving
and sustaining 1000°F. The following are examples of heat guns
that meet the needed criteria.
– Steinel HL 2010E LCD Display IntelliTemp Heat Gun
– Milwaukee 8988-20 Variable Temperature Heat Gun
– Bosch BOS1944LCDK Programmable Heat Gun Kit
• 3M™ Textured Surface Applicator TSA-1* Large Area Roller
• 3M™ Textured Surface Applicator TSA-2* Grout Line Roller
• 3M™ Textured Surface Applicator TSA-3* Edge Roller
• 3M™ Two-Handled Textured Surface Applicator TSA-4*
Combination Heat Gun Holder and Roller
Note: We recommend storing all foam tools neatly in a rigid plastic
box when not in use. Storing them carelessly with heavy or sharp
objects or exposing them to contaminants, can all damage the foam
and reduce the effectiveness of the tools.
• 3M™ Air Release Tool 391X*
• Tweezers
• Cutting tools, such as a razor blade with break off tips in a safety
holder
*Available from 3M Commercial Graphics
A. Tips for a Good Installation
ImportantNote
High Heat May Degrade Foam Rollers andDamage Substrate
High heat directed at foam rollers may degrade the
foam. Always direct the heat toward the film, not the
foam roller.
High heat may also damage the substrate: use with
caution.
1. Understand how film conforms to a textured wall.
• Heat. High heat warms the film and adhesive to make it more
conformable. Insufficient heating of the film during installation
may result in a film that looks good immediately following
installation, but may lift days or weeks later.
• Speed. The proper speed allows the film to be warmed suffi
ciently to relax lifting stresses within the film, and conform
effectively to the texture while the film is still pliable.
• Pressure. Firm, consistent pressure on the roller allows the
foam to conform the film into the texture. Since the film and
adhesive cool very quickly when the heat source is moved
away, adhesion occurs quickly.
2. When applying multiple film panels, use a 1/2 inch (13 mm)overlap.
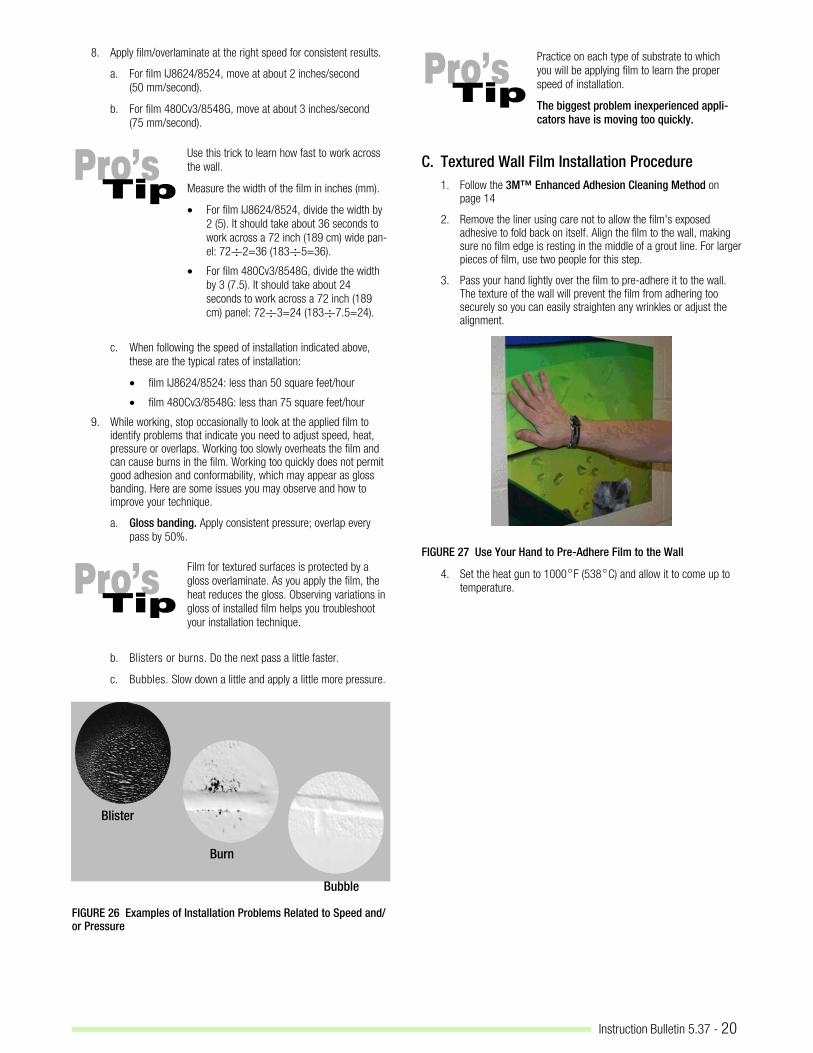
3. Assess the grout lines for the wall on which you will be working todetermine the proper technique for handling them. Refer to WallTextures and Compositions on page 6 for more information andexamples.
– Less than 1/8 inch (3.2 mm) deep and fairly smooth. Bridge
the grout lines so that at least 1 inch (25 mm) of film extends
beyond the line. The heat and pressure of the roller will con
form the film into the grout lines.
Film conforms well to
shallow grout lines
FIGURE 20 Shallow Grout Lines
– Greater than 1/8 inch (3.2) deep and/or heavily textured.
Align the first outside corner on the corner of the brick or tile
next to the grout line. After installing the film, trim the film
from the grout lines as described in Mosaic Graphic Tech
nique on page 22
Film bridges deep
grout lines
FIGURE 21 Deep Grout Lines

Instruction Bulletin 5.37 - 19
B. Using the 3M™ Two-Handled Textured Surface Applicator TSA-4
1. Consider this before mounting the gun:
a. Use a heat gun with a barrel of 1.53 to 1.55 inch (38.9 to
39.3 mm) diameter.
b. The gun must heat the film before the roller contacts the film.
c. In the orientation shown in these photos, the installer would
always be leading with the left hand and following with the
right hand. To lead with the right hand, rotate the tool 180
degrees.
Heat Gun Holder
Foam Roller
Handle
Clamping Knob
Alignment
Notch
FIGURE 22 Applicator TSA-4
2. Position the heat gun in the Heat Gun Holder so only about 1/2inch (1.2 cm) of the nozzle extends beyond the opening. Tightenthe Clamping Knob snugly. The end of the nozzle should be about1 inch (2.5 cm) above the film when the tool is in use.
CORRECT INCORRECT
1/2 inch
(1.2 cm)
FIGURE 23 Positioning Heat Gun Nozzle in Heat Gun Holder
3. Always move so the heat gun heats the film before the foam rollerconforms the film.
4. Start every stroke just off the film so that the edges are wellsealed.
5. Overlap every stroke by half the width of the TSA-4 roller. You canuse the notch in the heat gun holder as a visual guide to align thenext stroke with the bottom of the previous stroke.
6. Maintain a consistent temperature of 1000°F (538°C).
Alignment Notch
Maintain consistent temperature
of 1000�F (538�C)Start each pass off the film
Overlap
Every
Stroke
Direction of movement with gun
mounted this way
FIGURE 24 Good Installation Techniques
7. Use proper TSA-4 tool ergonomics.
a. Keep both handles parallel to the installation wall so the gun
nozzle maintains an even distance from the wall so there is
uniform pressure at both the top and bottom of the roller.
Keep the gun nozzle at an even distance from the film.
b. Walk along with the tool, using your body staying centered in
front of it for even pressure rather than extending your arms
across a broad distance.
c. Use enough pressure to conform the film to the substrate.
Lean into the wall to
get good, consistent
pressure on the TSA-4
tool
FIGURE 25
Instruction Bulletin 5.37 - 20
8. Apply film/overlaminate at the right speed for consistent results.
a. For film IJ8624/8524, move at about 2 inches/second
(50 mm/second).
b. For film 480Cv3/8548G, move at about 3 inches/second
(75 mm/second).
Use this trick to learn how fast to work across
the wall.
Measure the width of the film in inches (mm).
• For film IJ8624/8524, divide the width by
2 (5). It should take about 36 seconds to
work across a 72 inch (189 cm) wide pan
el: 72�2=36 (183�5=36).
• For film 480Cv3/8548G, divide the width
by 3 (7.5). It should take about 24
seconds to work across a 72 inch (189
cm) panel: 72�3=24 (183�7.5=24).
c. When following the speed of installation indicated above,
these are the typical rates of installation:
• film IJ8624/8524: less than 50 square feet/hour
• film 480Cv3/8548G: less than 75 square feet/hour
9. While working, stop occasionally to look at the applied film toidentify problems that indicate you need to adjust speed, heat,pressure or overlaps. Working too slowly overheats the film andcan cause burns in the film. Working too quickly does not permitgood adhesion and conformability, which may appear as glossbanding. Here are some issues you may observe and how toimprove your technique.
a. Gloss banding. Apply consistent pressure; overlap every
pass by 50%.
Film for textured surfaces is protected by a
gloss overlaminate. As you apply the film, the
heat reduces the gloss. Observing variations in
gloss of installed film helps you troubleshoot
your installation technique.
b. Blisters or burns. Do the next pass a little faster.
c. Bubbles. Slow down a little and apply a little more pressure.
Blister
Burn
Bubble
FIGURE 26 Examples of Installation Problems Related to Speed and/or Pressure
Practice on each type of substrate to which
you will be applying film to learn the proper
speed of installation.
The biggest problem inexperienced appli
cators have is moving too quickly.
C. Textured Wall Film Installation Procedure
1. Follow the 3M™ Enhanced Adhesion Cleaning Method onpage 14
2. Remove the liner using care not to allow the film's exposedadhesive to fold back on itself. Align the film to the wall, makingsure no film edge is resting in the middle of a grout line. For largerpieces of film, use two people for this step.
3. Pass your hand lightly over the film to pre-adhere it to the wall.The texture of the wall will prevent the film from adhering toosecurely so you can easily straighten any wrinkles or adjust thealignment.
FIGURE 27 Use Your Hand to Pre-Adhere Film to the Wall
4. Set the heat gun to 1000�F (538�C) and allow it to come up to
temperature.
Instruction Bulletin 5.37 - 21
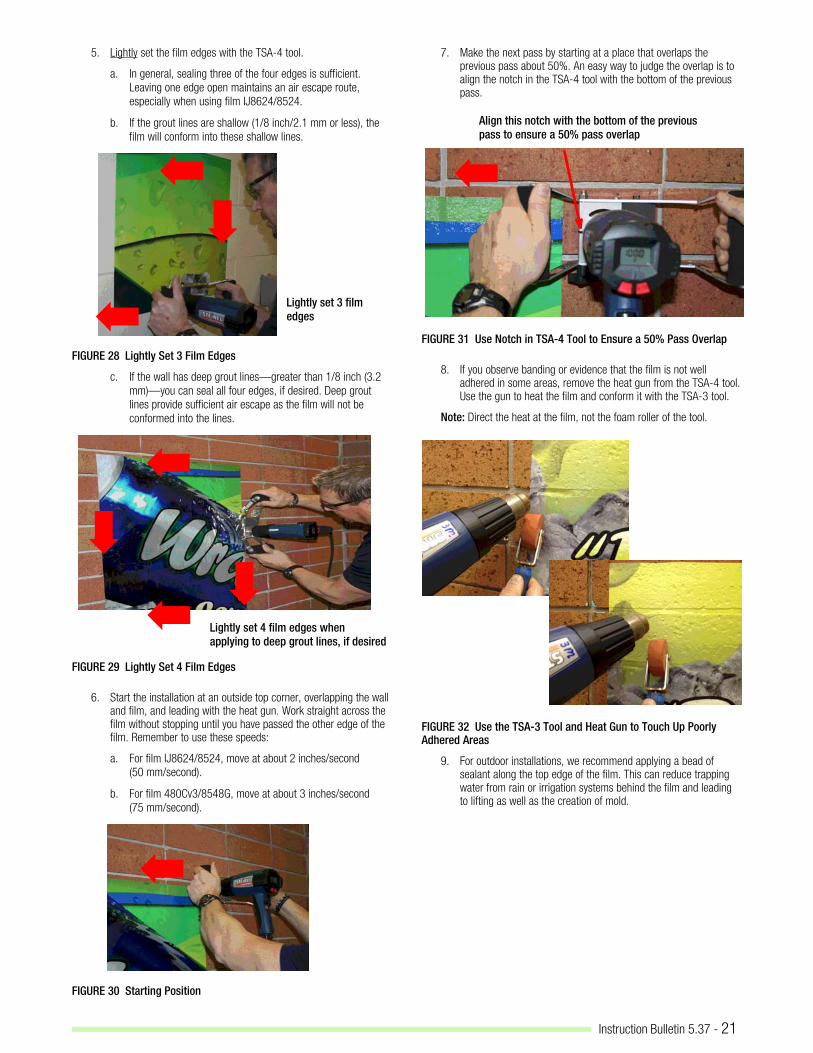
5. Lightly set the film edges with the TSA-4 tool.
a. In general, sealing three of the four edges is sufficient.
Leaving one edge open maintains an air escape route,
especially when using film IJ8624/8524.
b. If the grout lines are shallow (1/8 inch/2.1 mm or less), the
film will conform into these shallow lines.
Lightly set 3 film
edges
FIGURE 28 Lightly Set 3 Film Edges
c. If the wall has deep grout lines—greater than 1/8 inch (3.2
mm)—you can seal all four edges, if desired. Deep grout
lines provide sufficient air escape as the film will not be
conformed into the lines.
Lightly set 4 film edges when
applying to deep grout lines, if desired
FIGURE 29 Lightly Set 4 Film Edges
6. Start the installation at an outside top corner, overlapping the walland film, and leading with the heat gun. Work straight across thefilm without stopping until you have passed the other edge of thefilm. Remember to use these speeds:
a. For film IJ8624/8524, move at about 2 inches/second
(50 mm/second).
b. For film 480Cv3/8548G, move at about 3 inches/second
(75 mm/second).
FIGURE 30 Starting Position
7. Make the next pass by starting at a place that overlaps theprevious pass about 50%. An easy way to judge the overlap is toalign the notch in the TSA-4 tool with the bottom of the previouspass.
Align this notch with the bottom of the previous
pass to ensure a 50% pass overlap
FIGURE 31 Use Notch in TSA-4 Tool to Ensure a 50% Pass Overlap
8. If you observe banding or evidence that the film is not welladhered in some areas, remove the heat gun from the TSA-4 tool.Use the gun to heat the film and conform it with the TSA-3 tool.
Note: Direct the heat at the film, not the foam roller of the tool.
FIGURE 32 Use the TSA-3 Tool and Heat Gun to Touch Up Poorly Adhered Areas
9. For outdoor installations, we recommend applying a bead ofsealant along the top edge of the film. This can reduce trappingwater from rain or irrigation systems behind the film and leadingto lifting as well as the creation of mold.
Instruction Bulletin 5.37 - 22
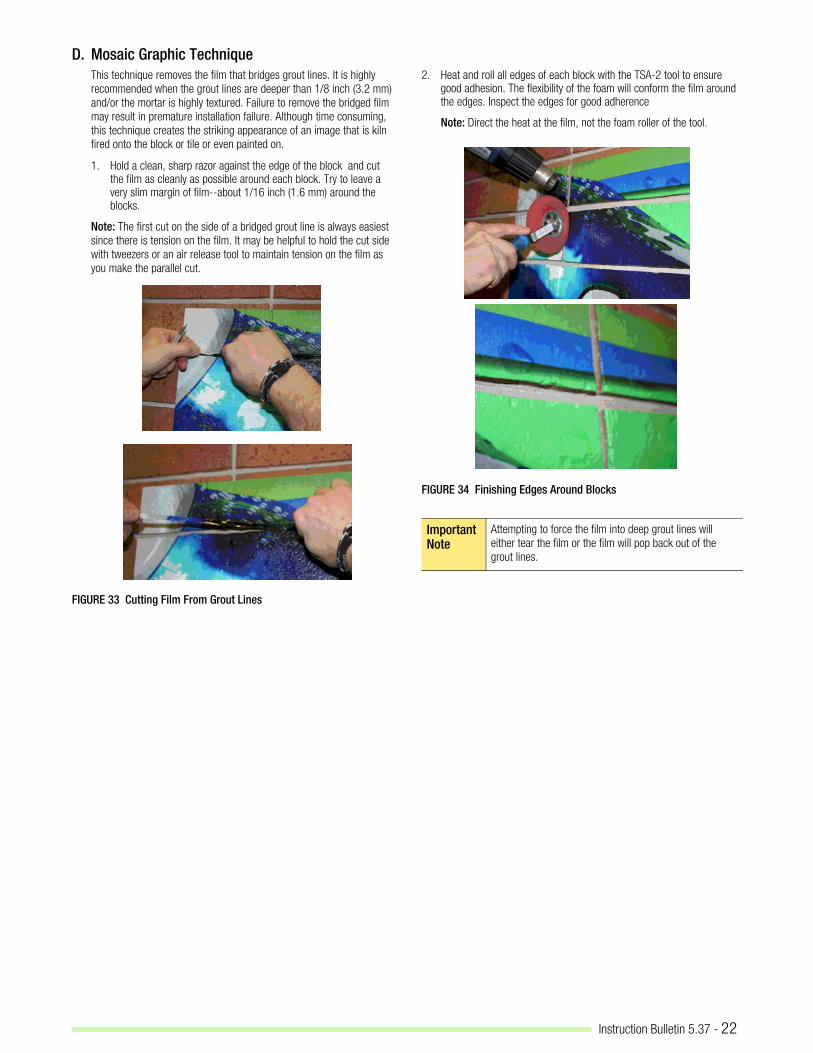
D. Mosaic Graphic Technique
This technique removes the film that bridges grout lines. It is highly
recommended when the grout lines are deeper than 1/8 inch (3.2 mm)
and/or the mortar is highly textured. Failure to remove the bridged film
may result in premature installation failure. Although time consuming,
this technique creates the striking appearance of an image that is kiln
fired onto the block or tile or even painted on.
1. Hold a clean, sharp razor against the edge of the block and cutthe film as cleanly as possible around each block. Try to leave avery slim margin of film--about 1/16 inch (1.6 mm) around theblocks.
Note: The first cut on the side of a bridged grout line is always easiest
since there is tension on the film. It may be helpful to hold the cut side
with tweezers or an air release tool to maintain tension on the film as
you make the parallel cut.
FIGURE 33 Cutting Film From Grout Lines
2. Heat and roll all edges of each block with the TSA-2 tool to ensuregood adhesion. The flexibility of the foam will conform the film aroundthe edges. Inspect the edges for good adherence
Note: Direct the heat at the film, not the foam roller of the tool.
FIGURE 34 Finishing Edges Around Blocks
ImportantNote
Attempting to force the film into deep grout lines will
either tear the film or the film will pop back out of the
grout lines.
Instruction Bulletin 5.37 - 23
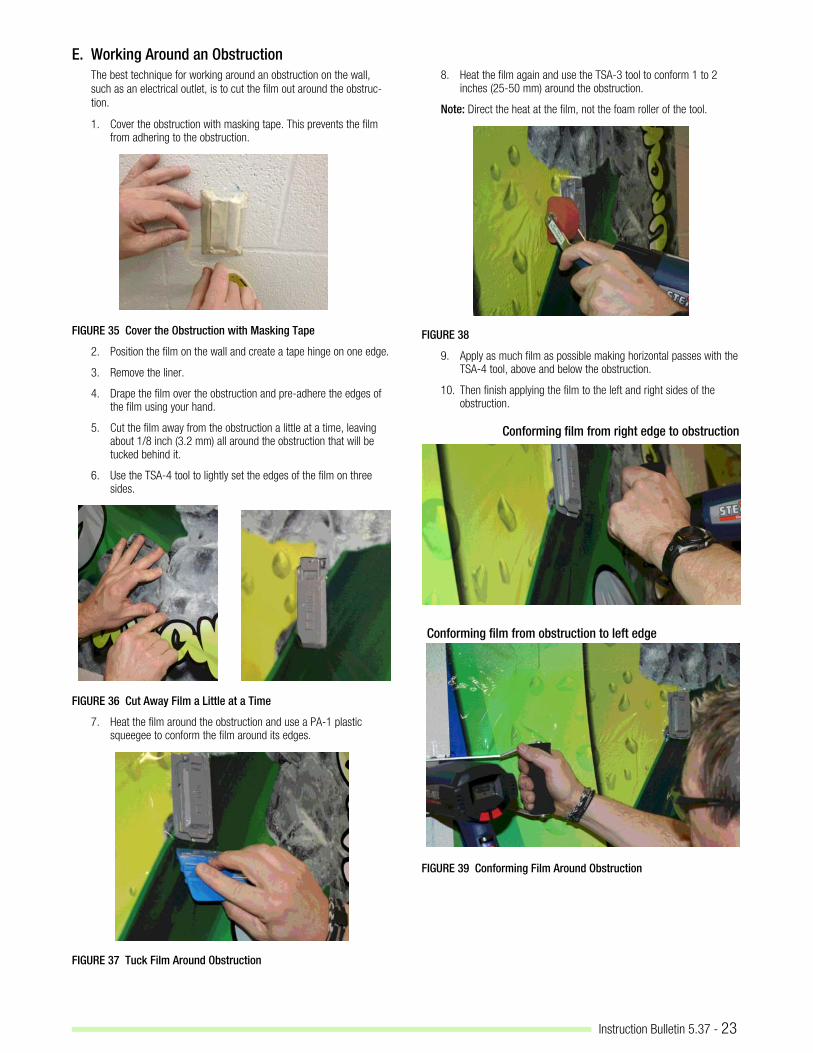
E. Working Around an Obstruction
The best technique for working around an obstruction on the wall,
such as an electrical outlet, is to cut the film out around the obstruc
tion.
1. Cover the obstruction with masking tape. This prevents the filmfrom adhering to the obstruction.
FIGURE 35 Cover the Obstruction with Masking Tape
2. Position the film on the wall and create a tape hinge on one edge.
3. Remove the liner.
4. Drape the film over the obstruction and pre-adhere the edges ofthe film using your hand.
5. Cut the film away from the obstruction a little at a time, leavingabout 1/8 inch (3.2 mm) all around the obstruction that will betucked behind it.
6. Use the TSA-4 tool to lightly set the edges of the film on threesides.
FIGURE 36 Cut Away Film a Little at a Time
7. Heat the film around the obstruction and use a PA-1 plasticsqueegee to conform the film around its edges.
FIGURE 37 Tuck Film Around Obstruction
8. Heat the film again and use the TSA-3 tool to conform 1 to 2inches (25-50 mm) around the obstruction.
Note: Direct the heat at the film, not the foam roller of the tool.
FIGURE 38
9. Apply as much film as possible making horizontal passes with theTSA-4 tool, above and below the obstruction.
10. Then finish applying the film to the left and right sides of theobstruction.
Conforming film from right edge to obstruction
Conforming film from obstruction to left edge
FIGURE 39 Conforming Film Around Obstruction
Instruction Bulletin 5.37 - 24
12. Graphic Maintenance, Repair, Removal: Smooth and Textured
A. Edge Lifting: Causes and Repair
Edge lifting is generally caused by inadequate adhesion. It may be due
to insufficient wall cleaning, the wrong film being used, contaminants
on the wall, poor edge finishing during initial installation, or abrasion
by people or equipment, or environment. The following options for
reattaching lifted edges can extend the life of the film and improve
appearance, but are aggressive and will likely damage the wall.
• Option 1: Use this procedure if a large area of film has come
loose, which is most likely to occur at the top edge. Pull down
more film until it does not release easily. Protect the exposed
adhesive with a piece of clean plastic sheeting. Follow the 3M™
Enhanced Adhesion Cleaning Method on page 14. Reinstall the
film using the normal procedure.
• Option 2: Apply a strip of two-sided 3M™ Transfer Adhesive 950
(5 mil thick, 1/2" x 60 yard roll) to the back side of the film, close
to the edge. Use a rivet brush to work the film in a circular motion
all around the outer edges.
• Option 3: Use mechanical fasteners such as staples.
B. Disposal of Film Liners and Used Film
3M products may be incinerated or may also be safely disposed of in a
landfill per U.S. Environmental Protection Agency guidelines.
C. Cleaning
Refer to Instruction Bulletin 6.5 for detailed cleaning guidelines.
D. Removal Risks
ImportantNote
Due to the great variety of wall surfaces, there is no
guarantee against damage-free film removal, even if
you are using a film described as removable or change
able.
Be sure your customer is aware of the potential for
damage, and use the techniques provided here at your
own risk.
• Film that is exposed to extreme environmental conditions,
such as heat and sun, for long periods of time are the most diffi
cult to remove. Typically, the greater the adhesion level of the film
to the wall, the greater the risk for damaging the wall upon film
removal.
• Film removal from textured block walls. 3M films IJ8624/8524
and 480Cv3/8548G may exhibit satisfactory removal characterist
ics from textured block walls depending on the amount of texture.
The greatest risk in removal typically is:
– loose mortar may be pulled off.
– the finish on the wall may be damaged.
– film exposed outdoors for a long time may be especially diffi
cult to remove cleanly.
• Hidden problems such as cuts in the wall or moisture that has
penetrated the wallboard will contribute to seriously damaging the
paint and/or the wallboard when film is removed.
• Difference surface gloss after film is removed. The cleaning
procedure, heat, environmental exposure and other factors can
contribute to changing the original gloss of the paint or finish.
E. Basic Removal Techniques
ImportantNote
Removing film from walls is significantly different than
removing film from semi-trailers and vehicles. Remove
at your own risk. 3M is not responsible for damage to
the paint or wall.
• Using two hands, start at the top of the film and pull it down slowly
at a consistent 120 to 180 degree angle.
• If the film is difficult to remove, cutting it into strips may ease the
removal process. Do not cut the wall.
• Do NOT use chemicals for indoor wall film removal.
• If the walls are not made of wallboard, heating the film as you
remove it may help. The heat softens the adhesive, reducing the
pull-off force and making the film more elastic, which reduces the
tendency to tear.
• If the wall appears stained or the gloss has changed after graphic
removal, it is usually the result of one of the following: the initial
wall cleaning process, paint and pigment quality, exposure to heat
and light, migrating particles in the paint, and/or adhesive residue.
• See Instruction Bulletin 6.5 for more details.

Instruction Bulletin 5.37 - 25
13. Troubleshooting
Every effort should be made to ensure that walls are in good condition before applying graphics. This generally reduces installa
tion time while improving graphic appearance, and if applicable, removal characteristics.
• Review all troubleshooting options before deciding on a course of action.
• Every wall paint must be cured for the full amount of time recommended by the paint manufacturer. See page 8.
• Follow the 3M Wall Film Adhesion Test (page 9 for smooth walls and page 12 for textured walls) for every film you intend to
use and on each different wall included in the installation.
• Every installation wall must be cleaned with the 3M™ Enhanced Adhesion Cleaning Method on page 14 before doing the
3M Wall Film Adhesion Test and before doing the full installation.
• Report installation issues to the graphics manufacturer.
Problem What To Look For Recommended Solutions
A. Pre-Installation Problems - All Walls
1 Unsound walls or sub
structures.
Evidence of a loose, inconsistent or
damaged surface, loose paint, mixed
surface finishes, abrasion, gouges,
etc.
Repair wall as appropriate. Be sure new paint cures for the full amount of time
recommended by the paint manufacturer before applying film.
Reconsider whether to apply a film at that location.
2 Concrete substrate is below grade
and not sealed.
Seal and cure the paint the full amount of time recommended by the paint manu
facturer before applying film.
Reconsider whether to apply film at that location.
3 Moisture behind a substrate. Look for boarded up windows or walls that back up to cooling systems, water
pipes, overhead windows or water pipes. Notify the graphics manufacturer or cus
tomer that applying film in these locations could create condensation or drip water
onto the film, resulting in premature failure.
4 Unclean substrate. Wall contamination such as dust,
dirt, grease, food, vehicle exhaust or
cleaning products.
Clean the substrate, using a degreaser if needed. Do not use cleaning solutions
that contain lotions, waxes or oils. Then clean using the 3M™ Enhanced Adhe
sion Cleaning Method on page 14.
B. Installation Problems - Smooth Walls
5 Film does not adhere
well or falls off wall pre
maturely.
Film was not tested on the wall prior
to installation.
Low VOC paint was used on the wall. Please read page 8.
Always perform the 3M Film Adhesion Test (page 9 for smooth walls and page
12 for textured walls) for each film and on each substrate before committing to the
complete installation.
6 Wall repairs were not properly
sealed, primed, painted or cured.
Always perform the 3M Film Adhesion Test (page 9 for smooth walls and page
12 for textured walls) for each film and on each substrate before committing to the
complete installation.
7 Walls were not washed with 70%
isopropyl alcohol and 30% water
Always follow the 3M™ Enhanced Adhesion Cleaning Method on page 14 to
increase film adhesion.
8 The texture of the substrate is not
well suited to the film being used.
If the wall texture is greater than just smooth, try film IJ8624/8524 or
480Cv3/8548G.
• Some textured paint additives create too much texture for film intended for
smooth walls.
• A wall with too little texture may prevent proper air bleed during the installation
of film IJ8624, which is necessary for a successful installation.
9 Substrate temperature tool low Check the film's Product Bulletin to determine the installation temperature range.
C. Tool Problems - TEXTURED Walls Only
10 Foam on the tool is fal
ling apart.
Foam has been exposed to too
much heat.
Do not direct the heat from the gun at the foam, which causes it to degrade.
Do not rub the tool against the hot barrel of the heat gun.
11 Foam tools have been improperly
stored.
Store foam tools neatly in a rigid plastic box to avoid exposing to heavy or sharp
objects or contaminates, which can damage the foam and reduce the effectiveness
of the tools.
12 Tool is worn out. Replacement foam rollers are available for TSA-1 and TSA-4 tools. Contact 3M
Customer Service.
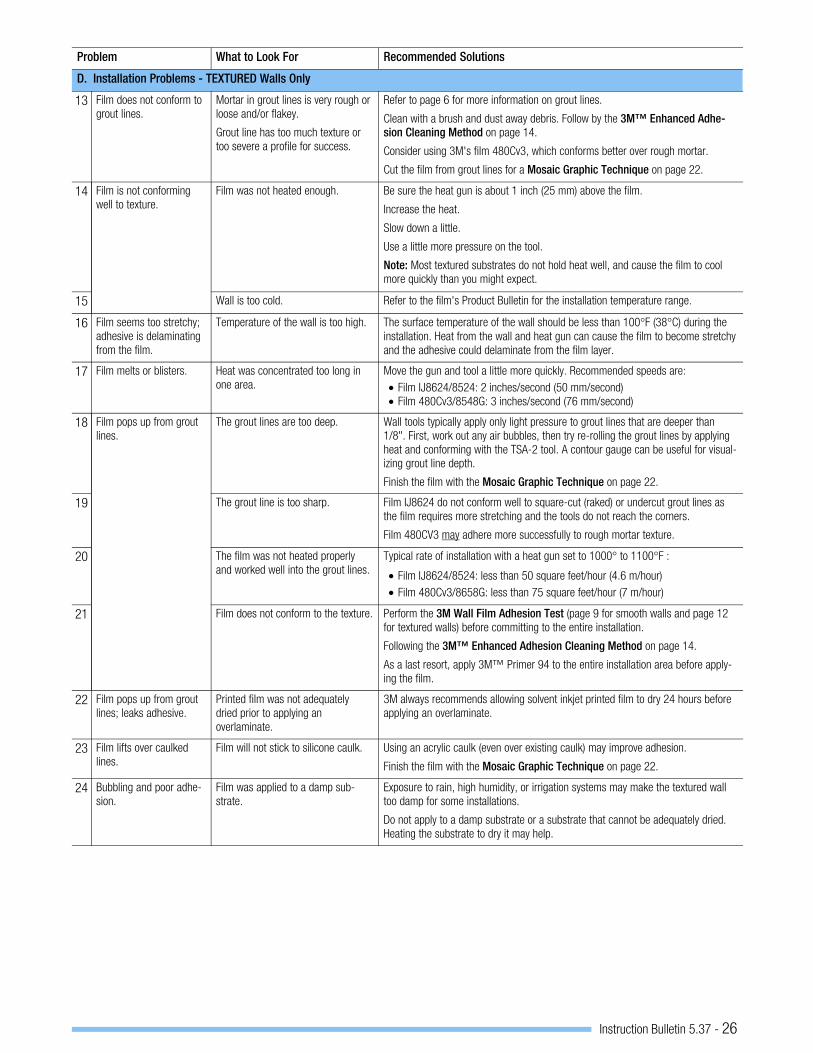
Instruction Bulletin 5.37 - 26
Problem What to Look For Recommended Solutions
D. Installation Problems - TEXTURED Walls Only
13 Film does not conform to
grout lines.
Mortar in grout lines is very rough or
loose and/or flakey.
Grout line has too much texture or
too severe a profile for success.
Refer to page 6 for more information on grout lines.
Clean with a brush and dust away debris. Follow by the 3M™ Enhanced Adhe
sion Cleaning Method on page 14.
Consider using 3M's film 480Cv3, which conforms better over rough mortar.
Cut the film from grout lines for a Mosaic Graphic Technique on page 22.
14 Film is not conforming
well to texture.
Film was not heated enough. Be sure the heat gun is about 1 inch (25 mm) above the film.
Increase the heat.
Slow down a little.
Use a little more pressure on the tool.
Note: Most textured substrates do not hold heat well, and cause the film to cool
more quickly than you might expect.
15 Wall is too cold. Refer to the film's Product Bulletin for the installation temperature range.
16 Film seems too stretchy;
adhesive is delaminating
from the film.
Temperature of the wall is too high. The surface temperature of the wall should be less than 100°F (38°C) during the
installation. Heat from the wall and heat gun can cause the film to become stretchy
and the adhesive could delaminate from the film layer.
17 Film melts or blisters. Heat was concentrated too long in
one area.
Move the gun and tool a little more quickly. Recommended speeds are:
• Film IJ8624/8524: 2 inches/second (50 mm/second)
• Film 480Cv3/8548G: 3 inches/second (76 mm/second)
18 Film pops up from grout
lines.
The grout lines are too deep. Wall tools typically apply only light pressure to grout lines that are deeper than
1/8". First, work out any air bubbles, then try re-rolling the grout lines by applying
heat and conforming with the TSA-2 tool. A contour gauge can be useful for visual
izing grout line depth.
Finish the film with the Mosaic Graphic Technique on page 22.
19 The grout line is too sharp. Film IJ8624 do not conform well to square-cut (raked) or undercut grout lines as
the film requires more stretching and the tools do not reach the corners.
Film 480CV3 may adhere more successfully to rough mortar texture.
20 The film was not heated properly
and worked well into the grout lines.
Typical rate of installation with a heat gun set to 1000° to 1100°F :
• Film IJ8624/8524: less than 50 square feet/hour (4.6 m/hour)
• Film 480Cv3/8658G: less than 75 square feet/hour (7 m/hour)
21 Film does not conform to the texture. Perform the 3M Wall Film Adhesion Test (page 9 for smooth walls and page 12
for textured walls) before committing to the entire installation.
Following the 3M™ Enhanced Adhesion Cleaning Method on page 14.
As a last resort, apply 3M™ Primer 94 to the entire installation area before apply
ing the film.
22 Film pops up from grout
lines; leaks adhesive.
Printed film was not adequately
dried prior to applying an
overlaminate.
3M always recommends allowing solvent inkjet printed film to dry 24 hours before
applying an overlaminate.
23 Film lifts over caulked
lines.
Film will not stick to silicone caulk. Using an acrylic caulk (even over existing caulk) may improve adhesion.
Finish the film with the Mosaic Graphic Technique on page 22.
24 Bubbling and poor adhe
sion.
Film was applied to a damp sub
strate.
Exposure to rain, high humidity, or irrigation systems may make the textured wall
too damp for some installations.
Do not apply to a damp substrate or a substrate that cannot be adequately dried.
Heating the substrate to dry it may help.
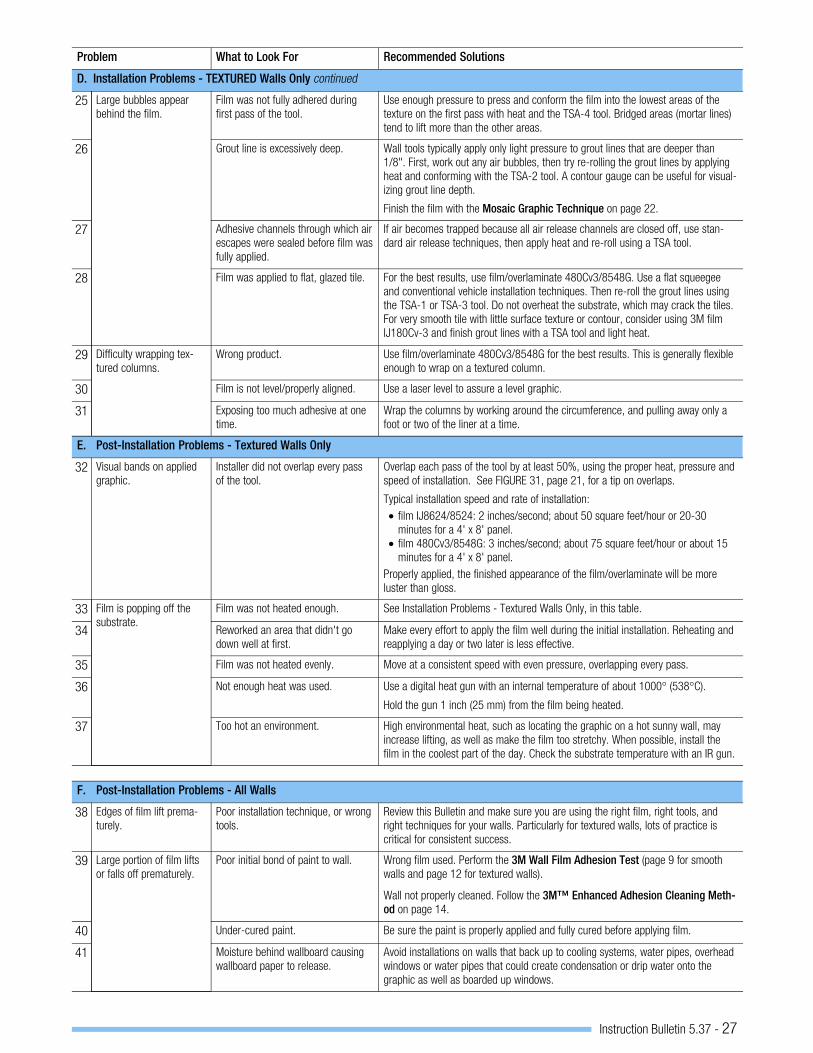
Instruction Bulletin 5.37 - 27
Problem What to Look For Recommended Solutions
D. Installation Problems - TEXTURED Walls Only continued
25 Large bubbles appear
behind the film.
Film was not fully adhered during
first pass of the tool.
Use enough pressure to press and conform the film into the lowest areas of the
texture on the first pass with heat and the TSA-4 tool. Bridged areas (mortar lines)
tend to lift more than the other areas.
26 Grout line is excessively deep. Wall tools typically apply only light pressure to grout lines that are deeper than
1/8". First, work out any air bubbles, then try re-rolling the grout lines by applying
heat and conforming with the TSA-2 tool. A contour gauge can be useful for visual
izing grout line depth.
Finish the film with the Mosaic Graphic Technique on page 22.
27 Adhesive channels through which air
escapes were sealed before film was
fully applied.
If air becomes trapped because all air release channels are closed off, use stan
dard air release techniques, then apply heat and re-roll using a TSA tool.
28 Film was applied to flat, glazed tile. For the best results, use film/overlaminate 480Cv3/8548G. Use a flat squeegee
and conventional vehicle installation techniques. Then re-roll the grout lines using
the TSA-1 or TSA-3 tool. Do not overheat the substrate, which may crack the tiles.
For very smooth tile with little surface texture or contour, consider using 3M film
IJ180Cv-3 and finish grout lines with a TSA tool and light heat.
29 Difficulty wrapping tex
tured columns.
Wrong product. Use film/overlaminate 480Cv3/8548G for the best results. This is generally flexible
enough to wrap on a textured column.
30 Film is not level/properly aligned. Use a laser level to assure a level graphic.
31 Exposing too much adhesive at one
time.
Wrap the columns by working around the circumference, and pulling away only a
foot or two of the liner at a time.
E. Post-Installation Problems - Textured Walls Only
32 Visual bands on applied
graphic.
Installer did not overlap every pass
of the tool.
Overlap each pass of the tool by at least 50%, using the proper heat, pressure and
speed of installation. See FIGURE 31, page 21, for a tip on overlaps.
Typical installation speed and rate of installation:
• film IJ8624/8524: 2 inches/second; about 50 square feet/hour or 20-30
minutes for a 4' x 8' panel.
• film 480Cv3/8548G: 3 inches/second; about 75 square feet/hour or about 15
minutes for a 4' x 8' panel.
Properly applied, the finished appearance of the film/overlaminate will be more
luster than gloss.
33 Film is popping off the
substrate.
Film was not heated enough. See Installation Problems - Textured Walls Only, in this table.
34 Reworked an area that didn't go
down well at first.
Make every effort to apply the film well during the initial installation. Reheating and
reapplying a day or two later is less effective.
35 Film was not heated evenly. Move at a consistent speed with even pressure, overlapping every pass.
36 Not enough heat was used. Use a digital heat gun with an internal temperature of about 1000° (538°C).
Hold the gun 1 inch (25 mm) from the film being heated.
37 Too hot an environment. High environmental heat, such as locating the graphic on a hot sunny wall, may
increase lifting, as well as make the film too stretchy. When possible, install the
film in the coolest part of the day. Check the substrate temperature with an IR gun.
F. Post-Installation Problems - All Walls
38 Edges of film lift prema
turely.
Poor installation technique, or wrong
tools.
Review this Bulletin and make sure you are using the right film, right tools, and
right techniques for your walls. Particularly for textured walls, lots of practice is
critical for consistent success.
39 Large portion of film lifts
or falls off prematurely.
Poor initial bond of paint to wall. Wrong film used. Perform the 3M Wall Film Adhesion Test (page 9 for smooth
walls and page 12 for textured walls).
Wall not properly cleaned. Follow the 3M™ Enhanced Adhesion Cleaning Meth
od on page 14.
40 Under-cured paint. Be sure the paint is properly applied and fully cured before applying film.
41 Moisture behind wallboard causing
wallboard paper to release.
Avoid installations on walls that back up to cooling systems, water pipes, overhead
windows or water pipes that could create condensation or drip water onto the
graphic as well as boarded up windows.
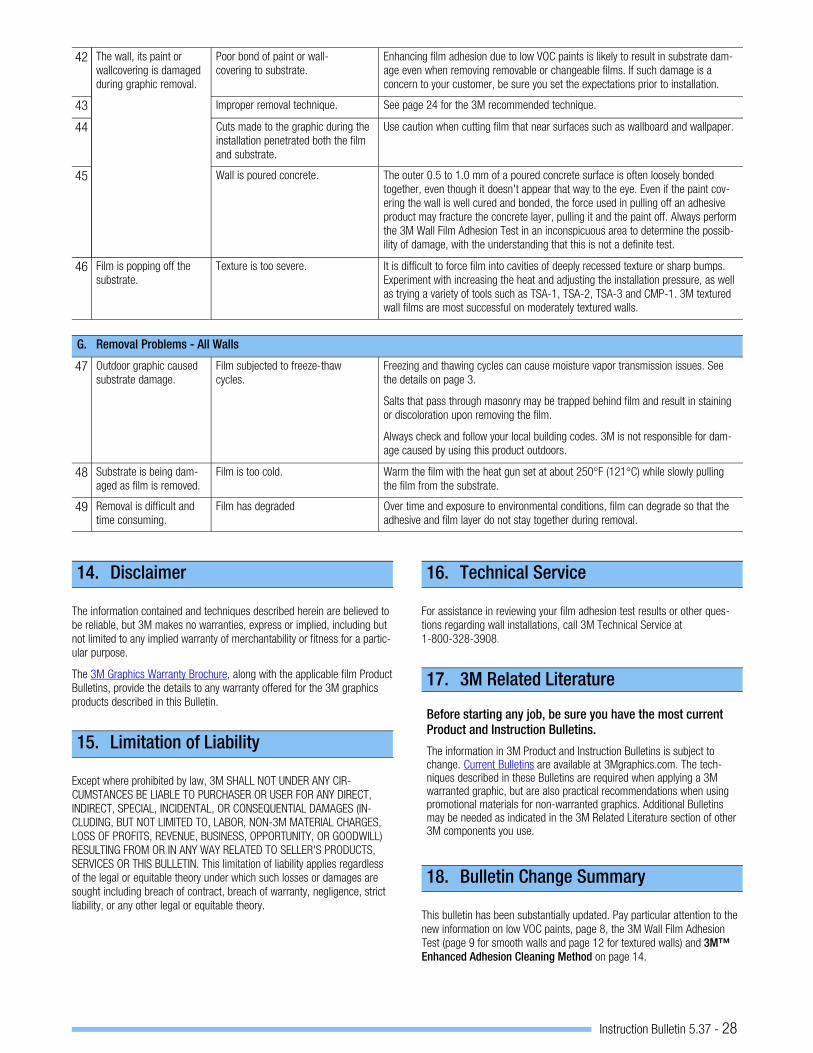
Instruction Bulletin 5.37 - 28
42 The wall, its paint or
wallcovering is damaged
during graphic removal.
Poor bond of paint or wall-
covering to substrate.
Enhancing film adhesion due to low VOC paints is likely to result in substrate dam
age even when removing removable or changeable films. If such damage is a
concern to your customer, be sure you set the expectations prior to installation.
43 Improper removal technique. See page 24 for the 3M recommended technique.
44 Cuts made to the graphic during the
installation penetrated both the film
and substrate.
Use caution when cutting film that near surfaces such as wallboard and wallpaper.
45 Wall is poured concrete. The outer 0.5 to 1.0 mm of a poured concrete surface is often loosely bonded
together, even though it doesn't appear that way to the eye. Even if the paint cov
ering the wall is well cured and bonded, the force used in pulling off an adhesive
product may fracture the concrete layer, pulling it and the paint off. Always perform
the 3M Wall Film Adhesion Test in an inconspicuous area to determine the possib
ility of damage, with the understanding that this is not a definite test.
46 Film is popping off the
substrate.
Texture is too severe. It is difficult to force film into cavities of deeply recessed texture or sharp bumps.
Experiment with increasing the heat and adjusting the installation pressure, as well
as trying a variety of tools such as TSA-1, TSA-2, TSA-3 and CMP-1. 3M textured
wall films are most successful on moderately textured walls.
G. Removal Problems - All Walls
47 Outdoor graphic caused
substrate damage.
Film subjected to freeze-thaw
cycles.
Freezing and thawing cycles can cause moisture vapor transmission issues. See
the details on page 3.
Salts that pass through masonry may be trapped behind film and result in staining
or discoloration upon removing the film.
Always check and follow your local building codes. 3M is not responsible for dam
age caused by using this product outdoors.
48 Substrate is being dam
aged as film is removed.
Film is too cold. Warm the film with the heat gun set at about 250°F (121°C) while slowly pulling
the film from the substrate.
49 Removal is difficult and
time consuming.
Film has degraded Over time and exposure to environmental conditions, film can degrade so that the
adhesive and film layer do not stay together during removal.
14. Disclaimer
The information contained and techniques described herein are believed to
be reliable, but 3M makes no warranties, express or implied, including but
not limited to any implied warranty of merchantability or fitness for a partic
ular purpose.
The 3M Graphics Warranty Brochure, along with the applicable film Product
Bulletins, provide the details to any warranty offered for the 3M graphics
products described in this Bulletin.
15. Limitation of Liability
Except where prohibited by law, 3M SHALL NOT UNDER ANY CIR
CUMSTANCES BE LIABLE TO PURCHASER OR USER FOR ANY DIRECT,
INDIRECT, SPECIAL, INCIDENTAL, OR CONSEQUENTIAL DAMAGES (IN
CLUDING, BUT NOT LIMITED TO, LABOR, NON-3M MATERIAL CHARGES,
LOSS OF PROFITS, REVENUE, BUSINESS, OPPORTUNITY, OR GOODWILL)
RESULTING FROM OR IN ANY WAY RELATED TO SELLER'S PRODUCTS,
SERVICES OR THIS BULLETIN. This limitation of liability applies regardless
of the legal or equitable theory under which such losses or damages are
sought including breach of contract, breach of warranty, negligence, strict
liability, or any other legal or equitable theory.
16. Technical Service
For assistance in reviewing your film adhesion test results or other ques
tions regarding wall installations, call 3M Technical Service at
1-800-328-3908.
17. 3M Related Literature
Before starting any job, be sure you have the most current
Product and Instruction Bulletins.
The information in 3M Product and Instruction Bulletins is subject tochange. Current Bulletins are available at 3Mgraphics.com. The techniques described in these Bulletins are required when applying a 3Mwarranted graphic, but are also practical recommendations when usingpromotional materials for non-warranted graphics. Additional Bulletinsmay be needed as indicated in the 3M Related Literature section of other3M components you use.
18. Bulletin Change Summary
This bulletin has been substantially updated. Pay particular attention to the
new information on low VOC paints, page 8, the 3M Wall Film Adhesion
Test (page 9 for smooth walls and page 12 for textured walls) and 3M™
Enhanced Adhesion Cleaning Method on page 14.
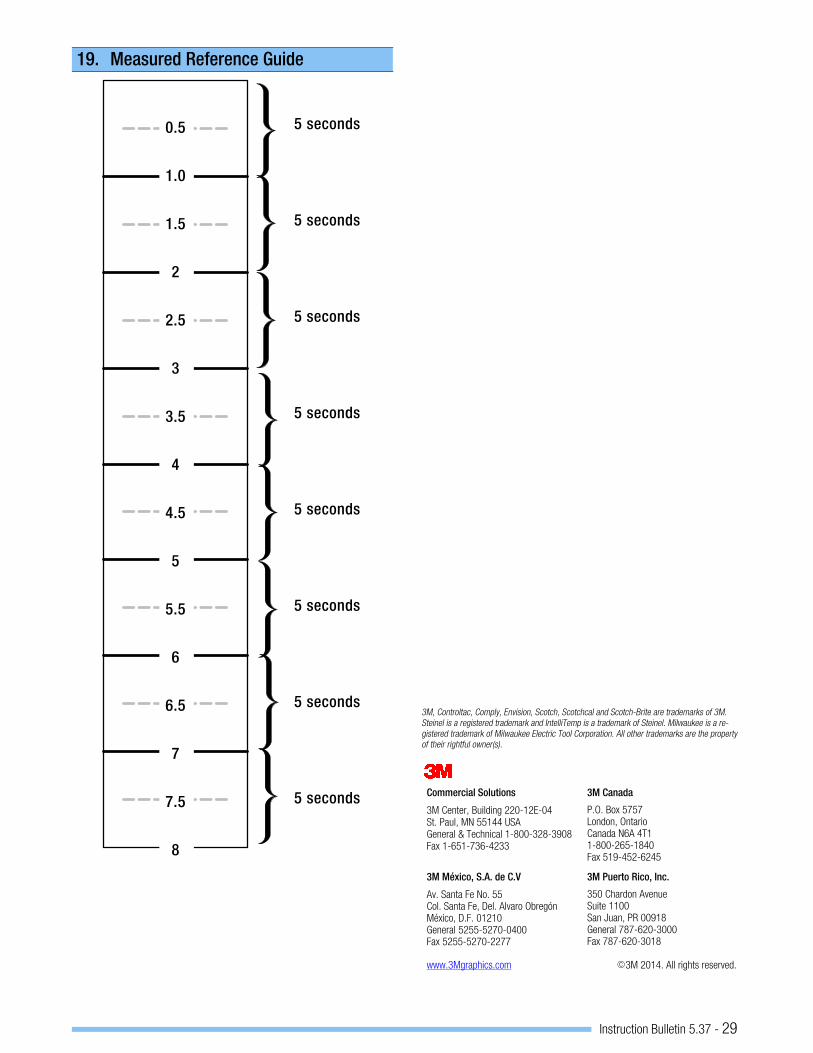
Instruction Bulletin 5.37 - 29
19. Measured Reference Guide
0.5
1.0
1.5
2
2.5
3
3.5
4
4.5
5
5.5
6
6.5
7
7.5
8
5 seconds
5 seconds
5 seconds
5 seconds
5 seconds
5 seconds
5 seconds
5 seconds
3M, Controltac, Comply, Envision, Scotch, Scotchcal and Scotch-Brite are trademarks of 3M.
Steinel is a registered trademark and IntelliTemp is a trademark of Steinel. Milwaukee is a re
gistered trademark of Milwaukee Electric Tool Corporation. All other trademarks are the property
of their rightful owner(s).
Commercial Solutions
3M Center, Building 220-12E-04St. Paul, MN 55144 USAGeneral & Technical 1-800-328-3908Fax 1-651-736-4233
3M Canada
P.O. Box 5757London, OntarioCanada N6A 4T11-800-265-1840Fax 519-452-6245
3M México, S.A. de C.V
Av. Santa Fe No. 55Col. Santa Fe, Del. Alvaro ObregónMéxico, D.F. 01210General 5255-5270-0400Fax 5255-5270-2277
3M Puerto Rico, Inc.
350 Chardon AvenueSuite 1100San Juan, PR 00918General 787-620-3000Fax 787-620-3018
www.3Mgraphics.com �3M 2014. All rights reserved.


![Power supplies and UPS [PDF, 5.37 MB]](https://cdn.vdocuments.site/doc/165x107/58677f3a1a28ab7d408bc5a9/power-supplies-and-ups-pdf-537-mb.jpg)