Download - Pick by Cart - SAP

How-To Guide SAPS/4HANA Document Version: 1.0 – 2017-11-06
PUBLIC
Pick by Cart

2
PUBLIC
© 2013 SAP AG or an SAP affiliate company. All rights reserved.
Pick by Cart
Business Scenario
Document History
Version Date Change
1.0 2017-11-06 First official release of this guide
Pick by Cart
Business Scenario
PUBLIC
© 2013 SAP AG or an SAP affiliate company. All rights reserved. 3
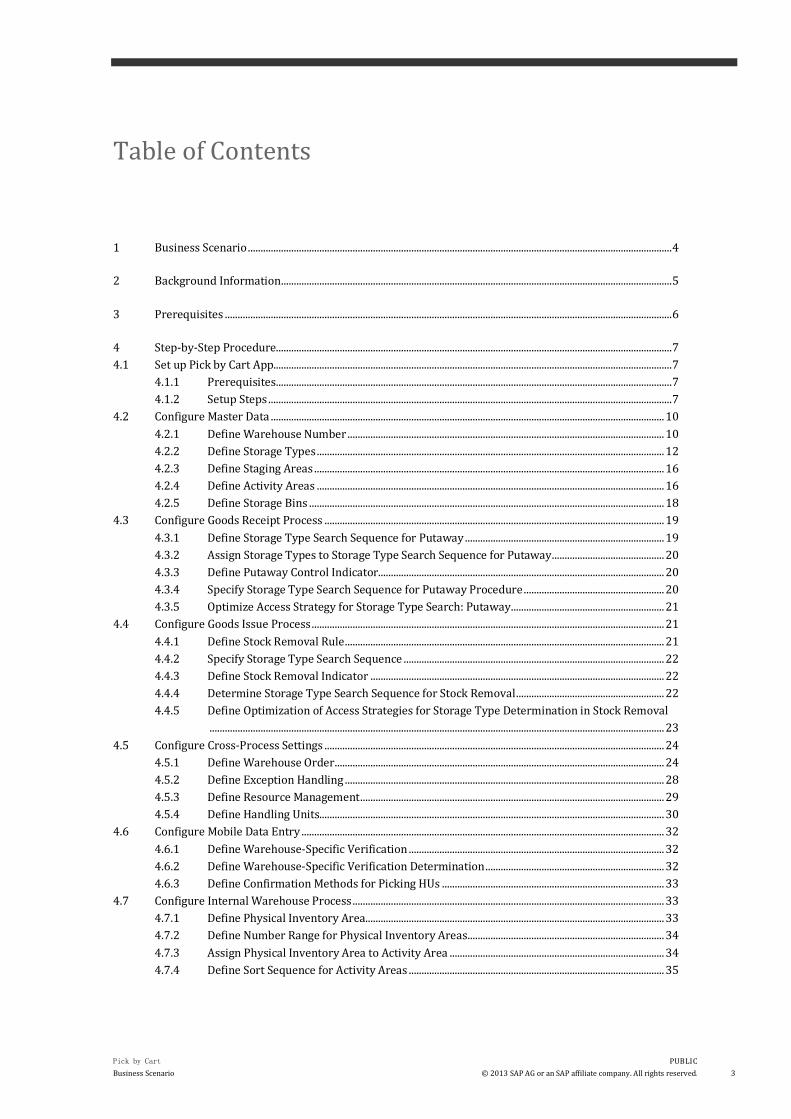
Table of Contents
1 Business Scenario ...................................................................................................................................................................... 4
2 Background Information ......................................................................................................................................................... 5
3 Prerequisites ............................................................................................................................................................................... 6
4 Step-by-Step Procedure........................................................................................................................................................... 7 4.1 Set up Pick by Cart App............................................................................................................................................................ 7
4.1.1 Prerequisites ........................................................................................................................................................... 7 4.1.2 Setup Steps .............................................................................................................................................................. 7
4.2 Configure Master Data .......................................................................................................................................................... 10 4.2.1 Define Warehouse Number ............................................................................................................................ 10 4.2.2 Define Storage Types ........................................................................................................................................ 12 4.2.3 Define Staging Areas ......................................................................................................................................... 16 4.2.4 Define Activity Areas ........................................................................................................................................ 16 4.2.5 Define Storage Bins ........................................................................................................................................... 18
4.3 Configure Goods Receipt Process ..................................................................................................................................... 19 4.3.1 Define Storage Type Search Sequence for Putaway .............................................................................. 19 4.3.2 Assign Storage Types to Storage Type Search Sequence for Putaway ............................................ 20 4.3.3 Define Putaway Control Indicator................................................................................................................ 20 4.3.4 Specify Storage Type Search Sequence for Putaway Procedure ....................................................... 20 4.3.5 Optimize Access Strategy for Storage Type Search: Putaway ............................................................ 21
4.4 Configure Goods Issue Process .......................................................................................................................................... 21 4.4.1 Define Stock Removal Rule ............................................................................................................................. 21 4.4.2 Specify Storage Type Search Sequence ...................................................................................................... 22 4.4.3 Define Stock Removal Indicator ................................................................................................................... 22 4.4.4 Determine Storage Type Search Sequence for Stock Removal .......................................................... 22 4.4.5 Define Optimization of Access Strategies for Storage Type Determination in Stock Removal
.................................................................................................................................................................................. 23 4.5 Configure Cross-Process Settings ..................................................................................................................................... 24
4.5.1 Define Warehouse Order ................................................................................................................................. 24 4.5.2 Define Exception Handling ............................................................................................................................. 28 4.5.3 Define Resource Management ....................................................................................................................... 29 4.5.4 Define Handling Units....................................................................................................................................... 30
4.6 Configure Mobile Data Entry .............................................................................................................................................. 32 4.6.1 Define Warehouse-Specific Verification .................................................................................................... 32 4.6.2 Define Warehouse-Specific Verification Determination ...................................................................... 32 4.6.3 Define Confirmation Methods for Picking HUs ....................................................................................... 33
4.7 Configure Internal Warehouse Process .......................................................................................................................... 33 4.7.1 Define Physical Inventory Area..................................................................................................................... 33 4.7.2 Define Number Range for Physical Inventory Areas ............................................................................. 34 4.7.3 Assign Physical Inventory Area to Activity Area .................................................................................... 34 4.7.4 Define Sort Sequence for Activity Areas .................................................................................................... 35

4
PUBLIC
© 2013 SAP AG or an SAP affiliate company. All rights reserved.
Pick by Cart
Business Scenario
1 Business Scenario
You want to pick multiple orders with a pick cart in a single trip through the warehouse. This app helps to improve customer satisfaction in the
following ways:
• Improves picking efficiency
• Reduces human errors
• Reduces the cost of warehouse operations

Pick by Cart
Background Information
PUBLIC
© 2013 SAP AG or an SAP affiliate company. All rights reserved. 5
2 Background Information
Pick by Cart app is typical transactional Fiori app, which integrates with EWM 9.5 system. This app is ported in UI5 1.38 and Fiori environment
support. In the backend logic, this app depends on picking scenario of EWM
Warehouse Order Processing, especially EWM RF framework. To fully configure this app, it requires master
knowledge of EWM picking and RF related configuration and customization experiences.
This document covers the basic configuration and master data setting up for Pick by Cart application.
The configuration data is taking QEX/101 for example.

6
PUBLIC
© 2013 SAP AG or an SAP affiliate company. All rights reserved.
Pick by Cart
Prerequisites
3 Prerequisites
Software
• UI exists in Software Component: UIEWM001, version 100, SP04
• Backend logic exists in Software Component: SCMEWM, version 950, SP0
Hardware
• Refer to EWM 9.5 hardware requirement
Relevant SAP Notes
SAP Note: Enhancement and Corrections of Pick by Cart app in EWM 9.5in SAP Note 2512300.
SAP pre-delivered content, e.g. exception codes and internal process codes are imported.
You have used the warehouse operative role in Pick by Cart app by performing the following settings:
• Open transaction “PFCG” in Fiori frontend server, copy SAP_EWM_BCR_WOP_T PFCG role to a temporary role for example,
Z_SAP_EWM_BCR_WOP_T.
• Open transaction “SU01” in Fiori frontend server, assign Z_SAP_EWM_BCR_WOP_T temporary role to your user.
• Open SAP Fiori Launchpad, add Pick by Cart tile to your home page.
For more information, see the Pick by Cart application help on SAP Help Portal.
Pick by Cart
Step-by-Step Procedure
PUBLIC
© 2013 SAP AG or an SAP affiliate company. All rights reserved. 7
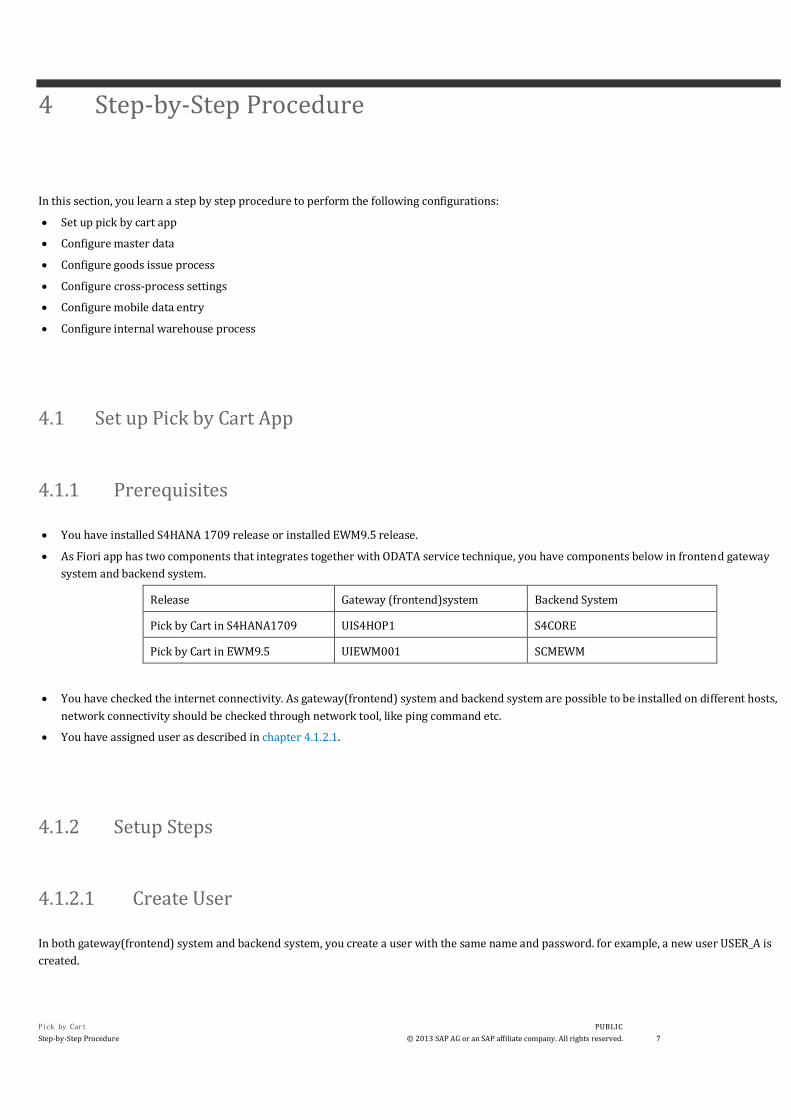
4 Step-by-Step Procedure
In this section, you learn a step by step procedure to perform the following configurations:
• Set up pick by cart app
• Configure master data
• Configure goods issue process
• Configure cross-process settings
• Configure mobile data entry
• Configure internal warehouse process
4.1 Set up Pick by Cart App
4.1.1 Prerequisites
• You have installed S4HANA 1709 release or installed EWM9.5 release.
• As Fiori app has two components that integrates together with ODATA service technique, you have components below in frontend gateway
system and backend system.
Release Gateway (frontend)system Backend System
Pick by Cart in S4HANA1709 UIS4HOP1 S4CORE
Pick by Cart in EWM9.5 UIEWM001 SCMEWM
• You have checked the internet connectivity. As gateway(frontend) system and backend system are possible to be installed on different hosts,
network connectivity should be checked through network tool, like ping command etc.
• You have assigned user as described in chapter 4.1.2.1.
4.1.2 Setup Steps
4.1.2.1 Create User
In both gateway(frontend) system and backend system, you create a user with the same name and password. for example, a new user USER_A is
created.

8
PUBLIC
© 2013 SAP AG or an SAP affiliate company. All rights reserved.
Pick by Cart
Step-by-Step Procedure
4.1.2.2 Assign Business Role
In gateway (frontend) system, assign business role to USER_A by using transaction code SU01 or PFCG. In different installations, the business
role is different due to delivery. Please check below business roles.
Business Role
Pick by Cart in S4HANA1709 SAP_BR_WAREHOUSE_OPERATIVE_EWM
Pick by Cart in EWM9.5 SAP_EWM_BCR_WOP_T
4.1.2.3 Activate OData Service
In gateway (frontend) system, UI code should be able to access OData service. The OData service is maintained through transaction code / iwfnd
/ maint_service. Here is document for reference. In the “System Alias” field, choose the correct backend trusted ABAP RFC. In the “Technical
Service Name” field, choose “PICKCART_SRV” in backend system.
4.1.2.4 Configure Pick Cart Layout Type
Before starting using pick by cart app, you need to define pick cart layout type. Pick cart have different layouts, such as 3 (levels) * 3 (stacks) or 5
(levels) * 5(stacks) layout in Customizing for Extended Warehouse Management under Cross-Process Settings → Resource Management
→Define Layout Types.
To use layout type, you assign layout type to resource type in Customizing for Extended Warehouse Management under Cross-Process Settings
→ Resource Management → Define Layout Types.

Pick by Cart
Step-by-Step Procedure
PUBLIC
© 2013 SAP AG or an SAP affiliate company. All rights reserved. 9
4.1.2.5 Configure User Default Warehouse Number and Resource
Before using this app, you assign a user USER_A to default warehouse number and resource in backend system. To assign default warehouse
number:
• Option 1: Set user default parameters (by entering transaction code “SU01” and edit “Parameters” tab) about warehouse number. The
default parameter ID is " / SCWM / LGN" and the parameter value is the warehouse number that is assigned to picker. This value will be
managed at the user’s default parameters in Fiori Launchpad. Below are screenshots.
User Default Parameter Setting of / SCWM / LGN
• Option 2: Maintain User under “Resource Management”. As Pick by Cart app depends on RF technique, which provides a central place to
manage user settings, which includes User/ Resource. EWM administrator should maintain each entry for each user, which indicates the
user and its default resource (pick cart) to start picking. Warehouse number is optional to maintained in / SCWM /USER. Application will
take warehouse number from / SCWM /LGN if warehouse is not maintained.
To assign default resource, maintain the user under “Resource Management ->Maintain Users”. Please ensure that assigned resource have been
configured as one type pick cart.
4.1.2.6 Post Validation
OData Service validation
Use button “SAP Gateway Client” or “Call Browser” in transaction code / iwfnd / maint_service to validate OData service. If OData service is set
up successfully, basic metadata should be fetched by calling:
http:// <host>:<port> / sap / opu / odata / SCWM / PICKCART_SRV / $metadata
Launchpad validation
Run transaction code / UI2 / FLP, a default browser should be opened. You need to input your credential to access Fiori Launchpad.
10
PUBLIC
© 2013 SAP AG or an SAP affiliate company. All rights reserved.
Pick by Cart
Step-by-Step Procedure
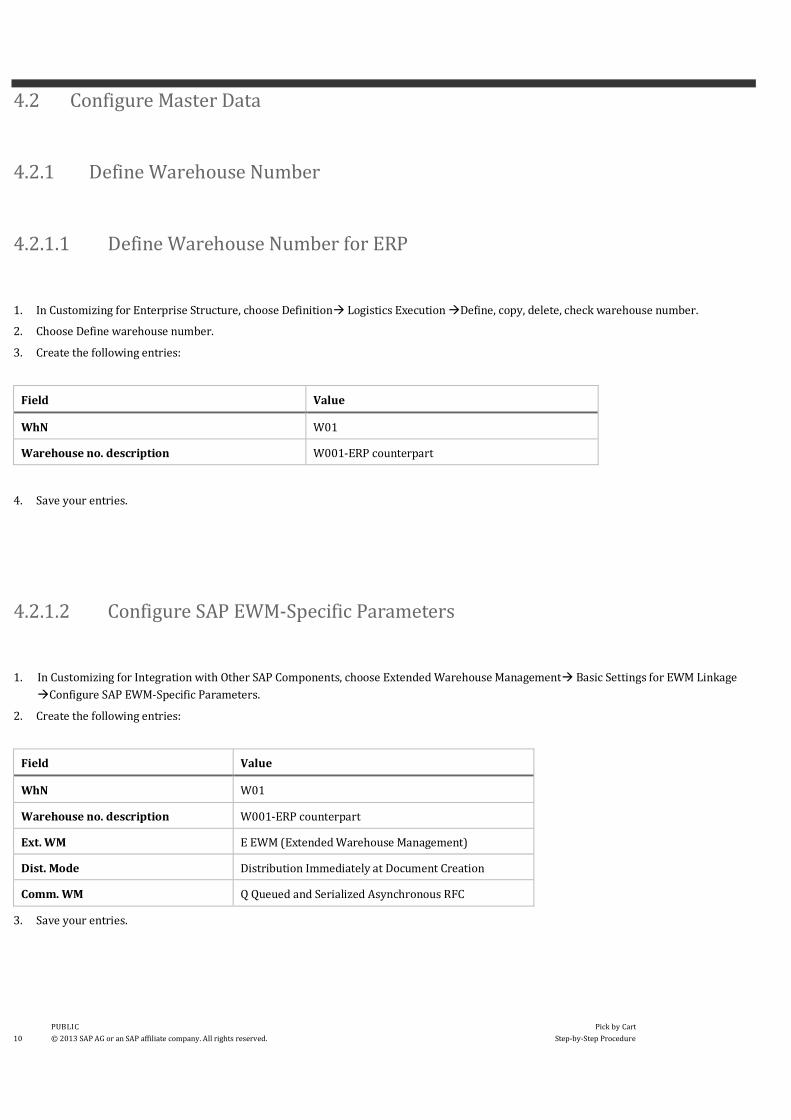
4.2 Configure Master Data
4.2.1 Define Warehouse Number
4.2.1.1 Define Warehouse Number for ERP
1. In Customizing for Enterprise Structure, choose Definition→ Logistics Execution →Define, copy, delete, check warehouse number.
2. Choose Define warehouse number.
3. Create the following entries:
Field Value
WhN W01
Warehouse no. description W001-ERP counterpart
4. Save your entries.
4.2.1.2 Configure SAP EWM-Specific Parameters
1. In Customizing for Integration with Other SAP Components, choose Extended Warehouse Management→ Basic Settings for EWM Linkage
→Configure SAP EWM-Specific Parameters.
2. Create the following entries:
Field Value
WhN W01
Warehouse no. description W001-ERP counterpart
Ext. WM E EWM (Extended Warehouse Management)
Dist. Mode Distribution Immediately at Document Creation
Comm. WM Q Queued and Serialized Asynchronous RFC
3. Save your entries.
Pick by Cart
Step-by-Step Procedure
PUBLIC
© 2013 SAP AG or an SAP affiliate company. All rights reserved. 11
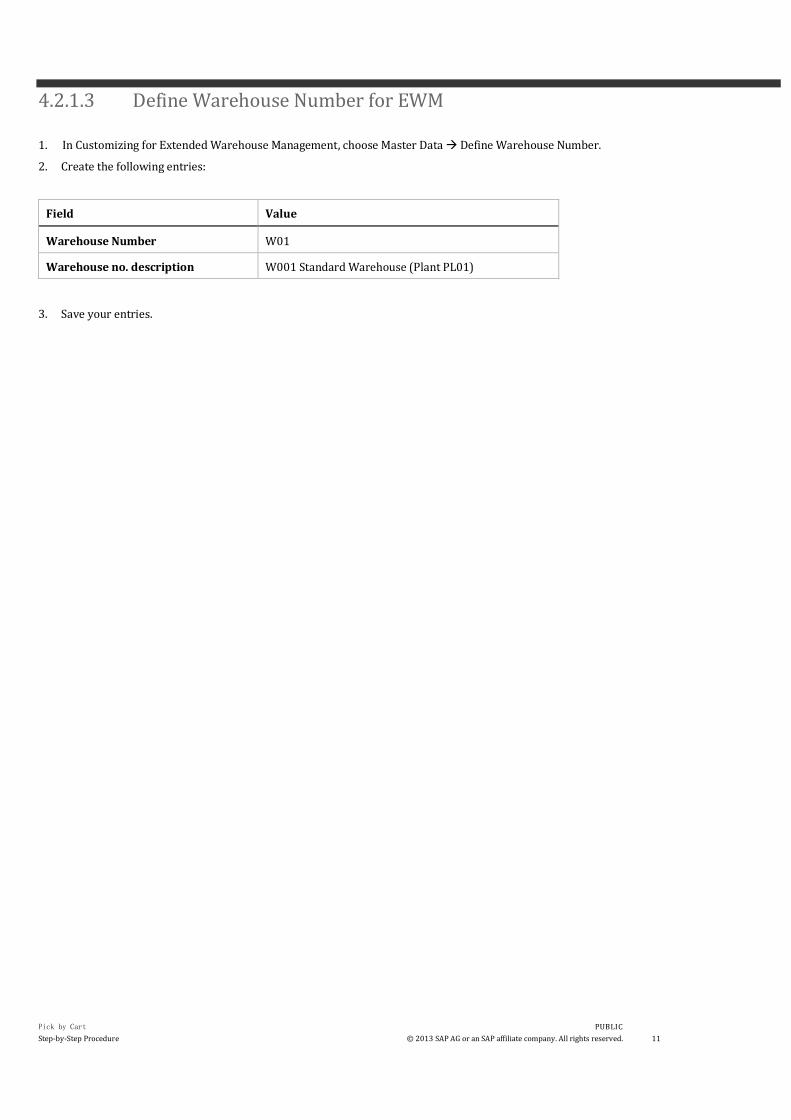
4.2.1.3 Define Warehouse Number for EWM
1. In Customizing for Extended Warehouse Management, choose Master Data → Define Warehouse Number.
2. Create the following entries:
Field Value
Warehouse Number W01
Warehouse no. description W001 Standard Warehouse (Plant PL01)
3. Save your entries.
12
PUBLIC
© 2013 SAP AG or an SAP affiliate company. All rights reserved.
Pick by Cart
Step-by-Step Procedure
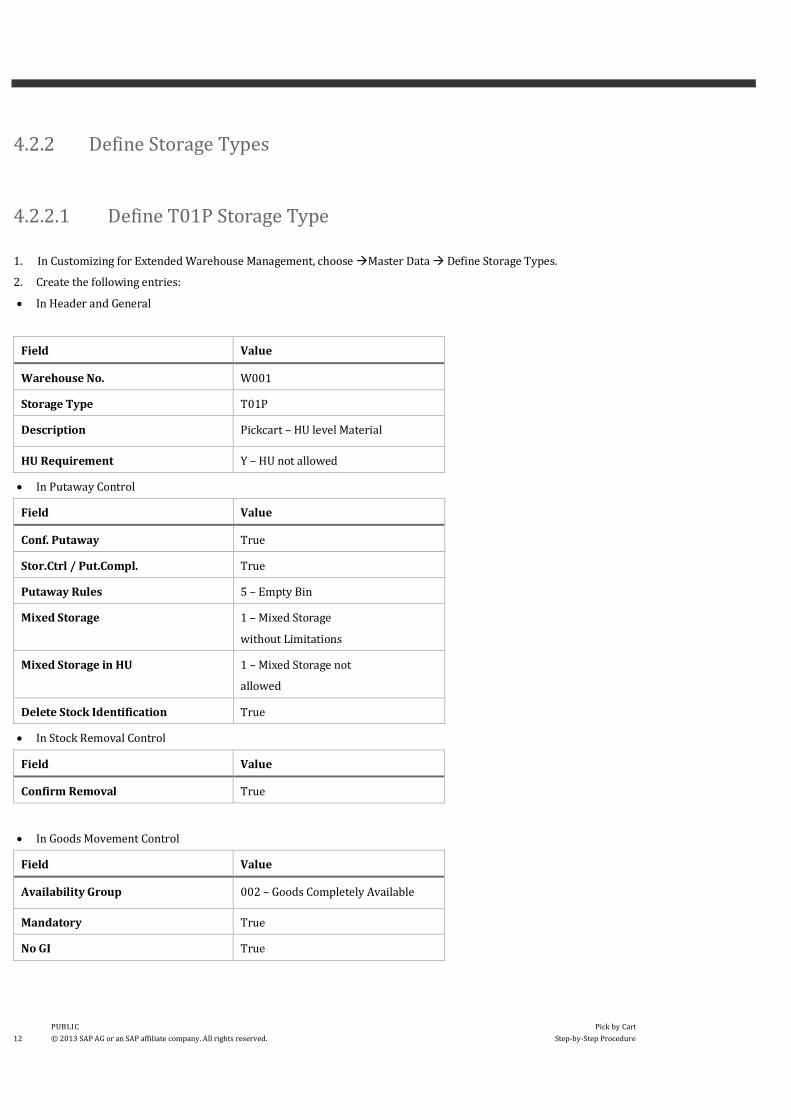
4.2.2 Define Storage Types
4.2.2.1 Define T01P Storage Type
1. In Customizing for Extended Warehouse Management, choose →Master Data → Define Storage Types.
2. Create the following entries:
• In Header and General
Field Value
Warehouse No. W001
Storage Type T01P
Description Pickcart – HU level Material
HU Requirement Y – HU not allowed
• In Putaway Control
Field Value
Conf. Putaway True
Stor.Ctrl / Put.Compl. True
Putaway Rules 5 – Empty Bin
Mixed Storage 1 – Mixed Storage
without Limitations
Mixed Storage in HU 1 – Mixed Storage not
allowed
Delete Stock Identification True
• In Stock Removal Control
Field Value
Confirm Removal True
• In Goods Movement Control
Field Value
Availability Group 002 – Goods Completely Available
Mandatory True
No GI True
Pick by Cart
Step-by-Step Procedure
PUBLIC
© 2013 SAP AG or an SAP affiliate company. All rights reserved. 13
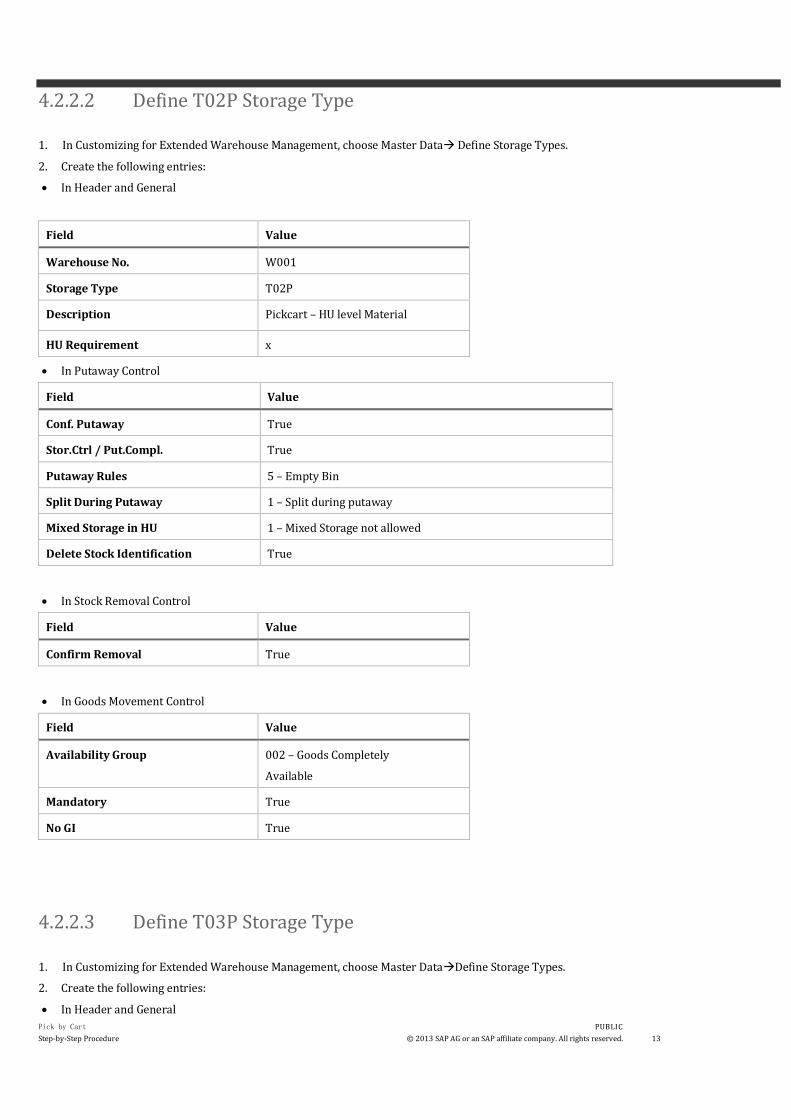
4.2.2.2 Define T02P Storage Type
1. In Customizing for Extended Warehouse Management, choose Master Data→ Define Storage Types.
2. Create the following entries:
• In Header and General
Field Value
Warehouse No. W001
Storage Type T02P
Description Pickcart – HU level Material
HU Requirement x
• In Putaway Control
Field Value
Conf. Putaway True
Stor.Ctrl / Put.Compl. True
Putaway Rules 5 – Empty Bin
Split During Putaway 1 – Split during putaway
Mixed Storage in HU 1 – Mixed Storage not allowed
Delete Stock Identification True
• In Stock Removal Control
Field Value
Confirm Removal True
• In Goods Movement Control
Field Value
Availability Group 002 – Goods Completely
Available
Mandatory True
No GI True
4.2.2.3 Define T03P Storage Type
1. In Customizing for Extended Warehouse Management, choose Master Data→Define Storage Types.
2. Create the following entries:
• In Header and General
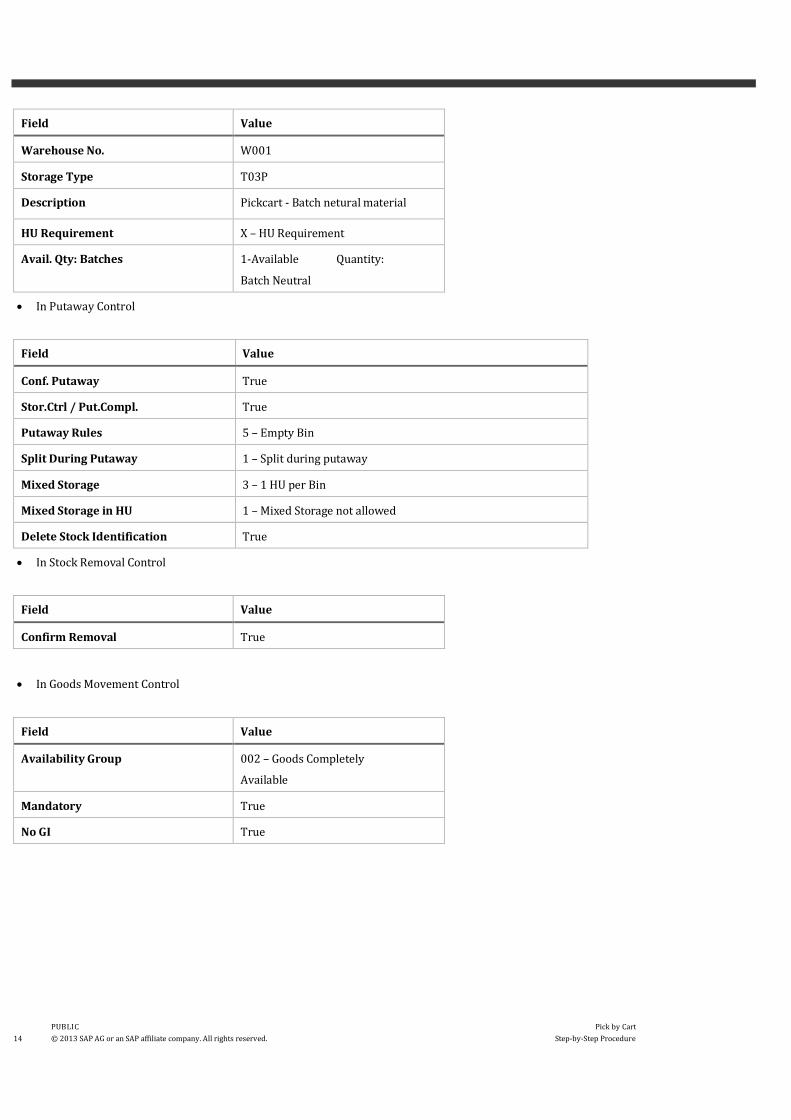
14
PUBLIC
© 2013 SAP AG or an SAP affiliate company. All rights reserved.
Pick by Cart
Step-by-Step Procedure
Field Value
Warehouse No. W001
Storage Type T03P
Description Pickcart - Batch netural material
HU Requirement X – HU Requirement
Avail. Qty: Batches 1-Available Quantity:
Batch Neutral
• In Putaway Control
Field Value
Conf. Putaway True
Stor.Ctrl / Put.Compl. True
Putaway Rules 5 – Empty Bin
Split During Putaway 1 – Split during putaway
Mixed Storage 3 – 1 HU per Bin
Mixed Storage in HU 1 – Mixed Storage not allowed
Delete Stock Identification True
• In Stock Removal Control
Field Value
Confirm Removal True
• In Goods Movement Control
Field Value
Availability Group 002 – Goods Completely
Available
Mandatory True
No GI True
Pick by Cart
Step-by-Step Procedure
PUBLIC
© 2013 SAP AG or an SAP affiliate company. All rights reserved. 15
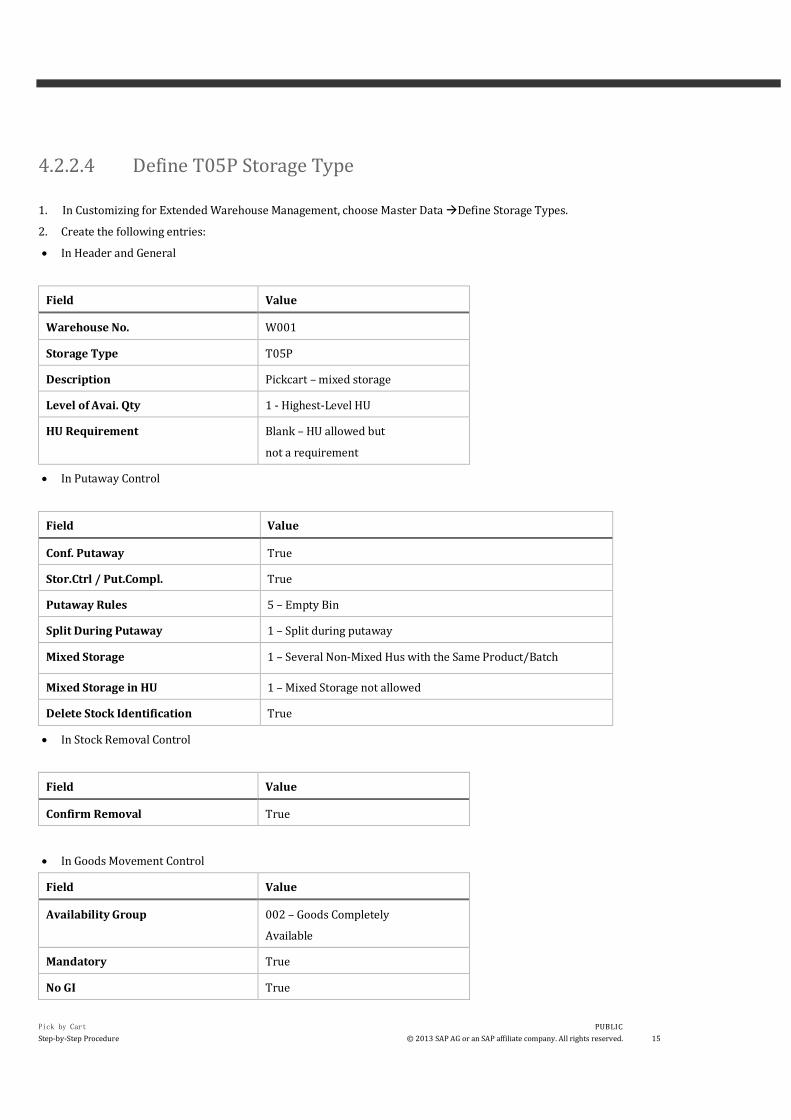
4.2.2.4 Define T05P Storage Type
1. In Customizing for Extended Warehouse Management, choose Master Data →Define Storage Types.
2. Create the following entries:
• In Header and General
Field Value
Warehouse No. W001
Storage Type T05P
Description Pickcart – mixed storage
Level of Avai. Qty 1 - Highest-Level HU
HU Requirement Blank – HU allowed but
not a requirement
• In Putaway Control
Field Value
Conf. Putaway True
Stor.Ctrl / Put.Compl. True
Putaway Rules 5 – Empty Bin
Split During Putaway 1 – Split during putaway
Mixed Storage 1 – Several Non-Mixed Hus with the Same Product/Batch
Mixed Storage in HU 1 – Mixed Storage not allowed
Delete Stock Identification True
• In Stock Removal Control
Field Value
Confirm Removal True
• In Goods Movement Control
Field Value
Availability Group 002 – Goods Completely
Available
Mandatory True
No GI True

16
PUBLIC
© 2013 SAP AG or an SAP affiliate company. All rights reserved.
Pick by Cart
Step-by-Step Procedure
4.2.3 Define Staging Areas
1. In Customizing for Extended Warehouse Management, choose Master Data →Staging Areas→Define Staging Areas.
2. Save your entries.
4.2.4 Define Activity Areas
4.2.4.1 Define Activity
1. In Customizing for Extended Warehouse Management, for choose → Master Data→Activity Areas → Activities → Define Activities.
2. Enter the following data:
Field Value
Warehouse Number W001
Activity PICK
Description Stock Removal
Process Category 2 - Stock Removal
3. Save your entries.
4.2.4.2 Define Activity Areas
1. In Customizing for Extended Warehouse Management, choose Extended Warehouse Management→Master Data→Activity Areas→Define
Activity Areas.
2. Enter the following data:
Field Value
Warehouse Number W001
Activity Area APIC
Description For pick cart APP
3. Save your entries.

Pick by Cart
Step-by-Step Procedure
PUBLIC
© 2013 SAP AG or an SAP affiliate company. All rights reserved. 17
4.2.4.3 Assign Storage Bins to Activity Areas
1. In Customizing for Extended Warehouse Management, choose Master Data →Activity Areas →Assign Storage Bins to Activity Areas.
2. Enter the following data:
Field Value Value Value Value
Warehouse Number W001 W001 W001 W001
Activity Area APIC APIC APIC APIC
Storage Type T01P T02P T03P T05P
3. Save your entries.
4.2.4.4 Define Sort Sequence for Activity Areas
1. In Customizing for Extended Warehouse Management, choose Master Data →Activity Areas → Define Sort Sequence for Activity Areas.
2. Enter the following data:
Field Value Value Value Value
Warehouse Number W001 W001 W001 W001
Activity Area APIC APIC APIC APIC
Activity PICK PICK PICK PICK
Storage Type T01P T02P T03P T05P
Sort Sequence 3 3 3 3
3. Save your entries.
18
PUBLIC
© 2013 SAP AG or an SAP affiliate company. All rights reserved.
Pick by Cart
Step-by-Step Procedure
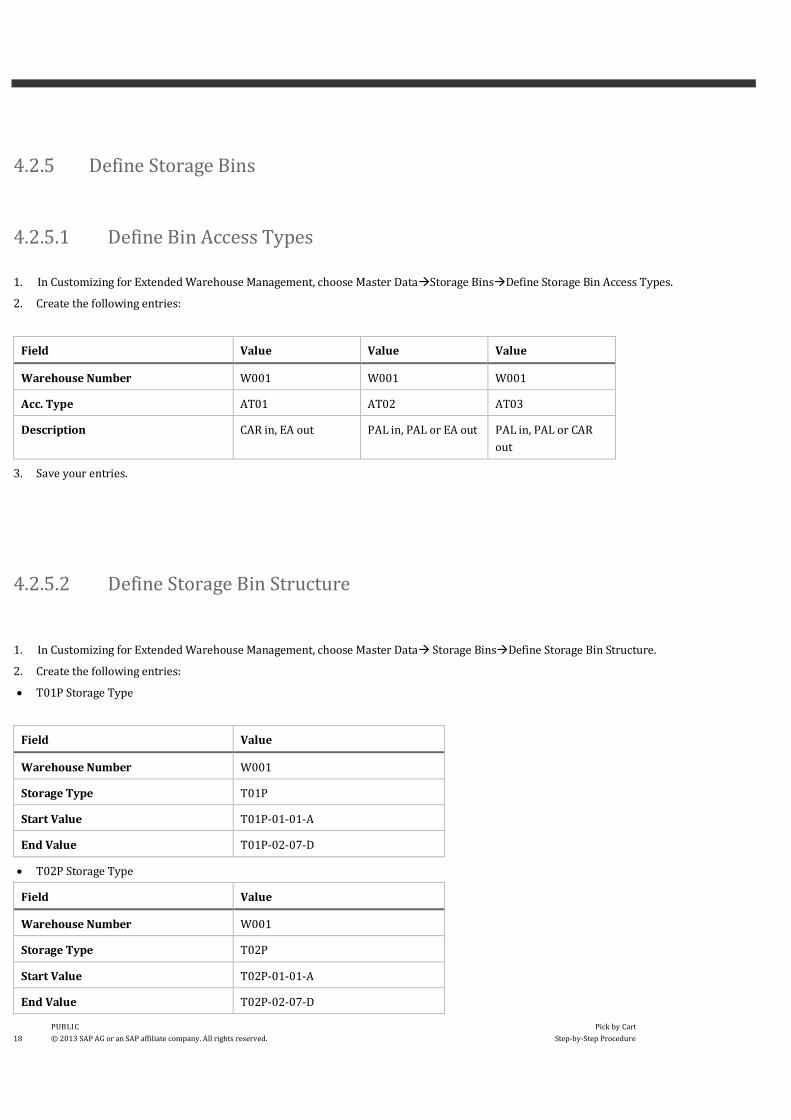
4.2.5 Define Storage Bins
4.2.5.1 Define Bin Access Types
1. In Customizing for Extended Warehouse Management, choose Master Data→Storage Bins→Define Storage Bin Access Types.
2. Create the following entries:
Field Value Value Value
Warehouse Number W001 W001 W001
Acc. Type AT01 AT02 AT03
Description CAR in, EA out PAL in, PAL or EA out PAL in, PAL or CAR
out
3. Save your entries.
4.2.5.2 Define Storage Bin Structure
1. In Customizing for Extended Warehouse Management, choose Master Data→ Storage Bins→Define Storage Bin Structure.
2. Create the following entries:
• T01P Storage Type
Field Value
Warehouse Number W001
Storage Type T01P
Start Value T01P-01-01-A
End Value T01P-02-07-D
• T02P Storage Type
Field Value
Warehouse Number W001
Storage Type T02P
Start Value T02P-01-01-A
End Value T02P-02-07-D

Pick by Cart
Step-by-Step Procedure
PUBLIC
© 2013 SAP AG or an SAP affiliate company. All rights reserved. 19
• T03P Storage Type
Field Value
Warehouse Number W001
Storage Type T03P
Start Value T03P-01-01-A
End Value T03P-02-07-D
• T05P Storage Type
Field Value
Warehouse Number W001
Storage Type T05P
Start Value T05P-01-01-A
End Value T05P-02-07-D
3. Save your entries.
4.3 Configure Goods Receipt Process
4.3.1 Define Storage Type Search Sequence for Putaway
1. In Customizing for Extended Warehouse Management, choose Goods Receipt Process→ Strategies→ Storage Type Search→ Define Storage
Type Search Sequence for Putaway.
2. Create the following entries:
Field Value Value Value Value
Warehouse Number W001 W001 W001 W001
Storage Type
Search
Sequence
S01P S02P S03P S05P
Description Putaway in Storage Type
T01P
Putaway in Storage Type
T02P
Putaway in Storage
Type
T03P
Putaway in Storage
Type
T05P
3. Save your entries.

20
PUBLIC
© 2013 SAP AG or an SAP affiliate company. All rights reserved.
Pick by Cart
Step-by-Step Procedure
4.3.2 Assign Storage Types to Storage Type Search Sequence for Putaway
1. In Customizing for Extended Warehouse Management, choose Goods Receipt Process → Strategies→ Storage Type Search → Assign Storage
Types to Storage Type Search Sequence for Putaway.
2. Create the following entries:
Field Value Value Value Value
Warehouse Number W001 W001 W001 W001
Storage Type Search
Sequence
S01P S02P S03P S05P
Storage Type T01P T02P T03P T05P
3. Save your entries
4.3.3 Define Putaway Control Indicator
1. In Customizing for Extended Warehouse Management, choose Goods Receipt Process → Strategies → Storage Type Search → Define
Putaway Control Indicator.
2. Create the following entries:
Field Value Value Value Value
Warehouse Number W001 W001 W001 W001
Putaway Control
Indicator
PA1P PA2P PA3P PA5P
3. Save your entries.
4.3.4 Specify Storage Type Search Sequence for Putaway Procedure
1. In Customizing for Extended Warehouse Management, choose Goods Receipt Process →Strategies →Storage Type Search → Specify Storage
Type Search Sequence for Putaway.
2. Create the following entries:
Field Value Value Value Value
Warehouse Number W001 W001 W001 W001
Putaway Control
Indicator
PA1P PA2P PA3P PA5P
Process Type P110 P110 P110 P110
Search Sequence S01P S02P S03P S05P

Pick by Cart
Step-by-Step Procedure
PUBLIC
© 2013 SAP AG or an SAP affiliate company. All rights reserved. 21
Putaway Rules No Putaway
Rule
No Putaway
Rule
No Putaway
Rule
No Putaway
Rule
3. Save your entries.
4.3.5 Optimize Access Strategy for Storage Type Search: Putaway
1. In Customizing for Extended Warehouse Management, choose Goods Receipt Process→Strategies →Storage Type Search→ Optimize Access
Strategy for Storage Type Search: Putaway.
2. Create the following entries:
Field Value Value Value
Warehouse Number W001 W001 W001
Seq No. 0 1 2
Take Putaway strategy
into account
True True False
Consider Warehouse
Process Type
True False True
3. Save your entries
4.4 Configure Goods Issue Process
4.4.1 Define Stock Removal Rule
1. In Customizing for Extended Warehouse Management, choose Goods Issue Process→ Strategies→ Define Stock Removal Rule.
2. Create the following entries:
Field Value
Warehouse Number W001
Storage Type Search Sequence FIFO
Description First In First Out
3. Select Stock Removal Rule and create the following entries:
Field Value
Sequence Number W001
Sort Field WDATU
22
PUBLIC
© 2013 SAP AG or an SAP affiliate company. All rights reserved.
Pick by Cart
Step-by-Step Procedure
Descending False
4. Save your entries
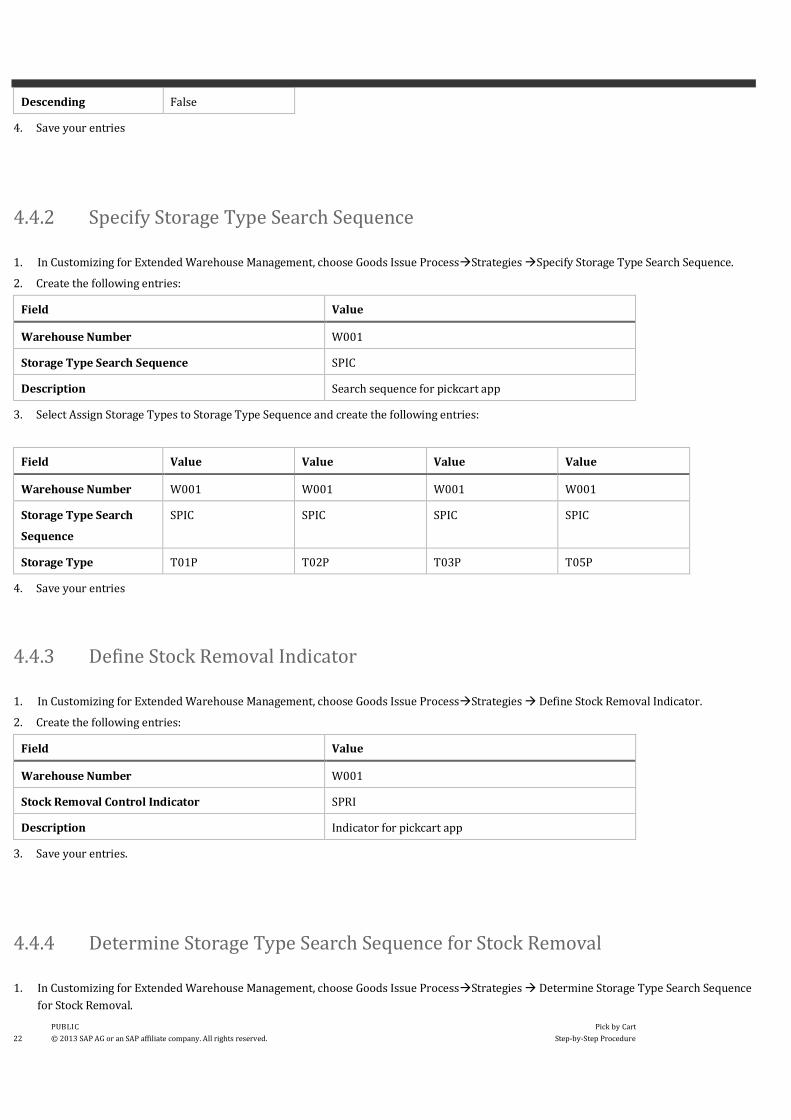
4.4.2 Specify Storage Type Search Sequence
1. In Customizing for Extended Warehouse Management, choose Goods Issue Process→Strategies →Specify Storage Type Search Sequence.
2. Create the following entries:
Field Value
Warehouse Number W001
Storage Type Search Sequence SPIC
Description Search sequence for pickcart app
3. Select Assign Storage Types to Storage Type Sequence and create the following entries:
Field Value Value Value Value
Warehouse Number W001 W001 W001 W001
Storage Type Search
Sequence
SPIC SPIC SPIC SPIC
Storage Type T01P T02P T03P T05P
4. Save your entries
4.4.3 Define Stock Removal Indicator
1. In Customizing for Extended Warehouse Management, choose Goods Issue Process→Strategies → Define Stock Removal Indicator.
2. Create the following entries:
Field Value
Warehouse Number W001
Stock Removal Control Indicator SPRI
Description Indicator for pickcart app
3. Save your entries.
4.4.4 Determine Storage Type Search Sequence for Stock Removal
1. In Customizing for Extended Warehouse Management, choose Goods Issue Process→Strategies → Determine Storage Type Search Sequence
for Stock Removal.

Pick by Cart
Step-by-Step Procedure
PUBLIC
© 2013 SAP AG or an SAP affiliate company. All rights reserved. 23
2. Create the following entries:
Field Value
Warehouse Number W001
Stock Removal Control Indicator SPRI
Warehouse Process Type PP01
Storage Type Search Sequence SPIC
Stock Removal Rule FIFO
3. Save your entries.
4.4.5 Define Optimization of Access Strategies for Storage Type Determination in Stock Removal
1. In Customizing for Extended Warehouse Management, choose Goods Issue Process→Strategies → Optimization of Access Strategies for
Storage Type Determination in Stock Removal.
2. Create the following entries:
Field Value
Warehouse Number W001
Consideration of Stock Removal Control Indicator True
Take Warehouse Process Type into Account True
3. Save your entries.
24
PUBLIC
© 2013 SAP AG or an SAP affiliate company. All rights reserved.
Pick by Cart
Step-by-Step Procedure
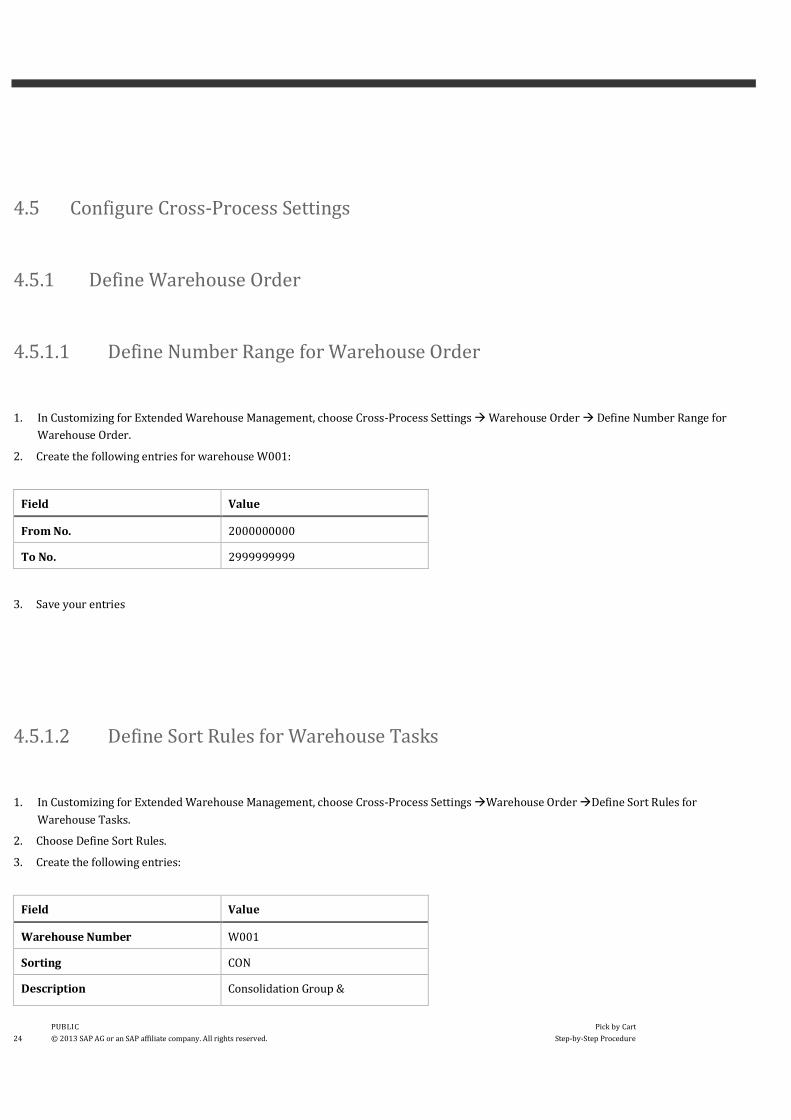
4.5 Configure Cross-Process Settings
4.5.1 Define Warehouse Order
4.5.1.1 Define Number Range for Warehouse Order
1. In Customizing for Extended Warehouse Management, choose Cross-Process Settings → Warehouse Order → Define Number Range for
Warehouse Order.
2. Create the following entries for warehouse W001:
Field Value
From No. 2000000000
To No. 2999999999
3. Save your entries
4.5.1.2 Define Sort Rules for Warehouse Tasks
1. In Customizing for Extended Warehouse Management, choose Cross-Process Settings →Warehouse Order →Define Sort Rules for
Warehouse Tasks.
2. Choose Define Sort Rules.
3. Create the following entries:
Field Value
Warehouse Number W001
Sorting CON
Description Consolidation Group &

Pick by Cart
Step-by-Step Procedure
PUBLIC
© 2013 SAP AG or an SAP affiliate company. All rights reserved. 25
Pick Path
4. Choose Define Sort Fields.
5. Create following entries:
Field Value Value
Warehouse Number W001 W001
Sorting CON CON
Sequence 1 2
Sort Field DSTGRPD PATHSEQ
6. Save your entries
4.5.1.3 Define Filters for Warehouse Order Creation Rules
1. In Customizing for Extended Warehouse Management, choose Cross-Process Settings →Warehouse Order→ Define Filters for Warehouse
Order Creation Rules.
2. Create following entries:
Field Value
Warehouse
Number
W001
WOCRule Filter FP01
Description WHO filter pick cart APP
Filter Type Warehouse Task
Filter Type I – Filter at Item Level
Volume unit CD3
Weight unit KG
Time unit MIN
Whse Proc. Type PP01
Complete HU No Restrictions
No Putaway True
No Int. Stk Transfer True
No Phys. Inv. True

26
PUBLIC
© 2013 SAP AG or an SAP affiliate company. All rights reserved.
Pick by Cart
Step-by-Step Procedure
3. Save your entries
4.5.1.4 Define Limit Values for the size of a Warehouse Order
1. In Customizing for Extended Warehouse Management, choose Cross-Process Settings → Warehouse Order → Define Limit Values for the
size of a Warehouse Order.
2. Create following entries:
Field Value
Warehouse Number W001
Limit LP01
Description WHO limit for pick cart APP
Limit Val. Type Warehouse Task
Filter Type I – Filter at Item Level
Weight unit KG
Time unit MIN
Max. CGr per WO 25
Max CGrp per HU 1
Max No. of HUs 25
3. Save your entries.
4.5.1.5 Define Packing Profile for Warehouse Order Creation
1. In Customizing for Extended Warehouse Management, choose Cross-Process Settings →Warehouse Order →Define Packing Profile for
Warehouse Order Creation.
2. Create following entries:
Field Value
Warehouse Number W001
Limit PP01
Description Packing Profile for pick cart APP
Pack. Mode A – Simple Algorithm
Pick by Cart
Step-by-Step Procedure
PUBLIC
© 2013 SAP AG or an SAP affiliate company. All rights reserved. 27
Split WT A – WT Split when too large for an
HU
Create Hus False
Assn WTs to Hus True
3. Save your entries.
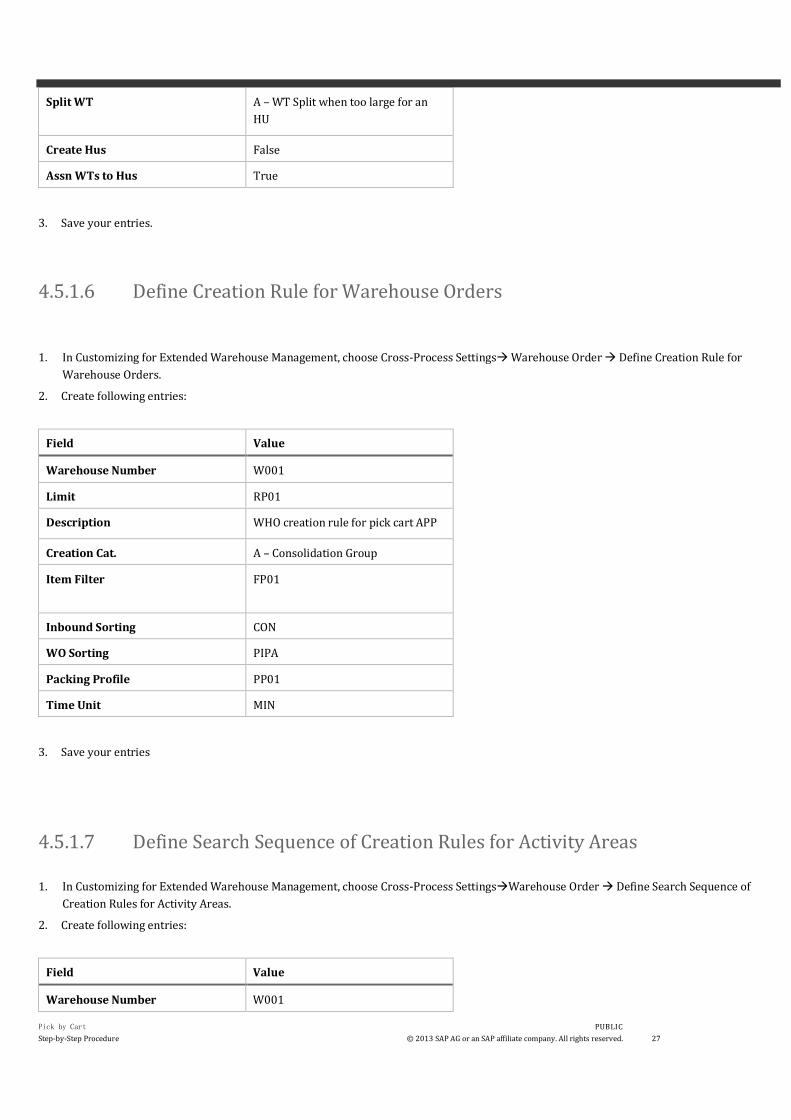
4.5.1.6 Define Creation Rule for Warehouse Orders
1. In Customizing for Extended Warehouse Management, choose Cross-Process Settings→ Warehouse Order → Define Creation Rule for
Warehouse Orders.
2. Create following entries:
Field Value
Warehouse Number W001
Limit RP01
Description WHO creation rule for pick cart APP
Creation Cat. A – Consolidation Group
Item Filter FP01
Inbound Sorting CON
WO Sorting PIPA
Packing Profile PP01
Time Unit MIN
3. Save your entries
4.5.1.7 Define Search Sequence of Creation Rules for Activity Areas
1. In Customizing for Extended Warehouse Management, choose Cross-Process Settings→Warehouse Order → Define Search Sequence of
Creation Rules for Activity Areas.
2. Create following entries:
Field Value
Warehouse Number W001
28
PUBLIC
© 2013 SAP AG or an SAP affiliate company. All rights reserved.
Pick by Cart
Step-by-Step Procedure
Activity Area APIC
Activity PICK
WOCR RP01
3. Save your entries
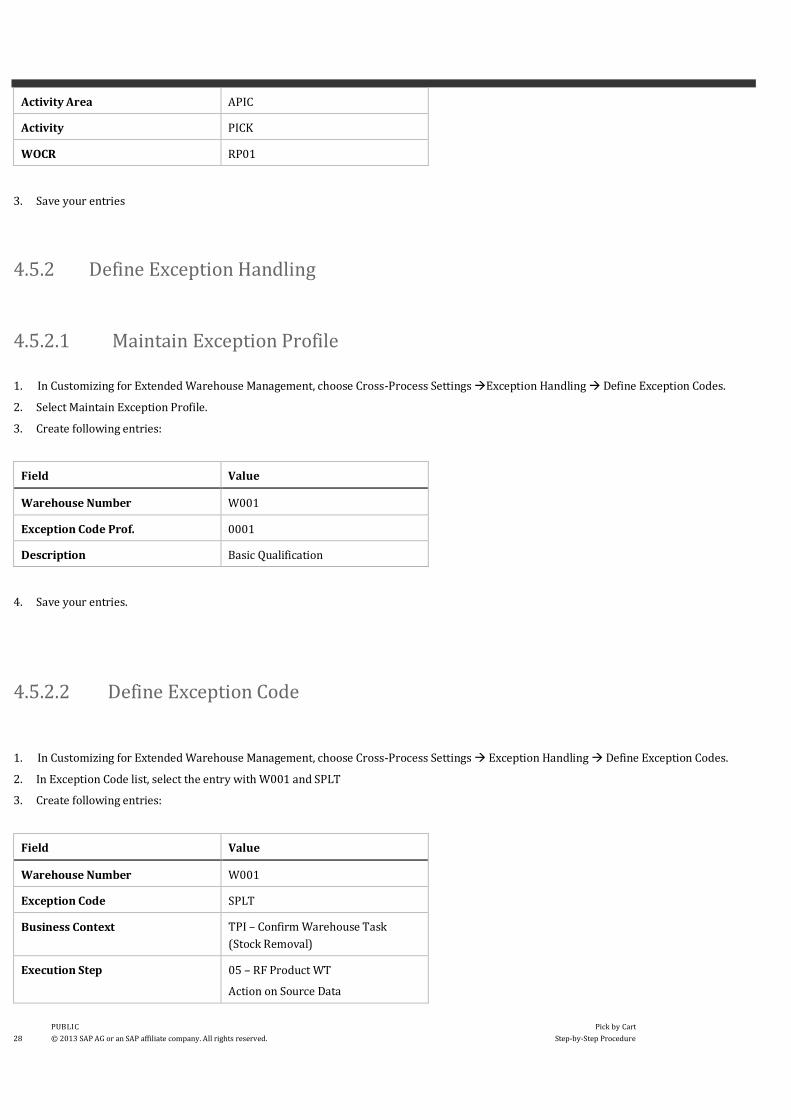
4.5.2 Define Exception Handling
4.5.2.1 Maintain Exception Profile
1. In Customizing for Extended Warehouse Management, choose Cross-Process Settings →Exception Handling → Define Exception Codes.
2. Select Maintain Exception Profile.
3. Create following entries:
Field Value
Warehouse Number W001
Exception Code Prof. 0001
Description Basic Qualification
4. Save your entries.
4.5.2.2 Define Exception Code
1. In Customizing for Extended Warehouse Management, choose Cross-Process Settings → Exception Handling → Define Exception Codes.
2. In Exception Code list, select the entry with W001 and SPLT
3. Create following entries:
Field Value
Warehouse Number W001
Exception Code SPLT
Business Context TPI – Confirm Warehouse Task
(Stock Removal)
Execution Step 05 – RF Product WT
Action on Source Data

Pick by Cart
Step-by-Step Procedure
PUBLIC
© 2013 SAP AG or an SAP affiliate company. All rights reserved. 29
Exception Code Profile 0001
4. Save your entries
4.5.3 Define Resource Management
4.5.3.1 Define Layout Types
1. In Customizing for Extended Warehouse Management, choose Cross-Process Settings→Resource Management → Define Layout Types.
2. Create following entries:
Field Value
Warehouse Number W001
Layout Type 01
Levels 5
Stacks 5
Description 5*5 layout type
3. Save your entries.
4.5.3.2 Define Resource Types
1. In Customizing for Extended Warehouse Management, choose Cross-Process Settings → Resource Management → Define Resource Types.
2. Create following entries:
Field Value
Warehouse Number W001
Rsrce Type RTPC
Layout Type 01
Description Pickcart (5*5)
3. Save your entries.

30
PUBLIC
© 2013 SAP AG or an SAP affiliate company. All rights reserved.
Pick by Cart
Step-by-Step Procedure
4.5.4 Define Handling Units
4.5.4.1 Define HU Types
1. In Customizing for Integration with Other SAP Components, choose Extended Warehouse Management →Attribute
Values for Additional Material Master Fields → Define Handling Unit Types.
2. Create following entries:
Field Value Value
HUTyp C1 C2
Description Carton Carton - Requiring 2 bin
depths
3. Save your entries.
4.5.4.2 Define HU Type Groups
1. In Customizing for Extended Warehouse Management, choose Cross-Process Settings →Handling Units →Basics
→Define HU Type.
2. Create following entries:
Field Value
Warehoue No. W001
HUTGr HG01
Description Boxes and Cartons
3. Save your entries.

Pick by Cart
Step-by-Step Procedure
PUBLIC
© 2013 SAP AG or an SAP affiliate company. All rights reserved. 31
4.5.4.3 Define HU Types for Each Warehouse Number and Assign HU Type Group
1. In Customizing Extended Warehouse Management, choose Cross-Process Settings→Handling Units →Basics→Define
HU Types for Each Warehouse Number and Assign HU Type Group.
2. Create following entries:
Value Value
Warehouse Number W001 W001
HU Type C1 C2
HU Type Group HG01 HG01
3. Save your entries.
4.5.4.4 Define Number Range for HU Identification
1. In Customizing for Extended Warehouse Management, choose Cross-Process Settings→ External Identification
→Define Number Range for HU Identification.
2. Create following entries:
Field Value
Warehouse Number W001
NummemKreisObjekt /SCWM/HUID
No 04
From No. AAAAAAAAAAAAAAAAAAAA
To Number ZZZZZZZZZZZZZZZZZZZZ
External Assignment True
3. Save your entries.

32
PUBLIC
© 2013 SAP AG or an SAP affiliate company. All rights reserved.
Pick by Cart
Step-by-Step Procedure
4.6 Configure Mobile Data Entry
4.6.1 Define Warehouse-Specific Verification
1. In Customizing for Extended Warehouse Management, choose Mobile Data Entry →Verification Control → Define
Warehouse-Specific Verification.
2. Create following entries:
Field Value
Warehouse Number W001
Verification Profile ZVP2
Description for Picking for pick
cart
3. Select Warehouse-Specific Verification Objects and create following entries
Field Value Value Value Value Value
Warehouse-Specific Verification
Objects
BATCH MATNR VLPLA VLENR NLPLA
4. Save your entries.
4.6.2 Define Warehouse-Specific Verification Determination
1. In Customizing for Extended Warehouse Management, choose Mobile Data Entry → Verification Control → Define
Warehouse-Specific Verification Determination.
2. Create following entries:
Field Value
Warehouse Number W001
Warehouse Process Type PP01
Activity PICK
Activity Area APIC
Verification Profile ZVP2

Pick by Cart
Step-by-Step Procedure
PUBLIC
© 2013 SAP AG or an SAP affiliate company. All rights reserved. 33
3. Save your entries.
4.6.3 Define Confirmation Methods for Picking HUs
1. In Customizing for Extended Warehouse Management, choose Mobile Data Entry → Verification Control → Define
Confirmation Methods for Picking HUs.
2. Select Determination of Conf. Methods for Pick HUs:
Field Value
Warehouse Number W001
WO Cr. Rle RP01
Warehouse Process Type PP01
Activity Area APIC
Rsrce Type RTPK
Source Storage Type T01P
Dest Storage Type T01P
Conf. Method A – Confirm Number of HUs at Last destination
Bin Only
3. Save your entries.
4.7 Configure Internal Warehouse Process
4.7.1 Define Physical Inventory Area
1. In Customizing for Extended Warehouse Management, choose Internal Warehouse Processes → Physical-Inventory-
Area-Specific Settings → Define Physical Inventory Area.
2. Create following entries:
Field Value
Physical Inventory Area W001_PIAC
PstgAfterCount True
LS Check True
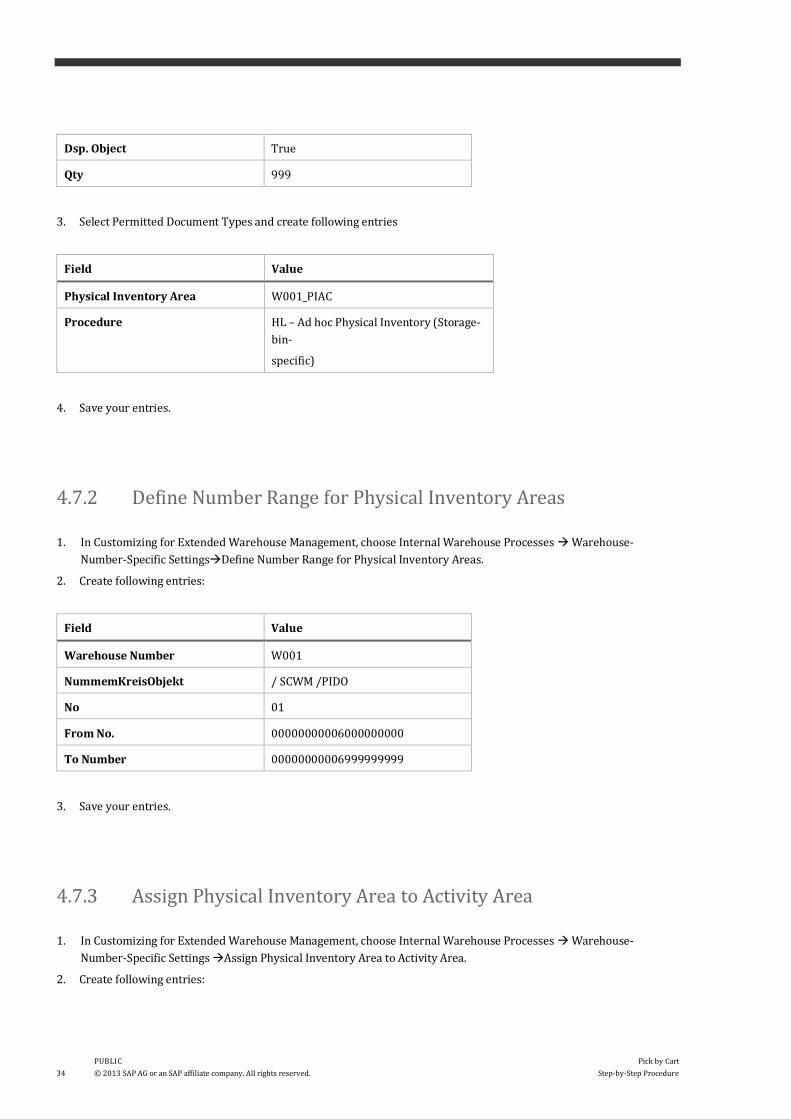
34
PUBLIC
© 2013 SAP AG or an SAP affiliate company. All rights reserved.
Pick by Cart
Step-by-Step Procedure
Dsp. Object True
Qty 999
3. Select Permitted Document Types and create following entries
Field Value
Physical Inventory Area W001_PIAC
Procedure HL – Ad hoc Physical Inventory (Storage-
bin-
specific)
4. Save your entries.
4.7.2 Define Number Range for Physical Inventory Areas
1. In Customizing for Extended Warehouse Management, choose Internal Warehouse Processes → Warehouse-
Number-Specific Settings→Define Number Range for Physical Inventory Areas.
2. Create following entries:
Field Value
Warehouse Number W001
NummemKreisObjekt / SCWM /PIDO
No 01
From No. 00000000006000000000
To Number 00000000006999999999
3. Save your entries.
4.7.3 Assign Physical Inventory Area to Activity Area
1. In Customizing for Extended Warehouse Management, choose Internal Warehouse Processes → Warehouse-
Number-Specific Settings →Assign Physical Inventory Area to Activity Area.
2. Create following entries:

Pick by Cart
Step-by-Step Procedure
PUBLIC
© 2013 SAP AG or an SAP affiliate company. All rights reserved. 35
Field Value
Warehouse Number W001
Fiscal Year Variant K1 – Calc. Year, 1 specific period
Proced. ID 0001
No Tol. True
NRI PI Document 01
3. Save your entries.
4.7.4 Define Sort Sequence for Activity Areas
1. In Customizing for Extended Warehouse Management, choose Master Data → Activity Areas → Define Sort Sequence
for Activity Areas.
2. Enter the following data:
Field Value
Warehouse Number W001
Activity Area APIC
Activity INVE
Storage Type T01P
Sort Sequence 3
3. Save your entries.

www.sap.com/contactsap
Material Number
© 2013 SAP AG or an SAP affiliate company. All rights reserved.
No part of this publication may be reproduced or transmitted in any
form or for any purpose without the express permission of SAP AG. The
information contained herein may be changed without prior notice.
Some software products marketed by SAP AG and its distributors contain
proprietary software components of other software vendors.
National product specifications may vary.
These materials are provided by SAP AG and its affiliated companies
(“SAP Group”) for informational purposes only, without representation
or warranty of any kind, and SAP Group shall not be liable for errors or
omissions with respect to the materials. The only warranties for SAP
Group products and services are those that are set forth in the express
warranty statements accompanying such products and services, if any.
Nothing herein should be construed as constituting an additional
warranty.
SAP and other SAP products and services mentioned herein as well as
their respective logos are trademarks or registered trademarks of SAP
AG in Germany and other countries. Please see www.sap.com/corporate-
en/legal/copyright/index.epx#trademark for additional trademark
information and notices.


