Download - Omni-Channel for Administrators
Omni-Channel forAdministrators
Salesforce, Spring ’18
@salesforcedocsLast updated: February 1, 2018

© Copyright 2000–2018 salesforce.com, inc. All rights reserved. Salesforce is a registered trademark of salesforce.com, inc.,as are other names and marks. Other marks appearing herein may be trademarks of their respective owners.
CONTENTS
Omni-Channel for Administrators . . . . . . . . . . . . . . . . . . . . . . . . . . . . . . . . . . . . . . . . . 1
Customize Omni-Channel . . . . . . . . . . . . . . . . . . . . . . . . . . . . . . . . . . . . . . . . . . . . . . . . 2Set Access to Presence Statuses . . . . . . . . . . . . . . . . . . . . . . . . . . . . . . . . . . . . . . . . . . . 13Add the Omni-Channel Widget to the Salesforce Console . . . . . . . . . . . . . . . . . . . . . . . . . . 14Add the Omni-Channel Utility to a Lightning Console App . . . . . . . . . . . . . . . . . . . . . . . . . . 15Test Your Omni-Channel Implementation . . . . . . . . . . . . . . . . . . . . . . . . . . . . . . . . . . . . . 16Use Omni-Channel with Your Existing Live Agent Implementation . . . . . . . . . . . . . . . . . . . . . 17Skills-Based Routing (Beta) for Omni-Channel . . . . . . . . . . . . . . . . . . . . . . . . . . . . . . . . . . 19Use External Routing (Beta) . . . . . . . . . . . . . . . . . . . . . . . . . . . . . . . . . . . . . . . . . . . . . . 28Omni-Channel Reference . . . . . . . . . . . . . . . . . . . . . . . . . . . . . . . . . . . . . . . . . . . . . . . 29
Index . . . . . . . . . . . . . . . . . . . . . . . . . . . . . . . . . . . . . . . . . . . . . . . . . . . . . . . . . . . . 35

OMNI-CHANNEL FOR ADMINISTRATORS
USER PERMISSIONS
To set up Omni-Channel:• Customize Application
To modify permission setsand profiles:• Manage Profiles and
Permission Sets
Route any type of incoming work item to the most qualified, available support agents in your callcenter. Omni-Channel integrates seamlessly into the console in both Salesforce Classic and LightningExperience.
Available in: Salesforce Classic, Lightning Experience
Omni-Channel is available in: Professional, Essentials, Enterprise, Performance, Unlimited,and Developer Editions
Omni-Channel is a flexible, customizable feature, and you can configure it declaratively—that is, without writing code. Use Omni-Channelto manage the priority of work items, which makes it a cinch to route important work items to agents quickly. Manage your agents’capacity to take on work items so that they’re given only the number of assignments that they can handle. You can also define whichagents can work on different types of assignments. For example, you can create one group of agents to respond to leads and salesinquiries, and another group that helps customers with support questions.
Best of all, Omni-Channel routes all these assignments to the correct agents automatically. Agents no longer have to pick and choosework assignments manually from a queue, which saves everyone in your call center time, effort, and brainpower. Because it’s easier foragents to work on their assignments, they can assist your customers faster and more effectively and close assignments more quickly.
Let’s get started!
Customize Omni-Channel
The first step towards getting your Omni-Channel implementation up and running is to create the necessary objects in Salesforce.
Set Access to Presence Statuses
Presence statuses indicate whether an agent is online and available to receive incoming work items, or whether the agent is awayor offline. Once you’ve created your Presence Statuses for Omni-Channel, you need to set up how your users will access them. Youcan set access through permission sets or profiles.
Add the Omni-Channel Widget to the Salesforce Console
After you get Omni-Channel all set up for your organization, it’s time to add the Omni-Channel widget to the Salesforce console sothat your agents can start receiving work.
Add the Omni-Channel Utility to a Lightning Console App
Add the Omni-Channel utility to your Lightning Service console to route work to agents in a flash.
Test Your Omni-Channel Implementation
Now that you’ve got Omni-Channel set up and enabled, test your implementation to make sure it’s working correctly.
Use Omni-Channel with Your Existing Live Agent Implementation
Are you loving Live Agent and want to add Omni-Channel to the mix? Here’s what changes for you and your organization (and notfor your agents!).
1
Skills-Based Routing (Beta) for Omni-Channel
Your agents have different skills sets and abilities. Your customers have different needs. Skills-based routing lets your contact centerroute work to the best agent for the job, so that customer cases are assigned to the agent who is best able to solve the issue.Skills-based routing improves the quality of customer service by automatically routing work items to the agent who has the skillsnecessary to do the work.
Use External Routing for Omni-Channel (Beta)
Integrate third-party routing with a partner application with Omni-Channel using Salesforce standard APIs and streaming APIs.External routing is supported with Omni-Channel in Salesforce Classic only.
Omni-Channel Reference
Understand how Omni-Channel routing works and reference the fields for agent work records and user presence records.
Customize Omni-Channel
The first step towards getting your Omni-Channel implementation up and running is to create the necessary objects in Salesforce.
Available in: Salesforce Classic, Lightning Experience
Omni-Channel is available in: Professional, Essentials, Enterprise, Performance, Unlimited, and Developer Editions
Enable Omni-Channel
Enable Omni-Channel to gain access to the objects that you’ll need to set up the feature in your organization.
Create Service Channels
Service channels let you turn nearly any Salesforce object such as a case, lead, SOS session, or even a custom object into a workrecord. Omni-Channel then plucks these work items from their queues like flowers from the garden of agent productivity and routesthem to your agents in real time.
Create Routing Configurations
Routing configurations determine how work items are routed to agents. Use them to prioritize the relative importance and size ofwork items from your queues. That way, the most important work items are handled accordingly, and work is evenly distributed toyour agents. To start routing work items to agents, create routing configurations and assign them to queues.
Associate Routing Configurations and Agents with Queues
Queues are a classic element of Salesforce that help your teams manage leads, cases, and custom objects. Omni-Channel superchargesyour queues to be able to route work items to your agents in real time. Agents don’t have to select work items manually from queuesbecause Omni-Channel routes work items to agents automatically and in real time!
Create Presence Configurations
Let’s focus on agents for a minute. Presence configurations determine how much work agents can take on and what Omni-Channelbehaviors they can access while they assist customers. Your organization can have multiple configurations for different groups ofagents who support different channels.
Create Presence Statuses
Presence statuses indicate whether an agent is online and available to receive incoming work items, or whether the agent is awayor offline.
2
Customize Omni-ChannelOmni-Channel for Administrators
Enable Omni-Channel
USER PERMISSIONS
To set up Omni-Channel:• Customize Application
Enable Omni-Channel to gain access to the objects that you’ll need to set up the feature in yourorganization.
Available in: Salesforce Classic, Lightning Experience
Omni-Channel is available in: Professional, Essentials, Enterprise, Performance, Unlimited,and Developer Editions
1. From Setup in Salesforce Classic, enter Omni-Channel Settings in the Quick Find box, then select Omni-Channel Settings.
2. Select Enable Omni-Channel.
3. Click Save.
Create Service Channels
USER PERMISSIONS
To set up Omni-Channel:• Customize Application
Service channels let you turn nearly any Salesforce object such as a case, lead, SOS session, or evena custom object into a work record. Omni-Channel then plucks these work items from theirqueues like flowers from the garden of agent productivity and routes them to your agents in realtime.
Available in: Salesforce Classic, Lightning Experience
Omni-Channel is available in: Professional, Essentials, Enterprise, Performance, Unlimited,and Developer Editions
Service channels let you manage sources of work and their priority compared to other work items. After you create service channels,you’ll associate them with queues, which determine how work items are routed to your agents. You can create service channels forsupport channels, such as cases or SOS calls, or for sales channels, such as leads.
1. From Setup in Salesforce Classic, enter Service Channels in the Quick Find box, select Service Channels, then click New.
2. Specify the settings for your service channel.
3. Click Save.
Service Channel Settings
Customize your service channel settings to define how your organization receives work from various sources, such as chat, email,SOS calls, or social channels.
Supported Objects for Omni-Channel
Omni-Channel turbocharges your agents’ productivity by assigning records to them in real time. But which objects and records doesOmni-Channel support?
Service Channel SettingsCustomize your service channel settings to define how your organization receives work from various sources, such as chat, email, SOScalls, or social channels.
3
Enable Omni-ChannelOmni-Channel for Administrators

Available in: Salesforce Classic, Lightning Experience
Omni-Channel is available in: Professional, Essentials, Enterprise, Performance, Unlimited, and Developer Editions
What It DoesSetting
Names the service channel.
This service channel name, or a version of it, automaticallybecomes the API Name.
Service Channel Name
Sets the API name for the service channel.API Name
The type of Salesforce standard or custom object that’s associatedwith this service channel. For example, if you have a service
Salesforce Object
channel for Web cases set the Related Object Type toCase. For a complete list of objects that service channels support,see Supported Objects for Omni-Channel.
(Optional) Opens the specified custom console footer componentwhen an agent accepts a work item request. For example, opena marketing campaign widget when an agent accepts a lead.
Custom Console Footer Component
Supported Objects for Omni-ChannelOmni-Channel turbocharges your agents’ productivity by assigning records to them in real time. But which objects and records doesOmni-Channel support?
Available in: Salesforce Classic, Lightning Experience
Omni-Channel is available in: Professional, Essentials, Enterprise, Performance, Unlimited, and Developer Editions
Omni-Channel currently supports routing for the following objects and records.
• Cases
• Chats
• SOS video calls
• Social posts
• Orders
• Leads
• Custom objects that don’t have a master object
Lightning Omni-Channel Routing (Beta) doesn’t support routing for the following objects and records.
• SOS video calls
4
Create Service ChannelsOmni-Channel for Administrators
Create Routing Configurations
USER PERMISSIONS
To set up Omni-Channel:• Customize Application
Routing configurations determine how work items are routed to agents. Use them to prioritize therelative importance and size of work items from your queues. That way, the most important workitems are handled accordingly, and work is evenly distributed to your agents. To start routing workitems to agents, create routing configurations and assign them to queues.
Available in: Salesforce Classic, Lightning Experience
Omni-Channel is available in: Professional, Essentials, Enterprise, Performance, Unlimited,and Developer Editions
Create a routing configuration for each service channel in your organization. After you create routing configurations, associate themwith queues so your agents can receive work after we get Omni-Channel set up.
1. From Setup in Salesforce Classic, enter Routing in the Quick Find box, select Routing Configurations, then click New.
2. Specify the settings for your routing configuration.
3. Click Save.
Routing Configuration Settings
Customize your routing configuration settings to define how work items are pushed to agents.
Omni-Channel Routing Model Options
Specify how incoming work items are directed to agents using Omni-Channel.
Routing Configuration SettingsCustomize your routing configuration settings to define how work items are pushed to agents.
Available in: Salesforce Classic, Lightning Experience
Omni-Channel is available in: Professional, Essentials, Enterprise, Performance, Unlimited, and Developer Editions
Basic Information
What It DoesSetting
Names the service routing configuration.
This routing configuration name, or a version of it, automaticallybecomes the Developer Name.
Routing Configuration Name
Sets the API name for the service channel.Developer Name
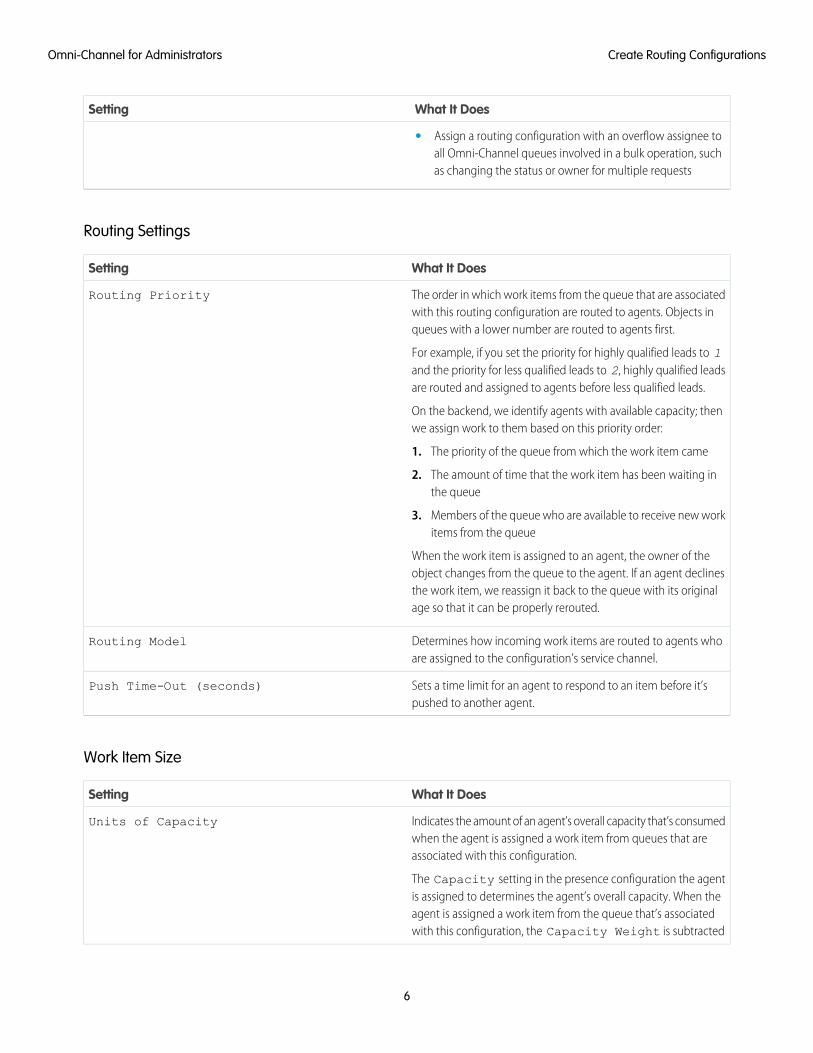
Sets the user or queue that Omni-Channel routes items to whenyour org reaches Omni-Channel limits. Ensure that you:
Overflow Assignee
• Select a user or queue that has access to the objects that thequeue(s) using this routing configuration handles
5
Create Routing ConfigurationsOmni-Channel for Administrators
What It DoesSetting
• Assign a routing configuration with an overflow assignee toall Omni-Channel queues involved in a bulk operation, suchas changing the status or owner for multiple requests
Routing Settings
What It DoesSetting
The order in which work items from the queue that are associatedwith this routing configuration are routed to agents. Objects inqueues with a lower number are routed to agents first.
For example, if you set the priority for highly qualified leads to 1and the priority for less qualified leads to 2, highly qualified leadsare routed and assigned to agents before less qualified leads.
Routing Priority
On the backend, we identify agents with available capacity; thenwe assign work to them based on this priority order:
1. The priority of the queue from which the work item came
2. The amount of time that the work item has been waiting inthe queue
3. Members of the queue who are available to receive new workitems from the queue
When the work item is assigned to an agent, the owner of theobject changes from the queue to the agent. If an agent declinesthe work item, we reassign it back to the queue with its originalage so that it can be properly rerouted.
Determines how incoming work items are routed to agents whoare assigned to the configuration’s service channel.
Routing Model
Sets a time limit for an agent to respond to an item before it’spushed to another agent.
Push Time-Out (seconds)
Work Item Size
What It DoesSetting
Indicates the amount of an agent’s overall capacity that’s consumedwhen the agent is assigned a work item from queues that areassociated with this configuration.
The Capacity setting in the presence configuration the agentis assigned to determines the agent’s overall capacity. When the
Units of Capacity
agent is assigned a work item from the queue that’s associatedwith this configuration, the Capacity Weight is subtracted
6
Create Routing ConfigurationsOmni-Channel for Administrators

What It DoesSetting
from the agent’s overall capacity. Agents can be assigned workitems until their overall capacity reaches 0.
You can select a Capacity Weight or a CapacityPercentage, but not both.
The percentage of an agent’s overall capacity that’s consumedwhen the agent is assigned a work item from queues that areassociated with this configuration.
The agent’s overall capacity is determined by the Capacitysetting in the presence configuration that the agent is assigned
Percentage of Capacity
to. When the agent is assigned a work item from the queue that’sassociated with this configuration, the CapacityPercentage is deducted from the agent’s overall capacity untilthe agent has 0% capacity remaining.
You can select a Capacity Weight or a CapacityPercentage, but not both.
Omni-Channel Routing Model OptionsSpecify how incoming work items are directed to agents using Omni-Channel.
Available in: Salesforce Classic, Lightning Experience
Omni-Channel is available in: Professional, Essentials, Enterprise, Performance, Unlimited, and Developer Editions
In Omni-Channel, work items are automatically routed or “pushed” to agents who are assigned to the appropriate queue.
ExampleDescriptionRouting Option
Incoming work items are routed to theagent with the least amount of open work.
Least Active • Agent A and Agent B each have anoverall capacity of 5.
When work items all consume 1 capacity,• Agent A has 3 active work items with
capacity impact of 1. Agent B has 1the agent with the lowest number of workitems receives incoming work. The example
active work item with capacity impactof 4.
presents a scenario in which agents havework with varying capacity impacts.
• Because Agent A has a lower capacityimpact than Agent B, incoming workitems are routed to Agent A.
Incoming work items are routed to theagent with the greatest difference between
Most Available • Agent A and Agent B each have anoverall capacity of 5.
work item capacity and open work items.• Agent A has 3 active work items while
Agent B has 1.Capacity is determined by the presenceconfiguration that the agent is assigned to.
7
Create Routing ConfigurationsOmni-Channel for Administrators

ExampleDescriptionRouting Option
• Because Agent B has the most opencapacity, incoming work items arerouted to Agent B.
Associate Routing Configurations and Agents with Queues
USER PERMISSIONS
To set up Omni-Channel:• Customize Application
Queues are a classic element of Salesforce that help your teams manage leads, cases, and customobjects. Omni-Channel supercharges your queues to be able to route work items to your agentsin real time. Agents don’t have to select work items manually from queues because Omni-Channelroutes work items to agents automatically and in real time!
Available in: Salesforce Classic, Lightning Experience
Omni-Channel is available in: Professional, Essentials, Enterprise, Performance, Unlimited,and Developer Editions
The work items in the queue are assigned the priority that you specified in the routing configuration that you created earlier. If yourorganization already uses them, you can reuse queues that are available in your organization. That way, you can route work items in realtime to the agents who are assigned to those queues.
If your organization doesn’t use queues, create at least one queue to integrate with Omni-Channel. You can also create multiple queuesto handle the different types of work items. For example, you might create one queue for incoming cases and another queue for incomingleads.
Note: Omni-Channel doesn't limit the number of queues that you can use. However, you can only modify (insert, update, ordelete) up to 16 queues in a single batch.
For routing to work correctly, assign each of your agents to the queue from which they are receiving work items.
For more information about queues, see “Queues Overview” in the Salesforce Help.
1. In Setup, enter Queues in the Quick Find box, then select Queues.
2. Create a queue or edit an existing one.
3. In the Routing Configuration field, look up the routing configuration that you want to associate with the queue.
4. In the Queue Members section, add agents to the Selected Users field.
These agents will receive work items from this queue.
5. Click Save.
Create Presence Configurations
USER PERMISSIONS
To set up Omni-Channel:• Customize Application
Let’s focus on agents for a minute. Presence configurations determine how much work agents cantake on and what Omni-Channel behaviors they can access while they assist customers. Yourorganization can have multiple configurations for different groups of agents who support differentchannels.
Available in: Salesforce Classic, Lightning Experience
8
Associate Routing Configurations and Agents with QueuesOmni-Channel for Administrators
Omni-Channel is available in: Professional, Essentials, Enterprise, Performance, Unlimited, and Developer Editions
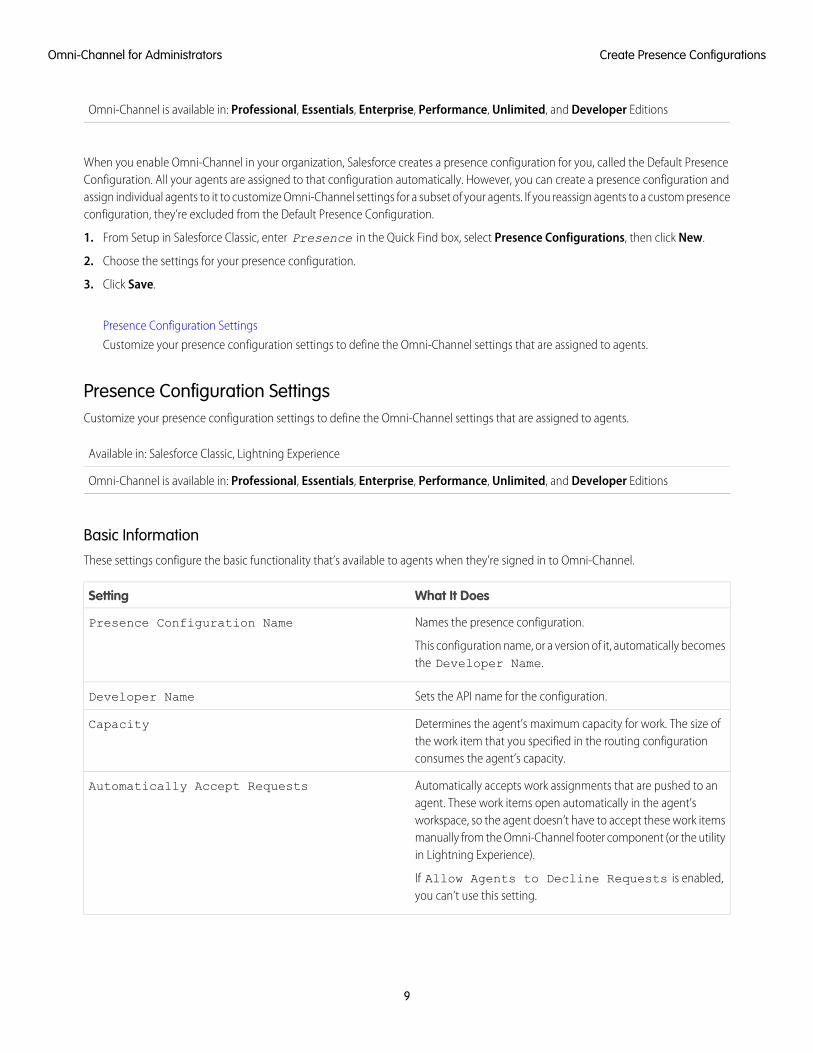
When you enable Omni-Channel in your organization, Salesforce creates a presence configuration for you, called the Default PresenceConfiguration. All your agents are assigned to that configuration automatically. However, you can create a presence configuration andassign individual agents to it to customize Omni-Channel settings for a subset of your agents. If you reassign agents to a custom presenceconfiguration, they’re excluded from the Default Presence Configuration.
1. From Setup in Salesforce Classic, enter Presence in the Quick Find box, select Presence Configurations, then click New.
2. Choose the settings for your presence configuration.
3. Click Save.
Presence Configuration Settings
Customize your presence configuration settings to define the Omni-Channel settings that are assigned to agents.
Presence Configuration SettingsCustomize your presence configuration settings to define the Omni-Channel settings that are assigned to agents.
Available in: Salesforce Classic, Lightning Experience
Omni-Channel is available in: Professional, Essentials, Enterprise, Performance, Unlimited, and Developer Editions
Basic InformationThese settings configure the basic functionality that’s available to agents when they’re signed in to Omni-Channel.
What It DoesSetting
Names the presence configuration.
This configuration name, or a version of it, automatically becomesthe Developer Name.
Presence Configuration Name
Sets the API name for the configuration.Developer Name
Determines the agent’s maximum capacity for work. The size ofthe work item that you specified in the routing configurationconsumes the agent’s capacity.
Capacity
Automatically accepts work assignments that are pushed to anagent. These work items open automatically in the agent’s
Automatically Accept Requests
workspace, so the agent doesn’t have to accept these work itemsmanually from the Omni-Channel footer component (or the utilityin Lightning Experience).
If Allow Agents to Decline Requests is enabled,you can’t use this setting.
9
Create Presence ConfigurationsOmni-Channel for Administrators
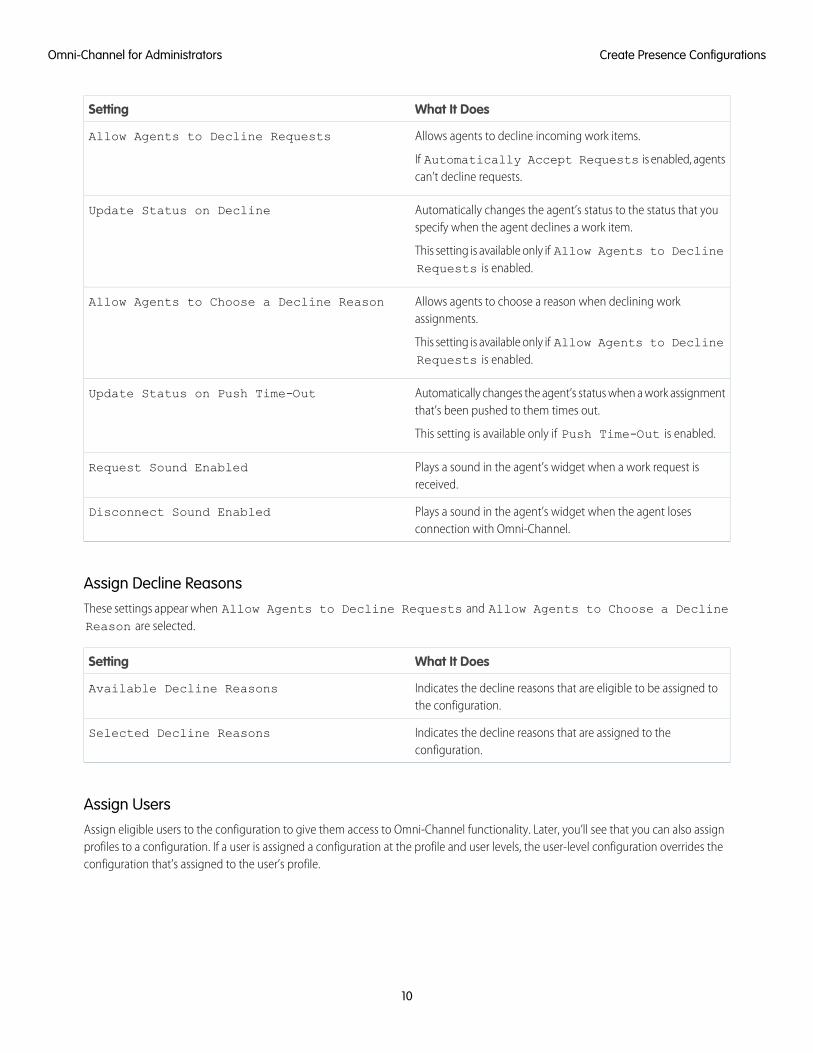
What It DoesSetting
Allows agents to decline incoming work items.
If Automatically Accept Requests is enabled, agentscan’t decline requests.
Allow Agents to Decline Requests
Automatically changes the agent’s status to the status that youspecify when the agent declines a work item.
This setting is available only if Allow Agents to DeclineRequests is enabled.
Update Status on Decline
Allows agents to choose a reason when declining workassignments.
This setting is available only if Allow Agents to DeclineRequests is enabled.
Allow Agents to Choose a Decline Reason
Automatically changes the agent’s status when a work assignmentthat’s been pushed to them times out.
This setting is available only if Push Time-Out is enabled.
Update Status on Push Time-Out
Plays a sound in the agent’s widget when a work request isreceived.
Request Sound Enabled
Plays a sound in the agent’s widget when the agent losesconnection with Omni-Channel.
Disconnect Sound Enabled
Assign Decline ReasonsThese settings appear when Allow Agents to Decline Requests and Allow Agents to Choose a DeclineReason are selected.
What It DoesSetting
Indicates the decline reasons that are eligible to be assigned tothe configuration.
Available Decline Reasons
Indicates the decline reasons that are assigned to theconfiguration.
Selected Decline Reasons
Assign UsersAssign eligible users to the configuration to give them access to Omni-Channel functionality. Later, you’ll see that you can also assignprofiles to a configuration. If a user is assigned a configuration at the profile and user levels, the user-level configuration overrides theconfiguration that’s assigned to the user’s profile.
10
Create Presence ConfigurationsOmni-Channel for Administrators
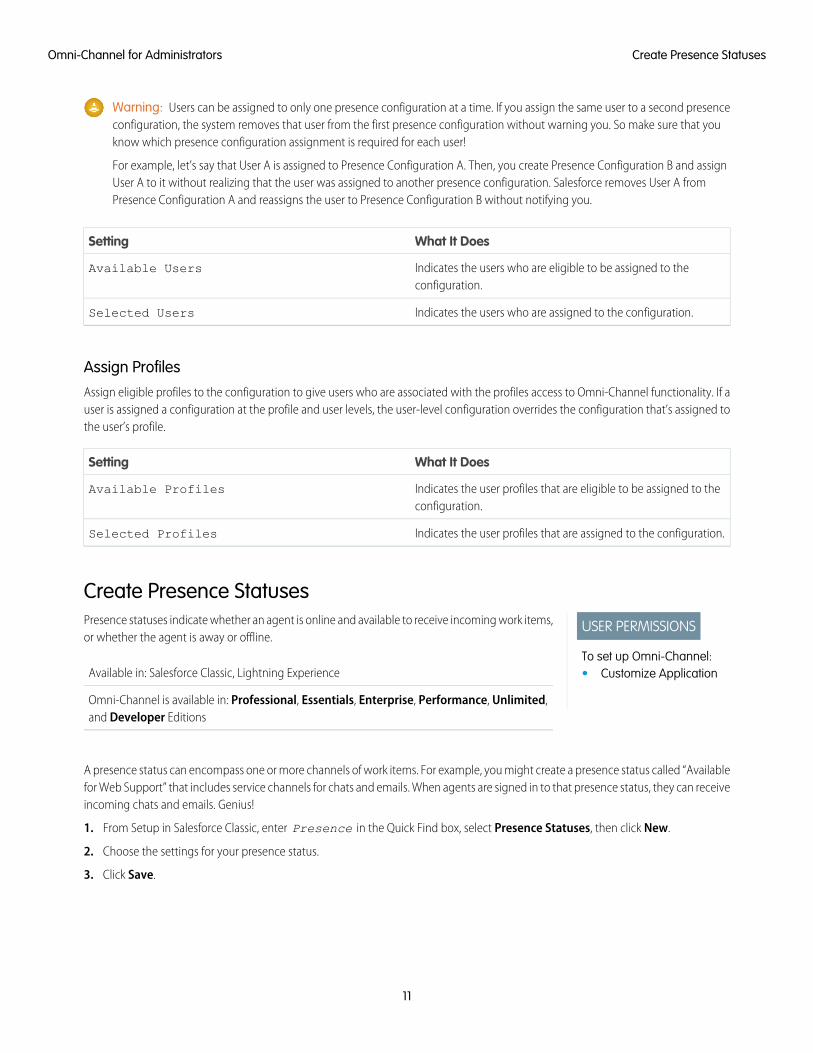
Warning: Users can be assigned to only one presence configuration at a time. If you assign the same user to a second presenceconfiguration, the system removes that user from the first presence configuration without warning you. So make sure that youknow which presence configuration assignment is required for each user!
For example, let’s say that User A is assigned to Presence Configuration A. Then, you create Presence Configuration B and assignUser A to it without realizing that the user was assigned to another presence configuration. Salesforce removes User A fromPresence Configuration A and reassigns the user to Presence Configuration B without notifying you.
What It DoesSetting
Indicates the users who are eligible to be assigned to theconfiguration.
Available Users
Indicates the users who are assigned to the configuration.Selected Users
Assign ProfilesAssign eligible profiles to the configuration to give users who are associated with the profiles access to Omni-Channel functionality. If auser is assigned a configuration at the profile and user levels, the user-level configuration overrides the configuration that’s assigned tothe user’s profile.
What It DoesSetting
Indicates the user profiles that are eligible to be assigned to theconfiguration.
Available Profiles
Indicates the user profiles that are assigned to the configuration.Selected Profiles
Create Presence Statuses
USER PERMISSIONS
To set up Omni-Channel:• Customize Application
Presence statuses indicate whether an agent is online and available to receive incoming work items,or whether the agent is away or offline.
Available in: Salesforce Classic, Lightning Experience
Omni-Channel is available in: Professional, Essentials, Enterprise, Performance, Unlimited,and Developer Editions
A presence status can encompass one or more channels of work items. For example, you might create a presence status called “Availablefor Web Support” that includes service channels for chats and emails. When agents are signed in to that presence status, they can receiveincoming chats and emails. Genius!
1. From Setup in Salesforce Classic, enter Presence in the Quick Find box, select Presence Statuses, then click New.
2. Choose the settings for your presence status.
3. Click Save.
11
Create Presence StatusesOmni-Channel for Administrators
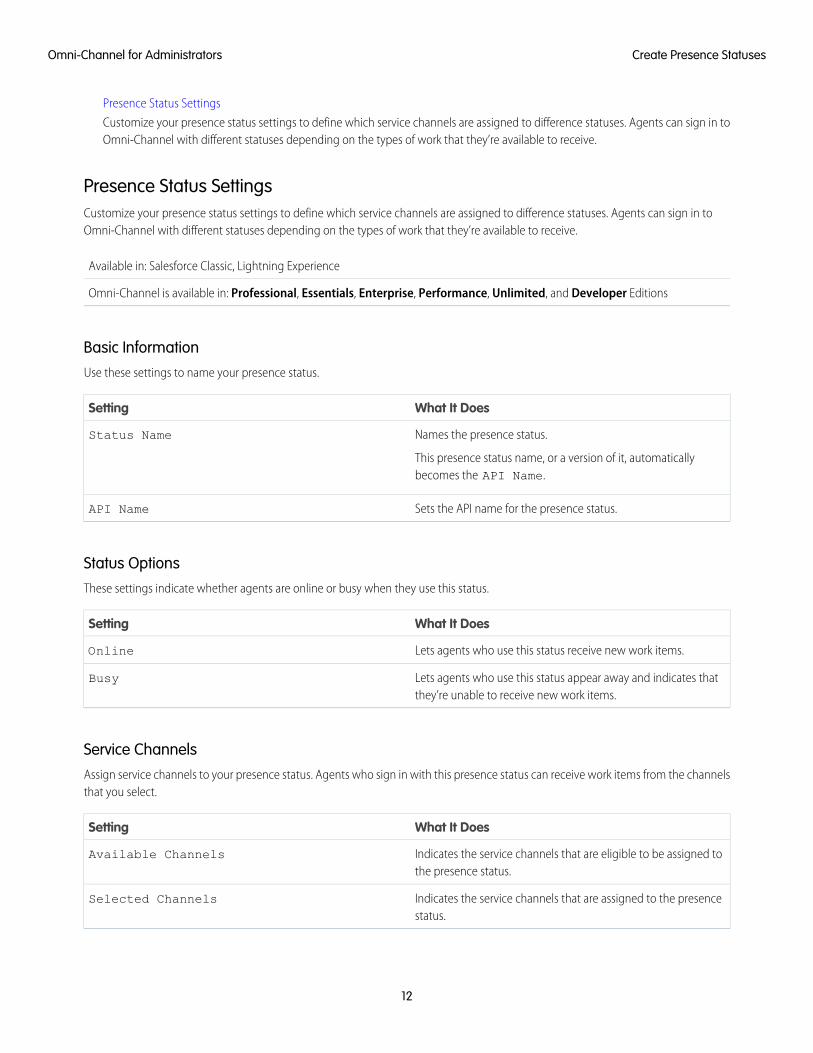
Presence Status Settings
Customize your presence status settings to define which service channels are assigned to difference statuses. Agents can sign in toOmni-Channel with different statuses depending on the types of work that they’re available to receive.
Presence Status SettingsCustomize your presence status settings to define which service channels are assigned to difference statuses. Agents can sign in toOmni-Channel with different statuses depending on the types of work that they’re available to receive.
Available in: Salesforce Classic, Lightning Experience
Omni-Channel is available in: Professional, Essentials, Enterprise, Performance, Unlimited, and Developer Editions
Basic InformationUse these settings to name your presence status.
What It DoesSetting
Names the presence status.
This presence status name, or a version of it, automaticallybecomes the API Name.
Status Name
Sets the API name for the presence status.API Name
Status OptionsThese settings indicate whether agents are online or busy when they use this status.
What It DoesSetting
Lets agents who use this status receive new work items.Online
Lets agents who use this status appear away and indicates thatthey’re unable to receive new work items.
Busy
Service ChannelsAssign service channels to your presence status. Agents who sign in with this presence status can receive work items from the channelsthat you select.
What It DoesSetting
Indicates the service channels that are eligible to be assigned tothe presence status.
Available Channels
Indicates the service channels that are assigned to the presencestatus.
Selected Channels
12
Create Presence StatusesOmni-Channel for Administrators
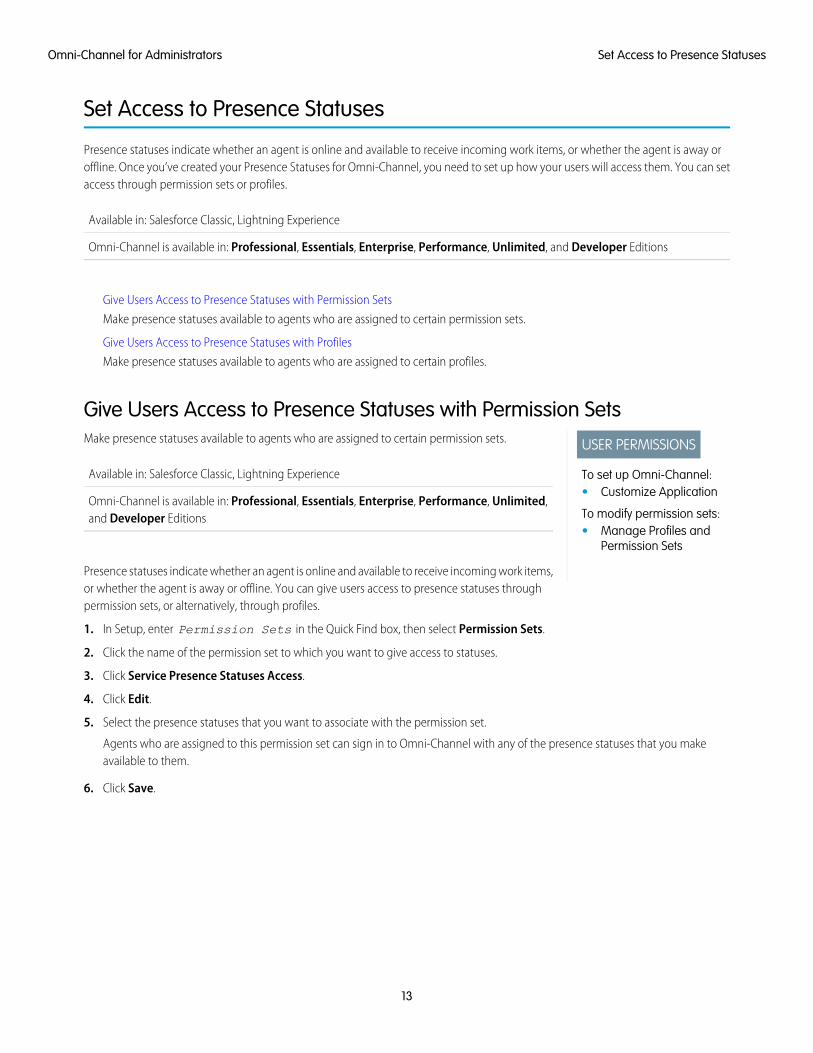
Set Access to Presence Statuses
Presence statuses indicate whether an agent is online and available to receive incoming work items, or whether the agent is away oroffline. Once you’ve created your Presence Statuses for Omni-Channel, you need to set up how your users will access them. You can setaccess through permission sets or profiles.
Available in: Salesforce Classic, Lightning Experience
Omni-Channel is available in: Professional, Essentials, Enterprise, Performance, Unlimited, and Developer Editions
Give Users Access to Presence Statuses with Permission Sets
Make presence statuses available to agents who are assigned to certain permission sets.
Give Users Access to Presence Statuses with Profiles
Make presence statuses available to agents who are assigned to certain profiles.
Give Users Access to Presence Statuses with Permission Sets
USER PERMISSIONS
To set up Omni-Channel:• Customize Application
To modify permission sets:• Manage Profiles and
Permission Sets
Make presence statuses available to agents who are assigned to certain permission sets.
Available in: Salesforce Classic, Lightning Experience
Omni-Channel is available in: Professional, Essentials, Enterprise, Performance, Unlimited,and Developer Editions
Presence statuses indicate whether an agent is online and available to receive incoming work items,or whether the agent is away or offline. You can give users access to presence statuses throughpermission sets, or alternatively, through profiles.
1. In Setup, enter Permission Sets in the Quick Find box, then select Permission Sets.
2. Click the name of the permission set to which you want to give access to statuses.
3. Click Service Presence Statuses Access.
4. Click Edit.
5. Select the presence statuses that you want to associate with the permission set.
Agents who are assigned to this permission set can sign in to Omni-Channel with any of the presence statuses that you makeavailable to them.
6. Click Save.
13
Set Access to Presence StatusesOmni-Channel for Administrators
Give Users Access to Presence Statuses with Profiles
USER PERMISSIONS
To set up Omni-Channel:• Customize Application
To modify profiles:• Manage Profiles and
Permission Sets
Make presence statuses available to agents who are assigned to certain profiles.
Available in: Salesforce Classic, Lightning Experience
Omni-Channel is available in: Professional, Essentials, Enterprise, Performance, Unlimited,and Developer Editions
Presence statuses indicate whether an agent is online and available to receive incoming work items,or whether the agent is away or offline. You can give users access to presence statuses throughprofiles, or alternatively, through permission sets.
1. In Setup, enter Profiles in the Quick Find box, then select Profiles.
2. Click the name of the profile to which you want to give access to statuses.
Don’t click Edit next to the profile name. If you do, you won’t see the correct page section where you can enable statuses.
3. In the Enabled Service Presence Status Access section, click Edit.
4. Select the presence statuses that you want to associate with the profile.
Agents who are assigned to this profile can sign in to Omni-Channel with any of the presence statuses that you make available tothem.
5. Click Save.
Add the Omni-Channel Widget to the Salesforce Console
USER PERMISSIONS
To set up Omni-Channel:• Customize Application
After you get Omni-Channel all set up for your organization, it’s time to add the Omni-Channelwidget to the Salesforce console so that your agents can start receiving work.
Available in: Salesforce Classic, Lightning Experience
Omni-Channel is available in: Professional, Essentials, Enterprise, Performance, Unlimited,and Developer Editions
The Omni-Channel widget appears in the bottom right corner of the Salesforce console. From there, agents can change their presencestatus and triage their incoming work assignments.
Note: If your organization uses Live Agent to manage chats, you can either use the Live Agent widget or the Omni-Channelwidget to manage chats, but not both. To learn more about managing Live Agent, see Use Omni-Channel with Your Existing LiveAgent Implementation.
1. From Setup, enter Apps in the Quick Find box, then select Apps.
2. Click Edit next to the Salesforce console app that you want to add the Omni-Channel widget to.
3. In the Choose Console Components section, add Omni-Channel to your list of selected items.
4. Click Save.
14
Give Users Access to Presence Statuses with ProfilesOmni-Channel for Administrators
Control Visible Work Item Details in Omni-Channel with Compact Layouts
Ever wanted to customize the information that your agents see when they get a new work item in Omni-Channel? You can! Justcustomize primary compact layout for that work item’s object.
Control Visible Work Item Details in Omni-Channel with Compact Layouts
USER PERMISSIONS
To set up Omni-Channel:• Customize Application
Ever wanted to customize the information that your agents see when they get a new work item inOmni-Channel? You can! Just customize primary compact layout for that work item’s object.
Available in: Salesforce Classic, Lightning Experience
Omni-Channel is available in: Professional, Essentials, Enterprise, Performance, Unlimited,and Developer Editions
If you look closely, you’ll notice that a few fields are visible by default on new work item requests. For example, if your agent receives arequest to manage a case, the request features the case’s priority, status, and case number by default. An object’s primary compactlayout controls all of the visible fields in the Omni-Channel footer component (or Omni-Channel utility, if you’re using LightningExperience). But what if you want to see more information, such as the case’s owner or its subject? Just edit the primary compact layoutso that it includes the fields that you want to appear in the widget.
Tip: The Omni-Channel footer component and Omni-Channel utility are, well, compact, so there’s only so much room to displayfields on work item requests. While you can technically put up to 10 fields on a compact layout, Omni-Channel displays only 4fields. As a best practice, select up to 4 of the most important fields that you want to expose on work item requests, then addthose to your compact layout.
1. Decide which object’s compact layout you want to edit.
2. From the management settings for the object whose work item you want to edit, select Compact Layouts, and then select New.
For example, to edit the compact layout for cases, go to the object management settings for cases, select Compact Layouts, thenselect New.
3. Select the settings for your compact layout, including the fields that you want it to include. The fields that you pick appear inOmni-Channel when an agent receives a request.
4. Click Save.
5. Change the primary compact layout to your new layout by clicking Compact Layout Assignment > Edit Assignment.
6. Select your new compact layout from the Primary Compact Layout drop-down list.
7. Click Save.
Add the Omni-Channel Utility to a Lightning Console App
USER PERMISSIONS
To set up Omni-Channel:• Customize Application
Add the Omni-Channel utility to your Lightning Service console to route work to agents in a flash.
Available in: Salesforce Classic, Lightning Experience
Omni-Channel is available in: Professional, Essentials, Enterprise, Performance, Unlimited,and Developer Editions
15
Control Visible Work Item Details in Omni-Channel withCompact Layouts
Omni-Channel for Administrators
The Omni-Channel utility appears in the utility bar in your Lightning Console app. From there, agents can change their presence statusand triage their incoming work assignments.
1. From Setup in Lightning Experience, enter Apps in the Quick Find box, then select App Manager.
2. Click the dropdown next to the console app your want to add Omni-Channel to, then click Edit.
3. Under Utility Bar, click Add.
4. Click Omni-Channel.
5. Click Save.
6. Click Done.
Test Your Omni-Channel Implementation
USER PERMISSIONS
To set up Omni-Channel:• Customize Application
Now that you’ve got Omni-Channel set up and enabled, test your implementation to make sureit’s working correctly.
Available in: Salesforce Classic, Lightning Experience
Omni-Channel is available in: Professional, Essentials, Enterprise, Performance, Unlimited,and Developer Editions
To test your implementation, route a work item to yourself in the console.
1. Log in to the console where you added Omni-Channel.
Make sure that you log in as a user who’s enabled to use Omni-Channel. For the sake of testing the feature, make sure that you’rethe only agent who’s signed into Omni-Channel.
2. Open Omni-Channel and change your status so that you can receive incoming work items.
3. In the console, navigate to the record that corresponds to the service channel you’ve set for your current presence status.
For example, if you’re logged in with a status that’s called “Available for Cases,” navigate to a list of your open cases in the console.
4. If you’re using Salesforce Classic, select the checkbox next to the record that you want to route to yourself. If you’re using LightningExpeirence, open the record you want to route to yourself.
5. Click Change Owner.
6. Select Queue.
7. Enter the name of the queue that you associated with your routing configuration.
8. Click Submit.
Sit back and relax. You’ll see an incoming request notification in Omni-Channel within a few seconds.
16
Test Your Omni-Channel ImplementationOmni-Channel for Administrators
Use Omni-Channel with Your Existing Live Agent Implementation
EDITIONS
Live Agent is available in:Salesforce Classic, LightningExperience
Live Agent is available in:Performance Editions andin Developer Edition orgsthat were created after June14, 2012
Live Agent is available in:Unlimited Edition with theService Cloud
Live Agent is available for anadditional cost in: Enterpriseand Unlimited Editions
Are you loving Live Agent and want to add Omni-Channel to the mix? Here’s what changes for youand your organization (and not for your agents!).
Available in: Salesforce Classic, Lightning Experience
Omni-Channel is available in: Professional, Essentials, Enterprise, Performance, Unlimited,and Developer Editions
So, you’ve decided to take your customer service to the next level by using Live Agent andOmni-Channel in tandem. That’s great! Once everything’s set up, you’ll find that the two worktogether in perfect harmony.
Live Agent is powered by Live Agent Configurations, which control the behaviors and settings thatare available to Live Agent users. Similarly, Omni-Channel uses Presence Configurations to controlthe behaviors and settings that are available to Omni-Channel users. You can integrate Live Agentwith Omni-Channel so chats are routed just like other work items, and you can even useOmni-Channel routing for your chats. Whichever way you use Omni-Channel with Live Agent, youragents are then able to accept or reject chat requests right from the Omni-Channel widget.
When you integrate Live Agent and Omni-Channel, your Live Agent users also become Omni-Channelusers, so your chat agents need to be associated with both a Live Agent Configuration and a Presence Configuration. Luckily, Salesforcedoes some of the heavy lifting for you when you enable Omni-Channel with your current Live Agent implementation.
For each Live Agent Configuration that you already have in your org, Salesforce:
• Creates a corresponding Presence Configuration for each of your Live Agent Configurations
• Sets the chat capacity for each Presence Configuration to what’s set in its corresponding Live Agent Configuration
• Assigns your chat agents to the new corresponding Presence Configurations
If you have Live Agent enabled but don’t have an implementation, when you enable Omni-Channel, Salesforce creates a Live AgentService Channel.
Salesforce does all this automatically so there’s no disruption to your agents’ workflow. They can start accepting chats throughOmni-Channel in the console. The only difference they see is that they now use Omni-Channel in the console to set their status andaccept chat notifications. They may also see a change in their status options, as Omni-Channel presence statuses are configurable.
If you want to use Live Agent and Omni-Channel in Lightning Experience, you must use Omni-Channel routing for your chats. All youhave to do is create a chat button with the routing type Omni and assign your chat agents to queues. Then, add the Omni-Channelutility and Live Chat Transcripts to your Lightning Console app, and you agents can start accepting chat requests.
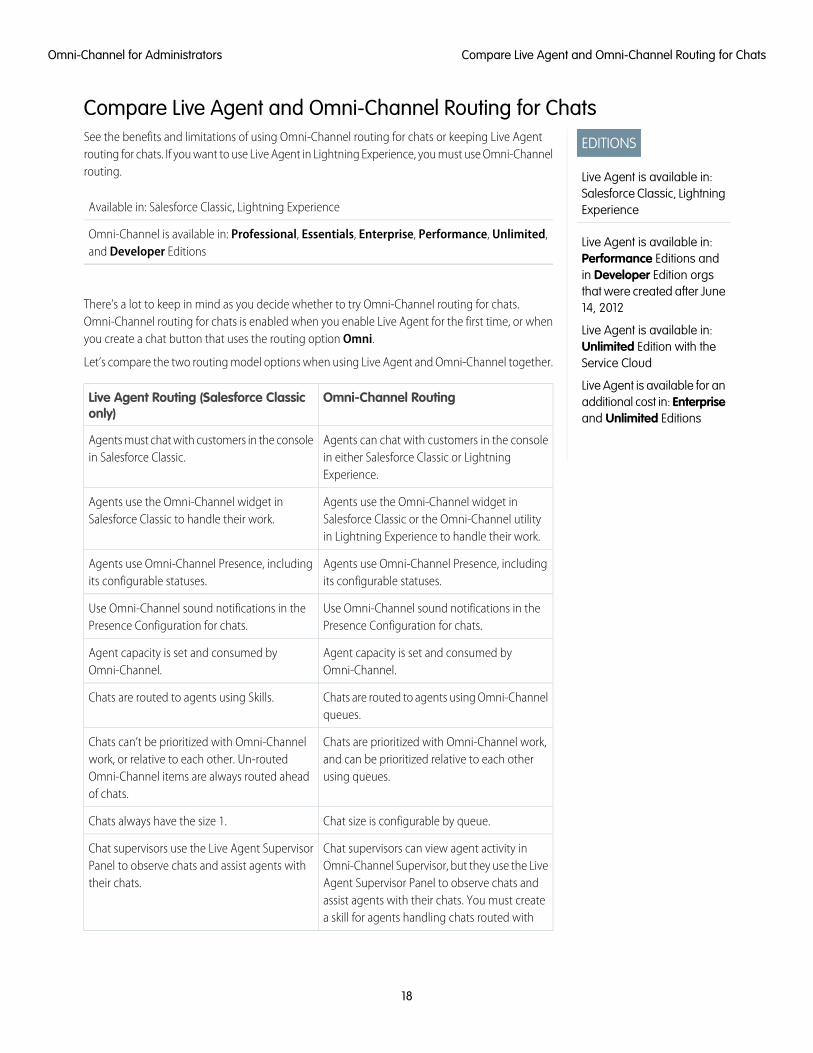
Compare Live Agent and Omni-Channel Routing for Chats
See the benefits and limitations of using Omni-Channel routing for chats or keeping Live Agent routing for chats. If you want to useLive Agent in Lightning Experience, you must use Omni-Channel routing.
17
Use Omni-Channel with Your Existing Live AgentImplementation
Omni-Channel for Administrators
Compare Live Agent and Omni-Channel Routing for Chats
EDITIONS
Live Agent is available in:Salesforce Classic, LightningExperience
Live Agent is available in:Performance Editions andin Developer Edition orgsthat were created after June14, 2012
Live Agent is available in:Unlimited Edition with theService Cloud
Live Agent is available for anadditional cost in: Enterpriseand Unlimited Editions
See the benefits and limitations of using Omni-Channel routing for chats or keeping Live Agentrouting for chats. If you want to use Live Agent in Lightning Experience, you must use Omni-Channelrouting.
Available in: Salesforce Classic, Lightning Experience
Omni-Channel is available in: Professional, Essentials, Enterprise, Performance, Unlimited,and Developer Editions
There’s a lot to keep in mind as you decide whether to try Omni-Channel routing for chats.Omni-Channel routing for chats is enabled when you enable Live Agent for the first time, or whenyou create a chat button that uses the routing option Omni.
Let’s compare the two routing model options when using Live Agent and Omni-Channel together.
Omni-Channel RoutingLive Agent Routing (Salesforce Classiconly)
Agents can chat with customers in the consolein either Salesforce Classic or LightningExperience.
Agents must chat with customers in the consolein Salesforce Classic.
Agents use the Omni-Channel widget inSalesforce Classic or the Omni-Channel utilityin Lightning Experience to handle their work.
Agents use the Omni-Channel widget inSalesforce Classic to handle their work.
Agents use Omni-Channel Presence, includingits configurable statuses.
Agents use Omni-Channel Presence, includingits configurable statuses.
Use Omni-Channel sound notifications in thePresence Configuration for chats.
Use Omni-Channel sound notifications in thePresence Configuration for chats.
Agent capacity is set and consumed byOmni-Channel.
Agent capacity is set and consumed byOmni-Channel.
Chats are routed to agents using Omni-Channelqueues.
Chats are routed to agents using Skills.
Chats are prioritized with Omni-Channel work,and can be prioritized relative to each otherusing queues.
Chats can’t be prioritized with Omni-Channelwork, or relative to each other. Un-routedOmni-Channel items are always routed aheadof chats.
Chat size is configurable by queue.Chats always have the size 1.
Chat supervisors can view agent activity inOmni-Channel Supervisor, but they use the Live
Chat supervisors use the Live Agent SupervisorPanel to observe chats and assist agents withtheir chats. Agent Supervisor Panel to observe chats and
assist agents with their chats. You must createa skill for agents handling chats routed with
18
Compare Live Agent and Omni-Channel Routing for ChatsOmni-Channel for Administrators
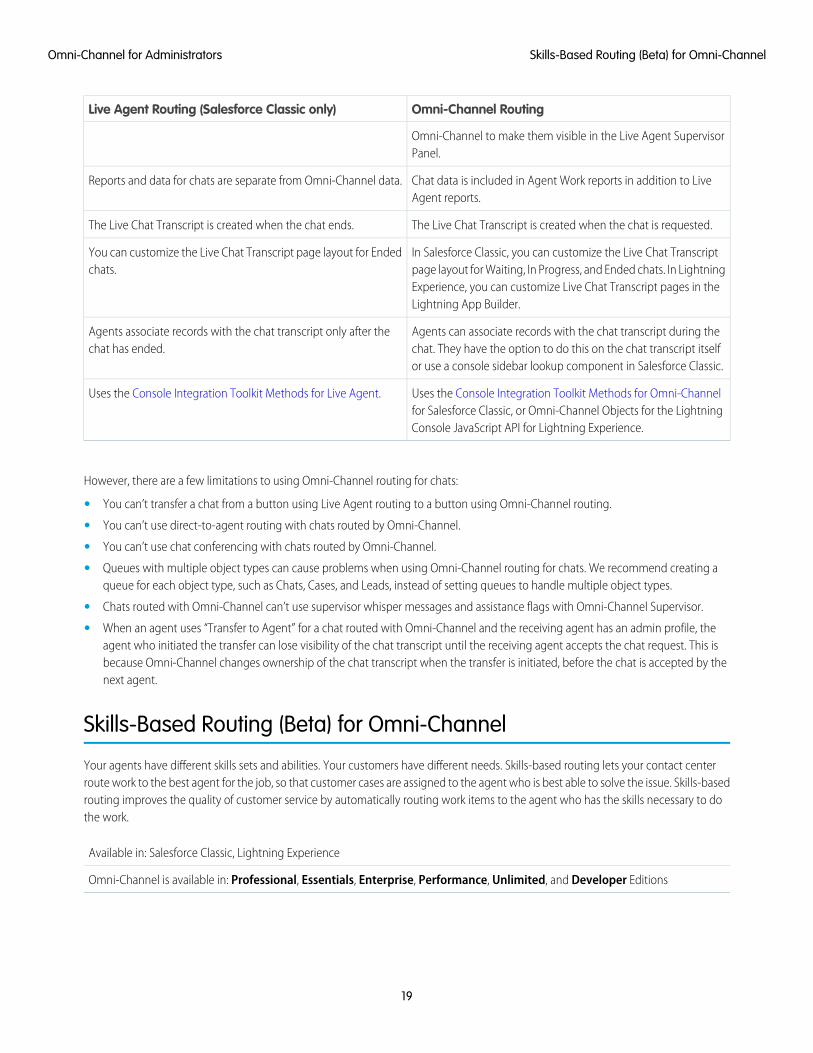
Omni-Channel RoutingLive Agent Routing (Salesforce Classic only)
Omni-Channel to make them visible in the Live Agent SupervisorPanel.
Chat data is included in Agent Work reports in addition to LiveAgent reports.
Reports and data for chats are separate from Omni-Channel data.
The Live Chat Transcript is created when the chat is requested.The Live Chat Transcript is created when the chat ends.
In Salesforce Classic, you can customize the Live Chat Transcriptpage layout for Waiting, In Progress, and Ended chats. In Lightning
You can customize the Live Chat Transcript page layout for Endedchats.
Experience, you can customize Live Chat Transcript pages in theLightning App Builder.
Agents can associate records with the chat transcript during thechat. They have the option to do this on the chat transcript itselfor use a console sidebar lookup component in Salesforce Classic.
Agents associate records with the chat transcript only after thechat has ended.
Uses the Console Integration Toolkit Methods for Omni-Channelfor Salesforce Classic, or Omni-Channel Objects for the LightningConsole JavaScript API for Lightning Experience.
Uses the Console Integration Toolkit Methods for Live Agent.
However, there are a few limitations to using Omni-Channel routing for chats:
• You can’t transfer a chat from a button using Live Agent routing to a button using Omni-Channel routing.
• You can’t use direct-to-agent routing with chats routed by Omni-Channel.
• You can’t use chat conferencing with chats routed by Omni-Channel.
• Queues with multiple object types can cause problems when using Omni-Channel routing for chats. We recommend creating aqueue for each object type, such as Chats, Cases, and Leads, instead of setting queues to handle multiple object types.
• Chats routed with Omni-Channel can’t use supervisor whisper messages and assistance flags with Omni-Channel Supervisor.
• When an agent uses “Transfer to Agent” for a chat routed with Omni-Channel and the receiving agent has an admin profile, theagent who initiated the transfer can lose visibility of the chat transcript until the receiving agent accepts the chat request. This isbecause Omni-Channel changes ownership of the chat transcript when the transfer is initiated, before the chat is accepted by thenext agent.
Skills-Based Routing (Beta) for Omni-Channel
Your agents have different skills sets and abilities. Your customers have different needs. Skills-based routing lets your contact centerroute work to the best agent for the job, so that customer cases are assigned to the agent who is best able to solve the issue. Skills-basedrouting improves the quality of customer service by automatically routing work items to the agent who has the skills necessary to dothe work.
Available in: Salesforce Classic, Lightning Experience
Omni-Channel is available in: Professional, Essentials, Enterprise, Performance, Unlimited, and Developer Editions
19
Skills-Based Routing (Beta) for Omni-ChannelOmni-Channel for Administrators
As a beta feature, Skills-Based Routing is a preview and isn’t part of the “Services” under your master subscription agreement withSalesforce. Use this feature at your sole discretion, and make your purchase decisions only on the basis of generally available productsand features. Salesforce doesn’t guarantee general availability of this feature within any particular time frame or at all, and we candiscontinue it at any time. This feature is for evaluation purposes only, not for production use. It’s offered as is and isn’t supported, andSalesforce has no liability for any harm or damage arising out of or in connection with it. All restrictions, Salesforce reservation of rights,obligations concerning the Services, and terms for related Non-Salesforce Applications and Content apply equally to your use of thisfeature. You can provide feedback and suggestions for skills-based routing in the IdeaExchange in the Trailblazer Community. Forinformation on enabling this feature in your org, contact Salesforce.
How Does Skills-Based Routing Work?
Skills-based routing looks at the skills required to complete a work item (requested skills) and matches these skills to the skills thatare assigned to the agent (agent’s skills). Omni-Channel routes the work to the first agent who has the requested skills and who isavailable (that is, has the capacity to take the work item).
How Does Skills-Based Routing Differ from Queue-Based Routing?
Skills-based routing allows work items to be routed using more sophisticated and dynamic criteria than queue-based routing.
Beta Considerations
Skills-based routing (beta) is set up using the Salesforce setup pages and the API. Administrators who are setting up skills-basedrouting should be familiar with Apex and using the API.
Beta Limitations
Skills-based routing (beta) has the following limitations.
Set Up Skills-Based Routing (Beta)
Follow these steps to set up skills-based routing for Omni-Channel in your org.
How Does Skills-Based Routing Work?Skills-based routing looks at the skills required to complete a work item (requested skills) and matches these skills to the skills that areassigned to the agent (agent’s skills). Omni-Channel routes the work to the first agent who has the requested skills and who is available(that is, has the capacity to take the work item).
Available in: Salesforce Classic, Lightning Experience
Omni-Channel is available in: Professional, Essentials, Enterprise, Performance, Unlimited, and Developer Editions
You can define whatever skills that you need for your company. Skills typically are used to represent attributes such as language ability,product knowledge, certifications, case origin, and account history. For example, you could define skills for language (Spanish, French,and English); for product knowledge (software and hardware); and for certifications (CompTIA, CCNP).
You can assign each agent a skill and can optionally assign a proficiency level (1–10, where 1 indicates the lowest skill level and 10indicates the highest level) for that skill. For example, an agent who speaks fluent Spanish could have the skill = Spanish and the proficiencylevel = 10 for expert.
Skills are assigned to incoming work items by the SkillRequirements object in the API. The PendingServiceRouting object adds attributesto the work item that represent the skill (skill id), priority, skill proficiency, and timestamp.
Work items are routed by creating a PendingServiceRouting object. The PendingServiceRouting object can have multiple SkillRequirementsobjects associated with it.
When a work item requires multiple skills, the case is routed only to an agent who possesses all of the required skills.
20
How Does Skills-Based Routing Work?Omni-Channel for Administrators
When multiple agents have the same skill, the case is routed to the agent who is first available based on the routing type (either mostavailable or least active) that you use in your org. If the agent doesn’t accept the case, then the case is routed to the next available agent.
How Does Skills-Based Routing Differ from Queue-Based Routing?Skills-based routing allows work items to be routed using more sophisticated and dynamic criteria than queue-based routing.
Available in: Salesforce Classic, Lightning Experience
Omni-Channel is available in: Professional, Essentials, Enterprise, Performance, Unlimited, and Developer Editions
Important: You can either use queues or skills-based routing to route work items to agents. If you enable skills-based routing,you can’t use queues.
Queues generally are designed to represent a single skill. For example, you might have a Spanish-language queue and a Level 3 technicalsupport queue.
Queues route work to agents who are members of the queue. Although you can have multiple queues, and agents can be members ofmultiple queues, a work item can be assigned only to one queue at a time.
In contrast, skills-based routing looks at the skills required to complete the work item, identifies agents who have those skills, and routesthe work item to an agent who has all of the requisite skills and who has available capacity to take on the work.
Beta ConsiderationsSkills-based routing (beta) is set up using the Salesforce setup pages and the API. Administrators who are setting up skills-based routingshould be familiar with Apex and using the API.
Available in: Salesforce Classic, Lightning Experience
Omni-Channel is available in: Professional, Essentials, Enterprise, Performance, Unlimited, and Developer Editions
Beta LimitationsSkills-based routing (beta) has the following limitations.
Available in: Salesforce Classic, Lightning Experience
Omni-Channel is available in: Professional, Essentials, Enterprise, Performance, Unlimited, and Developer Editions
Important: You can either use queues or skills-based routing to route work items to agents. If you enable skills-based routing,you can’t use queues.
Skills-based routing isn’t supported for external routing.
The Omni-Channel setup page is available only in Salesforce Classic.
Omni Supervisor doesn’t support skills-based routing.
Skills-based routing for Omni-Channel supports only the Case object, which means that you can route only cases using skills-basedrouting. You can’t route Salesforce records for other objects using skills-based routing.
21
How Does Skills-Based Routing Differ from Queue-BasedRouting?
Omni-Channel for Administrators
Push timeout isn’t supported. Work that is assigned to an agent stays in the Omni-Channel utility until the agent expressly accepts ordeclines the work item.
If an agent declines the work item, that information isn’t saved in the API. As a result, the same work item might be pushed to the sameagent.
If a work item requires certain skills, but no agents have those skills, then the work item isn’t routed. This situation is similar to how itemsin a queue are treated when no agents are online.
Set Up Skills-Based Routing (Beta)Follow these steps to set up skills-based routing for Omni-Channel in your org.
Available in: Salesforce Classic, Lightning Experience
Omni-Channel is available in: Professional, Essentials, Enterprise, Performance, Unlimited, and Developer Editions
The setup instructions start at the beginning and assume that you aren’t using Omni-Channel. If you’re already using Omni-Channel inyour org, that’s great! In that case, start by reviewing the considerations on page 21 and limitations on page 21, and then enableskills-based routing on page 23.
1. Enable Omni-Channel
Enable Omni-Channel to gain access to the objects that you’ll need to set up the feature in your organization.
2. Enable Skills-Based Routing
Enable skill-based routing in your org.
3. Create Skills for Skills-Based Routing
Skills identify your agents’ areas of expertise.
4. Create Service Resources for Agents
Service resources represent individual agents. Create a service resource for each agent.
5. Assign Skills to Service Resources
Assign skills to your agents to track their areas of experience and their level of proficiency for each skill.
6. Route Work Items Using Skills
To route work items using skills, create a PendingServiceRouting object and the associated SkillRequirement objects. ThePendingServiceRouting object represents the work item that is going to be routed. The SkillRequirement object represents the skilland the proficiency level.
Enable Omni-Channel
USER PERMISSIONS
To set up Omni-Channel:• Customize Application
Enable Omni-Channel to gain access to the objects that you’ll need to set up the feature in yourorganization.
Available in: Salesforce Classic, Lightning Experience
Omni-Channel is available in: Professional, Essentials, Enterprise, Performance, Unlimited,and Developer Editions
22
Set Up Skills-Based Routing (Beta)Omni-Channel for Administrators
1. From Setup in Salesforce Classic, enter Omni-Channel Settings in the Quick Find box, then select Omni-Channel Settings.
2. Select Enable Omni-Channel.
3. Click Save.
Enable Skills-Based Routing
USER PERMISSIONS
To set up Omni-Channel:• “Customize Application”
Enable skill-based routing in your org.
Available in: Salesforce Classic, Lightning Experience
Omni-Channel is available in: Professional, Essentials, Enterprise, Performance, Unlimited,and Developer Editions
Important: You can either use queues or skills-based routing to route work items to agents. If you enable skills-based routing,you can’t use queues.
1. From Setup in Salesforce Classic, enter Omni-Channel in the Quick Find box, then select Omni-Channel Settings.
2. Select Use Skills-Based Routing.
3. Click Save.
Create Skills for Skills-Based Routing
USER PERMISSIONS
To set up Omni-Channel:• “Customize Application”
Skills identify your agents’ areas of expertise.
Available in: Salesforce Classic, Lightning Experience
Omni-Channel is available in: Professional, Essentials, Enterprise, Performance, Unlimited,and Developer Editions
1. From Setup in Salesforce Classic, enter Omni-Channel in the Quick Find box, then select Skills.
2. Click New.
3. Enter a name for the skill.
For example, you can create a skill that’s called “Spanish” to denote agents who speak Spanish.
4. Optionally, enter a description of the skill.
5. Skip the Assign Users and Assign Profiles sections. Instead, add these skills to service resources.
6. Click Save.
Create Service Resources for Agents
USER PERMISSIONS
To create service resources:• “Create” on service
resources
Service resources represent individual agents. Create a service resource for each agent.
Available in: Salesforce Classic, Lightning Experience
Omni-Channel is available in: Professional, Essentials, Enterprise, Performance, Unlimited,and Developer Editions
23
Set Up Skills-Based Routing (Beta)Omni-Channel for Administrators
Note: The visibility of the Service Resource tab might be turned off by default. If you don’t see it, check the tab visibility. For moredetails, see the topic Tab Settings in Salesforce Help.
1. Open the Service Resources tab.
2. Click New.
3. For Name, enter the name of the agent.
4. Select the Active checkbox.
A service resource must be active to receive work items.
5. For User, use the lookup icon to select the agent.
6. For Resource Type, select Agent.
7. Click Save.
Assign Skills to Service Resources
USER PERMISSIONS
To assign skills to serviceresources:• “Edit” on service
resources
Assign skills to your agents to track their areas of experience and their level of proficiency for eachskill.
Available in: Salesforce Classic, Lightning Experience
Omni-Channel is available in: Professional, Essentials, Enterprise, Performance, Unlimited,and Developer Editions
Create skills before you can assign skills to agents.
1. Open the Service Resources tab.
2. Select the service resources that you want to assign skills to.
3. In the Skills related list, click New Service Resource Skill.
4. Select a skill.
Skills must be created before they can be assigned to a resource; to learn how, see topic Create Skills for Skills-Based Routing inSalesforce Help.
5. Optionally, enter a skill level 1–10 based on how your business measures skill level.
6. Enter a start date, and if needed, an end date.
For example, if an agent must be recertified in a particular skill every six months, enter an end date that’s six months later than thestart date.
7. Click Save.The service resource’s skill now appears in their Skills related list
Route Work Items Using SkillsTo route work items using skills, create a PendingServiceRouting object and the associated SkillRequirement objects. ThePendingServiceRouting object represents the work item that is going to be routed. The SkillRequirement object represents the skill andthe proficiency level.
Available in: Salesforce Classic, Lightning Experience
24
Set Up Skills-Based Routing (Beta)Omni-Channel for Administrators
Omni-Channel is available in: Professional, Essentials, Enterprise, Performance, Unlimited, and Developer Editions
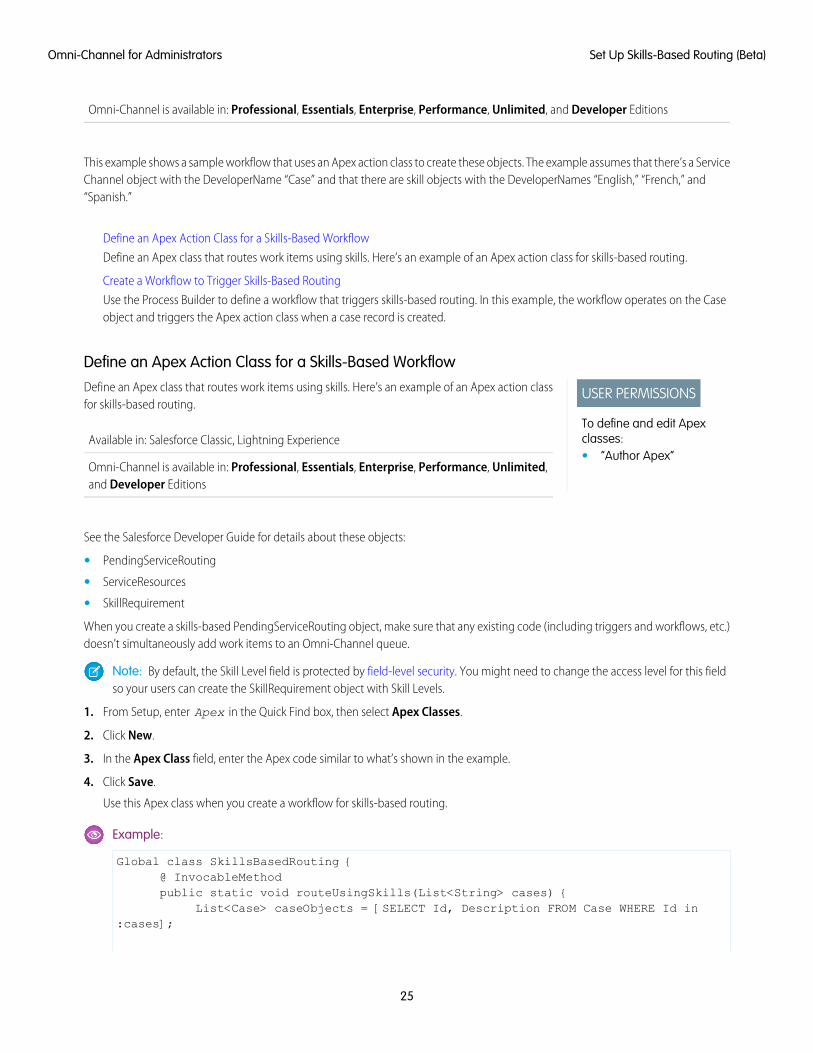
This example shows a sample workflow that uses an Apex action class to create these objects. The example assumes that there’s a ServiceChannel object with the DeveloperName “Case” and that there are skill objects with the DeveloperNames “English,” “French,” and“Spanish.”
Define an Apex Action Class for a Skills-Based Workflow
Define an Apex class that routes work items using skills. Here’s an example of an Apex action class for skills-based routing.
Create a Workflow to Trigger Skills-Based Routing
Use the Process Builder to define a workflow that triggers skills-based routing. In this example, the workflow operates on the Caseobject and triggers the Apex action class when a case record is created.
Define an Apex Action Class for a Skills-Based Workflow
USER PERMISSIONS
To define and edit Apexclasses:• “Author Apex”
Define an Apex class that routes work items using skills. Here’s an example of an Apex action classfor skills-based routing.
Available in: Salesforce Classic, Lightning Experience
Omni-Channel is available in: Professional, Essentials, Enterprise, Performance, Unlimited,and Developer Editions
See the Salesforce Developer Guide for details about these objects:
• PendingServiceRouting
• ServiceResources
• SkillRequirement
When you create a skills-based PendingServiceRouting object, make sure that any existing code (including triggers and workflows, etc.)doesn’t simultaneously add work items to an Omni-Channel queue.
Note: By default, the Skill Level field is protected by field-level security. You might need to change the access level for this fieldso your users can create the SkillRequirement object with Skill Levels.
1. From Setup, enter Apex in the Quick Find box, then select Apex Classes.
2. Click New.
3. In the Apex Class field, enter the Apex code similar to what’s shown in the example.
4. Click Save.
Use this Apex class when you create a workflow for skills-based routing.
Example:
Global class SkillsBasedRouting {@ InvocableMethodpublic static void routeUsingSkills(List<String> cases) {
List<Case> caseObjects = [SELECT Id, Description FROM Case WHERE Id in:cases];
25
Set Up Skills-Based Routing (Beta)Omni-Channel for Administrators
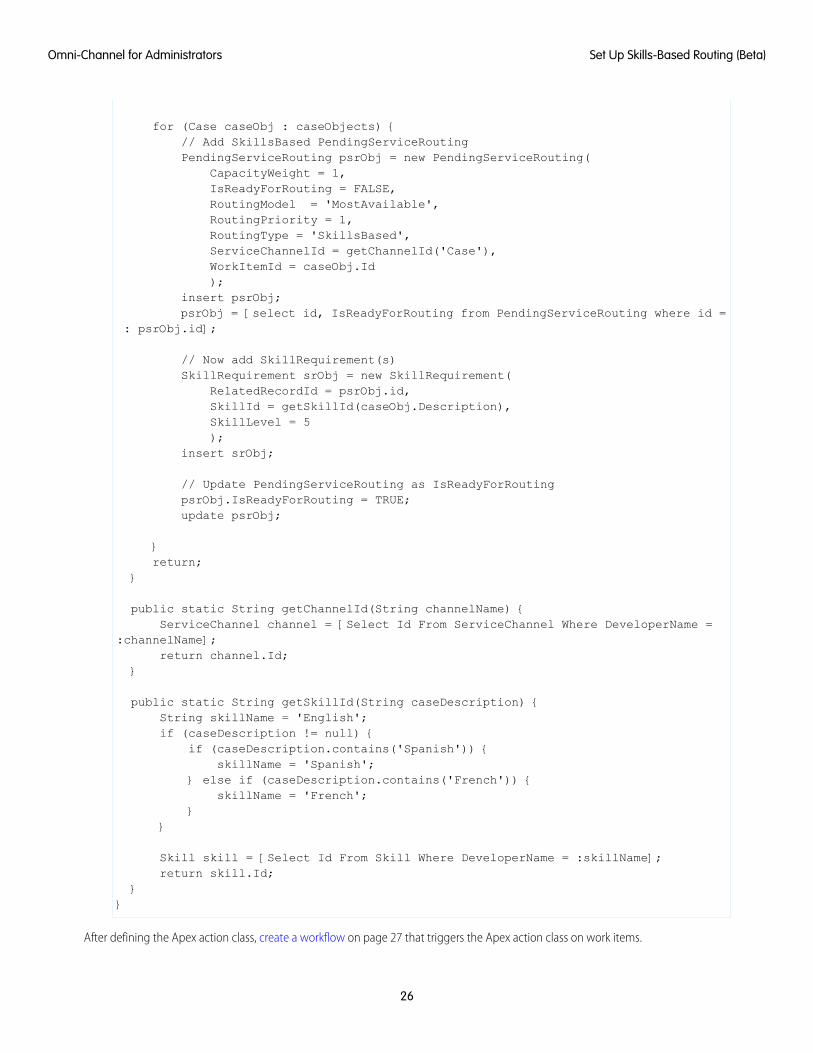
for (Case caseObj : caseObjects) {// Add SkillsBased PendingServiceRoutingPendingServiceRouting psrObj = new PendingServiceRouting(
CapacityWeight = 1,IsReadyForRouting = FALSE,RoutingModel = 'MostAvailable',RoutingPriority = 1,RoutingType = 'SkillsBased',ServiceChannelId = getChannelId('Case'),WorkItemId = caseObj.Id);
insert psrObj;psrObj = [select id, IsReadyForRouting from PendingServiceRouting where id =
: psrObj.id];
// Now add SkillRequirement(s)SkillRequirement srObj = new SkillRequirement(
RelatedRecordId = psrObj.id,SkillId = getSkillId(caseObj.Description),SkillLevel = 5);
insert srObj;
// Update PendingServiceRouting as IsReadyForRoutingpsrObj.IsReadyForRouting = TRUE;update psrObj;
}return;
}
public static String getChannelId(String channelName) {ServiceChannel channel = [Select Id From ServiceChannel Where DeveloperName =
:channelName];return channel.Id;
}
public static String getSkillId(String caseDescription) {String skillName = 'English';if (caseDescription != null) {
if (caseDescription.contains('Spanish')) {skillName = 'Spanish';
} else if (caseDescription.contains('French')) {skillName = 'French';
}}
Skill skill = [Select Id From Skill Where DeveloperName = :skillName];return skill.Id;
}}
After defining the Apex action class, create a workflow on page 27 that triggers the Apex action class on work items.
26
Set Up Skills-Based Routing (Beta)Omni-Channel for Administrators
Create a Workflow to Trigger Skills-Based Routing
USER PERMISSIONS
To create, edit, or viewprocesses:• “Manage Flow” AND
“View All Data”
Use the Process Builder to define a workflow that triggers skills-based routing. In this example, theworkflow operates on the Case object and triggers the Apex action class when a case record iscreated.
Available in: Salesforce Classic, Lightning Experience
Omni-Channel is available in: Professional, Essentials, Enterprise, Performance, Unlimited,and Developer Editions
Before you start, define the Apex action class on page 25 that creates the PendingServiceRouting object and SkillRequirement object.
1. From Setup, enter Process Builder in the Quick Find box, then select Process Builder.
2. Click New.
3. In the New Process modal window, complete the following fields:
a. For Process Name, specify the name for this process, such as “Skills-based routing.”
b. The API Name is automatically populated.
c. For Description, optionally describe what this process does.
d. For This process starts when, select A record changes.
4. On the next page, in the Choose Object and Specify When to Start the Process configuration, select the Case object.
5. For Start the process, select Only when a record is created.
6. Click Save.In the diagram, the Add Object box is changed to Case.
7. Click the Add Criteria diamond.
8. For Criteria for Executing Actions, select No criteria--just execute the actions!
9. Click Save.
10. In the Immediate Actions box, click Add Action.
11. In Action Type, select Apex.
12. For Action Name, enter the name of your action.
13. For Apex Class, enter the name of the Apex class that you created.
14. For Set Apex Variables, set the following parameters:
a. For Field, select cases.
b. For Type, select Field Reference.
c. For Value, use the lookup icon to select [Case].Id.
15. Click Save.The activation window opens.
16. To activate this process, click Confirm.The activation window closes. When a case is created, it triggers this workflow and routes the case based on skills.
27
Set Up Skills-Based Routing (Beta)Omni-Channel for Administrators

Example:
Use External Routing for Omni-Channel (Beta)
Integrate third-party routing with a partner application with Omni-Channel using Salesforce standard APIs and streaming APIs. Externalrouting is supported with Omni-Channel in Salesforce Classic only.
Available in: Salesforce Classic, Lightning Experience
Omni-Channel is available in: Professional, Essentials, Enterprise, Performance, Unlimited, and Developer Editions
Note: This release contains a beta version of External Routing with Omni-Channel, which means it’s a high-quality feature withknown limitations. External routing isn’t generally available unless or until Salesforce announces its general availability indocumentation or in press releases or public statements. We can’t guarantee general availability within any particular time frameor at all. Make your purchase decisions only on the basis of generally available products and features.
Multiple routing options, one console. Give your agents more routing options by integrating an external routing implementation withOmni-Channel. Learn more about external routing and how to set it up in the Omni-Channel Developer Guide.
28
Use External Routing for Omni-Channel (Beta)Omni-Channel for Administrators
Omni-Channel Reference
Understand how Omni-Channel routing works and reference the fields for agent work records and user presence records.
How Does Omni-Channel Routing Work?
Do data models make your heart skip a beat? Want to understand the ins and outs of how Omni-Channel routes work items to youragents? Then we have a treat for you. Omni-Channel pushes work items to the right agent at the right time so that your supportteam can efficiently help customers with their problems. But how does routing work under the hood? Let’s dive in.
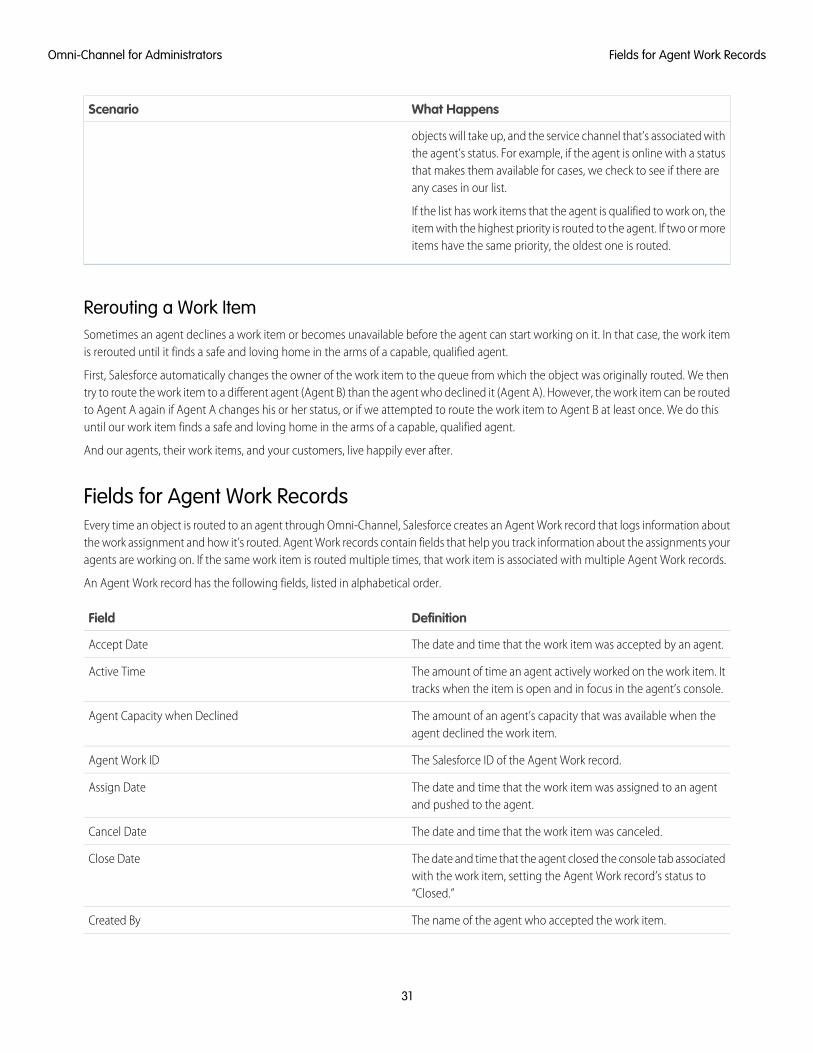
Fields for Agent Work Records
Every time an object is routed to an agent through Omni-Channel, Salesforce creates an Agent Work record that logs informationabout the work assignment and how it’s routed. Agent Work records contain fields that help you track information about theassignments your agents are working on. If the same work item is routed multiple times, that work item is associated with multipleAgent Work records.
Fields for User Presence Records
Every time agents change their Presence Statuses in Omni-Channel, Salesforce creates a User Presence record to log all of the agents’activities while they’re signed logged in with that status. User Presence records contain fields that help you track information aboutyour agents’ availability.
How Does Omni-Channel Routing Work?Do data models make your heart skip a beat? Want to understand the ins and outs of how Omni-Channel routes work items to youragents? Then we have a treat for you. Omni-Channel pushes work items to the right agent at the right time so that your support teamcan efficiently help customers with their problems. But how does routing work under the hood? Let’s dive in.
Available in: Salesforce Classic, Lightning Experience
Omni-Channel is available in: Professional, Essentials, Enterprise, Performance, Unlimited, and Developer Editions
Omni-Channel routes work through two separate processes.
• First, when a new work item is assigned to an Omni-Channel queue, Omni-Channel attempts to route it to an agent. Omni-Channelroutes work items by the priority of the queue that they’re assigned to, so the most important work items are pushed to agents first.Next, items are routed based on how long they’ve been sitting in the queue. The oldest work items are pushed to agents beforemore recent ones. (We’ll get into the details of how that happens in a minute.)
• Second, when an agent’s ability to receive work changes (perhaps they come back from “away” status, or they finish another workitem), Omni-Channel tries to find a work item that can be routed to that agent.
Routing New Work ItemsWhen a work item is created, it gets assigned to a queue. If that queue is associated with a Routing Configuration, it’s added to a list ofitems that are still waiting to be routed to agents.
Then Omni-Channel determines which agents are available and how much work each agent is currently working on. This informationcomes from the UserServicePresence API object, which tracks an agent’s current capacity for work items.
29
Omni-Channel ReferenceOmni-Channel for Administrators
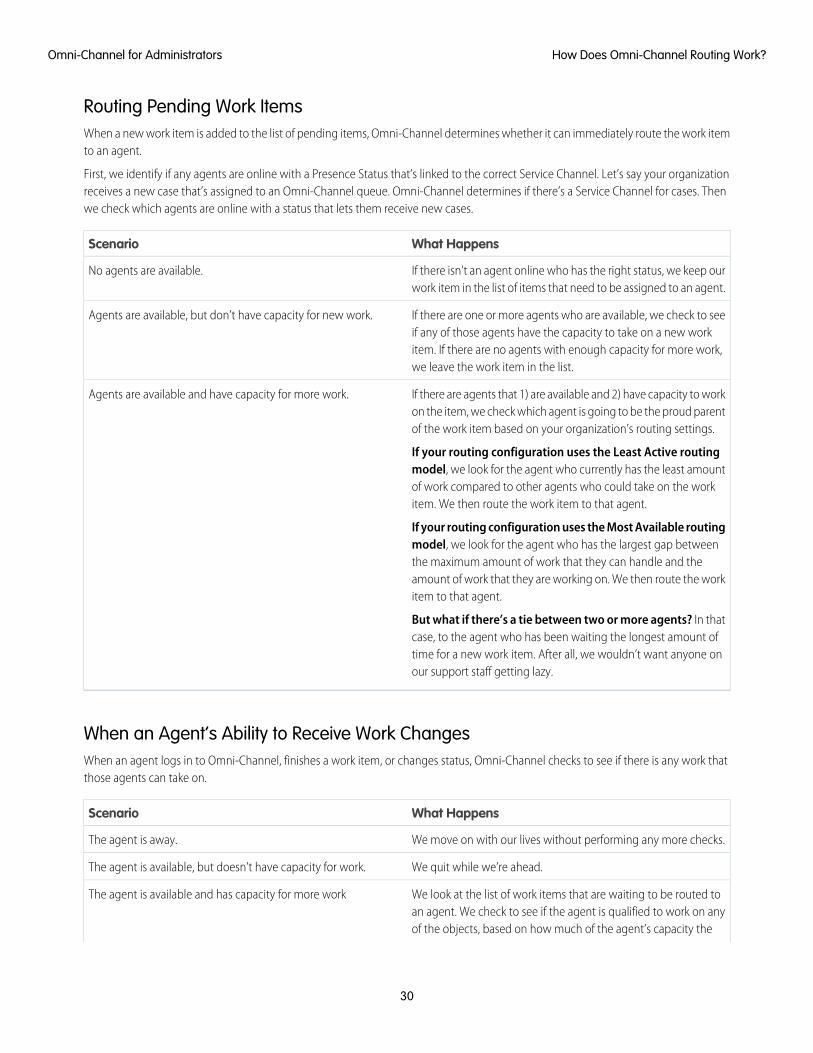
Routing Pending Work ItemsWhen a new work item is added to the list of pending items, Omni-Channel determines whether it can immediately route the work itemto an agent.
First, we identify if any agents are online with a Presence Status that’s linked to the correct Service Channel. Let’s say your organizationreceives a new case that’s assigned to an Omni-Channel queue. Omni-Channel determines if there’s a Service Channel for cases. Thenwe check which agents are online with a status that lets them receive new cases.
What HappensScenario
If there isn’t an agent online who has the right status, we keep ourwork item in the list of items that need to be assigned to an agent.
No agents are available.
If there are one or more agents who are available, we check to seeif any of those agents have the capacity to take on a new work
Agents are available, but don’t have capacity for new work.
item. If there are no agents with enough capacity for more work,we leave the work item in the list.
If there are agents that 1) are available and 2) have capacity to workon the item, we check which agent is going to be the proud parentof the work item based on your organization’s routing settings.
If your routing configuration uses the Least Active routingmodel, we look for the agent who currently has the least amount
Agents are available and have capacity for more work.
of work compared to other agents who could take on the workitem. We then route the work item to that agent.
If your routing configuration uses the Most Available routingmodel, we look for the agent who has the largest gap betweenthe maximum amount of work that they can handle and theamount of work that they are working on. We then route the workitem to that agent.
But what if there’s a tie between two or more agents? In thatcase, to the agent who has been waiting the longest amount oftime for a new work item. After all, we wouldn’t want anyone onour support staff getting lazy.
When an Agent’s Ability to Receive Work ChangesWhen an agent logs in to Omni-Channel, finishes a work item, or changes status, Omni-Channel checks to see if there is any work thatthose agents can take on.
What HappensScenario
We move on with our lives without performing any more checks.The agent is away.
We quit while we’re ahead.The agent is available, but doesn’t have capacity for work.
We look at the list of work items that are waiting to be routed toan agent. We check to see if the agent is qualified to work on any
The agent is available and has capacity for more work
of the objects, based on how much of the agent’s capacity the
30
How Does Omni-Channel Routing Work?Omni-Channel for Administrators
What HappensScenario
objects will take up, and the service channel that’s associated withthe agent’s status. For example, if the agent is online with a statusthat makes them available for cases, we check to see if there areany cases in our list.
If the list has work items that the agent is qualified to work on, theitem with the highest priority is routed to the agent. If two or moreitems have the same priority, the oldest one is routed.
Rerouting a Work ItemSometimes an agent declines a work item or becomes unavailable before the agent can start working on it. In that case, the work itemis rerouted until it finds a safe and loving home in the arms of a capable, qualified agent.
First, Salesforce automatically changes the owner of the work item to the queue from which the object was originally routed. We thentry to route the work item to a different agent (Agent B) than the agent who declined it (Agent A). However, the work item can be routedto Agent A again if Agent A changes his or her status, or if we attempted to route the work item to Agent B at least once. We do thisuntil our work item finds a safe and loving home in the arms of a capable, qualified agent.
And our agents, their work items, and your customers, live happily ever after.
Fields for Agent Work RecordsEvery time an object is routed to an agent through Omni-Channel, Salesforce creates an Agent Work record that logs information aboutthe work assignment and how it’s routed. Agent Work records contain fields that help you track information about the assignments youragents are working on. If the same work item is routed multiple times, that work item is associated with multiple Agent Work records.
An Agent Work record has the following fields, listed in alphabetical order.
DefinitionField
The date and time that the work item was accepted by an agent.Accept Date
The amount of time an agent actively worked on the work item. Ittracks when the item is open and in focus in the agent’s console.
Active Time
The amount of an agent’s capacity that was available when theagent declined the work item.
Agent Capacity when Declined
The Salesforce ID of the Agent Work record.Agent Work ID
The date and time that the work item was assigned to an agentand pushed to the agent.
Assign Date
The date and time that the work item was canceled.Cancel Date
The date and time that the agent closed the console tab associatedwith the work item, setting the Agent Work record’s status to“Closed.”
Close Date
The name of the agent who accepted the work item.Created By
31
Fields for Agent Work RecordsOmni-Channel for Administrators
DefinitionField
The date that the work item was created.Created Date
The date that an agent declined the work item request.Decline Date
The provided reason for why an agent declined the work request.Decline Reason
The amount of time an agent has the work item open, from theaccepted time to the closed time.
Handle Time
The name of the user who last modified the work item.Last Modified By
The date the work item was last modified.Last Modified Date
The session ID for Live Agent chats routed with Omni-Channel.Live Agent Session ID
The unique, Salesforce-generated number of the Agent Workrecord.
Name
The percentage of capacity that the work item consumes of theagent’s total, possible capacity.
Percentage of Capacity
The number of seconds set for push time-out. 0 is returned whenpush time-out isn’t enabled.
Push Time-Out
The date and time when push time-out occurred.Push Time-Out Date
The Salesforce queue from which the work item was routed.Queue
The date and time that the Salesforce object was assigned to thequeue, creating the associated work item.
Request Date
The service channel that’s associated with the work item.Service Channel
Indicates whether the check for an agent’s available capacity isskipped (true) or not (false) when an externally routed work item
Should Skip Capacity Check
is created. This field is used when agents can simultaneously handlework from both Omni-Channel queues and queues using externalrouting. When true, the receiving agent may exceed their setcapacity to accept the item, but they don’t receive moreOmni-Channel routed work. When false, the receiving agent can’texceed their set capacity and must have enough open capacity toaccept the item.
The amount of time in seconds between the time the work itemwas created (the Request Date) and the time the work item wasaccepted by an agent (the Accept Date).
Speed to Answer
The status of the Agent Work record. Valid values are:Status
• Assigned – The item is assigned to the agent but hasn’t beenopened.
• Opened – The item was opened by the agent.
• Unavailable – The item was assigned to the agent but theagent became unavailable (went offline or lost connection).
32
Fields for Agent Work RecordsOmni-Channel for Administrators
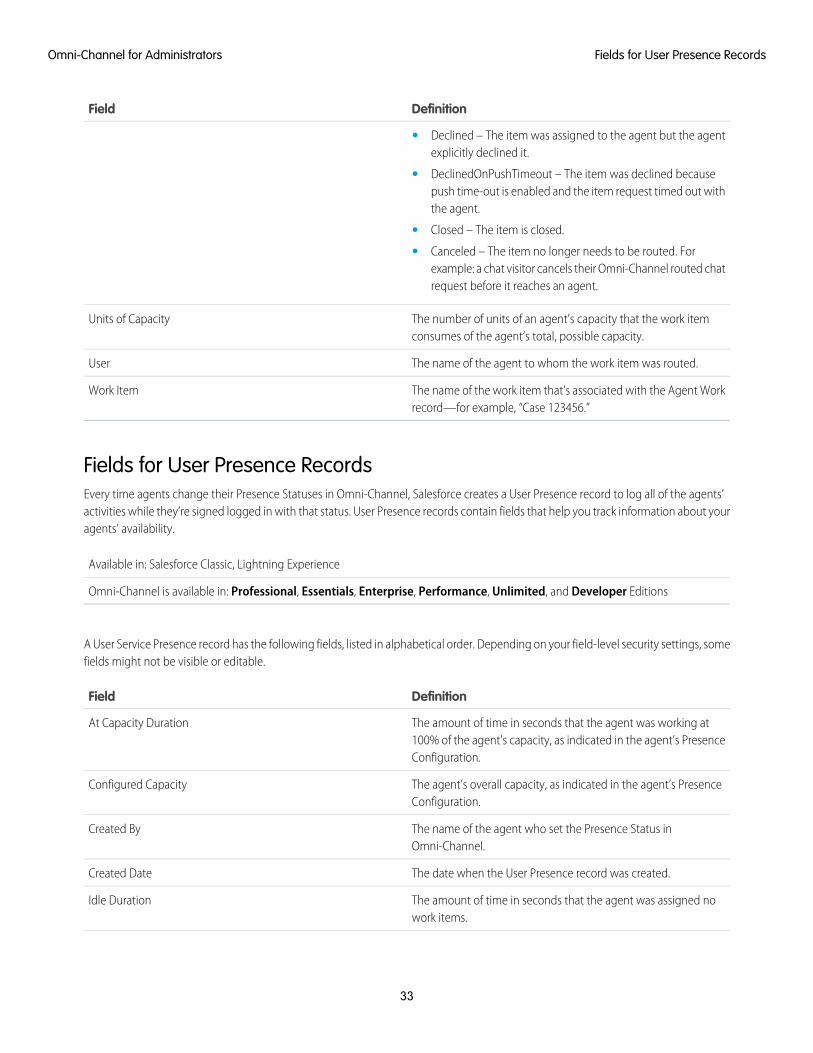
DefinitionField
• Declined – The item was assigned to the agent but the agentexplicitly declined it.
• DeclinedOnPushTimeout – The item was declined becausepush time-out is enabled and the item request timed out withthe agent.
• Closed – The item is closed.
• Canceled – The item no longer needs to be routed. Forexample: a chat visitor cancels their Omni-Channel routed chatrequest before it reaches an agent.
The number of units of an agent’s capacity that the work itemconsumes of the agent’s total, possible capacity.
Units of Capacity
The name of the agent to whom the work item was routed.User
The name of the work item that’s associated with the Agent Workrecord—for example, “Case 123456.”
Work Item
Fields for User Presence RecordsEvery time agents change their Presence Statuses in Omni-Channel, Salesforce creates a User Presence record to log all of the agents’activities while they’re signed logged in with that status. User Presence records contain fields that help you track information about youragents’ availability.
Available in: Salesforce Classic, Lightning Experience
Omni-Channel is available in: Professional, Essentials, Enterprise, Performance, Unlimited, and Developer Editions
A User Service Presence record has the following fields, listed in alphabetical order. Depending on your field-level security settings, somefields might not be visible or editable.
DefinitionField
The amount of time in seconds that the agent was working at100% of the agent’s capacity, as indicated in the agent’s PresenceConfiguration.
At Capacity Duration
The agent’s overall capacity, as indicated in the agent’s PresenceConfiguration.
Configured Capacity
The name of the agent who set the Presence Status inOmni-Channel.
Created By
The date when the User Presence record was created.Created Date
The amount of time in seconds that the agent was assigned nowork items.
Idle Duration
33
Fields for User Presence RecordsOmni-Channel for Administrators
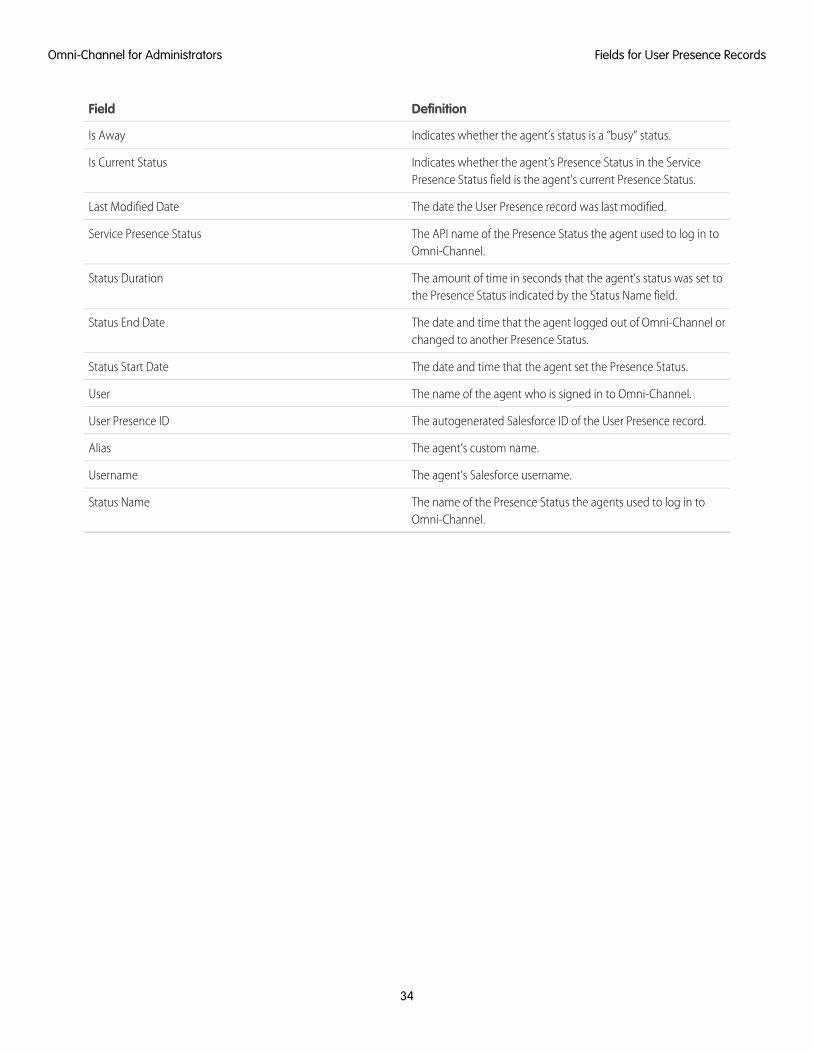
DefinitionField
Indicates whether the agent’s status is a “busy” status.Is Away
Indicates whether the agent’s Presence Status in the ServicePresence Status field is the agent’s current Presence Status.
Is Current Status
The date the User Presence record was last modified.Last Modified Date
The API name of the Presence Status the agent used to log in toOmni-Channel.
Service Presence Status
The amount of time in seconds that the agent’s status was set tothe Presence Status indicated by the Status Name field.
Status Duration
The date and time that the agent logged out of Omni-Channel orchanged to another Presence Status.
Status End Date
The date and time that the agent set the Presence Status.Status Start Date
The name of the agent who is signed in to Omni-Channel.User
The autogenerated Salesforce ID of the User Presence record.User Presence ID
The agent’s custom name.Alias
The agent’s Salesforce username.Username
The name of the Presence Status the agents used to log in toOmni-Channel.
Status Name
34
Fields for User Presence RecordsOmni-Channel for Administrators
INDEX
LLive Agent
enabling with Omni-Channel 17–18
OOmni-Channel
compact layouts 15enable 3, 22enabling with Live Agent 17–18Omni-Channel widget 14presence configuration 8presence status 11presence statuses 13–14reference 29routing 19–25, 27, 29routing configuration 7
routing configurations5
create 5routing mdoel options 7
service channels3
create 3supported objects 4testing 16
Omni-Channel Agent Workfields 31
Omni-Channel User Service Presencefields 33
Omni-Channel utility 15Omni-Channel widget
add to Salesforce console 14
Ppresence configuration
create 8Presence configuration
settings 9presence status
create 11Presence status
settings 12presence statuses
access through permission sets 13access through profiles 14
Rrouting configuration
settings 5
SService channel
settings 3Service Presence 1–2, 13
35


