
sdadasda
1
Lab 1 – Getting Started
Linux Installa,on (Virtualiza,on)
Sistemas Informáticos: Práctica 1 1!
Session Index
• Previous: Lab & Virtualiza,on
• Assignment 1: Installing Debian 7
• Assignment 2: Snapshots
• Assignment 3: Course VM
Sistemas Informáticos: Práctica 1 2

sdadasda
2
Previous: Lab & Virtualiza,on
• Laboratory LSC II Hardware • Processor: Intel core i5 • Memory: 8GB DDRAM • Windows 7
Sistemas Informáticos: Práctica 1 3!
• Laptop / Home PC • Hardware ¿? • SoAware ¿?
Recommended: Memory>=2GB
Capa de Virtualización (Vbox)
• Virtual Laboratory – AbstracCon from assigned machine – Simple rollback from SoAware errors – Portable environment (Combine work at lab and
home)
Previous: Virtualiza,on • Interfaces:
– Key aspect to deal with the complexity of a modern computer – Interface hides implementaCon details (mult instrucCon provided by ISA, no need to know how mulCplicaCon is implemented in HW): Employed both in HW and SW
• Ejemplos:
Sistemas Informáticos: Práctica 1 4
Sparc
Solaris
Solaris apps.
x86
Linux
Linux apps
x86
Windows
Windows apps.

sdadasda
3
Previous: Virtualiza,on • Disadvantages of Interfaces:
– SoAware compiled for a specific ISA cannot be executed in a HW with differnt ISA How can a Solaris (Sparc) binary run in a x86?
– Even with the same ISA, OS can differ. Can linux applicaCons run under Windows in a x86 machine?
Sistemas Informáticos: Práctica 1 5
Solaris OS
Solaris apps
x86 x86
Windows apps.
Linux
Previous: Virtualiza,on • Solu,on: Virtualiza,on
– Add a SoAware layer which allows to overcome the limitaCons of Interfaces.
Sistemas Informáticos: Práctica 1 6
VirtualMachine
OS
Applications
OS
Applications
VirtualizingSoftwareHardware"Machine"
Guest
VMM
Host

sdadasda
4
Previous: Virtualiza,on
Sistemas Informáticos: Práctica 1 7
Virtualization Layer
Host
Guests
Previous: Virtualiza,on
Sistemas Informáticos: Práctica 1 8
• VirtualBox – IniCally developed by Sun, currently supported by Oracle, under GPL license.
– MulCplaXorm Host (Linux, Osx, Windows,..) – MulCplaXorm Guest (Linux, Osx, Windows,...)
• More flexible than other free alternaCves – Vmware Player
• Always employ the last version: 5.0.14

sdadasda
5
Session Index
• Previous: Lab & Virtualiza,on
• Assignment 1: Installing Debian 7
• Assignment 2: Snapshots
• Assignment 3: Course VM
Sistemas Informáticos: Práctica 1 9
Assignment 1: Installing Debian 7 • Step 1: Define a new virtual machine in VirtualBox
– Type: Linux/Debian (64 bits) – ½ Physical Memory (min. 2 GB), ½ logic processors – 10 GB disk (Dynamic VDI)
– Start Machine • What happens?
Sistemas Informáticos: Práctica 1 10
sdadasda
6
Assignment 1: Installing Debian 7 • Step 2: Get a copy of the OS you want to employ (Debian)
– InstallaCon from image (ISO) – minimal ISO
• During installaCon process, we will connect to Debian servers (repositories) to download components under demand
Sistemas Informáticos: Práctica 1 11
https://www.debian.org/distrib/
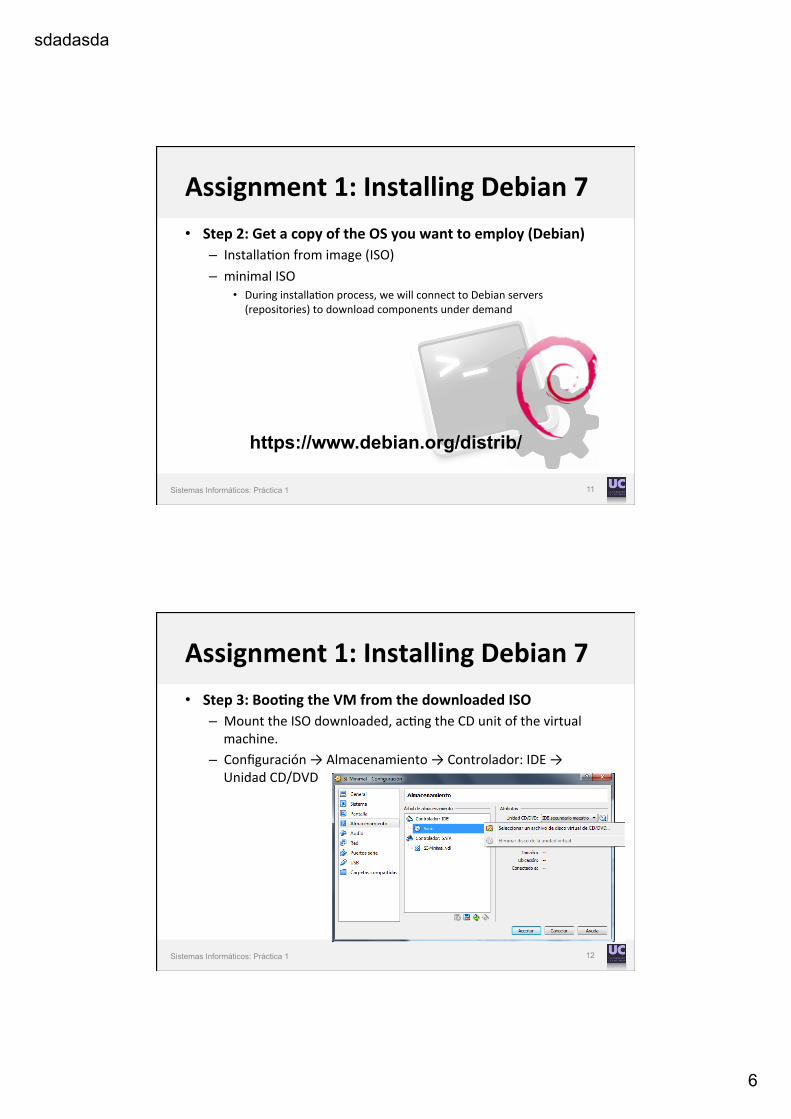
Assignment 1: Installing Debian 7 • Step 3: Boo,ng the VM from the downloaded ISO
– Mount the ISO downloaded, acCng the CD unit of the virtual machine.
– Configuración → Almacenamiento → Controlador: IDE → Unidad CD/DVD
Sistemas Informáticos: Práctica 1 12

sdadasda
7
Assignment 1: Installing Debian 7 • Step 4: Instala,on process
– Boot the Virtual Machine, which triggers the installaCon process.
– Graphic Install – Password superususario: root – Mirror Ap: España (choose one from the list), no proxi
• Recommended: cdn.debian.net
– CollecCons to install: NINGUNA.
– Once finished the installaCon, boot the machine and try to access with your user and password.
Sistemas Informáticos: Práctica 1 13
Session Index
• Previous: Lab & Virtualiza,on
• Assignment 1: Installing Debian 7
• Assignment 2: Snapshots
• Assignment 3: Course VM
Sistemas Informáticos: Práctica 1 14

sdadasda
8
Assignment 2: Snapshots • Could be defined as a “photograph” of the Virtual System state at
a certain moment, stored in disk by Vbox. • Crea,on:
– You can generate a copy of the current state whenever you want. – If you create a snapshot when the machine is running, Main memory state is also copied to disk ( << snapshot Size)
– Advice: Always create snapshots aAer turning off the machine.
Sistemas Informáticos: Práctica 1 15
ASSIG 1 ASSIG 2 ASSIG 3 ASSIG 4 ASSIG 5
Sn-inicial Sn-1 Sn-2 Sn-3 Sn-4 Sn-5
time
Assignment 2: Snapshots • Restore:
– Restoring means going back in Cme. Any change made aAer a snapshot can be reverted.
– The snapshots store incremental changes (in separated files) – The iniCal state can be restored eliminaCng the differenCal changes
Sistemas Informáticos: Práctica 1 16
TAREA 1 TAREA 2 TAREA 3 TAREA 4 TAREA 5
Sn-inicial Sn-1 Sn-2 Sn-3 Sn-4
time
RESTORE

sdadasda
9
Assignment 2: Snapshots • Removing snapshot:
– Removing a intermediate snapshot does not affect Virtual Machine state, only frees host files that Vbox employed to store data about that snapshot.
Sistemas Informáticos: Práctica 1 17
TAREA 2 TAREA 3 TAREA 4 TAREA 5
Sn-inicial Sn-1 Sn-2 Sn-3 Sn-4 Sn-5
time
TAREA 2 + 3 TAREA 1
Assignment 2: Snapshots • With your VM turned off, create a snapshot named “inicial”. • Power on your VM, and create a file with the following command:
cat /proc/cpuinfo > file1
• Turn off the machine and create another snapshot: “file1” • Power on again and run the command passwd to change your
user password. Power off and create a snapshot named passwd.
Sistemas Informáticos: Práctica 1 18
inicial
file1
passwd
Estado actual

sdadasda
10
Assignment 2: Snapshots • Remove the snapshot “file1”. AAer that, check out what happened
with the file file1 if we restore the snapshot passwd. Can you find that file?
• Finally, restore the iniCal state of the machine. Check that the password has returned to its previous value. What happens with snapshot passwd aAer restoring to iniCal state?
Sistemas Informáticos: Práctica 1 19
inicial
file1
passwd
Estado actual
Session Index
• Previous: Lab & Virtualiza,on
• Assignment 1: Installing Debian 7
• Assignment 2: Snapshots
• Assignment 3: Course VM
Sistemas Informáticos: Práctica 1 20

sdadasda
11
Assignment 3: Course VM • Once installed Debian on your Virtual Machine… Discard it. • We will make use of a VM specially created and opCmized for this
course – Common starCng point for everybody – Includes part of the tools employed in lab – OpCmized to work with VirtualBox.
• The link below contains a folder labeled VM, where you will find a tar.gz file with the Machine for this course.
hYp://www.atc.unican.es/SI (login: alumno / passwd: alu_SI)
• Download and uncompress the file. Copy the content in the folder where you want to work.
• Add the VM to Vbox and create a snapshot of the iniCal state.
Sistemas Informáticos: Práctica 1 21
Assignment 3: Course VM • Migra,ng a Virtual Machine between two PCs
– Useful in case of working simultaneously at Lab and home – Also useful to prevent HW failures (what if your laptop breaks?)
Sistemas Informáticos: Práctica 1 22
Virtualization Layer (Vbox)

sdadasda
12
Assignment 3: Course VM • Folder organiza,on for a Virtual Machine in Vbox:
Sistemas Informáticos: Práctica 1 23
Virtual_Machine
logs: messages with info about installation, errors, etc. (~500KB)
Snapshots: folder with disk files (vdi) containing the differences between two snapshots (Size??).
Virtual Disk Image: Disk Image. Large size (1-2GB)
VirtualBox Machine Definition: Xml file with the definition/configuration of the VM (8KB)
VM
logs
Sshots
Assignment 3: Course VM • Step 1: Replicate the Base VM
– We must copy all the VM files from one PC to the other one. This way, both PCs have the same iniCal image.
– Big amount of data, but fortunately it has to be done only once.
Sistemas Informáticos: Práctica 1 24
Virtualization layer (Vbox)
VM
logs
Sshots

sdadasda
13
VM
logs
Sshots
Assignment 3: Course VM • Step 2: Migra,ng your work between hosts
– Once performed the iniCal copy, only the migraCon of a few files is required to maintain the same state in both hosts.
– Procedure: Work in lab → Create snapshot → Copy [.vbox + Snapshots] → Overwrite these files in laptop → Keep on working…
Sistemas Informáticos: Práctica 1 25
Virtualization Layer (Vbox)
VM
logs
Sshots
Assignment 3: Course VM • Migra,on test
– Let’s try to migrate the VM prepared for this course. You don’t need to perform step 1 in this case ( You all have the same base machine installed). In your PC, power on the Course VM and create two new folders (mkdir), labeling them with your first and second surname. Power off the VM and create a snapshot.
– Copy the required files in a pendrive and exchange the PC with your classmate.
– In your new PC, overwrite the files with the ones in the pendrive, power on the VM and check if you are able to see the folders created previously.
Sistemas Informáticos: Práctica 1 26


