download all articles
TRANSCRIPT

·'
....
... ' i.
Journal of·
Biological Curation·
Volume 1, Number 2, 1990
-----~
l

lVlr CW PcUiU of Invertebrates, Manchester Museum,
Mancllcstcr Manchester M 13 ~JPL Tcl OG 1-2'7£) 2666 06 1-27!5 2G7G
Mr SI' Garland, Uolton J\!lu::;cum
C~raham, Hall Museum ,~Art Gallery, Burnky
Newsletter JVir ,J l\!laLllias, Leicestershire !Vluscurns
Dr G Re id, I lorniman li/Juscmn
Mr 1{ Barnct L !3ris1 ol JV!uscurn Mrs l< Down. London JV!r .S I lcwiU, Carlisle !Vlr S ,J udcl, Liverpool lVI uscu m Mr W Kcnclal Muscurn Mrn lVlr D MrA
I!awkcs, llaslemerc Tbc Biology Curators Group
Museum was founded in lD7l) with 11Jc following tcnn:, "I
rckn:ncc: 1. To bcilitiltc the
collccl ion of biol of information between inclividuals concenwcl vvill1 11~<
ea! specimen and rcl'orcls, !heir consc:rvatioii :111d
2. the views or biological curators (o !he Museum i\ssocintion <llHI oil I< I
BCG holds ml'ci usually based on topical lhcnws. and occasioll: llil' 111 associ.aiion olhcr groups. There arc u two a year, one i11 111,
which incorporates the /\GM, and one in tl1c AuLunlll.
ancl a scric·; of arc free !o mcJnLwn:;. information on back issues.
' one issue of the ,Journal or lliolol'i< .li ancl leaflets <lS the need arises. '1 11\, ·'
to 1 he l1:clitor or !he Ncwc;lcUcr Erlilo1 f,,
enquiries should he adclrcssecl to lhc Mcmlwrship Mollusca Seciion, Na1 ural Hbtorv Museum,
London SW7 5BD. ,
ISSN 09(5iF7608
R. H. Harris

2 R. H. Harris
R.H. Harris (1919-1987)
Reg Harris FMA, Hon.FLS, MIBiol., founder member of the Biology Curators Group, was born in 1919 over a jeweller's shop in Central London. He joined the staff of E. Gerrard, Royal College Street, straight from school, and moved to the Wellcome Museum Uust over the road from his home) in 1936. The war years saw him in the Navy, in the Laboratory at the Royal Naval Hospital Haslar from 1939-1941, aboard HMS Collinwood from 1941-1943 as Sick Berth Petty Officer in the Sick Quarter Laboratory, and attached to the Royal Netherlands Navy, on the Hospital Ship HMHC Ophir, Eastern Fleet, in 1943.
Returning to the Wellcome Museum in 1946, he moved on after a year to the Zoology Department of University College, London, as a teaching technician. Appointed Curator of the Museum of Zoology and Comparative Anatomy a year later, a post the current Professor relinquished in Reg's favour, he realised the vision of a former Professor, J.P. Hill., "for a trained zoologist who was also a good technician". His experimentation at this time produced new ways of preparing teaching specimens. He was invited to teach Biology in 1950 at the Working Mens College where he had been a student himself gaining the Foster Memorial Prize for Bacteriology and the Fotheringham Prize for Geology.
The move to the Natural History Museum at South Kensington as an Experimental Officer in 1956 gave Reg the time and the scope to develop further experimentation in new ways of specimen preparation. The work for which he is best known began in 1960 after a talk with Dr Meryman (a Naval Physicist from Washington) who described a method of drying entire biological samples in their natural shape and proportions without distortion. A subsequent meeting with Dr Roland Hamer of the Smithsonian Institution led to the technique of freeze drying being developed simultaneously in the USA and the UK. Together with Edwards High Vacuum Ltd the highly successful EF2 machine was evolved. An arrangement of spring flowers buried in Westminster Abbey in 1977 as part of the Queen's Jubilee Year Celebrations, were freeze dried by Reg.
Work on other applications of freeze drying, for stereoscan electron microscopy, marine archaeology, marine zooplankton, and geological applications, together with critical point drying, followed. He was deeply involved with the problems of bio-deterioration and very keen that this work should be continued by others. During his time at the Natural History Museum he taught Biology and museum technique at evening courses for the Science Laboratory Technicians Course at Paddington Technical College.
'Retirement' in 1980 saw him moving to Alderney for four years to become Curator of the Alderney Museum. On his return to the mainland he was still involved in promoting research into bio-deterioration, and took part in seminars as part of the Leicester Museums Studies Course.

Journal of Biological Curation Vol. 1 No. 2, 1990 (1992) 3
A very private man devoted to his family, Reg had a keen sense of humour and was a fountain of knowledge. He had the rare gift of communicating his love of and boundless enthusiasm for everything connected with Natural History and Geology, which enriched the lives of countless students, technicians and many others. His death. on 2nd March, 1987, left a gap which has yet to be filled.
Rosina Down
List of Publications by Reg Harris
1950 (with H C Bartle) Marco resin embedding. BulLsci.Tech.Ass. 1 (10) March.
1951 The use of enzymes in the osteological preparation of the Emperor Penguin. M us. J. 51, 97.
1952 Demonstration of the supporting tissue in the manus of the Indian Elephant by the use of a specific stain. Mus. J. 52 (8): 206.
1957 (with CA Wright and D Claugher) Paper Chromatography in taxonomic work. Nature 180, 1489.
1958 The extraction of bones from bird pellets. Essex Nat. 30 (2), 129 1959 Small vertebrate skeletons. Mus. J. 58 (10), 223-224. 1960 Alizarine transparencies. Mus. J. 60 (4), 99-101. 1964 Vacuum dehydration and freeze drying of entire biological specimens.
Ann. Mag. Nat. Hist. Ser.l3, VII: 65-74. 1964 Freeze drying - a Natural History Preservation Technique. Trans Mus.
Ass. Grp. No.3 (Sept.) 1965 Simple technique for embedding and supporting of delicate biological
specimens. Nature 208 (5006), 199. 1965 Vakuum - und Gefriertrocknung ganzer biologischer Objeckte. Der Pr
parator Jahrgang II. Heft 4. (translation of Vacuum dehydration and freeze drying 1964).
1967 [Editor] Aliverti, Ciccioli and Laudi. Secrets of the Microscope. 1968 A new apparatus for freeze drying whole biological specimens. Med. BioL
m. 17 (3) 1968 [Editor] Life on Earth. Hamlyn, London. 1969 Nature Collecting. Hamlyn, London. 1972 (with B S Martin and C G Ogden) Notes on the preparation for scanning
electron microscopy. BulL Mus. Nat. Hist. (ZooL) 24, 223-228. 1976 Preparation techniques for biological material. Biology Curators' Group
Newsletter 1 (3), 15. 1976 Freeze-drying of marine Zooplankton. Monographs on Oceanographic
Methodology N: Zooplankton fzxation and preservation. UNESCO Press, Paris.
1978 Biodeterioration. Biology Curators' Group Newsletter 1 (8), 3-12. 1979 (with R 0 Hower) Introduction in Freeze-drying Biological Specimens, a
laboratory manuaL Smithsonian Institution Press, Washington. 1979 The conservation of one of the earliest known examples of a fluid
preserved injection dissection (of a Marine Coelenterate from the John Hunter Collection). Mus. J. 79 (2), 71-72.
1984 A Selective Bibliography on Preservation, Macro and Micro-anatomical Techniques: BCG Report No.3 Biology Curators' Group, Leicester.

4 R. H. Han·is
Zoological Preservation and Conservation Techniques
R.H. Harris
Hazards Warning Please note that some of the chemicals used in the formulae here
presented, such as xylene and formaldehyde, are known carcinogens; inhibisol can often be used as a substitute for organic solvents. Several other substances, such as glacial acetic acid, mercuric chloride, and phenol, can also be very hazardous. All the formulae should only be mixed using protective clothing (including eye protection), and the work should be done within a suitable fume cupboard. The manufacturer's hazard information and instructions for use should always be consulted before handling or mixing any chemicals.
Editor's Preface
Editing a manuscript without being able to consult the author is difficult, but fortunately the draft left by Reg Harris was practically completed. Apart from some minor corrections of spelling, etc., the main work has been rationalising the layout, setting headings into a consistent hierarchy, redrawing the figures and moving the references from the end of each section to a unified citation list at the end. Otherwise Reg's work is published here as he left it, as a tribute to a pioneer in his field. The BCG Committee decided that it was not appropriate to attempt to bring the list of references up-to-date, so post-1987 work is not cited.
Author's Introduction
There has always been a tendency to regard the practice of techniques in zoology as a throwback to the past with an eloquence of bygone knowledge and small hope for the future. Zoology has become a mosaic of specialities and with the increase of research in many spheres it is more than ever essential that well founded technical research is needed to ensure that the specimens of today will be available to workers in time to come. Without adequately prepared material, taxonomic and systematic research will become virtually impossible. It is curious to note that the great efforts to accumulate and install collections have not been supplemented, in many cases, by adequate means of conservation and preservation. It is to be hoped that this small volume will play its part in ensuring that the techniques for the care and conservation of specimens will not disappear.
R. H. Harris

Journal of Biological Curation Vol. 1 No. 2, 1990 (1992)
Zoological Preservation and Conservation Techniques I. Fluid Preservation
R. H. Harris
History
Preservation and Fixation
Alcohol
Formaldehyde
Formaldehyde assay
Formaldehyde releasers
Post fixation reagents
Keeping solutions
Colour preservation
Anti-oxidants
Respiratory pigment preservation
Metallic salts
Neutralising agents
Fixative solutions
Fixation: Preliminary treatment of specimens before preservation
Preservation: Treatment after fixation
Mounting of fluid preserved specimens for museum and study purposes
Mounting fluid preserved specimens in glass museum jars
Cements for glass museum jars
Specimen attachment
Repair and conservation of fluid preserved specimens
Mounting fluid preserved specimens in plastic jars
Tissue reconstitution
5
6 R. H. Harris
History One of the most significant advances in the preservation of biological
tissues was the introduction of fluid preservation in the mid-17th century. In 1660 Elias Ashmole showed Charles 11 two abortions that had been preserved in fluid in a glass jar and these aroused considerable interest at court (Gunther, 1927). Later in 1662 Robert Boyle recorded the use of spirits of wine for preserving tissues. It seems very likely that the two puppy dogs shown by Mr Croune at a Royal Society meeting on June 4th 1662 were preserved in spirits of wine following Boyle's information (Birch, 1746). In 1670 Swammerdam mentioned spirits of wine in his museum catalogue and in 1681 Grew mentioned liquid preparations in the Royal Society catalogue of the year. In 1710 Ruysch mentioned the use of liquid preparation in his catalogue and the Hunter collections in 1768 contained a large number of fluid preserved specimens (Cole, 1944). In 1786 Seba records the use of "kilduivel" or killing devil, a popular name for spirits of wine (Engel, 1937).
Until the introduction of formaldehyde in 1859 all fluid preserved solutions of any reasonable preservative value were based on alcohol. It was in this year that Buterlov discovered formaldehyde as an interesting substance but he had no real idea of its true value as a disinfectant or preservative. It was in 1867 that van Hofman demonstrated the use of the reagent, preparing it from methyl alcohol. It was the antiseptic properties of the formaldehyde that drew the attention of preservation workers. In 1893 Blum noticed the preservation qualities of formaldehyde, and that it hardened and caused very little shrinkage of tissue. He then transferred some of the tissue to alcohol and was probably the first worker to bring about a form of colour preservation in biological tissue. It must be remembered that the formaldehyde prepared here was produced by placing a hot platinum coil in a bath of methyl alcohol and was probably a chemical of high analytical purity with none of the oxidation effects so noticeable in modern reagents. Blum summed up the advantages of formaldehyde over alcohol by saying 'It seems to harden objects without shrinking them, that mucin secreting animals remain transparent in formalin and that formalin preserves colour better. Furthermore formalin solutions are considerably cheaper in price than alcohol'. Bluntson recommended at the end of 1893 that tissue should be fixed in 10% formaldehyde and then transferred to alcohol to bring back the colour. He commented 'the colour of the flesh and blood apparently lost during the formalin hardening, reappears as if fresh and the blood corpuscles show up under the microscope in their natural shape and colouring'. This two stage method forms the basis of modem colour preservation technique.
Preservation and Fixation Fluid preservation is the prevention of cell breakdown by altering or
eliminating the action of enzymes within the cells; the combination of enzymes usually present in cells is called kathepsin. To preserve a piece of tissue it is necessary to place it in a fluid in which it will neither shrink or
Fluid Preservation) 7
swell, nor dissolve or distort in any way, and it must also render the kathepsin inactive. A fixative is a solution which will preserve and render the tissue stainable for histological examination. Some fixatives are only used for very short times and are positively harmful to tissues left too long in them.
Some preservatives are not suitable for tissues intended. for histological examination. It is essential to follow the correct procedure in the preparation of fixatives and preservatives. A solution that is too strong or too weak will often result in the breakdown of cells and tissues. In fact this phenomenon is utilised when cell studies require a complete dissociation of a tissue.
Further research in recent years using anti-oxidants together with formaldehyde solutions has brought success in a number of animal groups. Yoshida's (1962) use of vitamin C with formaldehyde for fish colour preservation is an example of this work. It seems very likely that alcohol and formalin based solutions will be used in preservation research for the foreseeable future.
However, with the Health and Safety problems aroused by the hazards of these two chemicals a search has been made for suitable substitutes or alternative reagents. This has initiated the introduction of post fixation reagents, formaldehyde releasing agents in the presence of protein and keeping reagents, which while not preserving, will keep tissues for a period to allow histochemistry or other biological analyses to be carried out. The search for the ideal fluid preservative continues.
There has been confusion over the various names formal, formalin and formaldehyde and no clear policy of how to use the terms. For the purposes of this thesis it will be stated that the product from methyl alcohol was first called formaldehyde and the other two terms are trade names from various German chemical manufacturers. 'Formaldehyde' is the name of a chemical compound (HCHO) which is gaseous at normal temperatures and pressures. 'Formalin' is the trivial name given to aqueous solutions (generally 40% weight/volume HCHO /H20) of the gas which usually contains methanol to inhibit polymerisation. 'Formal' is synonymous with 'formalin'.
Alcohol Ethyl Alcohol (ethanol or absolute alcohol) - An expensive reagent
used mainly for analysis and should not be diluted for preservation work.
Isopropyl Alcohol - A popular alcohol preservative in the USA and Europe. Can be diluted down to 50% and still give satisfactory results. Also used in place of ethyl alcohol in histology as it will not cause milkiness in xylene when used in dehydration technique. It can be used in all cases where absolute alcohol is required apart from pure chemical analysis.
Methylated Spirit - Ethyl and methyl alcohols to which mineral oils and colouring has been added. Useless for preservation. Goes milky on dilution with water.

8 R. H. Harris
Industrial Methylated Spirit - This is the alcohol used for biological preservation. To every ninety-five parts by volume of spirits are added five parts by volume of wood naphtha. Industrial methylated spirit is obtainable in a variety of strengths. The strength of alcohol is determined by excise officers according to a term known as Proof Spirit. This is a mixture of about equal parts of alcohol and water. The strengths of alcohol which are weaker than Proof spirit are measured on a scale of 100 degrees and those which are stronger are measured by a scale of about 75 degrees. Pure water is 100° under Proof, and pure spirit is 75.35° over Proof. The strengths available are usually 60, 66, 68 and 74° over proof. Proof alcohol is by definition around 57% at 60°F. Thus 66° over Proof is 95% and 74° over proof is around 98%. Much depends on the temperature and moisture content of the area surrounding the container of alcohol. The unstable estimation can be overcome by placing suitable dehydrating agents in the alcohol container. Dehydrated copper sulphate placed in a container of high grade alcohol will maintain the grade, provided that the open air is not admitted to the container too often. Any increase of hydration will be shown by the return of the blue colour to the white dehydrated copper sulphate being used as a desiccant.
When supplied at a strength of 74° over proof the reagent is often called absolute alcohol and it has the following qualities:-
a) equivalent to 99 percent by volume and as free from water as is absolute ethyl alcohol
b) miscible with xylene in all proportions
c) contains not more than a trace of acetone
d) remains clear in all dilutions
e) completely volatile
f) suitable for most laboratory purposes, including the preparation of elementary organic chemicals
g) satisfactory for most staining purposes and for general microscopic work and for the preservation of organic specimens
Formaldehyde Pure formaldehyde is an irritating pungent gas readily liquefYing at low
temperatures. The liquid and the gas readily polymerise into the insoluble form of poly-oxymethylene, which has little scientific application. Formaldehyde gas, however, is soluble in water to form solutions that are relatively stable. Formaldehyde is also used as the solid hydrated polymer paraformaldehyde. The greatest bulk of formaldehyde is supplied as a solution in water, containing 37% by weight of formaldehyde with a small amount of methanol. The solution is often referred to as formalin, 40% formalin, or more correctly as 40% formaldehyde. It is always used diluted as a fixative and then added to other reagents to form preservative media.

Fluid Preservation 9
Determination of strengths of formaldehyde solutions.
The basis of this metl;-od is the quantitative liberation of sodium hydroxide when formaldehyde reacts with sodium sulphite and water. The change in reaction may be followed by using thymol-phthalein as an indicator and the amount of sodium hydroxide liberated is estimated by titration. The amount of formaldehyde present in the fluid may be calculated as follows:-
1 Place 50 ml of a 30% aqueous solution of sodium sulphite in a flask.
2 Add 2 drops of thymol-phthalein indicator solution.
3 Add a few drops of normal sodium hydroxide solution until the colour is a faint blue.
4 Add normal sulphuric acid drop by drop until the blue colour just disappears.
5 Weigh out 3 gm of the formaldehyde containing sample. Add this to the sodium sulphite solution, which will turn blue.
6 Shake the solution and titrate with normal sulphuric acid until the blue colour just disappears. (NB: Hydrochloric acid should not be used as the mixture of hydrochloric acid and formaldehyde produces a gas bischloromethyl ether, a proven potent carcinogen.)
7 The percentage of formaldehyde may be calculated from the following equation:-
%formaldehyde= Acid titre x normality of acid x 3.003 Weight of sample
1ml normal acid is equivalent to 0.03003gms of formaldehyde therefore to convert to percentage formaldehyde multiply by 100. Thus 0.03003 times 100 is 3.003. In actual practice the titre is the percentage formaldehyde present in the sample.
Formaldehyde Releasers
There are a number of these reagents available and the most commonly used is Dowicil 100. It is a white to cream coloured powder with a high solubility and an aromatic smell. Its full chemical name is 3.5.7.triazo-1-azoniaadamantane chloride. The mechanism of the action of Dowicil is the controlled breakdown of the molecule, the solution liberating formaldehyde in the presence of protein. Solutions should be made up and used within two weeks. A 10% aqueous solution is satisfactory for most cases, although a solution of up to 30% in seawater is used for many invertebrates at the Indian Ocean Biological Centre, Cochin. For whole vertebrates a solution of up to 20% has been used by Australian and Swiss workers quite successfully.
10 R. H. Harris
Post fixation preservatives These reagents have been developed from germicide and fungicide
chemicals used in the pharmaceutical industry. They have the property of maintaining tissue in an aqueous solution after it has been well fixed by a standard formula. Although not preservatives in any sense they will retain enzymic activity in the tissues for several days when suitable material is available.
Phenoxetol - A clear viscous fluid which only dissolves in water with difficulty at about 2%.
Propylene phenoxetol - Is similar to phenoxetol but has an anaesthetic effect on many invertebrates and is often used for this purpose. Steedman's (1976) suggestion that propylene glycol might be added to these chemicals to effect easier solution in water has proved most successful. The addition of propylene glycol to either phenoxetol or propylene phenoxetol confers the following advantages:-
a) very easy solubility
b) improves clarity by changing the refractive index
c) resistance to complete desiccation
d) improved flexibility of the specimens
e) powerful fungicide action
The addition of phenoxetol to a formaldehyde fixative results in very much quicker penetration of the reagent. The phenoxetol acts as an indifferent salt in the same way that sodium chloride does when used as part of the fixative formal saline.
Keeping solutions
8-hydroxyquinoline sulphate in an aqueous solution is an excellent keeping solution. Useful in field collecting as a dry powder made up in aqueous solutions, it is able to keep plants and animals in a reasonable state for up to one month; after this time proper fixation and preservation should be carried out. Unless specially made it tends to be very acid in reaction, and material should be kept in glass or plastic containers, as most metals are attacked by solutions of the reagent. It is sometimes used as a post fixation preservative in many European museums, where it is known as 'Chinosol'; there is a neutral form available called 'Seraquin'.
Colour preservation The colours of animals are due to pigments or to the physical structure of
the integument. Most pigments are synthesised by the animals, but one important group, the carotenoids, are derived from plant food. The structural colours are caused by Tyndall scattering or by interference with light. Pigments are substances which, due to their chemical nature, absorb light of

Fluid Preservation 11
certain wavelengths and reflect light of others, and in so doing are coloured. The red robin, yellow canary, green caterpillar and blue lobster are coloured by pigments. There are, however, brilliant colours that are due not to pigments but to the physical properties of the animal's surface, i.e. the skin, hair, scales, feathers etc. These are the structural colours. Tyndall first explained the blue colour of the sky over a century ago. It is blue for the reason that very small particles in the upper air scatter back a higher proportion of the short wave, or blue, light from the sun, than of the longer red/ green waves. Feathers are blue for a similar reason, as are blue eyes and the blue faces of certain monkeys. An outer layer of yellow pigment absorbs the blue but allows the green, yellow and red components of white light to enter the tissues. The green light is scattered by minute air spaces in the translucent feather substance to a greater extent than the long wave yellow and red, which are absorbed by a black internal pigment. The green of a tree frog and lizard have a similar origin: living cells near the skin surface contain oily yellow droplets, beneath which are cells containing tiny granules that scatter green light more than yellow or red, which are absorbed by black cells beneath those containing the granules. The Australian Tree Frog Hyla coerulea is so called because it is bluish when preserved in alcohol; the yellow pigment is soluble in alcohol, and without it blue as well as green rays of light penetrate the cells containing the granules which scatter the blue light in addition to the green.
Thus the blue colour is a structural colour in feathers, insects and in the eye but it is caused by a carotenoid pigment in the lobster and by bile pigment in some birds eggs. Green is structural in beetles and in certain moths and partly so in feathers and in some frogs; it is a carotenoid pigment in crabs and has some connection with bile pigments with certain insects. Yellow is due to carotenoid pigment in feathers, a melanin in hair, a pterin (first found in butterfly wings and seems to be allied to uric acid) in the salamander and in certain butterflies. Red is structural in beetles, carotinoid pigment in sea anemones, crabs, certain fish (trout) and flamingoes, a pterin in butterflies and in the common frog, and is caused by echinochrome in sea urchins, to haemoglobin in humans, certain worms and molluscs and to a copper porphyrin in turaco feathers. Black is caused by melanin in skin, hair and feathers and by tanned proteins in beetles. There remain many animal colours whose chemical nature and possible physiological origin are still quite unknown.
Numerous attempts have been made over the centuries to perfect a method or technique for the preservation of natural colour in animals. For any form of colour preservation it is essential to begin with the living organism, as on death many colours are simply lost. Even those colours that are retained are affected by daylight and the bleaching effects of ultra violet light. Many of the structural colours in animals are transient in life and disappear or assume different phases on the death of the specimen. The only real progress in establishing a reasonable form of colour preservation has
12 R. H. Hams
been with the respiratory pigments. Methods of colour preservation have differed widely; for example the common lobster has a specific blue colour in life easily lost in drying or fluid preservation. However, it is possible to inject the animal with a solution of formaldehyde-acetic acid and water and then allow the specimen to dry slowly in the dark. The blue colour will be retained for long periods, even years, although why this happens is not clear. The most successful methods so far employed have been by using alcohols that do not leach out colour substances, the careful use of anti-oxidants, and the preservation of the respiratory pigments in a permanent state.
Tertiary butyl alcohol does not leach out colours in animals and, although there may be colour changes due to chemical interference, preservation will be reasonable in most cases.
Anti-oxidants
The prevention of oxidation and subsequent colour loss has been successful in many cases of colour preservation. Crystalline butylated hydroxytoluene has been used as an emulsion in alcohol and formaldehyde solutions to prevent colour loss in many invertebrate groups and with fish. Vitamin C (ascorbic acid) and pyridine have also been used in preservative solutions with success for fish and amphibia.
Respiratory pigment preservation
From the beginning of the 20th century and with the introduction of the new fluid preservative formaldehyde, research has been carried out in the preservation of the pigment haemoglobin and to a lesser extent the plant pigment chlorophyll. Formaldehyde in the pure state was, and still is, an excellent colour preservative. The problem is that slow oxidation will cause a bleaching effect, hence the use of anti-oxidants. The actual reaction that occurs during the pigment preservation is obscure but what happens seems to be as follows. First, the pigment is converted from haemoglobin to temporary acid haematein, using a solution of sodium salts with formaldehyde. After treatment with alcohol the specimen is transferred into a sodium salt-glycerin-water solution and the temporary acid haematein is converted finally into the permanent alkaline haematein in which state it is morphologically indistinguishable from the fresh, untreated tissue. The conversion change in the pigment can easily be followed by the use of a spectroscope, the absorption bands varying as the conversion progresses. This has proved to be the most efficient and lasting technique for fluid colour preservation.
Metallic salts Many metallic salts are used in fluid preservation, including mercuric
chloride, potassium dichromate, osmium tetroxide etc. They are almost all excellent fixatives but have no value as long term preservatives and they have
Fluid Preservation 13
many disadvantages, for example mercuric salts are poisonous, corrosive and give rise to precipitates within the tissues. Dichromate and alum initiate oxidising and acidic reactions, and osmium has a decolourising effect. These substances are best restricted to fixative solutions and for use in histological reagents.
Neutralising agents Sodium acetate - Frequently used to keep formaldehyde solutions at a
pH of 6.9 to 7.3. Without specimens immersed in it will keep a solution of formaldehyde at pH 7 for months; usually used as a 5% solution.
Pyridine 40% Formaldehyde Distilled water Pyridine
25ml 75ml
5ml pH approx 7. 8
For marine plankton 10 parts to 90 parts fixing fluid will maintain a pH of 7 to 7.6 .. Disadvantage: poisonous pungent vapour unsuitable for open dish or close work. Confine to fume chamber. Very good for nerve examination and general neurological investigations.
Sodium hexametaphosphate - This is the basic ingredient of many water softeners, and its solutions usually have a pH of 8 to 8.6; they may also have a slightly solvent action on calcium carbonate.
Hexamine - This reagent is produced as a reaction between ammonia and formaldehyde. Smith in 1944 suggested using a 20% solution with 40% formaldehyde, which maintains a pH of approximately 8.4 and has a softening effect on some tissues. Not widely used in general practice these days.
Sodium glycerophosphate- Used as a buffer for formaldehyde solutions. Has certain advantages; maintains a pH of 7 with a 2% solution in 40% formaldehyde. Usually precipitation follows the addition of phosphates to water (especially sea water), but this is not the case with sodium glycerophosphate. Tissues showed no change, and the solution remains clear after a year in the buffered fixative.
Borax (Sodium tetraborate) - Soluble to about 6% in water, it is a good neutralising agent. Used in excess in the fixative, it will maintain a pH of 8 to 8.4. Some bleaching occurs, however, and it is not suitable for colour preservation formulae.
Fixative solutions It is essential for research to ensure that adequate fixation precedes any
preservation technique. Often the two operations are combined but occasionally a fixative must be completely removed before preservation can commence. Formaldehyde, alcohols of various kinds and metallic salt additives have already been mentioned. Here is a list of common reagents normally used in fixation.
14 R. H. Harris
Formaldehyde
Mercuric chloride
Picric acid
Potassium dichromate
Chromic acid
Osmium tetroxide
(NB: This reagent has a very harmful vapour, it can fix the mucous membranes of eye and nose, and must only be used in an appropriate fume cupboard.)
Industrial methylated spirit
Acetic acid
Formaldehyde formulae: Forrnol saline 40% Formaldehyde Distilled water Sodium chloride
lOml 90ml
0.9gm
As alternative to the sodium chloride the solution may be buffered or sea water added in place of the distilled water for the treatment of marine invertebrates.
Bouin's Fluid Picric acid (saturated aqueous solution) 75ml 40% Formaldehyde 25ml Glacial acetic acid 5ml
This solution keeps indefinitely. It is sometimes diluted for delicate tissues (embryos etc.) with distilled water. The yellow stain of picric acid can be removed by immersion in a solution of saturated lithium carbonate in 70% alcohol.
Mercuric chloride formulae: Heidenhain's 'Susa' Mercuric chloride Distilled water Sodium chloride Trichloroacetic acid Glacial acetic acid 40% Formaldehyde
45gm 800ml
5gm 20gm
5ml 200ml
Fluid Preservation 15
Heidenhain's 'Susa' is one of the best fixatives available. Tissues should be transferred to alcohol after fixation; usually not more than 24 hours for large specimens and down to a few hours for small pieces of tissue. It is necessary to remove mercuric salts which form a precipitate in the tissues when immersed in this fixative. The precipitate is removed with alcoholic iodine. The nature of the precipitate is unknown.
Zenker's Fluid
Mercuric chloride
Potassium dichromate
Sodium sulphate
Glacial acetic acid
Distilled water
5gm
2.5gm
1gm
5ml
100ml
This solution does not keep, so it must be made up fresh just before use. However, one can make up a stock solution which keeps well by leaving out the acetic acid, which is added just before use.
Zenker-formol: (Helly's Fluid)
This is a variation of the Zenker formulation in which the acetic acid is omitted and 5ml of 40% Formaldehyde is substituted just before use.
Chromic acid formulae: Champy's Fluid
3% Potassium dichromate 1% Chromic acid 2% Osmium tetroxide
Flemming's Fluid 1% Chromic acid 2% Osmium tetroxide Glacial acetic acid
This solution is sometimes used minus the acetic acid.
Alcohol and acetic acid formulae: Camoy's Fluid
Absolute alcohol (7 40P) Chloroform Glacial acetic acid
Rapid penetration, fix for 10 minutes to 1 hour.
7ml 7ml 4ml
15ml 4ml 1ml
60ml 30ml 10ml

16 R. H. HaTTis
Schaudinn 's Fluid Saturated aqueous mercuric chloride 2 parts Absolute alcohol (740P) 1 part Glacial acetic acid to 5% added just before use.
Mainly used for smear fixation for single cells, protozoa etc.
Colour preservation fixatives: Kaiser ling's Fixative ( 1903)
Potassium acetate Potassium nitrate Formalin Distilled water
Jore's Fixative Sodium chloride Magnesium sulphate Sodium sulphate Formalin Distilled water
85gm 45gm
800ml 4000ml
1 part 2 parts 2 parts
5- 10 parts 100 parts
Jore also used a formula in which artificial Carlsbad salts were used: Formaldehyde 5 parts Saturated solution of chloral hydrate 5 parts Artificial Carlsbad salts 5 parts Distilled water 1000 parts
Pick's Fixative Formaldehyde 5% aqueous Artificial Carlsbad salts (by weight)
Artificial Carlsbad salts Sodium sulphate Potassium sulphate Sodium chloride Sodium bicarbonate
Wentworth's Fixative Formaldehyde Sodium acetate Distilled water
100 parts 5 parts
22gm 1gm 9gm
18gm
80- 100ml 40gm
1000ml Wentworth's fixative makes use of the anti-oxidant sodium hydrosulphite
in the final solution which also has marked reducing properties.
Fixation: Preliminary treatment of specimens before preservation.
It is essential to treat all specimens as something rare and valuable, since in many cases subsequent microscopic examination of an entire animal has
FLuid Preservation 1 7
often revealed new and important information of research value. The care taken of any specimen at the earliest stage is of the utmost importance as specimens damaged at this time are often beyond any further conservation or repair. Fresh specimens should never be placed in formal-saline unless circumstances require the sample to be kept for some time before treatment. Saline acts as an indifferent salt and the specimen could easily become overfixed and subsequently distorted and damaged. Organs should be suspended in the fixative and not allowed to lie on flat surfaces or they will adopt the flat appearance on fixation and many organs have been spoiled in this way. Gauze etc. should not be left on a specimen or it might leave an impression when fixation is completed.
All whole vertebrate animals of any size should be injected intra-pleurally and intra-peritoneally and an opening made in the skull to allow the fixative to reach the brain. Better still, the animal should be injected through the blood vascular system thus ensuring complete fixation of all tissues and organs. Again the injection technique may be adequate but it is necessary sometimes to open the pleural and peritoneal cavities and move the organs manually to allow the fixative to penetrate and bathe the organs and tissues thoroughly. Entire animal specimens that have been fluid preserved are often spoiled by insufficient fixation of the abdominal organs especially the liver and parts of the alimentary tract.
Preservation: Treatment of specimens after fixation.
Assuming that the specimen has been adequately fixed it is now ready for general preservation. Care must be taken in the selection of suitable containers. Glass jars with clip on lids similar to those used for bottling fruit are probably the most efficient for small and medium sized animal material. For larger and bulkier specimens tanks of some kind are required; ones with tightly fitting lids should be selected. Large plastic tanks may appear ideal but their efficiency has been called into question over lengthy periods of time. There is some evidence that they tend to develop splits and other surface degeneration after some years especially when formaldehyde containing solutions are employed. This may be due to the original polymerisation during tank production proving unstable in the long term. Certainly most plastic tanks will not stand prolonged contact with solutions containing alcohol or glycerine. There are many containers which are said to resist volatile chemicals, petrol and other solvents. This seems evident providing the vessel is kept constantly filled. It is when the container is partially filled that the deterioration seems to take place.
It now seems certain that the use of glass containers for fluid preserved biological material will never be entirely superseded until the resistant properties of plastics have been thoroughly investigated. Some form of lining might well be the answer. Paraffin wax has been used on many occasions experimentally to prevent the etching of glass when using hydrofluoric acid

18 R. H. Harris
and it seems reasonable to suggest that a similar form of lining of a plastic tank might improve its resistance to solvent and other deterioration effects.
Mounting fluid preserved specimens for museum and study purposes.
Historical:
The earliest containers for fluid preserved specimens were made of glass. These were hand blown into moulds to give a slightly oval shape with a lip on the top to secure some form of seal. In most cases this was quite complicated. A pig or sheep bladder was wetted and laid over the surface of the filled jar and this was covered with a layer of lead, followed by another layer of bladder. When quite dry the bladder-lead sequence gave a fairly tight and secure seal provided the jar was not moved about too much. This was one of the reasons why the earlier fluid preserved collections were kept under lock and key in glass fronted cupboards.
Later on the jars became more sophisticated and were made into rectangular or square shapes with one or more faces polished to give a clearer view of the specimen. Actual optical cells were made for specimens but these were always very expensive and very few were used in museum collections.
In the late 1940's plastics were employed for the production of museum jars and perspex sheet was made available for workers to make their own containers. The preparation of a perspex museum jar is and was a difficult process to do well, and there were unforseen problems. The sealing of a plastic container left much to be desired. Welding was eventually used, and Tompsett (1970) working at the Royal College of Surgeons described a useful technique which could be repeated quite successfully. Then there is the problem of suitable preserving fluids for use with plastic containers. Alcohol and glycerine cannot be used except on a very temporary basis because the plastic sheet deteriorates when in contact with these reagents. Any preservative used in plastic jars must be based on a formaldehyde formulation. However, where specimens are used for teaching and consequently are handled and moved a great deal, perspex museum jars are not recommended as they are prone to leak. Bostic glue applied to the surfaces (which must be dry) where the leak occurs can effect a useful temporary repair (R.Down, in litt).
There have been attempts to place fluid preserved material into plastic blocks for teaching and museum purposes. This has had a limited success as the eventual breakdown of many of the resins used has been a barrier to the use of valuable or irreplaceable material. It seems that for the foreseeable future glass jars will be the best means of keeping fluid preserved material, with the less efficient but more easily obtainable plastic containers playing an increasingly important role in this field.
Fluid Preservation 19
Procedure for mounting a fluid preserved specimen in a glass jar.
Selection of a suitable container: Most of the early jars fitted the specimen quite tightly and the samples were suspended with fine silk from two points on the lid which were pressed down by the sealing leaving a suspended specimen in the preserving fluid. With the introduction of the rectangular and square glass jars internal slips were cut to fit inside the jars so that the specimens could be sewn on. This involved the drilling of the glass slip. Although there are tungsten carbide bits which cut through glass quite easily, the earliest and in some ways the most efficient method of drilling holes in glass is to use bits broken from a small triangular file the ends of which have been ground to a pyramidal point, then heated in a bunsen flame to cherry red and plunged into water. Using a flux made from camphor and turpentine the drill will easily go through glass of medium thickness (up to 22 oz). Drill through until a slight click is heard. This indicates that the bit has just penetrated to the other side of the slip. Turn the glass slip over and finish off the hole by countersinking; this also leaves a depression in the glass. When the specimen is attached by fine silk to the glass slip the knot is tied over a small glass bead which fits snugly into the countersunk hole. Most specimens can easily be sewn through but on occasions a tissue or specimen might be too friable to be held in the normal way. Take for example, a brain, either entire or in sections. It would be impossible to sew through such a tissue and keep it firmly on a glass slip. The procedure in these cases is to insert a very fine glass rod along the length of the brain or section so that a thread can be passed over the rod and drawn back into the tissue leaving no trace, but firmly attached to the glass slip.
Alternatively a specimen may be attached to a slip by sewing through the specimen and running the silk round the slip. First make sure the edges of the glass slip have been rubbed smooth with a fine grade carborundum (emery paper will do for this). This is the general procedure for a specimen mounted in either an alcohol or formaldehyde formulation. Sometimes it is necessary to use other fluids. For cleared specimens, transparencies and calcium and cartilage specific stained samples, the preserving fluid may be a solvent or clearing agent. The same procedure is adopted for the mounting, but the sealing agent for the lid will have to be resistant to the action of the preserving reagent.
Cements for glass museum jars
Hot cements
1. Asphalt and guttapercha. - The guttapercha is obtained from the outer covering of pre-plastic electric wiring. It is made into a mixture by heating on a sand bath. Use a spatula or a table knife broken off at right angles to form a straight surface. Heat the lid of the jar and continue the seal

20 R. H. Harris
by heating a piece of glass and using this to press the lid into position until a seal has been obtained.
2. Bitumen.- Melted in an old kidney dish or other enamelled container. Keep melted by placing on the bypass of a bunsen burner flame or spirit burner. Apply with a knife as for 1. Seals may be made using an old electric iron which gives continuous heat and is very efficient.
3. Rubber and wax. - Scrap rubber 2 parts, paraffin wax (high melting point) 1 part. Melt together on a sand bath. Used for sealing specimens with an excess of fat.
4. Gelatin. - Use the best sheet gelatin. Soak in water until soft and squeeze out excess water. Melt on a sand bath adding a few drops of glacial acetic acid when melted. Pour into a flat tin and allow to set. Cut into small squares and keep in an airtight jar. Use only enough for the immediate purpose. Will not allow more than three consecutive meltings, after which it will no longer melt effectively as it turns into metagelatin.
These hot cements should only be used for formaldehyde and other aqueous formulations. Alcohol being inflammable would be dangerous except if an iron was used to seal the lids. If circumstances permit gelatin could be used, provided that the lid was warmed with hot water or on a hot plate and then applied to the gelatin smeared surface of the top of the jar. If successful full optical contact is made resulting in a good seal.
Cold Cements.
1. Lead oxide (red lead or litharge) and Stockholm tar. - Mix into a stiff paste and smear on the edges of the jar. Allow at least a week for hardening and in some cases (very large containers) several weeks. Formulated for use with large jars and those containers which for various reasons cannot be treated by other means.
2. Spateholtz cement. Gum arabic ........... 50gms Sugar .................... 50gms Isinglass................ 2gms Formaldehyde ....... 30mls
Mix into a paste, apply and leave for at least a week. Used for containers containing various organic solvents such as oil of wintergreen, methyl benzoate, liquid paraffin and benzyl alcohol. This reagent has been used with success for most solvents.
3 Silicone rubber. has been used for some time and has proved a very efficient sealant.

FLuid Preservation 21
Method of attachment of a specimen to an internal glass slip when it is too fragile or soft to be sewn or tied on. ·
Alcohol preserved specimens - Carefully clean and dry the internal plate and prepare the following two reagents, a solution of equal parts of ether and absolute ethyl alcohol and 'celloidin' (Necoloidine BDH). This is an 8% solution of pyroxylin in ether I absolute alcohol and before use is diluted to l o/o with the first solution. Apply the ether alcohol solution to the dry plate in the area of intended attachment. Place some diluted celloidin solution to the area and then gently press the specimen down on the slip. Allow to dry naturally (breath will cause opacity). After 20 seconds wash over the slip with alcohol and the specimen may then be sealed into a jar in the usual way. The alcohol will gel the celloidin into a colourless film and form a firm attachment.
Formaldehyde preserved specimens - The slip is dried as for the previous method. A solution of 3% gelatin is melted ready for use. An area of melted gelatin is placed on the slip and the specimen gently pressed onto it. Formaldehyde preservative is then poured over the attachment and the action of the fluid will convert the gelatin to an irreversible gel holding the specimen firmly in position.
Dealing with fluid preserved specimens of unknown history; repair and conservation.
First check the sealing of the jar, there will often be a straight forward leak from around the lid.
Sealing agents
These may be one of the following:Gold size and shellac
Glycerin and zinc oxide Red lead and Stockholm tar Isinglass and sugar Gelatin and agar Agar
In most of the above cases the lid will have to be broken to remove the specimen, though occasionally a lid may be removed by easing off with a sharp scalpel.
Glycerin and gelatin Bitumen Rubber and wax Bitumen and wax
In all the above cases gentle heat should be used to remove the lid. Take care with alcohol preserved material, immersion in hot water or the application of hot cloths are probably the best methods to adopt.

22 R. H. Harris
Supporting slips These may be:-
Plaster of Paris Natural mica Glass Celluloid (pre-perspex) Perspex (not with alcohol preserved specimens) Specimens may have come adrift from supporting slips. Their method of attachment may have been:-Silk (plain surgical or waxed) Silver wire Horse hair Nylon monofilament (usually in plastic containers) Specimens are sometimes reconstructed in several places so be prepared
to carry out delicate and complicated repair. Probe soft specimens to find supporting rods for re-attachment.Take great care as specimens become progressively fragile in preservative media.
Mounting a fluid preserved specimen in a plastic jar. The use of plastic museum jars should be restricted to fluid preserved
material based on a formaldehyde formulation and not alcohol which will attack most plastics in time. Post fixation reagents are also acceptable for this purpose. One advantage of a plastic jar is that it can be constructed to fit a specimen. In the case of manufactured glass jars a large range of sizes may be needed in order to find a suitable fit.
The construction of plastic jars is well described by Tompsett (1970) and should be followed carefully if such work is contemplated. Jars may be purchased from biological supply houses but tend to be rather expensive. A choice of coloured internal glass slips are also available. Specimens are usually attached to the internal slip and then the jar is sealed and the container filled through a small hole drilled in the lid; this is to avoid 'fluid creep' which is the cause of so much leakage in this type of jar. These fillingholes are covered with coverslips and sealed with any slide mountant. Plastic jars are easily scratched and are also subject to dirt and grease due to the problems of static electricity generation. There are a number of anti-static polishes available for the treatment of this situation. Plastic jars seem to last longer in better condition if they are filled with fluid preservative and used. Jars kept in store tend to show evidence of drying out of the adhesive from the edges of the container and this problem has not yet been satisfactorily dealt with. Construct or purchase a jar and use it as soon as possible.
Tissue reconstitution. One of the problems with a fluid preserved collection is the possibility of a
leak in a container or a breakage, somehow unnoticed, in which the fluid runs away or evaporates leaving the specimen to desiccate and generally

Fluid Presemation 23
deteriorate. In extreme cases, mould damage and even insect infestation can occur. The main aim in reconstitution is to regain the exact shape and dimensions of the specimen ·before drying out and to try to regain, if at all possible, some resemblance to the cellular integrity of the tissues. Based on archaeological studies of dried and mummified tissues and their possible resuscitation, a number of useful reconstitution formulae have been worked out.
l.
2.
3.
4.
5.
6.
7.
8.
9.
10.
11. 12.
13.
14.
15.
Solutions of sodium tetraborate. 2 to 5% aqueous
Solutions of sodium and potassium hydroxide. 1 to 2% aqueous
Solutions of sodium orthophosphate. 1 to a maximum of 14% aqueous
Solutions of sodium sulphate. 5% aqueous
Solutions of sodium acetate. 2 to 10% aqueous
Trichloracetic acid. 1 to 3% aqueous
Sodium carbonate 2% and formaldehyde 0.5% aqueous
Saline. 1 to 2% aqueous
Glycerol and 10% acetic acid equal parts
30% alcohol
Formaldehyde. 1% aqueous
Citric acid 2% and sodium citrate 20% aqueous
Clove oil (mainly for naturally desiccated material)
Alcohol 90%, 30 volumes; formaldehyde 1%, 50 volumes and sodium carbonate 5% aqueous, 20 volumes
Glacial acetic acid. 2% aqueous
The most commonly used reagent in this list is No. 3 sodium orthophosphate (or tri-basic sodium phosphate). It often has remarkable results with dried up tissues. Sometimes a little gentle heat or incubation helps the reconstitution along quite well. The strength of the solution can be varied according to the specimen involved. For very small or delicate specimens a 1 to 5% solution will be suitable. The time taken will vary according to the size and condition of the desiccated sample. Definite progress is usually observed in a few hours. Specimens treated in this way are vulnerable to breakdown in the reconstituting fluid if left for longer than the optimum time. The time in the solution can only be determined by trial and error coupled with careful observation. They must then be washed briefly in several changes of distilled water before returning to the original fixative. They remain in this for the same amount of time as is necessary for the fixation of fresh specimens. They may then, if necessary, be transferred to a preservative (if different from the fixative) or a post fixation preservative.
All solutions containing acetic acid are particularly good for the care and treatment of insect and general arthropod material, whilst the sodium and
24 R. H. Harris
potassium solutions are good for most invertebrates. It has been the practice in the past few years to include propylene glycol in preserving fluids as this reagent acts as a humectant and any specimen preserved in solutions containing it will never dry out completely even if all the fluid has evaporated away.
If for any reason a specimen is found to have dried out and it is not possible to treat it for some time, it may be kept in a stable condition and even slightly improved, by placing it in a container over crystals of tri-chlorphenol. Specimens have been made safe for over six months under these conditions, until the appropriate restorative treatment can be given.
Journal of Biological Curation Vol. 1 No. 2, 1990 (1992)
Zoological Preservation and Conservation Techniques 11. Dry Preservation and Freeze Drying.
R. H. Harris
Dry Preservation
Air drying
Warm and hot ovens
Sand baths
Riker mounts
Chlorocresol mounts
Freeze drying
History
General account of the technique
Preliminary treatment of animal tissues
Preliminary treatment of plant tissues
General procedure for freeze drying
Examples of freeze dried specimens
Soft tissue preparation for the stereoscan electron microscope
Technique
Use of liquid nitrogen to remove debris and excess tissue
25
~, ,,,,0~----------------------
26 R. H. Harris
Dry Preservation
Air drying
Many of the invertebrates, especially those with adequate exoskeletons, may be air dried. In particular the insects are usually treated in this way after careful positioning and pinning (setting). It will be necessary to take precautions against infestation of air drying material by provision of containers in which the samples can dry without any danger of infection or infestation. A simple technique, merely exposure to ambient temperatures with adequate safeguards against dust, dirt and pest infestation.
Warm and hot ovens
An improvement over simple air drying. Providing controllable heat to speed drying times and increase productivity. It is not usual to exceed a temperature of 60C for this type of air drying.
Sand baths, etc.
Metal trays are normally employed for this type of drying. A measured quantity of fine grade sand is poured to a constant level in the tray. A similar amount of sand is heated to 60°C in an oven. The sample to be dried is gently pressed into the surface of the sand in the tray and the heated sand poured over the specimen to completely cover it. The bath is left for 12 hours and the dried specimen removed by gently pouring away the covering sand. A modification of this process utilises a tin can with a narrow screw cap, the bottom of which has been cut out. The can is placed upside down on a support. Sand is poured in to fill half the container and the specimen gently pressed into this as before. The heated quantity of sand is then added and allowed to remain for 12 hours. By unscrewing the cap the sand will drain away with a minimum of movement to the specimen in the can. This is very useful for long delicate specimens, sponges, branching corals, invertebrates with lengthy appendages etc., when and where a sand tray may not be suitable. Silica gel may be used in the same way as sand and there are many grades right down to a fine dust. Colour indicators such as cobalt chloride may be used to monitor the drying. This is done by adding a few grains of the reagent to the sand or silica making sure that the reagent is quite dry before use. The cobalt salt is a deep blue when dry and shades of red when moist. Baking in an oven will regenerate it to the original blue colour.
Riker mounts.
Consists essentially of a glass topped box in which layers of cotton wool and sometimes tissue paper are placed. The specimen is pressed into the layers and the glass lid allows a protection and excellent observation. Used for many invertebrate forms.

Dry Preservation 27
Chlorocresol mounts.
A more successful modi~ication of the Riker mount in which a layer of chlorocresol is placed at the bottom of the glass topped box and this acts as a preservative. This has been a very successful technique for sending delicate invertebrates through the post or while on expeditions as the form, shape and colour are preserved indefinitely (Tin dale, 1962). Very much used in Australasia and S.E. Asia generally. A very useful pre-preservation technique for invertebrates in general when no adequate preserving media are available.
Freeze drying.
History
The sublimation of ice has been known since the early 18th century and was described by William Hyde Wollaston in a communication to the Royal Society in 1813. In 1890, in Leipzig, Richard Altmann described a method for the freeze drying of tissue for histological examination. This ingenious idea went largely unnoticed apart from brief recognition in papers and books by Mann (1902), Bayliss (1924), Mathews (1925) and Romeis (1928). It was not until 1932 that Gersh in Chicago again described the Altmann technique and suggested modifications for further histological work.
In 1939 Kidd in Cambridge took out a patent for freeze drying food involving different principles to those used in the treatment of entire animals and plants. It was in 1954 in this country that Davies wrote a short paper on the preservation of insects by drying in vacuo at low temperatures (Davies 1954, 1956). Previously in France Mercie in 1948 had suggested a method of controlled vacuum drying, and in 1959 Stadelman at the International Botanical Congress in Montreal repeated Mercie's work and gave an account of work on fungi.
Meryman in Washington, USA, in 1959 (Meryman 1960, 1961), gave an account of the freeze drying of small animals and birds and some invertebrates by the standard technique that has now been adopted to general use in this field. In 1960 Haskins in Canada showed that macro fungi could be well preserved by freeze drying and this was followed in 1962 by further work by Davies in which he too, described work on the larger fungi. In 1963 Woodring and Blum (1963a, 1963b) at Baton Rouge USA, described methods for the treatment of insects and arachnids.
In 1964 Harris in England and Hower in Washington USA wrote accounts of work based on the original work of Meryman. Harris was the first worker in the UK to develop apparatus specifically intended for the treatment of entire biological specimens. He concentrated on small specimens and also on cell integrity for histological investigation. Meanwhile, Hower in America developed bigger apparatus for larger biological specimens having the advantage of apparatus available through the space programme and no longer required for that purpose. In 1968 Harris described a new apparatus
28 R. H. Hams
of a portable nature for whole biological specimens and it was the first apparatus to be produced commercially in Europe in which the techniques of vacuum dehydration and freeze drying were combined. Since that time freeze drying has been found useful in Archaeology, Mineralogical and Palaeontological investigations, and also in Fine Art for the prevention of deterioration. It has also been found to be the most practical technique for the preparation of soft tissues for examination using the stereoscan electron microscope.
General account of the freeze drying technique.
It is one of the most efficient methods yet devised for preserving animal and plant material in the dry state, without shrinkage and with the natural colours intact. The technique involves the initial freezing of the specimen followed by the sublimation of the water vapour from the ice crystals of the specimen so that it will progressively lose weight until a final constant weight is arrived at. When this situation has been reached the specimen is considered dry and will not react to moisture indicators although chemically bound water is present in small quantities. It should be noted that water in the liquid state is not present at any time during the process.
Specimens which have been frozen, as indicated above, will when exposed to a low vacuum and temperature give off water vapour which collects in the form of a cloud and hangs as an aura in the vicinity of the specimen. This may be drawn away by the use of a desiccant or a condenser. In the most efficient systems the condenser is maintained at a substantially lower temperature than the specimen so that a temperature gradient forms. This encourages the water vapour molecules to migrate continuously from the specimen to the condenser and so to dry the specimen. The mechanisms through which freeze drying denatures biological constituents are still largely unknown, and a substantial amount of fundamental research is obviously necessary before the full potential of freeze drying can be realised (Rowe, 1960).
Since freeze drying entails the removal, first of free water and then of 'bound water', investigations of the drying process and of the mechanisms of further protection from later breakdown can all contribute to a better understanding of the technique. 'Bound water' is that which does not freeze. It comprises between 5 and 10% of the total water content of a typical animal. There is no sharp distinction between wholly free and totally bound water. Present knowledge suggests that a temperature of -10 to -20°C and a pressure of 10 to 40 microns Hg (0.04 Torr) will remove most freezable water from a cell interior to form ice outside the cell. A condenser at a lower temperature, -40°C, will effectively remove the ice from the cell, which will collect on the condenser surface.
In freeze drying investigations, the surface has barely been scratched and it is hoped that future studies will bring more emphasis on basic questions of

Dry Preservation 29
freezing and drying and that the technique will be increasingly recognised as a subject for major fundamental research and not merely a technological curiosity.
Preliminary treatment of animal tissues for freeze drying
Protozoa - The easiest to prepare are the freshwater groups. Relax the specimen in de-ionised water with a crystal of menthol. May take an hour or two to completely relax. Wash away any remains of menthol before the initial freezing to prevent build up of dissolved solids. Use Steedman's multipurpose fixative for several hours and wash out thoroughly.
Steedman's fixative Propylene phenoxytol Propylene glycol Formaldehyde Distilled water
lml 5mls 5mls
89mls
Good preparations are well extended, and suitable for surface illumination microscopy or stereoscan electron microscopy. Marine groups must be relaxed in sea water first then transferred to fresh de-ionised water to remove the dissolved solids in sea water. Normal relaxing reagents can be used as required. Terrestrial groups are frozen in small amounts of de-ionised water. They may need treatment with liquid nitrogen to remove the external debris with which many will be coated. Preserved protozoa may be successfully freeze dried if they are first thoroughly washed to remove all traces of the fixative. Special care must be taken when dealing with formaldehyde preserved specimens. Small traces of this reagent can cause damage to the condenser surfaces of the drier, causing expensive replacement repairs. Freeze dried protozoa do not need to be placed in a desiccator as they are not hygroscopic. They are, however, liable to be affected by dust and should be placed in a clean dust free container.
Porifera - These are good subjects for freeze drying. Care is essential to remove all debris and surface contaminants by thorough washing in several changes of de-ionised water. Marine or freshwater forms give equally good results. Colour retention is reasonable if they are treated as soon as possible after collection and before any deterioration has taken place.
· Coelenterata - Provided the specimens are properly narcotised and well extended, coelenterates freeze dry very well with good colour retention. There may, however, be many problems with the initial relaxation. It is, therefore, prudent to experiment with Hydra and Aurelia first before tlying rarer, more exotic forms.
Platyhelminthes, Nematodes and Minor Phyla - All groups freeze dry well. Subjects must be clean and debris free before initial freezing. Nematodes are best relaxed in dilute watery iodine (l: l 000). Endoprocts need relaxation

30 R. H. Harris
in MS 222 before washing. Other groups are best treated as for nematodes. Rotifers are difficult to prepare but the multipurpose fixative used for the protozoa often gives good results.
Annelids - This is a good group for freeze drying, and show good colour retention. They need careful relaxation (MS 222, menthol, Well's technique etc.); special care is necessary with leeches.
Molluscs - Careful relaxation gives very good results. It is often necessary to wash off slime from terrestrial groups before initial freezing to prevent gross contamination with the dried exudate after freeze drying. Asphyxiation in boiled cooled water (to remove the air) has often proven to be the best method of relaxation. Add a crystal of menthol to the water in a closed container, sealed to exclude the air and place in a refrigerator (not a freezer) at4C.
Lophophores - All groups freeze dry well. With Brachiopods make sure that the valves are not under stress before initial freezing.
Echinoderms - All groups must be washed carefully as this entirely marine family are exceptionally septic and give very nasty infections on abraded skin. Relax in freshwater, which acts as an anaesthetic. Good colour retention.
Arthropods - All groups under this heading freeze dry very well. Care in preparation and layout before initial freezing pays dividends. The only really efficient way to preserve spiders with good colour retention.
Chordates, Tunicates and Ascidians - All groups dry well. Thorough washing out of the seawater and careful arrangement before initial freezing is necessary for acceptable results.
Fish - A difficult group to deal with due to the presence of fat and oil deposits in the skin and organs. Freeze drying does not alter fat in any way apart from sterilising and rendering it bacteria free. Defatting techniques are sometimes successful. Colour retention is often very good until natural oxidation processes cause a slow loss of colour. The most successful method of fish preparation is based on the taxidermist's method, of removing the viscera from one side, then freeze drying the fish to show the other side only.
Amphibia - A less successful group. Some forms dry well with good colour retention. In many cases, however, discolouration of the skin and tissue shrinkage will occur. Much trial and error and the availability of plenty of specimens is needed to get consistently good results. Injection of the body with water prior to the initial freezing may help to prevent the shrinkage. Amphibia with dry skins, such as toads tend to dry better than those with thin moist skins such as frogs. Common newts collected when in their aquatic phase tend to freeze dry badly compared to those collected later when they have left the water.
Reptiles -These are very good subjects for freeze drying. In many cases excellent colour retention is shown. Reptiles share with birds and mammals

Dry Preservation 31
the following requirements for the best results. Posing of the killed animal is necessary before drying. The removal of the viscera will accelerate the drying, as will the drilling of small holes in the body of the frozen specimen. These procedures will merely hurry the process and are not otherwise essential. It is usual to replace the eyes with glass eyes before the initial deep freezing as the eyes become opaque during the process. Alternatively they may be painted afterwards, but the appearance, though adequate if skilfully done, is not so satisfactory.
Birds - One of the best groups to deal with. Shows the great capability of freeze drying. Better than many taxidermy preparations. Allows the specialist preparator to use skill and artistry backed up with knowledge of anatomy without the shedding of blood and viscera as all the organs are retained entire, the whole body being untouched. Only the eyes need attention as stated above.
Mammals- Specimens up to the size of a small rabbit are very well dried. Above that size it is usual to drape the skin over a modelled body. The larger specimens can still be processed, however, provided the specimen chamber is large enough and the operator is prepared for a long processing time. From rabbit size downwards all mammals are treated as for the other higher vertebrates, in the entire state.
Anatomical material - Excellent for preserving dissections and whole organs, for general anatomical and also pathology specimens. Such items can form a useful alternative and supplement to fluid preserved specimens in many cases with excellent colour retention. It is often useful to spray such items with a coat of shiny resin partly to prevent the attention of insect pests and also with the purpose to impart to the surface of the specimen a lifelike sheen.
Preliminary Treatment of Plant tissue. Algae - All this group freeze dry very successfully, usually with good
colour retention. It is necessary to pose the specimens either in the herbarium style or in any other natural posture. Time varies according to the size of the specimen.
Fungi - This group will dry excellently, the permeability and high moisture content of these plants make them particularly good subjects for freeze drying. Small specimens may be freeze dried overnight but the larger forms should be weighed at intervals till constant weight is achieved. It is a simple matter to test fungi for completion of drying. Dried forms are very light and feel warm. The slightest coldness indicates that the process is incomplete. Note: The more brightly coloured forms should be stored in the dark for they will fade if exposed to ultra violet light, either natural or artificial, for any length of time.
Mosses and Ferns - These groups are excellent examples for freeze drying and colour retention is good.

32 R. H. Harris
Flowering Plants - These groups can give excellent results, although problems can arise in respect of colour retention. Material must be fresh picked preferably with newly opened blooms and should be processed as soon as possible. For the best results with large brightly coloured flowers pre-freeze by standing in a metal container with liquid nitrogen which is poured into the vessel. This is then placed in the freezing chamber of the freeze dryer which should be at a temperature of -20°C. Allow plenty of time to elapse for the liquid nitrogen to evaporate before tuming on the vacuum pump. As with the fungi the more brightly coloured forms are best stored in the dark.
General procedure for freeze drying Before treatment all specimens should be initially frozen at a temperature
of -lOOC or lower for a period of 12 hours. When entire animals are being treated, it will probably be necessary before freezing to pose the specimen in a desired position. This can be achieved in a variety of ways, arrangements of wire and balsa wood supports may be constructed to display it. Some animals can be pinned into position, cotton wool and plasticine may be arranged to keep the body in a natural shape till frozen. Occasionally shrinkage of the body may occur due to constriction of the muscles. This may be corrected by injecting water into the affected part to fill out the space until a normal appearance is attained. The water will of course will be sublimed away as vapour during freeze drying. Organs which tend to flatten under their own weight after removal from the body so that they present an unnatural appearance after drying may be dealt with as suggested above.
Freeze drying will prepare specimens of plants and animals which are difficult and in some cases impossible to deal with adequately in any other way. Very small birds and mammals for example, may be dried in the entire state, with all their organs intact, except as mentioned above possibly the eyes.
Examples of freeze dried specimens Reconstituted toad - As a test to ascertain the condition of the cellular
integrity of freeze dried tissue a toad was freeze dried and left for a year. The animal was then bisected sagitally and one half left as a dry control, while the other was rehydrated using a 0.5% aqueous solution of tribasic sodium phosphate. When the organs reached a reasonable shape the tissues were placed into fixative. They were then processed by wax impregnation for routine histology sectioned and stained with Mayer's haematein and eosin and Masson's trichrome stain for microscopic examination. All the cells of the organs examined, though somewhat reduced in size, appeared to be normal, and the staining reactions were intensified by the process.
Valuable specimens have been freeze dried including a chinchilla and emperor penguin chicks. These specimens were in excess of 2kg in the initial frozen weight.

Dry Preservation 33
An elephant heart weighing 2700gms was dried in six days to a constant weight. Previously it had been preserved in a formaldehyde solution. Freeze drying enabled the specimen to be easily moved about, handled and freely examined without the hazards of bulky glass or plastic containers filled with dangerous fluid.
Mummified human hand - The hand was removed from a Guanche mummy from the Canary Islands. The mummy was pre-dynastic and 15,000 years old. Mummification had been affected by burying the corpse in hot sand. The hand was removed and then reconstituted using a solution of 5% tribasic sodium phosphate until the dehydrated tissue had absorbed water and presented a natural appearance. It was then washed in running tap water till the reagent had been removed. The specimen was then fixed in 10% formaldehyde and later transferred to 80% Alcohol. It remained as a spirit preserved specimen in a glass museum jar for some years. It was then washed again in running tap water to remove the alcohol and finally freeze dried. The dried hand presents an extremely lifelike appearance and without knowledge of its history would pass for a freeze dried hand obtained from a normal post-mortem human cadaver.
It may be concluded from the above examples that the technique of freeze drying is the most perfect and versatile method of preserving biological tissue yet devised. Entire animals may be processed and stored without hazard or more than routine maintenance for an indefinite period of time. Specimens are still in excellent condition from the inception of the process in 1956. Also freeze dried specimens may at any time be rehydrated for museum jar display, dissection or for microscopic examination.
Freeze drying for soft tissue stereoscan electron microscopy
Technique Tissue to be examined, both fresh and preserved, was carefully washed in
several changes of distilled water, with a final rinse in triple glass distilled water. This was necessary because it was found that normal distilled water and double distilled water left a considerable deposit of dissolved salts in the freeze dryer after sublimation. Delicate tissues were left in sufficient distilled water to support them in a life-like position. It was not necessary to support firm tissues, these simply being left in their containers with all the surplus water drained off. The containers used in this work were Durham's fermentation tubes, normally used in bacteriological technology. Each piece of tissue was treated in a separate tube. The specimen was rapidly frozen using a Polar spray, 100% dichloro-diflouro-methane in an aerosol container. The rate of freezing of this aerosol spray is comparable with C0 2 at approximately -70°C. Each small tube was taken up in a pair of forceps, sprayed for a few seconds and then placed without delay, into the specimen chamber of an Edwards High Vacuum freeze dryer. The machine had

34 R. H. Harris
previously been pumped down to a working pressure and temperature. These were working pressure of 50 microns Hg or 0.05 Torr., specimen chamber temperature of -15"C. and a condenser temperature of-40"C. After the samples had been sprayed and placed in the specimen chamber, the apparatus was switched on and sublimation carried out for 12 hours. After this period, the pressure was released and the specimens removed from the chamber. They were then placed into a small glass, medium vacuum, desiccator over silica gel for half an hour, to enable any condensation forming on the surface of the dried specimens after removal from the cool chamber to be removed. Specimens were then ready for stub mounting, coating and subsequent examination.
Use of liquid nitrogen for removal of debris and excess tissue
In some cases, an excess of debris or tissue was found on the samples, particularly on preserved tissues. Cleaning of the tissue was carried out, after washing and draining, using liquid nitrogen as follows. The samples, cooled for a few seconds by the Polar spray in the individual small tubes, were taken carefully in a pair of cooled Spencer-Wells forceps and dipped beneath the surface of a sample of liquid nitrogen. A small thermos flask was used as a suitable container for the liquified gas and this had been cooled for some hours in a freezer at -20"C. before attempting to pour in liquid nitrogen. It is dangerous to attempt to pour liquified gases into non-cooled glass containers. The tubes were taken from the surface of the nitrogen and placed without delay, into the specimen chamber of the freeze dryer and the apparatus switched on as for normal sublimation. The small amount of liquid nitrogen remaining in the tubes, after removal from the flask, boiled rapidly and this ebullition effectively removed debris and extra tissue not required in the preparation, from the surface of the sample, leaving clean specimens for examination.
Several hundred samples have been prepared in this way and it is now a standard procedure for cleaning tissues whenever the need arises. The sample treated with liquid nitrogen must be pre-cooled to prevent the formation of a 'Leidenfrost Envelope'. This envelope will cause considerable distortion in specimens not previously cooled. Tissues at room temperature cannot adjust to extreme temperatures successfully, without previous cooling to at least -50"C. or below. Liquid nitrogen has a temperature of -196"C. This cooling was carried out by using the aerosol spray.
Any soft biological tissue, whether fresh or preserved, may be prepared for scanning in this way. The final preparation of a clean and suitable sample may be helped by the use of liquid nitrogen.
r

---------------------~,------------
t
Journal of Biological Curation Vol. 1 No. 2, 1990 (1992)
Zoological Preservation and Conservation Techniques Ill. Injection, Corrosion and Miscellaneous techniques
R. H. Harris
Contents
Injection techniques History Sites for injection in animals Triple injections of small vertebrates Recent developments in injection techniques Injection masses Volumes needed for various animals
Corrosion techniques History Details of the technique Specific examples of the technique Pettigrew's method for the kidneys
Hochstetter's wax impregnation technique History Details of the technique
Brain and nervous system methods Preparation of whole brains Mounting the whole brain Brain decortication technique Brain slice staining technique Preparation of intact nervous systems Staining nerve tissue in entire specimens
Agar embedding technique Support technique for transparencies and small specimens Demonstration of internal organs of Echinodermata.
35
36 R. H. Hanis
Injection technique.
History
Before 1650 there existed only a few references to injection experiments in the bibliography of biology. Galen mentions the inflation of cerebral vessels by passing air through a tube. It has been stated that Giliani of Persceto, who died in 1326, filled blood vessels with liquids of different colours, which thickened and hardened after injection, but did not decompose. Unfortunately, it has not been possible to confirm this statement, made by Michele Medici.
The first reference to the use of injection, after the invention of printing, occurs in a commentary by Jacobus Berengarius published in 1521. He used a syringe and injected the renal veins with warm water. Massa in 1536 inflated the kidneys by forcing air into the renal vein, and Stephanus in 1545 devised a pump to inflate the vessels with air. Sylvius (Jaques Dubois), who arranged for the publication of his methods after his death, introduced "coloured fluids such as saffron and various wines", but he rejected the injection method because the liquids escaped whenever a vessel was cut through. In 1556, the Portuguese physician Amatus Lusitanius, filled vessels with a liquid through a siphon and also forced it through a tube filled by air pressure from the mouth.
Eustachius is no doubt one of the pioneers of the modern injection technique. Unfortunately, he made the error of thinking that by his technique there was a direct connection between the arteries and the uriniferous tubules and this mistake was taught in anatomical schools throughout the 18th century. It was not until Bowman published his work on the kidney in 1842, that the correct relationship between the renal arteries, veins and the uriniferous tubules was first demonstrated. Crook in 1615, suggested the use of quills, glass trunks and various reeds to blow up vessels.
At about this time, the possibility of diverting blood from the vessels of one animal to another, a transfusion, was first conceived. The earliest writers to mention transfusion seem to be Magnus Pegel in 1604, Andreas Libavius in 1615 and Johannes Cole in 1628. It is interesting to note that all this took place before Harvey's discovery of the circulation of the blood. It would have been most appropriate if Harvey had discussed injection technique but his treatise on circulation does not mention any methods (Singer, 1957).
By 1666 Malpighi was investigating the structure of the kidney incorporating injection methods. He used ink and a black liquid mixed with spirits of wine and also urine coloured with ink. The first use of gelatine in injection media was made by Robert Boyle in 1663. Grew in 1681, asserted that Boyle had also used wax as an injection medium. Boyle most probably used lead acetate which has a waxy constituency. In 1672, Willis was likely to have been the first to inject an invertebrate when he treated the heart and gills of a lobster.

Iryection, Corrosion, Miscellaneous Techniques 37
Swammerdam is generally regarded as the inventor of the solidifYing injection media. Priority of publication must be given to Boyle and possibly Pequet but Swammerdam, probably one of the greatest anatomists of all time, really deserves the credit. The first wax injection of Swammerdam was carried out in a house in Leyden on the 22nd of January 1667. This work and other relevant information was communicated to a colleague, Frederick Ruysch and it was this worker, who as Professor of Anatomy at Amsterdam University developed what is known as the "Ruyschian Art",
He vastly improved the technique of injection and in 1666 by order of the Dutch Government was instructed to prepare the British Admiral Sir William Berkeley who had been killed in action on the 1st of June and return the body to England. The cadaver was stated at the time to be "as fresh as an infant". There is still little known about the formulae used by Ruysch. His great friend Boerhavve, who was present on many occasions when Ruysch was working, says nothing about the methods used.
When Peter the Great acquired Ruysch's collection in 1717 he stipulated that the preparations were to be accompanied by a full description of the methods used. In 17 42 an account of this work based on a copy of Ruysch's handwriting was published by J. C. Rieger. Rieger had been in the employ of Peter the Great, after whose death in 1725 he retired to Holland, where he compiled a work which includes a description of Ruysch's methods. From this work we learn that a body was first placed in cold water for a day or two before injection. The aorta and the vena cava were slit and the blood "pressed out". The body was then immersed in hot water for several hours. The injection was carried out as follows:- in winter, suet or tallow was used and during summer a little white wax was added. The actual injecting mass seems to have been made with suet or wax added to turpentine and resin. The colouring agent was vermilion and wax was used to seal the injection sites to prevent escape of the injection medium. The injected specimen was preserved in diluted alcohol which Ruysch made from barley. The strength was stated to be around 60% which was far too weak for any permanent preservation. No obvious deterioration was noted in Ruysch's lifetime however. It is now known that dilute alcohol acts as a dissociating agent and would, in time, macerate the entire specimen. It was therefore obvious that Ruysch concealed much more than he disclosed.
There have been many conjectures by anatomists as to the exact composition of Ruysch's media but none carry the authority of the definite but meagre statements of Rieger. Jesse Foot published a statement in 1794 in which he says "I saw the preparations belonging to Ruysch, which are deposited in the museum in St. Petersburg, going apace in decay". I?efore this in 1748, Lieberkuhn had examined examples of Ruysch's injection masses. He considered them too fluid to last, also that the preparations would not stand microscopic examination. Besides injection technique, Ruysch was also a pioneer in the inflation of lymphatic vessels with subsequent drying.
38 R. H. Harris
From Ruysch to Lieberkuhn, who first established the methods for microinjection, there were few further advances made at the time. Lieberkuhn shares with Ruysch some of the most important advances in the practice of technical anatomical methods. He carried Ruysch's work still further and was one of the first to inject microscopic vessels. Most of his material was human in origin and sixty of his microscopical preparations are still in the Museum of Human Anatomy in Vienna University. A few preparations have been made from fish, frog, tortoise, as well as some from ox and horse material. Other preparations are in the Berlin University Museum and there are said to be a few of Lieberkuhn's specimens in the Museum of the University of St. Petersburg, being described by Burdach in 1817. Lieberkuhn's work was so good that a hundred years later Henle was using them for the purposes of original research. The period of the two Monro articles and the Hunter brothers is now reached.
Alexander Monro wrote two articles on preparation, neither of which contained much original material but they were very influential. The first was an account of the injection methods of the time and the second a comprehensive synopsis of current basic methods. Nevertheless he produced an incredible amount of work. He carried out probably the first, or one of the first, triple injections. He was certainly the first to inject an echinoderm. Some of these preparations may be seen in the Museum of Anatomy in Edinburgh, although there is now some doubt as to the preparator authenticity of some of some of the specimens. With very few exceptions, up to the time of Monro all material was mammal in origin.
In 1752 William and John Hunter injected the epididymis with mercury. William Hunter taught anatomy from 1746 to 1783 and four of his lectures in eighty two were devoted to the techniques of injection, a proportion large enough to emphasise the ,importance of such work in those days. William Hunter's work appears to be too similar to that of Lieberkuhn to have evolved independently.
John Hunter in some notes, written about 1770 but not published until 1861, seemed to prefer stale or unpreserved material for his injection methods. Occasionally he would use alcohol preserved specimens. His injection media consisted of resin, tallow, turpentine, hog's lard, butter, glue and isinglass. Colours were provided by hydrated copper (blue). vermilion and flake white. The first general treatise on anatomical injection was published by Pole in 1790. No original research was embodied in the work but four types of injection media were described: coarse injection, seven formulae; fine injection, six formulae; minute injection, six formulae; and mercurial injection. A cold injection which sets after some hours was added on the authority of William Hunter. The coarse injections were wax based, the fine injections varnish based and the minute injections were based on gelatin. According to Pole, mercury injections were going out of fashion and seldom used but in 1819 Rudolphi injected a liver fluke with this reagent. In 1843 the distinguished anatomist Straus-Durchheim published a careful review of

______________________ , ___ .. ,~----------
Injection, Corrosion, Miscellaneous Techniques 39
work based on first-hand investigations. He also classified methods into three main groups: coarse injection media, fifteen formulae; fine injection media, nine formulae and in addition corrosion methods. Substances tested were many and various, yellow and white wax, tallow, lard, spermaceti, fatty oils, essential oils especially turpentine and lavender, resin, plaster, gelatin, egg white, water, alcohol, fusible metal and mercury. He regarded mercury as one of the worst. methods and soon after this publication it ceased to be used seriously. His fusible metal consisted of bismuth 3 parts, lead 5 parts, tin 3 parts and a small amount of mercury to lower the melting point. He considered the gelatin method probably the best and liked the isinglass method, coagulating the watery medium with ferric sulphate.
The work of Strauss-Durchheim is said to mark the termination of the historical period in which injection methods were developed and tested. From 1843 onwards the modem techniques developed rapidly (Cole, 1921).
Sites for injection. Invertebrates - In all cases the vascular system, if present, is the usual
site for injection, good examples being the vascular systems of crayfish and freshwater mussel. Sometimes in very small invertebrates, such as liver flukes, chance injection is tried with considerable success. A small incision is made in the median line near the hind end of the animal. The alimentary tract is injected by using a site about 1mm from the median line. With a little practice very successful preparations can be made. Earthworms and related species may be injected through the main blood vessels remembering to inject from the hind end forward. Echinoderms and related animals may be successfully injected in a similar way.
Fish - The arteries and veins in the animal, the afferent and efferent branchial systems are used, mainly through the region presented when the tail is cut off to reveal the caudal vessels.
Amphibians and Reptiles: In these animals the arterial arches, heart and abdominal vein are the normal sites for injection.
Birds -These are very vascular animals. Sites in the legs are the best for injection but with experience, both the neck vessels and the heart may also be used.
Mammals - Depending on the size of the specimen it is usual to attempt injection through the femoral arteries and veins. Arteries are usually empty after death and are therefore quite easy to inject. Veins, on the other hand, are usually overfull with blood. Here, drainage, followed by perfusion is often necessary. It may be possible to force injection media througl:J. the vein contents, but the results are not usually very successful.
General considerations - Obtain the experimental animal as soon as possible after death. Incisions are then made in the selected spots. Cannulae or needles are fixed in position in the femoral arteries, veins, or sometimes
40 R. H. Harris
the carotid artery and jugular vein. Warm saline is then placed in an aspirator which is suspended above the animal and the vascular system is flushed through until there is no more blood present. Five to ten litres are required for an animal of rabbit to dog size.
Triple injections of small vertebrates. Usually a rabbit, pigeon, small cat or dog is selected for this purpose. The
thorax is opened and the heart exposed. After removing the pericardium, cannulae are inserted in the right and left ventricles. The system is then flushed out with warm saline. If using an injection medium containing gelatin, the animal must be kept warm, usually in a tank or similar container. Inject red media into the left ventricle, noticing the reddening of the feet area (pads), claw bases, and lips and ear regions. Blue media will be injected into the right ventricle, noting the blue colour appearing in the liver and adjacent vessels. The two colours will not mix for the fine capillaries form a barrier between the two injected systems. The third injection is made into the hepatic portal vein in a direction away from the liver. The whole injection is then coagulated by cooling or other chemical means and left for some days. Final dissection, either to display the fine detail, or for general demonstration, may then be carried out.
Points to note - Injection technique is not difficult but requires a good basic knowledge of anatomy and a great deal of patience. Do not, on any account, attempt to use rubber latex as an injection medium until thoroughly competent with the gelatin based media. Constant practice will provide valuable teaching material.
Recent developments in injection technique. Some interesting work has been carried out in Kenya whereby animals in
the entire state have been injected with fixatives in the normal standing anatomical position. By using suitable frames and selecting sites for injection with care, it has been possible to treat full grown ostriches, antelopes, zebras etc. As the organs have been injected in normal anatomical positions, all the organs are in their correct situations and may be considered to represent the lifelike appearance in all respects. Many injections and dissections are spoiled by the pressures exerted on the organs at post mortem when the animal is worked on in the prone or other supine position.
Knower, in 1908, recommended the use of glass bulbs with the finest capillary points. He comments, "If a gentle warmth is applied to a capillary tube, while a fine point of the tube is held below the surface of some fluid, such as Indian ink, air will be driven out of the bulb and the ink will run up to replace the water as the bulb cools. If the point of the tube is inserted into the desired blood vessel the ink may then be injected by warming the bulb."

Iryection, Corrosion, Miscellaneous Techniques 41
,~ _________________ a
Fig 1. A simple technique for small specimens. a. glass bulb; b. injection fluid; c. fine-drawn capillary glass tube; d. specimen; e. glass slide.
He used the method very successfully on small fish, amphibia, reptiles, birds and mammals. Its best application is for small embryonic specimens.
Injection masses used at the present time. 1 Starch 2 Milk 3 Plaster of Paris 4 Gelatin 5 Celloidin 6 Wood's metal 7 Latex 8 Phenol-glycerin-alcohol
Celloidin and Wood's metal are used for corrosion following injection, phenol-glycerin-alcohol for embalming following injection.
1. Starch- An excellent method which is still used, as follows:-. Water 100ml Glycerin 20ml Formaldehyde 20ml Powdered starch 75gm
Add the water and the glycerine to the starch rubbing out all the lumps. For colouring use :-for yellow- 10 gms chrome yellow; green- add 10 gms of chrome green; and red - 1 Ogms of vermilion. Strain through cheese cloth and add the formaldehyde. There are many aqueous solvent dyes available from I.C.I. which may be used as altematives to the dyes mentioned above.
42 R. H. Harris
2. Milk- Fresh milk may be injected and the following formula used as a coagulating agent.
Formaldehyde Acetic acid Water
I.C.I. dyes may be used for colouring purposes
75 parts 15 parts
1000 parts
3. Plaster of Paris - The finest dental plaster is used. A very dilute solution is made up and mixed with dilute Seccotine. This lengthens the time of coagulation and makes the resulting injection mass harder and less brittle.
4a. Cold gelatine injection masses. Metagelatin - If a small amount of ammonia is added to gelatin and the
solution heated for several hours, the mixture passes into the state of metagelatin. In this state it no longer coagulates on cooling and thus may be injected without warming either the injection mass or the specimen being injected. Colouring agents may be added to this medium and it may be thinned with weak (30%) alcohol. After injection specimens are placed into strong alcohol which sets the mass.
Tantler's gelatine injection mass - 5gms of the finest gelatin (it is usual to use Coignet's Gold Label sheet gelatin for this purpose) soaked in 100ml of distilled water, melted, and any dye required added. 5 to 6gms of potassium iodide is added slowly to the melted medium. After injection coagulation is carried out by immersing in 5% formaldehyde. Specimens injected in this fashion withstand decalcification.
Mejeko's injection mass - 10% sodium salicylate will retard setting of gelatin for hours. Coagulation is effected in 2 to 4% formaldehyde.
4b. Hot gelatin injection methods It is usual make up· a 15% solution of gelatin in water to which
chromopaque or I.C.I. dyes may be added as required.
5. Celloidin - Dilutions may be formulated from the histological reagent 'Necoloidine', a 4% solution in a mixture of ether and absolute alcohol. Inject this reagent to prepare a corrosion specimen. The resultant injection mass is resistant to decalcification and to most strong acids and alkalies.
6. Wood's metal - This is a low melting point alloy, of many different formulae, containing bismuth, tin, lead and (usually) cadmium, in variable proportion. It melts at 66 to 72°F.and is used in lung preparations and for other vascular tissues.
7. Latex- Usually obtained as a rubber solution in strong ammonia. It is coagulated in solutions of acetic acid. Is capable of great dilution but technique must be good for the reagent will permit no mistakes. Gelatin, however, can in most cases, be remelted for a fresh attempt at injection, provided of course, this is done before coagulation reagents have been added to solidifY the mass. Latex once set, forms an irreversible gel. It is resistant to dilute acids and alkalis and can be used for transparency preparations.

Injection, Corrosion, Miscellaneous Techniques 43
8. Phenol-glycerin-alcohol - This is an embalming agent with the formula:-
Liquor phenol 4 parts Formaldehyde 1 part Glycerin 4 parts 96% alcohol 4 parts Water 12 parts
Specimens may be injected and then left to dry in the atmosphere of the injection medium or in a tank of the solution as required.
Volumes needed for various animals:Rabbit Dog Cat Gazelles Cattle Horse Human Dogfish Frog Crayfish Earthworm Liver fluke
Corrosion Techniques
History
1000mls 2- 5000mls
1000mls 5- 10,000mls
20 - 30, OOOmls 40 - 50, OOOmls
5000mls 20- 50mls 5- lOmls 2- 5mls
0.5ml very small drop
In 1882 Paul Schieffendecker described a technique using celloidin (cellulose nitrate) dissolved in ether. After injection the evaporation of the ether left a cast of celloidin. The original tissues could then be dissolved away in strong hydrochloric acid which did not dissolve the cast. As ether does not mix with water the evaporation was slow. In addition, the dry celloidin cast tended to crumble so it was found necessary to keep the cast in a fluid preservative.
In 1899 Carl Starch introduced the use of celluloid (cellulose nitrate) which was highly inflammable and dangerous to use. Most authors refer to the use of X-ray film as part of the technique and this means that they probably meant celluloid. The X-ray film were taken from used stock and dissolved in acetone. The modern X-ray film is non-flammable and not suitable for corrosion formulae.
In 1936 Narat introduced the use of a vinyl resin called Vinylite dissolved in acetone as a substitute for cellulose acetate, and in 1948 the cold setting polyester resins Marco resin and Castolite were introduced successfully. The

44 R. H. Hams
histological reagent celloidin, used in differing dilutions to suit the size of the corrosion specimen, is also a very successful corrosion reagent.
Technique - Celloidin is usually diluted in acetone, and as this reagent is miscible with water the celloidin will precipitate out of solution to form a cast on the site of the injection.
For fine capillaries or vessels the following solution is suggested:-Acetone l OOml Celloidin 3gm Camphor 3gm (This reagent is added to make
the cast more pliable and less liable to cracking etc.)
For coarse vessels use the following:-Acetone l OOml Celloidin l Ogm Camphor 8gm
Mter injection the specimen is placed in cold water in a refrigerator at 4"C for at least 24 hours and then placed in a bath of concentrated hydrochloric acid. This will macerate all the tissue away leaving the injection cast revealed. The method can be used for lung, liver, blood vessels in fact all vascular systems. In recent years great strides have been made by Tompsett working at the Royal College of Surgeons who has successfully prepared entire juvenile human material. He worked with plastic injection media using mainly the polyester resins. It is not advisable to try these reagents until fully proficient with celloidin corrosion. The advantage of the plastic media is that it can be kept in the dry state. Celloidin corrosion preparations are usually kept in a jar of fluid (alcohol or formaldehyde based formulae).
Specific examples· of the technique Corrosion preparation of the Lungs - The organs are obtained fresh and
are washed out in warm saline and if no leaks show after inflation, the specimen is considered suitable for treatment. The thin solution is run in first, the time and amount depending on the size of the specimen. Only the alveoli area and base of the lungs are filled with the fine solution and then the thicker solution is run in on top. This may take several hours and the lung must be palpated to remove air bubbles. The injected lung is placed in cold water in a refrigerator, as previously mentioned, and left for 24 hours or so. The specimen is then placed in concentrated hydrochloric acid and the tissues allowed to digest away. Mter 24 hours direct a stream of water over the half digested tissue to wash it gently away. Although the casts are usually kept in a fluid condition it is sometimes convenient to have a dry preparation to hand, even if eventual breakdown is a risk. In such a case allow the specimen to dry thoroughly and then spray it with a fine transparent lacquer or shellac.
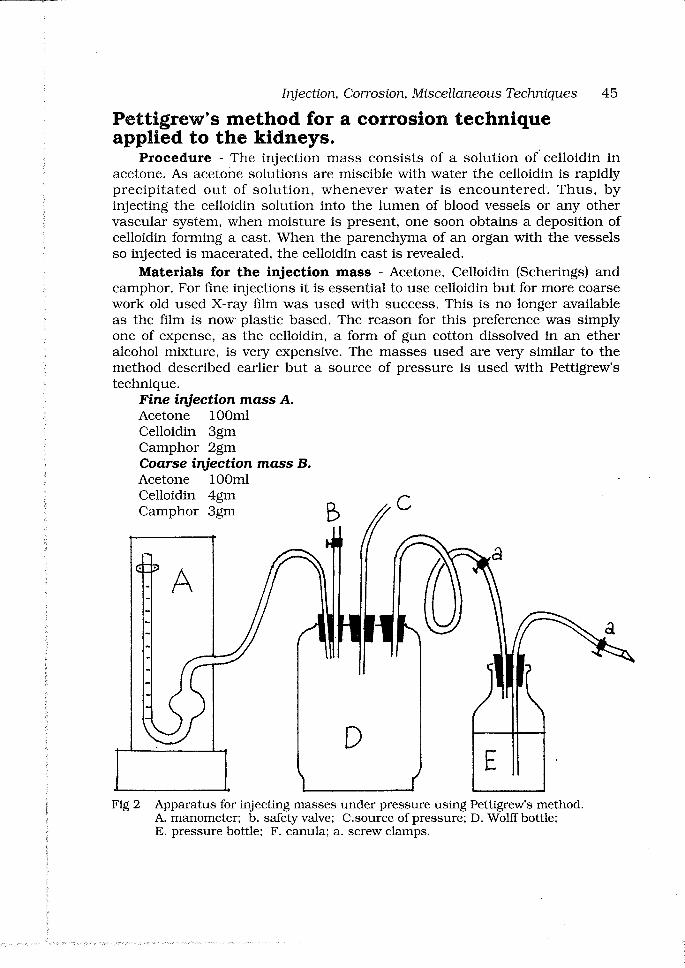
Injection, Corrosion, Miscellaneous Techniques 45
Pettigrew's method for a corrosion technique applied to the kidneys.
Procedure - The injection mass consists of a solution o( celloidin in acetone. As acetone solutions are miscible with water the celloidin is rapidly precipitated out of solution, whenever water is encountered. Thus, by injecting the celloidin solution into the lumen of blood vessels or any other vascular system, when moisture is present, one soon obtains a deposition of celloidin forming a cast. When the parenchyma of an organ with the vessels so injected is macerated, the celloidin cast is revealed.
Materials for the injection mass - Acetone, Celloidin (Scherings) and camphor. For fine injections it is essential to use celloidin but for more coarse work old used X-ray film was used with success. This is no longer available as the film is now plastic based. The reason for this preference was simply one of expense, as the celloidin, a form of gun cotton dissolved in an ether alcohol mixture, is very expensive. The masses used are very similar to the method described earlier but a source of pressure is used with Pettigrew's technique.
Fine injection mass A. Acetone lOOml Celloidin 3gm Camphor 2gm Coarse injection mass B. Acetone 1 OOml Celloidin 4gm Camphor 3gm B
A
D E
Fig 2 Apparatus for injecting masses under pressure using Pettigrew's method. A. manometer; b. safety valve; C.source ofpressure; D. Wolffbottle; E. pressure bottle; F. canula; a. screw clamps.
46 R. H. Harris
Apparatus - From the stock bottle the solutions pressure bottles of 250ml capacity.
Pressures required: A. fine structures: 1. Arterial 350 to
2. Venous 100 to B. coarse structures: 1. Arterial 200 to
2. Venous 80 to 3. Renal pelvis 50 to
are transferred to
600mm Hg. 200mmHg. 300mmHg. 100mm Hg. 80mmHg.
Hochstetter's wax impregnation technique.
History
Wolhard (1914-1915) wrote a paper on the impregnation of heart tissue for anatomical purposes, followed by Voss (1926) who described methods for wax infiltration of gross anatomical specimens of various kinds.
In 1927, Hochstetter, who may be regarded as the originator of the technique concerning impregnation of plants and animals, wrote a paper in which he used ether as an intermediate reagent between the alcohol and wax. Briefly, the technique is similar to block preparation for paraffin wax histology except that in the final phase all excess wax is removed from the external surface of the tissue. The use of ether with molten wax is not recommended because of fire risks and general safety hazard considerations.
In 1951 Rack wrote a paper in which he suggested the use of stearine with paraffin wax to keep the final impregnation softer and to prevent cracking. Although this sometimes occurs, most impregnations are successfully carried out, without recourse to this refinement.
Method
Taking a small grass snake as an example, the reptile is narcotised and killed, arranged in the required position and then injected with a suitable fixative such as 70% alcohol. Inject in several places along the body to be certain of complete penetration and preservation. After 24 hours fixation the specimen is transferred to ascending grades of alcohol, 2 days or so in each. Either industrial methylated spirit or isopropyl alcohols may be used. The grades are made up in 10% dilutions starting at 70% and thence by degrees to 90%. From 90% the specimen is placed in absolute alcohol and after 24 hours into a mixture of equal parts of chloroform and absolute alcohol. After 12 hours transfer to pure chloroform to complete the clearing. The tissues of the specimen are now completely impregnated with chloroform which is miscible with molten paraffin wax. From pure chloroform the specimen is placed in a bath of equal parts of chloroform and molten paraffin wax at 56·c melting point and after 8 hours to a bath of the pure wax. After 12 hours

Iryection, Corrosion, Miscellaneous Techniques 4 7
immersion in this the specimen may be injected with molten wax if necessary. The needles used for the injection of fixative may be left in place for this purpose.
After thorough impregnation remove the specimen from the wax bath, place it on a filter paper in a dish in the oven and allow the excess wax to drip off. The specimen should be removed from the oven and cooled before any of the wax in the tissues can escape. Before the specimen has cooled completely it should be wiped with a cloth moistened with Inhibisol. It may be necessary to brush specimens with hair or feathers with an Inhibisol moistened brush.
Points arising from the technique. A well impregnated specimen will probably not need any injection as no shrinkage will be seen but in some cases it might be necessary to inflate the specimen slightly to give it a natural, lifelike appearance. The method is suitable for all small zoological specimens and many plants, In addition it has many applications to archaeology.
Brain and nervous system techniques
Preparation of whole brains.
The head is removed from the animal as soon as possible after death. The flesh and fur is then dissected away from the skull leaving it as clean as possible. A small portion of skull bone is removed to allow access of th~ fixative to the general brain area. Place for at least a week in 10% formaldehyde.
Wash in running tapwater for 12 hours and then transfer to a solution of 10% hydrochloric acid and leave for 4 days to one week. Note: because of the carcinogenic nature of the combination of hydrochloric acid and formaldehyde it is suggested that Goading and Stewart's solution is used as an alternative to hydrochloric acid. The formula for this decalcifYing agent is:-
Formic acid Formaldehyde Distilled water to
5- 15ml 5ml
100ml
Test the consistency of the skull bone by probing with the point of a scalpel. The bone removal can begin when the skull is as soft as a thin card. A fine pair of scissors may be used for this purpose. Brains when prepared in this way are often quite soft and will need further hardening. The specimen is placed in the following solution:-
Chrome alum Copper acetate Glacial acetic acid 4% formaldehyde Distilled water
2.5gm s.ogni 5.0ml
10.0ml 77.5ml
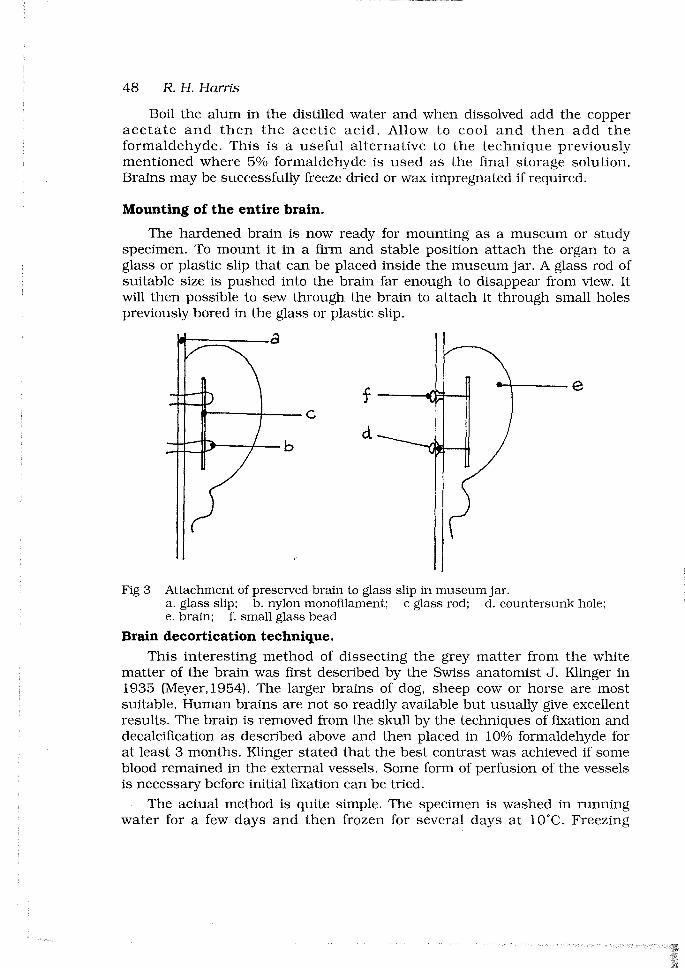
48 R. H. Harris
Boil the alum in the distilled water and when dissolved add the copper acetate and then the acetic acid. Allow to cool and then add the formaldehyde. This is a useful alternative to the technique previously mentioned where 5% formaldehyde is used as the final storage solution. Brains may be successfully freeze dried or wax impregnated if required.
Mounting of the entire brain.
The hardened brain is now ready for mounting as a museum or study specimen. To mount it in a firm and stable position attach the organ to a glass or plastic slip that can be placed inside the museum jar. A glass rod of suitable size is pushed into the brain far enough to disappear from view. It will then possible to sew through the brain to attach it through small holes previously bored in the glass or plastic slip.
Fig 3 Attachment of preserved brain to glass slip in museumjar. a. glass slip; b. nylon monofilament; c glass rod; d. countersunk hole; e. brain; f. small glass bead
Brain decortication technique. This interesting method of dissecting the grey matter from the white
matter of the brain was first described by the Swiss anatomist J. Klinger in 1935 (Meyer, 1954). The larger brains of dog, sheep cow or horse are most suitable. Human brains are not so readily available but usually give excellent results. The brain is removed from the skull by the techniques of fixation and decalcification as described above and then placed in 10% formaldehyde for at least 3 months. Klinger stated that the best contrast was achieved if some blood remained in the extemal vessels. Some form of perfusion of the vessels is necessary before initial fixation can be tried.
The actual method is quite simple. The specimen is washed in running water for a few days and then frozen for several days at 10"C. Freezing
Iryection, Corrosion, Miscellaneous Techniques 49
appears to separate and loosen tissue interfaces. After thawing the grey matter is peeled from the white matter with forceps or small rounded cocktail sticks. This work should be carried out in a bowl of water in or:der to wash away fragments as they break free from the brain surface. The cerebral cortex can be removed entirely to reveal the white cores of the gyri. Most of the major tracts can also be exposed. It takes considerable time to clear all the debris away l;>ut the results are very well worth while. The finished dissection is fragile and can be freeze dried with success or wax impregnated.
Brain slice staining technique.
This is a useful method for the demonstration of the grey and white matter of brain tissue (Mulligan, 1931).
Grey matter is defined as the neurons or nerve cells and their fibres and dendrites.
White matter is defined as the myelinated nerve fibres and practically no neurons.
Technique - Cut sections of the brain as required. Place in Mulligan's mordant for 2 minutes.
Mulligan's mordant: Phenol Copper sulphate Distilled water to
40gm 5gm
lOOOml
Wash in running tap water for 1 minute. Place in 2% iron alum and watch the development of the black colour in the grey matter, which takes about 1 minute for a rat brain section. Wash in running tap water and store in 5% formaldehyde. If left too long everything will be stained. As this is a surface stain no harm will have been done. Simply remove another thin slice and try again.
There is a dry method for this technique whereby the stained slices are taken up through the alcohols and then into absolute alcohol, paraffin wax and naphthalene, equal parts. This mixture is liquid at oven temperatures of between 50 to 60°C. Allow the impregnated slice to solidify, and when dry it should be varnished to prevent loss of the naphthalene. This impregnated tissue is quite satisfactory for general histological work.
A variation of this technique to give a blue and white comparison instead of black and white is as follows. Brain slices are immersed in the mordant as described above for 5 minutes at 60°C. The slice is then placed in iced water for 10 seconds and immersed in freshly made up 2% ferric cl).loride in distilled water for 45 seconds to 1 minute according to the intensity of the staining required. The slice is then immersed in 1% potassium ferrocyanide for 4 minutes during which time it will turn blue in the grey matter areas.

50 R. H. Harris
The specimen should be stored in the following solution:-Distilled water 75ml Glycerine 35ml Formaldehyde 1 Oml Citric acid 0.2gm Other methods ?f staining the grey matter areas of the brain are as
follows. Orange- Tartar emetic, 5%. Immerse for 6 minutes, wash in running tap
water for 1 minute. Place in a solution of hydrogen sulphide (saturated solution of hydrogen sulphide gas dissolved in water plus an equal volume of water) until there is a good strong stain. Wash and preserve in 5% formaldehyde or dry as required, either by wax impregnation or freeze drying.
Yellow - Lead nitrate, 1%. Stain section for 6 minutes, wash in running water for 1 minute. Place in 5% Potassium iodide solution for sufficient time to give the required intensity of staining. Wash and preserve or dry.
To demonstrate staining in both grey and white areas. Place section in soluble starch solution for 24 hours. Wash in running
water for 3 minutes. Place in Gram's iodine until there is a good differentiation, and store in 70% alcohol with a little iodine. The grey matter will be dark purple, the white matter yellow. It is not usually possible to prepare suitable dry sections using this method.
Preparation of intact nervous systems. This technique was described by Comwell in 1934. The intact nervous
system may be removed from small vertebrates by acid maceration. Nonmyelinated autonomic fibres are generally lost together with a few abdominal spinal nerves which extend into the body wall and a few caudal and terminal fibres in the limbs. The technique is not a substitute for dissection but does reveal the surprising bulk of the nervous system.
Technique - Skin and eviscerate the animal. Place in a pan of 30% nitric acid. Agitate from time to time with a glass rod. Bone is quickly decalcified and connective tissue destroyed, muscles will fray and separate. Nerves are protected by their fatty myelin sheaths. After 12 hours immersion clean away with a gentle flow of running tap water. Return to acid if it is difficult to remove eroded material. Save any major nerve that separates and this may be joined to the main system when the preparation is mounted.
Mounting - This is done on a film of gelatine attached to a glass slip in a formaldehyde based preservative. Or alternatively the specimen may be freeze dried, or displayed as a Riker mount on dark coloured cotton wool or similar bedding media.
Staining nerve tissue in entire specimens.
This technique, described by Guyer in 1953, may be applied with considerable success to samples of fish and other small vertebrates.

Iryection, Corrosion, Miscellaneous Techniques 51
Three solutions are required:-
1 Potassium hydroxide
2 Glacial acetic acid Glycerin Chloral hydrate 1% aqueous
3 Glycerin Ehrlich's haematoxylin Chloral hydrate 1% aqueous
1% aqueous solution
1 part 1 part
6 parts
1 part 1 part
6 parts
A small fish for example is killed in 95% alcohol and left for 72 hours. After evisceration, it is then transferred to the potash solution for 1 to 3 days. By this time the specimen should be more or less transparent. Place in solution 2 for 73 hours and then without washing into solution 3 for one week. Destain in solution 2 for 24 hours and then clear in glycerin. The nervous tissue shows up dark purple against the transparent muscular tissue. The technique can also be applied to a number of invertebrates especially those with a complex nervous system.
Agar support technique for small transparencies and other demonstration specimens.
Some of these items are really too large for conventional microscope slide preparation and at the same time too small for a museum jar or similar container.
The writer has developed a technique for supporting such small or delicate objects and at the same time affording them complete protection. (Harris 1965).
Technique- A 4% agar solution is prepared. Only the best powdered agar is used for this purpose. Using a steamer or perhaps a pressure cooker or small autoclave, remembering not to put the agar under steam pressure but use only free steam. Add a crystal or two of thymol to prevent mould growth. The agar solution hardens on cooling into a translucent mass. To prepare an agar block use a solid watch glass, pour in the melted agar and allow it to set.
Place the specimen, washed clean in several changes of distilled water and gently dried with a paper tissue, on the surface of the set agar. Pour melted agar over the specimen until completely covered and allow to set. The semi opaque block may be 'shelled' out of the watch glass and then trimmed into a small cube. This is then placed into 70% alcohol for a day or so and then slow dehydration is initiated. 80, 90 and absolute alcohols, a few days in each, and then into a mixture of equal parts of absolute alcohol and benzyl alcohols and finally into pure benzyl alcohol.
From the time the block is immersed in the 50:50 absolute and benzyl alcohols the block will have begun to show signs of becoming transparent and
52 R. H. Harris
by the time it is in neat benzyl alcohol it will be nearly completely transparent. This cube supports the alizarin or cartilage stained specimen as though it were embedded in plastic. The great advantage of this technique is that the specimen can be removed from the agar by careful dissection if required.
The cubes are kept in benzyl alcohol as a final storage mixture. They can be removed and studied under the microscope or lens for 1 or 3 hours before any drying becomes apparent. There is a tendency for the blocks to tinge a light brown colour over the years but this may be postponed indefinitely by keeping them in the dark between examinations.
Use of agar to demonstrate the internal organs of echinodermata.
All the globular echinoderms are well demonstrated by this technique. The fresh specimen is injected with melted 4% agar and the mixture allowed to set. The specimen is then placed in 70% alcohol for a few days. After washing well in running water, to get rid of the excess alcohol, the specimen is placed in a bath of 5% hydrochloric acid. The test will slowly erode away leaving the internal organs intact in their correct anatomical position. The opaque mass of agar is cleared in the same way as the small transparency blocks already mentioned. The final preserving fluid being benzyl alcohol.
Preserved material may be attempted using the technique but there may be difficulties in making a successful complete injection with the agar.
Holothurians may also be treated in this way. There is no need to use acid but it may be necessary to bleach the external wall of the animal using a 10 vol. strength hydrogen peroxide solution after the agar injection and before the dehydration in alcohol.

Joumal of Biological Curation Vol. 1 No. 2, 1990 (1992)
Zoological Preservation and Conservation Techniques IV. Skeletal Preparation
R. H. Harris
Contents
Skeletal preparation technique Skeletal material found in different animal groups Various techniques of invertebrate skeletal preparation Various techniques of vertebrate skeletal preparation Dissection
Maceration: natural, chemical, enzymatic, antiformin, animal Bleaching Degreasing
Disarticulation technique
Decalcification technique
Cartilaginous skeleton technique Fluid preserved skeletons Dry preserved skeletons
Skeletal transparencies Alizarin transparencies for bone Cartilage transparencies Combined technique for bone and cartilage
Skeleton preparation technique.
Skeletal material found in different animal groups
53
Protozoa - Many protozoa have skeletons of some kind. The Radiolarians have delicate siliceous skeletons. The Foraminifera are enclosed in shells of calcium carbonate (tests). usually composed of calcite, or they may have skeletons formed of cemented grains of sand. Some make use of other materials such as barium sulphate and strontium sulphate. ·
Porifera - There is a diversity of materials to be found in the sponge skeleton. Some have a horny collagen-like protein material called spongin, others calcium carbonate spicules, others silica spicules and still others, a mixture of spongin and silica.
54 R. H. Harris
Coelenterata - The corals have a skeleton of calcium carbonate while other members of this group have a main skeleton of aragonite. There are chitinous threads running through many of these matrices. Some gorgonian corals have a skeletal component of a collagen-like protein called gorgonin. Many hydroids have a chitinous perisarc and some have a stiffening of calcium deposits.
Worm-like lower invertebrates - Some secrete hard calcite tubes, while others have bristles of chitin or tanned protein.
Bryozoa - These animals secrete variable amounts of calcite in their tubes and the cases that surround them.
Mollusca- The external shell shows a great variety of forms in this group. There is sometimes an outer proteinaceous layer called the periostracum, inside which is a layer of calcite or aragonite. Cephalopods mostly have internal shells of horn or calcite etc.
Arthropoda - The exoskeleton found in this group is formed from the protein chitin. This material is very often heavily impregnated with calcium salts in the Crustacea and Myriopoda.
Brachiopoda - These animals look very similar to the Molluscs but they are totally unrelated to this group. They have two main types of external shells, one chitino-phosphatic in the smaller species, the other larger groups, having a protein-calcium carbonate basis.
Echinodermata - These animals have external tests made up of calcitelike material with magnesium taking the place of some of the calcium. There is virtually no organic matrix in the mineral skeleton.
Vertebrata - The bone forming the skeletal material of many of the vertebrates is essentially phosphates of calcium laid down in a matrix of collagen fibres. Other substances present are water, proteins and certain polysaccharides, with the remaining bone component being calcium phosphate.
The other important skeletal material found in vertebrates is cartilage. This is a complex and variable substance, consisting of cells lying in a matrix of collagen fibres, mucopolysaccarides and water. Cartilage also often occurs in invertebrates. It is the support of the tentacles of many sedentary polychaetes, and in some molluscs it supports the radula. In these examples the cartilage is formed of collagen and polysaccarides and never become calcified
The various techniques of invertebrate skeletal preparation:
Protozoa - The skeletons of radiolarians are prepared according to whether recent or fossil material is being prepared. For recent material, place in clean water and decant several times to remove debris. Finally add to the fresh water sample a few drops of nitric acid. When the skeletons, or tests,

Skeletal Preparation 55
are clean and free from any tissue, transfer to fresh water and either store in distilled water with a few crystals of thymol (to prevent mould formation) until they can be examined, or place into 80% alcohol. These samples can be mounted for microscopic examination in the dry state, but it is now more usual to dehydrate through the alcohols clear in xylene and to mount under a coverslip in Canada balsam or some other resinous mountant.
When dealing with fossil samples of Radiolaria, the earth containing them is broken into small fragments and boiled in water to which a little sodium carbonate has been added. Boil for 30 minutes and then decant several times, before transferring to fresh water. Add a few drops of nitric acid and when the tests are clean, transfer to distilled water or alcohol, as for the recent samples.
For foraminiferans, separation and cleaning of fossil samples is carried out by boiling in a dilute sodium carbonate solution. The organic material from recent samples is best removed by treating in hot 10% sodium hydroxide. Free either recent or fossil material from sand by washing through a series of sieves gauged at so many meshes to the inch. The series 40, 80, 100, 150, 200, 300 and 400 are the most suitable mesh sizes to use. Sometimes the bolting silk used for plankton trawls is used to sieve, and this can go down to a few microns in mesh size. When sorting, it is often found that sand grains will still pass through a sieve mesh and a spinning method may be adopted for the final separation of the tests. Place the sample in a little water and gently swirl the water round and round the container. Th~ lighter tests will collect at the sides of the vessel (watch glass or petri dish), leaving the heavier sand grains in the centre at the bottom of the container.
Porifera - The skeletal structure of the sponges is usually left untouched as the samples are generally kept in the dry state. It is, however, also necessary to prepare the skeletal supporting material for identification and general taxonomic research. The spicules of silica and calcium carbonate are separated and mounted as microscopical preparations for this purpose. Sponge samples are boiled in 10% sodium hydroxide and after careful washing, are treated according to the spicule content.
For siliceous spicules the samples are treated in 10% hydrochloric acid to clean away debris, before final mounting. The calcareous spicules are not treated with acid, as they would dissolve and disappear in this reagent. At the outset, small samples are tested to ascertain the spicule content of the sponge. Great care must be taken to keep all the spicules of a sample, as many are extremely minute and might be missed in the rather crude technique
Coelenterata - The corals are usually kept in the dry state with a few small samples, fluid preserved, to show the expanded polyps and other features of the entire animals. Hydroids are usually fluid preserved and are often stained on microscope slides for identification and taxonomy.
Worm-like lower invertebrates -The calcareous tubes of specimens are usually kept in the dried state, with no special treatment. If containing entire
56 R. H. Hanis
specimens, especially if they are expanded, the tubes may be fluid preserved. Bristles and other supporting features are often demonstrated by preparing microscopical preparations (wholemounts) of either the entire animal removed from the tube, or various parts of the animal. Transparencies may also be prepared of this type of material by dehydrating through the alcohols into benzyl alcohol in which the bristles show up clearly against the cleared tissues of the body.
Bryozoa - Large colonies are usually kept in the dry state, with small samples fluid preserved for fine detail and identification purposes.
Mollusca - Shell preparations are made by removing the animal from the surrounding shell, with minimal treatment. The radula, if present, should be kept for preparation, also the operculum, when present. Dried shells of freshwater and marine animals are usually lightly smeared with a little vaseline for better preservation and prevention of cracking, but this should not be done to on the shells of terrestrial forms.
Arthropoda - Insect cuticle, forming the exoskeleton, is usually preserved in the dry state, although some samples are fluid preserved for research. Some of the larger Crustacea, also examples of the Arachnida, Myriopoda, Chilopoda and Onychophora may also preserved dry, though the bulk of the collections of these groups will be fluid preserved.
Brachiopoda - The very delicate shells of these creatures require great care in preparation. Specimens are placed in dilute enzyme solution. A few grains of papain are added to the water, in a small watch glass containing the specimen. When digestion of the tissues has taken place, leaving the branchial skeleton intact for removal, very careful drying is essential.
Echinodermata - These animals are all marine and any preparation of the skeletal structure is best carried out by immersion in fresh water after collection. This is a most effective narcotising and finally killing agent. All examples can be then injected with formal-acetic acid and allowed to dry in the dark for a few weeks. In almost all cases, good colour preservation of the external skeleton is maintained.
Various techniques of vertebrate skeletal preparation
For the preparation of bony skeletons, proceed as follows:-1. dissection 2. maceration; natural, chemical, enzyme, antiformin, animal 3. bleaching 4. degreasing
Dissection Removal of the skin followed by very careful evisceration. It is
advantageous to remove as much muscular tissue as possible without damaging ligamentary attachments. The best preparations are generally the result of very careful dissection and tissue removal.

Skeletal Preparation 57
Maceration, natural
Cold water maceration is the oldest and remains one of the most efficient means of tissue removal for skeletal preparation. Unfortunately, the conditions under which the technique is carried out are very disagreeable. The nauseating smell and the possible hazard from bacterial infection are the two major drawbacks. Hot water maceration has many advantages. The method is equally applicable to freshly killed animals, deep frozen and also dried specimens. As is the case in cold water maceration, the animal is carefully skinned and fleshed at the outset. It is essential to make sure that rudimentary clavicles, hyoid apparatus, etc. are not lost and that where they occur, penis bones (bacula), and the epipubic bones which are found in marsupials and some reptiles, are not discarded unnoticed with the waste tissues. It is a good plan to become very familiar with the skeleton of the subject animal before proceeding. If possible consult drawings, mounted skeletons and alizarin transparencies, at the outset, especially where rare or valuable material is concerned.
Maceration, chemical
The smaller vertebrates may be processed in the articulated state; rat, mouse, vole, shrew, mole, lizard, amphibia and fish (Harris, 1959). Larger forms such as guinea pig, hedgehog, rabbit, cat, dog, pigeon, chicken etc., should be divided thus:- head and neck region, ribcage (entire abdominal skeleton in birds), lumbar-sacral-caudal region with pelvic girdle, fore-limbs with scapulae and lastly the hind-limbs. The animal or portion of animal is simmered in a 5% solution of sodium carbonate until the flesh is tender and can be stripped from the bones easily. There will be great variation in the times of simmering according to the size and age of the specimen. The removal of the adherent tissue can be facilitated by gently brushing with a paste of calcium hypochlorite (bleaching powder) in water, using an old toothbrush. If it seems that the bones are separating too readily the sample may be placed in a bath of 80% alcohol to reharden the ligamentary attachments after which it may be further simmered till all the flesh has been removed.
Maceration, enzymatic
Size and fragility are sources of much difficulty in the successful preparation of osteological material. These difficulties can be largely overcome by the use of enzymes, pancreatin and papain and the macerator antiformin. Most small vertebrates with the exception of fish and some amphibians, may be prepared by the following methods (Luther, 1949).
Pancreatin - The specimen to be treated with pancreatin is carefully skinned, eviscerated and defleshed, leaving the skeleton attached by cartilaginous and ligamentary means. Limbs and skull are not usually separated unless this happens accidentally.

58 R. H. Harris
Transfer the specimen to Rowley'sjluid: Sodium sulphide Pancreatin Normal saline
lgm 2gm
lL
The normal saline is made up according to the animal to be treated. Mammal saline is 0.9% NaCl in distilled water, bird and reptile saline 0.75% and amphibian saline 0.65%. The specimen is gently simmered in this solution. The times taken will be varied for the size of the animal and also the varying strengths of the enzyme batches. usually after 30 minutes it is advisable to remove the specimen and examine for signs of maceration. As soon as the flesh adherent to the bones is seen to come away easily the process is halted and the sample transferred to a bowl of warm water, any remaining flesh being removed either manually with a blunt seeker or an old tooth brush, according to the size of the specimen. Note: this method, although making use of an enzyme, does not follow the usual practice with these reagents of incubation in the appropriate saline. With papain, however, the normal procedure is adopted. Procedures for defatting and bleaching are as described below.
Papain - The specimen is skinned, eviscerated, etc. as before and is then placed in the appropriate saline and papain added, O.Sgm per lOOml of saline. The specimen is then incubated in the resultant fluid for 24 hours. The specimen will, after a few hours, disintegrate into its separate bones. The method is used for complete disarticulation and is so complete that it is not recommended for juvenile material, as the epiphyses of long bones and other attachments will separate. The bones are cleaned without handling and for very small vertebrates this can be a distinct advantage. The vertebrae of shrews, for example, may. be prepared to show a clean flesh-free technique. The incubating papain has a foul smell so that the container should be placed in a fume chamber or be well stoppered. An important point to remember is that papain solutions may be used repeatedly at slightly higher temperatures. A mouse can be macerated completely in 8 hours at 40°C. The sludge forming at the bottom of the container is simply filtered off. Defatting and bleaching are seldom required after papain treatment. The bones are air dried and show no signs of cracking or fragility.
Maceration, Antiformin
For samples long preserved in formaldehyde or alcohol, there is a useful technique, in which small skulls and skeletons may be satisfactorily prepared. This is by using antiformin, a microbiological reagent used for the removal of fats and mucins in tissue culture work. It has been found that small lizard, fish, snake and mammal skulls are particularly well prepared by this method. A 10% solution of antiformin in distilled water is made up and the specimen immersed in this, after a few hours in running water to remove the preservative. After some hours the specimen is examined for signs of
Skeletal Preparation 59
maceration. Ear ossicles, teeth and other fragile elements are usually found attached to their points of contact. The bones may need bleaching and defatting, although in a majority of cases bleaching only is ne~essary. The antiformin stock solution is prepared as follows:-
Sodium carbonate Bleaching powder Distilled water
150gm 100gm
1L
Place the sodium carbonate in 250ml of the water and the bleaching powder in the remainder. Mix the two solutions and shake for 2 to 4 hours at intervals. Filter, and add to the filtrate an equal quantity of 15% sodium hydroxide in distilled water.
Maceration, animal
The animals used for maceration purposes are mainly the following:arthropods; dermestid beetle larvae, cockroaches and crayfish; Vertebrates; fish and amphibian larvae
Dermestid beetles - Various species of Dermestes are used. One of the most common is Dermestes maculatus (Hall and Russell, 1933). These are kept in an escape proof box at a temperature of 75 to 80"F. The bottom of the box is covered with meatmeal to which a pinch or two of yeast is added. This helps egg laying and ensures the continuation of the colony. Pieces of cotton wool, to provide cover should also be included. The colonies should be transferred to fresh boxes every few months and it is advisable to give the beetles small pieces of raw meat, from time to time. Skulls and skeletons are usually coated with a meat extract solution to interest the larvae and so start the maceration. Preserved material may also be treated but all preserving agents must be thoroughly removed and the bones dried and then coated with bacon grease or other similar substance, to start the colony feeding. In general remove as much skin and meat as possible, giving the colony the opportunity of getting to the bone surface fairly easily. The usual techniques for bleaching and defatting will be necessary.
Cockroaches -These have been used extensively in the U.S.A. but not in the U.K. Bones coated with bacon grease give good results although cockroach colonies are not to easy to maintain in an eating situation as they have long periods when they do not eat in any case.
Crayfish - Maceration by these animals is usually carried out in an aquarium, which must be well aerated because a good deal of pollution is likely to occur in the water during maceration (Sealander and Leonard, 1954). The bones, skulls etc. are placed in open ended tubes, so that th~ crayfish can crawl in to feed. Small fish skeletons are prepared quite well by this technique, as are frogs and toads.
Fish -The guppy, a common tropical fresh water fish kept in aquaria, is a very good macerator when used for preparing skeletons of frog and toad

60 R. H. Harris
tadpoles, etc. The specimen will need to be removed when seen to be nearly clean. Excellent tadpole skeletons can be produced by this means. The fish are not fed during the maceration period but are well fed between macerations. Amphibian larvae will macerate in a similar way to guppies but are only available for a short time each year.
Bleaching
This is carried out by immersing the specimen in 10 volume strength hydrogen peroxide solution with the addition of a drop of .0880 ammonia to aid and catalyse the reaction. When the evolution of bubbles ceases and the skeleton is white, carefully wash in tap water. At this point it may be necessary to remove the fat from the bones as many vertebrates tend to leak oil globules from the bone marrow after the simmering treatment.
De greasing
Specimens are placed in a bath of acetone overnight; larger bones may need drilling to remove excess grease. They may then be dried out in an incubator at 35°C, no hotter, for at higher temperatures the bones have a tendency to twist and split.
Disarticulation technique
This method is applicable to skull preparation, especially medium sized vertebrate skulls. Prepare the skull by any of the usual methods and then thoroughly dry. Fill the skull with dried peas, through the foramen magnum, and cork the foramen securely with a rubber bung. Cover the skull loosely, with a wide (3") band;;tge wrapped round, to keep the separating bones together. Immerse the s~ull in tepid water and keep the temperature as steady as possible. The peas swell, causing the bones to separate at their suture lines. After a few specimens have been prepared, it will be possible to work to a definite time schedule. The separated bones are then carefully dried and usually wired together, leaving a gap of ~ to y,; of an inch between the bones. This is a long and painstaking task but it is very well worth attempting. Care must be taken to see that very delicate bones are not split and it might be necessary to help the process along manually, by using a mounted needle or forceps to loosen attachments.
Decalcification technique Bones may be decalcified to show how soft and pliable they may become
when the mineral component is removed, for comparison with the normal specimens. The method is especially useful for brain preparation. Decalcification fluids such as Goading and Stuarts solution and 10% hydrochloric acid are the most suitable. Take for example the preparation of a sheep brain. Remove the skin from the head and deflesh as much as possible leaving the eyes intact. Remove the lower jaw etc. Place in a solution of 10 %

Skeletal Preparation 61
formaldehyde and leave for at least two weeks. Wash out the preservative thoroughly, in running tap water and place in a solution of 10% hydrochloric acid. After two days, the skull bone will be of the consistency of thin cardboard and may be easily cut away with scissors. Careful removal of the skull bones will leave the brain intact. Place the brain into a 5% formaldehyde solution for 12 hours to ensure that preservation is complete.
Cartilagiitous Skeletons These may be prepared in the fluid preserved or dry state.
Fluid preserved skeletons
. The dogfish is taken here as an example. Dissect out the pectoral and pelvic fins and girdles, and remove the head with the gills attached from the cartilaginous backbone and caudal fin. Place the various parts in a solution of 3% hydrochloric acid. Leave for 12 to 24 hours. Test with a finger to see if softening and maceration have commenced. If not, leave for a few more hours. When ready, gently remove the major portions of flesh and finally neutralise in a bath of 2% ammonia. Leave for an hour. Do not clean any further at this stage. Prepare alcohol baths of 25, 50, 75 and 90%. Place for 5 hours in 25%, 24 hours in each of 50 and 75% and a week in 90% alcohol. Then commence the final cleaning. Use a tooth brush (bristle not nylon) and gently brush on a cream made of bleaching powder and water to remove the final flesh remnants. Bleach after this stage in 3% hydrogen peroxide. Store or mount in 70% alcohol. A great deal of experience and skill is required to achieve a reasonable result.
Rapid technique useful for teaching - The specimen is roughly fleshed by placing under running hotwater tap, transferring to 70% alcohol from time to time to prevent separation. Brush away flesh with a paste of bleaching powder in water and when completed store in 70% alcohol
Dry preserved skeletons
Fluid preserved cartilage skeletons may be carefully dehydrated into paraffin wax and polyethylene glycols, to store in the dry state. The method is useful for the demonstration of the chondrocranium of elasmobranchs, axial skeletons of elasmobranchs and holosteans, persistent notochords of cyclostomes, chimaeras and the dipnoans. Embryological material of all the vertebrates is well demonstrated by this method.
Technique - Mter dehydration, place in equal parts of absolute alcohol and toluene for a day and then into pure toluene for 2 days. Transfer to toluene and paraffin wax equal parts at 45°C for a day and from there into several changes of pure wax for 2 hours each change at 60°C and then remove the specimen and allow to cool and set.

62 R. H. Harris
Skeletal Transparencies
Alizarin transparencies for bone
This stain is calcium specific and is used to stain bone and other calcium deposits in vertebrates and some invertebrate animals.
History- It has been known since the eighteenth century that the bones of animals fed on madder would become stained red. Madder is obtained from the roots of Rubia tinctorum L. and R. perigrina, which are found growing in Western Europe. An Indian variety R. cordifolia, is used for making the dye Turkey red. This was one of the dyes used by the ancient Egyptians and in the 15th century, dyers used it with Brazil red, to make a richer shade of red. Pliny describes it as a very common dye used for wool and leather and as a paint made from the leaves and fibres of the plant. It was one of the best dyes for wool and cotton but it has now been superseded by the synthetic product alizarin. Madder is, however, still valuable to physiologists, to enable them to make an accurate study of bone development. Animals fed on it, as stated above, show a red colouration of bones, and in addition, the claws and beaks of birds become coloured. Two related compounds occur in· madder. They are alizarin and purpurin. The synthesis of alizarin, in 1869, gradually led to the end of the cultivation of the plant and to the synthesis of related compounds, some of which are very important in the dyeing industry.
A soluble sulphonate, alizarin redS, can be made from alizarin and is the reagent used in the preparation of transparencies. There are also various colour shades now available. Alizarin is too insoluble for microtechnique but purpurin, although only sparingly soluble in alcohol or water, is used for histo-chemical tests for calcium. The alizarin red S is prepared as a saturated alcoholic solution. The addition of an alkali causes the formation of an insoluble dye lake. This principle is involved when preparing whole transparencies of vertebrates and for certain calcium specific structures in some invertebrates. There are numerous ways in which to carry out this technique, but one of the most successful methods is as follows (Cumley, et al, Gray, 1939; Harris, 1960).
Technique - The specimen is first prepared for treatment, then fixed and rendered partially transparent in a solution of either sodium or potassium hydroxide. Staining with alizarin then takes place, followed by differentiation and clearing, with final storage in a selected preservative.
Before fixation it is necessary in the case of vertebrate specimens to skin and usually eviscerate the animal concerned; it may also be prudent to remove excess muscular tissue in some cases. Nevertheless, it is often quite possible to obtain satisfactory results from small specimens in the entire condition. Initial fixation is in 70% alcohol and takes several days. The specimen is then transferred to a solution of 2% sodium or potassium hydroxide, until the extremities of the limbs appear through the tissue. This is a matter of practice and experience.
Skeletal Preparation 63
The staining in a saturated soluf ion of alizarin red S in absolute alcohol can be either progressive or regrcssivl'. In t 111· former method, the stain is added drop by drop until the maximum sLdllhll~ effect is obtained. It should be borne in mind that clearing is continlling all the time in the hydroxide solution. In the latter method, the speclJIWil Is placed in a deeply stained hydroxide solution and after a period of t inH' n'llwved. Excess stain is then removed from the tissues by immersion in fn~sh hydroxide solution. Of the two methods the first, or progressive tcchnlqw· is probably the best for a beginner to commence with. After some experkncc has been obtained, several specimens can be stained by the regressive nwlhod, at the same time. The colour of the stain, rich port wine, only occurs when the saturated alcoholic dye is added to the alkaline hydroxide solution; tlw alizarin stock solution being a light brown colour.
The staining of the bones and the clearing of tlw specimen takes place at the same time, and after several changes of fn~sh hydroxide solution the differentiation of the clearing specimen becomes much more obvious. The actual time of staining is related to the size of the specimen and the amount of calcium in the skeleton; usually, staining has taken place in a few hours. The hydroxide solution is mixed with glycerin, so that after a few changes the specimen is fully cleared and transparent in pure glyc<~rine. The procedure can be carried out as follows:-
Staining and differentiation are followed by removal of excess stain, using. a freshly prepared hydroxide solution. When no more slain comes out of the specimen, transfer to equal parts of 2% aqueous hydroxide and glycerine and leave for several days. Then, transfer to a 50% glycerine solution in distilled water, for 2 to 3 days. By now the specimen should be almost clear. Finally, store in pure glycerine in a container with a well fitting stopper or lid. The most commonly used alternative method of clearing is to dehydrate through the alcohols to methyl benzoate, storing in a second change of this reagent. The glycerine method is, however, generally considered to be superior.
The alizarin transparency technique is a most useful method in genetics, embryology and taxonomic research. Small specimens which would be extremely difficult to prepare as dry osteological preparations such as small amphibians, reptiles, and juvenile specimens of mammals and birds are beautifully prepared by this method.
Examples of invertebrate animals containing calcareous structures, which make valuable alizarin transparencies are molluscs with internal shells, decapod crustaceans with a gastric mill, and sea urchins with the Aristotle's lantern. ·
The alizarin transparency may be described as an X-ray in three dimensions, with the added advantage that it may be handled and freely manipulated during examination.
64 R. H. Harris
Cartilage transparencies The whole technique depends on the use of an acid stain and is, in every
way the exact opposite of the alizarin transparency method. It is for this reason that it is extremely difficult to combine a calcium and cartilage specific staining technique in one specimen although it is occasionally successful.
Van Wijhe (1902) technique for cartilage transparencies
Embryos, small cartilaginous fish, amphibian larvae and similar specimens intended for this technique should be formalin fixed. This seems to give a sharper staining reaction. If, however, the specimen is already in alcohol, the technique can still be attempted and quite good results will be achieved. Following fixation, the specimen is placed in acid alcohol (1% hydrochloric acid in 70% alcohol), for one week. It is then transferred to a solution of 0.25% methylene blue in acid alcohol, for 2 weeks. The excess stain is washed out in 1% aqueous hydrochloric acid, and the time to stop destaining is immediately the entire specimen seems to be white in colour. Any staining of the cartilage will not be seen at this stage. Dehydration now commences, up through the alcohols, into toluene as the final storage solution. If the specimen is small enough for microscopic examination on a glass slide it can be mounted in Canada balsam. Alternatively, the larger specimens may be cleared through aqueous dilute acid and glycerine, and finally stored in glycerine.
Modifications of this technique, using victoria blue and toluidine blue instead of methylene blue, are available. Victoria blue is generally considered to give the best results of any of the techniques for demonstrating cartilage. The same schedule is followed as for the classical method of Van Wijhe except that 1% Victoria blue is the staining solution, and also the clearing solution is different. When differenti:'ition is complete dehydrate in 90% alcohol for 12 hours, then into several changes of absolute alcohol for the same times, followed by clearing in methyl benzoate. Store in fresh methyl benzoate. Alternatively, oil of wintergreen (methyl salicylate) may be used as the clearing agent.
Specimens fixed in formaldehyde, to which acetic acid has been added, give brilliant results with toluidine blue but only fair results with methylene blue. In this case, specimens are cleared into glycerine, which is the final storage solution. If, however, a specimen is small enough for microscopy, it may be dehydrated via the alcohols, cleared in xylene and mounted in Canada balsam.
Technique combining bone and cartilage staining in one specimen
Fix the fresh specimen in 10% formaldehyde for 2 to 3 days or longer. The technique will also work for material which is already formalin or alcohol fixed (Dingerkus and Uhler, 1977). Wash in several changes of distilled water

Skt'/du/ Preparation 65
for 2 to 3 days. Skin and eviscerate the spcclnwu m; Lo as possible. Place in the following solution for 24 to 48 hours.:-
Alcian blue 8 GN 95% Alcohol Glacial acetic acid
lOgm HOmls 20mls
Then transfer to 2 changes of 95% alcohol, 2 lo :1 lll>~trs ln each. Hydrate through 70%, 50%, 30% and 15% alcohol, 2 to :1 IJottr~• In each until the specimen sinks. Then transfer to the enzyme solution:
Trypsin Sodium borate Distilled water
lgm 30mls saturated aqu<:om• 70mls
Change this solution every 2 to 3 days, or somH·r lf tlw ~mlnUon takes on a bluish colour. Continue until the bones and cartilag<· ;tn· d<·arly visible and the flesh retains no blue colour; this may take 2 to :1 WtTI\s, Transfer to 0.5 aqueous potassium hydroxide solution, to which enolll!,lt nllznrln red S has been added to make the solution deep purple. Leave for :l-11 hollr:C~, or until the bones are distinctly red. Transfer for a few days in e:wll of the following solutions: a mixture of 3 parts of 0.5% potassiurn hydroxldt· to 1 part of glycerine, then equal parts of hydroxide and glycerine, lollov.wd by l part hydroxide solution to 3 parts of glycerine, and finally lnlo pttn: glycerine. Note: 3 or 4 drops of 3% hydrogen peroxide per lOOm! of H(Jlntlon may be added to the final two hydroxide/glycerine solutions to hkoc·h nway the pigments of dark specimens. Store the specimens in pure glyi'<'Jine to which a few crystals of thymol have been added.
Results - Cartilage, blue; bone, red.
Journal of Biological Cum lion Vol. I No. 2, 1990 (1 992)
Zoological Preservation and Conservation Techniques.
R. H. Harris
References
67
Altmann, R. (1890). Die Elementarorganismen und ihre Beziehungen zur den Zellen. Leipzig: Veit.
Baylis, W. M. (1924). Principles of General Physiology. Longmans Green and Company, New York.
Birch, T. ( 17 46). A history of the Royal Society. London 4 volumes. Cole, F. J. (1921). The history of Anatomical Injections Studies in the History and
Method in Science. Ed. Charles Singer II 8vo Oxford University Press 285-343. Cole, F. J. (1944). A history of comparative anatomy from Aristotle to the eighteenth
century. Macmillan & Co Ltd. London. Cornwell, W. S. (1934). The demonstration of intact mammalian and amphibian
nervous systems by maceration of whole animals. Science 79: 162 -163. Cumley, W. J. Craw, J. & Griffin A. (1939). Clearing specimens for the demonstration
of bone. Stain. Tech. 14: 7 - 11. Davies, D. A. L. (1954). On the preservation of insects by drying in vacuo at low
temperatures. Entomologist, 87: 36. Davies, D. A. L. (1956). Preservation of animals and plants by drying from the frozen
state. Nature, 177 (2) 657-658. Davies, D. A. L. (1962). The preservation of the larger fungi by freeze drying. Trans.
Brit. mycol. Soc. 54 (3): 424-428. Dingerkus, G and Uhler, L. D. (1977). Enzyme cleaning of Alcian blue stained whole
small vertebrates for demonstration of cartilage. Stain Tech. 52: No. 4. Engel, H. (1937). The life of Albert Seba. Svenska linnesallsk. Arsskr. 20, 75-100. Gersh, I. (1932). The Altmann technique for fixation by drying while freezing. Anat.
Rec. 53 (3), 309-337. Gray, P. (1939). The preparation of alizarine transparencies Museums J. 28, 341 -
342. Grew, N. (1681). Museum Regalis Societatis; or a description of the natural and artificial
rarities belonging to the Royal Society and preserved at Gresham College ... Whereunto is subjoyned the comparative anatomy of stomachs and guts. 2 parts, illus. London.
Gunther, R. ( 1927). The diary and will of Elias Ashmole. London. Guyer, M. F. (1936). Animal Micrology Univ. Chicago Press, Chicago. Hall, E. R. & Russell, W. C. (1933). Dermestid beetles as an aid to cleaning bones. J.
Mammal. 14, 372 - 373. Harris, R. H. (1959). Small vertebrate skeletons. Museums J. 58, 223- 224. Harris, R. H. (1960). Alizarine transparencies. Museums J. 60, 99- 101. Harris, R. H. (1964). Vacuum Dehydration and freeze-drying of entire biological
specimens. Ann. Mag. Nat. Hist. Ser.13, 7, 65-74, February. Harris, R. H. (1965). A simple technique for embedding and supporting biological
specimens. Nature.Lond. 208, 199. Harris, R. H. (1968). A new apparatus for freeze-drying whole biological specimens.
Medical and Biological Illustration 18 (3). Haskins, R. H. (1960). Freeze drying of macro fungi for display. Mycologia, 50, 11 (1),
161-164.
68 R. H. Harris
Hochstetter, F. (1927). Die Paraffindurchtrankung zur Erhaltung von Tieren und Pflanzen in ihrem naturlichen Aussehen. Die Umschau 31, 650-652.
Hower, R. H. (1964). Freeze-drying biological specimens. Museum News. Tech. Supp. 1 Washington, D. C.
Kleiss, E. & Simonsberger, P. (1964). La Parafinizacion Coma Metodo Morfologico. Universidad de los Andes, Facultad de Medicina, Merida, Venezuela.
Knower, H. McE. (1908). Injection methods. Anat. Rec. 40, 11. Luther, P. G. (1949). Enzymatic maceration of skeletons. Proc. Linn. Soc. Land. 161,
146- 147. Mann, G. (1902). Physiological Histology. Clarendon Press, Oxford. Mathews, AO. P. (1925). Physiological Chemistry, 4th ed. W. Wood and Company, New
York. Mercie, F. L. (1948). Preparation des collections vegetales par dessiccation sous vide
(Nouvelles Observations). BulL Soc. bot. Fr. 95, 38-43. Meryman, H. T. (1960). The preparation of biological museum specimens by freeze
drying. Curator, 1 (3), 5-19. Meryman, H. T. (1961). The preparation of biological museum specimens by freeze
drying. (Instrumentation). Curator, 4 (2), 153-174. Meyer, H. (1954). Macroscopic brain dissection in veterinary anatomy. J. Vet. Research
15, 143-146 Mulligan, J. H. (1931). A method of staining the brain for macroscopic study. J. Anat.
London 65: 468 -472. Pecina, P. & Porket, J. (1975). Zu anwendung der schabenart Nauphoeta cinerea zum
skelettieren. Paparatur 2, 428 - 429. Rack, E. (1951). Die Paraffin Methode fur anatomisches Sammlungspraparate. Anat.
Anz. 98: 6-9. Romeis, B. (1928). Tashenbuch der mikroskopischen Technik Munschen und Berlin:
Oldenburg. Rowe, T. (1960). The theory and practice of freeze drying. Ann. N. Y. Acad. Sci. 85,
679-681. Ruysch, F. (1710). Thesaurus animalium. Primus, Amstelaedan 4to. Sealander, J. A. & Leonard, R. G. (1954). Use of crayfish in cleaning skeletal material
J. MammaL 35, 428 - 429. Singer, C. J. (1957). A Short History of Anatomy from the Greeks to Harvey. Dover
Publications, NewYork. ' Smith, J. L. (1944). A neutral solution of formaldehyde for biological purposes. Trans.
R. Soc. S. Afr. Sept., 279-282. Stadelmann, E. J. (1959). The use of Mercie's method of freeze drying for the
preparation of fungi for demonstration. Proc. IX. Int. bot. Cong. MontreaL 11, 376. Steedman, H. F. (1976). ZooplanlctonfiXation and preservation. UNESCO Press, Paris. Swammerdam, J. (1681). Historia Insectorum generalis, ofte algemeene verhandeling
van de Bloedeloose Dierlcens etc. [in Dutch] pp.xxiv, 168, (48) 1 tab., 13pL Utrecht.
Tindale, N. B. (1962). The chlorocresol method for field collecting. Joum. Lepid. Soc. 3, 195-197.
Tompsett, D. H. (1970). Anatomical Techniques. 2nd Edition. Livingstone, London. Van Wijhe, J. (1902). A new method of demonstrating cartilaginous microskeletons
Proc. K. Med. Alcad. Wet. Amsterdam 31, 47- 50. Wolhard, D. (1951). Eine neue Methode zur Konservierung des Herzens. BulL Int. Ass.
Med. Mus. 5, 48-49 Woodring, J. P. & Blum, M. S. (1963a). Preservation of insect larvae by vacuum
dehydration. Joum. Kansas. Ent. Soc. 36 (2). Woodrtng, J. P. & Blum, M. S. (1963b). Freeze drying of spiders and immature insects.
Ann. Ent. Soc. Amer. 56 (2), 138-141. Yoshida, Y. (1962). A way of making fish specimens with their original colours kept.
BulL Misalci. Mar. BioL Inst. 3, 67-68.

Manuscripts should lw tdlnlill< <I 111 i lt.ttl• J', 11111, 1\<·cp<·r of
Invcdclxates, Manchester MtlS\'11111, l\iLttll'lu ·.1,1 11!11\11 111 i\'!,tlll lw:,i<'iiV!J:l DPL, England.
Tcl: 061 275 2666 FJ\X: 0\i J :~/!, ' 11; /I;
Preference will be 1 to p:ipt·r:; i11 1111 ltdlt 11 ' ·lii!J''
'" collection n1:::magcmcn I " c!ocumcnta Lion, ill I !llli!<!lki I (',!'"' .I!')J):;
natural ILIIIV (I( 11':1111 I
intcrpn·t:!l i<lfl. p.ttl 11L1 h ,Ji .pLt\ pl.tiillilll' .. < !Ttilioll
" ::.md evaluation biological record curatorial Lcclmiqt m a tcric:tl
('Oil< 'lii>ll, ·.lll!.i",< ,!Ill I i "!III!Lilillli ,,j ;l:tl;i
iilill<'plijL!J,IIl< ;,lJ)d><>ll'.>l\ ti !li<~lliildi
1 ,,j J,,,d ,,,Jin·linl invccst lii<lfl itll<, IIH il' tliL>I~<'
of collcctiom. :!IHI itt·.llilil 111 d l11 l!!w it~ HII i lu I 1!\ :Ill( I abroad
This list is not nwant to I)(' 1'\l~:;;t·.li" "' , , 1,1 ''' J<,, ,, 1 1111 n·hkd eel will also be consi<krt·d. ln1l 111, l'"'d111 1· nl Jlilll J, .1< 1r1:tlit·
I'Cscarch \Vill not be areas listed above.
All papers :cmbmilicd will lw 'I" til 11 I·,,,, 11 ltl'' .. 1 .!"'lid< ldiJlil protocol. so the author's Il<llll<' <tllli :HI>il' ,, ,, 1,, 11 ,,11 ·' •• , p:~tlli<'
slwc( and not repeaLed on cwl1 Jlil!'!. <d 1111 111 11>1<·,, iJd iill11 li'llil< ·!1
to previous issues of the ,Jounwl I• .1 "'''"' '" lt!Jill 1 11, illiild lw labcllccl [/\] IB] or [Cl to indic:11<- IIH il< 11,.! 111,1 '" 11 11 P .Jl' 11 IIIIIHL·d
of the cost or in,r.;. :utd :\l>' Ill<'''"'' I i'' I''" 1>! I' fill I"''' I' I h ,(lid
lo rnakc n1axirnu1n use of lllc :tv!lil.il>lc I'·"'' ·"' , lwq ' ·.wt>lr>" ,rJI nl\ and tables,
The typescript wi1 h a wide
should lw ott ;\I Jl.ll" 1
lt will ·''Jl<T<i ptrldt• I >tild< ·J'.ii>d diH]
il J!i,llilltl I 'dl],li!liit'd Ill
<ill 11 l J, 111,11 :\'"
Or 5;;;" (;)'/()!\Ill 1 1 111,1 dt J>tt I !I >!ildl'< lit I'!,
l'il ,.,filii JLijli i Ill VVorclS!ar or /\SC!l files. llltt:~lrlllitiiJ', ,ltll:lhl 1, i<d can!. Pl should Jw ld:wl; :ttlil IJII' , J, I" 1!>1
Full scientific nam . iiH lrt>ltrl;' '"lit,,! il I.. HI), 11\ "I I I Ill! . tll
sn1s on firs I nwnl io11. 1 i]' ,, I jl I' I il I 1 1.11(11 .11 11 t1 d I abbreviated to an iJJitiaL St·it tililt, ll l!lli >11!' ! lt I i I <I Ill I Ill.
, lVkasurcrncnl I',Jiinild I ll io 11 I : u ,f," Ill l!f!; Institute of Biolof.~Y
terms. units cmcl ( ! ! ) i:: l) I I. !i I j,, I i I i' (I I il 1111 I ill!'
1989. l~efercnces should he itlllw lt>ltll
<JefTrcys. J.G. (1858). Clt·<~tlitl:'.:, 1111 1, 1 11 i 1 1, B:lbington, C.C. (l8:l:J). f'rilllill'i'' I /Ill> if 11i•, l.i!ili'lli.lll I <lllilllll
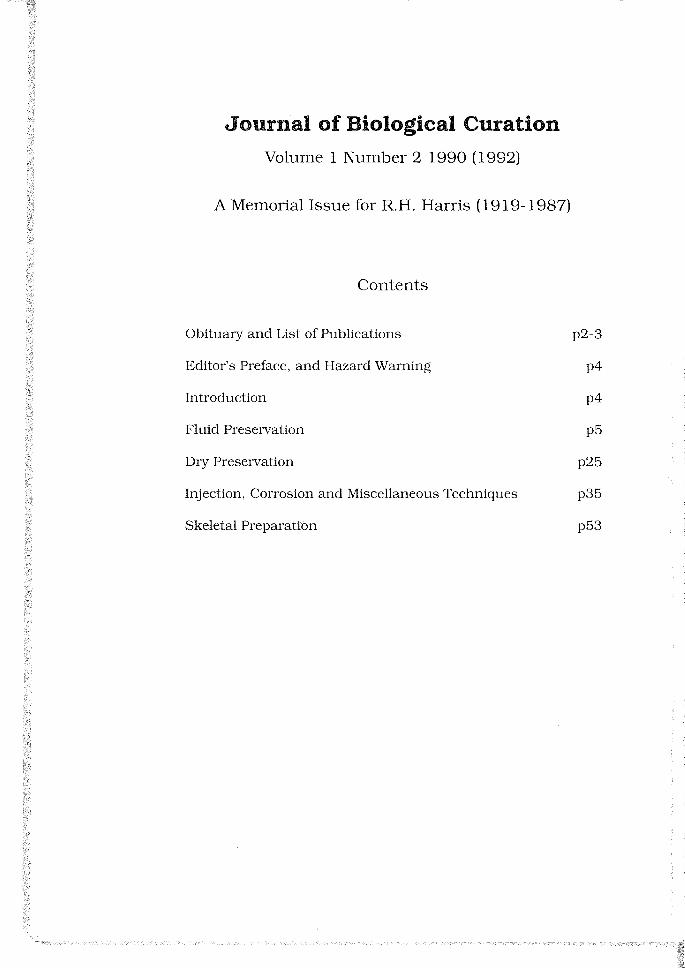
Journal of Biological Curation Volume 1 Number 2 1990 (1992)
A Memorial Issue for R.H. Harris (1919-1987)
Contents
Obituaiy and List of Publications p2-3
Editor's Preface, and Hazard Warning p4
Introduction p4
Fluid Preservation p5
Dry Preservation p25
Injection, Corrosion and Miscellaneous Techniques p35
Skeletal Preparation p53