dostek 440a btr - memex · 5.1.2 preparing the nc/cnc ... notes and technical support, see section...
TRANSCRIPT

Software Guide
Dostek 440A BTR


246.3 Dostek Techncial Support . . . . . . . . . . . . . . . . . . . . . . . . . . . . . . . . . . . . . . . . . .236.2 Application Notes . . . . . . . . . . . . . . . . . . . . . . . . . . . . . . . . . . . . . . . . . . . . . . . .236.1 Help Documents . . . . . . . . . . . . . . . . . . . . . . . . . . . . . . . . . . . . . . . . . . . . . . . . .236 Getting Help . . . . . . . . . . . . . . . . . . . . . . . . . . . . . . . . . . . . . . . . . . . . . . . . . . . . . .
215.5.2 Creating Separate Configurations for Loading/Drip-Feeding . . . . . . . . . .215.5.1 Overriding Transmit Repeat Setting . . . . . . . . . . . . . . . . . . . . . . . . . . . .215.5 Choosing Between Loading or Drip-Feeding . . . . . . . . . . . . . . . . . . . . . . . . . . . .195.4.3 Restarting from Specific Text (Using "Find text") . . . . . . . . . . . . . . . . . .185.4.2 Restarting from a Specific Line . . . . . . . . . . . . . . . . . . . . . . . . . . . . . . . .185.4.1 Restarting from the First Line . . . . . . . . . . . . . . . . . . . . . . . . . . . . . . . . .185.4 Restarting a Drip-Feed Session . . . . . . . . . . . . . . . . . . . . . . . . . . . . . . . . . . . . .185.3 Starting a New Drip-Feed Session . . . . . . . . . . . . . . . . . . . . . . . . . . . . . . . . . . .165.2 Working with the BTR . . . . . . . . . . . . . . . . . . . . . . . . . . . . . . . . . . . . . . . . . . . . .145.1.3 Configuring Dostek DNC . . . . . . . . . . . . . . . . . . . . . . . . . . . . . . . . . . . . .135.1.2 Preparing the NC/CNC . . . . . . . . . . . . . . . . . . . . . . . . . . . . . . . . . . . . . .135.1.1 Preparing the Computer . . . . . . . . . . . . . . . . . . . . . . . . . . . . . . . . . . . . .135.1 Getting Started with Drip-Feeding . . . . . . . . . . . . . . . . . . . . . . . . . . . . . . . . . . .135 Drip-Feeding with Dostek DNC . . . . . . . . . . . . . . . . . . . . . . . . . . . . . . . . . . . . .
124.2 Receiving a File from the CNC . . . . . . . . . . . . . . . . . . . . . . . . . . . . . . . . . . . . . .114.1 Sending a File to the CNC . . . . . . . . . . . . . . . . . . . . . . . . . . . . . . . . . . . . . . . . . .114 Using Dostek DNC . . . . . . . . . . . . . . . . . . . . . . . . . . . . . . . . . . . . . . . . . . . . . . . . .
103.3 Configuring Editor . . . . . . . . . . . . . . . . . . . . . . . . . . . . . . . . . . . . . . . . . . . . . . .103.2 Configuring File Manager . . . . . . . . . . . . . . . . . . . . . . . . . . . . . . . . . . . . . . . . . .103.1 Configuring General and Communication Settings . . . . . . . . . . . . . . . . . . . . . . .103 Configuring Dostek DNC . . . . . . . . . . . . . . . . . . . . . . . . . . . . . . . . . . . . . . . . . . .
9Tools and Utilities . . . . . . . . . . . . . . . . . . . . . . . . . . . . . . . . . . . . . . . . . . . . . . . . . . . . .9Touch DNC (DTouch) . . . . . . . . . . . . . . . . . . . . . . . . . . . . . . . . . . . . . . . . . . . . . . . . . . .9Configuration (DConfig) . . . . . . . . . . . . . . . . . . . . . . . . . . . . . . . . . . . . . . . . . . . . . . . .8Editor (DEditor) . . . . . . . . . . . . . . . . . . . . . . . . . . . . . . . . . . . . . . . . . . . . . . . . . . . . . . .8Communication (DDNC) . . . . . . . . . . . . . . . . . . . . . . . . . . . . . . . . . . . . . . . . . . . . . . . .7File Manager (DFileMgr) . . . . . . . . . . . . . . . . . . . . . . . . . . . . . . . . . . . . . . . . . . . . . . . .7Navigator (DDNav) . . . . . . . . . . . . . . . . . . . . . . . . . . . . . . . . . . . . . . . . . . . . . . . . . . . .72 Understanding Dostek DNC . . . . . . . . . . . . . . . . . . . . . . . . . . . . . . . . . . . . . . . . .
61.3 Understanding YourDostek DNC Software License . . . . . . . . . . . . . . . . . . . . . . . .51.2.2 Install Manually . . . . . . . . . . . . . . . . . . . . . . . . . . . . . . . . . . . . . . . . . . . .41.2.1 Install Automatically (Recommended) . . . . . . . . . . . . . . . . . . . . . . . . . . .41.2 Installing Your Software License Key . . . . . . . . . . . . . . . . . . . . . . . . . . . . . . . . . .21.1 Installing Dostek DNC . . . . . . . . . . . . . . . . . . . . . . . . . . . . . . . . . . . . . . . . . . . . .21 Installing Dostek DNC . . . . . . . . . . . . . . . . . . . . . . . . . . . . . . . . . . . . . . . . . . . . . .
1Introduction . . . . . . . . . . . . . . . . . . . . . . . . . . . . . . . . . . . . . . . . . . . . . . . . . . . . . . . . .
Table of Contents
www.memex.ca

This page intentionally left blank.
www.dostek.com

Dostek Model 440ABehind-the-Tape Reader (BTR)
Software GuideThis guide explains how to use Dostek DNC software with the Dostek Model 440ABehind-the-Tape Reader (BTR).
Dostek DNC is a suite of applications that work together to let you manage and editfiles, and transfer data between your computer and CNC machine tools.
With Dostek DNC, you can:
• Transfer programs and data between a Windows computer and CNC machine tools.
• Upload, download, and drip feed with data transfer rates up to 38,400 baud.
• Edit files, including: copy and paste, search and replace, reformat and renumber.
• Manage files, including: view, search, copy, rename, filter, and delete.
• Configure communication parameters and protocols to work with virtually any CNCmachine equipped with an RS-232C serial port or Dostek Model 440A BTR.
• Configure security and logging to control access and track activity.
• Work with standard Windows PCs (Windows XP through Windows 10).
• Work with multi-port serial cards and hubs (Ethernet and USB, wired andwireless).
This guide explains how to use Dostek DNC to load, save and drip-feed NC/CNC partprograms. For detailed information about using Dostek DNC file management andediting features, see the Dostek DNC User Guide. A PDF version of the User Guide isinstalled with the Dostek DNC software. To open the User Guide:
1. Open Dostek DNC File Manager.
2. Point to Documents in File Manager's Help menu, and then click Dostek DNCUser Guide (PDF).
Additional Resources
For information about additional resources, including help documents, applicationnotes and technical support, see Section 6, "Getting Help," at the end of this guide.
www.memex.ca

1 Installing Dostek DNC
This section explains how to install the Dostek DNC software for the first time. Toupdate, replace or move an existing copy of the Dostek DNC software, see theDostek DNC User Guide.
1.1 Installing Dostek DNC
To install Dostek DNC:
1. Insert your Dostek DNC software CD in your computer's CD or DVD drive. Setupopens automatically within a few seconds.
The method for opening Setup depends on whether you are installing using asoftware CD or a software download file:
¤ Software CDIf you received a software CD, insert it in your computer's CD drive. Setupopens automatically. If Setup fails to open automatically, use WindowsExplorer to manually open Setup.exe. The software CD is packaged in aplastic sleeve inside the front cover of the printed User Guide.
¤ Software Download FileOpen the software download file. The download file is named with the prefix"DDW" followed by a five-digit software version. For example, the file forversion 15.10A is "DDW1510A.exe".
Notes
› For information about downloading Dostek DNC software, visit www.dostek.com.
› You are permitted to download software updates for one year from date ofpurchase. Thereafter, you must subscribe to software support, or purchase asoftware update.
Page 2 Dostek 440A BTR - Software Guide
www.memex.ca

2. Follow the on-screen instructions to complete the installation. When finished,Setup automatically opens the Dostek DNC First-Time Setup Wizard.
Dostek DNC First-Time Setup Wizard guides you through:
¤ Installing your software license key. ¤ Viewing the Getting Started Guide. ¤ Setting up file locations and program shortcuts. ¤ Selecting from the supplied sample CNC configurations. ¤ Learning about backing up your data.
3. When the Wizard prompts you to "Choose setup mode,", choose one of thefollowing options:
¤ If you are installing Dostek DNC for the first time, select New Installationand continue following the wizard's on-screen instructions.
¤ If you are updating an existing, working, copy of the software, select Keepexisting configuration.
¤ If you are replacing a previous copy of the Dostek DNC software (to use a newcomputer, or to use the same computer after removing Dostek DNC), selectLoad previously-saved configuration and continue following the wizard'son-screen instructions.
4. When the Wizard prompts you to "Choose a sample CNC configuration," select theconfiguration indicated in the "Install and Configure Software" section in the 440ABTR Installation Guide included in the box with your BTR.
5. Complete the remaining Wizard steps, carefully following the on-screeninstructions.
When First-Time Setup wizard is finished, it automatically opens the Dostek DNCNavigator application, DDNav.
Dostek 440A BTR - User Guide Page 3
www.memex.ca

1.2 Installing Your Software License Key
If you install Dostek DNC using the software CD, your software license key file isincluded on the disk and is installed automatically by Dostek DNC First-Time SetupWizard.
If you downloaded Dostek DNC, you received your software license key by email. Youcan install it automatically (recommended), or you can manually type in your licensekey data.
Dostek DNC must be installed on your computer before you install your license key.
1.2.1 Install Automatically (Recommended)
To automatically install your Dostek DNC software license key:
1. Open the license key file attached to the email message you received fromDostek. Dostek DNC License Registration Wizard opens automatically, anddisplays your license key data.
2. Confirm that your license details are correct, and then click Finish. If your name,address or license details are incorrect, contact Dostek to obtain a new licensekey.
Note:
› To automatically install your software license key on a computer that does nothave access to your email, save the license key file to a portable media device(USB memory) or a shared network folder.
Page 4 Dostek 440A BTR - Software Guide
www.memex.ca

1.2.2 Install Manually
If you are unable to install your license key file automatically, you can install itmanually:
1. On the Windows Start menu, point to All programs. The Windows programsmenu opens.
2. Point to Dostek DNC, and then click Install new license key. Dostek DNCLicense Registration Wizard window opens.
3. Type your license key data provided in the email message you received fromDostek. You must type the data EXACTLY AS SHOWN, including punctuationand upper/lower case letters.
Notes:
› Your license key text includes 7 items, and looks something like this:(1) Company name(2) Street address(3) City, State(4) 20123867 (5) EPZLFWLL (6) 41533(7) F5D0-D205-902B-30C2-4493
› Items (4) and (6) are all numbers.
› Item (5) is all uppercase letters.
› Item (7) contains numbers 0-9 and letters A-F only.
› Omit the printed item number when typing license data. For example, type"Company name", not "(1) Company name".
4. Click Next. The Wizard displays your license key data.
5. Confirm that your license details are correct, and then click Finish. If your name,address or license details are incorrect, contact Dostek to obtain a new licensekey.
Dostek 440A BTR - User Guide Page 5
www.memex.ca

1.3 Understanding Your Dostek DNC Software License
To view your current Dostek DNC software license status:
• Click About in Dostek DNC's Help menu. The "About" window opens, and displaysthe software edition and number of seats licensed.
To view the Dostek DNC software license agreement, choose either of the followingmethods:
• Click License in the "About" window.
• Open Dostek DNC Navigator, and then click License in the "Introduction" tab.
Your Dostek DNC software license key includes the following information:
• Company name and address. Your company name is displayed in the title bar ofDostek DNC windows.
• Number of computers licensed. Purchase an additional license for each additionalcomputer.
• Support expiry date. Free software updates and limited support are provided untilyour support expires. Thereafter, you can purchase support, one-time softwareupdate, or an annual support subscription.
• License type:¤ Standard. License never expires (see item 1 below).¤ Trial. Expires after the trial period (usually 30 days).¤ Demo. Dealer demonstration license. Must be renewed annually.
The terms and conditions of your software license include:
1. Your standard Dostek DNC software license key never expires. You can use thesoftware version you purchased forever. However:
¤ Software updates are free for one year from the date of purchase. Thereafter,you must either purchase an update or annual support subscription to obtain anewer software version.
¤ Your license does not entitle you to free replacement. You areresponsible for making backup copies of your Dostek DNC software CDand software download files. Only the current software version isavailable from Dostek. If you lose your Dostek DNC software, you mustpurchase a software update to obtain the current version. For moreinformation, see Section 8, "Protecting your Investment."
2. You may use Dostek DNC software on the number of computers specified by yoursoftware license key. To use Dostek DNC on additional computers, contact Dostekto purchase additional software licenses.
3. Purchasing an additional license (for an additional computer) does not include asoftware update.
4. You are permitted to install your Dostek DNC software on one spare computer forbackup or testing purposes only (for example: to permit you to quickly replaceyour primary computer if it stops working).
Page 6 Dostek 440A BTR - Software Guide
www.memex.ca

2 Understanding Dostek DNC
Dostek DNC is a suite of applications that work together to let you manage and editfiles, and transfer data between your computer and CNC machine tools.
The following paragraphs introduce the Dostek DNC software components.
Navigator (DDNav)
Dostek DNC Navigator provides linksto Dostek DNC applications,documents, help files, and more.Links are categorized by tabs so youcan quickly find what you need.
To guide new users, Navigator opensautomatically each time Windowsstarts. You can clear this option whenyou become familiar with thesoftware.
File Manager (DFileMgr)
Dostek DNC File Manager has thefamiliar look and feel of classicWindows Explorer, but is easier touse and provides many enhance-ments and security features. With FileManager, you can:
• Organize your files.
• Browse folders and select files.
• View, print, copy, rename anddelete files.
• Restrict access to specific foldersand file types.
• Decide which folders to view. Youcan include folders on the computer's hard drive, a network drive or removablemedia.
• Customize viewing preferences and command buttons.
Dostek 440A BTR - User Guide Page 7
www.memex.ca

Communication (DDNC)
Dostek DNC Communication transfersfiles between the computer and CNCmachine tools. With Dostek DNCCommunication, you can:
• Load, save and drip feed withtransfer rates up to 38,400 baud.
• Stop, start, repeat, or restartanywhere in the file whendrip-feeding.
• Automatically store receivedprograms according to theprogram name or part number.
• Automatically select a machineconfiguration according to thecurrent folder.
• Display customized on-screenoperator instructions.
Editor (DEditor)
Dostek DNC Editor (Figure 4) is amultiple-document editor for CNCpart programs and text files. WithDostek DNC Editor, you can:
• Open multiple files of virtuallyunlimited size.
• Copy text between files.
• Search and replace text.
• Undo and redo changes.
• Reformat CNC part programs(expand, compress, resequenceand reformat numbers).
Page 8 Dostek 440A BTR - Software Guide
www.memex.ca
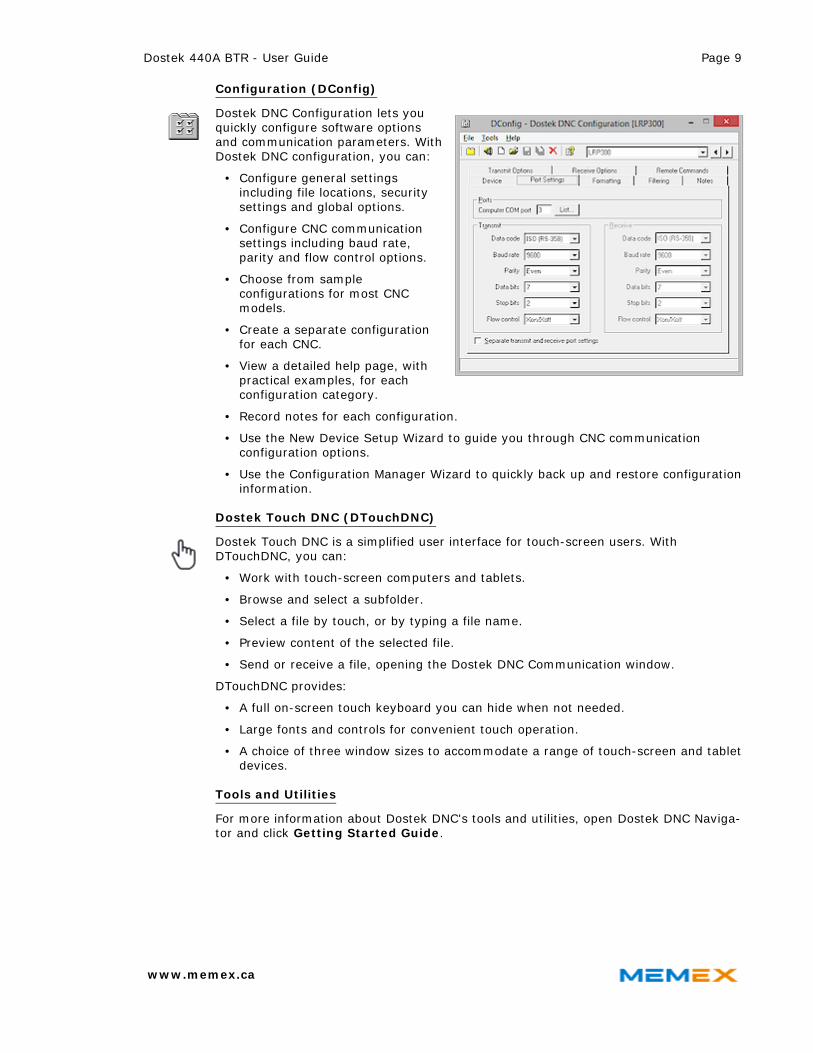
Configuration (DConfig)
Dostek DNC Configuration lets youquickly configure software optionsand communication parameters. WithDostek DNC configuration, you can:
• Configure general settingsincluding file locations, securitysettings and global options.
• Configure CNC communicationsettings including baud rate,parity and flow control options.
• Choose from sampleconfigurations for most CNCmodels.
• Create a separate configurationfor each CNC.
• View a detailed help page, withpractical examples, for eachconfiguration category.
• Record notes for each configuration.
• Use the New Device Setup Wizard to guide you through CNC communicationconfiguration options.
• Use the Configuration Manager Wizard to quickly back up and restore configurationinformation.
Dostek Touch DNC (DTouchDNC)
Dostek Touch DNC is a simplified user interface for touch-screen users. WithDTouchDNC, you can:
• Work with touch-screen computers and tablets.
• Browse and select a subfolder.
• Select a file by touch, or by typing a file name.
• Preview content of the selected file.
• Send or receive a file, opening the Dostek DNC Communication window.
DTouchDNC provides:
• A full on-screen touch keyboard you can hide when not needed.
• Large fonts and controls for convenient touch operation.
• A choice of three window sizes to accommodate a range of touch-screen and tabletdevices.
Tools and Utilities
For more information about Dostek DNC's tools and utilities, open Dostek DNC Naviga-tor and click Getting Started Guide.
Dostek 440A BTR - User Guide Page 9
www.memex.ca

3 Configuring Dostek DNC
You can configure dozens of Dostek DNC settings to suit your needs and preferences.
3.1 Configuring General and Communication Settings
To use the Dostek DNC Configuration application (DConfig) to change general settingsand CNC communication settings:
1. Open Dostek DNC File Manager.
2. Do one of the following:
¤ To change general settings such as file locations and security settings, clickDostek DNC general settings in the Configure menu.
¤ To change CNC settings such as baud rate, flow control and data format, clickCommunication (CNC) settings in the Configure menu.
Settings are organized by "tabs" to make it easy to find the setting you need. Detailedhelp is provided. To learn about settings found on a particular tab, click Help in theHelp menu, or click the Help icon in the toolbar.
Notes:
› Sample device configuration files are provided for a variety of CNCs. To use asample configuration, click Import sample configuration in DConfig's Filemenu.
› You can also start the Dostek DNC Configuration application from theConfiguration tab in Dostek DNC Navigator, and from the Windows Start menu.
3.2 Configuring File Manager
To change File Manager options:
• Click File Manager options in the Configure menu, and then do one of thefollowing:
¤ Select the View Preferences tab to change display preferences.
¤ Select the File Type Filters tab to change the types of files that aredisplayed.
¤ Select the QuickButtons tab to add or change QuickButtons.
¤ Select the Utilities tab to add or change commands on the Utilities menu.
3.3 Configuring Editor
To change the Editor font, which is also used for printing and viewing, click Prefer-ences in the Editor's File menu.
To change the page layout and font size used for printing, click Page Setup in theEditor's File menu.
Page 10 Dostek 440A BTR - Software Guide
www.memex.ca

4 Using Dostek DNC
Before you get started, here are a few things you should know about Dostek DNC:
Multi-Tasking. Dostek DNC's modular design means you can simultaneously openmultiple windows. For example, you can have the File Manager, Editor and Communi-cation windows all open at the same time. Switch between windows by clicking in theWindows taskbar or by pressing Alt+Tab.
Single Instance. You can only open one copy (instance) of most applications. If youtry to open a new copy of an application that is already open, the existing windowautomatically pops to the top. Although you can only open one Editor window, you canopen multiple files within the editor.
Tooltips. You can get a hint about the purpose of most of the software features(toolbar and command buttons, lists and text boxes, and so on) by hovering themouse over them.
4.1 Sending a File to the CNC
Sending a file to the CNC is a simple 3-step process with Dostek DNC:
STEP 1 - Select a File.
Open Dostek DNC File Manager. Folders are listed in the left window, and files inthe right window. Select the file you wish to send to the CNC.
Notes:
› Click [+] or [-] in File Manager's folder window to expandor collapse a folder tree.
› Click a file in the file window to select it. For moreinformation about selecting files, see Section 7.1,"Selecting Files and Folders."
› Click an icon in the toolbar or the View menu to choosefrom one of four file viewing formats.
› To quickly find a file in the current folder, click Go toFile and start typing the file name.
Dostek 440A BTR - User Guide Page 11
www.memex.ca

STEP 2 - Click "Send."
Click Send. File Manager opens the Dostek DNC Communication window (DDNC) tosend the file to the CNC.
If you created more than one CNC configuration file, DDNC first displays the"Communication Settings" window to let you pick a configuration.
The transfer continues according to your Dostek DNC configuration:
¤ If you are using a Dostek 440A Behind-the-Tape Reader (BTR), DDNCimmediately starts sending to the 440A BTR, and the BTR stores the data init's memory. Progress is shown in the status panel at the bottom of thewindow. You don't need to wait for the transfer to finish; proceed to step 3.
¤ If you are not using a 440A BTR (your computer is connected directly to theCNC's RS-232C serial port), DDNC pauses and indicates "Waiting for trigger"or "Press [Start Now] to begin" in the status panel at the bottom of thewindow.
STEP 3 - Go to the CNC, and start a Load or Run transfer.
Execute a read, load or run command on the CNC. If you are using a 440A BTR, theCNC starts reading from the BTR and DDNC displays the progress in the statuspanel. If you are connected to the CNC's serial port, DDNC starts sendingautomatically. If DDNC does not start automatically, click Start now.
4.2 Receiving a File from the CNC
Receiving a part program file from the CNC is also easy:
1. In Dostek DNC File Manager, select a folder, and then click Receive. File Manageropens the Communication (DDNC) window to handle the transfer.
2. Go to the CNC, and start a punch transfer. The received data scrolls in the DDNCwindow.
Notes:
› You can configure Dostek DNC to automatically name received files according tothe program number or a description stored in the first line of the program.
› To receive a file from the CNC, the CNC's puncher output must be connected tothe computer, either directly to a COM port or indirectly via a Dostek 440A BTR.
Page 12 Dostek 440A BTR - Software Guide
www.memex.ca
5 Drip-Feeding with the 440A BTR
This section explains how to drip-feed (run) programs directly from the Dostek 440ABTR using the Dostek DNC software.
Note:
› Some CNC models do not permit drip-feeding or running programs using the tapereader interface. You can not use the 440A BTR to drip-feed with these models.
5.1 Getting Started with Drip-Feeding
To get started with drip-feeding, you will:
• Prepare the computer (Section 5.1.1).
• Prepare the NC/CNC (Section 5.1.2).
• Choose a BTR Protocol (Section 5.1.3)
5.1.1 Preparing the Computer
To ensure reliable operation when drip-feeding CNC part programs using the 440ABTR, configure your computer as follows:
• Disable all power-saving (hibernation) and screen-saving features. Allowing thecomputer to hibernate during a drip-feeding session will disrupt critical datacommunication between the computer and BTR.
• Secure your computer to prevent anyone from disturbing software operation. Ifthe computer is disrupted, drip-feed operation will be affected.
5.1.2 Preparing the NC/CNC
To ensure reliable operation when drip-feeding CNC part programs using the 440ABTR, always prepare the NC/CNC before you start. Preparation requirements vary withthe type of NC/CNC you are using. In general, for example:
1. Clear the CNC tape reader buffer. Ensure that no program blocks from theprevious machining session remain in the CNC. For more information about thetape reader buffer, see the note below.
2. Set the machine controls, such as the feed rate override.
3. Manually execute any necessary preparatory functions or positioning.
4. Update any required tool offsets or machining parameters.
About the Tape Reader Buffer
Most NC or CNC machine tools "read ahead" one or more program blocks from thetape reader, and store the data in it's "tape reader buffer." When you stop themachine before it reaches the end of the program, the buffer contains the data thatwas read ahead.
To run a different program, or restart the same program at a different position:
• Using the CNC's control panel, be sure to clear the remaining data from the readerbuffer. The procedure depends on the CNC model. If you do not know theprocedure for your CNC model, refer to its operating manual.
• To verify that the CNC buffer was cleared, and to verify that the correct programwas loaded into the BTR's memory, always examine the first several blocks of theprogram on the CNC's control panel display before execution.
Dostek 440A BTR - User Guide Page 13
www.memex.ca
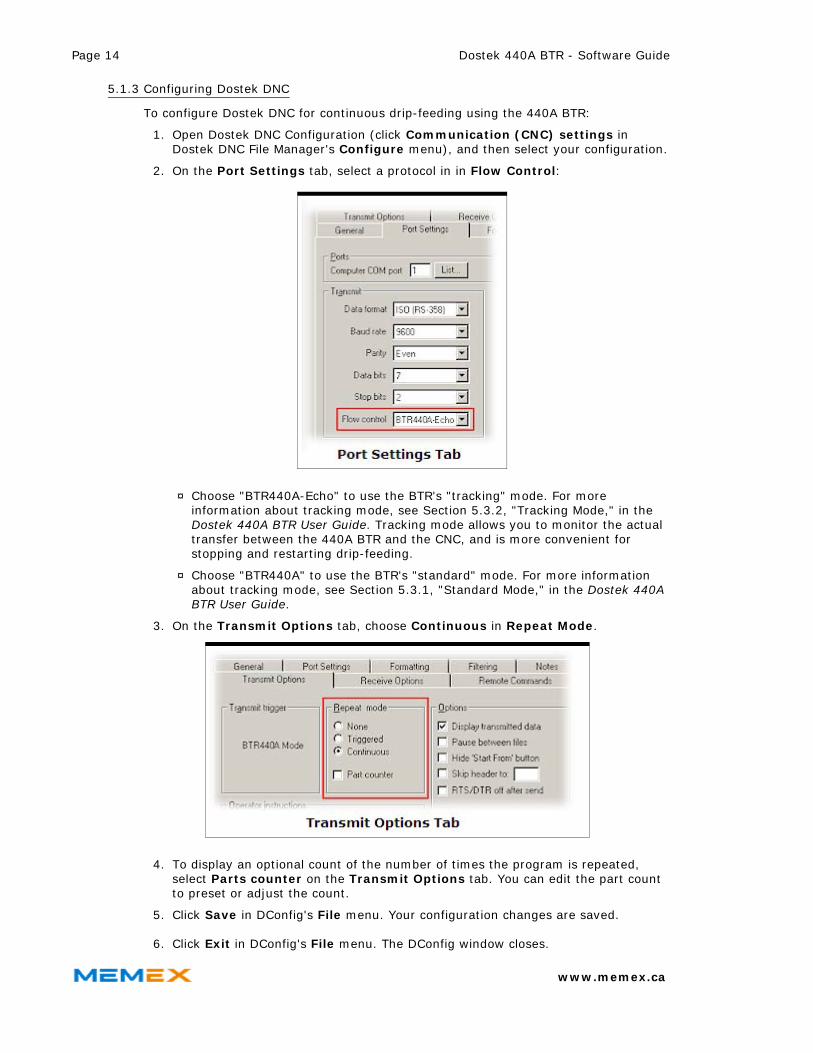
5.1.3 Configuring Dostek DNC
To configure Dostek DNC for continuous drip-feeding using the 440A BTR:
1. Open Dostek DNC Configuration (click Communication (CNC) settings inDostek DNC File Manager's Configure menu), and then select your configuration.
2. On the Port Settings tab, select a protocol in in Flow Control:
¤ Choose "BTR440A-Echo" to use the BTR's "tracking" mode. For moreinformation about tracking mode, see Section 5.3.2, "Tracking Mode," in theDostek 440A BTR User Guide. Tracking mode allows you to monitor the actualtransfer between the 440A BTR and the CNC, and is more convenient forstopping and restarting drip-feeding.
¤ Choose "BTR440A" to use the BTR's "standard" mode. For more informationabout tracking mode, see Section 5.3.1, "Standard Mode," in the Dostek 440ABTR User Guide.
3. On the Transmit Options tab, choose Continuous in Repeat Mode.
4. To display an optional count of the number of times the program is repeated,select Parts counter on the Transmit Options tab. You can edit the part countto preset or adjust the count.
5. Click Save in DConfig's File menu. Your configuration changes are saved.
6. Click Exit in DConfig's File menu. The DConfig window closes.
Page 14 Dostek 440A BTR - Software Guide
www.memex.ca

When Dostek DNC is configured to use continuous repeat mode, Dostek DNC workswith the BTR to emulate a "tape loop." That is, when the end of the program isreached, Dostek DNC automatically starts over from the beginning.
Notes:
› If you choose Dostek DNC's "BTR440A-Echo" flow control, Dostek DNC scrolls andhighlights the part program in the computer display as the machine reads it fromthe BTR.
› You don't need to wait while the program loads into the CNC's memory; you canstart running it right away. This is particularly useful for small runs of largerprograms.
› You can drip feed files of unlimited size.
› You can easily stop drip-feeding, and restart at any point in the program byclicking Stop and Start from in the Dostek DNC software.
› If you use your 440A BTR to drip-feed as well as to load part programs into theCNC's memory, you can create separate Dostek DNC configurations for loadingand for drip-feeding. For more information, see Section 5.5, "Choosing BetweenLoading or Drip-Feeding."
Dostek 440A BTR - User Guide Page 15
www.memex.ca
5.2 Working with the BTR
When using the 440A BTR for drip feeding, keep the following in mind:
• The BTR must be idle for at least 5 seconds before you send a new file from thecomputer to the BTR. Ensure the CNC is not reading or punching before you senda file.
• Using the BTR is a two-step process:
1. Send a file from the computer to the BTR. This is equivalent to mounting atape on a tape reader. It does not load any data into the CNC.
2. Read the data from the BTR into the CNC. You can begin immediately. You donot need to wait for the entire file to be loaded into the BTR. The BTR is readyafter receiving only 10 characters from the computer.
• You can drip-feed files of any size.
• To drip-feed from the BTR, always clear the machine's reader buffer before youstart. The CNC "reads ahead" from the BTR, and stores the data in it's "readerbuffer." If you restart without first clearing the CNC's reader buffer, you mayexecute data that is left over from the previous operation. See your CNC manualfor information about clearing the reader buffer.
• The data transfer rate from the computer to the BTR is about 950 characters(bytes) per second. The data transfer rate from the BTR to the CNC depends onthe CNC, but is never more than 300 characters per second. Because the BTR toCNC transfer is slower, the computer to BTR transfer will never fall behind.
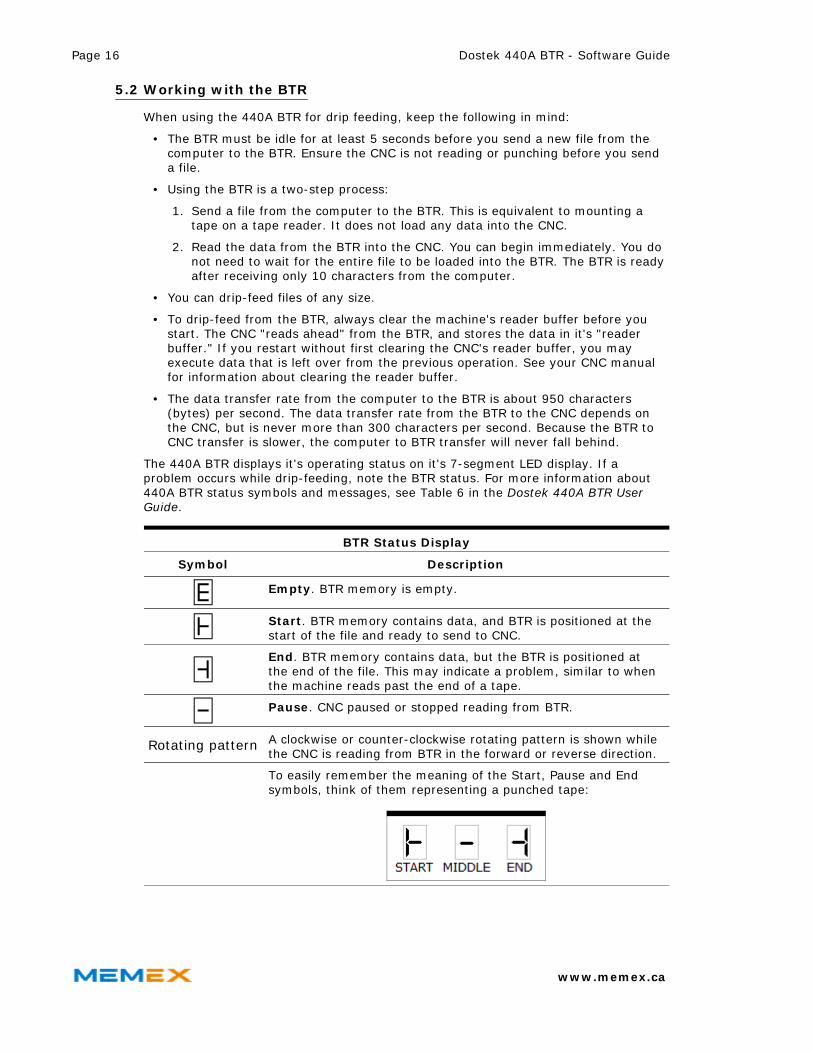
The 440A BTR displays it's operating status on it's 7-segment LED display. If aproblem occurs while drip-feeding, note the BTR status. For more information about440A BTR status symbols and messages, see Table 6 in the Dostek 440A BTR UserGuide.
To easily remember the meaning of the Start, Pause and Endsymbols, think of them representing a punched tape:
A clockwise or counter-clockwise rotating pattern is shown whilethe CNC is reading from BTR in the forward or reverse direction.
Rotating pattern
Pause. CNC paused or stopped reading from BTR.
End. BTR memory contains data, but the BTR is positioned atthe end of the file. This may indicate a problem, similar to whenthe machine reads past the end of a tape.
Start. BTR memory contains data, and BTR is positioned at thestart of the file and ready to send to CNC.
Empty. BTR memory is empty.
DescriptionSymbol
BTR Status Display
Page 16 Dostek 440A BTR - Software Guide
www.memex.ca
5.3 Starting a New Drip-Feed Session
To start a new drip-feed session:
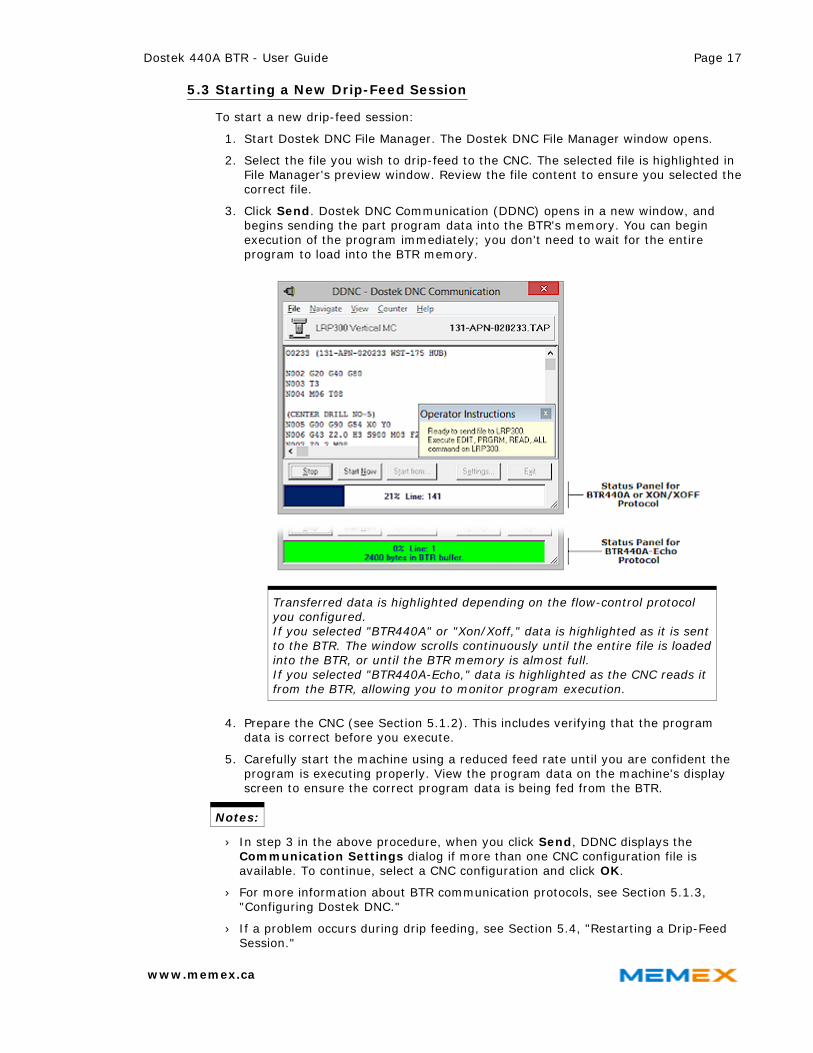
1. Start Dostek DNC File Manager. The Dostek DNC File Manager window opens.
2. Select the file you wish to drip-feed to the CNC. The selected file is highlighted inFile Manager's preview window. Review the file content to ensure you selected thecorrect file.
3. Click Send. Dostek DNC Communication (DDNC) opens in a new window, andbegins sending the part program data into the BTR's memory. You can beginexecution of the program immediately; you don't need to wait for the entireprogram to load into the BTR memory.
Transferred data is highlighted depending on the flow-control protocolyou configured.If you selected "BTR440A" or "Xon/Xoff," data is highlighted as it is sentto the BTR. The window scrolls continuously until the entire file is loadedinto the BTR, or until the BTR memory is almost full.If you selected "BTR440A-Echo," data is highlighted as the CNC reads it from the BTR, allowing you to monitor program execution.
4. Prepare the CNC (see Section 5.1.2). This includes verifying that the programdata is correct before you execute.
5. Carefully start the machine using a reduced feed rate until you are confident theprogram is executing properly. View the program data on the machine's displayscreen to ensure the correct program data is being fed from the BTR.
Notes:
› In step 3 in the above procedure, when you click Send, DDNC displays theCommunication Settings dialog if more than one CNC configuration file isavailable. To continue, select a CNC configuration and click OK.
› For more information about BTR communication protocols, see Section 5.1.3,"Configuring Dostek DNC."
› If a problem occurs during drip feeding, see Section 5.4, "Restarting a Drip-FeedSession."
Dostek 440A BTR - User Guide Page 17
www.memex.ca

5.4 Restarting a Drip-Feed Session
When a problem occurs while drip-feeding, you can:
• Restart from the first line in the file (Section 5.4.1).
• Restart from a specific line in the file (Section 5.4.2).
• Restart from specific text in the file, using "Find text" (Section 5.4.3).
5.4.1 Restarting from the First Line
To restart a drip-feeding session from the first line of the file:
1. Stop the machine.
2. In Dostek DNC Communication, click Stop. Dostek DNC stops sending data, anddisplays "Transfer cancelled" in its status panel.
3. Click Restart. Dostek DNC sends the same file from the start of the file.
4. Prepare the CNC (see Section 5.1.2, "Preparing the CNC"). Ensure the CNC readbuffer is empty.
5. Carefully start the machine. Single-step at a reduced feed rate until you areconfident the program is executing properly. View the program data on themachine's display screen to ensure the correct program data is being fed from thecomputer.
5.4.2 Restarting from a Specific Line
To restart a drip-feeding session from a specific line within the file:
1. In Dostek DNC Communication, click Stop. Dostek DNC stops sending data, anddisplays "Transfer cancelled" in its status panel.
2. Position the cursor to the line you wish to restart from. You can position thecursor using the mouse, the scroll bar, the cursor keys and the Page Up, PageDown, Home and End keys.
3. Click Start from. The restart menu appears.
Page 18 Dostek 440A BTR - Software Guide
www.memex.ca

4. In the restart menu, click From current line. A confirmation message appears.
1. Click Yes. The computer prepares to send the file, starting from the selected line.
2. Prepare the CNC (see Section 5.1.2, "Preparing the CNC"). Ensure the CNC readbuffer is empty.
3. Carefully start the machine. Single-step at a reduced feed rate until you areconfident the program is executing properly. View the program data on themachine's display screen to ensure the correct program data is being fed from thecomputer.
5.4.3 Restarting from Specific Text (Using "Find text")
To restart a drip-feeding session from a line containing specific text within the fileusing "Find text:"
1. In Dostek DNC Communication, click Stop. Dostek DNC stops sending data, anddisplays "Transfer cancelled" in its status panel.
2. Click Start from. The restart menu appears.
3. In the restart menu, click Find text or N-block number. The Find dialog opens.
4. Type the text to search for. You can type an N-block number, comment or othertext contained within the file. For more information about search options, see"Using the Find Dialog," below.
5. Click Find next. Dostek DNC searches for the text you entered. If the text isfound, it is highlighted in the Dostek DNC window. If the text is not foundbetween the current position and the end of the file, you can search again fromthe start of the file.
6. Examine the search result carefully. Ensure you have found the correct startingpoint. The file may contain more than one instance of your search text. To findthe next instance, click Find next again.
Dostek 440A BTR - User Guide Page 19
www.memex.ca

7. When you are certain that the correct starting position is highlighted in theDostek DNC window, choose one of the following actions:
a) To immediately start drip feeding from the selected (highlighted) line, clickStart here. A confirmation message appears. Click Yes.
b) To start drip feeding from a different position (for example, from a line ortwo before or after the selected line):
¤ click Cancel to return to the Dostek DNC window¤ click on the desired starting line¤ click Start from, and then click From Current line.
8. Prepare the CNC (see Section 5.1.2, "Preparing the CNC"). Ensure the CNC readbuffer is empty.
9. Carefully start the machine. Single-step at a reduced feed rate until you areconfident the program is executing properly. View the program data on themachine's display screen to ensure the correct program data is being fed from thecomputer.
Using the Find Dialog
The Find dialog provides two options to help you find text.
Check Line starts with to find text that begins at the start of a line.
Check Find whole word to find text that is preceded and followed by either a linebreak or a space.
When searching for an N-block number:
• Type the N-block number exactly as it appears in the file. Include leading zeros.For example, searching for "N120" does not find "N0120".
• Account for block skip characters (/). If Line starts with is checked, searching for"N0120" does not find "/N0120".
Page 20 Dostek 440A BTR - Software Guide
www.memex.ca

5.5 Choosing Between Loading or Drip-Feeding
If your NC/CNC model has memory for program storage, can you use the Dostek 440ABTR to drip-feed or to load programs into memory. However, the configurationdescribed in Section 5.1.1, "Configuring Dostek DNC," is not suitable for loadingprograms into memory because the "Repeat" mode is set to "Continuous." You can:
• Override the transmit repeat setting when sending the file from the computer tothe BTR (Section 5.5.1).
• Create separate configurations for drip-feeding and for loading programs intomemory. Set the "Repeat mode" to "Continuous" and "None" in the drip-feedingand loading configurations, respectively (Section 5.5.2).
5.5.1 Overriding Transmit Repeat Setting
To override the transmit repeat setting:
1. In Dostek DNC Communication (DDNC), click Stop and then click Settings. TheDostek DNC Communication Settings window opens.
2. Select No Repeat in the drop-down list, and then click OK.
5.5.2 Creating Separate Configurations for Loading and Drip-Feeding
To create separate configurations for loading and drip-feeding:
1. Open the drip-feed configuration you created in Section 5.1.3, "ConfiguringDostek DNC."
2. Click Rename in DConfig's File menu. The File Rename prompt appears.
3. Add "(Drip-Feed)" to the end of the existing name. For example, if yourconfiguration name is "MCV500," change the name to "MCV500 (Drip-feed)."
4. Click Save as in DConfig's File menu. The File Save dialog opens.
5. Change the "(Drip-feed)" in the file name to "(Load)." For example, change thename to "MCV500 (Load)."
6. Select the "Transmit Options" tab, and then select "None" in Repeat mode.
You now have two Dostek DNC configurations: one to use for loading programs in theCNC memory, and one to drip-feed from the BTR.
Dostek 440A BTR - User Guide Page 21
www.memex.ca

To use the separate configuration files:
1. In Dostek DNC File Manager, select a file and click Send. The Dostek DNCCommunication Settings window opens.
2. Select the drip-feed or load configuration. The file is sent to the Dostek 440ABTR.
3. Execute a "run" or "load" command on the CNC. For example, with a typicalFanuc CNC, select EDIT mode and press INPUT or READ to load a program intomemory, or select TAPE mode and press CYCLE START to drip feed.
Page 22 Dostek 440A BTR - Software Guide
www.memex.ca

6 Getting Help
This section explains how to get help understanding Dostek DNC software or resolvingproblems. Resources include help documents, application notes, and technical support.
6.1 Help Documents
Dostek DNC includes more than a dozen detailed help documents to help you under-stand, configure and use Dostek DNC, and troubleshoot CNC communication problems.To view help documents, use any of the following methods:
• Open Dostek DNC Navigator, and then select the Help tab.
• Click Help in the Help menu of a Dostek DNC application.
• Click the Help icon in the toolbar of some Dostek DNC applications.
Help documents include a side panel with Contents and Search tabs, and a toolbarwith a Print icon.
Help topics are listed in the Contents tab. To expand or collapse subtopics, click the[+] or [-] symbol beside the topic.
Select the Search tab to search for specific words or phrases.
Click the Print icon in the toolbar to print an entire help document, or a specific helptopic.
Note:
› To search all Dostek DNC help topics for a specific word or phrase, open DostekDNC Navigator (DDNav), select the Help tab, and then click the Master Help link.The master help document containing all Dostek DNC help topics opens.
6.2 Application Notes
To view application notes covering a variety of topics:
• Open Dostek DNC Navigator, select the Application Notes tab, and then clickApplication Note Selector.
Dostek 440A BTR - User Guide Page 23
www.memex.ca
6.3 Memex Technical Support
When contacting Memex for support, provide the following information:
• Your name, company name, telephone, and email.• Your Dostek DNC software serial number and software version number. This
information is displayed when you click About in Dostek DNC's Help menu, and isalso recorded on the media page at the front of the optional printed User Guide.
• If the CNC machine or Dostek DNC displays an alarm or error message, includethe exact message (write it down, or take a computer screen image or photo ofthe CNC screen).
Web Site
The Memex Web site provides all the information you need to recover from a problem.Type the following address into your Web browser, and then click Support.
memex.ca/dostek
View the Dostek Support Guide. It helps you with emergency or after-hours supportand helps you collect and submit information about a problem.
Contact Memex
E-mail: [email protected]: 519-742-5721Hours: 8 am to 5 pm EST
Page 24 Dostek 440A BTR - Software Guide
www.memex.ca