domino g20i rs485 guide
TRANSCRIPT

Domino G20iRS485 Guide
G20i

THIS PAGE INTENTIONALLY LEFT BLANK
(2) EPT052026 Issue 1 February 2019

DOMINO G20i RS485 GUIDEThis Guide, Domino Part No. EPT052026, describes how to send commands via RS485 toDomino G20i printers.
Users of this printer are warned that it is essential to read, understand and act according to theinformation given in the G20i Product Manual and User Guide.
All rights reserved. No part of this publication may be reproduced, stored on a retrieval system, ortransmitted in any form, or by any means, electronic, mechanical, photocopying, recording orotherwise, without the prior permission of Domino Printing Sciences plc.
Domino Printing Sciences plc. has a policy of continuous product improvement, the companytherefore reserves the right to modify the specification contained in this guide without notice.
© Domino Printing Sciences plc. 2019.
For technical support refer to www.DominoCaseCoding.com or contact you local Dominochannel.
Domino UK Ltd.
Bar HillCambridge CB23 8TUEnglandTel: 01954 782551Fax: 01954 782874
EPT052026 Issue 1 February 2019 (3)

THIS PAGE INTENTIONALLY LEFT BLANK
(4) EPT052026 Issue 1 February 2019

CONTENTS
PageAMENDMENT RECORD ........................................................................................................... 6
RS485 WIRING CONNECTION ................................................................................................. 7Extended Port Connection ................................................................................................... 7Connecting Multiple Printers to a PC ................................................................................... 7Connecting Multiple Printers to a PLC ................................................................................. 7
PRINTER SETTINGS ................................................................................................................. 8
COMMUNICATION COMMANDS ............................................................................................. 9Create Message and Start Printing Via RS485 .................................................................... 9Update Message While Printing ........................................................................................... 10
COMMUNICATION PROTOCOL TABLES ................................................................................. 11PC to Printer ......................................................................................................................... 11PLC to Printer ....................................................................................................................... 23
DECIMAL/HEXADECIMAL CONVERSION TABLE .................................................................... 35
EPT052026 Issue 1 February 2019 (5)

AMENDMENT RECORD
Amendment Date
All parts at Issue 1 February 2019
(6) EPT052026 Issue 1 February 2019

RS485 WIRING CONNECTION
Extended Port ConnectionRS485+ (A) connects to pin 11 on the printer’s extended port.
RS485- (B) connects to pin 1 on the printer’s extended port.
Connecting Multiple Printers to a PCThe diagram below illustrates how to connect more than 1 printer to a PC via RS485.
Connecting Multiple Printers to a PLCThe diagram below illustrates how to connect more than 1 printer to a PLC via RS485.
1
11
Extended Port
RS485- (B)
RS485+ (A)
Printer RS-485 Wiring Diagram
USB to RS485 Converter
RS
-485
+
RS
-485
-
RS
-485
+
RS
-485
-
RS485+
RS485-
PC G20i 1 G20i 2
RS485 Connection Diagram - Multiple Printers to PC
RS
-485
+
RS
-485
-G20i 3
RS
-485
+
RS
-485
-
RS
-485
+
RS
-485
-
RS485+
RS485-PLC
G20i 1 G20i 2
RS-485 Connection Diagram - Multiple Printers to PLC
RS
-485
+
RS
-485
-
G20i 3
EPT052026 Issue 1 February 2019 (7)
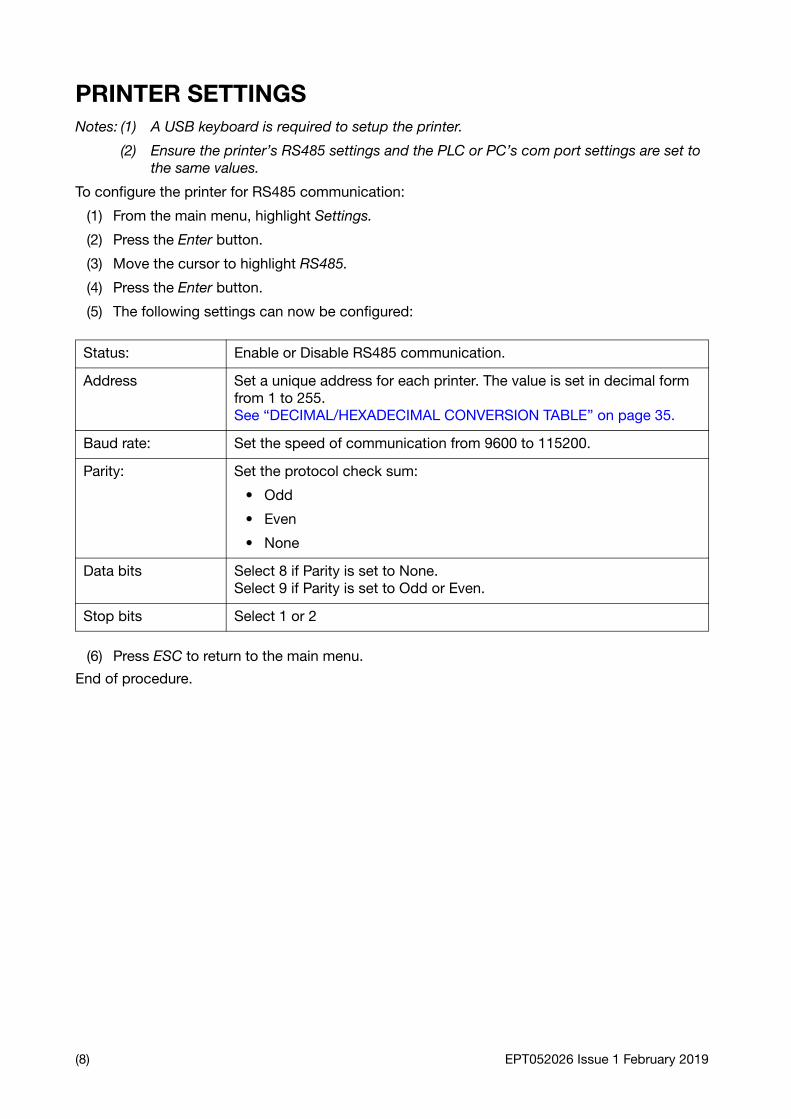
PRINTER SETTINGSNotes: (1) A USB keyboard is required to setup the printer.
(2) Ensure the printer’s RS485 settings and the PLC or PC’s com port settings are set to the same values.
To configure the printer for RS485 communication:
(1) From the main menu, highlight Settings.
(2) Press the Enter button.
(3) Move the cursor to highlight RS485.
(4) Press the Enter button.
(5) The following settings can now be configured:
(6) Press ESC to return to the main menu.
End of procedure.
Status: Enable or Disable RS485 communication.
Address Set a unique address for each printer. The value is set in decimal form from 1 to 255.See “DECIMAL/HEXADECIMAL CONVERSION TABLE” on page 35.
Baud rate: Set the speed of communication from 9600 to 115200.
Parity: Set the protocol check sum:
• Odd
• Even
• None
Data bits Select 8 if Parity is set to None.Select 9 if Parity is set to Odd or Even.
Stop bits Select 1 or 2
(8) EPT052026 Issue 1 February 2019

COMMUNICATION COMMANDS
Create Message and Start Printing Via RS485The example below illustrates how to send the commands to set the font type, font size, messagedata and start/stop printing.
Notes: (1) The printer’s address is sent in a hexadecimal format. 0b is printer 11.
(2) The <NUL> character has a hexadecimal value of 0x00.
(3) Add 000s to the end of commands to make the commands 150 bytes in length.
1st Command:
Send FONT TYPE150 bytesDelay at least 200ms
00:0b01^1U02CS1<NUL>00000000000000000000000000000000000000000000000000000000000000000000000000000000000000000000000000000000000000000000000000000000000000
0b = Printer Address Number 111U02CS = Set Font Type Command1 = Use Uppercase Font (0 = Use Lowercase Font)
2nd Command:
Send FONT SIZE150 bytesDelay at least 200ms
00:0b01^1U01CS0<NUL>00000000000000000000000000000000000000000000000000000000000000000000000000000000000000000000000000000000000000000000000000000000000000
0b = Printer Address Number 111U01CS = Set Font Size Command0 = 1 Line Font Height (Range: 0-5 = 1 Line to 6 Line Height)
3rd Command:
Send SET MESSAGE150 bytesDelay at least 500ms
00:0b01^1M01CS`@0`ABC`@1`XYZ`@2`IHG`@3`WER`@4`TUV`@5`OPQ<NUL>000000000000000000000000000000000000000000000000000000000000000000000000000000000000000000000
0b = Printer Address Number 111M01CS = Set Message Data Command`@0`ABC = Print “ABC” on line 1`@1`XYZ = Print “XYZ” on line 2`@2`IHG = Print “IHG” on line 3`@3`WER = Print “WER” on line 4`@4`TUV = Print “TUV” on line 5`@5`OPQ = Print “OPQ” on line 6
4th Command:
Send START PRINTING150 bytesDelay at least 200ms
00:0b01^1R01CS1<NUL>00000000000000000000000000000000000000000000000000000000000000000000000000000000000000000000000000000000000000000000000000000000000000
0b = Printer address number 111R01CS = Printer Start/Stop Command1 = Start Printing
5th Command:
Send STOP PRINTING150 bytesDelay at least 200ms
00:0b01^1R01CS0<NUL>00000000000000000000000000000000000000000000000000000000000000000000000000000000000000000000000000000000000000000000000000000000000000
0b = Printer address number 111R01CS = Printer Start/Stop Command0 = Stop Printing
EPT052026 Issue 1 February 2019 (9)

Update Message While PrintingDuring printing, users can send a new message to replace the current message that is beingprinted. The message can take between 3 and 5 seconds to update.
Note: Add 000s to the end of the command to make it 150 bytes in length.
Command:
Send SET MESSAGE WHILE PRINTING150 bytesDelay at least 500ms
00:0b01^1M03CS`@0`ABC`@1`XYZ`@2`IHG`@3`WER`@4`TUV`@5`OPQ<NUL>000000000000000000000000000000000000000000000000000000000000000000000000000000000000000000000
0b = Printer Address Number 111M03CS = Set Message Data While Printing Command`@0`ABC = Print “ABC” on line 1`@1`XYZ = Print “XYZ” on line 2`@2`IHG = Print “IHG” on line 3`@3`WER = Print “WER” on line 4`@4`TUV = Print “TUV” on line 5`@5`OPQ = Print “OPQ” on line 6
(10) EPT052026 Issue 1 February 2019
O t
S
S(in
S
S
S
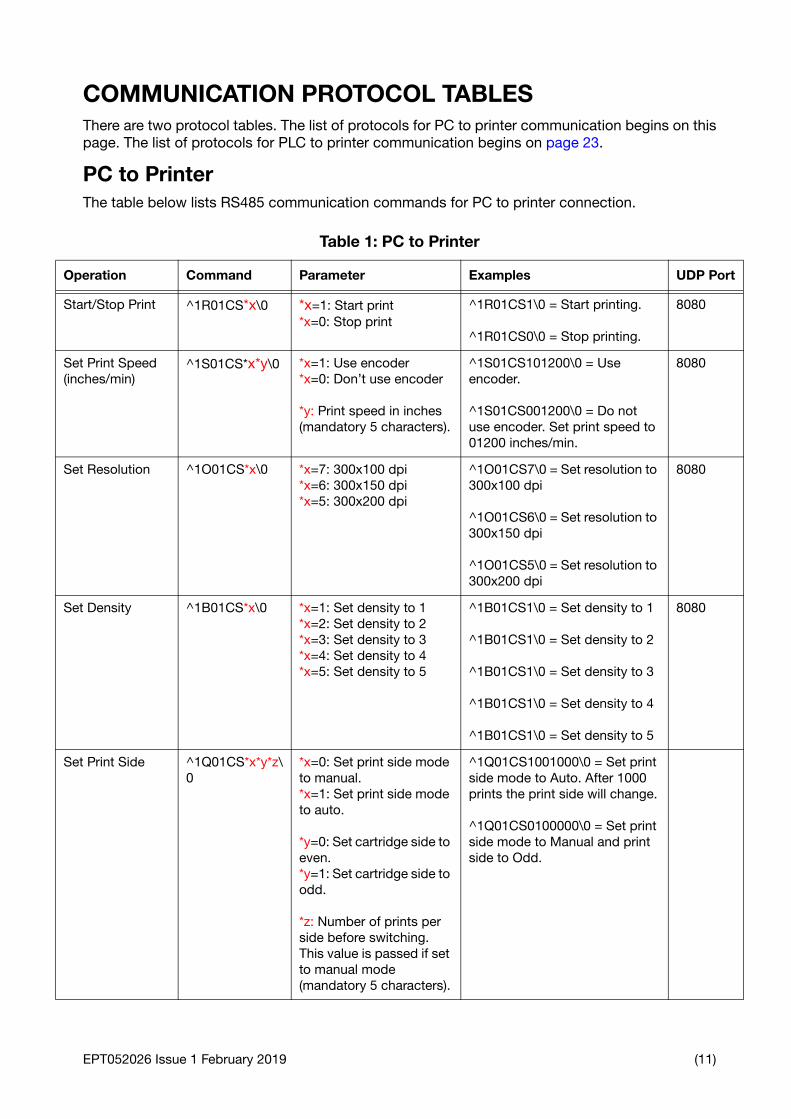
COMMUNICATION PROTOCOL TABLESThere are two protocol tables. The list of protocols for PC to printer communication begins on thispage. The list of protocols for PLC to printer communication begins on page 23.
PC to PrinterThe table below lists RS485 communication commands for PC to printer connection.
Table 1: PC to Printer
peration Command Parameter Examples UDP Por
tart/Stop Print ^1R01CS*x\0 *x=1: Start print*x=0: Stop print
^1R01CS1\0 = Start printing.
^1R01CS0\0 = Stop printing.
8080
et Print Speedches/min)
^1S01CS*x*y\0 *x=1: Use encoder*x=0: Don’t use encoder
*y: Print speed in inches (mandatory 5 characters).
^1S01CS101200\0 = Use encoder.
^1S01CS001200\0 = Do not use encoder. Set print speed to 01200 inches/min.
8080
et Resolution ^1O01CS*x\0 *x=7: 300x100 dpi*x=6: 300x150 dpi*x=5: 300x200 dpi
^1O01CS7\0 = Set resolution to 300x100 dpi
^1O01CS6\0 = Set resolution to 300x150 dpi
^1O01CS5\0 = Set resolution to 300x200 dpi
8080
et Density ^1B01CS*x\0 *x=1: Set density to 1*x=2: Set density to 2*x=3: Set density to 3*x=4: Set density to 4*x=5: Set density to 5
^1B01CS1\0 = Set density to 1
^1B01CS1\0 = Set density to 2
^1B01CS1\0 = Set density to 3
^1B01CS1\0 = Set density to 4
^1B01CS1\0 = Set density to 5
8080
et Print Side ^1Q01CS*x*y*z\0
*x=0: Set print side mode to manual.*x=1: Set print side mode to auto.
*y=0: Set cartridge side to even.*y=1: Set cartridge side to odd.
*z: Number of prints per side before switching. This value is passed if set to manual mode (mandatory 5 characters).
^1Q01CS1001000\0 = Set print side mode to Auto. After 1000 prints the print side will change.
^1Q01CS0100000\0 = Set print side mode to Manual and print side to Odd.
EPT052026 Issue 1 February 2019 (11)

S
S
Stim
S
O t
et print direction ^1V01CS*x\0 *x=0: Left to right normal.*x=1: Right to left normal.*x=2: Left to right inverted*x=3: Right to left inverted
^1V01CS0\0 = Left to right normal.
^1V01CS1\0 = Right to left normal.
^1V01CS2\0 = Left to right inverted.
^1V01CS3\0 = Left to right inverted.
8080
et print mode ^1W01CS*x*y*z*t\0
*x=0: Sensor mode.*x=1: Continuous mode.
*y: Number of prints for each time the sensor is triggered (mandatory 3 characters). This value is passed if using continuous mode.
*z: Space between prints, in inches (mandatory 5 characters).
*t:=0 Continuously print after the product detect sensor is triggered once.*t:=1 continuously print when the product detect sensor is continuously triggered. Stop printing when the product detect sensor is not triggered.
^1W01CS0002003930\0 = Print in sensor mode. Make 2 prints, each time the sensor is triggered. Set a 10cm space between prints. Continuously print after the product detect sensor is triggered once.
8080
et print delay e
^1D01CS*x*y\0 *x= Delay before print, in inches. Range = 00039-39370 (mandatory 5 characters).
*y= Delay after print, in inches. Range = 00039-39370 (mandatory 5 characters).
^1D01CS0019600393\0 = Set a delay of 5cm before the print and 10cm after the print.
8080
et sensor ^1H01CS*x\0 *x=0: Use internal product detect sensor.*x=1: Use external product detect sensor.
^1H01CS0\0 = Use the internal product detect sensor.
^1H01CS1\0 = Use an external product detect sensor.
8080
Table 1: PC to Printer
peration Command Parameter Examples UDP Por
(12) EPT052026 Issue 1 February 2019
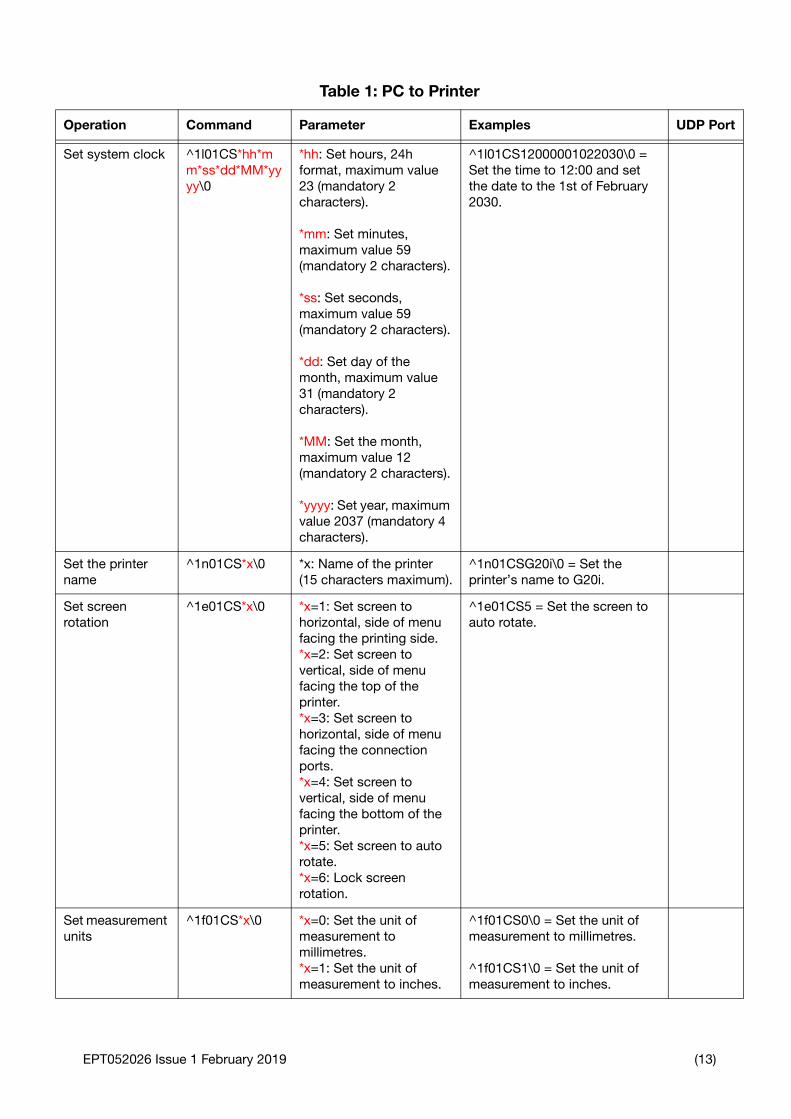
S
Sn
Sro
Su
O t
et system clock ^1l01CS*hh*mm*ss*dd*MM*yyyy\0
*hh: Set hours, 24h format, maximum value 23 (mandatory 2 characters).
*mm: Set minutes, maximum value 59 (mandatory 2 characters).
*ss: Set seconds, maximum value 59 (mandatory 2 characters).
*dd: Set day of the month, maximum value 31 (mandatory 2 characters).
*MM: Set the month, maximum value 12 (mandatory 2 characters).
*yyyy: Set year, maximum value 2037 (mandatory 4 characters).
^1l01CS12000001022030\0 = Set the time to 12:00 and set the date to the 1st of February 2030.
et the printer ame
^1n01CS*x\0 *x: Name of the printer (15 characters maximum).
^1n01CSG20i\0 = Set the printer’s name to G20i.
et screen tation
^1e01CS*x\0 *x=1: Set screen to horizontal, side of menu facing the printing side.*x=2: Set screen to vertical, side of menu facing the top of the printer.*x=3: Set screen to horizontal, side of menu facing the connection ports.*x=4: Set screen to vertical, side of menu facing the bottom of the printer.*x=5: Set screen to auto rotate.*x=6: Lock screen rotation.
^1e01CS5 = Set the screen to auto rotate.
et measurement nits
^1f01CS*x\0 *x=0: Set the unit of measurement to millimetres.*x=1: Set the unit of measurement to inches.
^1f01CS0\0 = Set the unit of measurement to millimetres.
^1f01CS1\0 = Set the unit of measurement to inches.
Table 1: PC to Printer
peration Command Parameter Examples UDP Por
EPT052026 Issue 1 February 2019 (13)
S
S
P
R
S
S
O t
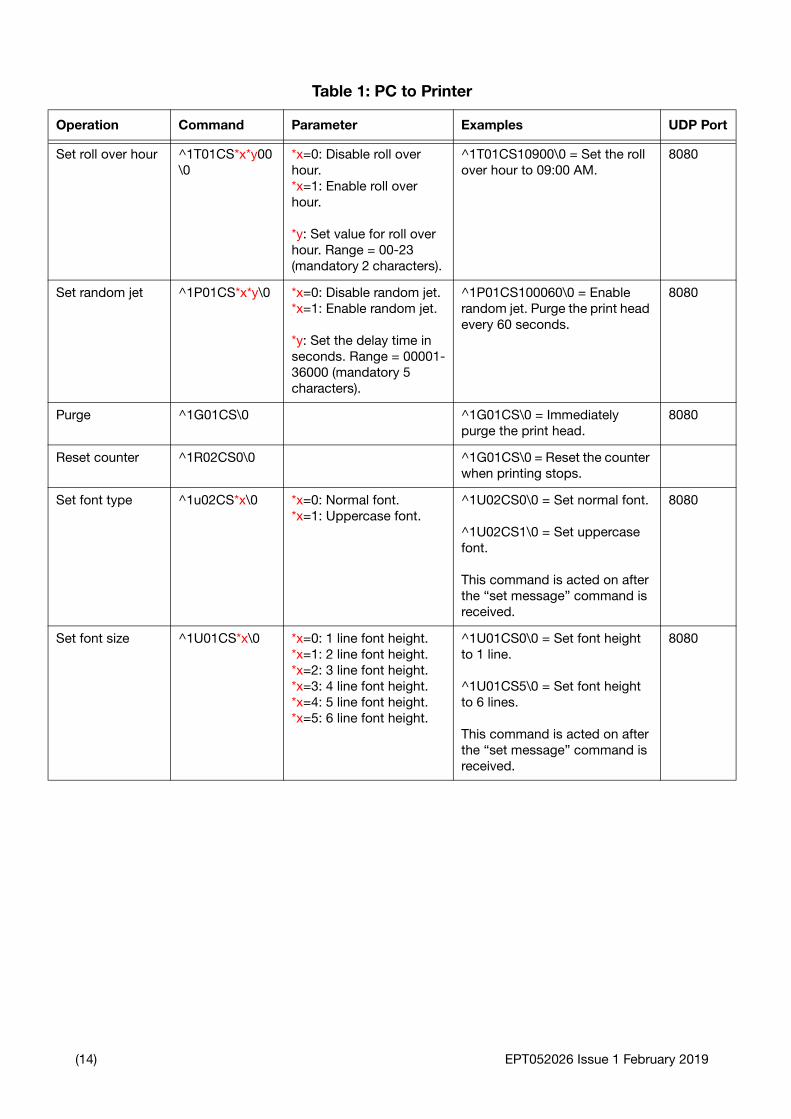
et roll over hour ^1T01CS*x*y00\0
*x=0: Disable roll over hour.*x=1: Enable roll over hour.
*y: Set value for roll over hour. Range = 00-23 (mandatory 2 characters).
^1T01CS10900\0 = Set the roll over hour to 09:00 AM.
8080
et random jet ^1P01CS*x*y\0 *x=0: Disable random jet.*x=1: Enable random jet.
*y: Set the delay time in seconds. Range = 00001-36000 (mandatory 5 characters).
^1P01CS100060\0 = Enable random jet. Purge the print head every 60 seconds.
8080
urge ^1G01CS\0 ^1G01CS\0 = Immediately purge the print head.
8080
eset counter ^1R02CS0\0 ^1G01CS\0 = Reset the counter when printing stops.
et font type ^1u02CS*x\0 *x=0: Normal font.*x=1: Uppercase font.
^1U02CS0\0 = Set normal font.
^1U02CS1\0 = Set uppercase font.
This command is acted on after the “set message” command is received.
8080
et font size ^1U01CS*x\0 *x=0: 1 line font height.*x=1: 2 line font height.*x=2: 3 line font height.*x=3: 4 line font height.*x=4: 5 line font height.*x=5: 6 line font height.
^1U01CS0\0 = Set font height to 1 line.
^1U01CS5\0 = Set font height to 6 lines.
This command is acted on after the “set message” command is received.
8080
Table 1: PC to Printer
peration Command Parameter Examples UDP Por
(14) EPT052026 Issue 1 February 2019

S
O t
et message ^1M01CS`@0`*x`@1`*y`@2`*z`@3`*p`@4`*r`@5`*q\0
*x: Message string for line 1. Range = 0-100 characters.
*y: Message string for line 2. Range = 0-100 characters.
*z: Message string for line 3. Range = 0-100 characters.
*p: Message string for line 4. Range = 0-100 characters.
*r: Message string for line 5. Range = 0-100 characters.
*q: Message string for line 6. Range = 0-100 characters.
To insert a variable item into the message:Counter = Cx with x: 0-5Shift code = Sx with x: 0-2BoxLot = Sxy with x: 0, y: 0-3Time = TDate = Dx with x: 0-4Expire date = Ex with x: 0-4Barcode = RLogo = Lx with x: 0-3
Note: Stop printing before sending the message.
^1M01CS`@0`ABC`@1`XYZ`@2`IHG`@3`WER`@4`TUV`@5`OPQ\0 = Print “ABC” on line 1, “XYZ” on line 2, “IHG” on line 3, “WER” on line 4, “TUV” on line 5 and “OPQ” on line 6.
To insert a counter to line 1 of message that has been setup with counter setup command, use this command:^1M01CS`@0`CounterSample: `C0`. Time: `T`. Date: `D0`. Expire date: `E0``@1`XYZ`@2`IHG`@3`WER`@4`TUV`@5`OPQ
8080
Table 1: PC to Printer
peration Command Parameter Examples UDP Por
EPT052026 Issue 1 February 2019 (15)

Sw
M
O t
et message hile printing
^1M03CS`@0`*x`@1`*y`@2`*z`@3`*p`@4`*r`@5`*q\0
*x: Message string for line 1. Range = 0-100 characters.
*y: Message string for line 2. Range = 0-100 characters.
*z: Message string for line 3. Range = 0-100 characters.
*p: Message string for line 4. Range = 0-100 characters.
*r: Message string for line 5. Range = 0-100 characters.
*q: Message string for line 6. Range = 0-100 characters.
To insert a variable item into the message:Counter = Cx with x: 0-5Shift code = Sx with x: 0-2BoxLot = Sxy with x: 0, y: 0-3Time = TDate = Dx with x: 0-4Expire date = Ex with x: 0-4Barcode = RLogo = Lx with x: 0-3
Note: It can take between 3 and 5 seconds for the message to update.
^1M03CS`@0`ABC`@1`XYZ`@2`IHG`@3`WER`@4`TUV`@5`OPQ\0 = Print “ABC” on line 1, “XYZ” on line 2, “IHG” on line 3, “WER” on line 4, “TUV” on line 5 and “OPQ” on line 6.
To insert the counter to line 1 of message that has been setup with counter setup command, we use this command:^1M03CS`@0`CounterSample: `C0`. Time: `T`. Date: `D`. Expire date: `E``@1`XYZ`@2`IHG`@3`WER`@4`TUV`@5`OPQ\0
8080
essage name ^1M07CS*x\0 *x: Message name. Range = 1-20 characters.
Note: Send the “Message name” command before sending the “Set message” command.
^1M07CSMessage 1\0 = Save message name as “Message 1”.
Table 1: PC to Printer
peration Command Parameter Examples UDP Por
(16) EPT052026 Issue 1 February 2019

S
O t
et counter ^1C01CS*x*y*z*a*b*c*d*e\0
*x: Counter number. Range = 0-5. This is the name of the counter that will be stored on the printer.
*y=0: Count upwards.*y=1: Count downwards.
*z=0: Do not fill zeros.*z=1: Fill zeros.
*a: Counter steps. Range = 000-250 (mandatory 3 characters).
*b: Counter start value. Range = 0000000001-2000000000 (mandatory 10 characters).
*c: Current counter value. Range = 0000000001-2000000000 (mandatory 10 characters).
*d: Counter reset value. Range = 0000000001-2000000000 (mandatory 10 characters).
*e: Current repeat value. Range = 0000000000-0010000000 (mandatory 10 characters).
1C01CS001001000000000100000000010000000999\0
=
Counter number: 0Count direction: UpwardsFill zeros: EnabledCounter steps: 1Start value: 1Current value: 1Reset value: 999
8080
Table 1: PC to Printer
peration Command Parameter Examples UDP Por
EPT052026 Issue 1 February 2019 (17)

SC
S
S
O t
et Box/Lot ounter
^1k01CS*x*y*z*a*b*c*d\0
*x: Counter number. Range = 00-03. This is the name of the counter that will be stored on the printer. Each box/lot uses 2 counters.
*y=0: Count upwards.*y=1: Count downwards.
*z=0: Do not fill zeros.*z=1: Fill zeros.
*a: Counter steps. Range = 000-250 (mandatory 3 characters).
*b: Counter start value. Range = 0000000001-2000000000 (mandatory 10 characters).
*c: Current counter value. Range = 0000000001-2000000000 (mandatory 10 characters).
*d: Counter reset value. Range = 0000000001-2000000000 (mandatory 10 characters).
*e: Current repeat value. Range = 0000000000-0010000000 (mandatory 10 characters).
Note: A pair of counters is required for a box/lot. The command will need to be sent twice.
1k01CS0001001000000000100000000010000000999\0 = Set counter 0 of box/lot1.
1k01CS0101001000000000100000000010000000999\0 = Set counter 1 of box/lot1
et date format ^1A*x1CS*y\0 *x: The number of the date format. Range = 0-4. The printer supports up to 5 date formats.
*y: Date format string.Maximum length = 13 charactersValid characters = (D,d,M,m,Y,y,J,j, - , /, . , _ , |, SPACE)]
^1A01CSDDMMMYYYY\0 = The printer will print the date as 11Sep2019
8080
et time format ^1I01CS*x\0 *x: The time format string.Maximum length = 12 charactersValid characters = (H, h, m, s, t, :, - , . , _ , |, SPACE)]
^1I01CShh:mm tt\0 = The printer will print the time as 10:30 PM
^1I01CSHH:mm\0 = The printer will print the time as 22:30
8080
Table 1: PC to Printer
peration Command Parameter Examples UDP Por
(18) EPT052026 Issue 1 February 2019
S
S
O t
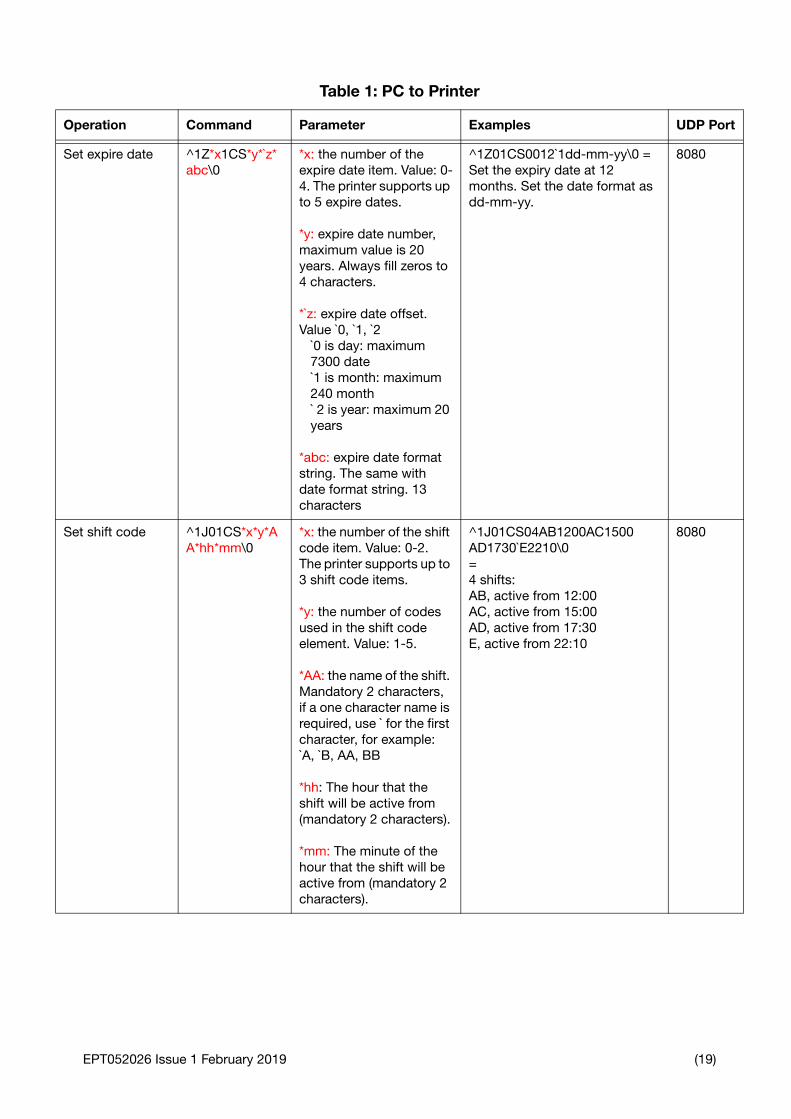
et expire date ^1Z*x1CS*y*`z*abc\0
*x: the number of the expire date item. Value: 0-4. The printer supports up to 5 expire dates.
*y: expire date number, maximum value is 20 years. Always fill zeros to 4 characters.
*`z: expire date offset. Value `0, `1, `2
`0 is day: maximum 7300 date`1 is month: maximum 240 month` 2 is year: maximum 20 years
*abc: expire date format string. The same with date format string. 13 characters
^1Z01CS0012`1dd-mm-yy\0 = Set the expiry date at 12 months. Set the date format as dd-mm-yy.
8080
et shift code ^1J01CS*x*y*AA*hh*mm\0
*x: the number of the shift code item. Value: 0-2. The printer supports up to 3 shift code items.
*y: the number of codes used in the shift code element. Value: 1-5.
*AA: the name of the shift. Mandatory 2 characters, if a one character name is required, use ` for the first character, for example: `A, `B, AA, BB
*hh: The hour that the shift will be active from (mandatory 2 characters).
*mm: The minute of the hour that the shift will be active from (mandatory 2 characters).
^1J01CS04AB1200AC1500 AD1730`E2210\0=4 shifts:AB, active from 12:00AC, active from 15:00AD, active from 17:30E, active from 22:10
8080
Table 1: PC to Printer
peration Command Parameter Examples UDP Por
EPT052026 Issue 1 February 2019 (19)

Sse
O t
tatic barcode tup
^1g01CS*x*y*z*w*p\0
*x=0: Set the barcode type to Code39.*x=1: Set the barcode type to Code2of5.*x=2: Set the barcode type to Code128.*x=3: Set the barcode type to Code93.*x=4: Set the barcode type to CodeUPC-A*x=5: Set the barcode type to CodeEAN.*x=6: Set the barcode type to CodaBar.*x=7: Set the barcode type to Code11.
*y: Set the barcode width, range 1-4.
*z: Set the barcode height, range 1-3.
*w=0: Disable human readable text.*w=1: Enable human readable text.
*p = barcode data. Maximum length, 30 characters.
^1g01CS0331BARCODE39\0=Set barcode type as Code39.Set barcode width to 3.Set barcode height to 3.Enable human readable text. Barcode data is “BARCODE39”.
8080
Table 1: PC to Printer
peration Command Parameter Examples UDP Por
(20) EPT052026 Issue 1 February 2019

Dse
O t
ynamic barcode tup
^1h01CS*x*y*z*a*b*c*d*e*f*g##*f\0
*x: Set the barcode type. 0=Code39, 1=Code2of5, 2=Code128, 3=Code93, 4=CodeUPC-A, 5=CodeEAN, 6=CodaBar, 7=Code11.
*y: Set the barcode width, range 1-4.
*z: Set the barcode height, range 1-3.
*w=0: Disable human readable text.*w=1: Enable human readable text.
*a=0: Count upwards.*a=1: Count downwards.
*b=1: Fill zeros (always = 1).
*c: Counter steps. Range = 000-250 (mandatory 3 characters).
*d: Counter start value. Range = 0000000001-2000000000 (mandatory 10 characters).
*e: Current counter value. Range = 0000000001-2000000000 (mandatory 10 characters).
*f: Counter reset value. Range = 0000000001-2000000000 (mandatory 10 characters).
*g: Prefix of barcode, maximum 10 characters.
*f: Suffix of barcode, maximum 10 characters.
1h01CS013101002000000000000000000020000010000AB##\0
=
Set barcode type as Code39.Set barcode width to 1.Set barcode height to 3.Enable human readable text.Count upwards.Fill zeros.Count in steps of 2.Counter start value: 0000000000.Current counter value: 0000000002.Counter reset value: 0000010000.Prefix: AB.No suffix.
8080
Table 1: PC to Printer
peration Command Parameter Examples UDP Por
EPT052026 Issue 1 February 2019 (21)
Scob
D
S
U
O t
et repeat unter, spacing
arcode.
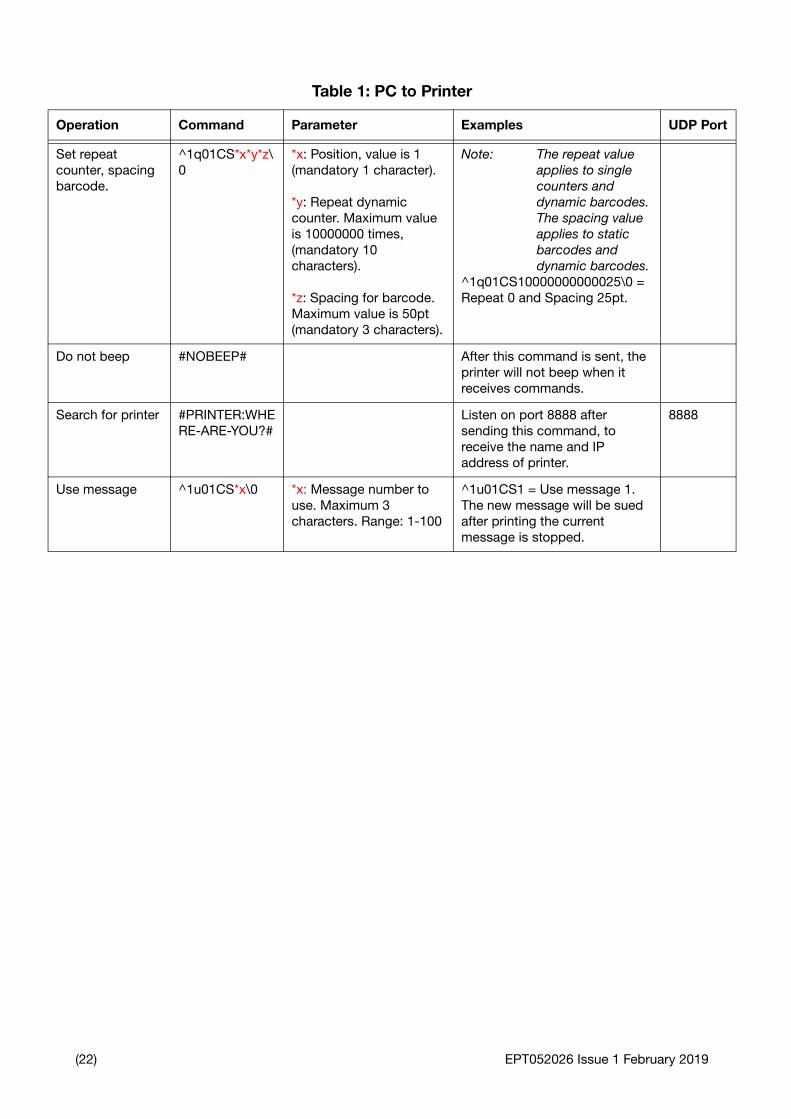
^1q01CS*x*y*z\0
*x: Position, value is 1 (mandatory 1 character).
*y: Repeat dynamic counter. Maximum value is 10000000 times, (mandatory 10 characters).
*z: Spacing for barcode. Maximum value is 50pt (mandatory 3 characters).
Note: The repeat value applies to single counters and dynamic barcodes. The spacing value applies to static barcodes and dynamic barcodes.
^1q01CS10000000000025\0 = Repeat 0 and Spacing 25pt.
o not beep #NOBEEP# After this command is sent, the printer will not beep when it receives commands.
earch for printer #PRINTER:WHERE-ARE-YOU?#
Listen on port 8888 after sending this command, to receive the name and IP address of printer.
8888
se message ^1u01CS*x\0 *x: Message number to use. Maximum 3 characters. Range: 1-100
^1u01CS1 = Use message 1. The new message will be sued after printing the current message is stopped.
Table 1: PC to Printer
peration Command Parameter Examples UDP Por
(22) EPT052026 Issue 1 February 2019

PLC to PrinterThe table below lists RS485 communication commands for PC to printer connection.
Table 2: PLC to Printer
Operation Command Parameter Examples
Start/Stop Print ^1R01CS*x\0 *x=1: Start print*x=0: Stop print
^1R01CS1\0 = Start printing.
^1R01CS0\0 = Stop printing.
Set Print Speed(inches/min)
^1S01CS*x*y\0 *x=1: Use encoder*x=0: Don’t use encoder
*y: Print speed in inches (mandatory 5 characters).
^1S01CS101200\0 = Use encoder.
^1S01CS001200\0 = Do not use encoder. Set print speed to 01200 inches/min.
Set Resolution ^1O01CS*x\0 *x=7: 300x100 dpi*x=6: 300x150 dpi*x=5: 300x200 dpi
^1O01CS7\0 = Set resolution to 300x100 dpi
^1O01CS6\0 = Set resolution to 300x150 dpi
^1O01CS5\0 = Set resolution to 300x200 dpi
Set Density ^1B01CS*x\0 *x=1: Set density to 1*x=2: Set density to 2*x=3: Set density to 3*x=4: Set density to 4*x=5: Set density to 5
^1B01CS1\0 = Set density to 1
^1B01CS1\0 = Set density to 2
^1B01CS1\0 = Set density to 3
^1B01CS1\0 = Set density to 4
^1B01CS1\0 = Set density to 5
Set Print Side ^1Q01CS*x*y*z\0
*x=0: Set print side mode to manual.*x=1: Set print side mode to auto.
*y=0: Set cartridge side to even.*y=1: Set cartridge side to odd.
*z: Number of prints per side before switching. This value is passed if set to manual mode (mandatory 5 characters).
^1Q01CS1001000\0 = Set print side mode to Auto. After 1000 prints the print side will change.
^1Q01CS0100000\0 = Set print side mode to Manual and print side to Odd.
EPT052026 Issue 1 February 2019 (23)

Set print direction ^1V01CS*x\0 *x=0: Left to right normal.*x=1: Right to left normal.*x=2: Left to right inverted*x=3: Right to left inverted
^1V01CS0\0 = Left to right normal.
^1V01CS1\0 = Right to left normal.
^1V01CS2\0 = Left to right inverted.
^1V01CS3\0 = Left to right inverted.
Set print mode ^1W01CS*x*y*z*t\0
*x=0: Sensor mode.*x=1: Continuous mode.
*y: Number of prints for each time the sensor is triggered (mandatory 3 characters). This value is passed if using continuous mode.
*z: Space between prints, in inches (mandatory 5 characters).
*t:=0 Continuously print after the product detect sensor is triggered once.*t:=1 continuously print when the product detect sensor is continuously triggered. Stop printing when the product detect sensor is not triggered.
^1W01CS0002003930\0 = Print in sensor mode. Make 2 prints, each time the sensor is triggered. Set a 10cm space between prints. Continuously print after the product detect sensor is triggered once.
Set print delay time
^1D01CS*x*y\0 *x= Delay before print, in inches. Range = 00039-39370 (mandatory 5 characters).
*y= Delay after print, in inches. Range = 00039-39370 (mandatory 5 characters).
^1D01CS0019600393\0 = Set a delay of 5cm before the print and 10cm after the print.
Set sensor ^1H01CS*x\0 *x=0: Use internal product detect sensor.*x=1: Use external product detect sensor.
^1H01CS0\0 = Use the internal product detect sensor.
^1H01CS1\0 = Use an external product detect sensor.
Table 2: PLC to Printer
Operation Command Parameter Examples
(24) EPT052026 Issue 1 February 2019
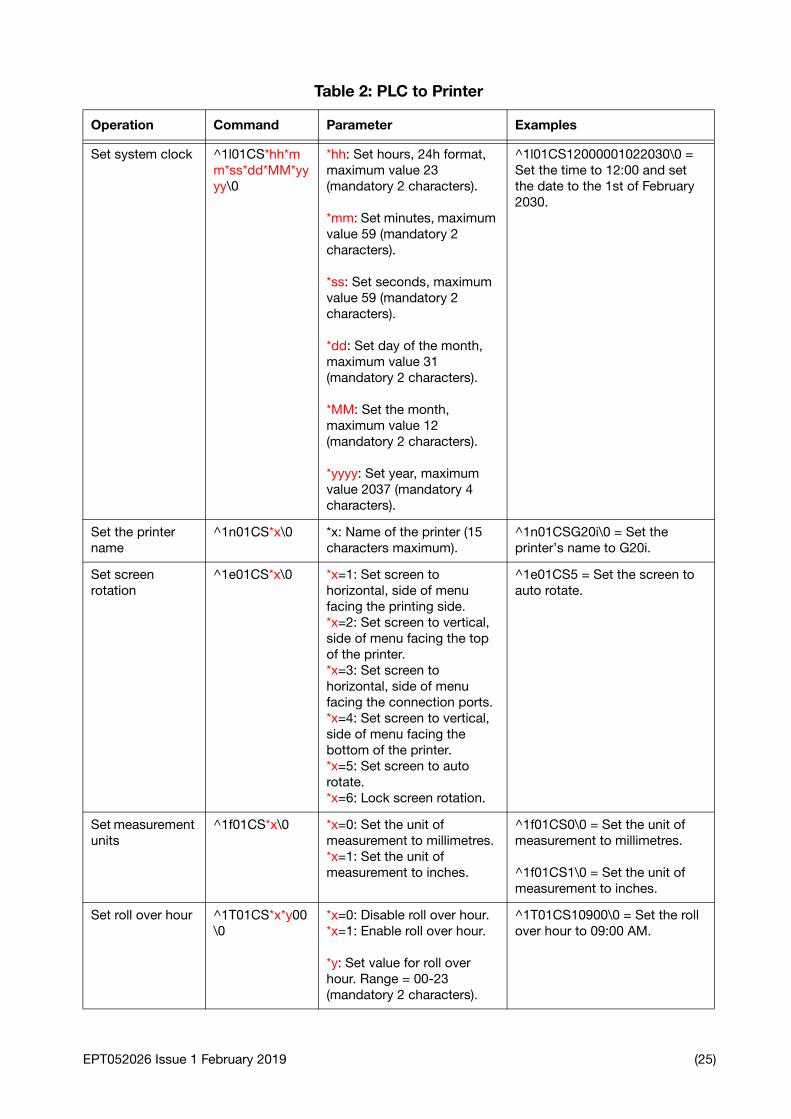
Set system clock ^1l01CS*hh*mm*ss*dd*MM*yyyy\0
*hh: Set hours, 24h format, maximum value 23 (mandatory 2 characters).
*mm: Set minutes, maximum value 59 (mandatory 2 characters).
*ss: Set seconds, maximum value 59 (mandatory 2 characters).
*dd: Set day of the month, maximum value 31 (mandatory 2 characters).
*MM: Set the month, maximum value 12 (mandatory 2 characters).
*yyyy: Set year, maximum value 2037 (mandatory 4 characters).
^1l01CS12000001022030\0 = Set the time to 12:00 and set the date to the 1st of February 2030.
Set the printer name
^1n01CS*x\0 *x: Name of the printer (15 characters maximum).
^1n01CSG20i\0 = Set the printer’s name to G20i.
Set screen rotation
^1e01CS*x\0 *x=1: Set screen to horizontal, side of menu facing the printing side.*x=2: Set screen to vertical, side of menu facing the top of the printer.*x=3: Set screen to horizontal, side of menu facing the connection ports.*x=4: Set screen to vertical, side of menu facing the bottom of the printer.*x=5: Set screen to auto rotate.*x=6: Lock screen rotation.
^1e01CS5 = Set the screen to auto rotate.
Set measurement units
^1f01CS*x\0 *x=0: Set the unit of measurement to millimetres.*x=1: Set the unit of measurement to inches.
^1f01CS0\0 = Set the unit of measurement to millimetres.
^1f01CS1\0 = Set the unit of measurement to inches.
Set roll over hour ^1T01CS*x*y00\0
*x=0: Disable roll over hour.*x=1: Enable roll over hour.
*y: Set value for roll over hour. Range = 00-23 (mandatory 2 characters).
^1T01CS10900\0 = Set the roll over hour to 09:00 AM.
Table 2: PLC to Printer
Operation Command Parameter Examples
EPT052026 Issue 1 February 2019 (25)

Set random jet ^1P01CS*x*y\0 *x=0: Disable random jet.*x=1: Enable random jet.
*y: Set the delay time in seconds. Range = 00001-36000 (mandatory 5 characters).
^1P01CS100060\0 = Enable random jet. Purge the print head every 60 seconds.
Purge print head ^1G01CS\0 ^1G01CS\0 = Immediately purge the print head.
Reset counter ^1R02CS0\0 ^1G01CS\0 = Reset the counter when printing stops.
Set font type ^1u02CS*x\0 *x=0: Normal font.*x=1: Uppercase font.
^1U02CS0\0 = Set normal font.
^1U02CS1\0 = Set uppercase font.
This command is acted on after the “set message” command is received.
Set font size ^1U01CS*x\0 *x=0: 1 line font height.*x=1: 2 line font height.*x=2: 3 line font height.*x=3: 4 line font height.*x=4: 5 line font height.*x=5: 6 line font height.
^1U01CS0\0 = Set font height to 1 line.
^1U01CS5\0 = Set font height to 6 lines.
This command is acted on after the “set message” command is received.
Table 2: PLC to Printer
Operation Command Parameter Examples
(26) EPT052026 Issue 1 February 2019
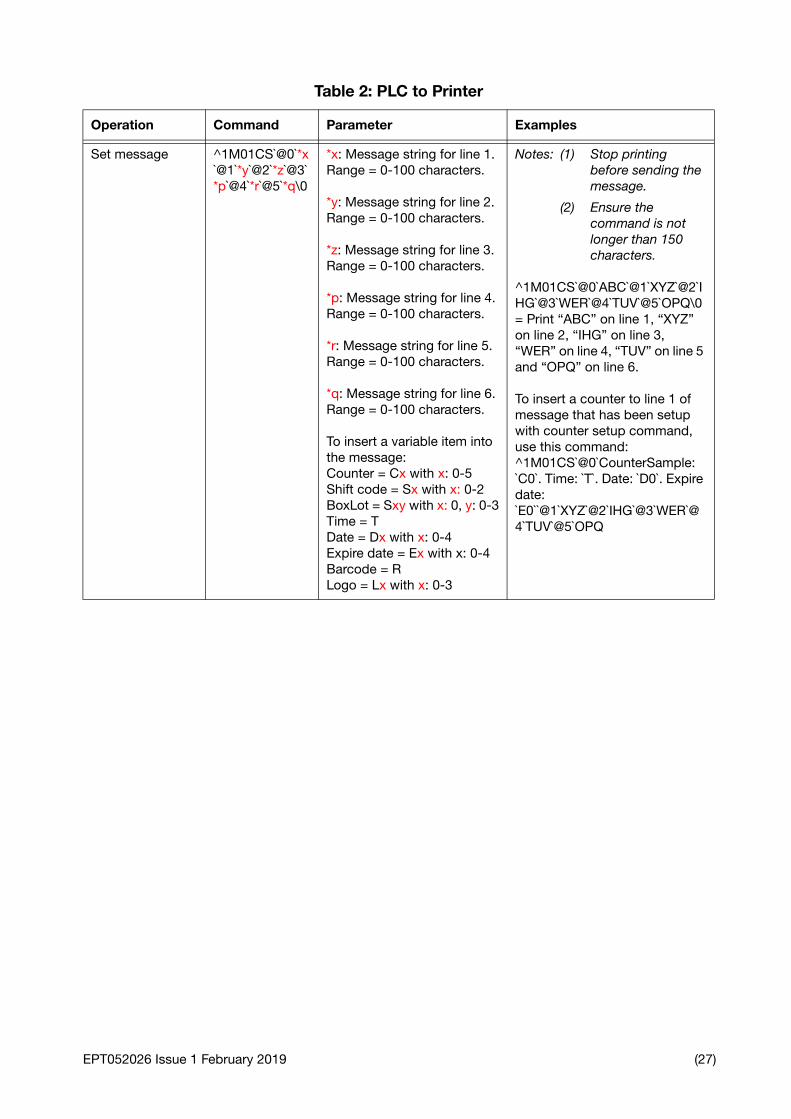
Set message ^1M01CS`@0`*x`@1`*y`@2`*z`@3`*p`@4`*r`@5`*q\0
*x: Message string for line 1. Range = 0-100 characters.
*y: Message string for line 2. Range = 0-100 characters.
*z: Message string for line 3. Range = 0-100 characters.
*p: Message string for line 4. Range = 0-100 characters.
*r: Message string for line 5. Range = 0-100 characters.
*q: Message string for line 6. Range = 0-100 characters.
To insert a variable item into the message:Counter = Cx with x: 0-5Shift code = Sx with x: 0-2BoxLot = Sxy with x: 0, y: 0-3Time = TDate = Dx with x: 0-4Expire date = Ex with x: 0-4Barcode = RLogo = Lx with x: 0-3
Notes: (1) Stop printing before sending the message.
(2) Ensure the command is not longer than 150 characters.
^1M01CS`@0`ABC`@1`XYZ`@2`IHG`@3`WER`@4`TUV`@5`OPQ\0 = Print “ABC” on line 1, “XYZ” on line 2, “IHG” on line 3, “WER” on line 4, “TUV” on line 5 and “OPQ” on line 6.
To insert a counter to line 1 of message that has been setup with counter setup command, use this command:^1M01CS`@0`CounterSample: `C0`. Time: `T`. Date: `D0`. Expire date: `E0``@1`XYZ`@2`IHG`@3`WER`@4`TUV`@5`OPQ
Table 2: PLC to Printer
Operation Command Parameter Examples
EPT052026 Issue 1 February 2019 (27)

Set message while printing
^1M03CS`@0`*x`@1`*y`@2`*z`@3`*p`@4`*r`@5`*q\0
*x: Message string for line 1. Range = 0-100 characters.
*y: Message string for line 2. Range = 0-100 characters.
*z: Message string for line 3. Range = 0-100 characters.
*p: Message string for line 4. Range = 0-100 characters.
*r: Message string for line 5. Range = 0-100 characters.
*q: Message string for line 6. Range = 0-100 characters.
To insert a variable item into the message:Counter = Cx with x: 0-5Shift code = Sx with x: 0-2BoxLot = Sxy with x: 0, y: 0-3Time = TDate = Dx with x: 0-4Expire date = Ex with x: 0-4Barcode = RLogo = Lx with x: 0-3
Note: It can take between 3 and 5 seconds for the message to update.
^1M03CS`@0`ABC`@1`XYZ`@2`IHG`@3`WER`@4`TUV`@5`OPQ\0 = Print “ABC” on line 1, “XYZ” on line 2, “IHG” on line 3, “WER” on line 4, “TUV” on line 5 and “OPQ” on line 6.
To insert the counter to line 1 of message that has been setup with counter setup command, we use this command:^1M03CS`@0`CounterSample: `C0`. Time: `T`. Date: `D`. Expire date: `E``@1`XYZ`@2`IHG`@3`WER`@4`TUV`@5`OPQ\0
Message name ^1M07CS*x\0 *x: Message name. Range = 1-20 characters.
Note: Send the “Message name” command before sending the “Set message” command.
^1M07CSMessage 1\0 = Save message name as “Message 1”.
Table 2: PLC to Printer
Operation Command Parameter Examples
(28) EPT052026 Issue 1 February 2019

Set counter ^1C01CS*x*y*z*a*b*c*d*e\0
*x: Counter number. Range = 0-5. This is the name of the counter that will be stored on the printer.
*y=0: Count upwards.*y=1: Count downwards.
*z=0: Do not fill zeros.*z=1: Fill zeros.
*a: Counter steps. Range = 000-250 (mandatory 3 characters).
*b: Counter start value. Range = 0000000001-2000000000 (mandatory 10 characters).
*c: Current counter value. Range = 0000000001-2000000000 (mandatory 10 characters).
*d: Counter reset value. Range = 0000000001-2000000000 (mandatory 10 characters).
*e: Current repeat value. Range = 0000000000-0010000000 (mandatory 10 characters).
1C01CS001001000000000100000000010000000999\0
=
Counter number: 0Count direction: UpwardsFill zeros: EnabledCounter steps: 1Start value: 1Current value: 1Reset value: 999
Table 2: PLC to Printer
Operation Command Parameter Examples
EPT052026 Issue 1 February 2019 (29)
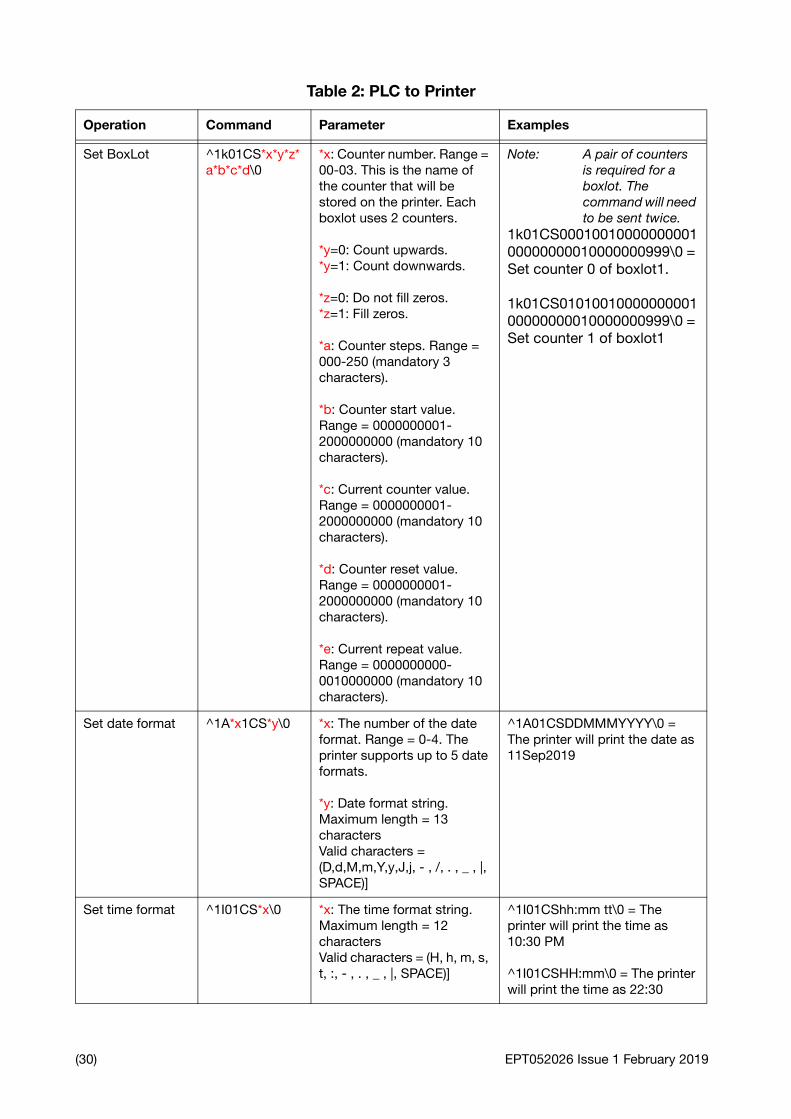
Set BoxLot ^1k01CS*x*y*z*a*b*c*d\0
*x: Counter number. Range = 00-03. This is the name of the counter that will be stored on the printer. Each boxlot uses 2 counters.
*y=0: Count upwards.*y=1: Count downwards.
*z=0: Do not fill zeros.*z=1: Fill zeros.
*a: Counter steps. Range = 000-250 (mandatory 3 characters).
*b: Counter start value. Range = 0000000001-2000000000 (mandatory 10 characters).
*c: Current counter value. Range = 0000000001-2000000000 (mandatory 10 characters).
*d: Counter reset value. Range = 0000000001-2000000000 (mandatory 10 characters).
*e: Current repeat value. Range = 0000000000-0010000000 (mandatory 10 characters).
Note: A pair of counters is required for a boxlot. The command will need to be sent twice.
1k01CS0001001000000000100000000010000000999\0 = Set counter 0 of boxlot1.
1k01CS0101001000000000100000000010000000999\0 = Set counter 1 of boxlot1
Set date format ^1A*x1CS*y\0 *x: The number of the date format. Range = 0-4. The printer supports up to 5 date formats.
*y: Date format string.Maximum length = 13 charactersValid characters = (D,d,M,m,Y,y,J,j, - , /, . , _ , |, SPACE)]
^1A01CSDDMMMYYYY\0 = The printer will print the date as 11Sep2019
Set time format ^1I01CS*x\0 *x: The time format string.Maximum length = 12 charactersValid characters = (H, h, m, s, t, :, - , . , _ , |, SPACE)]
^1I01CShh:mm tt\0 = The printer will print the time as 10:30 PM
^1I01CSHH:mm\0 = The printer will print the time as 22:30
Table 2: PLC to Printer
Operation Command Parameter Examples
(30) EPT052026 Issue 1 February 2019
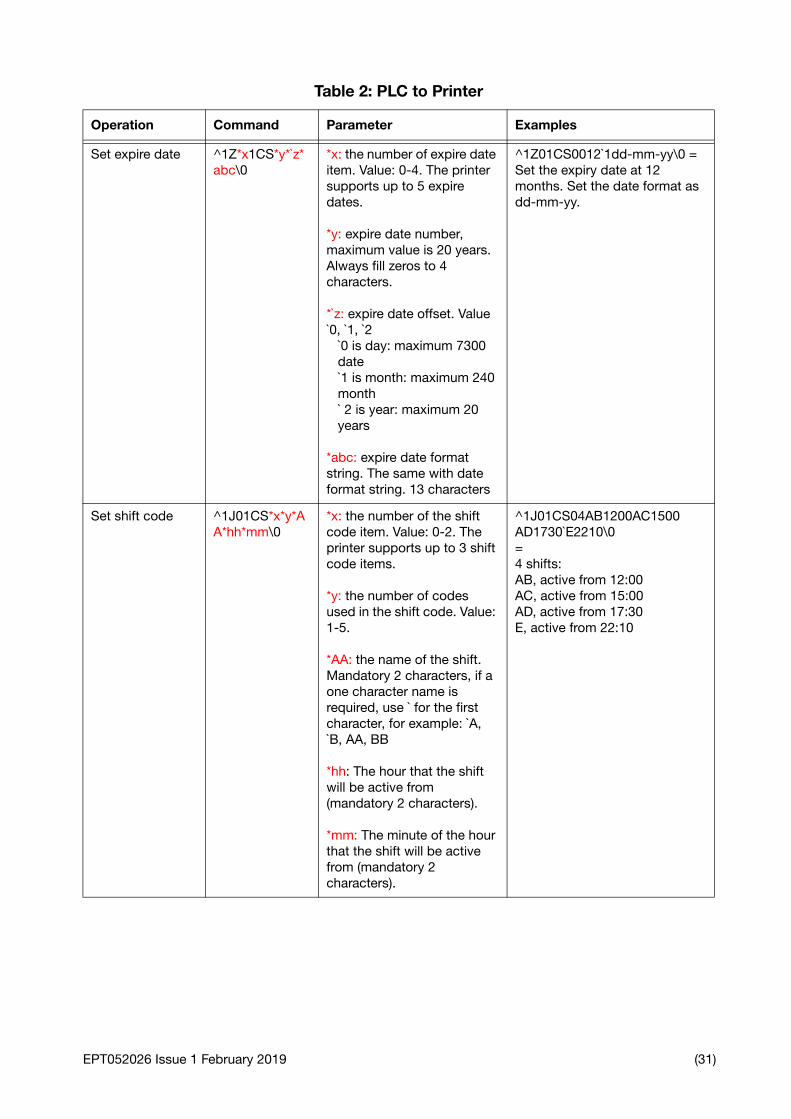
Set expire date ^1Z*x1CS*y*`z*abc\0
*x: the number of expire date item. Value: 0-4. The printer supports up to 5 expire dates.
*y: expire date number, maximum value is 20 years. Always fill zeros to 4 characters.
*`z: expire date offset. Value `0, `1, `2
`0 is day: maximum 7300 date`1 is month: maximum 240 month` 2 is year: maximum 20 years
*abc: expire date format string. The same with date format string. 13 characters
^1Z01CS0012`1dd-mm-yy\0 = Set the expiry date at 12 months. Set the date format as dd-mm-yy.
Set shift code ^1J01CS*x*y*AA*hh*mm\0
*x: the number of the shift code item. Value: 0-2. The printer supports up to 3 shift code items.
*y: the number of codes used in the shift code. Value: 1-5.
*AA: the name of the shift. Mandatory 2 characters, if a one character name is required, use ` for the first character, for example: `A, `B, AA, BB
*hh: The hour that the shift will be active from (mandatory 2 characters).
*mm: The minute of the hour that the shift will be active from (mandatory 2 characters).
^1J01CS04AB1200AC1500 AD1730`E2210\0=4 shifts:AB, active from 12:00AC, active from 15:00AD, active from 17:30E, active from 22:10
Table 2: PLC to Printer
Operation Command Parameter Examples
EPT052026 Issue 1 February 2019 (31)

Static barcode setup
^1g01CS*x*y*z*w*p\0
*x=0: Set the barcode type to Code39.*x=1: Set the barcode type to Code2of5.*x=2: Set the barcode type to Code128.*x=3: Set the barcode type to Code93.*x=4: Set the barcode type to CodeUPC-A*x=5: Set the barcode type to CodeEAN.*x=6: Set the barcode type to CodaBar.*x=7: Set the barcode type to Code11.
*y: Set the barcode width, range 1-4.
*z: Set the barcode height, range 1-3.
*w=0: Disable human readable text.*w=1: Enable human readable text.
*p = barcode data. Maximum length, 30 characters.
^1g01CS0331BARCODE39\0=Set barcode type as Code39.Set barcode width to 3.Set barcode height to 3.Enable human readable text. Barcode data is “BARCODE39”.
Table 2: PLC to Printer
Operation Command Parameter Examples
(32) EPT052026 Issue 1 February 2019
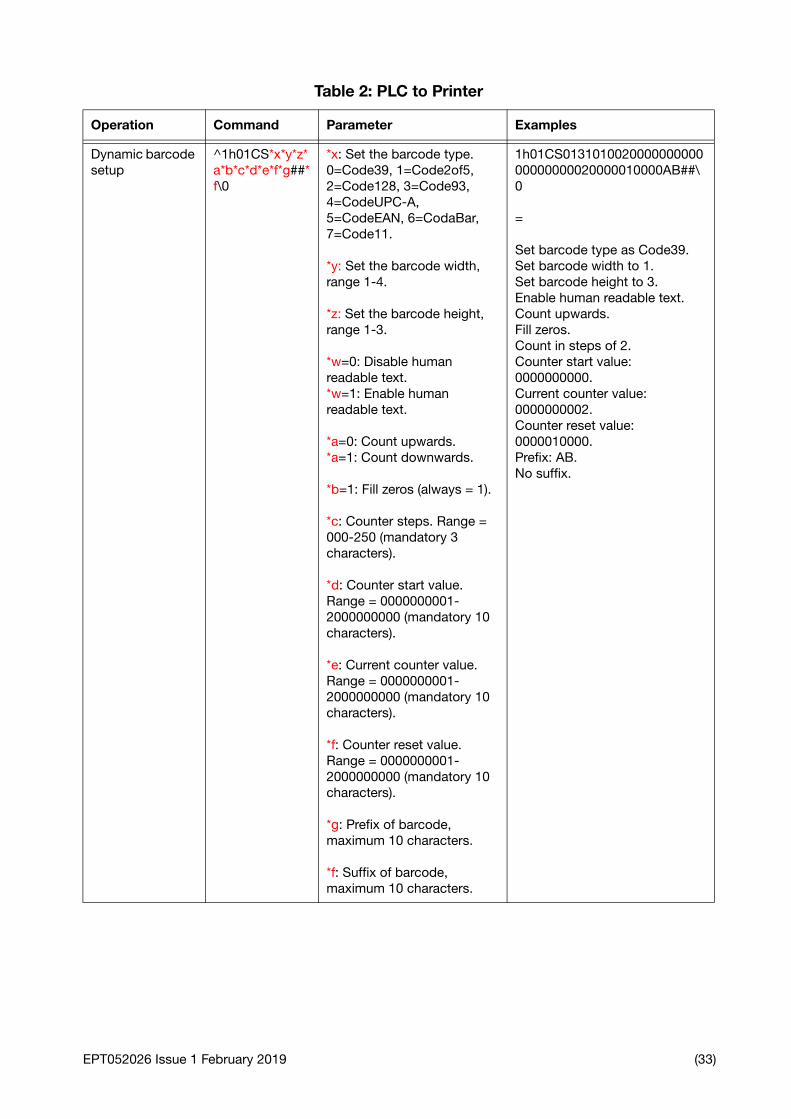
Dynamic barcode setup
^1h01CS*x*y*z*a*b*c*d*e*f*g##*f\0
*x: Set the barcode type. 0=Code39, 1=Code2of5, 2=Code128, 3=Code93, 4=CodeUPC-A, 5=CodeEAN, 6=CodaBar, 7=Code11.
*y: Set the barcode width, range 1-4.
*z: Set the barcode height, range 1-3.
*w=0: Disable human readable text.*w=1: Enable human readable text.
*a=0: Count upwards.*a=1: Count downwards.
*b=1: Fill zeros (always = 1).
*c: Counter steps. Range = 000-250 (mandatory 3 characters).
*d: Counter start value. Range = 0000000001-2000000000 (mandatory 10 characters).
*e: Current counter value. Range = 0000000001-2000000000 (mandatory 10 characters).
*f: Counter reset value. Range = 0000000001-2000000000 (mandatory 10 characters).
*g: Prefix of barcode, maximum 10 characters.
*f: Suffix of barcode, maximum 10 characters.
1h01CS013101002000000000000000000020000010000AB##\0
=
Set barcode type as Code39.Set barcode width to 1.Set barcode height to 3.Enable human readable text.Count upwards.Fill zeros.Count in steps of 2.Counter start value: 0000000000.Current counter value: 0000000002.Counter reset value: 0000010000.Prefix: AB.No suffix.
Table 2: PLC to Printer
Operation Command Parameter Examples
EPT052026 Issue 1 February 2019 (33)
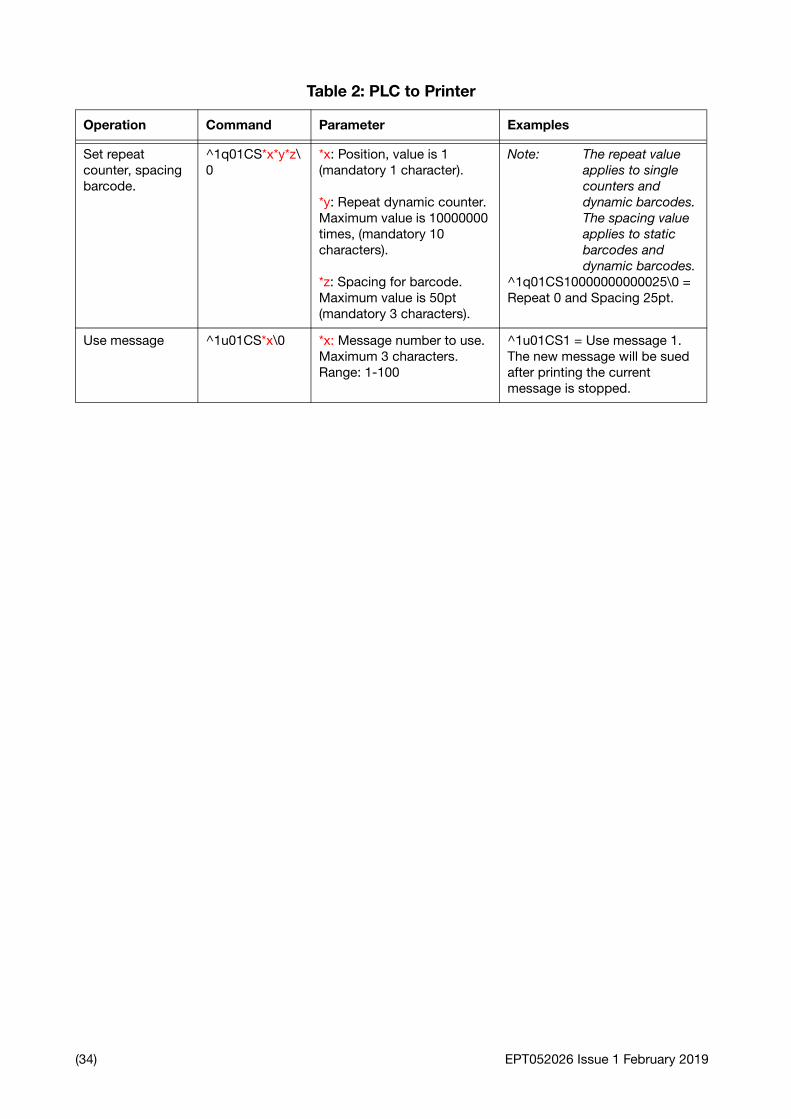
Set repeat counter, spacing barcode.
^1q01CS*x*y*z\0
*x: Position, value is 1 (mandatory 1 character).
*y: Repeat dynamic counter. Maximum value is 10000000 times, (mandatory 10 characters).
*z: Spacing for barcode. Maximum value is 50pt (mandatory 3 characters).
Note: The repeat value applies to single counters and dynamic barcodes. The spacing value applies to static barcodes and dynamic barcodes.
^1q01CS10000000000025\0 = Repeat 0 and Spacing 25pt.
Use message ^1u01CS*x\0 *x: Message number to use. Maximum 3 characters. Range: 1-100
^1u01CS1 = Use message 1. The new message will be sued after printing the current message is stopped.
Table 2: PLC to Printer
Operation Command Parameter Examples
(34) EPT052026 Issue 1 February 2019

DECIMAL/HEXADECIMAL CONVERSION TABLE
DEC HEX DEC HEX DEC HEX DEC HEX DEC HEX DEC HEX DEC HEX DEC HEX
0 00 32 20 64 40 96 60 128 80 160 A0 192 C0 224 E0
1 01 33 21 65 41 97 61 129 81 161 A1 193 C1 225 E1
2 02 34 22 66 42 98 62 130 82 162 A2 194 C2 226 E2
3 03 35 23 67 43 99 63 131 83 163 A3 195 C3 227 E3
4 04 36 24 68 44 100 64 132 84 164 A4 196 C4 228 E4
5 05 37 25 69 45 101 65 133 85 165 A5 197 C5 229 E5
6 06 38 26 70 46 102 66 134 86 166 A6 198 C6 230 E6
7 07 39 27 71 47 103 67 135 87 167 A7 199 C7 231 E7
8 08 40 28 72 48 104 68 136 88 168 A8 200 C8 232 E8
9 09 41 29 73 49 105 69 137 89 169 A9 201 C9 233 E9
10 0A 42 2A 74 4A 106 6A 138 8A 170 AA 202 CA 234 EA
11 0B 43 2B 75 4B 107 6B 139 8B 171 AB 203 CB 235 EB
12 0C 44 2C 76 4C 108 6C 140 8C 172 AC 204 CC 236 EC
13 0D 45 2D 77 4D 109 6D 141 8D 173 AD 205 CD 237 ED
14 0E 46 2E 78 4E 110 6E 142 8E 174 AE 206 CE 238 EE
15 0F 47 2F 79 4F 111 6F 143 8F 175 AF 207 CF 239 EF
16 10 48 30 80 50 112 70 144 90 176 B0 208 D0 240 F0
17 11 49 31 81 51 113 71 145 91 177 B1 209 D1 241 F1
18 12 50 32 82 52 114 72 146 92 178 B2 210 D2 242 F2
19 13 51 33 83 53 115 73 147 93 179 B3 211 D3 243 F3
20 14 52 34 84 54 116 74 148 94 180 B4 212 D4 244 F4
21 15 53 35 85 55 117 75 149 95 181 B5 213 D5 245 F5
22 16 54 36 86 56 118 76 150 96 182 B6 214 D6 246 F6
23 17 55 37 87 57 119 77 151 97 183 B7 215 D7 247 F7
24 18 56 38 88 58 120 78 152 98 184 B8 216 D8 248 F8
25 19 57 39 89 59 121 79 153 99 185 B9 217 D9 249 F9
26 1A 58 3A 90 5A 122 7A 154 9A 186 BA 218 DA 250 FA
27 1B 59 3B 91 5B 123 7B 155 9B 187 BB 219 DB 251 FB
28 1C 60 3C 92 5C 124 7C 156 9C 188 BC 220 DC 252 FC
29 1D 61 3D 93 5D 125 7D 157 9D 189 BD 221 DD 253 FD
30 1E 62 3E 94 5E 126 7E 158 9E 190 BE 222 DE 254 FE
31 1F 63 3F 95 5F 127 7F 159 9F 191 BF 223 DF 255 FF
EPT052026 Issue 1 February 2019 (35)

THIS PAGE INTENTIONALLY LEFT BLANK
(36) EPT052026 Issue 1 February 2019