dog bed… · shanty-2-chic.com dog bed - page | 4 start by building the frame for the bottom of...
TRANSCRIPT

Dog BedCopyright © 2015 Shanty-2-Chic.com
Item Quantity Description2"x 3" x 8' 7 Cedar board2" x 4" x 8' 1 Cedar board1" x 4" x 8’ 3 Cedar board1"x 6" x 8' 7 Cedar board16 guage 1-1/4" finish nails16 guage 2-1/2" finish nails2-1/2" Spax screwsWood glue It would be best to use an exterior grade wood glue.Finish of choiceDog cushion (optional)

1" x 6" x 8'
1" x 6" x 8'
1" x 6' x 8'
1" x 6" x 8'
1" x 6" x 8'
1" x 6" x 8'
1" x 6" x 8'
1" x 4" x 8'
1" x 4" x 8'
1" x 4" x 8'
2" x 4" x 8'
2" x 3" x 8'
2" x 3" x 8'
2" x 3" x 8'
2" x 3" x 8'
2" x 3" x 8'
2" x 3" x 8'
2" x 3" x 8'
Dog Bed - Page | 2sHanty-2-Chic.com
31.6 ˚
45˚ 45˚
31.6 ˚

sHanty-2-Chic.com Dog Bed - Page | 3

sHanty-2-Chic.com Dog Bed - Page | 4
Start by building the frame for the bottom of the house. Use 2x3 cedar boards and
attach with 2-1/2” finish nails and glue.
Attach the 1x6 slats to the frame with 2-1/2” finish nails and glue.First attach the front and back boards so
they are flush with the frame then evenly spaced the other 3 boards.
The gap between the slats should be approximately 2-1/8”.

sHanty-2-Chic.com Dog Bed - Page | 5
The legs are built by attaching 2 2x3’s with 2-1/2” finish nails and
glue to form an ‘L’ as shown.
Attach the legs to the frame with 2 1/2” spax screws. The full 2x3 will be on the shorter side of the dog house so that the seam of the “L” will be on the longer side of the house as shown. Make sure the bottom of the legs are flush with the bottom of the base frame.
Attach a 1x4 cedar board to the top of each set of legs with 1-1/4” nails and glue.
Make sure it is flush with the top of the legs.
sHanty-2-Chic.com Dog Bed - Page | 6
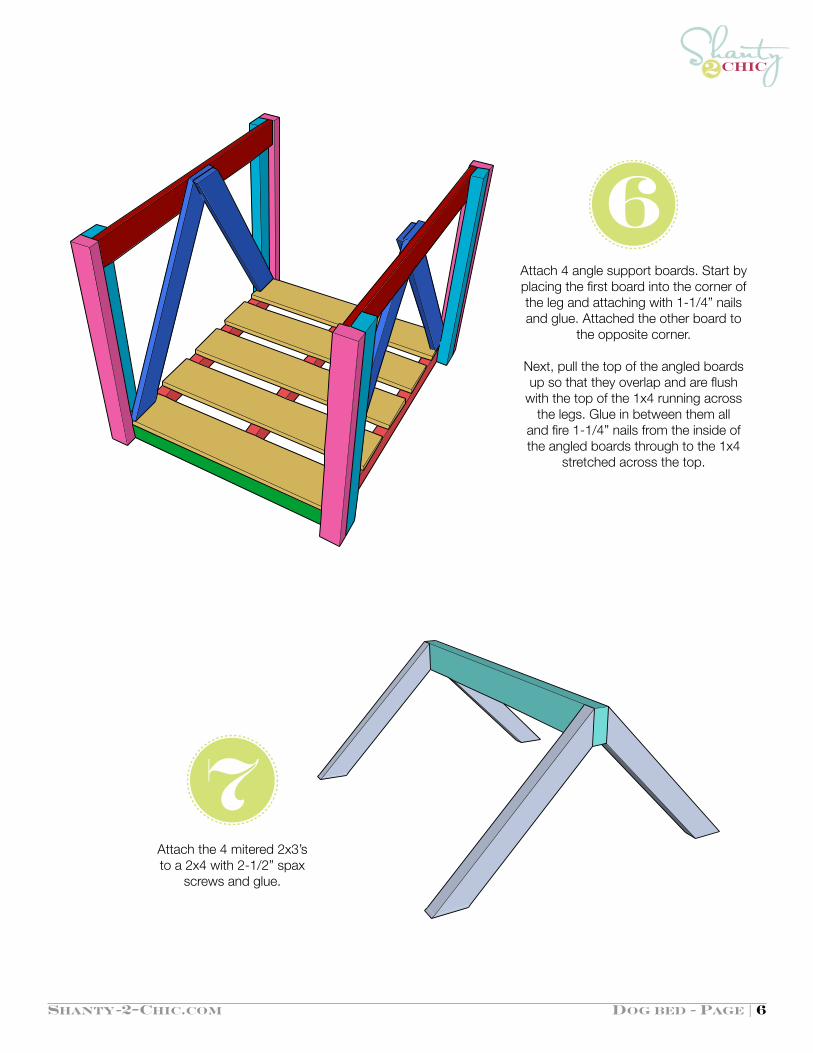
Attach 4 angle support boards. Start by placing the first board into the corner of the leg and attaching with 1-1/4” nails and glue. Attached the other board to
the opposite corner.
Next, pull the top of the angled boards up so that they overlap and are flush
with the top of the 1x4 running across the legs. Glue in between them all
and fire 1-1/4” nails from the inside of the angled boards through to the 1x4
stretched across the top.
Attach the 4 mitered 2x3’s to a 2x4 with 2-1/2” spax
screws and glue.

sHanty-2-Chic.com Dog Bed - Page | 7
Attach the roof to the house with 2-1/2” spax screws and glue. Drill from the top of the roof into the 2x3 legs on the front and back of the house. The mitered edge of 2x3 will over hang
the leg a bit allowing the inside of the mitered 2x3 to be flush with the leg.
Attach a 2x3 along the top of the legs with 2 1/2” nails
and glue. Make sure the outer upper edge of the 2x3 is flush with the slope edge of the roof line. You will use the edge of the 2x3 to nail
the roof slats to.

sHanty-2-Chic.com Dog Bed - Page | 8
Attach the 7 shorter 1x6 roof slats so that they overhang on the top approximately 1”. This should allow enough overhang
to meet the longer planks on the other side of the roof.
Start by aligning the middle of your center board with the
center of the top of the roof and hold a longer roof slat up to
verify proper overhang. Attach the center board with 1-1/4” finish nails and glue and work
your way out.
Attach the 7 longer slats on the other side with 1-1/4” finish nails
and glue wherever the planks touch wood.
approximately 1” overhang