digital voice tracer - getdictation.com · digital voice tracer for product information and...
TRANSCRIPT

Digital Voice Tracer
For product information and support, visitwww.philips.com/dictation
EN User manual 3
DE Benutzerhandbuch 21
FR Manuel de l‘utilisateur 39
LFH 660
LFH 860
LFH 870
LFH 880
ES Manual del usuario 57
IT Manuale di istruzioni 75
NL Gebruikershandleiding 93

3User manual
1 Welcome 41.1 What’s in the box 41.2 Product highlights 4
2 Important 62.1 Safety 62.2 Disposal of your old product 6
3 Your Digital Voice Tracer 7
4 Get started 84.1 Insert the batteries 84.2 Power on/off 84.3 Hold function 94.4 Set date and time 94.5 Display information 94.6 Use the Voice Tracer with a computer 9
5 Record 105.1 Record with the built-in microphone 105.2 Record with an external microphone 115.3 Overlap recording
(LFH 860/870/880 only) 115.4 Add index marks 11
6 Playback 126.1 Playback functions 136.2 Play features 13
7 Delete 14
8 Radio mode (LFH 880 only) 148.1 Auto tune radio stations 148.2 Manually tune to a radio station 158.3 Play a preset radio station 15
User manual
8.4 Delete a preset radio station 158.5 Record from FM radio 15
9 Customize settings 16
10 Update the firmware 18
11 Technical support and warranty 18
12 Troubleshooting 19
13 Technical data 20
EN
GL
ISH
4 User manual
Welcome1
Congratulations on your purchase and welcome to Philips! To fully benefit from the support that Philips offers, visit our Website for support information such as user manuals, software downloads, warranty information and more: www.philips.com/dictation.
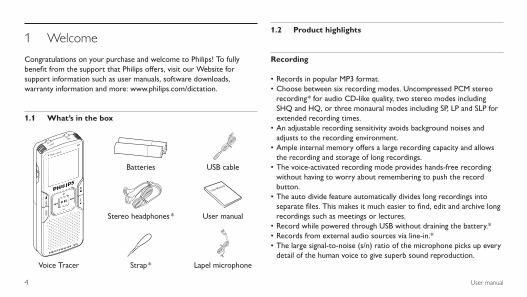
What’s in the box 1.1
Product highlights1.2
Recording
Records in popular MP3 format.•Choose between six recording modes. Uncompressed PCM stereo •recording* for audio CD-like quality, two stereo modes including SHQ and HQ, or three monaural modes including SP, LP and SLP for extended recording times.An adjustable recording sensitivity avoids background noises and •adjusts to the recording environment.Ample internal memory offers a large recording capacity and allows •the recording and storage of long recordings.The• voice-activated recording mode provides hands-free recording without having to worry about remembering to push the record button.The auto divide feature automatically divides long recordings into •separate files. This makes it much easier to find, edit and archive long recordings such as meetings or lectures.Record while powered through USB without draining the battery.*•Records from external audio sources via line-in.*•The large signal-to-noise (s/n) ratio of the microphone picks up every •detail of the human voice to give superb sound reproduction.
User manual
Batteries
Stereo headphones *
USB cable
Lapel microphoneVoice Tracer Strap *
5User manual
Playback
Adjustable playback speed to play recordings in fast and slow playback •modes.Set a complete or a portion of an audio file to play repeatly with the •repeat playback option.Enjoy MP3 and WMA music plus FM radio *.•Alarm clock with voice playback and timer recording.•
Convenience
Large backlit screen for comfortable viewing.•Enjoy up to 22 hours of continuous operation.•Speedily transfer recordings, music and data via high-speed USB 2.0.•Index mark and temp mark features allow you to quickly find desired •locations in a recording.Supports up to 99 recordings in each of four available folders to •organize your files in a fast and easy way.As a USB mass storage device, the Voice Tracer offers a convenient •way to save, back up and move files without special software or driver installations.
* Only available for some product versions.
EN
GL
ISH

6 User manual
Important (for models supplied with headphones):Philips guarantees compliance with the maximum sound power of its audio players as determined by relevant regulatory bodies, but only with the original model of provided headphones. If these headphones need replacement, we recommend that you contact your retailer to order a Philips model identical to that of the original.
Disposal of your old product2.2
Your product is designed and manufactured with high quality materials •and components that can be recycled and re-used.When this crossed-out wheeled bin symbol is attached to •a product, it indicates that the product is covered by the European Directive 2002/96/EC.Become informed about your local separate collection system for •electrical and electronic products.Act according to your local rules and do not dispose of old •products with normal household waste. The correct disposal of old products will help prevent potential negative consequences for the environment and human health.Batteries (including built-in rechargeable batteries) contain substances •that may pollute the environment. All batteries should be disposed of at an official collection point.
Important2
Safety2.1
To avoid a short circuit, do not expose the product to rain or water.•Do not expose the device to excessive heat caused by heating •equipment or direct sunlight.Protect the cables from being pinched, particularly at plugs and the •point where they exit from the unit.Back up your files. Philips is not responsible for any loss of data.•
Hearing safety2.1.1
Observe the following guidelines when using your headphones:Listen at reasonable volumes for reasonable periods of time.•Be careful not to adjust the volume higher as your hearing adapts.•Do not turn up the volume so high that you can’t hear what’s around •you.You should use caution or temporarily discontinue use in potentially •hazardous situations.Do not use headphones while operating a motorized vehicle, cycling, •or skateboarding, etc. It may create a traffic hazard and is illegal in many areas.

7User manual
Your Digital Voice Tracer3
1 Headphone socket2 Microphone socket, line-in socket3 Built-in microphone4 Record / Pause / Power on5 Stop / Display / Delete6 Speaker7 Menu / FM radio8 Index / Folder / Repeat9 Display10 Record / Play indicator11 Volume up12 Power on/off, Play/Pause, Play speed13 Fast forward / File selection / Menu selection14 Volume down15 Fast rewind / File selection / Menu selection16 Hold switch17 Battery compartment18 USB socket19 Strap hole
21
10
8
7
5
4
9
6
3
14
11
12
15
13
19
17
16
18
EN
GL
ISH
8 User manual
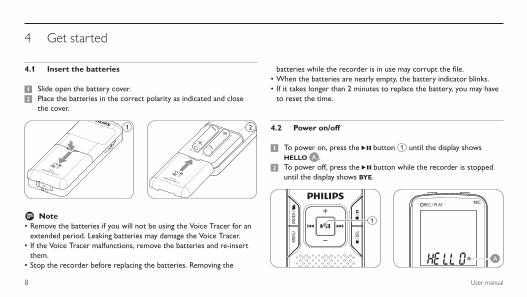
Insert the batteries 4.1
Slide open the battery cover.1 Place the batteries in the correct polarity as indicated and close 2 the cover.
1 2
D NoteRemove the batteries if you will not be using the Voice Tracer for an •extended period. Leaking batteries may damage the Voice Tracer.If the Voice Tracer malfunctions, remove the batteries and re-insert •them.Stop the recorder before replacing the batteries. Removing the •
batteries while the recorder is in use may corrupt the file.When the batteries are nearly empty, the battery indicator blinks.•If it takes longer than 2 minutes to replace the battery, you may have •to reset the time.
Power on/off4.2
To power on, press the 1 f button 1 until the display shows HELLO A .To power off, press the 2 f button while the recorder is stopped until the display shows BYE.
1
A
Get started 4
9User manual
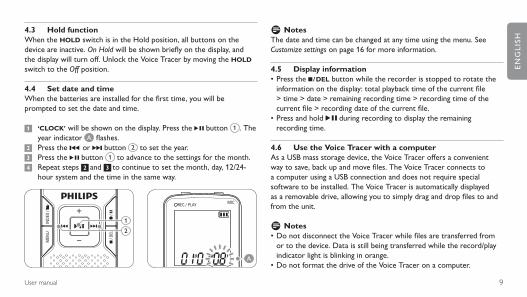
Hold function 4.3 When the HOLD switch is in the Hold position, all buttons on the device are inactive. On Hold will be shown briefly on the display, and the display will turn off. Unlock the Voice Tracer by moving the HOLD switch to the Off position.
Set date and time4.4 When the batteries are installed for the first time, you will be prompted to set the date and time.
‘CLOCK’1 will be shown on the display. Press the f button 1 . The year indicator A flashes.Press the 2 h or b button 2 to set the year.Press the 3 f button 1 to advance to the settings for the month.Repeat steps 4 2 and 3 to continue to set the month, day, 12/24-hour system and the time in the same way.
1
2
A
D NotesThe date and time can be changed at any time using the menu. See Customize settings on page 16 for more information.
Display information4.5 Press the• j / DEL button while the recorder is stopped to rotate the information on the display: total playback time of the current file > time > date > remaining recording time > recording time of the current file > recording date of the current file.Press and hold • f during recording to display the remaining recording time.
Use the Voice Tracer with a computer4.6 As a USB mass storage device, the Voice Tracer offers a convenient way to save, back up and move files. The Voice Tracer connects to a computer using a USB connection and does not require special software to be installed. The Voice Tracer is automatically displayed as a removable drive, allowing you to simply drag and drop files to and from the unit.
D NotesDo not disconnect the Voice Tracer while files are transferred from •or to the device. Data is still being transferred while the record/play indicator light is blinking in orange.Do not format the drive of the Voice Tracer on a computer.•
EN
GL
ISH
10 User manual
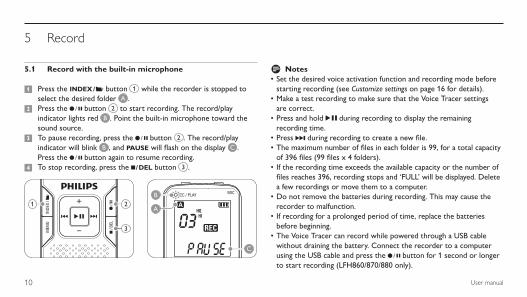
Record with the built-in microphone5.1
Press the1 INDEX / a button 1 while the recorder is stopped to select the desired folder A .Press the 2 g button 2 to start recording. The record/play indicator lights red B . Point the built-in microphone toward the sound source. To pause recording, press the 3 g button 2 . The record/play indicator will blink B , and PAUSE will flash on the display C . Press the g button again to resume recording.To stop recording, press the 4 j / DEL button 3 .
C
B
A1 2
3
D NotesSet the desired voice activation function and recording mode before •starting recording (see Customize settings on page 16 for details).Make a test recording to make sure that the Voice Tracer settings •are correct.Press and hold • f during recording to display the remaining recording time.Press • b during recording to create a new file.The maximum number of files in each folder is 99, for a total capacity •of 396 files (99 files x 4 folders).If the recording time exceeds the available capacity or the number of •files reaches 396, recording stops and ‘FULL’ will be displayed. Delete a few recordings or move them to a computer.Do not remove the batteries during recording. This may cause the •recorder to malfunction.If recording for a prolonged period of time, replace the batteries •before beginning.The Voice Tracer can record while powered through a USB cable •without draining the battery. Connect the recorder to a computer using the USB cable and press the g button for 1 second or longer to start recording (LFH860/870/880 only).
Record5
11User manual
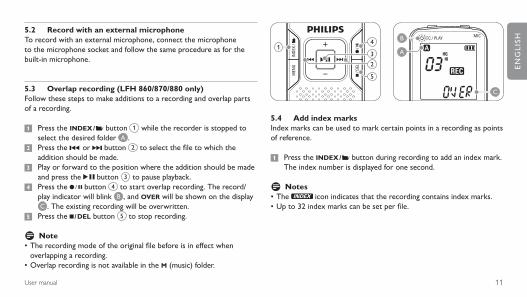
Record with an external microphone 5.2 To record with an external microphone, connect the microphone to the microphone socket and follow the same procedure as for the built-in microphone.
Overlap recording (LFH 860/870/880 only)5.3 Follow these steps to make additions to a recording and overlap parts of a recording.
Press the1 INDEX / a button 1 while the recorder is stopped to select the desired folder A .Press the 2 h or b button 2 to select the file to which the addition should be made.Play or forward to the position where the addition should be made 3 and press the f button 3 to pause playback.Press the 4 g button 4 to start overlap recording. The record/play indicator will blink B , and OVER will be shown on the display C . The existing recording will be overwritten.
Press the 5 j / DEL button 5 to stop recording.
D NoteThe recording mode of the original file before is in effect when •overlapping a recording.Overlap recording is not available in the • M (music) folder.
13
2
5
4
C
B
A
Add index marks5.4 Index marks can be used to mark certain points in a recording as points of reference.
Press the1 INDEX / a button during recording to add an index mark. The index number is displayed for one second.
D NotesThe • icon indicates that the recording contains index marks.Up to 32 index marks can be set per file.•
EN
GL
ISH
12 User manual
Playback6
D NoteWhen headphones are connected to the EAR jack, the recorder speaker will be switched off.
D Notes on using the Voice Tracer as a music playerThe recorder supports music files in .wma and .mp3 formats that •can be transferred from the computer to the music folder of the recorder. Files with copy protection (digital rights management) are not supported.The Voice Tracer supports up to two folder levels within the music •folder. Each folder can hold up to 199 entries (files and folders).Press the • f button to open a selected folder/file. Press the INDEX / a button to return to the folder one level higher.Press the • g button during music playback to change the equalizer mode (Normal > Classic > Jazz > Rock > Pop > Normal).
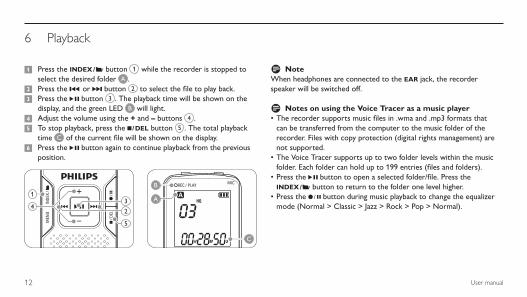
Press the1 INDEX / a button 1 while the recorder is stopped to select the desired folder A .Press the 2 h or b button 2 to select the file to play back.Press the 3 f button 3 . The playback time will be shown on the display, and the green LED B will light.Adjust the volume using the 4 + and – buttons 4 .To stop playback, press the 5 j / DEL button 5 . The total playback time C of the current file will be shown on the display.Press the 6 f button again to continue playback from the previous position.
13
24
5
C
B
A

13User manual
Playback functions6.1
Slow, fast, normal playback6.1.1 Press and hold the f button for 1 second or longer to switch between normal, slow and fast playback.
Search6.1.2 Press and hold the h or b button during playback to scan backward or forward in the current file at a fast speed. Release the button to resume playback at the selected speed.
Rewinding and forwarding6.1.3 Press the h or b button during playback to rewind to the beginning of the file being played or forward to the next file, respectively. If the file contains index marks, playback begins at that point.
Play features6.2 You can set the Voice Tracer to play files repeatedly or randomly.
Repeat a sequence6.2.1
To repeat or loop a sequence in a song, press the1 INDEX / a button 1 at the chosen starting point. REP. A – B flashes on the screen A .
Press the2 INDEX / a button again at the chosen end point. The
repeat sequence begins.Press the 3 j / DEL button 2 to stop playback or press the INDEX / a button to return to normal playback.
A
1
2
Repeat a file or folder / shuffle mode6.2.2
Press and hold the 1 INDEX / a button for 1 second or longer during playback to switch between play modes (repeat file, repeat folder, shuffle folder or normal playback).Icon MeaningREP. FILE Play one file repeatedlyREP. FOLD Play all files within folder repeatedlySHUF FOLD Play all music files within folder randomly
D NoteShuffle mode is available only in the M (music) folder.
EN
GL
ISH
14 User manual
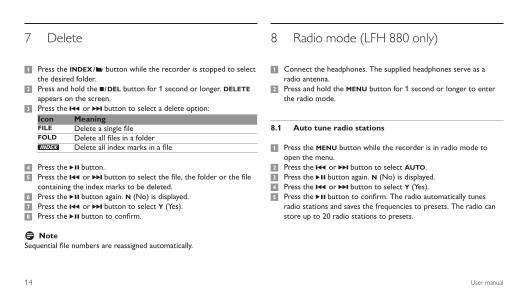
Delete7
Press the1 INDEX / a button while the recorder is stopped to select the desired folder.Press and hold the 2 j / DEL button for 1 second or longer. DELETE appears on the screen.Press the 3 h or b button to select a delete option:Icon MeaningFILE Delete a single fileFOLD Delete all files in a folder
Delete all index marks in a file
Press the 4 f button.Press the 5 h or b button to select the file, the folder or the file containing the index marks to be deleted.Press the 6 f button again. N (No) is displayed.Press the 7 h or b button to select Y (Yes).Press the 8 f button to confirm.
D NoteSequential file numbers are reassigned automatically.
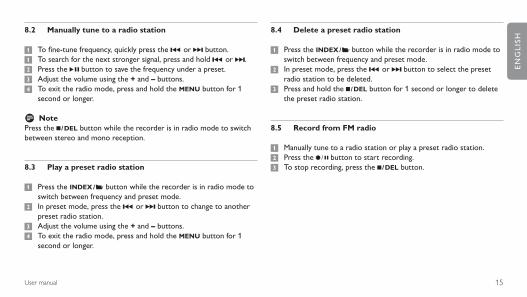
Radio mode (LFH 880 only)8
Connect the headphones. The supplied headphones serve as a 1 radio antenna.Press and hold the 2 MENU button for 1 second or longer to enter the radio mode.
Auto tune radio stations8.1
Press the 1 MENU button while the recorder is in radio mode to open the menu.Press the 2 h or b button to select AUTO.Press the 3 f button again. N (No) is displayed.Press the 4 h or b button to select Y (Yes).Press the 5 f button to confirm. The radio automatically tunes radio stations and saves the frequencies to presets. The radio can store up to 20 radio stations to presets.
15User manual
Manually tune to a radio station8.2
To fine-tune frequency, quickly press the 1 h or b button.To search for the next stronger signal, press and hold 1 h or b.Press the 2 f button to save the frequency under a preset.Adjust the volume using the 3 + and – buttons.To exit the radio mode, press and hold the 4 MENU button for 1 second or longer.
D NotePress the j / DEL button while the recorder is in radio mode to switch between stereo and mono reception.
Play a preset radio station8.3
Press the1 INDEX / a button while the recorder is in radio mode to switch between frequency and preset mode.In preset mode, press the 2 h or b button to change to another preset radio station.Adjust the volume using the 3 + and – buttons.To exit the radio mode, press and hold the 4 MENU button for 1 second or longer.
Delete a preset radio station8.4
Press the1 INDEX / a button while the recorder is in radio mode to switch between frequency and preset mode.In preset mode, press the 2 h or b button to select the preset radio station to be deleted.Press and hold the 3 j / DEL button for 1 second or longer to delete the preset radio station.
Record from FM radio8.5
Manually tune to a radio station or play a preset radio station.1 Press the 2 g button to start recording.To stop recording, press the 3 j / DEL button.
EN
GL
ISH

16 User manual
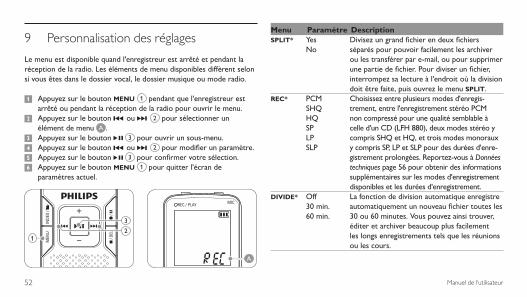
The menu is available while the recorder is stopped and during radio reception. The available menu items differ depending on whether you are in a voice folder, a music folder or in radio mode.
Press the 1 MENU button 1 while the recorder is stopped or during radio reception to open the menu.Press the 2 h or b button 2 to select a menu item A .Press the 3 f button 3 to enter a sub-menu.Press the 4 h or b button 2 to change a setting.Press the 5 f button 3 to confirm your selection.Press the 6 MENU button 1 to exit the current settings screen.
1
3
2
A
Menu Setting DescriptionSPLIT* Yes
NoSplit a large file into two separate files so that they can be easily archived or transferred via e-mail, or so that part of a file can be deleted. To split a file, play and stop at the position where the splitting should be made, then open the SPLIT menu.
REC* PCMSHQHQSPLPSLP
Choose among several recording modes, from un-compressed PCM stereo recording for audio CD-like quality (LFH 880), two stereo modes including SHQ and HQ, or three monaural modes including SP, LP and SLP for extended recording times. See Technical data on page 20 for details about available recording modes and recording times.
DIVIDE* Off30 min.60 min.
The auto divide feature automatically records into a new file every 30 or 60 minutes. This makes it much easier to find, edit and archive long recordings such as meetings or lectures.
INPUT V (voice) L (line-in)
Use the L (line-in) setting when recording from external audio sources via the line-in jack of the recorder (LFH 860/870/880 only).
9 Customize settings
17User manual
SENSE* HILO
Adjust the recording sensitivity to avoid recording background noises and to adjust to the recording environment.
BEEP OnOff
The recorder gives sound feedback about button operations or errors.
LIGHT OnOff
The display will remain lit for a few seconds when a button is pressed.
VA* OnOff
Voice-activated recording is a convenience feature for hands-free recording. When voice-activated recording is enabled, recording will start when you begin speaking. When you stop speaking, the recorder will automatically pause recording after three seconds of silence, and resume only when you begin speaking again.
CLOCK DD:MM:YY12/24 HHH:MM:SS
If the date and time is set, the information when the file is recorded is automatically stored with each file.
TIMER Off V CH
Schedule automatic recording to begin with the microphone (select V) or of a radio channel (select CH / LFH 880 only). Specify the start time, the duration of the recording (30/60/120 minutes/All), a folder and the radio channel to be recorded.
ALARM Off b F
Use the Voice Tracer as a mobile alarm clock. Choose the alarm mode (b = beep, F = file playback) and specify the start time and the file to be played.
FORMAT YesNo
Delete all files on the recorder including programmed radio stations. Transfer any important files to a computer before formatting the recorder.
VER Display the firmware version and the release date.
AUTO** YesNo
Auto-tune a radio station and store up to 20 stations to presets.
OUTPUT **
EPSP
Switch between earphone (EP) and speaker (SP) output in radio mode.
* This function is not available in the M (music) folder.** This function is available only in radio mode.
EN
GL
ISH

18 User manual
Update the firmware10
Your Voice Tracer is controlled by an internal program called firmware. Regularly check www.philips.com/dictation for new firmware updates.
Download the firmware update for your Voice Tracer model from 1 www.philips.com/dictation > Support Center > Software Downloads and save the file in the root directory of the Voice Tracer.Press the 2 MENU button 1 while the recorder is stopped to open the menu.Press the 3 h or b button 2 to select UPDATE A .Press the 4 f button 3 . N (No) is displayed.Press the 5 h or b button 2 to select Y (Yes).Press the 6 f button again to install the new firmware.
1
3
2
A
Technical support and warranty11
This Philips product was designed and manufactured to the highest quality standards. If your Philips product is not working correctly or is defective, contact your supplying Philips Speech Processing dealer who will provide you with the necessary information on how to proceed.
If you have questions that your dealer cannot answer or any other related question, visit www.philips.com/dictation to contact us.
No components are user-serviceable. Do not open or remove covers and do not insert objects not suitable for the specific connectors. Repairs may be made only by Philips service centers and official repair facilities. Failure to do so will void any warranty, stated or implied. Any operation expressly prohibited in this manual, any adjustments, or assembly procedures not recommended or authorized in this manual will void the warranty.
19User manual
My recorder cannot power onThe batteries may be out of power or not inserted correctly. Replace the batteries with new ones and verify that the batteries are inserted correctly.
My recorder does not record anythingThe recorder may be in HOLD mode. Slide the HOLD switch to the Off position.
The maximum number of recordings may be reached or the recording capacity is full. Delete some recordings or move recordings to an external device.
I cannot hear anything from the speakerThe headphones may be plugged in. Remove the headphones.
The volume is at the lowest setting. Adjust the volume.
My recorder cannot play recordingsThe recorder may be in HOLD mode. Slide the HOLD switch to the Off position.
The batteries may be out of power or not inserted correctly. Replace the batteries with new ones and verify that the batteries are inserted correctly.
Nothing has been recorded yet. Check the number of recordings.
My recorder cannot stop, pause, play or recordThe recorder may be in HOLD mode. Slide the HOLD switch to the Off position.
I cannot hear anything through the headphonesThe headphones may not be plugged in properly. Plug in the headphones properly.
The volume is at the lowest setting. Adjust the volume.
Troubleshooting 12
EN
GL
ISH

20 User manual
13 Technical data
ConnectivityUSB: High-speed 2.0 mini-USB•
Microphone: 3.5 mm, impedance 2.2 kΩ•
Headphone: 3.5 mm, impedance 16 •
Ω or more
DisplayType: LCD, segment•
Diagonal screen size: 39 mm / 1.5 in.•
Recording format.mp3 (Mpeg 1/Audio Layer 3)•
.wav (PCM) (LFH880)•
Recording mediaBuilt-in flash memory•
MicrophoneBuilt-in: mono (LFH 660) / •
stereo (LFH 860/870/880)
External: mono (LFH 660) / •
stereo (LFH 860/870/880)
Recording timeLFH 660 (1024 MB):•
SHQ mode (.mp3 / mono): 17.5 hours
HQ mode (.mp3 / mono): 35 hours
SP mode (.mp3 / mono): 46.5 hours
LP mode (.mp3 / mono): 69.5 hours
SLP mode (.mp3 / mono): 139.5 hours
LFH 860/870 (2048 MB):•
SHQ mode (.mp3 / stereo): 35.5 hours
HQ mode (.mp3 / stereo): 71 hours
SP mode (.mp3 / mono): 94.5 hours
LP mode (.mp3 / mono): 142 hours
SLP mode (.mp3 / mono): 284 hours
LFH 880 (2048 MB):•
PCM mode (.wav / stereo): 3.25 hours
SHQ mode (.mp3 / stereo): 35.5 hours
HQ mode (.mp3 / stereo): 71 hours
SP mode (.mp3 / mono): 94.5 hours
LP mode (.mp3 / mono): 142 hours
SLP mode (.mp3 / mono): 284 hours
Compression rate / sampling frequency
PCM mode: 1411 kbps / 44.1 kHz•
SHQ mode: 128 kbps / 44.1 kHz•
HQ mode: 64 kbps / 22 kHz•
SP mode: 48 kbps / 16 kHz•
LP mode: 32 kbps / 16 kHz•
SLP mode: 16 kbps / 16 kHz•
Music playbackCompression format: .mp3, .wma•
MP3 bit rates: 8 – 320 kbps•
WMA bit rates: 32 – 192 kbps•
No DRM support•
Tuner/reception (LFH 880)Tuner bands: FM stereo•
Frequency range: 87.5 – 108 MHz•
Number of preset channels: 20•
Auto digital tuning•
SpeakerBuilt-in 30 mm round dynamic speaker•
Output power: 110 mW•
Operating conditionsTemperature: 5° – 45° C / 41° – 113° F•
Humidity: 10 % – 90 %•
PowerBattery type: two Philips AAA alkaline •
batteries (LR03 or R03)
Battery life (SLP mode): 50 hours•
DimensionsProduct dimensions (W × D × H): •
40 × 18.4 × 108 mm / 1.6 × 0.7 × 4.3 in.
Weight: 81 g / 2.9 oz. incl. batteries•
System requirementsWindows Vista / XP / 2000, •
Mac OS X, Linux
Free USB port•
21Benutzerhandbuch
1 Willkommen 221.1 Lieferumfang 221.2 Produkthighlights 22
2 Wichtig 242.1 Sicherheit 242.2 Entsorgung des alten Geräts 24
3 Der Digital Voice Tracer 25
4 Erste Schritte 264.1 Einsetzen der Batterien 264.2 Ein-/Ausschalten 264.3 Haltefunktion 264.4 Einstellen von Datum und Uhrzeit 274.5 Display-Informationen 274.6 Verwenden des Voice Tracers mit
einem Computer 27
5 Aufnehmen 285.1 Aufnehmen mit dem integrierten
Mikrofon 285.2 Aufnehmen mit einem externen
Mikrofon 295.3 Überschreiben von Aufnahmen
(nur LFH 860/870/880) 295.4 Einfügen von Indexmarken 29
6 Wiedergabe 306.1 Wiedergabefunktionen 306.2 Wiederholte Wiedergabe und
Zufallswiedergabe 31
7 Löschen 32
8 Radio-Modus (nur LFH 880) 328.1 Automatisches Einstellen von
Radiosendern 32
Benutzerhandbuch
8.2 Manuelles Einstellen von Radiosendern 33
8.3 Wiedergabe eines voreingestellten Radiosenders 33
8.4 Löschen eines voreingestellten Radiosenders 33
8.5 Aufnehmen von FM-Radio 33
9 Anpassen von Einstellungen 34
10 Aktualisieren der Firmware 36
11 Technischer Support und Garantie 36
12 Störungsbehebung 37
13 Technische Daten 38
DE
UT
SCH
22 Benutzerhandbuch
Willkommen1
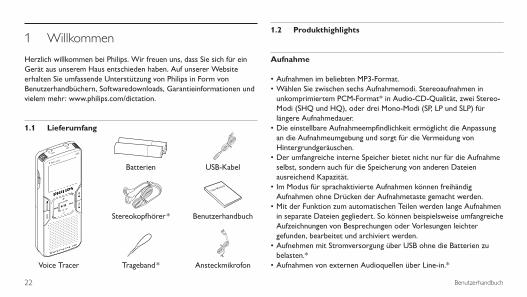
Herzlich willkommen bei Philips. Wir freuen uns, dass Sie sich für ein Gerät aus unserem Haus entschieden haben. Auf unserer Website erhalten Sie umfassende Unterstützung von Philips in Form von Benutzerhandbüchern, Softwaredownloads, Garantieinformationen und vielem mehr: www.philips.com/dictation.
Lieferumfang 1.1
Produkthighlights1.2
Aufnahme
Aufnahmen im beliebten MP3-Format.•Wählen Sie zwischen sechs Aufnahmemodi. Stereoaufnahmen in •unkomprimiertem PCM-Format* in Audio-CD-Qualität, zwei Stereo-Modi (SHQ und HQ), oder drei Mono-Modi (SP, LP und SLP) für längere Aufnahmedauer.Die einstellbare Aufnahmeempfindlichkeit ermöglicht die Anpassung •an die Aufnahmeumgebung und sorgt für die Vermeidung von Hintergrundgeräuschen.Der umfangreiche interne Speicher bietet nicht nur für die Aufnahme •selbst, sondern auch für die Speicherung von anderen Dateien ausreichend Kapazität.Im Modus• für sprachaktivierte Aufnahmen können freihändig Aufnahmen ohne Drücken der Aufnahmetaste gemacht werden.Mit der Funktion zum automatischen Teilen werden lange Aufnahmen •in separate Dateien gegliedert. So können beispielsweise umfangreiche Aufzeichnungen von Besprechungen oder Vorlesungen leichter gefunden, bearbeitet und archiviert werden.Aufnehmen mit Stromversorgung über USB ohne die Batterien zu •belasten.*Aufnahmen von externen Audioquellen über Line-in.*•
Benutzerhandbuch
Batterien
Stereokopfhörer *
USB-Kabel
AnsteckmikrofonVoice Tracer Trageband *
23Benutzerhandbuch
Der hohe Signal-Rauschabstand (S/N) des Mikrofons nimmt •jede Nuance der menschlichen Stimme auf und sorgt für eine hervorragende Tonwiedergabe.
Wiedergabe
Einstellbare Wiedergabegeschwindigkeit zur schnellen und langsamen •Wiedergabe von Aufnahmen.Wiederholte Wiedergabe von Audiodateien oder Teilen daraus.•Musikwiedergabe im MP3- und WMA-Format sowie FM-Radio *.•Wecker mit Sprachwiedergabe und Timer-Aufnahme.•
Komfort
Großes beleuchtetes Display für gut lesbare Anzeige.•Bis zu 22 Stunden Betriebszeit.•Schnelle Übertragung von Aufnahmen, Musik und Daten über USB •Highspeed 2.0.Schnelles Finden bestimmter Stellen in einer Aufnahme über •Indexmarken und Zeitmarken.Unterstützt bis zu 99 Aufnahmen in jedem der vier Ordner, sodass •Dateien schnell und einfach verwaltet werden können.Der Voice Tracer bietet als USB-Massenspeichergerät eine •
unkomplizierte Möglichkeit zum Speichern, Sichern und Verschieben von Dateien ohne spezielle Software oder Treiber.
* Nur bei bestimmten Produktausführungen verfügbar.
DE
UT
SCH
24 Benutzerhandbuch
board usw. unterwegs sind. Sie können dadurch den Verkehr gefährden und verstossen damit eventuell gegen gesetzliche Bestimmungen.
Wichtig (bei Modellen mit Kopfhörern):Philips garantiert die Übereinstimmung der maximalen Schallleistung seiner Audiogeräte mit den geltenden Bestimmungen, jedoch nur mit dem ursprünglichen Modell der im Lieferumfang enthaltenen Kopfhörer. Wenn diese Kopfhörer ersetzt werden müssen, sollten Sie bei Ihrem Händler ein dem Original entsprechendes Philips-Modell erwerben.
Entsorgung des alten Geräts2.2 Zur Herstellung des Geräts wurden hochwertige Materialien und •Kompo nenten verwendet, die recycelt und wiederverwertet werden können.Das durchgestrichene Mülleimersymbol weist darauf hin, dass •das Gerät der europäischen Richtlinie 2002/96/EC entspricht.Informieren Sie sich über das Mülltrennungssystem in Ihrer •Region für elektrische und elektronische Geräte.Halten Sie sich an die jeweils geltenden gesetzlichen Vorschriften, •und entsorgen Sie diese Produkte nicht mit dem normalen Hausmüll. Durch die sachgerechte Entsorgung alter Geräte werden schädliche Einflüsse auf Umwelt und Gesundheit vermieden.Batterien enthalten ebenso wie Akkus Substanzen, die die Umwelt •gefährden. Sie müssen daher an offiziellen Sammelstellen abgegeben werden.
Wichtig2
Sicherheit2.1 Das Gerät vor Regen oder Wasser schützen, um einen Kurzschluss •zu vermeiden.Das Gerät keiner durch Heizgeräte oder direkte Sonneneinstrahlung •verursachten starken Hitze aussetzen.Darauf achten, dass Kabel nicht gequetscht werden, vor allem an •Steckern und am Geräteausgang.Sichern Sie Ihre Dateien. Philips ist für Datenverlust nicht haftbar.•
Gehörschutz2.1.1 Halten Sie bei Verwendung der Kopfhörer die folgenden Richtlinien ein:
Stellen Sie die Lautstärke moderat ein, und hören Sie nicht zu lange •über Kopfhörer.Achten Sie unbedingt darauf, die Lautstärke nicht höher einzustellen, •als es Ihr Gehör verträgt.Stellen Sie die Lautstärke nur so hoch ein, dass Sie immer noch hören, •was um Sie herum geschieht.In möglicherweise gefährlichen Situationen sollten Sie sehr vorsichtig •sein oder die Nutzung vorübergehend unterbrechen.Setzen Sie keine Kopfhörer auf, wenn Sie mit dem Auto, Fahrrad, Skate-•

25Benutzerhandbuch
Der Digital Voice Tracer3
1 Kopfhörerbuchse2 Mikrofonbuchse, Line-in-Buchse3 Integriertes Mikrofon4 Aufnehmen / Pause / Einschalten5 Stopp / Displayanzeige / Löschen6 Lautsprecher7 Menü / FM-Radio8 Index / Ordner / Wiederholen9 Display10 Aufnahme- / Wiedergabeanzeige11 Lautstärke höher12 Ein- / Ausschalten, Wiedergabe / Pause,
Wiedergabegeschwindigkeit13 Schnelles Vorspulen / Dateiauswahl / Menüauswahl14 Lautstärke niedriger15 Schnelles Zurückspulen / Dateiauswahl / Menüauswahl16 Halteschalter17 Batteriefach18 USB-Buchse19 Bandöse
21
10
8
7
5
4
9
6
3
14
11
12
15
13
19
17
16
18
DE
UT
SCH

26 Benutzerhandbuch
Einsetzen der Batterien4.1 Nehmen Sie die Batteriefachabdeckung ab.1 Setzen Sie die Batterien wie angegeben ein. Achten Sie dabei auf die 2 richtige Polarität, und schließen Sie die Abdeckung wieder.
1 2
D HinweisNehmen Sie die Batterien heraus, wenn Sie den Voice Tracer längere •Zeit nicht verwenden. Der Voice Tracer kann durch undichte Batterien beschädigt werden.Wenn der Voice Tracer nicht richtig funktioniert, nehmen Sie die •Batterien heraus, und setzen Sie sie wieder ein.Halten Sie den Rekorder vor dem Austauschen der Batterien an. •Wenn die Batterien bei laufendem Rekorder herausgenommen
werden, kann die Datei beschädigt werden.Wenn die Batterien nahezu leer sind, blinkt die Batterieanzeige.•Wenn der Batteriewechsel länger als 2 Minuten dauert, muss •möglicherweise die Zeit neu eingestellt werden.
Ein-/Ausschalten4.2 Drücken Sie zum Einschalten des Geräts die Taste 1 f 1 so lange, bis am Display HELLO angezeigt wird A .Drücken Sie zum Ausschalten im Stopp-Modus die Taste 2 f so lange, bis BYE eingeblendet wird.
1
A
Haltefunktion 4.3 Wenn der Regler HOLD auf der Position ‚Hold‘ steht, sind alle Tasten am Gerät inaktiv. Am Display wird kurz On Hold angezeigt, dann wird das Display deaktiviert. Sie heben die Sperre des Voice Tracers wieder auf, indem Sie den Regler HOLD auf die Position Off stellen.
Erste Schritte4

27Benutzerhandbuch
Einstellen von Datum und Uhrzeit4.4 Beim ersten Einsetzen der Batterien, werden Sie aufgefordert, Datum und Uhrzeit einzustellen.
‚CLOCK‘1 eingeblendet. Drücken Sie die Taste f 1 . Die Jahresanzeige A blinkt.Drücken Sie die Taste 2 h bzw. die Taste b, 2 um das Jahr einzustellen.Drücken Sie die Taste 3 f, 1 um zur Einstellung für den Monat zu gelangen.Wiederholen Sie die Schritte 4 2 und 3, und stellen Sie Monat, Tag, 12-/24-Stundensystem und Uhrzeit ebenso ein.
1
2
A
D HinweisDatum und Uhrzeit können jederzeit über das Menü geändert werden. Weitere Informationen hierzu finden Sie unter Anpassen von Einstellungen auf Seite 34.
Display-Informationen4.5 Drücken Sie im Stopp-Modus die Taste• j / DEL, um die verschiedenen Anzeigen am Display durchzugehen: Gesamtwiedergabedauer der aktuellen Datei > Uhrzeit > Datum > verbleibende Aufnahmezeit > Aufnahmeuhrzeit der aktuellen Datei > Aufnahmedatum der aktuellen Datei.Halten Sie • f bei der Aufnahme gedrückt, damit die verbleibende Aufnahmezeit eingeblendet wird.
Verwenden des Voice Tracers mit einem Computer4.6 Der Voice Tracer bietet als USB-Massenspeichergerät unkomplizierte Methoden zum Speichern, Sichern und Verschieben von Dateien. Der Voice Tracer wird über einen USB-Anschluss mit einem Computer verbunden. Es muss keine spezielle Software installiert werden. Der Voice Tracer wird automatisch als Wechselmedium angezeigt, und Sie können mit der Maus problemlos Dateien verschieben.
D HinweiseNehmen Sie den Voice Tracer nicht vom Netz, während Dateien vom •bzw. zum Gerät übertragen werden. Während die Datenübertragung läuft, blinkt die orangefarbene Aufnahme-/Wiedergabe-Anzeige.Formatieren Sie das Laufwerk des Voice Tracers nicht auf einem •Computer.
DE
UT
SCH

28 Benutzerhandbuch
Aufnehmen mit dem integrierten Mikrofon5.1
Drücken Sie im Stopp-Modus die Taste 1 INDEX / a, 1 um den gewünschten Ordner auszuwählen A .Starten Sie die Aufnahme, indem Sie die Taste 2 g drücken 2 . Die Aufnahme-/Wiedergabe-Anzeige leuchtet rot B . Richten Sie das integrierte Mikrofon auf die Tonquelle aus. Drücken Sie zum Unterbrechen der Aufnahme die Taste 3 g 2 . Die Aufnahme-/Wiedergabe-Anzeige blinkt B , und am Display blinkt PAUSE C . Drücken Sie erneut die Taste g, um die Aufnahme fortzusetzen.Drücken Sie zum Beenden der Aufnahme die Taste 4 j / DEL 3 .
C
B
A1 2
3
D HinweiseLegen Sie vor Beginn der Aufnahme die gewünschte Sprach-•aktivierungs funktion und den Aufnahmemodus fest (Einzelheiten hierzu finden Sie unter Anpassen von Einstellungen auf Seite 34).Machen Sie eine Probeaufnahme, damit Sie sichergehen können, dass •die Einstellungen des Voice Tracers richtig sind.Halten Sie • f bei der Aufnahme gedrückt, damit die verbleibende Aufnahmezeit eingeblendet wird.Drücken Sie während der Aufnahme • b, um eine neue Datei zu erstellen.In jedem Ordner können maximal 99 Dateien gespeichert werden, die •Gesamtkapazität liegt bei 396 Dateien (99 Dateien x 4 Ordner).Wenn die Aufnahmezeit die verfügbare Kapazität übersteigt oder die •Dateianzahl 396 erreicht, wird die Aufnahme angehalten und es wird ‚FULL‘ angezeigt. Löschen Sie Aufnahmen, oder verschieben Sie sie auf einen Computer.Nehmen Sie die Batterien nicht während einer Aufnahme heraus. Das •kann zu einer Fehlfunktion des Rekorders führen.Wenn eine längere Aufnahme bevorsteht, wechseln Sie die Batterien •vor Beginn der Aufnahme.Der Voice Tracer kann zum Aufnehmen per USB-Kabel mit Strom •versorgt werden, sodass die Batterie nicht belastet wird. Schließen Sie den Rekorder über das USB-Kabel an einen Computer an, und drücken Sie mindestens eine Sekunde lang die Taste g, um die Aufnahme zu beginnen (nur LFH860/870/880).
Aufnehmen5

29Benutzerhandbuch
Aufnehmen mit einem externen Mikrofon 5.2 Wenn Sie mit einem externen Mikrofon aufnehmen möchten, schließen Sie das Mikrofon an die Mikrofonbuchse an, und gehen Sie ebenso vor wie beim integrierten Mikrofon.
Überschreiben von Aufnahmen (nur LFH 860/870/880)5.3 Wenn Sie Aufnahmen ergänzen oder Teile davon überschreiben möchten, führen Sie die folgenden Schritte aus.
Drücken Sie im Stopp-Modus die Taste 1 INDEX / a, 1 um den gewünschten Ordner auszuwählen A .Drücken Sie die Taste 2 h bzw. die Taste b, 2 um die zu ergänzende Datei auszuwählen.Gehen Sie per Wiedergabe oder schnellem Vorlauf zu der Stelle, an 3 der die Ergänzung eingefügt werden soll, und drücken Sie die Taste f, 3 um die Wiedergabe zu unterbrechen.Beginnen Sie mit dem Überschreiben der Aufnahme, indem Sie die 4 Taste g drücken 4 . Die Aufnahme-/Wiedergabe-Anzeige blinkt B , und am Display wird OVER eingeblendet C . Die vorhandene
Aufnahme wird überschrieben.Drücken Sie die Taste 5 j / DEL, 5 wenn Sie die Aufnahme beenden möchten.
D HinweisBeim Überschreiben einer Aufnahme wird der Aufnahmemodus der •ursprünglichen Datei verwendet.Überschreiben ist im Ordner • M (Musik) nicht verfügbar.
13
2
5
4
C
B
A
Einfügen von Indexmarken5.4 Mit Indexmarken können bestimmte Stellen einer Aufnahme als Referenzpunkte markiert werden.
Drücken Sie während der Aufnahme die Taste1 INDEX / a, um eine Indexmarke zu setzen. Die Indexnummer wird eine Sekunde lang angezeigt.
D HinweiseDas Symbol • gibt an, dass eine Aufnahme Indexmarken enthält.Pro Datei können bis zu 32 Indexmarken gesetzt werden.•
DE
UT
SCH

30 Benutzerhandbuch
Wiedergabe6 D HinweisWenn Kopfhörer angeschlossen sind, ist der Lautsprecher deaktiviert.
D Hinweise zur MusikwiedergabeDer Rekorder unterstützt Musikdateien in den Formaten .wma und •.mp3, die von einem Computer in den Musikordner des Rekorders übertragen werden können. Dateien mit Kopierschutz (Digital Rights Management) werden nicht unterstützt.Der Voice Tracer unterstützt im Musikordner bis zu zwei •Ordnerebenen. In jedem Ordner können bis zu 199 Einträge (Dateien und Ordner) gespeichert werden.Drücken Sie die Taste • f, um eine ausgewählte Datei/einen ausgewählten Ordner zu öffnen. Sie kehren zum Ordner eine Ebene höher zurück, indem Sie die Taste INDEX / a drücken.Wenn Sie den Equalizer-Modus ändern möchten, drücken Sie während •der Wiedergabe die Taste g (Normal > Classic > Jazz > Rock > Pop > Normal).
Wiedergabefunktionen6.1
Langsame, schnelle, normale Wiedergabe6.1.1 Halten Sie die Taste f mindestens eine Sekunde lang gedrückt, um zwischen normaler, langsamer und schneller Wiedergabe zu wechseln.
Drücken Sie im Stopp-Modus die Taste1 INDEX / a 1 , um den gewünschten Ordner auszuwählen A .Drücken Sie die Taste 2 h bzw. die Taste b, 2 um die wiederzugebende Datei auszuwählen.Drücken Sie die Taste 3 f 3 . Die Wiedergabedauer wird am Display angezeigt, und die grüne LED B leuchtet.Stellen Sie mit den Tasten 4 + und – die Lautstärke ein 4 .Drücken Sie zum Beenden der Wiedergabe die Taste 5 j / DEL 5 . Die gesamte Wiedergabedauer C der Datei wird am Display angezeigt.Drücken Sie erneut die Taste 6 f, um die Wiedergabe an der vorhergehenden Stelle fortzusetzen.
13
24
5
C
B
A
31Benutzerhandbuch
Suchen6.1.2 Halten Sie die Taste h bzw. die Taste b während der Wiedergabe gedrückt, um die aktuelle Datei in schneller Geschwindigkeit vorwärts oder rückwärts zu durchsuchen. Lassen Sie die Taste wieder los, um die Wiedergabe in der gewählten Geschwindigkeit wieder aufzunehmen.
Schneller Rücklauf und Vorlauf6.1.3 Drücken Sie während der Wiedergabe die Taste h bzw. b, um zum Anfang der derzeit wiedergegebenen Datei bzw. zur nächsten Datei zu wechseln. Wenn die Datei über Indexmarken verfügt, beginnt die Wiedergabe an dieser Stelle.
Wiederholte Wiedergabe und Zufallswiedergabe 6.2 Sie können den Voice Tracer so einstellen, dass Dateien wiederholt oder in zufälliger Reihenfolge abgespielt werden.
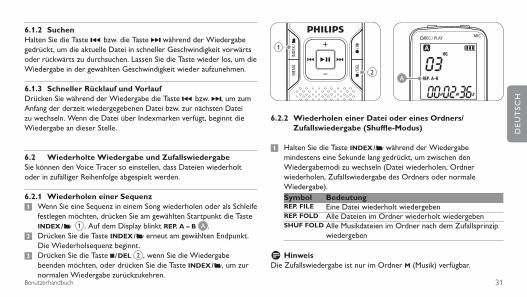
Wiederholen einer Sequenz6.2.1 Wenn Sie eine Sequenz in einem Song wiederholen oder als Schleife 1 festlegen möchten, drücken Sie am gewählten Startpunkt die Taste INDEX / a 1 . Auf dem Display blinkt REP. A – B A .Drücken Sie die Taste 2 INDEX / a erneut am gewählten Endpunkt. Die Wiederholsequenz beginnt.Drücken Sie die Taste 3 j / DEL 2 , wenn Sie die Wiedergabe beenden möchten, oder drücken Sie die Taste INDEX / a, um zur normalen Wiedergabe zurückzukehren.
A
1
2
Wiederholen einer Datei oder eines Ordners/6.2.2 Zufallswiedergabe (Shuffle-Modus)
Halten Sie die Taste 1 INDEX / a während der Wiedergabe mindestens eine Sekunde lang gedrückt, um zwischen den Wiedergabemodi zu wechseln (Datei wiederholen, Ordner wiederholen, Zufallswiedergabe des Ordners oder normale Wiedergabe).Symbol BedeutungREP. FILE Eine Datei wiederholt wiedergebenREP. FOLD Alle Dateien im Ordner wiederholt wiedergebenSHUF FOLD Alle Musikdateien im Ordner nach dem Zufallsprinzip
wiedergeben
D HinweisDie Zufallswiedergabe ist nur im Ordner M (Musik) verfügbar.
DE
UT
SCH

32 Benutzerhandbuch
Löschen7
Drücken Sie im Stopp-Modus die Taste1 INDEX / a, um den gewünschten Ordner auszuwählen.Halten Sie die Taste 2 j / DEL mindestens eine Sekunde lang gedrückt. Am Display wird DELETE eingeblendet.Drücken Sie die Taste 3 h bzw. b, um eine Löschoption auszuwählen.Symbol BedeutungFILE Eine einzelne Datei löschenFOLD Alle Dateien in einem Ordner löschen
Alle Indexmarken in einer Datei löschen
Drücken Sie die Taste 4 f.Drücken Sie die Taste 5 h bzw. b, um die Datei, den Ordner oder die Datei mit den Indexmarken auszuwählen, die/der gelöscht werden soll/en.Drücken Sie die Taste 6 f erneut. N (Nein) wird eingeblendet.Drücken Sie die Taste 7 h bzw. b, um Y ( Ja) auszuwählen.Drücken Sie zur Bestätigung die Taste 8 f.
D HinweisDie Dateinummerierung wird automatisch entsprechend erneuert.
Radio-Modus (nur LFH 880)8
Schließen Sie die Kopfhörer an. Die im Lieferumfang enthaltenen 1 Kopfhörer dienen als Radioantenne.Halten Sie die Taste 2 MENU mindestens eine Sekunde lang gedrückt, um zum Radiomodus zu wechseln.
Automatisches Einstellen von Radiosendern8.1
Drücken Sie zum Öffnen des Menüs die Taste 1 MENU, während sich der Rekorder im Radiomodus befindet.Drücken Sie die Taste 2 h bzw. b, um AUTO auszuwählen.Drücken Sie die Taste 3 f erneut. N (Nein) wird eingeblendet.Drücken Sie die Taste 4 h bzw. b, um Y ( Ja) auszuwählen.Drücken Sie zur Bestätigung die Taste 5 f. Das Radio sucht automatisch Sendestationen und speichert die Frequenzen unter den Voreinstellungen. Das Radio kann bis zu 20 Sender in den Voreinstellungen speichern.
33Benutzerhandbuch
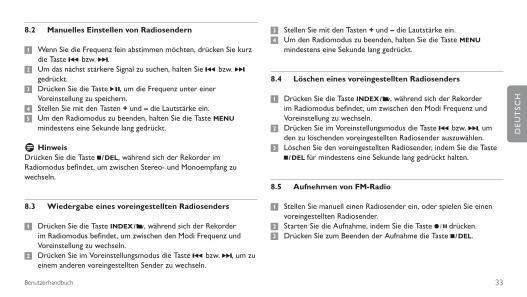
Manuelles Einstellen von Radiosendern8.2
Wenn Sie die Frequenz fein abstimmen möchten, drücken Sie kurz 1 die Taste h bzw. b.Um das nächst stärkere Signal zu suchen, halten Sie 2 h bzw. b gedrückt.Drücken Sie die Taste 3 f, um die Frequenz unter einer Voreinstellung zu speichern.Stellen Sie mit den Tasten 4 + und – die Lautstärke ein.Um den Radiomodus zu beenden, halten Sie die Taste 5 MENU mindestens eine Sekunde lang gedrückt.
D HinweisDrücken Sie die Taste j / DEL, während sich der Rekorder im Radiomodus befindet, um zwischen Stereo- und Monoempfang zu wechseln.
Wiedergabe eines voreingestellten Radiosenders8.3
Drücken Sie die Taste 1 INDEX / a, während sich der Rekorder im Radiomodus befindet, um zwischen den Modi Frequenz und Voreinstellung zu wechseln.Drücken Sie im Voreinstellungsmodus die Taste 2 h bzw. b, um zu einem anderen voreingestellten Sender zu wechseln.
Stellen Sie mit den Tasten 3 + und – die Lautstärke ein.Um den Radiomodus zu beenden, halten Sie die Taste 4 MENU mindestens eine Sekunde lang gedrückt.
Löschen eines voreingestellten Radiosenders8.4
Drücken Sie die Taste 1 INDEX / a, während sich der Rekorder im Radiomodus befindet, um zwischen den Modi Frequenz und Voreinstellung zu wechseln.Drücken Sie im Voreinstellungsmodus die Taste 2 h bzw. b, um den zu löschenden voreingestellten Radiosender auszuwählen.Löschen Sie den voreingestellten Radiosender, indem Sie die Taste 3 j / DEL für mindestens eine Sekunde lang gedrückt halten.
Aufnehmen von FM-Radio8.5
Stellen Sie manuell einen Radiosender ein, oder spielen Sie einen 1 voreingestellten Radiosender.Starten Sie die Aufnahme, indem Sie die Taste 2 g drücken.Drücken Sie zum Beenden der Aufnahme die Taste 3 j / DEL.
DE
UT
SCH
34 Benutzerhandbuch
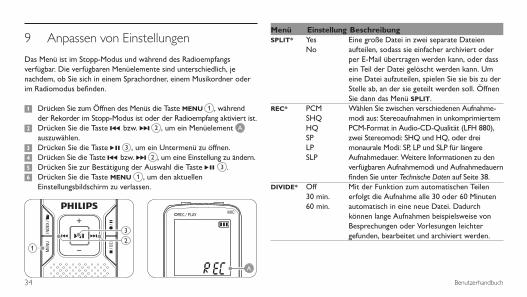
Das Menü ist im Stopp-Modus und während des Radioempfangs verfügbar. Die verfügbaren Menüelemente sind unterschiedlich, je nachdem, ob Sie sich in einem Sprachordner, einem Musikordner oder im Radiomodus befinden.
Drücken Sie zum Öffnen des Menüs die Taste 1 MENU 1 , während der Rekorder im Stopp-Modus ist oder der Radioempfang aktiviert ist.Drücken Sie die Taste 2 h bzw. b 2 , um ein Menüelement A auszuwählen.Drücken Sie die Taste 3 f 3 , um ein Untermenü zu öffnen.Drücken Sie die Taste 4 h bzw. b 2 , um eine Einstellung zu ändern.Drücken Sie zur Bestätigung der Auswahl die Taste 5 f 3 .Drücken Sie die Taste 6 MENU 1 , um den aktuellen Einstellungsbildschirm zu verlassen.
1
3
2
A
Menü Einstellung BeschreibungSPLIT* Yes
NoEine große Datei in zwei separate Dateien aufteilen, sodass sie einfacher archiviert oder per E-Mail übertragen werden kann, oder dass ein Teil der Datei gelöscht werden kann. Um eine Datei aufzuteilen, spielen Sie sie bis zu der Stelle ab, an der sie geteilt werden soll. Öffnen Sie dann das Menü SPLIT.
REC* PCMSHQHQSPLPSLP
Wählen Sie zwischen verschiedenen Aufnahme-modi aus: Stereoaufnahmen in unkomprimiertem PCM-Format in Audio-CD-Qualität (LFH 880), zwei Stereomodi: SHQ und HQ, oder drei monaurale Modi: SP, LP und SLP für längere Aufnahmedauer. Weitere Informationen zu den verfügbaren Aufnahmemodi und Aufnahmedauern finden Sie unter Technische Daten auf Seite 38.
DIVIDE* Off30 min.60 min.
Mit der Funktion zum automatischen Teilen erfolgt die Aufnahme alle 30 oder 60 Minuten automatisch in eine neue Datei. Dadurch können lange Aufnahmen beispielsweise von Besprechungen oder Vorlesungen leichter gefunden, bearbeitet und archiviert werden.
9 Anpassen von Einstellungen

35Benutzerhandbuch
INPUT V (Sprache)L (Line-in)
Verwenden Sie die Einstellung "L" (Line-in), wenn Sie Aufnahmen von externen Quellen über die Line-in-Buchse des Rekorders erstellen (nur LFH 860/870/880).
SENSE* HILO
Einstellen der Aufnahmeempfindlichkeit, um Hintergrundgeräusche bei der Aufnahme zu vermeiden und an die Aufnahmeumgebung anzupassen.
BEEP OnOff
Der Rekorder gibt bei Betätigen der Tasten oder bei Fehlern Tonsignale aus.
LIGHT OnOff
Das Display bleibt einige Sekunden beleuchtet, wenn eine Taste gedrückt wird.
VA* OnOff
Die sprachaktivierte Aufnahme ist eine praktische Funktion zum Aufzeichnen ohne erforderlichen Tastendruck. Wenn die sprachaktivierte Aufnahme aktiviert ist, beginnt die Aufnahme, sobald Sie zu sprechen beginnen. Wenn Sie aufhören zu sprechen, unterbricht der Rekorder die Aufnahme automatisch nach drei Sekunden und nimmt die Aufnahme wieder auf, sobald Sie wieder zu sprechen beginnen.
CLOCK DD:MM:YY12/24 HHH:MM:SS
Wenn Datum und Uhrzeit eingestellt sind, werden die Informationen zur Aufnahmezeit automatisch mit jeder Datei gespeichert.
TIMER OffVCH
Planen einer automatischen Mikrofonaufnahme ("V" wählen) oder einer Radiokanalaufnahme ("CH" wählen; nur LFH 880). Geben Sie die Startzeit, die Dauer der Aufnahme (30/60/120 minutes/All), einen Ordner und den aufzuzeichnenden Radiokanal an.
ALARM OffbF
Den Voice Tracer als mobilen Wecker einset-zen. Wählen Sie den Alarmmodus (b = Alarm-signal, F = Dateiwiedergabe), und geben Sie die Startzeit und die wiederzugebende Datei an.
FORMAT YesNo
Löschen aller Dateien auf dem Rekorder, einschließlich der programmierten Radiosender. Übertragen Sie alle wichtigen Dateien vor dem Formatieren des Rekorders auf einem PC.
VER Anzeigen der Firmwareversion und des Freigabedatums.
AUTO** YesNo
Automatische Radiosendersuche und Speichern von bis zu 20 Sendern in den Voreinstellungen.
OUTPUT **
EPSP
Im Radiomodus zwischen Kopfhörer- (EP) und Lautsprecher- (SP) Ausgabe wechseln.
* Diese Funktion ist im Ordner M (Musik) nicht verfügbar.** Diese Funktion ist nur im Radiomodus verfügbar.
DE
UT
SCH
36 Benutzerhandbuch
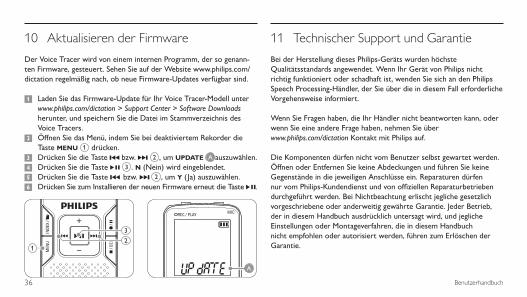
Aktualisieren der Firmware10
Der Voice Tracer wird von einem internen Programm, der so genann-ten Firmware, gesteuert. Sehen Sie auf der Website www.philips.com/dictation regelmäßig nach, ob neue Firmware-Updates verfügbar sind.
Laden Sie das Firmware-Update für Ihr Voice Tracer-Modell unter 1 www.philips.com/dictation > Support Center > Software Downloads herunter, und speichern Sie die Datei im Stammverzeichnis des Voice Tracers.Öffnen Sie das Menü, indem Sie bei deaktiviertem Rekorder die 2 Taste MENU 1 drücken.Drücken Sie die Taste 3 h bzw. b 2 , um UPDATE A auszuwählen.Drücken Sie die Taste 4 f 3 . N (Nein) wird eingeblendet.Drücken Sie die Taste 5 h bzw. b 2 , um Y ( Ja) auszuwählen.Drücken Sie zum Installieren der neuen Firmware erneut die Taste 6 f.
1
3
2
A
Technischer Support und Garantie11
Bei der Herstellung dieses Philips-Geräts wurden höchste Qualitätsstandards angewendet. Wenn Ihr Gerät von Philips nicht richtig funktioniert oder schadhaft ist, wenden Sie sich an den Philips Speech Processing-Händler, der Sie über die in diesem Fall erforderliche Vorgehensweise informiert.
Wenn Sie Fragen haben, die Ihr Händler nicht beantworten kann, oder wenn Sie eine andere Frage haben, nehmen Sie über www.philips.com/dictation Kontakt mit Philips auf.
Die Komponenten dürfen nicht vom Benutzer selbst gewartet werden. Öffnen oder Entfernen Sie keine Abdeckungen und führen Sie keine Gegenstände in die jeweiligen Anschlüsse ein. Reparaturen dürfen nur vom Philips-Kundendienst und von offiziellen Reparaturbetrieben durchgeführt werden. Bei Nichtbeachtung erlischt jegliche gesetzlich vorgeschriebene oder anderweitig gewährte Garantie. Jeder Betrieb, der in diesem Handbuch ausdrücklich untersagt wird, und jegliche Einstellungen oder Montageverfahren, die in diesem Handbuch nicht empfohlen oder autorisiert werden, führen zum Erlöschen der Garantie.
37Benutzerhandbuch
Der Rekorder lässt sich nicht einschalten.Die Batterien sind leer oder nicht richtig eingelegt. Ersetzen Sie die Bat-terien durch neue, und achten Sie darauf, dass sie richtig eingesetzt sind.
Der Rekorder nimmt nichts auf.Der Rekorder befindet sich im Modus HOLD. Schieben Sie den Regler HOLD in die Position "Off".
Die maximale Anzahl an Aufnahmen ist erreicht oder die Aufnahmekapazität ist erschöpft. Löschen Sie Aufnahmen, oder verschieben Sie Aufnahmen auf ein externes Gerät.
Über den Lautsprecher ist nichts zu hören.Der Kopfhörer ist eingesteckt. Ziehen Sie den Kopfhörer ab.
Die Lautstärke ist auf den niedrigsten Wert eingestellt. Stellen Sie die Lautstärke entsprechend ein.
Der Rekorder gibt keine Aufnahmen wieder.Der Rekorder befindet sich im Modus HOLD. Schieben Sie den Regler HOLD in die Position "Off".
Die Batterien sind leer oder nicht richtig eingelegt. Ersetzen Sie die Bat-terien durch neue und achten Sie darauf, dass sie richtig eingesetzt sind.
Es wurde noch nichts aufgenommen. Überprüfen Sie die Anzahl der Aufnahmen.
Der Rekorder kann weder anhalten, unterbrechen, wiedergeben noch aufnehmen.Der Rekorder befindet sich im Modus HOLD. Schieben Sie den Regler HOLD in die Position "Off".
Über den Kopfhörer ist nichts zu hören.Der Kopfhörer ist nicht richtig eingesteckt. Stecken Sie den Kopfhörer richtig ein.
Die Lautstärke ist auf den niedrigsten Wert eingestellt. Stellen Sie die Lautstärke entsprechend ein.
Störungsbehebung 12
DE
UT
SCH
38 Benutzerhandbuch
Technische Daten13
AnschlüsseUSB: Highspeed 2.0 Mini-USB•
Mikrofon: 3,5 mm, Impedanz 2,2 kΩ•
Kopfhörer: 3,5 mm, Impedanz 16 Ω •
oder mehr
DisplayTyp: LCD, Segment•
Bildschirmgröße diagonal: 39 mm •
Aufnahmeformat.mp3 (Mpeg 1/Audio Layer 3)•
.wav (PCM) (LFH 880)•
AufnahmemedienIntegrierter Flash-Speicher•
MikrofonIntegriert: Mono (LFH 660) / •
Stereo (LFH 860/870/880)
Extern: Mono (LFH 660) / •
Stereo (LFH 860/870/880)
AufnahmedauerLFH 660 (1024 MB):•
SHQ-Modus (.mp3 / Mono): 17,5 h
HQ-Modus (.mp3 / Mono): 35 h
SP-Modus (.mp3 / Mono): 46,5 h
LP-Modus (.mp3 / Mono): 69,5 h
SLP-Modus (.mp3 / Mono): 139,5 h
LFH 860/870 (2.048 MB):•
SHQ-Modus (.mp3 / Stereo): 35,5 h
HQ-Modus (.mp3 / Stereo): 71 h
SP-Modus (.mp3 / Mono): 94,5 h
LP-Modus (.mp3 / Mono): 142 h
SLP-Modus (.mp3 / Mono): 284 h
LFH 880 (2.048 MB):•
PCM-Modus (.wav / Stereo): 3,25 h
SHQ-Modus (.mp3 / Stereo): 35,5 h
HQ-Modus (.mp3 / Stereo): 71 h
SP-Modus (.mp3 / Mono): 94,5 h
LP-Modus (.mp3 / Mono): 142 h
SLP-Modus (.mp3 / Mono): 284 h
Kompressionsrate / AbtastratePCM-Modus: 1411 kBit/s / 44,1 kHz•
SHQ-Modus: 128 kBit/s / 44,1 kHz•
HQ-Modus: 64 kBit/s / 22 kHz•
SP-Modus: 48 kBit/s / 16 kHz•
LP-Modus: 32 kBit/s / 16 kHz•
SLP-Modus: 16 kBit/s / 16 kHz•
MusikwiedergabeKompressionsformat: .mp3, .wma•
MP3-Bitraten: 8 – 320 kBit/s•
WMA-Bitraten: 32 – 192 kBit/s•
Keine DRM-Unterstützung•
Tuner/Radioempfang (LFH 880)Empfangsbänder: FM Stereo•
Frequenzbereich: 87,5 – 108 MHz•
Anzahl voreingestellter Kanäle: 20•
Auto Digital Tuning•
LautsprecherIntegrierter dynamischer •
Lautsprecher, 30 mm, rund
Ausgangsleistung: 110 mW•
BetriebsbedingungenTemperatur: 5° – 45° C•
Luftfeuchtigkeit: 10 % – 90 %•
StromversorgungBatterietyp: zwei Philips AAA •
Alkaline-Batterien (LR03 oder R03)
Batterielebensdauer (SLP-Modus): •
50 Stunden
AbmessungenGerätemaße (B × H × T): •
40 × 108 × 18,4 mm
Gewicht: 81 g inkl. Batterien•
SystemanforderungenWindows Vista/XP/2000, Mac OS X, •
Linux
Freier USB-Anschluss•
39Manuel de l‘utilisateur
1 Bienvenue 401.1 Contenu de la boîte 401.2 Spécificités du produit 40
2 Important 422.1 Sécurité 422.2 Mise au rebut de votre produit périmé 42
3 Votre Digital Voice Tracer 43
4 Mise en route 444.1 Insertion des piles 444.2 Marche/arrêt 444.3 Fonction d'interruption 444.4 Réglage de la date et de l'heure 454.5 Informations à l'écran 454.6 Utilisation du Voice Tracer avec un
ordinateur 45
5 Enregistrement 465.1 Enregistrement avec le microphone
intégré 465.2 Enregistrement avec un microphone
externe 475.3 Remplacement d'un enregistrement
(LFH 860/870/880 seulement) 475.4 Ajout de marqueurs d'index 47
6 Lecture 486.1 Fonctions de lecture 486.2 Mode répétition / aléatoire 49
7 Supprimer 50
8 Mode radio (LFH 880 seulement) 508.1 Réglage automatique des stations
radio 50
Manuel de l‘utilisateur
8.2 Réglage manuel d'une station radio 518.3 Lecture d’une station radio
présélectionnée 518.4 Suppression d’une station radio
présélectionnée 518.5 Enregistrement de la radio FM 51
9 Personnalisation des réglages 52
10 Mise à jour du micrologiciel 54
11 Assistance technique et garantie 54
12 Dépannage 55
13 Données techniques 56
FRA
NÇ
AIS

40 Manuel de l‘utilisateur
Bienvenue1
Félicitations pour votre achat et bienvenue chez Philips ! Afin de bénéficier pleinement de l'assistance offerte par Philips, consultez notre site Web pour obtenir des informations sur l'assistance sous la forme de manuels d'utilisation, de téléchargements de logiciels, d'informations sur la garantie et plus encore : www.philips.com/dictation.
Contenu de la boîte 1.1
Spécificités du produit1.2
Enregistrement
Enregistre au format MP3 courant.•Choisissez entre six modes d'enregistrement. Enregistrement stéréo •PCM non compressé* pour une qualité audio similaire à celle d'un CD, deux modes stéréo (SHQ et HQ) et trois modes monauraux (SP, LP et SLP) pour des durées d'enregistrement prolongées.La sensibilité d'enregistrement réglable évite les bruits de fond et •s'ajuste à l'environnement.Son ample mémoire interne offre une grande capacité •d'enregistrement et permet de stocker de longues dictées.Le mode déclenchement vocal de l'enregistrement permet une •dictée mains libres sans avoir à se rappeler d'appuyer sur le bouton d'enregistrement.La fonction de division automatique divise automatique les longs •enregistrements en fichiers séparés. Vous pouvez ainsi trouver, éditer et archiver beaucoup plus facilement les longs enregistrements tels que les réunions ou les cours.Enregistre avec une alimentation USB sans décharger la batterie.*•Enregistre à partir de sources audio externes par la prise d'entrée •de ligne.*Le grand ratio signal/bruit (s/b) du microphone capte tous les détails •
Manuel de l’utilisateur
Piles
Écouteurs stéréo *
Câble USB
Microphone à pinceVoice Tracer Dragonne *

41Manuel de l‘utilisateur
de la voix humaine, apportant ainsi une excellente reproduction du son.
Lecture
Vitesse de lecture réglable pour lire les enregistrements en modes de •lecture rapide ou lente.Choisissez de lire un fichier audio partiel ou intégral à répétition •grâce à l'option de lecture à répétition.Écoutez des fichiers de musique MP3 ou WMA ainsi que la radio FM *.•Fonction de réveil avec lecture vocale et enregistrement par minuteur.•
Commodité
Grand écran rétroéclairé pour faciliter la visualisation.•Profitez de 22 heures de fonctionnement continu.•Transfère rapidement les enregistrements, la musique et les données •grâce au USB 2.0 à haut débit.Les fonctions de marquage d'index et de marquage temporaire •vous permettent de trouver rapidement un emplacement dans un enregistrement.Prend en charge jusqu'à 99 enregistrements dans chacun des quatre •dossiers disponibles, afin d'organiser vos fichiers de façon rapide et
facile.En tant que périphérique de stockage de masse USB, le Voice Tracer •propose une façon pratique d'enregistrer, sauvegarder et déplacer des fichiers, sans logiciel précis ni installation de pilote.
* Disponible seulement sur certaines versions du produit.
FRA
NÇ
AIS
42 Manuel de l‘utilisateur
Important (pour les modèles fournis avec des écouteurs) :Philips garantit la conformité avec la puissance de son maximale de ses lecteurs audio, comme l'indiquent les organismes régulateurs concernés, mais seulement avec le modèle d'origine des écouteurs fournis. Si ces écouteurs ont besoin d'être remplacés, nous vous conseillons de contacter votre revendeur pour commander un modèle Philips identique à celui d'origine.
Mise au rebut de votre produit périmé2.2 Votre produit a été conçu et fabriqué avec des matériaux et des •composants de haute qualité qui peuvent être recyclés et réutilisés.Lorsque ce symbole de poubelle barrée est joint à un produit, •il indique que ce produit est couvert par la directive europénne 2002/96/EC.Informez-vous sur le système de récupération spécial pour les •produits électriques et électroniques.Respectez les règles locales ; ne jetez pas vos produits périmés avec •vos ordures ménagères. La mise au rebut correcte des produits périmés permettra d'éviter des conséquences négatives potentielles pour l'environnement et la santé des personnes.Les batteries et piles (y compris les batteries rechargeables intégrées) •contiennent des substances qui peuvent polluer l'environnement. Toutes les batteries et piles doivent être remises à un point de collecte agréé.
Important2
Sécurité2.1 Pour éviter les courts-circuits, n'exposez pas le produit à la pluie ni •à l'eau.N'exposez pas cet appareil à une chaleur excessive causée par un •équipement ou la lumière directe du soleil.Protégez les câbles des pincements, notamment au niveau des prises •et à l'endroit où ils sortent de l'unité.Sauvegardez vos fichiers. Philips n'accepte aucune responsabilité en •cas de perte de données.
Sécurité auditive2.1.1 Respectez les consignes suivantes en utilisant vos écouteurs :
Écoutez à un volume raisonnable pendant une durée raisonnable.•Veillez à ne pas augmenter le volume, car votre audition s'adaptera.•N'augmentez pas le volume au point de ne plus entendre ce qui se •passe autour de vous.Vous devez être prudent et interrompre l'utilisation temporairement •dans les situations potentiellement dangereuses.N'utilisez pas les écouteurs en conduisant un véhicule motorisé, en •faisant du vélo, du skateboard, etc. Vous pourriez créer un risque pour la circulation et ce mode d'écoute est souvent illégal.
43Manuel de l‘utilisateur
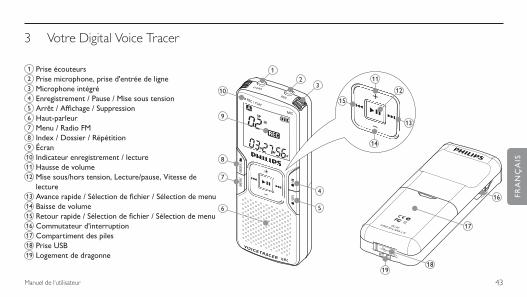
Votre Digital Voice Tracer3
1 Prise écouteurs2 Prise microphone, prise d'entrée de ligne3 Microphone intégré4 Enregistrement / Pause / Mise sous tension5 Arrêt / Affichage / Suppression6 Haut-parleur7 Menu / Radio FM8 Index / Dossier / Répétition9 Écran10 Indicateur enregistrement / lecture11 Hausse de volume12 Mise sous/hors tension, Lecture/pause, Vitesse de
lecture13 Avance rapide / Sélection de fichier / Sélection de menu14 Baisse de volume15 Retour rapide / Sélection de fichier / Sélection de menu16 Commutateur d'interruption17 Compartiment des piles18 Prise USB19 Logement de dragonne
21
10
8
7
5
4
9
6
3
14
11
12
15
13
19
17
16
18
FRA
NÇ
AIS

44 Manuel de l‘utilisateur
Mise en route 4
Insertion des piles 4.1 Ouvrez le couvercle des piles en le faisant coulisser.1 Placez les piles en respectant la polarité indiquée et refermez le 2 couvercle.
1 2
D RemarqueRetirez les piles du Voice Tracer si vous ne l'utilisez pas pendant •une longue période. Le liquide qui s'écoulerait des piles pourrait endommager le Voice Tracer.Si le Voice Tracer fonctionne mal, retirez les piles et ré-insérez-les.•Arrêtez l'enregistreur avant de remplacer les piles. Si vous retirez •les piles pendant que l'enregistreur fonctionne, vous risquez
d'endommager le fichier.Quand les piles sont presque déchargées, l'indicateur des piles clignote.•S'il faut plus de 2 minutes pour remplacer les piles, il vous faudra •peut-être régler à nouveau l'heure.
Marche/arrêt4.2 Pour mettre sous tension, appuyez sur le bouton 1 f 1 jusqu'à ce que l'écran affiche HELLO A .Pour mettre hors tension, appuyez sur le bouton 2 f quand l'enregistreur est arrêté, jusqu'à ce que l'écran affiche BYE.
1
A
Fonction d'interruption 4.3 Quand le commutateur HOLD est en position d'interruption, tous les boutons du périphérique sont inactifs. On Hold s'affichera brièvement à l'écran, puis l'écran s'éteindra. Déverrouillez le Voice Tracer en plaçant le commutateur HOLD en position Off.
45Manuel de l‘utilisateur
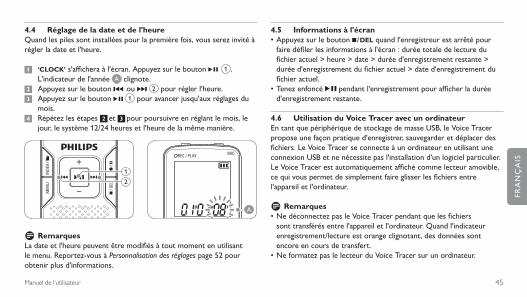
Réglage de la date et de l'heure4.4 Quand les piles sont installées pour la première fois, vous serez invité à régler la date et l'heure.
‘CLOCK’1 s'affichera à l'écran. Appuyez sur le bouton f 1 . L'indicateur de l'année A clignote.Appuyez sur le bouton 2 h ou b 2 pour régler l'heure.Appuyez sur le bouton 3 f 1 pour avancer jusqu'aux réglages du mois.Répétez les étapes 4 2 et 3 pour poursuivre en réglant le mois, le jour, le système 12/24 heures et l'heure de la même manière.
1
2
A
D RemarquesLa date et l'heure peuvent être modifiés à tout moment en utilisant le menu. Reportez-vous à Personnalisation des réglages page 52 pour obtenir plus d'informations.
Informations à l'écran4.5 Appuyez sur le bouton • j / DEL quand l'enregistreur est arrêté pour faire défiler les informations à l'écran : durée totale de lecture du fichier actuel > heure > date > durée d'enregistrement restante > durée d'enregistrement du fichier actuel > date d'enregistrement du fichier actuel.Tenez enfoncé • f pendant l'enregistrement pour afficher la durée d'enregistrement restante.
Utilisation du Voice Tracer avec un ordinateur4.6 En tant que périphérique de stockage de masse USB, le Voice Tracer propose une façon pratique d'enregistrer, sauvegarder et déplacer des fichiers. Le Voice Tracer se connecte à un ordinateur en utilisant une connexion USB et ne nécessite pas l'installation d'un logiciel particulier. Le Voice Tracer est automatiquement affiché comme lecteur amovible, ce qui vous permet de simplement faire glisser les fichiers entre l'appareil et l'ordinateur.
D RemarquesNe déconnectez pas le Voice Tracer pendant que les fichiers •sont transférés entre l'appareil et l'ordinateur. Quand l'indicateur enregistrement/lecture est orange clignotant, des données sont encore en cours de transfert.Ne formatez pas le lecteur du Voice Tracer sur un ordinateur.•
FRA
NÇ
AIS

46 Manuel de l‘utilisateur
Enregistrement5
Enregistrement avec le microphone intégré5.1
Appuyez sur le bouton 1 INDEX / a 1 quand l'enregistreur est à l'arrêt pour sélectionner le dossier désiré A .Appuyez sur le bouton 2 g 2 pour lancer l'enregistrement. L'indicateur enregistrement/lecture devient rouge B . Orientez le microphone intégré vers la source de son. Pour interrompre l'enregistrement, appuyez sur le bouton 3 g
2 . L'indicateur enregistrement/lecture clignotera B , etPAUSE clignotera à l'écran C . Appuyez à nouveau sur le bouton g pour reprendre l'enregistrement.Pour arrêter l'enregistrement, appuyez sur le bouton 4 j / DEL 3 .
C
B
A1 2
3
D RemarquesRéglez la fonction de déclenchement vocal et le mode •d'enregistrement désirés avant de commencer l'enregistrement (voir Personnalisation des réglages page 52 pour obtenir plus d'informations).Effectuez un test d'enregistrement pour veiller à ce que les •paramètres du Voice Tracer soient corrects.Tenez enfoncé • f pendant l'enregistrement pour afficher la durée d'enregistrement restante.Appuyez sur • b pendant l'enregistrement pour créer un nouveau fichier.Le nombre maximum de fichiers de chaque dossier est 99, pour une •capacité totale de 396 fichiers (99 fichiers x 4 dossiers).Si le temps d'enregistrement dépasse la capacité disponible ou si le •nombre de fichiers atteint 396, l'enregistrement s'arrête et 'FULL' s'affichera. Supprimez quelques enregistrements ou transférez-les sur un ordinateur.Ne retirez pas les piles pendant l'enregistrement. Vous risquez de •causer un dysfonctionnement de l'enregistreur.Si vous devez enregistrer pendant une période prolongée, remplacez •les piles avant de commencer.Le Voice Tracer peut enregistrer quand il est alimenté par câble USB, •sans décharger les piles. Connectez l'enregistreur à un ordinateur en utilisant le câble USB et appuyez sur le bouton g pendant au moins 1 seconde pour lancer l'enregistrement (LFH860/870/880 seulement).
47Manuel de l‘utilisateur
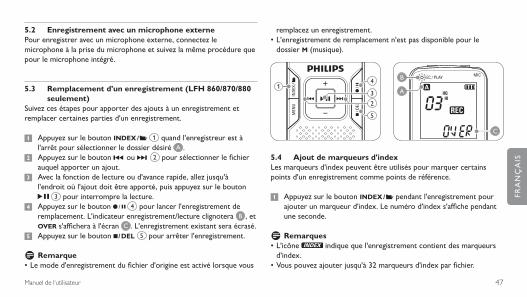
Enregistrement avec un microphone externe 5.2 Pour enregistrer avec un microphone externe, connectez le microphone à la prise du microphone et suivez la même procédure que pour le microphone intégré.
Remplacement d'un enregistrement (LFH 860/870/880 5.3 seulement)
Suivez ces étapes pour apporter des ajouts à un enregistrement et remplacer certaines parties d'un enregistrement.
Appuyez sur le bouton 1 INDEX / a 1 quand l'enregistreur est à l'arrêt pour sélectionner le dossier désiré A .Appuyez sur le bouton 2 h ou b 2 pour sélectionner le fichier auquel apporter un ajout.Avec la fonction de lecture ou d'avance rapide, allez jusqu'à 3 l'endroit où l'ajout doit être apporté, puis appuyez sur le bouton f 3 pour interrompre la lecture.Appuyez sur le bouton 4 g 4 pour lancer l'enregistrement de remplacement. L'indicateur enregistrement/lecture clignotera B , et OVER s'affichera à l'écran C . L'enregistrement existant sera écrasé.Appuyez sur le bouton 5 j / DEL 5 pour arrêter l'enregistrement.
D RemarqueLe mode d'enregistrement du fichier d'origine est activé lorsque vous •
remplacez un enregistrement.L'enregistrement de remplacement n'est pas disponible pour le •dossier M (musique).
13
2
5
4
C
B
A
Ajout de marqueurs d'index5.4 Les marqueurs d'index peuvent être utilisés pour marquer certains points d'un enregistrement comme points de référence.
Appuyez sur le bouton1 INDEX / a pendant l'enregistrement pour ajouter un marqueur d'index. Le numéro d'index s'affiche pendant une seconde.
D RemarquesL'icône • indique que l'enregistrement contient des marqueurs d'index.Vous pouvez ajouter jusqu'à 32 marqueurs d'index par fichier.•
FRA
NÇ
AIS
48 Manuel de l‘utilisateur
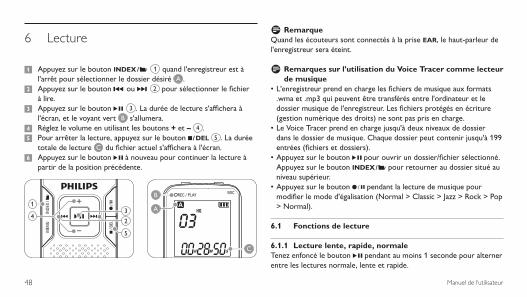
D RemarqueQuand les écouteurs sont connectés à la prise EAR, le haut-parleur de l'enregistreur sera éteint.
D Remarques sur l'utilisation du Voice Tracer comme lecteur de musique
L'enregistreur prend en charge les fichiers de musique aux formats •.wma et .mp3 qui peuvent être transférés entre l'ordinateur et le dossier musique de l'enregistreur. Les fichiers protégés en écriture (gestion numérique des droits) ne sont pas pris en charge.Le Voice Tracer prend en charge jusqu'à deux niveaux de dossier •dans le dossier de musique. Chaque dossier peut contenir jusqu'à 199 entrées (fichiers et dossiers).Appuyez sur le bouton • f pour ouvrir un dossier/fichier sélectionné. Appuyez sur le bouton INDEX / a pour retourner au dossier situé au niveau supérieur.Appuyez sur le bouton • g pendant la lecture de musique pour modifier le mode d'égalisation (Normal > Classic > Jazz > Rock > Pop > Normal).
Fonctions de lecture6.1
Lecture lente, rapide, normale6.1.1 Tenez enfoncé le bouton f pendant au moins 1 seconde pour alterner entre les lectures normale, lente et rapide.
Lecture6
Appuyez sur le bouton 1 INDEX / a 1 quand l'enregistreur est à l'arrêt pour sélectionner le dossier désiré A .Appuyez sur le bouton 2 h ou b 2 pour sélectionner le fichier à lire.Appuyez sur le bouton 3 f 3 . La durée de lecture s'affichera à l'écran, et le voyant vert B s'allumera.Réglez le volume en utilisant les boutons 4 + et – 4 .Pour arrêter la lecture, appuyez sur le bouton 5 j / DEL 5 . La durée totale de lecture C du fichier actuel s'affichera à l'écran.Appuyez sur le bouton 6 f à nouveau pour continuer la lecture à partir de la position précédente.
13
24
5
C
B
A

49Manuel de l‘utilisateur
Recherche6.1.2 Tenez enfoncé le bouton h ou b pendant la lecture pour faire une recherche en arrière ou en avant dans le fichier actuel, à vitesse accélérée. Pour reprendre la lecture à la vitesse sélectionnée, relâchez le bouton.
Retour/avance rapide6.1.3 Appuyez sur le bouton h ou b pendant la lecture pour, respectivement, revenir au début du fichier en cours de lecture ou avancer jusqu'au fichier suivant. Si le fichier contient des marqueurs d'index, la lecture commencera à cet endroit-là.
Mode répétition / aléatoire6.2 Vous pouvez régler le Voice Tracer pour qu'il lise des fichiers de façon répétée ou aléatoire.
Répétition d’une séquence6.2.1
Pour répéter ou lire en boucle une séquence de chanson, appuyez 1 sur le bouton INDEX / a 1 au point de départ choisi. REP. A – B clignote à l'écran A .Appuyez à nouveau sur le bouton2 INDEX / a au moment de fin choisi. La séquence à répéter commence.Appuyez sur le bouton 3 j / DEL 2 pour arrêter la lecture ou appuyez
sur le bouton INDEX / a pour reprendre la lecture normale.
A
1
2
Mode répétition d'un fichier ou d'un dossier / aléatoire6.2.2
Tenez enfoncé le bouton 1 INDEX / a pendant au moins 1 seconde durant la lecture pour alterner entre les modes de lecture (répétition de fichier, répétition de dossier, lecture aléatoire de dossier ou lecture normale).Icône SignificationREP. FILE Lecture répétée d'un fichierREP. FOLD Lecture répétée de tous les fichiers d'un dossierSHUF FOLD Lecture aléatoire de tous les fichiers de musique d'un
dossier
D RemarqueLe mode aléatoire est disponible seulement pour le dossier M (musique).
FRA
NÇ
AIS

50 Manuel de l‘utilisateur
Supprimer7
Appuyez sur le bouton 1 INDEX / a quand l'enregistreur est à l'arrêt pour sélectionner le dossier désiré.Tenez enfoncé le bouton 2 j / DEL pendant au moins 1 seconde. DELETE s'affichera à l'écran.Appuyez sur le bouton 3 h ou b pour sélectionner une option de suppression :Icône SignificationFILE Supprimer un seul fichierFOLD Supprimer tous les fichiers d'un dossier
Supprimer tous les marqueurs d'index d'un fichier
Appuyez sur le bouton 4 f.Appuyez sur le bouton 5 h ou bpour sélectionner le fichier, le dossier ou le fichier contenant les marqueurs d'index à supprimer.Appuyez à nouveau sur le bouton 6 f. N (Non) s'affiche.Appuyez sur le bouton 7 h ou b pour sélectionner Y (Oui).Appuyez sur le bouton 8 f pour confirmer.
D RemarqueDes numéros de fichier sont réattribués automatiquement dans l'ordre.
Mode radio (LFH 880 seulement)8
Connectez les écouteurs. Les écouteurs fournis servent d'antenne 1 radio.Tenez enfoncé le bouton 2 MENU pendant au moins 1 seconde pour ouvrir le mode radio.
Réglage automatique des stations radio8.1
Appuyez sur le bouton 1 MENU pendant que l'enregistreur est en mode radio pour ouvrir le menu.Appuyez sur le bouton 2 h ou b pour sélectionner AUTO.Appuyez à nouveau sur le bouton 3 f. N (Non) s'affiche.Appuyez sur le bouton 4 h ou b pour sélectionner Y (Oui).Appuyez sur le bouton 5 f pour confirmer. La radio règle automatiquement les stations radio et enregistre les fréquences sous forme de présélections. La radio peut stocker jusqu'à 20 stations radio sous forme de présélections.

51Manuel de l‘utilisateur
Réglage manuel d'une station radio8.2
Pour ajuster une fréquence, appuyez brièvement sur le bouton 1 h ou b.Pour rechercher le signal puissant suivant, tenez enfoncé le bouton 2 h ou b.Appuyez sur le bouton 3 f pour enregistrer la fréquence sous forme de présélection.Réglez le volume en utilisant les boutons 4 + et –.Pour quitter le mode radio, tenez enfoncé le bouton 5 MENU pendant au moins 1 seconde.
D RemarqueAppuyez sur le bouton j / DEL pendant que l'enregistreur est en mode radio pour alterner entre réception stéréo et mono.
Lecture d’une station radio présélectionnée8.3
Appuyez sur le bouton 1 INDEX / a pendant que l'enregistreur est en mode radio pour alterner entre mode fréquence et mode présélection.En mode présélection, appuyez sur le bouton 2 h ou b pour passer à une autre station radio présélectionnée.Réglez le volume en utilisant les boutons 3 + et –.
Pour quitter le mode radio, tenez enfoncé le bouton 4 MENU pendant au moins 1 seconde.
Suppression d’une station radio présélectionnée8.4
Appuyez sur le bouton 1 INDEX / a pendant que l'enregistreur est en mode radio pour alterner entre mode fréquence et mode présélection.En mode présélection, appuyez sur le bouton 2 h ou b pour sélectionner la station radio présélectionnée à supprimer.Tenez enfoncé le bouton 3 j / DEL pendant au moins 1 seconde pour supprimer la station radio présélectionnée.
Enregistrement de la radio FM8.5
Réglez manuellement une station radio ou choisissez une station 1 radio présélectionnée.Appuyez sur le bouton 2 g pour lancer l'enregistrement.Pour arrêter l'enregistrement, appuyez sur le bouton 3 j / DEL.
FRA
NÇ
AIS
52 Manuel de l‘utilisateur
9 Personnalisation des réglages
Le menu est disponible quand l'enregistreur est arrêté et pendant la réception de la radio. Les éléments de menu disponibles diffèrent selon si vous êtes dans le dossier vocal, le dossier musique ou mode radio.
Appuyez sur le bouton 1 MENU 1 pendant que l'enregistreur est arrêté ou pendant la réception de la radio pour ouvrir le menu.Appuyez sur le bouton 2 h ou b 2 pour sélectionner un élément de menu A .Appuyez sur le bouton 3 f 3 pour ouvrir un sous-menu.Appuyez sur le bouton 4 h ou b 2 pour modifier un paramètre.Appuyez sur le bouton 5 f 3 pour confirmer votre sélection.Appuyez sur le bouton 6 MENU 1 pour quitter l'écran de paramètres actuel.
1
3
2
A
Menu Paramètre DescriptionSPLIT* Yes
NoDivisez un grand fichier en deux fichiers séparés pour pouvoir facilement les archiver ou les transférer par e-mail, ou pour supprimer une partie de fichier. Pour diviser un fichier, interrompez sa lecture à l'endroit où la division doit être faite, puis ouvrez le menu SPLIT.
REC* PCMSHQHQSPLPSLP
Choisissez entre plusieurs modes d'enregis-trement, entre l'enregistrement stéréo PCM non compressé pour une qualité semblable à celle d'un CD (LFH 880), deux modes stéréo y compris SHQ et HQ, et trois modes monoraux y compris SP, LP et SLP pour des durées d'enre-gistrement prolongées. Reportez-vous à Données techniques page 56 pour obtenir des informations supplémentaires sur les modes d'enregistrement disponibles et les durées d'enregistrement.
DIVIDE* Off30 min.60 min.
La fonction de division automatique enregistre automatiquement un nouveau fichier toutes les 30 ou 60 minutes. Vous pouvez ainsi trouver, éditer et archiver beaucoup plus facilement les longs enregistrements tels que les réunions ou les cours.
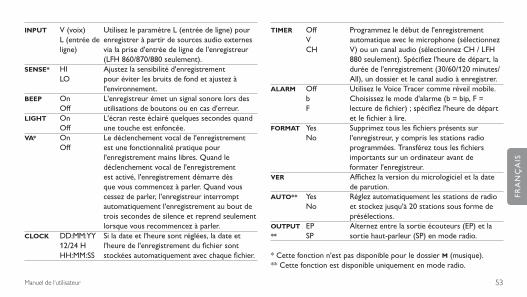
53Manuel de l‘utilisateur
INPUT V (voix) L (entrée de ligne)
Utilisez le paramètre L (entrée de ligne) pour enregistrer à partir de sources audio externes via la prise d'entrée de ligne de l'enregistreur (LFH 860/870/880 seulement).
SENSE* HILO
Ajustez la sensibilité d'enregistrement pour éviter les bruits de fond et ajustez à l'environnement.
BEEP OnOff
L'enregistreur émet un signal sonore lors des utilisations de boutons ou en cas d'erreur.
LIGHT OnOff
L'écran reste éclairé quelques secondes quand une touche est enfoncée.
VA* OnOff
Le déclenchement vocal de l'enregistrement est une fonctionnalité pratique pour l'enregistrement mains libres. Quand le déclenchement vocal de l'enregistrement est activé, l'enregistrement démarre dès que vous commencez à parler. Quand vous cessez de parler, l'enregistreur interrompt automatiquement l'enregistrement au bout de trois secondes de silence et reprend seulement lorsque vous recommencez à parler.
CLOCK DD:MM:YY12/24 HHH:MM:SS
Si la date et l'heure sont réglées, la date et l'heure de l'enregistrement du fichier sont stockées automatiquement avec chaque fichier.
TIMER Off V CH
Programmez le début de l'enregistrement automatique avec le microphone (sélectionnez V) ou un canal audio (sélectionnez CH / LFH 880 seulement). Spécifiez l'heure de départ, la durée de l'enregistrement (30/60/120 minutes/All), un dossier et le canal audio à enregistrer.
ALARM Off b F
Utilisez le Voice Tracer comme réveil mobile. Choisissez le mode d'alarme (b = bip, F = lecture de fichier) ; spécifiez l'heure de départ et le fichier à lire.
FORMAT YesNo
Supprimez tous les fichiers présents sur l'enregistreur, y compris les stations radio programmées. Transférez tous les fichiers importants sur un ordinateur avant de formater l'enregistreur.
VER Affichez la version du micrologiciel et la date de parution.
AUTO** YesNo
Réglez automatiquement les stations de radio et stockez jusqu'à 20 stations sous forme de présélections.
OUTPUT **
EPSP
Alternez entre la sortie écouteurs (EP) et la sortie haut-parleur (SP) en mode radio.
* Cette fonction n'est pas disponible pour le dossier M (musique).** Cette fonction est disponible uniquement en mode radio.
FRA
NÇ
AIS
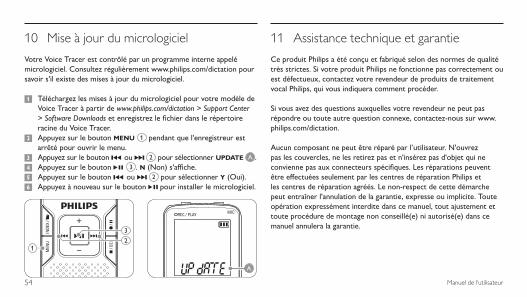
54 Manuel de l‘utilisateur
Mise à jour du micrologiciel10
Votre Voice Tracer est contrôlé par un programme interne appelé micrologiciel. Consultez régulièrement www.philips.com/dictation pour savoir s'il existe des mises à jour du micrologiciel.
Téléchargez les mises à jour du micrologiciel pour votre modèle de 1 Voice Tracer à partir de www.philips.com/dictation > Support Center > Software Downloads et enregistrez le fichier dans le répertoire racine du Voice Tracer.Appuyez sur le bouton 2 MENU 1 pendant que l'enregistreur est arrêté pour ouvrir le menu.Appuyez sur le bouton 3 h ou b 2 pour sélectionner UPDATE A .Appuyez sur le bouton 4 f 3 . N (Non) s'affiche.Appuyez sur le bouton 5 h ou b 2 pour sélectionner Y (Oui).Appuyez à nouveau sur le bouton 6 f pour installer le micrologiciel.
1
3
2
A
Assistance technique et garantie11
Ce produit Philips a été conçu et fabriqué selon des normes de qualité très strictes. Si votre produit Philips ne fonctionne pas correctement ou est défectueux, contactez votre revendeur de produits de traitement vocal Philips, qui vous indiquera comment procéder.
Si vous avez des questions auxquelles votre revendeur ne peut pas répondre ou toute autre question connexe, contactez-nous sur www.philips.com/dictation.
Aucun composant ne peut être réparé par l’utilisateur. N'ouvrez pas les couvercles, ne les retirez pas et n'insérez pas d'objet qui ne convienne pas aux connecteurs spécifiques. Les réparations peuvent être effectuées seulement par les centres de réparation Philips et les centres de réparation agréés. Le non-respect de cette démarche peut entraîner l'annulation de la garantie, expresse ou implicite. Toute opération expressément interdite dans ce manuel, tout ajustement et toute procédure de montage non conseillé(e) ni autorisé(e) dans ce manuel annulera la garantie.

55Manuel de l‘utilisateur
Mon enregistreur ne se met pas sous tensionLes piles sont peut-être déchargées ou mal insérées. Remplacez les piles par des piles neuves et vérifiez qu'elles sont insérées correctement.
Mon enregistreur n'enregistre rienL'enregistreur est peut-être en mode HOLD. Faites coulisser le commutateur HOLD jusqu'à la position Off.
Le nombre maximum d'enregistrements peut avoir été atteint ou la capacité d'enregistrement peut être pleine. Supprimez quelques enregistrements ou transférez-les sur un périphérique externe.
Aucun son ne sort du haut-parleurLes écouteurs sont peut-être branchés. Retirez les écouteurs.
Le volume est à son niveau le plus bas. Réglez le volume.
Mon enregistreur ne peut pas lire les enregistrementsL'enregistreur est peut-être en mode HOLD. Faites coulisser le commutateur HOLD jusqu'à la position Off.
Les piles sont peut-être déchargées ou mal insérées. Remplacez les piles par des piles neuves et vérifiez qu'elles sont insérées correctement.
Aucun enregistrement n'a été effectué. Vérifiez le nombre d'enregistrements.
Mon enregistreur ne peut pas s'arrêter, s'interrompre, lire ni enregistrerL'enregistreur est peut-être en mode HOLD. Faites coulisser le commutateur HOLD jusqu'à la position Off.
Aucun son ne sort des écouteursLes écouteurs sont peut-être mal branchés. Branchez les écouteurs correctement.
Le volume est à son niveau le plus bas. Réglez le volume.
Dépannage 12
FRA
NÇ
AIS
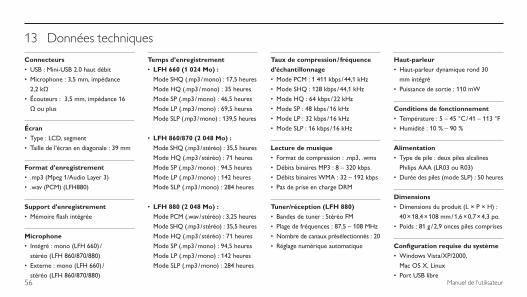
56 Manuel de l‘utilisateur
13 Données techniques
ConnecteursUSB : Mini-USB 2.0 haut débit•
Microphone : 3,5 mm, impédance •
2,2 kΩ
Écouteurs : 3,5 mm, impédance 16 •
Ω ou plus
ÉcranType : LCD, segment•
Taille de l'écran en diagonale : 39 mm •
Format d’enregistrement.mp3 (Mpeg 1/Audio Layer 3)•
.wav (PCM) (LFH880)•
Support d'enregistrementMémoire flash intégrée•
MicrophoneIntégré : mono (LFH 660) / •
stéréo (LFH 860/870/880)
Externe : mono (LFH 660) / •
stéréo (LFH 860/870/880)
Temps d’enregistrementLFH 660 (1 024 Mo) :•
Mode SHQ (.mp3 / mono) : 17,5 heures
Mode HQ (.mp3 / mono) : 35 heures
Mode SP (.mp3 / mono) : 46,5 heures
Mode LP (.mp3 / mono) : 69,5 heures
Mode SLP (.mp3 / mono) : 139,5 heures
LFH 860/870 (2 048 Mo) :•
Mode SHQ (.mp3 / stéréo) : 35,5 heures
Mode HQ (.mp3 / stéréo) : 71 heures
Mode SP (.mp3 / mono) : 94,5 heures
Mode LP (.mp3 / mono) : 142 heures
Mode SLP (.mp3 / mono) : 284 heures
LFH 880 (2 048 Mo) :•
Mode PCM (.wav / stéréo) : 3,25 heures
Mode SHQ (.mp3 / stéréo) : 35,5 heures
Mode HQ (.mp3 / stéréo) : 71 heures
Mode SP (.mp3 / mono) : 94,5 heures
Mode LP (.mp3 / mono) : 142 heures
Mode SLP (.mp3 / mono) : 284 heures
Taux de compression / fréquence d'échantillonnage
Mode PCM : 1 411 kbps / 44,1 kHz•
Mode SHQ : 128 kbps / 44,1 kHz•
Mode HQ : 64 kbps / 22 kHz•
Mode SP : 48 kbps / 16 kHz•
Mode LP : 32 kbps / 16 kHz•
Mode SLP : 16 kbps / 16 kHz•
Lecture de musiqueFormat de compression : .mp3, .wma•
Débits binaires MP3 : 8 – 320 kbps•
Débits binaires WMA : 32 – 192 kbps•
Pas de prise en charge DRM•
Tuner/réception (LFH 880)Bandes de tuner : Stéréo FM•
Plage de fréquences : 87,5 – 108 MHz•
Nombre de canaux présélectionnés : 20•
Réglage numérique automatique•
Haut-parleurHaut-parleur dynamique rond 30 •
mm intégré
Puissance de sortie : 110 mW•
Conditions de fonctionnementTempérature : 5 – 45 °C / 41 – 113 °F•
Humidité : 10 % – 90 %•
AlimentationType de pile : deux piles alcalines •
Philips AAA (LR03 ou R03)
Durée des piles (mode SLP) : 50 heures•
DimensionsDimensions du produit (L × P × H) : •
40 × 18,4 × 108 mm / 1,6 × 0,7 × 4,3 po.
Poids : 81 g / 2,9 onces piles comprises•
Configuration requise du systèmeWindows Vista/XP/2000, •
Mac OS X, Linux
Port USB libre•
57Manual del usuario
1 Bienvenido 581.1 Contenido de la caja 581.2 Funciones destacadas del producto 58
2 Importante 602.1 Seguridad 602.2 Desecho del producto anterior 60
3 Su Digital Voice Tracer 61
4 Primeros pasos 624.1 Colocación de las pilas 624.2 Encendido y apagado 624.3 Función de bloqueo 624.4 Configuración de fecha y hora 634.5 Mostrar información 634.6 Uso del Voice Tracer con un
ordenador 63
5 Grabación 645.1 Grabación con el micrófono
incorporado 645.2 Grabación con un micrófono externo 655.3 Superposición de grabaciones
(LFH 860/870/880 únicamente) 655.4 Agregar marcadores de índice 65
6 Reproducción 666.1 Funciones de reproducción 666.2 Otras funciones de reproducción 67
7 Borrado 68
8 Modo de radio (LFH 880 únicamente) 68
8.1 Sintonización automática de estaciones de radio 68
Manual del usuario
8.2 Sintonización manual de una estación de radio 69
8.3 Reproducción de una estación de radio preconfigurada 69
8.4 Borrado de una estación de radio preconfigurada 69
8.5 Grabación de radio FM 69
9 Configuración personalizada 70
10 Actualización del firmware 72
11 Soporte técnico y garantía 72
12 Solución de problemas 73
13 Datos técnicos 74
ESP
AÑ
OL

58 Manual del usuario
Bienvenido1
Felicitaciones por su compra y bienvenido a Philips. Con el fin de aprovechar al máximo el respaldo ofrecido por Philips, visite nuestro sitio web para obtener información de soporte, como manuales del usuario, descargas de software e información sobre la garantía, entre otros: www.philips.com/dictation.
Contenido de la caja1.1
Funciones destacadas del producto1.2
Grabación
Graba en el popular formato MP3.•Posibilidad de elegir entre seis modos de grabación. Grabación PCM •estéreo sin comprimir* para obtener calidad de audio de CD, dos modos estéreo que incluyen SHG y HQ, o tres modos mono que incluyen SP, LP y SLP para obtener tiempos de grabación prolongados.La sensibilidad de grabación regulable evita los ruidos de fondo y se •ajusta al entorno de grabación.La memoria interna de gran amplitud brinda una excepcional •capacidad de grabación, y permite realizar y almacenar grabaciones extensas. El modo de• grabación con activación por voz brinda la posibilidad de llevar a cabo grabaciones sin necesidad de utilizar las manos ni preocuparse por pulsar el botón de grabación.La función de división automática divide en forma automática las •grabaciones extensas en archivos separados. Esto permite que las grabaciones extensas, como reuniones, sean mucho más fáciles de buscar, editar y archivar.Grabación con alimentación a través de un cable USB sin necesidad de •consumir la carga de las baterías.*
Manual del usuario
Pilas
Auriculares estéreo *
Cable USB
Micrófono de solapaVoice Tracer Correa *
59Manual del usuario
Grabación desde fuentes de audio externas a través de una línea de •entrada.*La amplia relación señal-ruido (s/n) del micrófono capta todos los •detalles de la voz humana para brindar una excelente reproducción del sonido.
Reproducción
Velocidad de reproducción regulable para reproducir grabaciones en •modos de alta y baja velocidad.Reproducción reiterada de un archivo de audio completo o de una •sección del mismo mediante la opción de repetición de reproducción.Disfrute de la música con formato MP3 y WMA, y de la radio FM *.•Reloj despertador con reproducción de voz y grabación con •temporizador.
Comodidad
Amplia pantalla iluminada para una cómoda visualización. •Disfrute de hasta 22 horas de funcionamiento continuo.•Transfiera grabaciones, música y datos rápidamente a través del •puerto USB 2.0 de alta velocidad.
Las funciones de marcador de índice y marcador de tiempo permiten •encontrar rápidamente las ubicaciones deseadas en una grabación.Admite hasta 99 grabaciones en cada una de las cuatro carpetas •disponibles para organizar los archivos de manera fácil y rápida.Al tratarse de un dispositivo de almacenamiento masivo USB, el Voice •Tracer ofrece una cómoda manera de guardar, respaldar y trasladar archivos sin necesidad de utilizar software ni instalar controladores especiales.
* Disponible únicamente para algunas versiones de productos.
ESP
AÑ
OL

60 Manual del usuario
Importante (para modelos que incluyen auriculares):Philips garantiza la máxima potencia de sonido de sus reproductores de audio en cumplimiento con las regulaciones establecidas por los orga-nismos pertinentes, aunque sólo en el caso de los modelos originales de los auriculares proporcionados. En caso de que los auriculares deban sustituirse, le recomendamos que se comunique con su distribuidor minorista para solicitar un modelo Philips idéntico al original.
Desecho del producto anterior2.2 Su producto está diseñado y fabricado con materiales y componentes •de excelente calidad que pueden reciclarse y volverse a utilizar.Cuando un producto viene con el símbolo de un cubo de •basura con ruedas tachado, significa que el producto está cubierto por la directiva Europea 2002/96/EC.Infórmese acerca del sistema de recolección selectiva local para •productos eléctricos y electrónicos.Respete las normas locales y no deseche los productos anteriores •junto con los residuos domésticos habituales. El desecho adecuado de los productos anteriores permitirá impedir posibles consecuencias negativas para el medio ambiente y la salud de las personas.Las pilas (incluidas las pilas recargables incorporadas) contienen •sustancias que pueden contaminar el medio ambiente. Todas las pilas deben desecharse en un punto de recolección oficial.
Importante2
Seguridad2.1 Para evitar un cortocircuito, no exponga el producto a la lluvia ni al agua.•No exponga el dispositivo a un calor excesivo causado por equipos •de calefacción o rayos solares directos.Proteja los cables para evitar que se pellizquen, en especial en los •enchufes y en la parte que sale de la unidad.Realice una copia de seguridad de los archivos. Philips no se hace •responsable de ninguna pérdida de datos.
Seguridad de los oídos2.1.1 Tenga en cuenta los siguientes lineamientos al utilizar los auriculares:
Escuche con niveles de volumen moderados durante períodos de •tiempo razonables.Tenga cuidado de no subir el nivel de volumen a medida que sus oídos •se adaptan.No suba el volumen a un punto tal que le impida escuchar los sonidos •ambientales.Debe tener precaución o interrumpir temporalmente el uso ante •situaciones potencialmente peligrosas. No utilice auriculares mientras conduce un vehículo motorizado, •bicicleta, patineta, etc. Puede implicar un peligro para el tránsito y es ilegal en varias zonas.
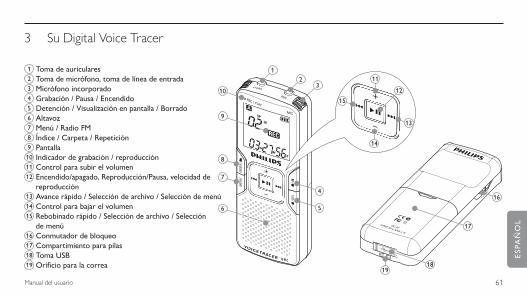
61Manual del usuario
Su Digital Voice Tracer3
1 Toma de auriculares2 Toma de micrófono, toma de línea de entrada3 Micrófono incorporado4 Grabación / Pausa / Encendido5 Detención / Visualización en pantalla / Borrado6 Altavoz7 Menú / Radio FM8 Índice / Carpeta / Repetición9 Pantalla10 Indicador de grabación / reproducción11 Control para subir el volumen12 Encendido/apagado, Reproducción/Pausa, velocidad de
reproducción13 Avance rápido / Selección de archivo / Selección de menú14 Control para bajar el volumen15 Rebobinado rápido / Selección de archivo / Selección
de menú16 Conmutador de bloqueo17 Compartimiento para pilas18 Toma USB19 Orificio para la correa
21
10
8
7
5
4
9
6
3
14
11
12
15
13
19
17
16
18
ESP
AÑ
OL

62 Manual del usuario
Primeros pasos4
Colocación de las pilas4.1 Deslice la tapa de las pilas para abrirla.1 Coloque las pilas en la polaridad correcta tal como se indica y 2 cierre la tapa.
1 2
D NotaExtraiga las pilas si no va a utilizar el Voice Tracer por un período •prolongado de tiempo. Las pilas que presenten filtraciones pueden dañar el dispositivo.En caso de que el Voice Tracer no funcione correctamente, retire las •pilas y-vuelva a introducirlas.Apague la grabadora antes de sustituir las pilas. Extraer las pilas •mientras la grabadora está en uso podría dañar el archivo.
Cuando las pilas estén casi agotadas, el indicador de estado de las •pilas comenzará a parpadear.Si el cambio de pilas le toma más de 2 minutos, es posible que deba •restablecer la hora.
Encendido y apagado4.2 Para encender el dispositivo, pulse el botón 1 f 1 hasta que en la pantalla aparezca el texto HELLO A .Para apagar el dispositivo, pulse el botón 2 f cuando la grabadora esté detenida hasta que en la pantalla aparezca el texto BYE.
1
A
Función de bloqueo4.3 Cuando el conmutador HOLD se encuentra en posición de bloqueo, todos los botones del dispositivo están inactivos. On Hold aparecerá brevemente en la pantalla, y luego la pantalla se apagará. Desbloquee el Voice Tracer moviendo el conmutador HOLD hacia la posición Off.
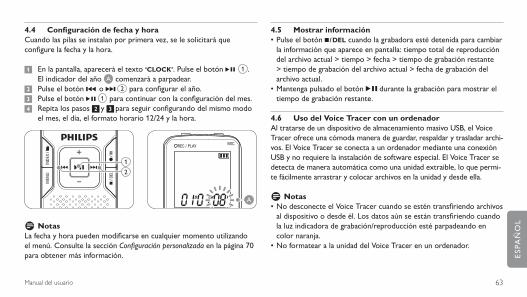
63Manual del usuario
Configuración de fecha y hora4.4 Cuando las pilas se instalan por primera vez, se le solicitará que configure la fecha y la hora.
En la pantalla, aparecerá el texto 1 ‘CLOCK’. Pulse el botón f 1 . El indicador del año A comenzará a parpadear.Pulse el botón 2 h o b 2 para configurar el año.Pulse el botón 3 f 1 para continuar con la configuración del mes.Repita los pasos 4 2 y 3 para seguir configurando del mismo modo el mes, el día, el formato horario 12/24 y la hora.
1
2
A
D NotasLa fecha y hora pueden modificarse en cualquier momento utilizando el menú. Consulte la sección Configuración personalizada en la página 70 para obtener más información.
Mostrar información4.5 Pulse el botón• j / DEL cuando la grabadora esté detenida para cambiar la información que aparece en pantalla: tiempo total de reproducción del archivo actual > tiempo > fecha > tiempo de grabación restante > tiempo de grabación del archivo actual > fecha de grabación del archivo actual.Mantenga pulsado el botón • f durante la grabación para mostrar el tiempo de grabación restante.
Uso del Voice Tracer con un ordenador4.6 Al tratarse de un dispositivo de almacenamiento masivo USB, el Voice Tracer ofrece una cómoda manera de guardar, respaldar y trasladar archi-vos. El Voice Tracer se conecta a un ordenador mediante una conexión USB y no requiere la instalación de software especial. El Voice Tracer se detecta de manera automática como una unidad extraíble, lo que permi-te fácilmente arrastrar y colocar archivos en la unidad y desde ella.
D NotasNo desconecte el Voice Tracer cuando se estén transfiriendo archivos •al dispositivo o desde él. Los datos aún se están transfiriendo cuando la luz indicadora de grabación/reproducción esté parpadeando en color naranja.No formatear a la unidad del Voice Tracer en un ordenador.•
ESP
AÑ
OL
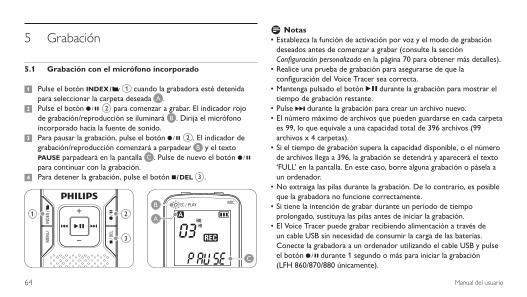
64 Manual del usuario
Grabación5
Grabación con el micrófono incorporado5.1
Pulse el botón1 INDEX / a 1 cuando la grabadora esté detenida para seleccionar la carpeta deseada A .Pulse el botón 2 g 2 para comenzar a grabar. El indicador rojo de grabación/reproducción se iluminará B . Dirija el micrófono incorporado hacia la fuente de sonido. Para pausar la grabación, pulse el botón 3 g 2 . El indicador de grabación/reproducción comenzará a parpadear B y el texto PAUSE parpadeará en la pantalla C . Pulse de nuevo el botón g para continuar con la grabación.Para detener la grabación, pulse el botón 4 j / DEL 3 .
C
B
A1 2
3
D NotasEstablezca la función de activación por voz y el modo de grabación •deseados antes de comenzar a grabar (consulte la sección Configuración personalizada en la página 70 para obtener más detalles).Realice una prueba de grabación para asegurarse de que la •configuración del Voice Tracer sea correcta.Mantenga pulsado el botón • f durante la grabación para mostrar el tiempo de grabación restante.Pulse • b durante la grabación para crear un archivo nuevo.El número máximo de archivos que pueden guardarse en cada carpeta •es 99, lo que equivale a una capacidad total de 396 archivos (99 archivos x 4 carpetas).Si el tiempo de grabación supera la capacidad disponible, o el número •de archivos llega a 396, la grabación se detendrá y aparecerá el texto ‘FULL’ en la pantalla. En este caso, borre alguna grabación o pásela a un ordenador.No extraiga las pilas durante la grabación. De lo contrario, es posible •que la grabadora no funcione correctamente.Si tiene la intención de grabar durante un período de tiempo •prolongado, sustituya las pilas antes de iniciar la grabación.El Voice Tracer puede grabar recibiendo alimentación a través de •un cable USB sin necesidad de consumir la carga de las baterías. Conecte la grabadora a un ordenador utilizando el cable USB y pulse el botón g durante 1 segundo o más para iniciar la grabación (LFH 860/870/880 únicamente).

65Manual del usuario
Grabación con un micrófono externo5.2 Para grabar con un micrófono externo, conéctelo a la toma de micrófono y siga el mismo procedimiento indicado para el micrófono incorporado.
Superposición de grabaciones (LFH 860/870/880 5.3 únicamente)
Siga los siguientes pasos para añadir y superponer fragmentos de una grabación.
Pulse el botón1 INDEX / a 1 cuando la grabadora esté detenida para seleccionar la carpeta deseada A .Pulse el botón 2 h o b 2 para seleccionar el archivo donde se añadirá el fragmento.Reproduzca o adelante la grabación hasta llegar a la posición donde 3 debe añadirse el fragmento y pulse el botón f 3 para pausar la reproducción.Pulse el botón 4 g 4 para iniciar la superposición de la grabación. El indicador de grabación/reproducción comenzará a titilar B y el texto OVER aparecerá en la pantalla C . Se sobrescribirá la grabación existente.Pulse el botón 5 j / DEL 5 para detener la grabación.
D NotaAl superponer una grabación, prevalece el modo de grabación del •
archivo original.La función de superposición de grabaciones no está disponible en la •carpeta M (música).
13
2
5
4
C
B
A
Agregar marcadores de índice5.4 Los marcadores de índice se pueden utilizar para señalar determinados puntos en una grabación como puntos de referencia.
Pulse el botón1 INDEX / a durante la grabación para agregar un marcador de índice. El número de índice se mostrará durante un segundo.
D NotasEl icono • indica que la grabación contiene marcadores de índice.Es posible establecer hasta 32 marcadores de índice por archivo.•
ESP
AÑ
OL

66 Manual del usuario
D NotaCuando los auriculares estén conectados, el altavoz de la grabadora se desactivará.
D Notas sobre el uso del Voice Tracer como reproductor de música
La grabadora admite archivos de música en formatos .wma y .mp3 •que pueden transferirse del ordenador a la carpeta para música de la grabadora. No admite archivos con protección contra copia (administración de derechos digitales).El Voice Tracer admite hasta dos niveles de carpetas dentro de •la carpeta para música. Cada carpeta puede almacenar hasta 199 entradas (archivos y carpetas).Pulse el botón • f para abrir una carpeta o archivo seleccionado. Pulse el botón INDEX / a para regresar a la carpeta ubicada en un nivel superior.Pulse el botón • g mientras se reproduce la música para cambiar el modo del ecualizador (Normal > Classic > Jazz > Rock > Pop > Normal).
Funciones de reproducción6.1
Reproducción a alta velocidad, baja velocidad y normal6.1.1 Mantenga pulsado el botón f durante 1 segundo o más para cambiar entre reproducción a alta velocidad, baja velocidad y normal.
Reproducción6
Pulse el botón1 INDEX / a 1 cuando la grabadora esté detenida para seleccionar la carpeta deseada A .Pulse el botón 2 h o b 2 para seleccionar el archivo a reproducir.Pulse el botón 3 f 3 . El tiempo de reproducción aparecerá en la pantalla, y el indicador LED verde B se iluminará.Ajuste el volumen utilizando los botones 4 + y – 4 .Para detener la reproducción, pulse el botón 5 j / DEL 5 . El tiempo total de reproducción C del archivo actual se mostrará en la pantalla.Pulse de nuevo el botón 6 f para continuar con la reproducción desde la posición anterior.
13
24
5
C
B
A
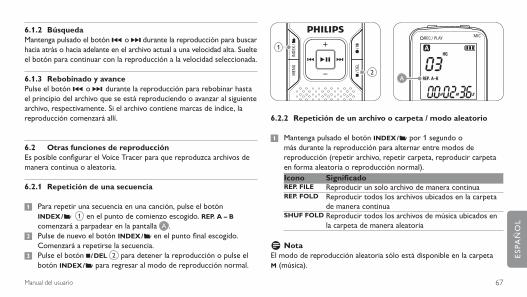
67Manual del usuario
Búsqueda6.1.2 Mantenga pulsado el botón h o b durante la reproducción para buscar hacia atrás o hacia adelante en el archivo actual a una velocidad alta. Suelte el botón para continuar con la reproducción a la velocidad seleccionada.
Rebobinado y avance6.1.3 Pulse el botón h o b durante la reproducción para rebobinar hasta el principio del archivo que se está reproduciendo o avanzar al siguiente archivo, respectivamente. Si el archivo contiene marcas de índice, la reproducción comenzará allí.
Otras funciones de reproducción6.2 Es posible configurar el Voice Tracer para que reproduzca archivos de manera continua o aleatoria.
Repetición de una secuencia6.2.1
Para repetir una secuencia en una canción, pulse el botón1 INDEX / a 1 en el punto de comienzo escogido. REP. A – B comenzará a parpadear en la pantalla A .Pulse de nuevo el botón2 INDEX / a en el punto final escogido. Comenzará a repetirse la secuencia.Pulse el botón 3 j / DEL 2 para detener la reproducción o pulse el botón INDEX / a para regresar al modo de reproducción normal.
A
1
2
Repetición de un archivo o carpeta / modo aleatorio6.2.2
Mantenga pulsado el botón 1 INDEX / a por 1 segundo o más durante la reproducción para alternar entre modos de reproducción (repetir archivo, repetir carpeta, reproducir carpeta en forma aleatoria o reproducción normal).Icono SignificadoREP. FILE Reproducir un solo archivo de manera continuaREP. FOLD Reproducir todos los archivos ubicados en la carpeta
de manera continuaSHUF FOLD Reproducir todos los archivos de música ubicados en
la carpeta de manera aleatoria
D NotaEl modo de reproducción aleatoria sólo está disponible en la carpeta M (música).
ESP
AÑ
OL

68 Manual del usuario
Borrado7
Pulse el botón1 INDEX / a cuando la grabadora esté detenida para seleccionar la carpeta deseada.Mantenga pulsado el botón 2 j / DEL durante 1 segundo o más. El texto DELETE aparecerá en la pantalla.Pulse el botón 3 h o b para seleccionar una opción de borrado:Icono SignificadoFILE Borrar un archivo específicoFOLD Borrar todos los archivos de una carpeta
Borrar todas las marcas de índice de un archivo
Pulse el botón 4 f.Pulse el botón 5 h o b para seleccionar el archivo, la carpeta o el archivo que contiene las marcas de índice que desea borrar.Pulse de nuevo el botón 6 f. Aparecerá N (No) en la pantalla.Pulse el botón 7 h o b para seleccionarY (Sí).Pulse el botón 8 f para confirmar.
D NotaLos números de archivo secuenciales se vuelven a asignar de forma automática.
Modo de radio (LFH 880 únicamente)8
Conecte los auriculares. Los auriculares suministrados funcionan 1 como antena de radio.Mantenga pulsado el botón 2 MENU durante 1 segundo o más para activar el modo de radio.
Sintonización automática de estaciones de radio8.1
Pulse el botón 1 MENU cuando la grabadora se encuentre en modo de radio para abrir el menú.Pulse el botón 2 h o b para seleccionar AUTO.Pulse de nuevo el botón 3 f. Aparecerá N (No) en la pantalla.Pulse el botón 4 h o b para seleccionar Y (Sí).Pulse el botón 5 f para confirmar. La radio sintoniza estaciones de radio en forma automática y guarda las frecuencias en canales preconfigurados. La radio puede almacenar hasta 20 estaciones de radio en canales preconfigurados.
69Manual del usuario
Sintonización manual de una estación de radio8.2
Para ajustar la frecuencia, pulse rápidamente el botón 1 h o b.Para buscar la próxima estación con buena señal, mantenga pulsado 2 el botón h o b.Pulse el botón 3 f para guardar la frecuencia en un canal preconfigurado.Ajuste el volumen utilizando los botones 4 + y –.Para salir del modo de radio, mantenga pulsado el botón 5 MENU durante 1 segundo o más.
D NotaPulse el botón j / DEL cuando la grabadora se encuentre en modo de radio para alternar entre recepción estéreo y mono.
Reproducción de una estación de radio preconfigurada8.3
Pulse el botón 1 INDEX / a cuando la grabadora se encuentre en modo de radio para alternar entre modo de frecuencia y preconfigurado.En modo preconfigurado, pulse el botón 2 h o b para cambiar a otra estación de radio preconfigurada.Ajuste el volumen utilizando los botones 3 + y –.
Para salir del modo de radio, mantenga pulsado el botón 4 MENU durante 1 segundo o más.
Borrado de una estación de radio preconfigurada8.4
Pulse el botón 1 INDEX / a cuando la grabadora se encuentre en modo de radio para alternar entre modo de frecuencia y preconfigurado.En modo preconfigurado, pulse el botón 2 h o b para seleccionar la estación de radio preconfigurada que desea borrar.Mantenga pulsado el botón 3 j / DEL durante 1 segundo o más para borrar la estación de radio preconfigurada.
Grabación de radio FM8.5
Sintonice una estación de radio en forma manual o una estación de 1 radio preconfigurada.Pulse el botón 2 g para comenzar a grabar.Para detener la grabación, pulse el botón 3 j / DEL.
ESP
AÑ
OL
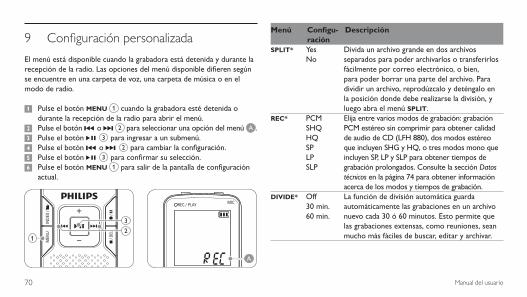
70 Manual del usuario
9 Configuración personalizada
El menú está disponible cuando la grabadora está detenida y durante la recepción de la radio. Las opciones del menú disponible difieren según se encuentre en una carpeta de voz, una carpeta de música o en el modo de radio.
Pulse el botón 1 MENU 1 cuando la grabadora esté detenida o durante la recepción de la radio para abrir el menú.Pulse el botón 2 h o b 2 para seleccionar una opción del menú A .Pulse el botón 3 f 3 para ingresar a un submenú.Pulse el botón 4 h o b 2 para cambiar la configuración.Pulse el botón 5 f 3 para confirmar su selección.Pulse el botón 6 MENU 1 para salir de la pantalla de configuración actual.
1
3
2
A
Menú Configu-ración
Descripción
SPLIT* YesNo
Divida un archivo grande en dos archivos separados para poder archivarlos o transferirlos fácilmente por correo electrónico, o bien, para poder borrar una parte del archivo. Para dividir un archivo, reprodúzcalo y deténgalo en la posición donde debe realizarse la división, y luego abra el menú SPLIT.
REC* PCMSHQHQSPLPSLP
Elija entre varios modos de grabación: grabación PCM estéreo sin comprimir para obtener calidad de audio de CD (LFH 880), dos modos estéreo que incluyen SHG y HQ, o tres modos mono que incluyen SP, LP y SLP para obtener tiempos de grabación prolongados. Consulte la sección Datos técnicos en la página 74 para obtener información acerca de los modos y tiempos de grabación.
DIVIDE* Off30 min.60 min.
La función de división automática guarda automáticamente las grabaciones en un archivo nuevo cada 30 ó 60 minutos. Esto permite que las grabaciones extensas, como reuniones, sean mucho más fáciles de buscar, editar y archivar.
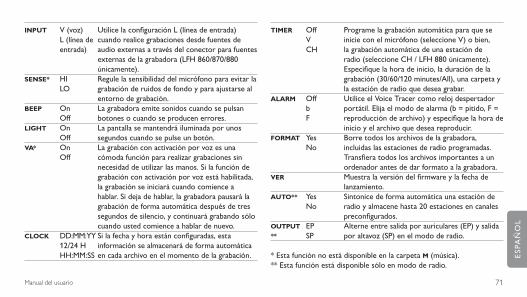
71Manual del usuario
INPUT V (voz) L (línea de entrada)
Utilice la configuración L (línea de entrada) cuando realice grabaciones desde fuentes de audio externas a través del conector para fuentes externas de la grabadora (LFH 860/870/880 únicamente).
SENSE* HILO
Regule la sensibilidad del micrófono para evitar la grabación de ruidos de fondo y para ajustarse al entorno de grabación.
BEEP OnOff
La grabadora emite sonidos cuando se pulsan botones o cuando se producen errores.
LIGHT OnOff
La pantalla se mantendrá iluminada por unos segundos cuando se pulse un botón.
VA* OnOff
La grabación con activación por voz es una cómoda función para realizar grabaciones sin necesidad de utilizar las manos. Si la función de grabación con activación por voz está habilitada, la grabación se iniciará cuando comience a hablar. Si deja de hablar, la grabadora pausará la grabación de forma automática después de tres segundos de silencio, y continuará grabando sólo cuando usted comience a hablar de nuevo.
CLOCK DD:MM:YY12/24 HHH:MM:SS
Si la fecha y hora están configuradas, esta información se almacenará de forma automática en cada archivo en el momento de la grabación.
TIMER Off V CH
Programe la grabación automática para que se inicie con el micrófono (seleccione V) o bien, la grabación automática de una estación de radio (seleccione CH / LFH 880 únicamente). Especifique la hora de inicio, la duración de la grabación (30/60/120 minutes/All), una carpeta y la estación de radio que desea grabar.
ALARM Off b F
Utilice el Voice Tracer como reloj despertador portátil. Elija el modo de alarma (b = pitido, F = reproducción de archivo) y especifique la hora de inicio y el archivo que desea reproducir.
FORMAT YesNo
Borre todos los archivos de la grabadora, incluidas las estaciones de radio programadas. Transfiera todos los archivos importantes a un ordenador antes de dar formato a la grabadora.
VER Muestra la versión del firmware y la fecha de lanzamiento.
AUTO** YesNo
Sintonice de forma automática una estación de radio y almacene hasta 20 estaciones en canales preconfigurados.
OUTPUT **
EPSP
Alterne entre salida por auriculares (EP) y salida por altavoz (SP) en el modo de radio.
* Esta función no está disponible en la carpeta M (música).** Esta función está disponible sólo en modo de radio.
ESP
AÑ
OL
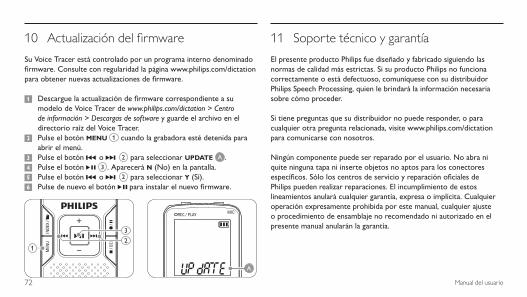
72 Manual del usuario
Actualización del firmware10
Su Voice Tracer está controlado por un programa interno denominado firmware. Consulte con regularidad la página www.philips.com/dictation para obtener nuevas actualizaciones de firmware.
Descargue la actualización de firmware correspondiente a su 1 modelo de Voice Tracer de www.philips.com/dictation > Centro de información > Descargas de software y guarde el archivo en el directorio raíz del Voice Tracer.Pulse el botón 2 MENU 1 cuando la grabadora esté detenida para abrir el menú.Pulse el botón 3 h o b 2 para seleccionar UPDATE A .Pulse el botón 4 f 3 . Aparecerá N (No) en la pantalla.Pulse el botón 5 h o b 2 para seleccionar Y (Sí).Pulse de nuevo el botón 6 f para instalar el nuevo firmware.
1
3
2
A
Soporte técnico y garantía11
El presente producto Philips fue diseñado y fabricado siguiendo las normas de calidad más estrictas. Si su producto Philips no funciona correctamente o está defectuoso, comuníquese con su distribuidor Philips Speech Processing, quien le brindará la información necesaria sobre cómo proceder.
Si tiene preguntas que su distribuidor no puede responder, o para cualquier otra pregunta relacionada, visite www.philips.com/dictation para comunicarse con nosotros.
Ningún componente puede ser reparado por el usuario. No abra ni quite ninguna tapa ni inserte objetos no aptos para los conectores específicos. Sólo los centros de servicio y reparación oficiales de Philips pueden realizar reparaciones. El incumplimiento de estos lineamientos anulará cualquier garantía, expresa o implícita. Cualquier operación expresamente prohibida por este manual, cualquier ajuste o procedimiento de ensamblaje no recomendado ni autorizado en el presente manual anularán la garantía.
73Manual del usuario
La grabadora no enciendeEs posible que las pilas estén agotadas o que se hayan colocado de manera incorrecta. Sustituya las pilas por otras nuevas y verifique si se han colocado correctamente.
La grabadora no graba ningún sonidoEs posible que la grabadora se encuentre en modo HOLD. Deslice el conmutador HOLD hacia la posición Off.
Es posible que se haya alcanzado el número máximo de grabaciones o que el espacio de grabación esté lleno. Borre algunas grabaciones o páselas a un dispositivo externo.
El altavoz no emite ningún sonidoEs posible que los auriculares estén conectados. Extraiga los auriculares.
La configuración del volumen se encuentra en el nivel más bajo. Ajuste el volumen.
La grabadora no reproduce grabacionesEs posible que la grabadora se encuentre en modo HOLD. Deslice el conmutador HOLD hacia la posición Off.
Es posible que las pilas estén agotadas o que se hayan colocado de manera incorrecta. Sustituya las pilas por otras nuevas y verifique si se han colocado correctamente.
No se ha grabado nada todavía. Compruebe el número de grabaciones.
La grabadora no se detiene, no pausa, no reproduce, ni grabaEs posible que la grabadora se encuentre en modo HOLD. Deslice el conmutador HOLD hacia la posición Off.
Los auriculares no emiten ningún sonidoEs posible que los auriculares no estén conectados de manera adecuada. Conecte los auriculares correctamente.
La configuración del volumen se encuentra en el nivel más bajo. Ajuste el volumen.
Solución de problemas12
ESP
AÑ
OL
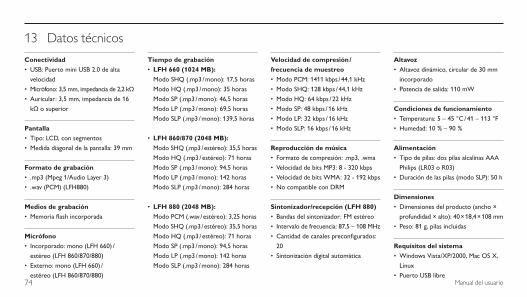
74 Manual del usuario
13 Datos técnicos
ConectividadUSB: Puerto mini USB 2.0 de alta •
velocidad
Micrófono: 3,5 mm, impedancia de 2,2 kΩ•
Auricular: 3,5 mm, impedancia de 16 •
kΩ o superior
PantallaTipo: LCD, con segmentos•
Medida diagonal de la pantalla: 39 mm •
Formato de grabación.mp3 (Mpeg 1/Audio Layer 3)•
.wav (PCM) (LFH880)•
Medios de grabaciónMemoria flash incorporada•
MicrófonoIncorporado: mono (LFH 660) / •
estéreo (LFH 860/870/880)
Externo: mono (LFH 660) / •
estéreo (LFH 860/870/880)
Tiempo de grabaciónLFH 660 (1024 MB):•
Modo SHQ (.mp3 / mono): 17,5 horas
Modo HQ (.mp3 / mono): 35 horas
Modo SP (.mp3 / mono): 46,5 horas
Modo LP (.mp3 / mono): 69,5 horas
Modo SLP (.mp3 / mono): 139,5 horas
LFH 860/870 (2048 MB):•
Modo SHQ (.mp3 / estéreo): 35,5 horas
Modo HQ (.mp3 / estéreo): 71 horas
Modo SP (.mp3 / mono): 94,5 horas
Modo LP (.mp3 / mono): 142 horas
Modo SLP (.mp3 / mono): 284 horas
LFH 880 (2048 MB):•
Modo PCM (.wav / estéreo): 3,25 horas
Modo SHQ (.mp3 / estéreo): 35,5 horas
Modo HQ (.mp3 / estéreo): 71 horas
Modo SP (.mp3 / mono): 94,5 horas
Modo LP (.mp3 / mono): 142 horas
Modo SLP (.mp3 / mono): 284 horas
Velocidad de compresión / frecuencia de muestreo
Modo PCM: 1411 kbps / 44,1 kHz•
Modo SHQ: 128 kbps / 44,1 kHz•
Modo HQ: 64 kbps / 22 kHz•
Modo SP: 48 kbps / 16 kHz•
Modo LP: 32 kbps / 16 kHz•
Modo SLP: 16 kbps / 16 kHz•
Reproducción de músicaFormato de compresión: .mp3, .wma•
Velocidad de bits MP3: 8 - 320 kbps•
Velocidad de bits WMA: 32 - 192 kbps•
No compatible con DRM•
Sintonizador/recepción (LFH 880)Bandas del sintonizador: FM estéreo•
Intervalo de frecuencia: 87,5 – 108 MHz•
Cantidad de canales preconfigurados: •
20
Sintonización digital automática•
AltavozAltavoz dinámico, circular de 30 mm •
incorporado
Potencia de salida: 110 mW•
Condiciones de funcionamientoTemperatura: 5 – 45 °C / 41 – 113 °F•
Humedad: 10 % – 90 %•
AlimentaciónTipo de pilas: dos pilas alcalinas AAA •
Philips (LR03 o R03)
Duración de las pilas (modo SLP): 50 h•
DimensionesDimensiones del producto (ancho × •
profundidad × alto): 40 × 18,4 × 108 mm
Peso: 81 g, pilas incluidas•
Requisitos del sistemaWindows Vista/XP/2000, Mac OS X, •
Linux
Puerto USB libre•

75Manuale di istruzioni
1 Benvenuti 761.1 Contenuto della confezione 761.2 Panoramica del prodotto 76
2 Importante 782.1 Sicurezza 782.2 Smaltimento del prodotto 78
3 Il vostro Digital Voice Tracer 79
4 Introduzione 804.1 Inserimento delle batterie 804.2 Accensione/spegnimento 804.3 Funzione di blocco 814.4 Impostazione di data e ora 814.5 Visualizzazione delle informazioni 814.6 Utilizzo combinato di Voice Tracer
e PC 81
5 Registrazione 825.1 Registrazione tramite microfono
incorporato 825.2 Registrazione tramite microfono
esterno 835.3 Sovrascrittura delle registrazioni
(solo LFH 860/870/880) 835.4 Aggiunta di indici 83
6 Riproduzione 846.1 Funzioni di riproduzione 846.2 Opzioni di riproduzione 85
7 Eliminazione 86
8 Modalità radio (solo LFH 880) 868.1 Sintonizzazione automatica delle
stazioni radio 86
Manuale di istruzioni
8.2 Sintonizzazione manuale di una stazione radio 87
8.3 Riproduzione di una stazione radio preimpostata 87
8.4 Eliminazione di una stazione radio preimpostata 87
8.5 Registrazione da radio FM 87
9 Impostazioni personalizzate 88
10 Aggiornamento del firmware 90
11 Supporto tecnico e garanzia 90
12 Risoluzione dei problemi 91
13 Specifiche tecniche 92
ITA
LIA
NO

76 Manuale di istruzioni
Benvenuti1
Congratulazioni per aver acquistato il Digital Voice Tracer e benvenuti in Philips! Per beneficiare appieno dell'assistenza Philips, visitare il nostro sito web per informazioni di supporto quali: manuali di istruzioni, download del software, garanzia, ecc. all'indirizzo www.philips.com/dictation.
Contenuto della confezione 1.1
Panoramica del prodotto1.2
Registrazione
Registrazioni in formato MP3.•Sei modalità di registrazione a disposizione: registrazione* in •formato PCM stereo non compresso per una qualità audio simile a quella dei CD, due modalità stereo SHQ e HQ oppure tre modalità monofoniche SP, LP e SLP per una maggiore autonomia di registrazione.Sensibilità di registrazione regolabile: consente di escludere i rumori •di sottofondo adattando la registrazione all'ambiente circostante.Elevata capacità della memoria integrata: consente di registrare e •memorizzare registrazioni di lunga durata.Modalità• di registrazione ad attivazione vocale: consente di avviare la registrazione senza dover premere il relativo pulsante.Funzione di suddivisione automatica: divide automaticamente le •registrazioni di lunga durata in file distinti. Questa funzione semplifica notevolmente la ricerca, la modifica e l’archiviazione delle registrazioni di conferenze o lezioni di lunga durata.Registrazione con alimentazione via USB: consente di non scaricare •la batteria.*Registrazione da fonti audio esterne tramite la linea in ingresso •(line-in).*
Manuale di istruzioni
Batterie
Cuffie stereo *
Cavo USB
Microfono da giaccaVoice Tracer Cinghia da polso *

77Manuale di istruzioni
Elevato rapporto segnale/rumore (S/R) del microfono: rileva ogni •singolo particolare della voce umana per fornire una riproduzione audio ottimale.
Riproduzione
Velocità di riproduzione regolabile: è possibile riprodurre le •registrazioni in modalità lenta o veloce.Funzione di ripetizione riproduzione: è possibile riprodurre •ripetutamente un file audio o una parte di file.Riproduzione di file musicali in formato MP3 e WMA e via radio FM *.•Sveglia con riproduzione vocale e timer.•
Vantaggi
Schermo retroilluminato per un uso più funzionale.•Fino a 22 ore di funzionamento ininterrotto.•Trasferimento rapido di registrazioni, musica e dati via USB 2.0 ad •alta velocità.Possibilità di inserimento di indici e contrassegni temporanei: •consentono di individuare più facilmente la sezione desiderata di una registrazione.Supporta fino a 99 registrazioni per ciascuna delle quattro cartelle •
disponibili, in modo da consentire una gestione facile e veloce dei file.Come dispositivo di archiviazione di massa USB, il Voice Tracer •consente di salvare, memorizzare e spostare file facilmente, senza l'utilizzo di software o driver specifici.
* Disponibile solamente per alcune versioni.
ITA
LIA
NO

78 Manuale di istruzioni
in bici o in skateboard ecc., si potrebbe dar luogo a incidenti e inoltre in molte zone è addirittura illegale.
Importante (per modelli dotati di cuffie):Philips garantisce la massima potenza acustica dei propri lettori audio, come stabilito dalle relative normative, ma solamente con l'utilizzo delle cuffie originali in dotazione. Se è necessario sostituire le cuffie, Philips raccomanda di rivolgersi al proprio rivenditore locale per ordinare cuffie identiche alle originali.
Smaltimento del prodotto2.2 Il prodotto da voi acquistato è costituito da materiali di alta qualità e •da componenti che possono essere riciclati e riutilizzati.Se il prodotto è contrassegnato dal simbolo riportato qui a •fianco, significa che è conforme alla direttiva europea 2002/96/EC.Consultare le normative locali per lo smaltimento di prodotti elettrici •ed elettronici.Agire in base a tali normative e non smaltire i vecchi prodotti come •rifiuti domestici. Il corretto smaltimento dei vecchi prodotti evita potenziali conseguenze negative per l'ambiente e la salute dell'uomo.Le batterie (incluse quelle ricaricabili integrate) contengono sostanze •inquinanti. Tutte le batterie devono essere smaltite nei relativi punti di raccolta.
Importante2
Sicurezza2.1 Per evitare cortocircuiti, non esporre il prodotto a pioggia o acqua.•Evitare che il prodotto si surriscaldi: non esporre il prodotto a fonti di •calore o alla luce diretta del sole.Evitare che i cavi vengano schiacciati, in particolare in corrispondenza •delle spine e delle uscite dall'unità.Back up dei file. Philips declina ogni responsabilità in caso di perdita •di dati.
Sicurezza durante l'ascolto2.1.1 Quando si utilizzano le cuffie, attenersi alle indicazioni riportate di seguito:
Evitare l'utilizzo delle cuffie per tempi prolungati e tenere il volume a •un livello moderato.Evitare di regolare il volume a un livello troppo elevato per il vostro •udito.Evitare di impostare il volume a un livello talmente elevato da non •poter udire i suoni esterni.Prestare la massima attenzione e interrompere l'uso dell'apparecchio •in situazioni potenzialmente pericolose.Non utilizzare le cuffie alla guida di un qualsiasi veicolo motorizzato, •
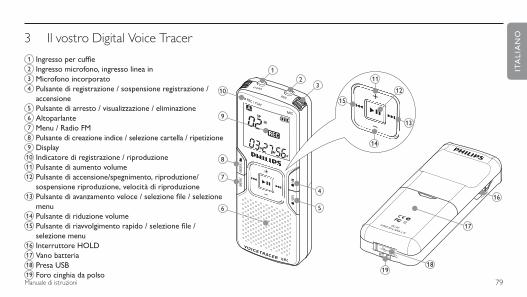
79Manuale di istruzioni
Il vostro Digital Voice Tracer3 1 Ingresso per cuffie2 Ingresso microfono, ingresso linea in3 Microfono incorporato4 Pulsante di registrazione / sospensione registrazione /
accensione5 Pulsante di arresto / visualizzazione / eliminazione6 Altoparlante7 Menu / Radio FM 8 Pulsante di creazione indice / selezione cartella / ripetizione9 Display10 Indicatore di registrazione / riproduzione11 Pulsante di aumento volume12 Pulsante di accensione/spegnimento, riproduzione/
sospensione riproduzione, velocità di riproduzione13 Pulsante di avanzamento veloce / selezione file / selezione
menu14 Pulsante di riduzione volume15 Pulsante di riavvolgimento rapido / selezione file /
selezione menu16 Interruttore HOLD17 Vano batteria18 Presa USB19 Foro cinghia da polso
21
10
8
7
5
4
9
6
3
14
11
12
15
13
19
17
16
18
ITA
LIA
NO

80 Manuale di istruzioni
Inserimento delle batterie 4.1
Aprire il coperchio del vano batterie facendolo scorrere.1 Posizionare le batterie rispettando la polarità, come indicato in 2 figura, quindi chiudere il coperchio del vano batterie.
1 2
D NotaRimuovere le batterie se non si utilizza il Voice Tracer per un periodo •di tempo prolungato. Eventuali perdite dalle batterie potrebbero danneggiare il dispositivo.Se il dispositivo non funziona correttamente, rimuovere le batterie, •quindi reinserirle.Prima di sostituire le batterie, disattivare il registratore. Se le batterie •
vengono rimosse mentre il registratore è in uso, il file potrebbe danneggiarsi.Quando le batterie sono ormai scariche, il relativo indicatore lampeggia.•La sostituzione delle batterie richiede più di 2 minuti, potrebbe essere •necessario reimpostare l'ora.
Accensione/spegnimento4.2
Per accendere il dispositivo, premere il pulsante 1 f 1 fino a quando viene visualizzato il messaggio HELLO A .Per spegnere il dispositivo, premere e mantenere premuto il 2 pulsante f, a registratore disattivato, fino a quando viene visualizzato il messaggio BYE.
1
A
Introduzione 4

81Manuale di istruzioni
Funzione di blocco 4.3 Quando l'interruttore HOLD è in posizione di blocco, tutti i pulsanti del dispositivo sono disabilitati. Viene momentaneamente visualizzato il messaggio On Hold, quindi il display si spegne. Sbloccare il dispositivo portando l'interruttore HOLD nella posizione di sblocco.
Impostazione di data e ora4.4 Quando si installano le batterie per la prima volta, vi verrà chiesto di impostare data e ora.
Sul display viene visualizzato 1 "CLOCK". Premere il pulsante f 1 . L'indicatore dell'anno A lampeggia.Per impostare l'anno, premere il pulsante 2 h o il pulsante b 2 .Per passare all'impostazione del mese, premere il pulsante 3 f 1 .Ripetere i punti 4 2 e 3 per passare a impostare il mese, il giorno, il formato 12/24-ore e l'ora.
1
2
A
D NoteLa data e l'ora possono essere modificate in qualsiasi momento tramite il menu. Per ulteriori informazioni, fare riferimento a Impostazioni personalizzate a pagina 88.
Visualizzazione delle informazioni4.5 Per ruotare le informazioni sul display, premere il pulsante• j / DEL, a registratore disattivato: tempo di riproduzione totale del file corrente > tempo > data > tempo di registrazione rimanente > tempo di registrazione del file corrente > data di registrazione del file corrente.Per visualizzare il tempo di registrazione rimanente, premere e •mantenere premuto il pulsante f durante la registrazione.
Utilizzo combinato di Voice Tracer e PC4.6 Come dispositivo di archiviazione di massa USB, il Voice Tracer consente di salvare, memorizzare e spostare facilmente i file. Il Voice Tracer si collega al PC via USB e non richiede l'installazione di software specifici. Il dispositivo viene automaticamente visualizzato come unità removibile, consentendo lo spostamento dei file da un'unità all'altra.
D NoteNon scollegare il dispositivo durante il trasferimento dei file. Se •l'indicatore di registrazione/riproduzione lampeggia illuminandosi di arancione, significa che il trasferimento dei dati è ancora in corso.Non formattare l'unità Voice Tracer tramite PC.•
ITA
LIA
NO
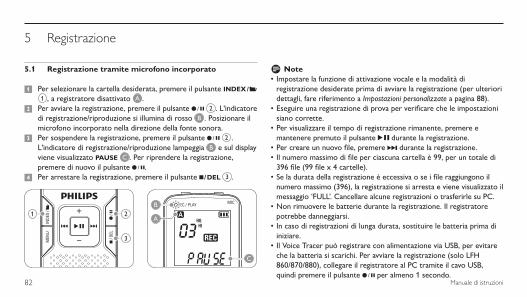
82 Manuale di istruzioni
Registrazione tramite microfono incorporato5.1
Per selezionare la cartella desiderata, premere il pulsante1 INDEX / a
1 , a registratore disattivato A .Per avviare la registrazione, premere il pulsante 2 g 2 . L'indicatore di registrazione/riproduzione si illumina di rosso B . Posizionare il microfono incorporato nella direzione della fonte sonora. Per sospendere la registrazione, premere il pulsante 3 g 2 . L'indicatore di registrazione/riproduzione lampeggia B e sul display viene visualizzato PAUSE C . Per riprendere la registrazione, premere di nuovo il pulsante g.Per arrestare la registrazione, premere il pulsante 4 j / DEL 3 .
C
B
A1 2
3
D NoteImpostare la funzione di attivazione vocale e la modalità di •registrazione desiderate prima di avviare la registrazione (per ulteriori dettagli, fare riferimento a Impostazioni personalizzate a pagina 88).Eseguire una registrazione di prova per verificare che le impostazioni •siano corrette.Per visualizzare il tempo di registrazione rimanente, premere e •mantenere premuto il pulsante f durante la registrazione.Per creare un nuovo file, premere • b durante la registrazione.Il numero massimo di file per ciascuna cartella è 99, per un totale di •396 file (99 file x 4 cartelle).Se la durata della registrazione è eccessiva o se i file raggiungono il •numero massimo (396), la registrazione si arresta e viene visualizzato il messaggio ‘FULL’. Cancellare alcune registrazioni o trasferirle su PC.Non rimuovere le batterie durante la registrazione. Il registratore •potrebbe danneggiarsi.In caso di registrazioni di lunga durata, sostituire le batteria prima di •iniziare.Il Voice Tracer può registrare con alimentazione via USB, per evitare •che la batteria si scarichi. Per avviare la registrazione (solo LFH 860/870/880), collegare il registratore al PC tramite il cavo USB, quindi premere il pulsante g per almeno 1 secondo.
Registrazione5

83Manuale di istruzioni
Registrazione tramite microfono esterno 5.2 Per registrare tramite microfono esterno, collegare il microfono alla relativa presa ed attenersi alla medesima procedura seguita per il microfono incorporato.
Sovrascrittura delle registrazioni (solo LFH 860/870/880)5.3 Per effettuare aggiunte ad una registrazione o per sovrascrivere alcune parti di essa, attenersi alle indicazioni riportate di seguito.
Per selezionare la cartella desiderata, premere il pulsante1 INDEX / a
1 , a registratore disattivato A .Per selezionare il file al quale si desidera eseguire l'aggiunta, 2 premere il pulsante h o b 2 .Andare al punto in cui si desidera eseguire l'aggiunta, quindi 3 premere il pulsante f 3 per sospendere la riproduzione.Per avviare la registrazione, premere il pulsante 4 g 4 . L'indicatore di registrazione/riproduzione lampeggia B e sul display viene visualizzato OVER C . La registrazione esistente viene sovrascritta.Per arrestare la registrazione, premere il pulsante 5 j / DEL 5 .
D NotaLa modalità di registrazione del file originale rimane attiva durante la •sovrascrittura di una registrazione.
La funzione di sovrascrittura di una registrazione non è disponibile •per la cartella M (musica).
13
2
5
4
C
B
A
Aggiunta di indici5.4 Gli indici possono essere utilizzati per contrassegnare determinati punti di riferimento in una registrazione.
Per aggiungere un indice, premere il pulsante1 INDEX / a durante la registrazione. Il numero di indice viene visualizzato per un secondo.
D NoteL'icona • indica che la registrazione contiene indici.È possibile impostare fino a un massimo di 32 indici per file.•
ITA
LIA
NO
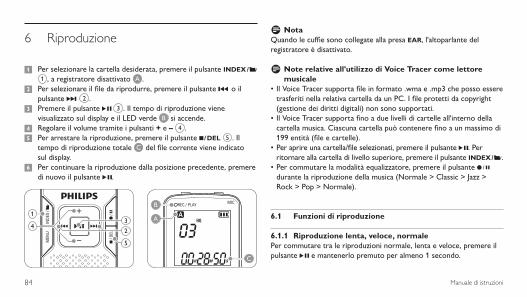
84 Manuale di istruzioni
D NotaQuando le cuffie sono collegate alla presa EAR, l'altoparlante del registratore è disattivato.
D Note relative all'utilizzo di Voice Tracer come lettore musicale
Il Voice Tracer supporta file in formato .wma e .mp3 che posso essere •trasferiti nella relativa cartella da un PC. I file protetti da copyright (gestione dei diritti digitali) non sono supportati.Il Voice Tracer supporta fino a due livelli di cartelle all'interno della •cartella musica. Ciascuna cartella può contenere fino a un massimo di 199 entità (file e cartelle).Per aprire una cartella/file selezionati, premere il pulsante • f. Per ritornare alla cartella di livello superiore, premere il pulsante INDEX / a.Per commutare la modalità equalizzatore, premere il pulsante • g durante la riproduzione della musica (Normale > Classic > Jazz > Rock > Pop > Normale).
Funzioni di riproduzione6.1
Riproduzione lenta, veloce, normale6.1.1 Per commutare tra le riproduzioni normale, lenta e veloce, premere il pulsante f e mantenerlo premuto per almeno 1 secondo.
Riproduzione6
Per selezionare la cartella desiderata, premere il pulsante1 INDEX / a
1 , a registratore disattivato A .Per selezionare il file da riprodurre, premere il pulsante 2 h o il pulsante b 2 .Premere il pulsante 3 f 3 . Il tempo di riproduzione viene visualizzato sul display e il LED verde B si accende.Regolare il volume tramite i pulsanti 4 + e – 4 .Per arrestare la riproduzione, premere il pulsante 5 j / DEL 5 . Il tempo di riproduzione totale C del file corrente viene indicato sul display.Per continuare la riproduzione dalla posizione precedente, premere 6 di nuovo il pulsante f.
13
24
5
C
B
A

85Manuale di istruzioni
Funzione di ricerca6.1.2 Per eseguire una ricerca rapida prima e dopo il file corrente, premere e mantenere premuto il pulsante h o b durante la riproduzione. Rila-sciare il pulsante per riprendere la riproduzione alla velocità desiderata.
Riavvolgimento e avanzamento6.1.3 Per far riprodurre il file corrente dall'inizio o per passare al file successivo, premere il pulsante h o b durante la riproduzione. Se il file contiene indici, la riproduzione ripartirà dal punto contrassegnato.
Opzioni di riproduzione6.2 È possibile impostare il Voice Tracer in modo che i file vengano riprodotti ripetutamente o in modo casuale.
Ripetizione di una sequenza6.2.1
Per ripetere o riprodurre di continuo la sequenza di una canzone, 1 premere il pulsante INDEX / a 1 in corrispondenza del punto iniziale scelto. REP. A – B lampeggia sullo schermo A .Premere di nuovo il pulsante2 INDEX / a in corrispondenza del punto finale scelto. Ha inizio la sequenza ripetuta.Premere il pulsante 3 j / DEL 2 per arrestare la riproduzione oppure premere il pulsante INDEX / a per ritornare alla riproduzione normale.
A
1
2
Ripetizione di un file o di una cartella / modalità di 6.2.2 riproduzione casuale (shuffle)
Premere e mantenere premuto per almeno 1 secondo il pulsante 1 INDEX / a durante la riproduzione, per commutare tra le modalità di riproduzione (ripeti file, ripeti cartella, cartella casuale o riproduzione normale).Icona SignificatoREP. FILE Riproduzione ripetuta di un singolo fileREP. FOLD Riproduzione ripetuta di tutti i file contenuti in una
cartellaSHUF FOLD Riproduzione casuale di tutti i file musicali contenuti
in una cartella
D NotaLa modalità casuale è disponibile solamente nella cartella M (musica).
ITA
LIA
NO

86 Manuale di istruzioni
Eliminazione7
Per selezionare la cartella desiderata, premere il pulsante1 INDEX / a a registratore disattivato.Premere e mantenere premuto per almeno 1 secondo il pulsante 2 j / DEL. Sullo schermo viene visualizzato il messaggio DELETE.Per selezionare un'opzione di eliminazione, premere il pulsante 3 h o b:Icona SignificatoFILE Eliminazione di un singolo fileFOLD Eliminazione di tutti i file contenuti in una cartella
Eliminazione di tutti gli indici di un file
Premere il pulsante 4 f.Per selezionare il file, la cartella o il file contenente gli indici da 5 cancellare, premere il pulsante h o b.Premere di nuovo il pulsante 6 f. Viene visualizzato N (No).Premere il pulsante 7 h o b per selezionare Y (Sì).Premere il pulsante 8 f per confermare.
D NotaAi file vengono automaticamente assegnati numeri sequenziali.
Modalità radio (solo LFH 880)8
Collegare le cuffie. Le cuffie in dotazione fungono da antenna radio.1 Per avviare la modalità radio, premere e mantenere premuto per 2 almeno 1 secondo il pulsante MENU .
Sintonizzazione automatica delle stazioni radio8.1
Per accedere al menu, premere il pulsante 1 MENU con il registratore in modalità radio.Premere il pulsante 2 h o b per selezionare AUTO.Premere di nuovo il pulsante 3 f. Viene visualizzato N (No).Premere il pulsante 4 h o b per selezionare Y (Sì).Premere il pulsante 5 f per confermare. La radio si sintonizza automaticamente sulle stazioni radio e salva le frequenze come preimpostate. La radio può memorizzare fino a un massimo di 20 stazioni preimpostate.
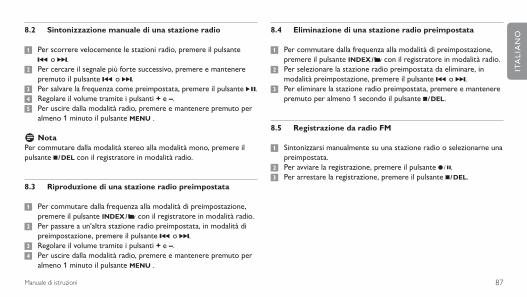
87Manuale di istruzioni
Sintonizzazione manuale di una stazione radio8.2
Per scorrere velocemente le stazioni radio, premere il pulsante 1 h o b.Per cercare il segnale più forte successivo, premere e mantenere 2 premuto il pulsante h o b.Per salvare la frequenza come preimpostata, premere il pulsante 3 f.Regolare il volume tramite i pulsanti 4 + e –.Per uscire dalla modalità radio, premere e mantenere premuto per 5 almeno 1 minuto il pulsante MENU .
D NotaPer commutare dalla modalità stereo alla modalità mono, premere il pulsante j / DEL con il registratore in modalità radio.
Riproduzione di una stazione radio preimpostata8.3
Per commutare dalla frequenza alla modalità di preimpostazione, 1 premere il pulsante INDEX / a con il registratore in modalità radio.Per passare a un'altra stazione radio preimpostata, in modalità di 2 preimpostazione, premere il pulsante h o b.Regolare il volume tramite i pulsanti 3 + e –.Per uscire dalla modalità radio, premere e mantenere premuto per 4 almeno 1 minuto il pulsante MENU .
Eliminazione di una stazione radio preimpostata8.4
Per commutare dalla frequenza alla modalità di preimpostazione, 1 premere il pulsante INDEX / a con il registratore in modalità radio.Per selezionare la stazione radio preimpostata da eliminare, in 2 modalità preimpostazione, premere il pulsante h o b.Per eliminare la stazione radio preimpostata, premere e mantenere 3 premuto per almeno 1 secondo il pulsante j / DEL.
Registrazione da radio FM8.5
Sintonizzarsi manualmente su una stazione radio o selezionarne una 1 preimpostata.Per avviare la registrazione, premere il pulsante 2 g.Per arrestare la registrazione, premere il pulsante 3 j / DEL.
ITA
LIA
NO
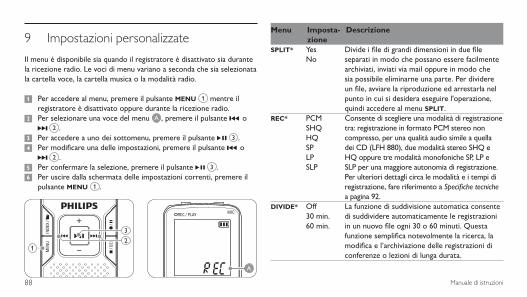
88 Manuale di istruzioni
9 Impostazioni personalizzate
Il menu è disponibile sia quando il registratore è disattivato sia durante la ricezione radio. Le voci di menu variano a seconda che sia selezionata la cartella voce, la cartella musica o la modalità radio.
Per accedere al menu, premere il pulsante 1 MENU 1 mentre il registratore è disattivato oppure durante la ricezione radio.Per selezionare una voce del menu 2 A , premere il pulsante h o b 2 .Per accedere a uno dei sottomenu, premere il pulsante 3 f 3 .Per modificare una delle impostazioni, premere il pulsante 4 h o b 2 .Per confermare la selezione, premere il pulsante 5 f 3 .Per uscire dalla schermata delle impostazioni correnti, premere il 6 pulsante MENU 1 .
1
3
2
A
Menu Imposta-zione
Descrizione
SPLIT* YesNo
Divide i file di grandi dimensioni in due file separati in modo che possano essere facilmente archiviati, inviati via mail oppure in modo che sia possibile eliminarne una parte. Per dividere un file, avviare la riproduzione ed arrestarla nel punto in cui si desidera eseguire l'operazione, quindi accedere al menu SPLIT.
REC* PCMSHQHQSPLPSLP
Consente di scegliere una modalità di registrazione tra: registrazione in formato PCM stereo non compresso, per una qualità audio simile a quella dei CD (LFH 880), due modalità stereo SHQ e HQ oppure tre modalità monofoniche SP, LP e SLP per una maggiore autonomia di registrazione. Per ulteriori dettagli circa le modalità e i tempi di registrazione, fare riferimento a Specifiche tecniche a pagina 92.
DIVIDE* Off30 min.60 min.
La funzione di suddivisione automatica consente di suddividere automaticamente le registrazioni in un nuovo file ogni 30 o 60 minuti. Questa funzione semplifica notevolmente la ricerca, la modifica e l’archiviazione delle registrazioni di conferenze o lezioni di lunga durata.
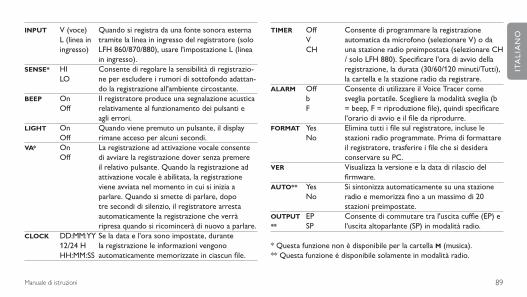
89Manuale di istruzioni
INPUT V (voce) L (linea in ingresso)
Quando si registra da una fonte sonora esterna tramite la linea in ingresso del registratore (solo LFH 860/870/880), usare l'impostazione L (linea in ingresso).
SENSE* HILO
Consente di regolare la sensibilità di registrazio-ne per escludere i rumori di sottofondo adattan-do la registrazione all'ambiente circostante.
BEEP OnOff
Il registratore produce una segnalazione acustica relativamente al funzionamento dei pulsanti e agli errori.
LIGHT OnOff
Quando viene premuto un pulsante, il display rimane acceso per alcuni secondi.
VA* OnOff
La registrazione ad attivazione vocale consente di avviare la registrazione dover senza premere il relativo pulsante. Quando la registrazione ad attivazione vocale è abilitata, la registrazione viene avviata nel momento in cui si inizia a parlare. Quando si smette di parlare, dopo tre secondi di silenzio, il registratore arresta automaticamente la registrazione che verrà ripresa quando si ricomincerà di nuovo a parlare.
CLOCK DD:MM:YY12/24 HHH:MM:SS
Se la data e l'ora sono impostate, durante la registrazione le informazioni vengono automaticamente memorizzate in ciascun file.
TIMER Off V CH
Consente di programmare la registrazione automatica da microfono (selezionare V) o da una stazione radio preimpostata (selezionare CH / solo LFH 880). Specificare l'ora di avvio della registrazione, la durata (30/60/120 minuti/Tutti), la cartella e la stazione radio da registrare.
ALARM Off b F
Consente di utilizzare il Voice Tracer come sveglia portatile. Scegliere la modalità sveglia (b = beep, F = riproduzione file), quindi specificare l'orario di avvio e il file da riprodurre.
FORMAT YesNo
Elimina tutti i file sul registratore, incluse le stazioni radio programmate. Prima di formattare il registratore, trasferire i file che si desidera conservare su PC.
VER Visualizza la versione e la data di rilascio del firmware.
AUTO** YesNo
Si sintonizza automaticamente su una stazione radio e memorizza fino a un massimo di 20 stazioni preimpostate.
OUTPUT **
EPSP
Consente di commutare tra l'uscita cuffie (EP) e l'uscita altoparlante (SP) in modalità radio.
* Questa funzione non è disponibile per la cartella M (musica).** Questa funzione è disponibile solamente in modalità radio.
ITA
LIA
NO

90 Manuale di istruzioni
Aggiornamento del firmware10
Il Voice Tracer è controllato da un programma interno chiamato firmware. Verificare regolarmente la presenza di nuovi aggiornamenti per il firmware all'indirizzo www.philips.com/dictation.
Scaricare gli aggiornamenti per il modello Voice Tracer acquistato 1 da www.philips.com/dictation > Support Center > Software Downloads e salvare i file nella directory principale del dispositivo.Per accedere al menu, premere il pulsante 2 MENU 1 a registratore disattivato.Premere il pulsante 3 h o b 2 per selezionare UPDATE A .Premere il pulsante 4 f 3 . Viene visualizzato N (No).Premere il pulsante 5 h o b 2 per selezionare Y (Sì).Per installare il nuovo firmware, premere il pulsante 6 f.
1
3
2
A
Supporto tecnico e garanzia11
Il presente prodotto Philips è stato progettato e fabbricato secondo i più elevati standard qualitativi. Nel caso in cui il prodotto da voi acquistato non funzioni in modo in corretto o sia difettoso, rivolgersi al proprio rivenditore Philips di prodotti professionali per la dettatura, che vi fornirà tutte le informazioni necessarie su come procedere.
Per qualsiasi richiesta di chiarimento, vi invitiamo a contattarci visitando il sito www.philips.com/dictation.
Non ci sono componenti la cui riparazione possa essere eseguita dall'utente. Non aprire o rimuovere i coperchi e non inserire oggetti non adatti ai connettori specifici. Le riparazioni devono essere eseguite esclusivamente presso i centri di assistenza e di riparazione autorizzati Philips. In caso contrario, qualsiasi garanzia esplicita o implicita verrà annullata. Azioni espressamente vietate dal presente manuale, regolazioni o procedure di montaggio non raccomandate o non autorizzate, porteranno all'annullamento della garanzia.

91Manuale di istruzioni
Il registratore non si accendeLe batterie potrebbero essere scariche oppure sono inserite in modo errato. Sostituire le batterie e verificare che siano inserite in modo corretto.
Il registratore non registraIl registratore è in modalità HOLD. Portare l'interruttore HOLD in posizione di abilitazione.
È stato raggiunto il numero massimo di registrazioni oppure la memoria del registratore è esaurita. Eliminare alcune registrazioni oppure trasferirle su un dispositivo esterno.
L'altoparlante sembra non riprodurre alcun suonoLe cuffie sono inserite. Rimuovere le cuffie.
Il volume è al minimo. Regolare il volume.
Il registratore non riproduce le registrazioniIl registratore è in modalità HOLD. Portare l'interruttore HOLD in posizione di abilitazione.
Le batterie potrebbero essere scariche oppure sono inserite in modo errato. Sostituire le batterie e verificare che siano inserite in modo corretto.
Non ci sono registrazioni da riprodurre. Verificare il numero delle registrazioni.
Il registratore non si arresta, non sospende la registrazione, non esegue la riproduzione o la registrazioneIl registratore è in modalità HOLD. Portare l'interruttore HOLD in posizione di abilitazione.
Le cuffie sembrano non riprodurre alcun suonoLe cuffie non sono inserite in modo corretto. Inserire correttamente le cuffie.
Il volume è al minimo. Regolare il volume.
Risoluzione dei problemi 12
ITA
LIA
NO
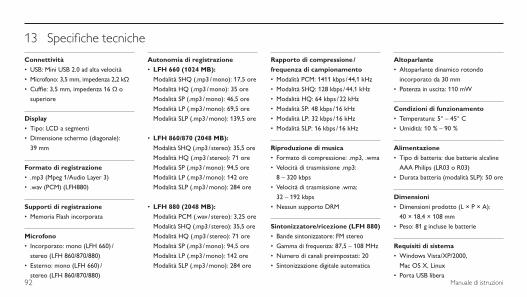
92 Manuale di istruzioni
Specifiche tecniche13
ConnettivitàUSB: Mini USB 2.0 ad alta velocità•
Microfono: 3,5 mm, impedenza 2,2 kΩ•
Cuffie: 3,5 mm, impedenza 16 Ω o •
superiore
DisplayTipo: LCD a segmenti•
Dimensione schermo (diagonale): •
39 mm
Formato di registrazione.mp3 (Mpeg 1/Audio Layer 3)•
.wav (PCM) (LFH880)•
Supporti di registrazioneMemoria Flash incorporata•
MicrofonoIncorporato: mono (LFH 660) / •
stereo (LFH 860/870/880)
Esterno: mono (LFH 660) / •
stereo (LFH 860/870/880)
Autonomia di registrazioneLFH 660 (1024 MB):•
Modalità SHQ (.mp3 / mono): 17,5 ore
Modalità HQ (.mp3 / mono): 35 ore
Modalità SP (.mp3 / mono): 46,5 ore
Modalità LP (.mp3 / mono): 69,5 ore
Modalità SLP (.mp3 / mono): 139,5 ore
LFH 860/870 (2048 MB):•
Modalità SHQ (.mp3 / stereo): 35,5 ore
Modalità HQ (.mp3 / stereo): 71 ore
Modalità SP (.mp3 / mono): 94,5 ore
Modalità LP (.mp3 / mono): 142 ore
Modalità SLP (.mp3 / mono): 284 ore
LFH 880 (2048 MB):•
Modalità PCM (.wav / stereo): 3,25 ore
Modalità SHQ (.mp3 / stereo): 35,5 ore
Modalità HQ (.mp3 / stereo): 71 ore
Modalità SP (.mp3 / mono): 94,5 ore
Modalità LP (.mp3 / mono): 142 ore
Modalità SLP (.mp3 / mono): 284 ore
Rapporto di compressione / frequenza di campionamento
Modalità PCM: 1411 kbps / 44,1 kHz•
Modalità SHQ: 128 kbps / 44,1 kHz•
Modalità HQ: 64 kbps / 22 kHz•
Modalità SP: 48 kbps / 16 kHz•
Modalità LP: 32 kbps / 16 kHz•
Modalità SLP: 16 kbps / 16 kHz•
Riproduzione di musicaFormato di compressione: .mp3, .wma•
Velocità di trasmissione .mp3: •
8 – 320 kbps
Velocità di trasmissione .wma: •
32 – 192 kbps
Nessun supporto DRM•
Sintonizzatore/ricezione (LFH 880)Bande sintonizzatore: FM stereo•
Gamma di frequenza: 87,5 – 108 MHz•
Numero di canali preimpostati: 20•
Sintonizzazione digitale automatica•
AltoparlanteAltoparlante dinamico rotondo •
incorporato da 30 mm
Potenza in uscita: 110 mW•
Condizioni di funzionamentoTemperatura: 5° – 45° C•
Umidità: 10 % – 90 %•
AlimentazioneTipo di batteria: due batterie alcaline •
AAA Philips (LR03 o R03)
Durata batteria (modalità SLP): 50 ore•
DimensioniDimensioni prodotto (L × P × A): •
40 × 18,4 × 108 mm
Peso: 81 g incluse le batterie•
Requisiti di sistemaWindows Vista/XP/2000, •
Mac OS X, Linux
Porta USB libera•
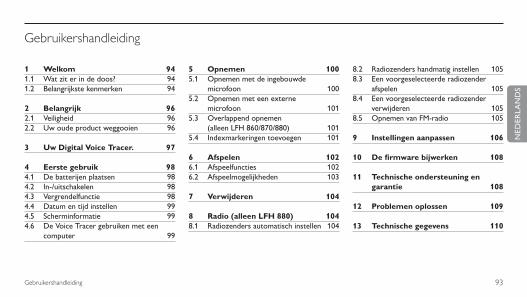
93Gebruikershandleiding
1 Welkom 941.1 Wat zit er in de doos? 941.2 Belangrijkste kenmerken 94
2 Belangrijk 962.1 Veiligheid 962.2 Uw oude product weggooien 96
3 Uw Digital Voice Tracer. 97
4 Eerste gebruik 984.1 De batterijen plaatsen 984.2 In-/uitschakelen 984.3 Vergrendelfunctie 984.4 Datum en tijd instellen 994.5 Scherminformatie 994.6 De Voice Tracer gebruiken met een
computer 99
5 Opnemen 1005.1 Opnemen met de ingebouwde
microfoon 1005.2 Opnemen met een externe
microfoon 1015.3 Overlappend opnemen
(alleen LFH 860/870/880) 1015.4 Indexmarkeringen toevoegen 101
6 Afspelen 1026.1 Afspeelfuncties 1026.2 Afspeelmogelijkheden 103
7 Verwijderen 104
8 Radio (alleen LFH 880) 1048.1 Radiozenders automatisch instellen 104
Gebruikershandleiding
8.2 Radiozenders handmatig instellen 1058.3 Een voorgeselecteerde radiozender
afspelen 1058.4 Een voorgeselecteerde radiozender
verwijderen 1058.5 Opnemen van FM-radio 105
9 Instellingen aanpassen 106
10 De firmware bijwerken 108
11 Technische ondersteuning en garantie 108
12 Problemen oplossen 109
13 Technische gegevens 110
NED
ERLA
ND
S

94 Gebruikershandleiding
Welkom1
Gefeliciteerd met uw aankoop en welkom bij Philips! Om volop te genieten van de ondersteuning die Philips biedt, kunt u een bezoek brengen aan onze website voor informatie zoals gebruikershandleidingen, softwaredownloads, garantiegegevens en heel wat meer: www.philips.com/dictation.
Wat zit er in de doos? 1.1
Belangrijkste kenmerken1.2
Opnemen
Neemt op in het populaire MP3-bestandsformaat.•Maak uw keuze uit zes opnamekwaliteiten: niet-gecomprimeerde •PCM-stereo-opname* voor opnames in cd-kwaliteit, twee stereo-instellingen (SHQ en HQ), of drie mono-instellingen (SP, LP en SLP) voor langere opnametijden.Een regelbare opnamegevoeligheid voorkomt achtergrondgeluiden en •stelt in op de opnameomgeving.Dankzij het ruime interne geheugen is er een grote opnamecapaciteit •en kunt u lange opnames maken en opslaan.Met de• spraakgestuurde opname-instelling kan handsfree worden opgenomen; de opnameknop hoeft niet te worden ingedrukt.De functie Automatisch opdelen verdeelt lange opnames automatisch •in afzonderlijke bestanden. Hierdoor wordt het makkelijker opnames van lange vergaderingen of lezingen terug te vinden, te bewerken en te archiveren.Opnemen met stroom via USB waardoor de batterij niet leeg raakt.*•Rechtstreeks van een externe geluidsbron opnemen via lijningang.*•Het grote ‘signal-to-noise (s/n)’-bereik van de microfoon neemt •ieder detail van de menselijke stem op voor een voortreffelijke geluidsweergave.
Gebruikershand-leiding
Batterijen
Stereo oortelefoon *
USB-kabel
ReversmicrofoonVoice Tracer Halsbandje *

95Gebruikershandleiding
Afspelen
Regelbare afspeelsnelheid om opnames langzaam en snel af te spelen.•Instellen dat een geluidsbestand een aantal keren geheel of •gedeeltelijk moet worden afgespeeld met de keuzemogelijkheid Afspelen herhalen.Geniet van MP3- en WMA-muziek plus FM-radio *.•Alarmfunctie met spraakweergave en opnametimer.•
Gebruikscomfort
Groot scherm met achtergrondverlichting om makkelijker te lezen.•Maximaal 22 uur continu gebruik.•Opnames, muziek en gegevens kunnen snel worden overgezet via •zeer snelle USB 2.0.Met de functies Indexmarkering en Tijdelijke markering kunt u snel de •gewenste plekken in een opname terugvinden.Maximaal 99 opnames in elk van de vier beschikbare mappen zodat u •uw bestanden snel en makkelijk kunt organiseren.U kunt de Voice Tracer ook gebruiken als USB-massageheugen om •eenvoudig bestanden op te slaan, te kopiëren of te verplaatsen zonder speciale software of de installatie van stuurprogramma's.
* Alleen beschikbaar voor bepaalde versies van het product.
NED
ERLA
ND
S
96 Gebruikershandleiding
Belangrijk (voor modellen met oortelefoon):Philips garandeert dat zijn geluidsapparatuur voldoet aan de maximale geluidssterkte zoals die is bepaald door de relevante regelgeving, maar alleen bij gebruik van de origineel meegeleverde oortelefoon. Moet deze oortelefoon worden vervangen, dan raden wij aan contact op te nemen met uw leverancier om een Philips-model te bestellen identiek aan het origineel.
Uw oude product weggooien2.2 Uw product is ontworpen en vervaardigd met hoogwaardige •materialen en componenten die kunnen worden gerecycleerd en hergebruikt.Het symbool van een verrijdbare vuilnisbak met een kruis •erdoorheen geeft aan dat het product valt onder de Europese richtlijn 2002/96/EC.Stel u op de hoogte van uw plaatselijke, gescheiden ophaalsysteem •voor elektrische en elektronische producten.Houd u aan uw plaatselijke regels en gooi oude producten niet weg •met het gewone huisvuil. Gooit u uw oude producten op de juiste manier weg, dan voorkomt dit negatieve gevolgen voor milieu en volksgezondheid.Batterijen (ook ingebouwde, oplaadbare batterijen) bevatten •substanties die het milieu kunnen verontreinigen. Alle batterijen moeten worden weggegooid bij een officieel verzamelpunt.
Belangrijk2
Veiligheid2.1 Houd het product uit de regen en vermijd contact met water om •kortsluiting te voorkomen.Stel het product niet bloot aan te veel warmte, bijvoorbeeld van een •verwarming of door direct zonlicht.Zorg ervoor dat de kabels niet geklemd raken, vooral bij de stekkers •en daar waar ze uit het product komen.Maak kopieën van uw bestanden. Philips is niet verantwoordelijk voor •enig gegevensverlies.
Veiligheid van het gehoor2.1.1 Houd u aan de volgende richtlijnen wanneer u uw oortelefoon gebruikt:
Luister naar een redelijke geluidssterkte voor een redelijke tijdsduur.•Zet het geluid niet harder, want uw gehoor past zich aan.•Zet het geluid niet zo hard dat u niets meer van uw omgeving hoort.•Wees voorzichtig of stop het gebruik in mogelijk gevaarlijke situaties.•Gebruik de oortelefoon niet in een gemotoriseerd voertuig, tijdens •het fietsen of skateboarden. Het kan gevaar voor het verkeer veroorzaken en is in veel gebieden verboden.

97Gebruikershandleiding
Uw Digital Voice Tracer.3
1 Oortelefoonaansluiting2 Microfoonaansluiting, lijningang3 Ingebouwde microfoon4 Opnemen/Pauzeren/Inschakelen5 Stoppen/Weergeven/Verwijderen6 Luidspreker7 Menu/FM-radio8 Index/Map/Herhalen9 Display10 Opname-/Afspeellichtje11 Volume luider12 In/Uitschakelen, Afspelen/Pauzeren, Afspeelsnelheid13 Snel vooruit/Bestand kiezen/Menu kiezen14 Volume stiller15 Snel terug/Bestand kiezen/Menu kiezen16 Vergrendelschakelaar17 Batterijvak18 USB-aansluiting19 Bevestiging voor het halsbandje
21
10
8
7
5
4
9
6
3
14
11
12
15
13
19
17
16
18
NED
ERLA
ND
S
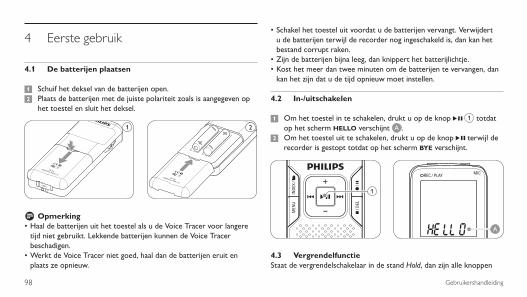
98 Gebruikershandleiding
Eerste gebruik 4
De batterijen plaatsen 4.1
Schuif het deksel van de batterijen open.1 Plaats de batterijen met de juiste polariteit zoals is aangegeven op 2 het toestel en sluit het deksel.
1 2
D OpmerkingHaal de batterijen uit het toestel als u de Voice Tracer voor langere •tijd niet gebruikt. Lekkende batterijen kunnen de Voice Tracer beschadigen.Werkt de Voice Tracer niet goed, haal dan de batterijen eruit en •plaats ze opnieuw.
Schakel het toestel uit voordat u de batterijen vervangt. Verwijdert •u de batterijen terwijl de recorder nog ingeschakeld is, dan kan het bestand corrupt raken.Zijn de batterijen bijna leeg, dan knippert het batterijlichtje.•Kost het meer dan twee minuten om de batterijen te vervangen, dan •kan het zijn dat u de tijd opnieuw moet instellen.
In-/uitschakelen4.2
Om het toestel in te schakelen, drukt u op de knop 1 f 1 totdat op het scherm HELLO verschijnt A .Om het toestel uit te schakelen, drukt u op de knop 2 f terwijl de recorder is gestopt totdat op het scherm BYE verschijnt.
1
A
Vergrendelfunctie4.3 Staat de vergrendelschakelaar in de stand Hold, dan zijn alle knoppen

99Gebruikershandleiding
op het apparaat geblokkeerd. Op het scherm komt eventjes On hold te staan, waarna het scherm uitgaat. Zet de vergrendelschakelaar in de stand Off om de Voice Tracer te ontgrendelen.
Datum en tijd instellen4.4 Wanneer u de batterijen voor de eerste keer in het apparaat plaatst, moet u de datum en de tijd instellen.
Op het scherm verschijnt 1 ‘CLOCK’. Druk op de knop f 1 . De aanduiding voor het jaar A knippert.Druk op de knop 2 h of op b 2 om het jaar in te stellen. Druk op de knop 3 f 1 om verder te gaan met de instellingen voor de maand. Herhaal de stappen 4 2 en 3 om op dezelfde manier de maand, de dag, 12- of 24-uursysteem en de tijd in te stellen.
1
2
A
D OpmerkingenU kunt de datum en de tijd op ieder gewenst moment veranderen via het menu. Zie Instellingen aanpassen op pagina 106 voor meer informatie.
Scherminformatie4.5 Druk op de knop• j / DEL terwijl de recorder niet opneemt om de informatie op het scherm door te nemen: totale afspeeltijd van het huidige bestand > tijd > datum > resterende opnametijd > opnametijd van het huidige bestand > opnamedatum van het huidige bestand.Houd • f ingedrukt tijdens het opnemen om de resterende opnametijd te bekijken.
De Voice Tracer gebruiken met een computer4.6 U kunt de Voice Tracer ook gebruiken als USB-massageheugen om eenvou-dig bestanden op te slaan, te kopiëren of te verplaatsen. U kunt de Voice Tracer via een USB-aansluiting met een computer verbinden; er hoeft geen speciale software te worden geïnstalleerd. De Voice Tracer wordt auto-matisch weergegeven als een verwijderbaar station, waardoor bestanden eenvoudig kunnen worden uitgewisseld tussen computer en apparaat.
D OpmerkingenMaak de Voice Tracer niet los terwijl u bestanden overzet van of naar •het apparaat. Er worden gegevens overgezet zolang het opname-/afspeellichtje oranje knippert.Formatteer het station van de Voice Tracer niet vanaf een computer.•
NED
ERLA
ND
S
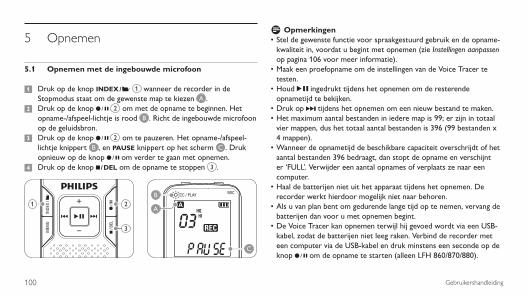
100 Gebruikershandleiding
Opnemen5
Opnemen met de ingebouwde microfoon5.1
Druk op de knop1 INDEX / a 1 wanneer de recorder in de Stopmodus staat om de gewenste map te kiezen A .Druk op de knop 2 g 2 om met de opname te beginnen. Het opname-/afspeel-lichtje is rood B . Richt de ingebouwde microfoon op de geluidsbron. Druk op de knop 3 g 2 om te pauzeren. Het opname-/afspeel-lichtje knippert B , en PAUSE knippert op het scherm C . Druk opnieuw op de knop g om verder te gaan met opnemen.Druk op de knop 4 j / DEL om de opname te stoppen 3 .
C
B
A1 2
3
D OpmerkingenStel de gewenste functie voor spraakgestuurd gebruik en de opname-•kwaliteit in, voordat u begint met opnemen (zie Instellingen aanpassen op pagina 106 voor meer informatie).Maak een proefopname om de instellingen van de Voice Tracer te •testen.Houd • f ingedrukt tijdens het opnemen om de resterende opnametijd te bekijken.Druk op • b tijdens het opnemen om een nieuw bestand te maken.Het maximum aantal bestanden in iedere map is 99; er zijn in totaal •vier mappen, dus het totaal aantal bestanden is 396 (99 bestanden x 4 mappen).Wanneer de opnametijd de beschikbare capaciteit overschrijdt of het •aantal bestanden 396 bedraagt, dan stopt de opname en verschijnt er ‘FULL’. Verwijder een aantal opnames of verplaats ze naar een computer.Haal de batterijen niet uit het apparaat tijdens het opnemen. De •recorder werkt hierdoor mogelijk niet naar behoren.Als u van plan bent om gedurende lange tijd op te nemen, vervang de •batterijen dan voor u met opnemen begint.De Voice Tracer kan opnemen terwijl hij gevoed wordt via een USB-•kabel, zodat de batterijen niet leeg raken. Verbind de recorder met een computer via de USB-kabel en druk minstens een seconde op de knop g om de opname te starten (alleen LFH 860/870/880).
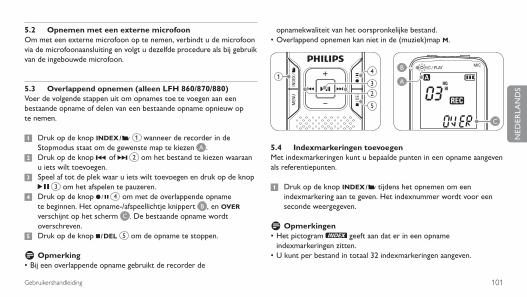
101Gebruikershandleiding
Opnemen met een externe microfoon 5.2 Om met een externe microfoon op te nemen, verbindt u de microfoon via de microfoonaansluiting en volgt u dezelfde procedure als bij gebruik van de ingebouwde microfoon.
Overlappend opnemen (alleen LFH 860/870/880)5.3 Voer de volgende stappen uit om opnames toe te voegen aan een bestaande opname of delen van een bestaande opname opnieuw op te nemen.
Druk op de knop1 INDEX / a 1 wanneer de recorder in de Stopmodus staat om de gewenste map te kiezen A .Druk op de knop 2 h of b 2 om het bestand te kiezen waaraan u iets wilt toevoegen.Speel af tot de plek waar u iets wilt toevoegen en druk op de knop 3 f 3 om het afspelen te pauzeren.Druk op de knop 4 g 4 om met de overlappende opname te beginnen. Het opname-/afspeellichtje knippert B , en OVER verschijnt op het scherm C . De bestaande opname wordt overschreven.Druk op de knop 5 j / DEL 5 om de opname te stoppen.
D OpmerkingBij een overlappende opname gebruikt de recorder de •
opnamekwaliteit van het oorspronkelijke bestand.Overlappend opnemen kan niet in de (muziek)map • M.
13
2
5
4
C
B
A
Indexmarkeringen toevoegen5.4 Met indexmarkeringen kunt u bepaalde punten in een opname aangeven als referentiepunten.
Druk op de knop1 INDEX / a tijdens het opnemen om een indexmarkering aan te geven. Het indexnummer wordt voor een seconde weergegeven.
D OpmerkingenHet pictogram • geeft aan dat er in een opname indexmarkeringen zitten.U kunt per bestand in totaal 32 indexmarkeringen aangeven.•
NED
ERLA
ND
S
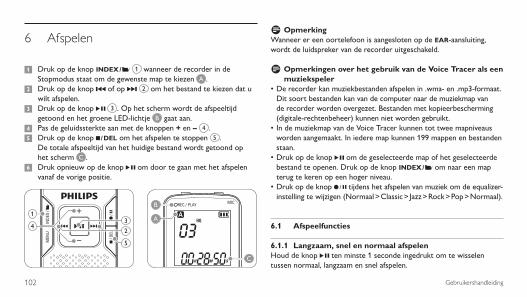
102 Gebruikershandleiding
D OpmerkingWanneer er een oortelefoon is aangesloten op de EAR-aansluiting, wordt de luidspreker van de recorder uitgeschakeld.
D Opmerkingen over het gebruik van de Voice Tracer als een muziekspeler
De recorder kan muziekbestanden afspelen in .wma- en .mp3-formaat. •Dit soort bestanden kan van de computer naar de muziekmap van de recorder worden overgezet. Bestanden met kopieerbescherming (digitale-rechtenbeheer) kunnen niet worden gebruikt.In de muziekmap van de Voice Tracer kunnen tot twee mapniveaus •worden aangemaakt. In iedere map kunnen 199 mappen en bestanden staan.Druk op de knop • f om de geselecteerde map of het geselecteerde bestand te openen. Druk op de knop INDEX / a om naar een map terug te keren op een hoger niveau.Druk op de knop • g tijdens het afspelen van muziek om de equalizer- instelling te wijzigen (Normaal > Classic > Jazz > Rock > Pop > Normaal).
Afspeelfuncties6.1
Langzaam, snel en normaal afspelen6.1.1 Houd de knop f ten minste 1 seconde ingedrukt om te wisselen tussen normaal, langzaam en snel afspelen.
Afspelen6
Druk op de knop1 INDEX / a 1 wanneer de recorder in de Stopmodus staat om de gewenste map te kiezen A .Druk op de knop 2 h of op b 2 om het bestand te kiezen dat u wilt afspelen. Druk op de knop 3 f 3 . Op het scherm wordt de afspeeltijd getoond en het groene LED-lichtje B gaat aan.Pas de geluidssterkte aan met de knoppen 4 + en – 4 .Druk op de knop 5 j / DEL om het afspelen te stoppen 5 . De totale afspeeltijd van het huidige bestand wordt getoond op het scherm C .Druk opnieuw op de knop 6 f om door te gaan met het afspelen vanaf de vorige positie.
13
24
5
C
B
A

103Gebruikershandleiding
Zoeken6.1.2 Houd de knop h of b ingedrukt tijdens het afspelen om in het huidige bestand snel naar voor of naar achter te scannen. Laat de knop los om weer terug te gaan naar afspelen met de gekozen snelheid.
Vooruit- en achteruitspoelen6.1.3 Druk op de knop h of b tijdens het afspelen om terug te spoelen naar het begin van het bestand dat wordt afgespeeld, of verder naar het volgende bestand. Staan er indexmarkeringen in het bestand, dan begint het afspelen op dat punt.
Afspeelmogelijkheden6.2 U kunt de Voice Tracer instellen op het steeds weer opnieuw afspelen van dezelfde reeks bestanden of op het afspelen van een reeks bestanden in een willekeurige volgorde.
Een passage afspelen6.2.1
Doe het volgende om een passage af te spelen in een nummer: 1 druk op de knop INDEX / a 1 op het gekozen beginpunt. REP. A – B knippert op het scherm A .Druk nog een keer op de knop2 INDEX / a bij het gekozen eindpunt. De herhaalpassage begint.Druk op de knop 3 j / DEL 2 om het afspelen te stoppen of druk op
de knop INDEX / a om terug te keren naar normaal afspelen.
A
1
2
Een bestand of map herhalen / willekeurig afspelen6.2.2
Houd de knop 1 INDEX / a minstens 1 seconde ingedrukt tijdens het afspelen om te wisselen tussen afspeelinstellingen (bestand herhalen, map herhalen, map willekeurig of gewoon afspelen).Pictogram BetekentREP. FILE Een bestand herhaaldelijk afspelenREP. FOLD Alle bestanden in de map herhaaldelijk afspelenSHUF FOLD Alle bestanden in de map in een willekeurige volgorde
afspelen
D OpmerkingWillekeurig afspelen kan alleen in de (muziek)map M.
NED
ERLA
ND
S
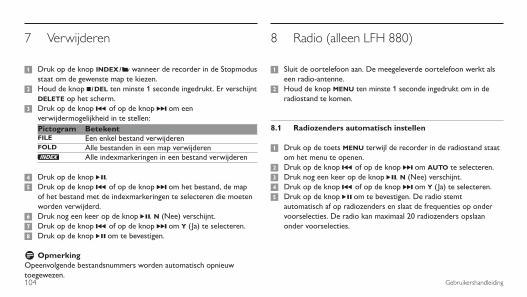
104 Gebruikershandleiding
Verwijderen7
Druk op de knop1 INDEX / a wanneer de recorder in de Stopmodus staat om de gewenste map te kiezen.Houd de knop 2 j / DEL ten minste 1 seconde ingedrukt. Er verschijnt DELETE op het scherm.Druk op de knop 3 h of op de knop b om een verwijdermogelijkheid in te stellen:Pictogram BetekentFILE Een enkel bestand verwijderenFOLD Alle bestanden in een map verwijderen
Alle indexmarkeringen in een bestand verwijderen
Druk op de knop 4 f.Druk op de knop 5 h of op de knop b om het bestand, de map of het bestand met de indexmarkeringen te selecteren die moeten worden verwijderd.Druk nog een keer op de knop 6 f. N (Nee) verschijnt.Druk op de knop 7 h of op de knop b om Y ( Ja) te selecteren.Druk op de knop 8 f om te bevestigen.
D OpmerkingOpeenvolgende bestandsnummers worden automatisch opnieuw toegewezen.
Radio (alleen LFH 880)8
Sluit de oortelefoon aan. De meegeleverde oortelefoon werkt als 1 een radio-antenne.Houd de knop 2 MENU ten minste 1 seconde ingedrukt om in de radiostand te komen.
Radiozenders automatisch instellen8.1
Druk op de toets 1 MENU terwijl de recorder in de radiostand staat om het menu te openen.Druk op de knop 2 h of op de knop b om AUTO te selecteren.Druk nog een keer op de knop 3 f. N (Nee) verschijnt.Druk op de knop 4 h of op de knop b om Y ( Ja) te selecteren.Druk op de knop 5 f om te bevestigen. De radio stemt automatisch af op radiozenders en slaat de frequenties op onder voorselecties. De radio kan maximaal 20 radiozenders opslaan onder voorselecties.
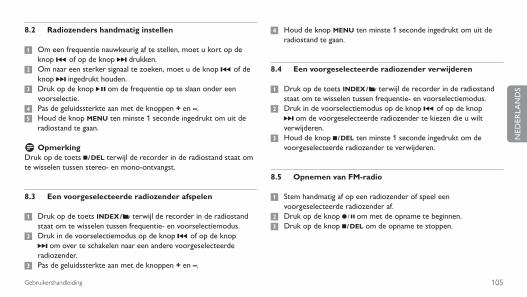
105Gebruikershandleiding
Radiozenders handmatig instellen8.2
Om een frequentie nauwkeurig af te stellen, moet u kort op de 1 knop h of op de knop b drukken.Om naar een sterker signaal te zoeken, moet u de knop 2 h of de knop b ingedrukt houden.Druk op de knop 3 f om de frequentie op te slaan onder een voorselectie.Pas de geluidssterkte aan met de knoppen 4 + en –.Houd de knop 5 MENU ten minste 1 seconde ingedrukt om uit de radiostand te gaan.
D OpmerkingDruk op de toets j / DEL terwijl de recorder in de radiostand staat om te wisselen tussen stereo- en mono-ontvangst.
Een voorgeselecteerde radiozender afspelen8.3
Druk op de toets1 INDEX / a terwijl de recorder in de radiostand staat om te wisselen tussen frequentie- en voorselectiemodus.Druk in de voorselectiemodus op de knop 2 h of op de knop b om over te schakelen naar een andere voorgeselecteerde radiozender.Pas de geluidssterkte aan met de knoppen 3 + en –.
Houd de knop 4 MENU ten minste 1 seconde ingedrukt om uit de radiostand te gaan.
Een voorgeselecteerde radiozender verwijderen8.4
Druk op de toets1 INDEX / a terwijl de recorder in de radiostand staat om te wisselen tussen frequentie- en voorselectiemodus.Druk in de voorselectiemodus op de knop 2 h of op de knop b om de voorgeselecteerde radiozender te kiezen die u wilt verwijderen.Houd de knop 3 j / DEL ten minste 1 seconde ingedrukt om de voorgeselecteerde radiozender te verwijderen.
Opnemen van FM-radio8.5
Stem handmatig af op een radiozender of speel een 1 voorgeselecteerde radiozender af.Druk op de knop 2 g om met de opname te beginnen.Druk op de knop 3 j / DEL om de opname te stoppen.
NED
ERLA
ND
S
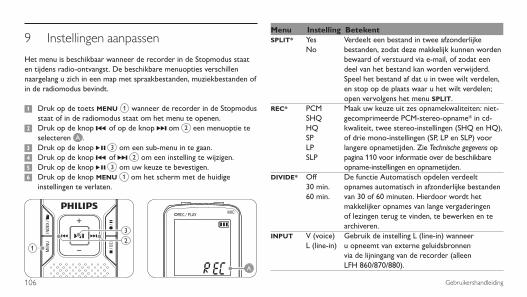
106 Gebruikershandleiding
9 Instellingen aanpassen
Het menu is beschikbaar wanneer de recorder in de Stopmodus staat en tijdens radio-ontvangst. De beschikbare menuopties verschillen naargelang u zich in een map met spraakbestanden, muziekbestanden of in de radiomodus bevindt.
Druk op de toets 1 MENU 1 wanneer de recorder in de Stopmodus staat of in de radiomodus staat om het menu te openen.Druk op de knop 2 h of op de knop b om 2 een menuoptie te selecteren A .Druk op de knop 3 f 3 om een sub-menu in te gaan.Druk op de knop 4 h of b 2 om een instelling te wijzigen.Druk op de knop 5 f 3 om uw keuze te bevestigen.Druk op de knop 6 MENU 1 om het scherm met de huidige instellingen te verlaten.
1
3
2
A
Menu Instelling BetekentSPLIT* Yes
NoVerdeelt een bestand in twee afzonderlijke bestanden, zodat deze makkelijk kunnen worden bewaard of verstuurd via e-mail, of zodat een deel van het bestand kan worden verwijderd. Speel het bestand af dat u in twee wilt verdelen, en stop op de plaats waar u het wilt verdelen; open vervolgens het menu SPLIT.
REC* PCMSHQHQSPLPSLP
Maak uw keuze uit zes opnamekwaliteiten: niet-gecomprimeerde PCM-stereo-opname* in cd-kwaliteit, twee stereo-instellingen (SHQ en HQ), of drie mono-instellingen (SP, LP en SLP) voor langere opnametijden. Zie Technische gegevens op pagina 110 voor informatie over de beschikbare opname-instellingen en opnametijden.
DIVIDE* Off30 min.60 min.
De functie Automatisch opdelen verdeelt opnames automatisch in afzonderlijke bestanden van 30 of 60 minuten. Hierdoor wordt het makkelijker opnames van lange vergaderingen of lezingen terug te vinden, te bewerken en te archiveren.
INPUT V (voice)L (line-in)
Gebruik de instelling L (line-in) wanneer u opneemt van externe geluidsbronnen via de lijningang van de recorder (alleen LFH 860/870/880).

107Gebruikershandleiding
SENSE* HILO
Regelt de opnamegevoeligheid om te voorkomen dat achtergrondgeluiden worden opgenomen en regelt de opnamegevoeligheid naargelang de opnameomgeving.
BEEP OnOff
De recorder reageert met geluid op het gebruik van knoppen en op fouten.
LIGHT OnOff
Het scherm licht een paar seconden op wanneer u op een knop hebt gedrukt.
VA* OnOff
Spraakgestuurde opname is een handige optie voor handsfree opnemen. Wanneer spraakgestuurd opnemen is ingeschakeld, begint het opnemen wanneer u begint te spreken. Stopt u met spreken, dan pauzeert de recorder automatisch na drie seconden stilte, en gaat alleen aan wanneer u weer begint te spreken.
CLOCK DD:MM:YY12/24 HHH:MM:SS
Zijn de datum en de tijd ingesteld, dan wordt bij ieder bestand automatisch de datum en tijd opgeslagen wanneer het bestand is opgenomen.
TIMER Off V CH
Programmeer een automatische opname met de microfoon (kies V) of van een radiozender (kies CH/alleen LFH 880). Geef het begintijdstip op, de lengte van de opname (30/60/120 minuten/All), een map en de radiozender die moet worden opgenomen.
ALARM Off b F
Gebruik de Voice Tracker als een mobiele wekker. Kies de alarminstelling (b = pieptoon, F = afspelen bestand), en geef de begintijd op en het bestand dat moet worden afgespeeld.
FORMAT YesNo
Verwijder alle bestanden op de recorder inclusief de ingestelde radiozenders. Zet alle belangrijke bestanden naar de computer over voordat u de recorder formatteert.
VER Laat de versie van de firmware zien en de release-datum.
AUTO** YesNo
Stem automatisch af op een radiozender en sla maximaal 20 zenders op onder de voorselecties.
OUTPUT **
EPSP
Wissel tussen uitvoer via de oortelefoon (EP) en via de luidspreker (SP) in de radiostand.
* Deze functie is niet aanwezig in de (muziek)map M.** Deze functie is alleen beschikbaar in de radiostand.
NED
ERLA
ND
S
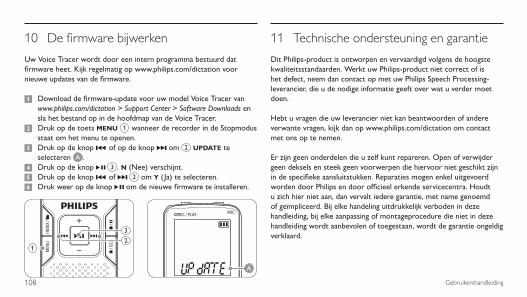
108 Gebruikershandleiding
De firmware bijwerken10
Uw Voice Tracer wordt door een intern programma bestuurd dat firmware heet. Kijk regelmatig op www.philips.com/dictation voor nieuwe updates van de firmware.
Download de firmware-update voor uw model Voice Tracer van 1 www.philips.com/dictation > Support Center > Software Downloads en sla het bestand op in de hoofdmap van de Voice Tracer.Druk op de toets 2 MENU 1 wanneer de recorder in de Stopmodus staat om het menu te openen.Druk op de knop 3 h of op de knop b om 2 UPDATE te selecteren A .Druk op de knop 4 f 3 . N (Nee) verschijnt.Druk op de knop 5 h of b 2 om Y ( Ja) te selecteren.Druk weer op de knop 6 f om de nieuwe firmware te installeren.
1
3
2
A
Technische ondersteuning en garantie11
Dit Philips-product is ontworpen en vervaardigd volgens de hoogste kwaliteitsstandaarden. Werkt uw Philips-product niet correct of is het defect, neem dan contact op met uw Philips Speech Processing-leverancier, die u de nodige informatie geeft over wat u verder moet doen.
Hebt u vragen die uw leverancier niet kan beantwoorden of andere verwante vragen, kijk dan op www.philips.com/dictation om contact met ons op te nemen.
Er zijn geen onderdelen die u zelf kunt repareren. Open of verwijder geen deksels en steek geen voorwerpen die hiervoor niet geschikt zijn in de specifieke aansluitstukken. Reparaties mogen enkel uitgevoerd worden door Philips en door officieel erkende servicecentra. Houdt u zich hier niet aan, dan vervalt iedere garantie, met name genoemd of geïmpliceerd. Bij elke handeling uitdrukkelijk verboden in deze handleiding, bij elke aanpassing of montageprocedure die niet in deze handleiding wordt aanbevolen of toegestaan, wordt de garantie ongeldig verklaard.

109Gebruikershandleiding
Mijn recorder kan niet worden ingeschakeldDe batterijen zijn leeg of zitten er niet goed in. Vervang de batterijen door nieuwe en zorg ervoor dat ze correct geplaatst worden.
Mijn recorder neemt niets opDe recorder staat misschien in de HOLD-stand. Schuif de vergrendelschakelaar naar de Off-positie.
Het maximale aantal opnames werd misschien bereikt of de opnamecapaciteit is uitgeput. Verwijder een aantal opnames of verplaats opnames naar een extern apparaat.
Ik hoor niets door de luidsprekerDe oortelefoon is misschien aangesloten. Verwijder de oortelefoon.
De geluidssterkte staat op zijn laagst. Pas de geluidssterkte aan.
Mijn recorder kan opnames niet afspelenDe recorder staat misschien in de HOLD -stand. Schuif de vergrendelschakelaar naar de Off-positie.
De batterijen zijn leeg of zitten er niet goed in. Vervang de batterijen door nieuwe en zorg ervoor dat ze correct geplaatst worden.
Er is nog niets opgenomen. Controleer het aantal opnames.
Mijn recorder stopt niet, pauzeert niet, speelt niet en neemt ook niet opDe recorder staat misschien in de HOLD-stand. Schuif de vergrendelschakelaar naar de Off-positie.
Ik hoor niets door de oortelefoonDe oortelefoon is misschien niet goed aangesloten. Sluit de oortelefoon goed aan.
De geluidssterkte staat op zijn laagst. Pas de geluidssterkte aan.
Problemen oplossen12
NED
ERLA
ND
S
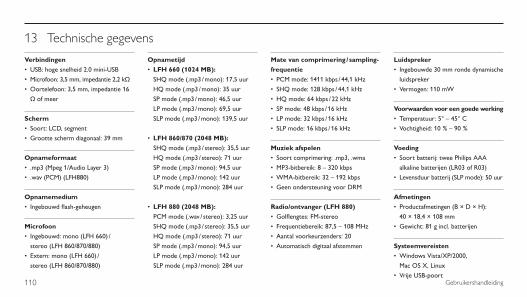
110 Gebruikershandleiding
13 Technische gegevens
VerbindingenUSB: hoge snelheid 2.0 mini-USB•
Microfoon: 3,5 mm, impedantie 2,2 kΩ•
Oortelefoon: 3,5 mm, impedantie 16 •
Ω of meer
SchermSoort: LCD, segment•
Grootte scherm diagonaal: 39 mm•
Opnameformaat.mp3 (Mpeg 1/Audio Layer 3)•
.wav (PCM) (LFH880)•
OpnamemediumIngebouwd flash-geheugen•
MicrofoonIngebouwd: mono (LFH 660) / •
stereo (LFH 860/870/880)
Extern: mono (LFH 660) / •
stereo (LFH 860/870/880)
OpnametijdLFH 660 (1024 MB):•
SHQ mode (.mp3 / mono): 17,5 uur
HQ mode (.mp3 / mono): 35 uur
SP mode (.mp3 / mono): 46,5 uur
LP mode (.mp3 / mono): 69,5 uur
SLP mode (.mp3 / mono): 139,5 uur
LFH 860/870 (2048 MB):•
SHQ mode (.mp3 / stereo): 35,5 uur
HQ mode (.mp3 / stereo): 71 uur
SP mode (.mp3 / mono): 94,5 uur
LP mode (.mp3 / mono): 142 uur
SLP mode (.mp3 / mono): 284 uur
LFH 880 (2048 MB):•
PCM mode (.wav / stereo): 3,25 uur
SHQ mode (.mp3 / stereo): 35,5 uur
HQ mode (.mp3 / stereo): 71 uur
SP mode (.mp3 / mono): 94,5 uur
LP mode (.mp3 / mono): 142 uur
SLP mode (.mp3 / mono): 284 uur
Mate van comprimering / sampling-frequentie
PCM mode: 1411 kbps / 44,1 kHz•
SHQ mode: 128 kbps / 44,1 kHz•
HQ mode: 64 kbps / 22 kHz•
SP mode: 48 kbps / 16 kHz•
LP mode: 32 kbps / 16 kHz•
SLP mode: 16 kbps / 16 kHz•
Muziek afspelenSoort comprimering: .mp3, .wma•
MP3-bitbereik: 8 – 320 kbps•
WMA-bitbereik: 32 – 192 kbps•
Geen ondersteuning voor DRM•
Radio/ontvanger (LFH 880)Golflengtes: FM-stereo•
Frequentiebereik: 87,5 – 108 MHz•
Aantal voorkeurzenders: 20•
Automatisch digitaal afstemmen•
LuidsprekerIngebouwde 30 mm ronde dynamische •
luidspreker
Vermogen: 110 mW•
Voorwaarden voor een goede werkingTemperatuur: 5° – 45° C•
Vochtigheid: 10 % – 90 %•
VoedingSoort batterij: twee Philips AAA •
alkaline batterijen (LR03 of R03)
Levensduur batterij (SLP mode): 50 uur•
AfmetingenProductafmetingen (B × D × H): •
40 × 18,4 × 108 mm
Gewicht: 81 g incl. batterijen•
SysteemvereistenWindows Vista/XP/2000, •
Mac OS X, Linux
Vrije USB-poort•
Model Number: LFH 660, LFH 860, LFH 870, LFH 880Trade Name: Philips Digital Voice Tracer 660 / 860 / 870 / 880Responsible Party: Philips Speech Processing
Disclaimer and noticesPhilips performs extensive testing with the most popular configurations. However, since PC add-ons and device drivers are updated continually, conflict-free operation cannot be guaranteed.
This device complies with part 15 of FCC rules. Operation is subject to the following two conditions:1) This device may not cause harmful interference.2) This device must accept any interference received, including interference that may cause undesired operation.
Address: 64 Perimeter Center East, Atlanta, GA 30346, USATelephone number: 888-260-6261Website: www.philips.com/dictation
Declaration of ConformityTested to comply with FCC standards
FOR HOME OR OFFICE USE
c f b g a
f

Specifications are subject to change without notice. Trademarks are the property of Royal Philips Electronics or their respective owners. © 2008 Royal Philips Electronics. All rights reserved. Document version 1.0, 2008/08/29.
Discover the comprehensive range of high-end dictation products from Philips www.philips.com/dictation