digital video camera recorder - sonywith the dvd video format. * 1 dvd-r/rw discs recorded by sony...
TRANSCRIPT

2-186-668-11 (1)
©2004 Sony Corporation
Operating InstructionsBefore operating the unit, please read this manual thoroughly,and retain it for future reference.
Owner’s RecordThe model and serial numbers are located on the bottom. Record theserial number in the space provided below. Refer to these numberswhenever you call upon your Sony dealer regarding this product.
DCR-DVD301
DigitalVideo CameraRecorder
Model No. DCR-DVD301 Model No. AC-
Serial No. Serial No.
SERIESTM
Op
erating
Instru
ction
s [US]
2
Welcome!Congratulations on your purchase of this Sony Handycam. With your Handycam, you can capture life’sprecious moments with superior picture and sound quality. Your Handycam is loaded with advancedfeatures, but at the same time it is very easy to use. You will soon be producing home video that you canenjoy for years to come.
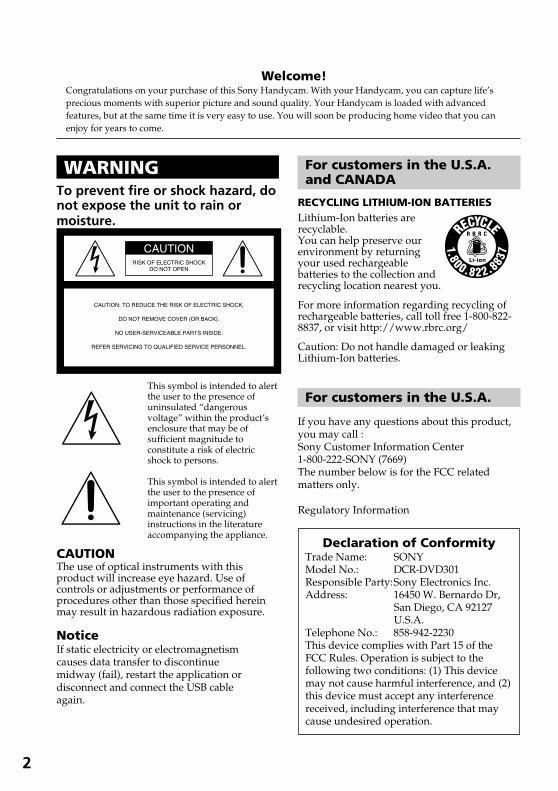
WARNINGTo prevent fire or shock hazard, donot expose the unit to rain ormoisture.
Declaration of ConformityTrade Name: SONYModel No.: DCR-DVD301Responsible Party:Sony Electronics Inc.Address: 16450 W. Bernardo Dr,
San Diego, CA 92127U.S.A.
Telephone No.: 858-942-2230This device complies with Part 15 of theFCC Rules. Operation is subject to thefollowing two conditions: (1) This devicemay not cause harmful interference, and (2)this device must accept any interferencereceived, including interference that maycause undesired operation.
For customers in the U.S.A.and CANADA
RECYCLING LITHIUM-ION BATTERIESLithium-Ion batteries arerecyclable.You can help preserve ourenvironment by returningyour used rechargeablebatteries to the collection andrecycling location nearest you.
For more information regarding recycling ofrechargeable batteries, call toll free 1-800-822-8837, or visit http://www.rbrc.org/
Caution: Do not handle damaged or leakingLithium-Ion batteries.
For customers in the U.S.A.
If you have any questions about this product,you may call :Sony Customer Information Center1-800-222-SONY (7669)The number below is for the FCC relatedmatters only.
Regulatory Information
CAUTIONThe use of optical instruments with thisproduct will increase eye hazard. Use ofcontrols or adjustments or performance ofprocedures other than those specified hereinmay result in hazardous radiation exposure.
NoticeIf static electricity or electromagnetismcauses data transfer to discontinuemidway (fail), restart the application ordisconnect and connect the USB cableagain.
This symbol is intended to alertthe user to the presence ofuninsulated “dangerousvoltage” within the product’senclosure that may be ofsufficient magnitude toconstitute a risk of electricshock to persons.
This symbol is intended to alertthe user to the presence ofimportant operating andmaintenance (servicing)instructions in the literatureaccompanying the appliance.

3
Gettin
g Started
CAUTIONYou are cautioned that any changes ormodifications not expressly approved in thismanual could void your authority to operatethis equipment.
Note:This equipment has been tested and found tocomply with the limits for a Class B digitaldevice, pursuant to Part 15 of the FCC Rules.These limits are designed to providereasonable protection against harmfulinterference in a residential installation. Thisequipment generates, uses, and can radiateradio frequency energy and, if not installedand used in accordance with the instructions,may cause harmful interference to radiocommunications. However, there is noguarantee that interference will not occur in aparticular installation. If this equipment doescause harmful interference to radio ortelevision reception, which can be determinedby turning the equipment off and on, the useris encouraged to try to correct the interferenceby one or more of the following measures:— Reorient or relocate the receiving antenna.— Increase the separation between the
equipment and receiver.— Connect the equipment into an outlet on a
circuit different from that to which thereceiver is connected.
— Consult the dealer or an experienced radio/TV technician for help.
The supplied interface cable must be used withthe equipment in order to comply with thelimits for a digital device pursuant to SubpartB of Part 15 of FCC Rules.
Certain countries or regions may regulatedisposal of the battery used to power thisproduct. Please consult with your localauthority.

4
Read this first
What you can do with yourDVD HandycamYour DVD Handycam uses DVD-R and DVD-RW as a recording media.You can enjoy your DVD Handycam in ways that are new and different from thoseof a tape media-based camcorder. Read the next few pages to find out how.
You can find a scene quickly usinga Visual Index display.The Visual Index display shows thumbnails of movies and stillimages recorded on the disc in your DVD Handycam. You canfind the desired scene quickly using this convenient index.
You can play back stillimages, one after another.You can play back still images one afteranother on your DVD Handycam. You can alsoenjoy the playback of still images continuouslyon a DVD player if you finalize the disc.

5
Read
this first
You can play back a discrecorded with your DVDHandycam on your DVDplayer.You can play back a disc recorded with yourDVD Handycam on DVD players that can playback DVD-R/DVD-RW.
You can edit and copy a disc easilyby connecting your DVDHandycam to your computer.You can edit and copy a disc easily on your computerusing the supplied ImageMixer Ver.1.5 for Sony DVDHandycam software. It also enables you to produceyour own original DVD disc.

6
What is the difference betweenDVD-R and DVD-RW?Two types of discs are available and they are different in the following ways.
How can I choosebetween thesetwo discs?The number of recordabletimes is different for the twodiscs. Choose the one thatmeets your needs.
Which disccan I use?8cm DVD-Rs and 8cm DVD-RWsare available.
8cm DVD-R
8cm DVD-RW DVD-RWs can beoverwritten repeatedly.They are suitable for source gatheringand temporary recordings.You can choose VIDEO mode or VRmode to make your recordings.
DVD-Rs can be recordedonly once.They are suitable for long-termrecords and for making backupcopies.Recorded in VIDEO mode.
You can use the following discs:• DMR30 (single-sided disc)• DMR60DS (double-sided disc)
You can use the following discs:• DMW30 (single-sided disc)• DMW60DS (double-sided
disc)
Discs other than these two typescannot be used in your DVDHandycam.
Examples of incompatible discs• 12cm DVD-R• 12cm DVD-RW• DVD+R• DVD-RAM• DVD+RW• DVD-ROM• CD-R• CD-RW
In VIDEO mode and VR (VideoRecording) modeVIDEO mode: A disc has wide compatibilitywith other players.VR mode: A disc can be edited on a DVDHandycam but the players are limited.

7
Read
this first
What kind of playercan I use for playback?You can play back a disc you have recorded on your DVD Handycam onother players by finalizing the disc (see page 64).The following list shows examples of players that can play back a discrecorded by your DVD Handycam. However, playback compatibility is notguaranteed with all players.*1
DVD-RW(in VR mode)Players that can play back DVD-RWs inVR mode.
DVD-RW(in VIDEO mode)Players that can play back DVD-RWs.
DVD-R(VIDEO mode only)Players compatiblewith the DVD Video format.
*1 DVD-R/RW discs recorded by Sony DVD Handycam camcorders are designed to be compatible withand may be played back on home DVD players, computer DVD drives and PlayStation 2 video gameconsoles.*2
*2 Playback on all home DVD players, computer DVD drives and PlayStation 2 consoles cannot beguaranteed. Some players, drives, and video game consoles lack the ability to read due to the opticalreflection standards of DVD-R/RW discs and/or due to decoding incompatibilities. Refer to thespecifications of your playback equipment for additional compatibility information.
Computer with aDVD drive installed
DVD player/DVD recorder
Computer with aDVD drive installed
DVD player/DVD recorder
Computer with aDVD drive installed
DVD player/DVD recorder
Choosing a discFor long-term storageTo use the same disc overand over
To play back on a DVDplayerTo edit with a DVDHandycam
DVD-RUse a DVD-RW in Video mode
Use a DVD-RW in VR mode

8
Both movies and still images can be recordedon a single disc.Because your movies and still images are recorded in free areason the disc automatically, important recordings are notoverwritten.If you finalize the recorded disc after shooting, you can play itback immediately on DVD players, etc..
How to prepare and use your DVDHandycam
Prepare a new disc.
• You can start recording promptly with a DVD-R.• You need to format a DVD-RW before recording.
Formatting is also required when using a once recordedDVD-RW again.
Select a recording format (either VIDEO modeor VR mode) when using DVD-RW.
Preparing
Shooting
Select a scene to play back from the VisualIndex display.If you finalize the recorded disc after shooting, you can play itback on DVD players, etc..
Playing back
Continued on the right page.

9
Read
this first
You can make a copy of a disc you haverecorded by connecting your DVDHandycam to your computer with thesupplied software.For the recommended computer system environment, seepage 91.
You can produce an original DVD byediting your movies/still images on yourcomputer.
Finalize the disc so that it becomescompatible with other DVD players.
You may not be able to record additional material, edit, orformat a disc after finalizing it, depending on the kind of thedisc used.
Overwrite Edit Format
DVD-R No No No(VIDEO mode)
DVD-RW Yes*1 No Yes*3
(VIDEO mode)
DVD-RW Yes*2 Yes*2 Yes*3
(VR mode)
*1 Unfinalizing is required.*2 Unfinalizing is not required.*3 Recorded data will be erased.
Finalizing
Editing
10
Table of contents
Read this firstWhat you can do with your
DVD Handycam ............................... 4What is the difference between
DVD-R and DVD-RW? .................... 6How to prepare and use your DVD
Handycam ......................................... 8
Getting StartedUsing this manual ................................. 12Checking the supplied accessories ..... 14Step 1 Preparing the power source ... 15
Installing/removing the batterypack ............................................ 15
Charging the installedbattery pack .............................. 16
Showing the remaining battery time– BATTERY INFO .................... 18
Connecting to a wall outlet ........... 18Step 2 Turning on the power .............. 19Step 3 Adjusting the LCD screen and
the viewfinder ................................. 20Adjusting the angle and the
brightness of the LCD screen ... 20Adjusting the viewfinder .............. 22
Step 4 Setting the date and time ........ 23Simple setting of the clock using a
time difference ......................... 25Step 5 Preparing a disc for recording ... 26
Shooting movies/still imagesBefore shooting ...................................... 28Shooting movies .................................... 29
Selecting the recording mode ....... 32Using the zoom feature ................. 33Shooting with the subject checking
the image – Mirror mode ........ 34Shooting still images ............................. 35
Selecting the still image qualityand size ..................................... 38
Shooting images continuously ....... 41Adjusting the exposure ........................ 43
Adjusting the exposure for backlitsubjects – BACK LIGHT ......... 43
Adjusting the exposuremanually ................................... 43
Shooting in the dark – NightShot plus,etc. ..................................................... 45Using NightShot plus .................... 45
Using Super NightShot plus ......... 45Using the NightShot Light ............ 46Using Color Slow Shutter .............. 46
Self-timer recording .............................. 47On shooting movies ....................... 47On shooting still images ................ 47
Shooting for the wide-screen TV– 16:9 Wide mode ........................... 48
Adjusting the white balancemanually .......................................... 50
Shooting techniques to match yourcircumstances – PROGRAM AE ... 51
Focusing manually ................................ 52Shooting with special effects .............. 53
Using fader (for movies only) ....... 53Using special effects
– Picture effect/Digital effect ... 54Checking/Deleting the last scene ....... 55
Checking the last scene– Review .................................... 55
Deleting the last scene(DVD-RWs only) ...................... 55
Viewing the recordingsPlaying a disc on your camcorder ...... 56
Choosing and viewing a recording– Visual Index ........................... 56
Various playback modes ............... 58Displaying the indicators during
playback – Display .................. 59Magnifying recorded images
– PB ZOOM (Playback zoom) .. 61Playing still images automatically
– Slide Show ............................ 62Viewing recordings on TV ................... 63
Finalizing a disc for otherplayers
Finalizing a disc ..................................... 64Changing the disc title ................... 67Playing back a disc on a DVD
player, etc. ................................. 69Playing back a disc on a computer
with a DVD drive installed .... 70Recording on a finalized disc
– Unfinalizing (VIDEO modeDVD-RWs only) .............................. 72
Recording again on a used disc– Formatting (DVD-RWs only) ..... 74

11
Gettin
g Started
Using a disc in VR mode(DVD-RWs only)
Selecting the playing order on yourcamcorder – Playlist ....................... 76Registering movies or still images in
the Playlist ................................ 76Converting all the still images on a
disc to a movie file – Photomovie ........................... 79
Erasing unnecessary scenes from thePlaylist ....................................... 80
Changing the order within thePlaylist ....................................... 82
Dividing a movie withinthe Playlist ................................ 84
Playing the Playlist ......................... 86Editing the original data ...................... 87
Dividing a movie ............................ 87Deleting movies/still images ....... 89
Viewing/duplicating discs/editing the recordings on yourcomputer
Connecting your camcorder to yourcomputer – Introduction ............... 91System requirements ..................... 91Installing the USB driver ............... 92Installing software .......................... 93Connecting your camcorder to the
computer ................................... 94Consulting the on-line help .......... 98
Viewing scenes recorded on yourcomputer .......................................... 99Viewing scenes on the disc ........... 99
Making a disc copy– Disc Duplicating ........................ 101Making a disc copy ...................... 101
Editing and saving scenes .................. 102Editing movies .............................. 102Saving the movie
on your computer .................. 102Creating an original disc .................... 103
Making a menu ............................. 103Editing the contents ..................... 104Recording on a disc ...................... 105
Connecting your camcorder toa TV and a VCR
Dubbing a disc to a tape ..................... 106Connecting your camcorder to a
VCR .......................................... 106Dubbing to a tape ......................... 107
Dubbing a TV program or video tapeonto a disc ...................................... 108Connecting your camcorder to a TV
or a VCR .................................. 108Selecting the Video jack to be used
on the TV or the VCR ............ 108Dubbing onto a disc ..................... 109
Customizing your camcorderChanging the SETUP display ............ 110
Selecting the option of each item .. 111
TroubleshootingTypes of trouble and corrective
action .............................................. 118Self-diagnosis display ......................... 125Warning indicators ............................. 126Warning messages .............................. 127
Additional informationAbout the disc ...................................... 129About the “InfoLITHIUM”
battery pack ................................... 130Using your camcorder abroad .......... 131Maintenance information and
precautions .................................... 132Specifications ....................................... 135
Parts and controls/IndexIdentifying parts and controls ........... 137Index ..................................................... 145
12
— Getting Started —
Using this manualThe images of the LCD display and the viewfinder used in this manual are capturedusing a digital still camera. These images may appear different from what you see withyour camcorder.
Note on TV color systems
TV color systems differ depending on the country or region. To view your recordingson a TV, you need an NTSC system-based TV.
Copyright precautions
Television programs, films, video tapes, and other materials may be copyrighted.Unauthorized recording of such materials may be contrary to copyright laws.You cannot dub copyright protected software on your camcorder.
Contents of the recording cannot be compensated if recording or playback is not made due to amalfunction of the camcorder, storage media, etc.

13
Gettin
g Started
Using this manual
Camcorder care
LCD display/viewfinderThe LCD display and the viewfinder are manufactured using extremely high-precision technology, so over 99.99 % of the pixels are operational for effectiveuse. However, there may be some tiny black points and/or bright points (white,red, blue or green in color) that appear constantly on the LCD display and theviewfinder. These points are normal in the manufacturing process and do notaffect the recording in any way.
Disc compatibility with other players
Discs recorded on your camcorder must be finalized to be played on other players. Fordetails on how to finalize a disc, see “Finalizing a disc” (page 64).
Discs recorded in VIDEO modeYou must finalize a disc after all the recording is finished. You cannot record additionalscene on a disc recorded in VIDEO mode once you finalize it. On DVD-RW, you canrecord additional scene by unfinalizing it.
Discs recorded in VR modeOnly DVD-RWs can be recorded in VR mode. Finalizing is required only when otherDVD-RW compatible players cannot play the disc. You can record again with yourcamcorder on a finalized disc recorded in VR mode.Compatible players: DVD players that can play back DVD-RWs in VR mode.
NoteYou may not be able to play certain finalized discs, depending on the disc and theplayers.

14
Checking the supplied accessoriesMake sure that the following accessories are supplied with your camcorder.
1 Wireless Remote Commander (1)(page 142)
2 AC-L15A/L15B AC adaptor (1),Power cord (1) (page 16)
3 NP-FM50 rechargeable battery pack(1) (page 15)
4 A/V connecting cable (1)
5 Shoulder strap (1)
6 Lens cap (1) (page 28)
7 USB cable (Hi-SPEED USB compatible)(1) (page 92)
8 DVD-R (DMR30) (1)
9 CD-ROM (SPVD-011 USB Driver) (1)
q; Cleaning cloth (1)
8
1 2
4 75 6
3
9 0

15
Gettin
g Started
Step 1 Preparing the power source
Installing/removing the battery pack
To install the battery pack, slide it in and up in the direction of the arrow until it clicks.
To remove the battery pack1 Slide the battery pack in the direction of arrow while pressing the battery
release button.
2 Slide the battery pack down.
21
BATT release button

16
Charging the installed battery pack
Your camcorder operates only with the “InfoLITHIUM” battery pack (M series).See page 130 for more information on the “InfoLITHIUM” battery pack.
1 Make sure that the battery pack is installed on the camcorder.
2 Open the DC IN jack cover, then connect the AC adaptor supplied with yourcamcorder to the DC IN jack on your camcorder with the plug’s v mark facingup.
3 Connect the power cord to the AC adaptor.
4 Connect the power cord to the wall outlet.Charging begins. The POWER/CHG lamp lights in orange during the charge,then turns off when the charge is completed (full charge).
After charging the battery packDisconnect the AC adaptor from the DC IN jack on your camcorder.
Notes•Prevent metallic objects from coming into contact with the metal parts of the DC plug
of the AC adaptor. This may cause a short-circuit, damaging the AC adaptor.•Place the AC adaptor near a wall outlet. If any trouble occurs with this unit while
using the AC adaptor, disconnect the plug from the wall outlet as soon as possible tocut off the power.
•The POWER/CHG lamp may flash if the battery pack is not installed correctly or thebattery pack is damaged.
Step 1 Preparing the power source
1
3
42
Power cordAC adaptor
With the v mark onthe DC plug facing upPOWER/CHG
lamp
Open the DC INjack cover.

17
Gettin
g Started
Charging time (full charge)*1
Battery pack
NP-FM50 (supplied) 150
NP-QM71/QM71D 260
NP-QM91/QM91D 360
Recording time with the viewfinder*2
Battery pack Continuous Typical*3
NP-FM50 (supplied) 115 55
NP-QM71/QM71D 285 140
NP-QM91/QM91D 430 215
Recording time with the LCD display*2
LCD BACKLIGHT is set to ONBattery pack Continuous Typical*3
NP-FM50 (supplied) 105 50
NP-QM71/QM71D 265 130
NP-QM91/QM91D 400 200
LCD BACKLIGHT is set to OFFBattery pack Continuous Typical*3
NP-FM50 (supplied) 120 60
NP-QM71/QM71D 300 150
NP-QM91/QM91D 455 225
Playing time*2
Battery pack Playing time on LCD screen Playing time with LCD closed
NP-FM50 (supplied) 115 125
NP-QM71/QM71D 285 305
NP-QM91/QM91D 430 465
*1 Approximate number of minutes required at 25°C (77°F) to charge an empty batterypack. The charging time may increase if the battery’s temperature is extremely highor low because of the ambient temperature.
*2 Approximate number of minutes you can record when using a fully charged batterypack.
*3 Approximate number of minutes you can record, including starting/stopping,zooming, and turning the power on/off. The actual battery life may be shorter.
Notes•If the power goes off even though the remaining battery time indicator indicates that
the battery pack has enough power to operate, charge the battery pack fully again sothat the indication on the remaining battery time indicator is correct.
•Battery pack performance decreases in low-temperature surroundings and recordingmay not be possible even though the battery time remaining may be as much as 20minutes. Recharge the battery pack fully in this case.
•NP-FM30 is not recommended because of its short recording time when used withyour camcorder.
Step 1 Preparing the power source

18
Showing the remaining battery time – BATTERY INFO
1 Open the LCD screen while pressing OPEN.
2 Press DISPLAY/BATT INFO.The remaining battery time appears for a while on the LCD display.
Notes•BATTERY INFO does not appear when the power of the camcorder is ON.•The remaining battery time may not be indicated in the following cases:
– The battery pack is not installed correctly.– The battery pack is damaged.– The battery pack is empty.
•The number displayed as Battery Info is the approximate recording time.•While the remaining battery time is being calculated, “CALCULATING BATTERY
INFO...” is displayed.•It may take some time to display the remaining battery time after DISPLAY/BATT
INFO is pressed.
Connecting to a wall outlet
When you use your camcorder for a long time, it is recommended that you power itfrom a wall outlet using the AC adaptor.
1 Open the DC IN jack cover, then connect the AC adaptor supplied with yourcamcorder to the DC IN jack on your camcorder with the plug’s v mark facingup.
2 Connect the power cord to the AC adaptor.
3 Connect the power cord to a wall outlet.See page 16 for details.
PRECAUTIONYour camcorder is not disconnected from the AC power source (house current) as longas it is connected to the wall outlet, even if your camcorder itself has been turned off.
Notes•The AC adaptor can supply power even if the battery pack is attached to your
camcorder.•The DC IN jack has “source priority”. This means that the battery pack cannot supply
any power if the AC adaptor is connected to the DC IN jack, even when the powercord is not plugged into a wall outlet.
Step 1 Preparing the power source
BATTERY INFO
BATTERY CHARGE LEVEL
REC TIME AVAILABLELCD SCREENVIEWFINDER
::
8492
minmin
0% 50% 100%
BATTERY INFO
BATTERY CHARGE LEVEL
REC TIME AVAILABLELCD SCREENVIEWFINDER
::
105115
minmin
0% 50% 100%
During charging Fully charged

19
Gettin
g Started
Step 2 Turning on the powerPress the POWER button for a few seconds. Your camcorder turns on and the POWER/CHG lamp lights up in green. When you turn on your camcorder for the first time, theCLOCK SET display appears.
To turn the power offPress the POWER button for a few seconds again. When the POWER/CHG lamp turnsoff, the power cuts off.
To set the mode dialRotate and set the mode dial to the operation you want to perform, such as shooting orplayback.
: Playback/editSelect this when you play back or edit (in VR mode only) scenes recorded on yourcamcorder.
: MoviesSelect this when you shoot the movies.
: Still imagesSelect this when you shoot the still images.
POWER/CHG lamp
POWER button

20
Adjusting the angle and the brightness of the LCD screen
Adjust the brightness and the angle of the LCD screen properly in your sight.
1 Open the LCD screen while pressing OPEN.
2 Adjust the direction of the LCD screen to the desired position.When you adjust the angle of the LCD screen, make sure if the LCD screen isopened up to a full 90 degrees.You can turn the LCD screen over and then fold it back to the camcorder bodywith the LCD screen facing out as shown below.
To adjust the brightness of the LCD display1 Turn the power on by pressing the POWER button for a few seconds.
2 Press SETUP.The SETUP display appears.
3 Use the multi-selector to select (LCD/VF SET).Refer to page 23 to see how to use the multi-selector.
Step 3 Adjusting the LCD screen and the viewfinder
[ SETUP ] : END
PROGRAM AEP EFFECTD EFFECT
AUTO SHTRWHT BAL
MANUAL SET
[ SETUP ] : END
LCD BRIGHTLCD B. L.LCD COLOR
RETURNVF B. L.
LCD / VF SET
1
2
LCD BACKLIGHTbutton
90°
180°90°
SETUP button
b
OPEN button

21
Gettin
g Started
Step 3 Adjusting the LCD screen and the viewfinder
4 Use the multi-selector to select [LCD BRIGHT].
5 Use the multi-selector to adjust the brightness of the LCD display.− : Get Darker+ : Get BrighterThe LCD screen brightness is adjusted.
6 Press SETUP.The SETUP display disappears from the LCD display.
Note[LCD B.L.] is set to [BRT NORMAL] when you close the LCD screen facing out.
Tips•You can change the brightness of the backlight. Select (LCD/VF SET) then [LCD
B.L.] in the SETUP display when using the battery pack (page 113).•The [LCD BRIGHT], [LCD B.L.] and [LCD COLOR] settings do not affect the
brightness of the image when you are recording.•The backlight of the LCD screen is set to ON normally. When you use the camcorder
outdoors, set it to OFF so that the battery pack lasts longer.•When you turn off the LCD back light, the icon appears on the LCD display.
[ SETUP ] : END
LCD BRIGHTLCD / VF SET

22
12
Viewfinder lensadjustment dial
Step 3 Adjusting the LCD screen and the viewfinder
Adjusting the viewfinder
When recording pictures with the LCD screen closed, check the picture with theviewfinder. Adjust the viewfinder lens to accommodate your eyesight so that the imagein the viewfinder comes into sharp focus.
1 Extend the viewfinder.
2 Turn the viewfinder lens adjustment dial until you can see the characters in theviewfinder clearly.
Tips•If you install a large capacity battery pack such as the NP-QM91/QM91D in your
camcorder, extend the viewfinder and adjust the angle.•You can change the brightness of the viewfinder backlight. Select [VF B.L.] in the
SETUP display when using the battery pack (page 113).•The [VF B.L.] setting does not affect the brightness of the image when you are
recording.•Recording pictures with the viewfinder is recommended in the following cases:
– When the pictures on the LCD screen are hard to see.– When you want to save on battery consumption.

23
Gettin
g Started
Set the date and time when you use your camcorder for the first time. Set thegeographical area, then daylight savings time([DST]), the year, the month, the day, thehour and the minute, in that order. If you do not set the date and time, the [CLOCKSET] display appears whenever you turn on your camcorder or change the mode dial.If you do not use your camcorder for about 3 months, the date and time settings maybe cleared from memory because the built-in rechargeable battery in your camcorderwill have been discharged during that time. In that case, charge the built-inrechargeable battery by connecting the AC adaptor, and set the date and time again(page 16, 134).
1 Open the LCD screen while pressing OPEN.
2 Turn the power on by pressing the POWER button for a few seconds.The CLOCK SET display appears.
3 Use the multi-selector to select the desired geographical area.
Step 4 Setting the date and time
Select with V/v/B/b and press the button in thecenter to confirm your selection.
SETUP button
[ ENTER ] : NEXT ITEM
AREA 26
DST OFF
DATE Y M D
-5.0GMTNew York,Bogota
CLOCK SET
:
NEAR FAR
Multi-selector
OPEN button

24
DST OFF
DATE Y M D2004 JAN 1 12 : 00AM
[ ENTER ] : NEXT ITEM
AREA 26 -5.0GMTNew York,Bogota
CLOCK SET
DST OFF
DATE Y M D2004 JAN 1 12 : 00AM
[ ENTER ] : NEXT ITEM
AREA 26 -5.0GMTNew York,Bogota
CLOCK SET
Step 4 Setting the date and time
4 Use the multi-selector to set daylight savings time ([DST]) to [ON], ifnecessary.
5 Use the multi-selector to set the year.
6 Set the month, day, hour and minute with the same procedure as in step 5, andthen press the button in the center.The clock starts to move.The internal clock of your camcorder operates on a 12-hour cycle.•12:00 AM stands for midnight.•12:00 PM stands for noon.
NoteWhen setting the date and time, you cannot go back to a previously set item. If youmake a mistake, press the SETUP button twice and re-start from the beginning of thestep by selecting (SETUP MENU) , then [CLOCK SET].
Tips•If the CLOCK SET display does not appear in step 2, press SETUP, then select
(SETUP MENU), then [CLOCK SET] using the multi-selector.•If the SETUP display appears after step 6, press SETUP.
The SETUP display disappears.
[ ENTER ] : NEXT ITEM
AREA 26
DST
DATE Y M D
-5.0GMTNew York,Bogota
CLOCK SET
:
OFFON

25
Gettin
g Started
Simple setting of the clock using a time difference
You can easily set the clock to the local time by setting the area. In the SETUP displayuse the multi-selector to select (OTHERS) then [AREA SET] .
World time difference
Step 4 Setting the date and time
Lisbon, LondonBerlin, ParisHelsinki, CairoMoscow, NairobiTehranAbu Dhabi, BakuKabulKarachi, IslamabadCalcutta, New DelhiAlmaty, DhakaRangoonBangkok, JakartaHongKong, SingaporeSeoul, TokyoAdelaide, DarwinMelbourne, Sydney
Area Time-zone Area settingcode differences
GMT+01:00+02:00+03:00+03:30+04:00+04:30+05:00+05:30+06:00+06:30+07:00+08:00+09:00+09:30+10:00
Area Time-zone Area settingcode differences
171819202122232425262728293031
+11:00+12:00–12:00–11:00–10:00–09:00–08:00–07:00–06:00–05:00–04:00–03:30–03:00–02:00–01:00
Solomon Is.Fiji, WellingtonEniwetok, KwajaleinMidway Is., SamoaHawaiiAlaskaLosAngeles, TijuanaDenver, ArizonaChicago, Mexico CityNew York, BogotaSantiagoSt. John’sBrasilia, MontevideoFernando de NoronhaAzores
1 2 3 4 6 8 10 12 1314 16 17 18 19 20 21 22 23 24 25 26 2729 30 31
12345678910111213141516

26
Step 5 Preparing a disc for recordingA new DVD-R or DVD-RW is required for recording. You cannot overwrite or deletedata recorded on a DVD-R, but you can delete data and record again with a DVD-RW.The preparation procedure is different depending on the type of disc you use.
Notes•When you insert or remove a disc, move the grip belt to the bottom of the camcorder
so as not to obstruct the operation with your hand, etc..•Do not apply shock or vibration to your camcorder while [DISC ACCESS] or
[PREPARING TO OPEN COVER] is displayed on the LCD display.•Formatting is required when a DVD-RW is used for the first time.
Make sure that the disc is not exposed to fingerprints and dust.
1 Set the mode dial to (Movie) or (Still).
2 Turn the power on by pressing the POWER button for a few seconds.
3 Slide the disc cover OPEN switch in the direction of the arrow.Opening melody rings once, then the camcorder beeps intermittently.[PREPARING TO OPEN COVER] appears on the LCD display. After the beepsstop, the disc cover opens slightly automatically. Open the cover completely.
4 Set the disc with the label side facing out, then press the center of the disc untilit clicks to seat it firmly on the center spindle .
ACCESS lamp
31
2
5
4

27
Gettin
g Started
5 Close the disc cover.Your camcorder starts recognizing the inserted disc.With a DVD-R, you can start recording immediately after [DISC ACCESS]disappears on the LCD display.The FORMAT display appears when you insert a DVD-RW. Proceed to step 6.
6 Use the multi-selector to select [REC FORMAT].
7 Use the multi-selector to select desired recording format.Your camcorder is set in VIDEO mode as the default setting. Refer to page 6about recording mode.
8 Use the multi-selector to select [EXECUTE].
9 Use the multi-selector to select [YES].The selection of the recording format is completed.The disc formatting starts. When the formatting is completed, you can startrecording on the DVD-RW.
Notes•It may take some time to recognize the disc depending on the disc type and condition.•If you close the disc cover with the disc set incorrectly, it may cause your camcorder to
malfunction.•You may hear the motor running when the disc cover is closed without a disc being
set. This is not a malfunction.•Do not remove the battery pack or disconnect the AC adaptor while formatting.•You can remove the disc when a power source is connected to your camcorder even
when your camcorder is turned off. However, if you change the disc, the discrecognition process will not start automatically.
To remove the discIt may take some time to remove the disc depending on the disc condition or recordedmaterials.
1 Follow step 3 on page 26.
2 Remove the disc.
Tips•When you replace a disc, disc information such as the date you started to use it and
information on previously recorded areas appears for about 5 seconds. Theinformation on previously recorded areas may not be displayed correctly dependingon the condition of the disc.
•See page 129 for details on disc handling.
REC FORMATEXECUTE
FORMATVIDEO
EST. PROCESS TIME : 7secREC FORMAT : VIDEO
Step 5 Preparing a disc for recording

28
— Shooting movies/still images —
Before shooting
NoteTo shoot movies/still images correctly, note the following:– Hold your camcorder correctly.– Do not shock or vibrate your camcorder during shooting.– Do not scratch, put the fingerprint on, or get the disc dirty.
NoteDo not pick up your camcorder by the viewfinder, the LCD screen, or the battery pack.
2
34
1
Viewfinder LCD screen Battery pack
To hold your camcorderHold your camcorder with your fingersinserted through the grip belt.
To fasten the grip beltFasten the grip belt firmly following theillustration below.
To attach the lens capAttach the lens cap to the metal fittings ofthe grip belt, as illustrated below, using thestrap.

29
Sho
otin
g m
ovies/still im
ages
Perform “Getting Started” from step 1 to 5 beforehand (page 15 to 27).The following operation is common with VIDEO mode and VR mode.
1 Remove the lens cap by pressing both knobs on the sides of the cap.
2 Install the battery pack or connect the AC adaptor (page 15).
3 Open the LCD screen while pressing OPEN.The image is not displayed in the viewfinder when the LCD screen opens.
4 Set the mode dial to (Movie).
5 Turn the power on by pressing the POWER button for a few seconds.
6 Insert a disc (page 26).This sets your camcorder to standby.
6
13
42
7
5
Shooting movies
STBY0:00:00 -R
VIDEO
Recordinglamp

30
Shooting movies
7 Press START/STOP (z).Your camcorder starts recording. [REC] appears on the LCD display. Thecamera recording lamp located on the front of your camcorder lights up. Tostop recording, press START/STOP again.
You can operate start/stop with the REC START/STOP button on the LCD screen.This is useful when you shoot movies from a low angle.
After recording1 Remove the disc (page 27).
2 Turn the power off by pressing the POWER button for a few seconds again.
3 Close the LCD screen.
4 Remove the battery pack or disconnect the AC adaptor.
Notes•Make sure that the lens cap strap is not caught into the disc cover when you insert or
remove a disc.•Do not touch the built-in microphone during recording.•When the ACCESS lamp lights on, data is being recorded on the disc. Take note of the
following when data is being recorded, or the data or the disc may be damaged.– Do not apply shock or shake the camcorder.– Do not turn the power off.– Do not remove the battery pack or disconnect the AC adaptor.– Do not open the disc cover.
•The writing time to the disc for recording may vary depending on the recording mode(page 32).
•There may be time difference between the point when you press START/STOP andthe actual point that the recording starts/stops.
•Make sure the POWER/CHG lamp is off when you remove the power source.
TipIf you leave your camcorder powered by the battery pack for five minutes, yourcamcorder automatically turns off. This is to save battery power and to prevent batterywear. Turn the power on again by pressing the POWER button for a few seconds. Youcan cancel the automatic power-off by setting the (SETUP MENU) – [A. SHUT OFF]menu item to [NEVER] in the SETUP display.
VIDEOREC 0:00:01 -R

31
Sho
otin
g m
ovies/still im
ages
0:00:01[30min]
40min REC
JAN 1 2004 11:23:45AM
VIDEO-R
Indicators displayed in the recording modeThese indicators are not recorded on discs.
Notes•The remaining battery time indicator shows the approximate continuous recording
time remaining. The indicator may not be displayed accurately, depending on theconditions under which you are recording. When you close the LCD screen and openit again, it may take some time for the correct remaining battery time in minutes to bedisplayed.
•The recording data (date/time or various settings in effect when shooting) are notdisplayed while recording. However, they are recorded automatically onto the disc.To display the recording data, press DATA CODE on the Remote Commander duringplayback (page 59).
Shooting movies
Recording mode (page 32)
Date and timeThe date and time are displayed about 5 secondsafter the power is turned on.
STBY/REC
Remaining battery time (page 18)
Counter
Remaining timeThis appears after you insert a disc for 8 seconds.
Disc type (page 6)
Recording format (page 6)
32
Shooting movies
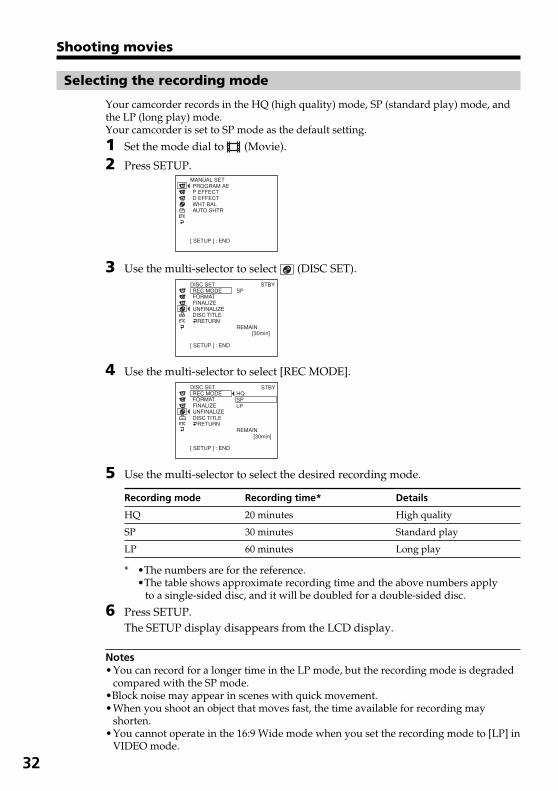
Selecting the recording mode
Your camcorder records in the HQ (high quality) mode, SP (standard play) mode, andthe LP (long play) mode.Your camcorder is set to SP mode as the default setting.
1 Set the mode dial to (Movie).
2 Press SETUP.
3 Use the multi-selector to select (DISC SET).
4 Use the multi-selector to select [REC MODE].
5 Use the multi-selector to select the desired recording mode.
Recording mode Recording time* Details
HQ 20 minutes High quality
SP 30 minutes Standard play
LP 60 minutes Long play
* •The numbers are for the reference.•The table shows approximate recording time and the above numbers apply
to a single-sided disc, and it will be doubled for a double-sided disc.
6 Press SETUP.The SETUP display disappears from the LCD display.
Notes•You can record for a longer time in the LP mode, but the recording mode is degraded
compared with the SP mode.•Block noise may appear in scenes with quick movement.•When you shoot an object that moves fast, the time available for recording may
shorten.•You cannot operate in the 16:9 Wide mode when you set the recording mode to [LP] in
VIDEO mode.
[ SETUP ] : END
REC MODEFORMATFINALIZE
SP
REMAIN
DISC TITLERETURN
UNFINALIZE
DISC SET
[30min]
STBY
[ SETUP ] : END
PROGRAM AEP EFFECTD EFFECT
AUTO SHTRWHT BAL
MANUAL SET
[ SETUP ] : END
REC MODEFORMATFINALIZE
HQSPLP
REMAIN[30min]
DISC TITLERETURN
UNFINALIZE
DISC SET STBY

33
Sho
otin
g m
ovies/still im
ages
Using the zoom feature
Move the power zoom lever a little for a slower zoom. Move it further for a faster zoom.Using the zoom sparingly results in better-looking recordings.W: For wide-angle (subject appears farther away)T : For telephoto (subject appears closer)
* The minimum distance required between your camcoder and the subject to get a sharpfocus in that position of the lever.
To use zoom greater than 10 ×Zoom greater than 10 × is performed digitally. Digital zoom can be set to 20 × or 120 ×.The picture quality deteriorates as you move the power zoom lever towards the “T”side.To activate digital zoom, select the digital zoom power in (CAMERA SET) –[D ZOOM] in the SETUP display (page 112). The digital zoom is set to [OFF] as thedefault setting.
TipIf you cannot get a sharp focus, move the power zoom lever to the “W” side until thefocus is sharp.
Shooting movies
TWThe right side of the bar showsthe digital zooming zone.The digital zooming zoneappears when you select thedigital zoom power in theSETUP display.
1 cm (approx.1/2 inch)*
80 cm (approx.2 5/8 feet)*

34
Shooting with the subject checking the image – Mirror mode
The picture on the LCD display is a mirror-image. However, the picture will benormal when recorded.
Open and rotate the LCD screen 180 degrees as shown above.
The indicator appears in the viewfinder and on the LCD display. When the modedial is set to (Movie), Xz appears in the standby mode, and z appears in therecording mode. Some indicators appear mirror-reversed and others are notdisplayed.
Shooting movies
90°
180°

35
Sho
otin
g m
ovies/still im
ages
VIDEOFINE 0 -R
Perform “Getting Started” from step 1 to 5 beforehand (page 15 to 27).The following operation is common with VIDEO mode and VR mode.You can record still images and movies on the same disc.
1 Remove the lens cap by pressing both knobs on the sides of the cap.
2 Install the battery pack or connect the AC adaptor (page 15).
3 Open the LCD screen while pressing OPEN.The image is not displayed in the viewfinder when the LCD screen opens.
4 Set the mode dial to (Still).
5 Turn the power on by pressing the POWER button for a few seconds.
6 Insert a disc (page 26).This sets your camcorder to standby.
Shooting still images
1
67 8
3
4
25

36
7 Press and hold PHOTO down lightly, then check out the image.When the AE/AF lock indicator (z) stops flashing and remains on, yourcamcorder is ready for shooting. The brightness of the image and focus areadjusted, are targeted for the middle of the image, and are set.
8 Press PHOTO all the way down.[CAPTURE] appears after the shutter sounds. Recording iscompleted when the bar scroll indicator disappears.
The image displayed when you pressed PHOTO all the way down in thisstep will be recorded.When you press PHOTO of the Remote Commander, the image appearing onthe LCD display at the moment is recorded.
Shooting still images
VIDEO0 -RFINE
Number of recorded images
VIDEO-RFINE

37
Sho
otin
g m
ovies/still im
ages
Notes•When the mode dial is set to (Still), the following functions do not work.
– 16:9 Wide mode– Digital zoom– SteadyShot– Super NightShot plus– Color Slow Shutter– Fader– Picture effect– Digital effect– The Sports lesson feature of [PROGRAM AE] (The indicator flashes.)
•When the ACCESS lamp lights on, data is being recorded on the disc. Take note of thefollowing when data is being recorded, or the data and the disc may be damaged.– Do not shock or vibrate the camcorder.– Do not turn the power off.– Do not remove the battery pack or disconnect the AC adaptor.– Do not open the disc cover.
•When you press PHOTO lightly in step 7, the image momentarily flickers. This is not amalfunction.
•You can neither turn off the power nor press PHOTO while CAPTURE appears on theLCD display.
•The writing time to the disc for recording may vary depending on the still image size.
Tips•The amount of recording data may vary depending on the settings for image quality
and image size, and the type of images you are shooting.•The recording data (date/time or various settings in effect when shooting) are not
displayed while recording. However, they are recorded automatically onto the disc.To display the recording data, press DATA CODE on the Remote Commander duringplayback (page 59).
•The angle of view for still images is slightly wider compared with the angle of view ofthe movie.
•If you leave your camcorder powered by battery for 5 minutes, your camcorderautomatically turns off. This is to save battery power and to prevent battery wear.Turn the power on again by pressing the POWER button for a few seconds. You cancancel the automatic power-off by setting the (SETUP MENU) – [A.SHUT OFF]menu item to [NEVER] in the SETUP display.
Shooting still images

38
Shooting still images
Selecting the still image quality and size
To select the still image qualityYou can select the image quality from [FINE] or [STANDARD] for still image recording.The default setting is [FINE].
1 Set the mode dial to (Still).
2 Press SETUP.
3 Use the multi-selector to select (CAMERA SET) .
4 Use the multi-selector to select [QUALITY].
5 Use the multi-selector to select the desired image quality.The amount of recording data varies depending on the settings for imagequality.Image quality settingsFINE (FINE):Use this mode when you want to record high quality images. The images arecompressed to about 1/4.STANDARD (STD):This is the standard image quality level for your camcorder. The images arecompressed to about 1/10.
6 Press SETUP.The SETUP display disappears from the LCD display.
[ SETUP ] : END
SELFTIMERBURSTQUALITY
OFF
N. S. LIGHTRETURN
IMAGESIZE
CAMERA SET
[ SETUP ] : END
PROGRAM AEFLASH MODEFLASH LVLWHT BAL
MANUAL SET

39
Sho
otin
g m
ovies/still im
ages
Shooting still images
[ SETUP ] : END
SELFTIMERBURSTQUALITY
OFF
N. S. LIGHTRETURN
IMAGESIZE
CAMERA SET
1152 640
[ SETUP ] : END
SELFTIMERBURSTQUALITY
1152 x 864N. S. LIGHT
RETURN
IMAGESIZE
CAMERA SET
REMAIN[2000]
640 x 480
[ SETUP ] : END
PROGRAM AEFLASH MODEFLASH LVLWHT BAL
MANUAL SET
To select the still image sizeYou can select either of 2 image sizes, 1152 × 864 or 640 × 480.The default setting is 1152 × 864.
1 Set the mode dial to (Still).
2 Press SETUP.
3 Use the multi-selector to select (CAMERA SET).
4 Use the multi-selector to select [IMAGESIZE].
5 Use the multi-selector to select the desired image size.The indicator changes as follows:
6 Press SETUPThe SETUP display disappears from the LCD display.

40
Number of still images recordable on a discYour camcorder compresses image data in JPEG format (extension .jpg).Default image data file name is as following:•100-0001: This file name appears on the LCD display of your camcorder.•DSC00001.jpg: This file name appears on the display of your personal computer.Number may vary depending on the settings of the image quality, the image size andthe type of images you are shooting.
Image quality Image sizeRecordable number DVD-RW DVD-RVIDEO VR VIDEO
FINE 1152 × 864 2 250 2 250 2 150640 × 480 5 400 5 400 5 100
STANDARD 1152 × 864 4 300 4 350 4 100640 × 480 8 600 8 600 8 100
The table shows approximate recordable number and the above numbers apply to asingle-sided disc, and it will be doubled for a double-sided disc.
File size of still images
Image qualityFile size
640 × 480 1152 × 864
FINE 150 KB 500 KB
STANDARD 60 KB 200 KB
The table shows approximate file size.
Shooting still images

41
Sho
otin
g m
ovies/still im
ages
Shooting still images
Shooting images continuously
You can record still images continuously by setting [BURST].
NORMAL Your camcorder shoots up to 4 still images in 1152 × 864 size or 12 still images in640 × 480 size at about 0.6 sec intervals.
EXP BRKTG (Exposure bracketing) Your camcorder automatically shoots 3 images at about 0.6 sec intervals at differentexposures.
1 Set the mode dial to (Still).
2 Press SETUP.
3 Use the multi-selector to select (CAMERA SET).
[ SETUP ] : END
SELFTIMERBURSTQUALITY
OFF
N. S. LIGHTRETURN
IMAGESIZE
CAMERA SET
[ SETUP ] : END
PROGRAM AEFLASH MODEFLASH LVLWHT BAL
MANUAL SET

42
4 Use the multi-selector to select [BURST].
5 Use the multi-selector to select [NORMAL] or [EXP BRKTG].
6 Press SETUP.The SETUP display disappears from the LCD display.
7 Press PHOTO all the way down.Images are recorded continuously as the settings specified above.In the [NORMAL] settings, images are recorded continuously to the maximumnumber while pressing PHOTO.
Notes•You may not be able to record continuous images up to the maximum number
depending on the image size and the remaining capacity of the disc.•The flash unit (optional) is disabled during continuous shooting.• It takes longer to record continuous images to the disc compared to normal shooting.
Shoot the next still image after the scroll bar indicator and the ACCESS lamp turns off.
Tips•Shooting with the self-timer or the Remote Commander, images are automatically
recorded up to the maximum number possible.•The effect of exposure bracketing may be difficult to recognize on the LCD display. It is
recommended that you connect your camcorder to a TV or a computer to see its effect.
Shooting still images
[ SETUP ] : END
SELFTIMERBURSTQUALITY
NORMAL
N. S. LIGHTRETURN
IMAGESIZE
CAMERA SET
[ SETUP ] : END
SELFTIMERBURSTQUALITY
OFF
N. S. LIGHTRETURN
IMAGESIZE
CAMERA SET
NORMALEXP BRKTG

43
Sho
otin
g m
ovies/still im
ages
Adjusting the exposure forbacklit subjects – BACK LIGHT
When you shoot a subject with the light sourcebehind the subject or a subject with a lightbackground, use the backlight.
1 Set the mode dial to (Movie) or (Still).
2 Press BACK LIGHT.The . indicator appears on the LCDdisplay.
To cancel BACK LIGHTPress BACK LIGHT again.
NoteIf you press EXPOSURE when shooting withBACK LIGHT, the backlight will be canceled.
Adjusting the exposure
BACK LIGHTbutton
Adjusting the exposuremanually
Adjust the exposure manually in the followingcases:
– when you need a fine adjustment forsubjects against the light.
– when the subject is too bright against thebackground.
– when recording dark pictures (e.g. nightscenes).
1 Set the mode dial to (Movie) or (Still).
2 Press EXPOSURE.
The exposure indicator appears.
NEAR FAR
VIDEO0:00:00 -R
EXPOSUREbutton

44
Adjusting the exposure
3 Use the multi-selector to adjust thebrightness shown as below.–: Get darker+: Get brighter
To return to the automaticexposurePress EXPOSURE again.
Notes•When you adjust the exposure manually, the
following functions do not work:– Color Slow Shutter– BACK LIGHT
•Your camcorder automatically returns to theautomatic exposure setting:– if you change the PROGRAM AE effect.– if you slide the NIGHTSHOT PLUS switch
to ON, while adjusting the exposuremanually.

45
Sho
otin
g m
ovies/still im
ages
Notes•Do not use the NightShot plus mode in bright
places (e.g. outdoors in the daytime). Thismay cause your camcorder to malfunction.
•If focusing is difficult with the autofocusmode when using NightShot plus, focusmanually.
•While recording using the NightShot Light,do not obstruct the Infrared rays (NightShotLight) emitter with your finger.
•While using NightShot plus, you cannot usethe following functions:– Exposure– PROGRAM AE (The indicator flashes)– White balance
Using Super NightShot plus
The Super NightShot plus makes subjects morethan 16 times brighter than those recorded inthe NightShot plus.
1 Set the mode dial to (Movie).
2 Slide the NIGHTSHOT PLUS switch to ON.
3 Press SUPER NS PLUS.The and [“SUPER NIGHTSHOTPLUS”] indicators flash on the LCDdisplay.
To cancel Super NightShot plusPress SUPER NS PLUS again.
Notes•You cannot use Super NightShot plus to
record still images.•While using Super NightShot plus, the
shutter speed is automatically adjusteddepending on the brightness. At this time,the motion of the picture may slow down.
•While using Super NightShot plus, youcannot use the following functions:– Fader– Exposure– Digital effect– PROGRAM AE– White balance
The functions using infrared rays, such asNightShot plus and Super NightShot plus, orColor Slow Shutter are useful when you shoota subject at night or in a dark place.NightShot plus and Super NightShot plusenable you to shoot bright movies, and ColorSlow Shutter enables you to shoot movies inrealistic color.
Using NightShot plus
1 Set the mode dial to (Movie) or (Still).
2 Slide the NIGHTSHOT PLUS switch to ON.The and [“NIGHTSHOT PLUS”]indicators flash on the LCD display.
To cancel the NightShot plusSlide the NIGHTSHOT PLUS switch to OFF.
Shooting in the dark – NightShot plus, etc.
SUPER NS PLUS/COLOR SLOW Sbutton
NIGHTSHOTPLUS switch
NIGHTSHOTlight emitter

46
Using the NightShot Light
The picture will be clearer with the NightShotLight on.NightShot Light rays are infrared and so areinvisible. The maximum shooting distanceusing the NightShot Light is about 3 m (10feet).To enable the NightShot Light, set (CAMERA SET) – [N.S.LIGHT] to [ON] in theSETUP display.The default setting is [ON].
Using Color Slow Shutter
Color Slow Shutter enables you to record colorimages in a dark place.Color Slow Shutter may not work normally intotal darkness.
1 Set the mode dial to (Movie).
2 Slide the NIGHTSHOT PLUS switch toOFF.
3 Press COLOR SLOW S.The and [“COLOR SLOW SHUTTER”]indicators flash on the LCD display.
To cancel Color Slow ShutterPress COLOR SLOW S again to make the indicator disappear.
Notes•You cannot use Color Slow Shutter to record
still images.•While using Color Slow Shutter, the shutter
speed is automatically adjusted dependingon the brightness. At this time, the motion ofthe picture may slow down.
•While using Color Slow Shutter, you cannotuse the following functions:– Fader– Exposure– Digital effect– PROGRAM AE
Shooting in the dark – NightShot plus, etc.

47
Sho
otin
g m
ovies/still im
ages
On shooting still images
1 Set the mode dial to (Still), then performSteps 2 to 6.
2 Press PHOTO all the way down.Self-timer starts counting down with abeep. In the last 2 seconds of thecountdown, the beep gets faster, thenrecording starts automatically 10 secondsafter pressing PHOTO.
To cancel self-timerSet (CAMERA SET) – [SELFTIMER] to[OFF] in the SETUP display during thestandby.
Notes•When the self-timer recording is finished, the
self-timer is automatically cancelled.•You can set self-timer during the standby
only.•You cannot stop the count-down on shooting
still images by pressing PHOTO.
TipTo stop the countdown when shooting amovie, press START/STOP.To restart the countdown, press START/STOPagain.
On shooting movies
1 Set the mode dial to (Movie).
2 Press SETUP.
3 Use the multi-selector to select (CAMERA SET).
4 Use the multi-selector to select[SELFTIMER].
5 Use the multi-selector to select [ON].
6 Press SETUP.The SETUP display disappears from theLCD display and the (self-timer)indicator appears.
7 Press START/STOP.Self-timer starts counting down with abeep. In the last 2 seconds of thecountdown, the beep gets faster, thenrecording starts automatically 10 secondsafter pressing START/STOP.
START/STOPbutton
[ SETUP ] : END
SELFTIMERD ZOOM16 : 9WIDE
N. S. LIGHTRETURN
STEADYSHOT
CAMERA SETOFFON
SETUPbutton
PHOTObutton
Self-timer recording

48
1 Set the mode dial to (Movie).
2 Press SETUP.
3 Use the multi-selector to select (CAMERA SET).
4 Use the multi-selector to select [16:9WIDE].
5 Use the multi-selector to select [ON].
6 Press SETUP.The SETUP display disappears from theLCD display.
To cancel the 16:9 Wide modeSet [16:9WIDE] to [OFF] in step 5.
[ SETUP ] : END
SELFTIMERD ZOOM16 : 9WIDE ON
N. S. LIGHTRETURN
STEADYSHOT
CAMERA SET
[ SETUP ] : END
PROGRAM AEP EFFECTD EFFECT
AUTO SHTRWHT BAL
MANUAL SET
[ SETUP ] : END
SELFTIMERD ZOOM16 : 9WIDE
N. S. LIGHTRETURN
STEADYSHOT
CAMERA SETOFF
[ SETUP ] : END
SELFTIMERD ZOOM16 : 9WIDE
N. S. LIGHTRETURN
STEADYSHOT
CAMERA SET
OFFON
You can record a 16:9 Wide picture to watchon a 16:9 wide-screen TV (16:9WIDE).Black bands appear on the LCD display duringrecording in 16:9 Wide mode [a]. The pictureduring playback on a normal TV [b] or on awide-screen TV [c] is compressed in thelongwise direction. If you set the screen modeof the wide-screen TV to the full mode, youcan watch pictures of normal images [d].If you connect a TV compatible with the ID-1/ID-2 system, the screen size is selectedautomatically.Refer to the operating instructions of your TVfor further information.
*1 When 16:9 Wide mode switches to fullmode, the picture appears on the TV screenat the right ratio.
*2 When you play back in ordinary TV (4:3mode), the picture may be compressed.When you play back in 16:9 Wide mode, thepicture appears as you see it on the LCDdisplay or in the viewfinder.
16:9WIDE
[a]
[b]*2[c]*1
[d]
Shooting for the wide-screen TV– 16:9 Wide mode

Sho
otin
g m
ovies/still im
ages
49
Shooting for the wide-screen TV – 16:9 Wide mode
Notes•You cannot select [OLD MOVIE] (page 54)
during recording in the 16:9 Wide mode.•When you select VIDEO mode, setting the
recording mode to [LP] cancels the 16:9 Widemode.
•You cannot change a movie recorded in the16:9 Wide mode to the normal aspect.
Tips•Pictures recorded in 16:9 Wide mode
automatically appear on the TV screen at fullsize when:– you connect your camcorder to a TV that is
compatible with the video ID (ID-1/ID-2)system.
– you connect your camcorder to the SVIDEO jack on the TV.
•The ID-1 system sends aspect ratio (screenhorizontal/vertical ratio) information (16:9,4:3, or letter box) along with the videosignals.
•The ID-2 system sends a copyright protectionsignal with ID-1 signals inserted betweenvideo signals when you connect yourcamcorder to other equipment using the A/Vconnecting cable.

50
Normally white balance is adjustedautomatically. Adjust manually in thefollowing cases:•When shooting in a place that the light
condition changes often such as a party hall.•When shooting a night scene and a neon
sign.
1 Set the mode dial to (Movie) or (Still).
2 Press SETUP.
3 Use the multi-selector to select (MANUAL SET).
4 Use the multi-selector to select [WHT BAL].
5 Select the desired white balance with themulti-selector.HOLD :When recording a single-colored subject orbackground
(OUTDOOR) :•When recording a sunset/sunrise, just
after sunset, just before sunrise•When recording a neon signs, or
fireworks•Under a color-matching fluorescent lampn (INDOOR) :•Where the lighting condition changes
quickly•When recording in TV lighting in a studio•Under sodium lamps or mercury lamps
6 Press SETUP.The SETUP display disappears from theLCD display.
Adjusting the white balance manually
[ SETUP ] : END
PROGRAM AEP EFFECTD EFFECT
AUTO
AUTO SHTRRETURN
WHT BAL
MANUAL SET
[ SETUP ] : END
PROGRAM AEP EFFECTD EFFECT
AUTOAUTO SHTRRETURN
WHT BAL
MANUAL SET
HOLDOUTDOORINDOOR
To return to the automatic whitebalance modeSet (MANUAL SET) – [WHT BAL] to[AUTO] in the SETUP display.
Notes•In the [HOLD] white balance, set the white
balance to [AUTO] and reset it to [HOLD]after a few seconds:– when you change the [PROGRAM AE]
setting.– when you take your camcorder outdoors
from inside a house, or vice versa.•If you remove the power source longer than
five minutes, the white balance returns to[AUTO] automatically.
Tips•If the picture is being taken in a studio lit
with a video light (optional), it isrecommended that you record using[INDOOR].
•When you record under fluorescent lighting,use the [AUTO] or [HOLD].Your camcorder may not adjust the whitebalance correctly when you use [INDOOR].
•In the automatic white balance mode, pointyour camcorder at a white subject for about10 seconds after turning the power on to geta better adjustment:– after you replace the battery pack.– when you take your camcorder outdoors
from inside a house while holding theexposure, or vice versa.
•When you slide the NIGHTSHOT PLUSswitch to ON, white balance returns to[AUTO].

Sho
otin
g m
ovies/still im
ages
51
Shooting techniques to match yourcircumstances – PROGRAM AE
SPOTLIGHT*1
This effect prevents people’s faces, forexample, from appearing excessively whitewhen shooting subjects lit by strong light.
PORTRAIT (soft portrait)This effect brings out the subject while creatinga soft background for subjects such as peopleor flowers.
SPORTS (sports lesson)*1
This effect minimizes camera-shake on fast-moving subjects such as in tennis or golf.
BEACH&SKI*1
This effect prevents people’s faces fromappearing dark in strong light or reflectedlight, such as at a beach in midsummer or on aski slope.
SUNSETMOON (sunset & moon)*2
This effect allows you to maintain atmospherewhen you are recording sunsets, general nightviews, fireworks displays and neon signs.
LANDSCAPE*2
This effect is for when you are recordingdistant subjects such as mountains, andprevents your camcorder from focusing onglass or metal mesh in windows when you arerecording a subject behind glass or a screen.
*1 Your camcorder focuses only on subjects inthe middle to far distance.
*2 Your camcorder focuses only on distantsubject.
[ SETUP ] : END
PROGRAM AE AUTOSPOTLIGHTPORTRAITSPORTSBEACH&SKISUNSETMOON
MANUAL SET
LANDSCAPE
P EFFECTD EFFECT
AUTO SHTRRETURN
WHT BAL
[ SETUP ] : END
PROGRAM AE SPOTLIGHTMANUAL SET
P EFFECTD EFFECT
AUTO SHTRRETURN
WHT BAL
1 Set the mode dial to (Movie) or (Still).
2 Press SETUP.
3 Use the multi-selector to select (MANUAL SET).
4 Use the multi-selector to select [PROGRAMAE].
5 Use the multi-selector to select the desiredeffect.
6 Press SETUP.The SETUP display disappears from theLCD display.
To cancel PROGRAM AESet [PROGRAM AE] to [AUTO] in step 5.
Notes•The following functions do not work with
PROGRAM AE:– Color Slow Shutter– OLD MOVIE
•When NIGHTSHOT PLUS switch is set toON, PROGRAM AE does not work. (Theindicator flashes.)
•You cannot use [SPORTS] to record stillimages. (The indicator flashes.)

52
1 Set the mode dial to (Movie) or (Still).
2 Press FOCUS.
The 9 (manual focus) indicator appears.
3 Check the viewfinder or the LCD displayand use the multi-selector to adjust thefocus.
To return to the autofocusPress FOCUS again.
To record distant subjectsTurn the dial to FAR until the indicatorappears.The focus is fixed at the most distant position.
Tips•It is easier to focus on subjects if you adjust
the zoom to shoot at the “W”(wide-angle)position after adjusting the focus at the“T”(telephoto) position.
•When you shoot close to the subject, focus atthe end of the “W” (wide-angle) position.
•9 changes as follows:– when recording a distant subject.– when the subject is too close to focus on.
You can adjust the focus manually accordingto the recording conditions.Use this function in the following cases.– To record a subject behind a window covered
with raindrops.– To record horizontal stripes.– To record a subject with little contrast
between the subject and its background.– When you want to focus on a subject in the
background.
– To record a stationary subject using a tripod.
NEAR FAR
Focusing manually
FOCUSbutton
53
Sho
otin
g m
ovies/still im
ages
VIDEO0:00:00 -R
FADER
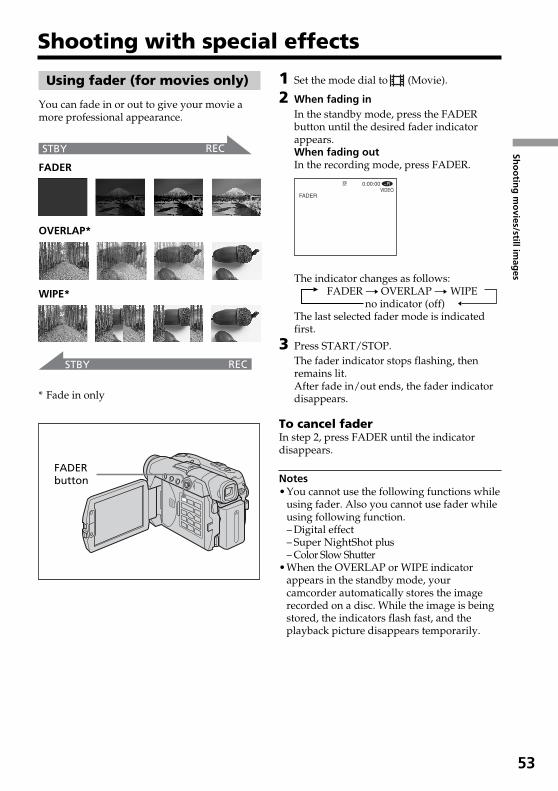
Using fader (for movies only)
You can fade in or out to give your movie amore professional appearance.
FADER
OVERLAP*
WIPE*
* Fade in only
FADERbutton
STBY REC
STBY REC
Shooting with special effects
1 Set the mode dial to (Movie).
2 When fading inIn the standby mode, press the FADERbutton until the desired fader indicatorappears.When fading outIn the recording mode, press FADER.
The indicator changes as follows:FADER t OVERLAP t WIPE no indicator (off)
The last selected fader mode is indicatedfirst.
3 Press START/STOP.The fader indicator stops flashing, thenremains lit.After fade in/out ends, the fader indicatordisappears.
To cancel faderIn step 2, press FADER until the indicatordisappears.
Notes•You cannot use the following functions while
using fader. Also you cannot use fader whileusing following function.– Digital effect– Super NightShot plus– Color Slow Shutter
•When the OVERLAP or WIPE indicatorappears in the standby mode, yourcamcorder automatically stores the imagerecorded on a disc. While the image is beingstored, the indicators flash fast, and theplayback picture disappears temporarily.

54
Shooting with special effects
Using special effects– Picture effect/Digital effect
You can digitally process movies to obtainspecial effects like those in films or on TV.
Picture effect
SEPIA: The picture appears in sepia.B&W: The picture appears in
monochrome (black-and-white).PASTEL: The picture appears like a pale
pastel drawing.MOSAIC: The picture appears mosaic-
patterned.
PASTEL MOSAIC
Digital effect
LUMI. (Luminance key):You can swap a brighter area in a still imagewith a moving picture.
OLD MOVIE:You can add an old movie-type atmosphere topictures. Your camcorder automaticallyrecords pictures in the letterbox mode for allscreen size, sepia in color, and at a slowershutter speed.
1 Set the mode dial to (Movie).
2 Press SETUP.
3 Use the multi-selector to select (MANUAL SET).
4 Use the multi-selector to select [P EFFECT]or [D EFFECT].
5 Use the multi-selector to select the desiredeffect.In the [LUMI.] mode, the still imagedisplayed when the multi-selector ispressed is recorded in the memory. Adjustthe degree of the still image swapped by amovie with b (reduce the degree)/B
(increase the degree).
6 Press SETUP.The SETUP display disappears from theLCD display.
To cancel effectSet [P EFFECT] or [D EFFECT] to [OFF] in step 5.
Notes•The following functions do not work during
digital effect:– Fader– Super NightShot plus– Color Slow Shutter
•While using picture effect, you cannot selectOLD MOVIE.
•The following functions do not work in OLDMOVIE:– 16:9 Wide mode– Picture effect– PROGRAM AE
[ SETUP ] : END
PROGRAM AEP EFFECTD EFFECT
AUTO SHTRWHT BAL
MANUAL SET
[ SETUP ] : END
PROGRAM AEP EFFECTD EFFECT
AUTO
AUTO SHTRRETURN
WHT BAL
MANUAL SET
[ SETUP ] : END
D EFFECTMANUAL SET
LUMI.
[ SETUP ] : END
D EFFECTOFFLUMI .OLD MOVIE
MANUAL SET
Bars: Displayed inLUMI. only.

55
Sho
otin
g m
ovies/still im
ages
Checking/Deleting the last scene
Checking the last scene– Review
You can check the last recorded scene quickly.
1 Set the mode dial to (Movie) or (Still).
2 Press REVIEW .The playback of the latest scene starts.
To return to recordingPress REVIEW again.
NoteThe recording data (DATA CODE) does notappear on the Review display.
TipWhen reviewing still images recordedcontinuously, you can forward/backward theimages with ./>.
Deleting the last scene(DVD-RWs only)
If the checked scene is unnecessary, you candelete it on the spot.
1 Press EDIT during the review.A deletion confirmation display appears.
2 Select [EXEC.] with the multi-selector.The latest scene is deleted.
To cancel the deletionSelect [ RET.] in step 2.
Notes•You can delete the latest scene only when it
has been recorded on a DVD-RW. Data oncerecorded on DVD-Rs cannot be deleted.
•You can delete the scene which was recordedjust before the operation. When you recordedin VR mode, you can delete any scenes. See“Deleting movies/still images” on page 89.
•When you delete the still images recordedcontinuously, all the images are deleted atsame time. You can delete a specific stillimage when you record in VR mode. See“Deleting movies/still images” on page 89.
•You cannot delete the last scene:– if you have moved the mode dial.– if you have turned the power off.– if you have ejected the disc.
REVIEW
PLAYREVIEWbutton
EXEC. RET.
DELETE?DELETE?DELETE?VIDEOVIDEO
0:00:280:00:28VIDEO
0:00:28 -RW
REVIEW
[ REVIEW ] : END
EDITbutton

56
Choosing and viewing a recording – Visual Index
The recorded scenes are displayed as a list in the Visual Index display. You can find thedesired scene quickly using this convenient index. If you close the LCD screen, you canmonitor the playback picture in the viewfinder. You can control playback using theRemote Commander supplied with your camcorder.Remove the insulation sheet to activate the Remote Commander (page 143).
1 Set the mode dial to (Play/Edit).
2 Open the LCD screen while pressing OPEN.The Visual Index display appears.
— Viewing the recordings —
Playing a disc on your camcorder
13,4
5
2
1/2001 JAN 1 03 6:00PM
Movie tab
Still image tab
Forwards the page.
Shows current page/total pages.
VISUAL INDEXbutton
VISUAL INDEXbutton
Backwards the page.
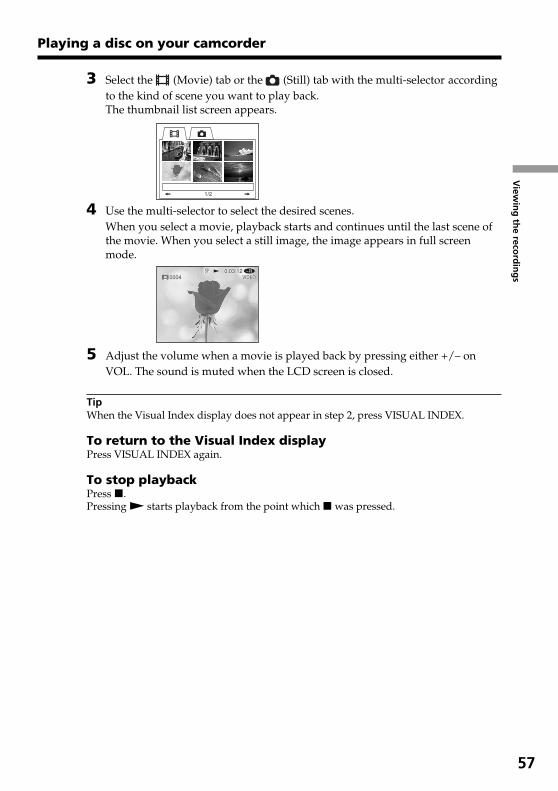
57
View
ing
the reco
rdin
gs
3 Select the (Movie) tab or the (Still) tab with the multi-selector accordingto the kind of scene you want to play back.The thumbnail list screen appears.
4 Use the multi-selector to select the desired scenes.When you select a movie, playback starts and continues until the last scene ofthe movie. When you select a still image, the image appears in full screenmode.
5 Adjust the volume when a movie is played back by pressing either +/– onVOL. The sound is muted when the LCD screen is closed.
TipWhen the Visual Index display does not appear in step 2, press VISUAL INDEX.
To return to the Visual Index displayPress VISUAL INDEX again.
To stop playbackPress x.Pressing N starts playback from the point which x was pressed.
Playing a disc on your camcorder
1/2001 JAN 1 03 6:00PM
00040004 VIDEOVIDEO0:03:120:03:12
0004 VIDEO0:03:12 -R

58
Various playback modes
MoviesThe sound is muted in the various playback modes.
To pause playback (view a still image)Press X during playback. To resume normal playback, press X again.
To advance the scenePress > during playback.
To return to the beginning of the scenePress . during playback.
To play a previous scenePress . repeatedly during playback.
To locate a scene while monitoring the picturePress and hold . or > during playback. To resume normal playback, release thebutton.On the Remote Commander, press or .*Pressing or repeatedly switches the playback speed from 5 and 10 .
To view the picture at slow speed (slow playback)Press on the Remote Commander during playback pause.* For slow playback inthe reverse direction, press on the Remote Commander.* The playback in thereverse direction moves in half a second step.
* To resume normal playback, press N.
Still imagesTo display the next imagePress >.
To display the previous imagePress ..
[Marks on the buttons]Marks on the buttons are different between the camcorder and the RemoteCommander.Marks of the camcorder: Marks of the Remote Commander:N Playback N PlaybackX Pause X Pausex Stop x Stop> Next > Next. Previous . Previous
Scan/Slow (forward)Scan/Slow (backward)
NoteIt may take some time to switch the picture from playback to forwarding/reversing orvice versa.
Playing a disc on your camcorder

59
View
ing
the reco
rdin
gs
Displaying the indicators during playback – Display
Press DISPLAY/BATT INFO on your camcorder, or press DISPLAY on your RemoteCommander.The indicators switch on or off as you press the button.
To display date/time and various settingsYour camcorder automatically records not only images on the disc but also therecording data (date/time and various settings when recorded) (Data code).To display both the date/time and the data code, set (OTHERS) – [DATA CODE] to[DATE/CAM] in the SETUP display.
To change date/time and various settingsPress DATA CODE on the Remote Commander during playback.
The display changes as follows:date/time t various settings (SteadyShot, white balance, gain, shutter speed, aperturevalue, exposure) t no indicator
Date/time
Playing a disc on your camcorder
DISPLAY/BATT INFO button
DISPLAY button
0:00:18000340min
11:23:45AMJAN 1 2004
VIDEO-R
[a] [b]
[a] date
[b] time

60
[a] SteadyShot OFF [g] Exposure value[b] Exposure [h] Shutter speed[c] White balance [i] Aperture value[d] Gain[e] Shutter speed[f] Aperture value
Tips•When you use data code during playback, bars (--- -- ----) appear if:
– the disc is unreadable due to damage or noise.– the disc was recorded through the AUDIO/VIDEO jack.
•The data code is displayed on the TV screen if you connect your camcorder to a TV.
Playing a disc on your camcorder
0:00:08000240min
F1 . 8 0dB100 AWB
AUTO
VIDEO-R
Various settings (movie)
[b]
[d]
[e]
[f]
[c]
[a]
6/34100-000640min
F1 . 860
0EV
VIDEO-R
[g]
Various settings (still image)
[h]
[i]

61
View
ing
the reco
rdin
gs
Playing a disc on your camcorder
Magnifying recorded images – PB ZOOM (Playback zoom)
1 In the playback, playback pause or review, move the power zoom lever.You can choose the magnification from approx. 1.1 to 5.W : Decreases the zoom ratio.T : Increases the zoom ratio.
2 Move the enlarged image in the desired direction with the multi-selector.
To cancel PB ZOOMPress the button in the center of the multi-selector.You can also cancel PB ZOOM by moving the power zoom lever toward W as far as itwill go.
Notes•You cannot process externally input scenes using PB ZOOM of your camcorder.•You cannot move a magnified circumferential image to the center of the display.
Tips•You cannot record images on a disc in your camcorder when you have processed the
image using PB ZOOM. However, you can record images on a VCR using yourcamcorder as a player.
•You can operate PB ZOOM in fast forward, fast backward and slow playback.•PB ZOOM is canceled when you change the scene with ./ >.
Zoom lever

62
Playing a disc on your camcorder
Playing still images automatically – Slide Show
You can see the automatic playback of all the still images recorded on the disc.
1 Set the mode dial to (Play/Edit).
2 Press SETUP.
3 Use the multi-selector to select (APPLI.).
4 Use the multi-selector to select [SLIDE SHOW].
5 Press the button in the center of the multi-selector.Still images play back in sequence. Playback stops when all the images areplayed back.
To start a slide show from a particular imageSelect the desired image with ./> after step 4.The slide show starts from the selected image and stops after all the images have beenshown.
To cancel a slide showPress SETUP.
To pause a slide showPress the button in the center of the multi-selector. Press it again to restart the slideshow.
VIDEOVIDEOSLIDESHOWSLIDESHOW
[ ENTER ] : START[ ENTER ] : START [ SETUP ] : END[ SETUP ] : END
100-0001100-00011/121/12
VIDEOSLIDESHOW
[ ENTER ] : START [ SETUP ] : END
100-00011/12 -R
[ SETUP ] : END
SLIDE SHOWAPPLI.
[ SETUP ] : END
APPLI.SLIDE SHOW
RETURNREADY

63
View
ing
the reco
rdin
gs
Connect your camcorder to your TV with the A/V connecting cable supplied with yourcamcorder to watch playback pictures on the TV screen. You can operate the videocontrol buttons in the same way as when you monitor playback pictures on the LCDdisplay. When monitoring playback pictures on the TV screen, it is recommended thatyou power your camcorder from a wall outlet using the AC adaptor (page 18). Refer tothe operating instructions of your TV.
Open the jack cover. Connect your camcorder to the TV using the A/V connecting cablesupplied with your camcorder. Then, set the TV/VCR selector on the TV to VCR.
The supplied A/V connecting cable is equipped with an S video plug and a video plug.Use either the S video plug or the video plug depending on the TV or VCR.
If your TV is already connected to a VCRConnect your camcorder to the LINE IN input on the VCR using the A/V connectingcable supplied with your camcorder. Set the input selector on the VCR to LINE.
If your TV or VCR is a monaural typeConnect the yellow plug of the A/V connecting cable to the video input jack and thewhite or the red plug to the audio input jack on the VCR or the TV. If you connect thewhite plug, the sound comes from the L (left) signal. If you connect the red plug, thesound comes from the R (right) signal.
Tips•Connecting via an S video jack reproduces pictures more faithfully. When there is an S
video jack on the device to be connected, connect the S video plug to that jack insteadof using the yellow video plug. The audio will not be output when you connect via theS video plug alone.
•To turn off the indicators on the TV, set [DISPLAY] to [V-OUT/LCD] in (OTHERS) in the SETUP display (page 116). Then press DISPLAY/BATT INFO onyour camcorder. To display the indicators, press DISPLAY/BATT INFO on yourcamcorder again.
Viewing recordings on TV
Black
: Signal flow
A/V connecting cable (supplied)
AUDIO/VIDEO
White
Yellow
Red
INPUT
VIDEO
AUDIO
TV
S VIDEO

64
— Finalizing a disc for other players —
Finalizing a discYou have to finalize the disc before you can play a recorded disc on other players.Finalizing makes the recorded disc DVD-Video compatible, and you can play the discon equipment such as DVD players.Note that you cannot record additional materials on finalized discs in VIDEO mode. Butyou can record on a disc again if you unfinalize the disc when you use DVD-RWs.Some players cannot play discs recorded in the VR mode. Make sure of playbackcompatibility with your players in advance of recording. For details, see the operatinginstructions supplied with your player.
Notes•Do not apply shock or vibration to your camcorder during finalizing.•Do not disconnect the AC adaptor during finalizing or the disc may be damaged.
When you need to disconnect the AC adaptor, make sure that the power of yourcamcorder is set to off and disconnect the adaptor after the POWER/CHG lamp goesoff. Finalizing restarts when you connect the AC adaptor and turn on your camcorderagain. You cannot remove the disc until the finalizing operation is completed.
Place your camcorder in a stable position. It takes about a minute to a few hoursfor finalizing. The shorter the amount of material recorded, the longer it takes forfinalizing.
1 Connect the AC adaptor to the DC IN jack on your camcorder, then connectthe power cord to the wall outlet.
2 Turn the power on by pressing the POWER button for a few seconds.
3 Press the FINALIZE button.The [FINALIZE] display appears on the LCD display.
When you want to change a disc title, use the multi-selector to select [DISCTITLE], and press the button in the center to confirm your selection, then startthe procedure from step 4 on page 67.
[ FINALIZE ] : END
DISC TITLEPHOTOMOVIEEXECUTE
EST. PROCESS TIME : 3minDISC TITLE :
JANPHOTOMOVIE :
RETURN
FINALIZEREADY
20041 8 : 48AM
FINALIZE
FINALIZE button

65
Finalizin
g a d
isc for o
ther p
layers
EXECUTINGAVOID ANY VIBRATION
FINALIZE
0:06
4 When still images are included on a disc recorded in VIDEO mode, use themulti-selector to select [PHOTOMOVIE], then select [CREATE]. Proceed tostep 5 in VR mode.To play back still images on players such as DVD players, still images must beconverted to a MPEG format. Converted still images are played back insequence as a movie. The original still images remain as JPEG files.When still images are recorded in VR mode, perform the operation in“Converting all the still images on a disc to a movie file – Photomovie” (page79).
5 Use the multi-selector to select [EXECUTE].The confirmation display appears.
6 Use the multi-selector to select [YES], and press the button in the center of themulti-selector to confirm your selection.Finalizing starts. In VIDEO mode, the menu display for the playback on DVDplayers appears temporarily.
7 Press FINALIZE when [COMPLETED] appears.
The finalizing completion display disappears from the LCD display.
To cancel finalizingPress FINALIZE or SETUP in any step from 3 to 6.
Finalizing a disc
[ FINALIZE ] : END
DISC TITLEPHOTOMOVIEEXECUTE
EST. PROCESS TIME : 3minDISC TITLE :
BEACHPHOTOMOVIE : CREATE
RETURN
FINALIZE
NOYES

66
Finalizing a disc
Notes•A Photomovie created in this section is used to view still images on other players. You
cannot view the Photomovie on your camcorder in VIDEO mode. Use the slide showfeature to play back still images in sequence on your camcorder (page 62).
•If you set [PHOTOMOVIE] to [CREATE] during finalizing, it may take some time forfinalizing. The more still images recorded on the disc, the more time it takes to create aPhotomovie.
•Still images which are not compatible with your camcorders, such as ones shot usinga digital still camera and then copied to a computer can not be converted from stillimages to a movie using [PHOTOMOVIE].
•Playback may pause between the scenes in some players.
Tips•You can also display the FINALIZE display by pressing SETUP and selecting
(DISC SET) – [FINALIZE] with the multi-selector.•When the finalized disc is inserted in your camcorder, the disc format display on the
upper-right corner is shown as below:– VIDEO mode: VIDEO– VR mode: VR
•A movie converted from still images is shown with .

67
Finalizin
g a d
isc for o
ther p
layersFinalizing a disc
Changing the disc title
By pressing the SETUP button, you can make a title on each disc. As the default, thedate when the disc was first used is added as a disc title.To change a disc title on the finalize display, select [DISC TITLE] with the multi-selectorand start from step 4 on this page.
1 Press SETUP.
2 Use the multi-selector to select (DISC SET).
3 Use the multi-selector to select [DISC TITLE].The DISC TITLE display appears.
4 Delete unnecessary characters by selecting [B] with the multi-selector.Characters are deleted from the end.
5 Use the multi-selector to select the desired character.Up to 20 characters can be registered.
[ SETUP ] : END
PROGRAM AEP EFFECTD EFFECT
AUTO SHTRWHT BAL
MANUAL SET
[ SETUP ] : END
REC MODEFORMATFINALIZE
SP
REMAIN
DISC TITLERETURN
UNFINALIZE
DISC SET
[30min]
STBY
DISC TITLE
[ SETUP ] : END
P1JAN 1 2004 1:23PM
[ [
DISC TITLE
[ SETUP ] : END
P1BEACH

68
6 Use the multi-selector to select [SET].The disc title is set and the display returns to the SETUP display.
7 Press SETUP.The SETUP display disappears from the LCD display.
To cancel editing the disc titleIn any step from 4 to 5, use the multi-selector to select [ESC].
NoteWhen you change a disc title already set by other devices, the 21st and subsequentcharacters are deleted.
Tips•You can add a space by selecting [ ] between [&] and [?].•When you press SETUP in step 6, the disc title is set and the SETUP display
disappears from the LCD display.
[ SETUP ] : END
REC MODEFORMATFINALIZE
BEACHDISC TITLERETURN
UNFINALIZE
DISC SET
Finalizing a disc

69
Finalizin
g a d
isc for o
ther p
layersFinalizing a disc
Playing back a disc on a DVD player, etc.
1/2
JAN 1 2004 10 : 30AM
JAN 1 20042 : 44PM
JAN 1 20043 : 15PM
JAN 1 20043 : 38PM
JAN 1 20044 : 02PM
JAN 1 20044 : 26PM
JAN 1 20044 : 45PM
2/2
JAN 1 2004 10 : 30AM
JAN 1 20044 : 50PM
JAN 1 20045 : 05PM
JAN 1 20045 : 10PM
JAN 1 20045 : 30PM
JAN 1 20045 : 32PM
JAN 1 20044 : 55PM
Disc title
Recorded date
Movies
A movie converted from still images isdisplayed after movies.The first still image is displayed as thethumbnail.
To play back a disc recorded in VIDEO modeYou can play back a finalized disc recorded in VIDEO mode on players that can playback DVD-Rs or DVD-RWs.When the disc is finalized in VIDEO mode, a menu display is provided similar to theVisual Index display. In menu display, six scenes are listed per page (200 pages inmaximum).Select the scene to be played back in menu display on the DVD player.
To play back still imagesStill images are played back as a Photomovie swapping images in every three seconds.Pressing m/M during playback skips 10 images.
To play back a disc recorded in VR modeYou can play back a finalized disc recorded in VR mode on players which is compatiblewith DVD-RWs in VR mode.Select the scene to be played back in menu display on the DVD player.
To play back still imagesThe operation is different depending on your player. See operating instructions of yourplayer.
Notes•Make sure that the vertical-shaped DVD player with a DVD drive are placed in a
horizontal position when playing back.•Do not use the 8 cm CD adaptor with an 8 cm DVD as it may cause malfunctions.•The disc may not be played back on some players.•Some functions, such as playback of still images, may be disabled on some players.•To play back still images on other players, the still images must be converted into a
Photomovie (page 79).•Still images converted to a Photomovie may not be played back clearly, as the
resolution (pixels) of the converted Photomovie is lower than that of the original stillimages.

70
Playing back a disc on a computer with a DVD drive installed
The display and the operation may vary depending on the operating system of yourcomputer.
To play back movies1 Turn on your computer.
2 Insert the finalized disc to the DVD drive of your computer.A DVD playback application starts and the movie is played back.When the DVD playback application does not start automatically, start theapplication from the [Start] menu of your computer.
To play back still images1 Turn on your computer.
2 Insert the finalized disc to the DVD drive of your computer.When a DVD playback application starts, close the application.
3 Click [Start] t [My Computer].Or, double-click the [My Computer] icon on the desktop.[My Computer] screen appears.
4 Right-click the DVD drive with the disc inserted, then click [Open].Folders in the disc appear.
5 Click [DCIM] t [100MSDCF].The list of still images recorded on the disc appears.
6 Double-click the file to be shown.The selected still image appears on the screen.
Finalizing a disc
The date the disc was first used is recorded on the volume label of the disc.When the disc was first used at 6:00 pm on January 1st 2004:2004_01_01_06H00M_PM

71
Finalizin
g a d
isc for o
ther p
layers
Structures and file names of movies and still imagesMovies and still images are stored in the following folders on the disc.Movies: VIDEO_TS folder (on VIDEO mode)
DVD_RTAV folder (on VR mode)Still images: DCIM\100MSDCF folder
Notes•Use the DVD drive compatible with 8 cm discs.•A DVD playback application must have been installed on your computer.•When playing back movies from the disc, the movie and sound may pause. In this
case, copy the data to the hard disk drive of your computer.•The disc may not be played back on some computers. For details, see operating
instructions of your computer.
TipYou can play back the disc on a computer without a DVD drive, by connecting yourcamcorder to your computer using a USB cable (page 99).
Movie folder
Still image folder
Finalizing a disc
Windows XP display

72
You can record on finalized DVD-RWs by unfinalizing them. This operation is valid inVIDEO mode only. You do not have to unfinalize a VR mode disc.Insert a finalized DVD-RW into your camcorder beforehand.
1 Press SETUP.
2 Use the multi-selector to select (DISC SET).
3 Use the multi-selector to select [UNFINALIZE].
4 Use the multi-selector to select [EXECUTE].The confirmation display appears.
5 Use the multi-selector to select [YES].Unfinalizing starts.
6 Press SETUP when the [COMPLETED] appears.The message disappears from the LCD display and you can record on the discagain.
To cancel unfinalizingPress SETUP in any step from 2 to 4.
[ SETUP ] : END
EXECUTE
EST. PROCESS TIME : 22secRECORDED AREA :
RETURN
UNFINALIZEREADY
[ SETUP ] : END
EXECUTE
EST. PROCESS TIME : 22secRECORDED AREA :
RETURN
UNFINALIZENOYES
EXECUTINGAVOID ANY VIBRATION
UNFINALIZE
0:10
Recording on a finalized disc –Unfinalizing (VIDEO mode DVD-RWs only)

73
Finalizin
g a d
isc for o
ther p
layers
Notes•Make sure that the power of your camcorder is supplied from a wall outlet using the
AC adaptor.•If you disconnect the AC adaptor while unfinalizing a disc, the disc may not be
unfinalized correctly and it cannot be used to record additional material.•Do not apply shock or vibration to your camcorder during unfinalizing.•You can unfinalize DVD-RWs only. You cannot unfinalize a DVD-R disc.
TipIt takes about 20 seconds for unfinalizing.
Recording on a finalized disc – Unfinalizing(VIDEO mode DVD-RWs only)

74
[ SETUP ] : END
REC FORMATEXECUTE
RETURN
FORMATVIDEO
ALL DATA TO BE DELETED
EST. PROCESS TIME : 7secREC FORMAT : VIDEO
You can format recorded DVD-RWs and make them new discs. Note that formattingerases all the data recorded on the disc.Insert a recorded DVD-RW into your camcorder beforehand.
1 Press SETUP.
2 Use the multi-selector to select (DISC SET).
3 Use the multi-selector to select [FORMAT].
4 Use the multi-selector to select [REC FORMAT].
5 Use the multi-selector to select [VIDEO] or [VR].
6 Use the multi-selector to select [EXECUTE].The confirmation display appears.
7 Use the multi-selector to select [YES].Formatting starts.
[ SETUP ] : END
REC FORMATEXECUTE
ALL DATA TO BE DELETED
FORMAT
CAN PLAYBACK ONVARIOUS DVD DEVICES.CANNOT EDIT IN CAMCORDER
VIDEOVR
RETURN
Recording again on a used disc – Formatting(DVD-RWs only)
[ SETUP ] : END
REC FORMATEXECUTE
RETURN
FORMATVIDEO
ALL DATA TO BE DELETED
EST. PROCESS TIME : 7secREC FORMAT : VIDEO
[ SETUP ] : END
REC FORMATEXECUTE
ALL DATA TO BE DELETED
FORMAT
EST. PROCESS TIME : 7secREC FORMAT : VIDEO
NOYESRETURN
EXECUTINGAVOID ANY VIBRATION
FORMAT
0:10

75
Finalizin
g a d
isc for o
ther p
layers
8 Press SETUP when the [COMPLETED] appears on the LCD display.The FORMAT display disappears from the LCD display. The disc is formattedand you can record on the disc again.
To cancel formattingPress SETUP in any step from 2 to 6.
Notes•Make sure that the power of your camcorder is supplied from a wall outlet using the
AC adaptor.•If you disconnect the AC adaptor during formatting, the disc may not be formatted
correctly or damaged, and can not be recorded.•Do not apply shock or vibration to your camcorder during formatting.•You can format DVD-RWs only. You cannot delete any recorded data from DVD-Rs.
Tips•It takes about 10 seconds to format a DVD-RW in VIDEO mode, and about 40 seconds
to format a DVD-RW in VR mode.•When you format a finalized disc, you will have a disc in one of the following
conditions:– VIDEO mode: unfinalized– VR mode: finalized.You can record additional scenes or edit a disc finalized in VR mode.
Recording again on a used disc – Formatting (DVD-RWs only)

76
You can edit the Playlist on your DVD-RWs recorded in VR mode. The Playlist is a listused to change the playback order of scenes to suit your own preference. The originalscenes do not have any change even though you edit or delete the scenes in the Playlist.
Notes•The Playlist is usable in VR mode only.•Do not remove the battery pack or the AC adaptor from you camcorder while editing.
It may damage the disc.
Registering movies or still images in the Playlist
Insert a DVD-RW recorded in VR mode into your camcorder.
1 Set the mode dial to (Play/Edit).
2 Press EDIT.The display to select editing object appears.
3 Use the multi-selector to select [EDIT PLAYLIST].The Playlist edit display appears.
— Using a disc in VR mode (DVD-RWs only) —
Selecting the playing order on yourcamcorder – Playlist
[ EDIT ] : END
EDIT MOVIE
EDIT STILL
EDIT PLAYLIST
EDIT
1/1
SEL. ITEMEDIT
RET.
. (PREV) button
N (PLAY)button
> (NEXT) button
EDIT button
Multi-selector
x (STOP) button
X (PAUSE) button

77
Usin
g a d
isc in V
R m
od
e (DV
D-R
Ws o
nly)
4 Use the multi-selector to select [SEL.ITEM].
5 Use the multi-selector to select [ADD].
6 Use the multi-selector to select [ SELECT] (movies) or [ SELECT] (stillimages).A thumbnail list of movies or still images on the disc appears.
7 Use the multi-selector to select the scene to be added to the Playlist.The selected scene is marked with .Repeat this step to select multiple scenes.
Pressing N starts playback of the selected scene. Press x to return to thedisplay to select other scenes.
8 Use the multi-selector to select [EXEC.] .The confirmation display appears.
Selecting the playing order on your camcorder – Playlist
SEL. ITEMERASEADDMOVEDIVIDE
RETURN
EDIT
SELECT ALLSELECT
SEL. ITEMERASEADDMOVEDIVIDE
RETURN
EDIT
ALLSELECTSELECT
1/1
EXEC.
001 JAN 1 04 6:00PM
EDIT ADDRET.
Forwards the page.
Shows current page/total pages.
1/1
EXEC.
004 JAN 1 04 6:30PM
EDIT ADDRET.
EDIT ADD
EXEC. RET.
ADD?ADD?ADD?
Backwards the page.

78
Selecting the playing order on your camcorder – Playlist
9 Use the multi-selector to select [EXEC.].The selected movies or still images are registered in the Playlist. When a stillimage is added to a Playlist, it is converted and registered as a new movie inthe movie folder. It returns to the Playlist edit display when the registration iscompleted.
To register all movies at the same timeSelect [ ALL] in step 6.
To register all still images at the same timeSee “Converting all the still images on a disc to a movie file – Photomovie” on page 79.
To cancel the registrationPress EDIT in any step from 3 to 8.
Tips•You can register up to 999 scenes in the Playlist.•You can register only MPEG format movies in the Playlist. Still images recorded in
JPEG format are converted to MPEG format when you register them in the Playlist.The original still image remains in the JPEG format.
•A movie converted from still images is shown with .
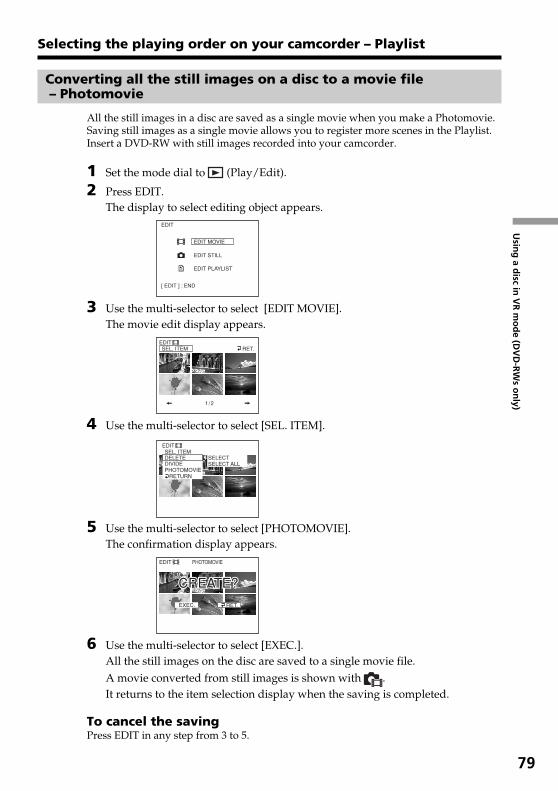
79
Usin
g a d
isc in V
R m
od
e (DV
D-R
Ws o
nly)
Converting all the still images on a disc to a movie file – Photomovie
All the still images in a disc are saved as a single movie when you make a Photomovie.Saving still images as a single movie allows you to register more scenes in the Playlist.Insert a DVD-RW with still images recorded into your camcorder.
1 Set the mode dial to (Play/Edit).
2 Press EDIT.The display to select editing object appears.
3 Use the multi-selector to select [EDIT MOVIE].The movie edit display appears.
4 Use the multi-selector to select [SEL. ITEM].
5 Use the multi-selector to select [PHOTOMOVIE].The confirmation display appears.
6 Use the multi-selector to select [EXEC.].All the still images on the disc are saved to a single movie file.A movie converted from still images is shown with .It returns to the item selection display when the saving is completed.
To cancel the savingPress EDIT in any step from 3 to 5.
[ EDIT ] : END
EDIT MOVIE
EDIT STILL
EDIT PLAYLIST
EDIT
1/2
SEL. ITEMEDIT
RET.
SEL. ITEMDELETE SELECT
SELECT ALLDIVIDEPHOTOMOVIE
RETURN
EDIT
EDIT PHOTOMOVIE
EXEC. RET.
CREATE?CREATE?CREATE?
Selecting the playing order on your camcorder – Playlist

80
Erasing unnecessary scenes from the Playlist
Erasing unnecessary scenes from the Playlist does not affect the actual recorded data onthe disc.Insert a Playlist-registered DVD-RW into your camcorder.
1 Set the mode dial to (Play/Edit).
2 Press EDIT.The display to select editing object appears.
3 Use the multi-selector to select [EDIT PLAYLIST].The Playlist edit display appears.
4 Use the multi-selector to select [SEL. ITEM].
5 Use the multi-selector to select [ERASE].
6 Use the multi-selector to select [SELECT].A thumbnail list of scenes registered in the Playlist appears.
[ EDIT ] : END
EDIT MOVIE
EDIT STILL
EDIT PLAYLIST
EDIT
1/2
SEL. ITEMEDIT
RET.
SEL. ITEMERASEADDMOVEDIVIDE
RETURN
EDIT
SELECT ALLSELECT
SEL. ITEMERASEADDMOVEDIVIDE
RETURN
EDIT
SELECT ALLSELECT
1/2
EXEC.
001 JAN 1 04 6:00PM
EDIT ERASERET.
Selecting the playing order on your camcorder – Playlist

81
Usin
g a d
isc in V
R m
od
e (DV
D-R
Ws o
nly)
7 Use the multi-selector to select the scene to be erased.The selected scene is marked with .Repeat this step to erase multiple scenes.
Pressing N starts playback of the selected scene. Press x to return to thedisplay to select other scenes.
8 Use the multi-selector to select [EXEC.].The confirmation display appears.
9 Use the multi-selector to select [EXEC.].The selected scenes are erased from the Playlist. It returns to the Playlist editdisplay when the erasing is completed.
To erase all the scenes at the same timeSelect [SELECT ALL] in step 6 then perform step 9.
To cancel erasingPress EDIT in any step from 3 to 8.
TipStill images registered in a Playlist are converted to an MPEG format movie file. If youerase still images from a Playlist, the converted movie file made from the still imagesstill remains. To delete a converted movie file from the movie folder, see “Deletingmovies/still images” (page 89).
1/2
EXEC.
003 JAN 1 04 6:10PM
EDIT ERASERET.
EDIT ERASE
EXEC. RET.
ERASE?ERASE?ERASE?
Selecting the playing order on your camcorder – Playlist

82
Changing the order within the Playlist
Insert a Playlist-registered DVD-RW into your camcorder.
1 Set the mode dial to (Play/Edit).
2 Press EDIT.The display to select editing object appears.
3 Use the multi-selector to select [EDIT PLAYLIST].The Playlist edit display appears.
4 Use the multi-selector to select [SEL. ITEM].
5 Use the multi-selector to select [MOVE].A thumbnail list of the scenes registered to the Playlist appears.
[ EDIT ] : END
EDIT MOVIE
EDIT STILL
EDIT PLAYLIST
EDIT
Selecting the playing order on your camcorder – Playlist
1/2
SEL. ITEMEDIT
RET.
SEL. ITEMERASEADDMOVEDIVIDE
RETURN
EDIT
SELECT ALLSELECT
1/2
EXEC.
001 JAN 1 04 6:00PM
EDIT MOVERET.

83
Usin
g a d
isc in V
R m
od
e (DV
D-R
Ws o
nly)
6 Use the multi-selector to select the scene to be moved.The selected scene is marked with .Repeat this step if you want to move multiple scenes.
Pressing N starts playback of the selected scene. Press x to return to thedisplay to select other scenes.
7 Use the multi-selector to select [EXEC.].The move destination display appears.
8 Use the multi-selector to place the move destination bar where you want tomove the scenes.The confirmation display appears.
9 Use the multi-selector to select [EXEC.].The selected scene in step 6 is moved to the designated position. When youhave selected multiple scenes, the scenes are moved following the orderdisplayed in the Playlist.It returns to the Playlist edit display when the moving is completed.
To cancel changing the orderPress EDIT in any step from 3 to 8.
Selecting the playing order on your camcorder – Playlist
1/2[ENTER] : MOVE
EDIT MOVERET.
Move destination bar
EDIT MOVE
EXEC. RET.
MOVE?MOVE?MOVE?
1/2
EXEC.
001 JAN 1 04 6:00PM
EDIT MOVERET.
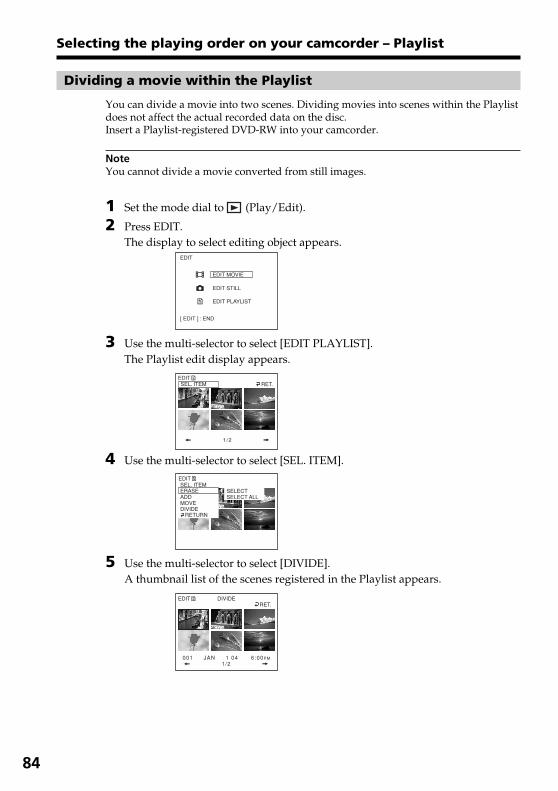
84
Dividing a movie within the Playlist
You can divide a movie into two scenes. Dividing movies into scenes within the Playlistdoes not affect the actual recorded data on the disc.Insert a Playlist-registered DVD-RW into your camcorder.
NoteYou cannot divide a movie converted from still images.
1 Set the mode dial to (Play/Edit).
2 Press EDIT.The display to select editing object appears.
3 Use the multi-selector to select [EDIT PLAYLIST].The Playlist edit display appears.
4 Use the multi-selector to select [SEL. ITEM].
5 Use the multi-selector to select [DIVIDE].A thumbnail list of the scenes registered in the Playlist appears.
[ EDIT ] : END
EDIT MOVIE
EDIT STILL
EDIT PLAYLIST
EDIT
Selecting the playing order on your camcorder – Playlist
1/2
SEL. ITEMEDIT
RET.
SEL. ITEMERASEADDMOVEDIVIDE
RETURN
EDIT
SELECT ALLSELECT
EDIT DIVIDERET.
1/2001 JAN 1 04 6:00PM

85
Usin
g a d
isc in V
R m
od
e (DV
D-R
Ws o
nly)
6 Use the multi-selector to select the scene to be divided.The playback of the selected scene starts.
7 Press the button in the center of the multi-selector at the point at which youwant to divide the movie into scenes.The movie pauses.
NoteA slight difference may occur from the point where you press c/C and theactual dividing point, as your camcorder selects the dividing point based on half-second increments.
8 Use the multi-selector to select [EXEC.].The confirmation display appears.
9 Use the multi-selector to select [EXEC.] again.Dividing of the movie starts. It returns to the Playlist edit display when thedividing is completed.
To cancel dividingPress EDIT in any step from 3 to 8.
Selecting the playing order on your camcorder – Playlist
DIVIDE
[ ] : RETURN
2:402:402:40
[EDIT] : END
0:00:120:00:120:00:12RET.EXEC.
DIVIDE
[ ] : RETURN
2:402:402:40
[EDIT] : END
0:02:050:02:050:02:05RET.EXEC.
DIVIDE
[ ] : RETURN [EDIT] : END
0:02:050:02:050:02:05
DIVIDE?DIVIDE?DIVIDE?EXEC. RET.
Time in progress
Total time of theselected scenes
After selecting u usingthe multi-selector, adjustthe dividing point withmore precision.

86
Playing the Playlist
Insert a Playlist-registered DVD-RW into your camcorder.
1 Set the mode dial to (Play/Edit).
The Visual Index display appears.
2 Use the multi-selector to select (Playlist) tab.A thumbnail list of the scenes registered to the Playlist appears.
3 Press N.A playback of the Playlist starts. On still images, they are displayed on theLCD screen for a while. It returns to the Visual Index display when all theregistered scenes are played back.
To start playback from a particular sceneUse the multi-selector to select the scene.Playback starts from the selected scene.
To display another scene during playbackPress ./>.
To pause the scenePress X.
To cancel playbackPress x.
Selecting the playing order on your camcorder – Playlist
1/2001 JAN 1 03 6:00PM
1/2001 JAN 1 03 6:00PM
Playlist tab

87
Usin
g a d
isc in V
R m
od
e (DV
D-R
Ws o
nly)
Editing the original dataOriginal data stand for the actual recorded movies and still images data on the disc.You can edit the original data of DVD-RW recorded in VR mode. Editing the originaldata affects the actual recorded data.
Dividing a movie
Note that this operation actually divides the original recorded data on the disc.Insert a movie recorded DVD-RW into your camcorder.
Notes•You cannot divide still images and still images converted to a movie.•When the movie is registered in the Playlist, dividing the original movie does not
affect the movie in the Playlist.
1 Set the mode dial to (Play/Edit).
2 Press EDIT.The display to select editing object appears.
3 Use the multi-selector to select [EDIT MOVIE].The Movie edit display appears.
4 Use the multi-selector to select [SEL. ITEM].
5 Use the multi-selector to select [DIVIDE].A thumbnail list of movies on the disc appears.
[ EDIT ] : END
EDIT MOVIE
EDIT STILL
EDIT PLAYLIST
EDIT
1/2
SEL. ITEMEDIT
RET.
SEL. ITEMDELETE SELECT
SELECT ALLDIVIDEPHOTOMOVIE
RETURN
EDIT
EDIT DIVIDERET.
1/2001 JAN 1 04 6:00

88
6 Use the multi-selector to select the scene to be divided.The playback of the selected movie starts.
7 Press the center of the multi-selector at the point at which you want to dividethe movie into scenes.The movie pauses.
NoteA slight difference may occur from the point where you press c/C and the actualdividing point, as your camcorder selects the dividing point based on half-secondincrements.
8 Use the multi-selector to select [EXEC.].The confirmation display appears.
9 Use the multi-selector to select [EXEC.] again.Dividing of the movie starts. It returns to the movie edit display when thedividing is completed.
To cancel dividingPress EDIT in any step from 3 to 8.
Editing the original data
DIVIDE
[ ] : RETURN
2:402:402:40
[EDIT] : END
0:00:120:00:120:00:12RET.EXEC.
Time in progress
Total time of theselected scenes
DIVIDE
[ ] : RETURN
2:402:402:40
[EDIT] : END
0:02:050:02:050:02:05RET.EXEC.
After selecting u using themulti-selector, adjust the dividingpoint with more precision.
DIVIDE
[ ] : RETURN [EDIT] : END
0:02:050:02:050:02:05
DIVIDE?DIVIDE?DIVIDE?EXEC. RET.

89
Usin
g a d
isc in V
R m
od
e (DV
D-R
Ws o
nly)
Deleting movies/still images
Note that this operation actually deletes recorded data from the disc.Insert a recorded DVD-RW into your camcorder.
Notes•When you delete movies, the movies registered to the Playlist are also deleted.•Deleting scenes may not provide enough space to record movies or still images
additionally.
1 Set the mode dial to (Play/Edit).
2 Press EDIT.The display to select editing object appears.
3 Use the multi-selector to select [EDIT MOVIE] or [EDIT STILL].The movie or still images edit display appears.
4 Use the multi-selector to select [SEL. ITEM].
5 Use the multi-selector to select [DELETE].
Editing the original data
[ EDIT ] : END
EDIT MOVIE
EDIT STILL
EDIT PLAYLIST
EDIT
1/2
SEL. ITEMEDIT
RET.
SEL. ITEMDELETE SELECT
SELECT ALLDIVIDEPHOTOMOVIE
RETURN
EDIT
SEL. ITEMDELETEDIVIDEPHOTOMOVIE
RETURN
EDIT
SELECT ALLSELECT
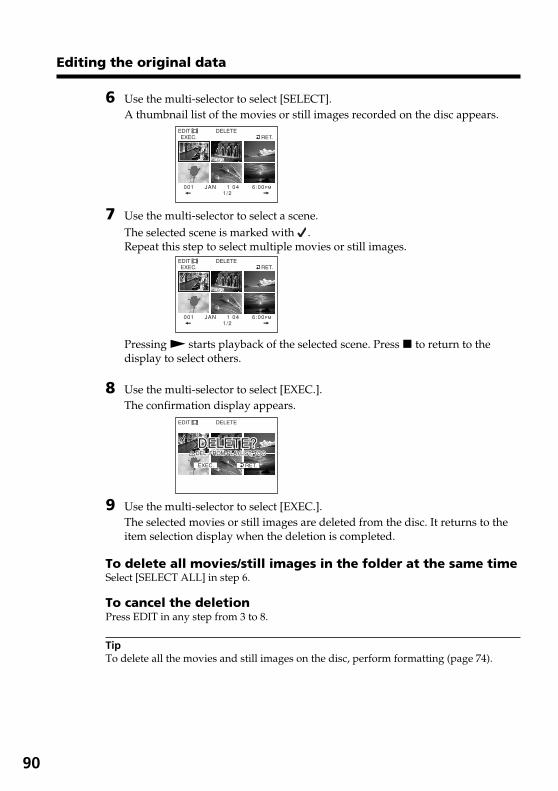
90
6 Use the multi-selector to select [SELECT].A thumbnail list of the movies or still images recorded on the disc appears.
7 Use the multi-selector to select a scene.The selected scene is marked with .Repeat this step to select multiple movies or still images.
Pressing N starts playback of the selected scene. Press x to return to thedisplay to select others.
8 Use the multi-selector to select [EXEC.].The confirmation display appears.
9 Use the multi-selector to select [EXEC.].The selected movies or still images are deleted from the disc. It returns to theitem selection display when the deletion is completed.
To delete all movies/still images in the folder at the same timeSelect [SELECT ALL] in step 6.
To cancel the deletionPress EDIT in any step from 3 to 8.
TipTo delete all the movies and still images on the disc, perform formatting (page 74).
Editing the original data
1/2
EXEC.
001 JAN 1 04 6:00PM
EDIT DELETERET.
1/2
EXEC.
001 JAN 1 04 6:00PM
EDIT DELETERET.
EDIT DELETE
EXEC. RET.
DELETE?DELETE?DELETE?DEL. FROM PLAYLIST, TOO DEL. FROM PLAYLIST, TOO DEL. FROM PLAYLIST, TOO

91
View
ing
/du
plicatin
g d
iscs/editin
g th
e record
ing
s on
you
r com
pu
ter
A USB driver and application softwareinstallation is required to connect yourcamcorder to your computer.The USB driver along with the applicationsoftware required for editing scenes can befound on the CD-ROM supplied with yourcomputer.You can enjoy the following withyour camcorder by connecting the camcorderto your computer using the USB cable:•Copying recorded scenes to your computer•Viewing scenes on your computer•Editing scenes copied to your computer•Duplicating a disc•Making an original DVD using recorded
scenes stored on your computer.
Notes•Scenes may not be transferred correctly
depending on your computer. If thishappens, set [USB SPEED] to [FULL-SPEED]in (SETUP MENU) in the SETUP display.
•Depending on your application software, thefile size may increase when you open a stillimage file.
•Communications between your camcorderand your computer may not recover properlyeven after your computer recovers fromSuspend/Resume, or from Sleep status.
•The software in the supplied CD-ROM doesnot work with a Mac OS or Mac OSX.
Tips•Your camcorder is compatible with Hi-Speed
USB (the USB 2.0 Specification).You cantransfer data at a faster rate using a computercompatible with Hi-Speed USB.
•When you connect a USB interface notcompatible with Hi-Speed USB, the datatransfer ratio will be that of USB 1.1 (USB fullspeed).
— Viewing/duplicating discs/editing the recordings on your computer —
Connecting your camcorder to yourcomputer – Introduction
System requirements
OS:Microsoft Windows Me,Microsoft Windows 2000 Professional,Microsoft Windows XP Home Edition orMicrosoft Windows XP Professional.The above OS must be installed at the factory.Operations are not guaranteed in anenvironment upgraded to the operatingsystems described above or in a multi-bootenvironment.CPU:Minimum: 500 MHz Intel Pentium III or faster(1 GHz Intel Pentium III or fasterrecommended)Application:DirectX 8.0a or laterSound system:16 bit stereo sound card and stereo speakersMemory:64 MB or moreHard disk:Available free space required for installation:at least 250 MBAvailable hard disk space recommended:at least 2 GB (depending on the size of the filesedited)Display:Video card with 4 MB or more of VRAM,Minimum 800 × 600 Hi color (16 bit color,65 000 colors), DirectDraw display drivercapability (At 800 × 600 or less, 256 colors andless, this product will not operate correctly.)USB port:Must be provided as standard.
Consult the computer manufacturer for thedetails on connectors and editing software ofyour computer.

92
3 Move the cursor to [USB Driver] andclick.
InstallShield Wizard program starts up.
4 Click [Next].The USB driver installation starts.[InstallShield Wizard Complete] dialogbox appears after a while.
5 Click [Finish].The USB driver installation iscompleted.
NoteIf you connect the USB cable before USB driverinstallation is complete, the USB driver will notbe properly installed. Install the USB driveragain following the steps in “If you cannotinstall the USB driver” (page 98).
Installing the USB driver
Start the following operation beforeconnecting the USB cable to yourcomputer.
Install the USB driver to control yourcamcorder from your computer.
If you are using Windows 2000 Professionalor Windows XP Home Edition/ProfessionalLog on as administrator.
1 Turn on your computer and allowWindows to load.When your computer is already turnedon, close all the software.
2 Insert the supplied CD-ROM into theCD-ROM drive of your computer.The installation menu window appears.
If the menu window does not appear,double-click [My Computer], then[ImageMixer] (CD-ROM Drive). Themenu window appears after a while.
Connecting your camcorder to your computer – Introduction

93
View
ing
/du
plicatin
g d
iscs/editin
g th
e record
ing
s on
you
r com
pu
terConnecting your camcorder to your computer – Introduction
Installing software
Install the ImageMixer Ver.1.5 for Sony DVDHandycam (hereinafter referred to asImageMixer) software that manages moviesand still images transferred from yourcamcorder on your computer, and theWINASPI software that manages writing dataon CD-Rs/CD-RWs.
1 When the USB driver installation iscompleted, click [ImageMixer] on themenu window.Install Wizard program starts up andthe [Choose Setup Language] windowappears.If the menu window does not appear,double-click [My Computer], then[ImageMixer] (CD-ROM Drive). Themenu window appears after a while.
2 Select the language to be used and click[OK].
3 Follow the instructions given in the on-screen messages. When the [Setup Type]window appears, make sure that[NTSC] is selected and continue theprocedure. The [InstallShield WizardComplete] dialog box appears.
4 Click [Finish].The installation of ImageMixer iscompleted. The installation dialog boxof WINASPI appears.
5 Click [OK], and follow the instructionsgiven in the on-screen messages.
6 When The [InstallShield WizardComplete] dialog box appears, click[Finish].
7 Take out the CD-ROM from the CD-ROM drive after the computer restarts.
NoteOn a computer without DirectX 8.0a or later,DirectX installation starts. Follow theinstructions given in the on-screen messagesand restart the computer after the installationis complete.
About WINASPITo be able to use the ImageMixer CD writingfunction, you need to install WINASPI. If adifferent writing application was previouslyinstalled, its writing function may not workcorrectly. If that happens, reinstall the originalapplication and replace WINASPI. Note thatthe ImageMixer CD writing function may notwork properly.

94
5 Select [Install the software automatically(Recommended)] and click [Next].
6 Make sure that [Sony DVD Handycam]is selected as the best match and click[Next].Click [Sony DVD Handycam] if it is notselected.[Completing the Found New HardwareWizard] dialog box appears.USB port
Connecting your camcorder to your computer – Introduction
Connecting your camcorder tothe computer
Notes•Install the USB driver before connecting the
camcorder to your computer. If you connectthe camcorder to the computer first, you willnot be able to install the USB driver correctly.
•You can connect only one camcorder to everysingle computer.
•Operations are not guaranteed if you connectyour camcorder via a USB hub or to the USBport not equipped with your computer atdefault.
•Operations are not guaranteed on all therecommended environments.
For Microsoft Windows XP users1 Connect the AC adaptor to your
camcorder.
2 Set the mode dial to (Play/Edit).
3 Turn the power on your camcorder bypressing the POWER button for a fewseconds.
4 Connect the (USB) jack of thecamcorder and the (USB) port of thecomputer using the USB cable suppliedwith your camcorder.
Your computer recognizes thecamcorder, and the [Found NewHardware Wizard] starts.
USB cable(supplied)
USB jack

95
View
ing
/du
plicatin
g d
iscs/editin
g th
e record
ing
s on
you
r com
pu
ter
7 Click [Finish].The connection between yourcamcorder and the computer iscompleted.
To confirm the USB driver installation1 Click [Start] t [Control Panel].2 Click [Performance and Maintenance]
t [System].[System Properties] window appears.
3 Click [Hardware] tab.4 Click [Device Manager].
[Device Manager] window appears.5 Make sure that [SONY DDX-A1010 USB
Device] appears in [DVD/CD-ROMdrives], [Generic volume] in [Storagevolumes], and [USB Mass StorageDevice] in [Universal Serial Buscontrollers] respectively.When all the devices appear, the USBdriver is installed correctly. If any ofthese devices are not shown, install theUSB driver again following “If youcannot install the USB driver” (page 98).
For Microsoft Windows 2000users1 Connect the AC adaptor to your
camcorder.
2 Set the mode dial to (Play/Edit).
3 Turn the power on your camcorder bypressing the POWER button for a few
seconds.
4 Connect the (USB) jack of thecamcorder and the (USB) port of thecomputer using the USB cable suppliedwith your camcorder.
Your computer recognizes thecamcorder, and the [Found NewHardware] dialog box appears.
5 Follow the instructions given in the on-screen messages.The connection between yourcamcorder and the computer iscompleted.
Connecting your camcorder to your computer – Introduction
USB cable(supplied)
USB jack
USB port

96
For Microsoft Windows Me users1 Connect the AC adaptor to your
camcorder.
2 Set the mode dial to (Play/Edit).
3 Turn the power on your camcorder bypressing the POWER button for a few
seconds.
4 Connect the (USB) jack of thecamcorder and the (USB) port of thecomputer using the USB cable suppliedwith your camcorder.
Your computer recognizes thecamcorder, and the [New HardwareFound] dialog box appears.
5 Follow the instructions given in the on-screen messages and restart yourcomputer.The connection between yourcamcorder and the computer iscompleted.
USB port
To confirm the USB driver installation1 Click [Start] t [Settings] t [Control
Panel].2 Click [System].
[System Properties] window appears.3 Click [Hardware] tab.4 Click [Device Manager].
[Device Manager] window appears.5 Make sure that [SONY DDX-A1010 USB
Device] appears in [DVD/CD-ROMdrives], [Generic volume] in [Storagevolumes], and [USB Mass StorageDevice] in [Universal Serial Buscontrollers] respectively.When all the devices appear, the USBdriver is installed correctly. If any ofthese devices are not shown, install theUSB driver again following “If youcannot install the USB driver” (page 98).
Connecting your camcorder to your computer – Introduction
USB cable(supplied)
USB jack

97
View
ing
/du
plicatin
g d
iscs/editin
g th
e record
ing
s on
you
r com
pu
ter
To confirm the USB driver installation1 Click [Start] t [Settings] t [Control
Panel].2 Click [System].
[System Properties] window appears.3 Click [Device Manager].
[Device Manager] window appears.4 Make sure that [SONY DDX-A1010]
appears in [CDROM], [Sony DVDHandycam] in [Storage device], and[USB Mass Storage Device] in [UniversalSerial Bus controllers] respectively.When all the devices appear, the USBdriver is installed correctly. If any ofthese devices are not shown, install theUSB driver again following “If youcannot install the USB driver” (page 98).
To disconnect the USB cable1 Move the cursor to the [Unplug or Eject
Hardware] icon on the Task Tray andclick to cancel the applicable drive.
2 After the [Safe to Remove Hardware]dialog box appears, disconnect the USBcable and turn off your camcorder.
Notes•Be sure to turn off your camcorder after
disconnecting the USB cable from yourcomputer. Turning off your camcorderkeeping connection to the computer mayprevent from normal disconnection.
•Never disconnect the USB cable when theACCESS lamp is lit in red. It may cause adamage to the disc.
Connecting your camcorder to your computer – Introduction
98
Consulting the on-line help
An ImageMixer on-line help is available whereyou can find detailed operating instructionsfor ImageMixer software.
1 Click located at the top right of thewindow.Or, click [Start] t [Programs] ([AllPrograms] in Windows XP) t[PIXELA] t [ImageMixer] t [Help].The ImageMixer Help window appears.
2 Find the information you need from thetable of contents.
To close the on-line helpClick the button at the top right of thewindow.
If you have any questions about ImageMixerImageMixer is a product of PIXELACorporation. For details, refer to the operatinginstructions of the CD-ROM supplied withyour camcorder.
If you cannot install the USBdriverThe USB driver has been registered incorrectlyas your camcorder was connected to yourcomputer before the installation of the USBdriver was completed. The incorrect data ofthe USB driver will be deleted when youre-install the driver correctly. Do the followingsteps to install the USB driver.
1 Disconnect your camcorder from thecomputer following “To disconnect theUSB cable” (page 97).
2 Install the USB driver again following“Installing the USB driver” (page 92).
3 After “InstallShield Wizard complete”dialog box disappears, restart yourcomputer.
4 Connect your camcorder to thecomputer following “Connecting yourcamcorder to the computer” (page 94).The USB driver installation and theconnection between your camcorderand the computer is completed.
Connecting your camcorder to your computer – Introduction

99
View
ing
/du
plicatin
g d
iscs/editin
g th
e record
ing
s on
you
r com
pu
ter
You must install the USB driver and theImageMixer software to view scenes recordedon a disc with your computer (page 92, 93).
If you are using Windows 2000 Professionalor Windows XP Home Edition/Professional,log in as administrator.
Viewing scenes on the disc
You can view scenes recorded on the discwithout finalizing on your computer, byinserting a recorded disc into your camcorderand connecting it to your computer.
1 Turn on your computer and allowWindows to load.
2 Connect the AC adaptor to yourcamcorder.
3 Set the mode dial to (Play/Edit).
4 Turn the power on your camcorder bypressing the POWER button for a fewseconds.
5 Insert a recorded disc into yourcamcorder.
6 Connect the (USB) jack of thecamcorder and the (USB) port of thecomputer using the USB cable suppliedwith your camcorder.
Viewing scenes recorded on your computer
7 Double-click [ImageMixer Ver.1.5 forSony DVD Handycam] icon on theWindows desktop.Or, click [Start] t [Programs] ([AllPrograms] in Windows XP) t[PIXELA] t [ImageMixer] t [PIXELAImageMixer Ver.1.5 for Sony DVDHandycam] on your computer.The ImageMixer software starts and thetitle dialog box appears.
8 Click on the left of the window.The thumbnails of the scenes recordedon the disc appear.When the thumbnails do not appear,
click , then click .
Click to view movies and click to view still images.
USB port
USB jack
Thumbnails
USB cable(supplied)

100
9 Double-click the scene to view from thethumbnails.The selected scene is temporarily copiedto your computer and is displayed inthe preview window.To return to the thumbnails list, click
below right of the window.
To save the scene on yourcomputer1 Click the thumbnail of the scene to save.
2 Click .The selected scene is saved on yourcomputer.
To view the album1 Click .2 Double-click the scene to view from the
thumbnails.The selected scene is displayed. Whenyou have selected a movie, click andstart playback.To return to the thumbnails list, click
at the top right of the window.
Viewing scenes recorded on your computer
Notes•If you connect the USB cable before USB
driver installation is complete, the USBdriver will not be properly registered. Installthe USB driver again following the steps in“If you cannot install the USB driver” (page98).
•It may take some time to save the scene to thecomputer depending on the recording mode(page 32) and the length of the movie.
•You cannot remove the disc from yourcamcorder during displaying the thumbnailson your computer display.
•When anything goes wrong with theoperation, close all the software and restartthe computer.
Tips•An album is a unit to register and to manage
the saved movies and still images saved fromyour camcorder to your computer.
•A movie converted from still images is notdisplayed.

101
View
ing
/du
plicatin
g d
iscs/editin
g th
e record
ing
s on
you
r com
pu
ter
Making a disc copy
You can make a copy of a finalized disc.
1 Turn on your computer and allowWindows to load.
2 Connect the AC adaptor to yourcamcorder.
3 Set the mode dial to (Play/Edit).
4 Turn the power on your camcorder bypressing the POWER button for a fewseconds.
5 Insert a recorded and finalized disc intoyour camcorder.
6 Connect the (USB) jack of thecamcorder and the (USB) port of thecomputer using the USB cable suppliedwith your camcorder.
7 Start the ImageMixer software on yourcomputer.
8 Click on the left of the window.
9 Click .The confirmation dialog box appears.
USB port
10 Click [OK].
11 When the copy completion messageappears, remove the disc and insert anew disc into your camcorder.
12 Click [OK].Copying of data from your computer tothe new disc starts. When the disc copyoperation is completed, a dialog boxasking if you want to make anadditional copy appears.
13 If you want to make an additional copy,click [OK].The making of an additional copy starts.If you do not want to make anadditional copy, click [Cancel] to endthe procedure.
14 Remove the disc following theinstructions given in the on-screenmessages.
Notes•It may take some time to save the scene
depending on the recording mode (page 32)and the length of the movie.
•You cannot make a copy of an unfinalizeddisc.
•You cannot copy a DVD-RW recorded in VRmode to a DVD-R. Use another DVD-RW.
•The ACCESS lamp lights up whenduplicating a disc. During the duplication,you cannot remove the disc.
•Using DVD-RWs for the copied mediaprevents you from unfinalizing and makingadditional recordings on your camcorderbecause the format of copied media isdifferent from that of your camcorder. Youmust format the DVD-RW to recordadditional material on the disc.
TipTo use the disc with other DVD authoringapplications, you must copy movies to yourPC using ImageMixer, and have a fileexporting procedure available. For details, seethe ImageMixer on-line help.
Making a disc copy – Disc Duplicating
USB cable(supplied)
USB jack

102
Editing and saving scenes
Editing movies
You can combine multiple scenes into a singlescene.
1 Click on the title window.The window switches to the [MovieEditing Environment] and thumbnailsappear.
2 Drag and drop the thumbnails on thestoryboard in the order you want to editthem.
When you want to delete a specificscene, click the scene, then click .
Saving the movie on yourcomputer
When the editing of the movie is completed,you can save the data on your computer. Thefollowing procedure shows an example ofsaving data in the [My Documents] folder.
1 Click on the right of the window.The [Output Format Settings] dialog boxappears.
2 Click [OK].
3 Select the [My Documents] folder as thesaving destination, then name the fileand click [OK] to save it.When the movie is saved, it is also savedas a new file in the album.
NoteIt takes some time for saving the file in thefollowing cases:– when the file includes both movies and still
images.– when the file includes multiple recording
modes (HQ/SP/LP).– when some effects such as faders are added.
To view the saved fileDouble-click the saved file (stored in the [MyDocuments] folder in this procedure).Windows Media Player starts and the file isplayed back.
Thumbnail
Storyboard

103
View
ing
/du
plicatin
g d
iscs/editin
g th
e record
ing
s on
you
r com
pu
ter
You can edit the scenes registered to the albumand make an original DVD.
Making a menu
A menu is required to play a disc recorded onyour camcorder on a DVD player.
1 Click on the title window.The [Layout mode] window appears.
2 Click the tab and select abackground.
3 Drag and drop thumbnails of the scenesto record on the disc, onto thebackground.The thumbnails change into icons andthe selected scenes are registered tocontents.You can register an album as a singletitle by dragging and dropping thealbum onto the background. You canalso joint scenes from multiple albumsand display them as a single title.
4 When you want to change the names
and designs of icons, click the tab.Click the icon and change the settings.
Creating an original disc
Title
Disc title
Album menu:Click to change thedisplayed album.
tab
Background

104
Editing the contents
You can edit the contents by adding/deletingscenes, changing the order of scenes, andselecting an image used for the thumbnail.
1 Click the icon of the contents to edit,
then click on the left of the window.The [Album mode] window appears.
2 Drag and drop the contents to add andchange the order.To delete the contents, click thecontents, then click . Note thatimage selected as a thumbnail cannot bedeleted.
5 When you want to change the disc titleshown on the menu, click the tab.Change the settings such as the nameand the font.
TipWhen you create a DVD on the DVD driveinstalled with your computer, you can changethe “Disc Type” from [1.4G] to [4.7G] byclicking at the top right of the window.Selecting [4.7G] enables you to record data in12 cm DVD-R/DVD-RW at its maximumcapacity.
Creating an original disc
tab

105
View
ing
/du
plicatin
g d
iscs/editin
g th
e record
ing
s on
you
r com
pu
ter
Recording on a disc
Check the menu and view the contents on apreview window, then record the contents on adisc.
1 Click on the left of the window.The [Writing mode] window appears.
2 Click the button on the (Previewpanel) box on the upper left of thewindow, and preview the contents.
Creating an original disc
Plays backthe sceneof theselectedicon.
Selects theicon
N:Playback./>:Backwards/forwards thecontents.X: Pausex: StopTITLE:Returns tothe menu.
3 When you have checked that all thecontents are right, connect yourcamcorder to the computer with theUSB cable, then insert a blank disc intoyour camcorder.
4 Click .The [DVD Video Output] windowappears.
5 Click [OK].Recording on the disc starts.When the operation is completed, adialog box asking if you want to makean additional copy appears.
6 If you want to make an additional copy,click [OK].The making of an additional copy starts.If you want to finish the procedure, click[Cancel].
7 Remove the disc following theinstructions given in the on-screenmessages.
Notes•It may take some time to save the scene
depending on the recording mode orrecording time.
•The ACCESS lamp lights up when recordingon a disc. During the recording, you cannotremove the disc.

106
You can dub movies recorded in a disc using aVCR connected to your camcorder, using yourcamcorder as a player.
Connecting your camcorder toa VCR
Connect your camcorder to the VCR using theA/V connecting cable supplied with yourcamcorder.
— Connecting your camcorder to a TV and a VCR —
Dubbing a disc to a tape
Tips•You can edit on VCRs that support the
following systems: 8 mm, Hi8, VHS, S-VHS,
VHSC, S-VHSC, Betamax, ED Betamax, mini
DV, DV, Digital8, MICRO MV•If your VCR is a monaural type, connect the
yellow plug of the A/V connecting cable tothe video input jack and the white or the redplug to the audio input jack on the VCR.When the white plug is connected, the leftchannel audio is output, and when the redplug is connected, the right channel audio isoutput.
•Connecting via an S video jack reproducespictures more faithfully. When there is an Svideo jack on the device to be connected,connect the S video plug to that jack insteadof using the yellow video plug. The audiowill not be output when you connect via theS video plug alone.
Black
AUDIO/VIDEO
: Signal flow
A/V connectingcable (supplied)
YellowRed
White
VIDEO INPUT
AUDIO
VCR
S VIDEO

107
Co
nn
ecting
you
r camco
rder to
a TV an
d a V
CR
Dubbing a disc to a tape
Dubbing to a tape
Before operation•Set [DISPLAY] in (OTHERS) to [LCD] in
the SETUP display (the default setting is[LCD]).
•Press the following buttons to make theindicators disappear so that they will not besuperimposed on the edited tape:– DISPLAY/BATT INFO– DISPLAY on the Remote Commander– DATA CODE on the Remote Commander
1 Insert the recorded disc into yourcamcorder.
2 Prepare the VCR for recording.Insert a blank tape (or a tape you wantto record over) into the VCR.Set the input selector to LINE.Refer to the operating instructions of theVCR.
3 Start recording on the VCR.
4 Play back the recorded disc on yourcamcorder.
When you have finished dubbingStop recording on the VCR, then press x onyour camcorder.
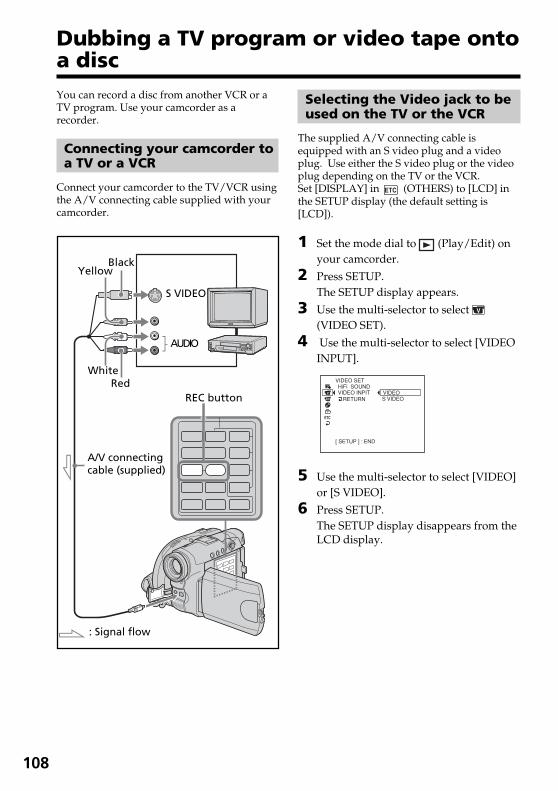
108
Dubbing a TV program or video tape ontoa discYou can record a disc from another VCR or aTV program. Use your camcorder as arecorder.
Connecting your camcorder toa TV or a VCR
Connect your camcorder to the TV/VCR usingthe A/V connecting cable supplied with yourcamcorder.
: Signal flow
A/V connectingcable (supplied)
Yellow
RedWhite
Black
Selecting the Video jack to beused on the TV or the VCR
The supplied A/V connecting cable isequipped with an S video plug and a videoplug. Use either the S video plug or the videoplug depending on the TV or the VCR.Set [DISPLAY] in (OTHERS) to [LCD] inthe SETUP display (the default setting is[LCD]).
1 Set the mode dial to (Play/Edit) onyour camcorder.
2 Press SETUP.The SETUP display appears.
3 Use the multi-selector to select (VIDEO SET).
4 Use the multi-selector to select [VIDEOINPUT].
5 Use the multi-selector to select [VIDEO]or [S VIDEO].
6 Press SETUP.The SETUP display disappears from theLCD display.
AUDIO
S VIDEO
REC button
[ SETUP ] : END
VIDEO INPITHiFi SOUND
VIDEO
VIDEO SET
S VIDEORETURN

109
Co
nn
ecting
you
r camco
rder to
a TV an
d a V
CR
Dubbing onto a disc
1 Prepare the TV/VCR.If you are recording a tape from theVCR, insert a recorded tape into theVCR.
2 Set the mode dial to (Play/Edit) onyour camcorder.
3 Insert a blank disc (or a disc you want torecord additionally) into yourcamcorder.The [FORMAT] display appears whenyou insert a new DVD-RW. Format thedisc in VIDEO mode or in VR mode(page 6) following the instructions onthe display.
4 Press VISUAL INDEX on yourcamcorder.The Visual Index display disappears,and the image from the LINE appears.
5 Play back the tape on the VCR if you arerecording a tape from a VCR. Select aTV program if you are recording from aTV. The picture from the VCR or TVappears on the LCD display or in theviewfinder.
6 Press RECz and the adjacent button atthe same time on your camcorder at thescene where you want to start recording.Dubbing starts.
When you have finished dubbingPress x on your camcorder to stop recordingand stop the playback on the VCR.
NoteThere may be time difference between thepoint when you press REC and the actualpoint that the recording starts/stops.
Tips•To change the recording mode, see page 32.•If your VCR is a monaural type, connect the
yellow plug of the A/V connecting cable tothe video output jack and the white or thered plug to the audio output jack on the VCRor the TV. If you connect the white plug, thesound is from the L (left) signal. If youconnect the red plug, the sound is from the R(right) signal.
•Connecting via an S video jack reproducespictures more faithfully. When there is an Svideo jack on the device to be connected,connect the S video plug to that jack insteadof using the yellow video plug. The audiowill not be output when you connect via theS video plug alone.
Dubbing a TV program or video tape onto a disc
REC

110
— Customizing your camcorder —
Changing the SETUP displayYou can change the default settings byselecting the options in the SETUP displaywith the multi-selector.Select the item in the following order:SETUP display t icon t menu itemt option
Menu items are displayed as the followingicons. The displayed icons are differentdepending on the mode dial position.
APPLI.MANUAL SETVIDEO SETCAMERA SETLCD/VF SETDISC SETSETUP MENUOTHERS
1 Turn the power on by pressing thePOWER button for a few seconds.
2 Press the SETUP button.One of the following screens appearsdepending on the position of the modedial. Set the mode dial to (Movie), (Still), or (Play/Edit), then pressSETUP.
(Movie)
(Still)
(Play/Edit)
3 Use the multi-selector to select thedesired icon.
4 Use the multi-selector to select thedesired item.
5 Use the multi-selector to select thedesired mode.
6 If you want to change other items, select[ RETURN] using the multi-selector andpress the button in the center of themulti-selector to confirm your selection,then repeat steps 3 to 5.To return to step 3, select [ RETURN].
For details, see “Selecting the option of eachitem” on the next page.
To make the SETUP display disappearPress SETUP.
[ SETUP ] : END
SELFTIMERBURSTQUALITY
OFF
N. S. LIGHTRETURN
IMAGESIZE
CAMERA SET
[ SETUP ] : END
SELFTIMERBURSTQUALITY
OFF
N. S. LIGHTRETURN
IMAGESIZE
CAMERA SET
NORMALEXP BRKTG
[ SETUP ] : END
SELFTIMERBURSTQUALITY
NORMAL
N. S. LIGHTRETURN
IMAGESIZE
CAMERA SET
[ SETUP ] : END
PROGRAM AEP EFFECTD EFFECT
AUTO SHTRWHT BAL
MANUAL SET
[ SETUP ] : END
PROGRAM AEFLASH MODEFLASH LVLWHT BAL
MANUAL SET
[ SETUP ] : END
SLIDE SHOWAPPLI.

111
Cu
stom
izing
you
r camco
rder
Changing the SETUP display
Selecting the option of each item
Menu items differ depending on the position of the mode dial. The display shows only the itemsthat are currently in effect or that you can operate at the moment.z is the default setting.
Icon/Item
MANUAL SET
PROGRAM AE
P EFFECT
D EFFECT
FLASH MODE*1
FLASH LVL*1*2
WHT BAL
AUTO SHTR
*1 You cannot adjust [FLASH MODE] and [FLASH LVL] if an external flash (optional) is notconnected.
*2 You cannot adjust [FLASH LVL] if the external flash (optional) used is not compatible with theflash level.
*3 You cannot adjust these settings if the external flash (optional) used is not compatible with thered-eye reduction.
*4 An electronic shutter is the function used to adjust the shutter speed electronically.
Option
—
—
—
z ON
ON *3
AUTO
AUTO *3
HIGH
z NORMAL
LOW
—
z ON
OFF
Meaning
To suit your specific shooting requirement(page 51).
To add special effects like those in films oron TV to images (page 54).
To add special effects using the variousdigital functions (page 54).
To fire the flash (optional), regardless ofthe brightness of the surroundings.
To fire the flash (optional), regardless ofthe brightness of the surroundings. Pre-flashes before recording to reduce the red-eye phenomenon.
To fire the flash (optional) automatically.
To fire the flash (optional) automatically.Pre-flashes before recording to reduce thered-eye phenomenon.
To make the flash (optional) level higherthan normal setting.
Normal setting.
To make the flash (optional) level lowerthan normal setting.
To adjust the white balance (page 50).
To automatically activate the electronicshutter*4 when shooting in brightconditions.
To not automatically activate the electronicshutter*4 in bright conditions.
Mode dial
Movie Still
Movie
Movie
Still
Still
Movie Still
Movie

112
Icon/Item
CAMERA SET
SELFTIMER
D ZOOM
16:9WIDE
STEADYSHOT
BURST
QUALITY
IMAGESIZE
N.S.LIGHT
NotesOn SteadyShot•SteadyShot will not correct excessive camera shake.•Attachment of a conversion lens (optional) may influence SteadyShot.
TipIf you cancel SteadyShot, the SteadyShot off indicator appears. Your camcorder preventsexcessive compensation for camera-shake.
Changing the SETUP display
Option
z OFF
ON
z OFF
20
120
z OFF
ON
z ON
OFF
z OFF
NORMAL
EXP BRKTG
z FINE
STANDARD
z 1152 864
640 480
z ON
OFF
Meaning
To disable self-timer.
To use self-timer (page 47).
To deactivate the digital zoom. Only up to10 optical zoom is performed.
To activate the digital zoom. From 10 to20 zoom is performed digitally (page 33).
To activate the digital zoom. From 10x to120 zoom is performed digitally.
Not to record a 16:9 Wide picture.
To record a 16:9 Wide picture (page 48).
To compensate for camera-shake.
To cancel SteadyShot. Natural picturesare produced when shooting a stationaryobject with a tripod.
To disable the Burst.
To record up to four (in 1152 864 size)or 12 (in 640 480 size) still imagescontinuously fast (page 41).
To record three images continuously withdifferent exposures.
To record still images in the fine imagequality (page 38).
To record still images in the standardimage quality.
To record still images in 1152 864 size(page 39).
To record still images in 640 480 size.
To use NightShot Light (page 45).
To cancel NightShot Light .
Mode dial
Movie
Still
Movie
Movie
Movie
Still
Still
Still
Movie Still

113
Cu
stom
izing
you
r camco
rder
Changing the SETUP display
Icon/Item
LCD/VF SET
LCD BRIGHT
LCD B.L.
LCD COLOR
VF B.L.
NotesOn LCD B.L. and VF B.L.•When you select [BRIGHT], battery life is reduced a little during recording.•When you use power supplies other than the battery pack, [BRIGHT] is automatically selected.
TipEven if you adjust [LCD BRIGHT], [LCD B.L.], [LCD COLOR], and/or [VF B.L.], the recordedpicture will not be affected.
Option
—
z BRT NORMAL
BRIGHT
—
z BRT NORMAL
BRIGHT
Meaning
To adjust the brightness on the LCD screenwith –/+.
To set the brightness on the LCD screen tonormal.
To brighten the LCD screen.
To adjust the color on the LCD screen with–/+.
To set the brightness on the viewfinderscreen to normal.
To brighten the viewfinder screen.
Darker Brighter
To get low-intensitycolor
To get high-intensitycolor
Mode dial
Movie Still Play/Edit
Movie Still Play/Edit
Movie Still Play/Edit
Movie Still Play/Edit
Icon/Item
APPLI.
SLIDE SHOW
Option
—
Meaning
To play back still images continuously(page 62).
Mode dial
Play/Edit

114
Icon/Item
DISC SET
REC MODE
FORMAT*1
FINALIZE
UNFINALIZE*1*2
DISC TITLE
FILE NO.
*1 DVD-RWs only*2 VIDEO mode only
Icon/Item
VIDEO SET
HiFi SOUND
VIDEO INPUT
Changing the SETUP display
Option
HQ
z SP
LP
—
—
—
—
z SERIES
RESET
Option
z STEREO
1
2
z VIDEO
S VIDEO
Meaning
To record in the HQ (High Quality) mode.
To record in the SP (Standard Play) mode.
To record in the LP (Long Play) mode.
To format a disc (page 74).
To prohibit further recording on the disc,and make it compatible with other DVDplayers (page 64).
To make the finalized disc recordableagain (page 72).
To add an original title to the disc (page67).
To assign numbers to files in sequenceeven if the disc is changed.
To reset the file numbering each time thedisc is changed.
Meaning
To play back a stereo disc or dual sound trackdisc with main and sub sound.
To play back a stereo disc with the left soundor a dual sound track disc with main sound.
To play back a stereo disc with the right soundor a dual sound trackdisc with sub sound.
To use the A/V connecting cable to connectyour camcorder and a player.
To use the S VIDEO cable to connect yourcamcorder and a player.
Mode dial
Movie Play/Edit
Movie Still Play/Edit
Movie Still Play/Edit
Movie Still Play/Edit
Movie Still Play/Edit
Still
Mode dial
Play/Edit
Play/Edit

115
Cu
stom
izing
you
r camco
rder
Icon/Item
SETUP MENU
CLOCK SET
A. SHUT OFF
LTR SIZE
USB SPEED
DEMO MODE
Changing the SETUP display
Option
—
z 5 min
NEVER
z NORMAL
2
z AUTO
FULL-SPEED
z ON
OFF
Meaning
To set the date or time (page 23).
To turn the power off automatically if nooperation have taken place for five minuteswhen powered by the battery pack.
To remain the power on even if no operationlast.
To display selected menu items in normal size.
To display selected menu items at twice thenormal size.
To send data corresponding with theconnected computer.
To send data corresponding with USB 1.1 (fullspeed transfer).
To make the demonstration appear.
To cancel the demonstration mode.
Mode dial
Movie Still Play/Edit
Movie Still Play/Edit
Movie Still Play/Edit
Play/Edit
Movie
NotesOn DEMO MODE•You cannot select [DEMO MODE] when a disc is inserted in your camcorder.•When NIGHTSHOT PLUS switch is set to ON, the [“NIGHTSHOT PLUS”] indicator appears on
the LCD display and you cannot select [DEMO MODE] in the SETUP display.•The following operations cancel the demonstration: - When the mode dial is set to (Still) or (Play/Edit). - When you press SETUP. - When the NIGHTSHOT PLUS switch is set to ON. - When you slide the disc cover OPEN switch.•When [DEMO MODE] default setting is standby, the demonstration starts about 10 minutes after
you have set the mode dial to (Movie) without a disc inserted.To cancel the demonstration, insert a disc, set the mode dial to (Still) or (Play/Edit), orset [DEMO MODE] to [OFF]. To set the camcorder to standby again, leave the [DEMO MODE] at[ON] in the menu settings, press the POWER button to OFF (CHG), and then return the POWERbutton to ON and the mode dial to (Movie).

116
Changing the SETUP display
Icon/Item
OTHERS
DATA CODE
AREA SET
DST SET
BEEP
COMMANDER
DISPLAY
REC LAMP
Option
z DATE/CAM
DATE
—
z OFF
ON
z MELODY
NORMAL
OFF
z ON
OFF
z LCD
V-OUT/LCD
z ON
OFF
Meaning
To change the display in the order of the dateand time t the camera data t the display eachtime pressing DATA CODE (page 59).
Press DATA CODE on the Remote Commanderto display date and time during playback.
To set your local area.
To cancel the use of daylight savings time.
To use the daylight savings time.
To output a melody when you start/stoprecording or when an unusual condition occurson your camcorder.
To output the beep instead of the melody.
To cancel the melody, beep sound and shuttersound.
To activate the Remote Commander suppliedwith your camcorder.
To deactivate the Remote Commander to avoiderroneous remote control operation caused byother equipments' remote control.
To show the display on the LCD screen and inthe viewfinder.
To show the display also on the TV screen.
To light up the camera recording lamp on thefront of your camcorder during recording.
To turn the camera recording lamp off so thatthe subject is not aware of the recording.
Mode dial
Play/Edit
Movie Still Play/Edit
Movie Still Play/Edit Movie Still Play/Edit
Movie Still Play/Edit
Movie Still Play/Edit
Still Movie
(operation onthe RemoteCommander)

117
Cu
stom
izing
you
r camco
rder
Changing the SETUP display
Icon/Item
OTHERS
REMAIN
Notes•If you press DISPLAY/BATT INFO with [DISPLAY] set to [V-OUT/LCD] in the SETUP display,
the picture from a TV or VCR will not appear on the LCD display even when your camcorder isconnected to outputs on the TV or VCR.
•If more than five minutes passes after removing the power source, the [PROGRAM AE], [FLASHLVL], [WHT BAL], [COMMANDER], and [HiFi SOUND] settings are returned to their factorysettings. Other settings are held in memory even when the battery is removed.
TipWhen recording a close subject, if [REC LAMP] is set to [ON], the red camera recording lamp onthe front of the camcorder may reflect on the subject. In this case, it is recommended to set [RECLAMP] to [OFF].
Option
z AUTO
ON
Meaning
To display the remaining capacity of the disc inthe following cases for example:
• For 8 seconds after setting the power on and themode dial to (Movie) or (Still).
• For 8 seconds after recognizing the inserted discinto your camcorder in (Movie) or (Still).
• For 8 seconds when set the display to on bypressing DISPLAY/BATT INFO in (Movie) or
(Still).
• When the remaining capacity of the disc is lessthan 5 minutes in (Movie) or 20 in (Still)
• For 8 seconds when starting recording from theline input.
To always display the remaining capacity of thedisc.
Mode dial
Movie Still Play/Edit

118
— Troubleshooting —
Types of trouble and corrective actionIf you run into problems using your camcorder, use the following table to troubleshootthe problem. If the problem persists, disconnect the power source and contact yourSony dealer or local authorized Sony service facility. If “C:ss:ss” appears on theLCD display, the self-diagnosis display function is working. See page 125.
About overall operations
Symptom Cause and/or Corrective Actions• The battery pack is not installed, or is exhausted or nearly
exhausted.c Install a charged battery pack. (page 15)
• The AC adaptor is not connected to a wall outlet.c Connect the AC adaptor to a wall outlet. (page 18)
• Vibration occurs depending on the condition of the disc.This is not a malfunction.
• Moisture condensation has occurred.c Turn off your camcorder and leave it for at least an hour
to acclimatize it. (page 132)• The temperature of your camcorder is extremely high.
c Turn off your camcorder and leave it for a while in acool place.
• The sound is caused by the disc. This is not a malfunction.
• This is caused by the disc drive. This is not a malfunction.
• This is not a malfunction.
• [COMMANDER] is set to [OFF] in (OTHERS) in theSETUP display.c Set it to [ON]. (page 116)
• Something is blocking the infrared rays.c Remove the obstacle.
• The battery is inserted in the battery holder with the+/– polarities incorrectly matching the +/– marks.c Insert the battery correctly. (page 143)
• The battery is dead.c Replace with a new one. (page 143)
•The temperature of your camcorder is extremely high.c Turn off your camcorder and leave it for a while in a
cool place.• Your camcorder was applied a strong shock or vibration.
c Your camcorder may be damaged. Contact your Sonydealer or local authorized Sony service facility.
c Remove the power souces such as the AC adaptor or thebattery pack, and turn on the power again about oneminute later. When you still can not operate yourcamcorder, push the RESET button using an object withthe point sharpened, it releases all the settings includingdate and time to the default.
The power does not turn on.
Your camcorder vibrates.
The % indicator flashes.
The indicator flashes.
A motor sound is heard from yourcamcorder periodically.A vibration is felt in your hand ora faint sound is heard duringoperation.Your camcorder gets hot duringuse for a long period.The Remote Commander suppliedwith your camcorder does notwork.
No functions work although thepower is on.
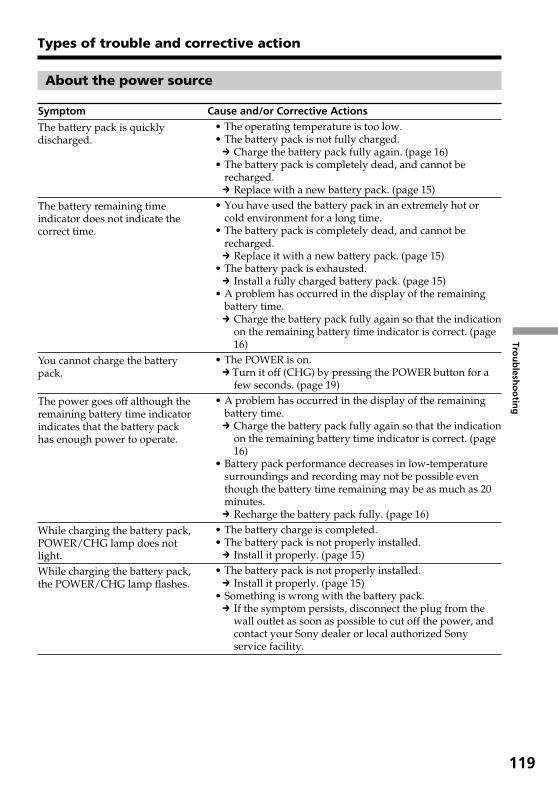
119
Trou
blesh
oo
ting
About the power source
Symptom Cause and/or Corrective Actions• The operating temperature is too low.• The battery pack is not fully charged.
c Charge the battery pack fully again. (page 16)• The battery pack is completely dead, and cannot be
recharged.c Replace with a new battery pack. (page 15)
• You have used the battery pack in an extremely hot orcold environment for a long time.
• The battery pack is completely dead, and cannot berecharged.c Replace it with a new battery pack. (page 15)
• The battery pack is exhausted.c Install a fully charged battery pack. (page 15)
• A problem has occurred in the display of the remainingbattery time.c Charge the battery pack fully again so that the indication
on the remaining battery time indicator is correct. (page16)
• The POWER is on.c Turn it off (CHG) by pressing the POWER button for a
few seconds. (page 19)• A problem has occurred in the display of the remaining
battery time.c Charge the battery pack fully again so that the indication
on the remaining battery time indicator is correct. (page16)
• Battery pack performance decreases in low-temperaturesurroundings and recording may not be possible eventhough the battery time remaining may be as much as 20minutes.c Recharge the battery pack fully. (page 16)
• The battery charge is completed.• The battery pack is not properly installed.
c Install it properly. (page 15)• The battery pack is not properly installed.
c Install it properly. (page 15)• Something is wrong with the battery pack.
c If the symptom persists, disconnect the plug from thewall outlet as soon as possible to cut off the power, andcontact your Sony dealer or local authorized Sonyservice facility.
The battery pack is quicklydischarged.
The battery remaining timeindicator does not indicate thecorrect time.
You cannot charge the batterypack.
The power goes off although theremaining battery time indicatorindicates that the battery packhas enough power to operate.
While charging the battery pack,POWER/CHG lamp does notlight.While charging the battery pack,the POWER/CHG lamp flashes.
Types of trouble and corrective action

120
Types of trouble and corrective action
About the disc
Symptom Cause and/or Corrective Actions• The [ REMAIN] item is set to [AUTO] in (OTHERS)
in the SETUP display.c Set it to [ON] to always display the remaining disc space
indicator. (page 117)• The battery pack or the AC adaptor are not installed/
connected.c Install/connect the power source correctly.
• The battery pack is exhausted.c Install a charged battery pack.
• Moisture condensation has occurred.c Turn off your camcorder and leave it for at least an hour
to acclimatize it. (page 132)• Finalizing is interrupted by turning off your camcorder.
c Turn on your camcorder and eject the disc afterfinalizing is completed.
• The temperature of your camcorder is extremely high.c Turn off your camcorder and leave it for a while in a
cool place.• The disc recorded on your camcorder may not be recorded
additionally on other devices.
Remaining disc space indicator isnot displayed.
The disc cannot be ejected.
The disc cannot be recordedadditionally on other devices.
About the LCD display or the viewfinder
Symptom Cause and/or Corrective Actions• If 10 minutes elapse after you set the mode dial to
(Movie) without a disc inserted, your camcorderautomatically starts the demonstration.c Insert a disc and the demonstration stops.
You can also cancel DEMO MODE. (page 115)• The viewfinder lens is not adjusted.
c Adjust the viewfinder lens. (page 22)• The LCD screen is open.
c Close the LCD screen.• When using the mirror mode, characters turn over on the
LCD display and on the TV monitor connected with theAUDIO/VIDEO jack. This is not a malfunction.
• It will occur when you remove the battery pack or unplugthe DC plug when the power of your camcorder is on.This is not a malfunction.
An unknown picture is displayedon the LCD display.
The image on the viewfinderscreen is not clear.The picture does not appear in theviewfinder.Characters on the LCD displayturn over.
A image is left on the LCD display.

121
Trou
blesh
oo
ting
During recording
Symptom Cause and/or Corrective Actions• The mode dial is set to (Play/Edit).
c Set it to (Movie) or (Still). (pages 29, 35)• The disc has run out of space.
c Use a new disc or format the disc (DVD-RW only, page74)
• The disc has been finalized.c Unfinalize the disc (DVD-RW only) or use a new disc.
(page 72)• Shooting by swapping movies and still images frequently
reduces the remaining capacity of the disc and mayprevent you from shooting movies.
• Your camcorder powered by the battery pack turns off formore than five minutes with no operations performed.c Press the POWER button for a few seconds.c Set [A. SHUT OFF] to [NEVER] in (SETUP MENU)
in the SETUP display. (page 115)• The battery pack is exhausted or nearly exhausted.
c Install a charged battery pack. (page 15)• [STEADYSHOT] is set to [OFF] in (CAMERA SET) in
the SETUP display.c Set it to [ON]. (page 112)
• The setting is set to manual focus.c Press FOCUS to set the autofocus. (page 52)
• Shooting conditions are not suitable for autofocus.c Adjust the focus manually. (page 52)
• The contrast between the subject and background is toohigh. This is not a malfunction.
• This is not a malfunction.
• Super NightShot Plus or Color Slow Shutter is activated.This is not a malfunction.
Pressing START/STOP or PHOTOdoes not record movies/stillimages.
The power goes off.
SteadyShot does not work.
Autofocus does not work.
A vertical band appears when youshoot a subject such as lights or acandle flame against a darkbackground.A vertical band appears when youshoot a very bright subject.Some tiny white, red, blue or greenspots appear on the display.
Types of trouble and corrective action

122
Symptom Cause and/or Corrective Actions• PROGRAM AE is set to [PORTRAIT] or [SPORTS] under
the fluorescent lamp, the sodium lamp and the mercurylamp.c Cancel PROGRAM AE. (page 51)
• NIGHTSHOT PLUS switch is set to ON.c Set it to OFF. (page 45)
• NIGHTSHOT PLUS switch is set to ON in a bright place.c Set it to OFF. (page 45)
• BACK LIGHT (.) is activated.c Deactivate it. (page 43)
• [BEEP] is set to [OFF] in (OTHERS) in the SETUPdisplay.c Set it to [MELODY] or [NORMAL]. (page 116)c Set [STEADYSHOT] to [OFF] in (CAMERA SET) in
the SETUP display. (page 112)• The temperature of your camcorder is extremely high.
c Turn off your camcorder and leave it for a while in acool place.
• When you shoot an object that moves fast, the timeavailable for recording may shorten.
During playback on your camcorder
Symptom Cause and/or Corrective Actions• There is no disc inserted in the camcorder.
c Insert a disc. (page 26)• A single-sided disc is inserted upside down.
c Insert the disc correctly.• The mode dial is set to (Movie) or (Still).
c Set the mode dial to (Play/Edit).• The incompatible disc is inserted.
c Check out the disc compatibility. (page 6)• The disc recorded in other devices is inserted.
c The disc recorded in other devices may not be playedback on your camcorder.
• The disc may be dirty.c Clean the disc using the cleaning cloth (supplied). (page
129)• The volume is turned to minimum.
c Turn up the volume. (page 56)• The LCD screen is closed.
c Open the LCD screen.
Types of trouble and corrective action
The picture flickers and the colorchanges incorrectly.
The picture is recorded in incorrector unnatural colors.The picture appears too bright,and the subject does not appear onthe LCD display.
The click of the shutter does notsound.
Black bands appear when yourecord a TV or computer screen.The recording stops.
The actual recording time formovie is less than the expectedapproximate recording time.
The disc cannot be played back.
The playback picture is distorted.
No sound or only a low sound isheard when playing back a disc.

123
Trou
blesh
oo
ting
Types of trouble and corrective action
During editing
Symptom Cause and/or Corrective Actions• The mode dial is set to (Movie) or (Still).
c Set the mode dial to (Play/Edit).• A DVD-R is inserted.
c DVD-R cannot be edited. Insert DVD-RW.• The inserted DVD-RW is formatted in VIDEO mode.
c Format the DVD-RW in VR mode. Note that all therecorded data are deleted if you format the disc.
• The registered scenes exceed 999.c Delete unnecessary scenes or register all the still images
by converting them to a movie. (pages 79, 80)• The disc is full.
c Delete unnecessary scenes. (page 89)• A movie that is too short cannot be divided.• Still images converted to a movie cannot be divided.• A movie protected on another device cannot be divided.
c Cancel the protection of the movie on the device used toprotect the movie.
• A scene protected on another device cannot be deleted.c Cancel the protection of the scene on the device used to
protect the scene.• Another device was used for editing the disc.
c Another device may not be able to edit a disc recordedon your camcorder.
The edit display is not displayedeven though you press EDIT.
Scenes cannot be registered in thePlaylist.
A movie cannot be divided.
A scene cannot be deleted.
Editing is disabled.
During playback of a disc on other players
Symptom Cause and/or Corrective Actions• The disc may be dirty.
c Clean it with the supplied cleaning cloth.• The disc is not finalized.
c Finalize it. (page 64)• You are trying to play back a disc recorded in VR mode
with equipment which is not compatible with the VRmode.c You cannot play back the disc with this equipment.
• The disc may be dirty.c Clean it with supplied cleaning cloth.
• The image may freeze for an instant between scenesdepending on the DVD player being used.
• If playback crosses 2 titles made automatically by yourcamcorder when . is pressed, playback may not moveto the previous scene.c Select the desired scene from the menu screen. Refer to
the instruction manual for further information.
Can not be played back or the disccan not be recognized.
The picture is distorted.
Playback freezes for an instantbetween the scenes.Playback does not move to theprevious scene when you press..

124
Types of trouble and corrective action
Others
Symptom Cause and/or Corrective Actions• The disc has been finalized.
c Unfinalize the disc (DVD-RW only). You cannot record adisc title on a finalized DVD-R.
• The disc title has been made by another device.c The disc title may not be changed on your camcorder if
the disc title has been made by another device.• When too many still images are recorded, the remaining of
the disc is reduced and still images cannot be converted toa movie.c Delete unnecessary scenes in the disc. (page 89)
• [DISPLAY] is set to [V-OUT/LCD] in (OTHERS) in theSETUP display.c Set it to [LCD]. (page 116)
• The Visual Index display is displayed.c Press VISUAL INDEX. The display disappears.
• Moisture condensation has occurred.c Turn off your camcorder and leave it for at least an hour
to acclimatize it. (page 132)• Some problems have occurred in your camcorder.
c Remove the disc and insert it again, then operate yourcamcorder again.
• The USB cable was connected before installation of theUSB driver was completed.c Install the USB driver again. (page 98)
The disc title cannot be changed.
Still images cannot be convertedto a movie.
The picture from a TV or VCRdoes not appear even when yourcamcorder is connected to outputon the TV or VCR.
The melody or beep sounds for 5seconds.
Scene can not be saved in thecomputer using the USBconnection.

125
Trou
blesh
oo
ting
C:21:00
Self-diagnosis display
Five-digit display Cause and/or Corrective Actions• You are using a battery pack that is not an
“InfoLITHIUM” battery pack.c Use an “InfoLITHIUM” battery pack. (pages 16, 130)
• The disc is faulty.c Use a compatible disc with your camcorder. (page 6)
• Moisture condensation has occurred.c Turn off your camcorder and leave your camcorder for
at least an hour to acclimatize it. (page 132)• A malfunction that you can service yourself other than
those above has occurred.c Remove the disc and insert it again, then operate your
camcorder again.c Disconnect the power cord of the AC adaptor or remove
the battery pack. After reconnecting/reinstalling thepower supply, operate your camcorder.
• A malfunction that you cannot service has occurred.c Contact your Sony dealer or local authorized Sony
service facility and inform them of the 5-digit code.(example: E:61:10)
If you are unable to rectify the problem even if you try the suggested corrective actions a fewtimes, contact your Sony dealer or local authorized Sony service facility.
Your camcorder has a self-diagnosis displayfunction.This function displays the current state of yourcamcorder as a 5-digit code (a combination of aletter and figures), on the LCD display or in theviewfinder. If a 5-digit code is displayed, check thefollowing list of codes. The last two digits(indicated by ss) differ depending on the state ofyour camcorder.
LCD display or viewfinder
Self-diagnosis display• C:ss:ss
You can service your camcorderyourself.
• E:ss:ss
Contact your Sony dealer or localauthorized Sony service facility.
C:04:ss
C:13:ss
C:21:ss
C:31:ss
C:32:ss
E:20:ss
E:61:ss
E:62:ss
E:93:ss
E:94:ss

126
Warning indicatorsIf indicators appear on the LCD display or inthe viewfinder, check the following:See the page in parentheses “( )” for moreinformation.
100-0001 Warning indicator referring to afileSlow flashing:•The file is corrupted.•The file is unreadable on your camcorder.
C:21:00 Self-diagnosis display (page 125)
Warning indicator referring to the discSlow flashing:•A disc is not inserted.*•Less than five minutes remains for recording
movies.•Fewer than 20 images can be accommodated
in the remaining space.•The disc recorded in the different TV color
system from your camcorder is inserted.*Fast flashing:•An unrecognizable disc is inserted.*•A finalized disc is inserted in VIDEO mode
when the mode dial is set to (Movie) or (Still).
•The disc is fully recorded.*•A disc containing copy protection signals is
inserted.*•A disc that cannot be read or written is
inserted, such as the single-sided discinserted inside out.
Z You need to eject the disc*Fast flashing:•An unrecognizable disc is inserted.•The disc is fully recorded.•A disc containing copy protection signals is
inserted.•The disc recorded in the different TV color
system from your camcorder is inserted.
Warning indicator referring to the discFast flashing:• An unrecognizable disc is inserted.
E The battery pack is dead or nearly deadSlow flashing:•The battery pack is exhausted.
Depending on the operating conditions, orthe environment and battery condition, theE indicator may flash even if there areapproximately 20 minutes remaining.
Fast flashing:•A battery error has occured.
% Moisture condensation has occurred*Fast flashing:•Moisture condensation has occurred with the
disc.Turn off your camcorder and leave it for atleast an hour to acclimatize it. (page 132)
Warning indicator referring to the temperature rise
Fast flashing:•The temperature of your camcorder is
extremely high.*Slow flashing:•The temperature of your camcorder is getting
higher.
Warning indicator referring to the flash(optional)
Slow flashing:•The flash is charging.*Fast flashing:•There is a problem with the flash (optional).
* You hear the melody or beep sound.

127
Trou
blesh
oo
ting
Warning messages
Message Cause and/or Corrective Actions• Use an “InfoLITHIUM” battery pack.
• Install a charged battery pack.• The battery pack is completely dead, and cannot be
recharged.c Replace it with a new battery pack.
• Moisture condensation has occurred.c Turn off your camcorder and leave it for at least an hour
to acclimatize it. (page 132)• Moisture condensation has occured.
c Turn off your camcorder and leave it for at least an hourto acclimatize it, then remove the disc.
• The temperature of your camcorder is extremely high.c Turn off your camcorder and leave it for a while in a
cool place.• The temperature of your camcorder is extremely high.
c Turn off your camcorder and leave it for a while in acool place, then remove the disc at least an hour toacclimatize it, then remove the disc.
• A malfunction has occurred with the disc and you cannotrecord any movies or still images on the disc.
• The disc is full for recording movies.c Use a new disc.
• Your camcorder can record up to 98 titles of movies inVIDEO mode and up to 999 chapters in VR mode per disc.
• Your camcorder can record up to 9999 still images perdisc.
• The disc has run out of space.c Use a new disc.
• You cannot play back an incompatible disc with yourcamcorder.
• A blank disc cannot be edited.• The disc is already finalized.• A finalized DVD-R cannot be recorded.
• To record on the finalized DVD-RW in VIDEO mode,unfinalize it.
• The disc cover is open.c Close the disc cover.
• There is no disc inserted.c Insert a disc.
• The disc is not set correctly.c Set the disc correctly. (page 26)
• The data cannot be recovered.c Use a new disc.
• The data cannot be recovered.c Format the disc (DVD-RW only).
FOR “InfoLITHIUM” BATTERYONLYE
%*1
%CANNOT OPEN TRY LATER*1
*1
CANNOT OPEN TRY LATER*1
REC. DISABLE*1
CAPACITY FULL FOR MOVIE*1
SCENE NUMBER FULL*1
Z DISC FULL*1
PLAYBACK PROHIBITED*1
EDIT DISABLE*1
DISC IS ALREADY FINALIZED*1
FINALIZED DISC, USEANOTHER DISC*1
NEED TO UNFINALIZE*1
CLOSE DISC COVER
NO DISC
CANNOT RECOVER DATA*1*2
NEED TO FORMAT DISC*1*2

128
Warning messages
*1 You hear the beep sound when the message appears.*2 If the data is not recorded correctly, your camcorder automatically recovers data when turn on
the power.
• A disc protected on another device cannot be edited.c Cancel the protection of the disc on the device used to
protect the disc.• Copyright protected movies and sounds cannot be
recorded on your camcorder.• The incompatible disc with your camcoder is inserted.• Your camcorder cannot recognize the disc because of
malfunctions such as scratches.• The disc is not set correctly.
c Set the disc correctly. (page 26)• The disc recorded in the different format code from your
camcorder.c Formatting the disc may enable you to use the disc on
your camcorder (DVD-RW only).• An error occurred during reading or writing the disc.• You cannot operate your camcorder during charging the
flash.
DISC PROTECTED*1
COPY INHIBIT*1
DISC ERROR*1
FORMAT ERROR*1
ACCESS ERROR*1
NOW CHARGING*1
Cause and/or Corrective ActionsMessage

129
Ad
ditio
nal in
form
ation
Usable discsYou can use 8 cm DVD-R and 8 cm DVD-RW
discs only. Use the discs with or logo.
NoteWe recommend you to use the Sony discswhich is confirmed compatibility with yourcamcorder. Refer to page 6 about therecommended discs.
Notes on use•Hold the disc by its edge while supporting
the center hole lightly. Do not touch therecording side (the opposite of the printedside) of a disc.
•Before shooting, be sure to remove dust andfingerprints from the disc with the cleaningcloth supplied with your camcorder.Otherwise you may not be able to record orplay normally in some situation using thatdisc.
•When you set the disc to your camcorder,press firmly until it clicks. When the message[C:13:ss] appears on the LCD screen, openthe disc cover and set the disc again.
•Do not attach any adhesive material such as asticker on the surface of a disc. If you do so,the disc may become unbalanced, and thismay cause a malfunction of the disc or yourcamcorder.
Care and storage of the discs•Keep the disc clean, or the quality of the
audio and video output is lessend.•Clean the disc with a supplied cleaning cloth.
Wipe the disc from the center out. For dirt,clean the disc with a soft cloth slightlymoistened in water, then remove themoisture with a soft, dry cloth. Do not usesolvents such as benzine, cleaners intendedfor vinyl LPs or antistatic splay, as they maycause a malfunction to the disc.
•Do not expose the disc to direct sunlight orleave it in a humid place.
•When you carry or store the disc, put it in itscase.
•You can write only on a printed side using anoil-based marker with a felt-tip, and do nottouch the ink until it dries. Do not heat thedisc or use a sharp-pointed tool, such as ballpoint pen. Do not dry the surface by heating.
— Additional information —
About the disc

130
About the “InfoLITHIUM” battery packThis unit is compatible with the“InfoLITHIUM” battery pack (M series). Yourcamcorder operates only with the“InfoLITHIUM” battery pack. “InfoLITHIUM”M series battery packs have the
SERIESTM
mark.
What is the “InfoLITHIUM”battery pack?The “InfoLITHIUM” battery pack is a lithium-ion battery pack that has functions forcommunicating information related tooperating conditions between the battery packand an AC adaptor/charger (optional).The “InfoLITHIUM” battery pack calculatesthe power consumption according to theoperating conditions of your camcorder, anddisplays the remaining battery time inminutes.With an AC adaptor/charger (optional), theremaining battery time and charging time aredisplayed.
Charging the battery pack•Be sure to charge the battery pack before you
start using your camcorder.•It is recommended to charge the battery pack
in an ambient temperature of between10°C to 30°C (50°F to 86°F) until POWER/CHG (Charge) lamp turns off. If you chargethe battery pack outside of this temperaturerange, you may not be able to efficientlycharge the battery pack.
•After charging is completed, eitherdisconnect the cable from the DC IN jack onyour camcorder or remove the battery pack.
Effective use of the battery pack•Battery pack performance decreases in low-
temperature surroundings and recordingmay not be possible even though the batterytime remaining may be as much as 20minutes. We recommend the following toensure longer battery pack use:– Put the battery pack in a pocket close to
your body to warm it up, and insert it inyour camcorder immediately before youstart taking shots.
– Use a large capacity battery pack (NP-QM71/QM71D/QM91/QM91D, optional).
•Frequently using the LCD screen orfrequently operating playback, fast forwardor backward wears out a battery pack faster.It is recommended that you use the largecapacity battery pack (NP-QM71/QM71D/QM91/QM91D, optional).
•Be sure to press the POWER button for a fewseconds and turn off the power when notshooting or playing back on your camcorder.The battery pack is also consumed whenyour camcorder is in the standby mode orplayback is paused.
•Have spare battery packs handy for two orthree times the expected recording time, andmake a trial recording on DVD-RW beforethe actual recording.
•Do not expose the battery pack to water. Thebattery pack is not water-resistant.
Remaining battery time indicator•If the power goes off even though the
remaining battery time indicator indicatesthat the battery pack has enough power tooperate, charge the battery pack fully againso that the indication on the remainingbattery time indicator is correct. Note,however, that the correct battery indicationsometimes will not be restored if the batteryis used in high temperatures for a long timeor left in a fully charged state, or the batterypack is used frequently. Regard theremaining battery time indication as theapproximate shooting time.
•The E mark indicating that there is littleremaining battery time sometimes flashesdepending on the operating conditions orambient temperature and environment evenif the remaining battery time isapproximately 20 minutes.
How to store the battery pack•If the battery pack is not used for a long time,
perform the following procedure once peryear to maintain proper battery function.1. Fully charge the battery pack.2. Discharge it using your camcorder.3. Remove the battery from the camcorder
and store it in a dry, cool place.•To use the battery pack up on your
camcorder, leave your camcorder in therecording standby without a disc insertedwith the [A. SHUT OFF] to [NEVER] in the
(SETUP MENU) in the SETUP displayuntil the power goes off.
Battery life•The battery life is limited. Battery capacity
drops little by little as you use it more andmore, and as time passes. When the availablebattery time is shortened considerably, aprobable cause is that the battery pack hasreached the end of its life. Buy a new batterypack.
•The battery life varies according to how it isstored, the operating conditions, and theenvironment in which each battery pack isused.

131
Ad
ditio
nal in
form
ation
You can use your camcorder with the ACadaptor supplied with it in any area with 100V to 240 V AC, 50/60 Hz power standards.
Use a commercially available AC plug adaptor[a], if necessary, depending on the design ofthe wall outlet [b].
Your camcorder is an NTSC system-basedcamcorder. If you want to view the playbackpicture on a TV, it must be an NTSC system-based TV with the AUDIO/VIDEO input jack.The following lists show TV color systemsused overseas.
NTSC systemBahama Islands, Bolivia, Canada, CentralAmerica, Chile, Colombia, Ecuador, Guyana,Jamaica, Japan, Korea, Mexico, Peru, Samoa,Surinam, Taiwan, the Philippines, the U.S.A.,Venezuela, etc.
PAL systemAustralia, Austria, Belgium, China, CzechRepublic, Denmark, Finland, Germany,Holland, Hong Kong, Hungary, Italy, Kuwait,Malaysia, New Zealand, Norway, Poland,Portugal, Singapore, Slovak Republic, Spain,Sweden, Switzerland, Thailand, UnitedKingdom, etc.
PAL-M systemBrazil
PAL-N systemArgentina, Paraguay, Uruguay
SECAM systemBulgaria, France, Guiana, Iran, Iraq, Monaco,Russia, Ukraine, etc.
Using your camcorder abroad
[b][a]
AC-L15A/L15B
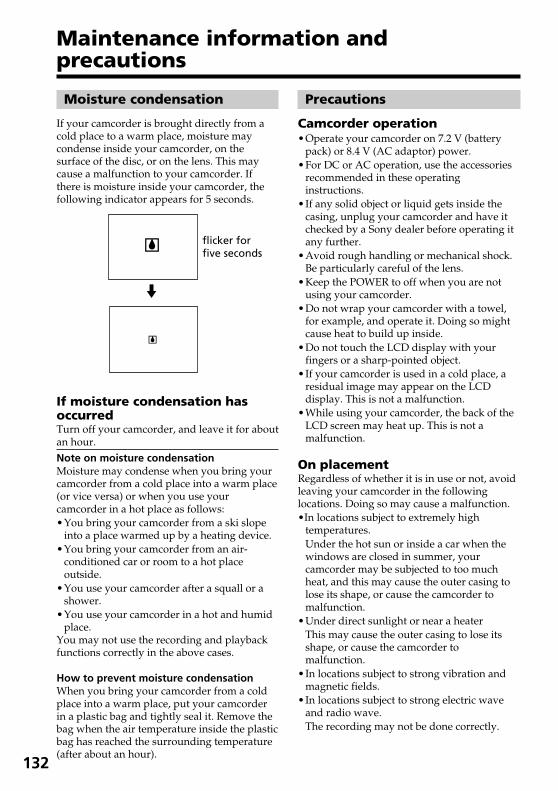
132
Precautions
Camcorder operation•Operate your camcorder on 7.2 V (battery
pack) or 8.4 V (AC adaptor) power.•For DC or AC operation, use the accessories
recommended in these operatinginstructions.
•If any solid object or liquid gets inside thecasing, unplug your camcorder and have itchecked by a Sony dealer before operating itany further.
•Avoid rough handling or mechanical shock.Be particularly careful of the lens.
•Keep the POWER to off when you are notusing your camcorder.
•Do not wrap your camcorder with a towel,for example, and operate it. Doing so mightcause heat to build up inside.
•Do not touch the LCD display with yourfingers or a sharp-pointed object.
•If your camcorder is used in a cold place, aresidual image may appear on the LCDdisplay. This is not a malfunction.
•While using your camcorder, the back of theLCD screen may heat up. This is not amalfunction.
On placementRegardless of whether it is in use or not, avoidleaving your camcorder in the followinglocations. Doing so may cause a malfunction.•In locations subject to extremely high
temperatures.Under the hot sun or inside a car when thewindows are closed in summer, yourcamcorder may be subjected to too muchheat, and this may cause the outer casing tolose its shape, or cause the camcorder tomalfunction.
•Under direct sunlight or near a heaterThis may cause the outer casing to lose itsshape, or cause the camcorder tomalfunction.
•In locations subject to strong vibration andmagnetic fields.
•In locations subject to strong electric waveand radio wave.The recording may not be done correctly.
Maintenance information andprecautions
Moisture condensation
If your camcorder is brought directly from acold place to a warm place, moisture maycondense inside your camcorder, on thesurface of the disc, or on the lens. This maycause a malfunction to your camcorder. Ifthere is moisture inside your camcorder, thefollowing indicator appears for 5 seconds.
If moisture condensation hasoccurredTurn off your camcorder, and leave it for aboutan hour.
Note on moisture condensationMoisture may condense when you bring yourcamcorder from a cold place into a warm place(or vice versa) or when you use yourcamcorder in a hot place as follows:•You bring your camcorder from a ski slope
into a place warmed up by a heating device.•You bring your camcorder from an air-
conditioned car or room to a hot placeoutside.
•You use your camcorder after a squall or ashower.
•You use your camcorder in a hot and humidplace.
You may not use the recording and playbackfunctions correctly in the above cases.
How to prevent moisture condensationWhen you bring your camcorder from a coldplace into a warm place, put your camcorderin a plastic bag and tightly seal it. Remove thebag when the air temperature inside the plasticbag has reached the surrounding temperature(after about an hour).
%
%
m
flicker forfive seconds

133
Ad
ditio
nal in
form
ation
Maintenance information and precautions
On the pickup lens•Do not touch the lens inside the disc cover.
Keep the disc cover closed except wheninserting and ejecting the disc, to keep dustout.
•When the camcorder does not work becausethe pickup lens is dirty, clean it with a blower(not supplied). Do not touch the pickup lensdirectly during cleaning because this maycause the camcorder to malfunction.
Care and storage of the cameralens•Wipe the surface of the lens clean with a soft
cloth in the following instances:– When there are fingerprints on the lens
surface.– In hot or humid locations.– When the lens is exposed to salty air such
as at the seaside.•Store in a well-ventilated location subject to
litte dirt or dust.•To prevent molds periodically clean the lens
as described above.It is recommended you operate yourcamcorder about once a month to keep it in anoptimum state for a long time.
Pickup lens
•Near a AM receivers and video equipment.Noise may occur.
•In sandy or dusty placesSand or dust may cause your camcorder tomalfunction, and sometimes this malfunctioncannot be repaired.
•Avoid exposing the viewfinder and the LCDscreen to direct sunlightThe internal mechanisms of the viewfinderand the LCD display may be damaged.
If your camcorder is not to beused for a long timeRemove the disc. Periodically turn on thepower, operate the movie and still imagesfunctions and play back a disc for about threeminutes.
On the LCD display•Do not press the LCD display firmly. Blurs
appear and it causes a malfunction of theLCD display.
•When you use the camcorder in a cold place,the picture may seem to be trailed. This is notmalfunction.
•The temperature around the LCD displaymay get higher while you use the camcorder.This is not malfunction.
•If fingerprints or dust make the LCD displaydirty, use the cleaning cloth (supplied) toclean the LCD display.When using the LCD Cleaning Kit (optional),do not pour the cleaning liquid directly onthe LCD display, but pour the liquid on asheet of cleaning paper and wipe the LCDdisplay gently.
On cleaning the casing•Clean the camcorder body with a soft cloth
lightly moistened with water or tepid water,and finish with a dry cloth.
•To prevent the camcorder body from beingdamaged, avoid followings;– To use the chemical products such as
thinner, benzine, alcohol, chemical cloth,volatile material like an insecticide forcleaning.
– To operate your camcorder by the handwith the above materials.
– To leave the case in contact with rubber orvinyl objects for a long period of time.

134
Maintenance information and precautions
AC adaptor•Unplug the unit from the wall outlet when
you are not using it for a long time. Todisconnect the power cord, pull it out by theplug. Never pull the power cord itself.
•Do not operate the unit with a damaged cordor if the unit has been dropped or damaged.
•Do not bend the power cord forcibly, or placea heavy object on it. This will damage thecord and may cause fire or electric shock.
•Prevent metallic objects from coming intocontact with the metal parts of the connectingsection. If this happens, a short may occurand the unit may be damaged.
•Always keep metal contacts clean.•Do not disassemble the unit.•Do not apply mechanical shock or drop the
unit.•While the unit is in use, particularly during
charging, keep it away from AM receiversand video equipment. AM receivers andvideo equipment disturb AM reception andvideo operation.
•The unit becomes warm during use. This isnot a malfunction.
•Do not place the unit in locations that are:– extremely hot or cold.– dusty or dirty.– very humid.– vibrating.
Rechargeable battery pack•Use only the specified charger or video
equipment with the charging function.•To prevent an accident from a short circuit,
do not allow metal objects to come intocontact with the battery terminals.
•Keep the battery pack away from fire.•Never expose the battery pack to
temperatures above 60°C (140°F), such as in acar parked in the sun or under directsunlight.
•Keep the battery pack dry.•Do not expose the battery pack to any
mechanical shock.•Do not disassemble or modify the battery
pack.•Attach the battery pack to the video
equipment securely.
Charging the built-inrechargeable battery in yourcamcorderA built-in rechargeable battery is installed inyour camcorder to retain the date and time,etc., regardless of the setting of the POWERbutton. The built-in rechargeable battery isalways charged as long as you are using yourcamcorder. The battery, however, will becomedischarged gradually if you do not use yourcamcorder. It will be completely discharged inabout three months if you do not use yourcamcorder at all. Even if the built-inrechargeable battery is not charged, it will notaffect camcorder operation. To retain the date,time, and other information, charge the batteryif it is discharged.
Charging the built-in rechargeable battery:•Connect your camcorder to a wall outlet
using the AC adaptor supplied with yourcamcorder, and leave your camcorder withthe POWER button turned off for more than24 hours.
•Or, install a fully charged battery pack inyour camcorder, and leave your camcorderwith the POWER button turned off for morethan 24 hours.

135
Ad
ditio
nal in
form
ation
Specifications
Video camerarecorder
System
Video recording formatDVD-VideoDVD-VR (DVD-RW only)Audio recording system2ch Dolby* DigitalVideo signalNTSC color, EIA standardsUsable discs8 cm DVD-R and DVD-RWVideo compression formatMPEG2/JPEG (Still images)Recording/playback timeHQ: Approx. 20 minutesSP: Approx. 30 minutesLP: Approx. 60 minutesViewfinderElectric viewfinder (color)Image device3.6 mm (1/5 type) CCD (ChargeCoupled Device)Number of PixelsGross: Approx. 1 070 000 pixelsEffective (for still images ):Approx. 1 000 000 pixelsEffective (for movies):Approx. 690 000 pixels
LensCarl Zeiss Vario-TessarFilter diameter:25 mm (1 in.)10× (Optical), 120× (Digital)F = 1.8 – 2.3Focal length3.2 – 32 mm (5/32 – 1 5/16 in.)When converted to a 35 mm stillcameraFor movies:46 – 460 mm (1 13/16 – 18 1/8 in.)For still images:38 – 380 mm (1 1/2 – 15 in.)
Color temperatureAuto, HOLD (Hold), nIndoor(3 200 K), Outdoor (5 800 K)Minimum illumination7 lx (lux) (F 1.8)0 lx (lux) (in the NightShot Plusmode)** Objects unable to be seen due to
the dark can be shot withinfrared lighting.
Input/Output connectors
AUDIO/VIDEO input/outputAV MINI JACK,input/output autoswitchVideo : 1 Vp-p, 75 Ω (ohms),unbalancedAudio : 327 mV, (at outputimpedance of more than 47 kΩ(kilohms))Output impedance of less than2.2 kΩ (kilohms)Input impedance of more than47 kΩ (kilohms)USB jackmini-BREMOTE jackStereo mini-minijack (ø 2.5 mm)MIC jackStereo minijack (ø 3.5 mm)
LCD display
Picture8.8 cm (3.5 type)Total number of pixels123 200 (560 × 220)
General
Power requirements7.2 V (battery pack)8.4 V (AC adaptor)Average power consumption(when using the battery pack)During camera recording usingLCD: 4.4 WViewfinder: 4.1 WOperating temperature0°C to 40°C (32°F to 104°F)Storage temperature–20°C to + 60°C(–4°F to + 140°F)Dimensions (Approx.)71.8 × 88 × 136 mm(2 7/8 × 3 1/2 × 5 3/8 in.)(w/h/d)Mass (approx.)570 g (1 lb 4 oz)main unit only675 g (1 lb 7 oz)including the battery pack,disc and lens capSupplied accessoriesSee page 14.
* Manufactured under licensefrom Dolby Laboratories.“Dolby” and the double-Dsymbol are trademarks of DolbyLaboratories.

136
Specifications
AC adaptorAC-L15A/L15B
Power requirements100 – 240 V AC, 50/60 HzCurrent consumption0.35 – 0.18 APower consumption18 WOutput voltageDC OUT: 8.4 V, 1.5 A in theoperating modeOperating temperature0°C to 40°C (32°F to 104°F)Storage temperature–20°C to + 60°C (–4°F to + 140°F)Dimensions (approx.)56 × 31 × 100 mm(2 1/4 × 1 1/4 × 4 in.) (w/h/d)excluding projecting partsMass (approx.)190 g (6.7 oz)excluding power cord
Rechargeablebattery packNP-FM50
Maximum output voltageDC 8.4 VOutput voltageDC 7.2 VCapacity8.5 Wh (1 180 mAh)Dimensions (approx.)38.2 × 20.5 × 55.6 mm(1 9/16 × 13/16 × 2 1/4 in.)(w/h/d)Mass (approx.)76 g (2.7 oz)Operating temperature0°C to 40°C (32°F to 104°F)TypeLithium ion
Design and specifications aresubject to change without notice.

137
Parts and
con
trols/In
dex
— Parts and controls/Index —
Identifying parts and controls
1 LCD screen (page 20)
2 LCD BACKLIGHT button (page 20)
3 OPEN button (page 20)
4 REC START/STOP button
5 USB jack (page 94)
Camcorder
6 Viewfinder (page 22)
7 Eye cup
8 START/STOP button (page 30)
9 Battery attachment (page 15)
0 Hooks for shoulder strap
Note on the Carl Zeiss lensYour camcorder is equipped with a Carl Zeiss lens which can reproduce fine images.The lens for your camcorder was developed jointly by Carl Zeiss, in Germany, andSony Corporation. It adopts the MTF* measurement system for video cameras andoffers the same quality as a Carl Zeiss lens.
* MTF stands for Modulation Transfer Function.The value number indicates the amount of light from a subject coming into thelens.
7
8
9
0
1
2
3
4
5
6

138
Identifying parts and controls
qa Mode dial (page 19)
qs POWER/CHG lamp (page 16)
qd REMOTE jackUse to connect to optional accessories.
qf Viewfinder lens adjustment dial (page22)
qg POWER button (page 19)
qh BATT (battery) release button (page15)
qj DC IN jack (page 16)
qk Lens cap (page 28)
ql Tripod receptacleMake sure that the length of the tripodscrew is less than 5.5 mm (7/32 inch).Otherwise, you cannot attach the tripodsecurely, and the screw may damageyour camcorder.
qa
qs
qd
qf
qg
qh
qj
qk
ql

139
Parts and
con
trols/In
dex
w;
wa
wd
wf
wg
wh
wj
wk
wl
e;ws
Identifying parts and controls
w; Intelligent accessory shoe
wa Shoe cover
ws Lens
wd Remote sensor/Infrared ray emitter
wf MIC (PLUG IN POWER) jackConnect an external microphone(optional). This jack also accepts a“plug-in-power” microphone. When anexternal microphone is connected, it ispreferred for an audio input source.
wg AUDIO/VIDEO jack (page 63)
wh Microphone
wj DISPLAY/BATT INFO button (page 18)
wk BACK LIGHT button (page 43)
wl VISUAL INDEX button (page 56)
e; Multi-selector (page 23)
Notes on the intelligent accessory shoe•When you use the intelligent accessory shoe, extend the viewfinder and detach the
shoe cover.•The intelligent accessory shoe supplies power to optional accessories such as a
microphone.•The intelligent accessory shoe is linked to the POWER button, allowing you to turn
the power supplied by the shoe on and off. Refer to the operating instructions of theaccessory for further information.
•The intelligent accessory shoe has a safety device for fixing the installed accessorysecurely. To connect an accessory, press down and push it to the end, and then tightenthe screw.
•To remove an accessory, loosen the screw, and then press down and pull out theaccessory.
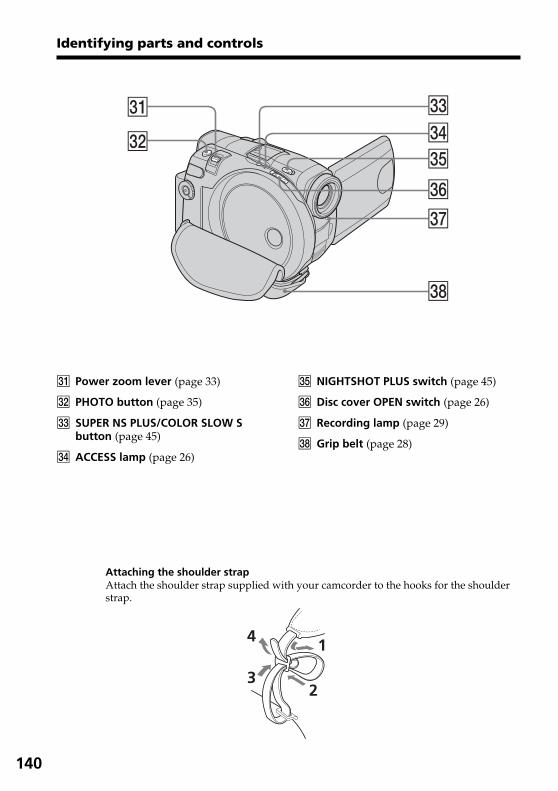
140
ea Power zoom lever (page 33)
es PHOTO button (page 35)
ed SUPER NS PLUS/COLOR SLOW Sbutton (page 45)
ef ACCESS lamp (page 26)
Identifying parts and controls
eg NIGHTSHOT PLUS switch (page 45)
eh Disc cover OPEN switch (page 26)
ej Recording lamp (page 29)
ek Grip belt (page 28)
ea
es
ed
ef
eg
eh
ej
ek
Attaching the shoulder strapAttach the shoulder strap supplied with your camcorder to the hooks for the shoulderstrap.
2
4
3
1

141
Parts and
con
trols/In
dex
el VOL buttons (page 56)
r; z REC buttons (page 109)
ra Speaker
rs > NEXT (next) button (page 58)
rd . PREV (previous) button (page 58)
rf RESET button
rg N PLAY (playback)/REVIEW button(pages 55, 56)
Identifying parts and controls
rh FADER button (page 53)
rj FOCUS button (page 52)
rk EXPOSURE button (page 43)
rl SETUP button (page 110)
t; FINALIZE button (page 64)
ta EDIT button (page 76)
ts x STOP button (page 57)
td X PAUSE button (page 58)
el
ra
rs
rd
rf
rg
rh
rj
rk
rl
t;
ta
ts
td
r;

142
Identifying parts and controls
Remote Commander
The buttons that have the same name on the Remote Commander as on your camcorderfunction identically to the buttons on your camcorder.
1 DATA CODE button (page 59)
2 PHOTO button (page 35)
3 SCAN/ SLOW buttons(page 58)
4 . PREV/> NEXT buttons (page 58)
5 N PLAY button (page 56)
6 x STOP button (page 57)
7 DISPLAY button (page 59)
8 Transmitter
9 START/STOP button (page 30)
0 Power zoom buttons (page 33)
qa X PAUSE button (page 58)
qs VISUAL INDEX button (page 56)
qd b/B/v/V/ENTER buttons
1
2
3
4
5
6
7
8
9
q;
qa
qs
qd

143
Parts and
con
trols/In
dex
To prepare the Remote CommanderRemove the insulation sheet as illustrated to activate the Remote Commander.
To replace the button-type battery of the Remote CommanderInsert CR2025 lithium battery by matching the + and – on the battery to the + and –terminals in the battery compartment.
WARNINGBattery may explode if mistreated. Do not recharge, disassemble or dispose of in fire.
NotesOn the Remote Commander•The button-type battery CR2025 is used in the Remote Commander. Do not use a
battery other than the CR2025.•Point the remote sensor away from strong light sources such as direct sunlight or
overhead lighting. Otherwise, the Remote Commander may not function properly.•Your camcorder works in the DVD 2 Commander mode. Commander modes
1, 2 and 3 are used to distinguish your camcorder from other Sony DVD players toavoid erroneous remote control operation. If you use another Sony DVD player in theDVD 2 Commander mode, it is recommended that you change the Commander modeof the DVD player or cover the sensor of the DVD player with black paper.
Identifying parts and controls
1 2 3
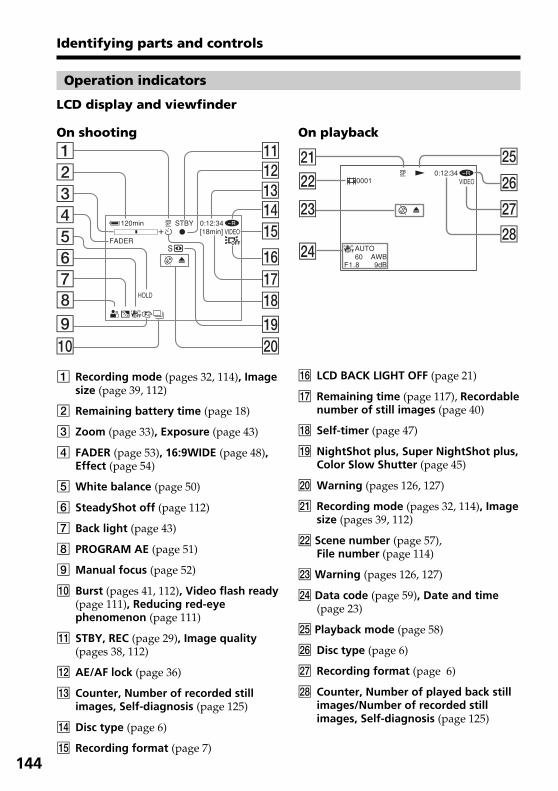
144
Identifying parts and controls
Operation indicators
LCD display and viewfinder
On shooting On playback
1 Recording mode (pages 32, 114), Imagesize (page 39, 112)
2 Remaining battery time (page 18)
3 Zoom (page 33), Exposure (page 43)
4 FADER (page 53), 16:9WIDE (page 48),Effect (page 54)
5 White balance (page 50)
6 SteadyShot off (page 112)
7 Back light (page 43)
8 PROGRAM AE (page 51)
9 Manual focus (page 52)
0 Burst (pages 41, 112), Video flash ready(page 111), Reducing red-eyephenomenon (page 111)
qa STBY, REC (page 29), Image quality(pages 38, 112)
qs AE/AF lock (page 36)
qd Counter, Number of recorded stillimages, Self-diagnosis (page 125)
qf Disc type (page 6)
qg Recording format (page 7)
0:12:34N
AUTO60 AWB
F1.8 9dB
VIDEO-R
wa
ws
wf
0001
wd
wk
wj
wh
wg
qh LCD BACK LIGHT OFF (page 21)
qj Remaining time (page 117), Recordablenumber of still images (page 40)
qk Self-timer (page 47)
ql NightShot plus, Super NightShot plus,Color Slow Shutter (page 45)
w; Warning (pages 126, 127)
wa Recording mode (pages 32, 114), Imagesize (pages 39, 112)
ws Scene number (page 57),File number (page 114)
wdWarning (pages 126, 127)
wf Data code (page 59), Date and time(page 23)
wg Playback mode (page 58)
wh Disc type (page 6)
wj Recording format (page 6)
wk Counter, Number of played back stillimages/Number of recorded stillimages, Self-diagnosis (page 125)

145
Parts and
con
trols/In
dex
Index
A, BAC adaptor .............................. 16Adjusting viewfinder ............. 22A/V connecting cable ...... 14, 63BACK LIGHT .......................... 43BATTERY INFO ...................... 18Battery pack ...................... 15,130BEACH & SKI ......................... 51Beep ............................ 26, 47, 116BURST ...................................... 41B & W ....................................... 54
C, DCharging the battery .............. 16Charging the built-in
rechargeable battery .......... 134Clock set ................................... 23Color slow shutter .................. 46Continuous still images
shooting ................................. 41Counter .................................... 31Data code ................................. 59Date/time display ............ 31, 59Daylight saving time ...... 24, 116Delete .................................. 55, 89DEMO ..................................... 115Digital effect ............................ 54Digital zoom ............................ 33Disc dubbing ......................... 106Disc title ................................... 67Disc ............................................. 6DISPLAY .................................. 59Divide ................................. 84, 87DVD-R ........................................ 6DVD-RW .................................... 6
EEXP BRKTG ............................. 41EXPOSURE .............................. 43
F, G, HFADER ..................................... 53Fade in/out .............................. 53Finalize ..................................... 64FINE .......................................... 38Flash ........................................ 111Folder ....................................... 71FOCUS ...................................... 52Format ...................................... 74Full charge ............................... 17Grip belt ................................... 28HiFi SOUND ......................... 114HQ ............................................ 32
I, J, K, LImageMixer ....................... 93, 99Image quality .................. 38, 112Image size ........................ 39, 112“InfoLITHIUM” battery ...... 130Infrared ray emitter .............. 139Intelligent accessory shoe .... 139JPEG .......................................... 40LANDSCAPE .......................... 51LCD screen .............................. 20LP .............................................. 32LUMI. (Luminance key) ........ 54
M, NManual focus ........................... 52MIC (PLUG IN POWER)
jack ....................................... 139Mirror mode ............................ 34Moisture condensation ........ 132MOSAIC ................................... 54Move ......................................... 82NightShot Light ...................... 46NightShot plus ........................ 45NORMAL ................ 41, 111, 112NTSC system ............. 12, 93, 131
O, P, QOLD MOVIE ............................ 54Operation indicators ............ 144Operation sound .......... See BeepOVERLAP ................................ 53PASTEL .................................... 54PB ZOOM ................................ 61Photomovie ....................... 65, 79Picture effect ............................ 54Playback pause ........................ 58Playing time ............................. 17Playlist ...................................... 76PORTRAIT ............................... 51PROGRAM AE ........................ 51
RRecording format ...................... 7Recording time ........................ 17Remaining battery time
indicator ................................ 31Remaining time ..................... 117Remote Commander ............ 142REMOTE jack ........................ 138RESET ............................. 114, 141Review ...................................... 55
SSelf-diagnosis display .......... 125Self-timer recording ............... 47SEPIA ........................................ 54SETUP display ...................... 110Shoulder strap ............... 137, 140Slide show ................................ 62Slow playback ......................... 58SP .............................................. 32SPORTS .................................... 51SPOTLIGHT ............................ 51STANDARD ............................ 38STEADYSHOT ...................... 112SUNSETMOON ...................... 51Super NightShot plus ............. 45S video jack ............... 63, 106,109
T, U, VTelephoto ................................. 33Time difference ....................... 25Title ........................................... 67TV ................................ 48, 63, 108TV color systems ............. 12, 131Unfinalize ................................ 72USB jack ................................... 94VCR ......................................... 106VIDEO mode ............................. 7Viewfinder ............................... 22Viewfinder lens
adjustment ............................ 22Visual Index ............................. 56VR mode .................................... 7
W, X, Y, ZWarning indicators ............... 126Warning messages ................ 127White balance .......................... 50Wide-angle .............................. 33Wide mode .............................. 48WIPE ......................................... 53Zoom .................................. 33, 61

146
On trademarks•DVD-VIDEO, DVD-RW, and the DVD-R logo are trademarks.• InfoLITHIUM is a trademark of Sony Corporation.•PlayStation is a registered trademark of Sony Computer Entertainment Inc.•Microsoft and Windows are trademarks or registered trademarks of Microsoft
Corporation in the United States and/or other countries.•Pentium is a trademark or a registered trademark of Intel Corporation.•Mac OS is a trademark or registered trademark of Apple Computer, Inc.All other product names mentioned herein may be the trademarks or registeredtrademarks of their respective companies. Furthermore, TM and ® are not mentionedin each case in this manual.

147
Parts and
con
trols/In
dex

Printed in Japan
Printed on 100% recycled paper using VOC(Volatile Organic Compound)-free vegetableoil based ink.