designated and preferred truck routes - illinois
TRANSCRIPT

Designated and Preferred Truck Routes
User Manual
This document is intended to assist the users of the Illinois Department of Transportation Designated and Preferred Truck Routes web application. It details the steps to add, delete, manage and view the Designated and Preferred Truck Routes in Illinois.

5
Table of Contents 1.0 User Accounts ..................................................................................................................................... 6
1.1 Create New User Account ............................................................................................................... 6
1.2 Log In to the website ....................................................................................................................... 8
1.3 Edit Existing User Account .............................................................................................................. 8
1.4 Change Password ............................................................................................................................ 9
1.5 Forgot Password ............................................................................................................................. 9
2.0 Administrator Account ...................................................................................................................... 10
2.1 Approve/Deny new User Registration Requests........................................................................... 10
2.2 Manage General User Accounts ................................................................................................... 10
2.3 Manager Settings .......................................................................................................................... 11
3.0 Add Truck Route ................................................................................................................................ 12
3.1 Add Class II or Class III Truck Route .............................................................................................. 12
3.2 Add Preferred Truck Route ........................................................................................................... 16
4.0 Delete Truck Route ........................................................................................................................... 19
4.1 Delete Class II or Class III Truck Route .......................................................................................... 19
4.2 Delete Preferred Truck Route ....................................................................................................... 19
5.0 Route Changes .............................................................................................................................. 20
6.0 Map Tools .......................................................................................................................................... 21
6.1 Mouse Wheel Zoom ...................................................................................................................... 21
6.2 Zoom Buttons ................................................................................................................................ 21
6.3 Pan ................................................................................................................................................ 21
6.4 Zoom Full Extent ........................................................................................................................... 21
6.5 Highlight Route ............................................................................................................................. 21
6.6 Display Local Roads ....................................................................................................................... 22
6.7 Measure Distance ......................................................................................................................... 22
7.0 Data Grid Features ............................................................................................................................ 23
7.1 Filter Records ................................................................................................................................ 23
7.2 Resolutions .................................................................................................................................... 24

6
1.0 User Accounts
1.1 Create New User Account
To create a new user account, click on the Register link on the Log In page. The registration process
involves three steps of entering information – User Information; Agency Information; and Account
Information. Required data items are indicated with a red asterisk. To create the new user account with
Administrative permissions, check the User Account Manager option in Step 1.
Step 1 - User Information
Enter First Name, Last Name and Phone Number (click User Account Manager if applicable) then click
the ‘Next’ button.
Step 2 - Agency Information Select a Jurisdiction Type, the applicable Agency then click the ‘Next’ button.

7
Step 3 - Account Information Enter an e-mail address and set an account password then click the ‘Create User’ button. Users with an IDOT domain account have the option of using their IDOT email and domain password or a different email account.
A summary page appears listing the registration details entered.
Once submitted, the registration request will be forwarded on to an Administrator for the Agency or an
IDOT District Engineer for approval. The account will not be enabled until an Administrator approves
the request. An email will be sent to the email address entered during registration to inform the user
the account has been enabled.

8
1.2 Log In to the website
To Log In to the website and use the truck routes application, enter the User Name and Password for the
user account. Optionally, check the ‘Keep me logged in’ option to remain logged in to the system until
the Log Out option in the top right corner of the application is clicked. The user will automatically be
logged in to the system each time an internet browser window is opened.
1.3 Edit Existing User Account
To edit an existing user account, click on the Edit link
located at the bottom of the Agency Information section
on the Account screen. The Agency Information
becomes editable with ‘Update’ and ‘Cancel’ options. To
save any changes to the Agency Information, click
‘Update’. Click ‘Cancel’ to keep the Agency Information
the same and exit edit mode.
The Agency is also able to indicate, via a checkbox, that
the Jurisdiction does not have any Preferred Truck
Routes to report.

9
1.4 Change Password
A user can change their account password on the My Account screen.
To change the user account password:
Enter the current password
Enter the new password
Re-enter the new password
Click the ‘Change Password’ button
1.5 Forgot Password
To retrieve a forgotten password, click the ‘I forgot my password’ link on the Log In screen. A textbox
will appear for the user to enter their User Name (email address) to receive their password. An email
with a temporary password will be sent from the system to the User Name (email address) entered.
Once logged in, the User can change their password using the steps detailed in Section 1.4 above.

10
2.0 Administrator Account
2.1 Approve/Deny new User Registration Requests
Any registration requests from General users within the Administrator’s Jurisdiction will be listed on the
Admin page under ‘Accounts Waiting Approval’. An Administrative user will approve or deny the
registration request.
2.2 Manage General User Accounts
The Admin page lists the user accounts the Administrator is currently managing. If there are no General
User accounts to manage, the message ‘No User Accounts to manage’ will be displayed. If General User
accounts exist for the Administrator, they will be displayed in a table. The Administrative User has the
ability to Enable or Disable current General User accounts.

11
2.3 Manager Settings
Administrative users are able to control their email notifications by using the checkbox options on the
My Account screen. Users can set preferences for the following options:
Receive Administrative email notifications
Receive Administrative Summary email notifications, once a week
After setting or changing the email preferences, click the ‘Save Manager Settings’ button to save the
preferences.

12
3.0 Add Truck Route
3.1 Add Class II or Class III Truck Route
Note: Class II and Class III Truck Routes cannot be created on State jurisdiction roadways
a) To add a new Class II or Class III Truck Route, click ‘Add new route’ on the Toolbar on the Editor
page.
b) Select ‘Class II Designated Truck Route’ or ‘Class III Designated Truck Route’ from the drop down
on the dialog box that appears.
c) Click the ‘Browse’ button to browse to the file location of the Resolution. If a Resolution does
not exist, click ‘Cancel’ until a Resolution is available for the route. A Class II or Class III Truck
Route cannot be added without a Resolution document. A message will appear informing the
user a resolution must be attached to continue the Add process:

13
d) Enter a Street Name, From Location and To Location. This information is required to add a new
route.
e) Click the ‘OK’ button once the required information has been entered.
f) A new record has now been added to the data grid below the map. Click on the pencil icon
on the new row in the data grid to change the map to edit mode. The pencil icon has now been
replaced with a save icon.
g) Click on the map to place the starting location of the route.
A green marker is placed at the mouse click location. Zoom in
close enough to the black lines to be sure the mouse click is
actually on the black line.

14
h) Continue clicking on the map to add additional points along the route. The text ‘Validating
route…’ will be displayed after each mouse click to ensure the point is on a road belonging to
the applicable jurisdiction. A green marker will be placed at each point location and a blue line
will appear indicating the route. Examples below:
To undo placement of a route point, click ‘Undo last stop’. This will clear the last point
clicked on the map. This tool will continue to remove the most recently placed point
each time it is clicked.
To completely clear the route being created, click ‘Reset map’.
Once the route has been drawn on the map as desired, save the route by clicking on the save icon for
the record in the data grid.
The text ‘Validating route…’ will be displayed as the route is validated and then subsequently saved.

15
Once the Route geometry, Route Name, From Name and To Name have all been confirmed, a message
box will appear confirming that the route has been saved successfully.
If the route is not valid, a dialog box will appear requesting that the user redraw the route.
If the route includes roads not within the user’s jurisdiction, an error message will appear.

16
3.2 Add Preferred Truck Route
Note: Preferred Truck Routes cannot be created on State jurisdiction roadways or be coincident with
Class II or Class III Designated Truck Routes. If a Preferred Truck Route crosses a Designated Route the
Preferred Route will be split into two routes where it crosses the Designated Route.
a) To add a new Preferred Truck Route, click ‘Add new route’ on the Toolbar on the Editor page.
b) Select ‘Preferred Truck Route’ from the drop down on the dialog box that appears.
c) A resolution is not required to add a Preferred Truck Route but is optional. If a resolution is to be
added, click the ‘Browse’ button to locate the resolution document.
d) Enter a Street Name, From Location and To Location. This information is required to add a new
route.
e) Click the ‘OK’ button once the required information has been entered.
f) A new record has now been added to the data grid below the map. Click on the pencil icon
on the new row in the data grid to change the map to edit mode. The pencil icon has now been
replaced with a save icon.

17
g) Click on the map to place the starting location of the route.
A green marker is placed at the mouse click location.
h) Continue clicking on the map to add additional points along the route. A green marker will be
placed at each point location and a blue line will appear indicating the route.
To undo placement of a route point, click ‘Undo last stop’. This will clear the last point
clicked on the map. This tool will continue to remove the most recently placed point
each time it is clicked.
To completely clear the route being created, click ‘Reset map’.

18
Once the route has been drawn on the map as desired, save the route by clicking on the save icon for
the record in the data grid.
The text ‘Validating route…’ will be displayed as the route is validated and then subsequently saved.
Once the Route geometry, Route Name, From Name and To Name have all been confirmed, a message
box will appear confirming that the route has been saved successfully.
If the route is not valid, a dialog box will appear requesting that the user redraw the route.
If the route includes roads not within the user’s jurisdiction, an error message will appear.
19
4.0 Delete Truck Route
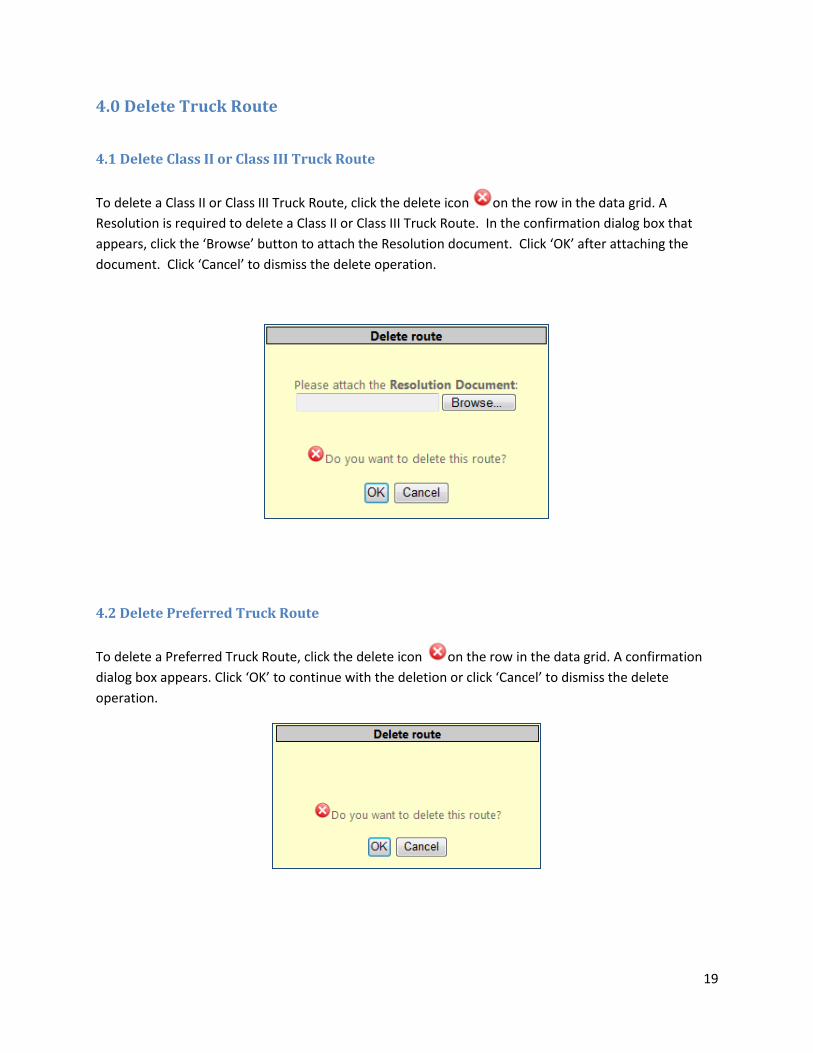
4.1 Delete Class II or Class III Truck Route
To delete a Class II or Class III Truck Route, click the delete icon on the row in the data grid. A
Resolution is required to delete a Class II or Class III Truck Route. In the confirmation dialog box that
appears, click the ‘Browse’ button to attach the Resolution document. Click ‘OK’ after attaching the
document. Click ‘Cancel’ to dismiss the delete operation.
4.2 Delete Preferred Truck Route
To delete a Preferred Truck Route, click the delete icon on the row in the data grid. A confirmation
dialog box appears. Click ‘OK’ to continue with the deletion or click ‘Cancel’ to dismiss the delete
operation.

20
5.0 Route Changes
Each time a new route is added or an existing route is deleted, an Approver must Approve or Deny the
change. This user will either be an IDOT District Engineer or an IDOT Central Office employee.
The number of pending Route Changes will be designated on the Approvals tab for the Approver user
account.
The Approval Status of all routes is also displayed in the data grid on the Main Mapping page. Users will
see the Approval Status of all routes they have access to.
The Approvals screen is very similar to the Main mapping page. The main difference is that the
Approver user will be able to approve a route by checking the green check mark in the data grid. The
Approver is also able to view the associated resolution and Zoom to the Feature.

21
6.0 Map Tools
6.1 Mouse Wheel Zoom
To Zoom In on the map (show the map with more detail), roll the mouse wheel forward. To Zoom Out
on the map (show the map with less detail), roll the mouse wheel backward.
6.2 Zoom Buttons
The user can also zoom in and out on the map by using the Zoom In and Zoom Out
buttons located to the left side of the map image. To Zoom In on the map (show the
map with more detail) click on the button with the addition sign. To Zoom Out on the
map (show the map with less detail), click on the button with the subtraction sign.
6.3 Pan
To Pan the map, hold down the left mouse button and drag the map to the desired location.
6.4 Zoom Full Extent
The ‘Zoom full extent’ tool on the Editor Toolbar repositions the map to the extent of
the user’s jurisdiction.
6.5 Highlight Route
To highlight a particular Truck Route on the map, click the Feature icon in the data grid for the
applicable data record.

22
6.6 Display Local Roads
To toggle the local roads visibility on the map, click ‘Hide local roads/Show local roads’. The local roads
are displayed by default when the map is loaded.
6.7 Measure Distance
To measure a distance on the map, click the Measure Distance tool. Once activated, click the starting
location on the map to place a starting point and a ‘Start’ label. Continue clicking along the road to
measure the distance. The last location clicked will have a ‘Finish’ label placed at the mouse click
location. A running total of the distance measured appears below the map tools. Click the ‘Clear
Measurement’ button to clear the points placed on the map.

23
7.0 Data Grid Features
7.1 Filter Records
To filter the data grid that displays the Designated and Preferred Truck Routes, use the drop down boxes
below the data grid.
The first drop down box lists the Jurisdictions available depending on the user that is logged in to the
application. For example, an IDOT Central user will have all Counties, Municipalities and Townships
listed. A County user will see the Municipalities and Townships within their County.
The second drop down lists the type of Truck Route – Class II, Class III or Preferred.
IDOT Central User Cass County User
Type of Route

24
7.2 Resolutions
To view the resolution associated with a Class II or Class III Truck Route, click the resolution icon
in the data grid for the applicable data record. Preferred Truck Routes do not require a
resolution.
If a resolution does not exist for a Preferred Route, no icon will be visible for that record in the data grid.