design and produce text documents (word 2013) 1-72-6 ccs...design and produce text documents (word...
TRANSCRIPT

Computer Skills
Design and produce text documents (Word 2013) This concise workbook supports BSBITU303A Design and produce text documents in the BSB07 Business Services Training Package.
© Software Publications Pty Ltd, June 2015
Author Software Publications writing team
ISBN 978-1-922241-72-6
Disclaimer All rights reserved. No part of this publication may be reproduced or transmitted in any form or by any means, electronic or mechanical, including photocopying, scanning, recording, or any information storage and retrieval system, without permission in writing from Millbank Investments Ltd, NZ or Software Publications Pty Ltd. No patent liability is assumed with respect to the use of the information contained herein. While every precaution has been taken in the preparation of this book, the publisher and authors assume no responsibility for errors or omissions. Neither is any liability assumed for damages resulting from the use of the information contained herein.
Software Publications Pty Ltd (ABN 75 078 026 150)
Head Office - Sydney
Unit 3 25 Gibbes Street Chatswood NSW 2067 www.softwarepublications.com.au Published and printed in Australia

4 © Software Publications Pty Ltd, 2014
BSBITU303A DESIGN AND PRODUCE TEXT DOCUMENTS
Unit descriptor This unit describes the performance outcomes, skills and knowledge required to design and develop predominantly text based documents using advanced features of word processing software.
Application of the unit This unit applies to individuals who possess fundamental skills in computer operations and keyboarding, and basic skills in the operation of word processing software. They may work as individuals who provide administrative support within an enterprise, or may be technical/knowledge experts responsible for production of their own word processed documents.
Employability skills This unit contains employability skills.
Prerequisites There are no prerequisites for this unit.
Element Performance criteria Page covered
1 Prepare to produce documents
1.1 Use safe work practices to ensure ergonomic, work organisation, energy and resource conservation requirements are addressed
14–21
1.2 Identify document purpose, audience and presentation requirements, and clarify with relevant personnel as required
24–26, 157
1.3 Identify organisational and task requirements for text-based business documents to ensure consistency of style and image
24, 157
2 Design word processed documents
2.1 Design document structure and layout to suit purpose, audience and information requirements of the task
22–23, 56, 72–80, 102–105, 157
2.2 Design document to enhance readability and appearance, and to meet organisational and task requirements for style and layout
22–26, 157
2.3 Use style sheets and automatic functions to ensure consistency of design and layout
31–33, 42–47, 61–64, 65–68, 70, 92–102, 121, 123, 126–131

© Software Publications Pty Ltd, 2014 5
Element Performance criteria Page covered
3 Add tables and other data
3.1 Insert a standard table into a document, changing cells to meet information requirements
34–40, 113–121, 124–125, 150
3.2 Insert and delete columns and rows as necessary
114–115, 125
3.3 Insert images and other data to meet required specifications
54–57, 72–80, 108–111
4 Produce text documents
4.1 Use advanced software functions to enable efficient production of documents
Throughout workbook
4.2 Enter or import, and edit text and other data to meet required specifications
Throughout workbook
4.3 Preview, adjust and print documents in accordance with organisational and task requirements
72, 154
4.4 Name and store text documents, in accordance with organisational requirements and exit the application without information loss/damage
Throughout workbook
4.5 Prepare text documents within designated time lines and organisational requirements for speed and accuracy
27, 155
4.6 Use manuals, user documentation and online help to overcome problems with document design and production
28

6 © Software Publications Pty Ltd, 2014
Range Statement The range statement relates to the unit of competency as a whole. It allows for different work environments and situations that may affect performance. Bold italicised wording, if used in the performance criteria, is detailed below. Essential operating conditions that may be present with training and assessment (depending on the work situation, needs of the candidate, accessibility of the item, and local industry and regional contexts) may also be included.
Variable Scope Pages Ergonomic requirements may include:
avoiding radiation from computer screens 14 chair height, seat and back adjustment 16 document holder 15 footrest 16 keyboard and mouse position 14–15 lighting 17 noise minimisation n/a posture 14–16 screen position 14 workstation height and layout 17
Work organisation requirements may include:
exercise breaks 18–19 mix of repetitive and other activities
rest periods Conservation requirements may include:
double-sided paper use
20 recycling used and shredded paper re-using paper for rough drafts (observing confidentiality requirements) utilising power-save options for equipment 21
Documents may include:
brochures 108–111 calendars n/a faxes 139–140 flyers 80, 105–107, 157 forms n/a mail merge documents, including labels 141–155 memos 55, 155 multi-page letters 84–87 promotional material 81–81, 157 reports 122–123 schedules n/a tables 34–40, 113–121, 124,
150 Organisational requirements may include:
company colour scheme 24, 157 company logo 24 consistent corporate image n/a content restrictions n/a established guidelines and procedures for document production
24

© Software Publications Pty Ltd, 2014 7
Variable Scope Pages house styles 24 observing copyright legislation n/a organisation name, time, date, document title, filename etc. in header/footer
24
templates 24 Design may include: balance 22
diversity n/a relative positioning of graphics and headings 22–23
simplicity 22 text flow 22 typography 23
Structure and layout may include:
boxes 75, 105 colour Throughout workbook columns 102–104 drawing 72–79 graphics 80 headings Throughout workbook letter and memo conventions Throughout workbook page layout Throughout workbook photographs 56 typeface Throughout workbook white space 22
Automatic functions may include:
auto correct n/a auto date Throughout workbook auto format 70 auto text 126–131 default settings Throughout workbook headers and footers 92–102 page numbering 96 styles 65–68 table headings 121
Consistency of design and layout may include:
annotated references 68–68 borders 61–64 bullet/number lists 42–47 captions 123 consistency with other business documents Throughout workbook
footnotes/endnotes 123 indentations 43, 46, 63, 68 page numbers 96 spacings 31–33, 43, 47 typeface styles and point size Throughout workbook
Data may include: clip art 80 data from other software applications 57 digital photographs 56 files 54–57, 108–111

8 © Software Publications Pty Ltd, 2014
Variable Scope Pages graphics 72–79 quotes n/a references 68–68 scanned photographs and logos n/a tables, graphs and charts 57
Advanced software functions may include:
alternate headers and footers 101 drawing tools 72–79 graphics tools n/a importing data/objects/pictures 52–57 mail merge 141–155 newspaper columns 102–103 sections 85 sort n/a styles 65–68 tables 34–40, 113–121, 124–
124–125, 150 templates 132–140
Printing may include: print merge 154 print to file n/a with comments n/a with drawing objects 72 with field codes n/a with hidden text 72
Naming and storage of documents may include:
authorised access n/a
file names according to organisational procedure e.g. numbers rather than names n/a
file names which are easily identifiable in relation to the content Throughout workbook
file/directory names which identify the operator, author, section, date etc. n/a
filing locations n/a organisational policy for backing up files, storage in folders/sub-folders
n/a
organisational policy for filing hard copies of documents
n/a
security/password protection n/a storage on hard/floppy disk drives, CD-ROM, tape backup
Throughout workbook
Designated time lines may include:
organisational time line e.g. deadline requirements
27, 155 time line agreed with internal/external
client time line agreed with supervisor/person requiring document/s

© Software Publications Pty Ltd, 2014 71
PRINTING OPTIONS The Print screen of the Backstage view provides a range of options including printing selected text or printing a specific range of pages.
Exercise 38
1 With Time Out Holidays open, click on and click on .
2 Explore the options described below.
3 Click on in the File menu.
4 Select from the menu at the left.
Select the number of copies required
Allows a different paper size to be selected
Allows different margins to be
selected
Select one sided or duplex (two sided)
printing where available
Select whether pages are collated or not
Allows a different orientation to be
selected
Allows multiple pages per sheet to
be printed
Opens the Page Setup dialog box to specify more page setup options
Enter the page number(s) required, e.g. 1-4
Click on the Print button to print the whole document
using default settings
Select from a list of
attached printers
Select from a list of
options for what to print, e.g. print selected
text only or print the current page only
72 © Software Publications Pty Ltd, 2014
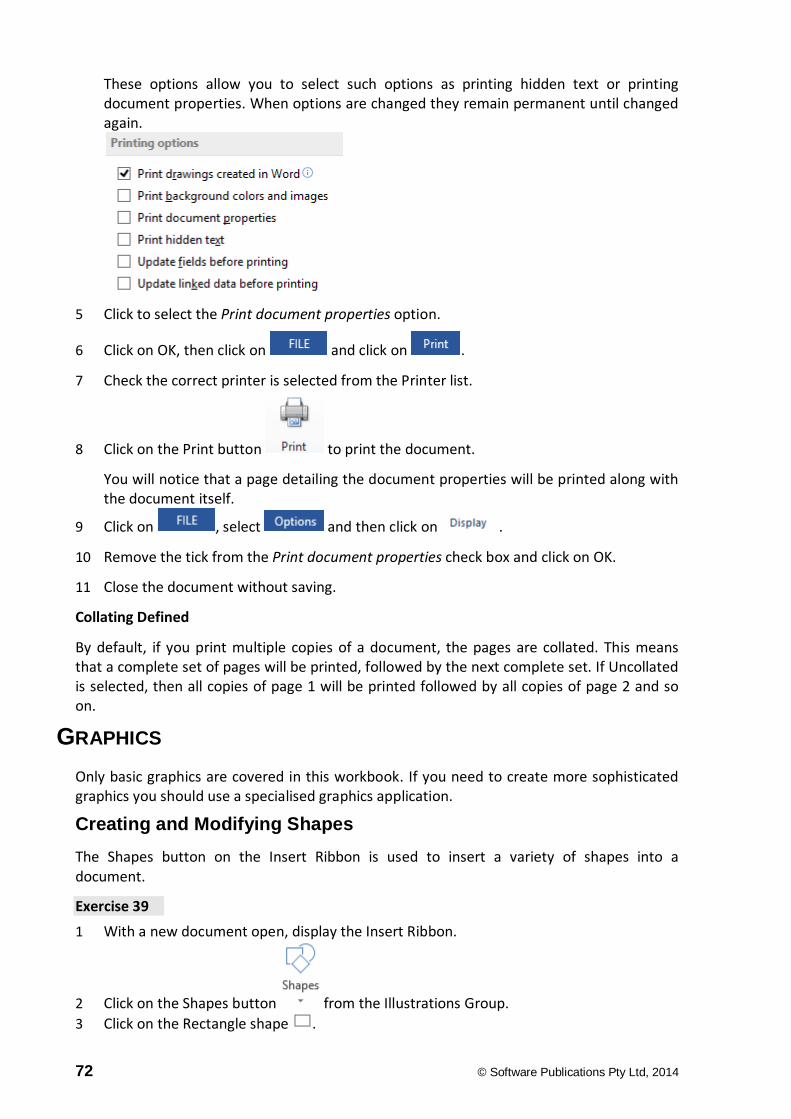
These options allow you to select such options as printing hidden text or printing document properties. When options are changed they remain permanent until changed again.
5 Click to select the Print document properties option.
6 Click on OK, then click on and click on .
7 Check the correct printer is selected from the Printer list.
8 Click on the Print button to print the document.
You will notice that a page detailing the document properties will be printed along with the document itself.
9 Click on , select and then click on .
10 Remove the tick from the Print document properties check box and click on OK.
11 Close the document without saving.
Collating Defined
By default, if you print multiple copies of a document, the pages are collated. This means that a complete set of pages will be printed, followed by the next complete set. If Uncollated is selected, then all copies of page 1 will be printed followed by all copies of page 2 and so on.
GRAPHICS Only basic graphics are covered in this workbook. If you need to create more sophisticated graphics you should use a specialised graphics application.
Creating and Modifying Shapes The Shapes button on the Insert Ribbon is used to insert a variety of shapes into a document.
Exercise 39
1 With a new document open, display the Insert Ribbon.
2 Click on the Shapes button from the Illustrations Group. 3 Click on the Rectangle shape .

© Software Publications Pty Ltd, 2014 73
4 Hold down the Shift key. Click and drag diagonally to create a square at the left of the page, about 3 cm in height and length. Release the mouse button then the Shift key.
Note The Shift key is used to create a precise square.
Handles display around the edge of a selected object. Handles are used to resize and object. The circular arrow at the top is used to rotate the item.
5 Position the mouse pointer over the bottom right corner handle. The mouse pointer will display as a double arrow.
Hold down the Shift key and click and drag the handle diagonally away from the object to increase the size. When the square is approximately 4 cm in height and length release the mouse button and then the Shift key.
Note The Shift key allows the object to be resized while staying in proportion.
6 With the square still selected, check the Drawing Tools Format Ribbon is displayed.
7 Click on the of the Shape Fill button and select Blue, Accent 1, Lighter 80%. (Position the mouse over the colours to see the names.)
8 Click on the of the Shape Outline button on the Drawing Tools Format Ribbon. Select Black.
9 Click on the of again and click on . Select .
10 Save the document with the file name Logo and leave it open for the next exercise.
Exercise 40 1 Using Logo, hold down the Ctrl and Shift keys and position the mouse pointer on the
edge of the square.
2 Click and drag the square to the right. Release the mouse button then the keyboard keys to copy the square. Position the newly copied square beside the first.
3 Using the instructions above, copy another square and position it beside the other two as shown at the right.
4 Click on an edge of the middle square to select it.
5 Apply the fill colour Blue, Accent 1, Lighter 40% to the middle square using .
6 Select the far right square and apply Blue, Accent 1, Darker 25% fill colour.
7 Display the Insert Ribbon and click on . Select Double Bracket .
Handles

74 © Software Publications Pty Ltd, 2014
8 Click and drag from the top left corner of the first square to the bottom right corner of the far right square as shown below. Brackets will display on either side of the squares.
9 With the brackets selected click on the of . Click on and select 3 pt.
Note
The Drawing Tools Format Ribbon contains the Insert Shapes Group, which is an alternative tool for inserting shapes.
10 From the Insert Shapes Group, select Rounded Rectangle . Click and drag to draw a
rounded rectangle that covers your other shapes. The shapes will be hidden.
11 With the new rounded rectangle selected, click on the of the Send Backward button
on the Drawing Tools Format Ribbon. Select .
12 With the rounded rectangle still selected, click on of . Select
.
13 Check the Custom tab is selected.
14 Check RGB is selected from the Color model: drop-down box.
15 Enter the numbers shown below into the Red:, Green: and Blue: boxes.
This creates a light purple colour as shown in the New box.
16 Click on OK.
Drag from here
to here

© Software Publications Pty Ltd, 2014 75
17 Use to change the outline of the rounded rectangle to No Outline.
18 Click on the brackets. Use to change the outline colour to white.
19 Select the Text Box button from the Insert Shapes Group.
20 Draw a text box over the three boxes as shown below.
21 Type: LOGISTICS
22 Select the text and format it to Arial, bold and centred.
23 With the text selected press Ctrl ] to increase the font size so the text fills the text box.
24 Change the Shape Fill colour of the text box to No Fill. Change the Shape Outline colour to No Outline.
25 Change the font colour to Black, Text 1, Lighter 25% using the mini toolbar.
26 Resize the rounded rectangle, text box, text size, distance between the squares, etc. as required until the logo looks similar to the one shown below:
27 Save and close the document.
Exercise 41
A model result for the Exercises 41–45 is shown on page 79.
1 Create a new document. Save with the name Shapes.
2 Click on and select the Rectangle .
3 Position the mouse pointer at the top left corner margin of the page. Drag across to 4 cm on the horizontal ruler and down to 2 cm on the vertical ruler.
4 Click away from the rectangle to deselect it.

76 © Software Publications Pty Ltd, 2014
5 Using the options from the Insert Shapes Group on the Drawing Tools Format Ribbon, draw the following shapes at the right of the rectangle.
Tip Use the Shift key to create an exact circle shape.
6 Click on an outside line of the rectangle shape. Click and drag on the lengthen handle (bottom middle handle) downwards until the rectangle becomes a square.
7 Click on an outside line of the circle. Drag downwards on the bottom middle handle. Adjust the left middle handle if required to turn the circle into an oval.
8 Click on an outside line of the square to select it, then click on the of . Click on and select a dotted line type.
9 Change the Outline Weight to 3 pt.
10 Click on the of and select Blue, Accent 1, Lighter 60%.
11 Select the oval and apply a thicker line style and a line colour and fill colour of your choice.
12 Select the arrow and click on the of . Click on Arrows
and select an arrow style with a dot at one end and an arrow at the other (Arrow Style 9).
13 Create a rectangular text box in the centre of the page under all the drawn shapes. A flashing cursor will display in the text box.
14 Type: Word 2013
15 Select the text and format to Calibri 26 pt, bold, centred and remove spacing after. Ensure the text can be read. If not resize the text box to display the text.
16 Insert the Smiley Face shape , using the Shift key to draw an in proportion face.
17 With the smiley face selected apply a yellow fill colour.
18 Click on the of and click on . Select a gradient of your choice to add to the smiley face.
19 Click on the Shapes button again and select Explosion 2 from Stars and Banners.
20 Draw the explosion to the right of the smiley face.
21 Apply a colour of your choice to the fill and outline of the explosion.
22 Save the document and leave it open for the next exercise.

© Software Publications Pty Ltd, 2014 101
Alternating Headers/Footers Alternating headers and/or footers are used in books and manuals where page numbering is inserted at the outside margins (as in this workbook). Generally even numbers are used at the outside margin on left pages and odd numbers at the outside margin on right pages as shown below. (In print preview page 1 is always shown on its own.)
Exercise 60 1 Open the file called Refrigeration.
2 Right click in the header area and select Edit Header .
3 In the Options Group of the Header & Footer Tools Design Ribbon, put a tick in the Different Odd & Even Pages check box.
4 The Odd Page Header will be displayed . At the right margin type: Refrigeration Development; select the text and use Ctrl I to apply italic.
5 Click on the Next button in the Navigation Group.
6 For the Even Page Header, type: Refrigeration Development in italic at the left margin.
7 Click on and select Bottom of Page, Plain Number 1.
8 Click on the Previous button . in the Navigation Group.
9 Click on and select Bottom of Page, Plain Number 3.
10 Click on the Close Headers and Footers button.
11 Press Ctrl Home.
Refrigeration Development
2
Refrigeration Development 3
Refrigeration Development 1

102 © Software Publications Pty Ltd, 2014
12 Print preview the document to check headers and footers.
Click on the Next Page button ; pages 2 and 3 will display opposite each other. If two pages are not shown, use the Zoom control to reduce the preview size until two pages are shown.
13 Save the document and close.
NEWSPAPER COLUMNS A document can be formatted into newsletter style with text arranged in two or more columns. Text flows continuously from the bottom of one column to the top of the next column.
To apply columns to a document, click on the Columns button in the Page Setup Group on the Page Layout Ribbon and select the number of columns from the menu displayed.
Different sections of a document can be formatted differently, e.g. a document can be arranged into two columns then the heading selected and formatted to one column.
Columns Dialog Box
Click on the Columns button and select More Columns to display the Columns dialog box.
This is used to choose preset options, to change text into uneven columns (or even columns) and to insert lines between columns. Exact margins for columns can also be specified.

© Software Publications Pty Ltd, 2014 103
Using the Columns Button Exercise 61 1 Open the file called Sparkling Pools. Display the Page Layout Ribbon.
2 Click on the Columns button and select Two .
The text will change into two columns.
You will now change the heading and first paragraph so that it spans the page.
3 Select the heading and first paragraph.
4 Click on and select One .
5 Centre the heading.
6 Save the document and leave it open for the next exercise.
Balancing Columns Columns can be balanced by inserting a section break at the end of the last column.
Exercise 62 1 Using Sparkling Pools click the insertion point at the end of the second column.
2 Display the Page Layout Ribbon. Click on and select Continuous. The columns will be balanced.
3 Save the document and leave it open for the next exercise.
Changing Spacing between Columns When spacing is adjusted between columns, the width of the columns is adjusted also so the text fits between the margins.
Exercise 63 1 Using Sparkling Pools click anywhere in the two column layout.
2 Click on and select More Columns .
3 Change the measurement in the Spacing: box to 3 cm. The Width: will automatically change.
4 Click on OK.
5 Save and close the document.

104 © Software Publications Pty Ltd, 2014
Exercise 64 1 Open the file called The Big OE. Select text from the second paragraph to the end of the
second to last paragraph (from Back in the early to inflation meantime).
2 Click on and select Two.
3 Insert a line between columns as follows:
a Click on and select .
b Click in the Line between check box ; click on OK.
4 Edit the document as shown below.
5 Save and close the document.
-------------------------------------------------------------------------------------------------------------
The Big O.E. Over the past 40 years, tens of thousands of young New Zealanders and Australians have celebrated adulthood by experiencing other parts of the world first-hand. Back in the early days of O.E., the preferred mode of transport was by ship, and while it is indeed still possible to travel to and from Britain in this manner, it is extremely expensive - well out of the price range of the vast majority of young travellers - and rather infrequent. Originally, a trip across the Tasman was the extent of most young people’s travelling ambitions, but the fascination of Mother England, where the roots of so many lay, became increasingly popular. This is a shame really, for any of the “baby boomers”, those young adults of the fifties and sixties, will bore you for
hours with the great times they had on board ship for anything up to six weeks, stopping at a wide range of exotic places, and really enjoying one big party before even arriving at Southampton or Tilbury. In these times of jet travel, it is possible to get to almost any point of the world within a day or so, and competition among airlines means that it is not particularly expensive. If you hunt around you can pick up a return ticket to the UK for around $2000, which is cheaper than it was a decade ago despite the significant inflation meantime.
Return tickets are generally a good idea, if only for the fact they work out cheaper than two singles, and it also helps placate English authorities by proving that you do in fact plan to return home after your allotted time.
Good deals areavailable at various times of the year.
Arial 16 pt, bold, centred

158 © Software Publications Pty Ltd, 2014
ASSESSMENT
BSBITU303A Design and produce text documents
The elements and performance criteria are covered during assessment in the following ways.
ELEMENT PERFORMANCE CRITERIA ASSESSMENT TASKS
1 Prepare to produce documents
1.1 Use safe work practices to ensure ergonomic, work organisation, energy and resource conservation requirements are addressed
Task 1
1.2 Identify document purpose, audience and presentation requirements, and clarify with relevant personnel as required
Task 8
1.3 Identify organisational and task requirements for text-based business documents to ensure consistency of style and image
Task 8
2 Design word processed documents
2.1 Design document structure and layout to suit purpose, audience and information requirements of the task
Task 5, Task 8, Task 9
2.2 Design document to enhance readability and appearance, and to meet organisational and task requirements for style and layout
Task 5, Task 8, Task 9
2.3 Use style sheets and automatic functions to ensure consistency of design and layout
Task 4, Task 5, Task 8, Task 9
3 Add tables and other data
3.1 Insert a standard table into a document, changing cells to meet information requirements
Task 7, Task 10
3.2 Insert and delete columns and rows as necessary
Task 10
3.3 Insert images and other data to meet required specifications
Task 5, Task 9, Task 10

© Software Publications Pty Ltd, 2014 159
ELEMENT PERFORMANCE CRITERIA ASSESSMENT TASKS
4 Produce text documents
4.1 Use advanced software functions to enable efficient production of documents
Task 5, Task 6, Task 7,
4.2 Enter or import, and edit text and other data to meet required specifications
Task 5, Task 9, Task 10
4.3 Preview, adjust and print documents in accordance with organisational and task requirements
Task 5, Task 7, Task 9, Task 10
4.4 Name and store text documents, in accordance with organisational requirements and exit the application without information loss/damage
Task 5, Task 6, Task 7, Task 9, Task 10
4.5 Prepare text documents within designated time lines and organisational requirements for speed and accuracy
Task 3
4.6 Use manuals, user documentation and online help to overcome problems with document design and production
Task 2, Task 10
Required Skills and Knowledge
The skills and knowledge are covered during assessment in the following ways.
Required Skills How will Evidence be Gathered?
• communication skills to clarify document requirements
Can be assessed through communication between candidate and assessor.
• editing and proofreading skills to check own work for accuracy against original
Task 7, Task 10
• keyboarding skills to enter text and numerical data
Task 6, Task 7, Task 9, Task 10
• literacy skills to read and understand the organisation's procedures, and to use models to produce a range of documents
Task 5, Task 6, Task 8, Task 9, Task 10
• problem-solving skills to use processes flexibly and interchangeably
Demonstrated through the completion of the assessment tasks

160 © Software Publications Pty Ltd, 2014
Required Knowledge How will Evidence be Gathered?
• formatting styles and their impact on formatting, readability and appearance of documents
Task 5, Task 6, Task 8, Task 9, Task 10
• organisational requirements for ergonomics, work periods and breaks, and conservation techniques
Task 1
• organisational style guide Task 5, Task 6, Task 8
• purposes, uses and functions of word processing software
Demonstrated through the completion of the assessment tasks
Evidence Guide
How will Evidence be Gathered?
Critical aspects for assessment and evidence required to demonstrate competency in this unit
Evidence of the following is essential:
• applying document design principles
Tasks 5–10
• knowledge of organisation’s style guide
Tasks 5 and 6
• production of a minimum of three text documents using advanced software functions.
Tasks 4–10

© Software Publications Pty Ltd, 2014 175
BSB Business Services Training Package
Supplement
This workbook can be used by learners completing a qualification in the BSB Business Services Training Package.

176 © Software Publications Pty Ltd, 2014
BSBITU303 Design and produce text documents
Application
This unit describes the skills and knowledge required to design and develop text-based documents using advanced features of word processing software.
It applies to individuals who possess fundamental skills in computer operations and keyboarding, and basic skills in operation of word processing software. They may work as individuals who provide administrative support within an enterprise, or may be technical/knowledge experts responsible for production of their own word processed documents.
No licensing, legislative or certification requirements apply to this unit at the time of publication.
Elements and Performance Criteria
Element Elements describe the essential outcomes.
Performance Criteria Performance criteria describe the performance needed to demonstrate achievement of the element.
Workbook page reference
Assessment Tasks
1. Prepare to produce word processed documents
1.1 Use safe work practices to ensure ergonomic, work organisation, energy and resource conservation requirements are met
14–21 Task 1
1.2 Identify document purpose, audience and presentation requirements, and clarify with relevant personnel as required
24–26, 157 Task 8
1.3 Identify organisational and task requirements for text-based business documents to ensure consistency of style and image
24, 157 Task 8
2. Design word processed documents
2.1 Design document structure and layout to suit purpose, audience and information requirements of the task
22–23, 56, 72–80, 102–105, 157
Task 5, Task 8, Task 9
2.2 Design document to enhance readability and appearance, and to meet organisational and task requirements for style and layout
22–26, 157 Task 5, Task 8, Task 9
2.3 Use style sheets and automatic functions to ensure consistency of design and layout
31–33, 42–47, 61–64, 65–68, 70, 92–102, 121, 123, 126–131
Task 4, Task 5, Task 8, Task 9

© Software Publications Pty Ltd, 2014 177
Element Elements describe the essential outcomes.
Performance Criteria Performance criteria describe the performance needed to demonstrate achievement of the element.
Workbook page reference
Assessment Tasks
3. Add tables and other data
3.1 Insert a standard table into a document, changing cells to meet information requirements
34–40, 113–121, 124–125, 150
Task 7, Task 10
3.2 Insert and delete columns and rows as necessary
114–115, 125 Task 10
3.3 Insert images and other data to meet required specifications
54–57, 72–80, 108–111
Task 5, Task 9, Task 10
4.Produce text documents
4.1 Use advanced software functions to enable efficient production of documents
Throughout workbook
Task 5, Task 6, Task 7,
4.2 Enter or import, and edit text and other data to meet required specifications
Throughout workbook
Task 5, Task 9, Task 10
4.3 Preview, adjust and print documents in accordance with organisational and task requirements
72, 154 Task 5, Task 7, Task 9, Task 10
4.4 Name and store text documents, in accordance with organisational requirements and exit application without information loss/damage
Throughout workbook
Task 5, Task 6, Task 7, Task 9, Task 10
4.5 Prepare text documents within designated timelines and organisational requirements for speed and accuracy
27, 155 Task 3
4.6 Use manuals, user documentation and online help to overcome problems with document design and production
28 Task 2, Task 10

178 © Software Publications Pty Ltd, 2014
Foundation Skills This section describes language, literacy, numeracy and employment skills incorporated in the performance criteria that are required for competent performance.
Skill Performance Criteria
Description Workbook page reference
Reading 2.2, 4.3, 4.4, 4.6
• Recognises and interprets textual information from a range of sources to determine and adhere to requirements
Whole workbook
Writing 2.1-2.3, 3.3, 4.2-4.5
• Develops documents using required format, accurate spelling and grammar and terminology specific to requirements
Whole workbook
• Organises content to support purpose and audience of material using clear and logical language
Whole workbook
Oral Communication
1.2 • Uses specific and direct language, and listening and questioning techniques to clarify requirements
Workbook exercises can be discussed with trainer as required
Navigate the world of work
1.1-1.3, 2.1-2.3, 3.1, 3.3, 4.2-4.5
• Recognises and follows explicit and implicit protocols and meets expectations associated with own role
Whole workbook
Interact with others
1.2 • Collaborates with others to achieve joint outcomes
Workbook exercises can be discussed with classmates or workmates
Get the work done
2.1-2.3, 3.1-3.3, 4.1-4.6
• Uses advanced features within applications to address routine and complex work tasks
Whole workbook

© Software Publications Pty Ltd, 2014 179
Assessment Requirements v1.0
Performance Evidence
Evidence of the ability to: Assessment Task
• adhere to organisational requirements and strategies when creating text documents including: • ergonomic requirements • energy and resource requirements
Task 1
• adhere closely to task requirements and required specifications by: • following designated timelines • achieving consistency of style and image • ensuring correct editing and style requirements • adhering to designated timelines
Tasks 3–10
• use advanced software features Tasks 4–7 and 9–10
• communicate effectively with personnel Can be assessed through communication between candidate and assessor
• overcome problems by referring to user documentation, manuals and online help.
Task 2
Knowledge Evidence
To complete the unit requirements safely and effectively, the individual must:
Assessment task
• outline various formatting styles and their impact on formatting, readability and appearance of documents
Task 5–10
• explain organisational requirements for ergonomics, work periods and breaks, and conservation techniques
Task 1
• describe purpose and contents of an organisational style guide Task 4–10
• identify purpose, uses and functions of word processing software.
Task 4–10