deploying windows server 2012 with smb direct over ... · white pape: deploying windows server ®...
TRANSCRIPT

WHITE PAPER
©2014 Mellanox Technologies. All rights reserved.
Deploying Windows Server® 2012 with SMB Direct overMellanox End-to-End 10/40Gb/s Ethernet Solutions
• Windows Server 2012 SMB Overview: http://technet.microsoft.com/en-us/library/hh831795.aspx
• High-Performance, Continuously Available File Share Storage for Server Applications Technical Preview: http://technet.microsoft.com/en-us/library/hh831399.aspx
• Deploying Fast and Efficient File Servers for Server Applications: http://technet.microsoft.com/en-us/library/hh831723.aspx
• Windows Server 2012 - Test cases for Hyper-V over SMB (includes PowerShell examples): http://blogs.technet.com/b/josebda/archive/2012/03/06/windows-server-quot-8-quot-beta-test-cases-for-hyper-v-over-smb.aspx
• Building Your Cloud Infrastructure: Converged Data Center with File Server Storage: http://technet.microsoft.com/en-us/library/hh831738.aspx
To implement and test this technology, you will need:
• Two or more computers running Windows Server 2012
• One or more Mellanox ConnectX®-3 adapter for each server
• One or more 10GbE or 40GbE Ethernet switches with the Priority Flow Control (PFC) capability
• Two or more cables required for the ConnectX-3 card (typically using SFP+ connectors for 10GbE or QSFP connectors for 40GbE)
Please note that support for SMB Direct is only provided starting with the ConnectX-3 family of adapters. SMB Direct is not supported by the ConnectX-2, ConnectX, or earlier adapter families.
There are many options in terms of adapters, cables and switches. At the Mellanox web site you can find more information about these RoCE adapters (http://www.mellanox.com/content/pages.php?pg=ethernet_cards_overview&menu_section=28) and Ethernet switches (http://www.mellanox.com/content/pages.php?pg=ethernet_switch_overview&menu_section=71). Here are some examples of configurations you can use to try the Windows Server 2012:
2.1 - Two computers using 10GbE RoCE
If you want to setup a simple pair of computers to test SMB Direct, you simply need two adapters and a back-to-back cable. This could be used for simple testing like one file server and one Hyper-V server.
For 10 Gigabit Ethernet, you can use adapters with SFP+ connectors. Here are the parts you will need:
Quantity Part Number Description Links
2 MCX312A-XCBT ConnectX-3 Adapter, dual port, 10GbE, SFP+ connector
http://www.mellanox.com/related-docs/user_manuals/ConnectX-3_Ethernet_Dual_SFP+_Port_Adapter_Card_User_Manual.pdf
1 MC3309130-001 SFP+ to SFP+ cable, 10GbE, 1m
http://www.mellanox.com/related-docs/user_manuals/Mellanox_approved_cables.pdf
1. Background
2. Hardware and Software

page 2
©2014 Mellanox Technologies. All rights reserved.
WHITE PAPER: Deploying Windows Server® 2012 with SMB Direct over Mellanox End-to-End 10/40Gb/s Ethernet Solutions
2.2 - Eight computers using dual 10GbE RoCE
If you want to try a more realistic configuration with RoCE, you could setup a two-node file server cluster connected to a six-node Hyper-V cluster. In this setup, you will need 8 computers, each with a dual port RoCE adapter. You will also need a 10GbE switch with at least 16 ports. Using 10GbE and SFP+ connectors, you’ll need the following parts:
Quantity Part Number Description Links
8 MCX312A-XCBT ConnectX-3 Adapter, dual port, 10GbE, SFP+ connector
http://www.mellanox.com/related-docs/user_manuals/ConnectX-3_Ethernet_Dual_SFP+_Port_Adapter_Card_User_Manual.pdf
16 MC3309130-001 SFP+ to SFP+ cable, 10GbE, 1m
http://www.mellanox.com/related-docs/user_manuals/Mellanox_approved_cables.pdf
1 MSX1016X 10GbE Switch, 64 ports, SFP+ connectors, PFC capable
http://www.mellanox.com/related-docs/prod_eth_switches/PB_SX1016.pdf
Note: You can also use a 10GbE switch from another vendor, as long as it provides support for Priority Flow Control (PFC). A common example is the Cisco Nexus 5000 series of switches.
2.3 - Two computers using 40GbE RoCE
You may also try the faster FDR speeds (54Gb/s). The minimum setup in this case would again be two cards and a cable. Please note that you need a cable with a specific type of QSFP connector for 40GbE. Here’s what you will need:
Quantity Part Number Description Links
2 MCX314A-BCBT ConnectX-3 Adapter, dual port, 40GbE, QSFP connector
http://www.mellanox.com/related-docs/user_manuals/ConnectX-3_Ethernet_Dual_SFP+_Port_Adapter_Card_User_Manual.pdf
1 MC2206130-001 QSFP to QSFP cable, 40GbE, 1m
http://www.mellanox.com/related-docs/prod_cables/DS_FDR_56Gbs_Passive_Cop-per_Cables.pdf
Please note that you will need a system with PCIe Gen3 slots to achieve the rated speed in this card. These slots are available on newer system like the ones equipped with an Intel Romley motherboard. If you use an older system, the card will be limited by the speed of the older PCIe Gen2 bus.
2.4 - Ten computers using dual 40GbE RoCE
If you’re interested in experience great throughput in a private cloud setup, you could configure a two-node file server cluster plus an eight-node Hyper-V cluster. You could also use two 40GbE RoCE adapters for each system, for added performance and fault tolerance. In this setup, you would need 20 adapters and a 20-port switch. Here are the parts required:
Quantity Part Number Description Links
20 MCX314A-BCBT ConnectX-3 Adapter, dual port, 40GbE, QSFP connector
http://www.mellanox.com/related-docs/user_manuals/ConnectX-3_Ethernet_Dual_SFP+_Port_Adapter_Card_User_Manual.pdf
20 MC2206130-001 QSFP to QSFP cable, 40GbE, 1m
http://www.mellanox.com/related-docs/prod_cables/DS_FDR_56Gbs_Passive_Cop-per_Cables.pdf
1 MSX1036B 40GbE Switch, 36 ports, SFP+ connectors, PFC capable
http://www.mellanox.com/related-docs/prod_cables/DS_FDR_56Gbs_Passive_Cop-per_Cables.pdf
Note: You will need a system with PCIe Gen3 slots to achieve the rated speed in this card. These slots are available on newer system like the ones equipped with an Intel Romley motherboard. If you use an older system, the card will be limited by the speed of the older PCIe Gen2 bus.
Windows Server 2012 includes an inbox driver for the Mellanox ConnectX-3 cards. However, Mellanox provides updated firmware and drivers for download. You should be able to use the inbox driver to access the Internet to download the updated driver.
The latest Mellanox drivers for Windows Server 2012 can be downloaded from the Windows Server 2012 tab on this page on the Mellanox web site: http://www.mellanox.com/content/pages.php?pg=products_dyn&product_family=32&menu_section=34.
3. Download and Update the Drivers

page 3
©2014 Mellanox Technologies. All rights reserved.
WHITE PAPER: Deploying Windows Server® 2012 with SMB Direct over Mellanox End-to-End 10/40Gb/s Ethernet Solutions
The package is provided to you as a single executable file. Simply run the EXE file to update the firmware and driver. This package will also install Mellanox tools on the server.
After the download, simply run the executable file and choose one of the installation options (complete or custom). The installer will automatically detect if you have at least one card with an old firmware, offering to update it. You should always update to the latest firmware provided.
Note 1: This package does not update firmware for OEM cards. If you are using this type of card, contact your OEM for an update.
Note 2: Certain Intel Romley systems won’t boot Windows Server 2012 when an old Mellanox firmware is present. It might be required for you to update the firmware of the Mellanox card using another system before you can use that Mellanox card on the Intel Romley system. That issue might also be addressed in certain cases by updating the firmware/BIOS of the Intel Romley system.
The ConnectX-3 cards can be used for both InfiniBand and Ethernet, so you need to make sure they are in the right protocol.
To do that using a GUI, follow the steps below:
• Open the Device Manager
• Right click on the “Mellanox ConnectX VPI” device under System Devices and click on Properties, then click on Port Protocol
• Change the port types to be “ETH” instead of “Auto” or “IB”
4. Configure the cards for RoCE

page 4WHITE PAPER: Deploying Windows Server® 2012 with SMB Direct over Mellanox End-to-End 10/40Gb/s Ethernet Solutions
©2014 Mellanox Technologies. All rights reserved.
Using PowerShell, you can achieve the same results by running the following cmdlets:
Dir HKLM:’SYSTEM\CurrentControlSet\Control\Class\’ -ErrorAction SilentlyContinue -Recurse | ? {
Get-ItemProperty $_.pspath -Name ‘DriverDesc’ -ErrorAction SilentlyContinue ) -match ‘Mellanox ConnectX VPI’ } | % {
Set-ItemProperty ($_.pspath+”\Parameters”) -Name PortType –Value “eth,eth”
Note: If the card you have supports only RoCE (this is true for specific cards with SFP+ connectors), Ethernet will be the only choice and the IB option will be greyed out.
In order to function reliably, RoCE needs the configuration of PFC (Priority Flow Control) on all nodes and also all switches in the flow path.
5.1 - Configuring PFC on Windows
To configure PFC on the Windows Servers, you need to perform the following steps:
• Enable PS to configure DCB
• Clear all previous QoS configuration
• Enable the Data Center Bridging (DCB) feature on both client and server
• Create a Quality of Service (QoS) policy to tag RoCE traffic on both client and server (the example below use priority 1 for TCP/UDP and priority 3 for ND/NDK)
• If VLANs are used, Mark the egress traffic with the relevant VlanID (the example below assumes the NIC is called Ethernet 4 & VlanID 55)
• Enable PriorityFlowControl (PFC) on a specific priority (the example below use priority 3)
• Disable PFC for all other priorities except for 3
• Enable DCB-capable NICs on both client and server (the example below assumes the NIC is called Ethernet 4)
• Plumb down the DCB settings to the NICs
• Optionally, you can limit the bandwidth used by the SMB traffic(the example below limits that to 60%)
5. Configuring Priority Flow Control (PFC)

page 5WHITE PAPER: Deploying Windows Server® 2012 with SMB Direct over Mellanox End-to-End 10/40Gb/s Ethernet Solutions
©2014 Mellanox Technologies. All rights reserved.
Here are the cmdlets to perform all the steps above using PowerShell:
PS $ Set-ExecutionPolicy Unrestricted
PS $ Remove-NetQosTrafficClass
PS $ Remove-NetQosPolicy -Confirm:$False
PS $ Install-WindowsFeature Data-Center-Bridging
PS $ New-NetQosPolicy “SMB” - store Activestore - NetDirectPortMatchCondition 445 -PriorityValue8021Action 3
PS $ New-NetQosPolicy “DEFAULT” - store Activestore - Default -PriorityValue8021Action 3
PS $ New-NetQosPolicy “TCP” - store Activestore - IPProtocolMatchCondition TCP -PriorityValue8021Action 1
PS $ New-NetQosPolicy “UDP” - store Activestore - IPProtocolMatchCondition UDP -PriorityValue8021Action 1
PS $ Set-NetAdapterAdvancedProperty -Name “Ethernet 4” -RegistryKeyword “VlanID” -RegistryValue “55”
PS $ Enable-NetQosFlowControl -Priority 3
PS $ Disable-NetQosFlowControl 0,1,2,4,5,6,7
PS $ Enable-NetAdapterQos -InterfaceAlias “Ethernet 4”
PS $ set-NetQosDcbxSetting -Willing 0
PS $ New-NetQoSTrafficClass“RoCE”-Priority 4 -Bandwidth 60 -AlgorithmETS
Note: When you have a Kernel Debugger attached to the computer (this is only applicable for developers), flow control is always disabled. In that case, you need to run the following PowerShell cmdlet to disable this behavior:
Set-ItemProperty HKLM:”\SYSTEM\CurrentControlSet\Services\NDIS\Parameters” AllowFlowControlUnderDebugger -Type DWORD -Value 1 –Force
5.2 - Configuring Your Mellanox Switches for RoCE/RRoCE
In this section we`ll describe how to configure Mellanox switches in order to work with RoCE/RRoCE.The most important step in this procedure is to create a lossless traffic, thus we`ll have to work in one of the following modes (according to the mode we configure on the host):
1) Priority Flow control (PFC)
2) Global-pause
Priority Flow control Configuration
Enable PFC on the switch
(config) # dcb priority-flow-control enable force
Enable PFC on a specific priority (according to the priority that was configured on the host)
(config) # dcb priority-flow-control priority 3 enable

page 6WHITE PAPER: Deploying Windows Server® 2012 with SMB Direct over Mellanox End-to-End 10/40Gb/s Ethernet Solutions
©2014 Mellanox Technologies. All rights reserved.
Enable PFC on a specific port:
(config) # interface ethernet 1/19
(config interface eth 1/19) # no dcb priority-flow-control mode force
(config interface eth 1/19) # flowcontrol receive off force
(config interface eth 1/19) # flowcontrol send off force
(config interface eth 1/19) # dcb priority-flow-control mode on force
By default the ports configured to access mode which used for untagged traffic, In case you are working with tagged traffic (VLANs) the ports that face the hosts should be configured to access-dcb mode:
(config interface eth 1/19) # switchport mode access-dcb
Note: access-dcb used for untagged traffic which will be directed to VLAN-0 & tagged traffic which will be directed to access VLAN that configured for this port.
Global Pause configuration
Disable PFC on the switch:
(config) # no dcb priority enable
Enable Global-pause on a specific port:
(config) # interface ethernet 1/19
(config interface eth 1/19) # no dcb priority-flow-control mode force
(config interface eth 1/19) # flowcontrol receive on force
(config interface eth 1/19) # flowcontrol send on force
Additional configuration
Once the traffic is lossless we can proceed to the next step.
If there more than one switch in the network we should configure LAG on the ports that are connected to switches & enable LACP:
(config) # interface port-channel 55
(config) # lacp
Assign the relevant ports to LAG group:
(config) # interface ethernet 1/19 channel-group 55 mode active
Set all the ports in the LAG group to trunk mode, this mode allows us to pass tagged & untagged traffic on the same port:
(config) # interface port-channel 55 switchport mode trunk
Create VLANs (if needed) and assign the relevant ports to it:
(config) # vlan 55
a. To assign a specific port to a VLAN, use:
(config) # interface ethernet 1/19
(config interface eth 1/19) # switchport access vlan 55
b. To assign the whole LAG to a VLAN, use:
(config) # interface port-channel 55 switchport trunk allowed-vlan 55

page 7WHITE PAPER: Deploying Windows Server® 2012 with SMB Direct over Mellanox End-to-End 10/40Gb/s Ethernet Solutions
©2014 Mellanox Technologies. All rights reserved.
Disable spanning-tree algorithm in order to avoid disabling redundant links among the switches (this step should be performed in case there is more than one switch in the network):
(config) # no spanning-tree
When working with L3 routing there are few additional steps that should be made:
a. Enable IP routing
(config) # ip routing
b. Create a VLAN interface
(config) # interface vlan 55
c. Assign an IP address to the VLAN interface
(config) # interface vlan 55 ip address 100.5.5.1 255.255.255.252
d. Enable OSPF routing protocol
(config) # protocol ospf
(config) # router ospf
(config) # interface vlan 55 ip ospf area 0.0.0.0
Verifying the Configuration
1) When working in PFC mode pay attention that “Flow-control send/receive=off” and “Switchport mode” configured to the correct state (according to your traffic type tagged/untagged)
(config) # show interfaces ethernet 1/1
Also verify that PFC is enabled on the switch and on the relevant ports (pay attention to the enabled priorities)
(config) # show dcb priority-flow-control

page 8WHITE PAPER: Deploying Windows Server® 2012 with SMB Direct over Mellanox End-to-End 10/40Gb/s Ethernet Solutions
©2014 Mellanox Technologies. All rights reserved.
2) Verify VLAN assignment & traffic forwarding modes for each port
(config) # show interfaces switchport
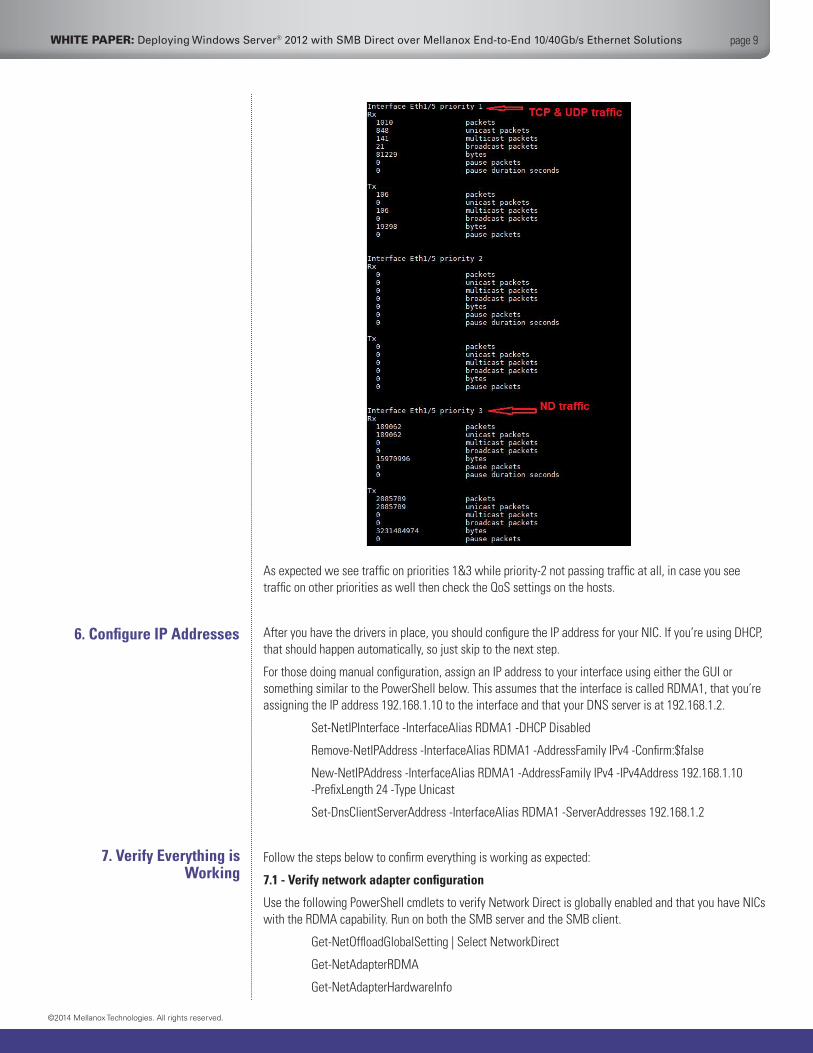
3) Clear the counters & generate RoCE traffic then verify the traffic goes through the right priority (in our configuration we sent TCP/UDP traffic to priority-1 and ND/NDK to priority-3)
(config) # clear counters all
(config) # show interface ethernet 1/5 counters priority all
page 9WHITE PAPER: Deploying Windows Server® 2012 with SMB Direct over Mellanox End-to-End 10/40Gb/s Ethernet Solutions
©2014 Mellanox Technologies. All rights reserved.
7. Verify Everything is Working
As expected we see traffic on priorities 1&3 while priority-2 not passing traffic at all, in case you see traffic on other priorities as well then check the QoS settings on the hosts.
After you have the drivers in place, you should configure the IP address for your NIC. If you’re using DHCP, that should happen automatically, so just skip to the next step.
For those doing manual configuration, assign an IP address to your interface using either the GUI or something similar to the PowerShell below. This assumes that the interface is called RDMA1, that you’re assigning the IP address 192.168.1.10 to the interface and that your DNS server is at 192.168.1.2.
Set-NetIPInterface -InterfaceAlias RDMA1 -DHCP Disabled
Remove-NetIPAddress -InterfaceAlias RDMA1 -AddressFamily IPv4 -Confirm:$false
New-NetIPAddress -InterfaceAlias RDMA1 -AddressFamily IPv4 -IPv4Address 192.168.1.10 -PrefixLength 24 -Type Unicast
Set-DnsClientServerAddress -InterfaceAlias RDMA1 -ServerAddresses 192.168.1.2
Follow the steps below to confirm everything is working as expected:
7.1 - Verify network adapter configuration
Use the following PowerShell cmdlets to verify Network Direct is globally enabled and that you have NICs with the RDMA capability. Run on both the SMB server and the SMB client.
Get-NetOffloadGlobalSetting | Select NetworkDirect
Get-NetAdapterRDMA
Get-NetAdapterHardwareInfo
6. Configure IP Addresses

page 10WHITE PAPER: Deploying Windows Server® 2012 with SMB Direct over Mellanox End-to-End 10/40Gb/s Ethernet Solutions
©2014 Mellanox Technologies. All rights reserved.
7.2 - Verify SMB configuration
Use the following PowerShell cmdlets to make sure SMB Multichannel is enabled, confirm the NICs are being properly recognized by SMB and that their RDMA capability is being properly identified.
On the SMB client, run the following PowerShell cmdlets:
Get-SmbClientConfiguration | Select EnableMultichannel
Get-SmbClientNetworkInterface
On the SMB server, run the following PowerShell cmdlets:
Get-SmbServerConfiguration | Select EnableMultichannel
Get-SmbServerNetworkInterface
netstat.exe -xan | ? {$_ -match “445”}
Note: The NETSTAT command confirms if the File Server is listening on the RDMA interfaces.
7.3 - Verify the SMB connection
On the SMB client, start a long-running file copy to create a lasting session with the SMB Server. While the copy is ongoing, open a PowerShell window and run the following cmdlets to verify the connection is using the right SMB dialect and that SMB Direct is working:
Get-SmbConnection
Get-SmbMultichannelConnection
netstat.exe -xan | ? {$_ -match “445”}
Note: If you have no activity while you run the commands above, it’s possible you get an empty list. This is likely because your session has expired and there are no current connections.
There are several performance counters that you can use to verify that the RDMA interfaces are being used and that the SMB Direct connections are being established. You can also use the regular SMB Server and SMB Client performance counters to verify the performance of SMB, including IOPs (data requests per second), Latency (average seconds per request) and Throughput (data bytes per second). Here’s a short list of the relevant performance counters.
On the SMB Client, watch for the following performance counters:
• RDMA Activity - One instance per RDMA interface
• SMB Direct Connection - One instance per SMB Direct connection
• SMB Client Shares - One instance per SMB share the client is currently sharing
On the SMB Server, watch for the following performance counters:
• RDMA Activity - One instance per RDMA interface
• SMB Direct Connection - One instance per SMB Direct connection
• SMB Server Shares - One instance per SMB share the server is currently sharing
• SMB Server Session - One instance per client SMB session established with the server
SMB 3.0 now offers a “Object State Diagnostic” event log that can be used to troubleshoot Multichannel (and therefore RDMA) connections. Keep in mind that this is a debug log, so it’s very verbose and requires a special procedure for gathering the events. You can follow the steps below:
9. Review the Connection Log Details (optional)
8. Review Performance Counters

page 11
350 Oakmead Parkway, Suite 100, Sunnyvale, CA 94085Tel: 408-970-3400 • Fax: 408-970-3403www.mellanox.com
© Copyright 2014 Mellanox Technologies. All rights reserved.Mellanox, Mellanox logo, ConnectX, and Virtual Protocol Interconnect are registered trademarks of Mellanox Technologies, Ltd. All other trademarks are property of their respective owners.
WHITE PAPER: Deploying Windows Server 2012 with SMB Direct over Mellanox End-to-End 10/40Gbs Ethernet Solutions
3920WP Rev 2.4
First, enable the log in Event Viewer:
• Open Event Viewer
• On the menu, select “View” then “Show Analytic and Debug Logs”
• Expand the tree on the left: Applications and Services Log, Microsoft, Windows, SMB Client, ObjectStateDiagnostic
• On the “Actions” pane on the right, select “Enable Log”
• Click OK to confirm the action.
After the log is enabled, perform the operation that requires an RDMA connection. For instance, copy a file or run a specific operation.
If you’re using mapped drives, be sure to map them after you enable the log, or else the connection events won’t be properly captured.
Next, disable the log in Event Viewer:
• In Event Viewer, make sure you select Applications and Services Log, Microsoft, Windows, SMB Client, ObjectStateDiagnostic
• On the “Actions” page on the right, “Disable Log”
Finally, review the events on the log in Event Viewer. You can filter the log to include only the SMB events that confirm that you have an SMB Direct connection or only error events.
The “Smb_MultiChannel” keyword will filter for connection, disconnection and error events related to SMB. You can also filter by event numbers 30700 to 30706.
• Click on the “ObjectStateDiagnostic” item on the tree on the left
• On the “Actions” pane on the right, select “Filter Current Log…”
• Select the appropriate filtersYou can also use a PowerShell window and run the following cmdlets to view the events. If there are any RDMA-related connection errors, you can use the following:
Get-WinEvent -LogName Microsoft-Windows-SMBClient/ObjectStateDiagnostic -Oldest |? Message -match “RDMA”