deploying microsoft hyper-v with routing · the hyper-v access to the vcn (in support of eventual...
TRANSCRIPT

Deploying Hyper-V with Routing O R A C L E W H I T E P A P E R | S E P T E M B E R 2 0 1 8

2 | DEPLOYING HYPER-V WITH ROUTING
Disclaimer The following is intended to outline our general product direction. It is intended for information purposes only, and may not be incorporated into any contract. It is not a commitment to deliver any material, code, or functionality, and should not be relied upon in making purchasing decisions. The development, release, and timing of any features or functionality described for Oracle’s products remains at the sole discretion of Oracle.
Revision History The following revisions have been made to this white paper since its initial publication:
Date Revision
September 7, 2018 • Updated introduction to include background information about Hyper-V. • Added an appendix illustrating the implementation of Hyper-V Replica
within Oracle Cloud Infrastructure.
April 20, 2018 • Updated the diagram on page 5 to be more readable. • Added an internal network adapter based on the Microsoft Loopback
Adapter. • Added instructions indicating that second subnets should be used for
the Hyper-V access to the VCN (in support of eventual SCVMM, Hyper-V Replica, and Hyper-V Clustering deployment guides).
• Added instructions for installing the Microsoft Loopback Adapter. • Added instructions and information about guest OS licensing and
procedures.
You can find the most recent versions of the Oracle Cloud Infrastructure white papers at https://cloud.oracle.com/iaas/technical-resources.

3 | DEPLOYING HYPER-V WITH ROUTING
Table of Contents Overview 4
Deployement Methodology 4
Prerequisites 6
Set Up the Oracle Cloud Infrastructure VCN and Deploy the Bare Metal Instance for Hyper-V 7
Configure Windows Server, Hyper-V, and Supporting Network Services 9
Install Hyper-V 9
Configure Hyper-V 15
Configure DNS and DHCP for Hyper-V Guests 17
Create the Initial Hyper-V Guests 20
Install and Configure Windows for hvnat and hvrouter Hyper-V Guests 24
Configure the hvnat Guest 25
Configure the hvrouter Guest 28
Installing Guests 28
Enabling Connections Between Guests on Different Hyper-V Servers 30
Conclusion 31
Appendix A: Deploying Hyper-V Replica 32
Prerequisites 32
Configure the Hyper-V Target Instance 33
Configure the Hyper-V Guests 36
Fail Over Between Source and Target Hyper-V Instances 41

4 | DEPLOYING HYPER-V WITH ROUTING
Overview Oracle Cloud Infrastructure provides a robust, highly configurable way of deploying individual guest instances that are highly flexible, have an elastic shape configuration, and provide a well-defined operational envelope that meets the needs of most customers. When you are considering the deployment of operating system platforms, using either bare metal or virtual instances within Oracle Cloud Infrastructure is considered the best method of achieving operational excellence for a particular application stack.
In certain situations, however, it’s not possible to use the capabilities of the various instance types within Oracle Cloud Infrastructure. Following are some of these situations:
• Instances or applications that require a specific relationship between the number of CPUs and the amount of RAM
• Requirements for legacy or other operating systems that are not provided by Oracle Cloud Infrastructure and can’t be run in a virtual instance
• Operating systems that aren’t contained within an existing hypervisor, or provided in a format that is incompatible with the Oracle Cloud Infrastructure import image process
• Operational requirements to maintain existing operational standards and tools in order to maintain on-premises operational excellence and standards of execution
These situations and others might require the use of a customer-installed hypervisor to provide the necessary environment in which applications can run within the cloud and gain the associated benefits. To support these situations, Oracle Cloud Infrastructure supports the installation of various hypervisors: Oracle VM, KVM, and Microsoft Hyper-V.
Microsoft Hyper-V is the hypervisor of choice within many environments. It provides the ability to leverage the Windows Administrator experience found in many organizations, but it also provides a method for running disparate operating systems on a common hardware platform. Many toolsets and operational practices have been developed for the use of Hyper-V in the on-premises environment, and the process illustrated in this paper extends those practices to the Oracle Cloud Infrastructure environment.
Deployment Methodology The original method for deploying Hyper-V was to map each secondary virtual network interface card (VNIC) to a single guest instance, similar to what was done originally with KVM. However, with the introduction of the Route to IP Target functionality within Oracle Cloud Infrastructure, it’s possible to deploy Hyper-V by using a routed interface. This method not only simplifies the deployment of guests, but also allows you to deploy however many guests that will run and practically fit within a single bare metal instance. These guests now have access to the full range

5 | DEPLOYING HYPER-V WITH ROUTING
of Oracle Cloud Infrastructure services and are supported by the options given to Oracle Cloud Infrastructure virtual cloud networks (VCNs).
The following diagram illustrates the endpoint architecture of the Hyper-V environment:
The architecture has the following elements:
• A VCN with an CIDR of 10.50.0.0/24
• Two subnets within the VCN with CIDRs of 10.50.0.0/26 and 10.50.0.64/26
• A bare metal Oracle Cloud Infrastructure Compute instance running Windows 2016 Datacenter, with the Hyper-V role installed
• An internet gateway, local and global security lists, and a route table that support the VCN
• A NAT gateway and bastion host for private subnets (optional)
• Representative resources on the subnet that the guests within Hyper-V can access
The bare metal instance running Hyper-V has the following elements:
• External vSwitch with single root I/O virtualization (SR-IOV) enabled
• External vSwitch for the guests, which does not require SR-IOV enablement

6 | DEPLOYING HYPER-V WITH ROUTING
• Two special-purpose Hyper-V guests to act as a NAT gateway and router for the internal guests (hvnat/hvrouter)
• A DHCP server running on the Windows 2016 bare metal instance, bound to the internal vSwitch, providing address/network information to the Hyper-V guests
• A DNS server running on the Windows 2016 bare metal instance, bound to the internal vSwitch, providing name resolution services to the Hyper-V guests
A combination of services provided by Oracle Cloud Infrastructure and services provided by Windows Server and Hyper-V are used to create an environment that seamlessly gives guests running on Hyper-V the ability to interact with instances and services provided by Oracle Cloud Infrastructure, and gives guests running on Oracle Cloud Infrastructure the ability to interact with instances and services provided by Hyper-V. This white paper describes how to set up both the Oracle Cloud Infrastructure and Hyper-V environments, and optionally Hyper-V Replica (see Appendix A), to achieve the architecture outlined here.
Prerequisites Before you begin, have the following items ready:
• Select an IP range, not part of the VCN IP range, that you want to use for the internal Hyper-V network. Identify the first three addresses of the IP range for use by Hyper-V:
o Default gateway (hvnat)
o VCN gateway (hvrouter)
o DNS/DHCP
• Have at least one public subnet available, or be connected to a private subnet with a NAT gateway. If you want your guests to connect to the internet, the secondary VNICs used for routing must also be on a public subnet, or be connected to a private subnet with a NAT gateway.
o Instructions for configuring a NAT gateway in Oracle Cloud Infrastructure are located in the NAT Instance Configuration white paper.
o The subnet used for the secondary VNIC should be on a separate subnet from the primary interface if clustering is to be used in the future. If the installation is a standalone installation, then the primary and secondary subnets can be co-located on the same subnet.
• Get a copy of the device drivers for the X7 Broadcom network cards. Also include the Hyper-V driver for the card. This will be used only for the hvnat and hvrouter guest instances configured in this paper.

7 | DEPLOYING HYPER-V WITH ROUTING
Set Up the Oracle Cloud Infrastructure VCN and Deploy the Bare Metal Instance for Hyper-V
1. Create a V2 (BM 2.x type) bare metal instance, and attach at least one block storage volume to it. For instructions, see the following topics in the Oracle Cloud Infrastructure documentation:
• Creating an Instance
• Overview of Block Volume
2. After the instance is provisioned, provision a VNIC for the secondary NIC (NIC 1) on the bare metal instance, preferably in a different subnet than that used for the bare metal instance. For instructions on how to deploy secondary VNICs, see the Virtual Network Interface Cards (VNICs) topic in the Oracle Cloud Infrastructure Networking service documentation.
Do not select the Skip Source/Destination Check option. This VNIC can be on either a public or private subnet. If it’s on a private subnet, we recommend that you configure a NAT gateway as noted in the “Prerequisites” section. We also recommend manually assigning the private IP address in order to maintain consistency. Note the private IP address of the NIC.

8 | DEPLOYING HYPER-V WITH ROUTING
3. Create two secondary VNICs for the secondary NIC (NIC 1).
Be sure to select the Skip Source/Destination Check option for both VNICs created in this step. The VNICs can be on either a public or private subnet, but should be either on the same subnet as the one assigned to the second physical NIC, or one that is different than that used for the primary physical NIC. If it’s on a private subnet, we recommend that you configure a NAT gateway as noted in the “Prerequisites” section. We also recommend that you manually assign the private IP addresses, in order to maintain consistency, but it’s not required. Note the MAC and private IP addresses, and the VLAN ID of these secondary VNICs.
4. Select one of the secondary VNICs as the route target, and note the IP address of the selected target.
5. Open the route table of the VCN where the Hyper-V server is being configured, and add a route rule. Enter the private IP address that you just selected as the route target for the IP address range selected for the Hyper-V deployment.
For example, 192.168.11.0/24 was selected as the address space for Hyper-V. A secondary VNIC on the Hyper-V server was selected with an IP address of 10.50.0.69. The resulting route table entry would look as follows:
For information about managing route tables, see the Route Tables topic in the Networking service documentation.
9 | DEPLOYING HYPER-V WITH ROUTING
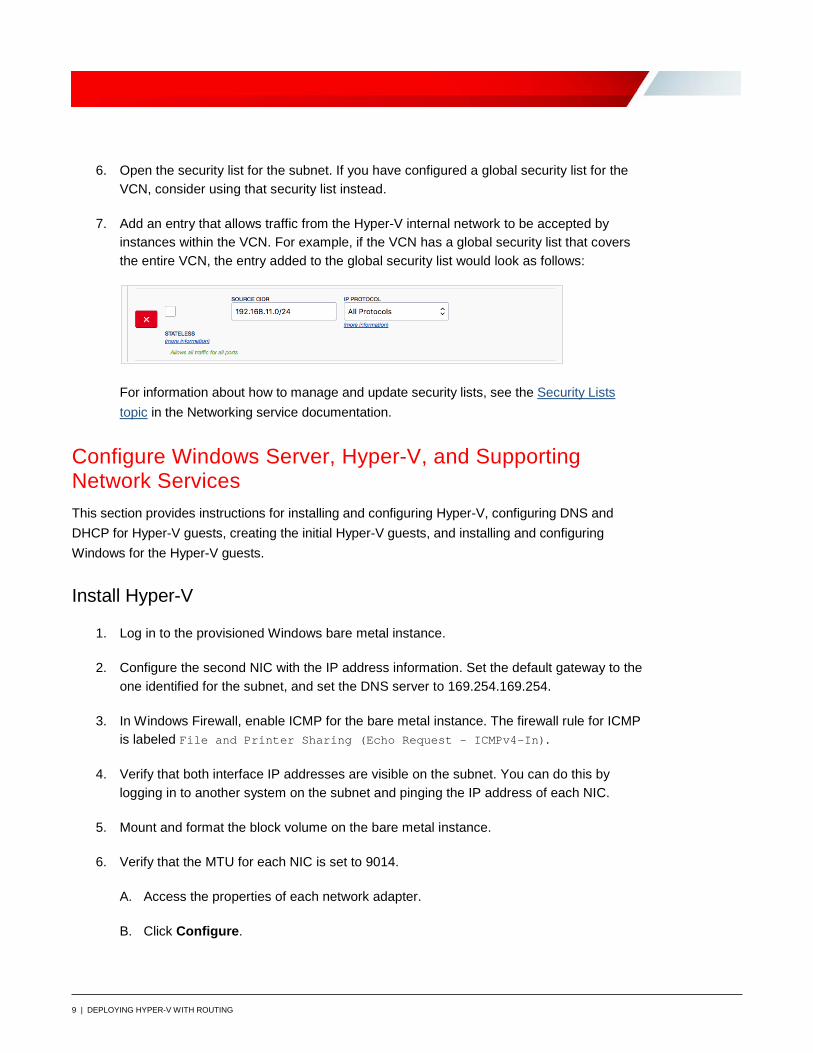
6. Open the security list for the subnet. If you have configured a global security list for the VCN, consider using that security list instead.
7. Add an entry that allows traffic from the Hyper-V internal network to be accepted by instances within the VCN. For example, if the VCN has a global security list that covers the entire VCN, the entry added to the global security list would look as follows:
For information about how to manage and update security lists, see the Security Lists topic in the Networking service documentation.
Configure Windows Server, Hyper-V, and Supporting Network Services This section provides instructions for installing and configuring Hyper-V, configuring DNS and DHCP for Hyper-V guests, creating the initial Hyper-V guests, and installing and configuring Windows for the Hyper-V guests.
Install Hyper-V
1. Log in to the provisioned Windows bare metal instance.
2. Configure the second NIC with the IP address information. Set the default gateway to the one identified for the subnet, and set the DNS server to 169.254.169.254.
3. In Windows Firewall, enable ICMP for the bare metal instance. The firewall rule for ICMP is labeled File and Printer Sharing (Echo Request - ICMPv4-In).
4. Verify that both interface IP addresses are visible on the subnet. You can do this by logging in to another system on the subnet and pinging the IP address of each NIC.
5. Mount and format the block volume on the bare metal instance.
6. Verify that the MTU for each NIC is set to 9014.
A. Access the properties of each network adapter.
B. Click Configure.

10 | DEPLOYING HYPER-V WITH ROUTING
C. On the Advanced tab, ensure that the value of Jumbo Packet is 9014.
Note: Do not restart the system yet.
7. Install the Microsoft KM-TEST Loopback Adapter, which is a localized loopback network adapter that will be used for guest connectivity.
A. Open Device Manager.
B. Right-click the server (top of the device tree) and select Add legacy hardware.

11 | DEPLOYING HYPER-V WITH ROUTING
C. In the wizard, select the Advanced option.
D. Select Network Adapters from the list of options.

12 | DEPLOYING HYPER-V WITH ROUTING
E. In the box on the left, select Microsoft, and in the box on the right, select Microsoft KM-TEST Loopback Adapter.
F. Finish the installation wizard.
8. Configure the loopback adapter with the IP address that you intend to assign for the DNS/DHCP interface in Hyper-V. Do not assign a default gateway or DNS address at this time.
In the process of performing this configuration, you will get the following warning:
You can safely ignore it.
9. Install the following Windows features:
• DHCP
• DNS
• Hyper-V
The Hyper-V installation requires a reboot of the instance, so be sure to install it last.

13 | DEPLOYING HYPER-V WITH ROUTING
You can perform this installation by using PowerShell. A script to perform these operations might look like the following one:
$internalIpBase="<IP address range with CIDR>" $hvIp="<IP Address of Internal Hyper-V adapter>" $instance=$(ConvertFrom-Json $(Invoke-WebRequest (“http://169.254.169.254/opc/v1/instance/”)).Content) $vnics=$(ConvertFrom-Json $(Invoke-WebRequest ("http://169.254.169.254/opc/v1/vnics/”)).Content) $secondVnic="" $primaryVnic="" $secondAdapter="" $primaryAdapter="" $loopAdapter="" foreach ($vnic in $vnics) { $vnic.macAddr = $vnic.macAddr.replace(":","-").toupper() if ($vnic.nicIndex -eq 1 -and $vnic.vlanTag -eq 0) { $secondVnic = $vnic } elseif ($vnic.nicIndex -eq 0 -and $vnic.vlanTag -eq 0) { $primaryVnic = $vnic } } foreach ($phys in Get-NetAdapter) { if ($secondVnic.macAddr -eq $phys.MacAddress) { $secondAdapter=$phys Rename-NetAdapter -Name $phys.Name -NewName "External-HV" continue } if ($primaryVnic.macAddr -eq $phys.MacAddress) { $primaryAdapter=$phys Rename-NetAdapter -Name $phys.Name -NewName "Primary" continue } $loopAdapter=$phys Rename-NetAdapter -Name $phys.Name -NewName "Internal-HV" } Update-Help -Force:$true $intPrefix=$internalIpBase.split("/")[1] $netPrefix=$secondVnic.subnetCidrBlock.split("/")[1] New-NetIPAddress -InterfaceIndex $secondAdapter.ifIndex -IPAddress $secondVnic.privateIp -PrefixLength $netPrefix -DefaultGateway $secondVnic.virtualRouterIp

14 | DEPLOYING HYPER-V WITH ROUTING
New-NetIPAddress -InterfaceIndex $loopAdapter.ifIndex -IPAddress $hvIp -PrefixLength $intPrefix -Confirm:$false Start-Sleep 10 Set-DnsClientServerAddress -InterfaceIndex $secondAdapter.ifIndex -ServerAddresses "169.254.169.254" Set-NetAdapterAdvancedProperty -Name * -RegistryKeyword "*JumboPacket" -RegistryValue 9014 -NoRestart Enable-NetFirewallRule -DisplayName "File and Printer Sharing (Echo Request - ICMPv4-In)" $nrTargetPortal=$(New-IscsiTargetPortal -TargetPortalAddress 169.254.2.2) Get-IscsiTarget -IscsiTargetPortal $nrTargetPortal | Connect-IscsiTarget -IsPersistent $true $nrDisk=Get-Disk | Where-Object {$_.IsSystem -eq $false} Initialize-Disk -Number $nrDisk.Number New-Partition -DiskNumber $nrDisk.Number -UseMaximumSize -AssignDriveLetter $nrPart=$(Get-Partition -DiskNumber $nrDisk.Number | where-object {$_.Type -match "Basic"}) Format-Volume -Partition $nrPart -NewFileSystemLabel "hvsystem" -Confirm:$false Install-WindowsFeature -Name "DHCP" -IncludeManagementTools Install-WindowsFeature -Name "DNS" -IncludeManagementTools Install-WindowsFeature -Name "Hyper-V" –IncludeManagementTools - IncludeAllSubFeature -Restart
Note: This script does not install the loopback adapter. You must install the loopback adapter separately by using the regular GUI, and before you this script. Do not attempt to run a script like this without installing the loopback adapter first.
10. After the instance reboots, log back in.

15 | DEPLOYING HYPER-V WITH ROUTING
Configure Hyper-V
1. Open the Hyper-V Manager.
2. Open the Virtual Switch Manager and create a new external vSwitch named External. Select the Allow management operating system to share this network adapter and Enable single-root IOV virtualization (SR-IOV) options.

16 | DEPLOYING HYPER-V WITH ROUTING
3. Create a new internal vSwitch named Internal. Select the External network option, and select the Microsoft Loopback Adapter previously configured as the DNS/DHCP adapter. Select the Allow management operating system to share this network adapter option.
4. Open the network configuration for the instance.
There should be four network interfaces, and two of them should be vEthernet interfaces. Open the configuration for the vEthernet interface labeled Internal.

17 | DEPLOYING HYPER-V WITH ROUTING
5. Change the MTU on both vEthernet adapters to 9014, using the same procedure that you did for the NICs. Do not reboot at this time.
Configure DNS and DHCP for Hyper-V Guests
1. Open the DNS management application, right-click the server, and select Properties.
2. On the Forwarders tab, click Edit and create an entry for 169.254.169.254. The FQDN will not resolve, which is a normal condition. Save the configuration and restart DNS.

18 | DEPLOYING HYPER-V WITH ROUTING
3. Open the DHCP management application.
4. Expand the server, right-click IPv4, and select New Scope.
5. Create the scope by using the IP address range selected for Hyper-V. Be sure to start with the address immediately following the three that you are using for this process.
6. After the scope is created, expand the scope in the left navigation pane, right-click the Scope Options folder, and select Configure Options.

19 | DEPLOYING HYPER-V WITH ROUTING
7. In the Scope Options dialog box, select the DNS option and enter the IP address that you selected for the DHCP/DNS.
8. Under Available Options, select 121 Classless Static Routes, and add the following routes (at a minimum). If you have other VCNs or networks via dynamic routing gateways (DRGs), also enter them here via the VCN gateway/router address.
Destination Mask Router
0.0.0.0 0.0.0.0 IP address previously selected for the default gateway/NAT
VCN network space Netmask of the VCN IP address previously selected for the VCN gateway/router

20 | DEPLOYING HYPER-V WITH ROUTING
9. Save the configuration and restart DHCP.
Create the Initial Hyper-V Guests
1. Open Hyper-V Manager and create two new VMs, one named hvnat and one named hvrouter. Define the following characteristics for the VMs:
• Generation 2 VM
• Minimum memory of 4196 MB (dynamic memory)
• Network connection to the external vSwitch
• 100G of space for the VMDK, located on the block storage device (typically the D: drive)
2. After it is created, select the hvnat VM and select Settings.
3. Get the information for the secondary VNIC that is not selected as the route target, and then perform the following steps in the Settings dialog box:
A. In the left navigation pane, click Network Adapter External.
B. Select the Enable virtual LAN identification check box.

21 | DEPLOYING HYPER-V WITH ROUTING
C. Enter the VLAN ID of the secondary VNIC.
4. In the left navigation pane, click Hardware Acceleration (under Network Adapter External), and then select the Enable SR-IOV check box.

22 | DEPLOYING HYPER-V WITH ROUTING
5. In the left navigation pane, click Advanced Features (under Network Adapter External). In the MAC Address section on the right, select the Static option, and then enter the MAC address associated with the secondary VNIC being used.
6. In the left navigation pane, click Add Hardware and then select Network Adapter.
7. Add an internal network adapter, keeping all of the default settings.
8. Save the configuration.
9. Repeat the preceding steps for the hvrouter VM.
The configuration items for the preceding three sections can also be completed using PowerShell. The following sample script (hvrouting.ps1) provides a template for executing these steps:
Function ConvertTo-NetMask($cidr) { $mask=[Convert]::ToString(([Math]::Pow(2,$cidr) - 1) -shl (32 - $cidr), 2) $netmask = @() for($x = 0; $x -lt 4; $x++) { $netmask += [Convert]::ToUInt32($mask.Substring((8 * $x),8),2).ToString() } return [String]::Join(".", $netmask) } $instance=$(ConvertFrom-Json $(Invoke-WebRequest (“http://169.254.169.254/opc/v1/instance/”)).Content) $vnics=$(ConvertFrom-Json $(Invoke-WebRequest ("http://169.254.169.254/opc/v1/vnics/”)).Content) $secondVnic="" $adapter="" $hvVnics=@() $internalIpBase="192.168.11.0/24" $hvIp="192.168.11.3" $beginIpRange="192.168.11.4" $endIpRange = "192.168.11.254"

23 | DEPLOYING HYPER-V WITH ROUTING
foreach ($vnic in $vnics) { if ($vnic.nicIndex -eq 1 -and $vnic.vlanTag -eq 0) { $secondVnic = $vnic foreach ($phys in Get-NetAdapter) { $vnicMac = $secondVnic.macAddr.replace(":","-").toupper() if ($vnicMac -eq $phys.MacAddress) { $adapter=$phys break } } } elseif ($vnic.nicIndex -eq 1 -and $vnic.vlanTag -gt 0) { $hvVnics+=$vnic } } New-VMSwitch -Name "External" -AllowManagementOS $true -NetAdapterName $adapter.InterfaceAlias -EnableIov $true New-VMSwitch -SwitchType Internal -Name "Internal" $intAdapter=$(Get-NetAdapter | Where-Object {$_.Name -match "internal"}) $extAdapter=$(Get-NetAdapter | Where-Object {$_.Name -match "external"}) New-NetIPAddress -InterfaceIndex $intAdapter.ifIndex -IPAddress $hvIp -PrefixLength $internalIpBase.split("/")[1] Set-DnsServerForwarder -IPAddress 169.254.169.254 sleep 30 Add-DhcpServerv4Scope -Name "Internal" -EndRange $endIpRange -StartRange $beginIpRange -SubnetMask $(ConvertTo-NetMask ([Convert]::ToInt16($internalIpBase.split("/")[1]))) Set-DhcpServerv4OptionValue -ScopeId $internalIpBase.split("/")[0] -DnsServer $hvIp Set-DhcpServerv4Binding -InterfaceAlias $intAdapter.InterfaceAlias -BindingState $true Set-DhcpServerv4Binding -InterfaceAlias $extAdapter.InterfaceAlias -BindingState $false New-Item -ItemType Directory -Path "D:\Virtual Machines" $hvNetGuests=@("hvnat","hvrouter") $count=0 foreach ($guest in $hvNetGuests) { New-Item -ItemType Directory -Path ("D:\Virtual Machines\" + $guest) New-VM -Name $guest -MemoryStartupBytes (4* [Math]::Pow(1024,3)) -NewVHDPath ("D:\Virtual Machines\" + $guest + "\" + $guest + ".vhdx") -NewVHDSizeBytes (100 * [Math]::Pow(1024, 3)) -Generation 2 -SwitchName "External" Add-VMDvdDrive -VMName $guest Set-VMFirmware -VMName $guest -BootOrder @($(Get-VMDvdDrive -VMName $guest), $(Get-VMHardDiskDrive -VMName $guest)) Set-VM -Name $guest -DynamicMemory -MemoryMinimumBytes (4* [Math]::Pow(1024,3))

24 | DEPLOYING HYPER-V WITH ROUTING
Set-VMNetworkAdapter -VMName $guest -StaticMacAddress $hvVnics[$count].macAddr -IovWeight 100 Set-VMNetworkAdapterVlan -VMName $guest -Access -VlanId $hvVnics[$count].vlanTag Add-VMNetworkAdapter -VMName $guest -SwitchName "Internal" $count++ } Set-NetAdapterAdvancedProperty -Name * -RegistryKeyword "*JumboPacket" -RegistryValue 9014
Install and Configure Windows for hvnat and hvrouter Hyper-V Guests
1. Install Windows 2012 R2 on both the hvnat VM and the hvrouter VM.
2. Perform the following steps on each guest:
A. Install the driver for the X7 network interface. This driver will be identified in Device Manager as an unknown network device.
B. Identify the interface associated with the secondary VNIC. To do this, look at the MAC address of the virtual NIC in the instance.
C. Configure the IP address, subnet mask, and default gateway of the secondary VNIC with the information identified for the particular instance.
D. Configure the second interface with the IP address selected for the function.
• The hvnat guest should not be the route target for the VCN and should get the Hyper-V address associated with the default gateway/NAT.
• The hvrouter guest should have the secondary VNIC associated with the route target address and should get the Hyper-V address associated with the VCN gateway/router.
The interface with the Hyper-V address should not get a default gateway configured, but should have the DNS address assigned. The DNS address should be the internal address associated with the DNS/DHCP function for Hyper-V.
E. Verify that each instance can ping the subnet default gateway on the VCN and the internal DNS/DHCP address, and can get to the internet.
F. Apply all current Windows patches to the operating system.

25 | DEPLOYING HYPER-V WITH ROUTING
Configure the hvnat Guest Before performing these steps, ensure that all networking on the hvnat guest has been configured and is functional. Tests of the network should include being able to communicate with both instances on the VCN side of the hvnat guest and network targets on the internal Hyper-V side. A simple ping test should suffice.
1. On the hvnat instance, install the Routing and Remote Access service (RRAS), routing only. Perform this step by using the following PowerShell command, run as Administrator: Install-WindowsFeature -Name “Routing” -IncludeSubFeature -IncludeManagementTools -Confirm:$false
2. Open the Routing and Remote Access tool.
3. Right-click the server and select Configure and Enable Routing and Remote Access.
4. On the welcome page of the Routing and Remote Access Server Setup Wizard, click Next.
5. On the Configuration page, select Network address translation (NAT), and then click Next.

26 | DEPLOYING HYPER-V WITH ROUTING
6. On the NAT Internet Connection page, select the interface that has the VCN IP address for the internet-facing interface, and then click Next.
7. Click Finish.
8. If you get the following warning, you can ignore it and click OK.
A dialog box is displayed, indicating that the configuration is being committed.
This process might stop responding. If the dialog box does not disappear after 10 or so minutes, restart the instance.

27 | DEPLOYING HYPER-V WITH ROUTING
9. In the Routing and Remote Access tool, expand the server and click NAT. The right side of the window should display entries similar to the following ones:
10. Verify that you can still ping the VCN subnet default gateway via the Hyper-V address. In the following example, the VCN gateway is 10.50.0.65 and the Hyper-V address for hvnat is 192.168.11.1. Open a PowerShell window to issue the commands.
The ping -S command sends the ping from the designated interface.
Note: You can’t ping the VCN interface of the hvnat VM from any instance on the subnet or VCN. This is normal.

28 | DEPLOYING HYPER-V WITH ROUTING
Configure the hvrouter Guest Before performing these steps, ensure that all networking on the hvrouter guest has been configured and is functional. Tests of the network should include being able to communicate with both instances on the VCN side of the hvrouter guest and network targets on the internal Hyper-V side. A simple ping test should suffice.
1. Log in to the hvrouter instance.
2. Open a PowerShell window as Administrator.
3. Identify the interface index numbers by running the following command: Get-NetAdapter
Note the ifIndex numbers for each of the Hyper-V interfaces.
4. Configure forwarding on each interface by running the following command for each interface number identified: Set-NetIPInterface -InterfaceIndex <ifIndex_number> -Forwarding Enabled
5. Test to ensure that you can ping the Hyper-V interface from an instance on the VCN subnet.
The configuration is now complete.
Installing Guests Guest instances can be installed by using the normal process associated with building Hyper-V guests. Following are exceptions to this rule:
• Guests should be configured with access only to the internal Hyper-V network vSwitch and not the external vSwitch.
• Guests should always use DHCP. If static addressing is required, either register the MAC address of the guest as a DHCP reservation within the Hyper-V based DHCP server, or configure the guest with the following information and add the exclusion to DHCP:
o IP address: Assigned IP address
o Netmask: Netmask for IP subnet.
o Default gateway: Hyper-V address of the hvnat instance
o DNS: Hyper-V address of the hypervisor (DNS/DHCP above)
o Manually add a route to the VCN subnets and other internal networks, via the VCN gateway (hvrouter) address

29 | DEPLOYING HYPER-V WITH ROUTING
Windows guests listed in the following table can participate in the Automatic Virtual Machine Activation (AVMA) process, which allows guests to be installed in the Windows 2016 Datacenter Hyper-V role and still be licensed. Linux and other operating systems do not require Windows licenses to run. Note that Windows Desktop licenses are not covered in this configuration.
Operating System Version AVMA Key
Windows Server 2012 R2 Essentials K2XGM-NMBT3-2R6Q8-WF2FK-P36R2
Windows Server 2012 R2 Standard DBGBW-NPF86-BJVTX-K3WKJ-MTB6V
Windows Server 2012 R2 Datacenter Y4TGP-NPTV9-HTC2H-7MGQ3-DV4TW
Windows Server 2016 Essentials B4YNW-62DX9-W8V6M-82649-MHBKQ
Windows Server 2016 Standard C3RCX-M6NRP-6CXC9-TW2F2-4RHYD
These keys are publicly available and valid for all installations of these operating systems under Hyper-V. Guests can be activated by using the following procedure, carried out on each guest:
1. Launch an administrative command prompt.
2. Type the following command: slmgr /ipk <AVMA_key>
3. Close the command prompt.
For details about AVMA, see the blog post at https://www.altaro.com/hyper-v/hyper-v-automatic-virtual-machine-activation-windows-server-2016/.

30 | DEPLOYING HYPER-V WITH ROUTING
Enabling Connections Between Guests on Different Hyper-V Servers This process allows isolated guests on one Hyper-V server to interact fully with isolated guests on another. This configuration is illustrated in the following diagram:
This process can be applied to all Hyper-V servers running within the same VCN. The instructions assume that you have two Hyper-V servers, Svr1 and Svr2, with two different IP address ranges for their guests. Both Hyper-V servers must be configured using the process described in this document before attempting this procedure. You should identify the guest IP subnet, associated netmask, and hvrouter IP address for each Hyper-V server before starting this process.
1. Open the DHCP server on Svr1.
2. Select the scope that you created in “Configure DNS and DHCP for Hyper-V Guests.”
3. Open the Scope Options dialog box and select 121 Classless Static Routes.
4. Enter the following route information:
• Destination: IP subnet for the guests located on Svr2
• Mask: IP subnet mask for the guests on Svr2
• Router: IP address of hvrouter created on Svr1
5. Save the configuration and restart DHCP.
6. Renew the DHCP leases on all guests running on Svr1.
7. Open the DHCP server on Svr2.

31 | DEPLOYING HYPER-V WITH ROUTING
8. Select the scope that you created in “Configure DNS and DHCP for Hyper-V Guests.”
9. Open the Scope Options dialog box and select 121 Classless Static Routes.
10. Enter the following route information:
• Destination: IP subnet for the guests on Svr 1
• Mask: IP subnet mask for the guests on Svr1
• Router: IP address of hvrouter created above for Svr2
11. Save the configuration and restart DHCP.
12. Renew the DHCP leases on all guests running on Svr2.
Assuming that you have created the security lists and entries in the route table for the VCN per Hyper-V server, you should now be able to communicate between guests residing in each Hyper-V server. This model can be extended to additional servers simply by adding their routing information to each other Hyper-V server that needs to participate in the relationship.
Conclusion Although the bare metal and virtual instance types remain the recommended method for deploying operating systems and applications, there are a number of situations in which using them is simply not possible. In environments where Windows is prevalent, operational practices have evolved to provide robust support for management of guests within Hyper-V. Because those guests cannot be migrated directly to Oracle Cloud Infrastructure instances, the method of deploying Hyper-V detailed in this paper provides the ability to extend those operations into the cloud with a minimum of disruption.

32 | DEPLOYING HYPER-V WITH ROUTING
Appendix A: Deploying Hyper-V Replica Although you can use Microsoft Hyper-V to create guests in the Oracle Cloud Infrastructure environment, like any hypervisor, they act as a single point of failure. Although cloud environments such as Oracle Cloud Infrastructure provide a resilient operational environment, many customers find it necessary to maintain strong high availability (HA) to ensure workload availability and business continuity. To help maintain strong HA, Oracle Cloud Infrastructure has enabled the ability to use Hyper-V Replica to establish replication connectivity between two Hyper-V instances.
Hyper-V Replica is the built-in functionality of Hyper-V that enables the online replication of a guest operating system to a target system without requiring a shared storage resource. Hyper-V Replica uses change tracking within the source guest virtual hard disks (VHDs) and replicates those changes via a TCP network connection to an arbitrary Hyper-V server acting as a replica target.
This appendix describes the process for establishing Hyper-V Replica connectivity between two Hyper-V instances built within Oracle Cloud Infrastructure. The process described here can also be applied to replicas deployed from on-premises instances to Oracle Cloud Infrastructure instances.
Prerequisites For this process to work as designed, the following prerequisites must be satisfied:
• For intraregion replicas, deploy two Hyper-V servers as explained in the main part of this paper. If Oracle Cloud Infrastructure is to act as a Hyper-V Replica target from on-premises, only one Hyper-V server is required.
• Ensure that connectivity exists bidirectionally between the source and target Hyper-V instances. A simple ping suffices for the connectivity test.
• Ensure that hostname resolution works between the source and target Hyper-V instances.
• Make TCP ports 80 and 443 available within the subnet. Configure your Oracle Cloud Infrastructure security lists appropriately.
• Attach additional Oracle Cloud Infrastructure Block Volumes storage volumes, or identify a directory within an existing attached block storage volume on the Hyper-V instances, to serve as a repository for the replica Hyper-V guests.

33 | DEPLOYING HYPER-V WITH ROUTING
Configure the Hyper-V Target Instance After the Hyper-V instances are deployed and tested, use the following procedure to configure Hyper-V Replica on the instance that is the target for replication.
1. Open Hyper-V Manager.
2. Right-click the Hyper-V host in the left-side pane and select Hyper-V Settings.
3. In the left-side pane of the Hyper-V Settings dialog box, click Replication Configuration.

34 | DEPLOYING HYPER-V WITH ROUTING
4. In the top-right pane, select Enable this computer as a Replica server.
5. In the Authentication and ports section, select Use Kerberos (HTTP). Keep the TCP port value of 80.
Note: Certificate-based authentication (HTTPS) is possible in this configuration, but the setup of that method is beyond the scope of this paper. See the appropriate Microsoft documentation for the configuration of a certificate provider within Windows Server 2016.
6. In the Authorization and storage section, select the Allow replication from the specified servers option.
Note: The Allow replication from any authenticated server function works, but is not recommended for security reasons.
7. Click Add.

35 | DEPLOYING HYPER-V WITH ROUTING
8. In the Add Authorization Entry dialog box, add the following information:
• Primary server: This is the source server for the replica information. This is the host name that you verified for hostname resolution as part of the prerequisites.
• Location for replica files: This is the full path to either the additional block storage volume attached to the target Hyper-V instance for replicas or the block storage volume attached for primary Hyper-V guests on this instance. Do not use the boot volume as the replica location.
• Trust group: This is an arbitrary group name that identifies the participant Hyper-V instances within a replication relationship. This name must be consistent between the source and target instances if you want to enable bidirectional replication.
9. Click OK, and then click OK in the Replication Configuration section.
10. Click OK in the settings message that is displayed.
.
11. In the Windows Control Panel, open the Network and Sharing Center.

36 | DEPLOYING HYPER-V WITH ROUTING
12. On the bottom-left side of the window, click Windows Firewall.
13. In the Windows Firewall window, click Advanced Options.
14. In the Windows Firewall with Advanced Security window, click Inbound Rules.
15. Scroll down and find the two Hyper-V Replica rules, as shown in the following screenshot. Select both rules, right-click, and then select Enable Rule.
16. Close both of the Windows Firewall windows.
The instance is now set up to receive replicas from the named Hyper-V instance. If you want to enable bidirectional replication, repeat this process on the source Hyper-V instance.
Configure the Hyper-V Guests After you configure the target Hyper-V instance, you need to configure individual guests within the source Hyper-V instance to replicate to the target Hyper-V instance.
Limitations of Guest Replication from On-Premises to Oracle Cloud Infrastructure
Guests replicated from on-premises to Oracle Cloud Infrastructure might require some configuration changes, depending on their network configuration, domain status, and DNS registration. In the default configuration, guests created within the Oracle Cloud Infrastructure environment have access to only a single vSwitch for their networking. The same limitation applies to guests that are replicated into the Oracle Cloud Infrastructure Hyper-V instances from an on-premises instance. On-premises guests that have more than one vSwitch attached will have only a single network interface when replicated to Oracle Cloud Infrastructure, and might require configuration as a result.

37 | DEPLOYING HYPER-V WITH ROUTING
Domain-joined guests might experience authentication issues if they can’t reach a domain controller after replication to Oracle Cloud Infrastructure. If domain-joined guests are to be replicated into an Oracle Cloud Infrastructure Hyper-V instance, we recommend establishing a primary domain controller, backup domain controller, or read-only domain controller within Oracle Cloud Infrastructure to prevent authentication issues resulting from long-latency or disconnected domains.
Guest hostname resolution might fail, particularly on non-domain-joined or non-Windows guests that use DNS services. Resolution might also fail if a Windows DNS service is not established in support of domain services established within Oracle Cloud Infrastructure. To maintain connectivity with guests after failover, we recommend manually verifying DNS to ensure that the current IP address assigned to the replica has been correctly inserted into the appropriate DNS zone or zones. A manual update of DNS might be required to ensure correct hostname resolution. Oracle Cloud Infrastructure DNS services do not currently recognize or accept updates from Hyper-V or any other external DNS service.
Configure a Hyper-V Guest
Follow this procedure to configure each guest.
1. Open Hyper-V Manager and select the guest to replicate.
2. In the lower-right pane, click Enable Replication.
3. On the first page of the wizard, click Next.
4. On the next page, enter the hostname of the target Hyper-V instance in the Replica server box and then click Next.

38 | DEPLOYING HYPER-V WITH ROUTING
NOTE: Communication failures between source and target Hyper-V instances are mainly caused by a failure of hostname resolution. If a failure occurs, ensure that the hostname entered in the box can be resolved by using that exact hostname. An FQDN might be required for correct connectivity, and the source Hyper-V instance name must match that set within the Add Authorization Entry step detailed in the “Configure the Hyper-V Target Instance” procedure.
If communication is successful, the Specify Connection Parameters page is displayed.
5. Select the Use Kerberos authentication (HTTP) option, select the Compress the data that is transmitted over the network check box, and then click Next.

39 | DEPLOYING HYPER-V WITH ROUTING
6. Select all the VHDs associated with this guest, and then click Next.
7. Select the frequency of replication, and then click Next.
8. Select the number of recovery points that you want to maintain. If you select multiple recovery points, do not select the VSS option.

40 | DEPLOYING HYPER-V WITH ROUTING
9. Select Send initial copy over the network as the initial replication method, and then select the schedule for the initial replication as appropriate for the environment. Click Finish.
If you selected an immediate replication, you should see an entry similar to the following one in the Hyper-V Manager for the guest being replicated.

41 | DEPLOYING HYPER-V WITH ROUTING
Fail Over Between Source and Target Hyper-V Instances Using this configuration, instances must be manually failed to the replica target before use.
Note: Guests failed over to target Hyper-V instances, particularly those from on-premises environments, are subject to the limitations listed in the “Limitations of Guest Replication from On-Premises to Oracle Cloud Infrastructure” section.
Use this procedure to fail over Hyper-V guests to the replica instance.
1. Open the Hyper-V Manager on the source instance and stop the Hyper-V guest.
2. With the guest selected in Hyper-V Manager, right-click Replication in the lower-right pane, and then select Planned Failover from the menu.
3. In the Planned Failover dialog box, select the Reverse the replication direction after failover check box, the Start the Replica virtual machine after failover check box, or both, as needed for the operation. Then click Fail Over.

42 | DEPLOYING HYPER-V WITH ROUTING
The replication runs through the steps listed in the box and provides feedback about the success of each step. If the replication is successful, the following message appears:
To fail the guest back to the original Hyper-V instance, log in to the target Hyper-V instance and reverse this process.

Oracle Corporation, World Headquarters Worldwide Inquiries 500 Oracle Parkway Phone: +1.650.506.7000 Redwood Shores, CA 94065, USA Fax: +1.650.506.7200
Copyright © 2018, Oracle and/or its affiliates. All rights reserved. This document is provided for information purposes only, and the contents hereof are subject to change without notice. This document is not warranted to be error-free, nor subject to any other warranties or conditions, whether expressed orally or implied in law, including implied warranties and conditions of merchantability or fitness for a particular purpose. We specifically disclaim any liability with respect to this document, and no contractual obligations are formed either directly or indirectly by this document. This document may not be reproduced or transmitted in any form or by any means, electronic or mechanical, for any purpose, without our prior written permission. Oracle and Java are registered trademarks of Oracle and/or its affiliates. Other names may be trademarks of their respective owners. Intel and Intel Xeon are trademarks or registered trademarks of Intel Corporation. All SPARC trademarks are used under license and are trademarks or registered trademarks of SPARC International, Inc. AMD, Opteron, the AMD logo, and the AMD Opteron logo are trademarks or registered trademarks of Advanced Micro Devices. UNIX is a registered trademark of The Open Group. 0918 Deploying Hyper-V with Routing September 2018 Author: Steven B. Nelson
C O N N E C T W I T H U S
blogs.oracle.com/oracle
facebook.com/oracle
twitter.com/oracle
oracle.com