day 3 at a glance
TRANSCRIPT

TEXTEAM Geometry Institute 3.1
DAY 3 AT A GLANCE
Geometry of Size
Time Topic TEKS Approach
45 The Birthday Cake
10 Reflection on The Birthday Cake
10 Shearing (Demo) 4a
10 From Circles to Rectangles 4a
10 Rectangles to Prisms 4a
50 Optimize the Area
15 Kitchen Triangles 4
15 Triangles and Trusses 5a
30 Medians and Areas 4a, 5b
30 Interior and Exterior Angles of a
Triangle
1a, 9b
30 Pythagorean Theorem-More or Less 4c
20 Pythagorean Tiling 1b, 4c
30 Pythagorean Dissection Proof 10b
15 A Tale of Caution 10c
15 Canning a Sphere 4d
15 Reflections & post its
5 Give assignment
355 Total suggested time (in minutes)

TEXTEAM Geometry Institute 3.2
Day 3: Materials Needed Sketchpad
Sketches
Shearing Triangles
Shearing Rectangles
Chocolate cake solution
Day 4 assignment
Index cards
Dot paper or 24 foot rope with a knot at every foot
Grid paper cut into various size squares
Display items for Triangles and Trusses:
sample bridges,
can with string and marbles,
triangles and squares made of paper and brads
TEXTEAM Geometry Institute 3.3
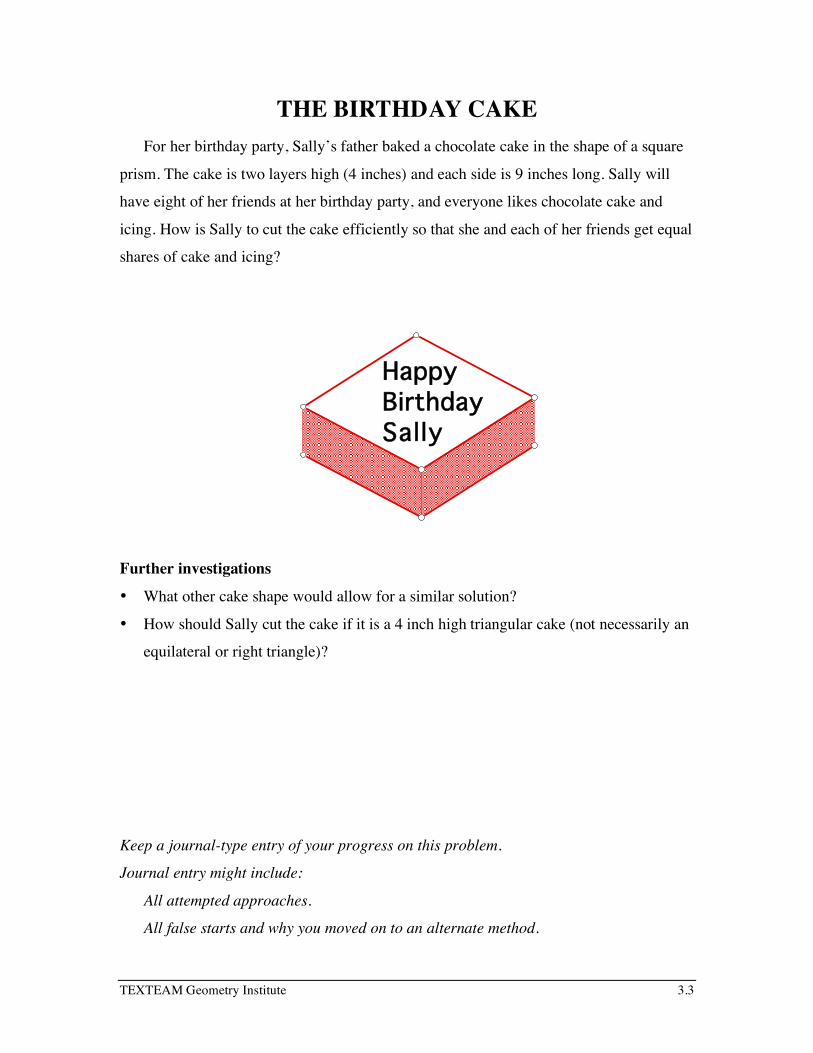
THE BIRTHDAY CAKE For her birthday party, Sally’s father baked a chocolate cake in the shape of a square
prism. The cake is two layers high (4 inches) and each side is 9 inches long. Sally will
have eight of her friends at her birthday party, and everyone likes chocolate cake and
icing. How is Sally to cut the cake efficiently so that she and each of her friends get equal
shares of cake and icing?
Happy
Birthday
Sally
Further investigations
• What other cake shape would allow for a similar solution?
• How should Sally cut the cake if it is a 4 inch high triangular cake (not necessarily an
equilateral or right triangle)?
Keep a journal-type entry of your progress on this problem.
Journal entry might include:
All attempted approaches.
All false starts and why you moved on to an alternate method.

TEXTEAM Geometry Institute 3.4
Your collaborators, if any, and what collaboration brought to the problem.

TEXTEAM Geometry Institute 3.5
THE BIRTHDAY CAKE
Solutions What looks like a volume and surface area problem may be reduced to an area and
perimeter problem since the height of the cake is assumed to be uniform.
Square Cake
Divide the perimeter into nine equal lengths using any point as a starting point. Cut
from the center of the cake to the dividing points on the perimeter.
The top of each slice of cake is either a triangle or the sum of two triangles. All the
triangles have the same altitude and the same base, or sum of two bases. Therefore, the
areas of the tops of the slices, and hence the volumes of the slices, are equal. The icing is
on the top and sides: the area of the tops are equal and the sides of the pieces are
rectangles of equal areas.
Figure 2
The solution of the Birthday Cake problem depends on two properties:
1. There is a point on the top of the cake equidistant from each side of the cake.
2. Any two triangles have the same area when they have equal base lengths as well as
equal heights.
Other Shapes
TEXTEAM Geometry Institute 3.6
These two properties hold for a variety of cake shapes, for instance any regular
polygon or circle allows for a similar solution. If fact any time the first property holds, a
similar solution will be valid.
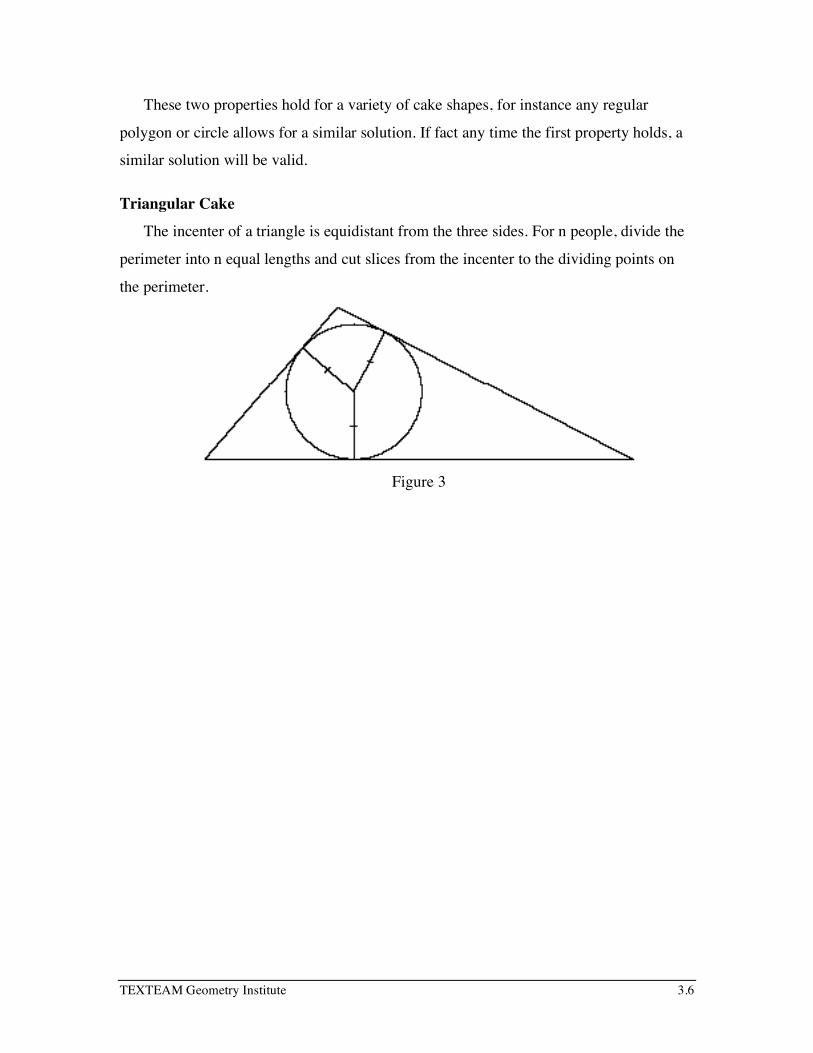
Triangular Cake
The incenter of a triangle is equidistant from the three sides. For n people, divide the
perimeter into n equal lengths and cut slices from the incenter to the dividing points on
the perimeter.
Figure 3

TEXTEAM Geometry Institute 3.7
THE BIRTHDAY CAKE
Reflections 1. Discuss the presentation styles used in this problem and how they contributed to the
problem.
• Hands on
• Technology
• Cooperative groups
• Journaling
2. Discuss the geometry learned from this problem.
3. Discuss the geometric concepts used in the solution to this problem.
• Perimeter
• Area
• Volume
• Polygons
• Triangles
• Incenters
• Circles
• Optimization
• Deductive Reasoning
• Shearing
4. How could this problem be adapted to the classroom?
5. Direction of the day. This problem will lead to:
• Investigation and derivation of area formulas
• Study of triangles: Pythagorean Theorem, applications, triangulations
• Dissections
• Optimization

TEXTEAM Geometry Institute 3.10
SHEARING TRIANGLES AND RECTANGLES
Teacher Guide GOALS:
Explore the formulas for the area of triangles and parallelograms through the use
of shearing.
PREREQUISITES:
Area formulas for triangles and rectangles.
MATERIALS:
Sketchpad Sketches: Shearing Triangles, Shearing Rectangles
PROCEDURES:
1. Load the sketch “Shearing Triangles” on a demonstration computer.
2. Give a brief explanation of the construction of the sketch and drag the components of
the sketch to demonstrate the constructed features.
• Two parallel lines were constructed.
• The vertices of the triangle were constructed as points on these lines.
• The altitude was constructed as a line from point A perpendicular to the base.
3. Before showing the measurements using the buttons, drag point A and ask for
intuitive answers to the question posed in the sketch.
4. Double-click on “Show Base & Height” and “Show Area & Perimeter”.
5. Once more drag point A and discuss the results.
6. Load the sketch “Shearing Rectangles” on participant’s computers.
7. Ask participants to follow a similar procedure in formulating a conclusion about the
area of a parallelogram.
8. Participants may need to be informed about the procedure for measuring objects.
• To measure area and perimeter, select the polygon interior and under the
Measure menu choose Area or Perimeter.
• To measure the length of a segment, select the segment and under the Measure
menu choose Length.
(Note: Investigate optimization of perimeter.)
TEXTEAM Geometry Institute 3.11
FROM CIRCLE TO RECTANGLE
Teacher Guide GOAL:
Use paper folding and transformations to derive the areas of basic shapes by
relating them to the area of a rectangle.
MATERIALS:
Pencil, paper, index cards, compass, scissors.
PREREQUISITE:
Area of rectangle, translation, rotation, sector.
NOTES TO TEACHER:
This is a teacher directed activity. The teacher instructs the students on how to
manipulate the shapes and then asks questions allowing for student discussion. Students
can use index cards for rectangles. These activities are designed to be a relatively simple
and concrete way for students to understand basic area formulas. Students need to start
with a clear understanding of the area of a rectangle since their experiences will be built
on that concept. Stressing an understanding of how these areas all relate to the area of a
rectangle reduces students dependence on formulas.
REFERENCE:
The Story of Pi. Video by Project MATHEMATICS!

TEXTEAM Geometry Institute 3.12
PROCEDURE:
Triangle
Mark a point on the top of the rectangle and connect the two base vertices to the point.
This gives you a triangle. Cut off the excess area outside the triangle.
What is the base and height of the triangle in relation to the original rectangle?
The base and height of the triangle are equal to the base and height of the rectangle.
Fit the excess area that was cut off onto the triangle.
What does this tell you about the area of the triangle?
It is half the area of the rectangle.
Write the formula for the area of a
triangle.
Although all the triangles constructed
this way are acute or right, a narrower
rectangle will yield obtuse triangles and
the method for relating the areas of the
triangle and rectangle is the same.
Parallelogram
Mark a point on the top of the rectangle and connect one of the base vertices to the point.
Cut along this line and translate the cut triangle to the opposite side of the rectangle, and
tape to form a parallelogram.
What is the base and height of the parallelogram in relation to the original rectangle?
The base and height of the parallelogram are equal to the base and height of the
rectangle.

TEXTEAM Geometry Institute 3.13
What does this tell you about the area of the parallelogram?
It is the same as the area of the rectangle
Write the formula for the area of a parallelogram.
TEXTEAM Geometry Institute 3.14
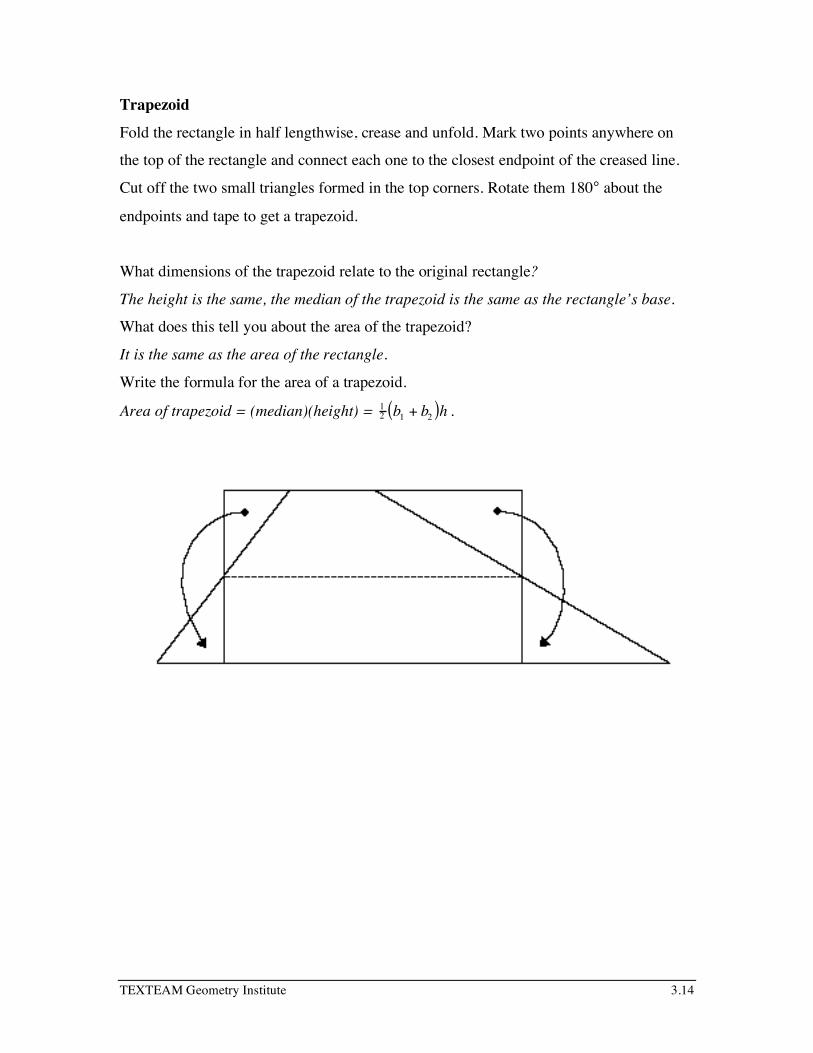
Trapezoid
Fold the rectangle in half lengthwise, crease and unfold. Mark two points anywhere on
the top of the rectangle and connect each one to the closest endpoint of the creased line.
Cut off the two small triangles formed in the top corners. Rotate them 180° about the
endpoints and tape to get a trapezoid.
What dimensions of the trapezoid relate to the original rectangle?
The height is the same, the median of the trapezoid is the same as the rectangle’s base.
What does this tell you about the area of the trapezoid?
It is the same as the area of the rectangle.
Write the formula for the area of a trapezoid.
Area of trapezoid = (median)(height) = 12 b1 + b2( )h .

TEXTEAM Geometry Institute 3.15
Circle
Cut out a large circle. Fold it in half and crease. Continue to fold and crease until you
have 16 sectors. Cut the circle into 16 sectors. Rearrange the sectors, fitting the straight
sides together, placing the curved sides alternating up and down.
What shape does this approximate?
A parallelogram.
Cut the sectors into narrower sectors and arrange as before.
What shape will be approached?
A rectangle.
What is the base and height of this shape in relation to the original circle?
The base is half the circumference and the height is the radius.
What does this tell you about the area of the circle?
It is the same as the area of the rectangle formed.
Write the formula for the circle area of a circle.
Area of circle = 12 (circumference)(radius) = πr2

TEXTEAM Geometry Institute 3.16

TEXTEAM Geometry Institute 3.15
RECTANGLES TO PRISMS
Teacher Guide GOAL:
Use rectangles to derive and justify surface area formulas of prisms and cylinders.
MATERIALS:
Rectangular paper, tape.
PREREQUISITE:
Area and perimeter of polygons, area and circumference of circle.
NOTES TO TEACHER:
This is a teacher directed activity. The teacher instructs the students on how to
manipulate the items and then ask questions allowing for student discussion. These
activities are designed to be a relatively simple, concrete way for students to understand
and generalize basic surface area formulas of prisms and cylinders. Stressing an
understanding of how these formulas are derived and the common pattern, reduces
students’ dependence on formulas.
PROCEDURE:
1. Triangular Prism
• Have students take a rectangular sheet of paper, crease it parallel to an edge in 2
places and then tape the edges, thereby forming an open-ended triangular prism.
• Compare the lateral surface area of the triangular prism to the area of the
rectangle.
They are equal.
• How do the parts of the triangular prism relate to the base and height of the
rectangle?
The height is the same and the base of the rectangle is the perimeter of the
base of the prism.
• Using this information, how could you find the lateral surface area of a triangular
prism?
Lateral surface area = (perimeter of base)(height)

TEXTEAM Geometry Institute 3.16
• If the prism has bases, what would the net look like?
Draw a sketch.
• How would you find the total surface area of the triangular prism?
Total surface area = (lateral surface area) + 2(area of base)

TEXTEAM Geometry Institute 3.17
2. Rectangular Prism
• Have students take a rectangular sheet of paper, crease it parallel to an edge in 3
places so that a rectangular prism will be formed, and then tape the edges.
• Compare the lateral surface area of the rectangular prism and the area of the
rectangle.
They are equal.
• How do the parts of the rectangular prism relate to the base and height of the
rectangle?
The height is the same and the base of the rectangle is the perimeter of the
base of the prism.
• Using this information, how could you find the lateral surface area of a
rectangular prism?
Lateral surface area = (perimeter of base) x (height)
• If the prism has bases, what would the net look like? Draw a sketch.
• How would you find the total surface area of the rectangular prism?
Total surface area = (lateral surface area) +
2(area of base)
• Would this formula work if you had any three
parallel creases in the paper, to create a
quadrilateral prism?
Yes
3. Prism with n-gon base
• Repeat the activity, having students add more creases each time.
• Develop the ideas about lateral and total surface area.
• What type of shape is created as n approaches infinity?
The prism approaches a cylinder.
4. Cylinder
• Students create an open-ended cylinder from a rectangular sheet of paper.
• How does the lateral surface area of the cylinder compare to the area of the
rectangle?

TEXTEAM Geometry Institute 3.18
They are equal.
• How do the parts of the cylinder relate to the base and height of the rectangle?
The height is the same and the base of the rectangle is the circumference of
the base of the cylinder.
• Using this information, how could you find the lateral surface area of a cylinder?
Lateral surface area = circumference of base) x (height)
• If the cylinder has bases, what would the net look like? Draw a sketch.
• How would you find the total surface area of the cylinder?
Total surface area = (lateral surface area) + 2(area of base)
EXTENSIONS:
Repeat activity with pyramids and cones. The models are more complicated for pyramids,
but could be built from isosceles triangles. Snow cone cups are inexpensive and simple
models for cones.
TEXTEAM Geometry Institute 3.18
OPTIMIZE THE AREA
Teacher Guide GOAL:
Understand the relationships between perimeter and area.
Calculate the optimal rectangular area for a fixed perimeter.
MATERIALS:
Dot paper or a 24 foot rope with knots every foot.
PREREQUISITES:
Area and perimeter of rectangles.
PROCEDURE:
Dot Paper:
Working in small groups, students draw many different rectangles with a perimeter of 24
units.
Rope:
Have 4 students represent the vertices of the rectangle and demonstrate the different
rectangles possible with a perimeter of 24 units.
As a class, record the base and height of all the possible rectangles formed Discussion
may be restricted to those rectangles with integral dimensions. For a fixed perimeter,
many areas are possible. How can the area be maximized? Organize the data in
increasing order of area and look for a pattern in the dimensions. The area increases as
the two dimensions approach the same value. Maximum area occurs when the rectangle
has greatest symmetry, i.e. a square.
In small groups, students compute the areas of the different rectangles and work problems
3, 4, 5.
Discuss 3, 4, 5 as a whole group. In problem 3, point out that the graph is a parabola with
its vertex at (6, 36) which represents the maximum area given the fixed perimeter.
Then work and discuss problem 6.
Students are to finish problems 7 and 8 in small groups.
HISTORICAL NOTE:
In ancient times it was known by mathematically aware people that a piece of land
having small perimeter might be larger in area than some other piece having a larger

TEXTEAM Geometry Institute 3.19
perimeter. Thus they could cheat less aware landowners provided the size of a field was
measured by the time it took to walk around it. This was described by Proclus circa 450
AD.
TEXTEAM Geometry Institute 3.20
EXTENSIONS
A. Investigate the areas of other shapes with perimeter of 24 units.
• Triangle
• Hexagon
• Circle
B. Connections to Algebra via Technology.
C. Research the legend of Queen Dido.
D. Find and compare the plans of walled cities.
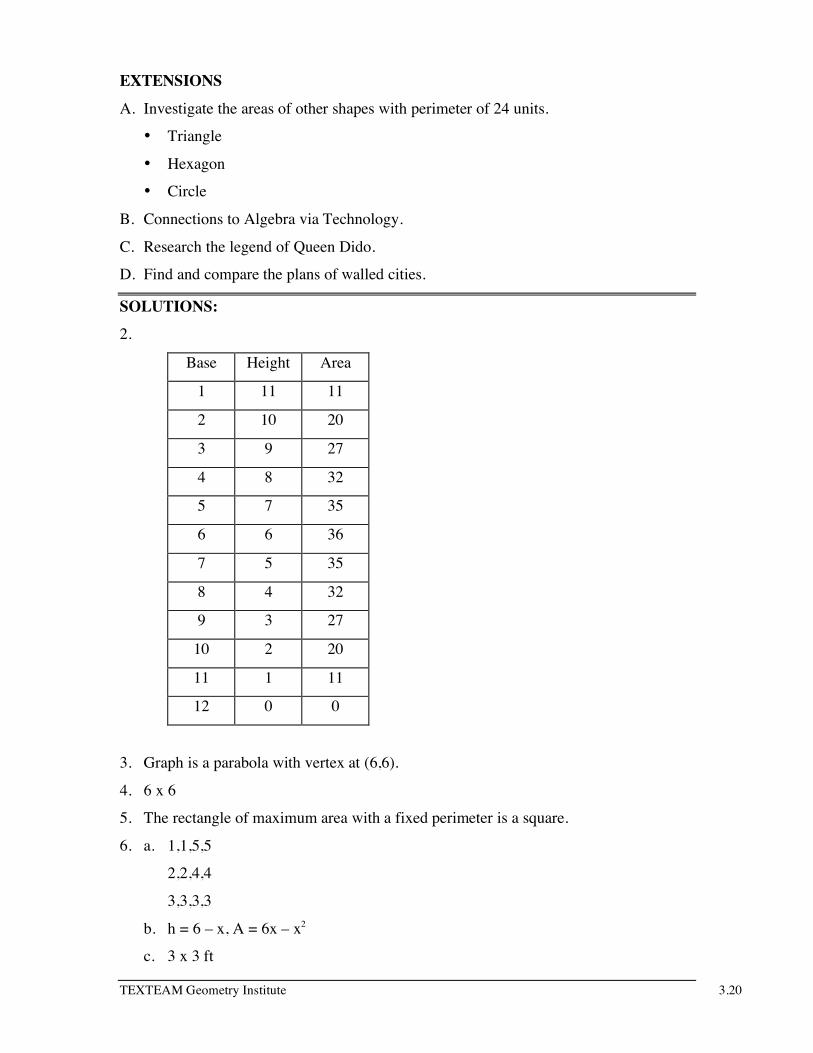
SOLUTIONS:
2.
Base Height Area
1 11 11
2 10 20
3 9 27
4 8 32
5 7 35
6 6 36
7 5 35
8 4 32
9 3 27
10 2 20
11 1 11
12 0 0
3. Graph is a parabola with vertex at (6,6).
4. 6 x 6
5. The rectangle of maximum area with a fixed perimeter is a square.
6. a. 1,1,5,5
2,2,4,4
3,3,3,3
b. h = 6 – x, A = 6x – x2
c. 3 x 3 ft
TEXTEAM Geometry Institute 3.21
d. 1 x 5 ft
TEXTEAM Geometry Institute 3.22
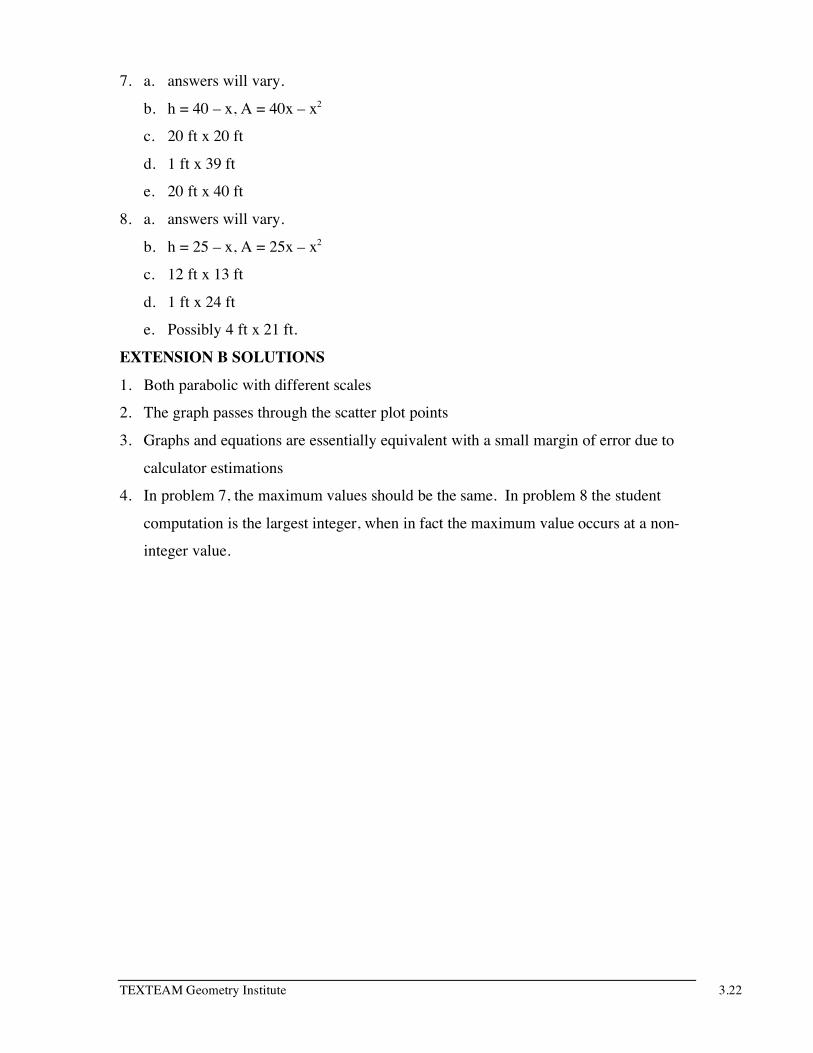
7. a. answers will vary.
b. h = 40 – x, A = 40x – x2
c. 20 ft x 20 ft
d. 1 ft x 39 ft
e. 20 ft x 40 ft
8. a. answers will vary.
b. h = 25 – x, A = 25x – x2
c. 12 ft x 13 ft
d. 1 ft x 24 ft
e. Possibly 4 ft x 21 ft.
EXTENSION B SOLUTIONS
1. Both parabolic with different scales
2. The graph passes through the scatter plot points
3. Graphs and equations are essentially equivalent with a small margin of error due to
calculator estimations
4. In problem 7, the maximum values should be the same. In problem 8 the student
computation is the largest integer, when in fact the maximum value occurs at a non-
integer value.
TEXTEAM Geometry Institute 3.23
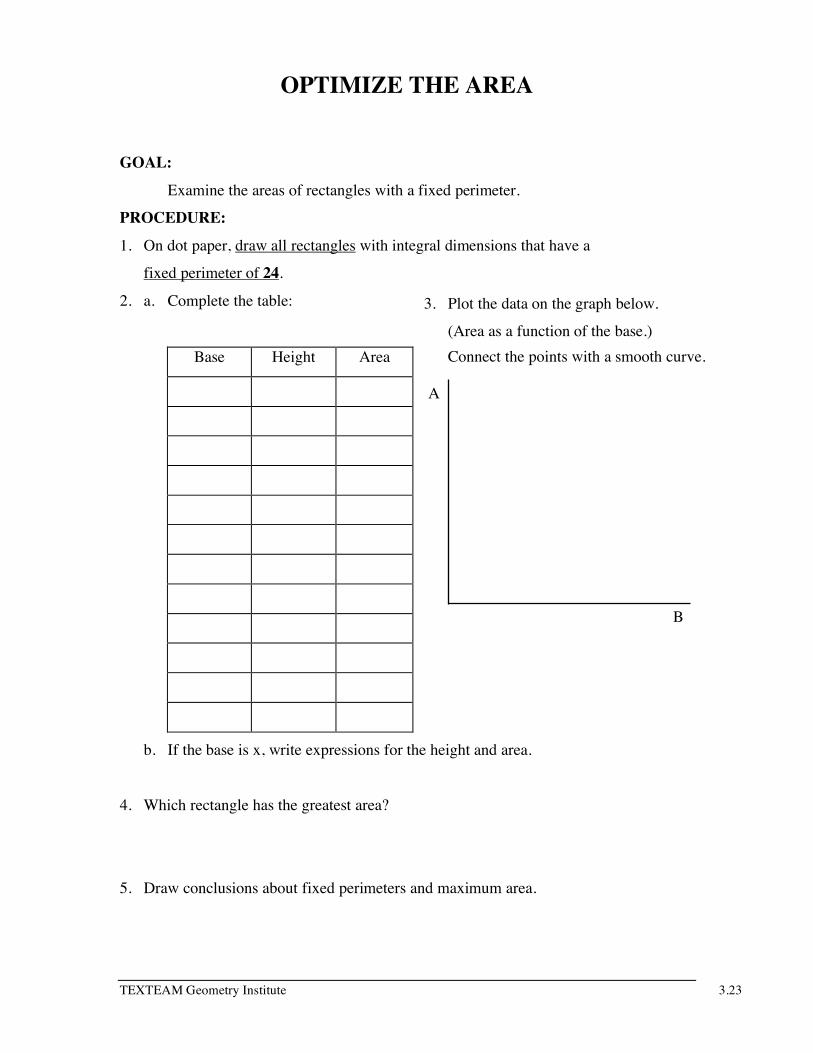
OPTIMIZE THE AREA
GOAL:
Examine the areas of rectangles with a fixed perimeter.
PROCEDURE:
1. On dot paper, draw all rectangles with integral dimensions that have a
fixed perimeter of 24.
2. a. Complete the table:
Base Height Area
b. If the base is x, write expressions for the height and area.
4. Which rectangle has the greatest area?
5. Draw conclusions about fixed perimeters and maximum area.
3. Plot the data on the graph below.
(Area as a function of the base.) Connect the points with a smooth curve.
A
B

TEXTEAM Geometry Institute 3.24

TEXTEAM Geometry Institute 3.25
6. Gerrell bought a 12 foot strip of wood to make a rectangular frame.
a. What are some different integral lengths in which he could cut the wood for the
frame?
b. If the base is x, write expressions for the height and area.
c. Which integral dimensions give Gerrell the maximum area to frame?
d. Which integral dimensions give Gerrell the minimum area to frame?
7. Brandi has 80 feet of fencing material to build a fenced rectangular garden.
a. What are some possible dimensions for her garden if she wants to use all the
fencing material?
b. If the base is x, write expressions for the height and area.
c. Which dimensions give the maximum fenced area?
d. Which dimensions give the minimum fenced area?
e. Brandi, from question 7, has decided to place one side of her garden up against
the house. Using all of the 80 feet of fencing material, what dimensions give the
maximum fenced area?
8. Roger just received a Rottweiler puppy. Roger has 50 feet of chain link fence to make
a rectangular pen for his Rottweiler.
a. What are some possible dimensions for the pen?
b. If the base is x, write expressions for the height and area.
c. Which dimensions give the maximum fenced area?
d. Which dimensions give the minimum fenced area?

TEXTEAM Geometry Institute 3.26
e. Since dogs like to run, what are the dimensions of the fence that Roger should
build?

TEXTEAM Geometry Institute 3.27
EXTENSION
Connections to Algebra via Technology
Follow the steps below using information from problem 7,
then repeat for problem 8.
• Enter the base lengths and the area values found in the problem into lists on a
graphing calculator.
• Create a scatter plot where the base is the independent variable and the area is the
dependent variable. (Be sure to adjust the viewing window to fit the data.)
1. Compare and contrast this graph to the graph in problem 3.
• Have the calculator compute a regression equation that best fits the data.
• Graph the regression equation with the scatter plot.
2. How does the regression graph compare to the scatter plot?
• Graph the area equation created in part (b).
3. How does the regression equation compare to the equation from part (b), both
graphically and algebraically?
• Use the graphing calculator to calculate the maximum area.
4. Compare calculator maximum to the maximum area found in part (c). If the
values are not the same, explain why.

TEXTEAM Geometry Institute 3.27
KITCHEN TRIANGLES Teacher Guide
GOAL:
Understand how the efficiency of a kitchen is affected by the relative positions of
the sink, refrigerator and range.
MATERIALS:
Triangles in the Kitchen worksheet. Ideal distances overhead.
PREREQUISITES:
Ability to write inequalities and find the perimeter of a polygon.
PROCEDURE:
Students can work individually or in groups.
• Have the students complete questions 1-3 on the worksheet.
• Discuss the “ideal distances” and have students label the “ideal distances” on their
worksheet.
• Complete the rest of the worksheet.
• Discuss the results.
• Arrange desks that represent a sink, refrigerator and range in various work triangles
and discuss the efficiency of the “kitchen.”
EXTENSION:
• Have students measure the efficiency of their kitchen at home and draw their kitchen
to scale.
• Have students look for and bring in examples of other “work triangles.”
• Have students draw the other “work triangles” to scale.
SOLUTIONS:
1. Answers vary. Distance between the most used appliances in a kitchen.
2. Perimeter. Perimeter measures length.
3. Answers vary.
4. 16 ft.
5. Answers vary.
6. 22 ft.

TEXTEAM Geometry Institute 3.28
7. 16 ≤ P ≤ 22
8. Answers vary. Yes, perimeter = 20 ft. No, because the distance between sink and
range is more than the ideal distance.
9. Ends of the counter.
10. C. Perimeter and distance are smaller, therefore more efficient.
11. A. 4 ≤ x ≤ 7
B. The counters would be further apart.
C. Answers vary.
12. A. 4 ≤ x ≤ 9
B. Further to the left.
C. Answers vary.
13. Yes because the dimensions fit the ideal distances. It really doesn’t exist — line
segment. Yes, varies. Yes, varies.
14. Equilateral; equal sides; 4ft.; varies.
15. Answers vary.

TEXTEAM Geometry Institute 3.29
KITCHEN TRIANGLES
Draw an overhead view of the kitchen in your home. Label the range (stove), the sink and
the refrigerator.
Connect the middle of the sink to the middle of the range, the middle of the range to the
middle of the refrigerator, and the middle of the sink to the middle of the refrigerator.
What kind of shape did you draw?
In most kitchens you will get a triangle. This triangle is often called The Work Triangle.
To make kitchens efficient work places, the distances between the three work areas need
to be considered. Use the diagram below to answer questions 1-7.
1. How can you use such a diagram to
measure the efficiency of a kitchen?
2. Which would be a better measure of
kitchen efficiency, area or perimeter?
________
Explain why.
3. What do you think are the ideal distances between:
Range Refrigerator
Sink

TEXTEAM Geometry Institute 3.30
sink and range _______
sink and refrigerator _______
range and refrigerator _______

TEXTEAM Geometry Institute 3.31
4. Using the diagram and the ideal distances from the overhead, what is the minimum
perimeter a work triangle should have?
5. Why aren't the appliances closer than 4 feet?
6. What is the maximum perimeter a work triangle should have?
7. Let p = perimeter. Write an inequality that represents the minimum and maximum
perimeters in a work triangle.
8. Look at the kitchen below. Explain whether this kitchen is designed to work
efficiently?
6 ft
7 ft7ft
9. In the kitchen below, there are two places where the refrigerator can be placed.
Draw in the two places.

TEXTEAM Geometry Institute 3.32
10. In the kitchen below, using the measurements, where would be the most efficient
place for the refrigerator be: A, B, or C. Explain your answer.
C
A
B
Position of
Refrigerator
Sink to
Refrigerator
Range to
Refrigerator
A 6'6" 6'8"
B 8'4" 3'5"
C 5'6" 5'4"
11. A. Look at the kitchen below. According to the ideal measurements, what could the
distance between the sink and the refrigerator be? Write an inequality showing
your answer.
7 ft6 ft
x ft
B. If the distance between the sink and the refrigerator is 7 feet, the 2 counters would
be closer together. If the distance between the sink and refrigerator is 4 feet, what
would that do to the distance between the counters?
C. What do you think the distance between the sink and the refrigerator should be?
Explain.

TEXTEAM Geometry Institute 3.33
12. A. Look at the kitchen below. According to the ideal distances,
what could the distance between the range and the refrigerator be?
Write an inequality showing your answer.
5 ftx ft
5 ft 6 in
B. If the distance between the range and the refrigerator is 9 feet, the refrigerator
would be further to the right. If the distance between the range and refrigerator is
4 feet, where would the refrigerator be moved to?
C. What do you think the distance between the range and the refrigerator should be?
Explain.
13. This is an example of a Galley Kitchen.
5' 4'
Is this kitchen arrangement efficient? Explain.
Draw the work triangle.
What are the disadvantages to such a kitchen?
What are the advantages to such a kitchen?

TEXTEAM Geometry Institute 3.34

TEXTEAM Geometry Institute 3.35
14. The smallest kitchen would be the most efficient for one person.
Design the ideal kitchen for one person.
What type of triangle did you use? __________ Why?
What is the length of each side of the work triangle?
Is this a good design for a couple who like to cook together? Explain.
15. Think of examples of other work triangles.

TEXTEAM Geometry Institute 3.34
TRIANGLES AND TRUSSES Teacher Guide
GOAL:
Understand the rigidity of triangles, learn and build the types of trusses used in
bridges.
PREREQUISITES:
Congruent segments, midpoint, and congruent triangles.
MATERIALS:
PART I: Straws and string or cardboard strips and brads.
PART II: Spaghetti, scissors, glue, tape, string, quarter inch graph paper, books
about bridges and structures, full soda can, scale.
NOTES TO TEACHER:
Triangles are the simplest polygons and are the most useful polygons. There are many
applications of triangles that involve mathematics beyond the high school geometry level.
The math required to build bridges is quite difficult. The Triangles and Trusses activity
barely touches on the math required, however it does allow students to understand how
triangles help in the building of bridges and other structures.
PROCEDURE:
• Divide the class into six groups.
Triangles used in structures. • Show the overheads of the Eiffel Tower, Statue of Liberty, New River Gorge Bridge.
“What do all of these pictures have in common?” Triangles in the frame.
• Why are structures made of triangles? Strong, rigid, relatively light weight.
Triangles and rigidity. • Give each group straws and string or cardboard and brads.
• Each group constructs a triangle and a quadrilateral similar to the ones shown
here from the materials. Compare and contrast the
properties of the triangle and quadrilateral just built. The triangle is rigid , the square
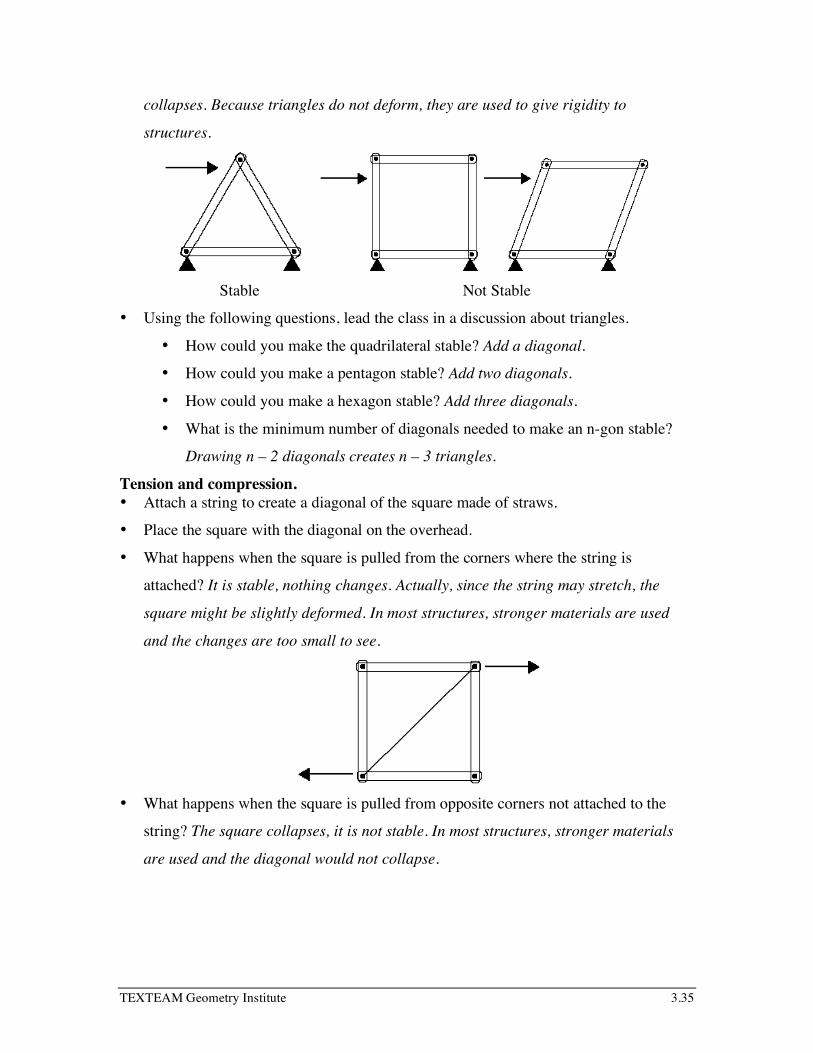
TEXTEAM Geometry Institute 3.35
collapses. Because triangles do not deform, they are used to give rigidity to
structures.
Stable Not Stable
• Using the following questions, lead the class in a discussion about triangles.
• How could you make the quadrilateral stable? Add a diagonal.
• How could you make a pentagon stable? Add two diagonals.
• How could you make a hexagon stable? Add three diagonals.
• What is the minimum number of diagonals needed to make an n-gon stable?
Drawing n – 2 diagonals creates n – 3 triangles.
Tension and compression. • Attach a string to create a diagonal of the square made of straws.
• Place the square with the diagonal on the overhead.
• What happens when the square is pulled from the corners where the string is
attached? It is stable, nothing changes. Actually, since the string may stretch, the
square might be slightly deformed. In most structures, stronger materials are used
and the changes are too small to see.
• What happens when the square is pulled from opposite corners not attached to the
string? The square collapses, it is not stable. In most structures, stronger materials
are used and the diagonal would not collapse.

TEXTEAM Geometry Institute 3.36
• Introduce the words tension and compression. The first demo worked because the
string was under tension - it was being stretched. In the second demo, the square was
not stable because the string was under compression - it was being pushed together
and folded under the compression.
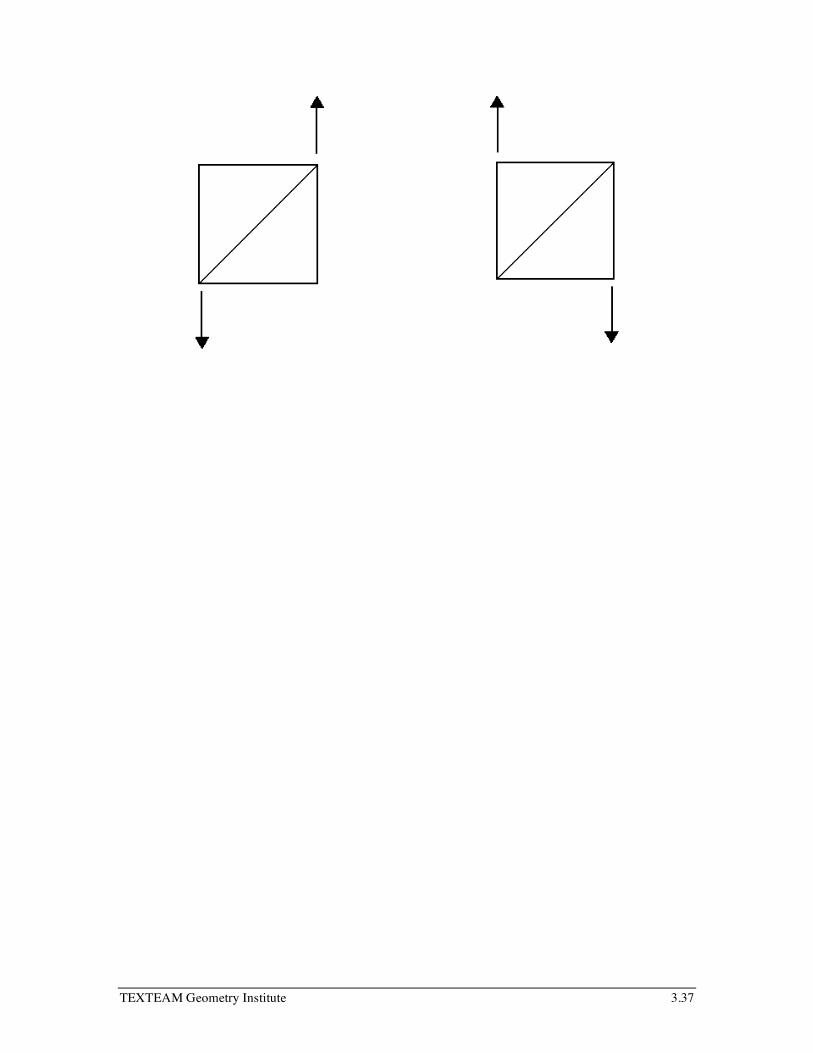
• What if the forces were vertical instead
of horizontal? Is the diagonal under
tension or compression?
Same as when horizontal, tension.
• What would happen in this situation?
Same as when horizontal, compression.
TEXTEAM Geometry Institute 3.37

TEXTEAM Geometry Institute 3.38
Trusses.
• Assign Triangles and Trusses Part I.
• Discuss answers to Part I
Building trusses.
• Hand out instructions for Part II.
• Either have students research truss designs or provide them with a handout of four
basic truss designs.
• After the trusses are built, test them to see which pass the weight test and which is the
lightest. Sit a full can of soda on top of the truss. The truss should support the soda
can. Weigh the truss. The truss which supports the soda can and weighs the least is
the one spanning the distance most efficiently.
EXTENSIONS:
• Look for other structures that utilize triangles. Bicycle frames, guy wires on telephone
poles, roof design, cranes, beams across a gym ceiling, automobile construction, etc.
• Take pictures of trusses around the city and have students analyze the compression,
tension and congruent segments.
• Investigate how vectors are utilized in forces of the truss.
• Add more math to Part II by making the students work within a budget and charge for
materials.
• Illustrate use of triangles for rigidity of Platonic solids. Which are rigid? Why? Use
straw models to illustrate.
REFERENCES:
Corbett, Scott. Bridges.
Carter, Polly. The Bridge Book
Peet, Creighton. The First Book of Bridges
Pollard, Jeanne. Building Toothpick Bridges.
Salvadori, Mario. Why Buildings Stand Up: The Strength of Architecture.
SOLUTIONS:
1. Connect B to A’ and C to A’; compression.
2. Further apart; tension.
4. Longer; tension.
TEXTEAM Geometry Institute 3.39
5. AB and AC are under tension; BC and AD are under compression.

TEXTEAM Geometry Institute 3.40
BASIC TRUSS DESIGNS
Howe Truss
Pratt Truss
Warren Truss
Fink Truss

TEXTEAM Geometry Institute 3.41
TRIANGLES AND TRUSSES Part I
GOAL: Investigate the King post truss and the compression and tension of its members.
PROCEDURE: Study the following figures and read the passages. As a group answer the questions.
To understand how triangles aid in the stability of structures, one must first understand
how tension and compression work together in a triangle.
1. Look at the figure below.
Fixed
Point
Fixed
Point
A
A'
B C
A load is applied at point A. With the load, point A moves to point A’.
Draw in the new locations of the members AB and AC using dashed lines.
Are the new members A' B and A' C under tension or compression?
Indicate the answer by labeling the members with a T or a C.

TEXTEAM Geometry Institute 3.42
2. On the figure below label each member using T or C to indicate whether the member
is under tension or compression.
In the figure, B and C are movable points, they are on wheels.
A
B C
A load is applied at point A.
Do the points B and C move closer together or further apart?
Is BC under tension or compression? Label BC with a T or a C.
3. The simplest truss is called the King’s Post. Most King’s Post trusses consist of an
isosceles triangle with an altitude to the base. The King’s Post (altitude) divides the
triangle into 2 smaller triangles, thus strengthening the span.
Draw a King’s Post Truss and mark the congruencies on it. Use a modification of the
drawing in 2.
TEXTEAM Geometry Institute 3.43
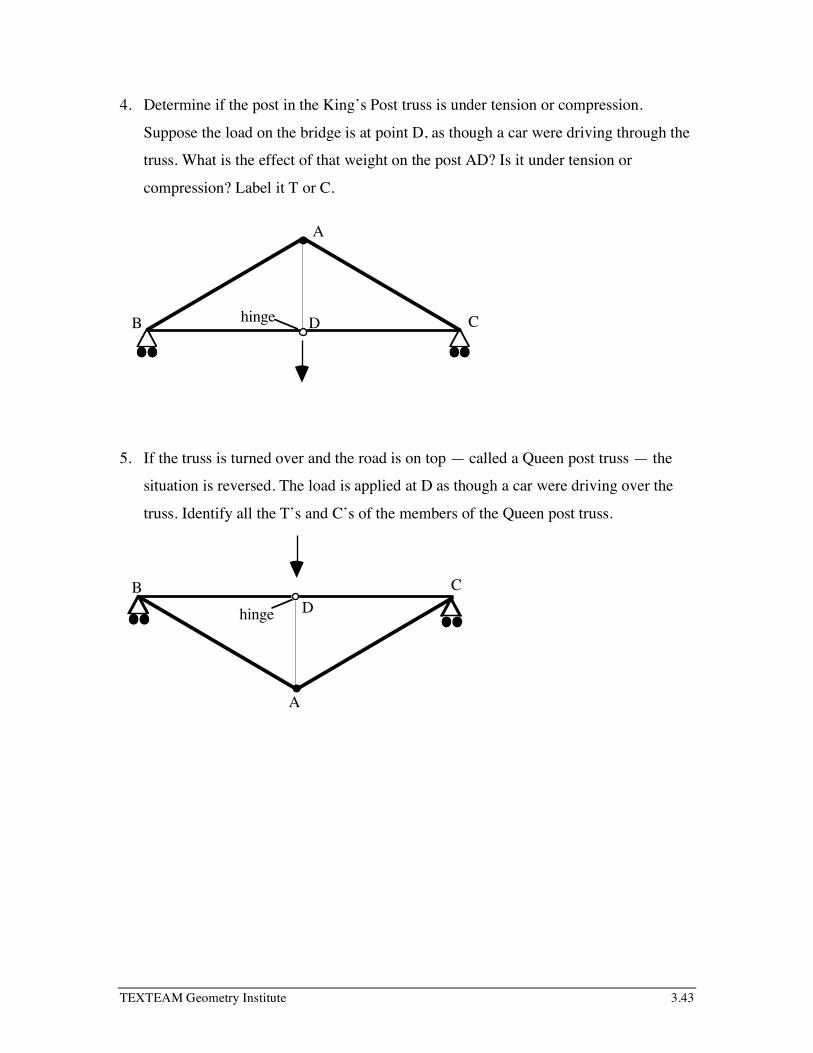
4. Determine if the post in the King’s Post truss is under tension or compression.
Suppose the load on the bridge is at point D, as though a car were driving through the
truss. What is the effect of that weight on the post AD? Is it under tension or
compression? Label it T or C.
A
B CDhinge
5. If the truss is turned over and the road is on top — called a Queen post truss — the
situation is reversed. The load is applied at D as though a car were driving over the
truss. Identify all the T’s and C’s of the members of the Queen post truss.
A
B C
Dhinge
TEXTEAM Geometry Institute 3.44
TRIANGLES AND TRUSSES Part II
Building Bridges
GOAL:
Build a truss bridge out of spaghetti.
The bridge must span a distance of 8 inches, be able to hold the weight of a full
soda can and must be as light weight as possible.
Read the passage below before starting the project.
Truss Bridges A truss is a rigid framework used in bridges. All trusses rely on triangles to insure
rigidity. As a refinement of solid beams, trusses are an efficient means to span long
distances with a minimum of materials. Made up of smaller elements connected with
hinged joints, trusses take advantage of the concept of triangular rigidity. By using
triangles, the truss makes the bridge strong and rigid, thus it does not sway in the wind or
bend when a load passes over it.
Until the sixteenth century, people who built crude forms of the truss bridge did not
understand how to give a truss the most strength. Adrea Palladio, a great architect in Italy
in the 1500s, is given credit for inventing the truss.
When a truss consists of a train of King’s Post triangles, it is called a multiple King’s
Post and it is capable of spanning a greater distance than a single King’s Post triangle.
Most true trusses are based on the King’s Post.
The truss bridge was used more in the united States than anywhere else in the world.
The earlier trusses were made of wood, then they were built from iron and finally from
steel, the strongest material.

TEXTEAM Geometry Institute 3.45
TEXTEAM Geometry Institute 3.46
Project
1. Assign jobs to group members.
Supervisor: ________________________________
Designers: ________________________________
________________________________
Crew: ________________________________
________________________________
________________________________
2. Job descriptions.
Everyone: Research trusses and bridges. Design trusses and select one design to be
built by the group.
Supervisor: Make sure designers and crew are working. Coordinate between crew,
designers and teacher. Help build the bridge. Make sure all paper work is in order.
Designers: Using quarter inch graph paper, draw an exact model of a side view of the
truss the group is building. The blue print should be the exact size of the truss. Be
sure the bridge is not longer than the length of the building materials provided.
Indicate the length of each piece of the truss on the drawing. Help build the
bridge.
Crew: Cut the pieces of the bridge. The crew is in charge of building the bridge. The
bridge should be no longer than the length of the building materials provided. It
must be able to span eight inches and be strong enough to support a full soda can.
Receive help from the supervisor and designers.
3. Turn in the required paper work.
Title and author of two reference books.
Every member’s sketch of his/her truss.
The blue print with lengths clearly marked.
TEXTEAM Geometry Institute 3.47
Weight of the truss.
4. Enter the bridge in the strength and weight contest.

TEXTEAM Geometry Institute 3.46
MEDIANS AND AREAS Teacher Guide
GOALS:
Compare areas of six triangles formed by the medians of a triangle.
PREREQUISITES:
Median, centroid, and area of a triangle.
MATERIALS:
Computer lab worksheet and a computer.
Scripts: Centroid, Centroid-Parallelogram.
PROCEDURES:
Pair students to work in the computer lab. Allow students to work through the lab sheet.
SOLUTIONS:
The students discover that all six triangles formed by the medians have equal area.
To justify this, they should look at two cases.
E. Since E is a midpoint of AD, AE=ED.
The height of each triangle can be
drawn from the centroid perpendicular
to AD. So the heights of the two
triangles are congruent by the reflexive
property. The two triangles have equal areas since their bases and heights are
congruent.
F. Draw the aktitudes GF and EH , of the
two triangles whose base connects the
centroid and D. If GF ≅ EH , then the
two triangles will have equal areas
since their bases and heights are
congruent. ∠EKH ≅ ∠FKG since
vertical angles are congruent.
Since EF || AB and DC is a median it follows that EK ≅ FK .
A
B
C
DE
FCentroid
A
B
C
DE
FCentroi d
GH
K

TEXTEAM Geometry Institute 3.47
∴ ∆EHK ≅ ∆FGK, and GF ≅ EH .

TEXTEAM Geometry Institute 3.48
MEDIANS AND AREAS GOAL:
Compare the areas of the six triangles formed by the medians of a triangle.
PROCEDURE: A. Open a new sketch on Sketchpad.
• Under the File menu, select New Sketch. B. Using the script tool construct a centroid of a triangle.
• Use the script tool of the toolbar, select-hold-drag down to Triangle Special Points, and then over to Centroid, THEN release.
• In the sketch, click-release-drag to create the first side, click-release-drag to complete the triangle, THEN click to finish the script. (“Centroid” should appear in your triangle.)
C. Calculate the areas of the six triangles formed.
• Select the arrow tool from the toolbar. • Click on midpoint C, press and hold down the
Shift key, click on the centroid point, click on a vertex of the original triangle to form a smaller triangle, release the shift-key.
• Under the Construct menu, select Polygon Interior, while interior is flashing go to Measure menu, select Area.
• Repeat for each of the five remaining
triangles.
C
E
F
Centroid
D. Conjecture about the area relationships of the six small triangles when any
triangle is subdivided by its medians.
• Select the arrow tool from the toolbar, click-hold-drag on any vertex of the original triangle, then release, check the area measures. Repeat to see a variety of triangles.
E. Prove your conjecture for two adjacent triangles, on a common SIDE of the
original triangle.

TEXTEAM Geometry Institute 3.49
F. Prove your conjecture for two adjacent triangles, sharing a common VERTEX
of the original triangle. HINT: Use the script tool of the toolbar, select-hold-drag down to Institute Scripts,
Triangles, and then over to Centroid-Parallelogram, THEN release.
* By the transitive property, your explanations for steps E and F
justify your conjecture for all six triangles.

TEXTEAM Geometry Institute 3.49
INTERIOR & EXTERIOR ANGLES
OF A TRIANGLE Teacher Guide
GOAL:
Explore and justify relationships between the interior and exterior angles of
triangles.
PREREQUISITES:
Triangles — right, acute, obtuse, isosceles, equilateral
Interior and exterior angles of a triangle
MATERIALS:
Computer lab worksheet and a computer.
PROCEDURE:
• Put students in pairs to work on the computer lab, giving each student a copy of the
worksheet to record their conjectures and justifications.
• Allow students to work through the lab.
• Ask student pairs to lead the discussion of each question after everyone has finished
the lab. Encourage students to offer alternate conjectures and let the class discuss the
validity of each conjecture. Each conjecture should be justified.
SOLUTIONS:
Note: These are general solutions. Students should be encouraged to put the conjectures
in their own words and provide alternate conjectures, no matter how trivial.
1. The sum of the interior angles of a triangle is 180°.
Draw line ED parallel to line AC. Then,
m∠ A=m∠ EBA and m∠ C=m∠ CBD, since they
are alternate interior angles of parallel lines. By the
angle addition postulate,
m∠EBA+m∠ABC+m∠CBD = 180°. By the
substitution property of equality,
m∠A+m∠ABC+m∠C = 180°.

TEXTEAM Geometry Institute 3.50
2. In a right triangle, the two non-right angles are complementary.
Given right triangle ABC where ∠A is a right angle. Since the sum of the
measures of any triangle is 180°, m∠A+m∠B+m∠C=180°. Since m∠A=90° by
definition, 90°+m∠B+m∠C=180°. By the subtraction property of equality,
m∠B+m∠C=90°. Therefore, ∠B and ∠C are complementary.
In a right triangle, two of the angles must be acute angles.
Given right triangle ABC where ∠A is a right angle. Then ∠B and ∠C must be
complimentary, so m∠B+m∠C=90°. Since m∠B and m∠C are both greater
than zero, m∠B < 90° and m∠C < 90°. So, ∠B and ∠C are both acute angles.
3. The angles opposite the congruent legs of an isosceles triangle are congruent.
(Note: this conjecture may be left as an observation to be proven later, if congruent
triangles have not yet been discussed.)
Given isosceles triangle ABC, where AB = BC. Draw BD
perpendicular to AC. BD = BD by the reflexive property of
equality. m∠BDA = m∠BDC since perpendicular lines
form congruent adjacent angles. Therefore, ∆ABD ≅ ∆CBD
by the Hypotenuse-Leg theorem. So, ∠A ≅ ∠C by the
definition of congruent triangles.
4. The measure of an exterior angle of a triangle is equal to the sum of the measures of
the remote interior angles.
Since the sum of the interior angles of a triangle is 180°, m∠C+m∠D+m∠CBD = 180°. By the angle addition postulate, m∠ABC+m∠CBD=180°. By the transitive property of equality, m∠C+m∠D+m∠CBD = m∠ABC+m∠CBD. By the subtraction property of equality, m∠C+m∠D=m∠ABC.
TEXTEAM Geometry Institute 3.51
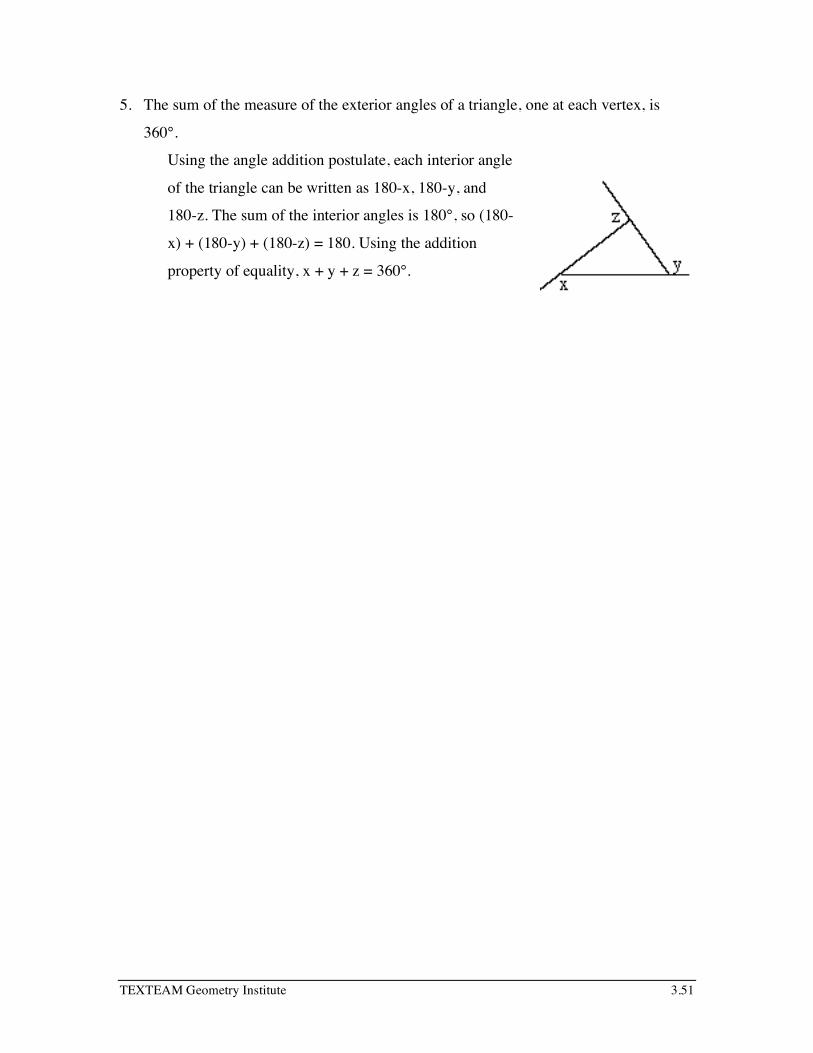
5. The sum of the measure of the exterior angles of a triangle, one at each vertex, is
360°.
Using the angle addition postulate, each interior angle
of the triangle can be written as 180-x, 180-y, and
180-z. The sum of the interior angles is 180°, so (180-
x) + (180-y) + (180-z) = 180. Using the addition
property of equality, x + y + z = 360°.

TEXTEAM Geometry Institute 3.52
INTERIOR & EXTERIOR ANGLES
OF A TRIANGLE
GOAL:
Explore and justify relationships between the interior and exterior angles of
triangles.
PROCEDURE:
1. Explore the sum of interior angles of different types of triangles.
A. Open a new sketch on Sketchpad.
• Under the File menu, select New Sketch.
B. Draw and label a triangle.
• Select the segment tool from the toolbar. • In the sketch, click-drag-release to create the first line segment of the triangle. • From the endpoint of the segment, click-drag-release to create the second side
of the triangle. (Caution: Be sure to line up the endpoints of the segments to form a vertex of the triangle. Remember to look at the bottom left corner of the sketch for guidance.)
• To draw the last side, connect the two open endpoints. • To label the vertices of the triangle, select the hand tool from the toolbar. • Move the hand until the finger points to a vertex. (Watch the hand turn black
and the bottom left corner say “Show Label”.) Click on the vertex. • Repeat for the other two vertices.
C. Measure each angle.
• Select the arrow from the toolbar. • Click on a vertex of the triangle. • While holding down the Shift key, click on the other two vertices. (Note the
order in which you selected the points.) • Release the Shift key. • Under the Measure menu, select Angle. (Note that the letter arrangement of
the angle name is in the same order as the points you had selected.) • Move the arrow on top of the angle measure. • Click-drag-release to place the measure near the named vertex of the triangle. • Repeat step C to measure the remaining two angles of the triangle.

TEXTEAM Geometry Institute 3.53
D. Use the calculator to find the sum of the angles of a triangle.
• Using the Shift key, select the three angle measures. • Under the Measure menu, select Calculate…. • Under the Values option, select first angle and release. • Click on “+”. • Go back to Values option and select the second angle. • Click on “+”. • Go back to Values option and select the third angle. • Click on “OK”.
E. Observe the sum of the angles of your triangle. Drag a vertex of the triangle
to see a variety of triangles. Record some of the triangles below, by sketching
several triangles, their angle measures and the sum.
F. Write a conclusion about the sum of the interior angles of a triangle. Justify
your conclusion.
2. Manipulate the triangle so that a right triangle is formed. Write more than one
conclusion about the non-right angles. Justify your conclusions.

TEXTEAM Geometry Institute 3.54
3. Manipulate the triangle so that an isosceles triangle is formed.
What conclusion can be made about the angles of the triangle?
A. Measure the length of the sides of the triangle.
• Select the arrow from the toolbar. • Select a side of the triangle. • Under the Measure menu, select Length. • Click-drag-release to place the measure by the named side. • Repeat for other two sides.
B. Manipulate the triangle to form an isosceles triangle. Write your conclusions
about the angles of an isosceles triangle.
4. Explore the relationship among the three interior angles and one exterior angle in
different types of triangles.
Definition: An exterior angle is the angle that forms a linear pair with an interior angle of a polygon. In the picture below, ∠ADC is an exterior angle of ∆DBC.
A. In a new sketch, recreate the
sketch to the right.
• Draw the segments in the following order: AB , BC , CD . Make sure that D lies on AB and is not a free point.
C
B AD
B. Measure ∠ADC, ∠CDB, ∠DCB and ∠CBD.
C. Write your conclusions about the relationship between the exterior and the
interior angles of the triangle. Does this apply for any triangle and its
exterior angle? Justify your conclusions.
Hint: Consider the sum of different pairs of angles.

TEXTEAM Geometry Institute 3.55
5. Investigate the relationship among the three exterior angles, one at each vertex, of a
triangle.
A. Draw the remaining two exterior angles using the previous sketch.
• Click and hold the segment tool in the toolbar. • Drag and release on the ray tool. • Draw a ray from Point D, passing through Point C. • Draw a ray from Point C, passing through Point B. • Select the point tool from the toolbar. • Place a point on each ray exterior to the triangle
and label them.
B. Measure the three exterior angles formed. Drag the triangle to see a variety
of triangles. Record the angles measures and sums of several triangles below.
C. Write a conclusion about the sum of the exterior angles of any triangle.
Justify your conclusion.

TEXTEAM Geometry Institute 3.56
INTERIOR AND EXTERIOR ANGLES
OF A TRIANGLE
TI-92
GOAL:
Explore and justify relationships between the interior and exterior angles of
triangles.
PROCEDURE:
1. Explore the sum of interior angles of different types of triangles.
A. Open a geometry session.
• 8:Geometry 3:New • “angles” •
B. Draw and label a triangle.
• 3:Triangle • crayon to position of first vertex
(chose a label for it by typing a letter from the keyboard), to a position of the second vertex (label), and finally to the third vertex
(label). C. Measure each angle.
• 3:Angle • to a position for the first vertex , to the position of the
second vertex , and finally to the third vertex . • Repeat this process for the other two angles. • Drag the angle measure near the named vertex of the triangle.
Press and hold , then to position. D. Use the calculator to find the sum of the angles of a triangle.
• 6:Calculate • + • + •
TEXTEAM Geometry Institute 3.57
E. Observe the sum of the angles of your triangle. Drag a vertex of the triangle
to see a variety of triangles. Record some of the triangles below, by sketching
several triangles, their angle measures and the sum.
• 1:Pointer
• Press and hold ,at same time press to reposition.
F. Write a conclusion about the sum of the interior angles of a triangle.
Justify your conclusion.
2. Manipulate the triangle so that a right triangle is formed. Write more than one
conclusion about the non-right angles. Justify your conclusions.

TEXTEAM Geometry Institute 3.58
3. Manipulate the triangle so that an isosceles triangle can be formed.
What conclusion can be made about the angles of the triangle?
A. Measure the length of the sides of the triangle.
• 1:Distance&Length • to a vertex , to a second vertex . • , to third vertex . • , to first vertex .
B. Manipulate the triangle to form an isosceles triangle. Write your conclusions.
• 1:Pointer • Press and hold , at same time press the to reposition.
4. Explore the relationship among the three interior angles and one exterior angle in
different types of triangles.
Definition: An exterior angle is the angle that forms a linear pair with an interior angle of a polygon. In the picture below, ∠ADC is an exterior angle of ∆DBC.
A. In a new sketch, recreate the
sketch to the right.
• 8:Geometry 3:New • “extang” • • 5:Segment
C
B AD
• crayon to position of first vertex , to a position of the second vertex , and finally to a position for the third vertex
. again to begin a new segment. • Draw the segments in the following order: AB , BC , CD . Make sure that D
lies on AB and is not a free point.

TEXTEAM Geometry Institute 3.59
B. Measure ∠ADC, ∠CDB, ∠DCB and ∠CBD.
C. Write your conclusions about the relationship between the exterior and the
interior angles of the triangle. Does this apply for any triangle and its
exterior angle? Justify your conclusions.
Hint: Consider the sum of different pairs of angles. 5. Investigate the relationship among the three exterior angles, one at each vertex, of a
triangle.
A. Draw the remaining two exterior angles using the previous sketch. To do this,
construct rays containing the appropriate vertices of ∆BDC and place points
on the rays to measure the angles.
• 6:
• the crayon to point D, , the crayon
to point C and . Repeat this procedure to
construct a ray from C through B.
• 2:
• crayon to point at ray DC, exterior to the triangle and . Repeat to put a point on ray CB exterior to the triangle.
B. Measure the three exterior angles formed. Drag the triangle to see a variety
of triangles.
• 3:Triangle • the crayon to point at a point of the angle to be measured. (Be sure it is
NOT the vertex of the angle.) and to the vertex of the angle, , to the remaining point on the angle and .
The angle measure should appear on the screen. • Repeat the steps in the previous bullet to measure the remaining two exterior
angles.
TEXTEAM Geometry Institute 3.60
C. Calculate the sum of the three exterior angles. Record the three angle
measures and their sums for several triangles below.
• 6:Calculate • Use the cursor pad to highlight the measurements on the screen. Press
to place the measure in the calculator line at the bottom of the screen. Continue to use the cursor pad to enter the other angles. The calculator line should read “a+b+c” when the command is complete. Press
to calculate the sum. The result will appear in the geometry screen, preceded by “R:”. Drag the triangle and the sum will update with the new angle measures.
D. Write a conclusion about the sum of the exterior angles of any triangle.
Justify your conclusion.
TEXTEAM Geometry Institute 3.61
PYTHAGOREAN THEOREM REVISITED
Institute Notes Lesson Pages Time TEKS
Pythagoras, More or Less 30 min.
Pythagorean Tiling 20 min.
Pythagorean Dissection Proof 30 min.
A Tale of Caution 15 min.
MATERIALS AND SETUP
Grid paper, Geometer’s Sketchpad Sketches “Pyth tiling”, “Puzzled Pythagoras”,
Tale of Caution squares
LEARNING STYLES
Hands on, technology, cooperative groups
MATH LINKS
Trigonometry, algebra, measurement
OTHER LINKS
Surveying, navigation, architecture, physics
HISTORICAL NOTE
Although the theorem is named after the Greek mathematician, Pythagoras, evidence of it
goes back to the Babylonians of Hammurabi’s time over 1000 years before Pythagoras.
Particular right triangles were used to ensure that walls of buildings were vertical long
before the birth of Euclid or Pythagoras. The existence of this theorem and its proofs
appear throughout the continents, cultures and centuries. Perhaps the credit is given to
Pythagoras because the first written proofs valid for any right triangle come from his
school. An interesting proof was done by President Garfield.
TEXTEAM Geometry Institute 3.62
LESSON OVERVIEW
Right triangles and the Pythagorean Theorem pervade mathematics. These lessons
emphasize the classical approach to the Pythagorean Theorem by comparing areas of
squares.

TEXTEAM Geometry Institute 3.63
Pythagoras, More or Less
This hands-on activity leads to verification of the Pythagorean theorem in sample
triangles and extends to discovery of attributes of triangles in cases where a2 + b2 < c2
or a2 + b2 > c2.
Participants work through the lesson and share results.
Pythagorean Tiling
This demonstration will support the hands-on activity, Pythagorean Dissection Proof.
It uses a tiling of two squares known as the Pythagorean Tiling, created on Geometer’s
Sketchpad. The demonstration shows multiple ways to dissect a square one side of which
is the hypotenuse of a right triangle. Trainer demonstrates two sketches, “Pyth tiling” and
“Puzzled Pythagoras”.
Pythagorean Dissection Proof
There are many proofs of the Pythagorean Theorem. This one, using construction and
dissection techniques, is easily accessible to most high school students. Additionally it
provides experience with proofs other than two column proofs.
Participants work through the lesson and share results.
A Tale of Caution
Used as a follow up activity to the dissection proof, this example points out the
pitfalls that can be encountered if visual proofs are not supported by other reasoning. The
lesson could also be used as an exercise in trigonometry to explain the paradox. Non-
trigonometric explanations may be presented with the use of technology.
Participants work through the lesson and share results.

TEXTEAM Geometry Institute 3.64
NOTES

TEXTEAM Geometry Institute 3.67
PYTHAGOREAN THEOREM-MORE OR LESS
Activity Sheet Lengths of sides of sides of the
triangle in increasing order:
a, b, c
Area of the largest
square:
c2
Area of one of the
smaller squares:
a2
Area of the remaining
square:
b2
Is the triangle formed
acute, right, or obtuse?
5, 6, 10 100 25 36 obtuse
1. Is c2 = a2 + b2 in any case?
For what type of triangle is c2 = a2 + b2?
2. If c2 ≠ a2 + b2, for what kind of triangle is c2 < a2 + b2?
3. If c2 ≠ a2 + b2, for what kind of triangle is c2 > a2 + b2?
4. In your own words, state the Un Pythagorean Theorem.
TEXTEAM Geometry Institute 3.67
PYTHAGOREAN TILING
Teacher Guide GOAL:
Understand the Pythagorean Theorem’s relationship to a tiling of the plane and
vice versa.
PREREQUISITES:
Tiling, translation, Pythagorean Theorem.
MATERIALS:
Overhead projector, computer demonstration station, Sketchpad sketches:
“Pyth tiling”, “Puzzled Pythagoras”
PROCEDURE:
This is a teacher led demonstration and discussion.
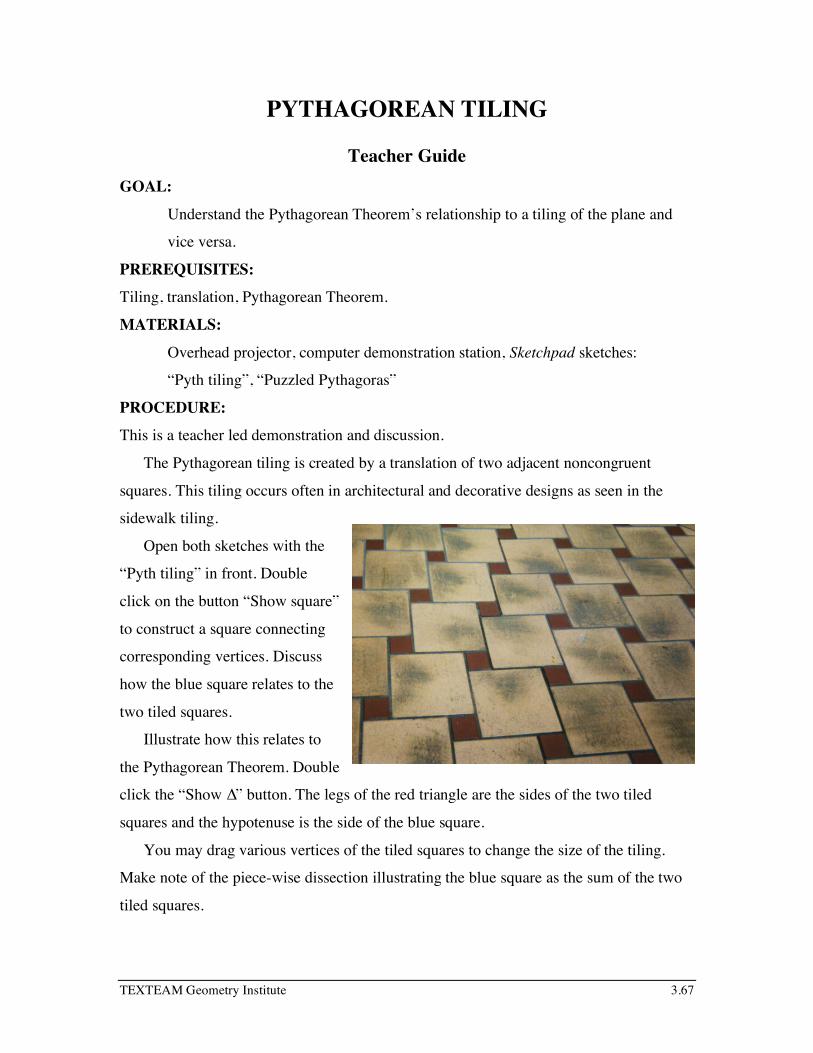
The Pythagorean tiling is created by a translation of two adjacent noncongruent
squares. This tiling occurs often in architectural and decorative designs as seen in the
sidewalk tiling.
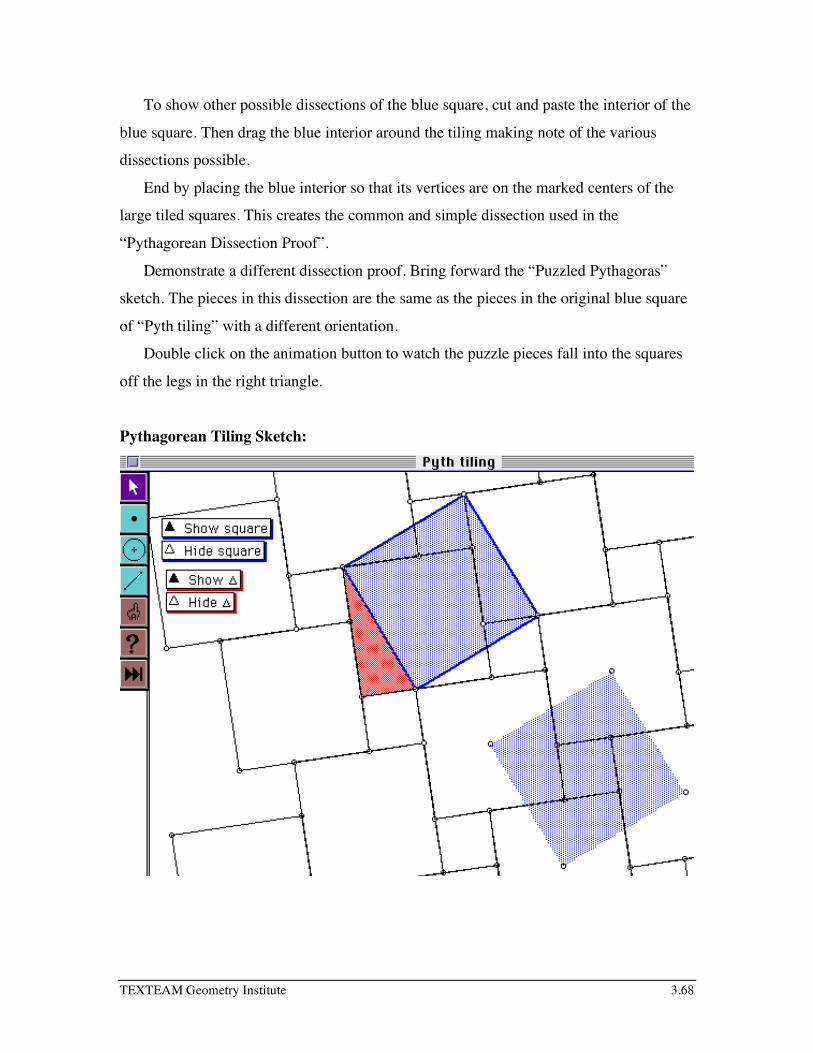
Open both sketches with the
“Pyth tiling” in front. Double
click on the button “Show square”
to construct a square connecting
corresponding vertices. Discuss
how the blue square relates to the
two tiled squares.
Illustrate how this relates to
the Pythagorean Theorem. Double
click the “Show ∆” button. The legs of the red triangle are the sides of the two tiled
squares and the hypotenuse is the side of the blue square.
You may drag various vertices of the tiled squares to change the size of the tiling.
Make note of the piece-wise dissection illustrating the blue square as the sum of the two
tiled squares.
TEXTEAM Geometry Institute 3.68
To show other possible dissections of the blue square, cut and paste the interior of the
blue square. Then drag the blue interior around the tiling making note of the various
dissections possible.
End by placing the blue interior so that its vertices are on the marked centers of the
large tiled squares. This creates the common and simple dissection used in the
“Pythagorean Dissection Proof”.
Demonstrate a different dissection proof. Bring forward the “Puzzled Pythagoras”
sketch. The pieces in this dissection are the same as the pieces in the original blue square
of “Pyth tiling” with a different orientation.
Double click on the animation button to watch the puzzle pieces fall into the squares
off the legs in the right triangle.
Pythagorean Tiling Sketch:

TEXTEAM Geometry Institute 3.69
PYTHAGOREAN DISSECTION PROOF
Teacher Guide GOAL:
Prove the Pythagorean Theorem using a dissection proof.
MATERIALS:
Pencil, grid paper, scissors, ruler, compass.
PREREQUISITE:
Area of squares, acute angles of a right triangle are complementary.
NOTES TO TEACHER:
Students should draw fairly large right triangles
(sides greater than 5) to prevent the cut up pieces being
too small to handle.
Have students draw the legs of their right
triangles on the grid lines. This will make construction
of those squares simple.
If you choose, students could construct the square of
the hypotenuse using a compass. If they do not know
constructions yet, have them use their rulers to draw the
side perpendicular to the hypotenuse and then show them
how to use the compass to mark off c units.
PROCEDURE:
1. After the students complete the activity, let them discuss
their answers.

TEXTEAM Geometry Institute 3.70
2. If possible, let a student explain why the dissection works. If no one is prepared to
explain, use the illustrations to go through the steps, prompting the answers from the
students.

TEXTEAM Geometry Institute 3.71
PYTHAGOREAN DISSECTION PROOF GOAL:
Prove the Pythagorean Theorem using a dissection proof.
MATERIALS:
Pencil, grid paper, scissors, ruler, compass.
PROCEDURE:
1. On grid paper draw a large right triangle with legs a and b and hypotenuse c.
2. Construct squares on each side.
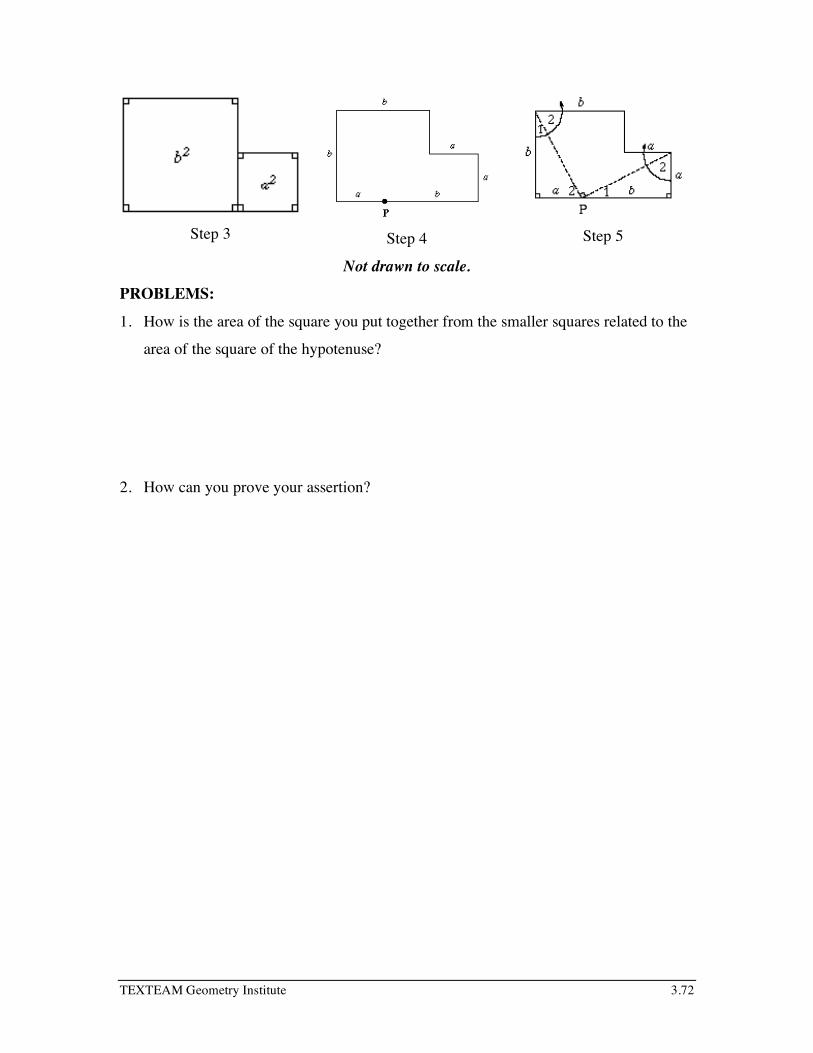
3. Copy the 2 squares on the legs, arranging the copies to construct a polygon as shown.
4. Locate point P on the base of the polygon, dividing the base into 2 segments of
lengths a and b starting at the left.
5. Draw segments from P to the far upper left and right vertices as shown.
6. Cut out the polygon and also cut along the two segments from P.
7. Rearrange the three pieces into a square, and place the resulting square on top of the
square of the hypotenuse.
8. Write a conclusion about the sum of the squares of the legs of a right triangle and the
square of the triangle’s hypotenuse.
Step 1
Step 2
TEXTEAM Geometry Institute 3.72
Step 3
Step 4
Step 5
Not drawn to scale.
PROBLEMS:
1. How is the area of the square you put together from the smaller squares related to the
area of the square of the hypotenuse?
2. How can you prove your assertion?

TEXTEAM Geometry Institute 3.72
A TALE OF CAUTION
Teacher Guide GOAL:
Illustrate the dangers of visual proofs if they are not backed up with deductive
proof.
MATERIALS:
Pencil, grid paper, scissors, ruler.
PREREQUISITES:
Area of rectangles and squares
NOTES TO TEACHER:
This lesson can be done as a group activity or by individuals. It can stand alone, but
would have more impact preceding or following a dissection proof. Students may need to
be given hints about the dimensions of the rectangle if they are having trouble fitting the
pieces into a rectangle.
This paradox is a good illustration of the limits of visualization. We can all recognize
what we believe is a right angle, but we cannot really distinguish it from an angle of
891/2 degrees; similarly, we can easily distinguish between a triangle and a square, but it
is next to impossible to distinguish between a regular polygon with 1,000 sides and one
with 1,001 sides. The paradox in the construction above is that inthe second figure the
edges of the four pieces do not lie on the diagonal AB. In reality, they form a small
diamond-shaped figure whose area is equal to that of one of the 64 small squares in the
first figure. Using trigonometry it is easy to see that the two smaller angles of this
diamond-shaped figure are equal to
arctan(2/5) - arctan(3/8),
which is less that 11/4 degrees. For so small an angle, the eye is easily fooled into
thinking the diamond-shaped figure is a line segment.
Nonetheless, visualization is important in investigating figures, in formulating
conjectures or in supporting the proof a conjecture - it is not visualization per se that is
at fault but the logical deductions made from the figures.

TEXTEAM Geometry Institute 3.73

TEXTEAM Geometry Institute 3.74
PROCEDURE:
After the students complete the activity, let them discuss their answers.
• Why are the areas different. There is a slight overlap along AB .
• Where is the missing area? It is spread over a very narrow diamond-shaped figure
with two opposiste vertices at A and B.
• Is it enough to trust what you see? No.
• Why work with a visual proof if it can’t be trusted?
It could suggest how to give a deductive proof.
SOLUTION: Pieces of the square should be reorganized into this rectangle:
Area of square = 169 sq. units. Area of rectangle = 168 sq. units.
EXTENSIONS:
This paradox depends on the relation 5⋅13 − 8⋅8 = 1.
Investigate the corresponding situation for the relations 5⋅5−3⋅8=1 and 13⋅13−8⋅21=1.
Explore the relation with Fibonacci numbers.

TEXTEAM Geometry Institute 3.75
A TALE OF CAUTION GOAL:
Illustrate the dangers of visual proofs if they are not backed up with deductive
proof.
PROCEDURE:
Cut apart the 13 x 13 square along the indicated lines and rearrange pieces into a
rectangle.
PROBLEMS:
1. Calculate the area of the original square and the new rectangle.
2. If the areas are different, explain how you think this happened.
TEXTEAM Geometry Institute 3.76

TEXTEAM Geometry Institute 3.77
CANNING A SPHERE
Teacher Guide GOAL:
Compare the surface areas and volumes of a sphere and the cylinder that
circumscribes (cans) the sphere.
MATERIALS:
Tennis balls in a can, various size balls, construction paper, scissors, tape, ruler.
PREREQUISITES:
Surface area and volume of a sphere, surface area and volume of a cylinder.
PROCEDURE:
• Assign students to groups of 3 - 4.
• Each group works with a ball and construction paper to compare surface areas.
If r = radius of sphere, then r = radius of cylinder and 2r = height of cylinder.
Thus surface area of collar = 4 πr2= surface area of sphere.
• Students are asked to imagine making horizontal slices through the cylinder and
sphere and compare surface areas of the slices of the sphere and the cylinder.
The surface areas remain equal for all possible horizontal slices, although this is
not obvious. Projections are required to prove this assertion.
• Illustrate with the can of three tennis balls or two racquet balls.
• Compare the volumes of the sphere and the cylinder.
• Volume of sphere = 43πr3
Volume of cylinder = (area of base)(height) = (πr2 )(2π) = 2πr3
Volume of cylinder - volume of sphere = 2
3πr3 = volume of a right circular cone
inscribed in the cylinder.
Thus, volume of cylinder = volume of inscribed sphere + volume of inscribed
cone.
TEXTEAM Geometry Institute 3.78
HISTORICAL NOTE:
On the Sphere and Cylinder is a two volume book by Archimedes (287-212 B.C.) in
which the dimensions of spheres, cones, polyhedra and cylinders are treated.
Archimedes’ Proposition 33 compares the surface areas of a sphere and its circumscribed
cylinder. Proposition 34 deals with their volumes.
EXTENSIONS:
• Research the various projections of the sphere onto a plane that are used in creating
two-dimensional maps of the earth.
What are the advantages and disadvantages of each projection?
• Using projections, prove that the areas of the sphere and the cylinder are equal.

TEXTEAM Geometry Institute 3.79
CANNING A SPHERE
GOAL:
Compare the surface areas and volumes of a sphere and the cylinder which “cans
the sphere”.
PROCEDURE:
Surface Area
• Create a paper tube that wraps your group’s sphere, forming a cylinder or can around
the sphere. Draw a sketch of the resulting sphere in a can.
• Find the surface area of the sphere and of the tube.
• How does the surface area of the tube compare with the surface area of the sphere?
• Imagine slicing the can horizontally through the sphere’s equator. How does the
surface area of the hemisphere compare with the surface area of the half-tube?

TEXTEAM Geometry Institute 3.80
• Imagine making another horizontal slice cutting the cylinder in half again. How do
the two surface areas compare now?
Cartography
Volume
• Compare the volume of the sphere with the volume of the cylinder within which it is
inscribed.
• Calculate the difference in the two volumes.
• This difference is also the volume of a common geometric solid that can be inscribed
in the cylinder. What is that solid?
TEXTEAM Geometry Institute 3.81
• What the ratio of the volumes? Cylinder : Sphere : Cone = ______ : ______ : ______
.

TEXTEAM Geometry Institute 3.82
CANNING A SPHERE THEOREM:
The surface area of a sphere is equal to the surface area of the tube that circumscribes it.
PROOF:
Projections of segments onto lines.
Perpendicular projection of a line segment AB onto a line l. AB is projected
perpendicularly on to line l, resulting in A' B' . Compare A' B' and AB.
A' B'=AC=AB ! cos(x) since cos(x) = ACAB
.
Central projections of arcs of concentric circles.
Project arc AB onto a circle of radius r1 from its center O on to the circumference of a
larger concentric circle or radius r2. Arc AB spanning the central angle y is projected to
the arc A’B’. Compare the lengths of arc A’B’ and arc AB. r1 = OA = OB and r2 = OA’ =
OB’.
arc AB = yr1, if y is measured in radians. Then arc A’B’ = yr2 = ABr1
!
" # $
% & r2
=r2
r1
!
" # $
% & AB.

TEXTEAM Geometry Institute 3.83
TEXTEAM Geometry Institute 3.84
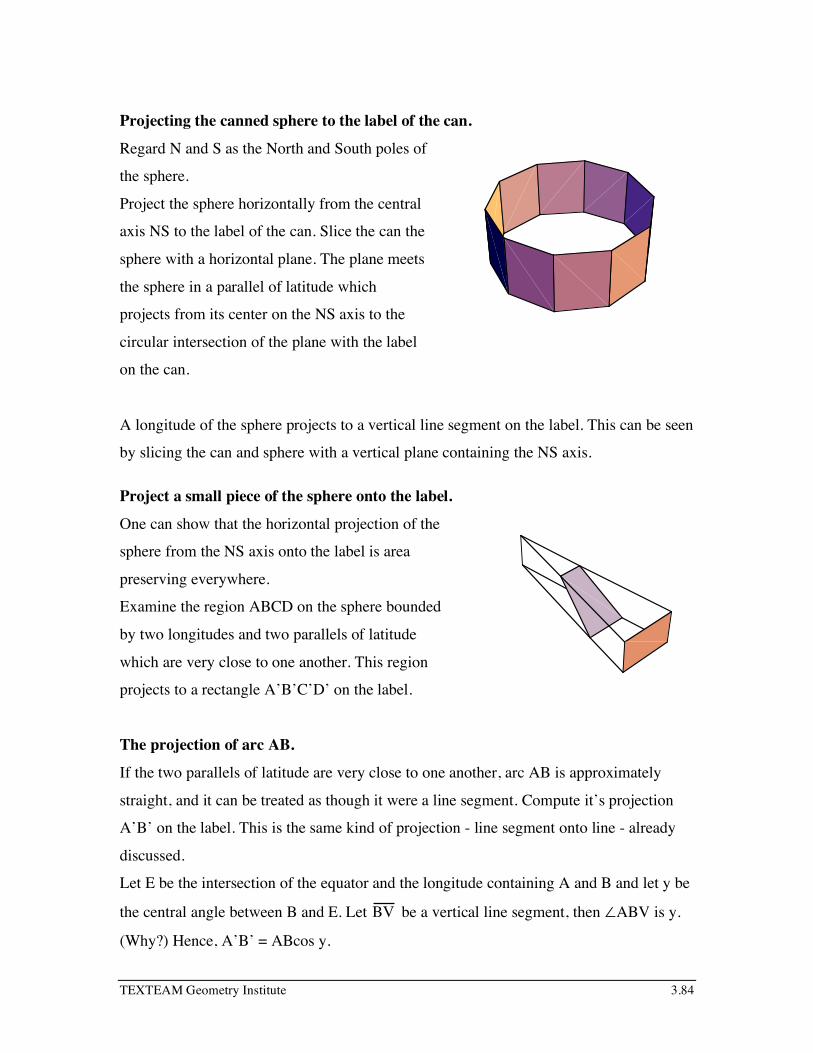
Projecting the canned sphere to the label of the can.
Regard N and S as the North and South poles of
the sphere.
Project the sphere horizontally from the central
axis NS to the label of the can. Slice the can the
sphere with a horizontal plane. The plane meets
the sphere in a parallel of latitude which
projects from its center on the NS axis to the
circular intersection of the plane with the label
on the can.
A longitude of the sphere projects to a vertical line segment on the label. This can be seen
by slicing the can and sphere with a vertical plane containing the NS axis.
Project a small piece of the sphere onto the label.
One can show that the horizontal projection of the
sphere from the NS axis onto the label is area
preserving everywhere.
Examine the region ABCD on the sphere bounded
by two longitudes and two parallels of latitude
which are very close to one another. This region
projects to a rectangle A’B’C’D’ on the label.
The projection of arc AB.
If the two parallels of latitude are very close to one another, arc AB is approximately
straight, and it can be treated as though it were a line segment. Compute it’s projection
A’B’ on the label. This is the same kind of projection - line segment onto line - already
discussed.
Let E be the intersection of the equator and the longitude containing A and B and let y be
the central angle between B and E. Let BV be a vertical line segment, then ∠ABV is y.
(Why?) Hence, A’B’ = ABcos y.

TEXTEAM Geometry Institute 3.85

TEXTEAM Geometry Institute 3.86
The projection of arc BC.
The parallel of latitude containing the arc BC projects onto the horizontal circle on the
label containing B’C’. This is an arc to arc projection already discussed. Let O’ be the
intersection of the vertical radius of the sphere with the line through B parallel to the
radius OE. Then O’B is a radius of the circular arc BC and OB = OE. But OE equals the
radius of the label which is the same as the radius of the circular arc B’C’. By the arc to
arc projection, B' C' =OB
O' B
! "
# $ BC =
1
cos y
!
" % #
$ BC .
The area preserving property of the projection.
Area (ABCD) = approx. (arc AB)(arc BC) and the approximation is better if the parallels
of latitude, AD and BC, are very close to one another.
Area(A’B’C”D’) = (arc A’B’)(arc B’C’) since A’B”C”D’ is a rectangle.
(Imagine cutting the label off the can and laying it flat on a table.)
Now it can be seen that the projection preserves area because
(A’B’)(B’C’) = (cos y)(AB)(1/cos y)(BC) = (AB)(BC).
Thus the area of the entire sphere is equal to the area of the entire label.