datahand professional ii user’s guide - microsoft.com hand pro ii... · section of this manual....
TRANSCRIPT

DataHand Professional II™
User’s GuideVersion 1.7.8
October 9, 2003
DataHand® Systems

ii User’s Guide, Version 1.7.8, October 9, 2003
© Copyright 1997, DataHand® Systems, Inc.3032 North 33rd AvenuePhoenix, AZ 85017
All rights are reserved. No part of this publication may be reproduced, stored in a retrieval system ortransmitted in any form or by any means, mechanical, photocopying, recording or otherwise, without theprior written permission of DataHand® Systems, Inc.
DataHand® Systems is a registered trademark of DataHand® Systems, Inc. Apple is a registeredtrademark of Apple Computer, Inc. IBM is a registered trademark of IBM Corporation. Microsoft andWindows are registered trademarks of Microsoft Corporation.
Neither DataHand® Systems, Inc. nor its affiliates shall be liable to the purchaser of this product or thirdparties for damages, losses, costs or expenses incurred by purchaser or third parties as a result of:accident, misuse or abuse of this product or unauthorized modifications, repairs or alterations to thisproduct.
DataHand® Systems, Inc. and its affiliates shall not be liable for any damages or problems arising fromthe use of any options or any consumable products other than those designated as original DataHand®Systems, Inc. products or DataHand® Systems, Inc. approved products.

User’s Guide, Version 1.7.8, October 9, 2003 iii
Congratulations!For choosing the world’s finest
user-to-computer interface.
You are now on the leading edge of interface technology. Your DataHand® Systemis a new and advantageous way to work with your computer. Learning to use thesystem requires commitment, patience and persistence, which will be well rewardedby increased comfort, reduced exposure to injury and long-term productivityincreases.
Although this DataHand® System was designed with the goal of reducinginjury exposure, the prolonged use of any manually operated data entry device(including this DataHand® System) may result in repetitive stress injury orrelated injury.
If pain, discomfort, numbness or tingling in the hands or arms is experienced duringor as a result of use, consult an appropriate medical professional and reduce usageuntil discomfort is eliminated. Avoid other activities that may aggravate yourcondition, such as using other less ergonomic keyboards. To reduce your risk ofrepetitive stress injury, please see the ergonomic guidelines in the ErgonomicSuggestions section of this user manual.
Take frequent breaks from typing and maintain good health habits.
iv User’s Guide, Version 1.7.8, October 9, 2003
CONTENTS
SECTION 1
WHAT IS THE DATAHAND® SYSTEM? 1
Advantages Of The DataHand® System 3Be Comfortable While Working 3Type With Only Slight Finger Movements 3Increase Your Efficiency 3
Hardware Compatibility 4
Software Compatibility 4
Care and Maintenance 4
SECTION 2
GETTING STARTED 5Checking the Parts in Your Shipment 6
Identifying the Components of the Hand Units 7
Connecting the Equipment 8
SECTION 3
POSITIONING YOURSELF 11Ergonomic Suggestions 12
Using The LapLander™ 12

User’s Guide, Version 1.7., October 9, 2003 v
SECTION 4
TRAINING AIDS 15Using the Training Aids 16
SECTION 5
LEARNING TO USE THE HAND UNITS 17Learning a New Skill 18
Setting Reasonable Performance Expectations 18
Moving Your Fingers to Press the Keys 19
Moving Your Thumbs to Press the Keys 20
SECTION 6
THREE MODES OF OPERATION 21Accessing Different Modes 22
Using Protected Mode Keys 23
Keys Available in Several Modes 24
Normal Mode 25Keys Available in Normal Mode 25Accessing Normal Mode 25Layout of Keys in Normal Mode 26
NAS Mode 27Keys Available in NAS Mode 27Accessing NAS Mode 27Layout of Keys in NAS Mode 27
10-Key Pad 29Keys Available in 10-Key Pad Configuration 29Accessing the 10-Key Pad 30Layout of 10 Key Pad 30
Mouse Function Mode 31Keys Available in Mouse Function Mode 31Accessing Mouse Function Mode 31Layout of Keys in Mouse Function Mode 32
Mouse Click Lock 32
SECTION 7
USING THE FINGER MOUSE AND ARROW KEYS35Activating the Mouse or the Arrow Keys 36
Moving the Mouse Pointer 36Moving Slowly 36Moving Quickly 36Moving at High Speed 36Moving Diagonally 36Changing Mouse Speed Settings 37

vi User’s Guide, Version 1.7.8, October 9, 2003
Clicking the Mouse Buttons 37
Using the Arrow Keys to Move the Cursor 37Moving the Cursor 37Switching Back to the Finger Mouse 38
Mouse Click Lock 38MOUSE Click Lock: 38WINDOWS EXAMPLES: 38
SECTION 8
SPECIAL KEYS 39Switching Left and Right Function for Duplicate Keys: The L/R ModfKey 40
Changing DataHand® System Settings: Program Selection Keys 41
Shortcut Keys: Creating Macros 43Defining and Replaying a Sequential Macro 43Defining and Replaying a Chorded Macro 44Reprogramming or Nulling a Macro 44Programming a Direct Substitution Key 45
SPECIAL KEYS, FEATURES AND OPTIONS 46Windows Keys ... 104 Keyboard 46Cursor Keys 46Mouse Nudge 46Swap Alt and CTL Keys: 46L/R ALT and CTL KEYS: 46SwapThumb ‘UP’ Keys: 46Foot Pedal Support: 47PS/2 Mouse Enable: 47DH-200 MODEL COMPATIBILITY: 47MacIntosh Users: 47
SECTION 9
COMMON QUESTIONS 49Questions and Answers 50
SECTION 10
WINDOWS NOTES & SHORTCUT KEYS 54Shortcut Keys using EXCEL with DataHand 55
Shortcut Keys using Windows with DataHand 56
Shortcut Keys using WORD with DataHand 57
GETTING MORE HELP 58

1 User’s Guide, Version 1.7., Error! Reference source not found.
SECTION 1
WHAT IS THEDATAHAND® SYSTEM?
The DataHand® System features a special pair of input devices called handunits. What makes the hand units so unique is that they combine and replacethe functions of a flat keyboard and mouse, while maximizing your comfortand efficiency.

SECTION 1 WHAT IS THE DATAHAND SYSTEM?
2 User’s Guide, Version 1.7., October 9, 2003
Figure 1. The Hand Units
The hand units were designed around the hands’ most natural position. Theydo not force the hand to adapt to the device. Instead of making your fingersmove to the keys, they bring the keys to your fingers.

SECTION 1 WHAT IS THE DATAHAND SYSTEM?
User’s Guide, Version 1.7.8, October 9, 2003 3
Advantages Of The DataHand® System
Using the hand units instead of a flat keyboard for computer input has manyadvantages. Here are some of them.
Be Comfortable While Working
To increase your working comfort you can:
♦ Reduce unnatural arm and elbow bends by tilting the hand unitsand spreading them comfortably apart.
♦ Lean back in your chair while working by using the LapLander™to place the hand units on your lap.
♦ Adjust the arch of your fingers, relative to your hand, by movingthe finger board up, down, forward or backward.
♦ Rest your hands on the palm supports. The supports come intwo sizes: large and small. They support your hands in arelaxed position and eliminate wrist motions.
See the Ergonomic Suggestions section for more details and anillustration.
Type With Only Slight Finger Movements
To type on the hand units, you move the fingers only slightly in oneof 5 directions: north, south, east, west and straight down. Youmove the thumbs in 4 directions: east, west, straight down and up.This reduces the repetitive downward pecking motions of fingersrequired to operate a flat keyboard and therefore reduces repetitivestress exposure.
Increase Your Efficiency
You can easily touch-type all the keys on the hand units. Minusculefinger movements access all the standard keys, the function keysand the mouse, so blind reaches are eliminated. This reducesfinger workload and can also boost your productivity.

SECTION 1 WHAT IS THE DATAHAND SYSTEM?
4 User’s Guide, Version 1.7., October 9, 2003
Hardware Compatibility
The DataHand® System plugs into all personal computers (ATs and newer)and compatibles, without the need for additional hardware or software. Thefollowing computers are also supported:
• Apple Macintosh, with an adapter for the Apple Desktop Bus (ADB) orUniversal Serial Bus (USB)
• Hewlett Packard X-Terminal• IBM PS/2• IBM RS6000• IBM 3270 mainframes• NCD 101 X-Terminal• Silicon Graphics’ Indy and Indigo II (currently being tested)• SUN (usable type-5 keyboard using SUN’s interface converter)
If you have a computer that is not on this list, and it has a keyboard that youcan unplug, DataHand® Systems, Inc. can set up a custom adaptation of theDataHand® System to your machine. To discuss customization services,contact DataHand® Systems, Inc. by using the reference in the Getting MoreHelp section of this manual.
Note: The right hand unit contains firmware that allows the hand units to beconnected to your particular computer. Utilyzing optional adapters the hand units canbe connected to different types of computers, such as Macintosh or Sun Systems.
Software Compatibility
Any software that runs on your computer will be compatible with theDataHand® System. By pressing the appropriate keys or key combinationson the hand units, you can perform the same functions you performed using aflat keyboard.
If you have a question about how your software is behaving with the handunits, first read the manual for your software and the Using the Hand Unitsand the Common Questions sections in this manual. If you still have aquestion, contact DataHand® Systems, Inc. using the reference in theGetting More Help section.
Care and Maintenance
The DataHand Ergonomic Keyboard requires cleaniliness as does allelectric/electronic devices. Foriegn material and dust can cause the keys to notfunction or stick open causing multiple characters. Periodically cleaning the keygaps will clear the gaps of foriegn material and maintain normal operations.
The Palm pads may be removed and washed in a dishwasher.

5 User’s Guide, Version 1.7., Error! Reference source not found.
SECTION 2
GETTING STARTED
This section identifies and describes the parts of the Professional II™. Itinstructs the user how to connect the hand units to your computer andpresents outlined diagrams of the hand units. This section also explains thewarranty that correlates with the DataHand® System purchase. With theinformation in this section, the user has enough information to acquaintthemselves with the hand units to successfully begin using the DataHandSystem.

SECTION 2 GETTING STARTED
6 User’s Guide, Version 1.7., October 9, 2003
Checking the Parts in Your Shipment
The checklist below describes the parts in your shipment. If any parts aremissing or damaged or to order replacement parts, contact DataHand®Systems, Inc. customer service using the reference in the Getting More Helpsection of this manual. The parts will be sent as soon as possible.
Note: The DataHand® System does not contain a separate mouse. The mousefunction is included in the keys operated by the index fingers on the hand units.
PARTS CHECKLISTPart Name Description Order Number
þ Hand units:Left and right
The hand units are contoured for eachhand and contain finger wells with keysfor each finger. The serial number ofyour system is on the underside of eachhand unit. See Figure 2 for a diagram ofthe right hand unit.
Left hand unit = A240LRight hand unit = A240R
þ PalmSupports:Left and right
The palm supports are removable partsof the hand units. They come in one of 2sizes: large (L) or small (S). See Figure2 for a diagram of the right hand unit.
Left support (L) = 247LLRight support (L) = 247RLLeft support (S) = 247LSRight support (S) = 247RS
þ LapLander™:Use is optional
The LapLander™ is a foam-lined boardto which you can bolt the hand units.See Ergonomic Suggestions page12 for details.WARNING: DO NOT REMOVE THEFOAM PADS AND REATTACH TOTHE LAPLANDER --- THE SCREWSWILL BREAK THROUGH THEPLASTIC TOP.
B70000001
þ Foam Wedges:Two
The foam wedges can be used to tilt thehand units when they are bolted to theLapLander™. See ErgonomicSuggestions page 12 for details.
F70000002
þ DataHandSystem UserGuide
The manual you are reading is the usermanual. It explains how to install theDataHand® System.
U-200M
þ DataHandSystemTraining Guide
The Training Guide provides step by stepinstructions with practice drills.
U-300M

SECTION 2 GETTING STARTED
User’s Guide, Version 1.7.8, October 9, 2003 7
Identifying the Components of the Hand Units
The following diagram labels the parts of the right hand unit. The left-handunit mirrors the right hand unit, except it does not have parts 9, 10 and 13.
13
Figure 2. Diagram of the Right Hand Unit
(1) Finger well surrounded by keys.(2) The direct access key above the thumb.(3) Template of key names color-coded by mode.(4a,b) Nuts for raising or lowering the internal finger board, one on each
side of the hand unit.(5) Dials for moving the left and right sides of the finger board, forward
or backward.(6) Ribbed rubber palm support, removable and available in two sizes:
Large and small.(7) Bolt that attaches the hand unit to the optional LapLander™.(8a,b) Tilt feet on the underside of the hand unit.(9) Keyboard-to-computer cable. This is the 6-pin mini din connector.(10) Mouse cable. This is the serial cable with a 9-prong female
terminator. (If PS/2 mouse version, cable has a 6-pin roundterminator like part #9).
(11) Cable that connects the right and left hand units to each other.(12) Bolt that attaches the palm support to the hand unit.(13) Four mode indicator lights.
The serial number for your system is on the bottom of both hand units.

SECTION 2 GETTING STARTED
8 User’s Guide, Version 1.7., October 9, 2003
Connecting the Equipment
To connect the DataHand® System to your computer, remove the old inputdevices and replace them with the hand units, but you must follow theinstructions below to connect the equipment properly.
Step 1. Preparing the computer.Power down your computer. This is an important step because themouse might not work if you connect the equipment before you shutoff the computer.
Step 2. Preparing the hand units and using the LapLander™.♦ If you use the optional LapLander™, remove the bolts (#12 in
Figure 2, #4 in Figure 3) from the underside of the hand units.Then thread the bolts through the slits in the LapLander™ andtighten them back on the hand units. You can slide the handunits in the slits in the LapLander™ to adjust their distance fromeach other before tightening the bolt.
♦ Make sure that the cable that attaches the two hand units to each
other is securely in place.
Figure 3. Bolting the Hand Units to the LapLander™
(1) LapLander™ (2) 1 Slot (3) Schematic left and right hand units
(4) Bolts that attach the hand units to the LapLander™(5) Foam Pads

SECTION 2 GETTING STARTED
User’s Guide, Version 1.7.8, October 9, 2003 9
Step 3. Removing your old keyboard and mouse. With your computer turned off, unplug your old keyboard andmouse, if you had one, from the back of the computer making noteof which ports you used.
Step 4. Identifying the keyboard-to-computer and mouse cables. Identify the following two cables that emerge from the right handunit:♦ The keyboard-to-computer cable (#9 in Figure 2) has a 6-prong
round terminator.♦ The mouse cable (#10 in Figure 2) has either a 9-prong female
terminator or a 6-prong round terminator, depending on whetheryou have a serial or PS/2 mouse.
Step 5. Connecting the keyboard-to-computer cable.
Plug the cable with the 6-prong terminator into the computer portfrom which you removed your keyboard in Step 3. NOTE: Some notebook computers such as the IBM Thinkpad,require a “Y-Connector” to connect an external keyboard suchas the DataHand Ergonomic Keyboard to the common singledual port.
Step 6. Connecting the mouse cable.♦ If you had a serial mouse, your cable has a 9-prong terminator.
Plug it into the computer port from which you removed yourmouse in Step 3. This will be one of the serial ports, COM 1through COM 4.
♦ If you had a PS/2 mouse, your cable has a 6-prong round
terminator. Connect the cable to the PS/2 mouse port.
Step 7. Starting your computer. Turn on your computer. The green light on the right hand unit should go on indicating youare in Normal mode. Note: The right hand unit contains firmware that allows the hand units to beconnected to a IBM PC computer. To connect the keyboard to othercomputers such as Macintosh or Sun, you will need an appropriateconverter … contact us for available adapters.

SECTION 2 GETTING STARTED
10 User’s Guide, Version 1.7., October 9, 2003
Attention
Your DataHand® System has been tested and found to comply with the limits for aClass B digital device, pursuant to Part 15 of the FCC Rules. These limits aredesigned to provide reasonable protection against harmful interference whenequipment is operated in a commercial environment. This device generates, uses,and can radiate radio frequency and, if not installed and used in acchordance withthis instruction manual, may cause harmful interference to radio communications.However, there is no guarantee that interference will not occure in a particularinstallation. If this device does cause harmful interference to radio or televisionreception, which can be determined by turning the device off and on, you areencouraged to try to correct the interference by one of more of the followingmeasures:• Reorient or relocate the receiving antenna.• Increase the separation between the equipment and receiver.• Connect the equipment into an outlet on a circuit different from that to which the
receiver is connected.• Consult the deal or an experienced radio/TV technician for help

11 User’s Guide, Version 1.7., Error! Reference source not found.
SECTION 3
POSITIONING YOURSELF
This section present the proper positioning of the units to maximize correctergonomic style as well as attain the most efficient results. Four steps areprovided in order to increase your working comfort. Together with your chairand armrests or LapLander™, you can obtain proper hand, arm and upperbody support.

SECTION 3 POSITIONING YOURSELF
12 User’s Guide, Version 1.7., October 9, 2003
Ergonomic Suggestions The following suggestions are meant to increase your working comfort.Remember that frequent rest breaks and exercises are advised after a periodof typing on any keyboard. Using The LapLander™
Your Professional II™ comes attached to an optional LapLander™.The LapLander™ is designed for the user to position the hand unitson the lap as opposed to placing them on the desk. TheLapLander™ is made of a flat-surfaced board with foam attached onthe bottom in order to provide cushion while resting the ProfessionalII™ on your lap. If you choose to use the Professional II™ withoutthe optional LapLander, the hand units should be removed from theLapLander™ and placed on the desk.
WARNING: DO NOT REMOVE THE FOAM PADS AND REATTACH TOTHE LAPLANDER --- THE SCREWS WILL BREAK THROUGH THEPLASTIC TOP.
Step 1. Positioning your chair, arms and legs.
Your hands and wrists should be in line with each other. Your wristsshould not be twisted or bent. Arm rests on the sides of your chaircan help to support your arms and increase your comfort. ♦ If you use the optional LapLander™:
You can lean back in your chair as you type, but remember toposition yourself so that your wrists are straight.
♦ If you do not use the optional LapLander™:
Place the hand units on the table in front of you. Adjust yourchair so that when you sit you will have angles of 90 degrees ormore at your knees, hips-to-thighs and elbows. If your chair hasarm rests, you may find you are now able to use them to helpsupport your arms and upper body while you are using theDataHand® System.
Warning
Although this DataHand® System was designed with the goal of reducing injuryexposure, the prolonged use of any manually-operated data entry device (includingthis DataHand® System) may result in repetitive stress injury or related injury.
If pain, discomfort, numbness or tingling in the hands or arms is experienced during or as aresult of use, consult an appropriate medical professional and reduce usage until discomfortis eliminated. Avoid other activities that may aggravate your condition, such as using otherless ergonomic keyboards. To reduce your risk of repetitive stress injury, please see theergonomic guidelines in the Ergonomic Suggestions section of this user manual.
Take frequent breaks from typing and maintain good health habits.

SECTION 3 POSITIONING YOURSELF
User’s Guide, Version 1.7.8, October 9, 2003 13
Figure 4. Ergonomic Suggestions
Step 2. Finding a comfortable position for the hand units.
♦ If you use the optional LapLander™:The hand units are in a lower position than they would be if theywere on the table in front of you. Consequently, they will becloser together than shoulder-width. You can slide the handunits through the slits in the LapLander™ as close as or as farapart as you want. You can also swivel the hand units.
♦ If you do not use the optional LapLander™Although you might be accustomed to keeping your hands closetogether when typing at a keyboard, in the long run placing thehand units shoulder-width apart will increase your comfort. It willmaintain the forearms at a comfortable angle to the shouldersand will prevent unnatural curving of the hands and arms aroundthe body that occurs when using a flat keyboard.

SECTION 3 POSITIONING YOURSELF
14 User’s Guide, Version 1.7., October 9, 2003
Step 3. Adjusting the internal fingerboard.Everyone’s fingers are different. You can raise, lower or tilt thefinger board to adjust the arch of your fingers relative to your hand:a) Loosen the nuts (#4a and #4b in Figure 2) on the sides of each
hand unit.b) Rest one hand on its hand unit.c) With your other hand, slide the finger board around until it barely
touches the finger tips of your stationary hand.d) Use the dials on the hand unit (#5 in Figure 2) to move the right
and left sides of the finger board forward or backward.e) Tighten the nuts.f) Repeat steps a) through e) for the other hand.
Figure 5. View of the Tilt Feet
Step 4. Using the foam wedges or tilt feet to tilt the hand units.You might be more comfortable elevating the thumb side of eachhand unit.
♦ If you use the optional LapLander™:Insert the foam wedges between the hand units and theLapLander™ on the thumb sides of the hand units.
♦ If you do not use the optional LapLander™:Raise the tilt feet (#8a and #8b in Figure 2) under the thumbsides of the hand units. The feet have 2 positions. You cannotdo this if the hand units are attached to the LapLander™.

15 User’s Guide, Version 1.7., Error! Reference source not found.
SECTION 4
TRAINING AIDS
Several training aids were shipped with the DataHand® System, and if youwish, you can make copies of these aids.

SECTION 4 TRAINING AIDS
16 User’s Guide, Version 1.7., October 9, 2003
Using the Training Aids
The training aids have four parts:
♦ Instructions on how to install the DataHand® System to your computer.
♦ A fold-out explaining the parts of the DataHand® System.
♦ Set of templates to use while learning the DataHand® System.
♦ Series of lessons to help you to learn how to use the mouse/functionmode, numeric mode (NAS), alpha mode (NORMAL) and 10-key mode.

17 User’s Guide, Version 1.7., Error! Reference source not found.
SECTION 5
LEARNING TO USE THEHAND UNITS
Learning to use the hand units can be exciting and rewarding. This sectionteaches you how to be efficient while learning to adapt a new skill and how toset reasonable performance expectations. It also teaches you how to moveyour fingers when operating the different keys. Keep in mind that practice isessential to master any new skill.

SECTION 5 LEARNING TO USE THE HAND UNITS
18 User’s Guide, Version 1.7., October 9, 2003
Learning a New Skill
You can learn to use the hand units most easily by:
♦ Setting reasonable performance expectations.
♦ Using the DataHand® System Training Aids shipped with the DataHand®System if you have Microsoft Windows®.
♦ Positioning yourself comfortably and taking frequent breaks (see thesection Ergonomic Suggestions for recommendations on positioningyourself).
♦ Avoiding switching back and forth between a flat keyboard and the handunits if you find switching to be confusing.
If this is your first experience typing, or if you want to practice typing using thehand units, you can install a program such as Typing Tutor V™ (Simon andSchuster) or Dvorak on Typing™ (Interplay). These commercially availabletyping programs work well with the DataHand® System. They providepractice exercises and feedback on accuracy and speed. They can bepurchased from any office supply store at a moderate price and run on avariety of computers. If you are converting from a flat keyboard to the hand units, it might be best tonot switch between the two types of keyboards more than necessary.Frequent switching might be confusing while you are first learning. Inaddition, if you are recovering from a hand injury using a flat keyboard mightprolong healing or cause more injury. Whether you are converting from a flat keyboard or learning to type for thefirst time, your comfort level with the DataHand® System will continuallyimprove with use. You can gain considerable proficiency over time. Over aperiod of time, almost every DataHand® System user finds it to be faster andmore comfortable than any other keyboard.
Setting Reasonable Performance Expectations
Many new users wonder why they are not able to attain their previous typingspeeds on the hand units in just a few hours. Becoming proficient in any newskill takes commitment and practice. Eventually your typing speeds on thehand units can exceed those attained on a flat keyboard. Finding time to learn and practice is essential. Uninterrupted training time willyield the best results. Studies show that 20- or 30-minute learning segmentsare most beneficial, but you can gradually increase these times as your

SECTION 5 LEARNING TO USE THE HAND UNITS
User’s Guide, Version 1.7.8, October 9, 2003 19
comfort level increases. A total of 2 hours per day for 2 weeks isrecommended. Most users report that it takes a total of 15 to 50 hours ofpractice to become well versed with the system. You can also use some of your practice time to play games on the computerthat allow you to become accustomed to the sensitivity of the hand units’ keysand finger mouse.
Moving Your Fingers to Press the Keys
When you place your hands on the hand units, each finger should be able tomove freely in 5 directions: north, south, east, west and straight down. Thekeys that you activate by pressing straight down are called the well keys.
North
StraightDown
West East
South
Figure 6. Finger Motions
Note: In the following sections, names of keys are bolded. For example, “On the leftthumb, light pressure activates SHIFT.”

SECTION 5 LEARNING TO USE THE HAND UNITS
20 User’s Guide, Version 1.7., October 9, 2003
Moving Your Thumbs to Press the Keys
Your right thumb should be able to move freely east, west, southwest,straight down to its well key and up to its direct access key. Your left thumbshould be able to move freely east, southeast, west, straight down to its wellkey and up to its direct access key .
Light pressure down
Hard pressuredown
West East
Southwest
Right Thumb
EastWest
Southeast
Left Thumb
Up Up
Figure 7. Thumb Motions
The well keys directly beneath the thumbs actually have twopositions: ♦ Pressing the left thumb lightly activates SHIFT. Hard down
pressure activates the second position, CAP LOCK, and thelock light over the left thumb goes on; the next cycle of harddown pressure will deactivate CAP LOCK and the lock light willgo out..
♦ Pressing the right thumb lightly activates NAS SHIFT. Hard
down pressure activates the second position, NAS LOCK, andthe lock light over the right thumb goes on; the next cycle of harddown pressure will deactivate NAS LOCK and the lock light willgo out..
The keys above the thumbs are called the direct access keys. Youactivate these keys by lifting up the thumbs. The use of these keysis explained in the next section Three Modes of Operation.

21 User’s Guide, Version 1.7., Error! Reference source not found.
SECTION 6
THREE MODES OF OPERATION
In section 5 you were introduced to the various finger movements in relationto the keys. In this section you will learn how to use the Professional II™ toaccess all of the keys and functions of the traditional flat keyboard. There arefour different modes that the Professional II™ is capable of operating in. Youwill explore these modes in order to discover the Professional II’s™ greatestpotential.

SECTION 6 THREE MODES OF OPERATION
22 User’s Guide, Version 1.7., October 9, 2003
Accessing Different Modes
The hand units operate in three modes as indicated on the right hand unit:1. NAS (Numbers and Symbols) mode2. Normal mode3. F (Mouse Function) mode
In addition, there is a fourth label on the right hand unit: 10-Key. This standsfor 10-Key pad, which is really a subset of NAS mode. You know you are in aparticular mode when the appropriate indicator light is on. All the modes andthe 10-Key pad are explained in detail in the following sections.
Each mode enables you to access a group of keys. If you want to access akey that is not available in the mode you are in, you must switch to the modein which the key is available. Together, the modes of operation allow you toaccess all the keys and functions of a standard flat keyboard without liftingyour hands from the hand units.
The templates on the hand units indicate in which modes the keys areavailable by using a color code. The chart below lists the modes, theirassociated color codes and the available keys.
DataHand® System ModesMode Color Code Keys
NAS Blue Keys(Orange modelight)
♦ Numbers 00 and 0 – 9♦ The following punctuation marks and symbols:
& ^ : ’ ( ) ; . ? ! ~ @ # <> % $ - + = / *♦ NUM LOCK, 10-K ON, 10-K OFF
Normal Green Keys (Green modelight)
♦ Letters a - z and A – Z♦ The following punctuation marks:
, ’ : . ; ? | “ ` { } [ ] \ /
Function
Yellow Keys (Yellow modelight)
♦ Function keys f1 - f12♦ Arrow and mouse key toggles and ♦ The arrow keys ß à á â♦ The finger mouse arrows ß à á â♦ The following function keys: HOME, END, PAGE
UP, PAGE DN, PAUSE, INS, HELP, PRINT, m.b.1,m.b.2, m.b.3, L/R MODF, OPT/CT, NUM LOCK andSCROLL LOCK.
10-Key (a subsetof NAS)
Pink keys(Orange and redmode lights)
♦ Numbers of the 10-Key pad 00 and 0 - 9♦ The following operators: = - * / + ( ) ‘ $ . &
SECTION 6 THREE MODES OF OPERATION
User’s Guide, Version 1.7.8, October 9, 2003 23
Using Protected Mode Keys
FUNCTION KEY PROTECTION: The FUNCTION keys may only beaccessed by holding the Function direct access key (right thumb key – up)and pressing F1 through F12. F13 through F24 keys are accessed byholding down SHIFT and at the same time operating F1 through F12respectively. Any function key accompanied by a modifier (i.e. ALT, CTL orSHIFT) is automatically sent along with the modifier.
TURNING OFF FUNCTION KEY PROTECTION: The user may togglebetween protected and unprotected function keys. Go to Program Mode (seeUser Guide, page #42) and press letter ‘I’ as your Program Selection key.This disables the protection until the user toggles the command again. TheREV message will now show a ‘f’ in the last position if the protection isenabled.
MISCELLANEOUS KEYS PROTECTED: The PRINT SCREEN, NUMLOCK,TEN-OFF, TEN-ON and LEFT/RIGHT MODIFIER keys are protected bydefault on power up. If the KEY is available in FUNCTION mode then theFUNCTION ACCESS key unlocks that key. If the key is found in the NASmode, the NAS LOCK (direct access) key unlocks the key and completes thenecessary task.
TURNING OFF PROTECTION: The user may toggle between protected andunprotected miscellaneous keys. Go to Program Mode (see User Guide,page #42) and press letter ‘K’ as your Program Selection key. This disablesthe protection until the user toggles the command again. The Rev messagedoes not show the state of this protection mode.
INDIVIDUAL KEYS PROTECTED: Individual keys may be protected fromaccidental hits. The user must select the keys to protect through the ProgramMode <C> (see User Guide, page #42). Up to five (5) keys may be chosenfor protection. All keys are available for protection including Mode Accesskeys. If the KEY is available in FUNCTION Mode then the FUNCTIONACCESS key unlocks that key. If the key is found in the NAS Mode, the NASLOCK (direct access) key unlocks the key and completes the necessary task.Program mode <,> will toggle on or off the Individual Key Protection
PROGRAMMING THE INDIVIDUAL KEYS: Go to Program Mode (see UserGuide, page #42) and press the ‘C’, and program the individual key byTWICE pressing the key to be protected then hold up the RIGHT THUMBAND AT THE SAME TIME press the ESC key TWICE to record the protectedkey. NOTE: The CAPS LOCK and NAS LOCK keys may be protected ...when releasing the CAPS LOCK or NAS LOCK for second press, be sure tostop midway up and not let the key up into the FIRST position. To quit mode<C>, hold the NORMAL access key and TWICE press the ESC key. Todelete individual protected keys only, enter Program Mode <C> and holdup the Normal Mode key and TWICE press the DEL key. TURNING OFF

SECTION 6 THREE MODES OF OPERATION
24 User’s Guide, Version 1.7., October 9, 2003
PROTECTION: The user may toggle between protected and unprotectedIndividual keys. Go to Program Mode (see User Guide, page #42) and pressthe letter ‘,’ (comma). This disables the protection until the user toggles thecommand again.
Keys Available in Several Modes
All the keys operated by the thumbs, as well as ENTER, DELETE andESCAPE, are available in all modes. The functions and the positions ofthese keys stay the same in all modes.
The keys available in all modes are indicated in white on the template.
The ESCAPE key (ESC) is one of the keys available in all three modes.When this key is activated simultaneously with the CONTROL key (left thumblower right), the combination emulates the Microsoft Windows® direct accesskey now available on some keyboards. A WINDOWS compatible key layout(104 keyboard) may be selected (see User Guide, page #42). In the NORMand FUNC modes the WINDOWS key will be in place of the extra ENTERkey (Right Ring East) and the Applications Key will be found in the NASmode.
Note: As described in the section, Moving Your Thumbs to Press the Keys, thethumbs can access two keys each in the down position. You activate one key byapplying light pressure and the other key by applying a harder pressure.
Figure 8. Keys Available in all Modes
Some keys are available in two modes. The punctuation keys, such as thecolon and the semi-colon, occur in Normal and NAS modes. Their locationsare the same in both modes.
Other keys that occur in two modes have different locations in each mode,such as the operator keys in the NAS and 10-Key modes.

SECTION 6 THREE MODES OF OPERATION
User’s Guide, Version 1.7.8, October 9, 2003 25
The illustrations on the following pages show the template for all threemodes. Each mode is illustrated and described in detail in the sections thatfollow.
Normal Mode
When you turn on your computer, the system comes up in Normal mode.
Keys Available in Normal Mode
This is the mode to type the letters of the alphabet. This is also themode to access the punctuation symbols that usually occur on themiddle three rows of a standard flat keyboard, such as theapostrophe <‘>, quotation marks <“>, comma, period and colon.
Accessing Normal Mode
To enter Normal mode from any other mode, lift the direct accesskey above the left thumb. The green indicator light on the right handunit should go on.
Figures 9 and 11 show all the letters and symbols each finger cantype in Normal mode. The letters and symbols that are accessed inNormal mode are indicated in green on the template above thefinger wells.
Figure 9. Left Hand in Normal Mode

SECTION 6 THREE MODES OF OPERATION
26 User’s Guide, Version 1.7., October 9, 2003
Figure 10. Layout of Right Index Finger Keys on a Flat Keyboardand on a DataHand® Keyboard
Layout of Keys in Normal Mode
The layout of keys on a standard flat keyboard is called QWERTY,for the sequence of letters in the third row of the left hand. If youare converting from a standard flat keyboard to the hand units, youwill find the mapping of keys to be similar. For example, on astandard flat keyboard the right index finger types the letters U, J, Mand H. Using the hand units, the right index finger types the lettersU, J, M, H and the apostrophe (‘). On the hand units, each fingeraccesses the same letters of the alphabet as it does on a standardflat keyboard, except for the letters B, T, N and Y.
Figure 10 compares the letters on the standard keyboard and theDataHand® Systems keyboard typed by the right index finger.
Figure 11. Right Hand in Normal Mode

SECTION 6 THREE MODES OF OPERATION
User’s Guide, Version 1.7.8, October 9, 2003 27
NAS Mode
NAS (Numbers and Symbols) mode contains commonly used numbers andsymbols, including those of the 10-Key pad.
Keys Available in NAS Mode
NAS mode is the mode in which you type the numbers zero throughnine, double zero and the symbols that are found at the top row of astandard flat keyboard, such as the exclamation point (!), dollar sign($) and ampersand (&).
NAS mode is also the mode from which you access the 10-Key pad.You use the 10 K&P ON and 10 K&P OFF keys on the east andwest of the right pinky finger to switch between NAS mode and the10-Key pad. See the next section for more details on the 10-Keypad.
Accessing NAS Mode
To lock into NAS mode, press NAS LOCK (right thumb, hardpressure, well key). The NAS Lock light under the right thumb goeson. To exit NAS mode activate either DA key (RT or LT thumb up).To type just a few characters, instead of locking into NAS mode, youcan shift into NAS mode. To shift, press NAS (right thumb, lightpressure, well key). Continue to hold this key with light pressureuntil you finish typing the NAS mode characters.
If you have activated the 10-Key pad and then switch to Normal orMouse Function mode, when you return to NAS mode, the 10-Keypad is automatically switched on. To access the keys available inNAS mode, you must turn off the 10-Key pad.
The orange right hand NAS light is on when in NAS mode.
Layout of Keys in NAS Mode
Figures 12 and 13 show all the keys available in NAS mode. Thenames of keys available in NAS mode are indicated in blue on thetemplate above your fingers.

SECTION 6 THREE MODES OF OPERATION
28 User’s Guide, Version 1.7., October 9, 2003
Figure 12. Left Hand in NAS Mode
Figure 13. Right Hand in NAS Mode

SECTION 6 THREE MODES OF OPERATION
User’s Guide, Version 1.7.8, October 9, 2003 29
10-Key Pad
Because you must access the 10-Key pad from NAS mode, the 10-Key padis considered a subset of NAS mode.
Keys Available in 10-Key Pad Configuration
Although the numbers may appear to be the same, some specialapplications distinguish between the numbers on the 10-Key padand the numbers on the top row of the main part of a flat keyboard.When you use the numbers in NAS mode, it’s like using thenumbers on the top row of a flat keyboard. The same is true whenyou use the 10-Key pad numbers. However, if you turn on NUMLOCK, these number keys will send the 10-Key pad keys.
The keys available on the 10-Key pad are the numbers (00 and 0 -9) and the operators of addition (+), subtraction (-), multiplication (*),division (/), equals (=), parentheses, dollar sign ($), period andampersand (&).
In addition, the arrow keys on the left index finger are available fornavigation.
Note: Some keys (such as @, !, #, <, > and %) are not shown inpink here and in the other guides as on the actual display of the lefthand unit but are shown in NAS mode blue. The rule for the lefthand is: When in 10-Key mode where a character or symbol is notshown in pink, the character or symbol shown in blue may beaccessed.
Figure 14. Left Hand in 10-Key Configuration

SECTION 6 THREE MODES OF OPERATION
30 User’s Guide, Version 1.7., October 9, 2003
Accessing the 10-Key Pad
To access the 10-Key pad, press the 10-Key ON key (right pinky,east) in NAS mode. You stay in 10-Key configuration, in this andfuture work sessions, until you press the 10-Key OFF key (rightpinky, west) to return to NAS mode. This means that if you do notpress the 10-Key OFF key and you go to another mode, such asMouse Function mode or Normal mode, when you return to NASmode, you will automatically be in 10-Key configuration.
You are in 10-Key configuration when the red 10-K&P light and theorange NAS indicator light on the right hand unit are on at the sametime.
Technical Note: If NUM LOCK is on, the number keys in 10-Key modesend scan codes of the numeric keypad normally found on the right side ofa flat keyboard. If NUM LOCK is off, the keys send scan codes of thenumeric keys at the top row of a flat keyboard. However, you get numberswhether NUM LOCK is on or off. You can engage NUM LOCK in eitherMouse Function or NAS mode, and the Num Lock light under the left ringfinger will go on, and the DataHand® System sends a NUM LOCK code tothe computer (required by some program for special features).
Layout of 10 Key Pad
Figures 14 and 15 show all the keys available in the 10-Key pad.The names of keys available in 10-Key pad configuration areindicated in pink on the template above your fingers. (If a 10 Key(pink) symbol is not shown, the NAS (blue) symbol applies.
Figure 15. Right Hand in 10-Key Configuration

SECTION 6 THREE MODES OF OPERATION
User’s Guide, Version 1.7.8, October 9, 2003 31
Mouse Function Mode
Use this mode to access the navigation and special function keys. For moreabout the Mouse and Cursor functions see Section 7, Activating the Mouse orthe Arrow Keys, pg. # 36.
Keys Available in Mouse Function Mode
In Mouse Function mode, you can access the DataHand® Systemfinger mouse and the directional arrow keys. These keys allow youto navigate the mouse pointer or cursor on the screen. The threemouse buttons, mb1, mb2, mb3, are also available.
In addition, you can access function keys f1 through f12.
You can also access HOME, END, PAGE UP, PAGE DN, PAUSE,INS, HELP, PRINT, L/R MODF, OPT/CT, SCROLL LOCK andNUM LOCK.
Note: HOME is only available with the Arrow Keys activated (seeSection 7).
Figure 16. Left Hand in Mouse Function Mode
Accessing Mouse Function Mode
To enter Mouse Function mode from any other mode, lift the directaccess key above the right thumb.
You are in Mouse Function mode when the yellow indicator light onthe right hand unit is on.

SECTION 6 THREE MODES OF OPERATION
32 User’s Guide, Version 1.7., October 9, 2003
Layout of Keys in Mouse Function Mode
Figures 16 and 17 show all the keys each finger can use in MouseFunction mode. The names of keys available in Mouse Functionmode are indicated in yellow on the template above your fingers.
The PRINT key requires a double strike to send the key to the PC.This helps protect from accidental print commands.
Figure 17. Right Hand in Mouse Function Mode
Mouse Click Lock
MOUSE Click Lock ("Sticky" Mouse Buttons): Hold the Function Modedirect access key up and press either the right or left mouse buttons. Torelease hit either right or left mouse button or any other key that is not amouse movement key like ALT, SHIFT or CTL. Examples: To block text: Enables the click lock for Left Button. Move mouse to hi-lightthe text. To delete text: Press the delete key. The delete will release the mousebutton and delete the text. Try this with CTL X for CUT or CTL C for COPY.To move text: The user may also move the highlighted text by using clicklock again. Now as you move the mouse the box of text is moved and can bedropped at a new location with by releasing as described above.Limitations: The CTL key can not be used with the drag to duplicate anobject selected because the button is released upon action from the CTL key.To copy, use the right mouse click-lock to move and duplicate the text,choose copy when the menu pops up.
Using Key Combinations
If you are using an application that requires you to use key combinations,such as the function keys in combination with CNTRL, ALT or SHIFT, apply
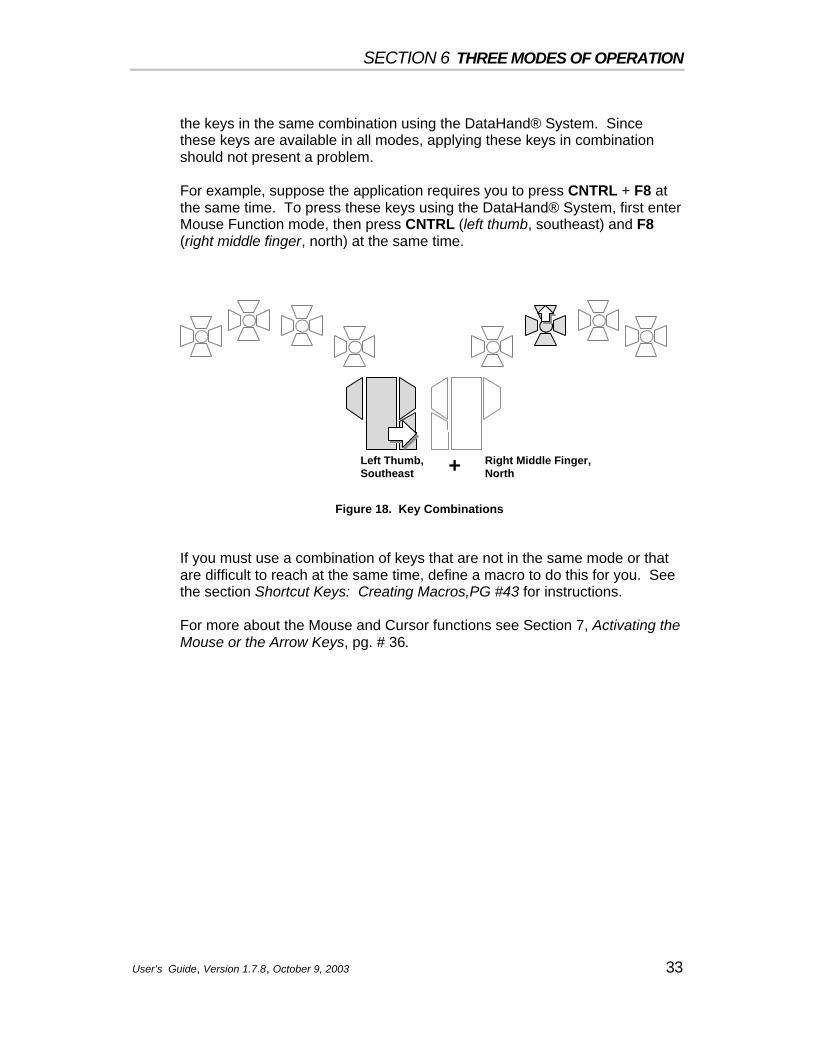
SECTION 6 THREE MODES OF OPERATION
User’s Guide, Version 1.7.8, October 9, 2003 33
the keys in the same combination using the DataHand® System. Sincethese keys are available in all modes, applying these keys in combinationshould not present a problem.
For example, suppose the application requires you to press CNTRL + F8 atthe same time. To press these keys using the DataHand® System, first enterMouse Function mode, then press CNTRL (left thumb, southeast) and F8(right middle finger, north) at the same time.
Left Thumb,Southeast
Right Middle Finger,North+
Figure 18. Key Combinations
If you must use a combination of keys that are not in the same mode or thatare difficult to reach at the same time, define a macro to do this for you. Seethe section Shortcut Keys: Creating Macros,PG #43 for instructions.
For more about the Mouse and Cursor functions see Section 7, Activating theMouse or the Arrow Keys, pg. # 36.

SECTION 6 THREE MODES OF OPERATION
34 User’s Guide, Version 1.7., October 9, 2003

35 User’s Guide, Version 1.7., Error! Reference source not found.
SECTION 7
USING THE FINGER MOUSEAND ARROW KEYS
While using the Professional II™, you have the option of navigating aroundyour screen by using either the finger mouse or the arrow keys. This sectionwill describe the operating capacities of these two functions.

SECTION 7 FINGERMOUSE AND ARROW KEYS
36 User’s Guide, Version 1.7., October 9, 2003
Activating the Mouse or the Arrow Keys
When the computer is first turned on, the mouse is automatically activatedwhen in Mouse Function mode and is indicated by the yellow mouse light inthe middle of the template for the left middle finger.
To switch to arrow key function, enter Mouse Function mode and press thearrow toggle (right middle finger, well key). The yellow mouse light on thetemplate for the left middle finger goes off. Note: The HOME key isavailable with the LT or RT Index Finger Down keys.
To switch back to mouse function, enter Mouse Function mode and press themouse key (left middle finger, well key). The yellow mouse light on thetemplate for the left middle finger goes back on.
Note: The DataHand® System is not shipped with a mouse driver; it is intended towork with your existing mouse driver. Make sure that one of the following mousedrivers is installed on your computer: an IBM PS/2 or Microsoft-compatible driver forMicrosoft Windows® and/or a DOS driver. The newer LOGITEC mouse driversallow more than one mouse to be used at one time, ie. PS/2 and serial mouse at thesame time.
Moving the Mouse Pointer
Make sure your computer supports the use of a mouse and that you attachedthe appropriate mouse cable to the back of your computer. See Connectingthe Equipment if you have any questions. You can then use the mouse.
Moving Slowly
Move the mouse pointer slowly around the screen by pressing thenorth, south, east and west keys with your right index finger.
Moving Quickly
Move the mouse pointer quickly around the screen by pressing thenorth, south, east and west keys with your left index finger.
Moving at High Speed
Move the mouse pointer at high speed around the screen bypressing the north, south, east and west keys with both indexfingers at the same time.
Moving Diagonally
You can move the mouse pointer diagonally by pressing twoadjacent directional keys simultaneously. For example, movenorthwest by pressing the north and west keys together with one ofyour index fingers.

SECTION 7 FINGER MOUSE AND ARROW KEYS
User’s Guide, Version 1.7.8, October 9, 2003 37
Changing Mouse Speed Settings
See <J> in the table in the section Changing DataHand® SystemSettings: The Program Selection Keys for instructions on fine tuningmouse speeds using the DataHand® System.
Your existing software might have a facility to adjust the range ofmouse speeds. For example, in Microsoft Windows®, the mousecontrol panel has a slide button for this purpose. However, if youfind that the slide button does not give you the range of control youneed, you may increase the sensitivity of that slide button by editingthe MOUSE.INI file. You do so using a DOS editor. For help withthis, contact DataHand® Systems, Inc. using the reference in theGetting More Help section.
Clicking the Mouse Buttons
To click the left mouse button, press the mb1 key (left index finger,well key).
To click the right mouse button, press the mb2 key (right indexfinger, well key).
If your computer supports a 3-button mouse, you can click theequivalent of the middle mouse button by pressing the mb3 key (leftring finger, well key). You must have first activated the middlemouse button. See <M> in the table in the section ChangingDataHand® System Settings: The Program Selection Keys forinstructions on activating the middle mouse button.
Using the Arrow Keys to Move the Cursor
To use the arrow keys in Mouse Function mode, you must first turn on thearrow keys and turn off the mouse. To do this, enter Mouse Function modeand press the arrow key toggle (right middle finger, well key). The yellowmouse light on the template for the left middle finger should go off. Thesekeys are the Grey Arrow Keys on the standard keyboard. Note: The HOMEkey is only available in this condition and activated with the LT or RT IndexFinger Down keys.
If you are in 10-Key pad configuration, you do not have to turn on the arrowkeys; they are automatically activated on the left index finger.
Moving the Cursor
Move the cursor around the screen by pressing the north, south,east and west keys with either index finger.

SECTION 7 FINGERMOUSE AND ARROW KEYS
38 User’s Guide, Version 1.7., October 9, 2003
Switching Back to the Finger Mouse
To change from arrow key function back to mouse function, firstenter Mouse Function mode. Then press the mouse key (leftmiddle finger, well key). The orange mouse light on the template forthe left middle finger should go on.
Note for IBM computers and compatibles only: Most applications do notdistinguish between the directional arrow keys on the right and left hands,so either hand can move the cursor. However, if your application doesmake a distinction, then the left hand arrow keys will behave like the arrowkeys on the extended keyboard of a flat keyboard (between the 10-Key padand the main part of the keyboard). The right hand arrow keys will behavelike the arrow keys on the 10-Key pad. If you are working with such anapplication, the arrow keys on only one index finger will work. To switchthe set that is operating, see the section Switching Left and Right Functionfor Duplicate Keys: The L/R Modf Key. Page # 40.
Mouse Click Lock
MOUSE Click Lock:
Hold the Function Mode direct access key up and press either the right or leftmouse buttons. To release hit either right or left mouse button or any otherkey that is not a mouse movement key like ALT, SHIFT or CTL. Examples:
WINDOWS EXAMPLES:
To block text: Enables the click lock for Left Button. Move mouse to hi-lightthe text.
To delete text: Press the delete key. The delete will release the mousebutton and delete the text. Try this with CTL X for CUT or CTL C for COPY.
To move text: The user may also move the highlighted text by using clicklock again. Now as you move the mouse the box of text is moved and can bedropped at a new location with by releasing as described above.
Limitations: The CTL key can not be used with the drag to duplicate anobject selected because the button is released upon action from the CTL key.To copy, use the right mouse click-lock to move and duplicate the text,choose copy when the menu pops up.

39 User’s Guide, Version 1.7., Error! Reference source not found.
SECTION 8
SPECIAL KEYS
This section describes keys that you might use under special circumstancesor with special applications. It directs you through all the necessary stepswhen changing functions.

SECTION 8 SPECIAL KEYS
40 User’s Guide, Version 1.7., October 9, 2003
Switching Left and Right Function for Duplicate Keys:The L/R Modf Key
A few software applications differentiate between keys that are apparentlyduplicated on the left and right sides of a standard flat keyboard and use thescan codes sent by the keyboard for the right and left positions…each keyposition is unique and has its own scan codes assigned. Some applicationsmay even require that you use the keys in one or the other of these locations,although most applications allow you to use the keys on either side, for thesame purpose.
The default mode for the duplicated keys is to send the “left” key scan code. .When these keys are pressed, they send codes to the computer that thenidentifies them as the “left” key. To change the L/R Modf, hold up the FUNCMode key and at same time press the L/R Modf (left little finger, wellkey…light on the right hand will flash to verify entry into right side). Tochange a key back to left function, repeat the procedure. Alternatively theALT and CNTR keys can toggle to RT by double clicking either key.
When the computer is turned off and on again, the keys revert to the default“left” key mode. To permanently change the default, use program key A, asdescribed in the table in Changing DataHand® System Settings: TheProgram Selection Keys.
Keys Affected by the L/R Modf KeyKeys Mode
ALT, CNTRL, SHIFT, DELETE All modesNote: The extra SHIFT key (right hand, middlefinger, east) in Mouse Function mode actsopposite to the SHIFT key under the right thumb,which is available in all modes.
INS, PAGE UP, PAGE DN, END Mouse /Function mode+ * - / NAS mode/ Normal modeWINDOWS Normal and Function modes.
Some keys differentiate between left and right function, but are not affectedby the L/R Modf. They are:
• The Home keys• ENTER• keys in the 10-Key pad configuration
SECTION 8 SPECIAL KEYS
User’s Guide, Version 1.7.8, October 9, 2003 41
The DataHand® System has two HOME keys that are available in MouseFunction mode. The HOME keys are only in the ARROW condition (mouselight off) the down keys of the left and right index fingers and have left andright function, respectively. The L/R Modf key does not affect these keys.Some applications require the left only or the right only key. If you are usingan application that requires you to use one or the other of these keys, onlyone of them will work.
The RETURN key (left thumb, northwest) has left function. The ENTER key(right ring finger, east) has 10-Key pad Enter. In the 101-keyboard mode, theL/R Modf affects neither key. Both keys are available in all modes.
In the 104-keyboard mode (WINDOWS), the ENTER key (RT RingEast—WINDOWS key) can be switched by the L/R Modf in the Normal andFunction Modes.
As stated in the 10-Key Configuration section, if NUM LOCK is on, thenumbers and operators available in 10-Key configuration send the same scancodes as the keys of the 10-Key pad on the right side of a flat keyboard. IfNUM LOCK is off, the keys send the same scan codes as the keys in themain part of a flat keyboard. The L/R Modf key does not affect the keysavailable in 10-Key configuration.
Changing DataHand® System Settings: ProgramSelection Keys
Special program keys allow you to change settings of the DataHand®System. The new settings stay until you change them again.
To make the setting changes, engage these two keys:• first the direct access key for Normal mode (left thumb, up), then• the Reset button at the back of the left hand unit
Note: To prevent errors, release the Reset button first and then the NormalDirect Access key.
After you release these keys, the red 10-Key indicator light on the right handunit flashes. It continues to flash until you enter one of the Program Selectionkeys indicated in the following table.
If the system change takes effect after you press the Program Selection key,the three mode lights on the right hand unit flash three times inacknowledgement. If the three mode lights continue to flash, you must takefurther action, as specified in the following table.

SECTION 8 SPECIAL KEYS
42 User’s Guide, Version 1.7., October 9, 2003
Changing Default Settings & Program MacrosKey Effect and any further actions necessary
A Toggles all special keys from left function to right or vice versa and save these newsettings as the defaults. See Switching Left and Right Function for Duplicate Keys: TheL/R Modf Key for information on temporarily switching individual key functions.
B Begins sequential macro recording. See Shortcut Keys: Creating Macros, pg. # 43 forinstructions on recording macros.
C
,
Begins individual key protection…a key can be individually protected by the mode keyused for the key selected. See Error! Reference source not found. , pg. 23 forinstructions on protecting individual keys.Toggles the Individual Key Protection.
D If the Dvorak keyboard is purchased … toggles between QWERTY (default) & Dvorak.ENTER
(Rt. Ring East)Toggles to Windows (104) Key Mode – Application Key on this key in NAS and RTWINDOWS key in NORM and FUNC Modes. ENTER in the TEN KEY Mode (nochange). L/R Modf Toggles between LT/RT WINDOWS key.
G Toggles Mouse “nudge” feature off/on. For more information see Mouse NudgeError!Reference source not found., page # 46.
I Toggle protection OFF/ON for FUNCTION keys.J Allows mouse speed adjustment. Choose one of the following options:
♦ R to increase left mouse speed♦ V to decrease left mouse speed♦ U to increase right mouse speed♦ M to decrease right mouse speed♦ H to decrease mouse acceleration♦ ‘ to increase mouse acceleration♦ J to exit mouse speed adjustment and return to the original mode
K To toggle off or on the Protection Mode for PRINT SCREEN, NUMLOCK, TEN KEYOFF, TEN KEY ON and L/R MODF. For more information see page # 40.
M Activates the middle button of a Logitech® 3-button mouse. If the middle button isalready active, this action returns the mouse to 2-button format.
N Swap the CTL and ALT keys. O Swap FUNCTION and NORMAL Direct Access keys. P ;
Toggles to emulate the model DH200 with (5) Thumb Keys. After toggle P --- toggles to model DH200 using thumb down chording (up keys notneeded).
S A speed typist option to force the SHIFT break when typing shifted keys: e.g.,!@#$%^&*().
Q Changes from IBM PS2 to RS6000 keyboard emulation. R Displays “Rev x.xx MM 2 or 3” (for Microsoft) or Rev x.xx P (for PS/2 mouse) on the
computer screen, where x.xx is the revision number of the DataHand® System you areusing, and 2 or 3 is the number of mouse buttons that are enabled. L or R indicates leftor right key modifier.
W Begins a single key substitution. See Programming a Direct Substitution Key, pg. # 45. X Begins chorded macro recording. See Shortcut Keys: Creating Macros, pg. # 44 for
instructions on recording macros. Z Switches the Mouse Function and NAS access keys:
♦ NAS SHIFT (right thumb, light pressure, down) becomes Mouse Function Shift.♦ NAS LOCK (right thumb, hard pressure, down) becomes Mouse Function Lock.♦ The Mouse Function mode direct access key (right thumb, up) becomes the NAS
Lock direct access key.
Note: When NAS Shift is lost, Mouse Function Shift is gained. The MouseFunction Shift might be more useful when you require a lot of cursor and mousemovement in another mode.
To switch the keys back to their original functions, repeat these steps. Normal directaccess and \ key(held together)
Resets all permanent memory to default values. In other words, the system reverts toall original settings, such as the original mouse speeds and the original settings for theNAS and Mouse Function access keys. All desired non-default program modes mustbe re-set.

SECTION 8 SPECIAL KEYS
User’s Guide, Version 1.7.8, October 9, 2003 43
Shortcut Keys: Creating Macros Macros assist to automatically chord keys or provide easy access to difficultkey combinations. You can store a short sequence of keys you usefrequently or even a key combination (chord) under a single key called amacro. The DataHand can store a maximum of twenty unique macros eachwith up to 5 individual keystrokes. The macro key under which you store your sequence is any key of yourchoice. After you define the macro key, you can replay the stored sequence or chordby simply pressing Normal Access Key (Left Thumb Up) followed by themacro key. Macros help you to reduce repetitive typing and save time. Use macros to:
♦ Store up to twenty unique 5 keys in sequence that you use frequently,
such as a business abbreviation. ♦ Save a sequence, or chord, of up to 5 keys that occur in different modes,
such as a sequence of numbers and letters. ♦ Save a chord of up to 5 keys that occur in the same mode but that might
be difficult to press, such as SHIFT + TAB. ♦ Reassign a key in one mode to another mode. Suppose you do most of
your work in Normal and NAS modes. You can reassign a key you use inMouse Function mode, such as one of the keys f1 - f12, to one of thesemodes.
Defining and Replaying a Sequential Macro
You can define a sequence of up to 5 keys in a sequential macro.
Step 1. Press Reset and the Normal direct access keys together.
Step 2. Press B.
The red 10-Key indicator light on the right hand unit flashes.
Step 3. Enter the macro key. The macro key is the key that stores thesequence.
Note: The macro key may be in any mode and the mode’sdirect access key in combination with the macro key “runs” themacro.
Step 4. Enter the sequence you want to record using up to 5 keys.

SECTION 8 SPECIAL KEYS
44 User’s Guide, Version 1.7., October 9, 2003
Step 5. To end the recording, together press the Normal Direct Accesskey and ESC key.
The three mode lights on the right hand unit will stop flashing.
Step 6. Replay the macro at any time by pressing the appropriatedirect access key and the macro key selected.
Defining and Replaying a Chorded Macro
You can define a combination of up to 5 keys in a chorded macro.
Step 1. Press Reset and the Normal direct access keys together.
The red 10-Key indicator light on the right hand unit flashes.
Step 2. Press X.
The three mode lights on the right hand unit flash.
Step 3. Enter the macro key. The macro key is the key under whichyou store the combination.
Step 4. Enter the keys you want to chord, using up to 5 keys. You donot have to press them together as you enter them.
Step 5. Press the same Normal Access Key and ESC at the same timeto end recording.
The three mode lights on the right hand unit stop flashing.
Step 6. Replay the macro whenever you need it by pressing the NormalAccess Key AND the macro key at the same time.
Reprogramming or Nulling a Macro
You can reprogram a macro by redefining it.
You can null or delete a macro definition by going through thedefinition sequence but omitting Step 4.

SECTION 8 SPECIAL KEYS
User’s Guide, Version 1.7.8, October 9, 2003 45
Programming a Direct Substitution Key
MACRO Keys for Direct Substitution: In the interest of speed, a key maybe sacrificed for use as a macro key only. When programmed, the macro keyrequires only a direct hit to actuate the macro sequence.Keys like SHIFT, ALT, and CTL that appear twice on a 101 keyboard, may becombined in a macro regardless of the L/R Modf setting of the keyboard. Dothis by toggling the L/R Modf key when building the MACRO. You can makea Right SHIFT, etc. available when the default keypad is set with L/R Modf tothe left.
Step 1. Press the Reset key and the Normal Direct Access keytogether.
Step 2. Press the letter W.
Step 3. Press the KEY that will change.
Step 4. Press the keys in sequence (up to 5 max) that will besubstituted for the Key to be changed.
Step 5. To end the recording, together press the Normal Direct Accesskey and ESC key.
Step 6. Replay the macro at any time by pressing the appropriate theselected Substitute key.
To Delete the Direct Substitution Macro: Skip Step #4 above.
Note: Keys like SHIFT, ALT and CTL that appear as left and right keys maybe combined as a Macro on the DEK setting the L/R Modf to the propersetting when creating the Macro will run as a Macro as recorded regardlessof the L/R Modf setting.

SECTION 8 SPECIAL KEYS
46 User’s Guide, Version 1.7., October 9, 2003
SPECIAL KEYS, FEATURES AND OPTIONS
Windows Keys ... 104 Keyboard
The 104 keyboard is toggled with Program Mode <ENTER> (Rt.Middle Finger East). If the 104 keyboard is selected then the RightRing Finger east becomes:
- APPLICATION Key in NAS;- Right WINDOWS key in NORM and FUNC modes; and- ENTER in Ten Key Mode.
The L/R Modf toggles between LT/RT WINDOWS key.
(See Changing Default Settings & Program Macros, page 42).
Cursor Keys
Cursor keys are found in the FUNCTION Mode on either the Right orLeft Index Finger when Mouse LED is OFF ... Rt. Middle Finger Downturns the Mouse LED off. The Ten Key Pad arrows are on the left-hand index finger.
Mouse Nudge
The mouse has a “nudge” feature that allows fine movement bydelaying full speed. A few computers may find the delay excessive. Inthis case the “nudge” feature may be cancelled using Program Mode“G” (See Changing Default Settings & Program Macros, page 42).
Swap Alt and CTL Keys:
The position of these two keys can be changed. From Program Mode (seeUser Guide, page 42) set the SWAP CTL & ALT keys with option ‘N’.
L/R ALT and CTL KEYS:
L/R Modf will switch the scan code output of the ALT and CTL keys.Alternatively a double strike of the either key will temporarily change to thealternate scan code output.
SwapThumb ‘UP’ Keys:

SECTION 8 SPECIAL KEYS
User’s Guide, Version 1.7.8, October 9, 2003 47
From Program Mode (see User Guide, page 42) set the SWAP THUMB ‘up’keys option ‘O’.
Foot Pedal Support:
The Foot pedals become shifted accesses switches for FUNCTION andNORMAL Mode direct access key. Call DataHand Systems to add the footpedal option. Foot pedals can also be used in macro programs.
PS/2 Mouse Enable:
Any hand mouse if hot plugged (not recommended), will power up asdisabled. The DEK PS/2 mouse also powers up as enabled if reconnected(not recommended).
DH-200 MODEL COMPATIBILITY:
This section for former DH200 users only.
From Program Mode, set the DH-200 command option ‘P’. This new modestill allows the use of the direct access switches but creates the chorded NASand FUNCTION Mode shifting that was used with the DH-200. The DH-200keyboards came originally changed mode using a chorded key scheme.There was no up thumb key. To select this option, press ‘;’ (semi colon) whilein Program Mode. An additional addendum is available for former DH-200users to explain the DH-200 compatibility.
MacIntosh Users:
The MAC COMMAND, MAC CONTROL and POWER -ON Keys can beprogrammed as follows:
MAC USB ADAPTER SETUP:
The DataHand must first be set up as a 104 key keyboard so the WINDOWSand APPLICATION Keys are available to the MAC Adapter. See ChangingDefault Settings & Program Macros, page 42.
- Hold Left Thumb up and at the same time press the Square RESETButton behind the left unit;
- Release the RESET Button first and the Left Thumb Up--- the Red LEDon the right unit will be blinking;
- Press the Rt. ENTER key (Right Ring East) --- the Green NAS light willlight.

SECTION 8 SPECIAL KEYS
48 User’s Guide, Version 1.7., October 9, 2003
With the MAC USB Adapter connected hold down <ESC> and at the sametime press the <W> key. Now the MAC Adapter will send the followingcommands:
- Press and hold the <ESC> key and at the same time press the letter <W>key. Now the MAC Adapter sends:
- <COMMAND> Key when the RT <ENTER> Key is pressed in eitherNORMAL or FUNCTION Modes.
- <OPTION> is sent when the RT <ALT> key is pressed (L/R Modf keytoggled) or Double Strike the <ALT> Key.
- POWER ON is sent with the <SCROLL LOC> key.
ADB ADAPTER:
- If KINESIS P/N-AC016PM (W) --- keys operate as the USB set up above.- If other adapter is used usually <CTRL> is the MAC <COMMAND> and
<ALT> is the MAC <OPTION> Key.

49 User’s Guide, Version 1.7., Error! Reference source not found.
SECTION 9
COMMON QUESTIONS
This section covers the most common questions that DataHand® Systemusers ask, as well as the answers to these questions. If you have questionsthat cannot be answered by reading this manual, contact DataHand®Systems, Inc. customer service, using the reference in Getting More Help atthe end of this section.
SECTION 9 COMMON QUESTIONS
50 User’s Guide, Version 1.7., October 9, 2003
Questions and Answers
1. Q. How do I activate the mouse?
A. First make sure that your computer supports the use of amouse. You must also have attached the necessary mousecable. See the Getting Started section if you have questionsabout connecting the mouse cable.
After you make the necessary cable connections, turn on yourcomputer. When you enter Mouse Function mode, the orangemouse light on the template for the left middle finger should beon and the mouse should be activated. If not, in MouseFunction mode press the mouse key (left middle finger,well key). The mouse light should go on. See the Using theFinger Mouse and Arrow Keys, page 35 for more details.
2. Q. The mouse driver is installed, the mouse cable is connectedand I’ve turned on the mouse. Why doesn’t the mouse work?
A. If you are using Microsoft Windows® on a PC, sometimes thedefault settings in Microsoft Windows® must be changed toreflect the correct mouse driver. To check that the defaultsetting is correct, select [Windows Setup] [Options] [ChangeSystem Settings] [Mouse] and make sure the setting is“Microsoft IBM PS/2 or compatible.” If the mouse still does notwork, you might have to modify the AUTOEXEC.BAT file toreflect the correct driver designation.
If you have a PS/2 mouse driver, make sure you power downyour system before connecting the parts of the DataHandSystem to get a functioning mouse.
You should also determine if you have a bus mouse. If youdo, you must disable the mouse, either through the software orby removing the card. Contact DataHand® Systems, Inc.using the reference in Getting More Help, page 58, at the endof this section.
3. Q. How do I activate the arrow keys?
A. In 10-Key configuration, the arrow keys on the left hand indexfinger are automatically activated.
SECTION 9 COMMON QUESTIONS
User’s Guide, Version 1.7.8, October 9, 2003 51
The only other mode in which you can use the arrow keys isMouse Function mode. In this mode, make sure the orangemouse light on the template for the left middle finger is off. If itis on, press the arrow toggle key (right middle finger, wellkey). The mouse light should go off. See Using the FingerMouse and Arrow Keys, page 35 for more information.
4. Q. Sometimes I get keys that I shouldn’t (e.g., a <1> when I push theEND key or <.> when I push the DEL key) or I don’t get shiftd keys when Ishoul (e.g., <?>)?
A. The L/R Modf key is in the Right mode and should be toggledagain to reset to the Left position. See Switching Left andRight Function for Duplicate Keys, page 40.
5. Q. Where is the 10-Key pad?
A. The numbers on the 10-Key pad, as well as the arithmeticoperators, are available through NAS mode. See the 10-KeyPad section, page 29 for details and an illustration.
6. Q. I used the 10-Key pad, but now I need NAS mode. How do Iget out of the 10-Key pad and back to NAS mode?
A. If you enter NAS mode and the 10-Key pad is activated, youmust press 10-Key OFF (right pinky, west) to return to NASmode. Otherwise, every time you enter NAS mode, you willaccess the 10-Key pad instead of the NAS mode characters.
7. Q. My computer is frozen. What can I do?
A. Check the connections on each of the cables to make surethat they are secure. Disconnect and then reconnect the handunit cables.
If the computer is still frozen, press the Reset button on therear of the left hand unit or press CNTRL + ALT + DELETEtogether to reboot the system (warm boot). The DataHand®System should return you to Normal mode.

SECTION 9 COMMON QUESTIONS
52 User’s Guide, Version 1.7., October 9, 2003
If this does not work, try a cold boot. Turn off the computer,disconnect and reconnect the cables again and turn thecomputer back on. If you have persistent problems, contactDataHand® Systems, Inc. using the reference in Getting MoreHelp at the end of this section.
8. Q. Why am I having trouble switching modes?
A. Check to see if any key caps are open or stuck. If so, pull upthe key cap, and then pop it back into place.
9. Q. Using my software, I sometimes have to press several keystogether. Can I still do that with the DataHand® System?
A. You can press combinations of keys that are available in thesame mode using your DataHand® System to perform thesame functions you performed using a flat keyboard. In thevery rare case where the key combination you require useskeys not available within one mode, you can define a macrokey. See the section Shortcut Keys: Creating Macros fordetails.
10. Q. How can I reset to the as shipped Default Settins??
A. Enter Program Mode <\>. See Changing Default Settings &Program Macros, page 42.
11. Q. How can I display the version number of my DataHand®System?
A. You can display the version number of your DataHand® Systemby using the program key <R>. The number of active mousebuttons is also displayed. See Changing Default Settings &Program Macros, page 42.
12. Q. Where do I find the serial number of my DataHand® System?
A. The serial number is on the underside of both hand units.

SECTION 9 COMMON QUESTIONS
User’s Guide, Version 1.7.8, October 9, 2003 53
13. Q. How do I get the Function Keys to work?
A. The Function Keys are “Protected Keys” and require holdingthe function Access Key (Rt Thumb Up) at the same timeactivating the desired Function Key. For more on ProtectedKeys see Using Protected Mode Keys, page 23.
14. Q. How can I use the APPLICATION and WINDOWS keys foundon a 104 key keyboard?
A. The 104 key keyboard mode is awith Program Mode<ENTER>. See Changing Default Settings & ProgramMacros, page 42.
15. Q. I can only find one connector to connect the DataHandErgonomic Keyboard and Mouse.
A. Some notebook computers such as the IBM Thinkpad, requirea “Y-Connector” to connect an external keyboard such as theDataHand Ergonomic Keyboard to the common single dualport.

54 User’s Guide, Version 1.7., Error! Reference source not found.
SECTION 10
WINDOWS NOTES & SHORTCUTKEYS
This section covers the shortcut keys useful with DataHand to speed up your Excel,Windows and Word usage by reducing mouse movement.

SECTION 10 WINDOWS NOTES & SHORTCUT KEYS
User’s Guide, Version 1.7.8, October 9, 2003 55
Windows Notes & Shortcut Keys:
Shortcut Keys using EXCEL with DataHand
CTL + ESC - Start menuALT + TAB- Switch between tasksCTL + F4 - Close current fileALT + F5- Close ExcelCTL + S- Save file
Numeric Entry / Basic Entry Modes:
Lock into FUNCTION mode (up):Shift to NAS to enter numbers.Cursor to next Cell for entry.
OR
Swap Function and NAS mode usage via program mode.Lock into NAS mode (up):
Enter numbersShift to Function (down) & use cursor to move from cell to cell.
Movement to Cell:ARROW - To move one at a time or let repeat occur.CTRL + HOME - Move to 1st cell.CTRL + END - Move to last call.CTRL + ARROW - Move to last active cell on Row or Column.F5 or CTRL + G - Move to Cell xx
(may type cell # or TAB and cursor to prev celllocation).
ALT + PGDN - Move cursor right a full screen.ALT + PGUP - Move cursor left a full screen.PGUP - Move cursor up a full screen.PGDN - Move cursor down full screen.
Mark Cells:SHIFT + ARROW- Mark the next cell.SHIFT + CTRL+END-Mark from cursor to END.SHIFT +CTRL+HOME-Mark from cursor to cell A1.SHIFT + CTRL + ARROW – Marks row or column.
(has various affects depending on cursor location).CTRL + Z - UndoCTRL + C - CopyCTRL + X - CutCTRL + V - Paste

SECTION 10 WINDOWS NOTES & SHORTCUT KEYS
56 User’s Guide, Version 1.7., October 9, 2003
Miscellaneous:Shift F3 - Open Function WizardShift F4 - Go to next empty cell in rowDBL Left Click - Edit on cellCTRL + F9 - Minimize current open fileCTRL + F10 - Toggle between small and large screen
Note: The main limitation using cursors is being unable to edit at the celllocation without deleting the cell data, unless you double click mouse on cell,or click on edit window, or use f2.
Shortcut Keys using Windows with DataHand
CTL + ESC - Start MenuALT + TAB - Switch between tasks
ALT SPACE N - Minimize application screen (do not need to chord)
SNGL RT CLICK TOP BAR + N - Minimize application screen
DBL LT CLICK TOP BAR - Toggle between full screen and small screen
Program Tools:ALT + F4 - Close current program windowCTL + F4 - Close current fileCTL + O - Open selection in fileCTRL + Z - Undo last
Selecting Files:CTRL + A - Selects all itemsSHIFT + ARROW - Include all items to the cursor as selectedSPACE - Select item at cursorCTRL + ARROW - Move cursor without changing selectionCTRL + SPACE - Add item at cursor to selectionF2 - Rename selected objectF5 - Refreshes current window
Button Selection:ENTER - Equivalent to clicking the Select buttonESC - Equivalent to clicking the Cancel button

SECTION 10 WINDOWS NOTES & SHORTCUT KEYS
User’s Guide, Version 1.7.8, October 9, 2003 57
Miscellaneous:CTRL DRAG - Copy object to new location (problem with using CTRL)SHIFT + F10 - Application key / sometimes right mouse clickPRNTSCRN - Copies screen image to clipboardALT + PRNTSCRN - Copies image of active window to clipboard
Shortcut Keys using WORD with DataHand
CTRL B - Toggle BOLD on/offCTRL U - Toggle UNDERLINE on/offSHIFT + ARROW - Mark characters during cursor movementSHIFT+CTRL+ARROW- Mark words during cursor movementSHIFT + END - Mark from cursor to end of lineDELETE - Deletes marked textHOME - Moves cursor to beginning of lineEND - Moves cursor to end of lineCTRL + ARROW - Moves cursor a word at a timeCTRL + HOME - Moves cursor to top of documentCTRL + END - Moves cursor to end of documentCTRL + Z - Undo lastCTRL + C - Copy to clipboardCTRL + X - Cuts to clipboardCTRL + V - Pase from clipboard

SECTION 10 WINDOWS NOTES & SHORTCUT KEYS
58 User’s Guide, Version 1.7., October 9, 2003
GETTING MORE HELP
DataHand® System’s customer service can be reached at (800) 875-7171 or(602) 233-6000. Please be prepared to give the customer service supportrepresentative the serial number and the version number of your DataHand®System and the type of computer you have.
You can also mail, fax or email your questions to:
DataHand® Systems, Inc.3032 N. 33rd Ave.Phoenix, AZ 85017-5201Attn: Customer Service Support
Fax: (602) 233-3434
E-Mail: [email protected]
Website: http://www.datahand.com