data validation tools - eyegene.nih.gov · the module dialog box appears. click browse (under...
TRANSCRIPT

© 2018 National Institutes of Health/CIT – Proprietary and Confidential
10-2 • BRICS USER MANUAL
Data Validation Tools
Chapter
10

10 CHAPTER 10 – DATA VALIDATION TOOL he Submission Tools assist researchers with the validation and upload of data into the repository. The validation component verifies that submitted data conforms to the required format and range values defined in the Data Dictionary. The tool references the Data Dictionary and validates the data associated with the files identified by the user for submission into the Data Repository. It provides a report of any data discrepancies in the form of errors and warnings. The errors highlight
when data does not conform to how that field has been defined. If errors are found, a submission package cannot be created. After successful validation, a submission package is created which allows the data to be submitted to the system with the upload component. The tool, which runs as a Java Web Start application, runs locally on a user's computer, requiring the Java runtime environment to be installed.
To ensure the quality of uploaded data and also to make data easy to query, data should be submitted in a specific format and range values should comply with the values defined in the data dictionary. It’s critical to understand the specific format which is defined by the data elements and form structure you are submitting your data against. All submitted research data must be validated against the values defined in the data dictionary prior to submission. The form structure templates serve as the template for data submission. To facilitate this process, we provide the Data Validation module that assists researchers with the submission of their data. The module accepts CSV files from a researcher and validates the files' content against the values defined in the data dictionary. These CSVs must be in the from the form structure templates available within the Data Dictionary. CSVs of data exported from an external system, such as redcap, that have not been formatted to match the form structure templates will not be recognized by the validation tool. For those CSV files that pass validation, the Data Validation module creates a submission ticket and submission package both in XML format. After that data are good for uploading. The submission ticket is used by the Data Upload module to upload the data (in the form of a corresponding submission package) to the repository.
T

© 2018 National Institutes of Health/CIT – Proprietary and Confidential
10-4 • BRICS USER MANUAL
10.1 SYSTEM REQUIREMENTS The Data Validation module runs locally on your machine. Note that the most recent version of Java Runtime Environment (JRE) (7 or higher) is required in order to run the module. Make sure your computer has it installed. The Validation Tool module (including any sub-modules) are available within the Data Repository module.
10.1.1 Module Input and Output Module Input: CSV files with clinical data or imaging metadata within form structure templates
from the data dictionary.
Module Output: A submission package and submission ticket (XML) ready for submission by the
Data Upload module. An error log with validation errors and warnings (if any).
10.1.2 CSV Checklist Before populating the form structure template in the form of a CSV file with data make sure ensure that the downloaded template contains the following: All data elements needed to capture data are included into the CSV file (and the form
structure). The form structure short name is entered in the cell A1 in the CSV file. The form structure version is entered in the cell B1 in the CSV file. The Main group (will all data elements) is present in the CSV file. The column A, starting from the A2 cell has no data, but has marks (x) that
represent the beginning of a new record. The columns that correspond to required DEs in the FS are populated with data. The group (if any) and data element names are the same as in the FS.
Note: the external checked – aka: there is an “X” in the “record” column for each new record. Ensnure there are no edits to the template and that the form hasn’t changed since it was downloaded.
10.1.3 Submission Package After the successful validation, the generated submission package includes: A submission ticket ( XML) A data file ( XML).
10.1.4 Validation Warnings If any validation errors or warnings are found, the module provides a detailed report of
any data discrepancies, errors, and warnings received.

Validation warnings are just warnings and they do not prevent the creation of the submission package. However, if any validation errors are found, a submission package cannot be created. In that case, you should the edit data to fix all errors, first, and then re-validate the data.
10.2 RUNNING THE DATA VALIDATION TOOL The Validation Tool module (including any sub-modules) are available within the Data Repository module. For steps downloading the CSV template, refer to the Data Dictionary module.
1. Log into BRICS, and navigate to your Workspace Workspace where all modules you have access to are displayed. Note: if the module is greyed out then you do not have access to the module. Please reach out to BRICS Operations to inquire about access should you not have access.
2. Click the Data Repository module from your Workspace. Note if the module is greyed out then you do not have access to the module. Please reach out to FITBIR Operations to inquire about access should you not have access.
© 2018 National Institutes of Health/CIT – Proprietary and Confidential
10-6 • BRICS USER MANUAL
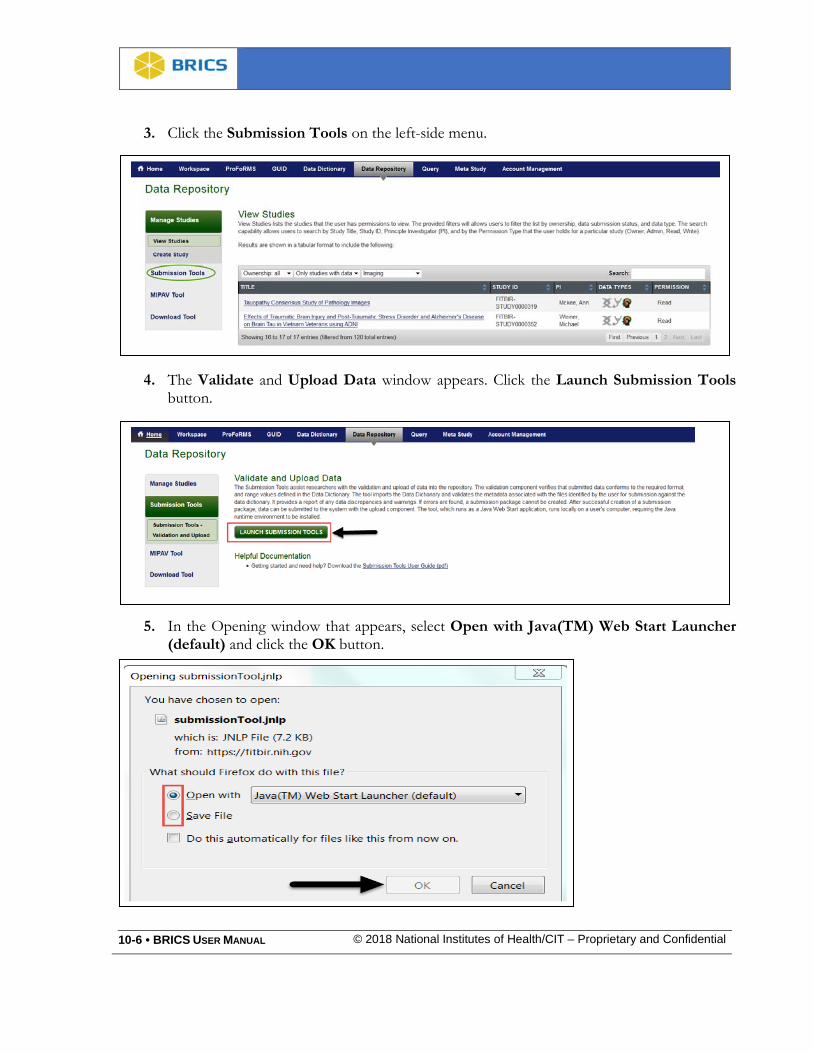
3. Click the Submission Tools on the left-side menu.
4. The Validate and Upload Data window appears. Click the Launch Submission Tools button.
5. In the Opening window that appears, select Open with Java(TM) Web Start Launcher (default) and click the OK button.

6. In the Java Runtime Environment window that appears next saying "Do you want to run this application?", click Run.
7. To continue, you MUST Accept the EULA agreement (this enables both the Validation and Upload Tools). If you click the Decline, only the Validation Tool will be enabled.

© 2018 National Institutes of Health/CIT – Proprietary and Confidential
10-8 • BRICS USER MANUAL
8. The module dialog box appears. Click Browse (under Working Directory) to navigate to the directory where the files for submission (CSVs) are located. We call it your Working Directory. Note: It is recommended that you store csv files in easy to access files with only the necessary files for validation for fastest speed.

9. Select the directory and click Open to load CSVs into the dialog box. The Loading Files window appears showing the progress.
10. Click Load Files. All files in the directory will be displayed.

© 2018 National Institutes of Health/CIT – Proprietary and Confidential
10-10 • BRICS USER MANUAL
Excluding Files From Validation To exclude files from validation, select individual file(s) (click to highlight) that are of TYPE UNKNOWN and those not needed for the submission. Hold Ctrl while clicking in order to highlight multiple files. Click Exclude Files. Note: Imaging files (ex. DICOM) should not be excluded in import.
Including Files For Validation To include files for validation, select the CSV files you want to be validated and press Include Files. Hold Ctrl while clicking in order to highlight multiple files.
11. Select individual file(s) (click to highlight) that are of TYPE UNKNOWN and those files not needed for the submission. Hold Ctrl while clicking in order to highlight multiple files. Click Exclude Files. Note: Excluding files are not specific to unknown file types. There are instances where you are selecting 1 form to validate and submit and there are instances where the forms are saved incorrectly and show up as “Unknown”. It’s recommended that you submit one form structure at a time as it makes resubmission easier should any data quality issues be idenitifed. In the ideal world, your Working Directory should contain only CSV files for validation.. Although very often it contains other files also (such as error logs and notes, etc.) In that case, you need to: Exclude from validation those files (and directories) that are not designated for validation. These files usually appear with Type= UNKNOWN under Files in the Working Directory; Include into validation the CSV data files that you would like to validate. These files have Type=CSV in the Files table.

12. Select the remaining file(s) (click to highlight) to be validated. All files that should not be validated should be in gray. Note: In this example, 3 of the .dcm(dicom) files below are relataed to subjects tests that are not meant to be submitted.

© 2018 National Institutes of Health/CIT – Proprietary and Confidential
10-12 • BRICS USER MANUAL
13. Click Validate Files button. If there are no errors, Click OK (All files are valid). The file(s) will then be highlighted in GREEN as Valid. If there are errors, Click OK (The validated files contain errors.) The file(s) will then be highlighted in RED as having an Error. Please make corrections to the file(s) and repeat steps above. Note: All Errors must be fixed. Files can pass validation with Warnings. Note: If there are no errors, you will see a prompt that reads “All files are Valid”. Select OK.” Same for if there are errors.
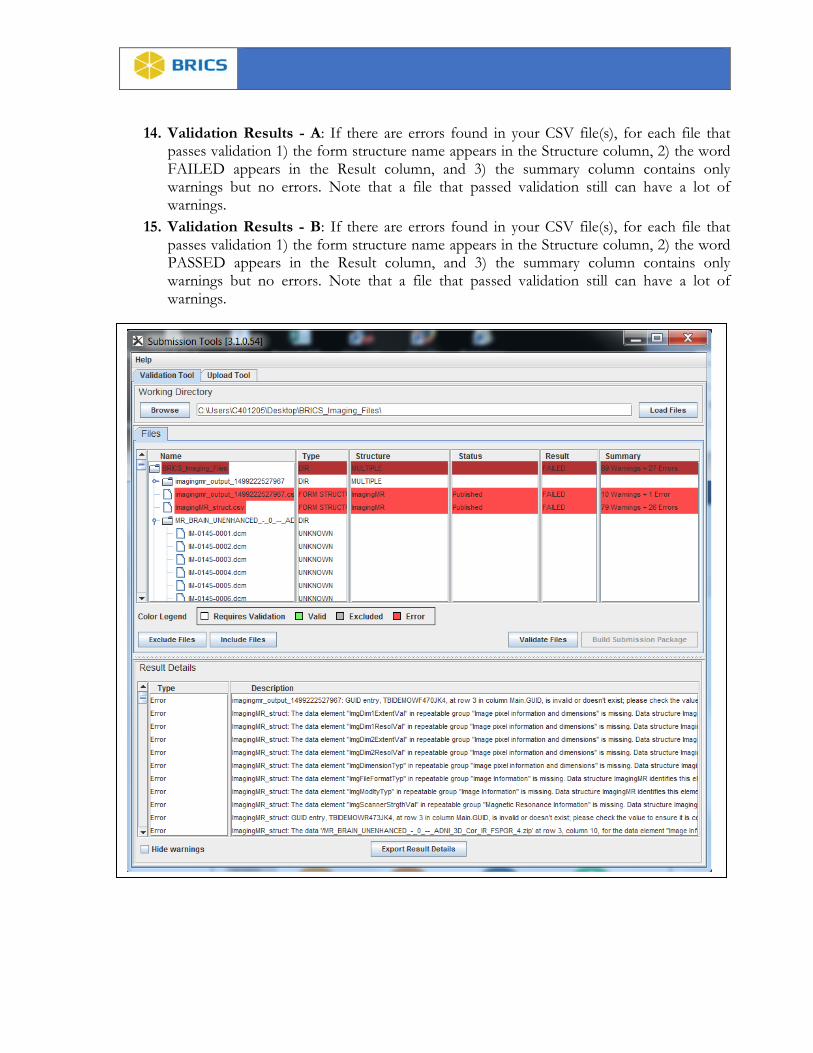
14. Validation Results - A: If there are errors found in your CSV file(s), for each file that passes validation 1) the form structure name appears in the Structure column, 2) the word FAILED appears in the Result column, and 3) the summary column contains only warnings but no errors. Note that a file that passed validation still can have a lot of warnings.
15. Validation Results - B: If there are errors found in your CSV file(s), for each file that passes validation 1) the form structure name appears in the Structure column, 2) the word PASSED appears in the Result column, and 3) the summary column contains only warnings but no errors. Note that a file that passed validation still can have a lot of warnings.

© 2018 National Institutes of Health/CIT – Proprietary and Confidential
10-14 • BRICS USER MANUAL
10.2.1 Error Logs Validation errors and warnings appear in the Result Details table. Files with warnings can be validated. However, files with errors must be fixed and re-validated, and then resubmitted for another validation round.
Validation errors appear when a CSV file has entries that are: In different format (other than defiled in the data dictionary for this data element); Not listed among permissible values for this particular data element; Have more than 1 permissible value separated by a semicolon ";" only if the data
elements is set to be a multiset. Some other errors.
Validation errors mostly appear when a data entry, which was defined as Required in the corresponding form structure, is missing in the CSV file.
10.2.2 Fixing Validation Errors Validation errors and warnings appear in the Result Details table. Files with warnings can be validated. However, files with errors must be fixed and re-validated, and then resubmitted for another validation round.
Validation errors and warnings can be exported into a text file - that makes working with them and fixing errors much easier.
To export validation errors or warnings, or both:
1. Click the Export Result Details, 2. In the Save dialog box that appears:
a) select a directory where you would like to save validation logs, b) specify what types of error log entries you would like to export. These could
be a) both errors and warnings (recommended only for smaller log files), c) errors only (recommended), or c) warnings only.
3. Type in your own file name and Click Save. 4. The log file will be saved in the designated directory under the chosen name.
10.2.1 Best Practices
By default, an error log file is created and stored in the same directory as your working files. We recommend that you create a designated error log directory and save validation logs there.
By default, an error log is saved under the "resultDetail.txt" name. We commend that you choose your own file name for an error log and that name is somehow

related to the name of your data file. E.g. if you have a data file let say "MyData.csv" you give the corresponding error log file the following name "MyDataErroLog.txt".
After you have exported all validation errors:
1. Open the log file in a text editor (MS Word, Notepad, Crimson, Notepadd++ - all these will work).
2. Open your CSV file in MS Excel or your preferable text editor that can work with CSV (not MS Word!).
3. Go through each entry in the error log and fix it in the CSV file. Save changes in the CSV file. Make sure you saved it as CSV. Some of these changes may require additional review and consultation with your principle investigator. If you have an error for data that you cannot change, please reach out to your BRICS point of contact.
4. Re-validate the fixed CSV file. Make sure that all errors are gone. 5. Create the submission package.
If you received numerous validation errors, we commend that you work on fixing them in batches. Fix a few errors, save the fixed CSV file and re-run it through the Data Validation module. It will still give you a lot of errors, but we hope it would be fewer that before. Save the new error log and go through it fixing a few more errors. Re-run validation. Repeat these steps until you get 0 (zero) errors.

© 2018 National Institutes of Health/CIT – Proprietary and Confidential
10-16 • BRICS USER MANUAL
10.3 DATA UPLOAD The Data Upload module helps researchers to upload data to the data repository. This phase is not accessible without a dataset that passed validation. The data should be uploaded in the form of a submission package (XML) that has a unique identifier - a submission ticket (XML). If you don't have a submission package ready, use the Data Validation module to create it. The module will also validate your data and make sure that they conform to the required format and range values defined in the data dictionary.
10.3.1 Running the Data Upload
The Data Upload module runs locally on your machine. In order to launch the module,
Perform the following actions: 1. Navigate to your Workspace,
2. Click the Data Repository module from your Workspace,
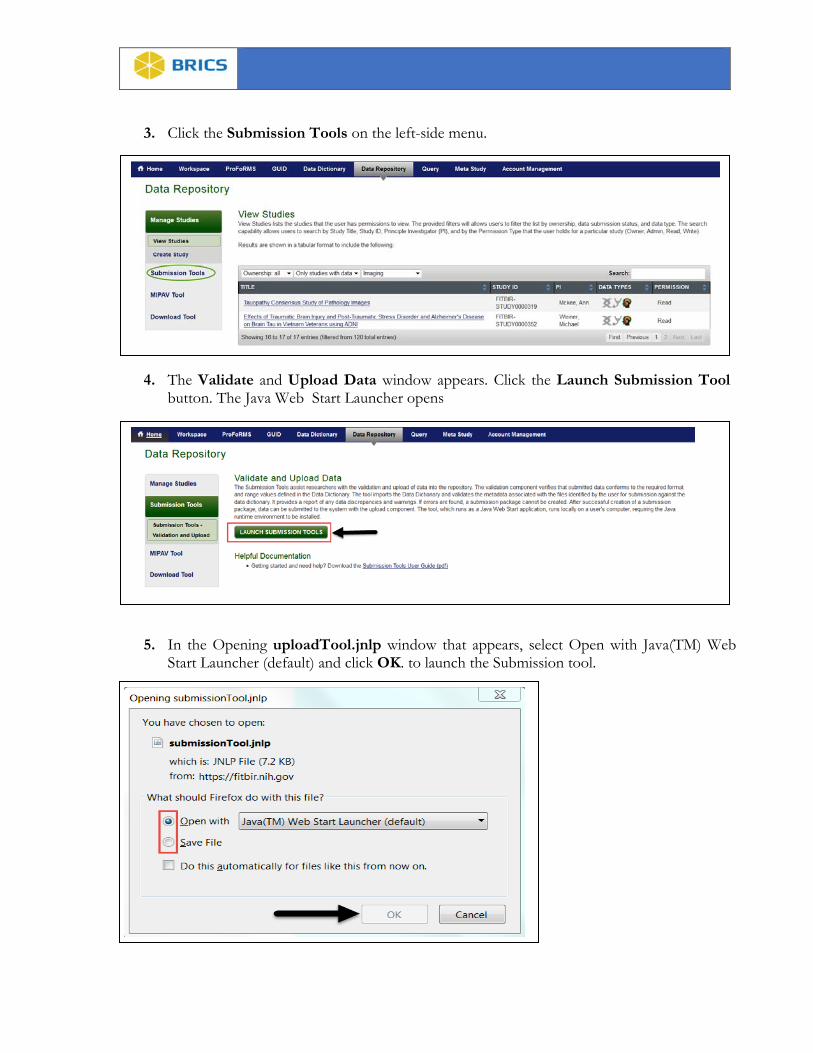
3. Click the Submission Tools on the left-side menu.
4. The Validate and Upload Data window appears. Click the Launch Submission Tool button. The Java Web Start Launcher opens
5. In the Opening uploadTool.jnlp window that appears, select Open with Java(TM) Web Start Launcher (default) and click OK. to launch the Submission tool.

© 2018 National Institutes of Health/CIT – Proprietary and Confidential
10-18 • BRICS USER MANUAL
6. In the Java Runtime Environment window that appears next saying "Do you want to run this application?", Click the Run button.
7. The EULA Agreement window appears displaying the data privacy user agreement. Read the agreement and click Accept if you agree. (this enables both the Valication and Upload Taools). If you click the Decline, only the Validation Tool will be enabled.

8. The Upload Manager window appears.

© 2018 National Institutes of Health/CIT – Proprietary and Confidential
10-20 • BRICS USER MANUAL
9. Use the drop-down Study Name menu to select the study name. Use the Refresh button to update the list of studies.
a) Navigate to the Submission Ticket (XML) box and use the Browse button to select the submission ticket file (XML).
b) Navigate to the Dataset Name text box and type in a unique name for your dataset. The dataset name must be unique to the selected study. Make it a meaningful name - an easy one to search for.
10. If accessing the Upload Tool immediately following the Validation Tool, items 2 and 3 of the Upload Tool are auto populated. Verify that the correct study was selected to upload the data to. Once information for Steps 1-3 have been confirmed, Click Start Submission Upload.
11. Data upload begins and the progress bar appears next to the uploading file name. Note: When you relaunch and attempt to go straight to “Upload” you have to use “Load Pending Submission” or Revalidate the data files.

12. The submission package appears in the Upload Queue table. In the Upload Queue table, you can watch the progress of your submission(s). The table will update as file(s) are being uploaded to the system. For successful upload(s), the Status (see the Status column) will be designated as "Completed".
Things to Note: If you need to cancel your submission, Click the Cancel button; To clear the completed submissions list, use the Clear Completed Submissions button located at the
bottom of the Upload Manager window. To clear the cancelled submissions list, use the Clear Cancelled Submissions button located at the
bottom of the Upload Manager window. To load pending submissions, use the Load Pending Submissions button located at the bottom of the
Upload Manager window.
ICON KEY
Notes
Important
Information

© 2018 National Institutes of Health/CIT – Proprietary and Confidential
10-22 • BRICS USER MANUAL
10.3.2 Best Practices
After submitting the data, to make sure that your dataset appears under the study you selected:
1. Navigate to the Data Repository > View Studies page. 2. Find your study on the study table. Note 3 icons located in the Data Types column.
If your study has any data submitted, at least one of the icons appears in color. 3. Select the study and click on the study name to open the Study Overview page. 4. On the study page, click on the "+" sign next to Dataset Submissions. 5. The table that contains all submitted datasets opens. Make sure that your dataset is
listed in this table. 6. Contact the BRICS System Administrator if you do not see the data you uploaded
The data types associated with a study are represented by three icons:
1. Double helix - represents genomics data; 2. Stethoscope - represents clinical assessment data; 3. Head profile - represents imaging data.
If the icons next to the study name are highlighted in color, the study has datasets of the highlighted types.
Things to Note: You can only upload data to the studies you have the data upload permissions. To make sure that the most recent list of studies is available for you, use the Refresh
button to update the list of studies. The name assigned to the uploading dataset must be unique for the selected study.
ICON KEY
Notes
Important
Information

10.3.1 Adding Submitted Data to the Download Queue The Data Download feature helps users to select and download datasets from the data repository to their own computer systems. Users may select datasets to download by placing them in their Download Queue (see below). Then, using The Download Tool, users may download selected datasets from the repository to their own systems. To Populate Download Queue: Perform the following actions:
1. Login to the system. 2. Navigate to the Workspace landing page
3. Click the Data Repository module.

© 2018 National Institutes of Health/CIT – Proprietary and Confidential
10-24 • BRICS USER MANUAL
4. Click the Manage Studies on the left-side tool bar. The View Studies list opens with the menu options.
5. Select the Study from which you wish to download a dataset by clicking on the Study
Tittle. [Note: View Studies lists the studies that the user has permissions to view]. The provided filters will allows users to filter the list by ownership, data submission status, and data type. The search capability allows users to search by: (Study Title, Study ID, Principle Investigator (PI), and by the Permission Type) that the user holds for a particular study (Owner, Admin, Read, Write).

6. Click on the + next to Data Set Submissions.
© 2018 National Institutes of Health/CIT – Proprietary and Confidential
10-26 • BRICS USER MANUAL
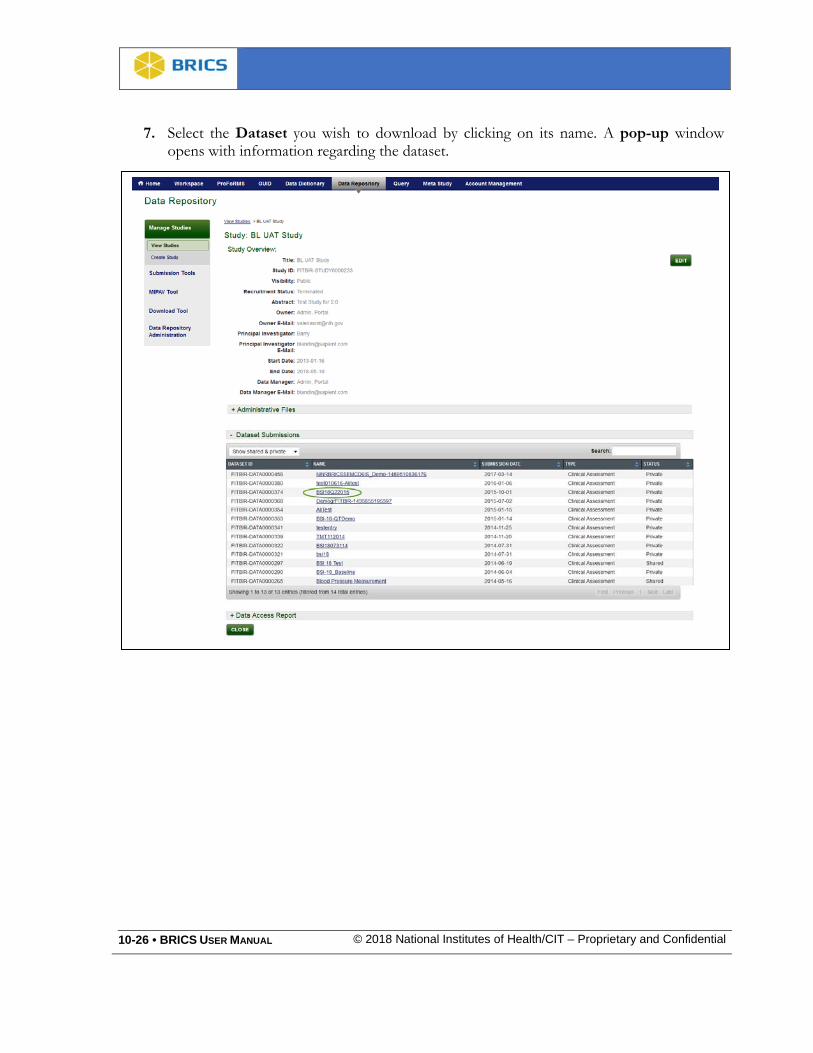
7. Select the Dataset you wish to download by clicking on its name. A pop-up window opens with information regarding the dataset.

8. Click Add To Download Queue.
9. The Dataset is Added to Download Queue. You will receive an e-mail indicating “Requested data is now available in the Download Manager”.

© 2018 National Institutes of Health/CIT – Proprietary and Confidential
10-28 • BRICS USER MANUAL
THIS PAGE HAS BEEN LEFT INTENTIONALLY BLANK