data assembly, part ii - university of...
TRANSCRIPT

Data Assembly, Part II
GIS Cyberinfrastructure Module
Day 4

Objectives
• Continuation of effective troubleshooting
• Create shapefiles for analysis with buffers, union, and dissolve functions
• Calculate polygon areas and line lengths
• Summarize rasters within buffers
• Derive DEM metrics: slope, aspect
• Manipulate display attributes

More Troubleshooting Tips
• When your processing results are not what you
expect, check that your input layer(s):
– Have the proper spatial reference
– Appear on your map as you expect
– Have data in their attribute table (except for floating
point rasters)
– Have the expected or reasonable number of records
– Have the expected or reasonable data in the attribute
table

• When a tool is processing and appears stuck:
– ArcGIS often says “Not Responding” when it is busy
processing
– Progress bars sometimes look frozen, but the process
is still running
– This makes it hard to decide when to kill a process or
when to sit back and wait
– To help decide, think about the size and complexity of
the input dataset and whether a long processing time is
reasonable
– Check ArcCatalog. You may see evidence of partial
results, which means the tool is (probably) processing
More Troubleshooting Tips

Data Recap
�You should now have 8 working data files for New England from Day 3:− 1 elevation raster
− 2 climate rasters
− 1 LULC raster
− 1 road layer
− 1 polygon hydrography layer
− 1 line hydrography layer
− 1 quality controlled species occurrence file
�Ensure that all data files are in the same datum and projection (they should be, but reproject if not!)

Buffer
• Development is often restricted within 150 feet of hydrologic
features
• These riparian buffers can be created using the Buffer Tool

Buffer� Open the Buffer Tool (use search to locate it)
� Select the reprojected, clipped polygon hydro layer as the Input Features
� Save the output to your Day 4 folder
� Set the Distance to 150 and select Feet from the dropdown list
� Select Full for Side Type
� Set the Dissolve Type to all (this will combine overlapping features)
� Click OK to run the tool

� Add the new shapefile to the map if it was not added automatically
� Note that if you need to keep the attributes of the buffered features DO NOT dissolve features
� Repeat the buffer procedure for the reprojected, clipped line hydro layer
Buffer
Zoom View
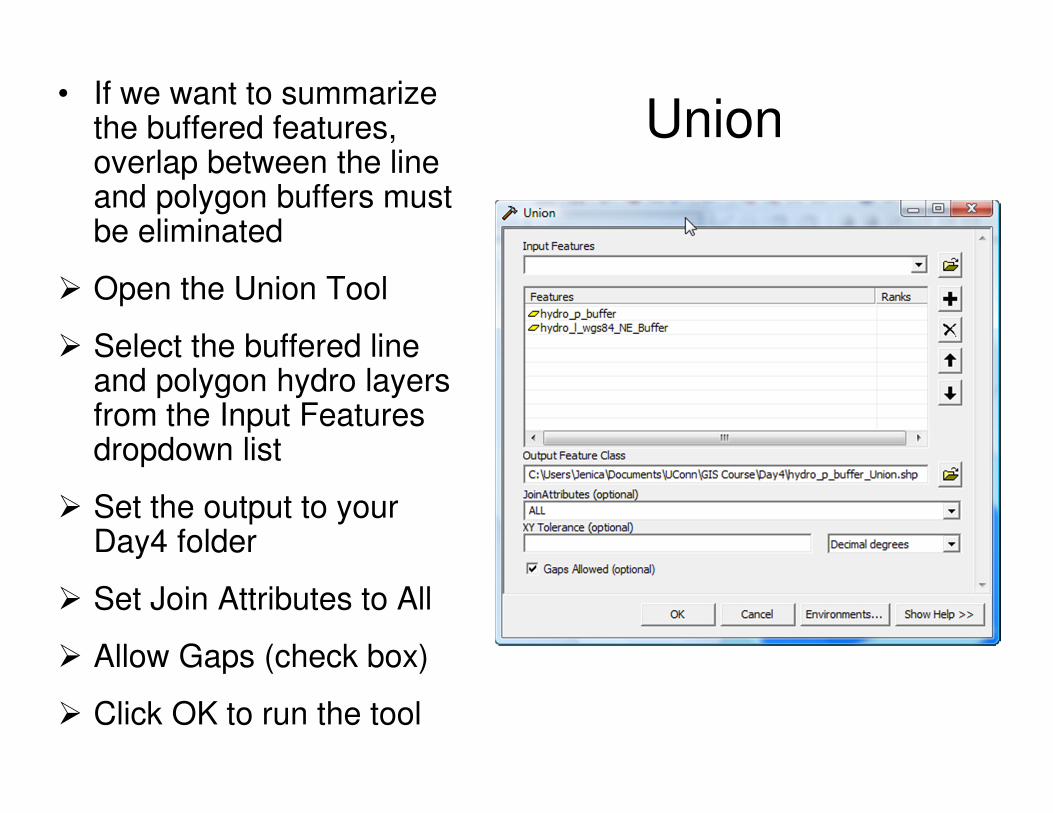
Union• If we want to summarize
the buffered features, overlap between the line and polygon buffers must be eliminated
� Open the Union Tool
� Select the buffered line and polygon hydro layers from the Input Features dropdown list
� Set the output to your Day4 folder
� Set Join Attributes to All
� Allow Gaps (check box)
� Click OK to run the tool

Union
� Examine the output relative to the buffer layer inputs
� Note that where there were overlapping polygons, new
polygons are created for each sub-region.
Zoom View
2 input layers
3 polygons
1 output layer
5 polygons

Dissolve• In order to eliminate the sub-region polygons, we can use the Dissolve Tool
� Open the Dissolve Tool
� Set the union layer as the Input Features
� Set the Output to your Day4 folder
� Don’t set dissolve fields or Statistics Field(s)
� Do not allow the multipart features or unsplit lines options (uncheck)
� Click OK to run the tool

Dissolve
• The dissolve of the union layer should yield single
polygons for all overlapping buffer regions.
• The protected riparian zone and water are now
represented as aggregated features on your map and
could be summarized on an aerial basis
Zoom View

Multipart vs. Single Polygons
• You have been working with single polygons thus far
– Each feature on the map is represented in the
attribute table individually
• Multipart features combine multiple map features into a
single entry in the attribute table.
– For example, if we ran the dissolve tool on the union
layer (previous step) and allowed multipart features,
you would see all of the same hydro polygons on the
map, but they would be represented as a single entry
in the attribute table

Attribute Propagation• In this example, we didn’t need the attributes of the
hydro features, just the area
• Dissolving features is the only way to obtain non-overlapping polygons in this case
• If we did need to retain the attributes, you would:
– NOT dissolve features when using the Buffer tool
– Join all features when using the Union tool
– NOT run the final Dissolve tool on the union result
• This would yield a single layer of buffered hydro features with their attributes (such as Lake and River names), but overlapping polygons would remain
• If you were to sum the area covered by buffered hydrography features for the region, you would be double-counting the areas of overlap, so user beware!!

Buffer
• Buffer your IPANE points by 10 km with no dissolve
� Do you see the difference between buffering with
dissolving and without?
� Why might you want to buffer points?

Measure Tool• A simple way to check your buffers is to use the Measure
tool
� Zoom so that you can see a
single point buffer
� Click the Measure Tool icon in the standard toolbar
� Click the , select “Distance” from the menu, then kilometers
� Your cursor will look like a corner square. Click on one end of the buffer and drag the cursor across the diameter. The length of the line you create will display in the Measure tool display in the units you selected.
� Convince yourself that your buffer tool worked as expected (note: you specified the buffer radius, so the diameter is 2x the buffer distance)

• The Measure Tool is designed for on-screen use
• What if you want to add feature measurements
(perimeter, area) to an attribute table?
• If our map was in a Geographic Coordinate System,
all measurements would be angular (unless ArcMap
reprojects on the fly, like in the Measure tool). For
example, a squared angular measurement does not
correspond to most ecological data
Calculate Area

Calculate Area� Search for and open the Calculate Areas tool
� Set your dissolve layer as the Input Feature Class and save
the new shapefile to your Day4 folder
� Click OK to run the tool
� Once the tool is complete, open the attribute table
• You should see a table that is identical to the input layer,
except that an area column has been added.
� What units are the areas in?

Alternative Method for Areas
� Open the Add Field tool
� Choose your reprojected
dissolve output layer as the
Input Table
� Name the field
� Select Float from the Field
Type dropdown list (Hint:
Click the “Show Help” button
to see what the different
types mean)
� Leave the other options
blank and click “OK”
� Open the attribute table after
running the tool. The field
should be added and
populated with zeros

Alternative Method for Areas� In the attribute table, right click the
new field name and select “Calculate Geometry…”
� You will likely see a warning message about calculating outside of an edit session. Click “Yes” since we’re modifying a new field, not modifying existing data.
� Select “Use coordinate system of the data source”
� Select units from the dropdown list. I chose units equivalent to the linear units of the Albers projection
� Click OK to run the tool. Once the tool is complete, compare these calculations to the previous method.
� Do the two methods agree?

Calculation Notes and Cautions
� How do the “Calculate Area” and “Add Field, Calculate
Geometry” methods differ in their result? Think about
numeric results and data formats.
• Perimeters can be calculated using the “Add Field,
Calculate Geometry” method as well.
• The Add Field tool can be finicky at times. One common
error is that the tool will run, but then your attribute table is
blank with some variant of a message that “data cannot
be loaded from source”. If this happens, use the Delete
Field tool to remove the field you just added, then re-run
the Add Field tool.

Calculate Line Length
• The length of line features can be calculated using the “Add
Field, Calculate Geometry” method we just used for the
area/perimeter of polygon features
� Use the Add Field tool to add a Length field to the
reprojected (Albers) line hydro layer
� Right click on the Length field name and select Calculate
Geometry.
� Select “Length” from the dropdown
list, set the coordinate system to
the input layer, and the units to
meters.
� Click OK to run the tool

Calculate Line Length� Check the attribute table after processing is complete.
� Use the identify tool with the on-screen Measure Tool to
convince yourself that these calculations are correct.

Zonal Statistics• The Zonal Statistics tool will summarize a raster layer within specified
features (within polygons, for example)
� Open the Zonal Statistics tool (Spatial Analyst � Zonal � Zonal
Statistics)
� Set the input layer as the IPANE point buffer layer you created on
page 17
� Set the Zone field to FID (stands for feature ID, ad unique ID number
assigned to each row of your attribute table) from the dropdown list
� Set the Input value raster as
your MAT dataset (bio_1)
� Save the output raster to your
Day 4 folder
� Select Mean from the statistics
dropdown list and check “ignore
NoData values”
� Click OK to run the tool

Zonal Statistics
• The result is a raster layer with mean MAT values within the buffers
�Explore the result with the identify tool to ensure you understand the output, especially areas where your buffer polygons overlap.
� Do you see any issues with the output?

Zonal Statistics
• You may have noticed that overlapping buffers are processed together. We will see a tool in the next session that avoids this problem.
• If you had non-overlapping buffers, the Extract to Point Tools could now be used to assign the buffer area mean from the zonal statistics result layer to specimen observation points.
� When might a buffer mean value, rather than a point value be desirable?
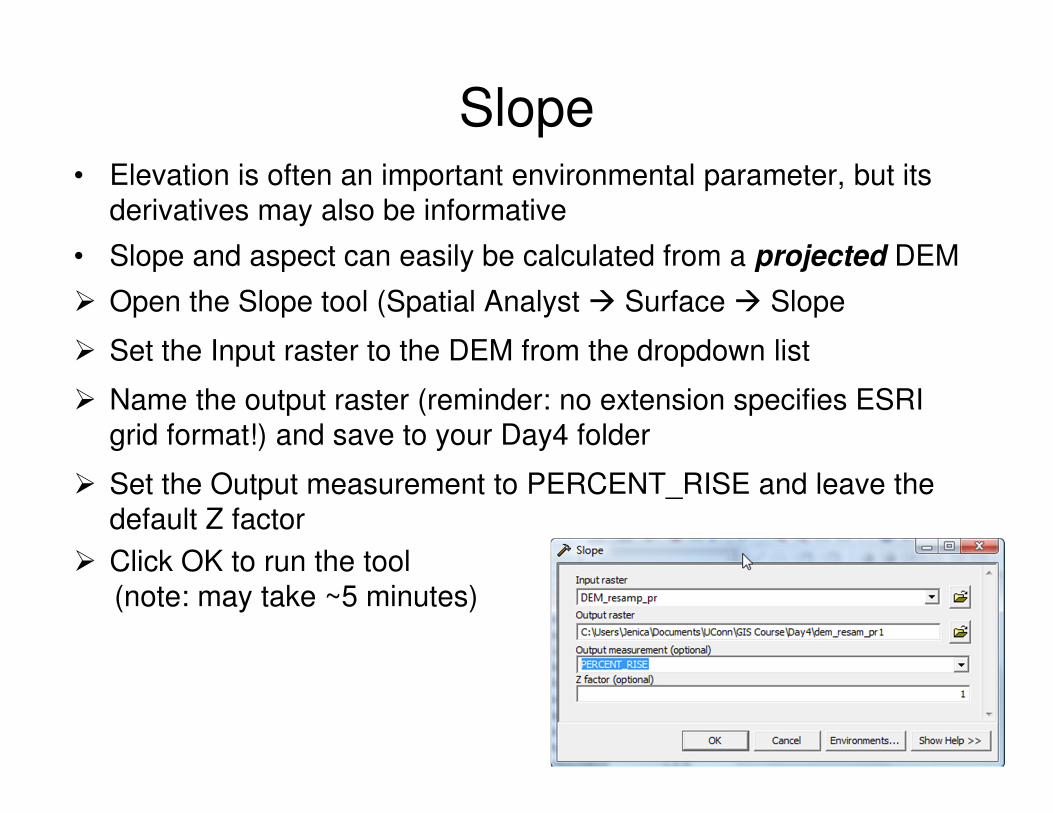
Slope• Elevation is often an important environmental parameter, but its
derivatives may also be informative
• Slope and aspect can easily be calculated from a projected DEM
� Open the Slope tool (Spatial Analyst � Surface � Slope
� Set the Input raster to the DEM from the dropdown list
� Name the output raster (reminder: no extension specifies ESRI
grid format!) and save to your Day4 folder
� Set the Output measurement to PERCENT_RISE and leave the
default Z factor
� Click OK to run the tool
(note: may take ~5 minutes)

Slope� Turn off all layers on your map except the new slope layer and
the New England boundary file
� If you want to set the “NoData” region outside of New England to
“no color”, open the layer Properties Symbology tab
� Check “Display Background
Value”
� Ensure the value is set to 0
� Select “no color” by clicking
next to the “as” dropdown
list.
� Click OK

Slope� Do the results seem reasonable?
� What is the spatial resolution (pixel size)? How does this
relate to the input layer?
Percent Slope

Aspect• Aspect can be calculated from a projected DEM
� Open the Aspect tool (Spatial Analyst � Surface � Aspect)
� Examine the required settings
� How is this tool similar or different from the Slope tool in its
required settings?
� Run the Aspect tool and examine the results
� Do the results seem appropriate? How would you find out
how this tool works?

Tool Descriptions & Details
• The ESRI website houses full documentation of the tools
available in ArcToolbox
• Learning how to understand tools you are not familiar
with will be critical to using ArcMap in the future
� Navigate to: http://webhelp.esri.com/arcgiSDEsktop/9.3/index.cfm?TopicName=Aspect
� Read the Aspect tool description for an explanation of
how the tool works.
� In addition to the tool description, command line and
scripting syntax are provided. These are the scripts that
are operating in the background when you use tools from
ArcToolbox.

Skills Summary• Prepare hydrography protected areas:
– Buffer polygons and lines with dissolve
– Union buffers to combine line and polygon buffers
– Dissolve union to produce a single buffered hydrography layer for analysis
• Calculate feature areas and lengths
• Measure Tool
• Buffer points without dissolve
• Zonal Statistics Tool
• Calculate DEM derivatives:
– Slope
– aspect

Assignment• In preparation for our guest lecture by Dr. Walter Jetz,
please complete the R tutorial posted on the course website (sections 0, 1.1-1.4, and 1.7 only).
• R is a freely available software package that is quickly becoming the most used statistical and modeling software in many scientific fields.
• To complete the tutorial, you will need to either download and install R on your own computer, or use a University computer with R installed. R is freely available online and instructions for downloading are included in the tutorial. Many computers on campus also have R installed (many more than ArcGIS).
• Please also install the following packages (see the tutorial for installing packages): maptools, RColorBrewer, classInt, sp, spdep