data analytics with hpc - archer.ac.uk · overview • practical aim: – to practice some common...
TRANSCRIPT

Data Analytics with HPC Practical – Data Cleaning with Python
1

Reusing this material
This work is licensed under a Creative Commons Attribution-NonCommercial-ShareAlike 4.0 International License.
http://creativecommons.org/licenses/by-nc-sa/4.0/deed.en_US
This means you are free to copy and redistribute the material and adapt and build on the material under the following terms: You must give appropriate credit, provide a link to the license and indicate if changes were made. If you adapt or build on the material you must
distribute your work under the same license as the original.
Note that this presentation contains images owned by others. Please seek their permission before reusing these images.
2

Overview • Practical Aim: - To practice some common techniques for cleaning and preparing
data directly in Python
• Practical based on Section 2 of “An introduction to data cleaning with R” from Statistics Netherlands - Available on CRAN at
http://cran.r-project.org/doc/contrib/de_Jonge+van_der_Loo-Introduction_to_data_cleaning_with_R.pdf
3

Practical Contents • Part 1 – using pandas read_csv() to read csv data into a
data frame, this illustrates - Header row - Setting column names - Using column classes - Coercion
• Part 2 – dealing with unstructured text data. Artificial example that illustrates various techniques - Pattern matching and regular expressions - Python lists and functions - More coercion
4

Part 1 • Reading data into a data frame

Logging in and getting started on your own laptop Prerequisites • Python 2.7 and Conda.
Command line install: • conda create --name pythonData • conda install -n pythonData Jupyter pandas • source activate pythonData • jupyter notebook • Open http://localhost:8888 in browser.
6

Logging in and getting started on RDF • Open a terminal window and run the following commands: • # Login • > ssh [email protected] • # Load python modules • > module load python • > module load anaconda • # Create working directory • > mkdir dataCleaning • > cd dataCleaning • # create the input data files • nano unnamed.txt • nano daltons.txt • ipython notebook --no-browser --port=8889 (or any no. 8000-9000)
7

On Mac or Unix connection to RDF • Open another terminal window (mac or Unix) and run this
command: • ssh -N -f -L localhost:8888:localhost:8889
• Go to http://localhost:8888 in your browser. Open the dataCleaning directory and create a new notebook to work in.
8

Windows connection to RDF • Open putty set ssh connection: • Host Name: user@IP • port: 22 • set putty/connections/SSH/tunnels • source: local port:8888 • Destination: remote server: localhost:8889
9

Setting up our data files • Create a text file called unnamed.txt. - > nano unnamed.txt
• Put the following into this file:
10
21,6.0 42,5.9 18,5.7* 21,NA
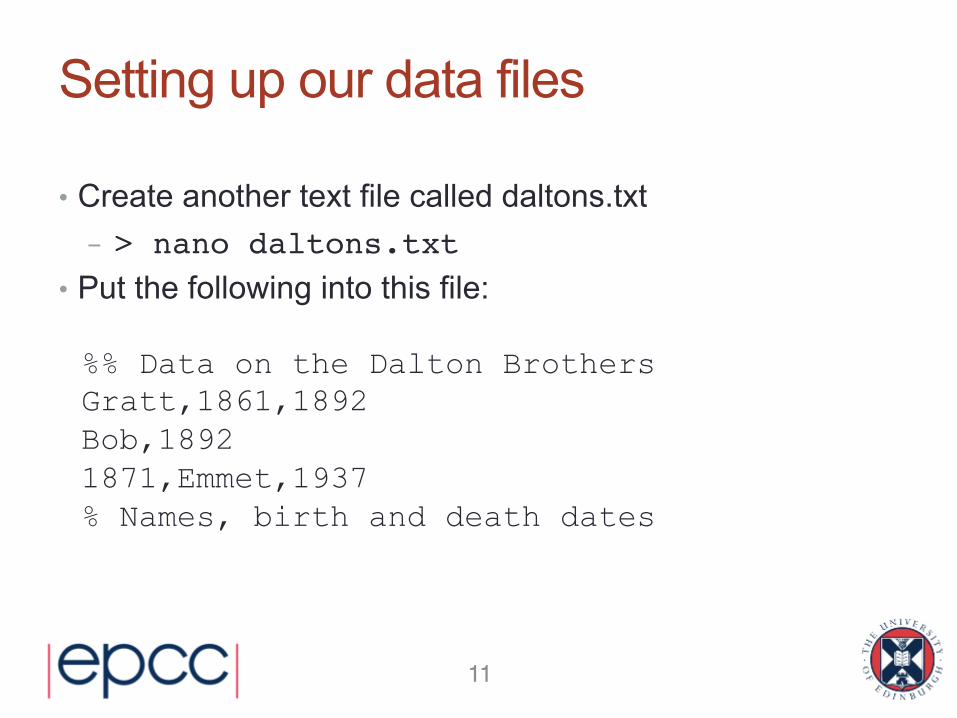
Setting up our data files • Create another text file called daltons.txt - > nano daltons.txt
• Put the following into this file:
11
%% Data on the Dalton Brothers Gratt,1861,1892 Bob,1892 1871,Emmet,1937 % Names, birth and death dates

read_csv using pandas • Pandas is the Python Data Analysis Library
• Import the pandas module as pd • Read this with pd.read_csv() - What has happened to the first row?
• now a header
• Read this again with • header=None as an argument - What has happened now?
12

Setting the column names (1) • Let’s read the data into a Python object this time and also
set the column names.
13

Setting the data type
14
• Let’s convert the height column into numeric values

Setting the data type
15
• Let’s convert the height column into numeric values

Structure of the Data Frame • Let’s check the structure - It’s a data frame containing:
• an age column of ints • a height columns of floats.
16
PART 2 Dealing with unstructured text data

Dealing with unstructured data Step 1 – Read the file Step 2 – Select only lines containing data Step 3 – Split each line into its separate fields Step 4 – Standardise the rows Step 5 – Transform to a data frame Step 6 – Normalise or coerce to the correct type
%% Data on the Dalton Brothers Gratt,1861,1892 Bob,1892 1871,Emmet,1937 % Names, birth and death dates
18

Step 1 - readlines() • readLines reads a file and returns a character vector,
where each element is one line from the file
19
• Use readlines() to read this into Python

Step 2 – Selecting lines only with data
• In our example a % at the beginning of the line indicates a comment. Let’s remove those lines.
• To do this we first need to learn about patterns and regular expressions
20
• Using a sample data set – iris
iris = pd.read_csv('https://github.com/pandas-dev/pandas/raw/master/pandas/tests/data/iris.csv')

Step 2 – Selecting lines only with data
21

Using List Comprehension • Python's list comprehension applies a function to each
element in a list.
• A simple pattern match in Python
• Use list comprehension to match the pattern in every item in the list
• Put matches into new list
22

Regular Expressions in Python • As before, using regular expressions
• ^ matches pattern at start •
• $ matches pattern at end
• [] character class, match characters enclosed in [ ]
• For more see help(re) for full explanation
23

An aside on Simple string matching alternatives
24

Subsetting and Logicals • Logical and &
• Logical or |
• Logical not ~
25
• Note difference in behaviour between == and =
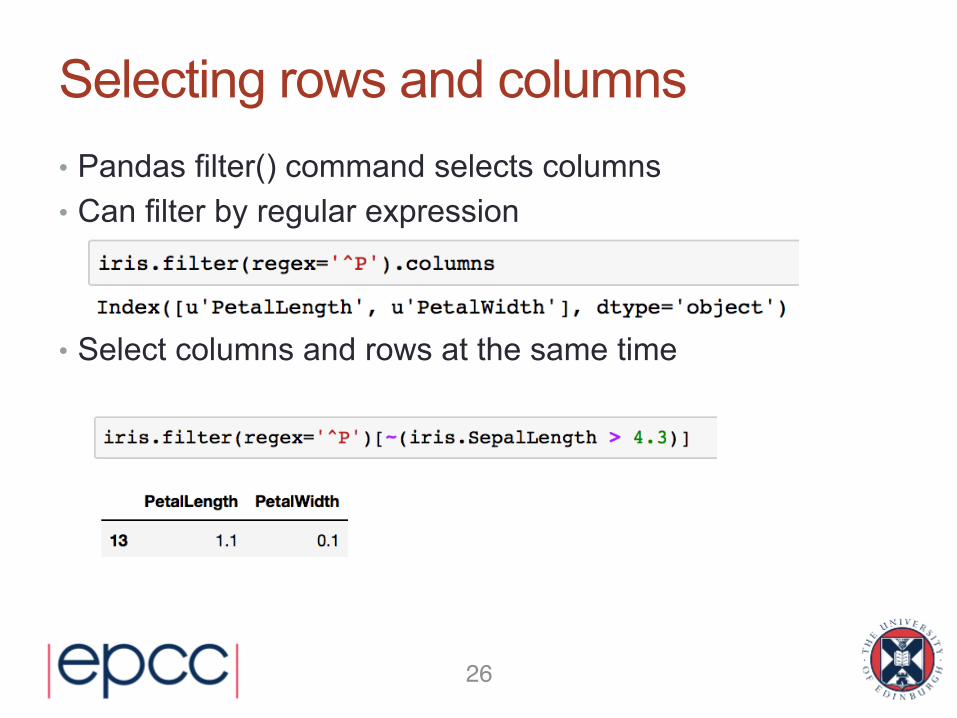
Selecting rows and columns • Pandas filter() command selects columns • Can filter by regular expression
• Select columns and rows at the same time
26

Step 2 (cont) Selecting lines only with data • Find lines starting with a % sign
27
• Remove those lines starting with a % sign

Step 3 – split lines into fields • For each line, we now want to extract the content for each
field • We now need to know about splitting lines and learn
about lists in Python
28

Python Lists • In a Python a list can contain objects of different types,
including others lists
• [] retrieves and object from the list. Indexing starts at zero.
• Can select a range of values
• Use – to count from end
• From second last to end`
29

split • split() – splits a string into a list of substrings at the point
indicated by the split pattern
30

Step 3 (cont) split lines into fields • Use split() to split each line into data chunks • Use strip() to remove whitespace characters such as \n
• Do this for each line in dat
31

Step 4 – Standardise Rows • Now we want to make sure each row has the same
number of fields and in the same order • Let's write a function to process each row.
32

User-defined functions in Python def my_function (arg1, arg2, ... ):
statements return(object)
code not in my_function
• Objects in the function are local to the function • The object returned can be any data type • Functions are stored as objects • An explicit return statement is required • : marks the start of the body of the function. The body must be
indented, the end of the indentation marks the end of the function.
33

assign_fields function • So let’s write a function that takes the list representing
each line, extracts the person’s name, their birth and death dates and re-orders them accordingly.
• Let’s call this function assign_fields and store it in a file called assign_fields.py
• Open a text file with: nano assign_fields.py
34

assign_fields function
35

Step 4 (cont) • Save the assign_fields.py file and restart ipython • Read the file in again after re-starting ipython
• Let’s run the assign fields function on the elements of field_list
36

Step 5 – Transform to a data frame • Let’s convert list of standardised rows into a data frame.
37

Step 6 – Normalise & coerce to correct type
• Now need to coerce our columns to the correct types eg. numerics, characters, categories, …. In this case birth and death, need to be numerics
38
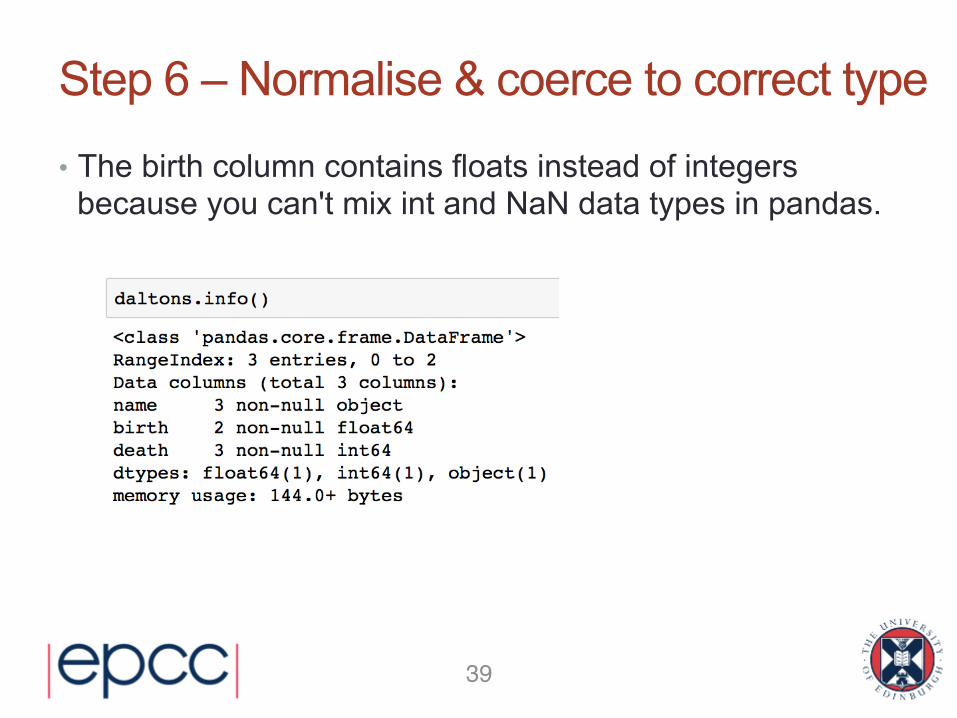
Step 6 – Normalise & coerce to correct type
• The birth column contains floats instead of integers because you can't mix int and NaN data types in pandas.
39

Repeatability
40
• Storing the instructions in a file along with comments enables repeatability
• Ipython notebooks allow nicely formatted comments, code, and output to be mixed.

Fixing character vectors – re.sub • sub() - replaces a pattern
• Can choose how many occurrences to replace
41

Fixing character vectors – re.sub • Apply a substitution across every string in a list
42

Parallel processing in Python • Can use the ‘multiprocessing’ module to run code across
more than one processor • Serial version:
• Parallel version:
43