csi forensics minilab - minione systems · csi forensics minilab (m3005) student s guide v062118...
TRANSCRIPT
CSI Forensics MiniLab Student’s Guide
Cat# M3005Version 062118
2 (858) 684-3190 theminione.com [email protected] is a registered trademark of C.C. Imex. GelGreenTM is a trademark of Biotium. Patents Pending.
(858) 684-3190 theminione.com [email protected] is a registered trademark of C.C. Imex. GelGreenTM is a trademark of Biotium. Patents Pending.
CSI Forensics MiniLab (M3005)Student’s Guide v062118
1. Exercise caution when heating or melting reagents.
2. Exercise caution when working with electrical equipment.
3. Gloves and eye protection should be used whenever needed as part of good laboratory practice.
4. Always wash hands thoroughly after handling biological materials or reagents.
Laboratory Safety
Table of Contents
Laboratory Safety 2
Objectives and Background 3
Hair Analysis 4
Fingerprint Analysis 6
DNA Analysis 7
Instructions 8
Results and Analysis 11
Appendix A - What is Gel Electrophoresis? 12
Appendix B - TBE Buffer Dilution Instructions 13

3 (858) 684-3190 theminione.com [email protected] is a registered trademark of C.C. Imex. GelGreenTM is a trademark of Biotium. Patents Pending.
(858) 684-3190 theminione.com [email protected] is a registered trademark of C.C. Imex. GelGreenTM is a trademark of Biotium. Patents Pending.
CSI Forensics MiniLab (M3005)Student’s Guide v062118
Objectives and Background
• To develop an understanding of electrophoresis principles.
• To understand and use forensic science principles to analyze data and to determine a probable conclusion.
ScenarioDr. Phillip Ward, a prominent physician, was found dead in his apartment. The cause of death was determined to be ingestion of potassium cyanide. Dr. Ward lives alone and does not own any pets. The police suspect that this may be a suicide case, but they are not sure at this time. Your team of forensic specialists had been assigned to this case and upon examining the crime scene, you found several pieces of evidence.
Traces of potassium cyanide were found in Dr. Ward’s coffee cup. When examining the cup, you lifted some fingerprints. On floor of the kitchen, you found a piece of hair that did not match the color of the victim’s hair, which was light brown. Lastly, among the trash in the apartment, you found a bag with white powder, which was tested in the lab and found to contain traces of potassium cyanide. You also found an eyelash stuck on the bag. There was just enough of the hair root on the second hair sample that you were able to extract a DNA sample from it. You also took light microscope images of both hair samples.
The police want information based on the physical evidence as soon as possible. Does the evidence support a suicide theory, or could this be a murder case? Is there evidence that someone other than Dr. Ward was in his apartment?
Crime Scene Exemplars and EvidenceDNA Samples:
• DNA V (Victim)
• DNA H (Hair 2)
Fingerprints:
Hair Samples:
Other:
• Coffee cup
• Bag with white powder residue
1. Exercise caution when heating or melting reagents.
2. Exercise caution when working with electrical equipment.
3. Gloves and eye protection should be used whenever needed as part of good laboratory practice.
4. Always wash hands thoroughly after handling biological materials or reagents.
Exemplar Collected Evidence
Victim Lifted fingerprint 1 on coffee cup Lifted fingerprint 2 on the bag
Exemplar Collected Evidence
Victim Microscopic image of hair 1 Microscopic image of hair 2

4 (858) 684-3190 theminione.com [email protected] is a registered trademark of C.C. Imex. GelGreenTM is a trademark of Biotium. Patents Pending.
(858) 684-3190 theminione.com [email protected] is a registered trademark of C.C. Imex. GelGreenTM is a trademark of Biotium. Patents Pending.
CSI Forensics MiniLab (M3005)Student’s Guide v062118
The police have been identifying and investigating suspects in the possible murder of Dr. Ward. They have narrowed the list of suspects to three. The police collected samples of their DNA, fingerprints and hair, as well as samples from the victim, Dr. Ward.
(S1) Dr. Caroline Powell: Dr. Powell is a colleague of Dr. Ward’s and they were co-owners of their joint practice for the past ten years. Employees remarked that Dr. Powell seemed to resent Dr. Ward for his success and felt eclipsed by him. Dr. Powell had been heard arguing with Dr. Ward recently. Now that Dr. Ward is dead, their practice belongs solely to her. She does not have an alibi. Dr. Powell owns a cat, and has light brown hair.
(S2) Mrs. Julie Fischer: A neighbor of Dr. Ward’s in the same apartment building. Mrs. Fischer owns a Pomeranian. Other neighbors said that Dr. Ward had complained about Mrs. Fischer’s dog barking too loudly and had threatened to report her to their building management. Mrs. Fischer claims that she was eating out with her husband that night. Her husband’s version of the story is slightly different. Mrs. Fischer has dark colored hair.
(S3) Miss Lauren White: The receptionist at Dr. Ward’s practice. She is also the girlfriend of Dr. Ward’s nephew, Oliver. Oliver was Dr. Ward’s only living relative and was the beneficiary of his life insurance policy. Miss White claims that she was at the movies that night, but no one can confirm her alibi. Miss White does not own any pets, but Oliver owns a cat. Ms. White has dark colored hair.
Suspects
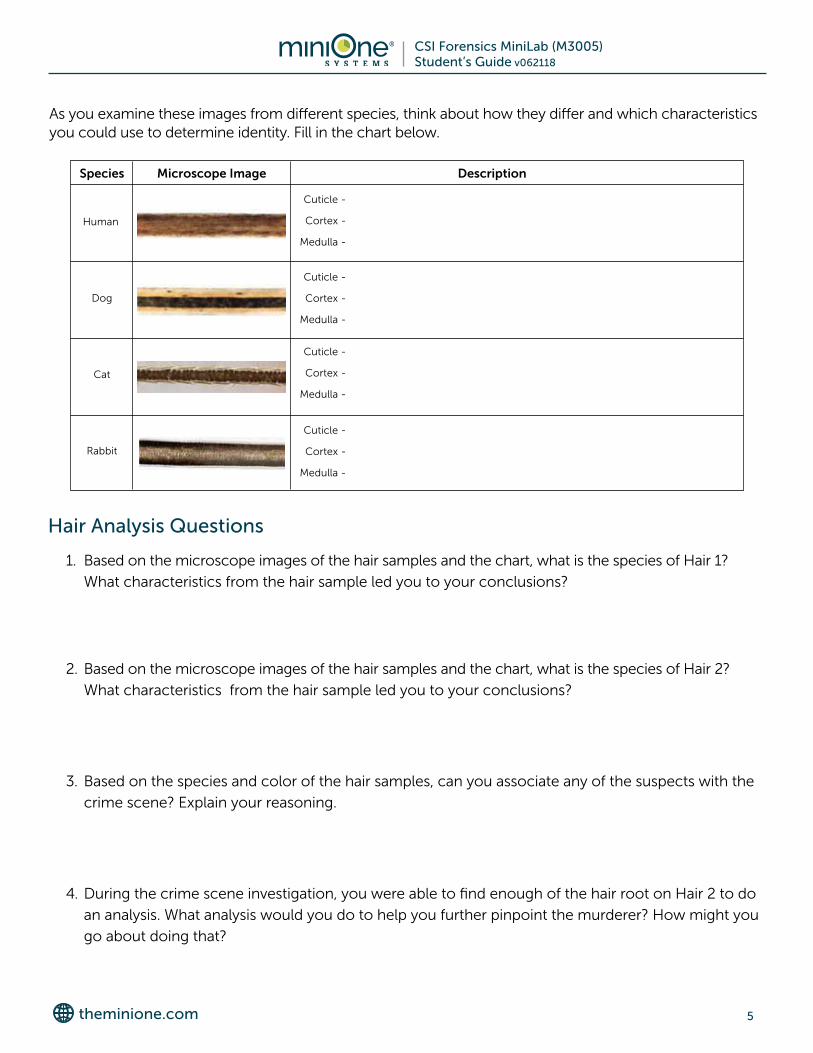
Hair AnalysisHair can be important pieces of evidence during an investigation. Since hair is easily transferred during physical contact, hair samples can associate a person to a crime scene. What would you do if you were given hair and asked to determine if it came from a suspect? One of the first questions a scientist will ask is whether the hair came from an animal or a human. If the hair is of animal origin, they will examine its morphology with a light microscope to determine the species. However, it is not possible to distinguish the hair between individual animals.
If the hair is from a human, it may be possible to identify individuals. Although the morphology of human hair is shared across individuals in the population, there are certain physical characteristics (such as arrangement, distribution or appearance) that skilled scientists can use to distinguish between people.
Cortex MedullaCuticlePhysical Structure of Hair
Cuticle - outer coating, made of overlapping scales
Cortex - main body of hair, is protein-rich and contains pigment granules
Medulla - center core, may be absent, fragmented or distinctly structured
Suspect Dr. Powell Mrs. Fischer Miss White
DNA Sample S1 S2 S3
Fingerprint
Hair Sample
5 (858) 684-3190 theminione.com [email protected] is a registered trademark of C.C. Imex. GelGreenTM is a trademark of Biotium. Patents Pending.
(858) 684-3190 theminione.com [email protected] is a registered trademark of C.C. Imex. GelGreenTM is a trademark of Biotium. Patents Pending.
CSI Forensics MiniLab (M3005)Student’s Guide v062118
Hair Analysis Questions
1. Based on the microscope images of the hair samples and the chart, what is the species of Hair 1?
What characteristics from the hair sample led you to your conclusions?
2. Based on the microscope images of the hair samples and the chart, what is the species of Hair 2?
What characteristics from the hair sample led you to your conclusions?
3. Based on the species and color of the hair samples, can you associate any of the suspects with the
crime scene? Explain your reasoning.
4. During the crime scene investigation, you were able to find enough of the hair root on Hair 2 to do
an analysis. What analysis would you do to help you further pinpoint the murderer? How might you
go about doing that?
As you examine these images from different species, think about how they differ and which characteristics you could use to determine identity. Fill in the chart below.
Species
Human
Dog
Cat
Rabbit
Microscope Image
Cuticle -
Cortex -
Medulla -
Cuticle -
Cortex -
Medulla -
Cuticle -
Cortex -
Medulla -
Cuticle -
Cortex -
Medulla -
Description
6 (858) 684-3190 theminione.com [email protected] is a registered trademark of C.C. Imex. GelGreenTM is a trademark of Biotium. Patents Pending.
(858) 684-3190 theminione.com [email protected] is a registered trademark of C.C. Imex. GelGreenTM is a trademark of Biotium. Patents Pending.
CSI Forensics MiniLab (M3005)Student’s Guide v062118
Fingerprint AnalysisFingerprints are more unique than DNA: each one is distinctive and different. Even identical twins, who have identical genetic information, do not share the same fingerprints. Fingerprint formation does have some genetic basis, but they are actually physically formed during fetal development. As pressure is exerted on the fetal skin layers, the result is the formation of ridges and patterns. Fingerprint patterns are set for life and do not change when a person ages, although the prints can acquire scars or get worn down.
Of all types of physical evidence left at a crime scene, fingerprints are still considered one of the best and most reliable. There are three different categories of fingerprint evidence: patent prints, latent prints, and plastic prints.
Patent prints are those left behind by a substance actually on the finger (like paint or blood) and are visible to the naked eye.
Latent prints are not visible to the naked eye, and are left by sweat and oils on the fingertips. Fingertips contain pores, which are connected to sweat glands. When you touch a surface, you leave fingerprints because of this sweat and other skin oils. Investigators use special methods and tools to retrieve these fingerprints depending on the object or item they are on.
Plastic fingerprints are imprints caused by the finger pressing into an impressionable surface such as a freshly painted railing. Scientists can pinpoint minute differences in fingerprint patterns to distinguish between them. You will take on this role today by determining if any of the suspects could have left fingerprints at the crime scene.
Common Fingerprint Pattern Classifications
Left Pocket Loop WhorlTented Arch
Plain Arch Plain Whorl Left Loop Right Loop
Double Loop Whorl Right Pocket Loop Whorl
1. Using the fingerprint guide, identify the fingerprint patterns for each of the suspects and the victim.
2. What fingerprint patterns can you pick out in the fingerprints on the coffee cup? On the bag?
3. Based on the fingerprint analysis, which suspect is more suspicious, if any? Why?
Fingerprint Analysis Questions
7 (858) 684-3190 theminione.com [email protected] is a registered trademark of C.C. Imex. GelGreenTM is a trademark of Biotium. Patents Pending.
(858) 684-3190 theminione.com [email protected] is a registered trademark of C.C. Imex. GelGreenTM is a trademark of Biotium. Patents Pending.
CSI Forensics MiniLab (M3005)Student’s Guide v062118
DNA AnalysisEvery individual is unique, but within your very DNA exist clues to your genetic history and heritage. These clues are held in the non-coding regions of DNA, where random mutations are relatively common. Since these minor changes usually do not affect genes essential to survival, the variation is passed along from parent to offspring. Over generations, these changes accumulate and the DNA regions develop distinct patterns, like a genetic “fingerprint”. To analyze these patterns, scientists use a method of genetic profiling called DNA fingerprinting. DNA fingerprinting takes advantage of these inherited sequences, and uses them to identify the genetic similarities between certain individuals. Restriction enzymes recognize particular DNA sequences, and the length of the DNA between these restriction sites is variable in different people based on their inherited genes. The resulting DNA fragments are then analyzed using a DNA separation technique called gel electrophoresis (for more information on Gel Electrophoresis, refer to Appendix A). When separated by gel electrophoresis, a banding pattern for each individual’s DNA is created based on fragment size. This pattern can then be compared with the banding patterns of other individuals. The more similar banding patterns are, the higher the probability that individuals are related. DNA fingerprinting techniques are used in many areas, from crime scene forensics and paternity cases, to healthcare and research.
1. What is DNA and what does it do?
2 What are chromosomes and how many copies do you have in each of your cells? Who did they come from?
3. How much DNA do you share with each of your parents? How much DNA do you share with your siblings?
4. What are some characteristics or properties of DNA?
DNA Analysis Questions

8 (858) 684-3190 theminione.com [email protected] is a registered trademark of C.C. Imex. GelGreenTM is a trademark of Biotium. Patents Pending.
(858) 684-3190 theminione.com [email protected] is a registered trademark of C.C. Imex. GelGreenTM is a trademark of Biotium. Patents Pending.
CSI Forensics MiniLab (M3005)Student’s Guide v062118
Part I - Electrophoresis
MiniOne Visual Instructions
Materials
1 MiniOne® Casting System1 MiniOne® Electrophoresis System1 agarose GreenGel™ Cup (1%)5 DNA sample aliquots Diluted 135 mL TBE running buffer 1 micropipette (2-20 µL) and 5 pipette tips
How to Cast a Gel
1. Place the MiniOne® Gel Casting Stand on a level
surface and place gel trays in the two cavities.
For proper tray orientation place the tab edge
of the tray on the left side. Insert the comb into
the slots at the top of the casting stand with the
6-well side facing down.
2. Partially peel the film off a GreenGel™ Cup and
microwave for 20 seconds. Allow to cool for
15 seconds. DO NOT microwave more than
5 gel cups at a time.
Safety requirement: Adult supervision required if students are handling gel cups!
3. One gel cup is for making one agarose gel!
Slowly pour the hot agarose solution into a
gel tray. Make sure there are no air bubbles
in the agarose solution. Let the agarose gel
solidify for 10 minutes or until opaque.
DO NOT disturb the gel until time is up.
4. Carefully remove comb when gel is ready.
Remove gel tray with solidified gel from
casting stand and wipe off any excess
agarose from the bottom of the tray.
00:20
Tab edge
Well Sample Name Volume
1 Victim (V) 10 µL
2 Suspect 1 (S1) 10 µL
3 Suspect 2 (S2) 10 µL
4 Suspect 3 (S3) 10 µL
5 DNA from Hair 2 (H) 10 µL
SAMPLE CHART:

9 (858) 684-3190 theminione.com [email protected] is a registered trademark of C.C. Imex. GelGreenTM is a trademark of Biotium. Patents Pending.
(858) 684-3190 theminione.com [email protected] is a registered trademark of C.C. Imex. GelGreenTM is a trademark of Biotium. Patents Pending.
CSI Forensics MiniLab (M3005)Student’s Guide v062118
How to Load a Gel1. Ensure the black viewing platform is in the gel tank.
Make sure the wells are aligned with the marks on
the platform on the negative end.
2. Plug the power supply into the wall and
carefully insert the other end into the
back of the MiniOne® Carriage.
3. Place the gel tank into the carriage so the carbon electrodes are touching the gold rivets and the tank sits level with the carriage.
4. Place the gel tray with the gel into the gel tank. The gel tank should not have any buffer in it when putting the gel tray with gel into it.
5. Turn the low intensity blue LED on by pressing the button on the carriage.
6. Measure 135 mL of TBE running buffer and pour into one side of the gel tank. Watch the air push out between the gel tray and viewing platform. Once air has been removed from under the gel tray, pour remaining buffer into the other side of the gel tank.
7. Place photo hood on the carriage.
8. Press the power button which should now be a solid green light. If green light is solid, turn off the unit and proceed to loading gels. If the green light is blinking, see the Troubleshooting Guide.
9. Turn the low intensity blue light on by pressing the button on the carriage to help visualize the wells when loading. Load 10 µL per well. Remember to change pipette tips for each sample. Load your samples according to the order given in the sample chart.
Note: Place gel tank with the gel on the gel tray into carriage before pouring buffer in.

10 (858) 684-3190 theminione.com [email protected] is a registered trademark of C.C. Imex. GelGreenTM is a trademark of Biotium. Patents Pending.
(858) 684-3190 theminione.com [email protected] is a registered trademark of C.C. Imex. GelGreenTM is a trademark of Biotium. Patents Pending.
CSI Forensics MiniLab (M3005)Student’s Guide v062118
Run, Visualize and Capture Image
The green power LED will not turn on if:
• The tank is not properly placed inside the carriage
• There is no buffer in the tank
• The buffer is too diluted
• The photo hood is not on the carriage
• There is too little running buffer
• The power supply is not plugged in. Check by turning on the blue LEDs
1. Once the gel is loaded, do not move it. Make sure
the power supply is plugged in and place the photo
hood on the carriage. Turn on the unit by pressing
the button. The green LED next to the button
will turn on.
2. Check the migration of the bands (~every
five minutes).
3. Allow the gel to run approximately 25 minutes
or until DNA separation is sufficient. After your
run is complete, turn off the power by pressing
the button. Use the low intensity for viewing
during the run. Light will weaken the fluorescent
DNA signal.
4. Document your results.
Wipe off the condensation from the inside of the
hood with a soft cloth if necessary, then place
the hood back on the carriage. Turn on the high
intensity light. Place your cell phone or camera
directly on the photo hood to take a picture of
the DNA. DO NOT zoom in as this will will result
in blurry pictures. (The photo hood is already at
the optimal focal length for a smart device).

11 (858) 684-3190 theminione.com [email protected] is a registered trademark of C.C. Imex. GelGreenTM is a trademark of Biotium. Patents Pending.
(858) 684-3190 theminione.com [email protected] is a registered trademark of C.C. Imex. GelGreenTM is a trademark of Biotium. Patents Pending.
CSI Forensics MiniLab (M3005)Student’s Guide v062118
Part II - ResultsWhat does your gel look like? Record images of the gel.
Part III - Analyze Your Data
1. What electrical charge did your samples carry? How do you know?
2. According to the results on the gel and other pieces of evidence from the crime scene, who was responsible for the death of Dr. Ward? How did you come to this conclusion?
Clean Up1. After collecting data and documenting results, remove the photo hood and unplug the power
supply from the wall and from the back of the MiniOne® Carriage. Remove the clear running tank
from the carriage and remove the gel and tray from the running tank.
2. Pour the used running buffer down the drain or into a waste beaker. Throw the gel away. Rinse the
clear plastic running tank, gel tray, comb, and casting system with DI or distilled water. Allow the
tanks to fully air dry before storing.
3. Use a paper towel or kimwipe to gently wipe the gold rivets in the carriage (where the electrodes
connect) to ensure all moisture is removed. Wipe up any buffer that may have spilled into the black
carriage. Follow any additional directions the instructor gives for cleanup and storage.

12 (858) 684-3190 theminione.com [email protected] is a registered trademark of C.C. Imex. GelGreenTM is a trademark of Biotium. Patents Pending.
(858) 684-3190 theminione.com [email protected] is a registered trademark of C.C. Imex. GelGreenTM is a trademark of Biotium. Patents Pending.
CSI Forensics MiniLab (M3005)Student’s Guide v062118
Appendix A - What is Gel Electrophoresis?
Looking at a sample of green dye, how can you know if it is really green? Could it be a mixture of blue and yellow dyes? Electrophoresis is a technique used in many areas of science to analyze and separate samples by applying a constant electric field. Biologists or forensic scientists can use this technology to separate mixtures of DNA or dyes into each component based on size and electrical charge.
The gel in gel electrophoresis is essentially a matrix through which particles travel. Gels can be made from different substances depending on what is being separated (DNA, RNA, proteins, etc.), but it should be both conductive and have the ability to form a uniform matrix with appropriate pore sizes. The matrix is like a sieve or colander: if the holes are too big or too small it won’t work very well. One of the most commonly used and effective reagents for DNA separation is agarose. Agarose gels are usually cast in a tray with molten (melted) agarose. A comb is placed while the agarose is molten and then removed after the gel solidifies to create wells in which to load samples. A DNA stain is added to the gel to enable visualization of the DNA, either before casting or after the run if DNA is going to be observed.
As an electric field is applied to the agarose gel, the particles in the wells will begin to to move. The direction that particles migrate depends on their charge. DNA has a negative charge, so it will be attracted to a positive electrode. Some dyes and other particles have a positive charge and will thus migrate toward a negative electrode. The relative speed of migration is determined mainly by the size of the particle but also by the strength of the particle’s charge. Like an obstacle course, larger particles have more difficulty passing through the matrix with their bulk and do not travel very far, while shorter and smaller ones can maneuver much more easily and therefore travel faster and farther.
Sometimes a particle with a bigger size migrates faster than a smaller particle. This can happen if the strength of the charge of the larger particle is significantly stronger by comparison to the charge on the smaller particle. An example of this phenomenon is the loading dye Orange G. This dye often runs faster than the smaller DNA fragments and other relatively small particles because it is more negatively charged and has a stronger attraction to the electrode than the smaller particles.
Both particle size and electrical charge can affect the results of gel electrophoresis experiments. In general however, gel electrophoresis separates charged particles and fragments by size.

13 (858) 684-3190 theminione.com [email protected] is a registered trademark of C.C. Imex. GelGreenTM is a trademark of Biotium. Patents Pending.
(858) 684-3190 theminione.com [email protected] is a registered trademark of C.C. Imex. GelGreenTM is a trademark of Biotium. Patents Pending.
CSI Forensics MiniLab (M3005)Student’s Guide v062118
Appendix B - TBE Concentrate Dilution InstructionDilute 1 part TBE Concentrate with 19 parts deionized or distilled water
1. To make 2000 mL TBE running buffer (1X) = mix 100 mL
TBE Concentrate and 1900 mL deinonized or distilled water
Limited TBE running buffer is stable to store at room temperature.
2. To make various volumes of TBE concentrate use the formula:
C1 x V
1 = C
2 x V
2
Where:
C1 = Original TBE Concentrate
V1 = Volume of the Original TBE Concentrate needed
C2 = Final concentration
V2 = Total final volume desired
Once you have calculated the volume of TBE Concentrate needed,
SUBTRACT that amount from the total volume of TBE running buffer
desired to find the volume of water needed.
We recommend diluting buffer in batches for accuracy.
100
50
2000
1000
2000
100 mLTBE Concentrate
1900 mLDI H
2O
2000 mLTBE running
buffer

(858) 684-3190 theminione.com [email protected], GreenGel, and PrepOne are trademarks of Embi Tec. GelGreen is a trademark of Biotium.
MiniOne is a registered trademark of C.C. IMEX. Patents Pending.
(858) 684-3190 theminione.com [email protected] is a registered trademark of C.C. Imex. GelGreenTM is a trademark of Biotium. Patents Pending.