creo 2-0 lesson 18 - gary · pdf filecreo parametric 2.0 allows you to hide and unhide some...
TRANSCRIPT

Creo Parametric 2.0 Lesson 18
©2014CengageLearning.AllRightsReserved.Maynotbescanned,copiedorduplicated,orpostedtoapubliclyaccessiblewebsite,inwholeorinpart. | 763
Lesson 18 Drafts, Suppress, and Text Extrusions
Figure 18.1 Enclosure OBJECTIVES
Create Draft features Shell a part Suppress features to decrease regeneration time Resume a set of suppressed features Create Text features on parts Render the part using room scenes
REFERENCES AND RESOURCES
For Resources go to www.cad-resources.com > click on the Creo Parametric 2.0 Book cover
Lesson 18 Lecture Book Projects PDF Project Lectures Creo Parametric 2.0 Quick Reference Card
http://www.cad-resources.com/Creo_Parametric_Qick_reference_cards.pdf Creo Parametric 2.0 Configuration Options
http://www.cad-resources.com/Creo_1.0_configoptions.pdf DRAFTS, SUPPRESS, AND TEXT EXTRUSIONS
The Draft feature adds a draft angle between surfaces. A wide range of parts incorporate drafts into their design. Casting, injection mold, and die parts normally have drafted surfaces. The ENCLOSURE in Figure 18.1 is a plastic injection-molded part. Suppressing features by using the Suppress command temporarily removes them from regeneration. Suppressed features can be “unsuppressed” (Resume) at any time. It is sometimes convenient to suppress text extrusions and rounds to speed up regeneration of the model. Suppressing removes the item from regeneration and requires you to resume the item later. Hide is another option. Creo Parametric 2.0 allows you to hide and unhide some types of model entities. When you hide an item, Creo Parametric 2.0 removes the item from the graphics window. The hidden item remains in the Model Tree list, and its icon dims to reveal its hidden status. When you unhide an item, its icon returns to normal display (undimmed) and the item is redisplayed in the graphics window. The hidden status of items is saved with the model. Unlike the suppression of items, hidden items are regenerated. Text can be included in a sketch for extruded extrusions and cuts, trimming surfaces, and cosmetic features. To decrease regeneration time of the model, text can be suppressed after it has been created. Text can also be drafted.

Creo Parametric 2.0 Lesson 18
©2014CengageLearning.AllRightsReserved.Maynotbescanned,copiedorduplicated,orpostedtoapubliclyaccessiblewebsite,inwholeorinpart. | 764
Drafts The Draft Tool adds a draft angle between two individual surfaces or to a series of selected planar surfaces. During draft creation, remember the following:
You can draft only the surfaces that are formed by tabulated cylinders or planes. The draft direction must be normal to the neutral plane if a draft surface is cylindrical. You cannot draft surfaces with fillets around the edge boundary. However, you can draft the surfaces
first, and then fillet the edges.
The following table lists the terminology used in drafts.
TERM DEFINITION
Draft surfaces Model surfaces selected for drafting.
Draft Hinges Draft surfaces are pivoted about the intersection of the neutral plane with the draft surfaces.
Pull direction Direction that is used to measure the draft angle. It is defined as normal to the reference plane.
Draft angle Angle between the draft direction and the resulting drafted surfaces. If the draft surfaces are split, you can define two independent angles for each portion of the draft.
Direction of rotation Direction that defines how draft surfaces are rotated with respect to the neutral plane or neutral curve.
Split areas Areas of the draft surfaces to which you can apply different draft angles. Split object is also a choice.
Suppressing and Resuming Features Suppressing a feature is similar to removing the feature from regeneration temporarily. You can “unsuppress” (Resume) suppressed features at any time. Features on a part can be suppressed to simplify the part model and decrease regeneration time. For example, while you work on one end of a shaft, it may be desirable to suppress features on the other end of the shaft. Similarly, while working on a complex assembly, you can suppress some of the features and components for which the detail is not essential to the current assembly process.
Unlike other features, the base feature cannot be suppressed. If you are not satisfied with your base feature, you can redefine the section of the feature, or you can delete it and start over again. Select feature(s) to suppress by: selecting it, picking on it from the Model Tree, specifying a range, entering its feature number or identifier, or using layers.
You can use Suppress and Resume to simplify the part before inserting features such as text extrusions. In addition, you may wish to suppress the text extrusion if there is other work to be done on the part. Text extrusions take time to regenerate, and increase the file size considerably. Text Extrusions When you are modeling, Text can be included in a sketch for extruded extrusions and cuts, trimming surfaces, and cosmetic features. The characters that are in an extruded feature use the font font3d as the default. Other fonts are available.

Creo Parametric 2.0 Lesson 18
©2014CengageLearning.AllRightsReserved.Maynotbescanned,copiedorduplicated,orpostedtoapubliclyaccessiblewebsite,inwholeorinpart. | 765
Lesson 18 STEPS
Figure 18.2(a) Enclosure Enclosure The Enclosure is a plastic injection-molded part. A variety of drafts will be used in the design of this part. A raised text extrusion will be modeled on the inside of the Enclosure, as shown in Figure 18.1. The dimensions for the part are provided in Figures 18.2(a) through 18.2(e).
Click: File > Manage Session > Select Working Directory > select the working directory > OK > Ctrl+N > Name enclosure > OK > File > Options > Configuration Editor > Import/Export > Import configuration file > select your previously created and saved file (clamp.pro) > Open > Find > 1. Type keyword: default_dec_places > Find Now > 3. Set value: 3 > Enter > Close > OK > No > File > Prepare > Model Properties > Units change > Units Manager Inch lbm Second (Creo Parametric Default) > Close
> Material change > fe20.mtl (plastic) > > OK > Close > slowly double-click on the default coordinate system name in the Model Tree-- PRT_CSYS_DEF > type CSYS_ENCLOSURE > Enter > Ctrl+S > Enter > File > Options > Customize Ribbon > Import/Export > Import customization file > select your
previously saved .ui file from Lesson 2 ( ) [only available if you created a .ui file and saved it as instructed] > Open > Import Mode Customizations > OK > LMB to deselect

Creo Parametric 2.0 Lesson 18
©2014CengageLearning.AllRightsReserved.Maynotbescanned,copiedorduplicated,orpostedtoapubliclyaccessiblewebsite,inwholeorinpart. | 766
Figure 18.2(b) SECTION A-A (Top View)
Figure 18.2(c) Front View

Creo Parametric 2.0 Lesson 18
©2014CengageLearning.AllRightsReserved.Maynotbescanned,copiedorduplicated,orpostedtoapubliclyaccessiblewebsite,inwholeorinpart. | 767
Figure 18.2(d) Right Side View
Figure 18.2(e) SECTION B-B (Left Side View)
Make the first extrusion 6.00 (width) X 5.00 (height) X 1.50 (depth), with R.50 rounds. Add the fillets in the sketch instead of rounds after the first extrusion is complete. Sketch on datum FRONT. Center the first extrusion horizontally on datum TOP and vertically on datum RIGHT. Add constraints as needed to control your sketch geometry. Incorporate the draft angle into the first extrusion instead of adding a separate draft feature [Figs. 18.3(a-c)]

Creo Parametric 2.0 Lesson 18
©2014CengageLearning.AllRightsReserved.Maynotbescanned,copiedorduplicated,orpostedtoapubliclyaccessiblewebsite,inwholeorinpart. | 768
Figure 18.3(a) Sketch on the Front Datum
Figure 18.3(b) Standard Orientation of the Sketch

Creo Parametric 2.0 Lesson 18
©2014CengageLearning.AllRightsReserved.Maynotbescanned,copiedorduplicated,orpostedtoapubliclyaccessiblewebsite,inwholeorinpart. | 769
Click: to compete the sketch > Options tab > > 5 > Enter [Fig. 18.3(c)] > > > Ctrl+S > Enter > LMB to deselect > View tab > Appearance Gallery > set a new color for the part
Figure 18.3(c) Adding a Taper

Creo Parametric 2.0 Lesson 18
©2014CengageLearning.AllRightsReserved.Maynotbescanned,copiedorduplicated,orpostedtoapubliclyaccessiblewebsite,inwholeorinpart. | 770
Click: Model tab > > Thickness .1875 > Enter > References tab > select the face to be removed [Figs. 18.4(a-b)]
Figure 18.4(a) Select the Surface to Remove
Figure 18.4(b) Shell Tool

Creo Parametric 2.0 Lesson 18
©2014CengageLearning.AllRightsReserved.Maynotbescanned,copiedorduplicated,orpostedtoapubliclyaccessiblewebsite,inwholeorinpart. | 771
Change the thickness of the top of the enclosure to be .25, the walls will remain .1875. In the Graphics Window, press: RMB > Non Default Thickness [Fig. 18.4(c)] > select the face (highlights) [Fig. 18.4(d)] >
type .250 in the Dimension field > Enter [Fig. 18.4(e)] > > in the Graphics Window, LMB to deselect > Ctrl+D > Ctrl+S > Enter
Figure 18.4(c) Non Default Thickness
Figure 18.4(d) Select the Non Default Surface Figure 18.4(e) Shelled Extrusion

Creo Parametric 2.0 Lesson 18
©2014CengageLearning.AllRightsReserved.Maynotbescanned,copiedorduplicated,orpostedtoapubliclyaccessiblewebsite,inwholeorinpart. | 772
Create the raised pedestal-like extrusion. Click: > select datum FRONT > drag the depth handle forward by .75 [Fig. 18.5(a)] > OK (DTM1 will be used to control the height of the pedestal.) > in the
Graphics Window, LMB to deselect > > Placement tab > Define > select the inside surface of the shell as the sketching plane > Sketch > press RMB > References > delete the datum references > select only the edges (toggle with RMB until an edge is highlighted) [Fig. 18.5(b)] > Solve > Close
Figure 18.5(a) Offset Datum DTM1
Figure 18.5(b) Extrusion References

Creo Parametric 2.0 Lesson 18
©2014CengageLearning.AllRightsReserved.Maynotbescanned,copiedorduplicated,orpostedtoapubliclyaccessiblewebsite,inwholeorinpart. | 773
Click: Project > select an existing internal shelled edge to start the section [Fig. 18.5(c)] > Close > add
four lines and a fillet > add and modify dimensions [Fig. 18.5(d)] > [Fig. 18.5(e)]
Figure 18.5(c) Create the First Entity using: Create entities by projecting curves or edges onto the sketch plane
Figure 18.5(d) Section Sketch
Figure 18.5(e) Initial Previewed Extrusion Depth

Creo Parametric 2.0 Lesson 18
©2014CengageLearning.AllRightsReserved.Maynotbescanned,copiedorduplicated,orpostedtoapubliclyaccessiblewebsite,inwholeorinpart. | 774
Place the pointer over the depth drag handle [Fig. 18.5(f)] > press RMB > To Selected [Fig. 18.5(g)] >
select DTM1 [Fig. 18.5(h)] > > in the Graphics Window, press RMB > Edit [Fig. 18.5(i)] > Ctrl+S > Enter > in the Graphics Window, LMB to deselect
Figure 18.5(f) Place Pointer Over the Drag Handle Figure 18.5(g) Press RMB > To Selected
Figure 18.5(h) Select DTM1 to Establish the Depth

Creo Parametric 2.0 Lesson 18
©2014CengageLearning.AllRightsReserved.Maynotbescanned,copiedorduplicated,orpostedtoapubliclyaccessiblewebsite,inwholeorinpart. | 775
Figure 18.5(i) Completed Pedestal Extrusion
Click: > References tab > select a vertical surface of the pedestal > press RMB > Draft Hinges
> select datum FRONT > type 5 in the Angle field > Enter > Reverse angle (Fig. 18.6) >
Figure 18.6 Draft Three Lateral Surfaces of the Pedestal

Creo Parametric 2.0 Lesson 18
©2014CengageLearning.AllRightsReserved.Maynotbescanned,copiedorduplicated,orpostedtoapubliclyaccessiblewebsite,inwholeorinpart. | 776
Model the circular extrusion. Click: > select the top surface of the pedestal as the sketching plane
> keep the default references > the section consists of one circle [Fig. 18.7(a)] > > rotate the model [Fig. 18.7(b)] > place the pointer over the depth drag handle > press RMB > To Selected [Fig. 18.7(c)]
Figure 18.7(a) Section Sketch for the Circular Extrusion
Figure 18.7(b) Extrusion Depth Figure 18.7(c) Depth Options

Creo Parametric 2.0 Lesson 18
©2014CengageLearning.AllRightsReserved.Maynotbescanned,copiedorduplicated,orpostedtoapubliclyaccessiblewebsite,inwholeorinpart. | 777
Select the surface [Fig. 18.7(d)] > [Fig. 18.7(e)] > in the Graphics Window, LMB to deselect > Ctrl+S > OK
Figure 18.7(d) Select Surface to Extrude To Figure 18.7(e) Circular Extrusion
The circular feature looks correct, but there seems to be a problem with the pedestal. Select the pedestal extrusion in the Graphics Window > press RMB > Edit Definition [Fig. 18.8(a)]
Figure 18.8(a) Redefining the Pedestal

Creo Parametric 2.0 Lesson 18
©2014CengageLearning.AllRightsReserved.Maynotbescanned,copiedorduplicated,orpostedtoapubliclyaccessiblewebsite,inwholeorinpart. | 778
Press: RMB > Edit Internal Sketch [Fig. 18.8(b)] > A dimension is referencing the end of the arc instead of the edge. Select this dimension. > press RMB > Delete > create a new defining dimension [Fig. 18.8(c)] >
modify the new dimension to 1.000 > > > [Fig. 18.8(d)] > in the Graphics Window, LMB to deselect > Ctrl+S > Enter
Figure 18.8(b) Original Dimensioning Scheme Figure 18.8(c) New Defining Dimension
Figure 18.8(d) Redefined Pedestal

Creo Parametric 2.0 Lesson 18
©2014CengageLearning.AllRightsReserved.Maynotbescanned,copiedorduplicated,orpostedtoapubliclyaccessiblewebsite,inwholeorinpart. | 779
Click: (Draft the circular extrusion at 5, using its top surface as the draft hinge [Fig. 18.9(a)].) >
Reverse angle > > in the Graphics Window, press RMB > Edit > select the 5 degree dimension > press RMB > Properties > Display tab > Flip Arrows > Properties tab > Move > select a new position > Decimal Places 0 > Enter > OK [Fig. 18.9(b)] > press RMB > Exit Edit Dimension > LMB to deselect
Figure 18.9(a) Draft the Circular Extrusion with its Top Surface as the Draft Hinge
Figure 18.9(b) Edit the Dimensions Properties

Creo Parametric 2.0 Lesson 18
©2014CengageLearning.AllRightsReserved.Maynotbescanned,copiedorduplicated,orpostedtoapubliclyaccessiblewebsite,inwholeorinpart. | 780
Create a .250 diameter coaxial hole on the upper surface of the circular extrusion [Fig. 18.10(a)]. Use “To Selected” to establish the hole’s depth to the top surface of the pedestal [Fig. 18.10(b)].
Figure 18.10(a) Coaxial Hole
Figure 18.10(b) Hole Depth to Selected Surface

Creo Parametric 2.0 Lesson 18
©2014CengageLearning.AllRightsReserved.Maynotbescanned,copiedorduplicated,orpostedtoapubliclyaccessiblewebsite,inwholeorinpart. | 781
Next, add an internal draft of .3 to the coaxial hole (select the top surface of the cylinder as the draft hinge) (Fig. 18.11).
Figure 18.11 Draft the Coaxial Hole Create one round feature for the .0625 [Fig. 18.12(a)] and the .125 rounds [Fig. 18.12(b)].
Figure 18.12(a) Round Set 1 (R.0625)

Creo Parametric 2.0 Lesson 18
©2014CengageLearning.AllRightsReserved.Maynotbescanned,copiedorduplicated,orpostedtoapubliclyaccessiblewebsite,inwholeorinpart. | 782
Figure 18.12(b) Round Set 2 (R.125) pedestal
Group the extrusions, the hole and the rounds. Select features > RMB > Group [Fig. 18.13(a)] > click on the
group name > type PEDESTAL > Enter ( ) [Fig. 18.13(b)] > LMB to deselect
Figure 18.13(a) Create a Group Figure 18.13(b) Local Group

Creo Parametric 2.0 Lesson 18
©2014CengageLearning.AllRightsReserved.Maynotbescanned,copiedorduplicated,orpostedtoapubliclyaccessiblewebsite,inwholeorinpart. | 783
Create three identical grouped features. From the Model Tree, select: Group PEDESTAL > >
select datum RIGHT [Fig. 18.14(a)] > > with the Ctrl key pressed, select Group PEDESTAL and
Mirror 1 (Group COPIED_GROUP) from the Model Tree > release the Ctrl key > > select
datum TOP [Fig. 18.14(b)] > > Ctrl+S > MMB > File > Manage File > Delete Old Versions > Enter
Figure 18.14(a) Group Copied and Mirrored about Datum RIGHT
Figure 18.14(b) Groups Copied and Mirrored about Datum TOP

Creo Parametric 2.0 Lesson 18
©2014CengageLearning.AllRightsReserved.Maynotbescanned,copiedorduplicated,orpostedtoapubliclyaccessiblewebsite,inwholeorinpart. | 784
Create the internal round, click: > type .125 > select the inside of the shelled wall as the first reference [Fig. 18.15(a)] > Sets tab > press and hold the Ctrl key > select the top surface of the pedestal as
the second reference [Fig. 18.15(b)] > release the Ctrl key > > LMB to deselect
Figure 18.15(a) Select First Reference
Figure 18.15(b) Select Second Reference

Creo Parametric 2.0 Lesson 18
©2014CengageLearning.AllRightsReserved.Maynotbescanned,copiedorduplicated,orpostedtoapubliclyaccessiblewebsite,inwholeorinpart. | 785
Click: > References: select axis A_1 [Fig. 18.16(a)] > press and hold the Ctrl key > References: select axis A_7 (your id’s may be different) [Fig. 18.16(b)] > release the Ctrl key > OK (creates DTM2) > in the Graphics Window, LMB to deselect
Figure 18.16(a) Select Axis A_1 (your id’s may be different)
Figure 18.16(b) Select Axis A_7 (your id’s may be different)

Creo Parametric 2.0 Lesson 18
©2014CengageLearning.AllRightsReserved.Maynotbescanned,copiedorduplicated,orpostedtoapubliclyaccessiblewebsite,inwholeorinpart. | 786
Create a cross section through the part. Click: Open the view manager > Sections tab > New > Planar
> type name A > Enter > select DTM2 > > select A > press RMB > Show Section (check) [Fig. 18.17(a)] > press RMB > Show Section (uncheck) [Fig. 18.17(b)] > select No Cross Section > press RMB > Activate > Close > Ctrl+S > OK
Figure 18.17(a) Active Section A with Hatching
Figure 18.17(b) Active Section A with no Hatching

Creo Parametric 2.0 Lesson 18
©2014CengageLearning.AllRightsReserved.Maynotbescanned,copiedorduplicated,orpostedtoapubliclyaccessiblewebsite,inwholeorinpart. | 787
Before creating the text extrusion, Suppress all the features after the shell command. Expand the Model Tree
to include the feature number and status. Click: Settings > Tree Columns > Feat # > > Status > > Apply > OK > Settings > Tree Filters > toggle on all options (Fig. 18.18) > Apply > OK
Figure 18.18 Model Tree Items Dialog Box
Click on Group PEDESTAL in the Model Tree > press and hold the Shift key > click DTM2 in the Model
Tree (or the last feature in the Model Tree before ) [Fig. 18.19(a)] > release the Shift key > press RMB > Suppress [Fig. 18.19(b)] > OK [Fig. 18.19(c)] > in the Graphics Window, LMB to deselect > Ctrl+S > Enter
Figure 18.19(a) Select the Features in the Model Tree to be Suppressed (Your Model Tree will Look Different.)

Creo Parametric 2.0 Lesson 18
©2014CengageLearning.AllRightsReserved.Maynotbescanned,copiedorduplicated,orpostedtoapubliclyaccessiblewebsite,inwholeorinpart. | 788
Figure 18.19(b) Highlighted Features (Your Suppress Warning Box may be different.) (Your Model Tree will Look Different.)
Figure 18.19(c) Suppressed Features (Your Model Tree will Look Different.)
The regeneration time for your model will now be shorter. Next, add the text extrusion.
Creo Parametric 2.0 Lesson 18
©2014CengageLearning.AllRightsReserved.Maynotbescanned,copiedorduplicated,orpostedtoapubliclyaccessiblewebsite,inwholeorinpart. | 789
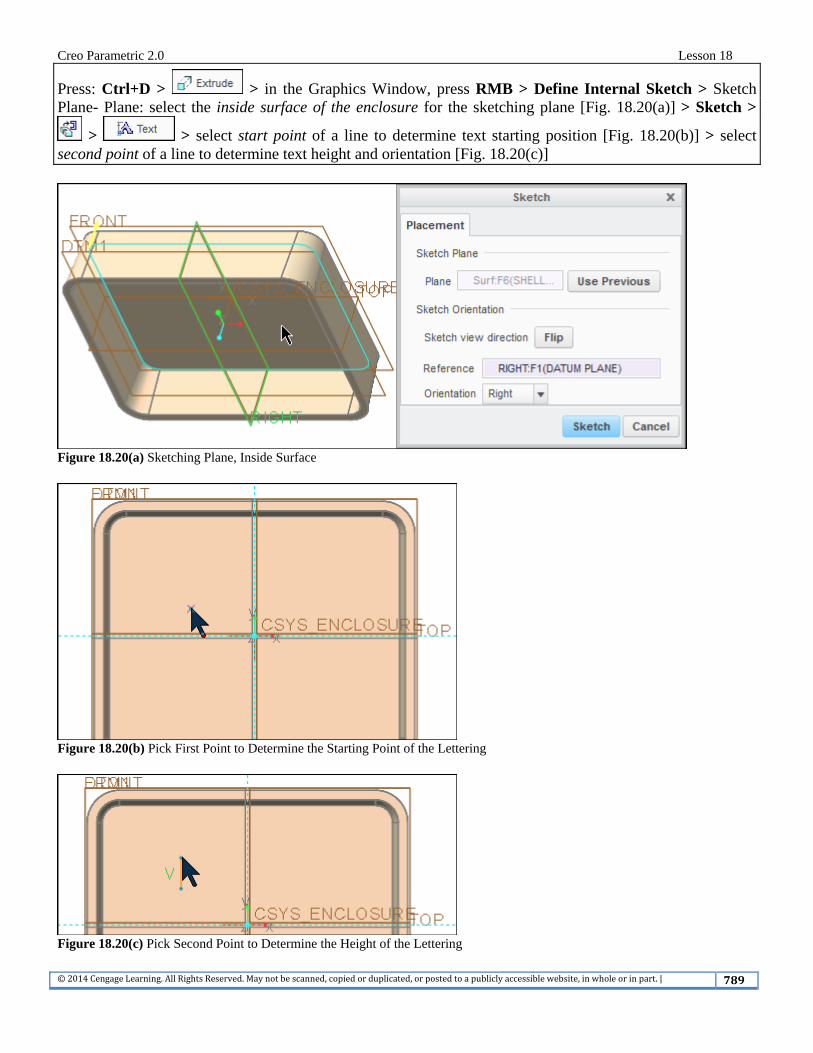
Press: Ctrl+D > > in the Graphics Window, press RMB > Define Internal Sketch > Sketch Plane- Plane: select the inside surface of the enclosure for the sketching plane [Fig. 18.20(a)] > Sketch >
> > select start point of a line to determine text starting position [Fig. 18.20(b)] > select second point of a line to determine text height and orientation [Fig. 18.20(c)]
Figure 18.20(a) Sketching Plane, Inside Surface
Figure 18.20(b) Pick First Point to Determine the Starting Point of the Lettering
Figure 18.20(c) Pick Second Point to Determine the Height of the Lettering

Creo Parametric 2.0 Lesson 18
©2014CengageLearning.AllRightsReserved.Maynotbescanned,copiedorduplicated,orpostedtoapubliclyaccessiblewebsite,inwholeorinpart. | 790
Click: > all off > LMB in the Graphics Window > type CFS-2134 in Text line field [Fig. 18.20(d)] > OK > MMB > window-in (select) the sketch to capture all dimensions > press RMB > Modify
> modify the dimensions [Fig. 18.20(e)] > from Modify Dimensions dialog box > >
all on > LMB in the Graphics Window >
Figure 18.20(d) Type the Text “CFS-2134” (case sensitive)
Figure 18.20(e) Modified Dimensions

Creo Parametric 2.0 Lesson 18
©2014CengageLearning.AllRightsReserved.Maynotbescanned,copiedorduplicated,orpostedtoapubliclyaccessiblewebsite,inwholeorinpart. | 791
Press: MMB to spin the model [Fig. 18.20(f)] > double-click on the height dimension and modify it to .0625
> Enter [Fig. 18.20(g)] > [Fig. 18.20(h)] > Ctrl+S > OK > LMB to deselect > Ctrl+D > Ctrl+R
Figure 18.20(f) Dynamic Preview
Figure 18.20(g) Modified Depth
Figure 18.20(h) Completed Text Extrusion (Your extrude id may be different) (Your Model Tree will Look Different.)

Creo Parametric 2.0 Lesson 18
©2014CengageLearning.AllRightsReserved.Maynotbescanned,copiedorduplicated,orpostedtoapubliclyaccessiblewebsite,inwholeorinpart. | 792
In the Model Tree, select all the suppressed features. Click: RMB > Resume [Figs. 18.21(a-b)] > in the
Model Tree, place the pointer on Extrude 4 > press LMB > drag pointer to a position above > release the LMB to drop the feature > select Extrude 4 [Fig. 18.21(c)] > Ctrl+S > OK > LMB to deselect
Figure 18.21(a) Resume
Figure 18.21(b) Suppressed Features Resumed
Figure 18.21(c) Standard Orientation

Creo Parametric 2.0 Lesson 18
©2014CengageLearning.AllRightsReserved.Maynotbescanned,copiedorduplicated,orpostedtoapubliclyaccessiblewebsite,inwholeorinpart. | 793
Press: MMB to spin the part > > > > select the top surface > select the parts’ edge [Fig. 18.22(a)] > press and hold down the Shift key > select the surface again [Fig. 18.22(b)] (Top surface edges will highlight, as the loop was selected. Note that this alternate selection method was not necessary for this round since all the edges were tangent.) > release the Shift key > press RMB > Round Edges [Fig. 18.22(c)] > modify round to .1875 [Fig. 18.22d)] > Enter >
> LMB to deselect > > [Fig. 18.22(e)]
Figure 18.22(a) Select the Edge Figure 18.22(b) Shift + Select the Surface
Figure 18.22(c) Round Edges Figure 18.22(d) Modify to .1875
Figure 18.22(e) Completed Round (Your Model Tree will Look Different.)

Creo Parametric 2.0 Lesson 18
©2014CengageLearning.AllRightsReserved.Maynotbescanned,copiedorduplicated,orpostedtoapubliclyaccessiblewebsite,inwholeorinpart. | 794
Press: Ctrl+D > select the text extrusion in the Model Tree > View tab > >
> > > [Fig. 18.23(a)] > hold down the MMB and move the cursor about the screen to orbit the model [Fig. 18.23(b)] > release the MMB > press RMB > Exit Orient Mode
Figure 18.23(a) Orient Mode Velocity
Figure 18.23(b) Spinning the Model in Real Time

Creo Parametric 2.0 Lesson 18
©2014CengageLearning.AllRightsReserved.Maynotbescanned,copiedorduplicated,orpostedtoapubliclyaccessiblewebsite,inwholeorinpart. | 795
With the text extrusion selected, press: RMB > Edit > Model tab [Fig. 18.24(a)] > drag the (depth) handle to .250 [Fig. 18.24(b)] > Ctrl+G Regenerate > Ctrl+D > Ctrl+S > Enter > File > Manage File > Delete Old Versions > Enter [Fig. 18.24(c)] > in the Graphics Window, LMB to deselect
Figure 18.24(a) Edit the Text Extrusion
Figure 18.24(b) Drag the (White) Square Drag Handle to .250
Figure 18.24(c) Completed Enclosure (Your Model Tree will Look Different.)

Creo Parametric 2.0 Lesson 18
©2014CengageLearning.AllRightsReserved.Maynotbescanned,copiedorduplicated,orpostedtoapubliclyaccessiblewebsite,inwholeorinpart. | 796
Click: File > Prepare > ModelCHECK Geometry Check [Fig. 18.25(a)] > OK [Figs. 18.25(b-c)] >
Ctrl+S > Enter > close the Browser > Refit
Figure 18.25(a) ModelCHECK Geometry Check
Figure 18.25(b) Geometry Check
Figure 18.25(c) ModelCHECK

Creo Parametric 2.0 Lesson 18
©2014CengageLearning.AllRightsReserved.Maynotbescanned,copiedorduplicated,orpostedtoapubliclyaccessiblewebsite,inwholeorinpart. | 797
Click: File > Options > Model Display > Isometric > OK > No > Shading > View tab >
off > off > close > Render tab > Render Setup > Renderer > PhotoRender > change settings as shown [Fig. 18.26(a)] > Close > Ctrl+D
Figure 18.26(a) Render Setup

Creo Parametric 2.0 Lesson 18
©2014CengageLearning.AllRightsReserved.Maynotbescanned,copiedorduplicated,orpostedtoapubliclyaccessiblewebsite,inwholeorinpart. | 798
Click: Scene > OK (if needed) > Lights tab > Add new spotlight > >
> Name Color for lighting [Fig. 18.26(b)] > adjust the slide bars in the Color Editor
Figure 18.26(b) Adjust the Spot Light RGB Color Values

Creo Parametric 2.0 Lesson 18
©2014CengageLearning.AllRightsReserved.Maynotbescanned,copiedorduplicated,orpostedtoapubliclyaccessiblewebsite,inwholeorinpart. | 799
Click: OK (from the Color Editor dialog box) > place the pointer on the circle just behind the spot light (highlights) > press and hold down the LMB [Fig. 18.26(c)] > move the pointer to a new position > release the LMB > place the pointer on the edge of the cone of the spot light (highlights) > press and hold down the LMB > move the pointer to a new cone angle position > release the LMB > place the pointer on the large arrow (highlights) > press and hold down the LMB > move the pointer to a new focus position > release the LMB [Fig. 18.26(d)]
Figure 18.26(c) Change Spot Light Position
Figure 18.26(d) Change Focus

Creo Parametric 2.0 Lesson 18
©2014CengageLearning.AllRightsReserved.Maynotbescanned,copiedorduplicated,orpostedtoapubliclyaccessiblewebsite,inwholeorinpart. | 800
Click: Add new distance light > > > > Name
Color for lighting > adjust the slide bars in the Color Editor to the RGB values you desire > OK (from the Color Editor dialog box) > select the new distance light and change its position [Fig. 18.26(e)] > Ctrl+D
Figure 18.26(e) New Distance Light

Creo Parametric 2.0 Lesson 18
©2014CengageLearning.AllRightsReserved.Maynotbescanned,copiedorduplicated,orpostedtoapubliclyaccessiblewebsite,inwholeorinpart. | 801
Click: Room tab > Wall1: enhanced-realism-wall1 [Fig. 18.26(f)] > Room Appearances default wall appearance [Fig. 18.26(g)] > Close Room Appearance Editor > repeat the process and change the walls, floor, and ceiling settings > Preview [Figs. 18.26(h-i)]
Figure 18.26(f) New Wall Selection
Figure 18.26(g) Room Appearance Editor

Creo Parametric 2.0 Lesson 18
©2014CengageLearning.AllRightsReserved.Maynotbescanned,copiedorduplicated,orpostedtoapubliclyaccessiblewebsite,inwholeorinpart. | 802
Figure 18.26(h) Room Appearance Editor
Figure 18.26(i) New Wall, Floor, and Ceiling Appearance Selections with Preview

Creo Parametric 2.0 Lesson 18
©2014CengageLearning.AllRightsReserved.Maynotbescanned,copiedorduplicated,orpostedtoapubliclyaccessiblewebsite,inwholeorinpart. | 803
Click: Close [Fig. 18.26(j)] > Render Window > Ctrl+S > Enter
Figure 18.26(j) Render Window (This may take some time to complete depending on your computers’ processor – Be patient!)

Creo Parametric 2.0 Lesson 18
©2014CengageLearning.AllRightsReserved.Maynotbescanned,copiedorduplicated,orpostedtoapubliclyaccessiblewebsite,inwholeorinpart. | 804
Click: > > Name enclosure > OK > Template d_drawing > OK > Layout tab >
> Sheet 1 Format > > Browse > d.frm > Open > OK > Ctrl+S > OK > >
all off > LMB in the Graphics Window > Ctrl+R > select the front view > press RMB > Insert Projection View > select on the left of the front view > press RMB > Lock View Movement (uncheck) > move the views as required > select left_6 (your view id may be different) view from the Drawing Tree > press RMB > Properties (Fig. 18.27) > View Display > Follow Environment > Hidden > OK > LMB to deselect > complete the detail [see Fig. 18.2(a)] > Ctrl+S > Enter > File > Save As > Save a
Copy > Type > Zip File (*.zip) > OK > upload the zip file to your course interface or attach to an email and send to your instructor and/or yourself > File > Close
Figure 18.27 Drawing Views (Your Drawing Tree and Model Tree will Look Different.)

Creo Parametric 2.0 Lesson 18
©2014CengageLearning.AllRightsReserved.Maynotbescanned,copiedorduplicated,orpostedtoapubliclyaccessiblewebsite,inwholeorinpart. | 805
If your system has the Flexible Modeling application, complete the following commands. Click: Flexible Modeling tab > spin the model > Move using Dragger > select the top face of the part [Figs. 18.28(a-b)] > place the pointer on the vertical axis (translation) arrow > press and hold down the LMB >
move the pointer to drag the axis vertically [Fig. 18.28(c)] > release the LMB at the desired position >
Figure 18.28(a) Select the Surface
Figure 18.28(b) 3D Dragger Displays
Figure 18.28(c) Drag the Vertical Axis

Creo Parametric 2.0 Lesson 18
©2014CengageLearning.AllRightsReserved.Maynotbescanned,copiedorduplicated,orpostedtoapubliclyaccessiblewebsite,inwholeorinpart. | 806
Click: Move using Dragger > select the top face of the lettering [Fig. 18.29(a)], 3D Dragger displays [Fig. 18.29(b)] > place the pointer on a rotation ring (arc) [Fig. 18.29(c)] > press and hold down the LMB > move
the pointer to rotate the ring (arc) > release the LMB at the desired rotation >
Figure 18.29(a) Select the Surface
Figure 18.29(b) 3D Dragger Displays
Figure 18.29(c) Drag the Rotation Ring (Arc)

Creo Parametric 2.0 Lesson 18
©2014CengageLearning.AllRightsReserved.Maynotbescanned,copiedorduplicated,orpostedtoapubliclyaccessiblewebsite,inwholeorinpart. | 807
Click: open [Fig. 18.30(a)] > File > Options > Model Display > Trimetric > OK > No > Ctrl+D > File > Save As > Save a Copy > New Name enclosure_one_off > OK > File > Save As > Save a Copy >
Type > Zip File (*.zip) > New Name enclosure_one_off.prt.zip > OK > upload the zip file to your course interface or attach to an email and send to your instructor and/or yourself
Figure 18.30(a) New Design (Your Model Tree will Look Different.)

Creo Parametric 2.0 Lesson 18
©2014CengageLearning.AllRightsReserved.Maynotbescanned,copiedorduplicated,orpostedtoapubliclyaccessiblewebsite,inwholeorinpart. | 808
Click: Shading With Reflections [Fig. 18.30(b)] > File > Close > File > Exit > Yes
Figure 18.30(b) New Design (the quality of your graphics card and graphics settings may prevent this display)
Video Lessons 19-22, and Lesson Projects can be downloaded at the publishers website for the book– www.cengage.com > Student’s Access Free Content > Related Products > Free > Lessons and Projects (Lectures etc.) or from: http://www.cad-resources.com/Creo_Parametric_Cengage.html?1341766955310