creating electronic portfolios with adobe...
TRANSCRIPT

.doc
.jpg
.jpg
.ai
.ai
.xls
.ai
.pdf.doc
.xls.pdf
.ai
.jpg
.jpg
Creating eleCtroniC portfolios with
ADOBE ACROBAT
Adobe Acrobat 9 Curriculum Guide
© 2008 Adobe Systems Incorporated Creating electronic portfolios with Adobe Acrobat 1
Introduction Portfolios collect a variety of documents and artifacts to communicate accomplishments, works in progress, or academic histories. With the Internet, both students and teachers can offer portfolios electronically, sharing work with peers, colleagues, parents, potential employers—anyone in the world—easily and quickly.
Such e-portfolios can typically serve one or more of these purposes:
• Class project portfolios: Present a gallery of student work on a particular assignment or collect materials gathered by students over a longer period of time for a large project. Allow students to collaborate and assemble their collective output.
• Student portfolios: Gather student product and responses to make assessment easier—the teacher uses Acrobat reviewing and commenting tools to provided feedback to students on their work. Serve as a digital resume to aid students in acquiring employment or entrance into institutions of higher education and to provide students opportunity to reflect on their work as a whole.
• Curriculum portfolios: Collect a package of materials for students where no textbook exists or as a way to augment or update an existing textbook.
• Teaching portfolios: Offer evidence of teaching performance to streamline a professional certification process or perhaps to show implementation of teaching methodologies. Include examples of lesson plans, unit study plans, an assertion of a particular teaching philosophy, images of students at work, or perhaps a video of the teacher teaching a class.
E-portfolios are rich. A PDF portfolio created in Adobe® Acrobat® 9 Pro is a container for any sort of electronic media. It can store not only text but images, movies, audio, video—you can include almost any type of digital object in a PDF portfolio.
E-portfolios are scalable and expandable. An e-portfolio can contain any number of pages. You might have dozens or even hundreds of pages to keep track of. Storing them in an easily organized e-portfolio makes them readily accessible and easily searchable. In electronic form, a portfolio is much easier to update and augment than a paper-based portfolio.
E-portfolios provide autonomy in publishing. Instead of waiting for someone else to write just the right textbook with exactly the right materials, you can package your own best anthology of lessons, readings, assignments, and practicum guidance. The ease of PDF distribution allows anyone to assemble and distribute materials widely, without specialized technical knowledge.
E-portfolios are narrative. Highlight exceptional work, show a progression of expertise, or document a particular project. Your students get to tell their own stories.
E-portfolios are universally accessible. Viewing a multimedia document or presentation on a machine other than the one that created it can lead to unexpected results. When rich media and other specialized electronic assets are assembled by traditional methods, viewers may need three or four applications to interact with a portfolio. But using Acrobat to wrap your material into PDF format allows everyone to view and interact with your materials.
The files in an e-portfolio can be in different formats, created in different applications. An e-portfolio can combine all the documents for a specific project: text documents, images, videos, Flash movies, illustrations, PowerPoint presentations. The original files retain their individual identities but are part of the one PDF portfolio file. Each component file can be opened, read, edited, and formatted independent of the other component files in the e-portfolio.
An e-portfolio built with Acrobat and viewed with Adobe Reader® is a robust mechanism to deliver the right experience for a given audience. You can present any number of files in one reliable, secure, and accessible Acrobat PDF. You can control the presentation of those files with sophisticated navigational structures that require minimal effort to implement.
At the same time, e-portfolios allow both teachers and students to demonstrate competency in technology integration and effective communication by illustrating the ability to create a customized experience for readers, crafting just the right portfolio for the designated purpose.
Adobe Acrobat 9 Curriculum Guide
2 Creating electronic portfolios with Adobe Acrobat ©2008 Adobe Systems, Inc
In this section of the curriculum, we cover:
• How to plan an e-portfolio
• How to introduce students to the Acrobat interface and workspace
• How to prepare files for inclusion in an e-portfolio
• How to create and add content to an e-portfolio
• How to personalize an e-portfolio
• How to publish an e-portfolio
Planning e-portfolios Adding files to a PDF portfolio is so easy that students may be tempted to jump right in. Instead, have them take time to plan first. Consider these questions with your students:
• What is the purpose of the e-portfolio? The answer to this question will determine what documents and media to put into the e-portfolio and help identify gaps in the available content.
• Who will view the portfolio? This has bearing on the visual layout selected (see “Personalizing a PDF portfolio”) and, again, on the content included.
• Does the e-portfolio have a narrative? What story is this collection of documents and media trying to tell? Should documents be presented in a particular order?
• What variety can be provided in the types of media included? With an e-portfolio, you can provide visual documentation and sound recordings. A wider range of media provides a wider range of touchpoints for viewers to engage with the story the e-portfolio is telling.
• Where will the e-portfolio live? If the e-portfolio will be posted to a website that can be accessed publicly by anyone, take into account government regulations, school policies, and best practices with regard to student identification. It’s appropriate to consider what personal information to include or exclude, since an e-portfolio may be forwarded by e-mail to unknown individuals.
• What’s the best way to navigate through this content? If you have just a few large documents, take advantage of one of the visual layouts. If there are many documents, consider organizing these files into folders. If many documents have the same kind of content, relying more heavily on list view (see “Personalizing a PDF portfolio” to find out more about choosing a view) may make the e-portfolio easier for viewers to navigate.
• How are the files named? The filenames of documents are exposed to viewers. Even a particularly efficient filenaming system may be difficult for viewers to figure out. Make sure the filenames of documents indicate their contents clearly.
Because an e-portfolio constantly evolves, be sure you plan the portfolio structure to allow for easy changes and additions. Help students identify their audiences and consider how they might expect an e-portfolio to change over time or how they might create several versions of the e-portfolio to accommodate different audiences.

Adobe Acrobat 9 Curriculum Guide
© 2008 Adobe Systems Incorporated Creating electronic portfolios with Adobe Acrobat 3
Overview of Adobe Acrobat Adobe PDF is the foundation for workflows in the publishing industry. It plays a key role in financial services, advertising, regulated industries, educational institutions, and government, with thousands of agencies worldwide sharing Adobe PDF files. Competence with Acrobat provides students with technical skills useful across a wide array of industries; Acrobat PDF integration is a natural fit for the classroom. Equally important is the opportunity for students to explore the digital workflow Adobe PDF provides. As students progress to post-secondary education and careers in the workplace, their familiarity with this format will give them the digital communication skills they need to create and work with digital documents across the office or across the web.
An Adobe PDF document preserves all the fonts, formatting, graphics, and color of any source document, regardless of the application and platform used to create it. Adobe PDF files are compact and can be shared, viewed, navigated, saved, and printed exactly as intended by anyone with the free Adobe Reader. You can convert any document to an Adobe PDF file by using Adobe Acrobat. If you or your students are new to Acrobat, use the following as an overview of the Acrobat interface and work area.
Acrobat work area
The Acrobat work area (Figure 1) includes a document pane that displays Adobe PDF documents and a navigation pane on the left side that helps you browse through an open PDF document. The toolbars are grouped at the top of the window according to feature type and provide the controls used to work with PDF documents.
Pages can be viewed in the navigation pane. The Pages panel displays thumbnail page views and an indication of what portion of the page is visible.
Bookmarks are also viewed in the navigation pane. Bookmarks are links to specific points of interest in the PDF document.
Figure 1 Acrobat work area
Toolbars Navigation pane Document pane
Bookmarks
Pages
Adobe Acrobat 9 Curriculum Guide
4 Creating electronic portfolios with Adobe Acrobat ©2008 Adobe Systems, Inc
Acrobat toolbars
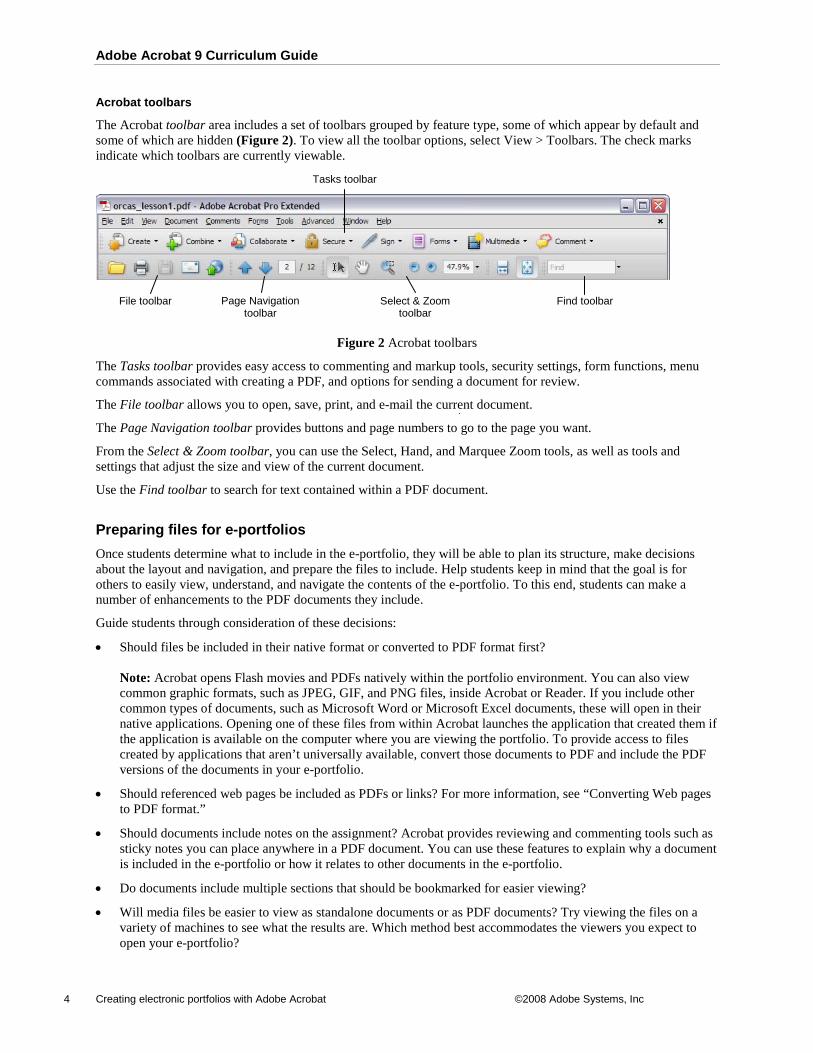
The Acrobat toolbar area includes a set of toolbars grouped by feature type, some of which appear by default and some of which are hidden (Figure 2). To view all the toolbar options, select View > Toolbars. The check marks indicate which toolbars are currently viewable.
Figure 2 Acrobat toolbars
The Tasks toolbar provides easy access to commenting and markup tools, security settings, form functions, menu commands associated with creating a PDF, and options for sending a document for review.
The File toolbar allows you to open, save, print, and e-mail the current document.
The Page Navigation toolbar provides buttons and page numbers to go to the page you want.
From the Select & Zoom toolbar, you can use the Select, Hand, and Marquee Zoom tools, as well as tools and settings that adjust the size and view of the current document.
Use the Find toolbar to search for text contained within a PDF document.
Preparing files for e-portfolios Once students determine what to include in the e-portfolio, they will be able to plan its structure, make decisions about the layout and navigation, and prepare the files to include. Help students keep in mind that the goal is for others to easily view, understand, and navigate the contents of the e-portfolio. To this end, students can make a number of enhancements to the PDF documents they include.
Guide students through consideration of these decisions:
• Should files be included in their native format or converted to PDF format first? Note: Acrobat opens Flash movies and PDFs natively within the portfolio environment. You can also view common graphic formats, such as JPEG, GIF, and PNG files, inside Acrobat or Reader. If you include other common types of documents, such as Microsoft Word or Microsoft Excel documents, these will open in their native applications. Opening one of these files from within Acrobat launches the application that created them if the application is available on the computer where you are viewing the portfolio. To provide access to files created by applications that aren’t universally available, convert those documents to PDF and include the PDF versions of the documents in your e-portfolio.
• Should referenced web pages be included as PDFs or links? For more information, see “Converting Web pages to PDF format.”
• Should documents include notes on the assignment? Acrobat provides reviewing and commenting tools such as sticky notes you can place anywhere in a PDF document. You can use these features to explain why a document is included in the e-portfolio or how it relates to other documents in the e-portfolio.
• Do documents include multiple sections that should be bookmarked for easier viewing?
• Will media files be easier to view as standalone documents or as PDF documents? Try viewing the files on a variety of machines to see what the results are. Which method best accommodates the viewers you expect to open your e-portfolio?
File toolbar
Tasks toolbar
Select & Zoom toolbar
Find toolbar Page Navigation toolbar

Adobe Acrobat 9 Curriculum Guide
© 2008 Adobe Systems Incorporated Creating electronic portfolios with Adobe Acrobat 5
• Will individuals without Acrobat be providing feedback for the PDF portfolio such that they would need special access rights through Adobe Reader?
• Do you want to use bookmarks, internal links, and/or folders to organize the portfolio?
The answers to these questions will help students prepare the files they plan to include and make the enhancements before building the PDF portfolio.
Keep in mind the difference between a PDF portfolio and a PDF document. A PDF portfolio is a container for documents, but it isn’t a document itself. Each of these enhancements must be made in each document contained in a PDF portfolio.
With a PDF document, you can:
• Attach sticky notes to the document
• Create links from one part of a document to another
• Create links to external websites
• Add bookmarks to a document
• Add video, audio, and Flash movies to a PDF
• Manage reader rights for viewers with Acrobat Reader
Although you can also make many more enhancements, we will cover these main ones that will help your students prepare the documents they provide in their PDF portfolios. For other enhancements, see Acrobat online help for more information or visit the Acrobat in Education blog at http://blogs.adobe.com/acrobatineducation/.
Converting files to PDF format
You create a PDF by converting other documents and resources to Portable Document Format. You can usually choose from several PDF creation methods, depending on the type of file you start with and your requirements for the PDF.
There are a number of ways to create PDFs. For instance, if a file is open in its authoring application (such as a spreadsheet that is open in Microsoft Excel), you can usually convert the file to PDF without starting Acrobat. However, every PDF strikes a balance between efficiency (small file size) and quality (such as resolution and color). When that balance is critical to your task, you’ll want to convert the files by using Acrobat, because that method includes access to various conversion options.
To convert a file to PDF:
1. In Acrobat, do one of the following:
• Choose File > Create PDF > From File.
• In the toolbar, click the Create button and choose PDF From File.
2. In the Open dialog box (Figure 3), select the file. You can browse all file types or select a specific type from the Files Of Type menu.
3. Optionally, click Settings to change the conversion options. The options available vary depending on the file type and include such settings as adding bookmarks automatically, implementing security settings, and managing color or compression. Note: The Settings button is unavailable if you choose All Files as the file type or if no conversion settings are available for the selected file type.
Figure 3 Open dialog box
Settings button

Adobe Acrobat 9 Curriculum Guide
6 Creating electronic portfolios with Adobe Acrobat ©2008 Adobe Systems, Inc
4. Click Open to convert the file to a PDF. Depending on the type of file you are converting, the authoring application starts automatically or a progress dialog box appears. If the file is in an unsupported format, a message appears telling you the file cannot be converted to PDF.
5. When the new PDF opens, choose File > Save or choose File > Save As. Then select a name and location for the PDF. When naming a PDF that’s intended for distribution via the web or e-mail, consider limiting the filename to eight characters (with no spaces) and include the .pdf extension. This ensures that email programs or network servers don’t truncate the filename and that the PDF opens as expected.
Converting Web pages to PDF format
You can include web-based materials in an e-portfolio. You can use Acrobat to link to web pages or capture them and convert them into a PDF for viewing offline. When you convert a web page to PDF, the HTML file and all associated files—such as JPEG images, Adobe Flash files, cascading style sheets, text files, image maps, and forms—are included in the conversion process.
The resulting PDF behaves much like the original web page. For example, the images, links, image maps, and most media files appear and function normally within the PDF. (Animated GIF files appear as still images, showing the last frame of the animation.)
In preparing to convert web pages to PDF, consider the following factors, which affect how you approach the conversion process:
• How much do you want to convert? If you want to convert several levels or all of a multipage website to PDF, work within Acrobat.
• Do you want to create a new PDF from the web pages or to append the converted pages to an existing PDF? You can do both in either Acrobat or Internet Explorer, but you choose different buttons or commands to accomplish these things.
• How complicated is the web page? Some web pages display differently in different browsers, and a web page that uses unconventional code or media may not convert the way you expect it to. If you have difficulty converting a particular web page to PDF, consider linking to the web page instead (see “Creating links in a PDF document”).
Here’s how to use Acrobat to convert one or more pages from a website into a PDF.
To convert a web page to PDF:
1. Choose File > Create PDF > From Web Page.
2. In the Create PDF From Web Page dialog box (Figure 4), enter the complete path to the web page or click Browse and locate an HTML file.
3. To change the number of levels in the website to convert (that is, the depth of links Acrobat should follow), expand Capture Multiple Levels. Enter the number of levels to include, or select Get Entire Site to include all levels from the website.
Figure 4 Create PDF From Web Page dialog box

Adobe Acrobat 9 Curriculum Guide
© 2008 Adobe Systems Incorporated Creating electronic portfolios with Adobe Acrobat 7
Note: Some websites have hundreds or even thousands of pages. Converting a large website can make your system slow and unresponsive and can even use up available hard-drive space and memory, causing a system crash. A good idea is to begin by downloading one level of pages and then go through them to find particular links to download.
4. If Get Only N Level(s) is selected, select one or both of the following options:
• Stay On Same Path: Downloads only web pages subordinate to the specified URL. Select this option if you want to capture only a particular section of a website.
• Stay On Same Server: Downloads only web pages stored on the same server. Select this option if you want to avoid capturing web pages from other websites. your target website links to.
5. Click Settings, change the selected options in the Web Page Conversion Settings dialog box as needed (typically you can use the default settings), and click OK.
6. Click Create. Note: You can view PDF pages while they are downloading; however, you cannot modify a page until the download process is complete.
7. If you closed the Download Status dialog box, choose Advanced > Web Capture > Bring Status Dialogs To Foreground to see the dialog box again.

Adobe Acrobat 9 Curriculum Guide
8 Creating electronic portfolios with Adobe Acrobat ©2008 Adobe Systems, Inc
Attaching sticky notes to a document
The most common type of comment is the sticky note. A sticky note has a note icon that appears on the page and a pop-up note for your text message. You can add a sticky note anywhere on the page or in the document area.
To add a sticky note comment:
1. Do one of the following:
• In Acrobat, choose Comments > Add Sticky Note.
• In Reader, choose Document > Comments > Add Sticky Note.
• Select the Sticky Note tool (Figure 5) in the Comment & Markup toolbar, and either click where you want to place the note or drag to create a custom-sized note.
2. Type text in the pop-up note (Figure 6). You can also use the Select tool to copy and paste text from a PDF into the note. Note: If you close the pop-up note, your text remains.
3. You can reposition the sticky note icon by dragging it to a new location.
Figure 5 Comment & Markup toolbar
Figure 6 Sticky note
To edit a sticky note comment
1. Click or double-click the note icon.
2. Make changes, as needed:
• To resize the pop-up note, drag the lower left or lower right corner (Figure 7).
• To change the text formatting, choose View > Toolbars > Properties Bar, select the text, and then select the property you want in the toolbar.
3. When you finish, click the minimize button in the upper right corner of the pop-up note, or click outside the pop-up note.
If you want to change the font size, default pop-up behavior, and other settings for creating and viewing comments, use the Commenting panel in the Preferences dialog box (Figure 8). To open the Commenting preferences, choose Edit > Preferences. Then select the Commenting category. The Commenting panel isn’t available in Reader.
Figure 7 Sticky note
Figure 8 Commenting preferences
Sticky Note tool
Sticky note icon Pop-up note
Drag to resize

Adobe Acrobat 9 Curriculum Guide
© 2008 Adobe Systems Incorporated Creating electronic portfolios with Adobe Acrobat 9
To delete a sticky note comment:
1. Select the Sticky Note tool , the Hand tool , or the Select tool .
2. Select the note icon, and press Delete. Alternatively, double-click the note icon and choose Delete from the Options menu (Figure 9).
Figure 9 Sticky note Options menu
Creating links in a PDF document
Links in a PDF document can be visible or invisible and can have one or more actions associated with them. They can be linked to initiate actions such as playing multimedia, accessing the web, reading articles, showing and hiding comments, and performing menu commands.
You can link from one part of a PDF document to another part of the same document. You can also use the same method to link one PDF document to another PDF document in the same PDF portfolio. Once you’ve shown students how to create PDF portfolios, you may want to revisit these instructions with them.
To link from one page in a PDF document to another or link from one document to another in the PDF portfolio:
1. If you have created a PDF portfolio, you can create a link from one document to another document in the portfolio. Make sure both the PDF document you want to link from and the PDF document you want to link to are in the PDF portfolio.
2. In the PDF portfolio, open the document that will contain the link.
3. Choose Tools > Advanced Editing > Link Tool. The cursor changes to a cross hair.
4. Draw a rectangle around the text or object you want viewers to click to activate your link. The Create Link dialog box appears (Figure 10), showing the properties you can assign to the link.
5. Use the Link Appearance section of the Create Link dialog box to set the appearance of the link.
6. In the Create Link dialog box, click Go To A Page View and click Next. The Create Go To View dialog box appears (Figure 11).
Figure 10 Create Link dialog box
Figure 11 Create Go To View dialog box

Adobe Acrobat 9 Curriculum Guide
10 Creating electronic portfolios with Adobe Acrobat ©2008 Adobe Systems, Inc
7. With the Create Go To View dialog box displayed, do one of the following:
• If you are linking from one page to another page in the same document, navigate to the page you want the link to open.
• If you are linking from one document to another document, navigate to the document you want the link to open, using the portfolio navigational controls or the scroll bars and mouse. If you want the link to open a page other than the first page of the document, navigate to that page in the document.
8. Use the zoom controls to set the zoom level of the document that viewers see when they open the document.
9. In the Create Go To View dialog box, click Set Link.
10. To test the link, choose Tools > Select & Zoom > Select Tool. Then click the link.
11. To change the appearance or behavior of the link, choose Tools > Advanced Editing > Link Tool. Then double-click the link and change the link settings in the Link Properties dialog box.

Adobe Acrobat 9 Curriculum Guide
© 2008 Adobe Systems Incorporated Creating electronic portfolios with Adobe Acrobat 11
You can also use the Link tool to create links that direct your viewer to web-based resources.
To link to an external site:
1. Open the document that will contain the link.
2. Choose Tools > Advanced Editing > Link Tool. The cursor changes to a cross hair.
3. Draw a rectangle around the text or object you want viewers to click to activate your link. The Create Link dialog box appears (Figure 12), showing the properties that can be assigned to the link.
4. Use the Link Appearance section of the Create Link dialog box to set the appearance of the link.
5. In the Create Link dialog box, click Open A Web Page and click Next. The Edit URL dialog box appears (Figure 13).
6. In the Edit URL dialog box, enter the web address of the web page or website you want the link to open. Then click OK.
7. To test the link, choose Tools > Select & Zoom > Select Tool. Then click the link.
8. To change the appearance or behavior of the link, choose Tools > Advanced Editing > Link Tool. Then double-click the link and change the link settings in the Link Properties dialog box.
Figure 12 Create Link dialog box
Figure 13 Edit URL dialog box

Adobe Acrobat 9 Curriculum Guide
12 Creating electronic portfolios with Adobe Acrobat ©2008 Adobe Systems, Inc
Adding bookmarks to a document
In Acrobat, you can use bookmarks (Figure 14) to mark a place in the PDF that you want viewers to find easily (or to which you want to return). You can use a bookmark to jump to a destination in the PDF, another document, or a web page. A bookmark is a link with representative text in the Bookmarks panel in the navigation pane. Each bookmark goes to a different view or page in the document. When you create PDFs of documents created by most desktop publishing programs, Acrobat automatically generates bookmarks from the table-of-contents entries.
Figure 14 Bookmarks in a document
Initially, a bookmark displays the page that was in view when the bookmark was created, which is the bookmark’s destination. In Acrobat, you can set bookmark destinations as you create each bookmark. However, it is sometimes easier to create a group of bookmarks and then set the destinations later.
Bookmarks button
Navigation pane

Adobe Acrobat 9 Curriculum Guide
© 2008 Adobe Systems Incorporated Creating electronic portfolios with Adobe Acrobat 13
To create a bookmark:
1. In a PDF document, open the page you want the bookmark to link to, and adjust the view settings (that is, use the Select & Zoom tools to adjust the magnification you want viewers to see when the bookmark opens the page).
2. Use the Select tool to select the part of the page you want the bookmark to open when it is clicked:
• To bookmark selected text, drag to select the text. The selected text becomes the label of the new bookmark. You can edit the label.
• To bookmark a single image, click the image or drag a rectangle around the image.
• To bookmark a portion of an image, drag a rectangle around the portion.
3. Make sure the Bookmarks panel is open in the navigation pane on the left side of the document window. If it isn’t, click the Bookmarks button (Figure 14).
4. Select the bookmark under which you want to place the new bookmark. If you don’t select a bookmark, the new bookmark is automatically added at the end of the list.
5. Click the New Bookmark button (Figure 15).
6. Type or edit the name of the new bookmark. To rename a bookmark you’ve already created, select the bookmark in the Bookmarks panel, choose Rename Bookmark in the options menu , and type the new bookmark name.
7. To change the order of bookmarks in the Bookmarks panel, drag the bookmark you want to move to its new location in the list of bookmarks.
Figure 15 New Bookmark button
Adding media to a PDF document
Inserting a media file into a PDF document has different results than adding media files directly to a PDF portfolio. Be sure students understand the difference so they can decide which approach is more effective.
The advantage to placing a video or audio file in a PDF document is that Acrobat converts the file to a format that can be played by Reader. This conversion process greatly reduces the file size of the PDF portfolio that includes this document compared to adding the file in its original format, and anyone with Reader can view and/or hear the media without additional software.
However, when such files are placed directly into a PDF portfolio, they are not converted. To view the files, viewers must have whatever application was used to create them; choose this option if you want viewers to have access to the original file format. The original files retain their individual identities but are still part of the one PDF portfolio file. Viewers can open, read, edit, and format each component file independent of the other component files in the PDF portfolio (provided they have the native applications that created those files).
PDFs can include Flash, QuickTime, MP3, MPEG, and Windows Media files, among others. You can play these files directly from the page or activate them from a link or a bookmark. Each multimedia file includes a play area
New Bookmark button
Adobe Acrobat 9 Curriculum Guide
14 Creating electronic portfolios with Adobe Acrobat ©2008 Adobe Systems, Inc
from which you can activate the media. The play area typically appears on the PDF page as an image or a rectangle but can also be invisible.
Any computer that has Adobe Reader 9 can play these files:
• Media files created in Flash (FLV format)
• Media files that comply with the H.264 standard for video compressions
Media files in other formats require the necessary hardware and software to play.
When you add a media file to a PDF document, Acrobat Pro Extended automatically converts video to FLV files. This format ensures both high-quality viewing and compatibility across computer platforms. FLV files are also compact, so converting multimedia to this format helps reduce the size of multimedia PDFs. Acrobat converts the following file formats to FLV format: ASF, ASX, AVI, 3GPP, MOV, MP4, MPEG, MPG, QT, and WMV files. MP3 audio files can also be added to a PDF for playback on any platform.
Note: All multimedia developed in Adobe Flash® and any multimedia that is H.264 compliant can be played back in Adobe Reader® 9 and later. (H.264, also known as MPEG-4 part 10, is a video compression standard that provides high-quality video without substantially increasing file size.) Video files of varying formats and filename extensions can be H.264 compliant.
To add video to a PDF document:
1. Open the PDF document. If the document is in a PDF portfolio, right-click (Windows) or Ctrl-click (Mac OS) the document and choose Open. Double-clicking a document in a PDF portfolio allows you to preview (rather than open) the document. You will not be able to proceed with this activity in a previewed document.
2. Choose Tools > Multimedia, and select the Video tool .
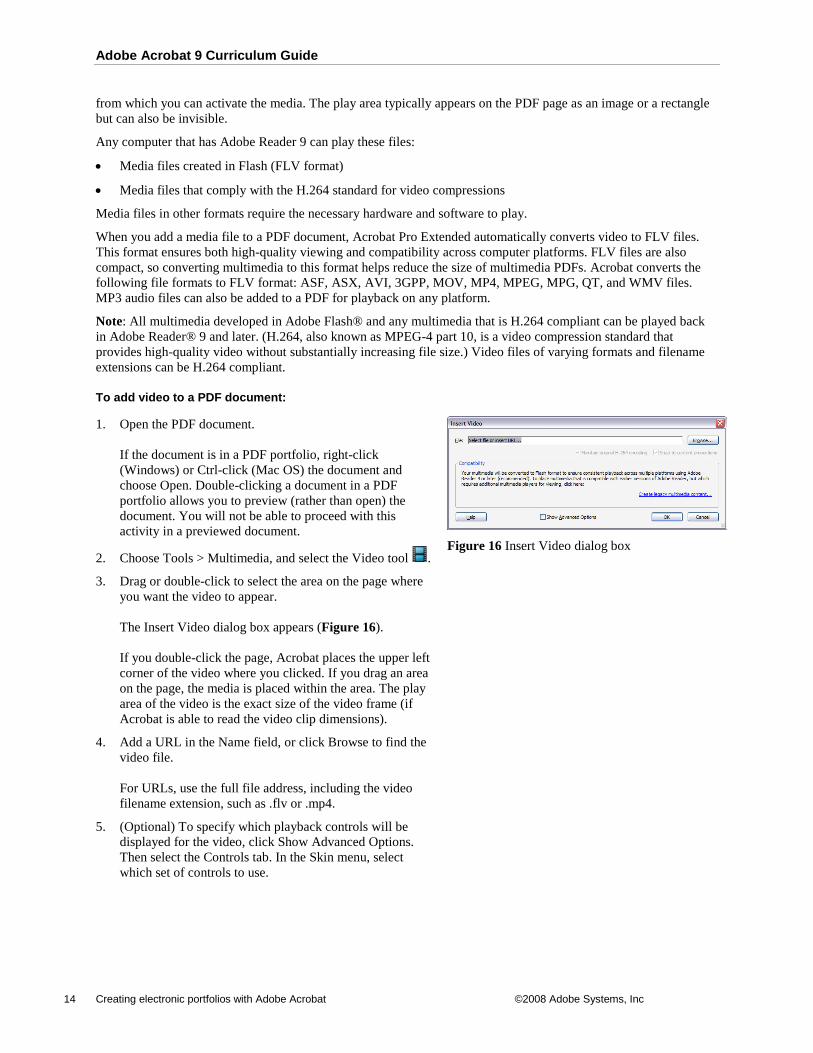
3. Drag or double-click to select the area on the page where you want the video to appear. The Insert Video dialog box appears (Figure 16). If you double-click the page, Acrobat places the upper left corner of the video where you clicked. If you drag an area on the page, the media is placed within the area. The play area of the video is the exact size of the video frame (if Acrobat is able to read the video clip dimensions).
4. Add a URL in the Name field, or click Browse to find the video file. For URLs, use the full file address, including the video filename extension, such as .flv or .mp4.
5. (Optional) To specify which playback controls will be displayed for the video, click Show Advanced Options. Then select the Controls tab. In the Skin menu, select which set of controls to use.
Figure 16 Insert Video dialog box
Adobe Acrobat 9 Curriculum Guide
© 2008 Adobe Systems Incorporated Creating electronic portfolios with Adobe Acrobat 15
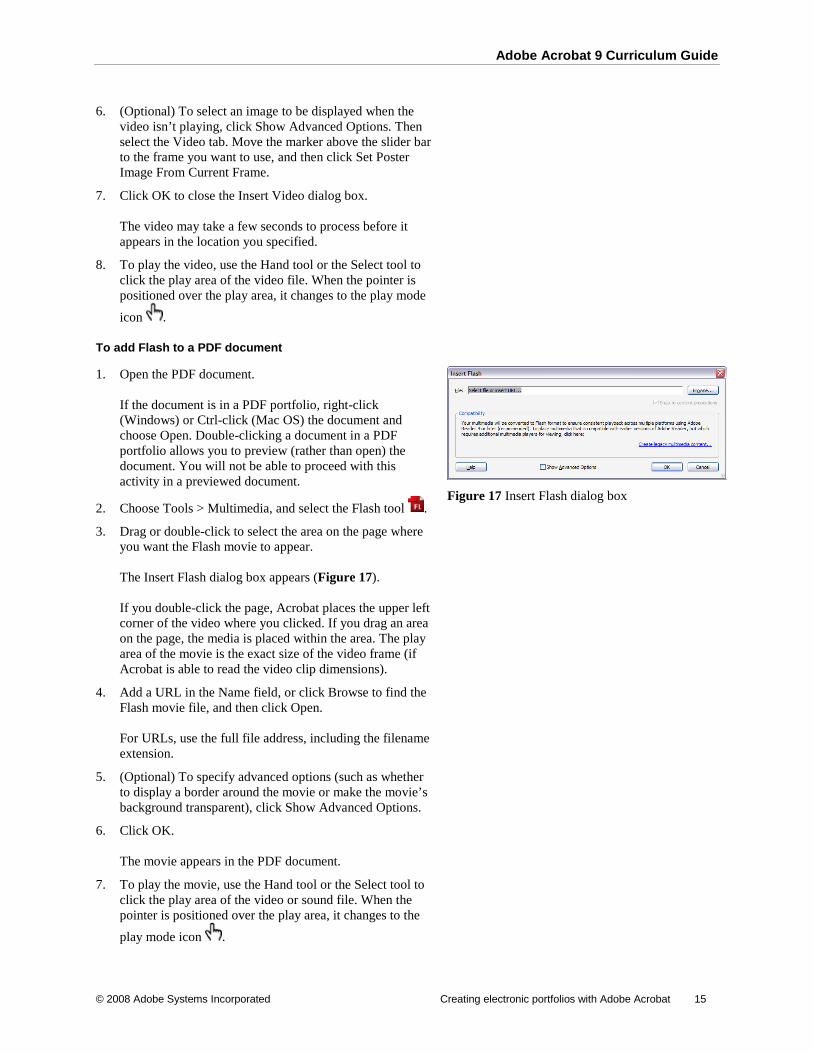
6. (Optional) To select an image to be displayed when the video isn’t playing, click Show Advanced Options. Then select the Video tab. Move the marker above the slider bar to the frame you want to use, and then click Set Poster Image From Current Frame.
7. Click OK to close the Insert Video dialog box. The video may take a few seconds to process before it appears in the location you specified.
8. To play the video, use the Hand tool or the Select tool to click the play area of the video file. When the pointer is positioned over the play area, it changes to the play mode
icon .
To add Flash to a PDF document
1. Open the PDF document. If the document is in a PDF portfolio, right-click (Windows) or Ctrl-click (Mac OS) the document and choose Open. Double-clicking a document in a PDF portfolio allows you to preview (rather than open) the document. You will not be able to proceed with this activity in a previewed document.
2. Choose Tools > Multimedia, and select the Flash tool .
3. Drag or double-click to select the area on the page where you want the Flash movie to appear. The Insert Flash dialog box appears (Figure 17). If you double-click the page, Acrobat places the upper left corner of the video where you clicked. If you drag an area on the page, the media is placed within the area. The play area of the movie is the exact size of the video frame (if Acrobat is able to read the video clip dimensions).
4. Add a URL in the Name field, or click Browse to find the Flash movie file, and then click Open. For URLs, use the full file address, including the filename extension.
5. (Optional) To specify advanced options (such as whether to display a border around the movie or make the movie’s background transparent), click Show Advanced Options.
6. Click OK. The movie appears in the PDF document.
7. To play the movie, use the Hand tool or the Select tool to click the play area of the video or sound file. When the pointer is positioned over the play area, it changes to the play mode icon .
Figure 17 Insert Flash dialog box

Adobe Acrobat 9 Curriculum Guide
16 Creating electronic portfolios with Adobe Acrobat ©2008 Adobe Systems, Inc
To add sound to a PDF document
1. Open the PDF document. If the document is in a PDF portfolio, right-click (Windows) or Ctrl-click (Mac OS) the document and choose Open. Double-clicking a document in a PDF portfolio allows you to preview (rather than open) the document. You will not be able to proceed with this activity in a previewed document.
2. Choose Tools > Multimedia, and select the Sound tool .
3. Drag or double-click to select the area on the page where you want to place the sound. The Insert Sound dialog box appears (Figure 18). If you double-click the page, Acrobat places the upper left corner of the sound play area where you clicked. If you drag an area on the page, the media is placed within the area.
4. Add a URL in the Name field, or click Browse to find the media file, and then click Open. For URLs, use the full file address, including the filename extension.
5. (Optional) To specify advanced options (such as what image, or “poster,” to display in the sound play area), click Show Advanced Options.
6. Click OK. A play area representing the sound appears in the PDF document.
7. To play the audio, use the Hand tool or the Select tool to click the sound play area. When the pointer is positioned
over the play area, it changes to the play mode icon .
Figure 18 Insert Sound dialog box
Converted media require Adobe Reader 9 or Acrobat 9 for playback. Viewers who attempt to play converted media in earlier versions of Adobe Reader or Acrobat are prompted to upgrade to Adobe Reader 9 or Acrobat 9.
If students want to delete or move media they’ve inserted, have them choose the media tool for that type of media again. Then they can select the button that launches the media and move or delete it.
Managing reader rights
Students may wish to create an e-portfolio that allows viewers to comment and respond to its contents. If students enable commenting rights in a PDF, student peers can offer feedback even if they do not have a copy of Adobe Acrobat. Enabling these rights allows viewers using Adobe Reader 8 or later to participate in reviews of that PDF. When a PDF with commenting rights opens in Reader, it includes a document message bar and commenting tools that are otherwise unavailable. For more on commenting and reviewing in Acrobat, see “Digital assessment with Adobe Acrobat.”
To enable commenting rights, open the PDF and choose Comments > Enable For Commenting And Analysis In Adobe Reader.
Adobe Acrobat 9 Curriculum Guide
© 2008 Adobe Systems Incorporated Creating electronic portfolios with Adobe Acrobat 17
Note: If you enable commenting for Reader in a digitally signed document, the signature is invalidated.
Creating and organizing a PDF portfolio To create a PDF portfolio, first have your students gather and organize the assets they want to include in the PDF portfolio. Such assets probably fall into one or more of these categories: digital, paper, web, and rich media. Prepare and organize these files prior to the assembly.
• Digital assets: Have students collect their digitally created documents into a folder. Make sure students keep in mind that if they want the files to stay in their native format, they can add them directly into the PDF portfolio without converting them to PDF. But if they want to be sure viewers can read the files, they should convert them to PDF first so the files will play automatically in Reader (see “Adding media to a PDF document”).
• Rich media files: Have students collect video and audio files into a separate folder for inclusion in the PDF portfolio. These would be media files students have chosen to add directly to the PDF portfolio rather than embed in a PDF document. Note: Viewers with the Macintosh operating system can interact with rich media supported by QuickTime Player and Adobe Flash Player. Viewers using Microsoft Windows have more player options available to them. Make sure students know their audience—have them make reasonable predictions about the capabilities of the computers that viewers might be using.
• Scanned documents: Your students might want to include documents that exist only on paper. Have students scan these documents in Acrobat; Acrobat can convert the scans to PDFs.
If your students have already organized their materials into folders on their local drive, they can use the same organization in their PDF portfolio with minimal effort. Just have students drag the top-level folder to their PDF portfolio work area, and all of the files will be copied into the PDF portfolio. The folders are copied as well, maintaining the organizational structure.
Creating and organizing a PDF portfolio is a simple process—as simple as dragging and dropping files from one folder to another.

Adobe Acrobat 9 Curriculum Guide
18 Creating electronic portfolios with Adobe Acrobat ©2008 Adobe Systems, Inc
To drag files into an empty PDF portfolio:
1. Start Acrobat.
2. Select File > Create PDF Portfolio. The portfolio work area appears (Figure 19).
3. Position the portfolio work area so you can see your desktop. From the desktop, drag documents or folders to the portfolio work area. The documents or folders you dragged appear in the portfolio work area (Figure 20).
Figure 19 Portfolio work area
Figure 20 Documents and folders in the portfolio work area
As viewers drill down into the folder hierarchy, Acrobat automatically builds breadcrumb trails to help keep track of where they are in the PDF portfolio and help them find their way back up the folder hierarchy (Figure 21).
Figure 21 Breadcrumb trail
Students can also create folders inside the PDF portfolio, allowing them to organize (or reorganize) their documents even after they have been added to the PDF portfolio.
Breadcrumb trail
Adobe Acrobat 9 Curriculum Guide
© 2008 Adobe Systems Incorporated Creating electronic portfolios with Adobe Acrobat 19
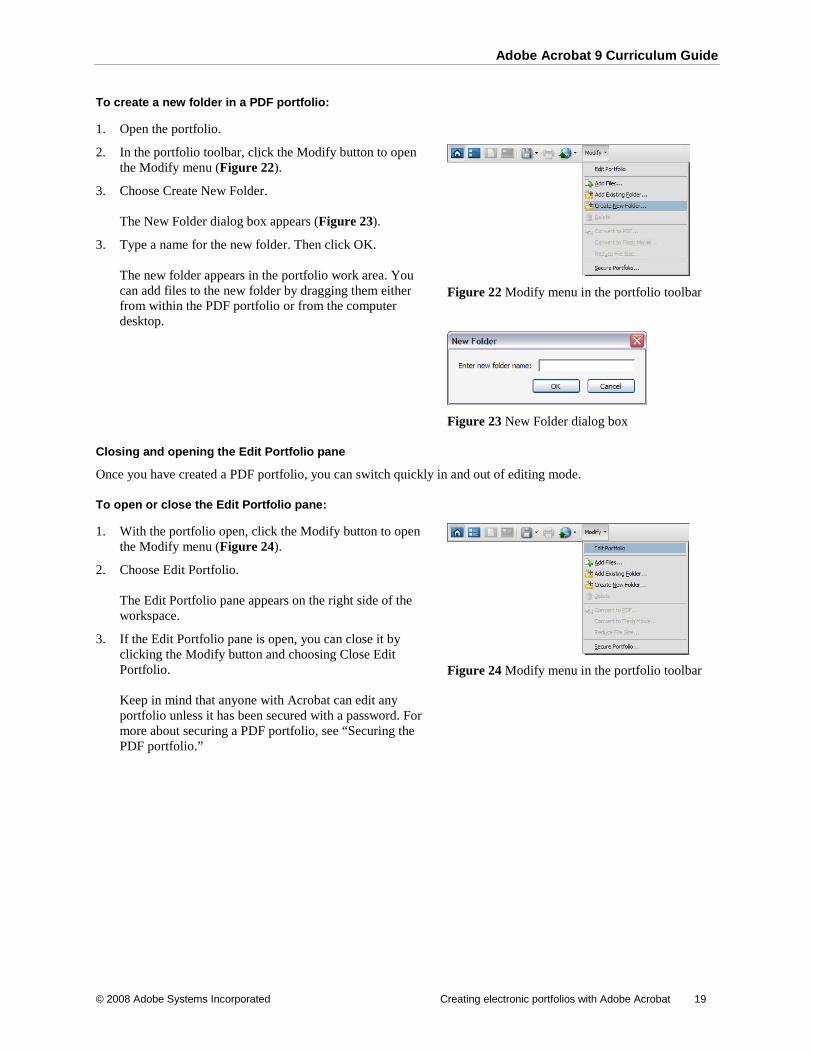
To create a new folder in a PDF portfolio:
1. Open the portfolio.
2. In the portfolio toolbar, click the Modify button to open the Modify menu (Figure 22).
3. Choose Create New Folder. The New Folder dialog box appears (Figure 23).
3. Type a name for the new folder. Then click OK. The new folder appears in the portfolio work area. You can add files to the new folder by dragging them either from within the PDF portfolio or from the computer desktop.
Figure 22 Modify menu in the portfolio toolbar
Figure 23 New Folder dialog box
Closing and opening the Edit Portfolio pane
Once you have created a PDF portfolio, you can switch quickly in and out of editing mode.
To open or close the Edit Portfolio pane:
1. With the portfolio open, click the Modify button to open the Modify menu (Figure 24).
2. Choose Edit Portfolio. The Edit Portfolio pane appears on the right side of the workspace.
3. If the Edit Portfolio pane is open, you can close it by clicking the Modify button and choosing Close Edit Portfolio. Keep in mind that anyone with Acrobat can edit any portfolio unless it has been secured with a password. For more about securing a PDF portfolio, see “Securing the PDF portfolio.”
Figure 24 Modify menu in the portfolio toolbar

Adobe Acrobat 9 Curriculum Guide
20 Creating electronic portfolios with Adobe Acrobat ©2008 Adobe Systems, Inc
Personalizing a PDF portfolio The robust PDF portfolio features in Acrobat make it easy to create a sophisticated presentation package. When students first open a PDF portfolio, they see the Edit PDF Portfolio pane on the right side of the portfolio work area. Every PDF portfolio can be viewed either in a customizable visual layout or in a list view. First, we will cover creating a visual layout.
In the Edit PDF Portfolio pane, you can quickly customize the appearance of the e-portfolio. You can choose:
• A visual layout
• A welcome page
• A color scheme
Students can also specify the details to display about the contents of the e-portfolio.
Have students choose one of the dynamic visual layouts that Acrobat provides. Then have them create a welcome page, set the headers and footers, and set the color scheme.
To choose a layout for a portfolio:
1. Open the portfolio.
2. In the Edit PDF Portfolio pane, open the Choose A Layout section (Figure 25).
3. In the Choose A Layout section of the Edit PDF Portfolio pane, select one of the basic layout options:
• Basic Grid: Arrange files as thumbnails with text.
• On An Image: Arrange files on top of any image you want. Use the Pick Image button to select the image to use as a background for your portfolio.
• Revolve: Bring one file into focus at a time.
• Sliding Row: Display several files in a row.
Figure 25 Choose A Layout section
Welcome page
E-portfolios posted to the web may be encountered by a variety of people. The welcome page provides context for the audience. Have students take a moment to consider the profiles of their potential viewers: what kinds of people might be interested in the e-portfolio? If students plan to present the e-portfolio in multiple venues, you may want them to make multiple copies of the PDF portfolio, each with a different welcome page customized to address a particular audience or objective.
A welcome page introduces the e-portfolio and its contents. It typically provides contact information and other useful details for the audience, such as instructions about what they can find in the portfolio and how to navigate it. Students can create their pages inside Acrobat by using text, images, or even a Flash movie. Students can also provide a video introduction by embedding a Flash video (FLV) in a Flash movie (SWF) and using that Flash movie as the welcome page.

Adobe Acrobat 9 Curriculum Guide
© 2008 Adobe Systems Incorporated Creating electronic portfolios with Adobe Acrobat 21
To create a welcome page:
1. In the Edit PDF Portfolio pane, open the Add Welcome & Header section. The Add Welcome & Header section has two parts to it: the Welcome pane and the Header pane. Make sure the Welcome pane is open (Figure 26).
2. Select one of the options for your welcome page:
• No Welcome Page: Select this option if you don’t want a welcome page or if you want to remove a welcome page you previously added to the e-portfolio.
• Text Only: Select this option for text. Acrobat provides a text area with text formatting options such as those found in a word processor.
• Image Only: Select this option to display a single image as your welcome page. Images can be JPG, GIF, or PNG formats. You can control the size and transparency of the image.
• Image & Text: Select this option to combine text and a single image. You can adjust the layout of the image and the text area.
• Flash Movie: Select this option to use a Flash movie as the welcome page.
3. If you selected text for your welcome page, click the text block and type the text you want displayed. Use the text options to format your text.
4. If you selected an image or a Flash movie for your welcome page, click the image object or the Flash movie object and select the file that contains the image or movie that should appear. Use the display options to modify how the object appears.
Figure 26 Add Welcome & Header section
Anyone who opens the PDF portfolio will first see the welcome page, with a Get Start button at the bottom. Viewers click the Get Started button to see the contents of the PDF portfolio.
Headers
A PDF portfolio header provides a consistent banner (and by extension, persistent context) over the e-portfolio content. Students can use the header to give their e-portfolios a name, offer contact information, or display images, such as the school’s logo or their photograph.
Note: Acrobat also lets you create headers and footers within a PDF document—such headers appear on every page of the PDF they belong to. However, a portfolio header is different. The portfolio header is visible when viewers are navigating the portfolio but not when they have opened one of the documents the portfolio contains.

Adobe Acrobat 9 Curriculum Guide
22 Creating electronic portfolios with Adobe Acrobat ©2008 Adobe Systems, Inc
To create a header:
1. In the Edit PDF Portfolio pane, open the Add Welcome & Header section.
2. In the Add Welcome & Header section, click Header to open the Header pane (Figure 27).
3. Select one of the options for your welcome page:
• No Header: Select this option if you don’t want a header or if you want to remove a header you previously added to the e-portfolio.
• Simple Text: Provides a text block you can format by using the text options.
• Structured Text: Provides several text blocks you can format by using the text options, including a text block you can use to provide a linked e-mail address and another (labeled URL text) you can use to provide a linked web address.
• Logo & Text: Displays an image next to the text block in your header.
• Logo & Structured Text: Displays an image next to a structured text block in your header.
• Image Only: Displays an image in your header but no text.
• Text & Background Image: Displays an image behind the text in your header.
4. If you selected text for your header, click the text block and type the text you want displayed. Use the text options to format your text.
5. If you selected an image or a logo for your header, click the image object or the Flash movie object and select the file that contains the image or movie that should appear. Use the display options to modify how the object appears.
Figure 27 Header pane
The Structured Text option provides a text field for an e-mail address and another for a web address (the URL text) (Figure 28). Acrobat automatically links the information in these fields so viewers can use them to create an e-mail message addressed to the student or to open the student’s web page.
Figure 28 Structured Text header
Note: If students are wondering whether to provide additional contact information of a more personal nature, have them give some consideration to who will have access to the portfolio. If the e-portfolio will be available publicly to anyone accessing the web, providing personal information (such as a home address) is not always in the best interest of the student and might also be against school policies.

Adobe Acrobat 9 Curriculum Guide
© 2008 Adobe Systems Incorporated Creating electronic portfolios with Adobe Acrobat 23
Adding headers or footers to documents
Students can also provide headers and footers for the pages of the documents in their PDF portfolios. Headers and footers present consistent information in the page margins throughout a PDF. The information could be the name of the project, a date, automatic page numbering, the title of the PDF document, or the name of the author. Students can add headers and footers to one or more PDFs, including component PDFs in a portfolio.
Students can vary the headers and footers within a PDF. For example, they can add a header that displays the page number on the right side of odd-numbered pages and another header that displays the page number on the left side of even-numbered pages.
After applying a header and footer, students can edit, replace, or delete them in the PDF. They can also preview headers and footers before applying them and adjust the header and footer margins so they don’t overlap other page content.
To add headers or footers to multiple documents in a portfolio:
1. Open your PDF portfolio. Select the PDF documents in the portfolio for which you want to have headers or footers. To select multiple documents in a PDF portfolio, do one of the following:
• To select a range of documents, click the first document and then Shift-click the last document. All documents between the two are selected.
• To select individual noncontiguous documents, Ctrl-click (Windows) or Control-click (Mac OS) each document.
• To deselect an individual document, Ctrl-click (Windows) or Control-click (Mac OS) that document.
2. Choose Document > Header & Footer > Add. The Add Header And Footer dialog box appears (Figure 29).
3. As needed, specify the Font and Margin values. These text properties apply to all header and footer entries that are part of this setting definition. To apply different settings to different documents, open each document individually to add the header and footer, and follow steps 2 through 6. To prevent the new header or footer from overlapping with the content of the PDF document, click the Appearance Options button and select Shrink Document To Avoid Overwriting The Document’s Text And Graphics.
Figure 29 Add Header And Footer dialog box

Adobe Acrobat 9 Curriculum Guide
24 Creating electronic portfolios with Adobe Acrobat ©2008 Adobe Systems, Inc
4. Type the text in any of the header and footer text boxes.
• To insert page numbers, click the Insert Page Number button.
• To insert the current date, click the Insert Page Number button.
• To select formatting for the page number and date automatic entries, click Page Number And Date Format.
You can combine text with dates and page numbers. You can also add several lines of text to an entry.
5. To specify the pages on which the header and footer appear, click the Page Range Options button. Then specify a page range and choose a Subset option as needed.
6. Examine the results in the Preview area, using the Preview Page option to see various pages of the PDF.
7. Click OK.
To edit headers or footers, choose Document > Header & Footer > Update. Then make the appropriate edits.
To remove headers or footers
Do one of the following:
• Open a single PDF, or select one or more component PDFs in a portfolio. Then choose Document > Header & Footer > Remove.
• To remove headers and footers from multiple PDFs, close any open documents and portfolios. Then choose Document > Header & Footer > Remove. In the dialog box, click Add Files, choose Add Files or Add Open Files, and select the files. Click OK, and then in the Output Options dialog box, specify your folder and filename preferences.
Color Scheme
Students can personalize their PDF portfolio by selecting a color scheme. They can select one of the preconfigured color schemes provided in Acrobat or they can create their own customized color scheme. Students might, for instance, use a customized color scheme to match their school colors. Consider having students visit Adobe Kuler at http://kuler.adobe.com/ for additional help with selecting a color scheme.

Adobe Acrobat 9 Curriculum Guide
© 2008 Adobe Systems Incorporated Creating electronic portfolios with Adobe Acrobat 25
To select a preset color scheme:
1. In the Edit PDF Portfolio pane, open the Select A Color Scheme section.
2. In the Select A Color Scheme section, click one of the 16 preset color schemes (Figure 30). Your PDF portfolio color scheme changes to match the preset colors. Documents remain unaltered by changes to the portfolio color scheme.
Figure 30 Customize Color Scheme pane
To customize a color scheme
1. In the Edit PDF Portfolio pane, open the Select A Color Scheme section.
2. In the Select A Color Scheme section, click Customize Color Scheme (Figure 31). The Customize Color Scheme pane appears. It contains a Lightness & Saturation control, a Hue slider, and five color categories.
3. Click one of the color categories. The categories are:
• Primary Text Color: The color used for the names of documents. This color should contrast sharply with both the card color and the secondary card color so document names are easy to read.
• Secondary Text Color: Used for document descriptions and when text is being selected. This color should also provide a comfortable reading contrast with both the card color and the secondary card color.
• Background Color: The primary color of the portfolio work area.
• Card Color: Cards are blocks that hold documents and folders. Card color refers to the color displayed on these cards when they are not selected.
• Secondary Card Color: The color displayed on cards when they are selected.
4. Drag the Hue slider to select a base color for the category.
5. Click or drag in the Lightness & Saturation control to choose a shade for the color.
6. Repeat steps 3 through 5 for all of the color categories you wish to change.
Figure 31 Customize Color Scheme pane
Preset color schemes
Hue slider
Lightness & Saturation control

Adobe Acrobat 9 Curriculum Guide
26 Creating electronic portfolios with Adobe Acrobat ©2008 Adobe Systems, Inc
Using list view
An alternative to a visual layout is list view (Figure 32). Acrobat automatically creates a list view for a PDF portfolio, showing a list of files by name, size, date the file was created and last modified, and any other details the portfolio author has added to the view. Students can add their own columns to list view. For instance, if students present a collection of work by various other students involved in their project, they might add a column for student names to identify which documents were generated by each student. If you present a collection of materials for students to study, you could add a column labeled “Read By” to make it clear when students should prepare that material for class.
Figure 32 PDF portfolio in list view
To add a column to list view:
1. In the Edit PDF Portfolio pane, open the Specify File Details section (Figure 33).
2. To add a column, click in the Add A Column text field and type the label for the column.
3. In the drop-down menu to the left of the text field, indicate the type of column you want (choices are Text, Number, Date). This choice determines the sorting rules for the column.
4. Click the + button to add the column to the list view.
5. In the list of columns to display, make sure the column is checked. You can remove columns from list view by deselecting them. You can get rid of them permanently by using one of these methods:
• Drag the column name to the trash icon at the bottom of the Columns To Display pane.
• Click the name of the column to select it. Then click the trash icon.
6. To add content to the new column, double-click the cell in the column for each item in the list, and type whatever you want displayed in the cell. Then press Enter (Windows) or Return (Mac OS).
Figure 33 Specify File Details section

Adobe Acrobat 9 Curriculum Guide
© 2008 Adobe Systems Incorporated Creating electronic portfolios with Adobe Acrobat 27
7. If you want your new column to be the column by which the documents are sorted in list view, use the Initial Sort drop-down menu to select the column.
Publishing a PDF portfolio Publishing a PDF portfolio is the simplest part of the process. Publishing is no more complicated than saving the document. Students have multiple publishing options. The one they choose depends on how they plan to distribute the e-portfolio. Students can:
• Save the portfolio (choose File > Save) and then copy it to a location where viewers can readily access it (say, a website).
• Send the portfolio via e-mail.
• Share the portfolio on Acrobat.com (a free service that makes it easy to create, share, and collaborate with others on documents).
Once the e-portfolio is published, have students experience it from a viewer’s perspective. They should try the options on the PDF portfolio toolbar so they understand what viewers can and can’t do with an e-portfolio.
If students determine a need to limit access to their e-portfolio (or limit what a viewer can do with it), you can show them how to secure the e-portfolio with a password.
To share a portfolio via e-mail:
1. Open the PDF portfolio.
2. In the portfolio toolbar, click the Share button to open the Share menu (Figure 34).
3. Choose Email. Acrobat uses your default e-mail client to open a new e-mail message with your PDF portfolio attached.
4. Complete the e-mail message with a subject, a message, and the e-mail addresses of those you wish to receive it. Then send the message.
Figure 34 Share menu in the portfolio toolbar
Navigating the PDF portfolio
Anyone who opens the PDF portfolio can explore it by using either list view or the portfolio’s visual layout. Viewers can use the PDF portfolio toolbar (Figure 35) to switch between the two views. The portfolio toolbar consolidates all of the key ways to interact with an e-portfolio.
Figure 35 Portfolio toolbar
• Home: Navigate through files visually, using the layout you selected in the PDF portfolio pane. If you have opened a PDF document in the PDF portfolio, click this button to close the document preview and return to the portfolio.
• List view: Navigate through files by using file details.
• Preview: Preview the selected file.
Share button
Home
List view
Preview
Welcome
Save
Share Modify
Search

Adobe Acrobat 9 Curriculum Guide
28 Creating electronic portfolios with Adobe Acrobat ©2008 Adobe Systems, Inc
• Welcome: Open the welcome page.
• Save: Save the e-portfolio as a whole or save the files individually.
• Print: Print some or all of the PDF files in the e-portfolio.
• Share: Share the e-portfolio with others, either by e-mail or by posting the file to Acrobat.com.
• Modify: Edit the contents of the e-portfolio. From this menu, you can add files or folders, delete items, convert documents to PDF or Flash, compress the e-portfolio’s file size, or secure the e-portfolio with a password. You can turn on or off the PDF portfolio editing mode.
Securing the PDF portfolio
If you or your students want to be selective about who can view the content of the e-portfolio, it should be secured. Students can secure a PDF portfolio by locking it with a password. Anyone who wants to view the contents must have the password to view it.
To secure a portfolio with a password:
1. Open the PDF portfolio.
2. In the portfolio toolbar, click the Modify button to open the Modify menu (Figure 36).
3. Choose Secure Portfolio. The Document Properties dialog box appears, open to the Security tab.
4. In the Security Method drop-down menu, choose Password Security (Figure 37). The Password Security – Settings dialog box appears (Figure 38).
5. In the Compatibility drop-down menu, choose which version of Acrobat you want the security settings to accommodate (later versions provide more security).
6. In the Select Document Components To Encrypt section of the dialog box, select Encrypt All Document Contents.
7. Select Require A Password To Open The Document.
8. In the Document Open Password text field, type the password you want viewers to use to allow access.
9. If you want to control who can edit and print the document, select Restrict Editing And Printing Of The Document. When this option is selected, you can select more specific permissions with regard to printing, copying, and editing the contents of the e-portfolio.
10. Click OK.
Figure 36 Modify menu in the portfolio toolbar
Figure 37 Security tab in the Document Properties dialog box

Adobe Acrobat 9 Curriculum Guide
© 2008 Adobe Systems Incorporated Creating electronic portfolios with Adobe Acrobat 29
11. If you changed the Document Open Password, the Confirm Document Open Password dialog box appears (Figure 39). Type the Document Open Password again, exactly as you did in the Password Security – Settings dialog box. You may see a warning about the limitations of third-party software with regard to Acrobat security settings. If so, read the warning and click OK.
12. If you changed the Permissions Password, the Confirm Permissions Password dialog box appears. Type the Permissions Password again, exactly as you did in the Password Security – Settings dialog box. Note: If you set a Document Open Password, the Permissions Password will also open the document and bypass the security settings.
13. A warning may appear indicating that security settings are not saved until the document is saved. If so, click OK.
14. Save the PDF portfolio to apply the security settings.
Figure 38 Passport Security – Settings dialog box
Figure 39 Confirm Document Open Password dialog box
Conclusion With e-portfolios created in Adobe Acrobat, your students will be able to deliver a package that is visually sophisticated, universally accessible, and easy to update. Using PDF portfolios in conjunction with the Acrobat reviewing and commenting features creates a powerful means of providing assessment and feedback on the wide variety of media artifacts students generate.
For more on reviewing and commenting in Acrobat, see “Digital assessment with Adobe Acrobat.” You may also wish to learn how Acrobat forms can help you create lesson plan templates and automate other administrative tasks for your classroom and school—see “Generating lesson plans with Adobe Acrobat.”