creating adobe pdf - pearsoncmg.comptgmedia.pearsoncmg.com/imprint_downloads/peachpit/peach...380...
TRANSCRIPT

376
CREATING ADOBE PDF FILES WITH FORM FIELDS
Lesson OverviewIn this lesson, you’ll learn to do the following:
• Add different types of PDF form fields to a page.
• Use prebuilt form fields.
• Add a description to a form field.
• Set the tab order of form fields.
• Add a Submit button to a form.
• Export and test an Adobe PDF (Interactive) file with form fields.
This lesson will take approximately 45 minutes to complete.
To download the project files for this lesson, log in or set up an account at peachpit.com. Enter the book’s ISBN (9780134664095) or go directly to the book’s product page to register. Once on the book’s page, click the Register Your Product link. The book will show up in your list of regis-tered products along with a link to the book’s bonus content. Click the link to access the lesson files for the book. Store the files on your computer in a convenient location, as described in the “Getting Started” section of this book. Your Account page is also where you’ll find any updates to the chapters or to the lesson files.
14
© 2017 Pearson Education, Inc., and Adobe Systems Incorporated and its licensors. All rights reserved.
377
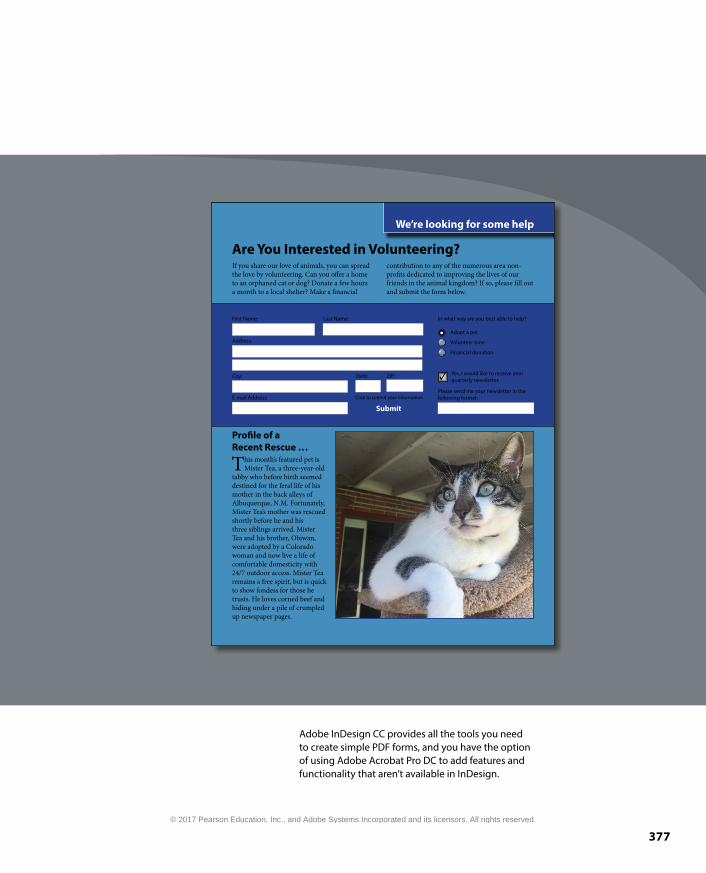
Adobe InDesign CC provides all the tools you need to create simple PDF forms, and you have the option of using Adobe Acrobat Pro DC to add features and functionality that aren’t available in InDesign.
4 • Rocky Mountain Pet Rescue Newsletter • Spring 2017
We’re looking for some help
Are You Interested in Volunteering?If you share our love of animals, you can spread the love by volunteering. Can you offer a home to an orphaned cat or dog? Donate a few hours a month to a local shelter? Make a financial
contribution to any of the numerous area non-profits dedicated to improving the lives of our friends in the animal kingdom? If so, please fill out and submit the form below.
Profile of a Recent Rescue …
This month’s featured pet is Mister Tea, a three-year-old
tabby who before birth seemed destined for the feral life of his mother in the back alleys of Albuquerque, N.M. Fortunately, Mister Tea’s mother was rescued shortly before he and his three siblings arrived. Mister Tea and his brother, Obiwan, were adopted by a Colorado woman and now live a life of comfortable domesticity with 24/7 outdoor access. Mister Tea remains a free spirit, but is quick to show fondess for those he trusts. He loves corned beef and hiding under a pile of crumpled up newspaper pages.
City:
E-mail Address:
State: ZIP:
First Name: Last Name:
Address:
Click to submit your information
In what way are you best able to help?
Adopt a pet
Volunteer time
Financial donation
Please send me your newsletter in the following format:
Yes, I would like to receive your quarterly newsletter.
Submit
© 2017 Pearson Education, Inc., and Adobe Systems Incorporated and its licensors. All rights reserved.
378 LESSON 14 Creating Adobe PDF Files with Form Fields
Getting startedIn this lesson, you’ll add several different types of form fields to a volunteer registra-tion form, export an Adobe PDF (Interactive) file, and then open the exported file and test the fields you created in InDesign.
1 To ensure that the preferences and default settings of your Adobe InDesign program match those used in this lesson, move the InDesign Defaults file to a different folder following the procedure in “Saving and restoring the InDesign Defaults file” on page 3.
2 Start Adobe InDesign. To ensure that the panels and menu commands match those used in this lesson, choose Window > Workspace > [Advanced], and then choose Window > Workspace > Reset Advanced. To begin working, you’ll open an InDesign document that is already partially completed.
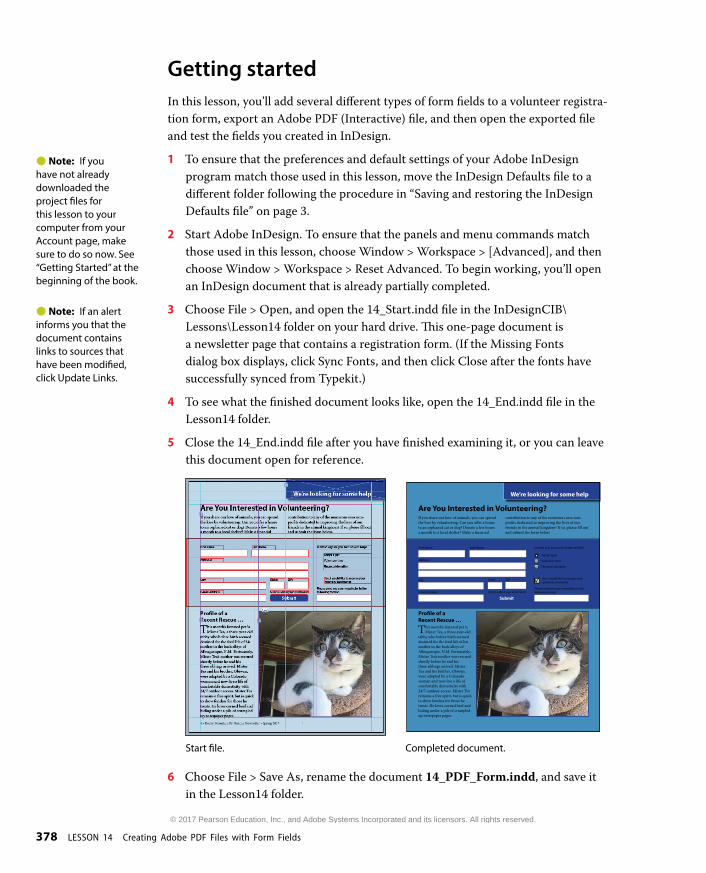
3 Choose File > Open, and open the 14_Start.indd file in the InDesignCIB\Lessons\Lesson14 folder on your hard drive. This one-page document is a newsletter page that contains a registration form. (If the Missing Fonts dialog box displays, click Sync Fonts, and then click Close after the fonts have successfully synced from Typekit.)
4 To see what the finished document looks like, open the 14_End.indd file in the Lesson14 folder.
5 Close the 14_End.indd file after you have finished examining it, or you can leave this document open for reference.
4 • Rocky Mountain Pet Rescue Newsletter • Spring 2017
We’re looking for some help
Are You Interested in Volunteering?If you share our love of animals, you can spread the love by volunteering. Can you offer a home to an orphaned cat or dog? Donate a few hours a month to a local shelter? Make a financial
contribution to any of the numerous area non-profits dedicated to improving the lives of our friends in the animal kingdom? If so, please fill out and submit the form below.
Profile of a Recent Rescue …
This month’s featured pet is Mister Tea, a three-year-old
tabby who before birth seemed destined for the feral life of his mother in the back alleys of Albuquerque, N.M. Fortunately, Mister Tea’s mother was rescued shortly before he and his three siblings arrived. Mister Tea and his brother, Obiwan, were adopted by a Colorado woman and now live a life of comfortable domesticity with 24/7 outdoor access. Mister Tea remains a free spirit, but is quick to show fondess for those he trusts. He loves corned beef and hiding under a pile of crumpled up newspaper pages.
City:
E-mail Address:
State: ZIP:
First Name: Last Name:
Address:
Click to submit your information
In what way are you best able to help?
Adopt a pet
Volunteer time
Financial donation
Please send me your newsletter in the following format:
Yes, I would like to receive your quarterly newsletter.
Submit
Start file. Completed document.
6 Choose File > Save As, rename the document 14_PDF_Form.indd, and save it in the Lesson14 folder.
Note: If you have not already downloaded the project files for this lesson to your computer from your Account page, make sure to do so now. See “Getting Started” at the beginning of the book.
Note: If an alert informs you that the document contains links to sources that have been modified, click Update Links.
© 2017 Pearson Education, Inc., and Adobe Systems Incorporated and its licensors. All rights reserved.

ADOBE INDESIGN CC CLASSROOM IN A BOOK (2017 RELEASE) 379
Adding form fieldsSome setup work on the form fields has already been done. You’ll complete the form by adding some more fields and then modifying some of them.
Adding text fieldsIn a PDF form, a text field is a container into which the person who fills out the form can enter text. All but two of the text frames have already been converted into text fields. You’ll convert these two text frames into text fields.
1 Choose Window > Workspace > Interactive For PDF. This optimizes the panel arrangement for the work you’ll be doing in this lesson and provides quick access to many of the controls you’ll use.
2 Use the Zoom tool ( ) to zoom in on the area in the top half of the page that contains the form objects. That’s where all of your work in this lesson will be done.
3 Select the Selection tool ( ), and then move the pointer over the text field below “First Name.” Notice that a red dotted line is displayed around the object and a small graphic of a text field is displayed on the right side. The dotted line indicates that the object is a PDF form element; the icon of the text frame indicates that the element is a text field. Select the object.
4 Choose Window > Interactive > Buttons And Forms, or click the Buttons And Forms panel icon to display the Buttons And Forms panel. Notice the settings for the text field. Text Field is selected in the Type menu, and the name of the element is First Name.
5 Select the text frame below “Last Name.” In the Buttons And Forms panel, choose Text Field from the Type menu, and then assign a name to the field by entering Last Name in the Name field. Press Enter or Return to apply the name change, and then deselect Scrollable.
Note: You can simplify the display of the page by hiding Layer 1 in the Layers panel. Only the objects in the form area are displayed when you hide Layer 1.
Note: When adjust-ing the appearance of a combo box, list box, text field, or signature field, keep in mind that only a solid stroke and fill are retained when you export as Adobe PDF. These attributes are visible in an exported PDF file when Highlight Existing Fields is not selected in Adobe Acrobat Reader DC or Adobe Acrobat Pro DC when the form is opened.
E Tip: When the Scrollable option is selected for a text field, more text can be entered in the field than is visible onscreen. This can result in only part of the text appearing on a printed copy of the page.
© 2017 Pearson Education, Inc., and Adobe Systems Incorporated and its licensors. All rights reserved.
380 LESSON 14 Creating Adobe PDF Files with Form Fields
6 Select the text frame under “E-mail Address.” In the Buttons And Forms panel, configure it the same as you did the Last Name field and assign it the name E-mail Address.
7 Choose File > Save.
Adding radio buttonsRadio buttons present the person filling out the form with two or more choices, but only one of the choices can be selected at a time, unlike check boxes, which do allow multiple choices to be selected. Radio buttons are often simple circles; however, you can design your own, more elaborate buttons or choose from several sample buttons included with InDesign. In this lesson, you’ll use one of the sample radio buttons.
1 Choose View > Fit Page In Window, and then use the Zoom tool ( ) to magnify the “In what way are you best able to help?” portion of the form.
2 Choose Sample Buttons And Forms from the Buttons And Forms panel menu or click the Sample Buttons And Forms panel icon ( ) located to the left of the Pages panel icon to display the Sample Buttons And Forms panel. If necessary, reposition and resize the panel so that you can see the “In what way are you best able to help?” portion of the form.
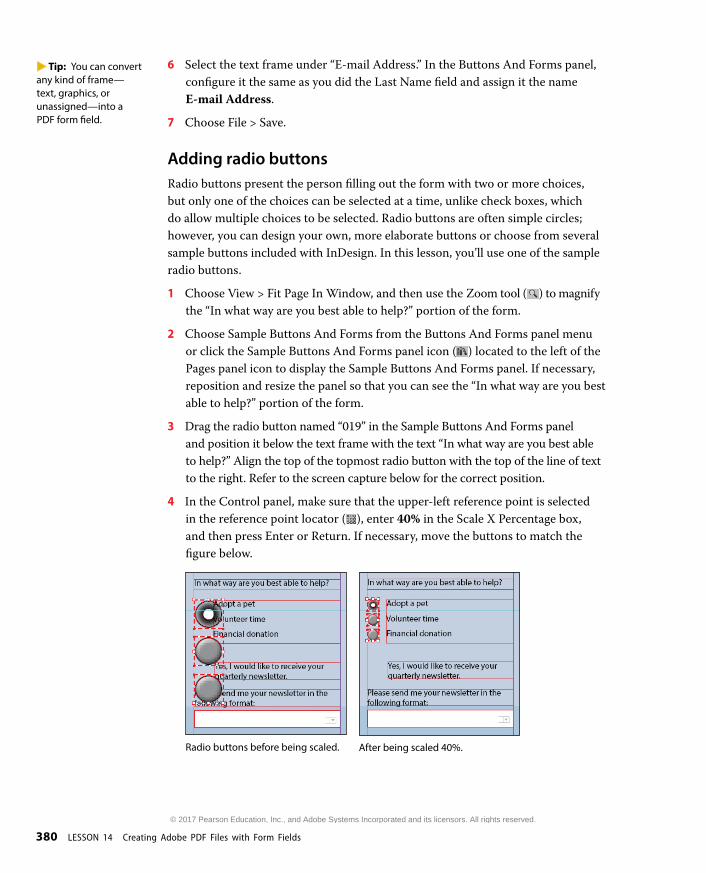
3 Drag the radio button named “019” in the Sample Buttons And Forms panel and position it below the text frame with the text “In what way are you best able to help?” Align the top of the topmost radio button with the top of the line of text to the right. Refer to the screen capture below for the correct position.
4 In the Control panel, make sure that the upper-left reference point is selected in the reference point locator ( ), enter 40% in the Scale X Percentage box, and then press Enter or Return. If necessary, move the buttons to match the figure below.
Radio buttons before being scaled. After being scaled 40%.
E Tip: You can convert any kind of frame—text, graphics, or unassigned—into a PDF form field.
© 2017 Pearson Education, Inc., and Adobe Systems Incorporated and its licensors. All rights reserved.
ADOBE INDESIGN CC CLASSROOM IN A BOOK (2017 RELEASE) 381
5 With all three buttons still selected, in the Buttons And Forms panel, enter Form of Assistance in the Name box, and then press Enter or Return.
6 Choose Edit > Deselect All or click an empty area of the page or pasteboard.
7 Use the Selection tool ( ) to select the first radio button (to the left of “Adopt a pet”).
8 In the Buttons And Forms panel, enter Adopt a pet in the Button Value field at the bottom of the panel, and then press Enter or Return.
9 Repeat steps 7 and 8 to name the middle button Volunteer time and the bottom button Financial donation.
10 Choose File > Save.
Adding a check boxA check box presents a yes-or-no choice for an individual item. A viewer of the form can click the empty check box (the default setting in the exported PDF) to add a check mark or leave it unchecked. Next, you’ll add a check box that accompanies the combo box below it, which you’ll create in the next task.
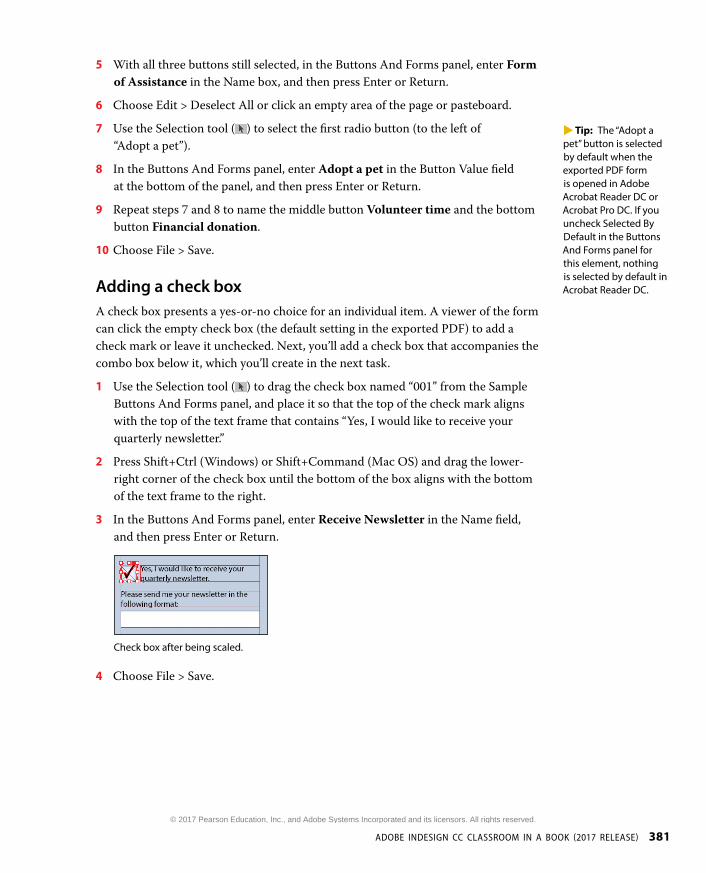
1 Use the Selection tool ( ) to drag the check box named “001” from the Sample Buttons And Forms panel, and place it so that the top of the check mark aligns with the top of the text frame that contains “Yes, I would like to receive your quarterly newsletter.”
2 Press Shift+Ctrl (Windows) or Shift+Command (Mac OS) and drag the lower-right corner of the check box until the bottom of the box aligns with the bottom of the text frame to the right.
3 In the Buttons And Forms panel, enter Receive Newsletter in the Name field, and then press Enter or Return.
Check box after being scaled.
4 Choose File > Save.
E Tip: The “Adopt a pet” button is selected by default when the exported PDF form is opened in Adobe Acrobat Reader DC or Acrobat Pro DC. If you uncheck Selected By Default in the Buttons And Forms panel for this element, nothing is selected by default in Acrobat Reader DC.
© 2017 Pearson Education, Inc., and Adobe Systems Incorporated and its licensors. All rights reserved.
382 LESSON 14 Creating Adobe PDF Files with Form Fields
Adding a combo boxA combo box is a menu that lists multiple predefined choices. A viewer of the form can select only one of the choices. Next, you’ll create a combo box that offers three choices.
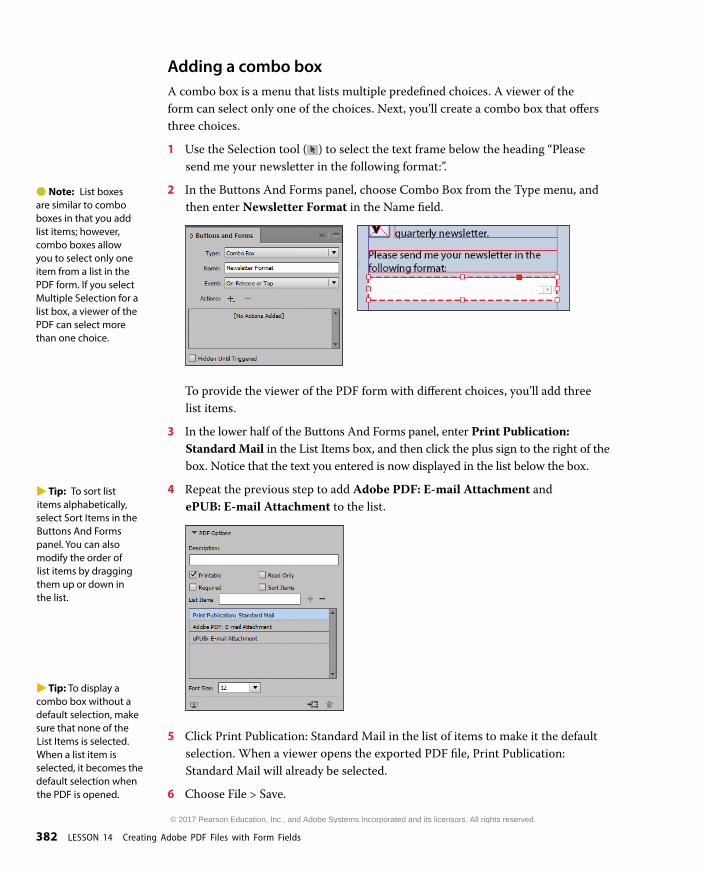
1 Use the Selection tool ( ) to select the text frame below the heading “Please send me your newsletter in the following format:”.
2 In the Buttons And Forms panel, choose Combo Box from the Type menu, and then enter Newsletter Format in the Name field.
To provide the viewer of the PDF form with different choices, you’ll add three list items.
3 In the lower half of the Buttons And Forms panel, enter Print Publication: Standard Mail in the List Items box, and then click the plus sign to the right of the box. Notice that the text you entered is now displayed in the list below the box.
4 Repeat the previous step to add Adobe PDF: E-mail Attachment and ePUB: E-mail Attachment to the list.
5 Click Print Publication: Standard Mail in the list of items to make it the default selection. When a viewer opens the exported PDF file, Print Publication: Standard Mail will already be selected.
6 Choose File > Save.
Note: List boxes are similar to combo boxes in that you add list items; however, combo boxes allow you to select only one item from a list in the PDF form. If you select Multiple Selection for a list box, a viewer of the PDF can select more than one choice.
E Tip: To sort list items alphabetically, select Sort Items in the Buttons And Forms panel. You can also modify the order of list items by dragging them up or down in the list.
E Tip: To display a combo box without a default selection, make sure that none of the List Items is selected. When a list item is selected, it becomes the default selection when the PDF is opened.
© 2017 Pearson Education, Inc., and Adobe Systems Incorporated and its licensors. All rights reserved.

ADOBE INDESIGN CC CLASSROOM IN A BOOK (2017 RELEASE) 383
Adding a description to a form fieldYou can provide additional guidance to viewers who fill out a form by adding descriptions to form fields. A description is displayed when the pointer rolls over a field that includes one. Next, you’ll add a description to one of the text fields.
1 Use the Selection tool ( ) to select the text field below the text frame with the heading “ZIP.”
2 In the Buttons And Forms panel, enter Enter your ZIP code along with your four-digit extension, if possible. in the Description box, and then press Enter or Return.
3 Choose File > Save.
Setting the tab order of the fieldsThe tab order you establish for a PDF form determines the order in which fields are selected as a viewer of the form presses the Tab key. Next, you’ll set the tab order for the fields on the page.
1 From the Object menu, choose Interactive > Set Tab Order.
2 In the Tab Order dialog box, click Last Name (the name of the text field you created that holds the surname of the person filling out the form), and then click Move Up until it appears below First Name near the top of the list. Use the Move Up and Move Down buttons or drag field names up or down to rearrange them so that they match the order on the page. Click OK to close the dialog box.
Tab order before being rearranged. After being rearranged.
3 Choose File > Save.
E Tip: Adding descriptions to form fields is recommended, as it assists in making PDF forms accessible. For more information, go to www.adobe.com/accessibility.html.
E Tip: You can also change the tab order by dragging list items up or down in the Tab Order dialog box.
© 2017 Pearson Education, Inc., and Adobe Systems Incorporated and its licensors. All rights reserved.

384 LESSON 14 Creating Adobe PDF Files with Form Fields
Adding a button to submit the formIf you distribute a PDF form, you’ll want to include a way for anybody who fills out the form to return it to you. To accomplish this, you’ll create a button that sends the filled-out PDF form to your email address.
1 Use the Selection tool ( ) to select the rounded-corner text frame with a blue fill and the text “Submit.”
2 In the Buttons And Forms panel, choose Button from the Type menu, enter Submit Form in the Name field, and then press Enter or Return.
3 Click the Add New Action For Selected Event ( ) button, and then choose Submit Form from the menu.
4 In the URL field, enter mailto:. Make sure you enter a colon after “mailto”. Do not enter a space or a period before or after the colon.
5 Enter your email address (for example, [email protected]) after mailto:. This will return the completed form to you.
To cause the button’s appearance to change when a user of the PDF form moves the pointer over the Submit button, you’ll add a Rollover appearance.
6 Click [Rollover] in the Buttons And Forms panel. Open the Swatches panel, enter 50 in the Tint field, press Enter or Return, and then close the panel.
7 Return to the Buttons And Forms panel. Notice that the [Rollover] appearance is now lighter than the [Normal] appearance, reflecting the tint change you just made. Click [Normal] to display the default appearance.
E Tip: Any object or group can be converted into a button. For example, a text frame with a fill color and the text “Submit” could become a Submit button. To convert a selected object or group into a button, choose Button from the Type menu in the Buttons And Forms panel.
E Tip: A button’s appearance can have three different states. The state that’s displayed depends on the user’s interaction. The Normal state is the default display when no interaction occurs; the Rollover state displays when the mouse pointer is over the button; and the Click state displays when the mouse button is clicked.
E Tip: Only the Rollover and Click states can be deleted. To delete a state, select it, and then click the Delete Optional State And Its Content button at the bottom of the Buttons And Forms panel.
© 2017 Pearson Education, Inc., and Adobe Systems Incorporated and its licensors. All rights reserved.

ADOBE INDESIGN CC CLASSROOM IN A BOOK (2017 RELEASE) 385
8 Open the Layers panel (Windows > Layers) and make sure all layers are visible (in case you hid Layer 1 earlier in the lesson).
9 Choose File > Save.
Exporting an interactive Adobe PDF fileNow that you’ve finished work on the form fields, you’re ready to export an interac-tive Adobe PDF file and then test the exported file.
1 Choose File > Export.
2 In the Export dialog box, choose Adobe PDF (Interactive) from the Save As Type menu (Windows) or Format menu (Mac OS). Name the file 14_PDF_Form.pdf and save it to the Lesson14 folder, located inside the Lessons folder within the InDesignCIB folder on your hard drive. Click Save.
3 In the General section of the Export To Interactive PDF dialog box, select Pages and make sure that Include All is selected for Forms And Media and that View After Exporting is selected.
4 Choose Fit Page from the View menu in the Export To Interactive PDF dialog box to display the entire page when the exported PDF is opened. Leave all other settings unchanged. Click Export, and then click OK to close the alert about document color conversion.
© 2017 Pearson Education, Inc., and Adobe Systems Incorporated and its licensors. All rights reserved.
386 LESSON 14 Creating Adobe PDF Files with Form Fields
If either Adobe Acrobat Pro DC or Adobe Acrobat Reader DC is installed on your computer, the exported PDF file will open automatically, and you can test the fields you created earlier. When you’re done, click the button that emails the filled-out form to you. (A security warning dialog box may display when Adobe Acrobat Reader DC or Acrobat Pro DC creates an email message with the completed form as an attachment.) If you want, modify the settings in the Send Email dialog box and then click Continue to submit the form information, or click Cancel. Return to InDesign.
5 Choose File > Save.
Congratulations! You’ve created a PDF form.
Exploring on your ownNow that you’ve created a simple PDF form, you can explore a little further by creating other kinds of fields and by creating your own custom-designed buttons.
1 Open a new document, create a text frame, and then use the Buttons And Forms panel to convert it to a signature field. A signature field in a PDF form lets the user apply a digital signature to the PDF file. Assign the field a name, and then export an Adobe PDF (Interactive) file. If it’s available on your computer, you can use Adobe Acrobat Pro DC to test the signature field by clicking it and then following the onscreen instructions.
2 Use the Ellipse tool ( ) to create a small circular frame. Use the Gradient panel to fill the circle with a radial gradient. If you want, use the Swatches panel to change the colors of the gradient. Use the Buttons And Forms panel to convert the frame into a button. Assign the button the Go To URL action and enter a complete URL in the URL field (for example, http://www.adobe.com). To test this button, export an Adobe PDF (Interactive) file and click the button.
3 Experiment with one of the other prebuilt form fields in the Sample Buttons And Forms panel. Drag one onto the page, and then view its properties in the Buttons And Forms panel. You can use the element as is, or you can modify its appearance, change some of its properties, or both. Export and test the result.
E Tip: Adobe Acrobat Standard DC is a Windows-only product that enables you to create, export, edit, and track PDFs from anywhere. For more information, go to https://acrobat.adobe.com/us/en/products/acrobat-standard.html.
© 2017 Pearson Education, Inc., and Adobe Systems Incorporated and its licensors. All rights reserved.
ADOBE INDESIGN CC CLASSROOM IN A BOOK (2017 RELEASE) 387
Review questions1 What panel lets you convert an object into a PDF form field and specify settings for
form fields?
2 What action can you assign to a button that enables a viewer of the exported PDF form to send a copy of the filled-out form to an email address?
3 What programs can be used to open and fill out an Adobe PDF form?
Review answers1 The Buttons And Forms panel (Window > Interactive > Buttons And Forms) lets you
convert objects into PDF form fields and specify settings for them.
2 To enable the viewer of a PDF form to return a filled-out form, use the Buttons And Forms panel to assign the Submit Form action to the button. After you assign the Submit Form action, enter mailto: followed by an email address (for example, mailto:[email protected]) in the URL field.
3 You can open and fill out PDF forms using Adobe Acrobat Pro DC or Adobe Acrobat Reader DC. Adobe Acrobat Pro DC also offers additional features for working with PDF form fields.
© 2017 Pearson Education, Inc., and Adobe Systems Incorporated and its licensors. All rights reserved.