createspace gilad
TRANSCRIPT
1
Knotting & Braiding
Step by Step Guide to Knotting. Including:
Kumihino & Macrame!
Doris J. Barnes
Copyright © 2016 by Doris J. Barnes
2
Table of Contents
Book Description
Chapter 1 - Essential Equipment
Cords and Threads
Wire
Beads
Findings
Finishing ends
Jewelry Findings
Jewelry Fastenings
Chapter 2 - Knotting
Basic Knots
Macramé Knots
Fusion
Chapter 3 - Braiding
Kumihimo
Essential Tools
Braiding Patterns
Conclusion
3
Chapter 1
Essential Equipment
If you are craft person or a beader, then you may already
have most of the essential equipment for knitting and
braiding in your workbox. You do not have to acquire all
the equipment at once, but you can try to improvise, but
ensure that you use the tools and equipment listed or a
similar material to ensure that you achieve the best results.
Let us discuss some of the essential equipment for knitting
and braiding:
Cords and Threads
There are variety of cords and threads which can be used
for the purpose of knitting and braiding.
How to Choose Cords
After learning a particular technique, it is good for you to
exercise it several times while using different materials and
observe the results that you get. Use of soft cord such as
embroidery cottons or satin rattail may make the knots lose
their definition, while use of stiffer cord like Superlon can
lead to a more distinct shape of the knots. Also, it is good
for you to be aware that each of cords comes in different
thicknesses, which can be worked either in multiple
bundles or singly.
A Guide on Cords
4
The following are some of the available and good cords for
knotting and braiding and the range of thicknesses available
for each:
1. Satin cord (rattail)
This is a silky cord with a high sheen. It is provided
in a variety of thicknesses. Mousetail is 15mm think,
bugtail 1mm thick while rattail 2mm thick.
Practically, these are all referred to as rattail. The
cord is very soft, making it not good for supporting
the shape of the knots. It is also not very hard-
wearing.
2. Wax cotton cord
This cord can be used in a number of techniques. Get
the thicker 3mm cord as it is suitable for knotted
braids and individual knots due to its ability to hold
well in shape. They are made in a variety of colors
and shapes, and they usually follow the emerging
trends.
3. Chinese knotting cord
This is s a nylon breaded cord and it holds its round
shape after being worked. Thicker Chinese cords are
good for knotting techniques, while the finer cords
are good for macramé and stringing with beads. The
cord is made in 0.4- 3mm. Search online for your
most favorable color, but remember that the wider
cords are available in limited colors.
4. Superlon
This is a string twisted nylon cord used for
upholstery. It is made in widths of 0.5mm and
0.9mm, which makes it good for knotting techniques

5
in which one needs a fine finish or braid such as
micro macramé. These cords are good for addition of
beads in braiding or knotting. If you need to change
the texture, mix it with some thicker cords. Both sizes
are made in a wide variety of colors, so choose your
favorite color.
5. Leather thing
The rounder leather thing is a very firm cord. It is
made in a variety of thicknesses, ranging from 0.5mm
to 6mm. The thinner cords are suitable for tying knots
while the thicker ones are good for use as core for
tying round the knots. It is available in a wide variety
of colors and natural shades.
6. Paracord
This is made in two thicknesses, that is, paracord
450(2mm) and paracord 550 (4mm). The former has
seven strands down from the centre while the later is
made with 4 centre strands. Paracord is suitable for
making accessories such as bracelets. Due to its
bulkiness, it is widely used for making men’s
jewelry. The cord comes in a wide variety of colors
and multi-colored patterns.
7. Embroidery threads
This includes cotton perle and stranded cotton and
these are good for use in plaiting, knotting and
braiding. They are a bit soft, making them capable of
holding firmly the shape of a knot, but combine them
with some stiffer cords and they will look nice. It
comes in a wide variety of colors compared to the
other cords, so choose the most exciting color. Since
6
the embroidery threads are matte, use the metallic
embroidery threads for addition of a touch of sparkle.
8. Faux suede
This is a flat microfiber cord which looks like a real
leather suede. However, it is more pliable compared
to the real thing, and this makes it give a different
look to knotted braids or knots. In comes with a width
of 3mm and in a wide variety of colors.
Wire
The use of wire for knotting is not common because of the
difficulty of tying the wire without getting kinked, but we
can use a wire to make knots via the wrapping technique.
Finer wire can be used for making kumihimo braid and for
finishing in braiding and knotting.
How to choose a Wire
A suitable wire for knotting and braiding should be the one
capable of resisting breakage even after being bent forth
and back severally. Most of the wires used for craft have a
copper core which makes them suitable for this, but it is
good for you to try using different wires.
Let us discuss some of the jewelry wires, but it is good for
you to know that two or even more thin wires can be
manipulated easily compared to one thick wire.
Copper wires
This is a cheap wire, commonly used for experimenting in
braiding and knotting techniques. Most craft wires are
made with a copper core with enameled colors and plated
metallic finishes. Copper craft wires sold for knitting or

7
crochet are softer. You should also know that the thinner
wires can be manipulated easily compared to the thicker
wires.
Silver wires
This wire is expensive but it gives high quality jewelry. It
comes in different thicknesses, with the hard one being
common. It is also made in different cross sections such as
square, rectangular, round and D-shape. Choose the softer
one as it will make yo0ur work easier.
Aluminum wire
Aluminum is softer than copper, and this is why we can
have being thicker. Use nylon-jaw pliers so as to prevent
the wire from getting damaged.
Coated wires
These are good for experimentation. Choose plastic, paper
or wrapped ones with fine thread since they are less likely
to kink and they can give you good results.
Wire Gauges
These are available in a range of gauges or thicknesses and
they are sold by a millimeter, American wire gauge or
standard wire gauge. Use a 0.6mm wire for finishing your
jewelry and 0.315mm for kumihimo.
Beads
These can be added to all braiding and knotting techniques
in a number of ways, either during knotting or braiding, or
afterwards.

8
How to choose Beads
Seed Beads
The basic ones are doughnut shaped with a size of 1-
5.5mm. The cylinder-shaped ones have large holes, and one
can stung double delicas onto 1mm cord. Experiment by
use of different textures such as square, hex, triangle and
others.
Focal beads
These are extra large beads and they are used as the focal
point for jewelry. You can use a bail for suspending the
pendant beads onto the braids, or attach the cords to ring
beads so as to work knotting techniques such as macramé
or others. You can use end caps to attach large beads to two
lengths of finished braid.
Large beads
There are several beads which we can use in braiding,
ranging from the simple wood beads to the crystals and
exquisite pearls, and you can choose any. You should not
be restricted by the size of the bead hole since some beads
will have large holes.
Findings
These are the little pieces made from metal, and they are
used for making and finishing the accessories such as
jewelry. Most of these findings are used for the purpose of
covering the raw ends of braids or cords. Always make sure
that you get the best shape and size. Also, ensure that you
have enough findings in your workbox to help you finish
your the different pieces.

9
Finishing ends
We use findings for finishing the ends of knotted cords and
braids. More styles of these are manufactured on a yearly
basis and different metallic finishes are used. To get the
best results, ensure that the internal dimensions of finishing
ends are matched with the braids or cords.
Cord ends
These are used for finishing single cords, and some of the
styles have lugs which you are expected to secure over cord
by use of pliers, while others are tubular and you should
secure using integral crimp ring or glue.
End cones
These bell or cone-shaped findings can be finished using a
loop at the top or can be made with a hole. To get the best
results, secure the braid into the two styles by use of
jewelry glue.
Spring ends
These findings were used even in the older days, and they
can be cone or cylindrical in shape. Braid inside your wire
coil or tuck the cord, and secure the end ring by squeezing
with pliers.
End caps
They come in square, cylindrical and rectangular versions
of the end cones, and they are finished with a loop or ring
at the top, or have a hole. To get the best results, secure the
braid into all styles by use of jewelry glue.
Ribbon crimps

10
These have been made so as to cover the ribbon’s raw end,
but they can be used for finishing the cord or flat braids. To
prevent this from damage, close the ribbon crimp by use of
nylon jaw.
Jewelry Findings
These are used as the basic components for making many
styles of jewelry. They come in a wide variety of metallic
finishes such as antique, so ensure that you get the best
color so as to match your braid.
Jump rings
They come in both oval and round shapes, and you can
open or close them by use of flat-nose pliers. Use them for
connecting items or attaching other fastenings or findings.
The smaller rings pull open easily compared to the larger
rings.
Split rings
A hard metal coil is used for making these, making them
more secure compared to a jump ring. Split-ring pliers
should be used to prise these open so that they can be
attached to the other findings.
Headpins
These are straight wire findings used for making bead
dangles with wrapped or plain loop. They have a decorative
or plain end for preventing the beads from falling off and
they are of different lengths. Choose the soft wire pins as
they are easy to manipulate.
Crimps

11
They are used with the bead stringing wire. You can secure
them using crimp pliers or flatten by use of flat-nose pliers.
Use them for spacing beads on single wire or on a doubled
wire for securing to a flattening or jump ring.
Eyepins
These are pieces of wire running straight and they are of
different lengths. One of their ends has a round loop. They
are used for making bead links or for creation of a loop
with an end cap having been attached at the braid’s end.
Calottes
These are also known as bead tips, and they used for
attaching fastenings neatly when stringing beads. The basic
calotte is made with a notch on one of the domes. For high
security, get clamshell calottes having a hole in the hinge.
Jewelry Fastenings
These are findings which are used for finishing pieces of
jewelry like bracelets, earrings, necklaces and rings. Some
of them are end caps and a magnetic fastening has been
incorporated in the design. Always, ensure that you use the
style which matches the edn cap and fits the braid in weight
and color.
Toggle fastening
This is a two-part fastening with a ring and T-bar. Turn the
T-bar on side and then slot it out or in of the ring. Ensure
that you get the most decorative style.
Magnetic fastenings

12
These are made with a strong magnet in the design. They
are good for finishing bracelets and necklaces. To prevent
the clasp from pulling apart, use a soft chain.
Trigger clasp
This is a cheap fastening having a spring closure and is
good for finishing necklaces and bracelets. Choose the best
style for yourself.
Plastic Clasps
These are made to be used in various knotting techniques
like the macramé, and they are made with a bar end for
attaching the cords. They come in a wide variety of colors
and sizes.
Multi-strand clasps
These are made in a wide range of styles. The slider
fastening is good for cuff-style bracelets such as macramé,
while the box-shaped one is good for necklaces. Use the
best number of rings on sides to fit your project.

13
Chapter 2
Knotting
Basic Knots
Anyone who uses knots should be aware of the basic knots.
They represent the basics of several other knots. The
following are the basic knots:
1. Overhand knot- this is the simplest knot to make. A
knot is made at the rope’s end for prevent fraying and
act as a stopper knot.
2. Half hitch- to create this knot, tie a rope round an
object and then back to itself. Follow it by a second
half hitch since it cannot be secure when used alone.
3. Half knot- this is a binding knot and we use it for
joining two ropes.

14
4. Square knot- this knot is used for joining ropes of
equal sizes such as a parcel or sail covers. Do not use
it for human or critical loads since it may slip after
spilling into two half hitches.
5. Sheet bend- this is used for joining ropes o unequal
sizes, but you can also use it to join ropes of equal
sizes and it will work well. To tie it, keep both ends
loose on hands and ensure that there is no load in the
rope.
6. Figure 8 knot- this acts as a stopper knot by
preventing a rope from sliding through the pulley. It
can also be used for addition of security to another
knot. The knot can be undone with much ease, but it
is less secure compared to the double overhand.

15
7. Slip knot- this is used for creation of a temporary loop
at a rope’s end, and this should loosen once pulled.
8. Noose knot- this should create a loop at the rope’s
end, but this should tighten after being pulled.
Macramé Knots
Let us discuss how the macramé knots can be created.
1. Larks Head knot
This knot should be used for connection of a cord to
an object. To create this, slide a loop around an object
such as a chopstick and a loop will be create. Pull the
tails through this loop.

16
2. Alternating half hitch
To tie this, pass t5he cord around a carrier cord, then
through the formed loop. To make it alternate, switch
it forth and back between two cords.
3. Horizontal Double Half Pitch
Take two half hitches and then tie them around a
carrier cord. Use a pin between your cords as it will
give you an object to pull against. Pull it snug,
holding the carrier cord straight. You will get a
complete row made up of knots.
4. Diagonal Double Half Pitch
The only difference between this knot and the
horizontal double half pitch is that in this case, the
17
carrier cord has to be held diagonally while tying the
knots.
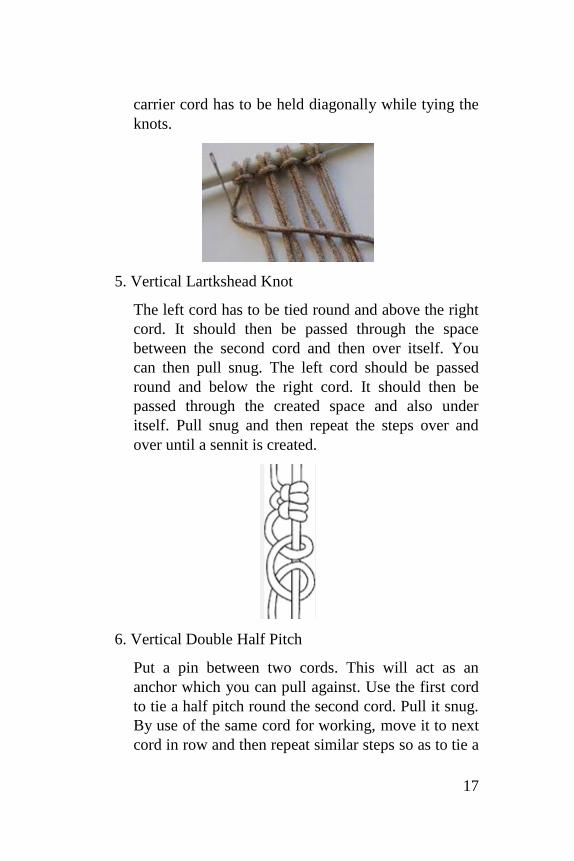
5. Vertical Lartkshead Knot
The left cord has to be tied round and above the right
cord. It should then be passed through the space
between the second cord and then over itself. You
can then pull snug. The left cord should be passed
round and below the right cord. It should then be
passed through the created space and also under
itself. Pull snug and then repeat the steps over and
over until a sennit is created.
6. Vertical Double Half Pitch
Put a pin between two cords. This will act as an
anchor which you can pull against. Use the first cord
to tie a half pitch round the second cord. Pull it snug.
By use of the same cord for working, move it to next
cord in row and then repeat similar steps so as to tie a

18
new vertical half pitch round your new cord. You can
then pull it snug. Repeat similar steps until you get a
complete row.
7. Berry knot
Tie a row forming square knots. Make sure that you
make at least 3 knots. Pass the center cords and then
pass them up between the center of the cords and
above the knots. Pull the cord down until your square
knots curl to form a ball. Use similar cords for tying a
knot round the cords which were not pulled through
cords on top of the knot.
8. Josephine Knot
By use of the left cord, make a loop which faces the
right side. Make the lower part of your cord pass
behind upper part. Take your right cord and then
place it across the loop made. Pass the cord below the
lower part of your left cord. Pass it on top of the left
cord by bringing it round, under the top of your loop,
over cord part which has been passed above the loop,
and under the outer part of the loop. Tighten it gently,
19
but ensure that the two sides are kept even. If you
need to create a double knot, just add a second cord
on each side.
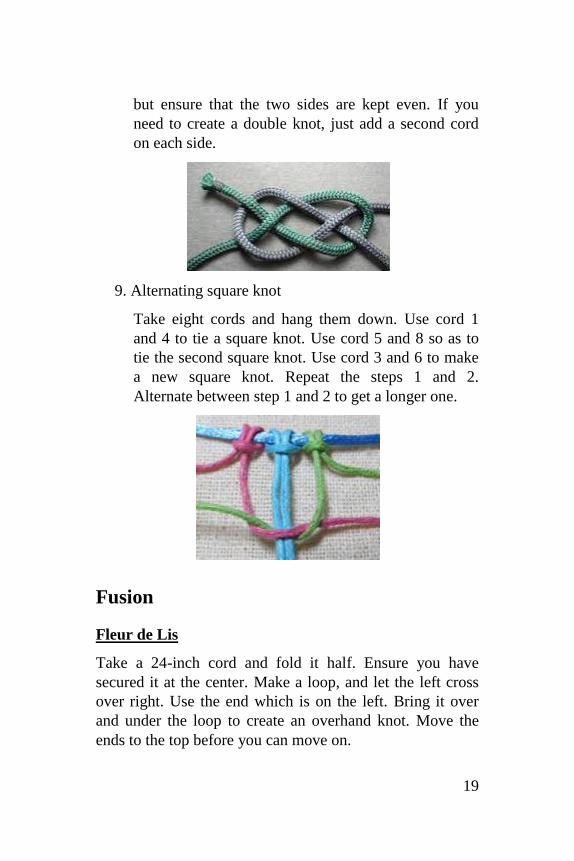
9. Alternating square knot
Take eight cords and hang them down. Use cord 1
and 4 to tie a square knot. Use cord 5 and 8 so as to
tie the second square knot. Use cord 3 and 6 to make
a new square knot. Repeat the steps 1 and 2.
Alternate between step 1 and 2 to get a longer one.
Fusion
Fleur de Lis
Take a 24-inch cord and fold it half. Ensure you have
secured it at the center. Make a loop, and let the left cross
over right. Use the end which is on the left. Bring it over
and under the loop to create an overhand knot. Move the
ends to the top before you can move on.

20
Extend your knot downward so that you may be in a
position to see the crossed area clearly and the two loops
which are located at the bottom. Ensure you have secured
the three areas. Use the end in the right to create a bight,
and ensure that you have secured it.
Make a right loop by moving the right end to left while
rotating in a clockwise direction.
While arranging the end horizontally, make sure that it is
passed over everything.
Make use of the left end so as to make a new loop. Pass it
over right end so as to bring it below.
Pass the left end under the segments while bringing it to the
right. Pull it out via the right loop.
At this point, the right end should be on the left side. Move
it back to right. Pass it in its path and over the segments. A
space should be left below the left loop, at the curving of
the right end.
Pass the left end over the right end, while preparing to
move it back to left. It should be passed under the rest of
the segments, and then protrude through the space.
Pull both ends so as to firm up your square knots and
tighten the whole design. Pull the upper ones so as to make
the lower loops smaller.
The loops at top left and right should be made larger so as
to curve outward. The center loop should be made to be a
bit pointing.

21
Portuguese sennit
Cut a cord of about 60 inches long. Make a large loop by
folding it, and ensure that you make the size you want it to
be after you are done.
Tie a square knot by use of the two ends. The loop will
form the filler cords.
Make sure that the loop has been placed 6 inches below the
region in which the ends have crossed. Tie other several
knots until you get closer to the loop’s end at the bottom. If
you need to make it be of a specific size, ensure that you
measure while progressing. Just stop once you see you have
the desired size.
Pass the ends via the loop at the Portuguese Sennit’s
bottom. Make sure that one of the ends enters the loop from
above and the other one from below, and they should head
in the opposite directions.
Begin by pulling the lower loops so as to remove one of
them from the top, but if you are in need of both, do not do
it. Pull the other loop at the top, which is good for securing
the ends.
Heat so as to finish the ends or just tuck them into the
sennit’s back.

22
Genoese Sennit
Begin by folding one of the cords into half, and form a
large loop. Place the cross point at the top. Also, ensure that
the right and the left cross each other. Note that size of the
design will be determined by the size of the loop, just like
in our previous knot.
Make a clockwise half hitch by use of the right end round
the loop, and this will form fillers. To create the half hitch,
just tie the end under and over the fillers. You can then tie
it over the end in work.
Make a half hitch in anticlockwise direction by use of the
cord’s left end. Place it below your first one.
Alternate it between the two ends, moving back and forth,
until you have create the rest of the half hitches. Once you
find yourself getting to the loop’s bottom, just stop.
Pass both ends through the created loop. One of the ends
should get in from below while the other one from the top,
that is, in opposite directions.
Secure the ends by pulling the loop at the upper part.
Tuck the ends into the sennit’s back or heat them so as to
ensure that they are secure.

23
Caged Solomon Bar
This is almost similar to the square know, but filler cords
are used for adding uniqueness to the knot. To decorate it,
make sure that you use two colors.
Begin by cutting two cords, each at least 60 inches in
length. Use the working cord to make a loop at the center,
and cross it right over left.
Move the filler through the created loop, ensuring that you
pass it under and over. The ends should also be matched so
that it can be centered.
Pass the left portion of your filler cord over front part of
crossed section for the working cord. Move the right
portion to the back.
Move your filler cord to the right, and over the right
working cord. Fold and bring it to where it began, ensuring
that it is passed under working cord.
To tie a half knot, pass the left working cord over fillers
and under the right working cord. Move your working cord
towards the right side under two fillers, and move it over
curved portion of the left working cord.
Pull the ends of your working cord so as to tighten the knot.

24
Secret River Bar
Cut two cords, ensuring that each is at least 60 inches long.
The best thing is to ensure that each cord is 8 x longer than
the size that you want. If you need to begin the Secret River
bar at the center, just cut 4 cords, ensuring that each is 4 x
longer than the length that you desire.
Fold the color A and then make it secure in the board. This
color will be used for running through the center of the
sennit in a zigzag line.
Find a color B, and then make it secure under your color A.
Bring their ends to the front part and then make them cross
right over left.
Pass the two ends of the color A of the area of color B
which has been crossed. Pass them the space which has
been created by the two halves of the color A. Tighten by
pulling them down in a straight line. Also, pull the color B
ends.
At this point, before continuing with the rest of the steps,
the four cords that you are having now are considered to be
separate cords.
Move the color B on the left side to the right, ensuring that
you have passed it over the color A. Pass it below the color
B on the right.

25
Move the color B on the right side below the fillers,
towards the left. Pull it out, and pass over the color B on
the left. With that, you will have completed the first half of
the square knot. Leave the knot un-tightened.
Move the color A cord on the left side up and over and the
front part of the knot you have just tied. Pass it through the
space created by the color A loop. Pull it down, ensuring
that it is passed at the back of the color B. At this point, feel
free to tighten the knots as it is of great importance.
Now, pull the ends of the color B, as this will help to
tighten the knot. You can then pull both ends of the color A
firmly.
Move the color B cord on the left side ensuring that you
pass it below the color A cord. Pull it up to the right side,
and ensure that it passes over the color B cord. You can
then pull the color B cord, and then pull the color A cord.
Note that the color A cord which is to be used should be on
the left side.
For your second half, begin with the color B cord, meaning
that you should use the right half of your color A cord.
Turn the Secret Bar over so as to ensure that the color A
cords are of equal sizes. Tighten the cords of color A if
they have not been tightened. However, you can leave one
of them to be somehow loose.
Continue alternating as we did before until you get the knot
of the size that you need.
Now, finish the ends of color B in the manner that you
want. If you are using Paracord, just cut the ends, and then
heat it to ensure that it melts and will be strong.
26
You can also use the cords of color A for tying of a button
knot, or for attaching a bead or a button so as to form a
clasp.

27
Chapter 3
Braiding
Kumihimo
This is a traditional Japanese technique used for braiding
silk strands to create colored cords. The cords are referred
to as “kumihimo”, and they strong, slender and can be used
in various fields.
Kumihimo is a Japanese word which means to
combine or gather cord or thread.
Essential Tools
Kumihimo braiding disk
This tool will make it easy for you to create a complex
kumihimo-braided design since the notches will hold fiber
firmly. After buying a braiding plate, you will be given
instructions and some project ideas which will help you in
getting started. You will also notice that the disks are made
from hardened foam or flexible plastic. Each disk has a
diameter of about 6 inches and 24 slots which are
distributed throughout their circumference. The disk has a
hole through which the kumihimo should hand. The threads
should be detached from secure slots for making the knots.
They are placed in new slots so that they can be held
tightly. These are mostly used by beginners, so if you are
one, take advantage of them. They will help you organize

28
and separate the threads on even viewing field. As the cord
grows in length, it should be removed from the way.
However, it is good for you to note that the disks are not
good for experienced braiders. This is because they may be
in need of making cords which are too thick, and these may
fail to fit in the hole of the beginner’s braiding disk.
Maru Dai
This is a wooden tool which is like a miniature stool. As a
braider, you can hone the skills you have known from the
disk on this tool. The maru dai is capable of standing on its
own, and the braider is allowed to create intricate patterns
without having to worry about the stability of the disk.
Instead of having slots for holding threads, it has weighted
bobbins which allow it to maintain the stability. As a
braider, this tool can help you use any number of threads
that you want and create any formation that you need since
you will not limited by slot number as in the disk. This
means that you will be in a position to create flat graphic
cords rather than the round cords.
Kaku Dai
This is a maru dai which has been inverted. It is used for
holding the finished cord expanse on a stand but upwards.
With this, the bobbins are kept hanging, and everything
will be made secure. As a braider, it is good for you to
know how to keep the tension balanced. If you are using
this tool, ensure that you are aware of how to maintain the
tension as it will help you achieve best quality results.
Note that you can get the kumihimo kits online and even at
a reduced price. You will also be given instructions which
will help you get started. Also, note that as the complexity
of the design increases, the use of the kumihimo tools also

29
become hard. Larger looms require extensive skills to be
used and they produce kumihimo cords which are too thick.
Braiding Patterns
Round braid
This forms the most versatile and basic kumihimo braid
pattern. It is also easy for anyone to complete. It best suits
jewelry makers.
8 Wrap Around Braid:
Begin by loading the kumihimo disk with threads on slots
32 & 1, 8 & 9, 16 & 17, 24 & 25.
Hold the kumihimo disk ensuring that the slot 32 is in 12
o’clock position. The threads can then be moved from 1 to
15 and then from 17 to 31.
Use the kumihimo disk to make a quarter turn in the right
direction, and make the slot 24 be in the 12 o’clock
position. Move the slot 25 to 7 and then slot 9 to 23.
Using the kumihimo disk, make a quarter turn in the right
direction to make the slot 15 be in the 12 o’clock position.
Move the threads from slot 16 to 30 and then 32 to 14.
Again, turn your kumihimo disk to the right direction and
make the slot 7 be in the 12 o’clock position. Move your
threads, from slot 8 to 22 and then 24 to 6.

30
You will then have created a basic pattern. You will begin
to see the braid appear on the lower part of the disk.
Half Round Braid
This pattern should give you a flat braid but one of the
sides appears to be rounded. A chevron pattern should run
down through the center. It should be worked out with
yarns, ribbons and threads. After braiding, it becomes easy
for one to embellish this braid by use of beads. You can
also choose to add the beads during braiding, but for some
warps only, so if you are making a fully beaded one, make
a round braid.
Add threads into the slots 32 & 1, 8 & 9, 16 & 17, 24 & 25
of the kumihimo disk. Make the moves given below:
32 to 10, and then 1 to 23
17 to 7, and then 16 to 26
8 to 16, and then 25 to 17
9 to 1, and then 24 to 32
After making the above moves, return your threads into
their starting positions and then repeat the moves and you
have the length that you require for the braid.
You may be in need of creating a heart design position. In
such a case, use slots 8 and 25 to place the color of the
hearts.

31
To have a single color at the middle and another color in an
outside position, just add one of the colors in slots number
8, 16, 17 and 25 and then another color in the rest of the
slots.
For the case of addition of beads, do not attempt to add the
beads unless you are good in making the basic round braid.
The following moves can help you to add the braids:
9 to 1 and then 24 to 32
8 to 16 and then 25 to 17
Hollow Braid
This pattern helps you create a braid having a hollow core,
and you can thread a wire through the core for braiding.
However, with this braid, you will realize that the
movement will have to change after each round from
clockwise to anti-clockwise. Tension is of great importance
in this braid. After each complete move, ensure that you
pull the braid from below the disk. We don’t recommend
that you add beads to the braid during the process of
beading.

32
Begin by adding threads to the kumihimo disks on slots
number 32 & 1, 8 & 9, 16 & 17, 24 & 25. Carry out the
moves given below:
32 to 7, then 8 to 15, followed by 16 to 23, and then 24 to
32. The threads should be moving in a clockwise direction
round your kumihimo disk.
1 to 26, then 25 to 18, followed by 17 to 10, and then 9 to
1. The threads should be moving in an anti-clockwise
direction round your kumihimo disk.
You can then place the threads back to their initial position.
Square Braid
This pattern gives a distinctive braid with a square shape
and a plated look. It is very good for those braiding in two
colors. With this pattern do not add braids during the
process of beading. After each round, the disk movement
will always change direction from clockwise to anti-
clockwise.
Set the kuhimo disk just by addition of threads in slots
number 32 & 1, 8 & 9, 16 & 17, 24 & 25.
Perform the moves given below:
Clockwise:

33
1 to 7, and then 17 to 23
24 to 1, and then 8 to 17
Anti-clockwise:
32 to 26, and then 16 to 10
9 to 32, and then 25 to 16
At this point, return the threads on either side to the initial
position, but ensure that you leave them readily crossed
both at the top and at the bottom.
Spiral Braid
This is a kumihimo braid with 12 warps and it has a unique
and spiral pattern. If you are sure that you have not fully
mastered the braid, then ensure that you use 3 colors. If you
need to add beads during the process of braiding, then do
so.
Begin by setting up your kumihimo disk with one of the
colors (green) in slots 30, 31, 18 and then 19. To avoid
confusion, remember that each slot is located on the left
side of its number. If you find confusion in knowing the
numbers, just confirm from “Quick No Number Method’
located at the bottom.
By use of another color, position threads in slots number 2,
3, 14 and then 15 (orange).
Position the other color in slots numbers 8, 9, 24 and then
25 (black).

34
Use the orange cords to perform the moves given below:
3 to 13, then 15 to 1
Use the green cords to make the following moves:
31 to 17, then 19 to 29
Make a quarter turn the kumihimo disk in a clockwise
direction in a clockwise direction. After that, the slot
number 24 should be in 12 o’clock position. Move your
black cords as follows:
25 to 7 and then 9 to 23
Make a quarter turn with the kumihimo disk ina clockwise
direction, and you should be having both the green and the
orange cords being at the top. The orange should be on the
left side while the green should be on the right side. Move
your green cords as follows:
18 to 28, and then 30 to 16
Move your orange cords as follows:
14 to 32, and then 2 to 12
Make a quarter turn with the kumihimo disk and in a
clockwise direction, and you will have the black cords
appearing at the top.
Move your black cords as follows:
8 to 22, and then 24 to 6
You can then continue working in the same direction, that
is, clockwise direction. However, ensure that the orange
and the green cords do not cross.
The Quick No Number methods instructions given below
may be helpful to you:
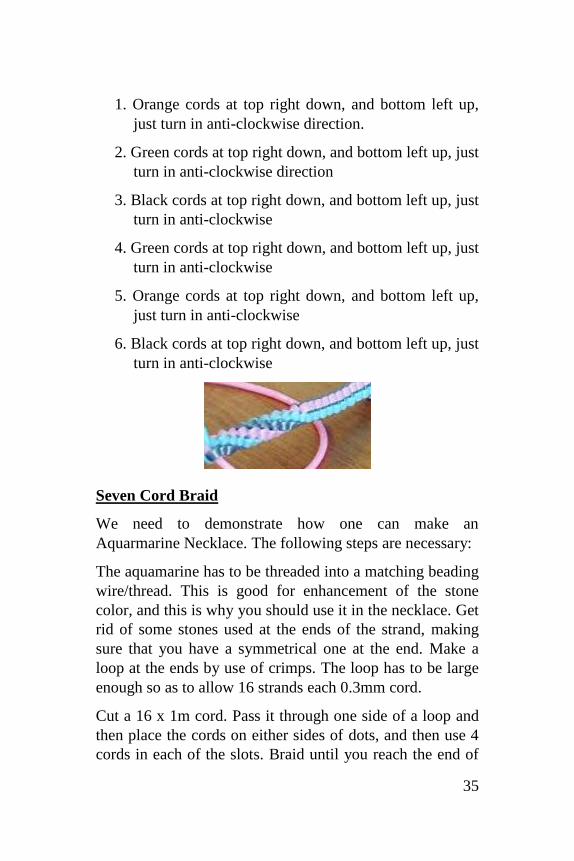
35
1. Orange cords at top right down, and bottom left up,
just turn in anti-clockwise direction.
2. Green cords at top right down, and bottom left up, just
turn in anti-clockwise direction
3. Black cords at top right down, and bottom left up, just
turn in anti-clockwise
4. Green cords at top right down, and bottom left up, just
turn in anti-clockwise
5. Orange cords at top right down, and bottom left up,
just turn in anti-clockwise
6. Black cords at top right down, and bottom left up, just
turn in anti-clockwise
Seven Cord Braid
We need to demonstrate how one can make an
Aquarmarine Necklace. The following steps are necessary:
The aquamarine has to be threaded into a matching beading
wire/thread. This is good for enhancement of the stone
color, and this is why you should use it in the necklace. Get
rid of some stones used at the ends of the strand, making
sure that you have a symmetrical one at the end. Make a
loop at the ends by use of crimps. The loop has to be large
enough so as to allow 16 strands each 0.3mm cord.
Cut a 16 x 1m cord. Pass it through one side of a loop and
then place the cords on either sides of dots, and then use 4
cords in each of the slots. Braid until you reach the end of

36
the cord. Finish the braid by use of glue in your end-cap.
Repeat similar steps for the other side.
Take the headpins and thread 3 stones into it. Move these
via a loop o beading wire/thread on one of the sides and
then wrap the headpins round the loop. Adjust the stones so
as to cover the loop. Repeat the same steps for the other
side.
To make a Gold 7 and Pearl bracelet, follow the steps given
below:
Cut a S-Lon 0.4mm of 7 x 60cm. Follow the above
instructions to create 7 cord braid.
Take seed beads of 22-26 gold 4mm and then thread them
onto 6 cords and a similar amount of black pearls (4mm)
onto another cord. Use the beads to braid and then use 2cm
un-beaded braid to finish. You can then make the bracelets
complete. Use a coil or headpin or a glue ending.

37
Conclusion
We have come to the end of this guide. The first thing
before beginning to create knots or braids is to assemble the
essential tools. Note that different tools are used for both
knotting and braiding techniques, meaning that you have to
assemble such tools before commencing the work. For the
case of knotting, the essential tools for the technique are
very common and you can easily find them in your
workbox. If you don’t have these, and if you lack money to
buy the essential tools, it is always good for you to
improvise what you have. However, to ensure quality
results, it is good for you to buy the necessary tools as we
have discussed in this book. As you might have noticed,
braiding tools are a bit complex for one to use, and
especially the beginners. It is recommended that you begin
with the disk and advance as you improve your braiding
skills.