cpr recording manikin instructions - simulaids | · pdf file · 2016-02-26no. 4003...
TRANSCRIPT

No. 4003 CPR Recording Manikin Instructions for care, use, and maintenance
June 2012

Product Instructions
CPR Recording Manikin
Item No 4003
The CPR Recording manikin from Simulaids measures compression rate
and depth and ventilation peak pressure and peak volume. You may
choose to track CPR, compressions, or ventilations. According to recent
developments in patient care, ventilation is an extremely important
consideration in the survival of a patient in an unconscious state. Over
ventilating patients increases their mortality. This manikin offers you
appropriate skill development to assist critical patients. The parameters
used in these skill sets match AHA standards, but can be adjusted to
meet whatever adult values you want to assign in order to satisfy any
worldwide protocol.
The product purchase includes:
Manikin torso
Mini-laptop
Power Cord that serves 110 a/c or 220 a/c
2 Replacement mouth pieces and 2 replacement lungs
Instructions
Calibration Kit
There is no program disc associated with the product. The
programming comes installed. If you ever need a copy of the
program to reinstall, contact Simulaids at [email protected].

Setting up the Manikin
Since the programming is installed on the mini-laptop when you receive
it, you simply connect the mini-laptop to the power source, plug in the
USB cable for the Manikin, and power it up. The program will start
automatically. You must have the manikin USB connected before
starting the laptop.
Using with a printer
You may need to install the necessary drivers, i.e., printer drivers. You
may download your printer’s driver from an appropriate website.
Example of a Hardware Pop-Up Window
The manikin will function without a printer attached. However, you
must have the laptop attached to a printer in order to use the Print
function of the product.
1. If you have a newer printer, the laptop program may recognize it and
automatically install the driver from the “plug and play” feature.
2. If the laptop does not recognize your printer, load the driver for the
printer into the manikin by utilizing your printer’s manufacturer’s
website.
3. The installation of the printer driver should happen automatically;
follow the prompts. If it does not, find the driver file and open it
manually to start the installation.
There are no batteries associated with the CPR Recording Manikin. The
model comes with a 110-220 V system for powering the laptop/manikin,
but the local power cord that connects the wall outlet with the equipment
must be supplied by the user.

START UP SCREEN
When the program opens on the mini-laptop, you will be prompted to
“Select a teacher”. In the line below this prompt is a place to enter a new
teacher name, which you will need to insert prior to continuing. Once
you have inserted the teacher’s name, tap the create button. This will
install the name in the list above and you can then select that name to
activate the program. From then on, you may either enter more teachers’
names or move on to the next feature.
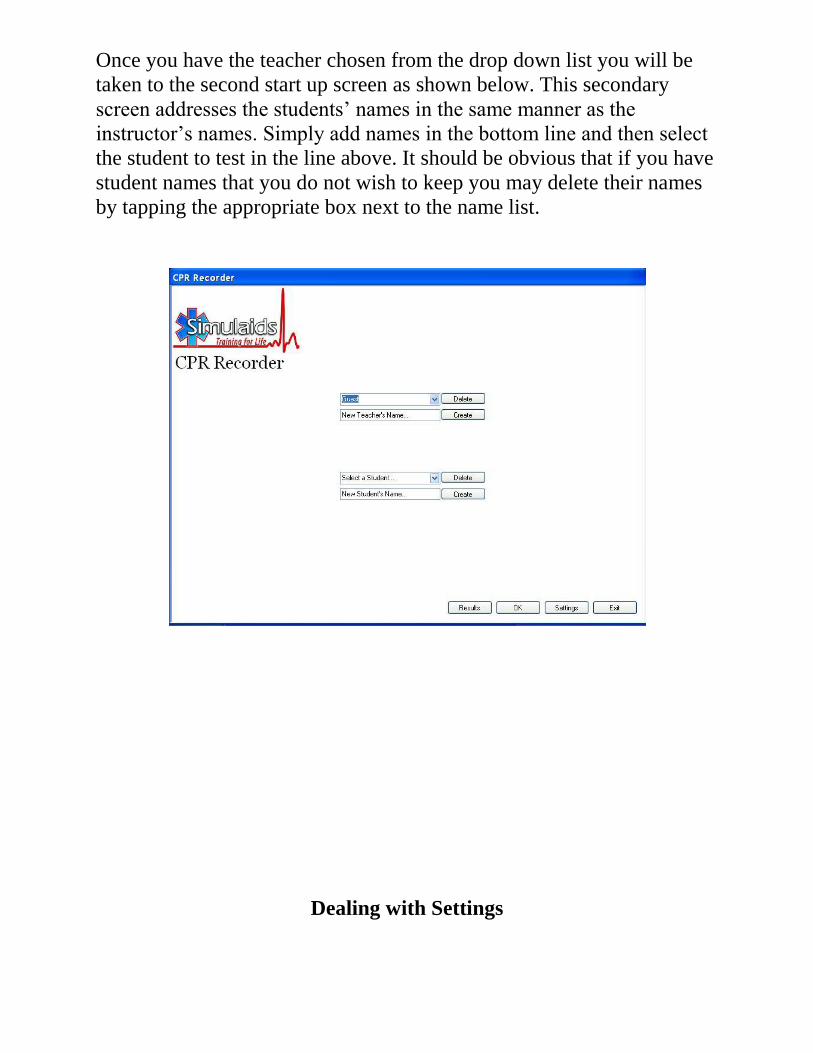
Once you have the teacher chosen from the drop down list you will be
taken to the second start up screen as shown below. This secondary
screen addresses the students’ names in the same manner as the
instructor’s names. Simply add names in the bottom line and then select
the student to test in the line above. It should be obvious that if you have
student names that you do not wish to keep you may delete their names
by tapping the appropriate box next to the name list.
Dealing with Settings

At the bottom of the opening screen as shown above are the boxes with
Results, OK, Settings, and Exit. Click on the “Settings” box and it will
bring you to this screen:
You should first note that the units of measurement on the right top of
the chart should be selected, either SAE (inches) or Metric (cm). Simply
check or uncheck to make your selection.
In the columns on the left side are the features of the reporting that you
can alter. These come to you in a platform that makes it rather easy to
evaluate performance for AHA 2010 standards: 2 minute test length, 100
compressions per minute target value, 2” minimum target depth and a
2.5” maximum depth allowed.
Below the selections are two check boxes labeled “Record
Compressions” and “Record Ventilation”. Simply place a check mark in
each box that you want to measure. If you wish to do only compressions,
check that box and eliminate the check in the ventilations box. If you
wish to do full CPR, check both boxes, and if you wish to only test
ventilations, check only that box.

Once you are done with the selections, click the save button at the
bottom of the page.
The other button to be aware of on this screen is the “Calibrate” button.
At this point the manikin should be calibrated correctly and you may
skip this feature. If, in the future, you determine that the product is not
reporting accurately, you may go back and calibrate the system.
Instructions on how to do that will be noted later in this pamphlet.
When you select a student from the above drop down list, you will be
taken to the action screen. This screen will show you real-time reports of
what is occurring during the student’s skill performance. At the top of
the screen the teacher and the student names show up and the unit of
measurement is shown, too.
Just above the action chart area are definitions of the Window time in
seconds and the overall test time in seconds. When the student starts to
do compressions, the chart will show the activity in relation to the skill
level. In the case presented so far, the screen will change every ten
seconds and in the end there will be six screens that show up on the
report document. At the bottom of the screen are the total test skill
measurements for either compressions or ventilations.
In order to start the recording process you simply click the “Start” button
once. You may, of course, cancel the selection. Once you click the
“Start” button the program waits for the student to do the first
compression or ventilation, depending on what you chose to measure.
Again, the student will see in real time what he/she is doing at that time.
This is a good way for the student to learn how to do good CPR. In a test
situation you would turn the computer screen away from the student and
they will have to perform “blind” compressions or ventilations.
When the appropriate time has passed, as defined in your settings and in
this case 2 minutes, the resulting charts pop up so you can see the skill
proficiency. The “Next” and “Last” buttons allow you to scroll through
the screens to see how the student did in each segment of his test.

The graphic below is an example of a 2 second test of ventilations.
The measurements of the chosen parameters start as soon as the
individual begins their compressions (in the case of CPR or
compressions). If you have selected ventilations, the program begins
recording at the time of the first ventilation. NOTE: if you use a BVM
rather than rescue breathing, you will not have to change the lung
system. However, if you use rescue breathing, the lung will be
contaminated and you must change it at the end of the day. See the
changing instructions later in the manual.
The individual must continue their skill applications until the time
allotted ends. In other words, if you use the one-minute setting, the CPR
must be performed for at least one minute so that the skill is adequately
recorded over a minute’s time.

At the end of the allotted time, the product stops recording and
automatically posts the percentage of success compared to the settings.
For instance, if you are running a test of compressions for one minute
and the individual did 100 compressions during that minute at 2+ inches
of depth, then they will be assigned a 100% score. If their depth of
compressions remains over 2”, but their rate equals 95, their score will
be 95%. The new standards indicate that there is only a minimum rate of
100, so any rate over that will result in a score of 100%.
Below is a sample of what occurs at the end of a test. In this case, the
test duration was 30 seconds (0.5 minutes) and 20 seconds worth of
screen shots was selected so that there is better definition of the
compressions relative to resting, depth and rate.
Clicking the OK button reveals the test score of 100% in the same area
of the screen.
It is not necessary to change the parameters each time you instruct a
different skill level, for instance healthcare providers vs. lay people.
Simply use the higher standard for establishing the settings and then
determine what percentage will be considered passing for either group.
For example, the lay people may have an expected skill level of 80%,
while the healthcare provider is held to 92% or better. This value is to be
determined by the instructor and their curriculum guidelines.
Inserting another student’s name in the startup screen will allow the
next student to be recorded under that instructor’s name. Simply click
the name and click on the “Start” button. Multiple attempts will be
recorded in the chronological order in which they are performed by
individuals within that group. You may always create another
instructor’s name to segregate your groups of students in order to assist
you in locating their recording.
Once you have saved a recording or discarded it, simply click on the
“Start” button again and that same student has another opportunity to
record an attempt.
Saving and Printing
This student’s test may be saved or discarded and another recording for
this student initiated by simply clicking on the Start button again. Or, if
you like, enter another student name.
To print a record for review and distribution, you minimize the CPR
Recording program and access a folder on the laptop desktop labeled
“CPR Recording”. Opening the folder will allow you to see all of the
Instructor folders that are created when you name a new instructor.
Opening a specific instructor’s folder allows you to access each student
file. Opening each student file will present the screens for each of the
test results and the charts associated with them.
If you are hooked up to a printer and the drivers have been installed on
the mini-laptop, you will be able to print them in the normal way by
clicking on the Print menu. If you must export the files to a different

machine to access a printer, simply save the file you wish to print to a
storage medium like a thumb drive and transfer the file to your print
capable PC.
Shutting Down
When you complete the recording activity for the day, close the CPR
Recording Manikin program by using the “Exit” button at the bottom of
the Instructor screen. Or you may exit normally through Windows,
which is active behind your CPR Recording Manikin screen view.
You will soon have the standard Windows™ message that indicates that
it is safe for you to shut off your computer. After shutting off the
computer you may pull the power cord plug.
Calibration
Your CPR Recording Manikin comes to you from the factory in
calibrated format. However, if at any time you feel that the calibration of
the unit varies and gives incorrect data, you may re-calibrate the device
in the field.
To calibrate the CPR Recording Manikin by Simulaids, start by
gathering the calibration tool kit which consists of a 4” aluminum screw
post with a screw mounted in one end, a short piece of 1/8th
inch silicone
tubing, and a 1 cc syringe.
To calibrate the depth of the compression reading:
1. Remove the overlay skin from the manikin by releasing the
Velcro straps across the back of the manikin’s skin and
pulling the skin off from the shoulders.
2. Displace the manikin’s lung system to one side in order to
expose the hole in the center of the chest
3. With the laptop connected to the manikin via the USB cable,
turn on the computer

4. On the opening screen of the CPR Recording Manikin
program, select “settings” at the bottom of the screen
5. On the bottom of the Settings and Calibration screen, select
“calibrate” at the bottom of the screen
6. Insert the 4” aluminum screw post into the hole in the center
of the chest so that the screw head rests upon the chest and the
post extends down into the manikin’s torso interior.
7. Place one hand on the chest over the screw post and rest your
hand (with contact but no pressure) to find the zero depth
mark, then click ‘ok’ on the laptop program screen
8. Place one hand on the chest over the screw post and push until
the post bottoms out on the inside of the manikin, hold it there
and then click “ok” on the laptop program screen.
9. Release the chest and remove the screw post—this finishes
the calibration of the depth measurement.
To calibrate the Pressure reading
10. Remove the mouth piece from the manikin’s head
11. Remove the clear plastic retainer that holds the valve
assembly in place in the mouth area of the head
12. Remove the tube from the plastic retainer’s barbed connector
13. Make sure nothing is covering the valve at the end of the tube
and no air is being drawn in or out, then click ‘ok’ on the
laptop program screen
To calibrate the Volume reading
14. Place the silicone tubing on the end of the 1.0cc syringe
15. Draw 0.1cc of air into the syringe
16. Place the other end of the silicone tubing on the end of the
connector coming out of the mouth area of the head
17. Click ‘ok’ on the laptop program screen

18. Replace the lungs on the manikin correctly and place the skin
back on, using the Velcro straps.
19. Replace the tube onto the clear plastic retainer’s barbed
connector
20. Replace the retainer onto the valve assembly
21. Place the mouth piece back on the head
22. Make sure there is no air in the lungs, then click ‘ok’
Your CPR Recording Manikin is now calibrated for use according to the
2010 AHA standards for CPR. NOTE: Also check to make sure that
during the calibration procedures that the other air line connected to the
small outlet hole of the airway valve is still solidly connected.
Manikin care and cleaning
Your CPR Recording Manikin from Simulaids is an
electrical/mechanical measuring device. Handle it with care; do not
expose it to moisture. Simply wipe the skin with a damp sponge or cloth
utilizing a water soluble cleaning agent. Avoid any contact with printed
material against the skin because it may cause a permanent stain. A
product called Oxy10 has been known to remove ink, but we do not
guarantee it. If at anytime you have difficulty with your manikin’s
performance, please call Simulaids technical support at 800-431-4310.
Mouthpieces and airway
You have received two mouthpieces with the product, but you may
purchase more of them in 10 packs by ordering item number 2023
(2023Export). The lung may be replaced when contaminated, but using a
Bag-Valve-Mask (BVM) for airway ventilations will cancel the need for
that. If you do need replacement lungs, place your order for part number
2805 (Brad lung).
The face pieces are removed by simply pulling the nose section away
from the manikin. Insertion of another face piece is done by placing the
nose bridge of the face piece into position and pushing the lower “chin”
section into the manikin’s head.

To remove a contaminated lung system, perform the following
procedure:
1. Remove the chest overlay skin by loosening the Velcro straps
located on the back of the manikin.
2. Remove the face piece
3. Pull the clear plastic retainer away from the manikin head.
Take care to not damage the air tube attached to the retainer.
4. Gently lift the chin of the manikin to access the one-way-
valve that is connected to the proximal end of the lung
system. Pull the one-way-valve assembly out of the head.
5. Remove the air tube assembly connector from the small port
on the one-way-valve assembly.
6. Discard the contaminated lung.
7. Place a new lung system on the chest of the manikin being
sure to turn the one-way-valve so that the port opposite the
lung system is oriented toward the back of the manikin; this
leaves the active side of the airway system toward the face of
the manikin.
8. Reattach the air tubing connector to the vacant small port on
the one-way-valve. A slight twisting motion will assist in
making the connection.
9. Insert the new one-way-valve into the hole in the manikin’s
face.
10. Reinstall the face side retainer over the protruding one-way-
valve port.
11. Install a clean face piece.
12. Replace the chest overlay.

All of the components of the CPR Recording Manikin are replaceable. A full list of parts and their cost is available via email from Simulaids at [email protected]. WARRANTY: Simulaids warrants this product to be free from defects in materials and/or workmanship for a period of one year from the date of purchase, as evidenced by the date on the invoice of the product shipment to the end user. This warranty expressly does not cover exterior vendor electrical products, abuse, accidental or purposeful damage, or any form of modification to the product. Only products manufactured at the Simulaids plant in Saugerties, NY receive this limited warranty status. All other products sold through Simulaids, but manufactured elsewhere, are subject to the warranties supplied by the product manufacturer. These warranties may differ from the Simulaids’ warranty. See the additional Extended Warranty product offering included with this unit. EXTENDED WARRANTY: Item number 4000W This extended warranty offer must be purchased within 2 months of the date of your delivery invoice. Call your Simulaids distributor to purchase the product. The Extended Warranty covers all of the issues as the Factory Warranty described above for an additional two years, totaling three. RETURN POLICY: Simulaids reserves the right to either repair or replace affected parts or the entire unit, at their sole discretion, after investigating and reviewing the actual product and the damage. In most instances, a digital photo of the product in question showing the damage will help qualify a product for return to the factory. At no time will any product be accepted without proper return authorization issued by Simulaids. Please contact our Customer Service Department to arrange a return and obtain a RGA number. Freight and Shipping charges are the sole responsibility of the end user. No product will be received with shipping charges due. Serial number and invoice number from the agency through whom the product was purchased must be provided for warranty repairs. No return authorization number will be provided without this information. Should you have any questions or wish further information on any product we manufacture call or write our Customer Service Department.

16 Simulaids Drive
Saugerties New York 12477
(845)-679-2475 Toll Free: (800)-431-4310
Fax: (845)-679-8996
www.simulaids.com 6/2011