covid-19 emergency support...complete” again once you have completed your edits. tip – if you...
TRANSCRIPT

1
COVID-19 EMERGENCY SUPPORT
FOR COMMUNITY ORGANIZATIONS
CONTENTS
OVERVIEW OF APPLICATION STEPS ............................................................................................ 3
STEP 1: CREATE AN ACCOUNT IN SM APPLY ............................................................................ 4
STEP 2: CHOOSE A PROGRAM ....................................................................................................... 5
NAVIGATING THE WEBSITE ........................................................................................................... 7
STEP 3: ORGANIZATION PROFILE INFORMATION ................................................................ 10
STEP 4: UPLOAD SUPPORTING DOCUMENTS ........................................................................ 12
STEP 5: COMPLETE APPLICATION FORM / REQUEST FORM............................................. 14
STEP 6: COMPLETE YOUR GRANT BUDGET (GRANT PROGRAM ONLY) ......................... 15
STEP 7: SUBMIT YOUR APPLICATION FOR REVIEW .............................................................. 17
ADDITIONAL INFORMATION AND TASKS ............................................................................... 18
Adding another team member to your organization’s application ................................. 18
Change your password ............................................................................................................. 18
Vewing your application after submission ........................................................................... 19
Understanding the application ‘status’ ................................................................................. 20
TECHNICAL SUPPORT AND RESOURCES FOR APPLICANTS

2
This document is to be used as a guide when applying to the Canadian Red Cross
for COVID-19 Emergency Support for Community Organizations, including:
• the Granting Program for Non-Profits
• the Preventing Disease Transmission Training & Equipment Program
For full information about both programs, including Program Guidelines, FAQs and other resources for applicants, visit: www.redcross.ca/communityorganizations.
The Canadian Red Cross application portal uses a platform called SurveyMonkey Apply
• For privacy information, relevant to how SurveyMonkey collects and stores user data, click here: https://help.smapply.io/hc/en-us/articles/360003749013-SurveyMonkey-Apply-Data-Privacy
In addition to this document, you can also find support by:
• contacting the site administrator at [email protected], or by phone at 1-866-221-2232.
• clicking the “i” button in the site header and choose Contact Site Administrator
This application is available to complete in either English or French. To change language, choose the EN button in the header and choose FR.
Cette demande peut être complétée en anglais ou en français. Pour changer la langue, cliquez sur le bouton EN en haut de la page et choisissez FR.
Completing this application may take anywhere between a few hours to a few days depending on your organization’s ability to source the information required. Documents required are referenced in Section 4 of this document. Please also refer to the Program Guidelines relevant to the particular program(s) to which you are applying.

3
OVERVIEW OF APPLICATION STEPS

4
STEP 1: CREATE AN ACCOUNT IN SM APPLY
The first task is to create an account on the Canadian Red Cross Application Portal by going to
https://redcross.smapply.ca on any web-enabled computer or mobile device. For the best user experience please
DO NOT USE INTERNET EXPLORER, any other browser such as Chrome or Firefox or Edge may be used.
Choose “REGISTER” located at the top of your screen.
Enter your name, email, and choose a secure password, then click “CREATE ACCOUNT”
Once you enter your information you will receive a prompt from the system to verify your email. Upon successful
verification you may continue with your application.
If you do not verify your email address you will be unable to continue. Click the red button in the header to resend the
verification link.

5
STEP 2: CHOOSE A PROGRAM
There are two distinct programs – Granting for Non-Profits ; and Preventing Disease Transmission Training and
Equipment. You may apply for both programs or just one, and you can complete them in any order.
We encourage you to work through Steps 1 to 4 for one program before commencing the second program.
Click on the “MORE” button to access specific information pertaining to that program.

6
From the Program information page click on “APPLY” to begin your application.

7
NAVIGATING THE WEBSITE
Your screen will look similar to the screenshot below once you have registered and launched the website.
This is the application dashboard.
TOGGLE BETWEEN PROGRAMS
While you are in the application system you can switch between Programs by clicking on the “PROGRAMS” button at
the top of the screen. It will take you back to the Welcome! Page where you can access the other program
Start here

8
VIEW MY APPLICATIONS
Clicking on the “MY APPLICATIONS” button will display the applications that are in progress/submitted.
Once your application is completed and submitted you may return to this page to see the status of your application.
Please see the Additional Information and Tasks section at the end of this document for a definition of the various
statuses.

9
COMPLETE THE SECTIONS OF YOUR APPLICATION
Once you begin to complete the application, the Task List from your
dashboard will show on the left side of your screen, providing a
roadmap of all the tasks that are required to complete the application.
Use this to navigate through the steps of your application.
The icons provide the following information:
Task not yet started
Task in progress
Task Completed
All mandatory sections must show a red checkmark before you will be
able to submit your application. The progress bar below the Task List
(x of 8 required tasks complete) will also provide a summary to gauge
your progress. At any point, you can save your progress and return to
complete the application at another time.
CONSENT
Please read the language provided in the consent form and provide your agreement by choosing the button
“I AGREE” and then clicking “MARK AS COMPLETE” to save and continue.

10
STEP 3: ORGANIZATION PROFILE INFORMATION
From your dashboard or the left hand Task List menu, choose ”ORGANIZATION PROFILE & ELIGIBILITY”.
Please complete the form in its entirety.
Choose “SAVE & CONTINUE EDITING” located at the bottom of the form to save your work periodically.
When you click “SAVE & CONTINUE EDITING” you will be alerted if the form contains errors (e.g., blank fields that
have not yet been filled out) but the form is still going to save with the errors.
The status of your form in the Task List will turn half red to indicate it is in progress.

11
Once you have completed all the questions choose “MARK AS COMPLETE” which will turn the task into a red
checkmark on the Task Bar. If you have completed the task and would like to return to make a change, you may
reopen by clicking the “…” menu at the top of the screen and choosing “EDIT”. Note you will need to “MARK AS
COMPLETE” again once you have completed your edits.
TIP – If you have already filled out your information in the Organizational Profile and have uploaded documents
into another program application, your data will also show here and you will not need to re-enter these items.
TIP – If you would like to print out the application to be able to gather the information offline before entering into
your online application, you may obtain a copy by clicking the “…” menu at the top of the screen and choosing
“DOWNLOAD”. This will open a PDF copy of the application which you may print for your own use.
WARNING: If you select “RESET” from the “…” menu, all data in your form will be deleted.

12
STEP 4: UPLOAD SUPPORTING DOCUMENTS
On your dashboard the next task is to upload supporting documents.
A minimum of 4 documents are required for your application, listed as individual document upload tasks.
Please refer to the Required Eligibility Documents sections of the relevant Program Guidelines, available from
www.redcross.ca/communityorganizations :
13
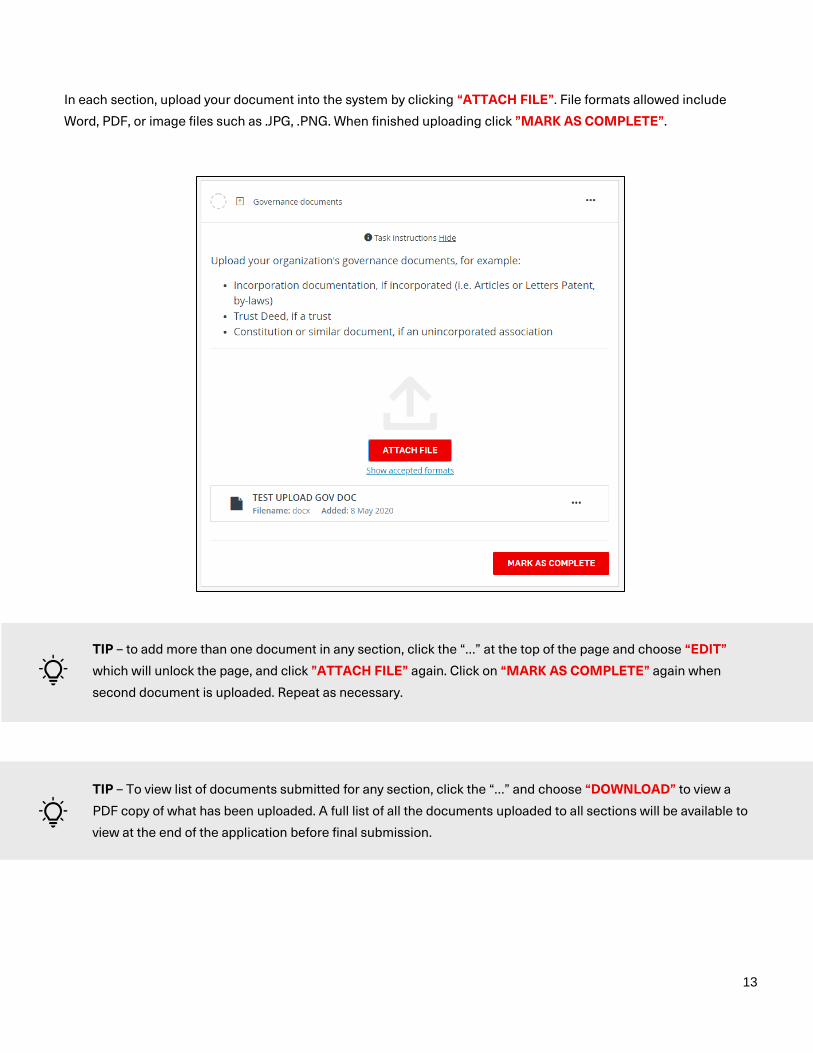
In each section, upload your document into the system by clicking “ATTACH FILE”. File formats allowed include
Word, PDF, or image files such as .JPG, .PNG. When finished uploading click ”MARK AS COMPLETE”.
TIP – to add more than one document in any section, click the “…” at the top of the page and choose “EDIT”
which will unlock the page, and click ”ATTACH FILE” again. Click on “MARK AS COMPLETE” again when
second document is uploaded. Repeat as necessary.
TIP – To view list of documents submitted for any section, click the “…” and choose “DOWNLOAD” to view a
PDF copy of what has been uploaded. A full list of all the documents uploaded to all sections will be available to
view at the end of the application before final submission.

14
STEP 5: COMPLETE APPLICATION FORM / REQUEST FORM
As part of an application for the Granting Program for Non-Profits you will be asked to complete an Application Form,
with the details of your planned project.
As part of an application for the Preventing Disease Transmission Training & Equipment Program you will be asked
to complete a Request Form with details on your organization’s activities and training and equipment needs.
While the information provided earlier regarding your organization and supporting documentation is the same for
both programs, the Application Form or Request Form is UNIQUE for each program. Please respond to all questions.
NOTE – The Application and Request Forms cannot be completed until the Organization Profile & Eligibility section
has been completed.
While your application is in progress it will show half red half white circle at the top of the page as well as in the left
hand task bar.
TIP – As with the Organizational Profile section, if you require a downloaded copy of the questions to gather
information offline, please go to the “…” menu at the top right corner of the screen and choose “DOWNLOAD”.
Save your application regularly by clicking “SAVE & CONTINUE EDITING” at the bottom of the form.
Signing your document: Use your mouse to sign your name in the blank space provided. You may choose “CLEAR”
to clear the box and try again if you are not satisfied.
Once you have signed electronically click “MARK AS COMPLETE”.
Once “MARK AS COMPLETE” has been checked, the form will lock and a red check mark will show at the top of the
page and in the left hand task bar.
If you need to return to the application form to make a change (before the final submission), click the “…”
button at the top right of the page and choose ”EDIT”. This will unlock the page for editing. You will need to choose
“MARK AS COMPLETE” again once you are done editing.

15
STEP 6: COMPLETE YOUR GRANT BUDGET
(GRANTING PROGRAM ONLY)
This form is divided into 3 budget categories, which are explained in detail with helpful tips in the Eligible Costing
Rules & Financial Management Guidelines:
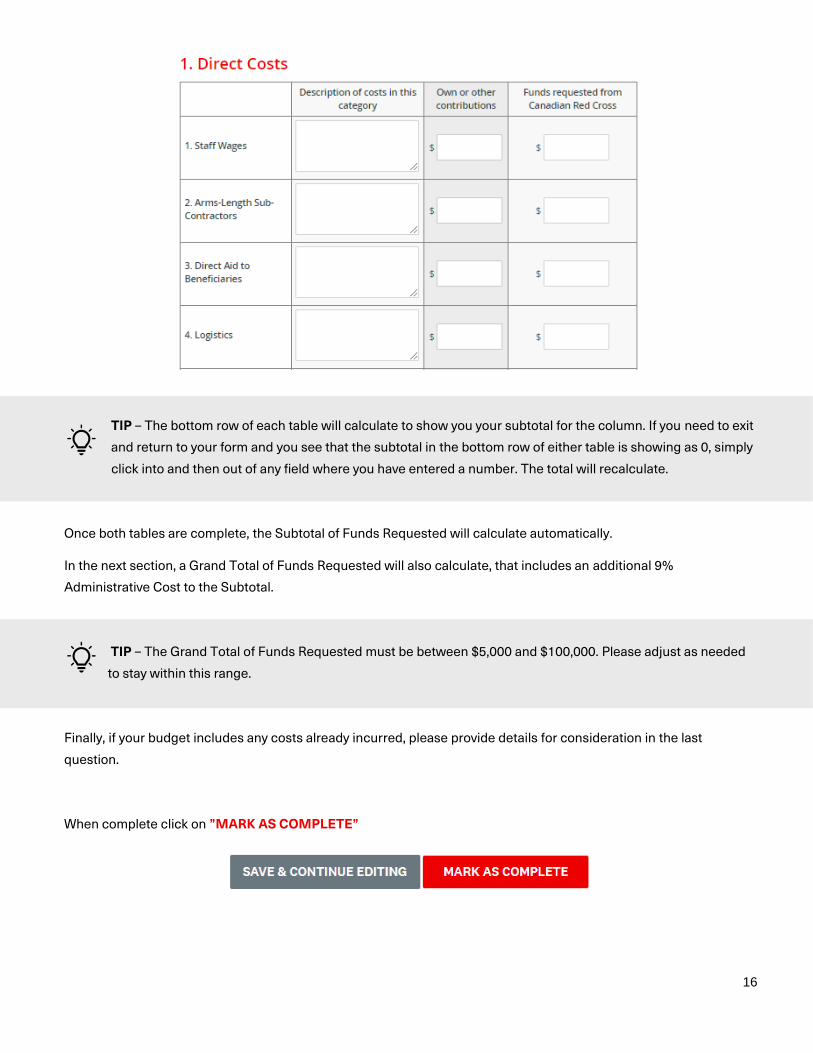
1. Direct Costs
2. Project Equipment & Inventory
3. Administrative Costs
When preparing your budget, please keep in mind the following key points from the Program Guidelines -
Granting Program for Non-Profits:
• Project budgets must be between $5,000 and $100,000.
• All activities and expenditures must take place between April 1, 2020 and October 31, 2020.
• If funded, you will be required to report on actual expenditures of the project, and to keep relevant
documentation on file in the case of an audit.
Steps for completing each Budget Category section:
STEP 1: In the first column, fill in a brief description of the costs included in each budget category. You may write
several lines of description for each category if needed. You can also use a " - " as a bullet point if useful.
STEP 2: In the second column, add the total amount of contributions from your organization or other contributors
toward the project, if applicable. Enter dollars and optional cents only, and do not use commas (e.g.
1000.50).
STEP 3: In the third column, add the total cost of all the components you identified for that category. Enter dollars
and optional cents only, and do not use commas (e.g. 1000.50).
16
TIP – The bottom row of each table will calculate to show you your subtotal for the column. If you need to exit
and return to your form and you see that the subtotal in the bottom row of either table is showing as 0, simply
click into and then out of any field where you have entered a number. The total will recalculate.
Once both tables are complete, the Subtotal of Funds Requested will calculate automatically.
In the next section, a Grand Total of Funds Requested will also calculate, that includes an additional 9%
Administrative Cost to the Subtotal.
TIP – The Grand Total of Funds Requested must be between $5,000 and $100,000. Please adjust as needed
to stay within this range.
Finally, if your budget includes any costs already incurred, please provide details for consideration in the last
question.
When complete click on ”MARK AS COMPLETE”

17
STEP 7: SUBMIT YOUR APPLICATION FOR REVIEW
Once there is a check mark against all sections in the task bar, you are ready to submit for review.
Click the “SUBMIT” button found at the bottom of the task bar.
The system will present you with an opportunity to review your application and documentation before your final
submission. Click on “REVIEW” to access. If all is correct, select “SUBMIT” again and your application will be
forwarded to the administration team for review. You will be contacted if additional information is required.
You may then redirect to view more programs and complete your application for the other program if desired.

18
ADDITIONAL INFORMATION AND TASKS
Adding another team member to your organization’s application
You can add additional team members to your account to enable a collaborative approach to completing your
organization’s application. To invite additional team members to your application, choose “ADD COLLABORATOR”
located below your Task List. This will send an email to your chosen colleague to invite them to participate.
Change your password
To change your password, click on your name on the top right corner of the screen and chose ”MY ACCOUNT”.
Scroll down to ”CHANGE PASSWORD”. Click ”SAVE” when you’re done.
19
Viewing your application after submission
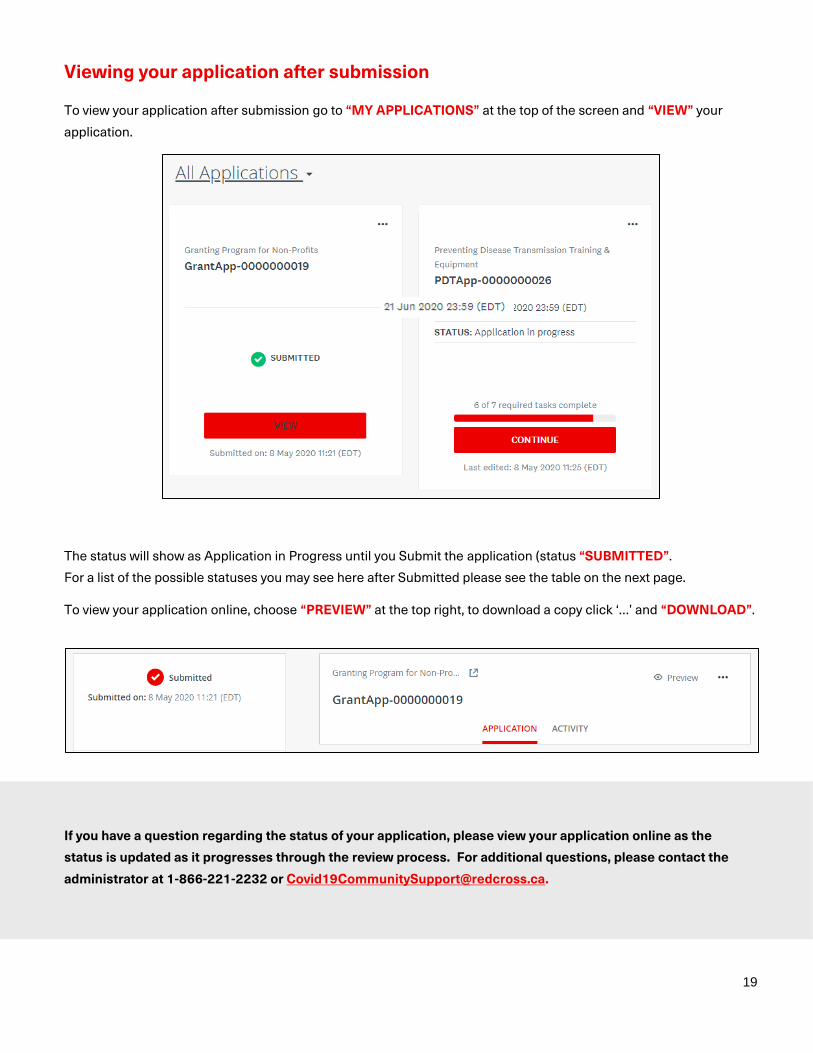
To view your application after submission go to “MY APPLICATIONS” at the top of the screen and “VIEW” your
application.
The status will show as Application in Progress until you Submit the application (status “SUBMITTED”.
For a list of the possible statuses you may see here after Submitted please see the table on the next page.
To view your application online, choose “PREVIEW” at the top right, to download a copy click ‘…’ and “DOWNLOAD”.
If you have a question regarding the status of your application, please view your application online as the
status is updated as it progresses through the review process. For additional questions, please contact the
administrator at 1-866-221-2232 or [email protected].

20
Understanding the Application ‘Status’
Once you complete your application, you will be able to view the status of your application(s) as it moves through the
review process. The following provides more information on what each status indicates.
In Progress Application is being completed by the applicant and has not yet been
submitted for review.
Submitted Application is complete and has been submitted to the Administrator.
Under Review The application is being reviewed by an Administrator.
Information Required Additional information or documentation is required to complete
review of the application. An email has been sent to the Applicant.
Decision Complete Application review is complete and the decision has been emailed to
the Applicant.