coreaudio drivers guide v8.0 - digidesignakmedia.digidesign.com/.../coreaudio_drivers_guide... · 4...
TRANSCRIPT

CoreAudio Drivers Guide
Version 8.0.4
Legal Notices
This guide is copyrighted ©2010 by Avid Technology, Inc., (hereafter “Avid”), with all rights reserved. Under copyright laws, this guide may not be duplicated in whole or in part without the written consent of Avid.
003, 96 I/O, 96i I/O, 192 Digital I/O, 192 I/O, 888|24 I/O, 882|20 I/O, 1622 I/O, 24-Bit ADAT Bridge I/O, AudioSuite, Avid, Avid DNA, Avid Mojo, Avid Unity, Avid Unity ISIS, Avid Xpress, AVoption, Axiom, Beat Detective, Bomb Factory, Bruno, C|24, Command|8, Control|24, D-Command, D-Control, D-Fi, D-fx, D-Show, D-Verb, DAE, Digi 002, DigiBase, DigiDelivery, Digidesign, Digidesign Audio Engine, Digidesign Intelligent Noise Reduction, Digidesign TDM Bus, DigiDrive, DigiRack, DigiTest, DigiTranslator, DINR, D-Show, DV Toolkit, EditPack, Eleven, HD Core, HD Process, Hybrid, Impact, Interplay, LoFi, M-Audio, MachineControl, Maxim, Mbox, MediaComposer, MIDI I/O, MIX, MultiShell, Nitris, OMF, OMF Interchange, PRE, ProControl, Pro Tools M-Powered, Pro Tools, Pro Tools|HD, Pro Tools LE, QuickPunch, Recti-Fi, Reel Tape, Reso, Reverb One, ReVibe, RTAS, Sibelius, Smack!, SoundReplacer, Sound Designer II, Strike, Structure, SYNC HD, SYNC I/O, Synchronic, TL Aggro, TL AutoPan, TL Drum Rehab, TL Everyphase, TL Fauxlder, TL In Tune, TL MasterMeter, TL Metro, TL Space, TL Utilities, Transfuser, Trillium Lane Labs, Vari-Fi Velvet, X-Form, and XMON are trademarks or registered trademarks of Avid Technology, Inc. Xpand! is Registered in the U.S. Patent and Trademark Office. All other trademarks are the property of their respective owners.
Product features, specifications, system requirements, and availability are subject to change without notice.
Guide Part Number 9329-65006-00 REV A 06/10
Documentation Feedback
At Avid, we are always looking for ways to improve our documentation. If you have comments, corrections, or suggestions regarding our documentation, email us at [email protected].

contents
Chapter 1. Introduction to Avid CoreAudio Drivers . . . . . . . . . . . . . . . . . . . . . . . . . . . . . . 1
Chapter 2. CoreAudio Driver and CoreAudio Manager . . . . . . . . . . . . . . . . . . . . . . . . . . . 3
System Requirements and Compatibility . . . . . . . . . . . . . . . . . . . . . . . . . . . . . . . . . . . . . . . . 4
Core Audio Capabilities . . . . . . . . . . . . . . . . . . . . . . . . . . . . . . . . . . . . . . . . . . . . . . . . . . . . 4
CoreAudio Manager . . . . . . . . . . . . . . . . . . . . . . . . . . . . . . . . . . . . . . . . . . . . . . . . . . . . . . . 5
Configuring a Pro Tools|HD Audio Interface for Third-Party Applications . . . . . . . . . . . . . . . . . . 8
Chapter 3. Mbox Family CoreAudio Drivers . . . . . . . . . . . . . . . . . . . . . . . . . . . . . . . . . . . . 11
System Requirements and Compatibility . . . . . . . . . . . . . . . . . . . . . . . . . . . . . . . . . . . . . . . 11
Mbox Family CoreAudio Driver Capabilities . . . . . . . . . . . . . . . . . . . . . . . . . . . . . . . . . . . . . 12
Mbox Pro, Mbox, and Mbox Mini Driver Control Panels . . . . . . . . . . . . . . . . . . . . . . . . . . . . . 12
Mbox Micro Control Panel . . . . . . . . . . . . . . . . . . . . . . . . . . . . . . . . . . . . . . . . . . . . . . . . . 13
Configuring Mbox Family Interfaces for Third-Party Applications. . . . . . . . . . . . . . . . . . . . . . . 14
Chapter 4. Mbox 2 Family CoreAudio Drivers . . . . . . . . . . . . . . . . . . . . . . . . . . . . . . . . . . 17
System Requirements and Compatibility . . . . . . . . . . . . . . . . . . . . . . . . . . . . . . . . . . . . . . . 17
Mbox 2 Family CoreAudio Driver Capabilities . . . . . . . . . . . . . . . . . . . . . . . . . . . . . . . . . . . . 18
Mbox 2 Pro Driver Control Panel . . . . . . . . . . . . . . . . . . . . . . . . . . . . . . . . . . . . . . . . . . . . . 18
Mbox 2, Mbox 2 Mini, and Mbox 2 Micro Driver Control Panels . . . . . . . . . . . . . . . . . . . . . . . 20
Configuring Mbox 2 Family Interfaces for Third-Party Applications . . . . . . . . . . . . . . . . . . . . . 21
Chapter 5. Eleven Rack CoreAudio Driver . . . . . . . . . . . . . . . . . . . . . . . . . . . . . . . . . . . . . 25
System Requirements and Compatibility . . . . . . . . . . . . . . . . . . . . . . . . . . . . . . . . . . . . . . . 25
Eleven Rack CoreAudio Driver Capabilities. . . . . . . . . . . . . . . . . . . . . . . . . . . . . . . . . . . . . . 26
Eleven Rack CoreAudio Driver Control Panel . . . . . . . . . . . . . . . . . . . . . . . . . . . . . . . . . . . . 26
Configuring Eleven Rack for Third-Party Applications . . . . . . . . . . . . . . . . . . . . . . . . . . . . . . 28
Contents iii

iv
CoreAudio Drivers Guide
chapter 1
Introduction to Avid CoreAudio Drivers
Avid CoreAudio Drivers let you use your quali-fied Pro Tools® audio interfaces with third-party applications that support the Core Audio stan-dard.
For example, you can use your audio interface independently of Pro Tools to listen to com-puter audio (such as game audio, YouTube, iTunes and other Mac applications).
The Avid CoreAudio Driver is installed when you install Pro Tools, unless you deselect it as one of the options to install along with Pro Tools.
For Pro Tools HD, 003 and Digi 002 family systems, see Chapter 2, “CoreAudio Driver and CoreAudio Manager.”
For Mbox family systems, see Chapter 3, “Mbox Family CoreAudio Drivers.”
For Mbox 2 family systems, see Chapter 4, “Mbox 2 Family CoreAudio Drivers.”
For Eleven Rack systems, see Chapter 5, “Eleven Rack CoreAudio Driver.”
Chapter 1: Introduction to Avid CoreAudio Drivers 1

2
CoreAudio Drivers Guide
chapter 2
CoreAudio Driver and CoreAudio Manager
The CoreAudio Driver for your Pro Tools hard-ware lets you use your qualified Pro Tools® au-dio interfaces with third-party applications that support the Core Audio standard.
The following Pro Tools system interfaces are supported:
• Pro Tools|HD®
• 003®
• 003 Rack
• 003 Rack+
• Digi 002®
• Digi 002 Rack
Installation
The CoreAudio Driver for your Pro Tools hard-ware is automatically installed when you install Pro Tools.
For instructions on installing Pro Tools, see the User Guide or Setup Guide that came with your system.
Standalone CoreAudio Drivers
CoreAudio Drivers can also be installed on Mac systems that do not have Pro Tools installed.
To install the Standalone CoreAudio Driver from the Pro Tools Installer disc:
1 Make sure you are logged in as an Administra-tor for the account where you want to install Pro Tools. For details on Administrator privi-leges in Mac OS X, see your Apple Mac OS X documentation.
2 Do one of the following:
• Insert the Pro Tools Installer disc in your DVD drive.
– or –
• If you purchased the software upgrade on-line, follow the instructions provided with it to expand and launch the installer.
3 Locate and double-click the Install Pro Tools.mpkg.
4 Follow the on-screen instructions to proceed with installation.
Chapter 2: CoreAudio Driver and CoreAudio Manager 3

4
5 In the Installation Type dialog select the Avid CoreAudio Driver and deselect the Pro Tools application and other options and click Continue.
6 Select the install location.
7 Click Continue.
8 Click Install.
9 If prompted, enter your Administrator pass-word and click OK to authenticate installation.
10 Follow the remaining on-screen instructions.
11 Click Restart to finish installing the software.
System Requirements and CompatibilityAvid can only assure compatibility and provide support for hardware and software it has tested and approved.
For complete system requirements and a list of qualified computers, operating systems, hard drives, and third-party devices, refer to the latest information on our website:
www.avid.com/compatibility
CoreAudio Drivers Guide
Core Audio CapabilitiesThe CoreAudio Driver is a multi-client, multi-channel sound driver that allows CoreAudio-compatible applications to record and play back through qualified Pro Tools audio interfaces.
Full-duplex recording and playback of 24-bit au-dio is supported at sample rates up to 96 kHz, depending on your Pro Tools hardware and CoreAudio client application.
The CoreAudio Driver provides up to 18 chan-nels of input and output, depending on your Pro Tools hardware:
• Up to 8 channels of I/O with Pro Tools|HD systems
• Up to 16 channels of input and 18 chan-nels of output with 003, 003 Rack, 003 Rack+, Digi 002, and Digi 002 Rack.
For Pro Tools|HD systems, only the primary I/O connected to the first (core) card can be used with CoreAudio.
For the latest CoreAudio Drivers for Pro Tools hardware, as well as any known issues, visit www.avid.com.

Limitations of the CoreAudio Driver
The CoreAudio Driver has the following limita-tions:
Pro Tools is not a CoreAudio application and therefore requires exclusive access to Pro Tools hardware. You cannot use CoreAudio applica-tions and Pro Tools at the same time. To use Pro Tools, make sure you quit any CoreAudio applications before starting Pro Tools. To use a CoreAudio application, make sure you quit Pro Tools before starting any CoreAudio applica-tion.
The CoreAudio Driver cannot be used to pre-view sound files from the Mac Finder. When a sound file is located in the Mac OS X navigation window, a QuickTime transport bar is displayed next to it. The QuickTime transport bar lets you audition the sound file. The sound will always play back though the Mac’s built-in audio con-troller (through the Mac speaker or headphone jack). However, if you double-click a sound file, the QuickTime application will launch, and you can then use the CoreAudio Driver for playback.
The CoreAudio Driver cannot be used for playback of Mac System Sounds.
CoreAudio ManagerYou can configure the CoreAudio Driver using CoreAudio Manager, or from within most third-party CoreAudio-compatible client applications (such as BIAS Peak). Refer to the manufacturer’s documentation for more information.
Some applications (such as Apple’s iTunes or QuickTime Player), also require that you config-ure either the Apple Sound Preferences or Apple Audio MIDI Setup to use the CoreAudio Driver.
The CoreAudio Manager is configured to auto-hide when first launched. To bring it to the fore-ground, click on its icon in the dock.
The Core Audio Manager is not used by Pro Tools. It is only used by other CoreAudio ap-plications.
Accessing the CoreAudio Manager
The CoreAudio Manager application launches automatically when the first client application accesses the CoreAudio Driver.
CoreAudio Manager (Pro Tools HD shown)
Chapter 2: CoreAudio Driver and CoreAudio Manager 5

6
CoreAudio Manager cannot be accessed under the following circumstances:
• When Pro Tools is running
• When another application is using Direct IO
Preventing an Application from Accessing CoreAudio Driver
You can prevent an application from accessing the CoreAudio Driver by holding down the Shift key just before the application would access the CoreAudio Driver, typically during launch of the application. Certain applications (such as Apple Mail and iChat), do not access the Core-Audio application until they first play a sound, so you will need to hold down the Shift key just prior to sound playback in order to prevent the use of Pro Tools hardware for playback.
Using the CoreAudio Manager
Use CoreAudio Manager to change the CoreAu-dio Buffer Size setting, access the Hardware Setup dialog for your Pro Tools hardware and control volume and mute for the CoreAudio Driver. CoreAudio Manager also identifies your Pro Tools hardware, the supported number of Input and Output Channels and the number of attached clients (applications).
To ensure proper playback with the Core-Audio Driver, launch the CoreAudio Man-ager first, making sure that its status is “Connected.”
CoreAudio Drivers Guide
Buffer Size
You may select from the following buffer sizes (depending on your Pro Tools hardware):
• 64 samples
• 128 samples
• 256 samples
• 512 samples
• 1024 samples
• 2048 samples
Small buffers have the advantage of low la-tency in the record monitor path, but also are more taxing on your computer’s CPU and could contribute to dropouts in your audio during re-cord or playback. (Latency is the time delay be-tween a signal entering the audio inputs and leaving the outputs during recording.)
Larger buffers have the advantage of making the CoreAudio Driver more immune to audio dropouts during playback and recording, but can cause a noticeable delay when monitoring your inputs in the recording process. In some CoreAudio-client applications, performing vari-ous tasks will interrupt the CoreAudio Driver and may result in clicks and pops in audio play-back or recording. Choosing medium or large buffers (such as 512 or 1024) can help alleviate this problem.
Changing the Buffer Size for the CoreAudio Driver does not affect the H/W Buffer Size setting in the Pro Tools Playback Engine dialog.

To configure CoreAudio Hardware Buffer Size:
1 Double-click the CoreAudio Manager file (lo-cated in /Applications/Digidesign/).
2 From the Buffer Size pop-up menu, select the desired CoreAudio buffer size (in samples). Gen-erally, smaller buffer sizes are preferable. How-ever, if you experience any problems with performance (such as clicks and pops during re-cording or playback), try increasing the CoreAu-dio Buffer Size setting. You can also change the buffer size from within the client application if it is the only client attached to the CoreAudio Driver. Once two or more clients are active, you will not be able to change the sample rate or the buffer size.
HW Setup Button
The HW Setup button opens the Hardware Setup dialog for your Pro Tools hardware. The HW Setup button is only available when no clients are using the CoreAudio Driver.
To configure CoreAudio HW Setup:
1 Quit any CoreAudio client applications.
2 Double-click the Digi CoreAudio Manager file (located in /Applications/Digidesign/).
3 Click the HW Setup button to open the Hard-ware Setup dialog.
Hardware Setup dialog, Pro Tools HD (96 I/O shown)
4 Configure the Hardware Setup dialog for your Pro Tools hardware. If you have more than one audio interface connected to a Pro Tools|HD sys-tem, be sure to select and configure only the pri-mary audio interface connected to the HD Core card.
5 When you are finished, click OK to close the Hardware Setup dialog.
Prefs Button
The Prefs button opens the CoreAudio Manager Preferences dialog for the Manager application. There are several options available for control and configuration of the Manager application. When finished setting these options, click OK to close the CoreAudio Manager Preferences win-dows.
Hide Manager if Auto-Launched by Client Enable this option to hide the Manager panel after the first client application accesses the CoreAudio Driver. To open the Manager panel, click on the CoreAudio Manager application icon in the Dock.
Auto-Quit Manager when Last Client Quits En-able this option to make the Manager applica-tion quit when there are no longer any clients using the CoreAudio Driver.
For more information on the Hardware Setup dialog, see the Pro Tools Reference Guide.
CoreAudio Manager Preferences
Chapter 2: CoreAudio Driver and CoreAudio Manager 7

8
Use C|24 Stereo Routing (L/R to 1/3) When using C|24, enable this option to configure the CoreAudio Driver to output through the C|24 standard stereo routing (outputs 1 and 3).
Use XMON Stereo Routing (L/R to 1/5) When using D-Control or D-Command, enable this option to configure the CoreAudio Driver to output through the D-Control or D-Command standard stereo routing (outputs 1 and 5).
Mirror Analog Outs 1 & 2 to Digital Outs (Digi 002 and Digi 002 Rack Only) When using Digi 002 or Digi 002 Rack, enable this option to mirror the main outputs through the digital outputs that are selected in the Hardware Setup dialog.
Connect Button
The Connect button is available when the Core-Audio Manager is launched and cannot connect with the Pro Tools hardware (such as when Pro Tools is launched and the hardware is dis-connected or disabled). Before trying to con-nect, make sure to quit Pro Tools and make sure that your hardware is connected and turned on. You can then click on the Connect button to ac-quire the hardware.
Quit Button
Use the Quit button to quit the CoreAudio Man-ger. Be sure to quit any client applications before using the Quit button in the Manager. If any ap-plications are currently attached to the Manager application when quitting, you may get an error message indicating that the Pro Tools hardware is no longer available. You may have to change
If any application is launched prior to press-ing the Connect button and you want that application to use the CoreAudio Driver for playback, you will need to quit and re-launch the application for it to connect properly to the CoreAudio Manager.
CoreAudio Drivers Guide
the application’s preferences to use different hardware for playback or possibly quit and re-launch the application for proper playback to be resumed.
Configuring a Pro Tools|HD Audio Interface for Third-Party ApplicationsWhen using a Pro Tools|HD interface with an application other than Pro Tools HD (such as Apple GarageBand), you can configure hardware settings through the audio preference settings available in that application.
To configure hardware settings through a client application (such as Apple GarageBand):
1 Choose CoreAudio for Audio Output and Au-dio Input.
2 Select a buffer size for your system by selecting an Optimize For option (Maximum/Large buffer size or Minimum/Small buffer size).
Small buffers have the advantage of low la-tency in the record monitor path, but also are more taxing on your computer’s CPU and could contribute to dropouts in your audio during re-cord or playback. (Latency is the time delay be-tween a signal entering the audio inputs and leaving the outputs during recording.)
Larger buffers have the advantage of making the CoreAudio Driver more immune to audio dropouts during playback and recording, but can cause a noticeable delay when monitoring your inputs in the recording process. In some CoreAudio-client applications, performing vari-ous tasks will interrupt the CoreAudio Driver and may result in clicks and pops in audio play-back or recording. Choosing a large buffer can help alleviate this problem.

Refer to the documentation for your third-party application to learn more about how these op-tions affect that application.
Configuring the Apple Sound Preferences or Apple Audio MIDI Setup(Required for Using a Qualified Pro Tools System Interface with Apple iTunes or QuickTime Player)
To use your Pro Tools hardware with certain CoreAudio-compatible playback applications (such as Apple iTunes or QuickTime Player), you will need to configure either Sound Preferences or Audio MIDI Setup in addition to CoreAudio Manager. However, for most CoreAudio-com-patible client applications (such as BIAS Peak or Cubase SX) this is unnecessary, because you can configure the CoreAudio Buffer Size setting and input and output channels from within the cli-ent application.
Apple Sound Preferences
To configure the Apple Sound Preferences:
1 Launch System Preferences (Apple menu > System Preferences).
2 Click Sound.
Changing the Buffer Size for the CoreAudio Driver does not affect the H/W Buffer Size settings in the Pro Tools Playback Engine dialog.
3 Click Output and select Digidesign HW as the de-vice for sound output.
4 Click Input and select Digidesign HW as the de-vice for sound input.
5 Quit System Preferences.
Sound Preferences, Output settings (Pro Tools HD shown)
Sound Preferences, Input settings (Pro Tools HD shown)
Chapter 2: CoreAudio Driver and CoreAudio Manager 9

10
Apple Audio MIDI Setup
To configure the Apple Audio MIDI Setup:
1 Launch Audio MIDI Setup (located in Home/Applications/Utilities).
2 In the Audio Devices window, click the Input tab.
3 From the Audio Devices list on the left, select Digidesign HW (HD).
4 In the Audio Devices window, click the Output tab.
Apple Audio MIDI Setup application, Audio Devices Input settings (Pro Tools|HD shown)
Apple Audio MIDI Setup application, Audio Devices Output settings (Pro Tools|HD shown)
CoreAudio Drivers Guide
5 From the Audio Devices list on the left, select Digidesign HW (HD).
6 In the Audio Input or Audio Output page, se-lect the Format (sample rate). Note that the input sample rate and output rate are linked.
7 Choose Audio MIDI Setup > Quit Audio MIDI Setup.
Leave System Output set to Built-in Audio. The CoreAudio Driver cannot be used for system sounds.
When Properties For Pro Tools HW is se-lected, you can click the Configure Device button to open System Preferences, where the CoreAudio Manager can be accessed.
For information on configuring MIDI devices in AMS, see the User Guide or Setup Guide that came with your Pro Tools system.

chapter 3
Mbox Family CoreAudio Drivers
The Mbox family CoreAudio Drivers let you use your qualified Mbox family audio interfaces with third-party applications that support the CoreAudio Driver standard.
The following Pro Tools system interfaces for the Avid Mbox family are supported:
• Mbox Pro
• Mbox
• Mbox Mini
• Mbox Micro
Installation
The Mbox family CoreAudio Drivers for your Pro Tools hardware are automatically installed when you install Pro Tools.
Standalone CoreAudio Driver
CoreAudio Drivers can be installed on Mac sys-tems that do not have Pro Tools installed. Use the standalone version of the CoreAudio Drivers installer (Install CoreAudio.mpkg). This is avail-able on the Pro Tools Installer disc or can be downloaded from our website (www.avid.com).
The “original” Mbox is not supported by Mbox family CoreAudio Drivers.
For instructions on installing Pro Tools, see the User Guide or Setup Guide that came with your system.
System Requirements and CompatibilityMbox family CoreAudio Drivers can be used on qualified Mbox family systems running on a qualified version of Mac OS X (or higher).
Avid can only assure compatibility and provide support for hardware and software it has tested and approved.
For complete system requirements and a list of qualified computers, operating systems, hard drives, and third-party devices, refer to the latest information on our website (www.avid.com).
For complete system requirements, visit www.avid.com/compatibility.
Chapter 3: Mbox Family CoreAudio Drivers 11

12
Mbox Family CoreAudio Driver CapabilitiesThe Mbox family of CoreAudio Drivers are multi-client, multichannel sound drivers that allow CoreAudio-compatible applications to re-cord and play back through qualified Mbox fam-ily audio interfaces.
Full-duplex recording and playback of 24-bit au-dio is supported at sample rates up to 96 kHz, depending on your CoreAudio client applica-tion.
The Mbox family of CoreAudio Drivers will pro-vide up to 6 channels of input and 8 channels of output, depending on your Pro Tools hardware:
• Up to 6 channels of inputs and 8 channels of output with Mbox Pro
• Up to 4 channels of input and 2 channels of output with Mbox
• Up to 2 channels of I/O with Mbox Mini
• Up to 2 channels of output with Mbox Micro
Limitations of the Mbox Family of CoreAudio Drivers
The Mbox family of CoreAudio Drivers have the following limitation:
• When Pro Tools is running, the Mbox family interface is set to the session sample rate. If another application changes the sample rate, Pro Tools will immediately change it back.
For the latest third-party drivers for Pro Tools hardware, as well as any known issues, visit www.avid.com/compatibility.
CoreAudio Drivers Guide
Mbox Pro, Mbox, and Mbox Mini Driver Control Panels
Configuring CoreAudio Driver
You can configure the Mbox Pro, Mbox, and Mbox Mini CoreAudio Drivers using the Driver Control Panel, or from within most third-party CoreAudio-compatible client applications (such as BIAS Peak or Logic Audio). Refer to the man-ufacturer’s documentation for more informa-tion.
Some applications (such as Apple’s iTunes or QuickTime Player), also require that you config-ure either the Apple Sound Preferences or Apple Audio MIDI Setup to use the Mbox Family Core-Audio driver. See “Configuring Mbox Family In-terfaces for Third-Party Applications” on page 14.
The Control Panel lets you configure settings for your audio interface for use with Pro Tools or other audio applications that support the Core-Audio Drivers standard.
The Driver Control Panel also features conve-nient links to driver updates, downloadable manuals, FAQs, tech support, product registra-tion, and our website (www.avid.com).
For detailed information on Driver Control Panels, see “Using the Driver Control Panel” in the User Guide or Setup Guide that came with your Pro Tools system.

To launch the Driver Control Panel:
1 Launch System Preferences (Apple menu > System Preferences), then locate the “Other” section.
2 Click your Pro Tools audio interface to launch the Control Panel.
System Preferences with installed Driver icons
Control Panel for Mbox Pro
Mbox Micro Control Panel
Configuring the CoreAudio Driver
You can configure the CoreAudio Driver using the Control Panel, or from within most third-party CoreAudio-compatible client applications (such as BIAS Peak or Logic Audio). Refer to the manufacturer’s documentation for more infor-mation.
Some applications (such as Apple’s iTunes or QuickTime Player), also require that you config-ure either the Apple Sound Preferences or Apple Audio MIDI Setup to use the Mbox 2 CoreAudio driver. See “Configuring Mbox Family Interfaces for Third-Party Applications” on page 14.
Click “Digidesign Mbox 2” to access the control panel for Mbox Micro.
Chapter 3: Mbox Family CoreAudio Drivers 13

14
Accessing the Mbox Micro Control Panel
Use the Control Panel to identify your Pro Tools hardware and check firmware.
To access the Control Panel:
In the System Preferences window, click Mbox 2 (Mbox Micro is accessed via the Mbox 2 Control Panel).
Hardware and Firmware
This area displays the firmware version of your Pro Tools audio interface. If your hardware is not connected or cannot be detected, this will display an “Unable to connect to” your interface message. Check that you have installed Pro Tools software correctly, and check your USB connection between the computer and the Pro Tools audio interface.
Clock
On Mbox Micro, this option is greyed out and cannot be changed. Mbox Micro is always set to Internal.
AC-3 Mode
On Mbox Micro, this option is greyed out and cannot be changed.
Connection Status and Device
This display area shows the hardware detected by the Control Panel.
Control Panel (Mbox 2 shown)
CoreAudio Drivers Guide
Configuring Mbox Family Interfaces for Third-Party ApplicationsWhen using Mbox family interfaces with an ap-plication other than Pro Tools LE (such as Apple GarageBand), you can configure hardware set-tings through the audio preference settings available in that application.
To configure hardware settings through a client application (such as Apple GarageBand):
1 Select an Mbox family interface for Audio Output and Audio Input.
Mbox selected in Audio/MIDI Preferences for Apple GarageBand

2 Select a buffer size for your system by choos-ing an Optimize For option (Maximum/Large buf-fer size, or Minimum/Small buffer size).
Small buffers have the advantage of low la-tency in the record monitor path, but also are more taxing on your computer’s CPU and could contribute to dropouts in your audio during re-cord or playback. (Latency is the time delay be-tween a signal entering the audio inputs and leaving the outputs during recording.)
Larger buffers have the advantage of making the CoreAudio Driver more immune to audio dropouts during playback and recording, but can cause a noticeable delay when monitoring your inputs in the recording process. In some CoreAudio-client applications, performing vari-ous tasks will interrupt the CoreAudio Driver and may result in clicks and pops in audio play-back or recording. Choosing a large buffer can help alleviate this problem.
Refer to the documentation for your third-party application to learn more about how these op-tions affect that application.
Changing the Buffer Size for the Mbox family CoreAudio Driver does not affect the H/W Buffer Size settings in the Pro Tools Playback Engine dialog.
Configuring the Apple Sound Preferences or Apple Audio MIDI Setup(Required for Using Mbox Family Interfaces with Apple ITunes and QuickTime Player)
To use your Mbox family interface with certain CoreAudio-compatible playback applications (such as Apple iTunes or QuickTime Player), you will need to configure either Sound Preferences or Audio MIDI Setup in addition to the Mbox Pro Control Panel. However, for most CoreAudio-compatible client applications (such as BIAS Peak or Ableton Live) this is unnecessary, because you can configure hardware settings, and input and output channels from within the application.
Apple Sound Preferences
To configure the Apple Sound Preferences:
1 Launch System Preferences (Apple menu > System Preferences).
2 Click Sound.
3 Click Output and select your Mbox family in-terface as the device for sound output.
Sound Preferences, Output settings (Mbox shown)
Chapter 3: Mbox Family CoreAudio Drivers 15

16
4 Click Input and select your Mbox family inter-face as the device for sound input.
5 Quit System Preferences.
Apple Audio MIDI Setup
To configure the Apple Audio MIDI Setup for your Mbox family interface:
1 Launch Audio MIDI Setup (located in Home/Applications/Utilities).
2 In the Audio Devices window, click the Input tab.
3 From the Audio Devices list on the left, select your Mbox family interface.
Sound Preferences, Input settings (Mbox shown)
Apple Audio MIDI Setup application, Audio Devices Input settings (Mbox shown)
CoreAudio Drivers Guide
4 In the Audio Devices window, click the Output tab.
5 From the Audio Devices list on the left, select your Mbox family interface.
6 In the Audio Input or Output page, select the Format (sample rate). Note that the input sample rate and output rate are linked.
7 Choose Audio MIDI Setup > Quit Audio MIDI Setup.
Apple Audio MIDI Setup application, Audio Devices Output settings (Mbox shown)
Leave System Output set to Built-in Audio. The CoreAudio Driver cannot be used for system sounds.
For information on configuring MIDI devices in AMS, see the User Guide or Setup Guide that came with your Pro Tools system.

chapter 4
Mbox 2 Family CoreAudio Drivers
Mbox 2 family CoreAudio Drivers let you use your qualified Mbox 2 family audio interfaces with third-party applications that support the CoreAudio Driver standard.
The following Pro Tools Mbox 2 family system interfaces are supported:
• Mbox 2 Pro
• Mbox 2
• Mbox 2 Mini
• Mbox 2 Micro
Installation
Mbox 2 family CoreAudio Drivers for your Pro Tools hardware are automatically installed when you install Pro Tools.
Standalone CoreAudio Drivers
CoreAudio Drivers can be installed on Mac sys-tem that do not have Pro Tools installed. Use the standalone version of the CoreAudio Drivers installer (Install CoreAudio.mpkg), which is available on the Pro Tools Installer disc or can be downloaded from our website (www.avid.com).
For instructions on installing Pro Tools, see the User Guide or Setup Guide that came with your system.
System Requirements and CompatibilityMbox 2 family CoreAudio Drivers can be used on qualified Mbox 2 family systems running on a qualified version of Mac OS X.
Avid can only assure compatibility and provide support for hardware and software it has tested and approved.
For complete system requirements and a list of qualified computers, operating systems, hard drives, and third-party devices, refer to the latest information on our website (www.avid.com).
For complete system requirements, visit www.avid.com/compatibility.
Chapter 4: Mbox 2 Family CoreAudio Drivers 17

18
Mbox 2 Family CoreAudio Driver CapabilitiesMbox 2 family CoreAudio Drivers are multi-cli-ent, multichannel sound drivers that allow CoreAudio-compatible applications to record and play back through qualified Mbox 2 family audio interfaces.
Full-duplex recording and playback of 24-bit au-dio is supported at sample rates up to 96 kHz, depending on your CoreAudio client applica-tion.
Mbox 2 family CoreAudio Drivers will provide up to 6 channels of input and 8 channels of out-put, depending on your Pro Tools hardware:
• Up to 6 channels of inputs and 8 channels of output with Mbox 2 Pro
• Up to 4 channels of input and 2 channels of output with Mbox 2
• Up to 2 channels of I/O with Mbox 2 Mini
• Up to 2 channels of output with Mbox 2Micro
Limitations of the Mbox 2 Family CoreAudio Drivers
Mbox 2 family CoreAudio Drivers have the fol-lowing limitation:
• When Pro Tools is running, the Mbox 2 fam-ily interface is set to the session sample rate. If another application changes the sample rate, Pro Tools will immediately change it back.
For the latest third-party drivers for Pro Tools hardware, as well as any known issues, visit www.avid.com/compatibility.
CoreAudio Drivers Guide
Mbox 2 Pro Driver Control Panel(Mbox 2 Pro Only)
You can configure the Mbox 2 Pro CoreAudio Driver using the Mbox 2 Pro Control Panel, or from within most third-party CoreAudio-com-patible client applications (such as BIAS Peak or Logic Audio). Refer to the manufacturer’s docu-mentation for more information.
Some applications (such as Apple’s iTunes or QuickTime Player), also require that you config-ure either the Apple Sound Preferences or Apple Audio MIDI Setup to use the Mbox 2 Pro Core-Audio Driver. See “Configuring Mbox 2 Family Interfaces for Third-Party Applications” on page 21.

Accessing the Mbox 2 Pro Control Panel
The Mbox 2 Pro Control Panel (and all the Mbox 2 family Control Panels) can be accessed without opening a third-party application from the Mac System Preferences, or from within some third-party programs.
To access the Mbox 2 Pro Control Panel without opening a third-party application:
1 Launch System Preferences (Apple menu > System Preferences), then locate the “Other” section.
2 Click Digidesign Mbox 2 Pro to launch the Con-trol Panel.
Mbox 2 Pro’s Driver icon in System Preferences
Mbox 2 Pro Control Panel
Using the Mbox 2 Pro Control Panel
Use the Mbox 2 Pro Control Panel to identify your Pro Tools hardware, check firmware, view or change the Clock Source, and enable S/PDIF mirroring of analog outputs 1 and 2.
Hardware Connection Status Display and Text
This display area shows the hardware (Mbox 2 Pro) detected by the Control Panel.
If your hardware is not connected or cannot be detected, the text below the display will read “No Hardware Detected.” In this case, check the FireWire connection between the computer and Mbox 2 Pro. If reconnecting the cable does not correct the problem, check that you have in-stalled Pro Tools LE correctly.
Firmware
This area displays the firmware version of your Mbox 2 Pro.
Changing the Clock Source in the Mbox 2 Pro Control Panel does not dynamically up-date the setting in the Pro Tools Hardware Setup or Session Setup window if it is open. The Pro Tools Hardware Setup and Session Setup window updates when you close and reopen them.
Chapter 4: Mbox 2 Family CoreAudio Drivers 19

20
Clock Source
This pop-up menu lets you select the clock source for Mbox 2 Pro:
Internal Use this setting for normal playback of audio, or if you are recording audio through the analog inputs.
S/PDIF Use this setting if you are recording au-dio through the S/PDIF input.
Word Clock Use this setting to clock Pro Tools to a Word clock source connected to the Mbox 2 Pro Word Clock In port.
Mirror Analog 1–2 on S/PDIF
Check this box to set the S/PDIF output chan-nels to always mirror analog outputs 1 and 2.
Mbox 2, Mbox 2 Mini, and Mbox 2 Micro Driver Control Panels(Mbox 2, Mbox 2 Mini, and Mbox 2 Micro Only)
Configuring CoreAudio Driver
You can configure the Mbox 2, Mbox 2 Mini, and Mbox 2 Micro CoreAudio Drivers using the Control Panel, or from within most third-party CoreAudio-compatible client applications (such as BIAS Peak or Logic Audio). Refer to the man-ufacturer’s documentation for more informa-tion.
S/PDIF input is only available when S/PDIF is the Clock Source.
CoreAudio Drivers Guide
Some applications (such as Apple’s iTunes or QuickTime Player), also require that you config-ure either the Apple Sound Preferences or Apple Audio MIDI Setup to use the Mbox 2 CoreAudio driver. See “Configuring Mbox 2 Family Inter-faces for Third-Party Applications” on page 21.
Accessing the Control Panel
Use the Control Panel to identify your Pro Tools hardware, check firmware, and view Clock Source and AC-3 mode.
With Mbox 2, you can also change the Clock Source and enable or disable AC-3 mode.
To access the Control Panel:
1 Launch System Preferences (Apple menu > System Preferences), then locate the “Other” section.
2 Click your Pro Tools audio interface to launch the Control Panel (Choose Digidesign Mbox 2 for Mbox 2, Mbox 2 Mini, and Mbox 2 Micro).
Hardware and Firmware
This area displays the firmware version of your Pro Tools audio interface. If your hardware is not connected or cannot be detected, this will display an “Unable to connect to” your interface message. Check that you have installed Pro Tools software correctly, and check your USB connection between the computer and your Pro Tools audio interface.
Control Panel (Mbox 2 shown)

Clock
This pop-up menu lets you choose the clock source for Mbox 2 interfaces. Choices include Internal and S/PDIF. Use Internal whenever you are playing back audio through Mbox 2. Use S/PDIF when you are recording into Mbox 2 from a digital device through the Mbox 2 S/PDIF inputs.
On Mbox 2 Mini and Mbox 2 Micro, this option is greyed out and cannot be changed. Mbox 2 Mini and Mbox 2 Micro are always set to Inter-nal.
AC-3 Mode
This option lets you enable AC-3 mode for Mbox 2 interfaces. When enabled, the inter-face’s S/PDIF output switches to a 24-bit clean passthrough mode for AC-3 or DTS encoded au-dio from a DVD or other media player applica-tion (the interface’s analog output is muted whenever AC-3 mode is enabled).
On Mbox 2 Mini and Mbox 2 Micro, this option is greyed out and cannot be changed.
Connection Status and Device
This display area shows the hardware detected by the Control Panel.
Enabling AC-3 mode in the Control Panel will prevent Pro Tools LE from being able to access the Mbox 2. Always turn off AC-3 mode before using Pro Tools LE.
Configuring Mbox 2 Family Interfaces for Third-Party ApplicationsWhen using Mbox 2 family interfaces with an application other than Pro Tools LE (such as Ap-ple GarageBand), you can configure hardware settings through the audio preference settings available in that application.
To configure hardware settings through a client application (such as Apple GarageBand):
1 Select an Mbox 2 family interface for Audio Output and Audio Input.
Mbox 2 selected in Audio/MIDI Preferences for Apple GarageBand
Chapter 4: Mbox 2 Family CoreAudio Drivers 21

22
2 Select a buffer size for your system by choos-ing an Optimize For option (Maximum/Large buffer size, or Minimum/Small buffer size).
Small buffers have the advantage of low la-tency in the record monitor path, but also are more taxing on your computer’s CPU and could contribute to dropouts in your audio during re-cord or playback. (Latency is the time delay be-tween a signal entering the audio inputs and leaving the outputs during recording.)
Larger buffers have the advantage of making the CoreAudio Driver more immune to audio dropouts during playback and recording, but can cause a noticeable delay when monitoring your inputs in the recording process. In some CoreAudio-client applications, performing vari-ous tasks will interrupt the CoreAudio Driver and may result in clicks and pops in audio play-back or recording. Choosing a large buffer can help alleviate this problem.
Refer to the documentation for your third-party application to learn more about how these op-tions affect that application.
Changing the Buffer Size for the Mbox 2 family CoreAudio Driver does not affect the H/W Buffer Size settings in the Pro Tools Playback Engine dialog.
CoreAudio Drivers Guide
Configuring the Apple Sound Preferences or Apple Audio MIDI Setup(Required for Using Mbox 2 Family Interfaces with Apple ITunes and QuickTime Player)
To use your Mbox 2 family interface with cer-tain CoreAudio-compatible playback applica-tions (such as Apple iTunes or QuickTime Player), you will need to configure either Sound Preferences or Audio MIDI Setup in addition to the Mbox 2 Pro Control Panel. However, for most CoreAudio-compatible client applications (such as BIAS Peak or Ableton Live) this is un-necessary, because you can configure hardware settings, and input and output channels from within the application.
Apple Sound Preferences
To configure the Apple Sound Preferences:
1 Launch System Preferences (Apple menu > System Preferences).
2 Click Sound.
3 Click Output and select your Mbox 2 family interface as the device for sound output.
Sound Preferences, Output settings (Mbox 2 Pro shown)

4 Click Input and select your Mbox 2 family in-terface as the device for sound input.
5 Quit System Preferences.
Apple Audio MIDI Setup
To configure the Apple Audio MIDI Setup for your Mbox 2 family interface:
1 Launch Audio MIDI Setup (located in Home/Applications/Utilities).
2 In the Audio Devices window, click the Input tab.
Sound Preferences, Input settings (Mbox 2 Pro shown)
Apple Audio MIDI Setup application, Audio Devices Input settings (Mbox 2 Pro shown)
3 From the Audio Devices list on the left, select your Mbox 2 family interface.
4 In the Audio Devices window, click the Output tab.
5 From the Audio Devices list on the left, select your Mbox 2 family interface.
6 In the Input or Output page, select the Format (sample rate). Note that the input sample rate and output rate are linked.
7 Choose Audio MIDI Setup > Quit Audio MIDI Setup.
Apple Audio MIDI Setup application, Audio Devices Output settings (Mbox 2 Pro shown)
Leave System Output set to Built-in Audio. The CoreAudio Driver cannot be used for system sounds.
For information on configuring MIDI devices in AMS, see the User Guide or Setup Guide that came with your Pro Tools system.
Chapter 4: Mbox 2 Family CoreAudio Drivers 23

24
CoreAudio Drivers Guide
chapter 5
Eleven Rack CoreAudio Driver
The Eleven Rack CoreAudio Driver lets you use your qualified Eleven Rack audio interface with third-party applications that support the Core-Audio Driver standard.
Installation
The Eleven Rack CoreAudio Driver for your Pro Tools hardware is automatically installed when you install Pro Tools.
Standalone CoreAudio Drivers
CoreAudio Drivers can be installed on Mac sys-tem that does not have Pro Tools installed. Use the standalone version of the CoreAudio Drivers installer (Install CoreAudio.mpkg), which is available on the Pro Tools Installer disc or can be downloaded from our website (www.avid.com).
For complete instructions on installing Pro Tools, see the Eleven Rack User Guide.
System Requirements and CompatibilityThis version of the Eleven Rack CoreAudio Driver can be used on qualified Eleven Rack sys-tems running on a qualified version of Mac OS X.
Avid can only assure compatibility and provide support for hardware and software it has tested and approved.
For complete system requirements and a list of qualified computers, operating systems, hard drives, and third-party devices, refer to the latest information on our website (www.avid.com).
For complete system requirements, visit www.avid.com/compatibility.
Chapter 5: Eleven Rack CoreAudio Driver 25

26
Eleven Rack CoreAudio Driver CapabilitiesThe Eleven Rack CoreAudio Driver is a multi-cli-ent, multichannel sound driver that allows CoreAudio-compatible applications to record and play back through your qualified Eleven Rack audio interface.
Full-duplex recording and playback of 24-bit au-dio is supported at sample rates up to 96 kHz, depending on your CoreAudio client applica-tion.
The Eleven Rack CoreAudio Driver provides up to 8 channels of input and 6 channels of output.
Limitations of the Eleven Rack CoreAudio Driver
The Eleven Rack CoreAudio Driver has the fol-lowing limitation:
• When Pro Tools is running, the Eleven Rack interface is set to the session sample rate. If another application changes the sample rate, Pro Tools will immediately change it back.
For the latest third-party drivers for Pro Tools hardware, as well as any known issues, visit www.avid.com/compatibility.
CoreAudio Drivers Guide
Eleven Rack CoreAudio Driver Control PanelYou can configure the Eleven Rack CoreAudio Driver using the Eleven Rack Control Panel, or from within most third-party CoreAudio-com-patible client applications (such as BIAS Peak or Logic Audio). Refer to the manufacturer’s docu-mentation for more information.
Some applications (such as Apple’s iTunes or QuickTime Player), also require that you config-ure either the Apple Sound Preferences or Apple Audio MIDI Setup to use the Eleven Rack Core-Audio Driver. See “Configuring Eleven Rack for Third-Party Applications” on page 28.

Accessing the Eleven Rack Control Panel
The Eleven Rack Control Panel can be accessed without opening a third-party application (from the Mac System Preferences), or from within some third-party programs.
To access the Eleven Rack Control Panel without opening a third-party application:
1 Launch System Preferences (Apple menu > System Preferences), then locate the “Other” section.
2 Click Digidesign Eleven Rack to launch the Control Panel.
To access the Eleven Rack Control Panel from a third-party application:
Refer to your program’s documentation.
Eleven Rack Driver icon in System Preferences
Eleven Rack Control Panel
Using the Eleven Rack Control Panel
Use the Eleven Rack Control Panel to identify your Pro Tools hardware, check firmware, view or change the Digital Input/Clock Source, and set the default Sample Rate.
Hardware Connection Status Display and Text
This display area shows the hardware (Eleven Rack) detected by the Control Panel.
If your hardware is not connected or cannot be detected, the text below the display will read “Device Not Connected.” In this case, check the FireWire connection between the computer and Mbox 2 Pro. If reconnecting the cable does not correct the problem, check that you have in-stalled Pro Tools LE correctly.
Firmware Version
This area displays the firmware version of your Eleven Rack.
Driver Version
This area displays the version of the Core Audio Driver for your Eleven Rack.
Changing the Clock Source in the Eleven Rack Control Panel does not dynamically update the setting in the Pro Tools Hard-ware Setup or Session Setup window if it is open. The Pro Tools Hardware Setup and Session Setup window update when you close and reopen them.
Chapter 5: Eleven Rack CoreAudio Driver 27

28
Digital Input/Clock Source
This pop-up menu lets you select the clock source for Eleven Rack:
Internal Use this setting for normal playback of audio, or if you are recording audio through the analog inputs.
S/PDIF Use this setting if you are recording au-dio through the S/PDIF input.
AES/EBU Use this setting if you are recording audio through the AES/EBU input.
Configuring Eleven Rack for Third-Party ApplicationsWhen using Eleven Rack with an application other than Pro Tools LE (such as Apple Garage-Band), you can configure hardware settings through the audio preference settings available in that application.
S/PDIF input is only available when S/PDIF is the Clock Source.
CoreAudio Drivers Guide
To configure hardware settings through a client application (such as Apple GarageBand):
1 Select Digidesign Eleven Rack for Audio Out-put and Audio Input.
2 Select a buffer size for your system by choos-ing an Optimize For option (Maximum/Large buffer size, or Minimum/Small buffer size).
Small buffers have the advantage of low la-tency in the record monitor path, but also are more taxing on your computer’s CPU and could contribute to dropouts in your audio during re-cord or playback. (Latency is the time delay be-tween a signal entering the audio inputs and leaving the outputs during recording.)
Larger buffers have the advantage of making the CoreAudio Driver more immune to audio dropouts during playback and recording, but can cause a noticeable delay when monitoring your inputs in the recording process. In some CoreAudio-client applications, performing vari-ous tasks will interrupt the CoreAudio Driver and may result in clicks and pops in audio play-back or recording. Selecting a large buffer can help alleviate this problem.
Eleven Rack selected in Audio/MIDI Preferences for Apple GarageBand
Refer to the documentation for your third-party application to learn more about how these op-tions affect that application.
Configuring the Apple Sound Preferences or Apple Audio MIDI Setup(Required for Using Eleven Rack with Apple ITunes and QuickTime Player)
To use Eleven Rack with certain CoreAudio-compatible playback applications (such as Apple iTunes or QuickTime Player), you will need to configure either Sound Preferences or Audio MIDI Setup in addition to the Eleven Rack Con-trol Panel. However, for most CoreAudio-com-patible client applications (such as BIAS Peak or Bulletin Live) this is unnecessary, because you can configure hardware settings, and input and output channels from within the application.
Apple Sound Preferences
To configure the Apple Sound Preferences:
1 Launch System Preferences (Apple menu > System Preferences).
2 Click Sound.
Changing the Buffer Size for the CoreAudio Driver does not affect the H/W Buffer Size settings in the Pro Tools Playback Engine dialog.
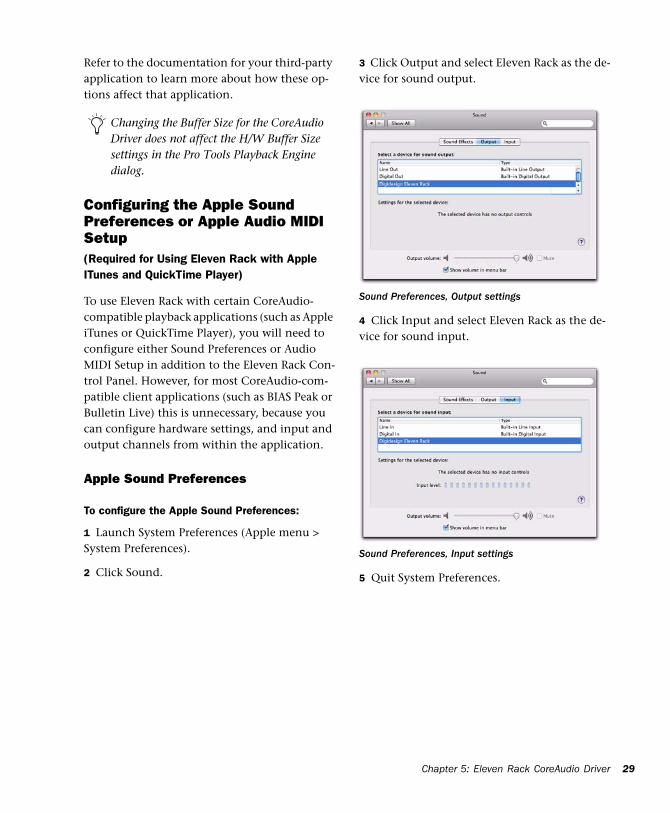
3 Click Output and select Eleven Rack as the de-vice for sound output.
4 Click Input and select Eleven Rack as the de-vice for sound input.
5 Quit System Preferences.
Sound Preferences, Output settings
Sound Preferences, Input settings
Chapter 5: Eleven Rack CoreAudio Driver 29

30
Apple Audio MIDI Setup
To configure the Apple Audio MIDI Setup for Eleven Rack:
1 Launch Audio MIDI Setup (located in Home/Applications/Utilities).
2 In the Audio Devices window, click the Input tab.
3 From the Audio Devices list on the left, select Eleven Rack.
4 In the Audio Devices window, click the Output tab.
Apple Audio MIDI Setup application, Audio Devices Input settings
Apple Audio MIDI Setup application, Audio Devices Output settings (Digidesign Eleven Rack shown)
CoreAudio Drivers Guide
5 From the Audio Devices list on the left, select Digidesign Eleven Rack Pro.
6 In the Input or Output page, select the Format (sample rate). Note that the input sample rate and output rate are linked.
7 Choose Audio MIDI Setup > Quit Audio MIDI Setup.
Leave System Output set to Built-in Audio. The CoreAudio Driver cannot be used for system sounds.
For information on configuring MIDI devices in AMS, see the Eleven Rack User Guide.


Avid2001 Junipero Serra Boulevard Daly City, CA 94014-3886 USA
Technical Support (USA)Visit the Online Support Center at www.avid.com/support
Product InformationFor company and product information, visit us on the web at www.avid.com