cooktops operation manual - artusi...
TRANSCRIPT

COOKTOPS OPERATION MANUAL
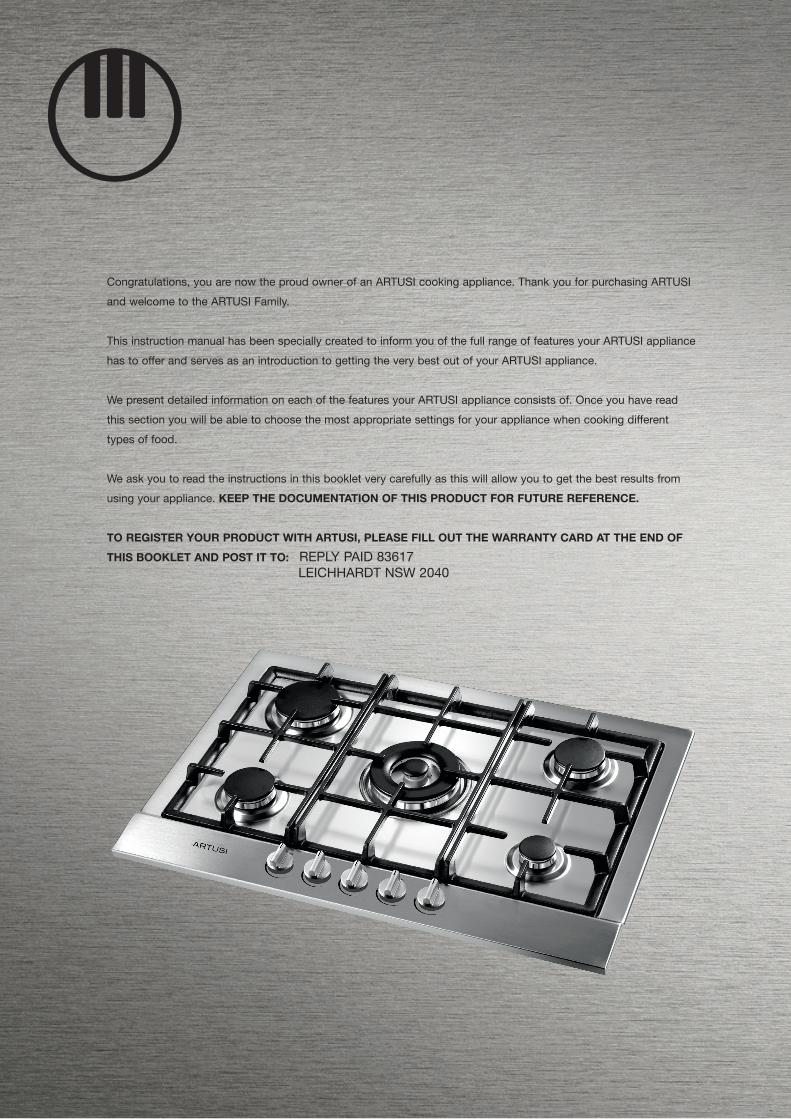
Congratulations, you are now the proud owner of an ARTUSI cooking appliance. Thank you for purchasing ARTUSI and welcome to the ARTUSI Family.
This instruction manual has been specially created to inform you of the full range of features your ARTUSI appliance has to offer and serves as an introduction to getting the very best out of your ARTUSI appliance.
We present detailed information on each of the features your ARTUSI appliance consists of. Once you have read this section you will be able to choose the most appropriate settings for your appliance when cooking different types of food.
We ask you to read the instructions in this booklet very carefully as this will allow you to get the best results from using your appliance. KEEP THE DOCUMENTATION OF THIS PRODUCT FOR FUTURE REFERENCE.
TO REGISTER YOUR PRODUCT WITH ARTUSI, PLEASE FILL OUT THE WARRANTY CARD AT THE END OF THIS BOOKLET AND POST IT TO: REPLY PAID 83617 LEICHHARDT NSW 2040

IT GB FRDear customer,
We thank you and con-gratulate you on yourchoice.This new carefully de-signed product, manu-factured with the highestquality materials, has beencarefully tested to satisfyall your cooking demands.We would therefore requestyou to read and follow theseeasy instructions whichwill allow you to obtain ex-cellent results right fromthe start.May we wish you all thevery best with your modernappliance!
THE MANUFACTURER
Chère cliente, Cher client,
merci et sincères félici-tations pour le choix quevous avez fait.Ce nouveau produit,développé avec soin etfabriqué avec des matièresde toute première qualité,a été soigneusement rodépour satisfaire toutes Vosexigences d’une cuissonparfaite.Veuillez lire attentivementles instructions simplesportées sur cette notice quivous permettront d’obte-nir d’excellents résultatsdès la première utilisation.Nous vous souhaitons uneentière et pleine satisfac-tion quant à l’utilisationde cet appareil moderne.
LE CONSTRUCTEUR
Index
Instructionsfor use
Installation 4Use 4-8Maintenance 30
Instructionsfor the installater
Installation 34Gas connection 36Electrical connection
40User characteristics
42-45
Index
Noticed’emploi
Installation 4Mode d’emploi 4-8Entretien 30
Modalitésd’installation
Installation 34Connexion gaz 36Branchementélectrique 40Caractéristiquesutilisateurs 42-45
Caro Cliente,
sentitamente La ringra-ziamo e ci congratuliamoper la scelta da Lei fatta.Questo nuovo prodotto,accuratamente progettatoe costruito con materiali diprimissima qualità, è statoaccuratamente collaudatoper poter soddisfare tuttele Sue esigenze di unaperfetta cottura.La preghiamo pertanto dileggere e rispettare le faciliistruzioni che Le permet-teranno di raggiungereeccellenti risultati sin dallaprima utilizzazione.Con questo moderno ap-parecchio Le formuliamo inostri più vivi auguri.
IL COSTRUTTORE
Indice
Istruzioniper l’utente
Installazione 4Uso 4-8Manutenzione 30
Istruzioni perl’installatore
Installazione 34Collegamento gas 36Collegamentoelettrico 40Caratteristicheutilizzatori 42-45
THIS APPLIANCE IS CONCEIVED FOR DOMESTIC USE ONLY. THE MANUFACTURER SHALL NOT IN ANY WAY BE HELD RESPONSIBLE
FOR WHATEVER INJURIES OR DAMAGES ARE CAUSED BY INCORRECT INSTALLATION OR BY UNSUITABLE, WRONG OR ABSURD USE.
THIS APPLIANCE IS NOT INTENDED FOR USE BY PERSONS (INCLUDING CHILDREN) WITH REDUCED
PHYSICAL, SENSORY OR MENTAL CAPABILITIES, OR LACK OF EXPERIENCE AND KNOWLEDGE, UNLESS THEY HAVE BEEN GIVEN SUPERVISION OR INSTRUCTION CONCERNING USE OF THE APPLIANCE BY A PERSON RESPONSIBLE FOR THEIR SAFETY. CHILDREN SHOULD BE SUPERVISED TO ENSURE THAT THEY DO NOT PLAY WITH THE APPLIANCE.
QUESTO PRODOTTO È STATO CONCEPITO PER UN IMPIEGO DI TIPO DOMESTICO. IL COSTRUTTOREDECLINA OGNI RESPONSABILITÀ
NEL CASO DI EVENTUALI DANNI A COSE O PERSONE DERIVANTI DA UNA NON CORRETTA INSTALLAZIONE O DA USO IMPROPRIO, ERRONEO OD ASSURDO.
L’APPARECCHIO NON DEVE ESSERE USATO DA PERSONE (COMPRESI BAMBINI) CON RIDOTTE CAPACITÀ FISICHE,
SENSORIALI O MENTALI, O DA PERSONE CHE MANCANO DELL’ESPERIENZA E DELLE CONOSCENZE NECESSARIE SE NON SOTTO LA SUPERVISIONE O DIETRO ISTRUZIONI SULL’USO DELL’APPARECCHIO DA PARTE DI UNA PERSONA RESPONSABILE PER LA LORO SICUREZZA. I BAMBINI DEVONO ESSERE CONTROLLATI PER ASSICURARSI CHE NON GIOCHINO CON L’APPARECCHIO.
CE PRODUIT EST CONÇU EXCLUSIVEMENT POUR USAGE DOMESTIQUE. LE CONSTRUCTEUR DÉCLINE TOUTE RESPONSABILITÉ
POUR DOMMAGES ET BLESSURES CAUSÉES PAR UNE INSTALLATION INCORRECTE OU PAR UN USAGE IMPROPRE, ERRONÉ OU ABSURDE.
L’APPAREIL NE DOIT PAS ÊTRE UTILISÉ PAR DES PERSONNES (ENFANTS INCLUS) DISPOSANT DE CAPACITÉS PHYSIQUES,
SENSORIELLES OU MENTALES RÉDUITES, OU PAR DES PERSONNES N’AYANT PAS L’EXPÉRIENCE OU LES CONNAISSANCES REQUISES, SI CE N’EST SOUS LA SURVEILLANCE D’UNE PERSONNE RESPONSABLE DE LEUR SÉCURITÉ OU APRÈS AVOIR REÇU DE CELLE-CI LES INSTRUCTIONS RELATIVES À L’UTILISATION DE L’APPAREIL. LES ENFANTS DOIVENT ÊTRE SURVEILLÉS, AFIN DE S’ASSURER QU’ILS NE JOUENT PAS AVEC L’APPAREIL.
2
IT GB FRIstruzioniper l’utenteInstallazioneTutte le operazioni rela-tive all’installazione (al-lacciamento elettrico, al-lacciamento gas, adat-tamento al tipo di gas,conseguenti regolazioni,ecc.) devono essere ese-guite da personale quali-ficato secondo le normevigenti. Per le istruzionispecifiche vedi la parteriservata all’installatore.
UsoBruciatori gas (Figg. 1-3).L'accensione del bruciatoreavviene avvicinando unafiammella ai fori della partesuperiore dello stessopremendo e ruotando insenso antiorario la ma-nopola corrispondente sinoa farne coincidere l'indicecon la posizione di mas-simo. Ad accensione av-venuta regolare la fiammasecondo la necessità. Laposizione di minimo sitrova al termine delle rota-zione antioraria. Neimodelli con accensioneautomatica agire sulla ma-nopola come sopradescritto, premendo con-temporaneamente l'ap-posito pulsante. Nei modellicon accensione automatica/simultanea (a una mano) èsufficiente agire come sopradescritto sulla solamanopola corrispondente.La scarica elettrica fracandelina e bruciatore dàluogo all'accensione delbruciatore interessato. Adaccensione avvenuta rila-sciare immediatamente ilpulsante regolando la fiam-ma secondo necessità.L’accensione del bruciatorenei modelli con sicurezzatermoelettrica avviene come
Instructionsfor useInstallationAll the operations con-cerned with the installation(electrical and gasconnections, adaptation totype of gas, necessaryadjustments, etc.) must becarried out by qualifiedtechnicians, in terms withthe standards in force.For specific instructions,kindly read the part re-served for the installationtechnician.
UseGas burners (Fig. 1-3).The ignition of the gasburner is carried out byputting a small flame to theupper part holes of theburner, pressing androtating the correspondingknob in an anti-clockwisemanner, until the maxi-mum position has coincidedwith the marker. When thegas burner has been turnedon, adjust the flameaccording to need. Theminimum position is foundat the end of the anti-clockwise rotationdirection.In models with automaticignition, operate the knobas described above, pressingsimultaneously, the cor-responding push-button.For models with automatic/simultaneous (with onehand) ignition, it issufficient to proceed asdescribed above using thecorresponding knob. Theelectric spark between theignition plug and theburner provides theignition of the burner itself.After ignition, immediatelyrelease the push-button andadjust the flame accordingto need.For models with athermoelectric safety
Noticed’emploiInstallationToutes les opérations rela-tives à l’installation(branchement électrique,raccordement gaz,adaptation au type de gaz,réglages nécessaires, etc...)doivent être effectuées pardes spécialistes suivant lesnormes en vigueur.Pour les instructions spéci-fiques, voir la partie quiconcerne les modalitésd’installation.
Mode d’emploiBrûleurs à gaz (Fig. 1-3). Onallume le brûleur en ap-prochant une petite flammeaux trous de sa partiesupérieure en poussant ettournant dans le senscontraire des aiguilles d’unemontre la manette corre-spondant jusqu’à faire coïn-cider l’aiguille avec laposition de maximum.Quand le bruleur est enmarche, règler la flammeselon la nécéssité. La po-sition de minimum setrouve à la fin de la rotationcontraire au sens des aiguil-les d’une montre.Pour les modèles à allu-mage automatique tournerla manette comme indiquèci-dessus, en poussant enmeme temps le boutonspècial. Pour les modèles àallumage automatique/simultané (à une main), ilsuffit d’agir sur le boutoncorrespondant, comme il estindiqué ci-dessus. La dé-charge électrique entre lapetite bougie et le brûleurallume le brûleur interessé.Quand le brûleur estallumé, lâcher la manette, etregler la flamme selonnécéssité.Dans le cas de modèlesdoués de sûreté thermo-
4

Modelli con bruciatore Dual WokAlcuni modelli sono dotati di un bruciatore Dual Wok. E’ possibile accendere la fiamma centrale (F1) ruotando e premendo la manopola in senso orario, oppure accendere tutto il bruciatore (F2), come indicato in figura qui sotto.
Models with Dual Wok burnerSome models have a Dual Wok burner. The centre flame (F1) can be lit by pressing the knob and turning it clockwise or the entire burner (F2) can be lit as shown in the figure below.
Modèles avec Dual WokCertains modèles sont munis d’un brûleur Dual Wok. Il est possible d’allumer la flamme centrale (F1) en tournant et en pressant la bouton dans le sens horaire, ou allumer tout le brûleur (F1) de la façon indiquée sur la figure ci-dessous.
F1F2
F1F2
6
Importante
termoelettrica non azionare l’accensione oltre 15 secondi. Se dopo 15 secondi il bruciatore non si è acceso, aprire la porta del locale e attendere almeno un minuto prima di ritentare.nei piani senza sicurezza in caso di estinzione delle fiamme di un bruciatore chiudere il rubinetto corrispondente e non ritentare l’accensione prima di un minuto.
Piastre elettriche / Elementi riscaldanti vetroceramici (Figg. 2-2a-3). Ruotare la manopola sulla posizione corrispondente alle necessità di cottura tenendo presente che a numero maggiore corrisponde maggiore erogazione di calore, vedi tabella “utilizzo piastre elettriche”/elementi riscaldanti vetroceramici.La lampada spia accesa segnala l’inserimento della piastra. Va comunque considerato normale, per certi tipi di lampada, il permanere di una leggera luminescenza anche a comandi disinseriti.
Important
protection do not keep the ignite button pushed for more than 15 seconds. If the burner has not ignited after 15 seconds, open the door of the room and wait at least one minute before making a further attempt.
should the burner flame go out close the corresponding gas cock and wait at least one minute before making any attempt to ignite it.
Electrical plates / Vitroceramic heating elements (Fig. 2-2a-3). Rotate the knob towards the position required for cooking and bear in mind that the higher the number, the higher the heat output. See table “use of electrical plates”/ heating elements vitroceramic. The pilot light signals that the plate is “on”. Some types of pilot lights will maintain some slight luminescence even after disconnection. That is quite normal.
Important
thermoélectrique, ne pas activer l’allumage pendant plus de 15 secondes. Si , après 15 secondes le brûleur ne s’est pas allumé, ouvrir la porte de la pièce et attendre au moins une minute avant de réessayer.
pas dotées de sécurité, en cas d’extinction des flammes d’un brûleur, fermer le robinet correspondant et attendre au moins une minute avant de réessayer.
Plaque électriques / Eléments de chauffe vitrocéramiques (Fig. 2-2a3). Tourner le bouton dans la position correspondante aux nécessités de cuisson, en gardant à l’esprit que la position maximum correspond à la plus grand émission de chaleur, voir tableau “utilisation plaques électriques”/eléments de chauffe vitrocéramiques. Le voyant lumineux allumé indique le fonctionnement de la plaque. Pour de certains types de voyants lumineux la permanence d’une légère luminiscence même à commandes déconnectées est tout à fait normale.
- nei piani con sicurezza
-
- on floors with thermoelectric
- on floors without protection,
- sur les plaques dotées de sécurité
- sur les plaques qui ne sont
Importante- l’uso dell’apparecchio
produce calore e umidità nella stanza in cui è installato. Assicurarsi che la cucina sia sufficientemente ventilata; mantenere aperti i fori di ventilazione naturale o installare dispositivi meccanici di ventilazione (es. cappa).
- L’uso prolungato dell’apparecchio può richiedere ulteriore ventilazione, per esempio l’apertura di una finestra.
Important- use of the appliance produces
heat and moisture in the room where it is installed. Make sure the kitchen is sufficiently ventilated; keep natural ventilation holes open or install mechanical ventilation devices (such as a hood).
- Prolonged use of the appliance may require additional ventilation, such as opening a window.
Important- L’utilisation de l’appareil produit de
la chaleur et de l’humidité dans le local d’installation. S’assurer que la cuisine est suffisamment aérée ; ne pas obstruer les orifices d’aération naturelle ou installer des dispositifs mécaniques d’aération (ex. une hotte).
- L’utilisation prolongée de l’appareil peut exiger un supplément d’aération, comme l’ouverture d’une fenêtre.Importante
termoelettrica non azionare l’accensione oltre 15 secondi. Se dopo 15 secondi il bruciatore non si è acceso, aprire la porta del locale e attendere almeno un minuto prima di ritentare.nei piani senza sicurezza in caso di estinzione delle fiamme di un bruciatore chiudere il rubinetto corrispondente e non ritentare l’accensione prima di un minuto.
Piastre elettriche / Elementi riscaldanti vetroceramici (Figg. 2-2a-3). Ruotare la manopola sulla posizione corrispondente alle necessità di cottura tenendo presente che a numero maggiore corrisponde maggiore erogazione di calore, vedi tabella “utilizzo piastre elettriche”/elementi riscaldanti vetroceramici.La lampada spia accesa segnala l’inserimento della piastra. Va comunque considerato normale, per certi tipi di lampada, il permanere di una leggera luminescenza anche a comandi disinseriti.
Important
protection do not keep the ignite button pushed for more than 15 seconds. If the burner has not ignited after 15 seconds, open the door of the room and wait at least one minute before making a further attempt.
should the burner flame go out close the corresponding gas cock and wait at least one minute before making any attempt to ignite it.
Electrical plates / Vitroceramic heating elements (Fig. 2-2a-3). Rotate the knob towards the position required for cooking and bear in mind that the higher the number, the higher the heat output. See table “use of electrical plates”/ heating elements vitroceramic. The pilot light signals that the plate is “on”. Some types of pilot lights will maintain some slight luminescence even after disconnection. That is quite normal.
Important
thermoélectrique, ne pas activer l’allumage pendant plus de 15 secondes. Si , après 15 secondes le brûleur ne s’est pas allumé, ouvrir la porte de la pièce et attendre au moins une minute avant de réessayer.
pas dotées de sécurité, en cas d’extinction des flammes d’un brûleur, fermer le robinet correspondant et attendre au moins une minute avant de réessayer.
Plaque électriques / Eléments de chauffe vitrocéramiques (Fig. 2-2a3). Tourner le bouton dans la position correspondante aux nécessités de cuisson, en gardant à l’esprit que la position maximum correspond à la plus grand émission de chaleur, voir tableau “utilisation plaques électriques”/eléments de chauffe vitrocéramiques. Le voyant lumineux allumé indique le fonctionnement de la plaque. Pour de certains types de voyants lumineux la permanence d’une légère luminiscence même à commandes déconnectées est tout à fait normale.
- nei piani con sicurezza
-
- on floors with thermoelectric
- on floors without protection,
- sur les plaques dotées de sécurité
- sur les plaques qui ne sont
Importante
termoelettrica non azionare l’accensione oltre 15 secondi. Se dopo 15 secondi il bruciatore non si è acceso, aprire la porta del locale e attendere almeno un minuto prima di ritentare.nei piani senza sicurezza in caso di estinzione delle fiamme di un bruciatore chiudere il rubinetto corrispondente e non ritentare l’accensione prima di un minuto.
Piastre elettriche / Elementi riscaldanti vetroceramici (Figg. 2-2a-3). Ruotare la manopola sulla posizione corrispondente alle necessità di cottura tenendo presente che a numero maggiore corrisponde maggiore erogazione di calore, vedi tabella “utilizzo piastre elettriche”/elementi riscaldanti vetroceramici.La lampada spia accesa segnala l’inserimento della piastra. Va comunque considerato normale, per certi tipi di lampada, il permanere di una leggera luminescenza anche a comandi disinseriti.
Important
protection do not keep the ignite button pushed for more than 15 seconds. If the burner has not ignited after 15 seconds, open the door of the room and wait at least one minute before making a further attempt.
should the burner flame go out close the corresponding gas cock and wait at least one minute before making any attempt to ignite it.
Electrical plates / Vitroceramic heating elements (Fig. 2-2a-3). Rotate the knob towards the position required for cooking and bear in mind that the higher the number, the higher the heat output. See table “use of electrical plates”/ heating elements vitroceramic. The pilot light signals that the plate is “on”. Some types of pilot lights will maintain some slight luminescence even after disconnection. That is quite normal.
Important
thermoélectrique, ne pas activer l’allumage pendant plus de 15 secondes. Si , après 15 secondes le brûleur ne s’est pas allumé, ouvrir la porte de la pièce et attendre au moins une minute avant de réessayer.
pas dotées de sécurité, en cas d’extinction des flammes d’un brûleur, fermer le robinet correspondant et attendre au moins une minute avant de réessayer.
Plaque électriques / Eléments de chauffe vitrocéramiques (Fig. 2-2a3). Tourner le bouton dans la position correspondante aux nécessités de cuisson, en gardant à l’esprit que la position maximum correspond à la plus grand émission de chaleur, voir tableau “utilisation plaques électriques”/eléments de chauffe vitrocéramiques. Le voyant lumineux allumé indique le fonctionnement de la plaque. Pour de certains types de voyants lumineux la permanence d’une légère luminiscence même à commandes déconnectées est tout à fait normale.
- nei piani con sicurezza
-
- on floors with thermoelectric
- on floors without protection,
- sur les plaques dotées de sécurité
- sur les plaques qui ne sont
8

N.B. Nell’uso di piastre elettriche /elementi riscaldanti vetroceramici si consigliano recipienti a fondo piatto con diametro uguale o leggermente superiore a quello della piastra.
trabocchi di liquido; pertanto ad ebollizione avvenuta o comunque a liquido riscaldato ridurre l’erogazione di calore;
lasciare inserite le piastre elettriche a vuoto o con pentole o tegami vuoti;
termine della cottura riportare la manopola in posizione di chiuso e/o disinserito.
Al verificarsi di una anche minima frattura della superficie del piano vetroceramico di cottura disinserire immediatamente l’alimentazione elettrica.
N.B.: When using electrical plates / heating elements vitroceramic, we recommend flat bottom recipients with a diameter equal or slightly larger than that of the plate itself.
avoid liquid overflow. Therefore, after boiling or heating liquids, reduce the heat output; do not leave the electrical plates on with empty pots and pans; when cooking is finished, rotate the knob back into closing and/or disconnected position.
In the event of even a slight fracture on the cooking vitroceramic surface, disconnect the electric power supply immediately.
N.B. Dans l’emploi des plaques électriques / eléments de chauffe vitrocéramiques on Vous conseille des récipients à fond plat avec le diamètre égal ou legèrement superieur à celui de la plaque.
les débordements de liquide; ainsi après l’ébullition ou même, quand le liquide a été réchauffé, réduire l’émission de la chaleur;
pas laisser les plaques électriques branchées à vide ou avec des casseroles ou des poêles vides; cuisson terminée, tourner le
bouton jusqu’à la position de fermeture et/ ou déconnexion.
Si vous constatez l’apparition d’une fissure, même légère, sur la surface du plan vitrocéramique de cuisson, débranchez immédiatement l’appareil.
10

ESDE NL PT
Fig. 3 - Abb. 3 - Afb. 3
A
1 2
1 2
1 1
1
1
x
15
ESDE NL PT
Fig. 3 - Abb. 3 - Afb. 3
B
21

Fig. 3 - Abb. 3 - Afb. 3
E
4
3
2
1
5
4
3
2
1
5
4
3
2
1
5
4
3
2
1
5
4
3
2
1
5
4
3
2
1
4
3
2
1
6
5
4
3
2
1
6
5
4
3
2
1
6
5
4
3
2
1
Fig. 3 - Abb. 3 - Afb. 3
D
650
40 mm.
30 mm.
26

ESDE NL PT
1 2 3 4 5
E
Fig. 3 - Abb. 3 - Afb. 3
E
29
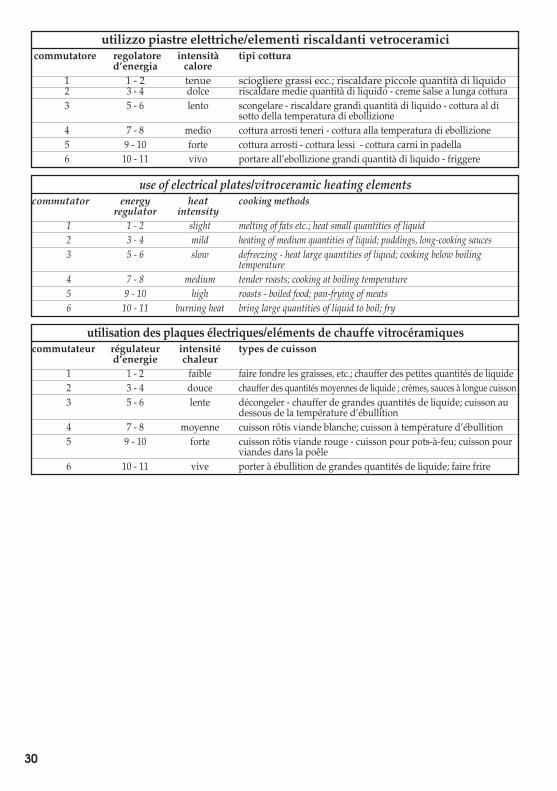
IT GB FRutilizzo piastre elettriche/elementi riscaldanti vetroceramicicommutatore regolatore intensità tipi cottura
d’energia calore1 1 - 2 tenue sciogliere grassi ecc.; riscaldare piccole quantità di liquido2 3 - 4 dolce riscaldare medie quantità di liquido - creme salse a lunga cottura3 5 - 6 lento scongelare - riscaldare grandi quantità di liquido - cottura al di
sotto della temperatura di ebollizione4 7 - 8 medio cottura arrosti teneri - cottura alla temperatura di ebollizione5 9 - 10 forte cottura arrosti - cottura lessi - cottura carni in padella6 10 - 11 vivo portare all’ebollizione grandi quantità di liquido - friggere
utilisation des plaques électriques/eléments de chauffe vitrocéramiquescommutateur régulateur intensité types de cuisson
d’energie chaleur1 1 - 2 faible faire fondre les graisses, etc.; chauffer des petites quantités de liquide2 3 - 4 douce chauffer des quantités moyennes de liquide ; crèmes, sauces à longue cuisson3 5 - 6 lente décongeler - chauffer de grandes quantités de liquide; cuisson au
dessous de la température d’ébullition4 7 - 8 moyenne cuisson rôtis viande blanche; cuisson à température d’ébullition5 9 - 10 forte cuisson rôtis viande rouge - cuisson pour pots-à-feu; cuisson pour
viandes dans la poêle6 10 - 11 vive porter à ébullition de grandes quantités de liquide; faire frire
use of electrical plates/vitroceramic heating elementscommutator energy heat cooking methods
regulator intensity1 1 - 2 slight melting of fats etc.; heat small quantities of liquid2 3 - 4 mild heating of medium quantities of liquid; puddings, long-cooking sauces3 5 - 6 slow defreezing - heat large quantities of liquid; cooking below boiling
temperature4 7 - 8 medium tender roasts; cooking at boiling temperature5 9 - 10 high roasts - boiled food; pan-frying of meats6 10 - 11 burning heat bring large quantities of liquid to boil; fry
30

IT GB FRManutenzioneGas/ElettricoPrima di ogni operazionedisinserire elettricamentel'apparecchiatura. Per unamaggiore durata dell'ap-parecchiatura è indispen-sabile eseguire periodica-mente un'accurata puliziagenerale tenendo presentequanto segue:• le parti in vetro, acciaio
e/o smaltate devonoessere pulite conprodotti idonei(reperibili in commer-cio) non abrasivi ocorrosivi. Evitare pro-dotti a base di cloro(varechina, ecc.)
• evitare di lasciare sulpiano lavoro sostanzeacide o alcaline (aceto,sale, succo di limone, ecc.)
• gli spartifiamma ed icoperchietti (parti mo-bili del bruciatore) van-no frequentemente la-vati con acqua bollentee detersivo avendo curadi togliere ogni even-tuale incrostazione,asciugati accuratamen-te, controllare che nes-suno dei fori dello spar-tifiamma risulti otturatoanche parzialmente.
• le piastre elettriche sipuliscono con uno stro-finaccio umido e si un-gono leggermente conolio lubrificante quandosono ancora tiepide.
• le griglie inox del pianodi lavoro dopo esserestate riscaldate assumo-no una colorazione blua-stra che non ne deteriorala qualità. Per riportarleall'aspetto originale usa-re un prodotto legger-mente abrasivo.
N.B.- L'eventuale lubrifica-zione dei rubinetti deve es-sere eseguita da personalequalificato al quale è benerivolgersi in caso di anoma-lie di funzionamento.Controllare periodicamen
MaintenanceGas/ElectricalPrior to any operation,disconnect the appliancefrom the electricalsystem.For long-life to theequipment, a generalcleaning operation musttake place periodically,bearing in mind thefollowing:• the glass, steel and/or
enamelled parts mustbe cleaned withsuitable non-abrasiveor corrosive products(found on the market).Avoid chlorine-baseproducts (bleach, etc.);
• avoid leaving acid oralkaline substances onthe working area(vinegar, salt, lemonjuice, etc.).
• the wall baffle and thesmall covers (mobileparts of the burner)must be washedfrequently withboiling water anddetergent, taking careto remove everypossible encrustation.Dry carefully andcheck that none of theburner holes is fully orpartially clogged;
• the electrical parts arecleaned with a dampcloth and are lightlygreased withlubricating oil whenstill warm.
• the stainless steel gridsof the working area,after having beenheated, take on abluish tint which doesnot deteriorate thequality. To bringcolour back to itsoriginal state, use aslightly abrasiveproduct.
N.B.- Cleaning of thetaps must be carried outby qualified personnel,who must be consulted
EntretienGaz/ÉlectricAvant de toute opèration,débrancher l’appareil dureseau électrique. Pourassurer une longue vie ál’appareil il fautabsolument effectuer detemps en temps un net-toyage général soigneuxen gardant à l’esprit ce quisuit:• les parties en vitre, acier
et/ou émaillées doiventetre nettoyées avec desproduits appropriés(faciles à trouver ans lesmagasins) non abrasifsni corrosifs. Eviter lesproduits qui contien-nent du chlore (eau deJavel.etc,)
• éviter de laisser sur latable de travail des sub-stances acides ou al-calines (vinaigre, sel, jusde citron, etc.)
• les orifices du bruleûr etles chapeaux (piècesmobiles du bruleur)doivent etre frequem-ment lavés avec del’eau bouillante et dudétergent, en ayant soind’enlever tout incru-station, ensuite ilsdoivent etre essuyéssoigneusement, en con-trolant que tous lestrous soient débouchés.
• les plaques électriquesdoivent être nettoyéesavec un torchon humi-de et un peu huiléesquand elles sont encoretièdes.
• les grilles inox du plande travail après avoirété chauffées prennentune couleur bleuâtrequi ne deterieoure pasleur qualité. Pour leurrendre leur aspect origi-nal employer un pro-duit un peu abrasif.
N.B.: - Le graissage even-tuel des robinets doit etrefaite par des spécialités,qui doivent etre appelés
32

IT GB FRte lo stato di conservazio-ne del tubo flessibile dialimentazione gas. In casodi perdite richiederel'immediato intervento delpersonale qualificato perla sostituzione.
Manutenzionesuperficievetroceramica(Fig.-4a) Prima di tuttorimuovere residui dicibo e spruzzi di grassodalla superficie dicottura con unraschietto. Successiva-mente pulire nella zonacalda con Sidol o Stahlfixcon carta da cucina, indirisciacquare con acqua easciugare con unostraccio pulito.Tracce di fogli di allumi-nio, di oggetti di plastica,zucchero o cibifortemente saccariferidevono essere rimosseimmediatamente dallazona calda di cottura conun raschietto per evitarepossibili danni allasuperficie del piano.In nessun caso usare spu-gne o strofinacci abrasivi;evitare anche l’uso di deter-sivi chimici aggressivi comeFornospray o smacchiatori.
in case of anyfunctioning anomaly.Check periodically thestate of conservation ofthe flexible gas feed pipe.In case of leakage, callimmediately thequalified technicians forits replacement.
Maintenancevitroceramic surface(Fig.-4a) First of all removestray food bits and greasedrops from the cookingsurface with the specialscraper (fig. 4). Then cleanthe hot area as best aspossible with SIDOL,STAHLFIX or other sim-ilar products with a paper-towel, then rinse againwith water and dry with aclean cloth.Pieces of aluminum foil andplastic material which haveinadvertently melted orsugar remains or highlysacchariferous food have tobe removed immediatelyfrom the hot cooking areawith the special scraper(fig. 4).-This is to avoid anypossible damage to thesurface of the top.Under no circumstancesshould abrasive sponges orirritating chemicaldetergents be used such asoven sprays or spotremovers.
en cas d’anomalie de fon-ctionnement. Controler detemps en temps l’état deconservation du conduitflexible d’alimentationgaz. Si il y a des fuitesremplacerimmediatement. Danstous les cas ne pas oublierde la changer avant ladate limite indiquée sur letube.
Entretien surfacevitrocéramique(Fig.-4a) Avant toutenlever les restes denourriture et les gicléesde graisse de la surfacede cuisson avec unepaillette métallique.Nettoyer ensuite dans lazone chaude avec Sidolou Stahfix et du papierde cuisine, rincer par del’eau et essuyer avec unchiffon propre.Les traces d’aluminium,d’objets en plastique, desucre ou de nourrituretrès riche en sucredoivent être enlevésinstamment da la zonechaude de cuisson parl’aide d’une paillette mé-tallique pour éviter depossible dégâts à la sur-face du plan.N’utiliser absolumentpas d’éponges ou detorchons abrasifs; éviteraussi l’emploi dedétergents chimiquesagressifs comme Forno-spray ou de dégrais-seurs.
NE PAS UTILISER DE NETTOYEURS À VAPEUR
DO NOT USE STEAM CLEANERS
NON UTILIZZARE PULITORI A VAPORE
34

IT GB FRIstruzioniper l’installatoreInstallazioneQuesto apparecchionon è provvisto di undispositivo di scaricodel prodotti della com-bustione. Si raccoman-da che sia installato inlocali sufficientementeareati secondo le di-sposizioni di legge vi-genti. La quantitàd'aria necessaria allacombustione non deveessere inferiore a 2.0m3/h per ogni kW dipotenza installato.Vedi tabella potenzebruciatori.
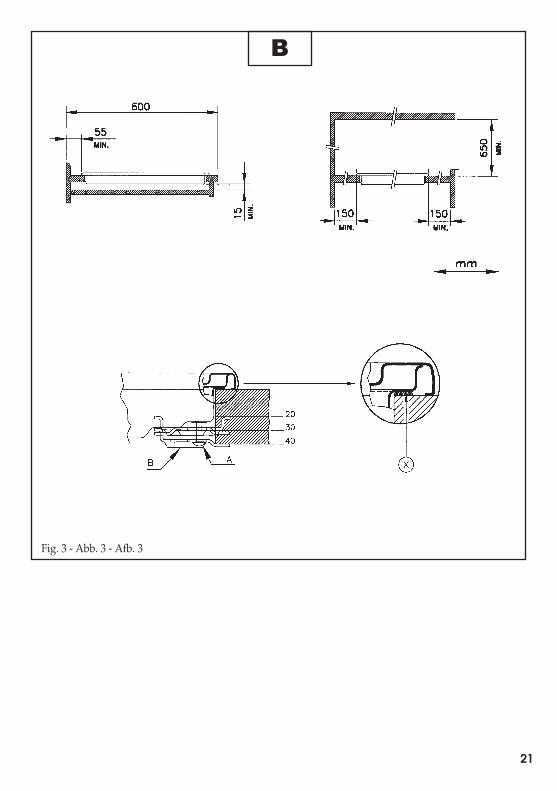
Posizionamento(Fig. 4). L'apparecchio èprevisto per essere incas-sato in un piano dilavoro come illustratonell'apposita figura.Prima di inserire il pianopredisporre laguarnizione di tenuta
su tutto il perimetrodella foratura d’incasso.
Instructionsfor the installerInstallationThis appliance is notprovided with a combu-stion product discharge.It is recommended that itbe installed insufficiently aeratedplaces, in terms of thelaws in force. Thequantity of air which isnecessary for combu-stion must not be below2.0 m3/h for each kW ofinstalled power.See table of burnerpower.
Positioning(Fig. 4). The appliancecan be fitted into aworking area asillustrated on thecorresponding figure.Before positioning the hob,fit the seal around theentire periphery of the holecut in the worktop.
Modalitésd’installationInstallationCet appareil n’est paspourvu de dispositif d’é-vacuation des produitsde la combustion. Ondoit donc l’installer dansdes endroits suffi-samment aerés suivantles dispositions des loisen vigueur. La quantitèd’air nécéssaire à la com-bustion ne doit pas etreinférieure à 2.0 m3/hpour chaque kW depuissance installer. Voirtableau puissancesbrûleurs.
PositionnementL’appareil est prévupour etre encastré dansun plan de travailcomme indiqué dans lafig. 4.Avant d’installer le plande cuisson, placer le jointd’étanchéité sur toutle périmètre de l’ouver-ture.
IT GB FRIstruzioniper l’installatoreInstallazioneQuesto apparecchionon è provvisto di undispositivo di scaricodel prodotti della com-bustione. Si raccoman-da che sia installato inlocali sufficientementeareati secondo le di-sposizioni di legge vi-genti. La quantitàd'aria necessaria allacombustione non deveessere inferiore a 2.0m3/h per ogni kW dipotenza installato.Vedi tabella potenzebruciatori.
Posizionamento(Fig. 4). L'apparecchio èprevisto per essere incas-sato in un piano dilavoro come illustratonell'apposita figura.Prima di inserire il pianopredisporre laguarnizione di tenuta
su tutto il perimetrodella foratura d’incasso.
Instructionsfor the installerInstallationThis appliance is notprovided with a combu-stion product discharge.It is recommended that itbe installed insufficiently aeratedplaces, in terms of thelaws in force. Thequantity of air which isnecessary for combu-stion must not be below2.0 m3/h for each kW ofinstalled power.See table of burnerpower.
Positioning(Fig. 4). The appliancecan be fitted into aworking area asillustrated on thecorresponding figure.Before positioning the hob,fit the seal around theentire periphery of the holecut in the worktop.
Modalitésd’installationInstallationCet appareil n’est paspourvu de dispositif d’é-vacuation des produitsde la combustion. Ondoit donc l’installer dansdes endroits suffi-samment aerés suivantles dispositions des loisen vigueur. La quantitèd’air nécéssaire à la com-bustion ne doit pas etreinférieure à 2.0 m3/hpour chaque kW depuissance installer. Voirtableau puissancesbrûleurs.
PositionnementL’appareil est prévupour etre encastré dansun plan de travailcomme indiqué dans lafig. 4.Avant d’installer le plande cuisson, placer le jointd’étanchéité sur toutle périmètre de l’ouver-ture.
NB: l’apparecchio è in Classe 3 di installazione.Le condizioni di regola-zione dell’apparecchio sono indicate nella targa dati fissata al carter.
N.B.: l’appareil appar-tient à la Classe 3 d’in-stallation.Les modalités de réglage de l’appareil sont indi-quées sur la plaque des données fixée au carter.
Note: the device is in installation class 3.The appliance’s adjustment parameters are shown on the plate attached to its housing.
36

IT GB FRGas connection(Fig. 5) Connect theappliance to the gascylinder or to the install-ation according to theprescribed standards inforce, and ensurebeforehand, that theappliance matches thetype of gas available.Otherwise, see"Adaptation to varioustypes of gas".Furthermore, check thatthe feed pressure fallswithin the valuesdescribed on the table:"User chacteristics".
Rigid/semi rigid metalconnectionCarry out the connectionwith fittings and metalpipes (even flexiblepipes) so as to obtaincounter stress the innerparts of the appliance.N.B. - when the instal-lation has been carriedout, check the perfectsealing of the entireconnection system, byusing a soapy solution.
Electrical connection(Fig. 6) Prior to carryingout the electrical connec-tion, please ensure that:• the plant characteris-
tics are such as to fol-low what is indicatedon the matrix plateplaced at the bottom ofthe working area;
Collegamento gas(Fig. 5) Collegarel'apparecchiatura allabombola o all'impiantosecondo le prescrizionidelle norme in vigoreaccertandosipreventivamente che l'ap-parecchiatura siapredisposta al tipo di gasdisponibile. In casocontrario vedi: "Adatta-mento a diverso tipo digas". Verificare inoltre chela pressione di alimen-tazione rientri nei valoririportati nella tabella: "Ca-ratteristiche utilizzatori".
Allacciamento metallicorigido/semirigidoEseguire l'allacciamentocon raccordi e tubi me-tallici (anche flessibili) inmodo da non provocaresollecitazioni agli organiinterni all'apparecchio.N.B. - Ad installazioneultimata controllare, conuna soluzione saponosa,la perfetta tenuta di tuttoil sistema dicollegamento.
Collegamento elettrico(Fig. 6) Prima di effettuarel’allacciamento elettrico ac-certarsi che:• le caratteristiche del-
l’impianto siano tali dasoddisfare quanto indi-cato sulla targa matrico-la applicata sul fondodel piano;
Connexion gaz(Fig. 5) Effectuer la con-nexion de l’appareil à labouteille ou à l’instal-lation selon les prescrip-tions des normes en vi-gueur s’assurant àl’avance que l’appareilest reglé pour le type degaz disponible. En cascontraire voir: “Adapta-tion à un type de gazdifférent”.Verifier aussi que lapression d’alimentationcorrespond aux valeursdu tableau: “Caractéri-stiques utilisateurs”.
Branchement métalliquerigide/semirigideEffectuer le branchementavec des raccords à con-duits métalliques (memeflexibles) de façon à ne pasprovoquer de contraintesaux organes internes à l’ap-pareil.N.B.: - Quand l’installationest terminée, controler,avec une solution savon-neuse, la parfaite eton-cheité de tout le système debranchement.
Branchement électrique(Fig. 6) Avant d’effectuerle branchement élec-trique, s’assurer que:• la tension de l’installa-
tion électrique corre-spond au voltage indi-qué sur la plaque si-gnalétique appliquéeau fond du plan;
Fig. 5 - Abb. 5 - Afb. 5
ISO 7/1
ISO 228/1 (FR)
38
IT GB FR• that the plant is fitted
with an efficient earthconnection, followingthe standards and lawprovisions in force.The earth connectionis compulsory interms of the law.
Should there be no cableand/or plug on theequipment, use suitableabsorption material forthe working temperatureas well, as indicated onthe matrix plate. Underno circumstance mustthe cable reach a tem-perature above 50°C ofthe ambient tempera-ture.
• l’impianto sia munito diun efficace collegamen-to di terra secondo lenorme e le disposizionidi legge in vigore. Lamessa a terra è obbliga-toria a termini di legge.
Nel caso che l’apparec-chiatura non sia munita dicavo e/o di relativa spinautilizzare materiale idoneoper l’assorbimento indica-to in targa matricola e perla temperatura di lavoro. Ilcavo in nessun punto do-vrà raggiungere una tem-peratura superiore di 50°C a quella ambiente.
• l’installation a uneconnexion de terre effi-cace suivant les nor-mes et les dispositionsde loi en vigueur. Lamise à terre est obliga-toire aux termes de laloi.
Si l’appareil n’a pas decâble et /ou de prise cor-respondante, ne utiliserque des câbles et des pri-ses, selon les données in-diquées sur la plaque si-gnalétique et à la tempé-rature de travail. Le câblene devra jamais atteindreune température supé-rieure de 50°C à celle del’ambiance.
Se il cavo dialimentazione èdanneggiato, esso deveessere sostituito dalcostruttore o dal suoservizio assistenza tecnicao comunque da unapersona con qualificasimilare, in modo daprevenire ogni rischio.
To avoid all risk, ifthe powercable becomesdamaged, it mustonly be replaced bythe manufacturer, byan authorised servicecentre, or by aqualified electrician.
Si le câbled’alimentation estendommagé, leconstructeur, le serviced’assistance techniqueou un technicienqualifié devra leremplacer afin d’évitertoute sorte de risque.
If connecting directly to the mains power supply,fit a multi-pole switch of a suitable size for the rated capacity with a clearance distance which completely disconnects the power line under overvoltage category III conditions, consistently with the rules of installation (the yellow/green earth wir must not be interrupted). The plug or omnipolar switch must be easily reached on the installed equipment.
Per il collegamento diret-to alla rete è necessario interporre un interruttoreomnipolare dimensionato per il carico di targa che assicuri la sconnessione della rete con una distan-za di apertura dei contatti che consenta la discon-nessione completa nelle condizioni della categoria
formemente alle regole di installazione (il cavo di terra giallo/verde non deve essere interrotto). La presa o l’interruttore om-nipolare devono essere facilmente reggiungibili con l’apparecchiatura installata.
Pour le raccordementdirect au réseau, il faut prévoir un interrupteur omnipolaire d’une puissance adaptée aux donneés figurant sur la plaque pour décon-necterl’appareil en cas debesoin; conformément aux règles d’installation, la distance d’ouver-ture des contacts doit permettre une décon-nexion complète dans les conditions de surtension de la catégorie III (le câble jaune et vert de mis à la terre ne doit pas être interrompu). La prise ou l’interrupteuromnipolaire doivent être facilement accessibles aprè la mise enplace de l’appareil.
di sovratensione III, con-
40

A
B
solo wokwok onlyseulement woknur woksólo wokalleen wokapenas wok
solo corona TCDwok TCD onlyseulement wok TCDnur wok TCDsólo corona TCDalleen wok TCDapenas corona TCD
solo miniwokminiwok onlyseulement miniwoknur miniwoksólo miniwokalleen miniwokapenas wok
solo corona DUALwok DUAL onlyseulement wok DUALnur wok DUALsólo corona DUALalleen wok DUALapenas corona DUAL
42

12
USER CHARACTERISTICS
GAS BURNERS
FEED BURNER Ø INJECTORS THÉRMAL CONSUMPTIONCAPACITY W
mm 001
3500
3500
3500
/1rabm ERUSSERPEPYT
fast
MnWK
MnWK
MnWK
MnWK
155/129 3000 286Natural gas semifast 117/101 1750 167G20 10/20 auxiliary 92/77 1000 95
wok DUAL 70A-150B/63A-121B 3500 333wok DUAL 70A-170B/63A-140B 4250 405
fast 87/94 3000 218LPG semifast 66/70 1750 127G30/G31 28-30/27.5 auxiliary 50/56 73
wok DUAL 37A-90B/44A-96B 3500 254wok DUAL 37A-97B/44A-100B 4250 309
fast 320 3000 680Towngas semifast 192 1750 398G110 8-10 auxiliary 150 1000 227
wok DUAL 150A/350B 3500 794
ELECTRICAL PLATES
TNEMTSUJDAWEPYTDEEF
normalØ 145 - Ø 180 1000 - 1500
commutator (0 ÷6) energy regulator (0 ÷11)
fastØ 145 - Ø 180 1500 - 2000
VITROCERAMIC HEATING ELEMENTS
FEED TYPE W ADJUSTMENT
triple-circuit radiantØ 145 - Ø 180 1200 - 1700 commutator (0 ÷6)
single-circuit radiantØ 145 - Ø 180 1200 - 1700 energy regulator (0 ÷11)
mixed-circuit radiant/halogenØ 145 - Ø 180 1200 - 1800 energy regulator (0 ÷11)
duble-circuit oval radiant0( rotatummoc0002003 x 541 Ø ÷4)
h/gh/l
h/l
~ 230 V
~ 230 V
C3 163/141C3
3500 333
333
254
794
3814000180/150168/140
93/100
310
C3C3
35004000
C3 3500
94/100102/108
794
1000
254291
350

IT GB FR PIASTRA ELETTRICA - ELECTRIC PLATE - PLAQUES ELECTRIQUES - ELEKTROKOCHSTELLEN - PLACA ELÉCTRICA - ELEKTRISCHE KOOKPLAAT - CHAPA ELÉCTRICA
ALIMENTAZIONE TIPO W REGOLAZIONEFEED TYPE W ADJUSTMENTALIMENTATION TYPE W REGLAGESPEISUNG TYP W REGELUNGALIMENTACION TIPO W REGULACIONVOEDING TYPE W REGELINGALIMENTAÇÃO TIPO W REGULAÇÃO
commutatore (0÷6) - commutator (0÷6)commutateur (0÷6) - Kommutator (0÷6) -
normale - normal conmutador (0÷6) - aan/uit schakelaar (0÷6) -normal - normal comutador (0÷6)normal - normaal 1000
normal regolatore d’energia (0÷11) - energy regulator (0÷11) -Ø145 régulateur d'énergie (0÷11) - Energieregler (0÷11) -
regulador d'energia (0÷11) - energie regelaar (0÷11) -regulador d'energía (0÷11)
~ 230 Vcommutatore (0÷6) - commutator (0÷6)
commutateur (0÷6) - Kommutator (0÷6) -rapida - fast conmutador (0÷6) - aan/uit schakelaar (0÷6)
rapide - schnell comutador (0÷6)rápida - snel 1500
rápida regolatore d’energia (0÷11) - energy regulator (0÷11) -Ø145 régulateur d'énergie (0÷11) - Energieregler (0÷11) -
regulador d'energía (0÷11) - energie regelaar (0÷11) -regulador d'energia (0÷11)
48

Cod . 1.007.40.1
Warranty Card
Worldwide Appliances Pty Limited A.B.N. 458680774226ɉJL!48-50 Moore Street, Leichhardt N.S.W 2040 Post:Locked Bag 3000, Annandale, N.S.W 2038 P: 1300 694 583WARRANTY REGISTRATIONYour ongoing satisfaction with your artusi product is important to us. We ask that you complete the enclosed Warranty Registration Card and return it to us so that we have a record of the artusi product purchased by you.
PRIVACYWorldwide Appliances respects your privacy and is committed to handling your personal information in accordance with the National Privacy Principles and the Privacy Act 1988 (Cth). A copy of the Worldwide Appliances Privacy Policy is available at www.artusi.com.au. Worldwide Appliances will not disclose any personal information set out in the Warranty Registration Card (“Personal Information”) without your consent unless required by:1. law;2. any Worldwide Appliances related company;3. any service provider which provide services to artusi or assist artusi in providing services (including repair and warranty services) to customers. Our purpose in collecting the Personal Information isto keep a record of the artusi product purchased by you, in order to provide a better warranty service to you in the unlikely event that there is a problem with your artusi product. Worldwide Appliances may contact you at any one or more of the address, email address or telephone numbers set out in the Warranty Registration Card. Please contact artusi on 1300 694 583 should you not wish to be contacted by Worldwide Appliances.
WARRANTY1. WarrantyWorldwide Appliances warrants that each artusi product will remain, for a period of either 12 months or 24 months of warranty. All Warranties are valid from the original date of purchase, And warranty claims must be accompanied by the proof of purchase.24 months warranty products:All Built-in Appliances – Limited to Ovens, Gas, Induction and Electric Cooktops, and All RangehoodsFreestanding Cookers - Gas and Electric Models (900mm Width)
artusi.com.au
Dishwashers - Freestanding, Fully Integrated, Semi Integrated and built-in12 months warranty products:Freestanding Cookers - Gas and Electric Models in 50cm, 54cm and 60cm WidthsPortable Appliances* – Benchtop Models and Portable Gas Models
2. What is not Covered by the Warranty.The Warranty does not apply if an artusi product is defective by a factor other than a defect arising in the manufacture of the artusi product, including but not limited to:(a) damage through misuse (including failure to maintain, service or use with proper care), neglect, accident or ordinary wear and tear (including deterioration of parts and accessories and glass breakage);(b) use for purpose for which the artusi product was not sold or designed;(c) use or installation which is not in accordance ^P[O�HU`�ZWLJPÄLK�PUZ[Y\J[PVUZ�MVY�\ZL�VY�installation;(d) use or operation after a defect has occurred or been discovered;(e) damage through freight, transportation or handling in transit (other than when Worldwide Appliances is responsible);(f) damage through exposure to chemicals, dusts, residues, excessive voltage, heat, atmospheric conditions or other forces or environmental factors outside the control or Worldwide Appliances;�N��YLWHPY��TVKPÄJH[PVU�VY�[HTWLYPUN�I`�[OL�purchaser or any person other than Worldwide Appliances, an employee of Worldwide Appliances or an authorised artusi service contractor*;(h) use of parts, components or accessories ^OPJO�OH]L�UV[�ILLU�Z\WWSPLK�VY�ZWLJPÄJHSS`�approved by artusi.(i) damage to surface coatings caused by cleaning or maintenance using products not recommended in the artusi product handbook provided to the purchaser upon purchase of the artusi product;(j) damage to the base of an electric oven due to items having been placed on the base of the oven cavity or covering the base, such as aluminium foil (this impedes the transfer of heat from the element to the oven cavity and can result in irreparable damage); or(k) damages, dents or other cosmetic PTWLYMLJ[PVUZ�UV[�HɈLJ[PUN�[OL�WLYMVYTHUJL�VM�[OL�artusi in respect of an artusi product purchased as a “factory second” or from displayThe Warranty does not extend to light globes used in artusi products.3. Domestic UseEach artusi product is made for domestic use. This Warranty may not extend to artusi products used for commercial purposes.
Continued over...

4
Please complete and send to ARTUSI at: REPLY PAID 83617 LEICHHARDT NSW 2040
Last Name: First Name:
Address:
State: Postcode: Email:
Home Phone: Mobile:
Purchase Date: / / (Please attach proof of purchase to validate warranty)
MODEL NUMBER SERIAL NUMBER (if you cannot locate the serial number please call ARTUSI on 1300 694 583)
1
2
3
4
WARRANTY REGISTRATION CARD01052013
01032014
4. Time for Claim under the WarrantyYou must make any claim under this Warranty within twenty eight (28) days after the occurrence of an event which gives rise to a claim pursuant to the Warranty, by booking a service call on the telephone number below.
5. Proof of PurchaseCustomers must retain proof of purchase in order to be eligible to make a warranty claim in respect of an artusi product.
6. Claiming under the WarrantyCustomers will bear the cost of claiming under this Warranty unless Worldwide Appliances determines the expenses are reasonable, in which case the customer must claim those expenses by providing written evidence of each expense to Worldwide Appliances at the address on the Warranty Registration Card.
7. Statutory Rights�H��;OLZL�[LYTZ�HUK�JVUKP[PVUZ�KV�UV[�HɈLJ[�`V\Y�statutory rights.(b) The limitations on the Warranty set out in this document do not exclude or limit the application of the consumer guarantees set out in the Act or any other equivalent or corresponding legislation in the relevant jurisdiction where to do so would:(i) contravene the law of the relevant jurisdiction; or (ii) cause any part of the Warranty to be void.(c) Worldwide Appliances excludes indirect or consequential loss of any kind (including, without limitation, loss of use of the artusi product) and (other than expressly provided for in these terms and conditions) subject to all terms,conditions and warranties implied by custom, the general law, the Act or other statute.(d) The liability of Worldwide Appliances to you
for a breach of any express or non-excludable implied term, condition or warranty is limited at the option of Worldwide Appliances to:
(i) replacing or repairing the defective part of the artusi product;(ii) paying the cost of replacing or repairing the defective part of the artusi product;(iii) replacing the artusi product; or(iv) paying the cost of replacing the artusi product.(e) Our goods come with guarantees that cannot be excluded under the Australian Consumer Law. You are entitled to a replacement or refund for a major failure and for compensation for any other reasonably foreseeable loss or damage. You are also entitled to have the goods repaired or replaced if the goods fail to be of acceptable quality and the failure does not amount to a major failure.
8. DefectsAny part of an artusi product deemed to be defective and replaced by Worldwide Appliances is the property of Worldwide Appliances. Worldwide Appliances reserves the right to inspect and test artusi products in order to determine the extent of any defect and the validity of a claim under the Warranty.*To locate your closest artusi authorised service agent please contact us on 1300 652 100 or visit www.artusi.com.au
ALL SERVICE CALLS MUST BE BOOKED THROUGH AN AUTHORISED DEALER OR WARRANTY DEPARTMENT ON 1300 652 100 OR stokesaps.com.au/artusi-service 01032014
Warranty Card continued artusi.com.au
Warranty Card tear off

P: 1300 649 583$5786,�2IÀFHV�DUH�RSHQ�GDLO\�IURP��DP��SP�DQG�6DWXUGD\V���DP��SP �:$�E\�DSSRLQWPHQW�RQO\�RQ�6DWXUGD\V�
VIC, TAS & SA�����7RRUDN�5RDG�&DPEHUZHOOF 03 9809 2155
16:��$&7��+HDG�2IÀFH�������0RRUH�6WUHHW�/HLFKKDUGWF 02 8569 4699
4/'�����&DYHQGLVK�5RDG�&RRUSDURRF 07 3397 0850
WA & NT8QLW�������+RZH�6WUHHW�2VERUQH�3DUNF 08 9201 9188
DUWXVL�FRP�DX