contents - vistechmgmt.zendesk.com · 6 download intellispex from the itunes app store tap on the...
TRANSCRIPT

2
Contents
Getting Started ...................................................................................................................................... 4
Key Icons on the IntelliSpeX App .................................................................................................... 4
Download IntelliSpeX from the iTunes App Store .......................................................................... 6
Register for an IntelliSpex Account ................................................................................................. 6
Login .................................................................................................................................................. 7
Events .................................................................................................................................................... 8
Creating An Event: ............................................................................................................................ 8
Adding an Audio Recording to an Event: ...................................................................................... 10
Adding a Video Recording to an Event: ........................................................................................ 10
Adding an Image(s) to an Event: ................................................................................................... 10
Adding Multiple Images Using Continuous Shooting Mode: ....................................................... 10
Adding a Text to an Event: ............................................................................................................. 11
Sharing An Event: ........................................................................................................................... 11
Becoming Friends: .......................................................................................................................... 12
Posting In An Event: ....................................................................................................................... 13
Functions in an Event: .................................................................................................................... 14
Share via Email .......................................................................................................................... 14
Add to Folder ............................................................................................................................. 14
Export to PDF ............................................................................................................................ 14
Delete .......................................................................................................................................... 15
Select Items from Existing Event for New Event ................................................................ 15
Add Media After ......................................................................................................................... 16
Up/Down Toggle ........................................................................................................................ 16
Notifications ............................................................................................................................... 16
Offline Mode ............................................................................................................................... 17

3
Sort .............................................................................................................................................. 18
Thumbnail/List View ................................................................................................................. 18
Use This Thumbnail .................................................................................................................. 19
Panoramic .................................................................................................................................. 19
Comment/Like............................................................................................................................ 20
Draw............................................................................................................................................. 20
Text .............................................................................................................................................. 21
Crop ............................................................................................................................................. 22
Settings: ............................................................................................................................................... 23
Troubleshooting .................................................................................................................................. 24

4
Getting Started
Key Icons on the IntelliSpeX App

5

6
Download IntelliSpeX from the iTunes App Store
Tap on the IntelliSpeX icon Allow Notifications
Register for an IntelliSpex Account
Create an Account by inputting your First Name, Last Name Username (this is what team members on the app will see) Enter your Email - do NOT use capital letters (if your company has purchased a
license do not sign up, ask for credentials and go to Login) Enter a Password (if your company has purchased a license do not sign up, ask for
credentials and go to Login) Upload a picture or select an avatar. Allow Camera usage.

7
Login
To Login you must create an account first.
Download IntelliSpeX from the App Store
1. Tap on the IntelliSpeX icon 2. Tap Login 3. Enter your Email (if your company has purchased a license use your corporate email) 4. Enter a Password (if your company has purchased a license use the password provided) 5. The first time you login, you will be asked to cancel or agree to the Terms and Conditions
Be sure to accept the following notifications – Microphone, Camera, Photos, and Location. They must be accepted for the app to work correctly.

8
Events
Creating An Event: Tap on the [edit] icon on the top right of your screen and choose your event
thumbnail (cover photo) from your camera roll, by taking a representative photo (tapping on the red button) or by filling out a representative cover sheet and taking a photo of the sheet. Tap the [ok] icon and then Done on the upper-right hand side of the app.
Low light conditions. At the top of your screen click the [lightning bolt] icon to turn on additional light. This is not a flash.
Tap to start typing and name your event,
Tap to add location, from the spinner choose the appropriate location, and click
Done. Clicking done populates the location at the top after the title.
Tap to add room/item, from the spinner choose the appropriate room, and click
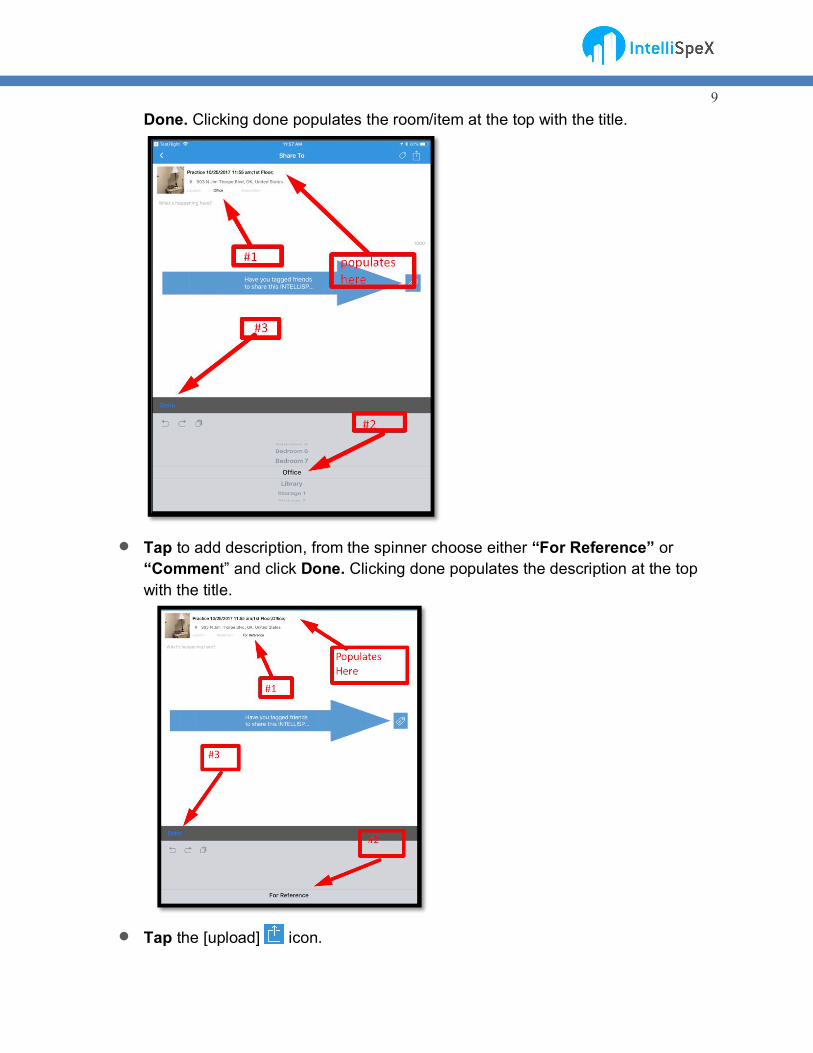
9 Done. Clicking done populates the room/item at the top with the title.
Tap to add description, from the spinner choose either “For Reference” or
“Comment” and click Done. Clicking done populates the description at the top with the title.
Tap the [upload] icon.

10
Adding an Audio Recording to an Event: Click on the [audio] icon to navigate to the record screen. When ready click
on AUDIO and record at least 10 seconds of audio. When done click Stop then Use. If you click Use and not Stop the audio will not be saved.
Adding a Video Recording to an Event: Click on the [video] icon to navigate to the record screen. When you see the
red button at the bottom of the screen click it to begin recording. When done click on the Green Check Mark.
Adding an Image(s) to an Event: Click on the [image] icon and from the popup screen choose either Camera
or Camera Roll. For images taken with the Camera you will have the option to edit the image by
cropping, rotating, adding text or drawing free-hand on the image. o Images may be taken using the front or back camera . o There are four different resolutions that may be chosen by tapping the
[resolution] icon : 320 x 240 pixels, 640 x 480 pixels, 1024 x 768 pixels or original 640 x 640 pixels. Default is 640 x 480.
o A timestamp is added to each image automatically. o Each image taken is automatically added to the camera roll.
o Low light conditions. At the top of your screen click the [lightning bolt] icon to turn on additional light.
For images selected from the Camera Roll editing can be done, but the process is different. Click on Camera then choose the camera roll option to the left of the red button. Now find the image from the camera roll that you would like to edit. Click the green check mark and then edit with draw, crop or add text.
When selecting images from the Camera Roll a bulk upload of up to 10 images is supported.
Editing a comment – Touch the insertion point within the comment and the cursor will appear. Type the correction or addition. You must click Return to save the edit.
Adding Multiple Images Using Continuous Shooting Mode:
11
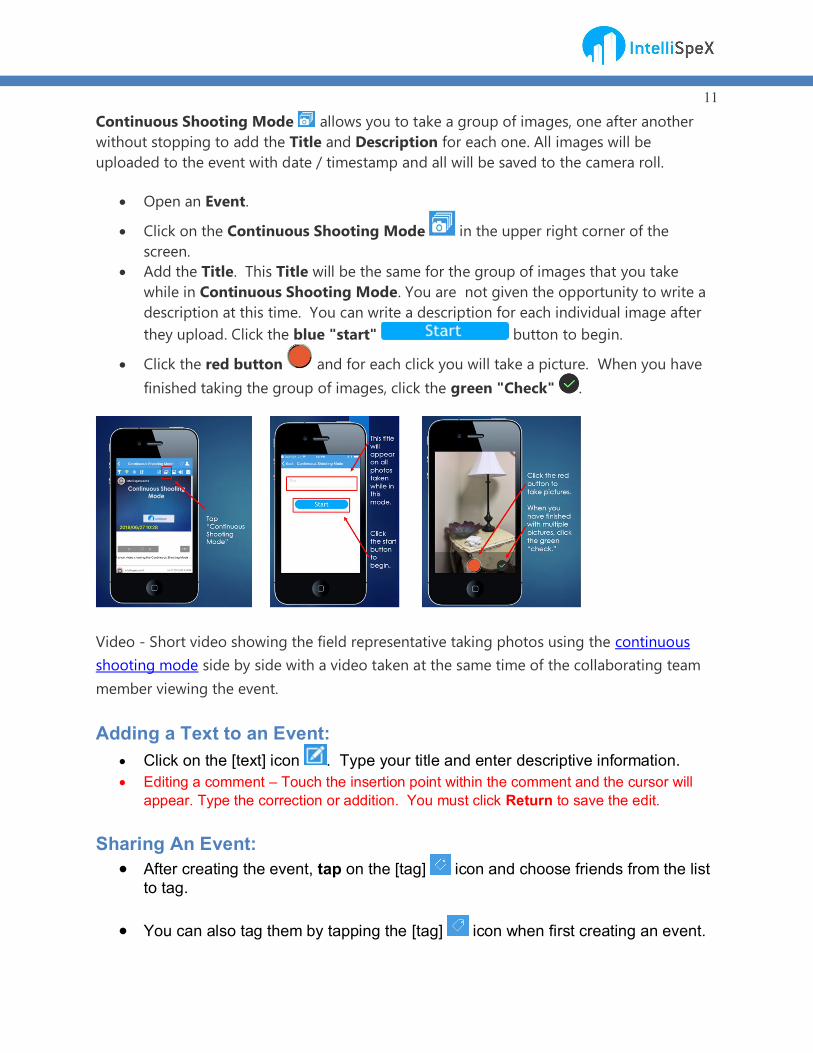
Continuous Shooting Mode allows you to take a group of images, one after another without stopping to add the Title and Description for each one. All images will be uploaded to the event with date / timestamp and all will be saved to the camera roll.
Open an Event.
Click on the Continuous Shooting Mode in the upper right corner of the screen.
Add the Title. This Title will be the same for the group of images that you take while in Continuous Shooting Mode. You are not given the opportunity to write a description at this time. You can write a description for each individual image after they upload. Click the blue "start" button to begin.
Click the red button and for each click you will take a picture. When you have finished taking the group of images, click the green "Check" .
Video - Short video showing the field representative taking photos using the continuous shooting mode side by side with a video taken at the same time of the collaborating team member viewing the event.
Adding a Text to an Event: Click on the [text] icon . Type your title and enter descriptive information. Editing a comment – Touch the insertion point within the comment and the cursor will
appear. Type the correction or addition. You must click Return to save the edit.
Sharing An Event: After creating the event, tap on the [tag] icon and choose friends from the list
to tag.
You can also tag them by tapping the [tag] icon when first creating an event.

12
Becoming Friends: This person must already have an IntelliSpeX account.
Tap on the [friend] icon at the bottom menu bar of the app.
Click on the [friend] icon on the right side of the screen. Once you click on
the [friend] icon the friend’s name will disappear from the list.
Or, at the top, search for the name of the person you wish to add.

13
● Tap on the add [ friend] con next to the user's name to add them as a friend. Note: In order for the user to see the event you shared with them, they must have added you as a friend following the process above.
Posting In An Event: Tap on the Event you will be posting in to access it. Tap on the [edit] icon on the upper right-hand side of the app to post text.
Add a Title and Description. Then tap on the [upload] icon. Tap on the icon on the upper right-hand side of the app to post a photo. Use a
photo from Camera Roll or Camera.
Low light conditions. At the top of your screen click the [lightning bolt] icon to turn on additional light.

14
If uploading from Camera tap on when finished. Tap on Done when finished. Add a Title and Description. Then tap on the [upload] icon.
Tap on the [record] icon and then the Record Button to begin recording. Tap STOP and then Use. Add a Title and Description. Then tap on the [upload] icon.
Tap on the [video] icon and then record your video. By tapping on the Red
Button on the bottom middle of the screen. Tap on the [ok] icon when done. Add a Title and Description. Then tap on the [upload] icon. Note: Tapping on the red button will erase the video recorded.
****Editing: Touch the insertion point within the comment and the cursor will appear. Type the correction or addition. You must click Return to save the edit.
***Note – In a situation in which you did not add a description before uploading the media, when you do add the description you must click the RETURN button to SAVE the description.
Functions in an Event: Share via Email
Ability to share events via Email by tapping on the [more] icon within an event.
Add to Folder Create Folders to organize all your events. Tap on Create New Folder, name
the folder, select a folder image and tap Create.
Go to the Event you would like in the Folder, tap on the [more] icon and select Add to Folder. Now you can view the events in the New Folder.
To view an Event in the new folder, click on your [profile] icon on the bottom right corner of your screen.
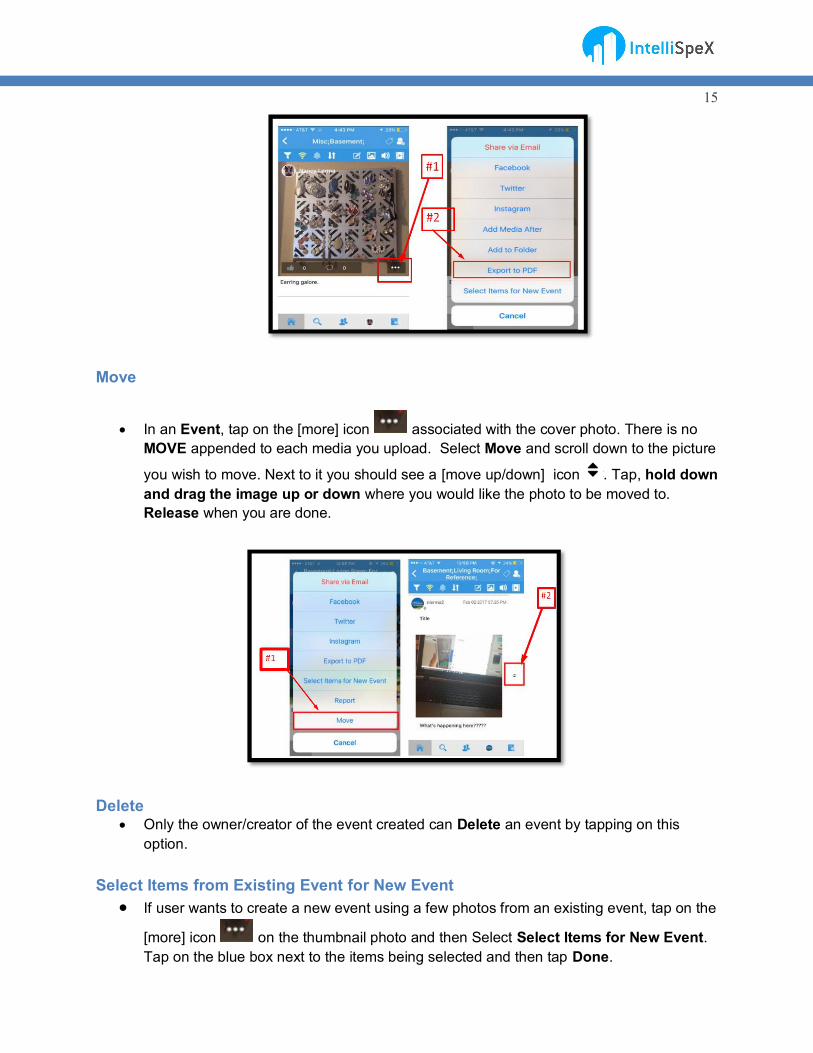
Export to PDF Allows you to create a PDF file of your event that can be shared. Click on the [more]
icon shown below. Then select Export to PDF from the list. You can either select items or select all. If you select items then scroll down and tap on the postings you wish to select. Tap done to exit or the [upload] icon on the bottom of the screen to send by email.
15
Move
In an Event, tap on the [more] icon associated with the cover photo. There is no MOVE appended to each media you upload. Select Move and scroll down to the picture
you wish to move. Next to it you should see a [move up/down] icon . Tap, hold down and drag the image up or down where you would like the photo to be moved to. Release when you are done.
Delete Only the owner/creator of the event created can Delete an event by tapping on this
option.
Select Items from Existing Event for New Event If user wants to create a new event using a few photos from an existing event, tap on the
[more] icon on the thumbnail photo and then Select Select Items for New Event. Tap on the blue box next to the items being selected and then tap Done.

16
Add Media After Allows you to post text, photo, audio or video immediately after the posting you select.
Makes an event more organized and allows for photos to be grouped together. Not supported in Offline mode. Example: John posted a blurry photo. Jane requests a clearer image. John uploads a clearer image immediately after the blurry photo.
Up/Down Toggle In an event, on the upper left bar there is a [toggle] icon . This allows you to change
the order of the event postings by date. (Newest to Oldest/Oldest to Newest).
Notifications Gives user [notification] when another user posts a comment or makes a new

17 posting. A red circle appears and the number indicates the number of new comments or postings that have been made.
Offline Mode
Offline is represented below.
Ability to toggle off/on when cell service is limited.
First person to determine that the site does not have signal should make a comment to let all other team members know this before arriving on site. It is best to edit the original description to add this information.
When working in a no signal area:
1. *********Create the event BEFORE entering the no signal area
2. **********Open the app BEFORE entering the no signal area
3. The app will automatically go into Offline mode. 4. Start uploading images/recordings/videos and text as usual. Enter all the
information about the media as before. Once you click the [upload] icon it will take longer than when in a good signal area. You will see the
uploading wheel over the media. a. Recordings and Video will take longer than Images and Text
5. Once you enter a signal area, the app will ask to Ignore or Go Online. If you intend to add additional content, click Ignore. If you click Go Online and the signal is not strong, it will continuously try to upload preventing

18 you from continuing to add media. Once you are in a good signal area, then click the [Offline/Online] icon . It should be a bright yellow. All media added while the event was offline will upload.
Sort
[Sort/filter] icon allows the user to sort items in the events by images, text, video or audio. Once sorted the user will see either all the images, or all texts, or all videos, etc.
Thumbnail/List View Change the way you view your events by tapping the [thumbnail/list view]
icon . Use list view by date and name, or arranged by icon using a thumbnail photo.

19
Use This Thumbnail
Select the [more] icon for the image that you would like to use to replace the cover photo/thumbnail for the Event. Click on “Use this as thumbnail.”
Panoramic
Allows a user to take a panorama photo of the room (180 degrees). Make sure to
hold your device steady and vertically. Tap on the [upload] icon . Select Camera and then Pano. Hold your device vertically and then tap the screen to begin taking
your photo. Follow along slowly with your phone until the [yin yang] icons connect. Keep rotating until you have captured the area. Tap to finish when ready or continue rotating.
If after clicking panoramic you decide not to take a Pano, click the [back arrow]

20 icon .
In many instances, it is good to take a panoramic view of each room to give views of the Event a perspective before beginning adding other media.
Comment/Like
Ability to comment on items in an event in real time. Tap the [comment] icon and the comment dialog box will open. Type your comment and click Return to go back to the same place in the event time line.
Editing a comment – Touch the insertion point within the comment and the cursor will appear. Type the correction or addition. You must click Return to save the edit.
Draw Allows you to use your finger as a stylus or a stylus and draw on a photo. You may
change the size and color of stylus. This feature is only used when snapping a photo. It can’t be applied to a photo already
in the event timeline. Snap a photo, click the green [check mark] icon, tap the [draw] icon, then using the finger draw or a stylus on the photo. Tap OK then click Done .

21
Text
Allows user to add text to the photo. There is an option to change the text font, color and size. Tap on New to begin typing text. Then press OK when done.
This feature is only used when snapping a photo. It can’t be applied to a photo already in the event timeline. Snap a photo, click the green [check mark] icon, tap the [text]
icon, then click the [New] icon and type your message. Tap Return then click OK, then Done.

22
Crop
Allows user to crop the photo to a selected section and to rotate the picture also. Tap on Done when section has been selected to crop.
This feature is only used when snapping a photo. It can’t be applied to a photo already
in the event timeline. Snap a photo, click the green [check mark] icon, tap the [crop]
icon , Tap on Done when section has been selected to crop and then Done one more time.

23
Invite Friends:
The user is inviting someone who does not have an IntelliSpeX account to be friends.
Click the [invite friends] . Invite friends via SMS Messaging. The message contains a link to the iTunes Store to download the app. You can select those to receive the message and then in the upper left corner is a back arrow to IntelliSpex, click it, enter the message, and send.
Click the [invite friends] . Invite friends via EMAIL or SMS Messaging. The message contains a link to the iTunes Store to download the app.
****Editing Text of Titles, Descriptions, and Comments:
The Title of an Event cannot be edited on the mobile app after it is created.
Anyone tagged to an event may edit the title and description of any image, video, audio or text post other than the thumbnail or cover photo for the Event. An author of a comment may edit their own comments.

24 To edit, put your finger on the line of text and hold it until you see the
bubble appear. Slide your finger on the text to the point of insertion. Once you have typed the edit, click return. If you do not click RETURN the edit will not be saved to the event.
Settings: On the setting icon, on the top right there is a drop-down list and 3 options.
Log-Out: Exits you from the application. Profile: You will be able to “Edit my account”, add a new profile picture, input the
Company you are associated with, and edit your password. Geocode:
Tap on your profile icon at the bottom menu bar of the app (4th button from the
Left Menu Bar on the Bottom). Then tap the icon on the upper right corner. Select Geocode from the list. This allows you to change the physical address in all the posts to a geocode location (latitude/longitude). Now click on an event previously created. The change should appear where the physical address was before.
Troubleshooting
● Are you experiencing issues? Restart your device Restart your device by powering off/on. Internet Connection Check your device is connected to the Internet and that you have sufficient mobile data. Force quit the app Double-click the Home button. Your recently opened devices should appear staggered. Select IntelliSpeX and swipe up. This will force quit the app. Delete and reinstall the app

25
Delete the app by holding down the app on your screen and wait for it to begin wiggling. Tap on the x to delete the app. Once it has been deleted, reinstall the app from the App Store. Update the App How to set up automatic app updates in covered in this article.
● If cell service is poor use the offline mode when posting/creating an event. It is
imperative to create the event, open the app, and choose offline mode prior to entering a no signal area.
If the application is frozen or not functioning correctly, double tap the home button and clear the application. Restart the application. If problem recurs contact the helpdesk @ [email protected].
If items are not adding to the event, it may be due to the fact that the device has Wi-Fi turned on. Many apps quit loading when Wi-Fi is on but either not available or the device is not attached. Solution: Turn the Wi-Fi off.