contents - sierragamers.com · 2 preflight installing red baron ii 1. insert the red baron ii cd...
TRANSCRIPT


i

ii
ContentsInstalling Red Baron II ........................................................................................................ . 2
Uninstalling Red Baron II ............................................................................................................. 2
Historical overview .............................................................................................................. 5Introduction: April 21, 1918: Amiens Front ............................................................................. 6Chapter One: Europe In Flames ................................................................................................ 11Chapter Two: The Rise of The Aeroplane .............................................................................. 16Chapter Three: The Birth of Air Fighting .............................................................................. 19Chapter Four: Deflectors and Interrupters ...................................................................... 21Chapter Five: The Swing of the Pendulum ............................................................................ 27Chapter Six: Verdun ...................................................................................................................... 29Chapter Seven: Germany Resurgent ....................................................................................... 33Chapter Eight: April Massacre ................................................................................................. 39Chapter Nine: The Year of Exhaustion ................................................................................... 46Chapter Ten: The Americans ...................................................................................................... 56Epilogue: The Air War�s Legacy................................................................................................. 63
Flight Reference .................................................................................................................. 65A Brief History of Flight ............................................................................................................. 66The Physics of Flight.................................................................................................................... 68
Flight Maneuvers ................................................................................................................. 73

iii
Battle Tactics of the Great War .................................................................................... 83Tactics En Route ............................................................................................................................ 83
Engagement ...................................................................................................................................................... 85Battle ............................................................................................................................................................... 86Turning Versus Hit-and-Run ............................................................................................................................. 86Make the Tactics Suit the Aircraft ................................................................................................................ 88Disengagement ................................................................................................................................................. 90Ground Attacks ............................................................................................................................................... 91
Specialized Attack Tactics ......................................................................................................... 98Attacking Two-Seaters .................................................................................................................................... 98Attacking Observation Balloons ................................................................................................................. 101Standard Fighter attack on an Observation Balloon ................................................................................ 102Firing Arcs for Standard Two-seater Aircraft .......................................................................................... 103Firing Arcs for Heavy Bombers .................................................................................................................... 104
Flight Formations .............................................................................................................. 106
Mission Types.........................................................................................................................114
The Aircraft of World War I ...........................................................................................117
Medals and Awards ........................................................................................................... 141

iv
Game Play .............................................................................................................................. 157Introduction .................................................................................................................................. 158Getting Started ............................................................................................................................ 158The Main Menu Screen ................................................................................................................ 158Flying A Single Mission .............................................................................................................. 159
Selecting a Mission ....................................................................................................................................... 160Viewing the Mission Briefing ......................................................................................................................... 161
Playing a Campaign ...................................................................................................................... 161Starting the Campaign ................................................................................................................................... 162Creating and Changing Pilots (New Pilot and Pilot Log buttons) ............................................................. 163
Pilot Rank and Position ................................................................................................................... 164Learning About Your Squadron (Squadron Ops button) ............................................................................ 165
Requesting a Transfer ...................................................................................................................... 166Painting Your Plane ........................................................................................................................... 166
Learning About the Enemy (Intelligence button) ........................................................................................ 169Viewing Your War Record (Personal Stats and Medals/Awards buttons) .............................................. 170Flying a Mission (Next Mission button) ........................................................................................................ 170
Campaign Time ...................................................................................................................................... 171Viewing and Changing Your Flight Plan ...................................................................................... 171Changing the Flight Path ................................................................................................................ 172Changing the Flight Ordnance ...................................................................................................... 174Changing the Squadron Status ..................................................................................................... 174Rules for Creating Unofficial Flights........................................................................................ 176Creating an Unofficial Flight ........................................................................................................ 176Mission Results .................................................................................................................................. 177

v
Object Preview ............................................................................................................................. 178Ace Preview .................................................................................................................................... 179Preferences ................................................................................................................................... 180
Realism Setting .............................................................................................................................................. 180Graphic Setting .............................................................................................................................................. 182Sound .............................................................................................................................................................. 184Fly Now ........................................................................................................................................................... 184
The Mission Builder ..................................................................................................................... 185Creating a Single Mission ............................................................................................................................. 185
Mission Creation Outline .................................................................................................................186Historical Mode Vs. Free Form Flights .......................................................................................186Squadrons and Flights ....................................................................................................................187Setting the Initial Conditions .........................................................................................................188The Front Map and the Region Maps.............................................................................................189Flight Creation Outline ...................................................................................................................190The Create Flight Index Card .........................................................................................................190Editing Waypoints ...............................................................................................................................193Waypoint Actions ................................................................................................................................194Creating an Escort Mission ............................................................................................................196Changing the Flight Ordnance ...................................................................................................... 197Changing the Squadron Status ..................................................................................................... 197
Editing an Existing Single Mission ................................................................................................................ 198Sharing Missions ........................................................................................................................................... 198
Flying the Simulation ........................................................................................................ 199Introduction .................................................................................................................................. 199

vi
Flight Controls .......................................................................................................................... 200View Commands ............................................................................................................................ 200
The Lockdown Cockpit Views ........................................................................................................................ 201Setting a Target for Slewable Cockpit and External Camera View Modes ............................................... 201The Slewable Cockpit View ........................................................................................................................... 202The External Camera Views ......................................................................................................................... 202
Joystick Controls ...................................................................................................................... 205Firing Controls ........................................................................................................................... 206Cockpit Instrumentation .......................................................................................................... 207The Autopilot................................................................................................................................ 209Time Compression ......................................................................................................................... 210Navigation and the Kneeboard................................................................................................ 210Flight Communication ................................................................................................................ 211In-flight Preferences ................................................................................................................. 211Ending the Simulation ................................................................................................................ 211Mission Debriefing ....................................................................................................................... 212
Glossary ............................................................................................................................... 214
Customer Service Support and Sales ......................................................................... 217
Technical Support ............................................................................................................. 219
Sierra Warranty ................................................................................................................ 222
vii
Manual Credits ................................................................................................................... 223
Photo Credits ...................................................................................................................... 224
Index ............................................................................................................................... ......... 225

viii

1
Installation

2
Preflight
InstallingRed Baron II1. Insert the Red Baron II CD into the CD-
ROM drive. If you have Windows®Autoplay enabled, the Red Baron IIAutoplay screen is displayed.
2. Click install and Red Baron II Setup willprepare the InstallShield® wizard.NOTE: If you do not have Autoplay en-abled on your system, you can run theSetup program from the root directoryof the Red Baron II CD. (Select Runfrom the Windows Start menu. In theOpen textbox, type D:\SETUP.EXE.Click OK.Substitute the drive letter thatrepresents your CD drive, if necessary.)
3. Read the instructions on the Welcomescreen and, when you are ready to pro-ceed, click Next.
4. The default folder for the installation isC:\Sierra\RedBaronII. Click Next if thisis okay. Setup will copy the Red Baron II
files to your hard drive.
5. Two Windows® system componentsmust be installed on your computer:Intel® Indeo® video interactive andMicrosoft® DirectX 5�. If setup detectsthat you do not have these components,it will guide you through the installationprocess. If you wish to reinstall DirectX�at a later time, run DXSETUP from the\DirectX directory on the Red Baron IICD.
6. We have provided a simple online reg-istration form. Please fill it out and sendit in so you can obtain technical supportand the latest news on Red Baron II up-grades and enhancements.
7. If you have installed DirectX�, whenyou are done with the installation, makesure that �Yes, I want to restart mycomputer� is checked, and click Fin-ish.
UninstallingRed Baron II
There are several methods by which youmay uninstall Red Baron II:1. Go to Start > Sierra Utilities > Uninstall;
then select Red Baron II from the list andclick OK.
2. Click the Windows 95 Start button andgo to Settings > Control Panel > Add/Remove Programs. Then choose RedBaron II from the listbox and click theAdd/Remove button.
3. Go to Start > Programs > Sierra > RBIIUninstaller.
Manual NoteSome minor changes may have been made
to this game after this manual was printed.Please check the Read Me file and the On-Line Help for last-minute changes, addi-tions, and corrections to this document.
Online HelpAdditional reference information and
gameplay instructions are provided in anonline manual which is accessible from

3
Preflight
within any Red Baron II setup screens. Toaccess it, simply press the F1 key.
You may also access the online manualby selecting Red Baron II Help from the Start> Programs > Sierra menu.
Troubleshooting The following information should help
you solve any problems you might experi-ence with Red Baron II. Sierra TechnicalSupport provides this documentation as areference to Sierra customers using Sierrasoftware products. Sierra Technical Sup-port makes reasonable efforts to ensure thatthe information contained in this documen-tation is accurate. Sierra makes no war-ranty, either express or implied, as to theaccuracy, effectiveness, or completeness ofthe information contained in this documen-tation.
Sierra On-Line, Inc. does not warrantyor promise that the information herein willwork with any or all computer systems. Si-erra does not assume any liability, eitherincidental or consequential, for the use ofthe information herein, including any and
all damage to or lost use of computer hard-ware or software products, loss of warran-ties, or lost data by the customer or any thirdparty. No oral or written information oradvice given by Sierra, its employees, dis-tributors, dealer or agents shall change therestriction of liability or create any new war-ranties. In no case shall Sierra�s liabilityexceed the purchase price of the Sierra soft-ware product.
Problem: �Error reading drive D�; �NotReady Reading Drive X:�; �General FailureReading Drive X:�; or �CDR 101 - Abort,Retry, Fail,� when installing Red Baron II.The drive letter will vary depending on whatdrive designates your CD.
Solution: There are several factors thatcan cause a �read� error. The most com-mon is a dirty or scratched CD. Check theCD to make sure that there are no smudges,fingerprints, scratches, or cracks on it. Ifthere are any smudges on the CD, clean itoff with a soft cloth and try it again. If thedisk is scratched, it will need to be replaced.
If cleaning the CD doesn�t help, the prob-lem may lie with the CD ROM drivers. RedBaron II may not install properly unless youare using Windows 95 virtual drivers. Todetermine whether you are using virtual orreal mode drivers, hold down the ALT keyand DOUBLE-CLICK on MY COM-PUTER. Click on the PERFORMANCEtab at the top of the SYSTEM PROPER-TIES window. In the FILE SYSTEM fieldit should read 32 BIT. It should NOT read:Some drives are using MSDOS compatibil-ity.
For information on using virtual driversin Windows 95, please contact the com-puter manufacturer.
Finally, check with your system manu-facturer to assure that the driver softwarethat your CD drive uses is up to date. Out-dated CD drivers can have difficulties read-ing newer CD�s.
If you need a replacement disk or CD,Sierra will gladly do so for you. If your re-quest is within the first 90 days of purchase,replacement is free of charge. After thiswarranty period, there is a $10.00 process-ing charge. Send disk or CD #1, along with

4
Preflight
a note with your name, mailing address,daytime phone, and a copy of the sales re-ceipt dated within the last 90 days, or acheck or money order for $10.00, to SierraOn-Line. Our address is:Sierra On-Line FulfillmentPO Box 485Coarsegold, CA 93614
AdditionalTroubleshootingInformation
You will find a more comprehensivetroubleshooting section in the onlinemanual. If Red Baron II installed success-fully, you can access online help from theStart > Programs > Sierra menu. If Red BaronII did not install successfully, you can stillaccess online help manually. In WindowsExplorer, locate your CD drive letter andclick on it to display the list of files on theRed Baron II CD. Double-click file calledRB2.HLP on the root directory of the RedBaron II CD to open the help file.
Still more information regarding RedBaron II can be found at the Sierra Web
site located at www.sierra.com. Finally, aReadme file, which is accessible from theSierra Utilities splash screeen (the ViewReadme icon) supplies last minute updatesabout Red Baron II that became availableafter the manual was printed.
Post-InstallationNotes
When you install Red Baron II, a SierraUtilities icon appears at the top of yourWindows Start menu. This utility allowsyou to easily register or uninstall any Sierraprograms that are detected on your com-puter. You may also access the Readme filefor any program that this utility detects. TheSupport option is an online Setup Help filethat provides answers to hardware ques-tions, troubleshooting issues, and explainshow to create a Windows boot disk.
If, for any reason, you would like to re-move this icon, go to the Start menu andselect Settings>Taskbar. Select the StartMenu Programs tab and click the Removebutton. Scroll to the bottom of the programslist where you should see the Sierra Utilities
icon listed. Highlight it and click Remove.Also upon installation, a NetMarket icon
was placed on your desktop. This is anInternet shortcut to the online shopping andtravel service offered by C.U.C. Interna-tional, the parent company of Sierra On-line. If you have an Internet browser and aconnection, take a moment to browse thegreat buys, special offers, and entertaininggames that this site provides. If you�d liketo remove this icon, simply drag it into theRecycle bin.

5
Historicaloverview

6
historical overview
A German machine gun crew in action during the March offensive.
April 21, 1918:Amiens Front
W hen the pilots of JG-1crawled out of their bunksin the early morning hours
of April 21, 1918, they found their aero-drome at Cappy shrouded in thick, gray fog.The blanket of mist clung to the ground,making any flying impossible. Delighted bythe break, the pilots gathered near theirplanes to await the events of the day.
They needed the break. Since March21st, the men had been in action nearlyevery day, fighting with a desperation bornfrom the knowledge that this last, greatGerman offensive would determine thecourse of the war. They knew that theirnation had gambled everything�resources,men, equipment, aircraft, and money�on this final effort. At first, it had suc-ceeded. Below the wings of JG-1s Fokkersand Albatros fighters, the infantry hadpoured through a broken British line. Ger-man reinforcements flooded to the break-

7
Introduction
throughs, pushing the Tommies back nearly40 miles. In a war that measured success inyards, 40 miles seemed a ringing victory.But as JG-1 discovered, it proved to be ahollow success. Now, a month later, theBritish had turned to fight, stopping the ad-vance cold before any real strategic successcould be achieved.
All that was left to do was fight on withsheer momentum. Already, gossip aroundthe mess tables at night told stories offriendly infantry units breaking and rout-ing; of fighter squadrons running out of gas,rubber, and oil; of discontent in the ranks.In some cases, the red specter of Socialismseemed to play a part, boding ill for the fu-ture in light of Russia�s Revolution the pre-vious fall. Clearly, four years of stagnant,bloody, trench warfare had just plain wornout the German army, and now its men werebeing asked to do too much.
That was also true of the Air Service, andof JG-1 in particular. For the last month,they�d been flying four or five times a day.The men were exhausted, their lives mea-sured in mere days as the inferno over thetrenches claimed pilot after pilot.
The aces of JG-1. Kurt Wusthoff (27 kills), Wilhelm Reinhard (20),Manfred von Richthofen (80), Erich Lowenhardt (54), and Lothar vonRichthofen (40).

8
historical overview
For the ground crews, times were nearlyas trying. They worked through the days andnights in a never ending battle to keep theplanes airborne. With stocks of spare partslow, and replacement aircraft a wishfuldream, the geschwader�s fighting strengthslowly drained away. Just to keep their re-maining planes in fighting shape, parties ofmechanics would scour the front for wrecks,from which they cannibalized all the rubberparts and brass fittings they could find.
Two things kept these men going: theirlove of Germany and their love for theirleader, the legendary Manfred vonRichthofen.
He was the type of man others instinc-tively followed. He lead by example, bydevotion to duty, and by sheer force of will.After four years of combat�first with thecavalry on the Eastern Front, then as afighter pilot in the West�Richthofen wasburned out. Nevertheless, he carried outhis duty with grim determination that in-spired all around him. His insistence to stayat the front endeared him to his men almostas much as it frustrated and worried theGerman high command. Richthofen, Gen-
eral Hindenburg once remarked, was worthat least one full division. He was the soulof the fighter force, the inspiration to all inthe Air Service after three years of battlingthe British from the cockpit of Germany�sbest fighters. Alive, he was a great propa-ganda asset, a symbolism of everything theGerman fighting man stood for in this longand dreary war. To the core, he was a com-bat pilot, a hunter of the sky. And that iswhy he never let up.
Not even after he nearly died did he givemuch thought to taking some desk job farfrom the front, though his superiors urgedhim to do just that. Nearly a year before,in July, 1917, he had been in a wild dog-fight with Naval Ten Squadron and someFE2s from a local RFC unit. During thefight, one of the Fee gunners had shotRichthofen in the head. Nearly out of hismind with pain, and practically blinded byblood gushing over his eyes, Germany�s aceof aces spiraled down to the trenches belowand crash-landed within friendly lines.Some soldiers pulled him from the wreck-age and carried him to a field hospital,where his wounds were dressed. After a spell
at home where he was sent to recover, hereturned to action once again that fall.
Despite his leave, he never really recov-ered from his wound. Now, months later,he looked gaunt and hollow. He sufferedfrom terrible headaches that at times threat-ened to confine him to bed. Yet, he dog-gedly pressed on, shooting down an everincreasing number of Allied aircraft, un-til, by April 21st, his total stood at 80 kills.
As the sun rose over Cappy that springmorning, Richthofen appeared at the flightline to check on his pilots. He was in finespirits, by all accounts, since the day be-fore he had claimed his 80th victim. As hetoured the scene, he tripped over a stretcherlaid out on the ground. When he lookedback to see what he�d fallen over, he sawLeutnant Wenzl, a young tiger who had justtransferred into geschwader from Jasta 31at the end of March. Playfully, theRittmeister tipped over the stretcher, spill-ing Wenzl into the mud.
Laughing at their leader�s prank, theother pilots plotted revenge. Later thatmorning, they kidnapped the Rittmeister�sdog, Moritz, and tied a wheel chock to his

9
Introduction
tail. Moritz had already seen much of thewar, and, in fact, was missing part of anear. Some months before, the big GreatDane was chasing Richthofen�s FokkerTriplane as it began its takeoff roll. The doggot too close and collided with the propel-ler blades, which chopped off a good por-tion of his ear.
So it was on the morning of April 21st,Mortiz, the half-eared dog came whiningto his master, a wheel chock dragging athis hind legs. The Rittmeister took the gagin stride, laughing at the sight as he kneltdown to free Moritz from the chock.
Little did anyone know that this would bethe last time the Rittmeister�s laughterwould ring in their ears.
With late morning came a break in theweather. A strong wind scattered the fog,and as blue skies appeared over Cappy, themood at the aerodrome became serious andbusinesslike. They�d be going into battlesoon, and the men knew the odds, as usual,would be heavily stacked against them.
The call came shortly after 10:30. A Ger-man observation point reported enemy air-craft heading for JG-1�s patrol area. The
The Red Baron�s funeral. The Australians buried the legendary acewith full military honors.

10
historical overview
news sent the pilots scurrying for theirplanes. In minutes, two ketten�flights�were airborne. Richthofen led them off inhis blood-red Fokker Dr. I.
The men left behind at Cappy anxiouslyawaited the return of the geschwader�s air-craft, going about their duty as they strainedto hear the warm sounds of engines ap-proaching the airfield.
Finally, in the early afternoon, theystraggled in. The ground crews watched theFokkers swing around the aerodrome, theirquirky Oberusel engines coughing andburping as the pilots hit their �blip buttons�to slow their planes down to landing speed.
But one aircraft was missing. The blood-red Fokker that belonged to the Rittmeisterwas nowhere to be seen.
Through the afternoon they waited fornews, despair threatening to overcome thisonce happy band of Germany�s elite avia-tors. As the sun went down that afternoon,dread filled their hearts. He had fallen be-hind British lines, and now all they coulddo was hope he had been taken prisoner.
When word did come of their leader�sfate, it was not what they had all feared.
Their Rittmeister, the great Manfred vonRichthofen, was dead.
British guns destroyed the heart and soulof the German fighter force that April day,and with it, so died Germany�s last hopesof winning the air war.
And yet, something else happened thatday, something that none of those presentat Cappy Aerodrome could ever have imag-ined. With the death of Manfred vonRichthofen, a legend was born�one thatwould endure long after they were but dustin a soldier�s grave�the legend of the RedBaron.
11
chapter one
Chapter OneEurope In Flames
One wrong turn changed thecourse of history.On June 28,1914, Austrian Archduke
Franz Ferdinand arrived in the Bosnian cityof Sarajevo intent on attending army ma-neuvers in that recently annexed provinceof the Austro-Hungarian Empire. The re-sults of that visit set in motion a chain ofevents that lead to the bloodiest war in worldhistory. Long after all the players that daywere dead and buried, the effects of theiractions resounded for decades, affecting thecourse of both Europe and the United Statesfor generations to come.
It began at the train station in Sarajevo,where the Archduke, his wife, and his en-tourage climbed into several open-toppedtouring cars to begin the short drive to CityHall, where they would meet Sarajevo�sMayor.
Unknown to them, assassins lurked alongtheir planned route. As the Archduke�s car
trundled down the street, one of the killersjumped forward to throw a bomb. Bychance, the bomb missed, bouncing off thecar then landing in the street. It explodednext to the car directly behind theArchduke�s, wounding several of his goodfriends and staff members. The injured menwere rushed to the hospital whileFerdinand, furious at what had just hap-pened, continued to City Hall.
Once he arrived there, he greeted theMayor icily. �So,you welcome your guestshere with bombs?� he asked angrily. TheMayor brushed aside the remark and wel-comed his Austrian dignitary to his city,assuring the Archduke that the would-beassassin had been caught. The meetingended with Ferdinand announcing hewished to visit his two wounded officers inthe hospital. This required a change in planswhich almost, but not quite, saved theAustrian�s life.
That day, a number of pro-Serbian as-sassins had staked out the Archduke�s routethrough the city. If the first assassin failed,there were backups to him�and backups
to those backups. The Austrian�s routethrough the city had been well known, andit was dotted with gun wielding, bomb tot-ing fanatics. Trained by the Serbian ter-rorist organization known as the BlackHand, their goal was to secure Bosnian in-dependence from Austria.
Now, though, circumstances foiled theirplot. The Archduke would not be travel-ing on his pre-selected route to the armymaneuvers. Instead, he insisted on goingto the hospital. He should have missed allthe other assassins waiting for him.
Enter Franz Urban, the Archduke�s per-sonal chauffeur. Urban had never drivenin Sarajevo before and did not know ex-actly how to get to the hospital. He triedhis best, though, working through the mazeof narrow streets, trying to follow his mapsand instructions. In the end, he got lost.
Somewhere along the way, he made aright turn into a single-lane alley that wasso narrow he could not turn the car around.He went only a few dozen yards down thealley before he realized his mistake. Heslowed the car down, getting ready to turn

12
historical overview
it around. Then he saw he would have toback up to the main street he had left. Hetouched the brakes just as a shabbily dressedyoung man crossed in front of the car a dozenor so feet ahead. Franz watched the man�a boy really�look up and see the car.
The boy was a 19-year-old Bosnian Serbstudent named Gavrilo Princip. Trained bythe Black Hand, he had been posted on theArchduke�s original touring route. Whenthe Austrian had not shown up, Princip gotbored and decided to head for home. Run-ning into the Archduke on this confinedback alley was a complete accident.
Princip capitalized on the chance meet-ing. Quickly, he pulled his revolver andstepped toward the car. Shots rang out. TheArchduke and Archduchess slumped for-ward, bleeding from their bullet wounds.Horrified, Franz Urban jammed the car intoreverse and sped to the hospital. But by thetime he arrived there, both Austrians hadbled to death.
Princip did not enjoy his victory. Bosnianpolice arrested him immediately, and hespent the next four years languishing in
prison before dying of pneumonia in 1918.He lived long enough to see the war�tosee the millions killed or maimed�that hadbeen touched off by his single act of mad-ness.
And still, none of it would have happenedif Franz Urban had not made that wrongturn. Urban�s moment in history lasted butan instant. When it passed, he disappearedfrom view and lived out his life as anony-mously as any other average person. Still,his single mistake triggered the events thatconsumed Europe in a four-year war thatkilled millions and destroyed an entire gen-eration. Entire nations, including Urban�sown, were erased from the map and newones took their place. In the end, whenthe shooting finally ceased, nobody couldremember what they had been fighting forin the first place.
In the wake of the assassination, the battlelines were quickly drawn. Soon, all of Eu-rope seemed to be sucked into the crisis.Austria blamed Serbia for the assassinationand threatened war. Russia, always the�savior� of the Balkan Slavs, came to
The Dual Monarchy�s leader,Emperor Franz Joseph (at right).He hated his nephew, FranzFerdinand, and thought God hadpunished him through theassassination for his liberalviews.

13
Serbia�s defense. With Russia now in-volved, the Germans backed their ally,Austria-Hungary, to the hilt. With Ger-many now enmeshed in the crisis, Francecame to Russia�s aid. As the diplomatsfussed and fumed, the armies began to mo-bilize. Once that happened, war was in-evitable.
Austria attacked Serbia, declaring war onJuly 28, 1914. On August 1, Germany de-clared war against Russia then invaded Lux-embourg and Belgium in order to get toFrance. Two days later, Germany declaredwar on France. The next day, Britain wentto war against Germany after learning of thatcountry�s invasion of Belgium. On the 6th,Austria-Hungary declared war on Russia.In the days that followed, the fighting spreadfrom Belgium to the Balkans, from theAlsace to East Prussia.
And all because of a wrong turn inSarajevo.
At first, the war delighted Europe. Therewere mass rallies in support of the war, andall the old divisions within France and Ger-many disappeared in a ground swell of na-
The Kaiser�s personal guard on parade just prior to the war�soutbreak in August, 1914.

14
historical overview
tionalism. Volunteers flocked to the col-ors, and millions went off to battle withsongs on their lips. Universally, Europethought the war would be quick, sharp andbloodless. A few weeks of fighting, and thewar would all be over.
The armies clashed in early August.Wearing brilliant colored uniforms andfighting with leftover Napoleonic tactics,Europe�s legions were in for a sudden shock.The stand-up, shoulder-to-shoulder fight-ing their great-grandfathers had done atAustrerlitz and Waterloo a hundred yearsbefore may have worked fine in the age ofthe muzzle-loading musket, but in the ageof rapid-fire artillery, machine guns andmagazine rifles, they were an invitation toslaughter. And that�s precisely what hap-pened.
France first went after its �lost territo-ries��the Alsace and Lorraine which it hadceded to Germany after the 1871 war. Innine days of fighting, known as the Battleof the Frontiers, the French launched mas-sive human-wave attacks into the teeth ofmachine gun and artillery fire. They were
where all too many of Europe�s enthusiastic volunteers ended up afterthe first weeks of the war.

15
chapter one
slaughtered by the thousands. By the timethe commander of the French army,Marshall Joffre, abandoned the offensive,300,000 of his men lay dead on the killingfields from Mulhouse in the south to Nancyin the north.
Modern technology, as all sides soon dis-covered, made obsolete their battle tactics.
With the French offensive in the eaststopped cold, the German army swept downfrom Belgium, threatening Paris from thenorth. Just in time to help avert disaster,the British Expeditionary Force arrived,100,000 strong. In its first three battles,the Germans nearly destroyed it.
By early September, the situation was des-perate. The Germans were on the outskirtsof Paris. The BEF had taken huge losses inthe last few weeks, and the French had beenbled white defending Nancy. It seemed asif nothing could stop the German army fromtaking Paris and fulfilling all the promisesthat this would be a short war.
But then, another anonymous figurestepped into the historical spotlight andchanged the course of the war. For the first
time ever, that anonymous figure would bean aviator. France would be saved by theaeroplane.

16
historical overview
Chapter TwoThe Rise of TheAeroplane
�...As experience has shown, a real combatin the air, such as journalists and romancershave described, should be considered a myth.The duty of the aviator is to see and not to fight.��German 1914 staff report.
The British knew exactly what theGermans were doing. When theBEF crossed the Channel into
France in August, the troops took along 48planes�the entire strength of the RoyalFlying Corps. These primitive machinessoon proved their worth as the �eyes� of theBEF. Each day, the pilots scouted out aheadof the ground troops, searching out Ger-man intentions as they lumbered overhead.At the end of August, with the situationon the ground growing increasingly desper-ate, the aviators brought home a bit of goodnews.
On the far right flank of the German thrustinto France, General Alexander von
Kluck�s First Army suddenly shifted its lineof advance. Instead of going around Paristo the west, von Kluck turned his corps
southeastward, cutting inside of Paris andputting the fortified capital on his rightflank. British pilots Lieutenant A.E.
Propellers of various types line the walls in this workshop.

17
chapter two
Borton, Captain D.LeG. Pitcher and Lieu-tenant C.G. Hosking all spotted the move,reporting back to HQ. Word of the changepassed up the chain of command until itreached Marshall Joffre�s desk. After study-ing the situation, he decided the time was
ripe for a counter-offensive against vonKluck�s army.
As planning began for the great counter-attack, von Kluck made another mistake.As he moved south across the Marne River,a gap opened between his army and the Sec-
French Troops on the move .
ond Army on his left flank. The gap grewwider and wider as von Kluck�s menmarched south.
Again, the eagle-eyed pilots and observ-ers of the RFC spotted the mistake. Again,word of the hole in the German lines spedup the chain of command.
On September 5, 1914, the Battle of theMarne began. The French, with the helpof the multi-colored Parisian taxi cabs,moved into place an entire army on vonKluck�s right flank. On the 5th, they wenton the attack, surprising the Germans andnearly overwhelming them. General vonKluck, more concerned with his advanceto the south than any �spoiling� attack theFrench could launch on his flank, ignoredthe brewing battle for two days. Finally,though, on September 7, von Kluck awoketo the danger and moved swiftly to crushthe French attack. As he did, his forwardunits had to re-cross the Marne and swingback north and west to get into the battle.
The hole between von Kluck and the restof the German army had just grown bigger.Into that gap flowed the resurgent BritishExpeditionary Force as well as the French

18
historical overview
Fifth Army. The Germans, nearly envel-oped now on both flanks, knew the gamewas up. Reluctantly, von Kluck ordered aretreat which later forced the rest of theGerman army to go on the defensive as well.The great push for Paris had collapsed infailure, as did any hopes that the war wouldbe a short one.
The aeroplane had helped save Francethat September. Without the vital infor-mation the pilots brought back from theirtrips behind the lines, the Allied armiesnever would have been in a position to rollup von Kluck�s army. Now, as the warsettled into a long stalemate that wouldstretch from the North Sea to the Swiss bor-der by Christmas, both sides wondered howelse they could use this new weapon of war.Would the airplane just be used as the eyesof the armies, or could it be even more use-ful?Joffre of the Marne. The
French commander-in-chiefwas given most of the creditfor the success at the Battleof the Marne.

19
chapter three
Chapter ThreeThe Birth of Air FightingJust an old-fashioned Avro withold-fashioned waysAnd a kick that says �back-fire� to you,An old Mono engine that konks out and staysWhen the toil of a long flight is through,Tho� the pressure will drop, and it loses its prop,And the pilot�s inclined to resign,I�ll rejoice till the day�that I learnt how to fly,In that old-fashioned Avro of mine!
�RFC Squadron Song
The Austrian Baron Rosenthal wasthe first to die in air-to-air combat. His victor, Russian Captain
Nesteroff, was the second. On September8, 1914, just as the Battle of the Marnereached its climax, Nesteroff encounteredthe Baron�s fragile craft over the EasternFront. Without thought to his own safety,Nesteroff dove after the Austrian plane andcrashed his own into it. Locked together,the two wooden machines tumbled earth-ward, both crews dead.
In the early days of the war, Nesteroff�ssuicidal battle with the Baron Rosenthal wasan aberration. In those first weeks of thewar, pilots shared a sort of kinship that tran-scended national boundaries. German pi-lots who stumbled across French or Britishplanes would often toss their enemies ajaunty wave�and nothing more. For themost part, the Allies did the same.
This sort of honeymoon didn�t last muchpast the Battle of the Marne. When bothsides realized the importance of air recon-naissance, air-to-air fighting became in-evitable. Pilots and observers began carry-ing shotguns, revolvers, carbines and evenbricks and bottles. Some of the more cre-ative thinkers hauled aloft machine guns.RFC pilot Louis A. Strange convinced hisobserver to bring aboard a Lewis gun on onereconnaissance flight. Unfortunately, theweight of the gun kept the plane from climb-ing above 3,500 feet�well below the Ger-man planes Strange had been hunting.When his commanding officer learned of hisidea, he ordered Strange to remove the gunand focus on his real job�scouting for the
army.Others continued to try. On October 5,
1914, French Sergeant-Pilot Frantz wentaloft in a Voisin biplane with his mechanic,Corporal Quenault. Over the lines thatmorning, Frantz spotted a German Aviatikat about 3,500 feet. He closed on the un-suspecting German until Quenault, armedwith a light machine gun, found the rangeand opened fire. The Aviatik dove away,turning northward for its own lines. Frantzwould not be deterred. He followed theGerman while Quenault snapped out shortbursts from the gun. In his haste to catchthe Aviatik, Frantz accidentally overshotit. As he passed on by, the German bankedaway from the Voisin and tried to run.Frantz reversed his turn, ending up behindthe Aviatik. Quenault poured rounds intothe ungainly German plane, even as thepilot tried to climb away from them. ButQuenault�s marksmanship was too good.The German plane, riddled with bullets,fell into a dive. The pilot fought the con-trols all the way down, pulling the nose upthree times before losing it again. Finally,
20
historical overview
the Aviatik plunged into a small copse oftrees, where it exploded.
Running to the scene of the crash, oneobserver recalled, �the motor was almostentirely buried in the ground, the fuselagewas twisted, and the wings were broken intoa thousand pieces. One of the aviators layquite dead three yards away from the mo-tor. The second, the observer, with beau-tiful hands exquisitely cared for and per-haps a great Prussian name, was caughtunder the red motor, now a wreck inflames. He seemed to us to attempt to pullhimself out, but the movement was prob-ably convulsive; he looked at us, clawedthe earth with his hands, and died beforeour eyes.�
The honeymoon was over. The air warwas about to get dirty.
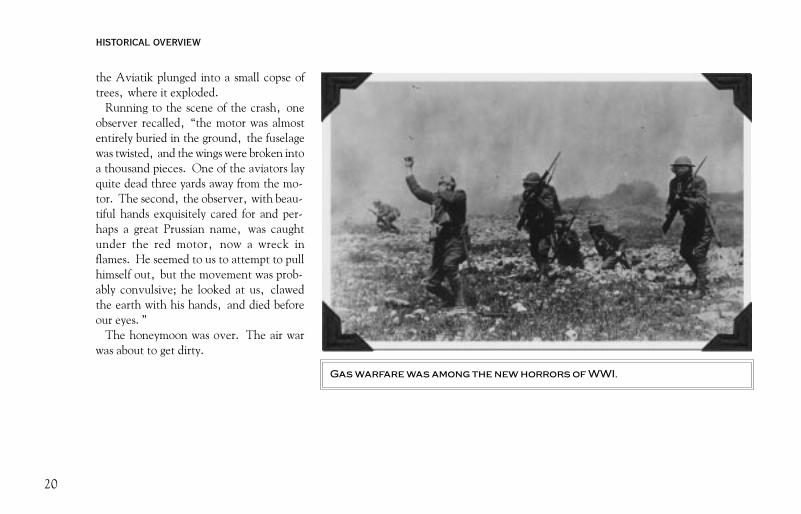
Gas warfare was among the new horrors of WWI.

21
chapter four
Chapter FourDeflectors andInterrupters
�A sort of mystery surrounded the Fokker...rumour credited it with the most fantastic per-formance! It could outclimb, outpace andoutmanoeuvre anything in the R.F.C. You wereas good as dead if you as much as saw one....�
�Cecil Lewis, Sagittarius Rising
The land war on the Western Frontremained a bloody standoffthroughout 1915. Both the
French and the British launched offensivesof their own. Always, the attacks succeededin gaining a little ground, but no attackmade the �breakthrough� all involvedsought.
Poison gas, a new and deadly weapon,was tried by the Germans for the first timeever during a local attack outside the cityof Ypres in April, 1915. The gas causedpanic among the British and French troops,sparking a stampede to the rear. A four-mile hole opened in the lines as men threw
down their weapons while fleeing the ter-rible gas clouds. Seventy thousand Alliedsoldiers fell during the attack, but the Ger-mans could not exploit their success. Notexpecting such a reaction from the Allies,the German high command had not back-stopped the attack with enough reserves toachieve a decisive victory.
The Allies responded with gas attacks oftheir own, though none succeeded like theGerman one that April. By late 1915, theAllies had lost close to a half a million menfor no gain at all in a series of vainoffensives. The year ended with the linesdrawn as they were the previous Decem-ber.
While the ground war grew increasinglybloody and futile, the air war evolvedthrough 1915 into a battle between tech-nology and tactics. As each side developednew planes, new refinements, and newweapons, the other side scrambled to de-velop tactics to counter these new threats.It was a race begun by a young French dare-devil named Roland Garros, and it wouldnot end until the Armistice in November,1918.
Before the war, Roland Garros was a well-known figure in aviation circles. As one ofFrance�s early air pioneers, he had enterednearly every contest and race in Europe,winning acclaim for his incredible feats. Hewas the first to fly across the MediterraneanSea, a risky proposition at best in that ageof fussy engines and flawed designs. He laterentered and won the Paris to Rome and Paristo Madrid races, and in 1911 he won theGrand Prix d�Anjou.
When the war broke out in 1914, Garroswas in Germany. Worried he that he mightbe arrested, he abandoned his belongingsand took the first train to Switzerland. Hereturned to Paris as fast as he could, wherehe offered his services as an aviator. Alongwith many other pre-war daredevils, theFrench Air Service assigned him to M.S.23, a squadron flying early Morane mono-planes.
During the first winter of the war, Garrosbegan thinking up new ways to shoot downGerman observation planes. He concludedthat the best way to do it would be to mounta machine gun on the nose of his plane sothat he wouldn�t have to carry an observer

22
historical overview
to shoot the gun. If the machine gun werefixed to fire forward, Garros could aim thegun by simply pointing his nose at his tar-get. A great idea with one huge flaw: thepropeller was in the way.
For several weeks, Garros and his me-chanic tinkered with one of the Moranemonoplanes, trying to come up with a wayto protect the prop from the machine gun.As they experimented, they discovered thatonly about 10% of the bullets fired ever hitthe prop blades. If they could just take careof that one in ten, their idea would work.
They settled on what they called a �de-flector system.� By mounting steel wedgesonto the back of each propeller blade, anybullets that would normally damage it wouldjust ricochet off. The wedges were angledso the bullets would not fly back and hit thepilot.
In the spring of 1915, after weeks of ex-perimentation, Garros and his new weapontook to the air in search of a victim. Oncealoft, he headed for his primary target, arailroad station outside of Ostend which hewould bomb. Along the way, though, hecame across a lone Albatros two-seater,
intent on spying behind Allied lines.His original mission forgotten, Garros
turned his Morane-Saulnier monoplane af-ter the German. He crept up on the unsus-pecting plane from behind, a tactic thatconfused the German observer. Then camethe clatter of Garros� Hotchkiss machinegun. The observer fought back with a car-bine, but it was really no contest. TheAlbatros burst into flames and crashed.Garros, horrified by what had happened,later reported, �I gazed below me for a longtime to convince myself that it was not anightmare.�
Garros� jury-rigged experiment had justgiven birth to the first true fighter plane inaviation history.
For eighteen days, Garros terrorized thelocal German units on the Belgian coast.German pilots, filled with rumors of newFrench superweapons, began avoiding allmonoplanes to the outrage of their com-manding officers, one of whom accused hisaviators of having the �hallucinations of oldwomen.�
Garros� one man war ended almost asquickly as it had begun. After shooting
down three planes, he himself fell victim toa German bullet on April 18, 1915. Withhis fuel line severed, he coasted down for acrash-landing behind German lines. Beforehe could burn his craft, German soldiersappeared and took him prisoner. His pre-cious machine had fallen into enemy hands.
Garros remained a prisoner until Janu-ary, 1918, when he and another Frenchpilot escaped from their captors and madetheir way to England. Upon returning toFrance, Garros rejoined the French AirService, not realizing the tremendouschanges that had taken place between hisdaring experiment and his return to com-bat. After flying only a few missions, theGermans shot him down again. A great pio-neer of air combat technology had died atthe hands of the weapons he helped invent.
Though Garros started the air combatrevolution, it would be the Germans whorefined his ideas, making them both prac-tical and deadly. In April, 1915, whenGarros went down behind the lines, theGermans captured his Morane-Saulnier.After local officials examined it, they real-ized Garros� plane was an incredible intel-

23
chapter four
ligence coup. Quickly, they packed it upand sent it to young Tony Fokker, a Dutchaircraft designer working in Germany.
The German Air Service asked Fokker ifhe could duplicate Garros� invention.Fokker agreed to have a look, but insteadof copying the deflector gear, he improvedon it. Later, Fokker claimed that his novelidea came with a flash of inspiration. Morelikely, however, was the fact that the Ger-man Air Service provided Fokker with thedetails of a sychnronizing system patentedin 1913 by LVG engineer Franz Schneider.In exchange for Fokker�s time and effort,the Air Service apparently promised to pro-tect him from lawsuits.
It took only a few days for Fokker to workthrough the kinks of the new system. In-stead of protecting the propeller, Fokkerbuilt a system of gears into the machine gunand engine that would ensure no bulletswere fired when the propeller blade passedin front of the barrel. Fokker called his in-vention the �Interrupter Gear.�
Earlier in 1915, his company had beenhired to build a lightweight, single-seat air-craft whose chief attribute was speed.
Fokker copied the Morane-Saulnier designand even used a license-built version of theFrench Gnome rotary engine�theOberusal. Now, with his Eindecker aircraftjust reaching production stages, Fokkermarried his interrupter gear to it and cre-ated the world�s first true fighter plane.
When the first Eindeckers arrived at thefront in mid-May, 1915, they were allo-cated in penny-packets to the existing re-connaissance units. Initially, the Germanpilots balked at the Eindecker�s capabilities.Having learned to fly on slow, awkward bi-planes, or the Austrian Erich Taube, thespeedy Fokker proved to be a difficult ad-justment. Compared to the Aviatiks and theearly Albatros two-seaters, the Fokker wasfar more maneuverable, unforgiving, andquirky. Fokker realized this problem earlyon and helped establish a training school toteach the proper techniques needed to flyhis creation.
The transition period lasted until earlyAugust, and for some time the German AirService doubted the effectiveness ofFokker�s new airplane. In some cases, theinterrupter gear malfunctioned, shooting off
the propeller blades and killing the pilot inthe ensuing crash. After three fatal crashesin July and August, the Air Service for-bade its further use. It even disbandedFokker�s training school at Doberitz.
The Air Service very nearly killed the bestweapon at its disposal by its overreaction.Two pilots, however, stepped in to savethe day. They were Max Immelmann andOswald Boelcke.
On August 1, 1915, a flight of nine Brit-ish Be2 �Quirks� flew over the German air-field outside Douai. The Allied planes sur-prised the German pilots, who had beennapping in their quarters nearby. Max Im-melmann, a talented twenty-five year oldpilot from Dresden, awoke to a �terriblerow.� When he reached his window, hespotted the British planes passing overhead,dropping bombs on the airfield. He tele-phoned for a car at once so he could get tohis plane.
While waiting for his ride to the airfield,Oswald Boelcke, a smart Saxon with onekill already to his credit, buzzed by on hismotor bike, heading for the airfield and hisawaiting Fokker Eindecker.

24
historical overview
Boelcke and Immelmann were F.F.A.62�s two best pilots. When the squadronreceived a pair of Eindeckers earlier in July,their commanding officer assigned both ofthem to fly the new planes. Immelmann hadonly been flying the Eindecker for threedays, but his raw talent as a flier would morethan make up for his lack of experience onthis day.
Immelmann reached the airfield ten min-utes after Boelcke took off after the BritishQuirks. He fumed impatiently as he waitedfor the ground crew to roll his Fokker out ofits shed, then climbed aboard once it wasready to go. Finally, well behind his com-rade, Immelmann took to the skies, readyto test Fokker�s fussy, but potentiallydeadly, interrupter gear.
Immelmann climbed to about 6,500 feetwhen he saw Boelcke abandon his attackon two Be2s. Boelcke dived away from theBritish planes and did not return to the ac-tion. Immelmann later discoveredBoelcke�s gun had jammed.
With the Quirks split up into at least threegroups, Immelmann climbed after the twoBoelcke had been stalking. Then he spot-
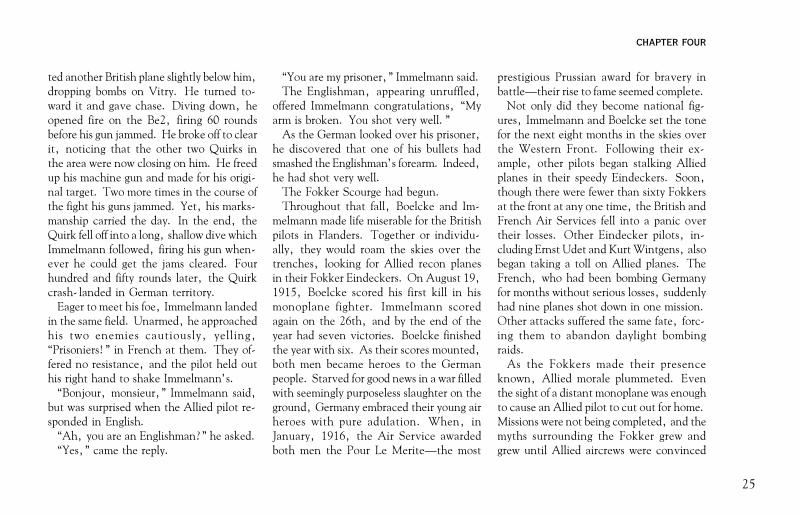
While Fokker worked on a copy of the Morane Bullet, Pfalz produced acopy of the Morane Parasol called the A.I. It saw only limited use.
25
chapter four
ted another British plane slightly below him,dropping bombs on Vitry. He turned to-ward it and gave chase. Diving down, heopened fire on the Be2, firing 60 roundsbefore his gun jammed. He broke off to clearit, noticing that the other two Quirks inthe area were now closing on him. He freedup his machine gun and made for his origi-nal target. Two more times in the course ofthe fight his guns jammed. Yet, his marks-manship carried the day. In the end, theQuirk fell off into a long, shallow dive whichImmelmann followed, firing his gun when-ever he could get the jams cleared. Fourhundred and fifty rounds later, the Quirkcrash-landed in German territory.
Eager to meet his foe, Immelmann landedin the same field. Unarmed, he approachedhis two enemies cautiously, yelling,�Prisoniers!� in French at them. They of-fered no resistance, and the pilot held outhis right hand to shake Immelmann�s.
�Bonjour, monsieur,� Immelmann said,but was surprised when the Allied pilot re-sponded in English.
�Ah, you are an Englishman?� he asked.�Yes,� came the reply.
�You are my prisoner,� Immelmann said.The Englishman, appearing unruffled,
offered Immelmann congratulations, �Myarm is broken. You shot very well.�
As the German looked over his prisoner,he discovered that one of his bullets hadsmashed the Englishman�s forearm. Indeed,he had shot very well.
The Fokker Scourge had begun.Throughout that fall, Boelcke and Im-
melmann made life miserable for the Britishpilots in Flanders. Together or individu-ally, they would roam the skies over thetrenches, looking for Allied recon planesin their Fokker Eindeckers. On August 19,1915, Boelcke scored his first kill in hismonoplane fighter. Immelmann scoredagain on the 26th, and by the end of theyear had seven victories. Boelcke finishedthe year with six. As their scores mounted,both men became heroes to the Germanpeople. Starved for good news in a war filledwith seemingly purposeless slaughter on theground, Germany embraced their young airheroes with pure adulation. When, inJanuary, 1916, the Air Service awardedboth men the Pour Le Merite�the most
prestigious Prussian award for bravery inbattle�their rise to fame seemed complete.
Not only did they become national fig-ures, Immelmann and Boelcke set the tonefor the next eight months in the skies overthe Western Front. Following their ex-ample, other pilots began stalking Alliedplanes in their speedy Eindeckers. Soon,though there were fewer than sixty Fokkersat the front at any one time, the British andFrench Air Services fell into a panic overtheir losses. Other Eindecker pilots, in-cluding Ernst Udet and Kurt Wintgens, alsobegan taking a toll on Allied planes. TheFrench, who had been bombing Germanyfor months without serious losses, suddenlyhad nine planes shot down in one mission.Other attacks suffered the same fate, forc-ing them to abandon daylight bombingraids.
As the Fokkers made their presenceknown, Allied morale plummeted. Eventhe sight of a distant monoplane was enoughto cause an Allied pilot to cut out for home.Missions were not being completed, and themyths surrounding the Fokker grew andgrew until Allied aircrews were convinced

26
historical overview
it was an unbeatable super-weapon.Allied leaders knew only two things could
stop this German onslaught. First, newplanes had to be deployed that could beatthe Fokker. Second, tactics had to be de-veloped to counter the Eindecker threat.In the meantime, the French and Britishpilots would have to take their losses, buy-ing time with their lives until the next gen-eration of aircraft arrived at the front. Fornearly six months, the Allied pilots waitedand bled, knowing that the Germans for thefirst time in the war had command of the airover the Western Front. As the war wenton, the battle for that command would growboth furious and bloody.
An observer raises his arms to surrender as he enters some unfriendlysights.

27
Chapter five
Chapter FiveThe Swing of thePendulum
�You seem magnetically attracted to any Ger-man aeroplane you see, and never weigh thesituation. I saw one of your machines take onone Fokker, then two Fokkers , then threeFokkers, before being shot down at Lille.�
�Captured German pilot Lt. Baldamusto his British interrogators.
Major Lanoe Hawker was nostranger to air combat. Inearly 1915, he earned the
Royal Flying Corps� second Victoria Cross,England�s highest award for bravery.Hawker, a small, sensitive man prone tofits of depression, mounted a Lewis gun onthe side of his Bristol Scout and went hunt-ing for targets. He found two Germanplanes, one of which he shot down and theother he forced to land behind Germanlines. He did it by aiming the gun off to theside, outside the propeller�s arc.
That sort of ingenuity and aggressivenessconvinced the RFC to give Hawker com-mand of the world�s first true fighter squad-ron. It almost proved his undoing. Hawkerhad been flying in combat since the war be-gan with No. Six Squadron. When theRFC ordered him to England in the fall of1915, Hawker was the last original mem-ber of his squadron. Everyone else had beenkilled or wounded.
Command in England did not go well atfirst. With all the fighting he�d seen,Hawker sometimes appeared on the vergeof a total mental breakdown. The strain ofhis new position pushed him even closer tothat edge. Nevertheless, this tough formerengineer knew his duty, and carried out hisresponsibility well. By December, 1915,No. 24 Squadron was ready to go to France.
Equipped with the new Airco DH-2,Hawker�s men would be the spear point ofthe RFC�s response to the Fokker Scourge.Relatively fast for its time, the DH-2 car-ried a single machine gun fixed to fire for-ward. To solve the problem of firing throughthe propeller, British designers gave up on
their own version of the interrupter gear andjust moved the engine behind the pilot. Thispusher design solved the problem admira-bly, but created others. As Hawker�s mendiscovered, the DH-2 had some nasty hab-its. Its unreliable engine tended to catchfire, which usually meant the end for theunfortunate pilot. Worse, it spun easily,an especially bad characteristic in an agewhere nobody knew how to recover from aspin. With their usual grim humor, the pi-lots nicknamed the DH-2 the �Spinning In-cinerator.�
Hawker�s Squadron, as the outfit wasnicknamed, went into action in early Feb-ruary, 1916. He taught his men to be ag-gressive��Attack everything,� he oncetold them. After arriving in Flanders, thesquadron�s DH-2s sought out the dreadedEindeckers and brought them into battle.Though the DH-2 had many problems, itwas far superior to the Fokker monoplane.Soon, as other DH-2 squadrons arrived atthe Front, the German Fokker menacegradually evaporated.

28
historical overview
In early 1916, the French captured an in-tact Fokker Eindecker. After test flying it,they discovered the plane had only limitedmaneuverability, especially compared to thelatest Allied types arriving at the front.When these facts filtered down to the squad-rons, the Fokker at last ceased to be a psy-chological threat.
Instead, they were hunted until the Ger-mans were nearly driven from the skies. Re-surgent Allied airpower had crushed theFokker Scourge.
German infantry man a machine gun.

29
Chapter Six
Chapter SixVerdun
�Victory was to be bought so dear as to bealmost indistinguishable from defeat.�
�Winston Churchill
On February 20, 1916, a crush-ing bombardment�the biggestever seen in human history�
all but wiped out the forward French posi-tions guarding the strategic city of Verdun.The next day, eight German divisions at-tacked on a narrow front, grinding their waythrough the remains of the French defense.By nightfall, good progress had been madeon every sector.
The biggest and most important battle ofthe war had just begun.
As the battle raged below, a new struggleunfolded in the air. For their offensive, theGermans had amassed four observationsquadrons, 14 balloons, and some 20Fokker Eindeckers. The Eindeckers werecharged with protecting the artillery-spot-ters as they went about their vital tasks.
The lunar landscape around Fort Douaumont

30
historical overview
When the battle began, the Eindeckerscleared the sky of all French machines.Outnumbered, and with their aerodromesunder heavy artillery fire, the Frenchsquadron fled Verdun for safer areas. How-ever, that retreat did not last long. At theend of February, Colonel Bares took com-mand of the shattered units around Verdun.General Petain, head of the ground forcesin the Verdun sector, ordered Bares to seizeand hold air supremacy at all costs. Thebrutal artillery barrages had to be renderedineffective, and the only way to do that wasto shoot down the German spotter planes.
Bares immediately called for reinforce-ments until he had almost 120 planes un-der his command. By early March, he hadeight reconnaissance, two artillery, and sixfighter escadrilles at his disposal. To leadthe fighter squadrons, he chose MajorTricornot de Rose, a pre-war aviator whowas France�s first military pilot. An expe-rienced leader, whose drooping mustachehad made him a well-known figure in theAir Service, de Rose set to work reorga-nizing the fighter escadrilles to carry out
The dead at Verdun. The Morte Homme, a vital hill that the Germansrepeatedly attacked, but could never take and hold.
their mission.The first important change came on
March 21. Prior to Verdun, aviation units
had always been under the control of thelocal army commander. Now, the Frenchtried a new system. After de Rose collected

31
Chapter Six
no fewer than fifteen fighter squadrons un-der his direct supervision, Marshall Joffretook his group out of the normal chain ofcommand. Instead of reporting to the localground commanders, de Rose reported di-rectly to de Bares, who in turn answeredonly to Joffre himself. This way, the im-mediate needs of the army commanderswould not interfere with the overall objec-tive: air superiority over Verdun.
Major de Rose, with his chain of com-mand secured, soon modified the very wayhis fighter squadrons did battle in the air.Until Verdun, Allied fighters had patrolledthe front in small numbers, just as the Ger-mans had done with their Eindeckers.Lanoe Hawker and No. 24 Squadron startedto change that in Flanders when they flewmissions as a squadron. At about the sametime, Major de Rose ordered his squadronsto do the same thing.
No longer would there be single plane pa-trols over Verdun. Instead, de Rose taughthis escadrilles to fly and fight in formation.He developed escort tactics and worked outeffective ways to intercept incoming Ger-
man aircraft. His experiments and their ap-plications led to the first truly homogenousfighter squadron. It did not take long forhis ideas to spread all through the FrenchAir Service, as Hawker�s did in the RFC.
The new tactics, combined with new air-craft like the Nieuport 11, went a long waytoward saving France that grim spring. Onthe ground, the Germans slowly advancedtoward Verdun, taking huge losses butgrinding up the French army in the pro-cess. In the air, the Germans lost their briefcontrol of the air over Verdun as theirEindeckers, scattered through the recon-naissance units, ran afoul of superior num-bers and better French airplanes.
Once the Eindeckers had been van-quished, Major de Rose instituted a dailypatrol system that he felt eliminated the needfor escort missions altogether. Each day,his squadrons would patrol their assignedsector in groups of five or six. Sometimes,above these patrols would be the squadron�selite aces�men like Jean Navarre andAlfred Heurtaux. By using their comradesbelow as bait, they racked up high scores in
the vicious fighting at Verdun.And it was vicious. The French showed
no mercy to their outnumbered German en-emies.
Twenty-six year old Albert Deullin roseto acehood over the skies of Verdun, shoot-ing down five planes between February andJune, 1916. On June 4, France awardedhim the Legion of Honor, its highest awardfor bravery. On one of his most notablemissions, Deullin was full of rage at theGermans after having lost his close friend,Lieutenant Peretti, in battle over Verdun.Thirsting for revenge, he caught anEindecker from behind and closed to lessthan thirty feet before opening fire.Twenty-five rounds from his machine gunstruck the cockpit and, as Deullin recalled,�The fellow was so riddled that vaporizedblood sprayed on my hood, windshield,cap, and goggles. Naturally, the descentfrom 2,600 meters was delicious to contem-plate.�
It got even uglier. Bernard Lafont in hiscandid book, Au Ciel de Verdun, detailedthe brutal side of the air war. One time, a

32
historical overview
Caudron bomber force-landed at his aero-drome. When he and his friends came outto see it, they discovered that the Caudron�sgunner had been shot in the head. The pi-lot, Lafont noted, was unhurt but quiteshaken as he was �covered with blood, {his}clothes and face, for in the wind of themotors, the blood that poured out of thepassenger�s wound lashed him.�
Another time, Lafont�s squadron com-mander assigned him to burial detail. Hespent his days recovering the mutilated bod-ies of his comrades. Once, after a night-time crash, Lafont arrived at the crash sitethe next morning and noted:
It is Senain. He received three bullets inthe head, which exploded like rotten fruit;brains and blood trickle on the face andclothes. The helmet moves on a brokenskull.
Both are horribly crushed. The stretcherbearers who pick them up have only a bloodypulp in their hands.
Another time he recovered the body of aFarman crewman, who had fallen to hisdeath from his airplane.
The fate of many aviators who fought for the sky over Verdun.
The second fell on the roof of the house.I clearly heard the dull sound of the bodywhen it was crushed in a heap.Flouc!...The body was recovered from theroof, entirely broken, shattered and shape-less and without rigidity like a heap of
ooze....Clearly, the air war over Verdun was not
for the faint of heart.

33
Chapter Seven
Chapter SevenGermany ResurgentAs a pilot in France I chanced over the linesAnd there I met an Albatros Scout.It seems that he saw me, or so I presumed,His manoeuvres left small room for doubt.He sat on my tail without further delay,Of my subsequent actions I think I might say�
My turns approximated to the vertical,I deemed it most judicious to recede.I frequently gyrated on my axisAnd obtained colossal atmospheric speed.O descended with unparalleled momentumMy propeller�s point of rupture I surpassed,And performed the most astounding evolu-tions�In other words�I SPLIT-ASSED!
��In Other Words� RFC squadron song.
By early April, the air fightingover Verdun had all but driventhe German Air Service from the
skies. The Nieuport escadrilles had carriedout Petain�s desperate February order to wincommand of the air. Now, the Germanarmy below was blind, its reconnaissance
and observation planes shot out of the sky.No longer would their artillery fire be nearlyas effective as it was at the outset of thebattle. As this happened, both sides real-ized the importance of the air fighting andrenewed their efforts to take or maintain
air superiority. The struggle took on a des-perate intensity.
As their enemies concentrated their fight-ers into dedicated squadrons, the Germansbegan to react in the same way by the springof 1916. Separate Fokker squadrons were
Nieuports on the flightline.

34
historical overview
established, sometimes called Fokker staffelsor Single-Seat-Combat Flights (KEKs).These primitive fighter squadrons helpedoffset the Allied advantage in aircraft de-sign until better German planes could maketheir debut over the front.
At first, the Germans tried to defend ev-ery piece of sky at once. They flew �barragepatrols� where each staffel was assigned asector to scour. No Allied planes were sup-posed to cross the barrage patrol barrier. Butto cover every inch of sky in a given sectorrequired the Fokker staffels to break downinto flights of two or three each. Again,their tactics left them outnumbered and fre-quently overwhelmed by the larger forma-tions of Allied planes.
Summer started poorly for the Germansand only got worse. In June, the great MaxImmelmann, known to his countrymen asthe �Eagle of Lille� died in combat with aBritish Fe2. Later investigation indicatedthat Immelmann�s interrupter gear hadfailed and he had shot his propeller off. TonyFokker, always worried about negativepress, went to great lengths to deny this.In any case, the British were happy to take
credit for Immelmann�s death. He had beenone of the top aces of the war at the time ofhis death, with 15 kills to his credit.
As the summer wore on, the German AirService continued to be rolled back by theAllied change in tactics and aircraft. When
A Nieuport 17 at the front. The Nieuports 11 and 17 helped turn thetide against the Fokker Eindeckers.
the British launched their Somme Offen-sive in July, the air fighting heated up onceagain. Though the RFC squadrons tookheavy losses, the Germans seemed on theropes for sure. Given the disaster the groundoffensive produced, the success in the air

35
Chapter Seven
provided a glimmer of hope to the tiringAllied home fronts.
The German Air Service knew it had todo something soon to redress the balance inthe air. To do it, they called on OswaldBoelcke, their leading ace and master tac-tician.
Clearly, the KEKs and Fokker staffelswere a step in the right direction. Just asclearly, they had not gone far enough.Starting in late summer, the Germans be-gan organizing dedicated fighter squadronsof nine planes each. Boelcke was given afree hand to recruit for his squadron, whichwould be one of the first formed. CalledJagdstaffels�or hunting flights�these newunits were sure to be an improvement overthe earlier, ad-hoc collection of Eindeckersin the KEKs.
Jagdstaffel 2�or Jasta 2 as everyone sooncalled it�was given to Oswald Boelcke. Hespent the end of the summer traveling allover Germany and the front lines selectinghis pilots. In Russia, he found a former cav-alry-officer-turned-reconnaissance-pilotnamed Manfred von Richthofen.Richthofen had proved time and again his
The wreckage of Max Immelmann�s Fokker Eindecker being inspected byGerman personnel

36
historical overview
aggressiveness in the air. The attribute ap-pealed to Boelcke who invited him to joinhis new squadron. The young Prussian aris-tocrat quickly accepted.
In Werner Voss, Boelcke found anothergreat fighter pilot. A shy, enigmatic nine-teen year old, Voss impressed Boelcke withhis remarkable flying abilities. He wouldlater become one of Germany�s top aces.
By mid-September, 1916, Jasta 2 wasready for combat. Assigned to the FirstArmy, Boelcke�s men would be going upagainst the best British squadrons inFlanders. In the weeks that followed, thesquadron routinely ran up against LanoeHawker�s No. 24 Squadron�and came outon top. After nearly six months ofthrashings at the hands of the Allies, theGerman Air Service was slowly climbingback on top.
Boelcke himself went on a scoring frenzyunmatched so far in the war. Between Sep-tember 2 and October 27, 1916, Boelckedowned no fewer than twenty Britishplanes. His men paced his achievements.Richthofen knocked down six in the sameperiod while Boelcke�s wingman, Erwin
Boehme, claimed another five.The string of victories continued through
the fall, as Boelcke taught his elite group ofpilots all that he had learned in his manyprior combats. To help the entire Air Ser-vice, he set down on paper his famous�Dicta Boelcke� which spelled out the mostimportant tenants of air combat. Thosesame basic principles apply today just as theydid in the war-torn skies of France someeighty years ago.
But Boelcke was wearing himself out. Fly-ing two or three missions a day throughoutthat fall had given him a haggard, gauntvisage. Despite his exhaustion, he contin-ued to lead his men in battle. Neverthe-less, the air fighting had long since becomeunforgiving, and the destruction in the skiesthat he helped develop and refine eventu-ally claimed his life.
On October 28, 1916, Boelcke and hissquadron were scrambled to intercept LanoeHawker�s No. 24 Squadron. In his hasteto get airborne, the great German tacticianhad forgotten to strap himself into the cock-pit�a mistake born from exhaustion thatwould soon prove fatal.
With faithful Erwin Boehme on his wing,Boelcke led his Jasta up against Hawker�sSquadron. Soon, a whirlwind dogfightraged, with planes zipping all over the sky.As usual, Boehme stayed close to his leader.Suddenly, though, Manfred vonRichthofen cut in front of Boelcke, intenton killing a diving DH-2. Boelcke had toswerve to avoid colliding with the Prussian.As he did, his wing scuffed Boehme�sAlbatros D.II. It was barely a collision,Boehme recalled later, but it was enoughto be Boelcke�s undoing. His Albatros fellout of control toward the front lines below.The master tactician fought his plane all theway down and even managed to make arelatively soft crash landing. But since hewas not strapped in, even the modest im-pact of the crash killed him.
Boehme, whose plane was also damaged,managed to make a successful landing andemerged from the tragedy physically unhurt.Emotionally, he was traumatized by the ac-cident. For weeks, the brave native ofHolzminden carried the guilt of Boelcke�sdeath on his conscience. It did not help thathis own comrades also blamed him for their

37
Chapter Seven
leader�s death. Another man would havebeen broken by the accident, but notBoehme. He continued to fly and fight,winning back the respect of his fellow pilotswith his impressive string of victories. Hewould continue to fly combat through 1917,despite two severe wounds including oneterrible head injury that kept him out ofcombat for nearly five months.
Oswald Boelcke was gone, but his legacylived in both the spirit and the organizationof the German fighter force. He had taughtthem how to fight, and how to fight suc-cessfully despite being outnumbered. Now,though, his death created a leadershipvacuum that would not be filled until early1917.
The man who filled that vacuum was noneother than Boelcke�s former protégé,Manfred von Richthofen.
A cold, calculating pilot whose flyingskills were not nearly as refined as some ofhis comrades, including Werner Voss,Richthofen nonetheless possessed all theingredients for acehood. He had a thirst forhunting British planes, as well as a knackfor picking the right fights and avoiding dis-
advantageous situations. He was a stalker,a plotter, a master of patience. All of thesethings paid off in spades as he continued tofly with Jasta 2.
His first big splash came on November 23,1916, a day in which Jasta 2 met Hawker�sSquadron twice. The first encounter camethat morning over Le Sars. Though a whirl-ing dogfight erupted between the two sides,no planes were shot down. After a sharp,intense action, both the British and Ger-mans retreated to rearm and refuel.
Later that day, three DH-2s took off onanother patrol. This flight, led by MajorHawker, included Captain J.O. Andrewsand Lieutenant Robert Saundby, a futureAir Marshal.
Over the lines, Hawker�s patrol ran afoulof Jasta 2 again. This time, the British wereoutnumbered and soon thrown on the de-fensive. Early in the dogfight, an AlbatrosD.II slid behind Hawker�s DH-2, but be-fore it could open fire, Andrews chased itoff. He paid for saving his squadron com-mander moments later when another Ger-man hit his engine, forcing him to disen-gage and return to No. 24 Squadron�s aero-
drome at Bapaume.Somehow in the fray, Hawker ended up
one-on-one with an Albatros D.II. TheGerman plane, flown by Manfred vonRichthofen himself, was not as nimble asthe DH-2, but was faster and could climbbetter.
What developed was a battle of two mas-ters. Hawker used his DH-2�s maneuver-ability to avoid every attack Richthofen at-tempted. For his own part, the Prussian acerelied on his climb rate to get him aboveand behind Hawker�s pusher. Round andround the fight went, all the while the windblowing the two combatants deeper intoGerman-held territory.
It was a standoff�neither pilot could getinto position for the killing shot. But timeand circumstance began to tell againstHawker. The farther the fight moved be-hind German lines, the more anxiously theBritish ace looked after his fuel gauge. Fi-nally, with no other choice, the nine-killVictoria Cross winner had to cut out forhome. He chose to dive out of the fight,building airspeed as he sped back toward hisown lines.
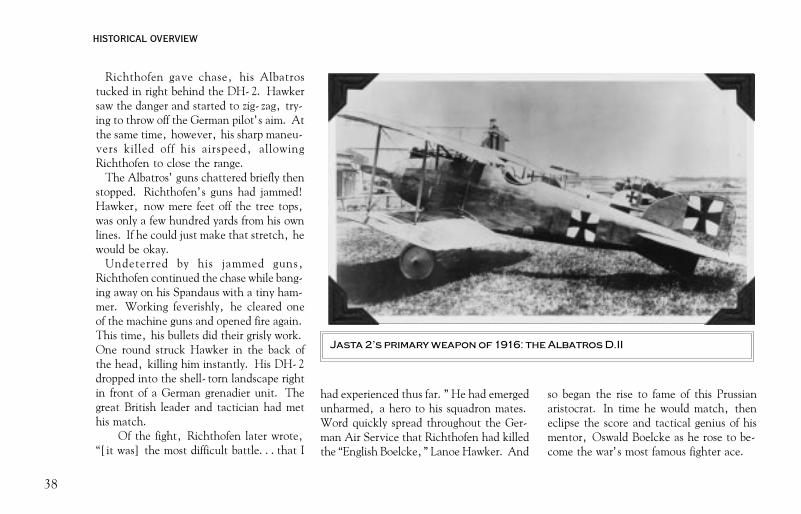
38
historical overview
Richthofen gave chase, his Albatrostucked in right behind the DH-2. Hawkersaw the danger and started to zig-zag, try-ing to throw off the German pilot�s aim. Atthe same time, however, his sharp maneu-vers killed off his airspeed, allowingRichthofen to close the range.
The Albatros� guns chattered briefly thenstopped. Richthofen�s guns had jammed!Hawker, now mere feet off the tree tops,was only a few hundred yards from his ownlines. If he could just make that stretch, hewould be okay.
Undeterred by his jammed guns,Richthofen continued the chase while bang-ing away on his Spandaus with a tiny ham-mer. Working feverishly, he cleared oneof the machine guns and opened fire again.This time, his bullets did their grisly work.One round struck Hawker in the back ofthe head, killing him instantly. His DH-2dropped into the shell-torn landscape rightin front of a German grenadier unit. Thegreat British leader and tactician had methis match.
Of the fight, Richthofen later wrote,�[it was] the most difficult battle...that I
Jasta 2�s primary weapon of 1916: the Albatros D.II
had experienced thus far.� He had emergedunharmed, a hero to his squadron mates.Word quickly spread throughout the Ger-man Air Service that Richthofen had killedthe �English Boelcke,� Lanoe Hawker. And
so began the rise to fame of this Prussianaristocrat. In time he would match, theneclipse the score and tactical genius of hismentor, Oswald Boelcke as he rose to be-come the war�s most famous fighter ace.

39
Chapter Eight
Chapter EightApril Massacre
When you soar in the air on a Sopwith ScoutAnd you�re scrapping with a Hun and your guncuts outWell, you stuff down your nose �til your plugsfall outCos you haven�t got a hope in the morning.
For a batman woke me from my bedI had a thick night and a very sore headAnd I said to myself, to myself I said�Oh! We haven�t got a hope in the morning!
We were escorting Twenty-Two.Hadn�t a notion what to do,So we shot down a Hun and an FE too!Cos they hadn�t got a hope in the morning.
We went to Cambrai all in vainThe FE�s said, �We must explain,Our cameras broke; we must do it again,�Oh! we haven�t got a hope in the morning!
��We Haven�t Got a Hope in the Morn-ing� 54 Squadron, RFC.
As the Jagdstaffeln made theirpresence felt all along the Western Front, Allied aviators found
themselves again on the verge of losing con-trol of the air. The German Air Service,now equipped with tough, nimble biplanefighters like the Albatros D.II and FokkerD.II, had come a long way since the blood-letting over Verdun and Flanders.
Now it was the Allies who were at a dis-advantage. Their tactics and organizationhad been copied by their enemy, and nowthe German aircraft they met in the sky wereat least as good as their own, and frequentlybetter. While fighter development inFrance and Britain produced such excel-lent designs as the Spad 7, the Nieuports11 and 17, and the Sopwith Pup in 1916,reconnaissance designs languished. TheBritish were forced to keep using the hope-lessly inadequate Be2 Quirk. German aceslike Manfred von Richthofen feasted onthese hapless planes, making a living byeasily knocking them out of the sky. TheBe2�s replacement, the RE8�nicknamedthe �Harry Tate� by its crews�turned out
to be a disaster. Ungainly in the air, andprone to all sorts of mechanical failures, theRE8 was, at best, a marginal improvementover the Quirk.
Then, in early 1917, the next genera-tion of German fighters reached the front.Led by the agile and swift Albatros D.III,the new German designs caught the Alliestotally unprepared. Their own replacementsfor the Nieuports and Spad 7s were justreaching squadron status and had not yetarrived in strength on the Western Front.These included the famed SE5 and the tem-peramental Sopwith Camel. While thefront-line squadrons waited for these newplanes, they did the best with what they hadon hand, their morale soaring with theknowledge that the Germans seemed on theverge of defeat on the ground.
The year started on a high note for theFrench and British on the Western Front.The battle at Verdun had finally ended inDecember, 1916, with the French pullinga victory out of what looked like certain de-feat. On the Eastern Front, the Brusilovoffensive had nearly crushed the Austrian

40
historical overview
army before petering out when the Germansarrived to bolster their sagging partners. Bythe end of the year, it looked like the Ger-mans would be finished off in 1917. Alliedfortunes were finally on the rise, and alllooked forward to what they thought wouldbe the final campaign season.
April, 1917 shattered all their hopes.That month started and ended with disas-ter, both on the ground and in the air.
On the ground, the French launched amassive, go-for-broke offensive along theChemin-des-Dames. Naturally, overhead,the air war heated up as the troops wentover the top. The operations turned intodisaster. In 48 hours, the French lost120,000 men to the stiff German defenses.The medical corps had prepared onlyenough beds for 10,000 wounded, causinguntold misery to the thousands of woundedwho died while waiting to be examined by adoctor or an orderly. As the slaughter con-tinued, the first cracks in the French armyappeared. Some units refused to advance,others in the rear would not go back intothe trenches, even when their officers
threatened them at gunpoint. The rebel-lion spread like wildfire from the 6th Army(the one involved in the Chemin-des-Dames offensive) into the rest of the army.By the end of April, 68 of France�s 110 in-fantry divisions were in open mutiny. It tookuntil June to quell the unrest, but by thenthe damage had been done. Morale in theFrench army remained low, and for the restof the war all it could manage were mainlydefensive duties and limited offensive op-erations.
The fighting in the air mirrored the for-tunes below. With the new Albatros D.IIIin full service, the Jastas entered the monthin better shape than ever. Tempered by thepitched air battles of the previous fall, theGerman pilots had both the tactics and theexperience to deal the Allied air services aheavy blow. They took full advantage ofit.
In Flanders, as Sir Douglas Haig�s BEFflung itself at the German defenses aroundArras, the Royal Flying Corps was calledupon to give full support to the offensive.En masse, artillery spotting Quirks and
Harry Tates crossed the lines to lend a handin the fighting, only to be chopped out ofthe sky by prowling Albatros scouts. Thefighter squadrons, now flying aging 1916designs, could offer but little support. Asthe losses mounted, the replacement pilotsentering the fray were so poorly trained theywere hardly more than cannon fodder.Morale in the observation units plummetedas the death toll mounted.
The British started the battle of Arras withtotal superiority in aircraft. Three hundredand sixty five RFC planes blanketed the skiesover the battle, fully a third of them fight-ers. Against this force the Germans couldmuster only about a hundred fighters and ahundred other planes. By the end of themonth, the British had lost 176 machines,while the Germans suffered losses of only21 pilots and crew killed, and 15 wounded.
Nowhere was the carnage worse thanaround Douai, where two Nieuport squad-rons, No. 60 and No. 29 were stationed.In one four-week period, both squadronslost 100% of their pilot strength in action.Only the constant flow of inexperienced

41
Chapter Eight
replacements kept the Nieuports mannedfor the daily dawn patrols over Douai. Mo-rale sank as losses increased, but the twosquadrons fought on in part because of ris-ing stars like Billy Bishop and Albert Ball,as well as by the false assumption that theGermans were being hit as hard as theywere. Day in and day out through April,they clashed with a deadly new threat,Jagdstaffel 11, now commanded by the leg-endary Manfred von Richthofen.
Richthofen took over Jasta 11 earlier in1917 at a time when the outfit had donelittle in the air. It took only a short time forhim to whip the squadron into fightingshape. By April, it had all the trappings ofan elite formation�experience, dedica-tion, high morale, and a tremendous com-manding officer. When they went into ac-tion during the Battle of Arras, they soonproved their superiority over the best theBritish could field. Throughout the month,Richthofen set the pace for all his pilots byshooting down no fewer than 20 Britishplanes, most of which were elderly Quirksand slow FE2s. Other pilots in the units
chalked up amazing tallies as well. Lotharvon Richthofen, Manfred�s younger andmore reckless brother, claimed fifteen killsthat month, showing in the process that air
combat ran in his family�s blood. AnotherJasta 11 pilot, Kurt Wulf, outshone hiscommander by knocking down no fewerthan twenty-two RFC planes between April6th and April 30th. Karl Allmenroder, afuture 30-kill ace, got eight more thatmonth.
By the end of the month, Jasta 11 and itscohorts killed or wounded 443 British avia-tors. Since the British insisted on offensiveoperations at all costs in the air, most ofthe wounded pilots and observers fell be-hind German lines and spent the rest of thewar in POW camps.
The slaughter, known to the British as�Bloody April,� had a profound effect onthe air war. In the summer of 1916, theaverage life expectancy of an RFC pilot was295 combat hours. After April, 1917, thenumber fell to 92. The war would be foughtfrom then on by a small core of hardenedveterans surrounded by neophytes who werelittle more than victories-in-waiting for thelikes of Manfred von Richthofen.
After April, the British and French spentthe rest of that spring deploying their latest
Douglas Haig, commander of theBEF.

42
historical overview
generation of fighters and bombers. The ar-rival of the Camels, SE5s, RE8s, Breugets,and SPAD 13s helped redress the imbal-ance in the air. For almost two years now,the air war had seesawed back and forth,with one side gaining the advantage andslaughtering the other until the technologi-cal balance swung to the other side. By thesummer of 1917, the latest German andAllied planes were just about evenlymatched. The technological advantagesenjoyed in the past�if but for fleeting mo-ments�would never again be seen. For therest of the war, the technological race wouldremain a near dead-heat, a fact that for-ever changed the nature of the fighting overthe Western Front.
Through the summer and into the fall,the air war settled down into a stranglingstruggle of attrition. No longer would in-dividual feats of bravery affect the course ofthe fighting as it had back in 1915 whenBoelcke and Immelmann struck terror intotheir British opponents. Two years removedfrom the Eagle of Lille�s heyday, the air warbecame a simple battle of numbers. The
Allies had them, the Germans did not.Compensating for their lack of numbers, theaverage German pilot was more experiencedand better trained than his Allied counter-part. That fact alone helped even the oddsas more and more Allied planes poured intoGerman territory.
Losses were staggering. French and Brit-ish units took 70% losses each month, butcarried on anyway. Others suffered nearly100% aircrew losses a month, and as theold veterans died, fewer and fewer of thenew replacements lived long enough to beof use to their squadrons.
Despite the horrifying casualties, the Al-lies insisted on prosecuting an offensive airwar. By maintaining the pressure on theGermans, they hoped to wear them down.As bloody as the strategy proved, the effecton the German Air Service slowly began totell. By 1918, the strategy would finally bearfruit.
In the meantime, the killing continued.One of the first great Allied pilots to die
as the air war evolved into this battle of at-trition was Albert Ball. Ball cut his teeth in
combat in the early days of air combat wherehe learned to be a lone-wolf style hunter.He fought with reckless abandon, throw-ing himself into every fight no matter whatthe odds or risks may have been. Heemerged undaunted after every fight, some-times through sheer audacity. In the air,he was a one-man whirling dervish, but onthe ground, he was a troubling characterwhose odd habits sometimes made his com-rades nervous. He spent much of his off-duty hours tending to his gardens, but onoccasion he would build a bonfire, thendance around the flames madly playing aviolin. Needless to say it was a quirk thatdid not endear him to his squadron mates.
Though he preferred to stalk his aerialprey alone, by 1917, circumstances forcedhim to fly in with other pilots from 56Squadron. He carried out his duties withthe squadron, flying the SE5�a plane hedetested�in formation like the others. Af-ter he completed these routine patrols, hewould frequently exchange his SE5 for themore maneuverable Nieuport 17 and fly solomissions over the front. It was an increas-

43
Chapter Eight
ingly dangerous pastime.On May 7, 1917, Ball led a late after-
noon patrol over German lines aroundLens. The squadron ran right intoRichthofen�s Jasta 11, and a series of con-fused mini-battles raged all over the front.
Toward the end of the fight, Albert Ballwas seen to dive on an Albatros D.III, al-most certainly flown by Lothar vonRichthofen. He overshot the Germanfighter, which was then attacked by Ball�swingman, Lt. C.M. Crowe. As Lothar
fended off this second attack, Ball contin-ued down into a thick cloud layer just be-low the brewing fight. It was the last timeanyone from his squadron saw him alive.
Witnesses later reported seeing Ball�s SE5plunge out of the cloud inverted with itspropeller stopped. Too close to the groundto pull up, the SE5 smashed into theground, killing Ball instantly.
Later research has shown that Ball prob-ably became disoriented in the cloud andaccidentally entered an inverted dive whichchoked the carburetor and killed the en-gine. The doctor examining Ball�s corpseconcluded he had suffered a broken backbut no combat injuries. Later, the Germanstried to claim that Lothar von Richthofenshot Ball down. They even went so far asto fire a revolver into his SE5�s wreckagethen show the bullet holes as evidence ofLothar�s success.
Either way, Britain�s first 40-kill ace wasdead.
Four months later, Germany�s greatestlone wolf ace, Werner Voss, met his endin one of the great air battles of the First
Richthofen speaking with Jasta 10�s commanding officer, Lt. Klein, a 22kill ace.

44
historical overview
World War.Voss, like Ball, did not have many friends
on the ground. He kept to himself, eschew-
ing friendships with his fellow pilots in fa-vor of spending time alone with his motor-cycle. He spent hours tinkering with the
cycle, working away on its tiny engine whiledressed in an ancient green sweater muchtoo big for his spindly frame. He loved ma-chines and would spend much time talkingwith his mechanic about his airplanes andhow they could improve on them.
While on the ground he was an awkward,retiring fellow, Voss was pure pilot in theair. A gifted flier with a phenomenal graspof aerobatics, he could quickly maneuverfor a killing shot in almost any situation.Combined with his incredible flying skillwere his sharpshooting abilities with hisplane�s machine guns. Voss was a deadeyeshot who used his uncanny accuracy to sparethe lives of his opponents. Having been atwo-seater pilot once himself, he felt sym-pathy for his enemy to a degree few of hispeers showed. Instead of shooting to kill,he would aim for the engine, hoping toknock it out, while leaving the crew un-harmed. In Voss� mind, that at least gavehis quarry a fair chance to make a crashlanding�and he could claim a victory aswell.
The Spad XIII, one of the best fighters of the war. This particular Spadserved in the USAS as Captain John Mitchell�s personal plane.Mitchell was the commander of the 95th Aero Squadron.

45
Chapter Eight
By early September, 1917, Voss had risento command of Jasta 10. His 48 victoriesmade him the second leading ace in theGerman Air Service, a fact that earned himmuch publicity and praise. Just 20 years old,Voss hated his new responsibilities. Com-mand did not suit him, and whenever hecould, he�d fly his favored lone-wolf pa-trols.
On September 23, 1917, Voss flew hislast patrol. The night before, the youngsquadron commander had attended a partyfor one of his pilots who had just earned thePour Le Merite. He awoke the next morn-ing groggy from a hangover. As a result,he was not at his best.
Alone, he set out over the front that af-ternoon in his Fokker Dr. I Triplane, a newtype just entering use in the GermanJagdstaffeln. Near Poelcapelle, he ranacross B Flight, 56 Squadron. Led by noless a figure than ace Jimmy McCudden, BFlight represented one of the most experi-enced formations in the entire RFC. Six-to-one odds did nothing to deter Voss, whofought McCudden and his comrades to a
standstill in an epic, 10-minute fight. Hedrove off one SE5, put holes in the otherfive until, at last, sheer numbers began totell. Somewhere in the fight, Voss prob-ably took a bullet that severely injured him.His flying became erratic, and when he wentinto a shaky, shallow dive, Arthur Rhys-Davids slipped onto the Fokker�s tail andpoured a long burst into the Triplane. Thefusillade of bullets tore into the Dr.I, andVoss spun into the ground where his craftexploded in flames.
Perhaps the last, great lone-wolf hunterhad met his end. With him, so ended thelast vestiges of the earlier air war. From nowon, the fight in the air would grow increas-ingly impersonal and bloody as the final cli-max of the war approached.
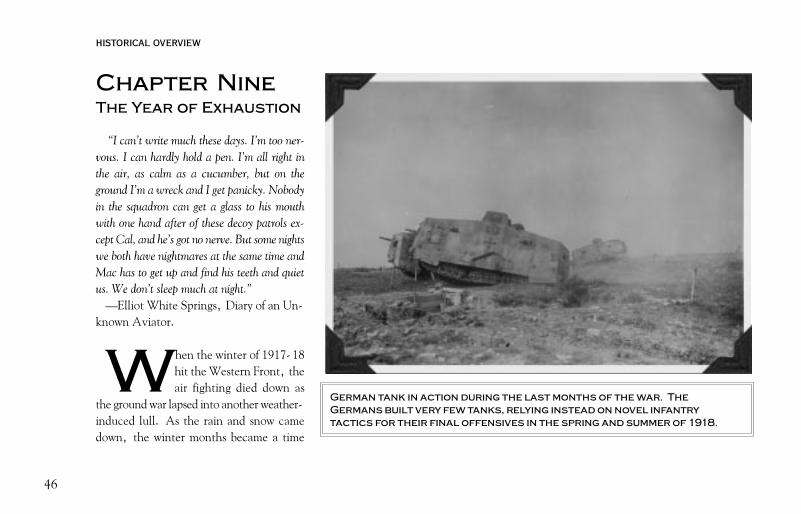
46
historical overview
Chapter NineThe Year of Exhaustion
�I can�t write much these days. I�m too ner-vous. I can hardly hold a pen. I�m all right inthe air, as calm as a cucumber, but on theground I�m a wreck and I get panicky. Nobodyin the squadron can get a glass to his mouthwith one hand after of these decoy patrols ex-cept Cal, and he�s got no nerve. But some nightswe both have nightmares at the same time andMac has to get up and find his teeth and quietus. We don�t sleep much at night.�
�Elliot White Springs, Diary of an Un-known Aviator.
When the winter of 1917-18hit the Western Front, theair fighting died down as
the ground war lapsed into another weather-induced lull. As the rain and snow camedown, the winter months became a time
German tank in action during the last months of the war. TheGermans built very few tanks, relying instead on novel infantrytactics for their final offensives in the spring and summer of 1918.

47
Chapter Nine
for renewal and preparation as both sidesreadied themselves for the coming spring.
With Russia knocked out of the war, theAllies knew they�d soon be hit by the fullweight of the German army in one last, all-or-nothing effort to win the war. The spentthe time building up reserves, sending ad-ditional squadrons to the front, and bick-ering over how best to employ the thou-sands of troops America was just beginningto send to Europe. Though the U.S. en-tered the war in April, 1917, it had yet tomake an impact on the Western Front.
The Germans did likewise. After the Rus-sians surrendered that December, the Ger-mans began transferring hundreds of thou-sands of troops west to France where theywould undertake one last massive offensivedesigned to end the war before the Ameri-cans could get into it in any number. Calledthe Ludendorf Offensive, the initial planwas to drive a wedge between the Frenchand British sectors of the front with spe-cially trained assault troops equipped with
light machine guns, mortars, and flamethrowers.
On March 21, 1918, the Germansopened the Ludendorf Offensive with stun-ning success. At first, the British seemedto crumple under the weight of the Germanattack. Ground that cost millions of casu-alties to gain was surrendered in the firstfew days of the battle. Along a 60-milestretch of the front, the German shocktroops overwhelmed and threw back theAllied defenders. As the crisis mounted,the British began retreating toward thechannel ports, while the French focused onthe protection of Paris. Into the growinggap between the Allied armies flowed divi-sion after division of German soldiers. Fora time, it looked like the offensive wouldfinally break the Allies, but FerdinandFoch, the commander of all Allied forcesin France, threw in his reserves. The Ger-man advance slowly lost steam as resistancestiffened and material shortages, includingweapons and ammunition, began to plague
the army. By April 5th, the offensive cameto a halt after gaining some 40 miles ofground.
The second part of the offensive openedon April 9th. Again aimed mainly at theBritish, the attack succeeded for a time,but then ground to a halt as British reserveswere flung into the battle. No breakthroughhad been achieved, but the assault cost theBritish 100,000 men in less than a month�sfighting.
The next phase of the German offensivecame on May 27th against the French 6thArmy along the Chemin-des-Dames. Ini-tially, this attack proved even more suc-cessful than the other two combined as thedispirited and weakened 6th Army buck-led, then collapsed. The Germans pouredsouth toward the Marne in hot pursuit ofthe retreating French. Then, with theiradvance elements almost to the Paris sub-urbs, the German attack was stopped coldat a little town called Chateau-Thierry.Ominously, for the Germans, their oppo-

48
historical overview
nent at Chateau-Thierry was the 6th U.S.Marine regiment.
The Americans had arrived in force. Ger-many had lost the race against time.
When the German offensive opened inMarch, the air war exploded with renewedintensity. Losses over the two Flanders op-erations were staggering as both sides foughtwith a desperation unsurpassed in the war.Hundreds of Allied pilots died in the ensu-ing weeks attempting to slow the Germanadvance with bombing and strafing attacks.
On the German side, the Air Service co-operated with the ground troops in newways. Using �infantry battle planes� like theHannover CL.III and Halberstadt C.L.II,the German Air Service swept ahead of theadvancing infantry to bomb and strafe Al-lied strongpoints and troop concentrations.It was hazardous duty at best, flying downlow amidst rifle and machine gun fire.Losses in the ground attack squadrons�known as Schlastas�approached criticallevels during the spring offensives. Despite
U.S. troops in action, supported by a French tank.

49
Chapter Nine
the casualties, their support proved a valu-able component to the early successes inFlanders and along the Chemin-des-Dames.
Battle casualties and operational lossestook a staggering toll on the German airunits supporting the spring offensives. Be-tween mid-March and mid-May, thesquadrons in Flanders lost 479 planes, ofwhich 135 were fighters. The rest were in-fantry support planes and reconnaissanceaircraft. Later, historians calculated thatthe German Air Service lost at least one-seventh of its total strength each monthduring the spring of 1918�a figure theirlimited remaining resources just could notsupport.
Meanwhile, the Jastas continued to takea heavy toll of Allied aircraft. To compen-sate for the superior numbers they faced allalong the front, the Germans began con-centrating their Jagdstaffeln in critical ar-eas in an effort to gain local air superiority.During the initial days of the March offen-
sive, the Germans actually outnumberedthe British on the sixty-mile stretch of frontby almost 200 planes. Flying in geschwadersof up to four squadrons at a time, the Ger-
mans mowed down their opposition at analarming rate. In one 10-day period alone,the Germans knocked down 478 Britishplanes. By April 29th, the toll had risen to
A Hannover C.L III, captured by the 95th Aero Squadron.
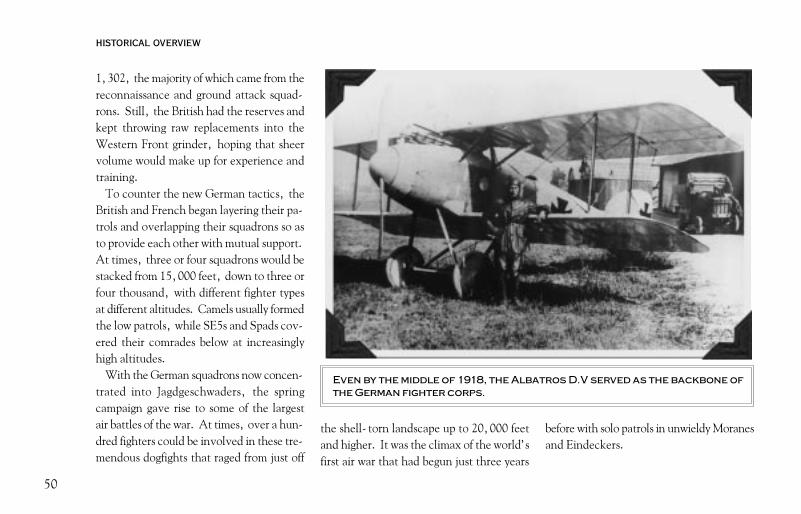
50
historical overview
1,302, the majority of which came from thereconnaissance and ground attack squad-rons. Still, the British had the reserves andkept throwing raw replacements into theWestern Front grinder, hoping that sheervolume would make up for experience andtraining.
To counter the new German tactics, theBritish and French began layering their pa-trols and overlapping their squadrons so asto provide each other with mutual support.At times, three or four squadrons would bestacked from 15,000 feet, down to three orfour thousand, with different fighter typesat different altitudes. Camels usually formedthe low patrols, while SE5s and Spads cov-ered their comrades below at increasinglyhigh altitudes.
With the German squadrons now concen-trated into Jagdgeschwaders, the springcampaign gave rise to some of the largestair battles of the war. At times, over a hun-dred fighters could be involved in these tre-mendous dogfights that raged from just off
Even by the middle of 1918, the Albatros D.V served as the backbone ofthe German fighter corps.
the shell-torn landscape up to 20,000 feetand higher. It was the climax of the world�sfirst air war that had begun just three years
before with solo patrols in unwieldy Moranesand Eindeckers.

51
Chapter Nine
Though the Germans were giving morethan they received, the steady drain of ex-perienced pilots began to take its toll. Byearly summer, the units were growing ex-hausted. The tactic of concentrating largenumbers of Jagdstaffeln on one critical fronthad not succeeded in winning local air su-periority, for the Allies responded in kindand could absorb the tremendous losses theGermans inflicted on them.
On April 21, 1918, the German Air Ser-vice suffered its worst loss of the war. Onthat day, the legendary Red Baron�Rittmeister Manfred von Richthofen�tookoff from Cappy Aerodrome with nine otherpilots from Jasta 11. The 10 planes brokeup into two flights. The lead flight of fourplanes was led by Jasta 11�s commandingofficer, Leutnant Hans Weiss. Richthofen,in his scarlet Fokker Dr.I Triplane, tookthe rear flight of six and set off behind Weissin search of Allied prey.
At 10:40 that morning, Weiss spotted apair of RE8s from No. 35 Squadron. At
Pilots and crews alongside their SE5As.
7,000 feet, the two planes were busy tak-ing pictures when the sky around them sud-denly erupted with German fighters. Mi-
raculously, the RE8s held their own, fight-ing back with their rearward firing machineguns with fierce desperation. One of the

52
historical overview
RE8 gunners actually hit Weiss� fighter,severing his rudder controls. Crippled,Weiss limped back to Cappy.
Five minutes after the first flight attackedthe RE8s, Sopwith Camels from No. 209Squadron, led by Captain A.R. Brown,appeared on the scene at 12,000 feet.Brown saw Richthofen�s men far below at5,000 feet and dove to the attack. Soon,Richthofen�s men were embroiled in a swirl-ing dogfight with the aggressive Camel pi-lots.
Flying with 209 Squadron that day was ayoung neophyte pilot named LieutenantW.R. May. His flight leader, CaptainBrown, had given him explicit orders notto stay in a fight should one develop. In-stead, he was to dive for home and avoidcontact with any German planes.
When the fight started, May did exactlyas he was told. He dove out of the growingdogfight, running westward toward the vil-lage of Vaux-sur-Somme. Above him, theBaron saw the lone Camel disengage and
The spoils of war. Three Australian soldiers display the Red Baron�smachine guns taken from the wreck of his Dr.I.
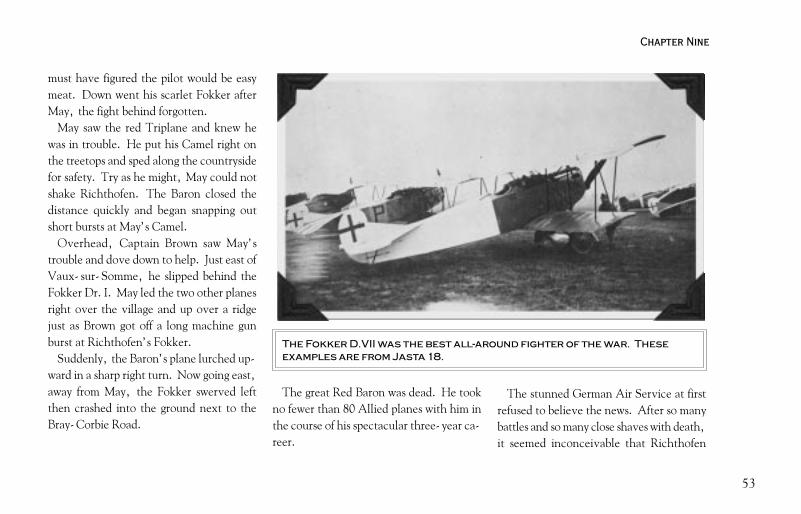
53
Chapter Nine
must have figured the pilot would be easymeat. Down went his scarlet Fokker afterMay, the fight behind forgotten.
May saw the red Triplane and knew hewas in trouble. He put his Camel right onthe treetops and sped along the countrysidefor safety. Try as he might, May could notshake Richthofen. The Baron closed thedistance quickly and began snapping outshort bursts at May�s Camel.
Overhead, Captain Brown saw May�strouble and dove down to help. Just east ofVaux-sur-Somme, he slipped behind theFokker Dr.I. May led the two other planesright over the village and up over a ridgejust as Brown got off a long machine gunburst at Richthofen�s Fokker.
Suddenly, the Baron�s plane lurched up-ward in a sharp right turn. Now going east,away from May, the Fokker swerved leftthen crashed into the ground next to theBray-Corbie Road.
The Fokker D.VII was the best all-around fighter of the war. Theseexamples are from Jasta 18.
The great Red Baron was dead. He tookno fewer than 80 Allied planes with him inthe course of his spectacular three-year ca-reer.
The stunned German Air Service at firstrefused to believe the news. After so manybattles and so many close shaves with death,it seemed inconceivable that Richthofen

54
historical overview
By the Allied summer offensive in 1918, the tank had become anintegral part of the assault forces.
could have finally been killed. Throughoutthe day and into the next, they waited fornews that their leader and inspiration wasnot dead, but rather a prisoner of the En-glish. When word came through thatRichthofen died in the crash, all of Ger-many mourned his loss. As for the Germanfighter corps, it had suffered a brutal blowto its morale, one from which it would neverquite recover.
After Richthofen, it seemed that one-by-one, the great German aces began to fall.That summer, Erich Lowenhardt was killedduring a fight with 56 Squadron when hecollided with a comrade�s Fokker D.VII.When he died, he was the leading activeace in the German Air Service with 54 kills.The veterans that had so long helped staveoff the Allied air offensive were beginningto disappear.
Even worse, material shortages began tostrike at the Jagdstaffeln. Spare parts be-came increasingly harder to find, and rub-ber and brass fittings became almost unob-

55
chapter Ten
Marshal Foch and General Haig reviewing troops in 1918. In 1918, Fochbecame commander-in-chief of all Allied forces in France. He was thelast French commander in chief to ever win a war.
tainable. Units were reduced to strippingwrecks in no-man�s-land for strategic ma-terials. By the end of the summer, thoughthe fighter squadrons were still offering stiffresistance, the German Air Service beganto run out of fuel.
At the same time, the ground war turneddecisively against the German army. Thatsummer, the British, Americans, andFrench launched a series of offensives thatthrew the Germans back all along the front.On August 8, 1918�the �Black Day� inthe Germany army�the British came withina whisker of achieving a total breakthroughat Amiens. In just three days, they cap-tured 11,000 Germans, 400 guns and 10miles of ground.
The German gambit to end the war by thesummer of 1918 had failed. With it wentall hopes of winning the war. As fall ap-proached, Germany teetered on the brinkof a military collapse on the Western Fronteven as it faced revolution and civil war athome.

56
historical overview
Captain Eddie
Chapter TenThe Americans
�You cannot guess how I hate to put thesenew boys into the hardest kind of fighting,while they are still so totally inexperienced thatthey do not know how to properly protect them-selves. One knows perfectly well when onesends them out that some of them are going tobe killed... it is absolutely necessary to throwthe green men in, and when they don�t comeback, one has to simply grin and bear it.�
�Major Charles J. Biddle, USAS
The Americans stepped into themaelstrom of fighting in strengthduring the summer of 1918.
After a year of organizing and sendingtroops across the Atlantic, the UnitedStates was at last ready for war.
During the spring, the first Americanfighter squadrons saw action. Most no-table of these was the 94th Aero, a unitthat would become the closest thing to an

57
chapter Ten
The 94th Aero Squadron, America�s most famous unit to see action inWWI.
elite outfit in the U.S. Air Service. Fly-ing outdated Nieuport 28s at first, the 94thAero Squadron went through a tough bap-tism of fire, but in the process, discov-ered it had one of the best pilots of the warin its ranks�Eddie Rickenbacker.
Captain Eddie, as Americans came toknow him, was a pre-war daredevil autoracer whose love of all things mechanicalnaturally drew him toward aviation. En-listing soon after the war broke out,Rickenbacker at first became the personalchauffeur to the commander of the Ameri-can Expeditionary Force, General John J.�Blackjack� Pershing. Eventually, hemanaged to convince the general to re-lease him for flight training, a move thatproved wise indeed.
It did not take long for EddieRickenbacker to show his stuff in combat.On April 1, 1918, he downed a PfalzD.III from Jasta 64 over Baussant. Amonth later, he claimed another Pfalz,this one flown by Lt. Sheerer of Jasta 64.
By the end of May, his score rose to six,including two more fighters and a pair ofAlbatros two-seat recon planes.
Just as his star began to rise, fate steppedin. He came down with an inner ear in-
fection that required hospitalization. As aresult, he missed the bitter fighting of thatsummer. In September, during the worstmonth in the history of the USAS, Eddiereturned to action. Flying Spad 13 fight-

58
historical overview
Rickenbacker with members of the 94th Aero Squadron. Note thecaptured Hannover C.L. III in the background.
ers, he cut a swath through his opponentslike no other American pilot. BetweenSeptember 14th and October 30th, hescored 20 more kills in the vicious fightingover St. Mihiel and the Argonne Forest.When the war ended, his grateful nationlater awarded him the Congressional Medalof Honor, one of only two given to fighterpilots for service in France. Rickenbackerlater started an automobile company be-fore becoming president of Eastern Air-lines. He lived a long, full life, dying atage 82 in Zurich, Switzerland on July 27,1973.
While Rickenbacker was gaining fameas America�s premier ace, the rest of theUSAS was taking a pounding at the handsof veteran German Jastas. In the finalmonths of the war, the fledgling Ameri-can squadrons were pitted against the bestformation of the entire war�J.G.1. Nowcommanded by Hermann Goring, theRichthofen geschwader was transferredsouth to the fighting around the Meuse-

59
chapter Ten
The new American fighter squadrons first used the Nieuport 28 incombat before switching to the Spad XIII. The Nieuports seen herebelong to the 95th Aero Squadron.
Argonne to help beat back the latest Al-lied offensive.
That October saw the USAS take ter-rible losses as it supported the Allied drivein the Meuse-Argonne area. When theoffensive started, the Americans had atotal of 646 planes at the front. Through-out the last two months of the war, newreplacements and fresh units joined thefighting, but the service suffered such highcasualties that the number of planes avail-able actually shrank by the time of theArmistice.
From the nearly 650 planes ready at theoutset of the Meuse-Argonne offensive,the USAS had only 579 by October 15th.When the war ended, 479 were left in thefront-line units. During that time, thethree pursuit groups in action went from atotal strength of 300 Spad 13s to less than150.
In October alone, the Americans lost537 planes in action and 583 aviators. Ad-ditionally, training claimed the lives of
hundreds more pilots and aircrew. A 1920evaluation of losses concluded that for ev-ery American killed in action over thefront, three pilots died in training.
Yet, despite the losses, the Americanswere the final element needed in the Al-lied equation to secure victory over thestubborn German defenders. Though losses

60
historical overview
Herman Goring (left). Fighter ace, future morphine addict and Nazi,Goring committed suicide after being sentenced to death by theNuremburg Tribunal in 1946.
ran high both on the ground and in theair, the influx of fresh American pilots andsoldiers swelled the ranks of the advanc-ing Allied armies and ensured the victo-ries at St. Mihiel and the Argonne For-est. In the final days of the war, Americalost nearly 100,000 men to achieve thatvictory.
After four years of brutal, exhaustingwarfare, Germany had at last reached theend of its rope. At home, its citizens werewar weary and threatened with full scalestarvation. Influenza outbreaks all overGermany had killed thousands and left thepopulation weakened and dispirited. Fi-nally, as the German army slowly collapsedon the Western Front, the navy mutiniedat home, sparking a revolution and a re-bellion that lasted until 1920.
Germany had no choice but to surren-der. As the Kaiser fled to neutral Hol-land, Germany asked for an Armisticebased on American President Wilson�s fa-mous Fourteen Points. On November 11,

61
chapter Ten
Undertrained, the average American pilot was not a match for theveteran German airman.
1918, at 11:00 in the morning, the fight-ing ceased. The worst four years in Euro-pean history finally had come to an end.
The death toll was appalling. Ninetypercent of all French males between theages of 18 and 24 had been killed orwounded in action. Sixty percent of itsarmy became casualties during the war.The British had 900,000 dead; the Ger-mans, 1,800,000. Much of Europe layin ruins or in hopeless poverty. Diseasesravaged the Central European nations asstarvation continued to claim victims aswell.
In the end, all the suffering, the mis-ery, and death the war caused solvednothing. The peace treaty signed atVersailles in 1919 went a long way to en-suring that. Within that document lay theseeds for a second great war within a gen-eration, a war that would surpass even thecarnage of World War I. So the lull thatfell across no-man�s-land that Novemberwas but a stay of execution for much of

62
historical overview
An American 1st Aero Squadron Salmson two-seater in flight.
Europe. For 20 years the uneasy peacelasted until Hitler�s armored spearheadsground into Poland in September, 1939.When the panzers rolled that autumn, the
ghosts of the Great War rode with them.The great European calamity, sparked bythat one wrong turn by Franz Urban inJune of 1914, was at last complete.

63
Epilogue
EpilogueThe Air War�s Legacy
By the time the fighting finallyended in 1918, every major el-ement of modern air warfare had
been developed and employed in action byGermany or the Allied powers. From theearly days of bottles and bricks being thrownat passing aircraft, air-to-air combat hadbeen refined to a deadly science. Bombingraids, once ineffective and almost laugh-able, had also become more effective, withspecific targets like railroad stations or vitalbridges. In the infantry attack planes usedto support the ground troops in 1918, onecan see the inspiration of the Stukas andSturmoviks of the Second World War.Even the A-10 Thunderbolt II has its rootsin the armored aircraft used by the Schlastasat the end of the Great War.
The zeppelin raids of 1916-1917 on Brit-ish industries represented the first strategicair campaign in history, where one side triedto destroy the other�s means of waging war.The subsequent Gotha raids on London and
Zeppelins terrorized Britain during the middle part of the war.
its environs through the remainder of thewar convinced the British that strategicbombing in the future could win wars byairpower alone.
The strategic air war also had one otherimpact on the future. The Royal FlyingCorps became an independent branch of themilitary in Great Britain on April 1, 1918,
largely due to the constant air raids overLondon. Unchained from the army andnavy, the new Royal Air Force set to workjustifying its independence through the re-mainder of the war, and continued to doso in the 20s and 30s by focusing on strate-gic aviation. The two issues became hope-lessly intertwined, leading the British to

64
historical overview
The last of a breed: a late-war jasta carries on to the end, flying a mixof Fokker D.VIIs, Albatros D.Vs and Fokker Dr.Is.
make some pretty serious doctrinal mistakesin the inter-war years. Incidentally, thesame thing happened to the Americans.
Today, the First World War is but a dimmemory in the United States. In Europe,its horrors have been overshadowed by themisery and carnage of World War II. Still,the Great War set the tone for the first halfof the 20th Century, and from its mud-filledtrenches and bullet-torn skies, the futurecould be gleaned. In the air, the Great Warsaw the fastest rate of technological ad-vances ever made in aviation history. To-day, the legacy of the air war still enduresin the sleek modern fighters, bombers, andground attack aircraft used the world over.On their steel wings fly the undiminishedmemories of the Great War�s Camels,Fokkers and Spads.

65
FlightReference

66
Flight Reference
A Brief Historyof Flight
For centuries men dreamed of oneday being able to fly through thesky like the birds. Many dream-
ers, such as Leonardo da Vinci, attemptedto conquer the mysteries of flight. Da Vincieven went so far as to draw sketches of birdsin flight and proposed flying machines basedon these drawings. In 1783, two French-men, the Montgolfier brothers, made a bal-loon that carried the first men in free flight.The success of the balloon led to continueddevelopment of the craft. During theAmerican Civil War, balloons were usedby the Union army for observing the battle-field.
Meanwhile, other inventors turned theirattention to gliders. In 1804, an Englishinventor, Sir George Cayley, invented thefirst glider. During the 1890�s, OttoLilienthal of Germany continued to developthe glider.
During the late 1800�s, various inven-
An aircraft assembly plant.

67
Flight
tors attempted to invent powered aircraft.The most common approach involved theapplication of a steam engine. But steamengines were much too heavy. It wasn�tuntil 1903 that the first powered flight oc-curred. Two American brothers, Orvilleand Wilbur Wright, had experimented withvarious glider designs. In 1903, they addeda gasoline-powered engine to a bi-wingedplane and flew 120 feet. Development con-tinued throughout the first decade of thiscentury. Alberto Santos-Dumont devel-oped an aircraft patterned after a box kiteand became the first person in Europe tofly. In 1907, Louis Bleriot developed oneof the first successful monoplanes completewith a tail for balance at the rear.
Workers create aircraft fuselage parts.

68
Flight Reference
The Physicsof Flight
There are four basic forces actingupon an aircraft in flight: lift,thrust, gravity, and drag.
Lift is achieved through the design of thewing. As an aircraft moves, air flows overthe surfaces of the wing. Wings have a spe-cial shape that forces the air to move fasterover the top of the wing than on the bot-tom. This creates more pressure on the bot-tom than on the top. Known as the Ber-noulli effect, this air pressure differencepushes up on the bottom of the wing, andlift is generated.
The angle at which the wing meets theairflow also affects the amount of lift gener-ated. As this angle (known as the angle ofattack) increases, more lift is created.However, if the angle of attack is too great,the air flowing above the wing will be dis-rupted, causing a sudden decrease in lift.This condition, a stall, occurs when theaircraft is either flying too slowly, or flying
at too steep of an angle. When an aircraftstalls, the sudden loss of lift will force it intoa dive. This is especially dangerous if theaircraft is at a low altitude. The aircraft willrecover from a stall when it has regainedsufficient airspeed.
Increasing airspeed increases lift. Themore airspeed, the greater the difference
between the air pressure above the wing andbelow, creating more lift.
Thrust is generated by the rotation of thepropeller. Propeller blades are curved in thesame way as wings. However, instead oflift being generated (ie., a movement up-ward), thrust (a movement forward) is cre-ated. To create more thrust, increase your
Control surfaces of an airplane
RudderElevator
Aileron

69
Flight
throttle. Generally more throttle will in-crease your airspeed.
Drag is the friction caused by the aircraft�ssurfaces moving through the air. The morestreamlined an aircraft, the less drag is pro-duced.
When an aircraft is in level flight at a con-stant speed, all four forces (lift, thrust,gravity, and drag) are in balance.
The control surfaces of the aircraft areused for maneuvering it. With these con-trol surfaces, the pilot can perform threebasic movements: pitch, roll, and yaw.
Pitch is the rotation of the aircraft up ordown. Roll is the motion of the aircraftbanking left or right. Yaw is the motion ofthe aircraft rotating either left or right
The �elevators� are located on the tailassembly, and control the aircraft�s pitch.When the elevators move down, the nosewill pitch down, and vice-versa.
The pilot controls the elevators with thestick. To nose the aircraft down, push for-ward on the stick. Pulling back on the stickwill pull the nose of the aircraft up.
The rudder is located on the tail assem-bly. It controls the aircraft�s yaw. When
you move the rudder left or right, youraircraft�s nose will yaw in the correspond-ing direction.
The ailerons, located on the wings, con-trol the rolling motion of the aircraft. Whenthe left aileron is raised or lowered, the rightwing aileron moves in the opposite direc-
tion. This causes the aircraft to bank. Theailerons are controlled by the stick. To bankto the left, move the stick to the left; tobank to the right move the stick to the right.
The throttle controls the rotation speedof the propeller. By increasing the throttle,the pilot increases the speed of the propel-
To roll left, push the stick to the left; to roll right, push the stick tothe right.

70
Flight Reference
ler, thereby increasing the speed of the air-craft.
The aircraft of World War I did not haveflaps or brakes. Keep this in mind when youland.
Many of the WWI aircraft were equippedwith rotary engines. The entire enginewould spin along with the propeller. Thishuge spinning mass of metal caused a pow-erful, gyroscopic effect. This meant that arotary-equipped aircraft would try to nosedown in a right-hand turn, and would at-tempt to nose up in a left-hand turn.Therefore left rudder had to be vigorouslyapplied to keep the aircraft�s nose level withthe horizon. The Sopwith Camel had themost pronounced gyroscopic tendencies.
TurningBank your aircraft by using the ailerons.
This will cause your aircraft to slip sideways.Since the airflow will now strike the tail onone side more than the other, the aircraftwill turn. Turning is not accomplished withthe rudder, but with the ailerons. You alsoneed to increase the throttle, as a turn will
bleed off speed. The greater the bank, thefaster the turn rate. Gently pulling back onthe stick while banked will result in an eventighter turn. More altitude is lost during atighter turn, so keep your nose pointedabove the horizon during the turn.
The TakeoffThe takeoff procedure is performed a little
differently for World War I aircraft than formodern aircraft. The aircraft of WWI weretail draggers�they were equipped with a tail
To pitch down, push forward on the stick; to pitch up, pull back on thestick.

71
Flight
skid rather than a wheel.First, apply full throttle. When the air-
craft has picked up speed, push the stickforward. This will lift the tail off the ground.Be careful to avoid pushing too far forwardon the stick or you may find your propellerplowing into the ground! Now that the tailis off the ground, the aircraft is morestreamlined and will gain speed rapidly.When your aircraft gets up to about 40 mph,gently pull back on the stick to lift your air-craft into the air. You may damage yourlanding gear if you stay on the ground attoo high of a speed (above 60 mph). Donot attempt to climb at too steep of an angleor your aircraft will go into a stall (with noroom for recovery).Landing
When you begin the landing procedure,reduce the throttle. Approach the landingfield with as little speed as possible (it is bestto be slightly above stall speed, 40-50mph). As you get close to the landing area,bring the nose of the aircraft up and reducethrottle some more. Keep the nose of youraircraft up to allow you to come in at a lowerspeed. Do not try to land with your nose
below the horizon. When your wheels con-tact the ground, keep gentle pressure backon the stick so the nose of the aircraftdoesn�t pitch too far forward (caused by theincreased drag of the wheels on theground).
Takeoffs and landings are much easier atan aerodrome, because the area has been
specifically prepared for aircraft. It is stillpossible to land on the open countryside,but the ground is rougher and the chanceof losing control increases. Also, be sureto avoid landing or rolling onto forests orrivers�they�ll spell the end of your aircraft!
Don�t worry if you don�t get the hang oftakeoffs and landings at first. If you want
To yaw left, Apply left rudder; to yaw right, apply right rudder.

72
Flight Reference
to, you may activate the aircraft autopilotAI to takeoff or land for you. See Autopi-lot in the Game Play section of the manual.
Recovery from a StallAllow your aircraft to nose down. Don�t
fight the stall by pulling back on the stick.When the aircraft picks up enough speed,it will recover from the stall. Pull back onthe stick gently to level out.
Recovery from a SpinA spin is a very nasty type of stall. Your
aircraft will go into a spin when one wingstalls before the other. This immediatelyforces your aircraft to spin very rapidly. Thenatural instinct of a pilot is to fight the spinby applying opposite aileron. Unfortu-nately, this only makes the spin worse(many WWI aviators died this way). Thesafest way to recover is to let the stick re-turn to the neutral position. Your aircraftwill eventually stabilize itself. If you wishto come out of a spin more quickly, movethe ailerons as if you were trying to roll theaircraft with the spin. But be careful�it�s
easy to get confused when you see theground spinning around rapidly and, con-sequently, move the stick to the wrong side!

73
Flight Maneuvers
FlightManeuvers
Dive
In World War I, even simple maneu-vers such as steep dives and climbswere considered acrobatic�not sur-
prising since aircraft were prone to stall andmany had structural flaws.
A steep dive can be used to get out ofcombat quickly, especially when your air-craft can dive safely at a higher speed thanyour pursuer�s. Keep an eye on your altim-eter and, if an enemy follows you into thedive, jink your aircraft left and right withthe rudder.
Diving is simple. Point the nose towardthe ground and your crate will gain speedvery quickly. Be careful because some air-craft have weak wings, and a high-speeddive may shear them off!

74
Flight Reference
Zoom or Zoom-Climb
A very steep climb at high speed,the zoom-climb is usually per-formed after a dive. Sacrificing
speed for higher altitude, it was used by theaviators of the Great War after they made adiving attack on an enemy aircraft to pullup beyond the reach of the enemy.
When zooming skyward, keep an eye onyour airspeed. When it gets below 50 mph,level off before you stall your aircraft.
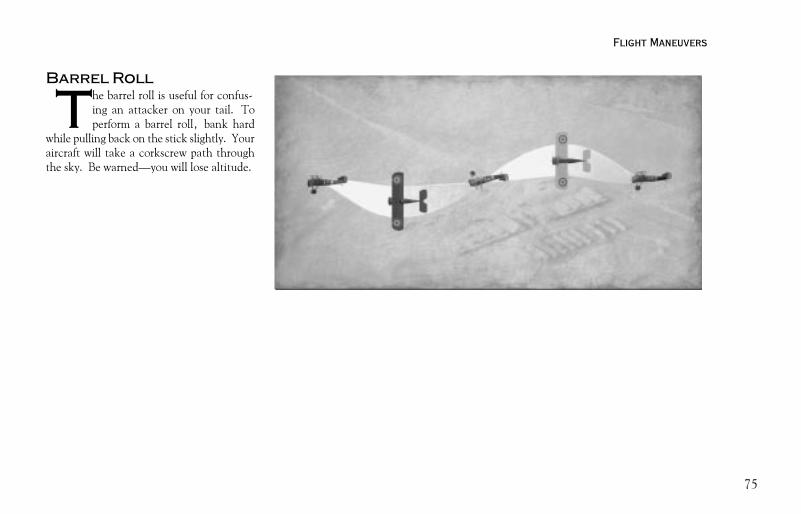
75
Flight Maneuvers
Barrel Roll
The barrel roll is useful for confus-ing an attacker on your tail. Toperform a barrel roll, bank hard
while pulling back on the stick slightly. Youraircraft will take a corkscrew path throughthe sky. Be warned�you will lose altitude.

76
Flight Reference
Half-Loop
Today this maneuver is called anImmelmann turn. However, inWorld War I the Immelmann turn
was an entirely different maneuver (see nextpage).
Perform a half-loop when you want toreverse direction and gain altitude. Use itwhen an enemy passes you going the otherdirection at a higher altitude.
Before starting a half-loop, make sure youhave a lot of speed. Pull up as if you weregoing to loop, but begin rolling the aircraftbefore you reach the top of the loop. Levelout when you reach the top.

77
Flight Maneuvers
Immelmann Turn
Also known as Renversement bythe French pilotes de chasse.The World War I Immelmann
turn was used frequently by Max Immel-mann. After making a diving pass on anenemy, Immelmann zoomed up past theenemy aircraft, and before stalling, used fullrudder to bring his aircraft around. This puthis aircraft facing down at the enemy air-craft, making another pass possible.
This is a difficult maneuver to performproperly. Pull up into a climb, apply fullrudder as your speed drops, roll your air-craft, and pull back slightly on the stick.With good timing, you will be diving backdown in the opposite direction.

78
Flight Reference
Loop
An impressive maneuver at anairshow, the loop is not veryuseful in combat. While loop-
ing, a pilot has no options until the loop isfinished. In addition, you will lose a greatdeal of altitude.
Before starting a loop, make sure you havea lot of airspeed (generally accomplished bydiving first), otherwise you�ll stall halfwaythrough the loop!

79
Flight Maneuvers
Retournment
This offensive maneuver is similarto the Immelmann. Continue toapply rudder and roll the aircraft
after you have looped and come over thetop. Instead of reversing direction, you�llbe flying in the same direction you weregoing before you started climbing.
A retournment is used after a diving passon an enemy. If the enemy continues in astraight path, not veering off to the side, awell-executed retournment will put you onthe tail of your enemy.

80
Flight Reference
Split-S
The Split-S is an excellent way toescape an attacker on your tail.To perform a Split-S, roll your
aircraft until it�s inverted, then pull backon the stick to perform the last half of a loop.When you level off, you may repeat thismaneuver. Be aware that altitude is rapidlylost in this maneuver.

81
Flight Maneuvers
Side-Slip
A side-slip is used to lose altitudequickly without gaining speed.To side-slip, dip one wing down
and apply enough reverse rudder to keepyour aircraft from turning. You may needto push forward slightly on the stick to main-tain your heading.
Slip-Turn
The slip-turn is a flat turn performedexclusively with the rudder. Un-like a normal banked turn, the
slip-turn uses no ailerons.
Most aircraft cannot perform an effectiveslip-turn. However, the Fokker Triplanedid not have a vertical stabilizer, and couldyaw very quickly with hard rudder applied.Although the Triplane would slip during theturn, losing a great deal of speed, it couldreverse direction in about half the time ofother fighters performing a normal turn. Toexecute an effective slip-turn, don�t bankyour aircraft�s wings.

82
Flight Reference
A Fokker DVII comes �over the top� in a loop. This DVII was used inseveral aviation films in the 1920s, including the Howard Hughes epic,�Hell�s Angels.�

83
Scout Tactics
Battle Tacticsof theGreat War
Ace Versus Ace
They were down to just four scouts.For weeks, Jasta 15 fought des-perately against the rising tide of
Allied airpower. One by one, the pilotswent to their deaths, carried to the groundbelow in broken, flaming birds. By thesummer of 1917, the squadron had justthree sergeant pilots and rising ace ErnstUdet. The squadron commander, HenrichGontermann, had seen enough of the war.One day, he took Udet aside and led himover to a metal table. Deftly, Gontermannbent over and scooped up some pebbles anda leaf. Putting the leaf on the table, hebarraged it with pebbles until his hand wasagain empty. Each time a pebble struck thetable, it sounded like a bullet strikinghome.
�You see, Udet,� Gontermann lectured,
�that�s the way it is. The bullets fall fromthe hand of God. They come closer andcloser. Sooner or later they will hit us. Theywill hit us for certain.�
The long war of attrition was taking itstoll. Even the most stout hearted, such asGontermann �wearer of the Blue Max anduniversally respected by his peers � couldnot take the daily losses forever. Sooner orlater, a pilot�s nerves would be shot.
Udet fought on, knowing his experienceand expertise could keep him alive. Thenone day in June, 1917, at the height of hissquadron�s crisis, he ran into a tan SPADVII with �Vieux Charles� spelled out inblack letters on the fuselage.
It started at 15,000 feet over the littleFrench town of Liearval. Flying alone,Udet had crossed the lines in search of anAllied observation balloon. Before he foundit, though, a speck appeared off to the west.As it grew closer, he could see it was a Spad.He turned toward it, and the German�sAlbatros scout rushed headlong at the sturdyFrench biplane. They barreled past eachother, mere feet apart. Both pilots nowwere too intent on the kill to be rattled by
such a narrow evasion of death. Udet brokehard left, trying to come around behind theSpad. As he looked back at his enemy, hecould see the Spad doing the same thing.Suddenly, they were locked in anotherhead-on pass. Again, the two planesbrushed by, escaping a collision by only thenarrowest margin.
The battle continued as each pilot circledthe other. Every few seconds, they leveledout of their tight turns to make a quick head-on attack before quickly banking hard tocome around one more time. After one suchrun, Udet passed so close to the Spad thathe recognized the �narrow, pale face underthe leather helmet.� It was France�s ace ofaces, Charles Guynemer.
Convinced now he had his hands full,Udet resolved to stick it out, fighting thislegendary French ace to the death. Swiftly,after another head-on attack, he pulled upinto an Immelmann and tried to roll backdown on the French ace. No good,Guynemer spotted the move and loopedaway. Udet broke into another hard turn,but as he emerged from it, Guynemerpounced. Guns rattled and Udet saw bul-

84
Flight Reference
lets tear across his wings and struts.Desperate now, Udet threw his plane all
over the sky. It did no good, for Guynemermatched every maneuver with one of hisown. Always, the French ace seemed a bitfaster, a bit better. Then, for an instant,the Spad appeared in his sights. It wasUdet�s one chance to take a shot, and henever hesitated. His finger crunched downon the gun tit on his control stick. Noth-ing. He pressed it again. Still nothing. Hisguns had jammed!
Now what would he do? Taking the stickin his left hand, Udet tried to clear the jamwith his right hand. No good � he couldn�tget the shell out. Briefly, he consideredbreaking away and diving for home, but hequickly squelched the thought. Guynemerwould have jumped all over his tail in thatsturdy Spad had he tried to get away. No,his only chance lay in evading Guynemer�sattacks until the French ace tired of thegame.
They went at it for eight more minutes,turning banking, arching up and down inhalf loops and split S�s. By some miracle,Udet managed to keep Guynemer from get-
ting all but the most fleeting of shots in athim. As the fight continued, Udet nevergave up trying to clear his guns. Finally,out of sheer frustration, he began banging
his fist against the guns. Just as he did,Guynemer soared over Udet�s plane, in-verted. As the Frenchman passed by, hesaw Udet�s gesture and realized the
Guynemer�s famous Spad VII

85
Scout Tactics
German�s predicament.Guynemer finished his pass then reversed
his turn, coming back straight at Udet, al-most inverted again. Udet was cold meatand he knew it. But instead of a torrent ofbullets, all he received from Guynemer wasa jaunty wave. And then he was gone, div-ing for home, his Spad disappearing rapidlyinto the gray summer�s day.
Udet returned to Jasta 15 in a state ofnear-shock, his plane shot full of holes.Only through Guynemer�s chivalry had hesurvived his brush with death.
*******Udet�s fight with Guynemer ranks as one
of the all time one-on-one duels in avia-tion history. Two great masters fought itout, using every ounce of performance theycould draw from their machines in concertwith every maneuver and every tactic theyhad ever learned. In this one fight, the es-sential elements of World War I air combatcan all be distilled and examined.
EngagementWhen Udet first spotted Guynemer clos-
Taken at Koblenz in 1919, Ernst Udet and Bruno Loerzer chat withtheir former enemies. Udet is seated at the far left, while Loerzer isseated at the far right.

86
Flight Reference
ing in on him, he reacted instinctively.While some inexperienced pilots wouldhave attempted to dive away, or turn awayfrom the French Spad, Udet knew he hadto turn toward Guynemer. Had he turnedaway, the Spad would have been on his tailin a heartbeat. And with its superior div-ing abilities, the Spad would have caughteven the best German plane in a long divefrom 15,000 feet. Turning toward the en-emy aircraft, however, as Udet did, de-nied Guynemer a tail-shot and initiated ahead-on attack.
The manner in which pilots engaged theirenemy often dictated just how the fightwould turn out. Canny pilots would oftenstalk their prey for long periods, climbingabove to get every possible advantage. Thebest possible position to engage an enemywas up sun, and above and behind. Withthe sun behind the attacker, the defendingpilots would have been hard-pressed to seethe attack coming. Meanwhile, divingdown from above gave the attacking planeextra speed�energy�that could be used tomaintain an advantageous position on thedefender. And, best of all, attacking from
the rear usually meant that no return firecould be expected (unless, of course, thedefender happened to be a reconnaissanceplane or a bomber).
BattleOnce the battle was joined, both Udet
and Guynemer did their best to protect theirvulnerable tails. To do that, they endedup in a turning contest, each one seekingthe other�s rear while striving to cover theirown. As a result, the initial part of theircontest developed into a series of turnspunctuated with short, violent, head-onpasses. Neither pilot could get directly be-hind the other though, through the courseof the fight, Guynemer had several split-second opportunities to take a shot. He wasan excellent marksman, so those fleetingchances were all he needed to stitch Udet�splane full of holes.
As the battle progressed, Udet could seethat Guynemer was not only a better pilot,but his Spad was a better plane. If he hadcontinued to turn-fight with the Spad,Guynemer would have eventually won thefight. So, Udet chose to take what had been
a horizontal fight into the vertical plane byexecuting an Immelmann. Against a nor-mal opponent, Udet�s move probably wouldhave cleared his tail and given him an op-portunity for a killing shot on the Spad. Nottrue with Guynemer. The French ace in-stinctively understood what Udet was at-tempting to do, so he followed with verti-cal maneuvers of his own.
Turning Versus Hit-and-RunIn the battle phase of a World War One
dogfight, there were two main sets of tac-tics that could be employed. Turn fighting� as Udet and Guynemer did at the outsetof their duel � was probably the most com-mon until late in the war. Here, adversar-ies would swirl around, using their aircraft�sturning agility in an effort to get on eachother�s tails for a killing shot. This is thetype of dogfight usually portrayed in WorldWar One aviation films.
The other type of fighting, more com-monly used by the Germans toward the endof the war, was the hit-and-run methodthat today�s fighter pilots sometimes callenergy fighting. Here, a pilot in a plane

87
Scout Tactics
with superior speed attributes picked a tar-get below that he could make a diving at-tack upon. Having selected the target, hewould swoop down, making a firing pass ashe went, then climb back above his quarry.By trading altitude for speed and energy,he could always maintain the advantageover his slower � and lower � target. Byracing back up above the target craft, theattacker would deny him any chance of acounter shot.
Toward the end of the war, especially inthe summer of 1918, the German Air Ser-vice found itself so outnumbered in the skiesover France that its pilots were forced toresort to hit-and-run attacks. Usually, thejagdstaffeln would patrol the front, pickingout Allied aircraft below them to attack.They�d dive down, make a pass, maybetwo, then run for home. It was all theycould do in the face of overwhelming odds.
To counter these types of attacks, theBritish began stacking flights of fighters atdifferent altitudes. In the final months ofWorld War One, the RAF would some-times patrol the front with three of foursquadrons covering each other for mutual
The Fokker Dr.I was one of the best pure turn fighters of the war.However, it was ill-suited for the hit-and-run tactics German pilotswere forced to use by 1918.

88
Flight Reference
protection. Usually, the Camels wouldcruise at medium to low altitude, while theSE5s provided high cover. Such an inno-vation forced the Germans to react as well.They started flying higher patrols, trying tomaintain an altitude advantage even againstthe SE5 squadrons. In the latter stages ofthe war, the BMW-engined Fokker D.VIIsproved to be the best high-altitude fighterof the war. Some of the D.VII pilots couldactually claw their way up to 20,000 feet ormore. At such amazing heights, the SE5swere nearly helpless.
Make the TacticsSuit the Aircraft
Throughout World War One, and indeedthroughout aviation history, the battle tac-tics were usually dictated by either circum-stance (such as the Germans being outnum-bered at the end of the war) or by the air-craft types employed. Some airplanes arebetter than others at turn-fighting, whileothers excel at hit-and-run attacks. Forexample, the best two pure turn-fighters ofthe Great War were the Sopwith Camel and
the Fokker Triplane. Neither possessedgreat speed or diving ability, but both couldmaneuver and turn better than any otherplane deployed during the war. The prob-lem with these two fighters � especially withthe Fokker Triplane � was that they wereunable to disengage from a fight if the pilotfelt the odds were against him. Theycouldn�t run away, for the Fokker andSopwith lacked the speed to do so. Norcould the Dr.I dive away from most Alliedtypes, including the SE5 and Spad XIII. So,these two great turn-fighters could some-times trap their pilots in bad situations fromwhich other plane types might have beenable to escape. Werner Voss�s last fightagainst 56 Squadron was a clear example ofthis flaw in the Triplane. Voss fought sixSE5s to a draw for 10 minutes in a classicturn-fight. But, the minute he tried to dis-engage, he was caught from behind andshot down. No Fokker DR.I could haveout-dived an SE5.
The best hit-and-run fighters includedthe Spad XIII, the SE5, and the FokkerD.VII. The Spad was probably the moststurdy and dependable fighter of the war in
The best high altitude fighterof the war: the Fokker D.VII.These examples are from Jasta72. The Fokker in theforeground belonged to thesquadron commander, LeutnantKarl Menckhoff.

89
Scout Tactics
steep dives. While other fighters lost wingsin fast dives, the Spad XIII hung togetherthanks to its solid construction. Though itcould not turn as well as the late genera-tion German fighters, it could hit and runwith the best of them. A Spad in capablehands was more than a match for any Ger-man fighter.
The SE5�s best attribute was pure speed.In fact, it was the fastest fighter of the warwith a top speed close to 140 mph. Solid ina dive, and capable of limited high altitudeflight, it was the Allies� best answer to theFokker D.VII.
The D.VII was not as fast as the SE5,but the BMW-powered versions could flyhigher and maintain better performance.Moreover, the D.VII was evenly balanced.Capable in a turn-fight, it could also be usedas an energy fighter for hit-and-run attacks.Overall, the D.VII offered the greatest tac-tical flexibility to its pilots, making it prob-ably the best fighter of the First World War.
When playing Red Baron II, be sure tolearn what method of dogfighting best fitsyour aircraft. Then, when you engage anenemy formation, use your aircraft�s at-
Frank Luke beside his Spad XIII. Luke was not a tactical genius, but hisultra-aggressiveness led him to rack up an impressive score beforegetting shot down in September, 1918.

90
Flight Reference
tributes to your advantage. Don�t, for ex-ample, try to turn-fight with a Fokker Dr.Iif you�re in a Spad XIII. That will just sendyou to an early grave. Hit and run in thatsituation. A good part of the fun in RedBaron II is learning about how the differentplanes fly, and how best to employ them.
Be sure your tactics also fit the strategicsituation on your stretch of front. If you�rehopelessly outnumbered by the enemy, get-ting into twisting, turn-fights might be amistake. In such situations, you may wantto get your hands on a hit-and-run fighterso that you and your men live to fight an-other day. Remember, in campaign games,it is important to keep your NPC pilotsalive, so plan your engagements carefullyand maximize your advantages.
DisengagementSooner or later, every pilot had to head
for home after a fight. Sometimes, fuel con-siderations forced a pilot to cut and run forhis side of the lines. Other times, it wasammunition. On occasion, pilots disen-gaged because they were at a disadvantagein a fight. Most pilots felt that it was better
to survive and fight again later, then stayin a battle with the deck stacked againstthem. Of course, there were exceptions tothat rule, but most of the exceptions lie insoldiers� graves in France.
To disengage in the middle of a fight,every pilot had to know the capabilities ofhis own craft compared to those of his en-emy. Some World War I aircraft could climbfaster than others, so climbing out of a fight
A Fokker D.VII captured by the 95th Aero Squadron on the Verdunsector.

91
Scout Tactics
could be an effective way to disengage.Others, like the Spad XIII, could out diveanything on the Western Front. Spad pi-lots could usually get out of any fight theywere in if they had altitude to dive away.Other planes had great level speed and insome cases could break out of a fight by justrunning away.
That latter tactic was always fraught withperil, however. In late 1916, LanoeHawker found this out when he tried to runaway from Manfred von Richthofen. Downlow and nearly out of gas, he had no choicebut to just cut and run, jinking around ashe went to throw off the Baron�s aim. Ofcourse, the DH-2 and the Albatros D.IIwere about equal in speed, with the D.IIhaving a slight edge. Not surprisingly,Richthofen managed to catch Hawker frombehind and shoot him down.
The fight between Guynemer and Udetdemonstrated just how important disengage-ment options were to the pilots of the GreatWar. Very soon after entering the fight,Udet realized he was outmatched by hisFrench enemy. Guynemer proved to be asuperior pilot and the Spad XIII he was fly-
ing was a better overall aircraft to Udet�sAlbatros. Had Udet been able to run away,he probably would have taken the first op-portunity to do so. However, he realizedthat his plane could not dive away fromGuynemer�s Spad, and the chance for himto climb away was negligible as well. In theend, the circumstances of the engagementforced him to fight it out knowing the cardswere against him.
In Red Baron II, always try to have an es-cape route. If your fighter climbs well, besure to keep your speed up in a fight so, ifthe need arises, you can head for the hills.Whenever possible, avoid fights that youwon�t be able to get out of after they start.It is not wise, for example, to go chargingalone into a flight of SE5s while flying aFokker Dr. I. You won�t be able to get outof the fight unless you shoot all the SE5sdown, or they decide to run away. Con-versely, if you have an altitude advantageand want to attack a formation of AlbtrosD.Vs with your SE5, your superior perfor-mance and ability to disengage offsets, toan extent, their advantage of numbers.Basically, it comes down to this: try to dic-
tate the terms of the dogfight to your en-emy, while always keeping an escape routeopen. Disengaging is sometimes seen asinglorious, but it will keep you and yourpilots alive.
Ground AttacksDuring the final months of the Great
War, aircraft were used more and more forinfantry support missions. Squadrons weresent out to strafe and bomb enemy infantryin front of friendly ground units. This re-quired cooperation with the PBI (poorbloody infantry) so friendly troops were notstrafed. Above all, the attacking pilot hadto know, or at least have a reasonable ideaof, where the friendlies were and where theenemy was in relation.
When strafing trenches or infantry in theopen, World War I pilots tended to get rightdown on the deck. Sometimes, infantryofficers reported being attacked by planesthat were flying less than 25-50 feet off theground!
In Red Baron II, try hunting infantry fromabout 500 feet. Once you spot your quarry,make shallow, diving passes at them, guns

92
Flight Reference
blazing. If you have bombs, use them too,but try releasing them above a few hundredfeet, as you might be hit by your own bombblast, otherwise. Once you finish your pass,climb back up to 500 feet, circle aroundand go back in. While making these straf-ing runs, be certain to keep checking thesky around you. Many World War I pilotsdied when they became fixated on their tar-gets and forgot to check their tails.
When attacking other targets, such asairfields, anti-aircraft fire can get quite in-tense. Many Great War pilots learned it wasbest to make only one pass on such targets,causing as much damage as possible beforezooming out of range. The single pass willusually minimize the amount of AA fire youtake as you strike your target. Another op-tion would be to try and knock out the AAguns in your first pass, freeing you up toattack the target with impunity.
A German machine gun platoon moves forward along a French countrylane. Such daylight marches became increasingly hazardous by war�send, as marauding Allied aircraft searched for just such targets.

93
Scout Tactics
Boelcke�s Dicta1. Try to secure advantages before attacking. If possible, keep the
sun behind you.
2. Always carry through an attack when you have started it.
3. Fire only at close range, and only when your opponent isproperly in your sights.
4. Always keep your eye on your opponent, and never let yourself bedeceived by ruses.
5. In any form of attack it is essential to assail your opponent frombehind.
6. If your opponent dives on you, do not try to evade his onslaught,but fly to meet it.
7. When over the enemy�s lines never forget your own line ofretreat.
8. For the Staffel: Attack on principle in groups of four or six. Whenthe fight breaks up into a series of single combats, take care thatseveral do not go for one opponent.
The sky above the trenches was a deadlyplace to be. During Bloody April, someBritish squadrons suffered 60 percent losses.During the more routine months of the warthe attrition rate was still very high. Mostnovice pilots never lived long enough to callthemselves veterans. Those who did sur-vive month after month rarely showed anyinclination to coach the new replacements.
Oswald Boelcke was the exception.Boelcke possessed a rare combination of tac-tical brilliance and keen flying technique.Nothing escaped his eyes in the air, and ashis experience grew, he began to teach hismen how to survive in the air. Eventually,he put to paper his advice and circulated itamong the Jagdstaffeln. His advice becameknown as Boelcke�s Dicta. Its principles stillform the foundation of fighter combat to-day.
1. Try to secure advantages before at-tacking. If possible, keep the sun behindyou.
If you want to emulate the reckless fight-ing style of flamboyant pilots like Albert Ballor Lothar von Richthofen, attack before

94
Flight Reference
evaluating the situation. While you mayscore some spectacular victories, chancesare you�ll be flamed before the armistice.Exercising caution, however, will increaseyour odds for survival. Before you attack,try to secure as many advantages as pos-sible. Attack out of the sun, for it is everypilot�s blind spot. Try to attack from ahigher altitude. This way, you�ll have theinitiative as well as superior speed and mo-mentum. The pilot below can only react toyour moves, so you�ve forced him to de-fend himself, and not go on the attack.Surprising your foe is the best way to mini-mize risks to yourself. Sneak up on youropponents by staying above them and in thesun. Be patient, and when a favorablemoment arises, swoop down behind the tar-get and attack before he can react. Unlessyou possess all three of these advantages(surprise, altitude and having the sun be-hind you), it is probably wise to avoid dog-fighting against superior numbers.
2. Always carry through an attackwhen you have started it.
Often a green pilot, in his first engage-
�Beware of the Hun in the sun�: The pilot has a difficult time spottingenemy aircraft that are in his sun blind spot. It is a common tactic for apilot to attack with the sun at his back.
ment with an enemy aircraft, will start afiring pass on an enemy aircraft only to getcold feet and try to disengage. This pre-sents his tail to the enemy, and, more of-ten than not, the novice is shot down. Thekey is to be aggressive. When you are in
the air, commit to a target. Don�t breakoff the attack until you�ve completed thefiring run. Your aggressiveness will oftenfrighten your opponent into making a mis-take. Many a novice pilot will freeze upwhen an enemy is on his tail.

95
Scout Tactics
3. Fire only at close range, and onlywhen your opponent is properly in yoursights.
Machine guns from the Great War wereterribly inaccurate weapons on the ground,let alone in the air. Successful pilots closedto point-blank range before opening fire.When you find yourself in a dogfight, don�twaste precious ammunition on long-rangeshots. Instead, choose your targets care-fully, then close the range until you�rewithin about 30 yards of your opponent.When you open fire, don�t hold the trig-ger down too long. Snap out short, well-aimed bursts. Long bursts are likely to jamthe machine guns and will waste ammuni-tion.
4. Always keep your eye on your op-ponent, and never let yourself be de-ceived by ruses.
Occasionally, a pilot who is outmatchedwill feign death by going into a seeminglyuncontrolled spin. At treetop level, thepilot will pull-up, level off, and head forhome.
Shot Selection�Best Areas to Attack From: The higher thedeflection angle, the harder the shot. The best shot is from directlybehind the target. The worst is from either side of it.
5. In any form of attack it is essentialto assail your opponent from behind.
The art of deflection shooting was so dif-ficult to master during the Great War thatmany pilots didn�t even bother to try. Afew of the great aces, most notably Mannock
and Fonck, successfully made deflectionshots in combat.
A deflection shot is made when the targetaircraft is flying in a different direction thanthe attacker. To make a deflection shot,the attacker must lead the target since the
Poor Poor
Fair
Best(smallestdeflection
angle)
Fair Fair

96
Flight Reference
target is not flying along the path of thebullets. For example, say you are travelingnorth and your target is in front of you head-ing west. This is a 90-degree deflectionshot, since the target is perpendicular toyou. This is the most difficult shot to make.Deflection requires leading the target; howmuch to lead depends on the speed of thetarget and the angle of the shot. A 90-de-gree deflection shot demands a great deal ofleading.
If you do try a deflection shot, put thecross hairs well forward of the nose of thetarget plane. Squeeze off a short burst, andwatch the tracers. Then adjust your aimaccordingly. If you have time that is.Chances are, you�ll have already passed thetarget. Rather than trying to adjust your aimfor the speed of the enemy, the deflectionangle of the shot, and the distance to theenemy, most pilots fired from a positionwhere there was no deflection. This meantattacking head-on or from the rear. At-tacking head-on has many disadvantages.First, because of the closure rate, you don�thave much time to aim and shoot. Also,your target will probably be shooting at you
Turning away from an attacker: The defender has chosen to go withhis natural instinct�to turn away from the attacker. The end result isthat the attacker ends up on the tail of the defender with a relativelyeasy shot.
too, while you�re making your pass. Fi-nally, you run the risk of a collision if oneof you does not swerve.
Attacking from the rear is much better.Often your target won�t see you. If you are
stalking a single-seat scout, attacking fromthe rear denies him the ability to shoot atyou. Furthermore, there is no deflectionangle from a stern shot, which greatly in-creases your chance of scoring a hit.
Defender
Attacker

97
Scout Tactics
6. If your opponent dives on you, donot try to evade his onslaught, but fly tomeet it.
Don�t break away from an attack. If youdo, you�ll give your opponent a choice tar-get and a chance to get on your tail if youdo. For example, if you spot a Fokker mak-ing a pass at you from behind and to theright, don�t break left to avoid him. Whilethe natural instinct is to turn away fromhim, this only exposes your tail. Instead,turn hard to your right. Even though youwill cross his line of fire, it will only be for abrief moment. By turning toward him, youcut inside his turn and he won�t be able tofollow you. If a Fokker dives on you fromthe rear, don�t try to dive straight down toget away. That gives him a clear stern shot.Instead, break left or right and turn towardhim.
If your aircraft is sturdier than theenemy�s, you may try diving to get away.In other cases, however, it�s best not todive away as this only gives the enemy aclear stern shot.
Turning toward an attacker: In this situation, the defender hascorrectly chosen to turn toward his attacker. Although he will passthrough the line of fire of the attacker, it will only be for an instant.The attacker will not be able to follow the defender through his turn.
7. When over the enemy�s lines neverforget your own line of retreat.
Always make sure you can run for homewhen you need to. Many pilots found them-selves cut off from their lines with a dam-
aged plane and had to land in enemy terri-tory. Make sure you know where you areand where the front is.
Defender
Attacker

98
Flight Reference
8. For the Staffel: Attack on principlein groups of four or six. When the fightbreaks up into a series of single combats,take care that several do not go for oneopponent.
To retain the advantage in combat, it isessential to attack every enemy aircraft if theodds are even. If three Eindeckers bouncethree Nieuports the odds are even, right?This is true only if each Eindecker engagesa different Nieuport. This way, all threeNieuport pilots are forced to defend them-selves with evasive flying. However, if allof the Eindeckers attack a single Nieuport,it leaves the other two Nieuports free to at-tack the Eindeckers.
SpecializedAttack TacticsAttacking Two-Seaters
Albert Ball had to be the worst air combattactician to make ace in World War I. Hethrew himself headlong into fights despitebeing outnumbered, cornered, or at anydisadvantage. He didn�t care, all he wantedto do was fight.
A Roland C.II. Well armed and fast, these were dangerous two-seatersto attack. Ball found their weak spot by attacking them from behindand below.

99
Scout Tactics
But, when it came to attacking two-seat-ers, even Ball approached them with care.He learned early in his career that to makea diving attack on a two-seater�s tail simplycourted disaster. The observer/gunnercould easily draw a bead on him and plinkhis scout full of holes. That sort of risk evenBall refused to take. So, he looked for ablind spot that would let him get a shot inwithout worrying about any return fire.
One day in 1916, he discovered wherethat was. Patrolling the front alone, asusual, he ran across a couple of Roland C.IIrecon planes. The rear gunner on the C.IIhad an excellent field of fire due to theplacement of the wings. Any attackingplane coming in from above, the sides, ordead behind were in his firing arc, and ifBall had chosen to make a head-on pass,he would have had a Spandau machine gunblazing away in his face.
Realizing this, Ball dove down behind andbeneath the Whalefish and crept up on itfrom below. With his extra speed from thedive, he closed the distance to his targetquickly. Once directly underneath, hepulled up and sprayed the Roland with long
Billy Bishop demonstrates how to use the Lewis gun mounted atop hisNieuport�s wing. Ball would slide the Lewis down the Foster mountthen aim the gun up at his opponent�s belly.

100
Flight Reference
bursts from his wing-mounted Lewis ma-chine gun. Stricken, the Roland fell off intoa spiraling dive that ended only when itimpacted with the ground below. Just likethat, Ball had discovered the Roland�s weakspot. Moreover, it was a weak spot sharedby all two-seaters.
In Red Baron II, two-seaters can be justas deadly as they were in the Great War.Taking on a Roland C. II or a HannoverC.III from above and behind is just goingto get you killed. Copy Ball�s method! Getabove and behind your target � but wellout of his gunner�s range � then dive downbelow him and give him a squirt in the belly.The two-seater will probably jink and bankas he tries to give his gunner a shot, so bequick with the pass and break away if youstart receiving return fire. You can alwaysmake another run.
Another, less favorable approach to at-tacking two-seaters was a head-on pass.Early in the war, many recon planes didn�thave a forward firing machine gun. TheAviatik, the BE2, and the later RE8 allshared this blind spot. In certain cases, itmay make more sense in Red Baron II to
One of the toughest two-seaters of the war was the Hannover C.L.IIIinfantry attack plane. This particular plane was captured by the 94thAero Squadron right at the end of the war.
make a level, head-on pass that ends witha downward break. Breaking underneathyour two-seat target will minimize the
chances of any counter-fire from the reargunner as you pass on by.
Two-seaters can be tough, but heavy

101
Scout Tactics
bombers such as the Gotha and theHandley-Page can be downright dangerous.To protect its vulnerable belly, the Gothacame equipped with a ventral tunnel gunthat surprised many a British pilot. Becauseof it, attacking from dead astern and un-derneath is not recommended. Basically,the Gotha has very few blind spots to ex-ploit. The best you can do is give the gun-ners a poor shot at you. To that end, trymaking, what was called in WWII, a pur-suit curve. Start above and behind thebomber, a little offset to one side. Then,as you draw up along side (remember to dothis with the bomber below you and out ofrange), turn toward him and make a highdeflection run. Best results were achievedwhen the attacking plane had about a 45-degree deflection shot. Such an attackforced the gunners to guess on lead, some-thing that was quite difficult to do when theaircraft the gunners were shooting at werecoming head-on and at a slight angle to-ward them.
Head-on attacks on Gothas and Handley-Pages can also be successful. To do them,you need to be a crack shot and have a great
sense of timing. These sorts of runs,though, can disable the crew or knock anengine out, making the big bomber a crippleand thus easy meat for you.
Attacking Observation BalloonsWell-protected with machine guns and
flak, the lowly observation balloon rankedas the single-most difficult target to bringdown in World War I. So important werethese balloons to the artillery units on bothsides that they were sometimes ringed bydozens of ground-based machine guns andcannon. Only a few fighter pilots dared suchstiff defenses, others steered clear of thementirely. The few who tried generally gotvery good at making lightning-quick, div-ing attacks that would minimize their timeunder the balloon defense�s guns. Rittervon Roth, Henrich Gontermann, andFrank Luke were probably the best balloon-busters of the war. They all took huge risksto shoot the great floating gasbags out of thesky, usually returning home with theirplanes full of bullet holes. It took nerves ofsteel to hit such dangerous targets, but therewards were great as well. Knocking out
two or three balloons on one sector couldeffectively blind the enemy�s artillery units.Without spotters to watch and correct theirfire, the big guns were almost useless, es-pecially if the front lines were moving as aresult of an offensive or minor break-through.
In Red Baron II, balloons are extremelywell defended. To attack one, first makesure you have part of your flight coveringyou as you make your run. The last thingyou need as you�re diving down on a bal-loon is to check your six and discover anenemy scout sitting right on your tail. So,leave a few planes up high to provide topcover while you make a diving pass at theballoon. If you fail to bring it down on thefirst pass, forget it. Keep running at highspeed until you�re out of range of the de-fensive guns. If you must make anotherpass, don�t turn around while still in rangeof the AA guns below. Run clear, climbback up, then make another quick pass.
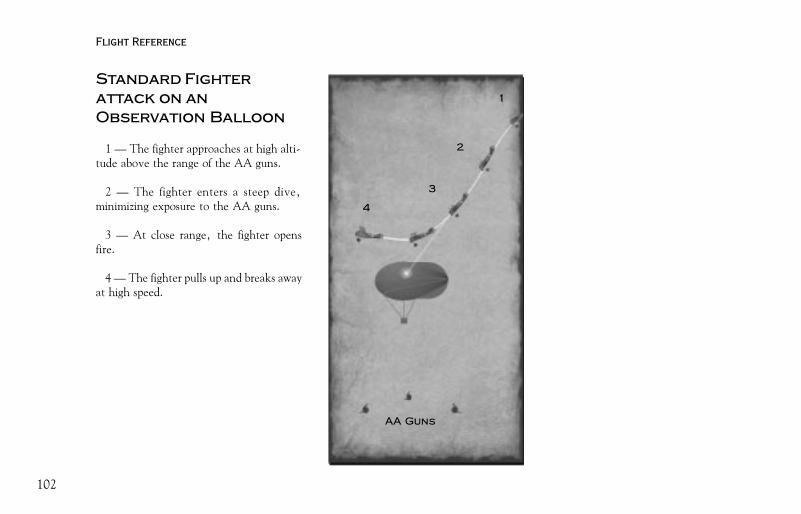
102
Flight Reference
Standard Fighterattack on anObservation Balloon
1 � The fighter approaches at high alti-tude above the range of the AA guns.
2 � The fighter enters a steep dive,minimizing exposure to the AA guns.
3 � At close range, the fighter opensfire.
4 � The fighter pulls up and breaks awayat high speed.
1
2
3
4
AA Guns

103
Scout Tactics
Firing Arcs forStandard Two-seaterAircraft
(includes the R.E.8, Bristol Fighter, D.H.4,Roland C.II, Rumpler C.IV, and Junkers J.I.)
On these aircraft, the rear gun wasmounted on a swivel, whereas the forward-firing gun was fixed. The standard attacktactic against two-seaters was to approachfrom its blind spot�from behind and belowthe two-seater.
RearGun�sArc
ForwardGun�s Line
Side View TopView
RearGun�sArc
ForwardGun�s Line

104
Flight Reference
Firing Arcsfor Heavy Bombers
These large bombers were bristling withmachine guns. They carried three separategunners. The forward and rear guns weremounted on a swivel. They also included a�tunnel gun� which fired through a hole inthe fuselage out the rear of the bomber. Thisgun removed the usual blind spot that ex-isted on two-seater aircraft. The HandleyPage was more heavily armed than theGotha, as it mounted dual guns on eachgun swivel.
ForwardGun�sArc
RearGun�sArc
TunnelGun�sArc
ForwardGun�sArc
Rear andTunnel Gun�s
Arc
Side View TopView

105
Scout Tactics
Final WordsRed Baron II�s campaign system was con-
structed to mirror the historical realities onthe Western Front as much as possible.While it may make headlines to be rash anddaring, you�ll soon discover such recklessbehavior will not get you through the war.Remember that discretion is always the bet-ter part of valor, so it is better to run from apoor situation. Fighting it out every timewill only get you killed. So be discreet, cal-culate the odds and only take risks if therewards are worth it.
Plan your engagements carefully. If youspot a formation of enemy planes above you,run away if you can. Then, if they aren�tchasing, try turning around and stalkingthem. Climb above them and sneak behindthem if you can. Use the sun to your ad-vantage by keeping it at your back when-ever possible. Whatever you do, don�t en-gage every flight you see no matter what thetactical situation. You may get away with itfor awhile, but sooner or later, you�ll gothe way of the Albert Balls and Frank Lukesof the war.
Another key to Red Baron�s campaignmode is keeping your pilots alive. Once you
become the squadron commander, it is yourduty to preserve your pilots and help themgain experience. Being reckless and rashwith their lives will only engender resent-ment. Morale in your unit will plummet asthe tables in the mess have more and moreempty place settings. Don�t sell your mencheaply, for replacements are hard to comeby and are usually of low quality at first.Conversely, you don�t want to burn yoursquadron out. If you insist on selecting thesame few pilots for each mission, sooner orlater they will come to their emotional limit.When that happens, their nerves are shotand they�ll be worse than useless in the air.Beware of this and don�t drive your men tothe point where they all get the Twitch!
Calculated risks, crafty tactical planning,and good decision making are what makefor successful careers in Red Baron II. Studyyour aircraft carefully, learn their good andbad qualities and use the former to your ad-vantage while minimizing the latter whenyou engage the enemy. Above all, remem-ber that the most successful pilots of the war� Fonck, Richthofen, and Rickenbacker�were all plotters. Far from rash or reck-less, these men were stalkers who plannedeach engagement with care. Learn from
them and apply what you�ve discovered toyour career in Red Baron II. You�ll find thatyour success will mirror theirs.
The last stop for many areckless aviator.

106
Flight Reference
FlightFormations
Formations in Red Baron II determine howplanes are arranged in a flight. Any flightthat has more than one plane in it (max.12 planes in any flight) will need some kindof formation. The number of planes in aflight will determine what formations areavailable, as some formations require anexact amount (like the diamond, whichrequires four planes). A flight can changeformations several times throughout a mis-sion, usually with a formation for takeoff,a second one to get to the target, a thirdformation at the target, and a fourth one toland.
All formations are lead by they flightleader. He fills slot #1 (or lead) of the for-mation. All other planes fill descending slots(2, 3, 4, 5, etc). Each slot beyond thelead will read off of a slot positioned beforehim. In other words, slots #2 and #3 willusually read their position off of the lead,and further slots usually read off of the leador slots 2 and 3. The following pages de-scribe the common formations in detail.
Echelon ( Left & Right)This is the simplest of formations. It can
hold from two to 12 planes. Planes in theformation will line up off of the lead�s rightor left side at a 135-degree angle. Eachplane forms off of its previous slot on thesame side, at the same angle (2 forms off of1, 3 forms off of 2, etc). Each plane is 10feet above or below the plane it follows.
The Echelon forms the core of most otherformations, and can be considered to be ageneric or fallback formation. It can be usedfor takeoffs, landings, or patrolling the skiesfor enemies.
Left Echelon1 (lead)
2 (±10ft)
3 (±10ft)
4 (±10ft)
5 (±10ft)
6 (±10 ft/±50 ft from lead)

107
Flight Formations
DiamondThe diamond adds a plane to the Vee. The fourth
plane follows directly behind the lead and at a 135-degree angle from slots 2 and 3. From the lead, slots 2and 3 are 10 feet below, and slot 4 is 20 feet below.
VeeThis formation requires three planes. It has a lead,
one plane in left echelon, and one in right echelon.Both stack 10 feet above or below the lead.
Vee
1 (lead)
2 (±10ft)3 (±10ft)
Diamond 1 (lead)
2 (-10ft)3 (-10ft)
4 (-20ft)

108
Flight Reference
WedgeThis formation adds two planes to the Vee. This for-
mation puts two planes on either side of the lead inechelons. All planes form on the slot before them inthe echelon (4 forms on 2, 2 forms on the lead). Allplanes stack 10 feet below the plane they follow.
DeltaThe Delta can handle anywhere from six to 12
planes. At its minimum number of planes, it lookslike a combination of a diamond and a wedge.
Beyond the first 6 planes in the formation, addi-tional planes line up in echelons, aside from slots 9and 10, that form behind 2 and 3, respectively. Planesmust be added in pairs (and in slot order�7 and 8must be filled before 9 and 10,etc), so this formationis only available to flights of six, eight, 10, or 12planes.
All planes in echelons are stacked 10 feet below theslot they follow, and planes directly behind anotherplane (slots 6, 9, and 10) stack 20 feet below.
Wedge
1 (lead)
2 (-10ft)3 (-10ft)
4 (-10ft)5 (-10ft)
7 (-10ft)
Delta 1 (lead)
2 (-10ft)3 (-10ft)
4 (-10ft)5 (-10ft)
6 (-20ft)8 (-10ft)
12 (-10ft)10 (-20ft) 9 (-20ft)
11 (-10ft)

109
Flight Formations
VicA Vic formation is basically the same as a Vee, ex-
cept that pairs of planes can be added, up to a maxi-mum of 12. The means that the Vic can have 3, 5, 7,9 , or 11 planes in the formation. All planes are inright or left echelon from the lead, stacking 10 feet downper plane.
In Trail (Line Astern)The In Trail formation is simply a row of planes, each
lined up behind the plane it follows. This formationcan have anywhere from two to 12 planes. This is agood takeoff formation. Its tactical use is limited, how-ever.
Vic 1 (lead)
6 (-10ft)
3 (-10ft) 2 (-10ft)
5 (-10ft) 4 (-10ft)
8 (-10ft)
11 (-10ft)
9 (-10ft)
7 (-10ft)
10 (-10ft)
In Trail 1 (lead)
3 (-10ft)
2 (-10ft)
5 (-10ft)
4 (-10ft)

110
Flight Reference
JavelinThe Javelin is mainly a bomber formation, and used
only when there are more than six planes in the flight.While it looks complicated, it can be deadly when usedby bombers, because each plane provides cover fire tothe rear of other planes in the formation.
There are two variations of the Javelin, which areused for differing numbers of planes in the formation.Basically, the formation used will be the regular Jav-elin unless the number of planes gives the formationan asymmetrical look.
For instance, if there are six or seven planes in theformation, a regular Javelin is used. An eighth planewould unbalance the formation (as there would be anextra plane on the right), so the formation would usethe Modified Javelin instead. Nine, 10, or 12 planeswould use the regular Javelin, but 11 would use theModified.
Slots 2 and 3 stack up 10 feet from the lead, andevery other plane stacks down 10 feet from the plane itfollows.
Don�t worry if this seems a little confusing, sincethis is a bomber formation, you won�t have to do any-thing but look at it in flight.
Javelin
6 (-10 ft)
12 (-10ft)
1 (lead)
3 (+10ft) 2 (+10ft)
5 (-10ft)
4 (-10ft)
8 (-10ft)
11 (-10ft)
9 (-10ft)
7 (-10ft)
10 (-10ft)
Modified Javelin
6 (-10 ft)
1 (lead)
3 (+10ft) 2 (+10ft)
5 (-10ft)
4 (-10ft)
8 (-10ft)
11 (-10ft)
10 (-10ft)
7 (-10ft)
9 (-10ft)

111
Flight Formations
Wall (Line Abreast)The Wall is another good takeoff formation. The
lead is at the far left, and additional planes line up tothe right. This formation has a zero stack, meaningthat all the planes are at the same altitude. Two to 12planes are possible.
Low Altitude (Strafe)This formation is generally limited to ground attack.
Planes line up in a Right Echelon from the lead, buttheir angle to the lead is much steeper (150 degrees,instead of the usual 135 degrees). Planes always stackup from the lead, so they don�t crash into the groundduring the attack.
6
Wall (line Abreast)
lead 2 3 4 5
Low Altitude(strafe) 1 (lead)
3 (+10ft)
2 (+10ft)
5 (+10ft)
4 (+10ft)

112
Flight Reference
Sectionand Stinger
Section and StingerThis is a formation designed to lure the enemy in to
attack the two forward elements, while the third waitsto drop down on the engaged enemy.
Slot 2 of the formation lines up on the lead in a nor-mal Right Echelon, while slot 3 follows far behind andhigh above. If the first two slots are engaged, slot 3 isin a great position to finish off the enemy.
Fluid FourThis generic, four-plane formation is useful for pa-
trols. Planes stack down.
1 (lead)
3 (+100ft)
2 (-10ft)
Fluid Four1 (lead)
3 (-10ft) 2 (-10ft)
4 (-10ft)

113
Flight Formations
EscortThe Escort formation is special in that the bomber
being escorted becomes the formation lead. The flightlead before joining the bombers, becomes the slot 2plane, and so on. Basically, the escort fighters (fromtwo to 12 of them) take up defensive positions aroundthe bombers in simple Echelons according to their re-lation to the bombers.
Slots 2, 4, 6, and 8 key off of the bomber lead(stacking high), while all other slots follow the planebefore them, stacking down 10 feet.
Note that a 12-plane Escort can join with a 12-planebomber formation (usually a Javelin). This results inquite a scary sight (although rare)for your enemies!
Modified EscortThe Modified Escort is a combination of a normal
Escort formation and a Section and Stinger formation.It can hold three to four planes. The first two slots(slot 2 and 3) are in a Right Echelon in front and tothe right of the bombers. The last slots are behind andabove the bombers, waiting for an enemy to engagethem, so they can pounce.
12 (-10ft)12 (-10ft)
Escort
9 (±10ft)
bomberis lead
6 (+400ft) 2 (+500ft)7 (-10ft)
10 (-10ft)
4 (+300ft)5 (-10ft)
8 (+200ft)
11 (-10ft)
3 (-10ft)
Modified Escort(Section and Stinger)
2 (+500ft)
3 (-10ft)
4 (+800ft)
5 (-10ft)
bomberis lead

114
Flight Reference
Mission Types
Fighter AttackMissions
Attack missions are offensive�the goalis usually to severely damage or destroy atarget located behind enemy lines.
Attack TargetThe goal of this mission is to attack an
enemy aerodrome or infantry position. Theplayer�s flight must show up at the targetand wreak havoc on its priority structureswithout taking excessive losses. Try to de-stroy over a quarter of the priority struc-tures without losing more than a third ofyour flight�s planes.
Priority structures for aerodromes areparked aircraft (if any) and hangars - largeor small. Observation towers and barracksare lower priority targets, when present.
An infantry position�s priority targets arethe artillery emplacements, and the smallgreen tent there is a secondary target.
Attack BalloonThis mission�s goal is to destroy an en-
emy observation balloon, used to spot forartillery. Try to destroy the balloon with-out losing too many of your men. The bal-loon is the only priority target. Make surethat you take incendiary bullets or Le Prierrockets (you may adjust your ordnance loadafter the mission briefing in the View FlightPlan area), or you�ll have a tough time ofit!
Fighter DefenseMissions
Defense missions require you to defend afriendly target from the enemy. Get to thetarget, patrol the air above, and take outany enemies that get too near!
Combat Air PatrolThis is the general defense mission. Your
flight may be assigned to a variety of friendlyassets�anything from supply dumps to fac-tories to railyards. Your mission is to patrolthe air above the asset for a specified amountof time. Any enemy aircraft that come too
close must be destroyed. Protect the assetand try not to lose any flight members.
Balloon DefenseThis is the counterpart of the Attack Bal-
loon mission described earlier. Get to thefriendly balloon you�re assigned to, protectyour own observation balloon for the de-fined duration, and lose as few planes aspossible.
Fighter SupportMissions
Support missions are related to groundactivity. Your job is to provide air cover foryour infantry positions, or add an extrapunch to an offensive. Victory conditionswill weigh how much damage to the enemyyou do in the target area against your flight�slosses.
Support AttackYou are assigned to support an infantry
offensive against enemy-held positions onthe front. Shoot down any enemy fightersthat get near, and help out your infantry by

115
Mission Types
taking out enemy machine gun nests andartillery. Be careful though, hostile ma-chine gun nests can be deadly up close!
Support DefenseIn this mission, you are backing up your
own ground troops against an enemycharge. Protect you troops and defensivepositions by driving off or destroying enemyplanes and ground forces for the definedduration.
Fighter EscortMissionsEscort
Your mission as an escort is to protect aflight of bombers or reconnaissance planesand ensure they get to their target and back.Your flight will start off in its own forma-tion until it reaches a rendezvous with thebombers. From there on, the lead of thebombing formation controls both flights forwaypoint navigation.
Drive off any enemies that try to engagethe bombers, and keep casualties low. Staywithin sight of the bombers�if you pursue
enemies too far and leave your bombers,you may fail the mission.
Fighter PatrolMissionsOffensive Patrol
This is basically a mission to find and shootdown any enemy aircraft you come across.The flight patrols a landmark, or the areabetween multiple landmarks, on theenemy�s side of the front and engages anyplanes they encounter (within reason, ofcourse - the key is to be aggressive, notsuicidal). Success depends on the numberof enemy planes your flight shoots downcompared to the number of your losses.
Barrage PatrolThis is the same as an Offensive Patrol,
except the area patrolled is on the friendlyside of the lines. Your job is to make surethat no enemy flights make it through yourarea of patrol. Also like the Offensive Pa-trol, success weighs kills against your losses.
Fighter �Lone Wolf�Missions
A �Lone Wolf� mission is essentially amaverick flight in which the player is sentoff to any location on the map looking foraction. In Campaign mode, a Lone Wolfflight must contain only the player pilot him-self. In the Mission Builder, a Lone Wolfflight may contain any number of pilots anddoes not have to include the player.
Bomber/ReconMissions
While the two-seater airplanes aren�t fly-able by the player, he may be called on togive an escort. Here�s the description of themissions on which the player may be escort-ing. Not all bombing flights will be escortedby fighters.
Bomb TargetUsually reserved for the best two-seater
squads available, bombing missions send inflights to drop bombs on important land-marks (factories, bridges, etc).

116
Flight Reference
Artillery SpottingIn this mission, two-seater planes will go
to the front and act as forward observers forfriendly artillery. The flight must get to thetarget waypoint and stay there for a timebefore returning to base.
Landmark ReconnaissanceThis mission usually involves older or in-
ferior two-seaters flying to an enemy land-mark at high altitude. Once there, they takesome recon photos and return to base.

117
Aircraft
The Aircraftof World War I

118
Art
© c
opyr
ight
199
7 R
ay R
imel
l/A
lbat
ros P
rodu
ctio
ns L
td.
� u
sed
with
per
miss
ion.
French Aircraft
Morane Saulnier NAccepted into service before the start of the war, the Bullet was one of the first
airplanes to mount a machine gun to its cowling. While only a few were put intoservice, it flew virtually undisputed until the appearance of the Fokker EIII.

119
Aircraft
Art
© c
opyr
ight
199
7 R
ay R
imel
l/A
lbat
ros P
rodu
ctio
ns L
td.
� u
sed
with
per
miss
ion.
Nieuport 11Incredibly maneuverable, the Bebe (Baby) enabled the allies to gain air
superiority in the skies over France at the end of 1915 and much of 1916.Many great aces, like Albert Ball, Billy Bishop, and Charles Nungesser,began their fighter careers in the Nieuport 11.

120
Aircraft
Art
© c
opyr
ight
199
7 R
ay R
imel
l/A
lbat
ros P
rodu
ctio
ns L
td.
� u
sed
with
per
miss
ion.
Nieuport 17The Nieuport was one of the classic designs to emerge from the Great War. Light,
powerful, and incredibly nimble, this aeroplane had no equal in the sky until theadvent of the Albatros D.III. It first arrived in the spring and summer of 1916, andequipped most French units and many British ones until mid-1917. Unfortunately,this type had a nasty habit of shedding its lower wings after violent maneuvers or steepdives. Nevertheless, it was one of the best Allied fighters of 1916-17.

121
Aircraft
Art
© c
opyr
ight
199
7 R
ay R
imel
l/A
lbat
ros P
rodu
ctio
ns L
td.
� u
sed
with
per
miss
ion.
Spad 7First appearing in the summer of 1916, the Spad 7 combined speed and
strength into a business-like airframe. Though it couldn�t out-turn theNieuport 17 or many of the German aircraft, it could handle very steepdives without losing a wing. Their early engines, however, suffered fromall kinds of teething troubles. Eventually, these were ironed out and theSpad became a deadly adversary in the air.
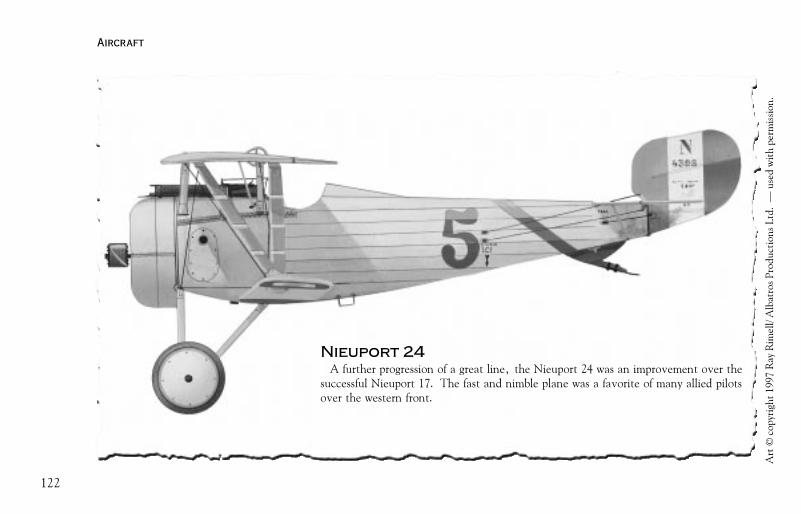
122
Aircraft
Art
© c
opyr
ight
199
7 R
ay R
imel
l/A
lbat
ros P
rodu
ctio
ns L
td.
� u
sed
with
per
miss
ion.
Nieuport 24A further progression of a great line, the Nieuport 24 was an improvement over the
successful Nieuport 17. The fast and nimble plane was a favorite of many allied pilotsover the western front.

123
Aircraft
Art
© c
opyr
ight
199
7 R
ay R
imel
l/A
lbat
ros P
rodu
ctio
ns L
td.
� u
sed
with
per
miss
ion.
Spad XIIIThis was simply an improved Spad 7. It mounted a more powerful engine,
and two Vickers machine guns instead of just one. The Spad 13 became oneof the classic designs of World War One. Fast, sleek, and robust, Spadswere capable of dives exceeding 200 miles per hour.

124
Aircraft
Art
© c
opyr
ight
199
7 R
ay R
imel
l/A
lbat
ros P
rodu
ctio
ns L
td.
� u
sed
with
per
miss
ion.
Nieuport 28A great plane in its own right, the Nieuport 28 entered service after the Spad XIII
had been accepted as the front-line fighter of choice. The Nieuport 28 was assigned tomany units that couldn�t get the Spad, including most of the American ExpeditionaryForce.

125
Aircraft
Art
© c
opyr
ight
199
7 R
ay R
imel
l/A
lbat
ros P
rodu
ctio
ns L
td.
� u
sed
with
per
miss
ion.
British Aircraft
Airco D.H.2The D.H.2 was nimble and highly maneuverable. It was one of the earliestfighters to have an engine mounted behind the pilot in a pusher-type design.Unfortunately, the engine was totally unreliable and, often, several D.H.2sout of each patrol would abort because of engine trouble. Nevertheless, itserved well into 1917.

126
Aircraft
Art
© c
opyr
ight
199
7 R
ay R
imel
l/A
lbat
ros P
rodu
ctio
ns L
td.
� u
sed
with
per
miss
ion.
Sopwith PupThe Pup was a lightweight, graceful biplane whose docile flight characteristics earned
the affection of its pilots. Though it was underpowered, it could outmaneuver manyGerman aircraft it faced in 1916-17 above 10,000 feet. The Pup primarily served withR.N.A.S. and Home Defense units until it was replaced by the Sopwith Triplane andCamel.

127
Aircraft
Art
© c
opyr
ight
199
7 R
ay R
imel
l/A
lbat
ros P
rodu
ctio
ns L
td.
� u
sed
with
per
miss
ion.
Sopwith triplaneThe Triplane served only in limited numbers with R.N.A.S. units during
the first half of 1917. They were extremely nimble, but underpowered, air-craft.

128
Aircraft
Art
© c
opyr
ight
199
7 R
ay R
imel
l/A
lbat
ros P
rodu
ctio
ns L
td.
� u
sed
with
per
miss
ion.
S.E.5aS.E.5a was probably the best British scout of the war. Easy to fly, stable and very
effective at high altitude, the S.E.5a made even a mediocre pilot look good. Its stabil-ity made it an excellent gun platform. Though it was not as maneuverable as the Camelor the Fokker Triplane, it could outdive anything the Germans flew. It could alsoclimb better than most other aircraft.

129
Aircraft
Art
© c
opyr
ight
199
7 R
ay R
imel
l/A
lbat
ros P
rodu
ctio
ns L
td.
� u
sed
with
per
miss
ion.
Sopwith CamelOne of the better Allied scouts of the war, the Camel was used primarily
for low-altitude missions. In the hands of a veteran pilot, the Camel couldturn more sharply to the right than any other aircraft (except perhaps theFokker Dr.I). To the left, the plane had a tendency to climb. The Camelserved as both a fighter and a ground attack aircraft in both the R.F.C. andthe American Air Service until the end of the war.

130
Aircraft
Art
© c
opyr
ight
199
7 R
ay R
imel
l/A
lbat
ros P
rodu
ctio
ns L
td.
� u
sed
with
per
miss
ion.
Sopwith SnipeEntering production at the end of the war, the Sopwith Snipe was a further evolution
of the Camel. While only a few squadrons were equipped with the Snipe before theArmistice, its high speed and stunning maneuverability ensured widespread use longafter the war ended.
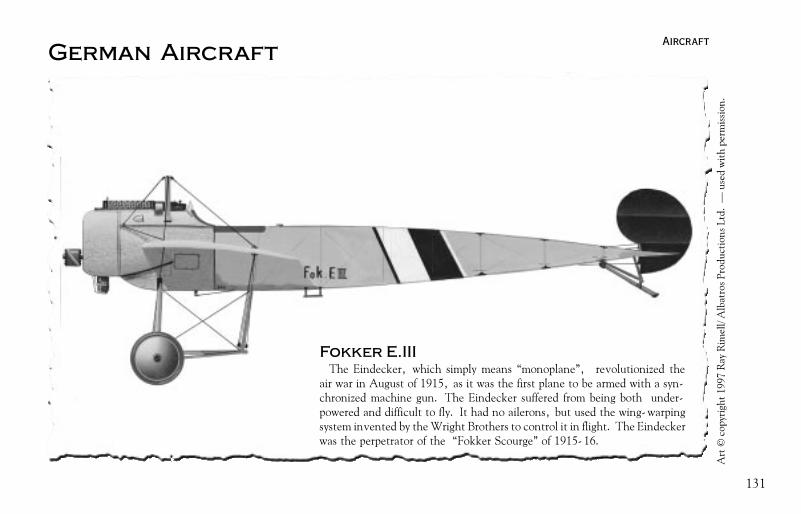
131
Aircraft
Art
© c
opyr
ight
199
7 R
ay R
imel
l/A
lbat
ros P
rodu
ctio
ns L
td.
� u
sed
with
per
miss
ion.
Fokker E.IIIThe Eindecker, which simply means �monoplane�, revolutionized the
air war in August of 1915, as it was the first plane to be armed with a syn-chronized machine gun. The Eindecker suffered from being both under-powered and difficult to fly. It had no ailerons, but used the wing-warpingsystem invented by the Wright Brothers to control it in flight. The Eindeckerwas the perpetrator of the �Fokker Scourge� of 1915-16.
German Aircraft

132
Aircraft
Art
© c
opyr
ight
199
7 R
ay R
imel
l/A
lbat
ros P
rodu
ctio
ns L
td.
� u
sed
with
per
miss
ion.
Halberstadt D.IIAn early German biplane fighter, the Halberstadt DII was armed with only one for-
ward-firing machine gun. While quite successful early on, it was outclassed with theemergence of the DH2 and Nieuport fighters and was finally replaced with the Albatrosseries of scouts.

133
Aircraft
Art
© c
opyr
ight
199
7 R
ay R
imel
l/A
lbat
ros P
rodu
ctio
ns L
td.
� u
sed
with
per
miss
ion.
Albatros D.IIThe first in one of the wars most successful design series, the Albatros D.II
re-established parity in the air in late 1916. Fast, maneuverable and heavilyarmed with twin Spandau machine guns, the D.II served as Germany�s pri-mary scout plane until the arrival of the Albatros D.III in early 1917.

134
Aircraft
Art
© c
opyr
ight
199
7 R
ay R
imel
l/A
lbat
ros P
rodu
ctio
ns L
td.
� u
sed
with
per
miss
ion.
Albatros D.IIIThe D.III was Germany�s best scout during the early part of 1917. It was fast and
maneuverable for its time. Bloody April was, in large part, due to the superiority of theD.III over its Allied contemporaries.

135
Aircraft
Art
© c
opyr
ight
199
7 R
ay R
imel
l/A
lbat
ros P
rodu
ctio
ns L
td.
� u
sed
with
per
miss
ion.
Albatros D.Va Most German pilots were disappointed with the D.Va since it was not a
major improvement on the Albatros D.III. In fact, the D.Va was heavierand could not climb as fast as its predecessor. While it wasn�t an outstandingaircraft, it was very easy to fly. Despite its mediocre performance, this air-craft served until the Armistice in many German units.

136
Aircraft
Art
© c
opyr
ight
199
7 R
ay R
imel
l/A
lbat
ros P
rodu
ctio
ns L
td.
� u
sed
with
per
miss
ion.
Pfalz D.IIIThe Pfalz D. III supplied most of the Bavarian Jagdstaffeln at one point or another
from summer 1917 until mid 1918. It was fast, sturdy, and durable. The Pfalz Acessuch as Werner Voss and Rudolf Berthold preferred this aircraft over the Albatros D.Vsince it could dive faster and was more rugged.

137
Aircraft
Art
© c
opyr
ight
199
7 R
ay R
imel
l/A
lbat
ros P
rodu
ctio
ns L
td.
� u
sed
with
per
miss
ion.
fokker Dr.IThe Dr.I was very effective in the swirling dogfights of late 1917 and early
1918. Its massive wing area allowed it to out-turn and out-climb all Alliedaircraft. It did not, however, possess great speed or structural integrity.Though it was incredibly maneuverable, it proved to be very difficult to fly.

138
Aircraft
Art
© c
opyr
ight
199
7 R
ay R
imel
l/A
lbat
ros P
rodu
ctio
ns L
td.
� u
sed
with
per
miss
ion.
Fokker D.VIIThe D.VII was easily the best scout of the war. It was easy to fly, yet it was quick
and rugged. A pilot could dive a D.VII without fear of losing a wing. It�s high com-pression BMW and Mercedes engines gave it unrivaled high-altitude capabilities.Fokker pilots routinely stood their D.VIIs on their tails and climbed vertically incombat. For short periods, the Fokkers could maintain this attitude and fire the twinSpandaus without fear of stalling.

139
Aircraft
Art
© c
opyr
ight
199
7 R
ay R
imel
l/A
lbat
ros P
rodu
ctio
ns L
td.
� u
sed
with
per
miss
ion.
Pfalz D.XIIDue to its late entry to the war and the predominance of the Fokker DVII,
the Pfalz DXII was destined to be remembered as a second-rate fighter. How-ever, it was a sturdy plane and performed nearly as well as the DVII.

140
Medals and Awards

141
Medals and Awards
Medalsand Awards
142
Medals and Awards
Background
Both the Central Powers and theAllies had their own awardsstructures that came into play
during World War I and which were givenfor gallantry and military merit to nativesand others deemed deserving. Amonghigher-ranking officers and royalty there wasmuch exchange of awards as a customarymilitary nicety. But the fighting man, bothofficer and man alike, was also recognizednot only by his own country but if his brav-ery was sufficient, by the other nations al-lied with it in war.
While many nations had highly developedand complex awards structures, especiallyin countries with long dynastic histories likethe Romanovs in Russia and theHohenzollerns in Prussia, none was quiteas extensive as that which existed in Impe-rial Germany during World War I. Thereason was that even though Prussia was thelead entity in the empire and its king wasthe emperor (Kaiser), the other states stillretained certain military privileges. Theseincluded their own individual awards.
Since Germany was still a collection of fourkingdoms, many grand duchies, duchies,principalities, the three free cities of the oldHanseatic League and the Imperial Domainof Alsace-Lorraine (only the latter did notmake awards), a fighter pilot of the promi-nence of Manfred von Richthofen couldamass a truly staggering array of suchawards.
One point regarding Imperial Germanawards needs to be made. There were no�German,� or empire, awards for braveryand military merit in World War I. Eachcame from an individual state. Thus it isnot correct to call the famous Orden Pourle Merite, the so-called �Blue Max,�Germany�s highest recognition for officers onthe battlefield. It was Prussia�s. However,because of its pre-eminent position withinthe empire, Prussia was called upon to makeits awards throughout all contingents, notjust its own. So, in effect, they becameempire awards while still retaining their spe-cific identity and origin.
BRITISH AWARDSThe Victoria Cross
Instituted by QueenVictoria in 1856, it takesprecedence over everyother honor in the BritishEmpire including such il-lustrious orders of knight-hood and chivalry such asthe Order of the Garter,Order of the Thistle, Or-der of St. Patrick, Etc. Itwas meant to recognize
some signal act of valor or devotion to thecountry that was performed in the presenceof the enemy.

143
Medals and Awards
TheDistinguishedService Order
Established in 1886to recognize distin-guished or meritoriousservice in war, it wasawarded to officersonly. It generallywent to more seniorofficers for superior
work. It was also awarded as recognitionfor valor or merit of a superior kind whichdid not warrant the award of the VictoriaCross.
As with other British awards, bars wereawarded to represent subsequent awards ofthe same decoration. Albert Ball is believedto be the first officer to receive the D.S.O.with 2 Bars.
TheDistinguishedFlying Cross
When the Royal Fly-ing Corps and the RoyalNaval Air Service werecombined to create theRoyal Air Force with aneffective date of April1, 1918, it had beendecided to found a new
range of awards for the service which weremeant to replace the Army and Navy awardspreviously bestowed.
The Distinguished Flying Cross was meantto reward officers and Warrant Officers ofthe R.A.F. for an act or acts of valor,courage or devotion to duty performed whileflying in active operations against the en-emy. It was meant to replace the M.C.There were 889 awards of the D.F.C. topilots in the R.A.F..
TheMilitary Cross
This decoration wasestablished on December31, 1914 as an Armyaward to commissionedofficers from the rank ofCaptain and below andto Warrant Officers. Itwas meant to recognizedistinguished and meri-torious service in time of
war by men of these ranks. There were1,077 awards of the M.C. for service bymen in the R.F.C. / R.A.F.

144
Medals and Awards
FRENCH AWARDSLegion ofHonor
Founded by Na-poleon Bonaparteon May 19, 1802,it was France�shighest honor. Itcame in five grades.The two lowest, theOfficer�s Cross andKnight�s Cross,
could go to the younger combat officers andthe Knight�s Cross could also go exception-ally to non-commissioned officers and men.
It was awarded to French citizens and for-eigners for outstanding services of a civil ormilitary nature. There was, however, nodistinction on the insignia to differentiatebetween an award won, for example, onthe battlefield versus one that might havebeen given for a distinguished career in civillife.
Croix de GuerreThis decoration was
established on April 8,1915 as a means tomark individuals whohad been mentioned indispatches. It couldgo to both officer andman alike.
For a mention in anArmy Dispatch (or the
corresponding unit in the navy), a bronzelaurel wreath, called a palm, was affixed tothe ribbon of the cross. An Army Corpsdispatch mention rated a gilt star. A Divi-sional dispatch mention was marked by asilver star and a Bri-gade, Regimental orUnit mention in a dis-patch by a bronze star.
Military MedalEstablished in 1852
during the reign of Napo-leon III, the MedailleMilitaire consisted of agilded portrait of theFrench Emperor sus-pended by an eagle. Itwas awarded to both of-ficers and NCOs for brav-ery in battle.

145
Medals and Awards
GERMAN AWARDSOrder forMerit (alsoknown as �TheBlue Max�)
Prussian name:Orden Pour le Merite
Founded in 1740by Friedrich theGreat of Prussia, he
used French terminology for the words �forMerit� rather than the German because hewas a great admirer of French court cus-toms and insisted that language be used inhis court. It was Prussia�s highest recogni-tion to officers for courage on the battle-field and for superior military performancein time of war. Thus it was rewarded inlarge numbers to senior military leaders androyalty as well as to officers for bravery inactual conflict with the enemy. In that re-spect it differed from the Victoria Cross andthe U.S. Medal of Honor.
The order came in one class, that ofknight, and was worn from the neck on acravat. There was also a separate and
higher award of theorder, the OrdenPour le Merite mitEichenlaub (theOrder for Merit withOakleaf). Theoakleaf did not in-dicate a secondaward of the sameorder as a bar or anoak leaf cluster would in the case of a Brit-ish or U.S. award respectively.
No combat flier received the order withOakleaf during the war although vonRichthofen was proposed for it (see the RedEagle Order description).
There were 81 awards of the Orden Pourle Merite within the various air services inworld War I. The Prussian awards systemvalued the consistent performer more sothan a man who might perform a single act,however brave. It usually took repeatedacts of bravery or continued good work overtime to earn a high award like the Pour leMerite. For the combat airmen then, thisgot translated into the number of victoriesfor a fighter pilot or in the case of the men
in the multi-place aircraft, many success-ful missions across enemy lines.
The first aviation awards of the Pour leMerite went to Oswald Boelcke and MaxImmelmann on January 12, 1916, the dayeach scored his eighth confirmed victory.For the rest of that year, it took eight vic-tories for the other fighter pilots who hadbeen flying for some time before they re-ceived their awards. For the newer fighterpilots, a higher requirement was adoptedin November 1916. The first to feel its ef-fect was Manfred von Richthofen who wasmade to wait until he had 16 victories be-fore his award was approved on January 12,1917. Thereafter, it usually took at least20 victories before the award would be ap-proved but there were a few exceptions(Goering was one of them). In the lastmonths of the war with scoring at a rapidrate among the leading German aces andpaperwork breaking down, the award some-times did not reach a man until he had con-siderably more than 20 victories. The lasttwo aviation recipients of the order, forexample, had 30 victories when the awardcaught up with them.

146
Medals and Awards
and separate award.The order came in three classes with the
lowest, that of Knight, being the one go-ing to the young combat officers. Since theorder could also be given in peacetime forservice to the House of Hohenzollern, whenawarded in wartime, a pair of crossed swordswas placed between the arms of the crosson the insignia. It was then said that theorder had been given �with Swords.�
The first airmen to receive the Knight�sCross with Swords of the order were, again,Boelcke and Immelmann. They receivedit in November 1915 after their sixth con-firmed victories. Throughout 1916 it usu-ally took fighter pilots six victories beforethey, too, received the award. In 1917and thereafter it usually took at least 10 vic-tories before a man would be favorably con-sidered. In total, 8,291 Knight�s Crosseswith Swords were awarded for service inWorld War I.
The RedEagle Order
German name:Roter Adler-Ordenmit Schwerten
Prior to WorldWar I, this order,founded in 1705,was used to re-ward junior offic-ers for bravery in
action and for meritorious service. Its us-age in these ways was dropped in World WarI and the Royal Hohenzollern House Orderwas employed instead.
However, one combat airman receivedthe order. He was Manfred von Richthofenwho received the Red Eagle Order, 3rdClass with Crown and Swords
on April 6, 1918 in recognition of his 70thvictory and his nearly three years of servicein the air. It was thus a unique award withinthe Imperial German Air Service in WorldWar I.
Actually, von Richthofen had been pro-posed for the award of the Pour le Meritewith Oakleaf instead. This was turned
RoyalHohenzollernHouseOrder withSwords
German name:Ritterkreuz desK o e n i g l i c h e nHausorden vonHohenzollern mitSchwerten
Founded on December 5, 1841 by KingFriedrich Wilhelm IV of Prussia, it was themajor award used by Prussia in World WarI to recognize bravery and distinguishedmilitary service by officers after they hadreceived the Iron Cross, 1st Class. It thusbecame the customary intermediate awardbetween an Iron Cross, 1st Class and theOrden Pour le Merite. It is important tonote that unlike Great Britain and theU.S., Imperial Germany did not engage inmaking multiple awards of the same orderor decoration. To recognize a man for re-peated acts of courage or superior perfor-mance it was necessary to go to a higher
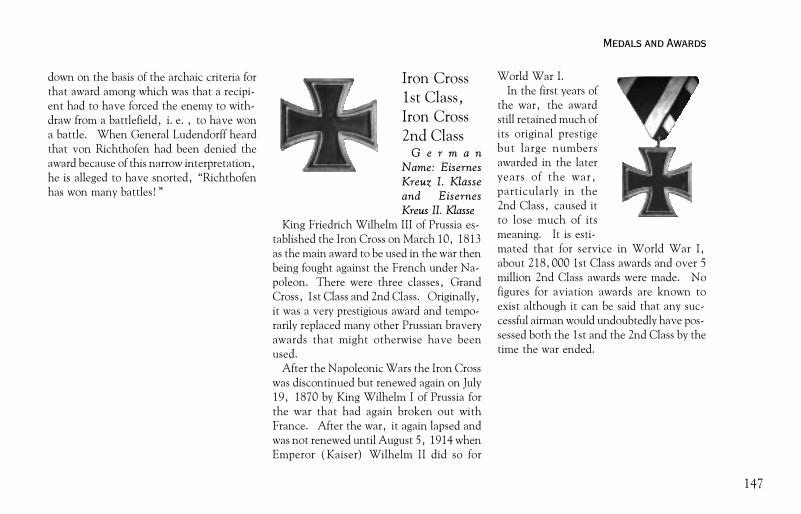
147
Medals and Awards
down on the basis of the archaic criteria forthat award among which was that a recipi-ent had to have forced the enemy to with-draw from a battlefield, i.e., to have wona battle. When General Ludendorff heardthat von Richthofen had been denied theaward because of this narrow interpretation,he is alleged to have snorted, �Richthofenhas won many battles!�
Iron Cross1st Class,Iron Cross2nd Class
G e r m a nName: EisernesKreuz I. Klasseand EisernesKreus II. Klasse
King Friedrich Wilhelm III of Prussia es-tablished the Iron Cross on March 10, 1813as the main award to be used in the war thenbeing fought against the French under Na-poleon. There were three classes, GrandCross, 1st Class and 2nd Class. Originally,it was a very prestigious award and tempo-rarily replaced many other Prussian braveryawards that might otherwise have beenused.
After the Napoleonic Wars the Iron Crosswas discontinued but renewed again on July19, 1870 by King Wilhelm I of Prussia forthe war that had again broken out withFrance. After the war, it again lapsed andwas not renewed until August 5, 1914 whenEmperor (Kaiser) Wilhelm II did so for
World War I.In the first years of
the war, the awardstill retained much ofits original prestigebut large numbersawarded in the lateryears of the war,particularly in the2nd Class, caused itto lose much of itsmeaning. It is esti-mated that for service in World War I,about 218,000 1st Class awards and over 5million 2nd Class awards were made. Nofigures for aviation awards are known toexist although it can be said that any suc-cessful airman would undoubtedly have pos-sessed both the 1st and the 2nd Class by thetime the war ended.

148
Medals and Awards
United StatesAwardsCongressionalMedal of Honor
The Medal of Honor,given for service �above andbeyond the call of duty,� isthe highest award for valorin action against an enemyforce that can be bestowedupon an individual serving
in the Armed Services of the United States.It is usually presented by the President ofthe United States in the name of Congress,and is therefore often called the Congres-sional Medal of Honor.
The Medal of Honor holds a special placeas the first American decoration not pat-terned after English awards. It began as aCivil War decoration, approved by Presi-dent Lincoln, intended for use by the Navyas a morale booster. It was to be awardedupon those servicemen �as shall most dis-tinguish themselves by their gallantry inaction.� The Army soon adopted the awardas well, and in 1904 added a wreath to the
basic star-shaped medal for their own ser-vice. The Air Force added a separate wreathdesign to create their unique version of themedal in 1965.
DistinguishedService Cross
The DistinguishedService Cross, estab-lished by an Act ofCongress on July 9,1918, could be awardedto any member of theUS Army for �Extraor-dinary Heroism in Con-nection with MilitaryOperations Against an
Opposing Armed Force.� This service couldbe in any capacity under the following cir-cumstance: against an enemy of the UnitedStates; while engaged in military operationsinvolving conflict with an opposing or for-eign force; or while serving with friendlyforeign forces engaged in an armed conflictagainst an opposing Armed Force in whichthe United States was not a belligerentparty.
This medal was intended for presentationto servicemen whose actions were �so no-table and have involved risk of life so ex-traordinary as to set the individual apartfrom his or her comrades,� yet whose ac-

149
Medals and Awards
tions were not judged sufficient for theMedal of Honor. Although established in1918, servicemen were eligible for thisdecoration for any action taking place afterApril 6, 1917.

150

151
Maps

152

153

154

155

156

157
Game Play

158
Game Play
IntroductionRed Baron II is a flight simulation program
set in World War I, an era that saw the dawnof aerial warfare. There are three ways to playthis game, each with its own appeal.
The simplest way to play Red Baron II isusing the Fly Now option. When you selectFly Now, you jump straight to the simulationpart of the game to begin dogfighting. By set-ting options on the Preferences menu, youcan fly most of the fighter planes availableduring WWI in a dogfight against any otherplane from the same set. A Fly Now game hasno mission goal; you fly alone, your only pur-pose being to shoot down as many opponentsas you can.
For a more complex game, you may chooseto play a Single Mission. These missions arestand-alone scenarios that may be historicalin scope, or may instead be fantasy �Whatif?� missions. Each Single Mission is a sepa-rate entity, with no connection to any othermission, but all of the elements of a full cam-paign are present: you fly as part of a squad-ron, with a specific mission goal chosen froma long list of possible targets. Red Baron II
includes a Mission Builder module you canuse to create customized single missions to flyyourself or to share with friends.
For the longest and richest game experi-ence, you can play a Campaign game. In thismode, you create a pilot whose career canspan the entirety of World War I (though youcan choose to run a shorter campaign if youwish.) For the Campaign mode, Red Baron IIcreates a dynamic virtual world of great his-torical accuracy, constantly populated andmaintained as the campaign progresses. Asingle campaign may include hundreds of mis-sions over years of game time.
Whichever style of game you choose, RedBaron II will provide an exciting and chal-lenging flight sim experience.
Getting StartedWhen you insert the Red Baron II CD, if
your computer has the Autoplay function en-abled you will see the Autoplay screen dis-played. To play Red Baron II solo, click onPlay Red Baron II.
The Main Menu ScreenWhen you select �Play Red Baron II� from
the Autoplay screen, the Main MenuScreen appears. The first three buttons (FlyNow, Single Mission, and Campaign) allowyou to select the mode of play you want. Thenext two (Object Preview and Ace Preview)bring up historical information about thepeople and things you may encounter in RedBaron II. The Preferences button lets youcustomize the game parameters to suit yourcomputer�s power and your own tastes.
� The Fly Now button takes you straightinto the flight sim for a quick standalone dog-fight. The parameters for the Fly Now dog-fight are set from the Preferences Screen.Fly Now dogfights are completely indepen-

159
Game Play
dent of either Single Mission play or Cam-paign play.
� The Single Mission button takes you tothe Single Mission Screen, from which youcan design, save, and play individual mis-sions.
� The Cam-paign buttontakes you toC a m p a i g nScreen, whereyou can create apilot and re-fightWorld War I.
� The ObjectPreview buttonallows you to se-lect enemy or al-lied planes,ground forces, orbuildings, see a3-D picture ofthe object, andacquire some in-formation about
it that may be useful to you.
� The Ace Preview button allows you toview the biographical information and careerrecords of the top German, French, British,
and American Aces of World War I.
� The Preferences button allows you tochange game parameters such as the level ofgraphic detail, the sound volume, and thespecifics for your Fly Now instant dogfights.
Flying A Single MissionClicking on the Single Mission button on
the Main Menu Screen takes you to theSingle Mission Screen. The controls on thisscreen allow you to fly non-Campaign mis-sions, and to create and save standalone mis-sions for Red Baron II.
· The Fly Mission button takes youstraight into the cockpit to fly the currentmission.
· The View Briefing button brings updetailed information about the currently se-lected mission.
· The Select Mission button calls up alist of previously created missions for you toplay. Once a mission has been selected, a boxcontaining that mission�s name and informa-
The Main Menu

160
Game Play
tion will appear at the bottom of the screen.If there is no currently selected mission, thisbox will not appear.
· The New Mission button takes you tothe Mission Builder Screen so you can con-struct a custom mission. (See �The MissionBuilder� section.)
· The Edit Mission button takes you tothe Mission Builder with the currently selectedmission already loaded and ready for editing.
· The Main Menu button returns you tothe Main Menu.
Selecting a MissionWhen you choose the Select Mission but-
ton, a box containing a list of the availablemissions appears. Both the pre-created mis-sions included with this game and any mis-sions you have built yourself appear on thislist. The missions are displayed in alphabeti-cal order by filename, with the mission typeand squad name also shown. To load a mis-sion, click on its filename. If the list is toolong to display completely, use the scroll bar
to scroll the listuntil you find thefile you want.The filename willhighlight, and ashort descriptionof the missionwill appear in thetextbox abovethe list.
If you decide toplay the missionyou�ve high-lighted, click onthe Select buttonat the bottom ofthe list. The listdisappears andthe SelectedMission box ap-pears on the Single Mission Screen. Youcan then view the mission briefing, edit themission, or head for the skies.
If you decide you don�t want to select amission after all, click on Cancel to exit thelist. If you decide to completely erase a mis-sion, select it and then click the Delete but-
ton. The game will ask you to confirm thataction, and then delete the file. This deletioncan�t be undone, so be sure you want to getrid of that mission forever. The only limit onthe number of missions you can store is onyour disk space.
The Mission Briefing Screen

161
Game Play
Viewing theMission Briefing
When you click on the View Briefing but-ton on the Single Mission Screen, the Mis-sion Briefing chalkboard appears. The chalk-board summarizes the key information aboutyour flight and your mission. (Note: The mapsare disabled while you are viewing the missionbriefing.)
When you�ve reviewed the basics of yourmission, click on Continue. The briefing clip-board will appear on the right half of the screenwith your mission navigation chart (in blackand white) visible on the top page. This isthe portion of the map that will appear onyour kneeboard during the actual flight. Yourflight path is displayed, along with all nearbyunits and terrain features. The waypoints ofyour projected flight path are listed to the leftof the clipboard.
After rechecking your flight path, click onContinue to flip to the next page of the clip-board. This page displays the formation yoursquad will fly on their way to the target. (SeeFormations in the Reference section.) Thebasic mission information is recapped next tothe formation diagram. Click on Continue to
view the formation diagram for your squad toassume when it reaches its target.
After reviewing your formation plans, clickon Continue again to bring up a black andwhite recon photo of your mission objectiveas viewed from the southeast. If your missionis a bomber escort, this page will show a sche-matic of the lead bomber in the flight to beescorted.
Once you finish examining the photo, youmay click on Replay to flip back to the toppage of the clipboard and view any or all of thepages on it a second time. You may click onthe Done button on any page of the briefingto return to the Single Mission Screen.
Playing a CampaignWhen you select Campaign from the Main
Menu, Red Baron II �s Campaign Screenappears. When you choose to play a cam-paign instead of a single mission, you begin bycreating a pilot character and determining thedate on which he entered service in WorldWar I. Your pilot is then assigned missions tocarry out. If your pilot does well in his assign-ments, he will earn promotions which willallow you to have greater control over which
missions you will fly and what tactics you canemploy to carry them out.
The basic unit of organization for pilots inWorld War I was the squadron, a group ofup to twelve pilots (for Allied squadrons) ornine pilots (for German squadrons) under thecommand of a senior flyer, the SquadronCommander. On any given day, the squad-ron might be assigned one or more missionsto fly. For this mission, the squadron may bedivided up into smaller groups, called Flights,each with its own subcommander, the FlightLeader. Each Flight Leader has charge of thepilots in his flight, subordinate to the wishesof the Squadron Commander. Not every mis-sion calls for the squadron to be divided thisway, but it�s more common than not.
Different squadrons have pilots of differentquality. Better pilots tend to clump togetherin certain well-reputed squadrons. The bestof the pilots, the Aces (those flyers who hadshot down five or more enemy planes) areoften, but not always, Squadron Command-ers. A green pilot usually starts in a poor qual-ity squadron; if he performs well enough, hemay be able to swing a transfer to a bettergroup. The better squadrons get the first shot

162
Game Play
at the latest and greatest planes to roll off theassembly line, and also get replacement pilotsand planes more quickly than poorer ones.The possible squadron ratings are Poor, Aver-age, Good, and Elite.
In Red Baron II, you play a pilot in a fightersquadron in the service of your choice. Al-
though bomberflights exist in thegame, and caneven be created inthe MissionBuilder, your pi-lot will never flya bomber, onlyfighters.
Starting theCampaign
The first timeyou start a newcampaign, orany time you be-gin a campaignwithout any pi-lots created andsaved, the New
Pilot Screen will automatically appear on topof the Campaign Screen (see �Creating aPilot�).
The Campaign Screen itself has the fol-lowing buttons:
· Next Mission: Once you have created
a pilot, this command will cause the game togenerate your pilot�s next mission. Since youmay have more than one pilot �active� at atime, missions will be created for whicheverpilot you have currently selected using thePilot Log button. Each pilot�s career is en-tirely separate from every other pilot�s andkeeps its own separate timeline throughoutthe war.
· Squadron Ops: This button takes youto the Squadron Ops Screen, where youcan examine data on the pilots and planes inyour squadron, request a transfer, or person-alize your plane (if your rank is high enough;see the section titled �Painting Your Plane�.).
· Intelligence: From this screen, you canview intelligence data on other Aces and squadsand get intelligence updates about the war ef-fort in general.
· Pilot Log: This button takes you to thePilot Log Screen, where you can view theidentification papers of all the pilots you�vecreated, select which pilot you want to fly, orremove a pilot permanently from the roster.
The Campaign Screen

163
Game Play
· Personal Stats: This button brings upthe dossier of your current pilot.
· Medals/Awards: This button will bringup your medals box and allow you to viewyour earned honors (if any).
· New Pilot: This button takes you to ablank pilot dossier, where you can create anew pilot with which to campaign.
Creating and Changing Pilots(New Pilot and Pilot Log buttons)
When you click on the New Pilot button,or if you enter the Campaign area of the gamewithout any pilots, the blank Pilot Log bookopens on the screen. On the left are the newpilot�s enlistment papers, and on the right, asummary of his enlistment information.
To create a new pilot:
· First, select a service by clicking onthe paper labeled Service in the left part of thedossier folder. A panel pops up, giving you achoice of the four available nationalities in the
game. Select theone you want byclicking on it, orclick Cancel toclose the boxwithout making aselection. Thebox marked Ser-vice on the sum-mary sheet (rightpage of the dos-sier folder)changes to showyour choice.
· Second,choose an enlist-ment date(DOE) by click-ing on the paperlabeled Enlistment Date, then selecting a startdate from the list shown. If you want to startlater in the war, click on More to bring upmore dates to choose from. The later youstart in the war, the fewer missions your pilotcan go on before the war ends, and thereforethe shorter your campaign will be. Select the
date you want to start by clicking on it, orclick Cancel to exit the Pilot Log. The boxmarked Date of Enlistment on the summarysheet changes to show your choice. Note thatsince Red Baron II uses historical data for cam-paigns, your choice of service will affect thedate at which your pilot can enter the war.
The Pilot Log
164
Game Play
· Third, choose the squadron you wantyour pilot to be assigned to at the start of hiscareer. The choices you�ve already made forhis service and enlistment date limit whichsquadrons are available to your pilot. (Moresquads are available later in the war than dur-ing the earliest months.) Select the squadronyou want to belong to by clicking on it, orclick Cancel to exit the Pilot Log. The boxmarked Current Squadron on the summarysheet changes to show your choice.
· Fourth, choose a starting rank for yourpilot. This list is displayed with the lowestrank at the top and the highest rank at thebottom. Starting at a higher rank gives yourpilot more privileges but fewer opportunitiesfor promotion during the campaign itself. (See�Pilot Rank and Position�.) Select yourpilot�s rank by clicking on it, or click Cancelto exit the Pilot Log. The box marked Rankon the summery sheet changes to show yourchoice.
· Fifth, christen your pilot. Click in eachof the boxes on the summary sheet next toLast Name and First Name. Type in your pilot�s
name and press enter.
· Last, you may select a photo for yourpilot by clicking on the box in the upper leftcorner of the summary sheet (which by de-fault says �No Pilot Photo Available�.) Con-tinue clicking on the photo box until you finda photo that you like.
· When you are finished, click on theDone button below the Pilot Log in order tosave your pilot and exit from the Pilot Logscreen.
Once you have created one or more pilots,you can switch between campaigns by clickingon the Pilot Log button and selecting a newpilot. You can shuffle through the availablepilot logs by using the Next Page and Previ-ous buttons at the bottom of the screen. Thelast page in the logbook always displays a blankpage for creating a new pilot.
To remove a pilot completely (and the cam-paign he is associated with), bring up his login the book and then click on Delete.
Pilot Rank and PositionThe rank you select for your pilot at the
start of the campaign will tend to affect whatposition he is assigned in the squadron. If youchoose a high rank, your pilot may be as-signed as Squadron Commander, a posi-tion with command privileges over the entiresquadron. If you choose a moderate rank,your pilot may be assigned as a Flight Leader,with command privileges over his own flight,but not over the squad as a whole. If youchoose a low rank, your pilot will probablybegin with no privileges at all.
Choosing a high rank is no guarantee of yourpilot�s position, however. If there is anotherpilot of equivalent rank in the squadron, thepilot with the most seniority will be posted asthe Squadron Commander. Similarly, if yourmid-ranked pilot is assigned to fly in the sameflight as Squadron Commander, he may endup without command privileges despite hisrank. Conversely, your low-ranked pilot mayfind himself in charge of a flight, or even theentire squadron, if all the higher-ranked pi-lots in your squadron are killed.
If your pilot scores five kills, he becomes anAce, a designation that gives him the right topersonalize his plane. Other pilots may worktheir way up to become Aces during the course

165
Game Play
of the campaign; however, only historical Aceswill have personalized planes and entries inthe Ace Preview.
Learning About Your Squadron(Squadron Ops button)
The Squadron Ops Screen holds com-mands that you can use to find out about thepilots and planes in your squadron.
· The Kill Board button brings up a listof the pilots in your squadron and their scoreof kills, with the pilot having the most killslisted at the top. Click on Done to return toSquadron Ops.
· The Pilot Dossiers button brings up anotebook, which shows your squadron�s nameand insignia on the left page and a list of thepilots in the squadron on the right. Click onthe name of one of the pilots to bring up thatpilot�s dossier and kill list. You can turn thepages of the notebook by clicking on them, orby using the Previous and Next buttons at thebottom of the screen. To return to the pilotlist, click on the tab marked �I� (for Index.)Click on Done to return to Squadron Ops.
· T h eSquadron Infobutton brings upa notebook whichshows yours q u a d r o n � sname, insignia,base of opera-tions, assignedregion, quality,and which Aces(if any) are partof the squadronon the left page,while the rightpage shows a listof the planes inyour squadron. Ifthere is an Ace inyour squadronwho has a personalized plane, that plane willhave a separate entry of its own. Click on thename of a plane to bring up a picture of thatplane and its performance specifications. Youcan turn the pages of the notebook by clickingon them, or by using the Previous and Nextbuttons at the bottom of the screen. Click on
Done to return to Squadron Ops.
· The Transfer button allows you to re-quest assignment to a different squadron. (See�Requesting a Transfer.�)
· The Paint Shop button lets you change
The Squadron Ops Screen

166
Game Play
the graphics for your plane and/or for the otherplanes in the squadron, if your rank is highenough. See �Painting Your Plane� for de-tails.
· The Campaign button returns you tothe Campaign Screen.
Requesting a TransferTo request a transfer to a different squad-
ron, click on Transfer on the Squadron OpsScreen. A transfer request form appears.Click on the box under New Squadron thatsays Select and a selection box will pop up(this box is moveable). Click on the name ofa squadron to which you are possibly inter-ested in transferring. With that squadron�sname highlighted, you can then select Info topull up the Squadron Info for that squad, oryou can select Locate to see the Front Mapwith that squadron�s location marked by aflashing red box.
When you�ve decided on a squad to trans-fer to, click on Done (with that squad high-lighted). You will be returned to the Squad-ron Ops Screen. At the end of your nextmission, you will be informed whether or not
your transfer request was granted. You mustcomplete a mission after putting in the trans-fer request in order to have the transfer re-quest considered.
Painting Your PlaneSelecting the Paint Shop button from the
Squadron Ops Screen allows you to cus-tomize the look of your plane, if you have theappropriate position in your squadron.
· If you are an Ace (that is, you havefive or more kills to your credit), you will beallowed to customize your own plane. Many,but not all, of the historical Aces in the gamehave their own personalized paint schemes fortheir planes.
· If you are Squadron Commander,you may redesign the paint scheme for everyplane in your squadron except any Aces whohave their own plane design. If there is anAce in your squadron who does not have apersonalized plane, his plane will be rede-signed with the rest of the squad�s.
· If you are neither an Ace nor the Squad-
ron Commander, you cannot repaint anyplanes.
When you click on the Paint Shop button,the Paint Shop Screen appears. From thisscreen, you can apply previously created paintschemes to the planes in your squadrons (as-suming you have the right status.) The firstcolumn on the page shows the list of planetypes available to your squad. The two col-umns to the right of the plane list show whatpaint schemes, if any, are currently assignedto each type of plane. The buttons in the SelfAssignments column can be clicked on to as-sign a paint scheme to just your own plane ifyou are an Ace; the buttons in the SquadronAssignments column can be clicked on to as-sign a new paint scheme to all planes in yoursquadron if you are the Squadron Commander(except those belonging to Aces with theirown personal paint schemes.)
There are three settings for each of the paintschemes buttons:
· If the button says None Available, itmeans that no paint schemes have been cre-ated yet for that type of plane.

167
Game Play
· If the button says Unassigned, paintschemes are available but none have actuallybeen applied to that plane.
· If you have already assigned one or morepaint schemes, the button will show thefilename of the chosen paint scheme.
To assign apaint scheme, orto switch to a dif-ferent paintscheme, click onthe button in theappropriate rowand column. Afile list will ap-pear. Select ascheme by click-ing on it, thenclick on Select toapply thatscheme, or clickon Cancel to goback to the PaintShop Screenwithout making
any changes.To create a new plane paint scheme, click
on Paint Shop. The Paint Shop Screen willappear. On this screen, you can choose toeither load an entire paint scheme to be ap-plied to your plane all at once, or you cancustom design a pattern for each of the areas
of the plane�s surface. The number of areas tobe painted will vary between planes, depend-ing on the number of wings.
There are two types of files used in paintingplanes:
· Parts files: These are bitmap files (BMPformat) that hold patterns for a single part ofthe plane. To customize a bitmap, you canexport one of the designs that come with RedBaron II, alter it using most common graphicsprograms, and re-import the changed file.Each bitmap is created to fit onto a specificpart of the plane � if you attempt to load abitmap created for one plane part onto a dif-ferent plane part, the game will try to mapthat bitmap onto the new plane part (mostlikely with unpleasing results.) Therefore, it�sa good idea to be careful when naming files soyou will later be able to tell which bitmap goeswith which part of the plane. Also, you arenot allowed to load a bitmap that has toomuch �blank� (transparent) color as part ofthe image.
· Configuration files: When you savean entire paint scheme, a configuration file(CFG format) is created which lists the
The Paint Plane Screen

168
Game Play
bitmaps to be used when creating that paintscheme. If you create a configuration file, thenlater remove one of the bitmaps called for inthat file, the game will use the default bitmapfor that plane in place of the missing one.
Paint schemes for each of the squadrons andmany of the Aces in the game come preloadedin Red Baron II. You can freely borrow any ofthe existing paint schemes for your own planeor squadron, or mix-and-match parts of dif-ferent schemes to create a unique pattern.
To paint your plane, start by painting eachof the surfaces. (The default paint texture foryour squadron will be displayed when you be-gin.) On the left of the Paint Plane Screenis the Plane Part panel. Click on the up/downarrow buttons in the selection box at the topof this panel to select a plane part to paint.The picture under the selection box will changeto show the plane part being painted.
· If you want to use one or more of thepre-existing paint textures, click on the up/down arrows in the Squadron Texture selec-tion box under the part graphic to choose apre-existing squadron or Ace paint texturefor that part. (Only paint textures from
squadrons and Aces of your own service areavailable.) Clicking Cancel reverts to the lastapplied paint job. When you find a designyou like, click on Apply, and the new painttexture for that part will be applied to the 3Dpicture of the entire plane (to the right of thePlane Part panel.) Once you click Apply,you can�t cancel your choice unless you eitherexit without saving and start over, or reapplythe default paint texture. Note: If you can�tsee the part of the plane you�re painting onthe 3D picture, try rotating the plane to ex-pose the lower surfaces.
· If you want to modify an existing tex-ture by hand, find the part and paint designyou want to work on, then click on Export.In the file list that appears, click on the bot-tom box, type in a file name (eight charac-ters, no extension) and click on Save. Youcan then exit Red Baron II and use the graphicsprogram of your choice to modify the bitmap.Then bring the modified bitmap back into thePaint Plane Screen by clicking on Import.A file list appears. Click on the file name andon Select, or click Cancel to return to thePaint Plane Screen without loading the
edited bitmap.
The right side of the Paint Plane Screenallows you to save a paint scheme for the en-tire plane at once. A 3D picture of the planeis displayed, showing the current paintscheme. Use the view control diamond di-rectly beneath the 3D-plane graphic to get agood look at all the painted surfaces of theplane. Click on an arrow to rotate the planein that direction, left-click on the magnifyingglass in the center of the diamond to zoom in,and right-click on the magnifying glass to zoomout.
When you have a paint scheme you�repleased with, click on Save. In the file listthat appears, click on the bottom box, typein a file name (eight characters, no exten-sion) and click on Save.
To bring in a previously saved paint scheme,click on Load. A file list appears, with thecurrently selected file highlighted in green.Select the file to load by clicking on it, thenclicking on Select. The new paint scheme ap-pears.
If there is more than one plane available toyour squad, click on Plane List to see themall. You can then click on the type of plane

169
Game Play
you want to create a design for to select it,then click on Select to load that plane forpainting. Note that if you want to see yourfancy new paint scheme on your own plane,or on those of your squad members, you haveto make sure you�ve assigned them that typeof plane to fly!
If you decide you don�t like your new paintscheme after all, click on Exit to return todiscard all your changes and return to the PaintShop Screen.
Learning About the Enemy(Intelligence button)
The Intelligence Screen gives you foursources of information on the players in thewar.
· The Top Aces button shows you a listof the top fifteen Aces of all four services indescending order, the Aces with the most killsat the top.
· The Ace Dossiers button opens a note-book you can use to get information on the
Aces serving inthe war. (Note:The list ofAmerican Acesis not availableuntil 1918.)You can jump tothe list for a par-ticular service byclicking on eitherthe service nameor the index tabmarked with thatservice�s initial(click on the �I�tab to return tothe index) or youcan flip throughthe notebook apage at a time byeither clicking on the page you want to turn orby clicking on the Previous and Next Pagebuttons at the bottom of the screen. On theindex page for the service you�ve chosen is alist of the Aces of that service; select an Aceby clicking on his name and his dossier willopen, showing his biographical information
and his kill list. (Note: if the Ace�s kill list isvery long, the pilot�s dossier may take up morethan two pages of the notebook.)
· The Local Squads button brings up anotebook holding information on any othersquads which are reported to be in action inthe same region as your own squad. As with
The Intelligence Screen

170
Game Play
the pilot dossiers, select a service by clickingon the service name or on the appropriateindex tab, or flip through the notebook pageby page to see all the entries in order. On thesquadron index page for the service you�vechosen is a list of the nearby squadrons of thatservice. Select a squadron by clicking on itsname and a Squadron Info sheet on that squad-ron will appear. As with your own SquadronInfo sheet, you can bring up information onthe squadron�s planes by clicking on the planename on the right-hand page.
· The Intel. Reports button brings up ashort movie which will describe some new de-velopment in the ongoing war effort.
Viewing Your War Record(Personal Stats and Medals/Awards buttons)
Clicking on the Personal Stats button onthe Campaign Screen brings up the dossierfor your current pilot, showing his biographi-cal information and his performance record.You can flip through the pages of your dossiereither by clicking directly on the page you want
to turn, or by using the Next Page and Previ-ous buttons at the bottom of the screen.
To view your war honors (if you�ve earnedany), click on the Medals/Awards button.Your medal box will appear on the screen andopen to show your medals. Click on a medalto zoom to a close-up picture of the awardand read a text description of the meaning ofthe medal. Click on Done to return to theCampaign Screen.
Flying a Mission(Next Mission button)
When you select Next Mission from theCampaign Screen for the first time, youwill automatically be taken to the first screenof the Mission Briefing for your current as-signment. The information presented in thisbriefing is exactly the same as that presentedfor a Single Mission (see �Viewing the Mis-sion Briefing�). You may skip the briefing byclicking on Done on this first screen.
After you have read (or skipped) the brief-ing, the orientation screen for your new as-signment appears. There are four buttons onthis screen:
· Fly Mission will take you directly to thecockpit of your plane to start flying.
· View Flight Plan will take you to screensallowing you to view and � if your rank is highenough � change elements of the flight planfor the current mission.
· Repeat Briefing will return you to thebriefing screens to review the mission profile.
· Campaign will return you to the Cam-paign Screen.
Campaign TimeTime during a campaign passes in a more-
or-less normal fashion. Most days your squadwill be assigned to at least one mission flight,perhaps as many as four. Missions can be as-signed once every four hours, but in the win-ter months there might not be that much day-light available. (Although you can design anight mission in the Mission Builder if youchoose, during a Campaign you will never beassigned to fly in the dark.) Any day on whichyour squad is not assigned a mission flight,

171
Game Play
you have the option of rounding up some ofyour squad mates and taking them out on anUnofficial Flight (see �Unofficial Flights�).
Some days your squad will not be able tofly, either because of weather or because HQhas ordered your squad to stay grounded thatday. Days on which your squad can�t fly aresimply skipped without comment on the cam-paign calendar.
Some campaign events that can happen toyour pilot during his career will advance thecampaign calendar by significant jumps. If yourpilot is wounded, for example, he will be outof action for several months, on average. Hemay also be captured by the opposition andimprisoned for some length of time before heis able to escape.
When a non-player pilot in a squad is killed,it will take a certain amount of time before areplacement is assigned to fill the space. Theamount of time it will take for a new pilot toarrive will vary from a few days to a week.Squadrons with a higher quality rating will getreplacements faster than poorer squadrons.Similarly, if a plane is lost but the pilot sur-vives and remains active, the amount of timeit will take for a replacement plane to arrive
will vary but will usually take about a week,and will be delivered more quickly to the bet-ter squadrons.
Viewing and ChangingYour Flight Plan
There are three screens within the FlightPlan section of the mission: the Flight PathMap, the Flight Ordnance screen, and theSquadron Status screen. On each screen is adifferent set of information about your mis-sion plan, with a number of options that youmay be able to adjust, depending on your po-sition within the squadron. The higher yourpilot�s status in the squad, the more elementsof the flight you have the authority to alter.
· If your pilot is the highest-ranked flyerin the squadron, he will be the SquadronCommander. (If you and another pilot haveequal ranks, the one with the most senioritywill be the Squadron Commander.) TheSquadron Commander has the authority torearrange all elements of the mission exceptfor the mission targets.
· If your pilot has sufficient status, hemay be assigned as the Flight Leader in hisown flight. (As with the Squadron Com-
mander, in case of a tie on rank, the flyerwith the most seniority gets the leader spot.)As Flight Leader, you can rearrange all ele-ments of your own flight, but not of any otherflights in the squadron.
· If your pilot is neither the SquadronCommander nor the Flight Leader, the onlything you can change in the flight plan is thestatus of your own ordnance.
Note that your pilot�s status in the squadmay change even if he doesn�t get promoted;if a senior officer is killed, your pilot may bemoved up in position and gain new authorityeven though he remains at his former rank.
Changing the Flight PathThe first screen that appears when you se-
lect the View Flight Plan button is the FlightPath Map which shows the area of opera-tions, target, and vector for your flight, plusthe flight summary card. The pointer appearsas a magnifying glass. To zoom in for a closerlook at any area, center the pointer over thearea you want to view and click the left mousebutton. To zoom back out, click the rightmouse button. You can also use the plus (+)and minus (-) keys to zoom in and out. There

172
Game Play
are two levels of magnification available.To view a different area of the map while
zoomed in, move the cursor to the edge of themap in the direction you want to travel andthe map will scroll that way. The closer to theedge of the map the cursor is placed, the fasterthe map will scroll.
On this screen,player position inthe squad allowsthe followingthings to bechanged:
·By theS q u a d r o nCommander:The squad com-mander maychange, add, ordelete anywaypoint (ex-cept for the startand targetw a y p o i n t s ,which may beedited but not
moved or deleted) for any flight in the squad.
· By the Flight Leader: The Flight Leadermay change, add, or delete any waypoint (ex-cept for the start and target waypoints, whichmay be edited but not moved or deleted) forhis own flight only.
· By other pilots: If you are neither Squad-ron Commander nor Flight Leader, you maynot edit any waypoints.
The Flight Summary Card has the followingbuttons:
· Squadron: This button brings up theSquadron Card, which shows all the flights inthe squadron. You can view the flight path ofany flight in the squadron by clicking on theflight number; the Flight Summary Card forthe flight number will appear. You can accessthe Squadron Screen from this card by click-ing Done. When the Squadron Card is dis-played, the flight paths of all the flights in thesquadron show up on the map. The playerflight is shown in red; all other flights are shownin yellow.
· Waypoints: This button brings up thelist of waypoints for the current flight. If yourpilot has the authority, these waypoints canbe edited as they are in the Single Missionbuilder (see �Editing Waypoints� in the SingleMission section).
· Restore Path: This button only appears
The Flight Plan Screen

173
Game Play
after a change in the flight path has been made.Clicking it will return the path to its originalstate, erasing any changes you�ve made.
· Next and Prev: These buttons allowyou to shuffle through the stack of flight sum-mary cards.
· Done: Thisbutton takes youto the FlightO r d n a n c eScreen. Theflight whose flightcard is showing onthe Flight PathMap will appearon the FlightO r d n a n c eScreen.
Changing theFlightOrdnance
When you clickon the Done but-ton on a flight
card (or the Flight button on the SquadronScreen), the Flight Ordnance Screenappears. This screen holds a summary of in-formation about the current flight, includingthe target nature and location, takeoff time,pilots assigned, and planes. To the right ofthe pilot names is a four-column table with
one of the four possible types of ordnance ineach column. You can always adjust the ord-nance carried by your own plane. If you areSquadron Commander or Flight Leader, youmay adjust the ordnance carried by all planesin the flight. To select a type of ordnance,click in the check box. Depending on thetype of plane your squadron is flying, somekinds of ordnance may not be available (theboxes will be obscured and inactive.)
You can return to the Flight Path Map byclicking on the red ring under the appropriatemap name (top of the screen); the Flight Sum-mary Card for the current flight will be auto-matically displayed. Click on Squadron toswitch to the Squadron Screen. Click onDone to save your changes and return to theNext Mission Screen. Click on Cancel todiscard all your changes and return to the NextMission Screen.
Changing the Squadron StatusThe Squadron Status Screen appears
when you click on Squadron while on theFlight Ordnance Screen, or when you clickon Done from a squad card on the flight pathmap. This screen shows a list of all the flights
The Flight Path Map

174
Game Play
in the squadron and which pilots are assignedto which flights. The final slot on the flightchart shows those pilots who are Available �not currently assigned to any flight. A checkmark by the flight number shows which flightis currently selected; to select a different flight,
click on the flightnumber and thecheck mark willchange position.
This screen canbe used to rear-range pilot as-signments, butthe degree towhich you can dothis depends onyour pilot�s au-thority in thesquadron.
If you are theS q u a d r o nCommander,you may makethe followingchanges:
· You may transfer any pilot from anyflight to any other flight, including yourself,or transfer a pilot into or out of the Availablepool of idle pilots. (You can put yourself inthe Available pool too, if you wish to avoidthe mission altogether.) The only restrictionis that each pre-existing flight must have at
least two pilots.
· You may change a plane assignment byright clicking on the plane name. To swapplanes between two pilots, left-click on thefirst plane name and drag it into the slot nextto the second pilot�s name. The two planeswill swap positions.· If you have sufficient pilots available, youcan create a new flight to add to the onesalready assigned to your squadron. (See �Un-official Flights.�)
· You can remove a flight that you createdyourself. (Note: only those flights that youcreated yourself can be deleted � you can�tdelete flights assigned by HQ.)
If you are a Flight Leader, you may trans-fer any pilot in your flight to the Availablepool (including yourself), or add any pilotsin the Available pool to your flight. One im-portant point: If you transfer yourself to theAvailable pool, your pilot will lose his FlightLeader privileges and be unable to return tohis previous position in the flight! You willnever be placed in the Available pool by thegame at the start of a mission; if there is a flight
The Flight Ordnance Screen

175
Game Play
scheduled, your pilot will be assigned to it.If you are neither the Squadron Commander
nor a Flight Leader, you may not make anychanges in the squadron assignments.
To change a pilot�s assignment in the squad-ron or in your flight, click and hold on thepilot�s name, then drag it to a new slot on thechart and release the mouse button. If youdrag your current choice into an empty slot,that pilot will be added to that flight (or tothe Available pool); if you drag your choiceto a slot that already has a pilot in it, he willswap places with your choice.
Pilots who remain unassigned to a flight (thatis, in the Available pool) at the start of themission will be able to provide air cover forthe aerodrome in case of enemy action. Notethat squad members can die during a mission,which may leave your squadron underpow-ered until a replacement is assigned.
You can return to the Flight Path Map byclicking on the red ring under the appropriatemap name (top of the screen); the squad cardfor your squad will be automatically displayed.Click on Flight to switch to the Flight Ord-nance Screen. Click on Done to save yourchanges and return to the Next Mission
Screen. Clickon Cancel to dis-card all yourchanges and re-turn to the NextM i s s i o nScreen.
Rules forCreatingUnofficialFlights
Somet imes,your pilot mayhave the option oforganizing a flightthat wasn�t calledfor by HQ. Yourability to set upone of these un-official flights depends on several factors.
An unofficial flight may be set up during aregular mission. In order to add a flight suchas this, your pilot must be either the FlightLeader or the Squadron Commander.
Although your player will always begin as-signed as part of a flight, if you are a Flight
Leader, you have the option of moving your-self (and any excess pilots in your flight, ifyou wish) into the Available pool and thenattempting to create a new flight. Rememberthat you will lose your Flight Leader privilegesonce you move into the Available pool, somove your extra pilots out before you move
The Squadron Status Screen

176
Game Play
yourself. The rules for successful flight creation are:· You may always create a �Lone Wolf�
flight for just yourself, with no other pilots.
· You may recruit any other pilots fromthe available pool who are of your rank orlower to join you in one of the limited mis-sion types available.
· Some mission types require a minimumnumber of pilots to set up. If there are too fewpilots in the pool who are of your rank orlower, you will not be able to set up certaintypes of missions.
If you are the Squadron Commander, youhave the option of creating a flight just as aFlight Leader does, except that you do nothave to include yourself in the new flight.The limitations on pilot minimums for mis-sions still apply, however.
Creating an Unofficial FlightWhenever conditions are right to allow the
creation of an unofficial flight, a new buttonwill appear on the Squadron Status Screenlabeled Add Flight. Select this button to be-
gin creating the new flight.When you select Add Flight, the view will
switch to the Flight Path Map, and you willbe presented with a card listing the possibletypes of missions your new flight can under-take. (These mission types are the ones thatcan be accomplished without a need for coor-dination with other units.) Choose a missiontype by clicking on it. If there are not enoughpilots in your new flight for the mission typeyou�ve chosen, a dialog box will appear in-forming you of this fact.
Once you have a usable mission type se-lected, select a target for the flight. The flightwill be added to your squad�s mission profileand can then be edited like any other flight.
If you change your mind about creating thisflight, you may remove a flight you addedyourself by selecting your flight and then click-ing on the Delete Flight button that appearswhen your new flight is created.
Mission ResultsA mission can end in any of several ways.· Your pilot could Die in a crash or if
directly hit by enemy fire. Naturally, this endsthe campaign.
· Your pilot could be permanentlyMaimed in a crash, by direct enemy fire, orwhen bailing out of a burning plane. This alsoends that pilot�s campaign. (To bail out of aplane, press the j key three times in a row.Note that you don�t have a parachute, so thisshould be considered an action of the last re-sort.)
· Your plane could Crash, your pilotmaking it out unscathed somehow.
· Your pilot could be Injured in any ofthe same ways. In this case, his wounds arenot severe enough to cause a permanent dis-ability. The campaign date will be advancedseveral months from the mission in which thepilot was injured, to allow for recovery time.
· Your pilot could be Captured if heends his mission over enemy territory, or if hecrashes or bails out into enemy territory butsurvives. This may or may not end that pilot�scampaign; there is a chance that he will escapebefore the end of the war and be able to returnto his unit.

177
Game Play
· Your pilot could be Disciplined if hisactions during the mission were deemed crimi-nal or just plain incompetent. For serious in-fractions, such as shooting down members ofhis own squadron, the pilot might be executedor imprisoned, ending the campaign. Forlesser offenses, he might be transferred to alower-quality squadron, demoted in rank,or officially reprimanded. If your pilot is sentbefore a court martial for his actions, there isalso a chance he�ll be cleared � that is, aninvestigation will determine that his breach ofconduct was due to the heat of combat, andhe will not be disciplined for it.
· Your pilot could get Promoted if histotal earned points for the campaign reach thenext rank threshold.
· Your pilot could get a Medal or Awardif his actions were particularly meritorious.(These are usually given out based on numberof kills.)
It�s possible for your pilot to get some com-bination of these results. He could be bothwounded and captured, for example, or be
promoted and get a medal at the same time(or die and get a medal posthumously.) Oneor more short animated sequences will play toshow you what happened at the end of yourmission.
The accumulation of mission points duringthe campaign may also allow your pilot totransfer to another, better-quality squadronif he chooses.
Object PreviewThis screen allows you to view information
on objects that you may encounter during yourmissions. The main window on this screendisplays a three-dimensional picture of what-ever object you have selected to view. Thename of the object appears at the top of thewindow.
To rotate the object, click on one of thefour arrows in the Control Diamond. The rightand left arrows will rotate the object horizon-tally, and the up and down arrows will rotatethe object vertically. You can change the viewin small steps by clicking repeatedly on an ar-row, or you can scroll the view smoothly byclicking on an arrow and holding down themouse button. To resize the picture, click on
the magnifying glass icon in the center of theControl Diamond. Clicking with the leftmouse button zooms in (enlarges the picture)while clicking with the right mouse buttonzooms out (reduces the picture). You caneither resize one step at a time with each click,or you can click and hold the mouse buttondown to smoothly zoom in or out of the pic-ture.
To view a new object, click on the Listbutton at the bottom of the Object PreviewScreen. A panel will pop up on the left sideof the window. You can choose from one offour object �classes�: German planes, Alliedplanes, ground forces, and structures. An�X� appears in the check box next to the nameof the currently selected class. To switch to adifferent class, click the mouse pointer in thecheck box next to the class you want to view.The �X� will move to that class, and the ob-jects within that class will appear on the listbelow the class selection box.
To select an object from the list, use thearrows at the left of the list box to movethrough the list until you find the object youwant to view, then click on the button la-beled Select. The object will appear in the

178
Game Play
Object Preview window. You can flip throughthe list one page at a time using the Page Upand Page Down buttons on your keyboard. Ifyou change your mind about selecting a newobject to view, click Cancel to return to theObject Preview Screen without changingthe displayed object.
To see usefuldata about thepictured object,click on the but-ton labeledSpecifications. Ablock of text willappear next tothe pictured ob-ject. To removethis block, clickon Specificationsagain.
To return tothe Main MenuScreen from theObject Pre-view Screen,click on MainMenu.
Ace PreviewThis screen allows you to view biographical
data and career records of the greatest Aces ofWorld War I. Unlike the dossier you can ac-cess from within the campaign, this screenpresents historical information on each Ace�s
performance for the entire war.When you select the Ace Preview button
from the Main Menu, the Ace Dossier Bookappears on the screen and opens to the Index.From the Index page, you can choose to viewthe Ace biographies of any of the four nationsrepresented in Red Baron II. To choose a na-tion, you can either place the mouse pointerover that nation�s name on the index pageand click, or you can click on one of the IndexTabs at the right edge of the Ace Dossier Book.The book will open to the alphabetical listingof all the Aces of that service who saw serviceduring World War I. To return to the Indexpage at any time, click on the �I� tab.
Select a record to view by clicking on theAce�s name. The dossier book will open tothat Ace�s page and display his picture, bio-graphical information, and record of killsthroughout the war. To turn to the next page,you can either click anywhere on the right-hand page itself, or click on the Next Pagebutton at the bottom of the screen. To flipback a page, click anywhere on the left-handpage, or on the Previous button at the bot-tom of the screen.
When you are done reading the Ace biog-raphies, click on Done to return to the Main
The Object Preview Screen
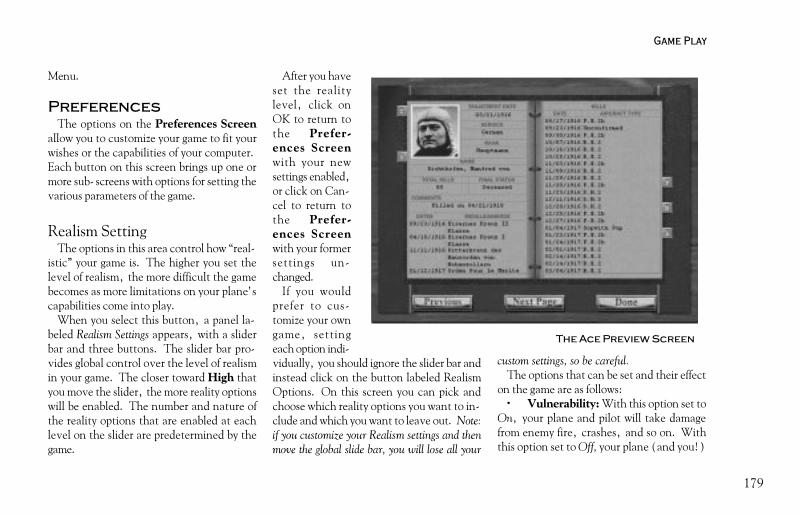
179
Game Play
Menu.
PreferencesThe options on the Preferences Screen
allow you to customize your game to fit yourwishes or the capabilities of your computer.Each button on this screen brings up one ormore sub-screens with options for setting thevarious parameters of the game.
Realism SettingThe options in this area control how �real-
istic� your game is. The higher you set thelevel of realism, the more difficult the gamebecomes as more limitations on your plane�scapabilities come into play.
When you select this button, a panel la-beled Realism Settings appears, with a sliderbar and three buttons. The slider bar pro-vides global control over the level of realismin your game. The closer toward High thatyou move the slider, the more reality optionswill be enabled. The number and nature ofthe reality options that are enabled at eachlevel on the slider are predetermined by thegame.
After you haveset the realitylevel, click onOK to return tothe Prefer-ences Screenwith your newsettings enabled,or click on Can-cel to return tothe Prefer-ences Screenwith your formersettings un-changed.
If you wouldprefer to cus-tomize your owngame, settingeach option indi-vidually, you should ignore the slider bar andinstead click on the button labeled RealismOptions. On this screen you can pick andchoose which reality options you want to in-clude and which you want to leave out. Note:if you customize your Realism settings and thenmove the global slide bar, you will lose all your
custom settings, so be careful.The options that can be set and their effect
on the game are as follows:· Vulnerability: With this option set to
On, your plane and pilot will take damagefrom enemy fire, crashes, and so on. Withthis option set to Off, your plane (and you!)
The Ace Preview Screen

180
Game Play
become invulnerable and won�t take damagefrom anything at all. Note that making yourplane invulnerable drastically reduces yourgame score modifier.
· Ordnance: Set this option to Limitedto limit the amount of ordnance (ammo,bombs, and rockets) your plane can carry forany one flight. Set it to Unlimited to haveinfinite ordnance. If you run out of things tofire at your opponent, you can still ram theenemy plane or maneuver him into crashing,if you have the skill (and luck) to pull it off.
· Fuel: Set this option to Limited to limitthe amount of fuel your plane can carry. Set itto Unlimited to have infinite fuel. If you runout of fuel, your engine will stop. You maystill be able to make a dead stick landing andbring your plane in safely, but it won�t beeasy.
· G-Force Effects: With this option setto On, pulling too many gees will cause youto become dazed (red out) or fall completelyunconscious (black out). Alternatively, thestress may tear your plane apart. In a red out,
your view fadesto red, and in ablack out it fadesto black, and inboth cases yourplane is out ofcontrol until yourecover. Thelength of timeyou will be dazedor unconsciousdepends on howmany gees youpulled. With thisoption set to Off,you can pull aninfinite numberof gees without illeffects on eitheryou or yourplane.
· Collisions: When this option is set toOn, two planes can crash into each other.With it set to Off, planes on a collision coursesimply pass through one another at the pointof impact, and impacts with the ground or
ground objects are also harmless. You maystill be damaged by weapons fire, however,from either enemy planes or from ground in-stallations. Also note that if you have set yourplane to Invulnerable, collisions are automati-cally disabled as well.
The Preferences Screen

181
Game Play
· Sun Glare: Set this option to On toallow the position of the sun to affect yourview from the cockpit, and to Off to disre-gard the sun. When this option is enabled,flying toward the sun will obscure your vi-sion, making it much harder to see your op-ponent. The degree to which your vision willbe impaired will depend on how directly intothe sun you are flying.
· Gun Jams: With this option set to On,your guns may jam when overheated or simplydue to mechanical problems. Jammed gunsmay be unjammed by pressing the �u� keyrepeatedly on the keyboard, but the delay cancause problems in a tough dogfight. Set thisoption to Off to have perfectly reliable guns atall times.
· Enemy Skill Factor: You can set thisoption at any level from Minimum to Maxi-mum. The closer to maximum you set theslider, the tougher and smarter the computeropposition will become. Note that there willstill be individual differences between pilots;there will always be Aces and novices, butthis option controls how tough each of these
different pilots will be within their own skillclass. In other words, a novice opponent atMaximum skill level may be more difficult toshoot down than an average opponent at Mini-mum skill, but even at Minimum level therewill be some Aces who will be tough to shootdown.
· Instruments: You can choose any ofthree types of instrumentation. The hardestsetting is Authentic, which allows you onlythe minimal instruments that were availablein WWI. The easiest setting is Modern, whichprovides you with a complete set of moderninstruments. Balanced provides a moderatenumber of gauges, about equal to those in aWWII plane cockpit.
The Score Modifier indicator shows youthe percentage modifier that will be applied toyour total points earned in any mission withthe current realism settings. For example, agame with a very low realism might have amodifier of 20%, meaning that you would becredited with only 20% of the points youearned during that mission. For extremelydifficult sets of conditions, your score modi-fier might go above 100%.
When you are done setting the reality op-tions, click on OK to return to the Prefer-ences panel, or click on Cancel to revert toyour original settings and return to the Pref-erences panel.
Graphic SettingThe options in this area control how de-
tailed the graphics for your game will be. Thehigher you set the graphics, the more demand-ing the game will become on your computersystem. If at any time the frame rate drops toolow, reducing the level of graphics detail willprobably speed things back up.
When you select this button, a panel la-beled Graphic Settings appears, with a sliderbar and three buttons. The slider bar pro-vides global control over the level of graphicdetail in your game; the closer toward Highthat you move the slider, the more detailedthe graphics become.
After you have set the level of graphic de-tail, click on OK to return to the Prefer-ences Screen with your new settings en-abled, or click on Cancel to return to thePreferences Screen with your former set-tings unchanged.

182
Game Play
If you would prefer to customize your owndisplay, setting each graphic option individu-ally, you should ignore the slider bar and in-stead click on the button labeled GraphicsOptions to set your game graphics. Note: ifyou customize your Graphics settings and thenmove the global slider bar, you will lose all yourcustom settings, so be careful.
The graphics options that can be set andtheir effect on the game are as follows:
· Object Detail: This option controlsthe distance at which ground objects (build-ings, etc.) will become detailed. With thisoption set at Far, objects in the distance willbe drawn in detail; with it set at a Near, groundobjects will be indistinct until your plane isquite close to them.
· Aircraft Detail: This option controlsthe distance detail of other aircraft in the sameway that the Ground Range option controlsthe appearance of ground objects.
· Object Density: This option controlshow many ground objects the program willgenerate. Set this option to High to producea large number of ground objects, or to Low
to produce relatively featureless terrain.
· Ground Shadows: With this optionOn, airplanes and other objects will cast shad-ows on the ground. With it Off, no shadowswill appear. Turning the shadows off will speedup the game�s frame rate.
· Prop Animations: Set this option toOn, and your plane�s propeller will be ani-mated. Set it to Off for no propeller. Re-moving the propeller animation will speed upthe game�s frame rate.
· Max Detail: Turn this option On tohave the greatest detail possible for the gamegraphics. Set it to Off to reduce the amountof detail and increase the game�s frame rate.Note: Turning this option off may make it slightlyharder to identify enemy planes.
· Combat Detail: Setting this option toOn will improve game speed during combatby reducing the detail level of all backgroundgraphics (clouds, object details, terrain de-tails, and so on) for the duration of the dog-fight. Turning this option to Off will keep theamount of background detail during combat
at its usual level.
· Terrain Range: This option controlshow far you can see from the cockpit of yourplane. The closer to Far this option is set,the farther you can see. If this option is set toNear, distant objects are obscured by haze.
· Terrain Detail: This option controlsat what distance from your viewpoint theground changes from low detail to high de-tail. If this option is set to Far, details of theterrain will be visible at a distance. When thisoption is set to Near, the terrain will be low-resolution until your plane gets close.
· Clouds: Set this option to On to addclouds to the sky. Set it to Off for a perpetu-ally clear day. Note that the clouds have noeffect on game play � neither you nor youropponent can fly into the clouds.
· Terrain Textures: This option canbe set at any of three levels. Normal is thestandard setting for terrain graphics. To im-prove the look of the terrain, set this optionto Smooth. If frame rate slows down, the ter-

183
Game Play
rain texture can be set to None, which is theleast realistic but provides the fastest render-ing.
· Sim Resolution: Set the screen reso-lution in the sim to 640 x 480 or to 320 x240.
· Pixel Size: Set this option to Large tohave fewer but bigger pixels, or to Small formore detailed pixellation. Larger pixels givea rougher look to the game but increase gamespeed.
· Graphics: Set this to Windowed to haveRed Baron II displayed as a window on yourscreen. Set it to Full Screen to have it occupythe entire screen.
When you are done setting the object graph-ics options, click on OK to return to the Pref-erences Screen, or click on Cancel to re-vert to your original settings and return to thePreferences Screen.
SoundThe options in this panel control the sounds
you hear while playing Red Baron II. Each as-
pect of the sound mix can be controlled sepa-rately to allow you to completely customizewhat you will hear as you play.
· The Shell Music slider controls thevolume of the music that plays whenever youare not actually flying your plane.
· The Shell Sounds slider controls thevolume of the sound effects that accompanyactions you take while you are in the gameshell (such as pressing buttons).
· The Sim Sounds slider controls thevolume of the sounds you hear while flyingyour plane.
For each sound, you can lower the volumeby moving the slider down or raise it by mov-ing the slider up. If you want to turn any ofthese sounds off completely, click in the checkbox next to the word Mute at the bottom ofthe appropriate slider control. An �X� willappear to show that the sound is turned off.To turn the sound back on, click in the checkbox again to remove the �X�.
When you are done setting the sound op-tions, click on OK to return to the Prefer-ences Screen, or click on Cancel to revert
to your original settings and return to thePreferences Screen.
Fly NowThe options that appear when you select
this button are used to determine what type ofmission you get when you choose to play RedBaron II in the Fly Now instant dogfightmode.
You can set the following options:· Player�s Plane: Use the vertical scroll
bar to find the type of plane you want to fly.Highlight the name of the plane by clicking onit, then click the button labeled Select justbelow the list. If you want the game to pick adifferent plane for you each mission, selectRandom.
· Enemy�s Plane: Use the vertical scrollbar to find the type of plane you want to flyagainst. Highlight the name of the plane byclicking on it, then click the button labeledSelect just below the list. If you select a par-ticular type of plane, every plane you fly againstwill be that type of plane. If you select Ran-dom in this panel, you will encounter a vari-ety of planes during a single flight.

184
Game Play
· Weather: Select one of the five weatherconditions for your flight by clicking in thecheck box next to the weather you want.These settings affect the game graphics only �they have no direct effect on your flight.
· Season: Select a season for your flightby clicking in the check box next to the sea-son you want. These settings affect the ter-rain graphics only � they have no direct effecton your flight.
· Enemy AI Level: This setting con-trols how savvy your computer opponent willbe. In order from least to most difficult, theratings are: Novice, Junior, Veteran, Ace, andElite. If you want the game to choose a differ-ent rating for your opponent each time a newopponent is generated, set this variable toRandom.
· New Enemy Activated: This settingdetermines how soon your second and subse-quent opponents will appear. (Your first op-ponent will always be present at the start ofthe mission.) Click on the up/down arrows
at the left of thebox to adjust thetime interval be-tween opponentsfrom one to tenminutes.
· Time ofDay: This settingdetermines whattime of day yourflight takesplace. Nightmissions are al-lowed (but diffi-cult.) Click onthe up/down ar-rows at the left ofthe box to adjustthe flight timebetween 0100 and 2300 hours, military time.(0100 is 1 a.m.; 2300 is 11 p.m.)
When you are done setting the Fly Nowoptions, click on OK to return to the Pref-erences Screen, or click on Cancel to re-vert to your original Fly Now settings and re-turn to the Preferences Screen.
The Mission Builder:Creating aSingle Mission
To create a Single Mission from scratch,click on the Single Mission button on the Main
The Fly Now Screen
185
Game Play
Menu Screen to get to the Single MissionScreen. The controls on this screen allowyou to create and save standalone missions forRed Baron II.
Creating a Single MissionA Single Mission, unlike a Campaign (see
�Playing a Campaign�), is a stand-alone sce-nario you can customize to suit your tastes orto provide a unique challenge for anotherplayer. Once you have created and saved yournew mission, it can be selected using the Se-lect Mission button on the Single MissionScreen and then flown using the Fly Missionbutton. The mission can be played as manytimes as you like, and edited at any time withthe Mission Builder.
Mission Creation OutlineThere are six steps to creating a Single Mis-
sion for Red Baron II:1. Name your pilot and set the general envi-ronment variables for the mission.
2. Choose whether you want to build themission using Historical information (and lim-its) or whether you prefer a Free Form mis-
sion with no constraints on your design deci-sions. If you choose Historical, decide whetheryou want to create all the flights yourself, orhave the game generate appropriate flights forall active squadrons in your chosen region.
3. Create a Flight in which the player willpilot his plane. (Or, if you have used the�Generate Flights� option, choose an exist-ing flight for the player pilot.)
4. Edit the flight path, plane ordnance,and squadron status for the player flight, ifyou wish (these steps are optional).
5. Create any additional non-player flightsyou wish (or, in Historical mode with flightsgenerated by the game, delete extraneousflights you don�t want to bother with).
6. Save the mission file.
Historical Mode Vs.Free Form Flights
Missions in Red Baron II can be designed ineither of two modes. In Free Form Mode,there are no limitations on any of the design
elements of your mission. In Historical Mode,which is enabled when the Historical Modecheck-box on the introductory MissionBuilder Screen is selected, the choices youare offered for certain design elements havebeen limited to only those which were actu-ally available during the war at the missiondate you set.
The following limitations and features comeinto play when Historical Mode is chosen:
· Squadron assignments are limited tothose squadrons that were historically avail-able at the specified date and in the specifiedregion for the mission.
· Pilots may be assigned only those typesof planes that were historically available at thespecified date of the mission (you may disablethis option).
· The Locate Ace and Locate Squad but-tons on the introductory Mission BuilderScreen can be used to find the historical lo-cation of specific Aces or squads at the speci-fied date of the mission, so that you may tar-get flights toward or away from these histori-cal figures.

186
Game Play
· The Generate Flights check box onthe introductory Mission Builder Screen isenabled, giving you the option of having thegame generate flights for all of the historicallyavailable squads, instead of designing each ofthe flights for the mission individually. (See
�Creating aFlight� for a de-scription of thisfeature.)
To use the Lo-cate Ace or Lo-cate Squad fea-ture, click theappropriate but-ton on the intro-ductory MissionBuilder Screenand the FrontMap will ap-pear, with amoveable selec-tion box super-imposed. Usethe arrow but-tons at the bot-
tom of the panel to select a nationality; the listof the Aces (or squadrons) from that nationwho were in active service at the date speci-fied for the mission will appear in the top boxon the panel. Click on the Ace or squad youwant to locate. A flashing red box will appearon the Front Map in the historical location of
that squad or Ace. Click Done to close themap and return to the introductory MissionBuilder Screen.
Squadrons and FlightsA Squadron is a military air unit which
can have up to twelve pilots assigned (in anAllied squadron) or nine pilots assigned (in aGerman squadron.) A squadron may be di-vided in one or more Flights, which can havea single pilot, or can contain every pilot in thesquadron.
Each flight has a separate mission assign-ment to pursue, with its own flight path, take-off time, and so on. In Free Form designmode, you need to create the assignment de-tails for each flight in each squadron in themission. This can be as few as one flight, or asmany as there are available flights in the game.If you choose to design in the Historical modewith the �Generate Flights� option enabled,the game will generate flights for all the activesquadrons in the region.
In historical design mode, historical Aceswill always appear in one of the historicalsquadrons with which they really flew. If youwant the player to fly with a particular Ace,
The Mission Builder Screen

187
Game Play
you�ll need to determine which squadron theAce was assigned to and use that squadron toset up the player flight.
Both fighter and bomber squadrons appearon the squadron list, but only a fighter squad-ron can be assigned the player flight.
Setting theInitialConditions
When you se-lect New Missionfrom the SingleMission Screen,a chalkboard ap-pears that pro-vides you withsome starting in-formation, aplace to nameyour pilot, andthe opportunityto set the overallvariables for themission.
The areas onthis screen and
their functions are:· The Map Bar, at the top of the screen,
which holds a detailed map for each of thefour regions that make up the front, plus afifth map which shows the entire front at onetime (see the following section).
· The Pilot Name Boxes, in which youcan christen your pilot by clicking in the spacenext to First and Last and typing in a name.
· The Initial Settings for Region, Weather,Season, and Time of Day.
· The Historical Mode Box, which enablesRed Baron II �s Historical Mode of play whenchecked (see �Historical Mode Vs. Free FormFlights�).
If the Historical Mode Box is checked, thefollowing additional areas appear on thescreen:
· The Generate Flights option, whichinstructs the game to create a batch of flightsfor you.
· The Mission Date option, which de-termines the historical limits of your mission(note that the Season variable will automati-cally change to stay consistent with the cho-sen date).
· The Locate Ace and Locate Squad but-tons, which allow you to find the historicallocation of a particular WWI Ace or squad-
The Single Mission Screen

188
Game Play
ron at the date you�ve chosen for your mis-sion.
Click on the right/left arrows underneatheach of these areas to set the Region, Weather,Season, and Time variables. If you have setthe builder to Historical mode, changing theRegion will affect which squadrons you canassign to your flights. (Only squadrons thatwere actually in that region at the time set foryour mission will be available.) The Weatherand Season variables will change the graphiclook of your flight, but have no other effecton the mission. The Time of Day variable(set using military time conventions) will de-termine the position of the sun during yourflight, including sunrise and sunset. (You caneven create a mission to be flown at night � ifyou really want to.) This will then becomethe default value for every flight, but this vari-able may be adjusted for individual flights onthe Create Flight card when the flight is cre-ated.
When you�ve finished setting the initial pa-rameters for your mission, click on Continueto move on to creating and editing the mis-sion flights, or on Cancel to return to theSingle Mission Screen. After you hit Con-
tinue, these initial options are set and cannotbe changed (although the departure time forindividual flights may be adjusted later.)
The Front Map and the RegionMaps
The tactical maps for Red Baron II are ac-cessed through the Map Bar at the top of theMission Builder screens. The name of eachmapped area is shown on the bar. To accessthe map, click on the pull-ring just beneaththe map name. The pull-ring under the mapfor the selected region will be highlighted inred.
Note: All maps are reprinted at the end of thereference section in this manual.
The first map is the Front Map. This is alarge-scale map of the entire geographic areacovered in Red Baron II. The four boxes indi-cate the four sub-regions of the game(Flanders, the Marne, Verdun, and Alsace.)The front can be seen as a cratered area run-ning roughly through the center of the fourregions. The pointer appears as a magnifyingglass. To zoom in for a closer look at anyarea, center the pointer over the area youwant to view and click the left mouse button.
To zoom back out, click the right mouse but-ton. Clicking the right mouse button whilethe map is fully displayed will exit back to theintroductory Mission Builder Screen. Youcan also use the plus (+) and minus (-) keysto zoom in and out. There are two levels ofmagnification available.
To view a different area of the map whilezoomed in, move the cursor to the edge of themap in the direction you want to travel andthe map will scroll that way. The closer to theedge of the map the cursor is placed, the fasterthe map will scroll.
In the lower left corner is the map legend.This area is active whenever you are viewingone of the Region Maps, but not on the FrontMap. Beside each unit on the legend is a checkbox; click on this box to display that type ofunit on the map. At the bottom of the legendis a scale bar showing the map scale. This baris a moveable object which can be picked upand placed directly on the map to measuredistances. Click and hold on the scale bar,then drag it onto the map and drop it in place.
To close the map and return to the intro-ductory Mission Builder Screen, click onthe pull-ring hanging from the bottom edge of

189
Game Play
the map.Navigation in the four Region Maps on the
Map Bar is done in the exact same fashion asin the Front Map. Each of the regions is a10,000 square mile area with its own uniquegeographical attributes and distribution oflandmarks. For example, Flanders is relativelyflat and heavily populated, while Alsace ishilly and thinly populated.
Flight Creation OutlineThere are seven steps to creating a mission
flight:1. After you�ve set the starting conditions
for the mission and selected a design mode,the region map for your mission will drop downand the Create Flight index card appears. Setthe service, squadron, type and number ofaircraft in the flight, the mission type, andthe start time of the mission.
2. Select the start point for the missionfrom any location on the map.
3. Select an appropriate landmark as thetarget for the mission.
4. If you want the current flight to be theone the player will fly, click in the Player�sFlight check box.
5. Edit, add, or delete the waypoints onthe flight path (optional).
6. On the Current Flight Screen, setthe ordnance to be carried on the mission (op-tional).
7. On the Squadron Status Screen,change pilot assignments, plane assignments,and pilot skill levels (optional).
The Create Flight Index CardWhen you finish setting the initial condi-
tions for your design, you will arrive at theFlight Creation Map, where you can cre-ate, delete, and edit the squadron flights foryour mission. If you have chosen HistoricalMode and enabled the Generate Flights op-tion, the map will show a large number ofcolored lines, each one a squadron flight,which you can then proceed to edit or delete.If you have chosen Free Form Mode or His-torical Mode with the Generate Flights op-tion disabled, you will instead see the Create
Flight �index card� panel. You must create atleast one flight and designate it as the player�sflight in order to have a useable mission.
To create a flight, begin by setting the flightoptions. Note that the choices available forsome settings depend on the values of the othersettings � for example, the type of missionsyou can choose from are determined by yourchoice of squad.
· Use the up/down arrows on the firstline of the card to set the Service � the nationto which the pilots in this flight will belong.
· Click on the second line on the Squad-ron name, and a list of available squadrons ofthe appropriate nationality will appear. Clickon the squadron you want to select (it will behighlighted) and then click on Done. Notethat your choice of a fighter, bomber, orbomber/recon squadron at this point will de-termine which aircraft and mission types youcan assign to the flight, and that only fighterflights may be assigned to the player.
· In the same way, on the third line ofthe card select the default Aircraft that all thepilots in the flight will fly. (This assignmentmay be changed later for individual pilots.)

190
Game Play
You must choose from the list of planes avail-able to that service only. If you are designingin historical mode, a check box appears onthe list of plane names; uncheck this box ifyou would prefer to choose from the entire listof that service�s planes, not just the histori-cally available ones.
· Next to the aircraft name, click on theup/down arrows to set the Number of planesin this flight. Allied flights may have up totwelve planes, and German flights may haveup to nine. Note that if you have already cre-ated other flights for this squadron, you maybe limited in the number of planes remainingthat you can assign to your current flight.
· On the fourth line, select the Type ofMission you want the flight to pursue (SeeMission Types in the Flight Reference sec-tion.) This mission list will be different forfighter flights, bomber flights, and bomber/recon flights.
· On the fifth line, use the right/left ar-rows to set the Time you want the flight tobegin, using military time conventions.
Once these op-tions are set,click on Continueto set the start lo-cation, destina-tion, and defaultflight path for theflight. To set thestart point, clickthe mouse cursoron any point onthe map. A redtriangle will ap-pear, marking thespot you�ve cho-sen. (Note: All�cards� on thisscreen are move-able panels thatcan be relocatedif you want to see the map beneath them.)
If you want to fly the takeoff in the sim, besure to select a friendly aerodrome as yourstart point. If you move the pointer closeenough to a friendly aerodrome, a red target-ing box will appear at that aerodrome; youcan click the pointer when you see the red
targeting box to assign that aerodrome as yourstart point. A flashing red box shows wherethe current squadron�s historical aerodromewas located (unless that squad was stationedin a completely different region), but you arenot limited to starting the flight from that lo-cation. In this mode, the magnifying glass
The Flight Creation Map

191
Game Play
zoom is disabled, but the key zooms (+ tozoom in, � to zoom out) still function.
Next, select a target for the flight. Unlikethe start point, which can be anywhere in theactive region of the map, the target point mustbe a landmark of some kind. A red box willappear around whatever landmark the mousepointer is closest to; if you want to select thatlandmark as a target, click the mouse. If youhave selected a mission type that calls for aspecific kind of target, you will only be al-lowed to select targets that fit the mission pro-file. (If you are sending this flight to attack aballoon, for example, you won�t be allowedto select an aerodrome as a target.) For themost part, friendly landmarks are chosen asthe targets for defensive missions while enemylandmarks are chosen as targets for offensivemissions.
When you click to select the target, a yel-low line appears between it and your chosenstart point. This line shows the default flightpath that will be used by the game�s Autopi-lot function when it is enabled. The CreateFlight Card is replaced by the Flight SummaryCard, which recaps the options you�ve cho-sen for this flight. Until you select your target
point, you can back up and reset any of theflight variables; once your target point is setand the Flight Summary Card appears, thesevariables can no longer be changed withoutdeleting the flight and starting over.
If you wish to create only one flight for thismission, you must designate that single flightas the Player Flight, and it must be a fighterflight, not a bomber flight. Without a playerflight, a mission cannot be saved. To markany fighter flight as a Player Flight, click inthe check box on the Flight Summary Cardnext to the label Player�s Flight. (You can�thave more than one Player Flight per mis-sion.) The flight path changes from yellow tored. If you want to adjust the waypoints forthis flight, click on Waypoints to bring up thewaypoint list card. If you don�t wish to makeany changes to the waypoints, click on Doneto close the Region Map and bring up theFlight Ordnance screen.
At this point, if you have chosen a missiontype for your flight that calls for an attack on aground target, you have a complete mission,which can be saved and played. However, ifyou have chosen a mission goal that involvesaerial combat, you will have to add at least
one more flight, assigned to the opposition,to give your pilots something to shoot down.Similarly, if you want to set up an escort mis-sion, you will need to create a bomber flightto be escorted.
You can create as many additional flights asyou want by clicking on the Create Flight but-ton on the Flight Summary Card, and thenfollowing the same Flight Creation methodoutlined above. If you want to get rid of apreviously created flight, click on the DeleteFlight button on the Flight Summary Card.(Note that if you try to delete the player flightfrom the mission, the game will ask you toconfirm this decision, since removing theplayer flight makes the mission unplayable.)To shuffle through your stack of Flight Sum-mary index cards, use the Prev and Next but-tons; a card will appear for each flight.
If you choose to set your initial conditionsto Historical Mode, and enable the GenerateFlights option, you will begin on the FlightCreation Map with a large number of flightscreated for your mission. You can then re-move or edit any of these flights as usual; addnew flights to this map (if there are pilotsavailable); or choose one of the pre-gener-
192
Game Play
ated fighter flights to be the player flight.To select a generated flight to adjust, first
click on the aerodrome where the flight origi-nates. This will bring up an index card listingthe squads that are stationed at that aero-drome. Click on the squad you want to workwith, and the Squadron Card for that squadwill appear, listing all the flights for that squad-ron. Click on one of the flights to bring up theFlight Summary card and edit the flight. Youcan also select a flight by shuffling through thestack of flight cards with the Prev and Nextbuttons.
The color scheme for flight paths is as fol-lows:
· Any currently selected flight is shownin Yellow except for the Player Flight, whichis always shown in Red.
· Unselected Allied fighter flights areshown in Blue.
· Unselected German fighter flights areshown in Green.
· If a fighter flight has been assigned aBomber Escort mission, when that fighter
flight is selected the bomber flight it is as-signed to escort is displayed in Gray.
Editing WaypointsEach flight you create starts out with two
waypoints: the start point and the target point.These two waypoints can�t be moved afterthe flight is created, but you can add otherwaypoints between these two points or be-yond the target point. (You can change thealtitude and plane formations at the start andtarget points, however � just not their loca-tions.) These waypoints are locations usedby the Autopilot when your plane is on auto-matic flight or when you are flying in timecompression mode, so they can be used to seta flight path that, for example, avoids pass-ing over enemy units on the way to the target.The program also uses these waypoints to de-termine the flight path for all non-player pi-lots and flights. All enemy units except townsand villages have anti-aircraft guns that willshoot at enemy planes that pass within rangeof them.
To adjust the waypoints of a flight, click onthe Waypoints button. The Waypoint Detailscard appears, listing the waypoints for the flight
and the features of each. To change the fea-tures of a waypoint, select the waypoint (itwill highlight on the list, and appear as a whitetriangle on the map), then click on the Editbutton. The Edit Waypoint card will appear.The top line shows the sequence number ofthe waypoint on the flight path and the type oflandmark nearest to the waypoint.
The waypoint options that can be adjustedare as follows:
· Time at Waypoint: Set the time youwant the flight to arrive at the waypoint. Ifyou don�t leave enough time for the flight toget to the waypoint, the times for all pointsbefore that one in the flight will be automati-cally adjusted downward to compensate.
· Altitude at Waypoint: Set the alti-tude the flight will be at when it passes overthis waypoint. This figure is shown as feetabove Mean Sea Level (MSL) until it is setwithin 1500 feet of the highest point in theimmediate area of the waypoint. At this pointthe number is shown as feet Above GroundLevel (AGL).
· Action to: Choose the action your flight
193
Game Play
will take on the way to the waypoint. (See�Waypoint Actions�)
· Action at: Choose the action your flightwill take when it reaches the waypoint. (See�Waypoint Actions�)
· Minutes: This setting appears only ifyou have Loiter, Support Attack, Defend Infan-try, Defend Balloon, Barrage Patrol, SupportDefense, or Defense Patrol as the �Action At�setting. Set the number of minutes you wantthe flight to spend at that waypoint perform-ing this action.
· Formation to: Choose the formationthe flight will assume on the way to thewaypoint. (See Flight Reference: Forma-tions.)
· Formation at: Choose the formationthe flight will assume when it reaches thewaypoint. (See Flight Reference: Forma-tions.)
To add a new waypoint, select the waypointjust before the location where you want thenew waypoint to go and then click on Add.
The game will add a new waypoint at the land-mark that is closest to being halfway betweenthe two waypoints that already exist and cre-ate a line on the waypoint card for the newwaypoint. If you select the last waypoint onthe waypoint card and click Add, the gamewill extend the vector of the existing flightpath and add the new waypoint at the closestlandmark in that direction. To adjust the lo-cation of the new waypoint, click the mouseon the white triangle, which represents thecurrent waypoint, and then drag it to its newlocation on the map. The new flight path willbe shown in yellow, and a blue or green line(Allied or German) will show what the origi-nal flight path was. (This line will disappearonce you finalize the new path.)
Once you have added a waypoint beyondthe start and target points, a Delete buttonwill appear on the card. You may delete anywaypoint except the start and target points byselecting the waypoint on the waypoint de-tails card and clicking on this button.
Click on the Flights button to return to theFlight Summary card for the current flight.
Waypoint Actions
Waypoint actions can be either actions to(something your flight will do on its way tothe waypoint) or actions at (something yourflight will do when it reaches the waypoint.)The available choices for these actions willdepend on what kind of squadron the currentflight is, and also on what kind of mission theflight has been sent.
There are three possible things your flightmay do on its way to a waypoint:
· Your flight can Ingress: navigate to thetarget;
· Your flight can Egress: navigate awayfrom the target;
· If your flight has been assigned a Patrolmission, your flight may Patrol as it heads forthe waypoint. When the Action To variableis set to patrol, the flight will proceed to thenext waypoint, but will be very aggressive insearching for enemy flights on the way.
Note that you can�t set an Action To for thestart waypoint on your flight�s flight path.
Your flight has many more options for thingsto do once the waypoint is reached, althoughthere are some limitations on your choices de-

194
Game Play
termined by the type of plane in the flight, themission type, and the landmark present at thewaypoint. The Action At setting for your tar-get waypoint is always preset by the flight�smission type; for example, if the flight�s goalis to attack an enemy balloon, the flight�sAction At will automatically be set as Attack.
The following Action At settings are spe-cific to certain waypoints on the flight path:
· For non-target waypoints, your flightmay do the following:
1. Navigate: The planes will simply reori-ent toward the next waypoint and keep fly-ing. Most non-target waypoints will have thisAction At; this prevents the flight from stop-ping to bomb a factory on its way to its as-signed mission target.
2. Loiter: If the flight has been assigned aPatrol mission, the pilots may be directed towait some length of time at a non-targetwaypoint and look for enemy planes to en-gage. If you wish to have the flight patrol alarge area, you can accomplish this by addingnew waypoints at the perimeter of the patrolarea and setting each of the Action At settingsfor the new waypoints to Loiter. This will
cause the flight to patrol between all the se-quential waypoints set in this fashion until thetime duration set at the first Loiter patrol pointhas elapsed. The Loiter option is also avail-able as an Action At for the target waypoint,if the flight is a fighter flight assigned to Patrolduty at that target location.
3. If the flight is a Bomber flight only,the Rendezvous action is available when abomber flight has been assigned a fighter Es-cort. This option should be set at the waypointwhere the fighter escort has been directed tomeet the bomber flight it is escorting.
· If the landmark at the Start Waypointis a friendly aerodrome, your flight may beassigned the Takeoff action at this waypoint.(This is not required; the flight path couldstart with the flight already in the air.) Set-ting the action to Takeoff means that the simwill begin with the player�s plane on the ground;the player will have to pilot the plane throughits takeoff.
· If the landmark at the End Waypoint(which is not necessarily the same as the Tar-
get waypoint) is a friendly aerodrome, yourflight may be assigned the Land action at thiswaypoint. If the elevation of the waypoint isabove the aerodrome, the flight will circledown until it gets close enough to assume alanding pattern.
The next group of Action At settings isavailable only to Fighter Flights at the Tar-get Waypoint. These are set automaticallywhen the mission type is selected.
· Defend Balloon: If the fighter flight�smission is to defend a friendly observationballoon from enemy fighters, this is the actionat the target waypoint. Use the time settingto determine how long the flight will stay onpatrol in the area of the balloon.
· Defend Infantry: If the fighter flight�smission is to defend a friendly infantry group,this action is set at the target waypoint. Thefighter flight will attempt to defend the infan-try from attacks from both the sky and theground. Use the time setting to determinehow long the flight will provide cover for theground unit.

195
Game Play
· Support Attack: If the fighter flight�smission is to aid in an offensive ground ma-neuver, this action is set to have the pilotsstrafe and drop bombs on ground targets inthe enemy area.
· Escort: If the fighter flight�s assignmentis to escort a bomber group, set this action atthe waypoint where the fighters are to meetup with the bombers to be escorted. In orderto set this action, a friendly bomber flightmust already have this waypoint set for Ren-dezvous. Once this action has been accepted,waypoints leading up to the escort waypoint(including the start point) will adjust theirtimes so that the escorts will be at the waypointat the same time as the bombers or shortlybefore.
The following Action At option can be usedonly by Bomber/Recon flights at the Tar-get Waypoint:
· Reconnaissance: A bomber flight canbe sent on a reconnaissance mission to gatherintelligence. The flight will circle for the speci-fied time at the target, taking intelligencephotos or calling down artillery fire.
Fighters, Bombers, or Bomber/Recon
squads at the Target Waypoint can use thelast Action At option:
· Attack: This will be the Action At set-ting if a flight has been assigned to attack anenemy landmark.
1. A flight of fighters can only attack en-emy infantry or aerodromes.
2. If the flight is a bomber or bomber/recon flight, any enemy landmark may be thetarget.
Creating an Escort MissionDesigning an Escort mission is involves a
few extra steps beyond those required to cre-ate a non-Escort mission.
· To make an Escort mission, begin bycreating the Bomber flight that will be es-corted.
· Next, create a new fighter flight.
· Set the mission type for the fighter flightas Escort.
· You will then be asked to select abomber flight to escort. The currently se-
lected bomber flight will be shown in gray. Ifthere is more than one bomber flight availableto be escorted, use the Prev and Next but-tons to shuffle through the stack of bomberflights until the one you want is highlighted,then click on Select.
· Set the start point for the fighter flight.· Set the target point (which is the loca-
tion for the escort rendezvous point) for thefighter flight. You may choose one of the ex-isting waypoints on the bomber flight�s flightpath (except for the target waypoint), or itcan be a completely new location. If you se-lect a new location, the bomber flight will beredirected to include the fighter flight�s targetpoint on the bombers� flight path. This com-pletes the creation of the escort mission.
Changing the Flight OrdnanceWhen you have finished setting up the ba-
sics of the flight, click on Done on the FlightSummary card, or zoom out beyond the far-thest magnification. The map will roll up,revealing the chalkboard beneath with theFlight Ordnance Screen for the currentflight showing. From this screen, you can set

196
Game Play
what type of ordnance each plane will be car-rying by clicking on any or all of the checkboxes that appear to the right of the pilotname. (Note: you can only set ordnance forfighter flights.) Each pilot will start out witha full load of all the types of ordnance youassign to him. If a plane has two machineguns, you may assign both incendiary and nor-mal ammo rounds to that pilot, and one typewill be loaded in each gun. If the play has onlya single machine gun, you must pick eitherincendiary or normal rounds, not both. Notevery type of plane can carry every type ofordnance; the appropriate checkbox will beunavailable if this is the case for the currentplane.
To move forward or backward in the flightlist, click on Prev Flight or Next Flight. Youcan return to the Flight Plan Map at anytime to edit waypoints by clicking on the redpull-ring beneath the map of the appropriateregion. To move on to the Squadron Sta-tus Screen to continue adjusting the currentflight, click on Squadron.
To Save the current mission, click on Save,then click on the file name box that appearsand type in a file name. You may also type in
a longer description of the mission in the Mis-sion Description box by clicking in the boxand typing in your text. Click Done to returnto the Single Mission Screen. (You will beprompted to save the current mission if youhaven�t done so.)Changing the Squadron Status
On the Squadron Status Screen, youcan adjust most of the elements that make upthe current squad. This screen shows a list ofall the flights in the squadron and which pilotsare assigned to which flights. The final slot onthe flight chart shows those pilots who areAvailable � not currently assigned to any flight.A check mark by the flight number showswhich flight is currently selected; to select adifferent flight, click on the flight number andthe check mark will change position.
This screen can be used to rearrange pilotassignments, rearrange plane assignments,change the skill level of the squad pilots (ex-cept the historical Aces) and give a name andrank to the player pilot.
· To change a pilot�s assignment in thesquadron, click and hold on the pilot�s name,then drag it to a new slot on the chart andrelease the mouse button. If you drag your
current choice into an empty slot, that pilotwill be added to that flight (or to the Avail-able pool); if you drag your choice to a slotthat already has a pilot in it, he will swapplaces with your choice.
· To change a plane assignment, right-click on the plane name. A panel with a list ofavailable plane types will pop up. Click onthe aircraft you want to select it (it will high-light) and then click on Done. To swap planesbetween two pilots, left-click on the first planename and drag it into the slot next to thesecond pilot�s name. The two planes will swappositions.
· To change the skill level of a pilot (ex-cept for Aces, who cannot be changed), right-click on the name of the pilot. A panel with alist of skill levels will appear. Click on theskill level you want the pilot to have (it willhighlight) and then click on Done. If youwant the game to randomly select a skill levelfor the pilot each time the mission is played,select �Random� as the pilot�s skill level.
· To change the name and/or rank of theplayer pilot, find the pilot entry for the player

197
Game Play
and right-click on the name. In the panelthat appears, click in the first box and type inthe pilot�s first name, click in the second boxand type in the pilot�s last name, then select arank for the pilot and click on Done.
You can return to the Flight Plan Map atany time to edit waypoints by clicking on thered pull-ring beneath the map of the appro-priate region. When you do this, you will seethe Squadron Card on the map, listing all theflights in that squadron. Click on a flight tobring up its Flight Summary Card.
To move back to the Flight OrdnanceScreen, click on Flight. To Save the currentmission, click on Save, then click on the filename box that appears and type in a file name.You may also type in a longer description ofthe mission in the Mission Description box byclicking in the box and typing in your text.Click Done to return to the Single MissionScreen. (You will be prompted to save thecurrent mission if you haven�t done so.)
Editing an Existing SingleMission
To adjust an already-created mission, first
select it using the Select Mission button, thenclick on Edit Mission. The Mission Builderopens to the Region Map for the mission,with the Flight Summary Card for the player�sflight displayed. Mission flights may then beadded, deleted, and edited as usual.
Sharing MissionsOnce you have created and saved a mis-
sion, it can be shared with other players. Findthe sub-folder labeled Single in the secondplayer�s game directory and copy the threemission files into that sub-folder, and themission will be made available for selection.(There will be one DAT, one DSC, andone MIS file for each mission; all three mustbe copied.)
Flying theSimulationIntroduction
Red Baron II is an historically accurate anddetailed recreation of flight during World WarI, the era that launched aerial combat. The
controls available to the great Aces were fewand primitive. However, as a computerizedsimulation Red Baron II is capable of offeringyou controls unlike anything the Aces wouldhave ever dreamed. This portion of themanual outlines and describes these controls.The elements of flight such as takeoff and land-ing, maneuvers, and tactics are described inthe Flight Reference section of this manual.
Key identification conventions: Mostkeyboards have two sets of number keys, onein the main keyboard panel and one off to theside in a separate keypad. To clearly identifywhich key is meant, the convention KP# isused for numeric keypad (Be sure that yournumber lock is turned on!) Keys given as F#are found in the function key row above themain keyboard panel.Flight ControlsMovement
You use the control surfaces and the throttleto maneuver your aircraft. These include theailerons, the elevators, the rudder, and thethrottle. You may use a joystick setup, thekeyboard, or a combination of both to con-trol your plane.

198
Game Play
RudderThe rudders can be controlled from the key-
board or by using rudder pedals. On the key-board, the longer you hold in the key, themore the rudder moves toward its maximumposition. If you release the key, the rudderwill remain fixed at that position until youchange it.
Keyboard Rudder Controls, (comma) left rudder/ (slash) right rudder. (period) center rudder
For information on rudder pedals, please re-fer to the manual that came with them.ThrottleThe throttle can be controlled by the key-board or by a joystick throttle.
Keyboard Throttle Controls1 through 0 controls throttle.
1 = idle0 = full throttle
+(plus) increase throttle
� (hyphen) decrease throttleTAB Engine On/Off
For information on a joystick throttle,please refer to the manual that came with yourjoystick.
Historical Note: Airplanes with rotary en-gines had no throttle control; the engines ranat full power constantly. The pilot could cutthrottle with a �blip-button,� which wouldsimply turn the engine off completely. If youwish to simulate this mechanical limitation,you may use the keyboard controls for yourplane�s throttle, alternating between 1 (nothrottle) and 0 (full throttle) and ignoringthe numbers in between.View Commands
There are three different viewing modes forthe flight sim in Red Baron II . Each mode hasits own particular strengths and weaknesses.
· The lockdown cockpit view is thesimplest but least flexible mode. In this mode,you have seven fixed views, each of whichcovers a different portion of the sky. To enterthe lockdown view from any other view mode,press F1.
· The slewable cockpit (a.k.a. Pad-lock) view is a free-moving view that allowsyou to scroll smoothly across most of the sky.The slewable view is more flexible than thelockdown view, but makes its slower to reachany particular view since you must scroll overto it instead of jumping directly as with thelockdown view. To enter the slewable viewfrom any other view mode, press F2.
· The external camera views are a set ofspecial �outside� views that take you out ofyour plane�s cockpit and to a vantage pointelsewhere in the sky. To enter one of theexternal camera views, press the appropriatefunction key.
The Lockdown Cockpit Views
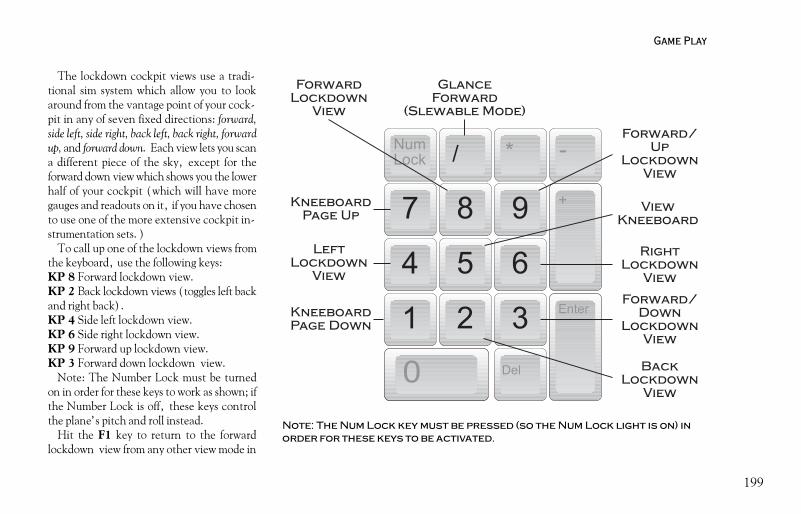
199
Game Play
The lockdown cockpit views use a tradi-tional sim system which allow you to lookaround from the vantage point of your cock-pit in any of seven fixed directions: forward,side left, side right, back left, back right, forwardup, and forward down. Each view lets you scana different piece of the sky, except for theforward down view which shows you the lowerhalf of your cockpit (which will have moregauges and readouts on it, if you have chosento use one of the more extensive cockpit in-strumentation sets.)
To call up one of the lockdown views fromthe keyboard, use the following keys:KP 8 Forward lockdown view.KP 2 Back lockdown views (toggles left backand right back).KP 4 Side left lockdown view.KP 6 Side right lockdown view.KP 9 Forward up lockdown view.KP 3 Forward down lockdown view.
Note: The Number Lock must be turnedon in order for these keys to work as shown; ifthe Number Lock is off, these keys controlthe plane�s pitch and roll instead.
Hit the F1 key to return to the forwardlockdown view from any other view mode in
Note: The Num Lock key must be pressed (so the Num Lock light is on) inorder for these keys to be activated.

200
Game Play
the sim.
Setting a Target for SlewableCockpit and External CameraView Modes
Both the slewable cockpit and external cam-era views can be set to orient themselves on apreset target that you select. The target maybe any other plane in the sim or a stationaryground object. To choose a target, press oneof the following keys:
n Target next plane (closest enemy orfriendly)
e Target closest enemy planef Target closest friendly planem Target closest plane in your forma-
tiond Target best enemy plane to dogfightt Target most threatening enemy plane
(i.e. plane most likely to shoot suc-cessfully at you.)
l Target nearest ground landmarko Target ground object in front of guns
All targeting commands except for d (dog-
fight) and t (threat) cycle; that is, if there ismore than one target fitting the descriptionwithin visual range, repeatedly pressing thetargeting key will cause the target to jump tothe next target of the right type. For example,repeatedly pressing m (formation) will targeteach of the other planes in your formation insequence, eventually returning to the first(closest) plane in the formation.
The Slewable Cockpit ViewThe slewable cockpit view simulates the
pilot�s head moving dynamically to follow apreset target. The chosen target will remaincentered on the screen as long as the pilot�shead could reasonably continue to view it. Thetarget will be lost if it goes below your plane,where the pilot can�t see. If the target circlesin back of your plane, the view will not scrollpast the back of the plane (thus simulatingyour pilot�s head spinning completely around)but instead will turn back the other way andpick up the target again on the other side ofthe plane.
Hit F2 to enter the slewable cockpit viewmode. If there is no target selected, the viewremains pointed center forward (straight
ahead). When in slewable mode, hitting theglance key, KP/ (the forward slash on thenumeric keypad) will force your view straightahead for as long as the key is held down. Theview returns to its previous setting when yourelease the glance key.
If you want to temporarily unlock the targetas the center of your view and look elsewherein slewable view, press and hold the Enterkey, or button 2 on the joystick, and movethe joystick in the direction you want to view.Note that while you�re using the joystick todetermine which way you are looking, youcannot use it to control your plane, so it mightbe useful to engage the Autopilot before look-ing around. When the Enter key or button 2is released, the view will return to the currenttarget and joystick control of the plane willreturn. You may also unlock the camera bypressing the following keys, which will shiftyour view as long as they are pressed:F9 Rotate view left.F10 Rotate view down.F11 Rotate view up.F12 Rotate view right.
The External Camera Views

201
Game Play
The external camera view system in the flightsim allows you to get an �outside� view ofvarious objects in the game. In all externalcamera views, you can zoom out by pressingthe z key and zoom in by pressing the x key.Note that if you bring up an external view of atarget other than your own plane, you are stillflying your own plane even though you can�tsee it � so it might be a good idea to enable theAutopilot while you�re checking out the scen-ery.
The following external camera views areavailable:
· Press F3 to activate an external
slewable view showing your plane and yourcurrent target in relation to each other. Yourplane stays in the foreground while your targetremains in the center of the screen in the back-ground. If there is no target selected, andtherefore no background object, the view re-mains centered on your plane. You can tem-porarily unlock the �camera� by pressing andholding the Enter key or button 2 on yourjoystick and then using the joystick to movethe viewpoint to any position around yourplane. (Note that you won�t be able to con-trol your plane with the joystick while you aredoing this.) The �glance� key (KP/) also
works in this view as it does in the slewablecockpit view.
· Pressing F4 activates an external viewmuch like F3 except that the �camera� is per-manently unlocked. All camera movementmust be manually. You can use the joystick tomove the viewpoint to any position aroundwhichever plane is in the foreground of thecamera view. (Again, you won�t be able tocontrol your plane with the joystick while youare doing this.)
· Press F5 to enable the �chase plane�

202
Game Play
view, with the camera following in a fixedposition behind whichever plane is in the fore-ground of your external camera view.
· F6 activates a delay in the chase planeview. The further out the camera is zoomed,the longer the delay.
· F7 shows a fast fly-by view of which-ever plane is in the foreground of your exter-nal camera view. Once the target has passed,the camera will follow at a distance. (Sta-tionary targets will simply be shown as sta-tionary.)
If you have selected a target, pressing theF8 key causes the external camera to swap theforeground object (usually your own plane)with the background target and takes you au-tomatically back to the F3 external slewableview. You can then use F4 through F7 to getexternal camera views of your new foregroundobject. Press F8 again to swap back to youroriginal foreground object and jump to the F3slewable view. Jumping to either of the cock-pit views (F1 or F2) automatically reassignsyour own plane as the foreground object for
the external camera views.
Firing ControlsYour primary weapon as a World War I
pilot will be the machine-gun; you may haveone or two, depending on the type of planeyou are flying. Certain types of planes mayalso be able to carry a certain number of bombsor rockets.
To fire your gun(s), press and hold button1 on your joystick or the space bar on thekeyboard. Firing too long a burst may causeyour guns to jam; if this happens, you may beable to unjam them by pressing the u key re-peatedly. This won�t always work, but beingpersistent might bring a result eventually.(Note that sometimes your guns will jam evenif you don�t abuse them; WWI firearms weren�tterribly reliable). Muzzle flashes show thatyour guns are firing; if you succeed in hittingyour opponent, the other plane will give offpuffs of black smoke. Damage to your ownplane is signaled by the sound of bullets im-pacting your fuselage and possibly by the ap-pearance of wreckage torn from your plane.
Your guns may be loaded with either of twotypes of ammunition: normal or incendiary.
Normal rounds are better in most cases � theyare more accurate, travel farther, do moredamage, and are less likely to jam your guns.However, incendiary rounds are extremelyuseful if your target is an enemy observationballoon; incendiary rounds will ignite the hy-drogen in the lighter-than-air craft and usu-ally cause quick and complete destruction.Normal rounds are much less effective againstballoon-type targets. If your plane has only asingle gun, you will have to choose whichtype of ordnance to load onto your plane onthe Flight Ordnance Screen before enteringthe sim. If your plane has two guns and youchoose to load both types of ammo, one gunwill be loaded with standard ammo and onewith incendiaries. (This will somewhat re-duce the effectiveness of both types of ammo.)
Most machine guns held 500 rounds ofammo per gun. The exceptions to this ruleare the Lewis and Parabellum machine guns,which held only 98 rounds.
Allied fighter biplanes also have the optionof carrying Le Prieur rockets, four on eachside. These rockets have short ranges andmiserable accuracy, but one hit on an obser-vation balloon guarantees a dandy explosion.

203
Game Play

204
Game Play
Red Baron IIJoystickControls

205
Game Play

206
Game Play
To fire a rocket, press r or button 4 on yourjoystick. Be sure to load rockets on your planeon the Flight Ordnance Screen before enteringthe sim if you think they might be useful.
Most fighter planes are also able to carry apair of bombs on a mission, which can beuseful if your target is on the ground (enemyinfantry or aerodrome). To drop a bomb,press b or button 3 on your joystick. Be sureto load bombs on your plane on the FlightOrdnance Screen before entering the sim ifyou think they might be useful.
CockpitInstrumentation
You can choose one of three cockpit instru-mentation sets, depending on the degree ofhistorical accuracy you find appealing. Thisoption can be set from the Preferences screen.
The Authentic cockpit includes a selec-tion of instruments that were available inWorld War I:
The Engine Temperature gauge, whichwill tell you if your engine starts to overheat.This will only happen if your engine loses itscooling system because of damage that causes
an oil leak. An overheated engine may seizeup, or even burst into flames.
The Tachometer, which tells you the cur-rent speed of your engine in revolutions perminute (RPMs), with each tick mark repre-senting 100 RPMs. This is a measure of yourcurrent throttle setting.
The Compass, which shows you the di-rection in which you are flying.
The Altimeter, which shows you your cur-rent altitude. The readout is in thousands offeet for Allied planes, and kilometers in Ger-man planes. Zero indicates sea level.
The Inclinometer, a simple device thattells you how far off level your plane currentlyis, and which way the plane is currentlybanked.
An ordinary Clock, to help your pilot getto his waypoints on schedule. Failing to keepon schedule will lower your pilot�s perfor-mance evaluation for the mission.
The Balanced cockpit adds a number ofinstruments to the board that weren�t nor-mally available during World War I, result-ing in a display similar to that available topilots of the second World War. In additionto the instruments listed above, the Balancedcockpit also has:
The Airspeed Indicator, which showshow fast your plane is going. The readout is inmiles per hour for Allied planes, and kilome-ters per hour for German planes.
The Vertical Speed Indicator (VSI),which tells you how fast your plane is losing orgaining altitude. A positive number indicatesthat your plane is climbing, while a negativenumber indicates a descent.

207
Game Play
The Fuel Gauge, which shows how muchfuel you have left.
The Oil Pressure Gauge, which showsyou how much oil is in your engine. If yourengine�s cooling system is hit, it will start tolose oil, and your oil pressure will drop. Ifyour engine loses too much oil, it will over-heat.
The Modern cockpit has instrumentationequal to that found on a modern airplane. Inaddition to all the instruments found in theBalanced cockpit, it has:
An Artificial Horizon, which shows yourplane�s bank and pitch.
An improved Compass.
A G-Meter, which shows how many posi-tive or negative Gs are being applied to yourplane and pilot.
The AutopilotRed Baron II includes a multilevel Autopi-
lot function that can take over some or all ofthe flying for you depending on which levelyou pick. The Autopilot is most useful whenyou want to look around without worryingabout keeping your plane straight and level,or when your flight plan calls for a long stretchof flying.
There are three levels of Autopilot in thegame. You may enter any of them at any timein the sim.
· Press Shift-a to activate the lowestlevel of the autopilot, the �straight and level�version. Like the name says, this version ofthe Autopilot will keep your plane flying in astraight line, but won�t do anything else for
you, like keep you from crashing into amountain.This is a good Autopilot to use forshort periods of scanning the skies.
· Press Alt-a to activate the mediumlevel of the autopilot, the �navigation� ver-sion. If you are the Flight Leader, this Auto-
pilot will automati-cally guide your flightto each successivewaypoint. If you area wingman, this Au-topilot setting willkeep you in your cor-rect position within
the formation.
· Press Ctrl-a to activate the most com-plete autopilot, which will do everything for
you except turn onyour computer.
· Press a to turnthe Autopilot off.
Only the highestlevel of the Autopilotwill react to any threat;

208
Game Play
if you are using one of the lower levels of theAutopilot and enemyplanes engage yourflight, your plane willbe helpless.
TimeCompression
There may be peri-ods of simulation playwhen there�s not a lotof action going on � forexample, after takingoff, as you make yourway to the front, orafter the mission is
complete and you are making your way backto your aerodrome.
As a convenience,Red Baron II containsa time compressionmode that will speedup the simulation tomany times its normal
speed to get to the action more expeditiously.Time compression isactivated by pressingthe ] (right squarebracket) key. Eachpress of this key willdouble the speed atwhich the simulationtakes place, up to a
maximum of 16 times normal. A small dis-play in the upper right hand corner of the gamewindow shows you what level of time com-pression is currently enabled.
You can decompress time back to normal inthe same steps by hitting the [ (left squarebracket) key. Time compression will be au-tomatically deactivated when you press the \(backslash) key, when you fire your machine
guns, when you cometoo near enemy air-craft or balloons, andwhen you fly near theground. If you are fly-ing with compressedtime and an enemy ap-proaches, time com-pression will auto-
matically turn off to give you a chance to re-spond.
IMPORTANT:It�s very difficult tocontrol your planewhen time compres-sion is active. Becauseof this, it would be agood idea to activate
the Autopilot before you go into time com-pression.
Navigationand theKneeboard
To keep track of theprogress of your flight,your pilot is provided

209
Game Play
with a kneeboard map that displays the flightplan for your mission.(This is the same mapfound within the Mis-sion Briefing area out-side of the sim.) Tobring up yourkneeboard map, pressthe KP5 key; pressthe same key a second
time to return to your previous viewOn your kneeboard, the map displays your
mission area, flight path, and any importantlandmarks nearby. As your flight progresses,the path you�ve flown up to the current pointwill be shown in red. If you fly off the edge ofthe map, the map will not scroll; you will have
to navigate by eyefrom that point. Asmall marker at theedge of the map shows
your relative positionto the map.
The kneeboard alsocontains other infor-mation relevant toyour mission, identi-cal to the info that ap-peared during the
Mission Briefing. You can flip to the nextpage by pressingKP1, and flip back tothe previous page bypressing KP7. Notethat if this is a Fly Nowdogfight, thekneeboard holds only
the navigation map, so the paging buttons aredisabled.
Flight CommunicationIf you are the Flight Leader, you can issue
very simple orders to the rest of your flight.Since plane-to-plane radios were not yet inuse, only information that could be commu-nicated through the use of hand signals, flares,or other basic signaling methods could bepassed to the flight.
· Press Ctrl-e to tell your flight to en-gage the enemy. Note that if the flight startstaking enemy fire, or if enemy planes get un-comfortably close, your flight will probablytake the initiative and engage without yourgo-ahead.
· Press Ctrl-r to call for a regroup (areturn to formation flying after an engage-ment.) This is useful if your flight starts torun off after fleeing enemy fighters when theirmission has some other goal (such as escort-ing bombers or strafing an enemy infantryunit.)In-flight Preferences
It is generally easier to set all your sim pref-

210
Game Play
erences from the Preferences area outside ofthe sim. However, you can also adjust somepreferences from within the sim by right-click-ing anywhere in the game window. A menuappears, which will allow you to select thetype of preference you want to change.
In addition to changing graphics and soundpreferences, you can use this menu to adjustyour joystick setup by selecting Input Devicesto bring up the Windows 95® joystick con-figuration panel. You can also select Help tosummon up a list of keyboard commands.
Ending the SimulationThere are several ways that a simulated flight
can conclude.· At any time, you may press the Es-
cape key to end the sim.
· Your plane may crash, or your pilotmay be shot.
· Your plane may be disabled.· Your plane may land, either at the aero-
drome or force down at some other location.If you choose to end the flight in midair
over enemy territory instead of after landing,your pilot might wind up shot down and cap-
tured or killed. There is also a small chancethat something bad might happen to your planeif you end the flight in midair over friendlyterritory � your plane may crash on landing oryour pilot might be shot by an enemy patrol infriendly territory � but this isn�t very likely.
At the end of the simulated flight, you willsee a menu appear giving you several optionsfor how to conclude the sim:
· End Mission: If you choose this op-tion, you will exit the sim and enter the Mis-sion Debriefing area.
· Restart Mission: If you choose thisoption, the sim will reset to its starting con-ditions and begin over.
· Abort Mission: This option returnsyou to the shell as if you never started themission. Use this option if you want to skip acertain mission completely.
· Return to Sim: If you hit the Escapekey by accident, or change your mind aboutending the mission, choose this option to re-
enter the sim at the place and time you left.
Mission DebriefingIf you choose the End Mission option, a
map appears and the flight path flown by thepilot will be animated on the map. Boxes willappear to note interesting events at the siteswhere they took place, and the animation willpause; to move on quickly, hit any key orclick the mouse. If you don�t want to watchthe entire animation, you can hit the Escapekey at any time to move on to the next part ofthe debriefing.
The mission summary chalkboard appearsnext, displaying a summary of your missionperformance and statistics about your pilot�sperformance and ending condition (numberof kills, injuries, crashes, etc.) If the mis-sion was a simple Fly Now dogfight, this willconclude the debriefing. For any other type offlight, the chalkboard will also display theoutcome of the mission.
To see the animation tracing again, clickon Replay; to conclude the debriefing andreturn to the shell, click on Done.

211
Game Play
GlossaryAce An aviator with at least five victories.Aerodrome An airfield, generally make-
shift or temporary.Ailerons The movable surfaces on an
aircraft�s wings that control its roll.Alley-man Derived from the French word
for German, this was a British and Americanterm for a German.
Allies The French, British, American,Russian and Italian coalition which was alliedagainst the Central Powers.
Archie Pilot�s slang for anti-aircraft fire.As des As French term for the top ace. It
literally means ace of aces.Bloody April A name given to April of
1917 when the German Albatros D.III in-flicted huge casualties on the Allied aircraft.
Blue Max Common English term forGermany�s highest military honor, the PourLe Merite award.
Bosche French slang for a German.Bounce A slang term meaning to surprise
an enemy aircraft.Brisfit Nickname of the Bristol Fighter.Central Powers The German and Austro-
Hungarian Alliance that was allied against theAllies.
Crate Slang for aircraft.Deflection angle The angle of a target in
relation to the aircraft shooting at it.Deflector gear Invented by Roland Garros
as a means to allow a machine gun to firethrough the arc of a propeller. A deflectorgear was nothing more than a steel wedgemounted on the propeller blades to deflectany bullets that would have otherwise tornthe blades off.
Dirigible A gas-filled airship with an in-ternal framework or skeleton.
Dogfight Multiple aircraft involved in amelee. Sometimes more than 50 were in-volved in such battles.
Doppledecker German for biplane.Dreidecker German for triplane, as in
�Fokker Dreidecker I� or �Fokker Dr.I� forshort.
Eagle of the Lille Nickname of Max Im-melmann.
Egress Navigate away from the target.Eindecker German for monoplane. It is
used to describe the Fokker E series.Elevators The movable surfaces on an
aircraft�s tail assembly that control pitch.Escadrille French term for squadron. Usu-
ally composed of 12 planes.Fee Nickname for the F.E.2b. A British
two-seat pusher biplane first used as a fighter,then later as night bomber.
Flak Antiaircraft fireFlamed A verb used to describe a downed
plane.Flying Circus Nickname applied to
Richthofen�s Jagdgeschwader because the unitlived out of tents, moved around a lot, andpainted their planes in extravagant colors.
Fokker Scourge Took place between1915-16 when the Fokker Eindeckers clearedthe skies of Allied aircraft. Ended by summerof 1916.
Frog, Froggies British term for their Frenchallies.
Geschwader Short for Jagdgeschwader.Grid British expression for an aircraft.Hate, Morning and Evening British ex-
pression for German artillery bombardmentsand anti-aircraft fire.
Hun Slang for a German.Hunland German-held territory.Ingress Navigate to the target.

212
Appendix
Jagdgeschwader It literally means �hunt-ing wing�. It is a large German unit of about50 scouts composed of 3 to 4 Jagdstaffeln.
Jagdstaffel Literally �hunting group�, it isthe German equivalent of the British Squad-ron. Each Jagdstaffel was equipped with amaximum of 12 scouts.
Jasta Short for Jagdstaffel.J.G. Short for Jagdgeschwader.Kill A downed aircraft credited to a pilot.Lead Placing a machine gun�s crosshairs in
front of a target in order to compensate for thespeed of the target and the angle it is at inrelation to the gun.
Luftstreitkrafte Official German name forthe German Imperial Air Service.
No-Man�s Land The space between theGerman and Allied front line trenches. It waspocked and scarred and destroyed by the fight-ing.
Observer The gunner in all two-seaters.Piste French for landing field, used by
American pilots.Pitch The up or down rotation of an air-
craft controlled by the elevators.Quirk Nickname of the B.E.2c British
observation aircraft.
R.A.F. Abbreviation for the British RoyalAir Force. Founded on April 1, 1918 fromthe combined R.F.C. and R.N.A.S.
Reconnaissance Scouting the enemy�sstrength, location and if possible, his inten-tions.

213
Appendix
Appendix

214
Appendix
Red Baron Nickname of Manfred vonRichthofen.
Red Devil/ Le Diable Rouge Allied nick-name for Manfred von Richthofen.
Roll The rotation of an aircraft about theaxis running from nose to tail. It is controlledby the ailerons.
R.F.C. Abbreviation for the British RoyalFlying Corps. It later became the Royal AirForce.
R.N.A.S. Abbreviation for the British RoyalNavy Air Service. It was incorporated intothe R.A.F. on April 1, 1918.
Rudder The fin on the tail of an aircraftthat controls its yaw.
Sardine Can Nickname of the FokkerEindecker.
Schlastastaffel German ground attacksquadron. It literally means �battle group.�
Scout Usually a single-seat aircraft. De-signed specifically to fight other aircraft. Calledfighters or interceptors today.
Sortie A mission flown by an airplane.Spad Acronym for the French Societe Pour
l�Aviation et ses Derives. A French aviationcompany responsible for building the Spad VIIand XIII among other aircraft.
Spinning Incinerator Slang for the AircoD.H. 2. Named this since its engines were sounreliable as well as the plane�s habit of fallinginto spins suddenly.
Squadron Standard British and Americantactical aircraft unit. Composed of between12 and 18 planes.
Staffel Short for JagdstaffelStrafe To shoot at ground targets with air-
borne machine guns.Stick The control column in an aircraft�s
cockpit used to operate the ailerons and el-evators.
Stunt Merchant 60 Squadron�s nicknamefor Billy Bishop
Synchroniser gear A timing device whichallowed the machine-gun to fire betweenmoving propeller blades without ever hittingthem. Invented by Anthony Fokker, it revo-lutionized aerial warfare.
Tripehound Nickname for the SopwithTriplane.
Triple Entente The French, British andRussian pre-war Alliance.
Two-Seater Generic term applied to air-craft with a crew of two, which were generallyobservation aircraft.
Victory The shooting down of an enemyaircraft.
Yaw The rotation of the aircraft in the hori-zontal plane. It is controlled by the rudder.

215
Appendix

216
Appendix

217
Appendix
Customer Service Support and Sales
United StatesSierra Direct U.S.A. Sales Phone: (800) 757-77077100 W. Center Rd International Sales: (425) 746-5771STE 301 Hours: Monday-Saturday 7AM to 11 PM CST,Omaha, NE 68106 Sundays 8 AM to 9PM CST
FAX: (402) 393-3224
United KingdomCUC Software International Limited Main: (0118) 920-91112 Beacontree Plaza, Monday-Friday, 9:00 a.m. - 5:00 p.m.Gillette Way, Fax: (0118) 987-5603Reading, Berkshire Disk/CD replacements in the U.K. are £6.00,RG2 0BS United Kingdom or £7.00 outside the UK. Add �ATTN.: Returns.�
FranceCUC Software International Limited Phone: (01) 46-01-46-50Parc Tertiaire de Meudon Lundi au Vendredi de 9h à 19hImmeuble �Le Newton� Fax: (01) 46-30-00-6525 rue Jeanne Braconnier92366 Meudon La Forêt CedexFrance

218
Appendix
GermanyCUC Software International Limited Tel: (0) 6103-99-40-40Robert-Bosh-Str. 32 Montag bis Freitag von 9h � 19UhrD-63303 Dreieich Fax: (0) 6103-99-40-35Germany
On-Line SalesCompuServe United Kingdom: GO UKSIERRACompuServe France: GO FRSIERRACompuServe Germany: GO DESIERRAInternet USA: http://www.sierra.comInternet United Kingdom: http://www.sierra-online.co.ukInternet France: http://www.sierra.frInternet Germany: http://www.sierra.de
The Sierra No-Risk GuaranteeThe Promise: We want you to be happy with every Sierra product you purchase from us. Period. If for any reason you�re unhappy withthe product, return it within 30 days for an exchange or a full refund�EVEN IF YOU BOUGHT IT RETAIL. (Hardware ordered directmust be returned within ten days.) Please send back your product � signature required if mailing via US Postal Service.
The Only Catch: You have to tell us why you don�t like the game. Otherwise, we�ll never get any better. Send it back to us andwe promise we�ll make things right. (If you bought it at a retail outlet, please send your original sales receipt.)

219
Appendix
Disk and or Manual Replacement: Product Returns:*Sierra On-Line Fulfillment Sierra On-Line Returns4100 West 190th Street 4100 West 190th StreetTorrance, CA 90504 Torrance, CA 90504* Returns valid in North America only.
NOTE: To replace your disk(s) please send only Disk #1 (or the CD) and copy of your dated receipt, if less than 90 days. After 90days, please include a $10 handling fee along with Disk / CD #1. For Documentation, please include a $5.00 handling fee and aphotocopy ONLY of disk #1. Payment should be made at the time of your request. Sorry, no credit cards.
Technical SupportAutomated Technical Support Line - USA1-425-644-4343Sierra On-Line offers a 24-hour Automated Technical Support line with recorded answers to the most frequently asked technicalquestions. To access this service, call (425) 644-4343, and follow the recorded instructions to find your specific topic and resolve theissue. If this fails to solve your problem, you may still write or fax us with your questions, or contact us via our Web site.
U.S. Technical SupportSierra On-Line Main: (425) 644-4343Technical Support Monday-Friday, 8:00 a.m. - 4:45 p.m. PSTP.O. Box 85006 Fax: (425) 644-7697Bellevue, WA 98015-8506

220
Appendix
Automated Technical Support Line - United Kingdom(0118) 920-9111CUC Software International Limited offers a 24-hour Automated Technical Support line with recorded answers to the most frequentlyasked technical questions. To access this service, call (0118) 920-9111, and follow the recorded instructions to find your specific topicand resolve the issue. If this fails to solve your problem, you may still write or fax us with your questions, or contact us via our Internetor CompuServe sites.
U.K. Technical SupportCUC Software International Limited Phone: (0118) 920-91112 Beacontree Plaza, Monday-Friday, 9:00 a.m. - 5:00 p.m.Gillette Way, Fax: (0118) 987-5603Reading, Berkshire Disk/CD replacements in the U.K. are £6.00,RG2 0BS United Kingdom or £7.00 outside the UK. Add �ATTN.: Returns.�
FranceCUC Software International LimitedParc Tertiaire de Meudon Téléphone: 01-46-01-46-50Immeuble �Le Newton� Lundi au Vendredi de 9h à 19h25 rue Jeanne Braconnier Fax: 01-46-30-00-6592366 Meudon La Forêt CedexFrance

221
Appendix
GermanyCUC Software International Limited Tel: (0) 6103-99-40-40Robert-Bosh-Str. 32 Montag bis Freitag von 9 � 19UhrD-63303 Dreieich Fax: (0) 6103-99-40-35Deutschland Mailbox: (0) 6103-99-40-35
SpainCUC Software International Limited Teléfono: (01) 383-2623Avenida de Burgos 9 Lunes a Viernes de 9h30 a 14h y de 15h a 18h301º-OF2 Fax: (01) 381-243728036 MadridSpain
ItalyContattare il vostro distribotore.

222
Appendix
Sierra WarrantyYOU ARE ENTITLED TO USE THIS PRODUCT FOR YOUR OWN USE, BUT MAY NOT COPY, REPRODUCE, TRANSLATE,PUBLICLY PERFORM, DISPLAY, OR REDUCE TO ANY ELECTRONIC MEDIUM OR MACHINE- READABLE FORM, REPRO-DUCTIONS OF THE SOFTWARE OR MANUAL TO OTHER PARTIES IN ANY WAY, NOR SELL, RENT OR LEASE THE PROD-UCT TO OTHERS WITHOUT PRIOR WRITTEN PERMISSION OF SIERRA. YOU MAY USE ONE COPY OF THE PRODUCT ONA SINGLE COMPUTER. YOU MAY NOT NETWORK THE PRODUCT OR OTHERWISE INSTALL IT OR USE IT ON MORETHAN ONE COMPUTER AT THE SAME TIME.
UNAUTHORIZED REPRESENTATIONS: SIERRA WARRANTS ONLY THAT THE PROGRAM WILL PERFORM AS DESCRIBEDIN THE USER DOCUMENTATION. NO OTHER ADVERTISING, DESCRIPTION, OR REPRESENTATION, WHETHER MADEBY A SIERRA DEALER, DISTRIBUTOR, AGENT, OR EMPLOYEE, SHALL BE BINDING UPON SIERRA OR SHALL CHANGETHE TERMS OF THIS WARRANTY.
IMPLIED WARRANTIES LIMITED: EXCEPT AS STATED ABOVE, SIERRA MAKES NO WARRANTY, EXPRESS OR IMPLIED,REGARDING THIS PRODUCT. SIERRA DISCLAIMS ANY WARRANTY THAT THE SOFTWARE IS FIT FOR A PARTICULARPURPOSE, AND ANY IMPLIED WARRANTY OF MERCHANTABILITY SHALL BE LIMITED TO THE NINETY (90) DAY DURA-TION OF THIS LIMITED EXPRESS WARRANTY AND IS OTHERWISE EXPRESSLY AND SPECIFICALLY DISCLAIMED. SOMESTATES DO NOT ALLOW LIMITATIONS ON HOW LONG AN IMPLIED WARRANTY LASTS, SO THE ABOVE LIMITATIONMAY NOT APPLY TO YOU.
NO CONSEQUENTIAL DAMAGES: SIERRA SHALL NOT BE LIABLE FOR SPECIAL, INCIDENTAL, CONSEQUENTIAL OROTHER DAMAGES, EVEN IF SIERRA IS ADVISED OF OR AWARE OF THE POSSIBILITY OF SUCH DAMAGES. THIS MEANSTHAT SIERRA SHALL NOT BE RESPONSIBLE OR LIABLE FOR LOST PROFITS OR REVENUES, OR FOR DAMAGES OR COSTSINCURRED AS A RESULT OF LOSS OF TIME, DATA OR USE OF THE SOFTWARE, OR FROM ANY OTHER CAUSE EXCEPTTHE ACTUAL COST OF THE PRODUCT. IN NO EVENT SHALL SIERRA�S LIABILITY EXCEED THE PURCHASE PRICE OFTHIS PRODUCT. SOME STATES DO NOT ALLOW THE EXCLUSION OR LIMITATION OF INCIDENTAL OR CONSEQUEN-TIAL DAMAGES, SO THE ABOVE LIMITATION OR EXCLUSION MAY NOT APPLY TO YOU.

223
Appendix
Manual Credits
PRODUCER Neil HaldarDIRECTOR Steven HillHISTORICAL SECTION John R. BruningTACTICAL SECTION John R. BruningMEDALS AND AWARDS SECTION Neal O�Connor
Jennifer HawthorneGAMEPLAY SECTION Jennifer Hawthorne
Scott RudiINSTALLATION AND SETUP Erica ErkkilaQUALITY ASSURANCE AND EDITING Lloyd MaddenMANUAL EDITING AND LAYOUT Kevin M. Lamb, Wordworks, Inc.MANUAL DESIGN Egil GloersenCOMPUTER ARTISTS Jarrett Jester
Ron ClaybornCOLOR ILLUSTRATIONS Raymond Rimell
SPECIAL THANKS TO:The National Archives and Records Administration for photos and assistance; the Congressional Medal of Honor Society, NationalHeadquarters, for the United States of America Congressional Medal of Honor images; the Oregon Air and Space Museum for addi-tional photos.
©1997 Sierra On-Line, Inc. ® and � designate trademarks of, or licensed to Sierra On-Line, Inc. All rights reserved.

224
Appendix
Photo Credits
Page #6 ..... National Archives7 ..... Airmen Memorial Museum9 ..... National Archives12 .... National Archives13 .... Airmen Memorial Museum14 .... National Archives16 .... National Archives17 .... Airmen Memorial Museum18 .... National Archives20 .... National Archives24 .... Airmen Memorial Museum26 .... Airmen Memorial Museum29 .... National Archives30 .... Airmen Memorial Museum32 .... Airmen Memorial Museum33 .... National Archives34 .... Airmen Memorial Museum35 .... National Archives38 .... Experimental Aircraft Assn.41 .... National Archives43 .... National Archives44 .... Airmen Memorial Museum46 .... National Archives
Page #48 .... National Archives49 .... Airmen Memorial Museum50 .... Experimental Aircraft Assn.51 .... National Archives52 .... National Archives53 .... National Archives54 .... National Archives55 .... Airmen Memorial Museum56 .... National Archives57 .... Airmen Memorial Museum58 .... National Archives59 .... Airmen Memorial Museum60 .... Experimental Aircraft Assn.61 .... National Archives62 .... National Archives63 .... National Archives64 .... National Archives66 .... National Archives67 .... National Archives82 .... National Archives84 .... Airmen Memorial Museum85 .... National Archives87 .... National Archives
Page #88 .... National Archives89 .... National Archives90 .... Airmen Memorial Museum92 .... National Archives98 .... Experimental Aircraft Assn.99 .... National Archives of Canada100 ... Airmen Memorial Museum105 ... National Archives

225
Appendix
IndexA
Abort Mission 211Ace Preview 179Ailerons 69Aircraft, color plates 117Airspeed Indicator 208Altimeter 208Appendix 213Artificial Horizon 209Autopilot 209
B
Battle Tactics 83�105battle 86disengagement 90engagement 85ground attacks 91make the tactics suit the aircraft
88turning vs. hit-and-run 86
Boelcke�s Dicta 93
C
Campaignplaying 161starting 162time 171
Campaign Screen 162Medals/Awards button 170Next Mission button 170Personal Stats button 170
Clock 208Cockpit Instrumentation 207Compass 208Controls
firing 206rudder 200throttle 200
Create Flight Index Card 190Creating a single mission 185
changing flight ordnance 197create flight index card 190editing an existing single mission
198flight creation outline 190front and region maps 189
historical mode vs. free form flights186
mission creation outline 186setting the initial conditions 188sharing 198squadrons and flights 187waypoint actions 194
Creating and Changing Pilots 163Customer Service 217
D
Dossiers 165Drag 69
E
Editing, single mission 198Elevators 69Ending the Simulation 211Engine Temperature 207External Camera View 202
F
Firing Controls 206Flight Communication 211

226
Appendix
Flight Controls 200Flight Formations 106Flight Maneuvers 73Flight Ordnance 174
changing 174Flight Path Map 172
changing 172Flight Plan
Summary Card 173viewing and changing 171
Flight Summary Card 173Fly Now
options 184Fly Now button 184Flying a Mission 170Flying A Single Mission 159Flying the Simulation 199Formations 106Fuel Gauge 208
G
G-Meter 209Getting Started 158Glossary 214
Graphic Setting 182Aircraft Detail 182Clouds 183Combat Detail 183Graphics 183Ground Shadows 183Max Detail 183Object Density 183Object Detail 182Pixel Size 183Prop Animations 183Sim Resolution 183Terrain Detail 183Terrain Range 183Terrain Textures 183
H
Historical Mode Vs. Free FormFlights 186
History of Flight 66
I
Inclinometer 208Intelligence Screen 169
J
Joystick Controls 205
K
Kill Board 165Kneeboard 210
L
Landing 71Lift 68Lockdown Cockpit View 201Lockdown cockpit view 200
M
Main MenuFly Now 158
Main Menu Screen 158Manual Credits 223Maps 151Medals 141Medals/Awards button 170Mission Builder 185
creating single mission 185

227
Appendix
Mission Debriefing 212Mission Results 177Mission Types 114Missions
flying single 159Next Mission button 170selecting 160view briefing 161
N
Navigation 210
O
Object Preview 178Oil Pressure Gauge 209
P
Paint Shop button 166Painting Your Plane 166�168Personal Stats button 170Photo Credits 224Physics of Flight 68
Pilotdossiers 165rank and position 164
Pilotscreating and changing 163
Pitch 69Playing a Campaign 161Preferences
in-flight 211Preferences Screen 180
Graphic Setting 182Realism Setting 180Sound 184
R
Rank and Position 164Realism Options 180Realism Setting 180Recovery from a Spin 72Recovery from a Stall 72Return to Sim 212Rudder 69Rudder Controls 200
S
Score Modifier 182Selecting a Mission 160Sewable cockpit 200Sharing Missions 198Sierra Warranty 222Slewable Cockpit View 202Sound 184Specialized Attack Tactics 98
attacking observation balloons 101attacking two-seaters 98
SquadronInfo button 165status, changing 174
Squadron Ops Screen 165Info button 165Kill Board 165Paint Shop button 166Transfer button 166
Squadron Screen 174Squadron Status Screen
Add Flight 176Squadrons and Flights 187

228
Appendix
Starting the Campaign 162
T
Tachometer 207Takeoff 70Technical Support 219Throttle Contol 200Thrust 68Time Compression 210Transfer button 166Turning 70
U
Unofficial Flightscreating 176rules for creating 176
V
Vertical Speed Indicator 208View Commands 209Viewing the Mission Briefing 161Views
external camera 202
lockdown cockpit 201slewable cockpit 202
W
Waypoint Actions 194