configuration guide for sql server - lepide · configuration guide for sql server this document...
TRANSCRIPT

Configuration Guide for SQL Server This document explains the steps to configure
LepideAuditor Suite to add and audit SQL Server.
LEPIDE SOFTWARE
LepideAuditor Suite

LepideAuditor Suite SQL Server Auditing Configuration Guide
© 2016 Lepide Software Pvt. Ltd. Page | 2
Copyright
LepideAuditor Suite, LepideAuditor App, LepideAuditor App Server, LepideAuditor Suite (Web
Console), LepideAuditor Logon/Logoff Audit Module, any and all components, any and all
accompanying software, files, data and materials, this Configuration Guide, and other
documentation are copyright of Lepide Software Private Limited, with all rights reserved under
the copyright laws. This user guide cannot be reproduced in any form without the prior written
permission of Lepide Software Private Limited. No Patent Liability is assumed, however, with
respect to the use of the information contained herein.
© Lepide Software Private Limited, All Rights Reserved.
Warranty Disclaimers and Liability Limitation
LepideAuditor Suite, LepideAuditor App, LepideAuditor App Server, LepideAuditor Suite (Web
Console), LepideAuditor Logon/Logoff Audit Module, any and all components, any and all
accompanying software, files, data and materials, are distributed and provided AS IS and with
no warranties of any kind, whether expressed or implied. In particular, there is no warranty for
any harm, destruction, impairment caused to the system where these are installed. You
acknowledge that good data processing procedure dictates that any program, listed above, must
be thoroughly tested with non-critical data before there is any reliance on it, and you hereby
assume the entire risk of all use of the copies of LepideAuditor Suite and the above listed
accompanying programs covered by this License. This disclaimer of warranty constitutes an
essential part of this License.
In addition, in no event does Lepide Software Private Limited authorize you or anyone else to
use LepideAuditor Suite and the above listed accompanying programs in applications or systems
where LepideAuditor Suite and the above listed accompanying programs’ failure to perform can
reasonably be expected to result in a significant physical injury, or in loss of life. Any such use is
entirely at your own risk, and you agree to hold Lepide Software Private Limited harmless from
any and all claims or losses relating to such unauthorized use.
Trademarks
LepideAuditor Suite, LAS, LepideAuditor App, LepideAuditor App Server, LepideAuditor Suite
(Web Console), LepideAuditor Logon/Logoff Audit Module, LepideAuditor for Active Directory,
LAAD, LepideAuditor for Group Policy Object, LAGPO, LepideAuditor for Exchange Server,
LAES, LepideAuditor for SQL Server, LASS, LepideAuditor SharePoint, LASP, Lepide Object
Restore Wizard, Lepide Active Directory Cleaner, LADC, Lepide User Password Expiration
Reminder, LUPER, and LiveFeed are registered trademarks of Lepide Software Pvt Ltd.

LepideAuditor Suite SQL Server Auditing Configuration Guide
© 2016 Lepide Software Pvt. Ltd. Page | 3
All other brand names, product names, logos, registered marks, service marks and trademarks
(except above of Lepide Software Pvt. Ltd.) appearing in this document are the sole property of
their respective owners. These are purely used for informational purposes only. We have
compiled a list of such trademarks but it may be possible that few of them are not listed here.
Windows XP®, Windows 7®, Windows 8®, Windows 2000 Server®, Windows 2000 Advanced
Server®, Windows Server 2003®, Windows Server 2003 R2®, Windows Server 2008®, Windows
Server 2008 R2®, Windows Server 2012®, Exchange Server 2003®, Exchange Server 2007®,
Exchange Server 2010®, Exchange Server 2013®, SharePoint Server®, SharePoint Server 2010®,
SharePoint Foundation 2010®, SharePoint Server 2013® SharePoint Foundation 2013®, SQL
Server 2005®, SQL Server 2008®, SQL Server 2008 R2®, SQL Server 2012®, SQL Server 2014®,
SQL Server 2005 Express Edition®, SQL Server 2008 Express® SQL Server 2008 R2 Express®, SQL
Server 2012 Express®, SQL Server 2014 Express® .NET Framework 4.0, .NET Framework 2.0,
Windows PowerShell® are registered trademarks of Microsoft Corporation.
Intel and Pentium are registered trademarks of Intel Corporation.
Contact Information
Email: [email protected]
Website: http://www.lepide.com

LepideAuditor Suite SQL Server Auditing Configuration Guide
© 2016 Lepide Software Pvt. Ltd. Page | 4
Table of Contents 1. Introduction ............................................................................................................................................ 5
2. Adding SQL Server ................................................................................................................................ 5
2.1 Add SQL Server with Express Configuration .............................................................................. 7
2.1.1 SQL Server Details .................................................................................................................... 8
2.1.2 Database Settings .................................................................................................................... 12
2.1.3 Install SQL Auditing Agent ................................................................................................... 14
2.2 Add SQL Server with Advanced Configuration ....................................................................... 16
2.2.1 SQL Server Details .................................................................................................................. 17
2.2.2 SQL Health Monitoring .......................................................................................................... 18
2.2.3 Audit Settings .......................................................................................................................... 20
2.2.4 Object Settings ......................................................................................................................... 22
2.2.5 User Settings ............................................................................................................................ 24
2.2.6 Database Settings .................................................................................................................... 25
2.2.7 Archive Database Settings ..................................................................................................... 26
2.2.8 Install SQL Auditing Agent ................................................................................................... 28
3. Remove SQL Server ............................................................................................................................. 31
4. Modify SQL Server Properties ........................................................................................................... 35
5. Manage SQL Auditing Agent ............................................................................................................. 42
5.1 Switching SQL Auditing Mode .................................................................................................... 42
5.2 Uninstall SQL Agent ...................................................................................................................... 44
5.3 Uninstall Agent from not added SQL Server ............................................................................. 48
5.4 Install SQL Agent ........................................................................................................................... 54
6. Manage SQL Health Monitoring ....................................................................................................... 60
6.1 Disable Health Monitoring ........................................................................................................... 60
6.2 Enable SQL Server Health Monitoring ....................................................................................... 63
7. Conclusion ............................................................................................................................................ 66

LepideAuditor Suite SQL Server Auditing Configuration Guide
© 2016 Lepide Software Pvt. Ltd. Page | 5
1. Introduction Welcome to the Configuration Guide of LepideAuditor Suite.
This software is a comprehensive solution providing all round audit information and control
regarding Active Directory, Group Policy Objects, Exchange Servers, SharePoint Servers, and
SQL Servers.
In this configuration guide, we have covered the steps to add and audit SQL Server.
2. Adding SQL Server LepideAuditor Suite allows you to add and audit multiple SQL Servers in the network from a
central platform. You can use any of the following procedures to add a SQL Server.
1. Agent-based Auditing: An agent will be installed on SQL Server to collect the logs, which
will pass it to LepideAuditor Suite for parsing and display. This agent will run
continuously and consume the server resources as per requirement.
2. Agentless Auditing: No agent will be installed for auditing SQL Server and hence no
system resources of SQL Server will be used.
Go to "Settings" tab → "Component Management" and use any of the following methods to start
with Click "SQL Server" button under "Add Component" section.
Figure 1: SQL Server button
You can also right click on "Component Management" node, go to "Add" and select "Active
Directory, Group Policy and Exchange Server" to add a domain.
Figure 2: Right click on “Component Management”
Clicking it shows the following wizard.

LepideAuditor Suite SQL Server Auditing Configuration Guide
© 2016 Lepide Software Pvt. Ltd. Page | 6
Figure 3: Add SQL Server wizard
Here, software offers two different ways to add SQL Server.
1. Express Configuration: Add SQL Server with minimum recommended settings.
2. Advanced Configuration: Add SQL Server with the advanced settings to customize the
auditing.

LepideAuditor Suite SQL Server Auditing Configuration Guide
© 2016 Lepide Software Pvt. Ltd. Page | 7
2.1 Add SQL Server with Express Configuration Perform the below steps at the “Add SQL Server” wizard,
1. Select "Express Configuration" at the following wizard.
Figure 4: Adding SQL Server with Express Configuration

LepideAuditor Suite SQL Server Auditing Configuration Guide
© 2016 Lepide Software Pvt. Ltd. Page | 8
2.1.1 SQL Server Details 2. Click "Next". It asks you to provide the details of SQL Server to be added
Figure 5: Asking for SQL Server details
3. The software lets you add a local or networked SQL Server. You can either enter the name
of SQL Server manually in the text box.
4. Alternatively, you can click to enumerate all SQL Servers in a list.

LepideAuditor Suite SQL Server Auditing Configuration Guide
© 2016 Lepide Software Pvt. Ltd. Page | 9
NOTE: User should be assigned the role of sysadmin in SQL Server. If you are using a
local system administrator or domain administrator to run LepideAuditor Suite Service,
then its login with Windows Authentication and sysAdmin role should exist in SQL
Server.
If the user login does not exist already, then follow the steps below to create it.
a. Open “SQL Server Management Studio”.
b. Select SQL or Windows Authentication.
c. Enter username and password of a SQL Server Administrator.
d. Click “Connect”.
e. In the left tree panel, go to “Security” “Logins”.
f. Right click on “Logins” and select “New Login”.
g. “Login – New” wizard appears onscreen.
h. Enter the same login name as that of local system administrator or domain
administrator, with which you are running LepideAuditor Suite Server.
i. Switch to “Server Roles” and select “sysAdmin”.
j. Click “OK”.
If the user exists but no such rights are assigned, then follow these steps to assign the
required rights:
a. Open “SQL Server Management Studio”.
b. Select SQL or Windows Authentication.
c. Enter username and password of a SQL Server Administrator.
d. Click “Connect”.
e. In the left tree panel, go to “Security” “Logins”.
f. Expand “Logins” and select the required user.
g. Right click on the user and select “Properties”.
h. Switch to “Server Roles” and select “sysAdmin”.
i. Click “OK”.
j. Go to Status page, select Grant and Enabled.
k. Click “OK”.

LepideAuditor Suite SQL Server Auditing Configuration Guide
© 2016 Lepide Software Pvt. Ltd. Page | 10
Figure 6: Enumerating all SQL Servers in the network
5. Click icon to expand the listings for local and network servers. You can click icon to
collapse the list.
6. Select a server and click "OK". It takes you back the "SQL Server Settings" box, which will
now show the selected SQL Server.
7. You have to select either Windows Authentication or SQL Server Authentication.
Selecting latter is recommended.
8. Enter the username and password of a SQL Server user.
9. Select any of the following radio buttons for "Auditing Method".
a) With Agent: Click this button to install an agent for auditing SQL Server.
b) Without Agent: Click this button to add the SQL Server without installing any agent.
10. Please view the following snapshot displaying the details of a sample server.

LepideAuditor Suite SQL Server Auditing Configuration Guide
© 2016 Lepide Software Pvt. Ltd. Page | 11
Figure 7: Sample Details
11. Click "Next" to proceed.

LepideAuditor Suite SQL Server Auditing Configuration Guide
© 2016 Lepide Software Pvt. Ltd. Page | 12
2.1.2 Database Settings The next step shows “Database Settings”.
Figure 8: Database Settings
NOTE: You can click button to load the SQL Server Settings from "Default SQL Server
Settings".

LepideAuditor Suite SQL Server Auditing Configuration Guide
© 2016 Lepide Software Pvt. Ltd. Page | 13
Follow the steps below to configure the database settings.
1. Enter the name of a SQL Server or click icon to select a local or network hosted SQL
Server
2. Select the authentication type, preferably "SQL Authentication" for a remote SQL Server.
3. Enter the login credentials of a SQL administrative user.
4. Enter the desired name of database in which the SQL Server auditing logs will be stored.
You can provide the name of same database used earlier to store domain and/or
SharePoint auditing logs. Following screenshot displays the sample details.
Figure 9: Sample Details in Database Settings

LepideAuditor Suite SQL Server Auditing Configuration Guide
© 2016 Lepide Software Pvt. Ltd. Page | 14
5. Click to test the connection to SQL Server.
6. Click "Finish".
2.1.3 Install SQL Auditing Agent If you have selected “Without Agent” in above step, then agent installation wizard will not be
displayed and this step will be skipped.
Selecting “With Agent” will show "Install Agent" wizard.
Figure 10: “Install Agent” wizard
NOTE: Click button to save the current SQL Server Settings as default in “Default SQL
Server Settings”.

LepideAuditor Suite SQL Server Auditing Configuration Guide
© 2016 Lepide Software Pvt. Ltd. Page | 15
Click "Next" to proceed and follow onscreen instructions. Please refer to “5.4 Install SQL Agent”
section to know these steps in detail.
Once installed, it displays a message box asking the permission to restart the software.
Figure 11: Restart Software
Click "Yes" to restart the software.
SQL Server will be added in software. Once restarted, a new SQL Server tab will be created under
“Radar” tab.
Figure 12: SQL Server Tab in Radar

LepideAuditor Suite SQL Server Auditing Configuration Guide
© 2016 Lepide Software Pvt. Ltd. Page | 16
2.2 Add SQL Server with Advanced Configuration At the following wizard, you have to select “Advanced Configuration” option.
Figure 13: Adding SQL Server with Advanced Configuration
Click “Next”.
Here, have to provide the details of SQL Server to be added.

LepideAuditor Suite SQL Server Auditing Configuration Guide
© 2016 Lepide Software Pvt. Ltd. Page | 17
Figure 14: Asking for SQL Server details
2.2.1 SQL Server Details This setting is already explained in Express Configuration. Please click 2.1.1 SQL Server Details
link to know more.
Click button to proceed.

LepideAuditor Suite SQL Server Auditing Configuration Guide
© 2016 Lepide Software Pvt. Ltd. Page | 18
2.2.2 SQL Health Monitoring The next step displays the SQL Server Health Monitoring Settings.
Figure 15: SQL Server Health Monitoring Settings
If you want to enable the health monitoring of SQL Server, check the box "Enable Health
Monitoring". Keep it unchecked for not enabling the health monitoring.
Once "Health Monitoring" is enabled, you have to provide the following details of the computer
where SQL Server is installed.

LepideAuditor Suite SQL Server Auditing Configuration Guide
© 2016 Lepide Software Pvt. Ltd. Page | 19
1. Computer Name: Enter the name or IP Address of the computer where SQL Server is
installed.
2. User Name: Provide the name of an administrator user of that computer.
3. Password: Enter the password of above user.
Following is the screenshot of sample details.
Figure 16: Sample Details for SQL Health Audit Settings
Click “Next” to proceed.

LepideAuditor Suite SQL Server Auditing Configuration Guide
© 2016 Lepide Software Pvt. Ltd. Page | 20
2.2.3 Audit Settings The next step displays “Audit Settings”.
Figure 17: Audit Settings
At this step, you need to specify the auditing type. There are following options available:
a. Audit Everything: All the Server objects and Database objects including the databases created
in future will be audited.
b. Audit Server: Only Server objects will be audited no database objects will be audited.

LepideAuditor Suite SQL Server Auditing Configuration Guide
© 2016 Lepide Software Pvt. Ltd. Page | 21
c. Audit Server with Selected Databases: Server objects and only selected database objects will
be audited. If you select this option, then you have to select which databases you want to
audit.
Figure 18: Listing all databases to audit
Check the boxes for the databases to be audited. Please note that unchecked databases will not be
audited or monitored.
Click on button once you are done. The next page shows “Object Settings”.

LepideAuditor Suite SQL Server Auditing Configuration Guide
© 2016 Lepide Software Pvt. Ltd. Page | 22
2.2.4 Object Settings
Figure 19: Object Settings
In this page, you need to select server and database objects and operations for auditing. You can
check the box for the object that has to be monitored. Further, you can click the operations to
select which operations has be audited or excluded from auditing.
Follow the steps below to select the operations for an object.
1. Select an operation cell for an object either server or database.
LepideAuditor Suite SQL Server Auditing Configuration Guide
© 2016 Lepide Software Pvt. Ltd. Page | 23
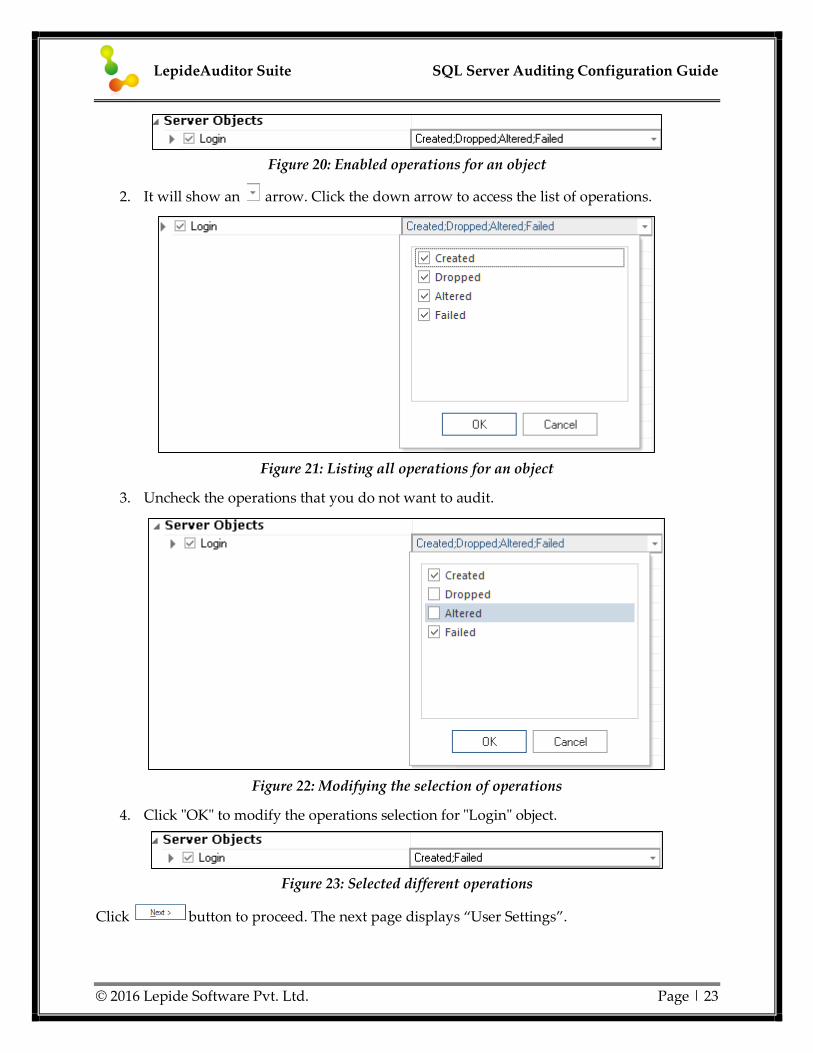
Figure 20: Enabled operations for an object
2. It will show an arrow. Click the down arrow to access the list of operations.
Figure 21: Listing all operations for an object
3. Uncheck the operations that you do not want to audit.
Figure 22: Modifying the selection of operations
4. Click "OK" to modify the operations selection for "Login" object.
Figure 23: Selected different operations
Click button to proceed. The next page displays “User Settings”.

LepideAuditor Suite SQL Server Auditing Configuration Guide
© 2016 Lepide Software Pvt. Ltd. Page | 24
2.2.5 User Settings
Figure 24: User Settings
It has the following options.
1. Audit All Users: Select this option to audit all users.
2. Audit Selected Users: Select this option to enable the "Users" section and enumerate all
SQL users in it.

LepideAuditor Suite SQL Server Auditing Configuration Guide
© 2016 Lepide Software Pvt. Ltd. Page | 25
Figure 25: Listing all users
Here, you can check the users to be audited and uncheck them to exclude from auditing.
Click “Next” once you are done with User Settings. The next page will display database settings.
2.2.6 Database Settings
NOTE: You can click button to load the SQL Server Settings from "Default SQL Server
Settings".

LepideAuditor Suite SQL Server Auditing Configuration Guide
© 2016 Lepide Software Pvt. Ltd. Page | 26
This setting is already explained in Express Configuration. Please click 2.1.2 Database Settings
link to know more.
2.2.7 Archive Database Settings In this page, you need to provide archive data details. This is an optional step and you can skip
it if you do not want to archive audit data.
Figure 26: Archive Database Settings to add SQL Server

LepideAuditor Suite SQL Server Auditing Configuration Guide
© 2016 Lepide Software Pvt. Ltd. Page | 27
Archive Audit Data: Select this checkbox if you want to archive audit data.
In Configure Database section, there are two options:
SQL Server: Enter name of SQL Server in which you want to configure your database for audit
log archiving. You can also click on button to enumerate all local and remote SQL Servers in
the network.
Authenticate the SQL Server configuration by either way:
1. Windows authentication: Choose this option to allow the software to access SQL Server
using the credentials with which the user is currently logged in.
2. SQL Server authentication: Provide SQL server username and password to allow the
software to access SQL using these credentials.
Refer SQL Server Rights section to see what User rights are required.
Archive Database Name: Enter a name for the new archive database. In this example we have
provided Archive_SharePoint_database as name.
You can click on to check if a successful connection can be established or not.
In Schedule section, there are following options:
1. Monthly: Select this option if you want to archive audit data on monthly basis.
2. Weekly: Select this option if you want to archive audit data on weekly basis.
3. In this example we have selected Monthly option.
4. Select Dates: Select the dates on which you want to run the archiving job.
5. Start Time: Specify the Start Time to run the archiving job on the above selected date.
6. Archive Older than: Enter number of days whose data you want to exclude counting
backwards from the scheduled date. For example, if you enter 30 days, software will
exclude the last 30-days’ data and will archive all data from beginning of time to the date
30 days before scheduled date.
7. Delete records from production database after archiving: Select this checkbox to delete
all the archived data from the production database.
Click “Finish” to complete the process.
NOTE: You can click button to load the SQL Server Settings from "Default SQL Server
Settings".

LepideAuditor Suite SQL Server Auditing Configuration Guide
© 2016 Lepide Software Pvt. Ltd. Page | 28
2.2.8 Install SQL Auditing Agent If you have selected “Without Agent” in above step, then agent installation wizard will not be
displayed and this step will be skipped.
“Install Agent” wizard appears only when you have selected to add SQL Server with agent.
Figure 27: Agent Installation wizard
Click "Next" to proceed and follow onscreen instructions. Please refer to “5.4 Install SQL Agent”
section to know these steps in detail.
Once installed, it displays a message box asking the permission to restart the software.
Figure 28: Asking to restart the software

LepideAuditor Suite SQL Server Auditing Configuration Guide
© 2016 Lepide Software Pvt. Ltd. Page | 29
Click “Yes” to restart the software. After restart, a new tab is displayed showing dashboard for
the newly added SQL Server. The following image shows how software looks like after it is
launched. Once restarted, a new SQL Server tab will be created under “Radar” tab.
Figure 29: SQL Server Tab in Radar
The SQL Server Settings are displayed in “Settings” Tab under “Component Management”.
LepideAuditor Suite SQL Server Auditing Configuration Guide
© 2016 Lepide Software Pvt. Ltd. Page | 30
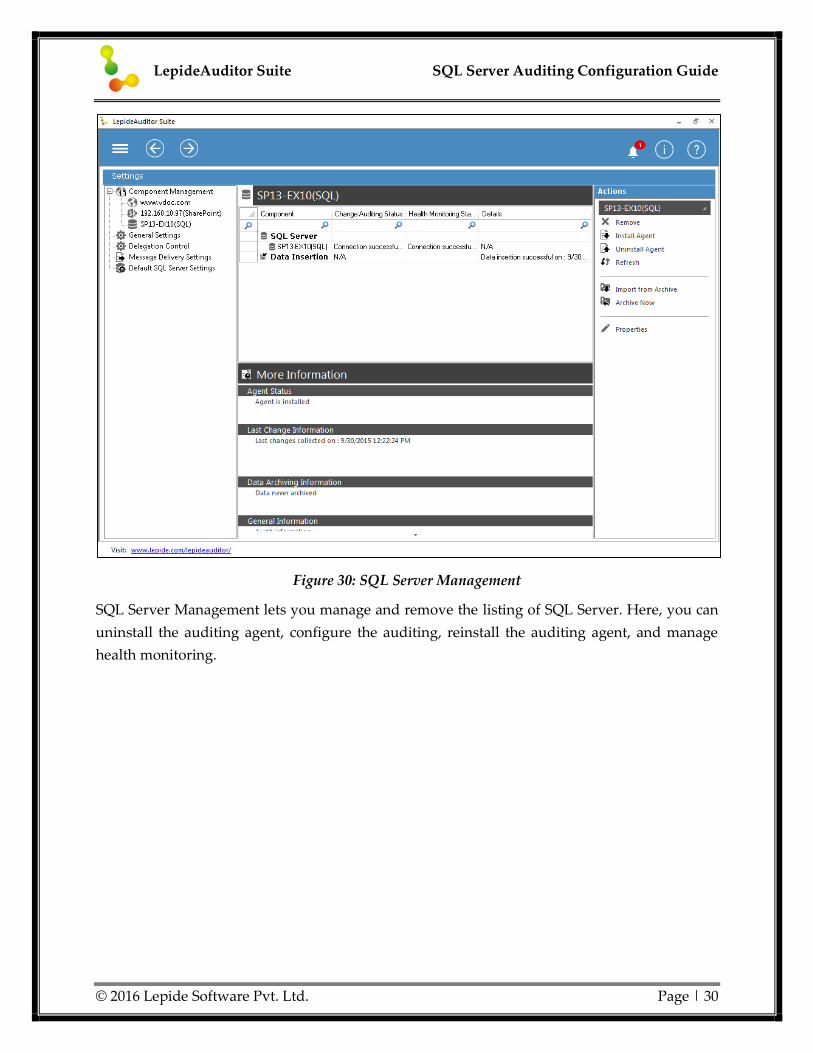
Figure 30: SQL Server Management
SQL Server Management lets you manage and remove the listing of SQL Server. Here, you can
uninstall the auditing agent, configure the auditing, reinstall the auditing agent, and manage
health monitoring.

LepideAuditor Suite SQL Server Auditing Configuration Guide
© 2016 Lepide Software Pvt. Ltd. Page | 31
3. Remove SQL Server You can remove the listing of a SQL Server from LepideAuditor Suite. After this, the software
will not monitor and audit that SQL Server. Follow the steps below,
1. Use any of the following methods to start with.
a. Go to "Settings" tab → "Component Management", select the added SQL Server
from the list. Click “Remove” in “Actions” pane.
Figure 31: Removing the selected SQL Server
b. Right click on “SQL Server” node under “Component Management” and click
“Remove”.
Figure 32: Option to remove SQL Server
2. Following any of the above methods will display the warning message.

LepideAuditor Suite SQL Server Auditing Configuration Guide
© 2016 Lepide Software Pvt. Ltd. Page | 32
Figure 33: Warning before deleting the listing of a SQL Server
3. It shows “Uninstall Agent” wizard.
Figure 34: Wizard to uninstall SQL Agent
4. Click "Next”.
5. The next step shows the details of SQL Server from which you have to uninstall the agent.
Kindly don't modify the existing details.

LepideAuditor Suite SQL Server Auditing Configuration Guide
© 2016 Lepide Software Pvt. Ltd. Page | 33
Figure 35: Verify the details
6. Click "Next" to proceed. The next step shows the summary of steps.
Figure 36: Summary of steps

LepideAuditor Suite SQL Server Auditing Configuration Guide
© 2016 Lepide Software Pvt. Ltd. Page | 34
7. Click on "Next" to start the uninstallation of agent.
8. “Finish” button is activated once the uninstallation is completed.
Figure 37: Agent has been uninstalled
9. Click “Finish”. It shows the following message box asking you to restart the software
Figure 38: Asking to restart the software
10. Click "Yes".
After restart, the SQL Server will be removed from the auditing list.

LepideAuditor Suite SQL Server Auditing Configuration Guide
© 2016 Lepide Software Pvt. Ltd. Page | 35
4. Modify SQL Server Properties Follow the steps below to modify the properties of SQL Server..
1. Go to "Settings" tab → "Component Management", select the SQL Server and use any of
the following methods to start.
a. Select the SQL Server and click "Properties" in "Actions" pane on left.
Figure 39: Option to view the SQL Server Properties
b. Right click on the SQL Server node under "Component Management" and click
"Properties".
Figure 40: Option to view properties of SQL Server
2. Following any of the above methods will display the following wizard.

LepideAuditor Suite SQL Server Auditing Configuration Guide
© 2016 Lepide Software Pvt. Ltd. Page | 36
Figure 41: Wizard to modify the listing of SQL Server
3. SQL Server Credentials: Here, you can change the following options.
a. Authentication Type: You can select either Windows authentication or SQL
Server authentication.
b. Username and Password for SQL Server Authentication
4. Auditing Method: For auditing method, here you can select any of the following options.
a. With Agent: Select it to choose agent-based auditing, which will install an agent
on SQL Server. If you are switching from agentless to agent-based auditing here,
you will receive "Install Agent" process.
b. Without Agent: Select it to choose the agentless auditing, where no agent will be
installed and run on SQL Server. If you are switching from agent-based auditing
to agentless auditing here, then "Uninstall Agent" wizard will appear.
5. You cannot change the name of SQL Server.

LepideAuditor Suite SQL Server Auditing Configuration Guide
© 2016 Lepide Software Pvt. Ltd. Page | 37
6. Health Audit Settings: It lets you modify the health auditing of SQL Server. Checking the
box will enable SQL Health Monitoring whereas unchecking it will disable it.
Figure 42: SQL Server Health Auditing
7. Here, you have to provide the details of computer where SQL Server is installed.
a. Computer Name: Enter the name or IP Address of computer where SQL Server is
installed.
b. User Name: Provide the name of an administrator user of that computer.
c. Password: Enter the password of above user.
8. Audit Settings: It lets you modify the auditing settings of SQL Server. Clicking it will
show the audit types.

LepideAuditor Suite SQL Server Auditing Configuration Guide
© 2016 Lepide Software Pvt. Ltd. Page | 38
Figure 43: Audit Types
9. It has the following options.
a. Audit Everything: Select this option to audit all server objects and databases.
b. Audit Server: Select this option to audit only the server objects. The databases will
not be audited.
c. Audit Server with selected databases: Select this option to audit all server objects
but selected databases. It lets you select the databases, which has to be audited and
which not. Choosing it will enable the area containing the list of databases.

LepideAuditor Suite SQL Server Auditing Configuration Guide
© 2016 Lepide Software Pvt. Ltd. Page | 39
Figure 44: Select the databases to be audited
10. Here, you can select the databases to be audited by checking them. You can uncheck the
databases, which you don't want to audit.
11. If unchecked, LepideAuditor Suite will not monitor and audit these databases. You have
to include all databases or select "Audit All" to turn on the auditing of the excluded
databases.
12. Object Settings: Here, you can specify what database objects, server objects, operations,
and users have to be audited or excluded from auditing.

LepideAuditor Suite SQL Server Auditing Configuration Guide
© 2016 Lepide Software Pvt. Ltd. Page | 40
Figure 45: Select the objects, users, and operations
13. You have to uncheck the boxes for items, which you do not want to audit.
14. User Settings: Select the option "Select Users" in the section - "Select User(s) to audit". This
will enable the list of users in the adjoining area.

LepideAuditor Suite SQL Server Auditing Configuration Guide
© 2016 Lepide Software Pvt. Ltd. Page | 41
Figure 46: Select the users
15. Check the boxes for the users to be audited.
16. Database Settings: Here, you can modify the database settings. You can select a different
SQL Server, authentication mode, and database.
17. Archive Database Settings: Here, you can modify the archive database settings for the
domain.

LepideAuditor Suite SQL Server Auditing Configuration Guide
© 2016 Lepide Software Pvt. Ltd. Page | 42
5. Manage SQL Auditing Agent You can perform the following tasks to manage the SQL Server Auditing Agent.
Switch between Agentless and Agent-based auditing (to and fro)
Uninstall Auditing Agent
o Uninstall Agent from an added SQL Server
o Uninstall Agent from not added SQL Server
Reinstall Auditing Agent
5.1 Switching SQL Auditing Mode Follow the steps below,
1. Go to "Settings" tab → "Component Management" and use any of the following methods
to start.
A. Select the SQL Server and click "Properties" in "Actions" pane on left.
Figure 47: Clicking "Properties" link in "Actions" pane
B. Right click on the SQL Server node under "Component Management" and click
"Properties".

LepideAuditor Suite SQL Server Auditing Configuration Guide
© 2016 Lepide Software Pvt. Ltd. Page | 43
Figure 48: Option to view the properties of SQL Server
2. Following any of the above methods displays the following wizard.
Figure 49: Wizard to modify the listing of SQL Server
3. Here, you can select "With Agent" in "Auditing Method" section to switch to agent-based
auditing, which will install an agent on SQL Server. If you are switching from agentless
to agent-based auditing here, "Install Agent" wizard appears.

LepideAuditor Suite SQL Server Auditing Configuration Guide
© 2016 Lepide Software Pvt. Ltd. Page | 44
4. You can select "Without Agent" option to choose agentless auditing, where no agent will
be installed and run on SQL Server. If you are switching from agent-based auditing to
agentless auditing here, then "Uninstall Agent" wizard will appear.
5.2 Uninstall SQL Agent Follow the steps below to uninstall the SQL auditing agent.
1. Go to "Component Management" → "SQL Server" and use any of the following methods
to start with.
A. Select a SQL Server in the list and click "Uninstall".
Figure 50: Link to Uninstall Agent
B. Right click on "SQL Server" node under "Component Management" in left panel
and select "Uninstall Agent" option.
Figure 51: Option to uninstall SQL Agent
2. Click "Uninstall Agent" link to launch “Uninstall Agent” wizard.

LepideAuditor Suite SQL Server Auditing Configuration Guide
© 2016 Lepide Software Pvt. Ltd. Page | 45
Figure 52: “Uninstall Agent” wizard
3. Click “Next” to proceed.
4. The next step shows the details of SQL Server from which you selected to uninstall the
agent. Kindly don't modify the existing details.

LepideAuditor Suite SQL Server Auditing Configuration Guide
© 2016 Lepide Software Pvt. Ltd. Page | 46
Figure 53: Verify the details
5. Click on "Next" to proceed.
6. On the below screen, summary of the entire process is displayed.

LepideAuditor Suite SQL Server Auditing Configuration Guide
© 2016 Lepide Software Pvt. Ltd. Page | 47
Figure 54: Summary of the Process
7. Click on Next to proceed.
8. Agent installation progress is displayed. After completion of the process, "Finish" button
is enabled.

LepideAuditor Suite SQL Server Auditing Configuration Guide
© 2016 Lepide Software Pvt. Ltd. Page | 48
Figure 55: Uninstallation Complete
9. Click "Finish" to complete the process.
5.3 Uninstall Agent from not added SQL Server LepideAuditor Suite lets you uninstall agent from not added SQL Server. This will help you to
remove the agent installed by an outdated version of LepideAuditor Suite or LepideAuditor for
SQL Server. Follow the steps below,
1) Go to "Settings" tab, right click on "Component Management".
Figure 56: Option to uninstall SQL Agent

LepideAuditor Suite SQL Server Auditing Configuration Guide
© 2016 Lepide Software Pvt. Ltd. Page | 49
2) Go to "Uninstall Agent" and click "SQL Server". It shows the following wizard.
Figure 57: Uninstallation Wizard Starts
3) Click "Next". It now asks the details of SQL Server from which agent has to be uninstalled.

LepideAuditor Suite SQL Server Auditing Configuration Guide
© 2016 Lepide Software Pvt. Ltd. Page | 50
Figure 58: Enter details of SQL Server
4) You have to enter the following details.
a) SQL Server Name: Enter the name or IP Address of SQL Server from which agent has to
be removed.
b) Authentication Type: You have to select any of the following authentication types
i) Windows Authentication: It will let the software login at SQL Server using the
credentials of that user with which you are logged in at the computer currently.
ii) SQL Server Authentication: It will let you provide the username and password of a
SQL Server user.

LepideAuditor Suite SQL Server Auditing Configuration Guide
© 2016 Lepide Software Pvt. Ltd. Page | 51
Figure 59: Entered the sample details
5) Click "Next". It displays the summary of above steps.

LepideAuditor Suite SQL Server Auditing Configuration Guide
© 2016 Lepide Software Pvt. Ltd. Page | 52
Figure 60: Summary of steps

LepideAuditor Suite SQL Server Auditing Configuration Guide
© 2016 Lepide Software Pvt. Ltd. Page | 53
6) Click "Next" to start the process to uninstall SQL Agent.
Figure 61: Uninstalling SQL Agent
7) Once uninstall, "Finish" button will be activated.

LepideAuditor Suite SQL Server Auditing Configuration Guide
© 2016 Lepide Software Pvt. Ltd. Page | 54
Figure 62: SQL Agent has been uninstalled.
8) Click "Finish" to complete the process and to close the wizard.
5.4 Install SQL Agent This wizard also appears when you add a SQL Server with agent in Express or Advanced
Configuration. Follow the steps below to install the SQL Auditing agent, if you have uninstalled
it.
1. Go to "Component Management" → "SQL Server" and use any of the following methods
to start with.
A. Select a SQL Server in the list and click "Install Agent".

LepideAuditor Suite SQL Server Auditing Configuration Guide
© 2016 Lepide Software Pvt. Ltd. Page | 55
Figure 63: Link to Install Agent
B. Right click on "SQL Server" node under "Component Management" in left panel
and select "Install Agent" option.
Figure 64: Option to Install SQL Agent
If you are clicking any of the above options in case of agentless auditing where a SQL
Server is added without agent, you will receive the following warning message.
Figure 65: Message in case of agentless auditing
2. Select the SQL Server from the list and click "Install Agent" link in the Actions pane.

LepideAuditor Suite SQL Server Auditing Configuration Guide
© 2016 Lepide Software Pvt. Ltd. Page | 56
3. It starts the Install Agent wizard. It also appears while adding a SQL Server with agent.
Figure 66: Agent Installation
4. Click "Next" to proceed.
5. The details of the SQL Server are displayed in the next step. Please do not change these
details else the agent installation and SQL Server auditing will be interrupted.

LepideAuditor Suite SQL Server Auditing Configuration Guide
© 2016 Lepide Software Pvt. Ltd. Page | 57
Figure 67: Showing the SQL Server details
6. Click on "Next" to proceed.
7. In the next step, the summary of the entire process is shown. You can click "Back" to go
and do required changes, else click on "Next" to proceed.

LepideAuditor Suite SQL Server Auditing Configuration Guide
© 2016 Lepide Software Pvt. Ltd. Page | 58
Figure 68: Process Summary
8. Agent Installation process's progress is displayed on this screen. After completion of the
process, "Finish" button is enabled.

LepideAuditor Suite SQL Server Auditing Configuration Guide
© 2016 Lepide Software Pvt. Ltd. Page | 59
Figure 69: Agent Installation Status
9. Click "Finish" to close the wizard.
10. Click “OK” to close the SQL Server properties.

LepideAuditor Suite SQL Server Auditing Configuration Guide
© 2016 Lepide Software Pvt. Ltd. Page | 60
6. Manage SQL Health Monitoring You can enable or disable the health monitoring of SQL Server. Settings Tab → Component
Management lets you manage the health monitoring of SQL Server. Here, you can use
"Properties" link for SQL Server to exclude and include the server(s) from Health Monitoring.
6.1 Disable Health Monitoring Follow the steps below to disable the health monitoring of SQL Server.
1. Go to "Settings" tab → "Component Management" and use any of the following methods
to start.
A. Select the SQL Server and click "Properties" in "Actions" pane on left.
Figure 70: Clicking "Properties" link in "Actions" pane

LepideAuditor Suite SQL Server Auditing Configuration Guide
© 2016 Lepide Software Pvt. Ltd. Page | 61
B. Right click on the SQL Server node under "Component Management" and click
"Properties".
Figure 71: Option to view properties of SQL Server
2. Following any of the above methods displays the SQL Server properties.
3. Click "Health Auditing" setting in the left panel.
Figure 72: Modifying Health Auditing Settings

LepideAuditor Suite SQL Server Auditing Configuration Guide
© 2016 Lepide Software Pvt. Ltd. Page | 62
4. To disable Health Monitoring for SQL Server, uncheck "Enable Health Monitoring".
Figure 73: Disabling Health Monitoring of SQL Server
5. Click "OK" to save the changes in SQL listing.

LepideAuditor Suite SQL Server Auditing Configuration Guide
© 2016 Lepide Software Pvt. Ltd. Page | 63
6.2 Enable SQL Server Health Monitoring Follow the steps below to enable the Health Monitoring of SQL Server.
1. Go to "Settings" tab → "Component Management" and use any of the following methods
to start with.
A. Select the SQL Server and click "Properties" in "Actions" pane on left.
Figure 74: Clicking "Properties" link in "Actions" pane
B. Right click on the SQL Server node under "Component Management" and click
"Properties".
Figure 75: Option to view properties of SQL Server
2. Following any of the above methods displays the SQL Server properties.
LepideAuditor Suite SQL Server Auditing Configuration Guide
© 2016 Lepide Software Pvt. Ltd. Page | 64
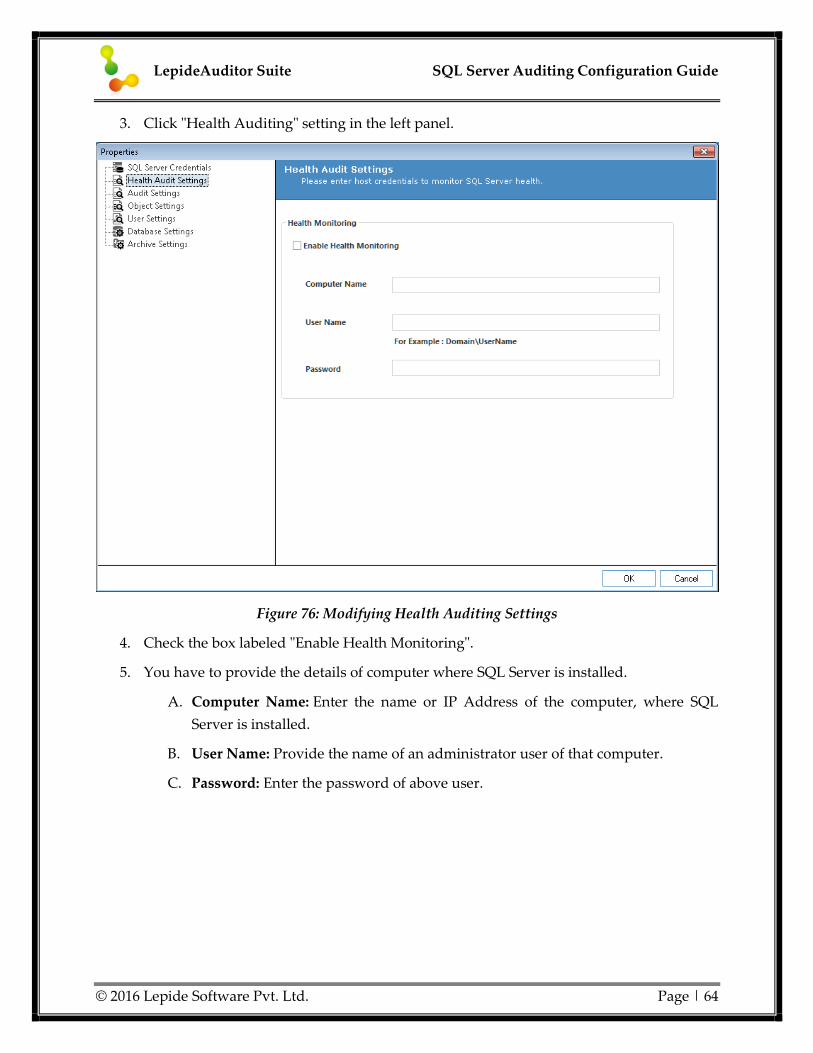
3. Click "Health Auditing" setting in the left panel.
Figure 76: Modifying Health Auditing Settings
4. Check the box labeled "Enable Health Monitoring".
5. You have to provide the details of computer where SQL Server is installed.
A. Computer Name: Enter the name or IP Address of the computer, where SQL
Server is installed.
B. User Name: Provide the name of an administrator user of that computer.
C. Password: Enter the password of above user.

LepideAuditor Suite SQL Server Auditing Configuration Guide
© 2016 Lepide Software Pvt. Ltd. Page | 65
Here is a screenshot of sample details.
Figure 77: Enabling Health Monitoring
6. Click "OK" to save the changes and enable the health monitoring of SQL Server.

LepideAuditor Suite SQL Server Auditing Configuration Guide
© 2016 Lepide Software Pvt. Ltd. Page | 66
7. Conclusion After following the above mentioned steps, you will start receiving audit reports and see
dashboard details. In order to create alerts and schedule reports for accessing complete software
features, check the software help manual: http://www.lepide.com/lepideauditor/
Thus, LepideAuditor Suite can be easily configured and used to audit Active Directory, Group
Policy Objects, Exchange Servers, SharePoint and SQL Servers. Real-time auditing, Dashboard
reports in graphical format and LiveFeed add a definite edge to this application. Moreover, email
alerts, scheduled reports and options to restore AD state make it a one-stop solution for all
Auditing purposes.
To read more about the software visit: http://www.lepide.com/lepideauditor/
For software related queries, you can contact us at:
Helpline: +1-800-814-0578
For support or any other queries, drop a mail at:
For General Queries: [email protected]
For Sales: [email protected]
For Technical Support: [email protected]