cobb processing
TRANSCRIPT
Cobb ProcessingManagement Guide
www.cobb-vantress.com


01 Catching, Transport and Live Receiving
1.1
1.2
1.3
1.4
Feeding Withdrawal ...................................................................
Catching Birds .............................................................................
Container Maintenance and Repair Program .....................
Transportation and Logistics Planning ..................................
3
4
9
10
02 Unloading and Shackling
2.1
2.2
Unloading Equipment ...............................................................
Shackling .......................................................................................
14
14
03 Stunning and Slaughtering
3.1
3.2
3.3
3.4
3.5
Variable and Adjustable Stunning
The European Union Regulation Model for Stunning
Controlled Atmosphere Stunning (CAS)
Traditional Halal-Kosher Slaughtering
Best Practices in Slaughter
17
20
20
21
21
04 Scalding and Picking
4.1
4.2
4.3
4.4
4.5
Water Scalding Best Practice
Issues and Maintenance of Scalding Water
Alternative Scalding Methods
Picking
Common Picking Defects
23
24
24
25
26
05 Evisceration
5.1
5.2
5.3
5.4
Equipment and Adjustment
Product and Parts Recovery
Salvage and Rework Program
Contamination Issues
29
30
31
32
06 Chilling
6.1
6.2
6.3
6.4
6.5
6.6
6.7
Water Chilling
Chiller Refrigeration Systems
Anti-microbial Interventions
Moisture Absorption
Air Chilling
Combination Systems
Common Issues and Solutions in Chilling
35
38
39
39
39
42
42
07 Product Processing
7.1
7.2
7.3
7.4
7.5
7.6
Cutting and Packing Environment
In-Line Operations and Best Practices
Sizing and Grading
Cut-up and Deboning
Evaluating the System
Marinade
46
47
48
49
52
53
Cobb Processing Management guide is available online under Resources > Management Guides
Look for this Cobb Cares symbol throughout the guide that highlights the Animal Welfare Tips and
important aspects of management to improve poultry welfare outcomes.
Animal Welfare Tips
INTRODUCTION
2
COBB
PRO
CESS
ING
MAN
AGEM
ENT G
UIDE
Poultry processing operations vary considerably throughout the world. It is important to understand your product variety, along with the regulatory and customer requirements as they provide the framework around which you will operate your facility. Regardless of the wide range of products produced, the basic principles of processing discussed in this guide can be adapted to your needs and optimized to achieve high yields of product.
This guide is designed to help producers achieve maximum meat yield and quality in processing facilities. The goal in all facilities is to produce the highest yield of quality product at the lowest cost while meeting customer expectations. The most effective way to accomplish this in the facility is by increasing yield and quality. Increasing yield and quality will increase profit by offsetting costs. An increase in yield will add volume without additional raw material, labor, or overhead cost.
High yield operations are all founded on a strong management program that produces quality products at the highest efficiency possible. These management programs focus on animal welfare, personnel training and safety, proactive maintenance, and rigorous documentation.
Achieving High Yield
A strong management program should include: ✓ Ambitious, but achievable goals for your operation
✓ Rigorous documentation that provides cost analysis
✓ A list of critical control points that are consistently monitored and allows precise corrective actions
✓ Documentation and measurement of loss to identify areas that can increase yield
✓ Specific and detailed job descriptions and a robust training program to have well-trained employees
✓ Strong communication among facility personnel with farm and transportation personnel
✓ Written expectations and standards for animal welfare, biosecurity and safety to optimize bird and human health and safety throughout the supply chain
✓ Regular verification of employee actions and performance
✓ Continuous review of your operation to confirm your facility is operating as efficiently and productively as possible
Best Practices in Processing
Develop a passion in your team to pursue improvement without compromise.
Companies should have a written animal welfare program that provide details about the comprehensive implementation and expectations for poultry care, catching, bird handling, live
animal transport, and slaughter. By measuring key welfare indicators and auditing welfare outcomes, companies can ensure best practices and achieve continuous improvement.
Animal Welfare Tips
CATCHING, TRANSPORT AND LIVE RECEIVING
3
COBB PROCESSING M
ANAGEMENT GUIDE
The goal of the process is to humanely catch and transport live birds from the farm to the facilities for processing. This process involves many steps to achieve the highest quality live bird entering the staging and slaughter area. The critical steps involved to help ensure optimal conditions for bird welfare, quality and yield are explained in the following sections.
Catching, Transport and Live Receiving
1.1 Feed Withdrawal
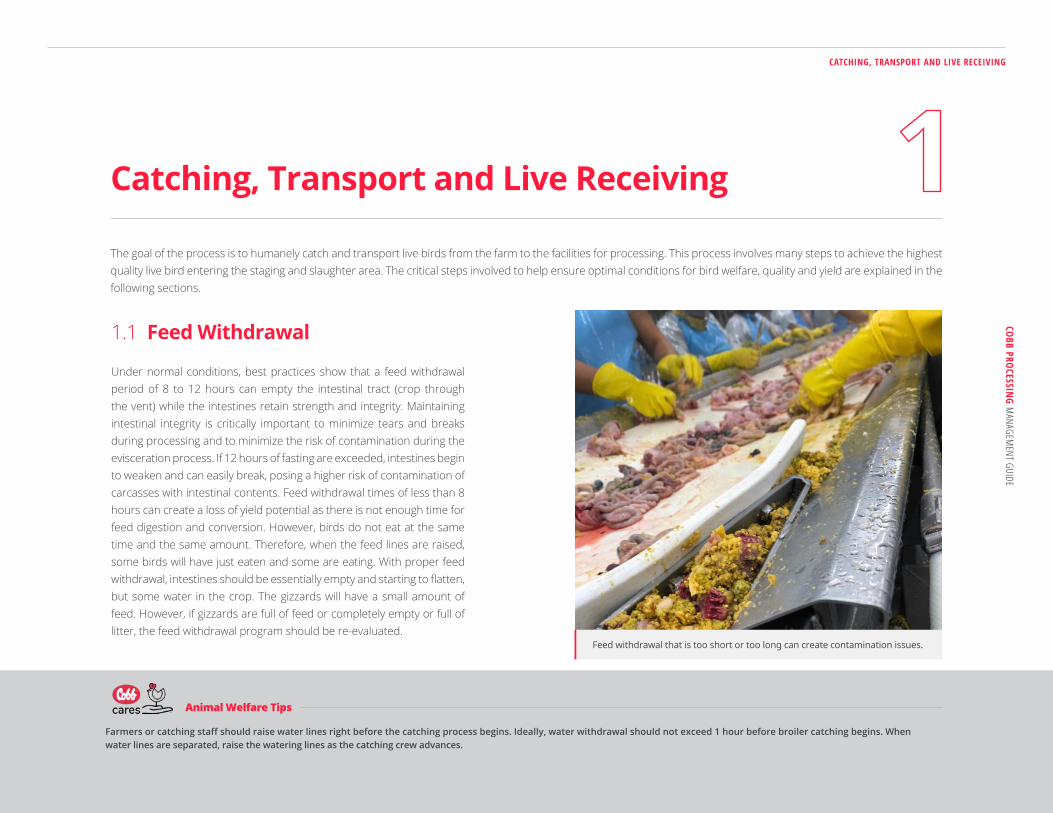
Under normal conditions, best practices show that a feed withdrawal period of 8 to 12 hours can empty the intestinal tract (crop through the vent) while the intestines retain strength and integrity. Maintaining intestinal integrity is critically important to minimize tears and breaks during processing and to minimize the risk of contamination during the evisceration process. If 12 hours of fasting are exceeded, intestines begin to weaken and can easily break, posing a higher risk of contamination of carcasses with intestinal contents. Feed withdrawal times of less than 8 hours can create a loss of yield potential as there is not enough time for feed digestion and conversion. However, birds do not eat at the same time and the same amount. Therefore, when the feed lines are raised, some birds will have just eaten and some are eating. With proper feed withdrawal, intestines should be essentially empty and starting to flatten, but some water in the crop. The gizzards will have a small amount of feed. However, if gizzards are full of feed or completely empty or full of litter, the feed withdrawal program should be re-evaluated.
Feed withdrawal that is too short or too long can create contamination issues.
Farmers or catching staff should raise water lines right before the catching process begins. Ideally, water withdrawal should not exceed 1 hour before broiler catching begins. When water lines are separated, raise the watering lines as the catching crew advances.
Animal Welfare Tips
CATCHING, TRANSPORT AND LIVE RECEIVING
4
COBB
PRO
CESS
ING
MAN
AGEM
ENT G
UIDE
1.1 Feed Withdrawal (cont.)
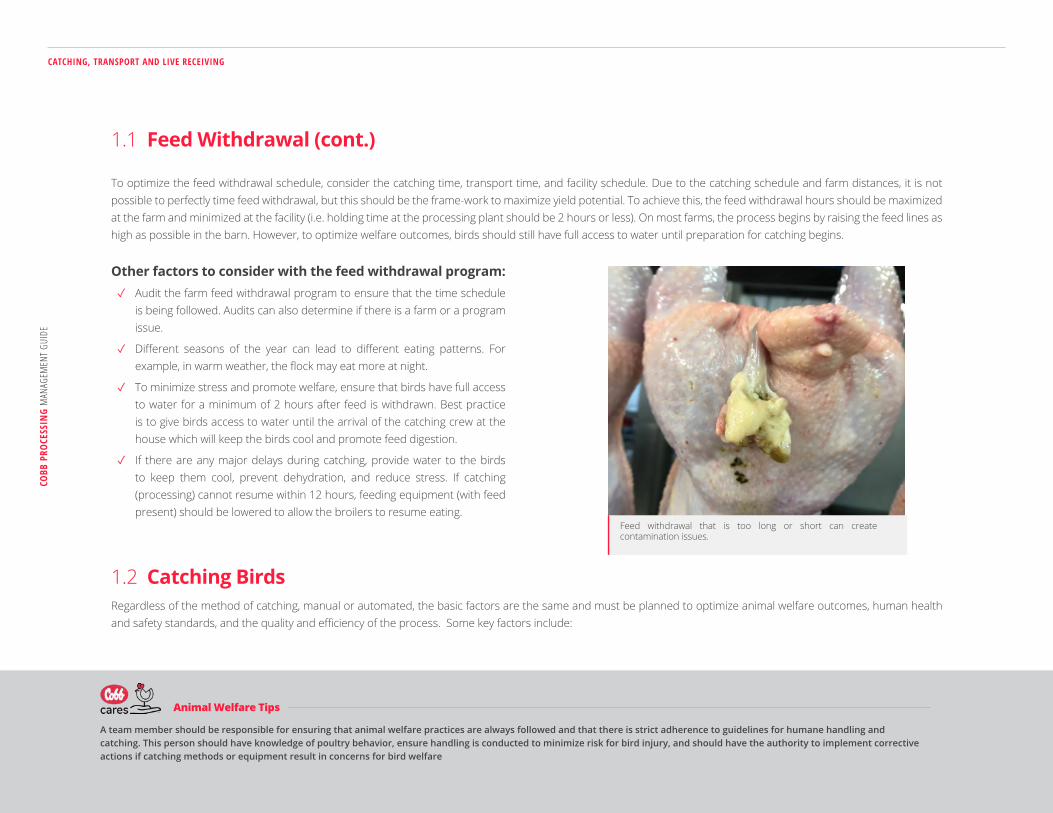
To optimize the feed withdrawal schedule, consider the catching time, transport time, and facility schedule. Due to the catching schedule and farm distances, it is not possible to perfectly time feed withdrawal, but this should be the frame-work to maximize yield potential. To achieve this, the feed withdrawal hours should be maximized at the farm and minimized at the facility (i.e. holding time at the processing plant should be 2 hours or less). On most farms, the process begins by raising the feed lines as high as possible in the barn. However, to optimize welfare outcomes, birds should still have full access to water until preparation for catching begins.
Other factors to consider with the feed withdrawal program: ✓ Audit the farm feed withdrawal program to ensure that the time schedule
is being followed. Audits can also determine if there is a farm or a program issue.
✓ Different seasons of the year can lead to different eating patterns. For example, in warm weather, the flock may eat more at night.
✓ To minimize stress and promote welfare, ensure that birds have full access to water for a minimum of 2 hours after feed is withdrawn. Best practice is to give birds access to water until the arrival of the catching crew at the house which will keep the birds cool and promote feed digestion.
✓ If there are any major delays during catching, provide water to the birds to keep them cool, prevent dehydration, and reduce stress. If catching (processing) cannot resume within 12 hours, feeding equipment (with feed present) should be lowered to allow the broilers to resume eating.
1.2 Catching BirdsRegardless of the method of catching, manual or automated, the basic factors are the same and must be planned to optimize animal welfare outcomes, human health and safety standards, and the quality and efficiency of the process. Some key factors include:
Feed withdrawal that is too long or short can create contamination issues.
A team member should be responsible for ensuring that animal welfare practices are always followed and that there is strict adherence to guidelines for humane handling and catching. This person should have knowledge of poultry behavior, ensure handling is conducted to minimize risk for bird injury, and should have the authority to implement corrective actions if catching methods or equipment result in concerns for bird welfare
Animal Welfare Tips

CATCHING, TRANSPORT AND LIVE RECEIVING
5
COBB PROCESSING M
ANAGEMENT GUIDE
Preparing the house for catching: Based on the expected catching time and arrival of the catching personnel on the farm, farm staff are responsible for removing or raising all equipment from the floor. Feed equipment should be raised or removed in accordance with the feed withdrawal program. Watering equipment should be raised immediately before catching crew personnel enter the house. When water lines are separated, raise the watering lines as the catching crew advances. Any other equipment (ex: enrichments, weigh scales, etc.) should be removed before the catching crew arrives on the farm. The floor of the barn should be clear of obstructions providing a clear path for catching staff and equipment. Clearing the floor area will prevent hazards and reduce the risk of injury to both personnel and birds. Injuries to birds and personnel are welfare issues, cause time delays and impact profitability. Lighting in broiler houses should be at a minimum level to control bird movement and stress. Utilize dark-out or extreme low-level lighting to produce a calming effect for the birds. Keep the door entrances closed to keep the house dark.
Ventilation and temperature: Depending on the external climatic conditions and the ventilation equipment present in the house, the temperature and air flow must be optimized immediately before and during the entire catching process. If available, use tunnel ventilation fans and cool cells to control the ambient temperature and the effective temperature for the birds. Catching crew staff should be trained to minimize the stress during the catching process and should be watchful for chickens with open-mouthed breathing as this is a primary sign of thermal stress.
Distribution of birds during catching: Some congregation of birds will occur naturally when the catching personnel and equipment enter the house. However, catching personnel should be watchful for piling of birds and should use equipment to minimize the stress and congregation of the birds for extended periods. For example, use barriers to congregate birds into smaller groups. Ideally,
barriers, curtains or fencing materials that are perforated and allow air to flow through the partition will help minimize thermal stress. Barriers will
ensure that broilers cannot bunch or gather into large groups causing lack of proper ventilation and / or physical injury. Be mindful of the care, maintenance and security of fences, barriers and curtains to avoid injury and bird damage. Defects such as bruises, broken wings, and drumsticks or scratches will cause downgrades and a loss of yield and yield value in the processing facility. Do not force bird movement. Always move the containers to the birds, and never force the birds towards the containers.
Safety for birds and people: After placing the birds in barriers or dividers to restrict bird movement, subsequent steps should be followed to keep birds calm and to reduce the risk of bird injury from catching equipment. For example, it is recommended to utilize “red” lights on forklifts and any automatic catching machine equipment that enters the house since this lighting will not scare the birds. For the safety of personnel that are inside the house and especially staff

CATCHING, TRANSPORT AND LIVE RECEIVING
6
COBB
PRO
CESS
ING
MAN
AGEM
ENT G
UIDE
that are responsible for catching the birds, it is recommended to use reflective clothing, glow lights, or red lights on caps or vests so that good visibility and safety are prioritized. The barriers should keep birds away from areas where people are walking and where equipment is moving in the house to avoid bird injury and accidental bird death. Ensure animal welfare and safety training are conducted with the entire catching crew including the forklift operators.
Expectations for catching:
A company must have a written catching procedure which should include, but is not limited to, 1) the maximum number of birds that can be placed in the transportation container, 2) the maximum number of birds per hand (applicable to hand catching methods), 3) expectations for active record-keeping to assess and measure welfare outcomes, 4) a corrective
actions system by which any welfare concerns and the measured key welfare indicators are communicated to the catching crew, 5) a prescribed timeframe by which this information is communicated to the catching company or supervisor, and 6) defined corrective actions that must be taken if any issues or failures are noted.
Catching Methods
Manual Hand Catching:
Hand catching methods for broilers are performed by handling the bird correctly by the back or the feet. Monitor crews for bird handling to prevent bird injury. Training and supervision are always the key to achieving good results. Catching birds by the feet is the most common method of manual catching. Set a maximum number of birds per hand per person. This should be established by individual facilities based on the bird size and handling method. When catching birds by the feet, kneel or bend down to restrain the legs of the birds and carefully carry them to the transport module (never carry by head, neck or wings).
Leg Catching Method:
Standard procedure for hand-catching broilers is to catch them by their legs. Catchers should grasp birds by the feet only and not the drumsticks to prevent bruising of the hock areas of the legs. Birds must never be lifted, carried, or dragged by the wing or neck. Birds must never be thrown. Catching must be conducted in a manner that minimizes bird stress and does not cause bird injury.
The number of birds in the transport container will vary based on the size of the container, the size of the broilers, and the climatic conditions. However, as a minimum standard for welfare, the density in the container should allow the birds to sit (in a single layer) during transport without being on top of one another. Broilers should not be handled or caught by their wings since the skeletal structure is not mature on young birds. The manual catching method used (legs or back) should be based on national guidelines, type of transport container being utilized and training of the catchers. The catching method chosen should incorporate decisions that optimize animal welfare, labor capability, speed of catching, and efficiency of loading broilers safely into transport containers.
Animal Welfare Tips

CATCHING, TRANSPORT AND LIVE RECEIVING
7
✓ Catchers must be trained to correctly catch and handle the birds in a manner that optimizes animal welfare and product quality. Training and supervision are essential for quality results. Additionally, each company should have a written training program for bird catching, handling, and transportation. This training must be conducted annually for all employees involved in conducting these procedures.
✓ Minimize the number of steps taken and number of times the bird is handled when carrying the birds to the container. The distance the bird is carried should be as short as possible. Bring the coop, cage or container into the house where the birds are being caught to decrease the time the birds are carried. Monitor quantity (kgs/lbs) per coop or module to prevent high density.
✓ Density in the transport containers should allow the birds to sit during transport without being on top of one another (all birds should be in a single layer inside the container).
✓ Do not swing the birds once they are in hand, as this can injure the birds and cause downgrades in processing. This will also cause the birds to flap unnecessarily which can result in bruising, breakage and possible blood engorgement of the extremities, especially the wings.
✓ All birds must be placed carefully in the containers to ensure that they are in a sitting posture on the bottom of the container. Catch crews must evaluate the containers at loading to ensure that all bird heads and extremities are inside the containers. Catchers should also check the bottom of the cage or drawer style containers before moving to prevent unnecessary injury of birds.
✓ Catching crews should receive annual training for animal welfare and regular feedback about key welfare indicators (ex: % of DOAs, % of birds with severe injuries, % of birds with severe bruising) from the processing plant. Objective analysis of catching outcomes and incentives for catchers often yield positive results for catching efficiency and continuous improvement in welfare indicators.
Back Catching Method:
Catchers should cup the birds by the sides, making sure wings are secure against the bird’s body and wrap the catcher’s fingers on the sides of the bird’s breast. Place the birds into the coops, keeping the wings secured to prevent wing damage. If coops are used (as shown in the illustration), care must be taken to prevent bird injury. Sliding coops along the floor may cause toe injuries. Take care when closing the top or lid of the coop to ensure that the heads and wings of broilers are not caught when the container is closed.

CATCHING, TRANSPORT AND LIVE RECEIVING
8
COBB
PRO
CESS
ING
MAN
AGEM
ENT G
UIDE
Automated Catching MachinesAutomated catching machines are a viable means used to catch birds. There are multiple types of machines with rotating heads and elongated fingers and / or with variable speed belting to move the birds to the catching container. In general:
✓ Machines have loud motors which can cause gathering of birds, especially in well-lit houses. Account for this source of stress by adjusting the lighting. Follow the same lighting procedures used with manual catching.
✓ Catchers must be trained to correctly operate the machinery to optimize efficiency, animal welfare and quality outcomes. If a mechanical catching system is used, there must be a written protocol in place to ensure birds are handled in a manner that does not cause bird injury and minimizes bird stress.
✓ Equipment design and maintenance should ensure proper equipment function as designed. Implement a comprehensive preventive maintenance program for machinery upkeep. Follow the equipment manufacturer’s recommended maintenance and preventive maintenance programs.
✓ Gaps in transfer belts can create catching hazards and pinch points causing bird injury which are an animal welfare and direct yield loss issues. Ensure smooth transfers by using slides or barriers to prevent hazards on the equipment.
✓ Bird defects, especially wing issues, directly correlate to light management, poor personnel practice, belt speeds and mechanical maintenance of equipment. Investigate all bird defects to determine the cause and make proper adjustments to limit any loss.
When using an automated catching system, companies should have a written protocol to ensure humane handling of birds and should also have a backup plan for catching in case there is a mechanical failure of the machine. The processing plant should provide regular feedback about key welfare indicators (ex: DOAs, bird injuries, severe bruising) should also be provided to crews using automated catching equipment.
Animal Welfare Tips
CATCHING, TRANSPORT AND LIVE RECEIVING
9
COBB PROCESSING M
ANAGEMENT GUIDE
1.3 Container Maintenance and Repair Program
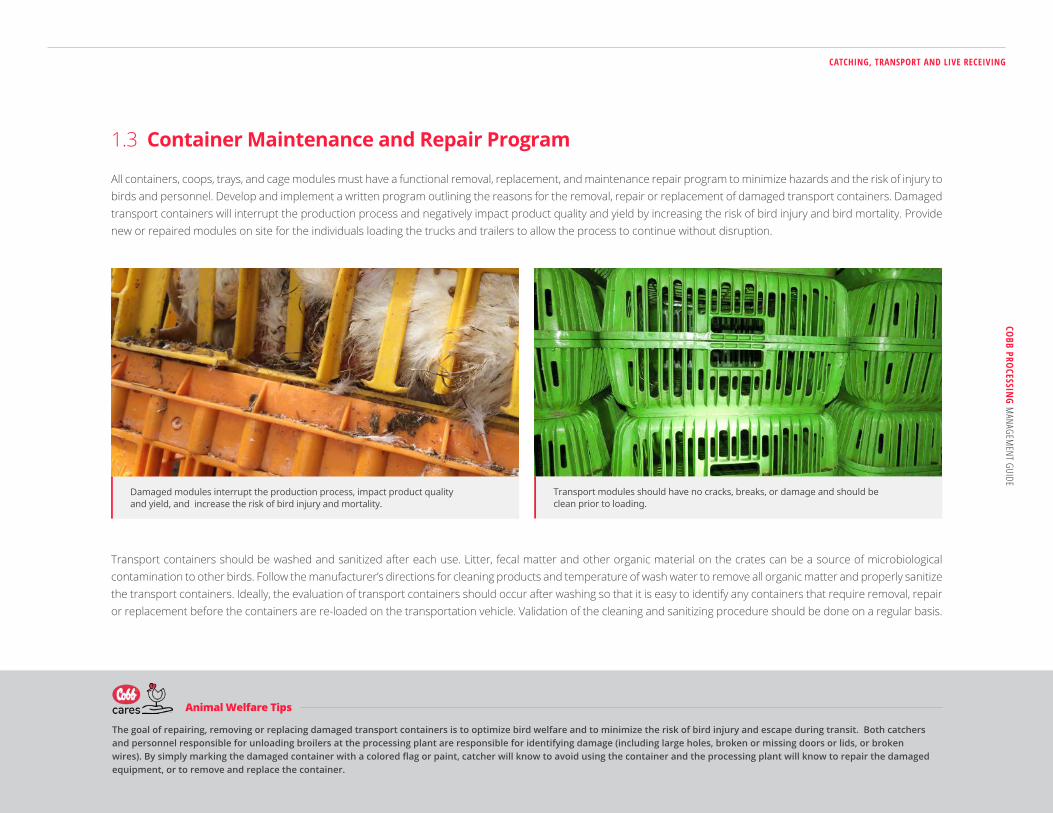
All containers, coops, trays, and cage modules must have a functional removal, replacement, and maintenance repair program to minimize hazards and the risk of injury to birds and personnel. Develop and implement a written program outlining the reasons for the removal, repair or replacement of damaged transport containers. Damaged transport containers will interrupt the production process and negatively impact product quality and yield by increasing the risk of bird injury and bird mortality. Provide new or repaired modules on site for the individuals loading the trucks and trailers to allow the process to continue without disruption.
Transport containers should be washed and sanitized after each use. Litter, fecal matter and other organic material on the crates can be a source of microbiological contamination to other birds. Follow the manufacturer’s directions for cleaning products and temperature of wash water to remove all organic matter and properly sanitize the transport containers. Ideally, the evaluation of transport containers should occur after washing so that it is easy to identify any containers that require removal, repair or replacement before the containers are re-loaded on the transportation vehicle. Validation of the cleaning and sanitizing procedure should be done on a regular basis.
Damaged modules interrupt the production process, impact product quality and yield, and increase the risk of bird injury and mortality.
Transport modules should have no cracks, breaks, or damage and should be clean prior to loading.
The goal of repairing, removing or replacing damaged transport containers is to optimize bird welfare and to minimize the risk of bird injury and escape during transit. Both catchers and personnel responsible for unloading broilers at the processing plant are responsible for identifying damage (including large holes, broken or missing doors or lids, or broken wires). By simply marking the damaged container with a colored flag or paint, catcher will know to avoid using the container and the processing plant will know to repair the damaged equipment, or to remove and replace the container.
Animal Welfare Tips

CATCHING, TRANSPORT AND LIVE RECEIVING
10
COBB
PRO
CESS
ING
MAN
AGEM
ENT G
UIDE
1.4 Transport and Logistics Planning
Auditing and evaluating results will help identify trends and risk areas where adjustments can be made to improve the process. Various conditions need to be considered for each load and transport.
Based on your local climate and transportation equipment, develop a written guide to optimize bird comfort and welfare during catching and transport. Ambient temperature and relative humidity should be used to develop this guide so catchers can objectively consider climatic conditions when scheduling catching and transport. This guide should also provide recommendations for the use of additional equipment like fans to limit thermal stress. The following points should be considered for all transportation methods:
✓ Condition of the birds ✓ Weather and travel conditions ✓ Duration of travel ✓ Time of loading ✓ Tarps needed on trucks ✓ Current wind chill and humidity
Hot Weather ✓ While loading trailers, arrange fans next to the live bird trailer to cover
the entire length of the trailer and start fans before loading the trailer. The fans on the trailer need to be the same length as the trailer so all areas have air movement for birds.
✓ Minimize holding time of trucks at the farm with good logistics.
After washing, damaged containers will be easy to identify. Any damaged containers then should be removed and replaced or repaired.
During loading, arrange fans next to the live bird trailer to cover the entire length of the trailer so all areas have air movement for birds.
Consider using a transport guide that highlights the impact of temperature and humidity during HOT weather. For example, if the combination of high temperature and high humidity result in a “red zone” outcome, catching should be stopped since it is risky for bird welfare. If the combination of temperature and humidity result in a “yellow zone” outcome, fans and adequate precautions must be taken for catching and transport. If the combination of mild temperature and low humidity result in a “green zone” outcome, there are no climate concerns for catching.
Animal Welfare Tips

CATCHING, TRANSPORT AND LIVE RECEIVING
11
COBB PROCESSING M
ANAGEMENT GUIDE
✓ Eliminate any unnecessary truck / lorry stopping en route to the processing facility.
✓ Place the trailer into the holding shed or lairage as quickly as possible to cool the birds and provide adequate shade and ventilation. Fans in the lairage or holding area must cover the entire length of the trailer.
✓ If wetting birds for cooling, use a water hose or misting equipment on the fan trailer to reduce the effective temperature for the birds and to improve wind chill effect. Only wet birds while catching if a fan trailer is used for windchill effect. Without trailer fans, only wet birds right before leaving the farm so that the birds will experience the wind chill effect while the trailer is moving.
Cold Weather ✓ Limit loading time and position the trailer (if possible) to prevent or
reduce thermal stress of the birds from wind chill.
✓ Plastic modules and/or header boards to block air flowing through the containers when the truck is moving can be used to reduce wind chill effect. However, they can be time consuming to attach or detach if weather and/or temperature changes during the day.
✓ Plastic wrap can be used around modules to keep birds warm and can be added as needed on-site. Make sure wrap is secure and does not come off during transportation. Use wrap correctly to prevent any overheating risk due to trapped humidity and place intermittent slits in the plastic wrap for limited air flow and to prevent over humidity.
✓ Curtains can be used on the trailer to protect against wind and rain, but can be an added expense.
Never wet birds if fans are not operating. (See table 1 for temperature and humidity relationship)
Consider using a custom transport guide for your region that highlights the impact of temperature and wind speed during COLD weather. The guide should provide definitive recommendations for the use of headboard, side boards, wraps or curtains on transport equipment to limit thermal stress and wind chill for broilers during cold weather.
Animal Welfare Tips

CATCHING, TRANSPORT AND LIVE RECEIVING
12
COBB
PRO
CESS
ING
MAN
AGEM
ENT G
UIDE
50%
60%
70%
75%
80%
85%
Table 1The “humidex” should be factored into transportation logistics. A relative humidity of 50% or above can increase the perceived temperature by 2 degrees or more.
21°C (70°F)
22°C (72°F)
23°C (73°F)
24°C (75°F)
25°C (77°F)
25°C (77°F)
28°C (82°F)
30°C (86°F)
32°C (90°F)
33°C (91°F)
33°C (91°F)
34°C (93°F)
36°C (97°F)
38°C (100°F)
41°C (106°F)
42°C (108°F)
43°C (109°F)
44°C (111°F)
45°C (113°F)
48°C (118°F)
51°C (124°F)
53°C (127°F)
54°C (129°F)
56°C (133°F)
Ambient Temperature
20°C (68°F) 25°C (77°F) 30°C (86°F) 35°C (95°F)
Humidity
Facility Receiving Area
The holding areas at the processing plant must be designed for bird welfare. Minimize the holding time to 2 hours or less and provide a very well-ventilated area. Keep the birds as calm as possible by providing a comfortable temperature, adequate ventilation, low level lighting or adequate shade, and reduce the noise level to minimize bird stress.
Fans or air-conditioned blowing units (if needed) should be cooling the entire area so all areas have air movement.
Water foggers can be used to reduce the effective temperature in the holding area. Use a ventilation system with appropriate air movement. At temperatures of 16°C (60.8°F), all fans should be operating. Use the foggers or cool cells at or above 25°C (77°F) to help control temperatures in the holding shed by conditioning the air.
Use cool cell pads for evaporative cooling or an air conditioning system in a lairage. Provide adequate space between cages, modules, or coops to maximize air flow around the transport containers and to ensure adequate air flow among the containers.

CATCHING, TRANSPORT AND LIVE RECEIVING
13
COBB PROCESSING M
ANAGEMENT GUIDE
Mortality
Mortality during transport is a bird welfare issue and a profit loss. Mortality during transport can be a result of bird health, physical injury or trauma, or thermal stress. Any birds found during catching that are unfit for transport should not be loaded and must be humanely euthanized on the farm using an approved method and in a timely manner. Document and audit the transportation process and track mortality. Some issues that can be associated with mortality during transportation include:
✓ road conditions ✓ damaged modules ✓ distance and transport time ✓ temperature ✓ humidity ✓ bird density in modules
Shrinkage
Shrinkage is the natural weight loss that occurs after the birds no longer have access to feed and water. The bird’s bodyweight can decrease as much as 0.25% per hour of holding at the processing plant. The ideal holding time at the plant is less 2 hours or 0.5% loss of bodyweight. A well designed and managed feed withdrawal program, along with proper holding sheds that have fogging and fan programs can reduce this loss. Once the birds lose weight due to shrinkage, this weight cannot be recovered. Measurement and analysis of shrinkage will assess the effectiveness of the holding area (ventilation, logistics, etc.) and the efficiency of the transportation process to mitigate any excessive weight loss due to shrinkage.
The animal welfare program should include specific guidelines to optimize bird comfort in the holding area. Ideally, equipment (fans, misters, etc.) should be connected to a thermostat so that equipment will turn on/off automatically when live animals are present in the holding area. Truck arrival time and bird unloading time should be logged so that actual holding time can be verified. The processing plant must have ownership for this critical welfare aspect and should regularly verify equipment function and bird comfort throughout the day with a written audit. In addition to observation of bird behavior, the program should also include observation and retrieval of any loose birds in the lairage area and verification that holding time does not exceed company limits.
Mortality during transport, also known as DOA (dead on arrival), should be documented on a flock or farm basis by the processing plant. As part of the animal welfare program, there should be a DOA limit (ex: average of 0.5% per week) and any incidents that are higher than this limit should initiate an internal investigation and corrective action. Catching and transportation managers should be regularly informed about DOAs so that they can take immediate action to improve welfare if numbers are higher than expected.
The most common welfare problems encountered in lairage areas are related to overloaded containers, thermal stress (heat or extreme cold), and death due to exposure. Poorly maintained or broken containers may result in bird injury or loss. A comprehensive welfare program should track these welfare indicators, audit for compliance, and have procedures in place to limit their occurrence.
Animal Welfare Tips

UNLOADING & SHACKLING
14
COBB
PRO
CESS
ING
MAN
AGEM
ENT G
UIDE
✓ Confirm all belt transfer points have only a minimal gap for rotation radius, to prevent birds from falling and being injured.
✓ Design the conveyor system so that the degree and distance of transition from one conveyor to the next is as short as possible.
✓ It is important that the birds do not accumulate on the conveyor belts, as accumulations and piling can cause physical defects such as bruises and broken wings (direct yield loss).
✓ Time and synchronize transfer belt speeds to keep the final shackling belt full of birds and prevent empty shackles. Empty shackles reduce efficiency and will disrupt the settings of downstream equipment.
✓ Follow the manufacturer’s maintenance and preventive maintenance programs. Poorly maintained equipment can cause bird injury (bruising and broken bones).
Unloading and Shackling
2.1 Unloading EquipmentThere are a few different systems for live bird unloading at the processing plant. One very common style is the automated cage tilt system. Another common style is the coop system utilizing hydraulic chain drags on the trailers and hydraulic lifts to relay the coops to a powered or skate conveyor system into the live shackling area. Using slide tray modules with a tilt unloader or total tray removal to a conveyor system are also commonly used systems especially in processing plants with controlled atmospheric stunning systems. Below are common factors to evaluate to ensure birds are unloaded carefully, prevent unnecessary stress, limit bird injury and reduce yield loss.
2.2 ShacklingThe shackling area must be designed and maintained for the comfort of birds as well as workers, in terms of adequate space, lighting, air quality, and ventilation. Adjustment of light intensity and belt speeds must be used to help keep birds calm and to minimize stress. Management practices must be in place to minimize worker fatigue (rotation or similar practices) as this may contribute to inappropriate bird handling. Shackles must be appropriately sized so that birds can be shackled without causing injury to the broilers’ legs.
The unloading equipment and conveyor system must be designed, maintained, and operated to prevent bird injury. Birds should not be unloaded on top of other birds. If any birds remain in modules or coops after automatic tilting, they should be gently removed by the operator and then placed on the conveyor. For this manual handling, birds should not be lifted by the wings, neck or head.
Animal Welfare Tips
UNLOADING & SHACKLING
15
COBB PROCESSING M
ANAGEMENT GUIDE
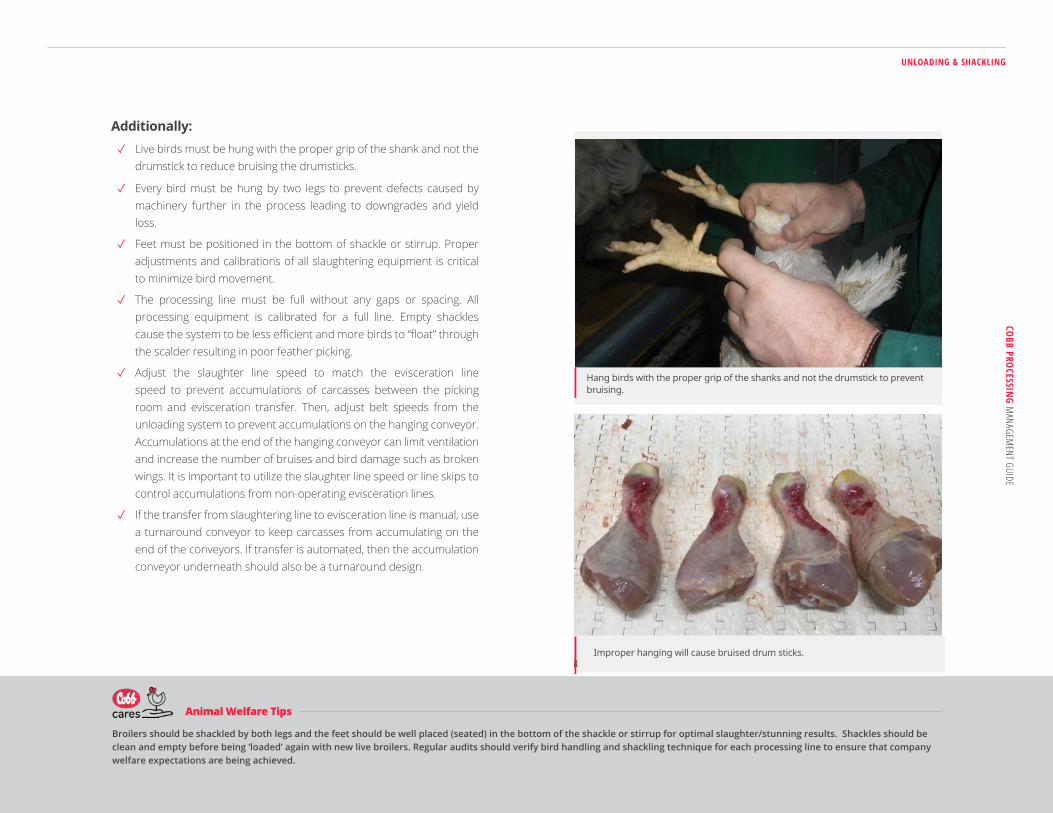
Additionally: ✓ Live birds must be hung with the proper grip of the shank and not the
drumstick to reduce bruising the drumsticks.
✓ Every bird must be hung by two legs to prevent defects caused by machinery further in the process leading to downgrades and yield loss.
✓ Feet must be positioned in the bottom of shackle or stirrup. Proper adjustments and calibrations of all slaughtering equipment is critical to minimize bird movement.
✓ The processing line must be full without any gaps or spacing. All processing equipment is calibrated for a full line. Empty shackles cause the system to be less efficient and more birds to “float” through the scalder resulting in poor feather picking.
✓ Adjust the slaughter line speed to match the evisceration line speed to prevent accumulations of carcasses between the picking room and evisceration transfer. Then, adjust belt speeds from the unloading system to prevent accumulations on the hanging conveyor. Accumulations at the end of the hanging conveyor can limit ventilation and increase the number of bruises and bird damage such as broken wings. It is important to utilize the slaughter line speed or line skips to control accumulations from non-operating evisceration lines.
✓ If the transfer from slaughtering line to evisceration line is manual, use a turnaround conveyor to keep carcasses from accumulating on the end of the conveyors. If transfer is automated, then the accumulation conveyor underneath should also be a turnaround design.
Improper hanging will cause bruised drum sticks.
Hang birds with the proper grip of the shanks and not the drumstick to prevent bruising.
Broilers should be shackled by both legs and the feet should be well placed (seated) in the bottom of the shackle or stirrup for optimal slaughter/stunning results. Shackles should be clean and empty before being ‘loaded’ again with new live broilers. Regular audits should verify bird handling and shackling technique for each processing line to ensure that company welfare expectations are being achieved.
Animal Welfare Tips

UNLOADING & SHACKLING
16
COBB
PRO
CESS
ING
MAN
AGEM
ENT G
UIDE
Room Conditions
✓ The shackling area should have controlled lighting when live birds are being handled. Dark out conditions using black or blue lights will help keep the birds calm and reduce stress and bird injury due to excessive bird movement and wing flapping during the shackling process.
✓ Shackles must be ergonomically positioned for team members and to prevent shackled birds from contacting their heads, bodies or wings on the coops or frame of the shackling equipment surfaces.
✓ Breast rubs must begin before the first shackle and be continuous, leading into the electrical stunner keeping the birds’ breast in continuous light contact with the breast rub. This will provide the maximum calming effect and prevent wing damage from birds climbing the shackles.
✓ Belt speeds and loading of birds must be synchronized to have a consistent flow of chickens without accumulations, and for the shacklers to keep the shackles full.
✓ Processing lines should be as straight as possible and avoid multiple turns and long distances. The processing line should be timed so that there is 60 seconds or less from the point of shackling to the stunner.
✓ For controlled atmosphere stunning, birds will be shackled after controlled atmosphere stunning (fully lit room) and shackling should be performed in the same manner as with electrical stunning.
Shackling Training for Personnel
It is important to have documented training with signed acknowledgment from the shackling personnel confirming they understand the correct methods for handling live birds. Companies should consistently monitor and continuously train all staff working in this area. Any noted deficiencies should immediately be addressed and corrective actions documented.
It is very important to keep birds calm after shackling and prior to stunning. For good welfare, the primary goals are to have quiet birds and to prevent excessive wing activity (flapping). This can be easily achieved by providing subdued lighting, by using breast-rubs, by using curtains or shields to prevent the entry of bright outdoor light in the shackling room.
Shackling live birds is one of the most difficult but most important jobs in the processing plant. Attention to bird handling, care and comfort are critical to keep birds calm and to limit unnecessary stress and injury. Any birds that are injured should be euthanized and placed in a condemnation container in the shackling area. Staff working in this area must be trained and audited for correct bird handling, shackling technique and approved euthanasia methods.
Animal Welfare Tips

STUNNING & SLAUGHTERING
17
COBB PROCESSING M
ANAGEMENT GUIDE
The objective of stunning is to render the birds insensible to pain prior to the neck cut where death occurs by blood loss. There are 3 methods of stunning that are typically used:
Stunning and Slaughtering
✓ Reversible electrical stunning: a low current, low voltage and high frequency electrical stunning method that uses a variable and optimized setting for each facility.
✓ Non-reversible electrical stunning: a high voltage, high current and usually higher frequency electrical stunning method that uses a mandated voltage (milliamps) to achieve an irreversible stun of each broiler (European Union Council Regulation (EC) No 1099/2009).
✓ Controlled atmosphere stunning: results in the loss of consciousness and loss of posture of the broiler and can eventually lead to death due to the displacement of air using inert gases or due to acute hypercapnia when using carbon dioxide (AVMA Humane slaughter guidelines).
3.1 Variable and Adjustable StunningA consistent process is required in order to achieve the best results. A full line of correctly shackled birds without gaps or empty spaces is key to the process. All equipment must be in excellent working condition and monitored and evaluated daily to ensure proper operation. Additional factors for proper stunning include:
✓ The transition room / area into the stunner should be dark to keep birds calm.
✓ Ground bars on either side of the shackles must capture and immediately contact the shackle to complete the circuit and maintain shackle contact with the ground bar (and the circuit) throughout the complete length of the cabinet. The correct ground wires and secure connections are necessary for proper treatment and safety.
✓ The volume of fresh replacement water for the stunner bath should be
controlled to prevent a constant stream of water to the floor, which will disrupt stunner settings and waste water.
✓ Water temperature in the stunner should be a minimum of 25°C (77°F).
✓ The shackle line should always be full of birds, without empty or damaged shackles, which will maintain a constant number of resistors in the system.
✓ At each flock change, adjust the stunner height to water level just below wings of largest birds. In this way, all birds will still be stunned.
Stunning and slaughter equipment must be maintained, operated, and monitored daily to ensure correct function and the desired outcomes for the humane processing of poultry. If national standards do not exist, the company’s welfare program should set a goal of the % of birds that must be effectively stunned at the plant. The program must specify that corrective actions will be initiated if the percentage of effectively-stunned birds is below the standard.
Animal Welfare Tips

STUNNING & SLAUGHTERING
18
COBB
PRO
CESS
ING
MAN
AGEM
ENT G
UIDE
✓ To avoid pre-shock, the heads of the birds should enter the water before the wings. The water overflow must be at the exit end of stunner and not the entrance. The cabinet height and water bath level can be adjusted to prevent wings from entering the bath first. The cabinet should have a spray that sprays the feet /shackle contact area with very fine mist and not a stream of water. The foot spray at the entrance end of the stunner will increase conductivity and must be positioned at the point the bird enters the stunner cabinet. Ensure the mist is spraying in the direction of the flow of birds to prevent water from spraying back on the incline ramp, wetting it, and causing birds to be pre-shocked.
✓ The water in the stunner cabinet should have a 1% salt solution treatment to condition the water and help conductivity. Saltwater is 40x more conductive than tap water.
✓ The birds should remain in the stunner bath for 10 to 20 seconds.
✓ When adjusting the frequency of the stunner, consider regulations, minimizing damage of stun amperage, and the effect the frequency has on the birds. Frequency at lower ranges will increase the stun effect and higher frequency will decrease the effect. Do not use a combination of low amperage and high frequency which can cause wing flapping and movement after the stunner. To prevent damage, stun at the lowest possible amperage per bird and the highest frequency that will meet governing regulations.
Evaluating the Stunner Process
In electrical water-bath stunning, the current flows through both the head and body to induce tonic seizures. Birds should have the following characteristics when correctly stunned:
✓ Wings tucked tightly to the body
✓ Neck slightly arched
✓ No heavy wing flapping
✓ Minimal movement (some mild wing flapping may occur as a result of tremors)
✓ No eye reaction
Under Stunning
Under stunning is the inability to render a bird unconscious and / or maintain unconsciousness before exsanguination can occur and is unacceptable from a welfare standpoint and can also lead to yield and quality issues. For effective stunning, do not use a combination of low milliamp and high frequency that causes wing flapping and movement after the stunner. Best practice is to stun at the lowest possible milliamp per bird and highest frequency that meets governing regulation and properly stuns the bird.
Welfare audits should include evaluation of the stunner process to confirm the efficiency of the stunning system. The auditor should stand immediately after the electrical stunning equipment (and before exsanguination via the blade or knife) to observe the posture and behavior of the birds. Specifically, the auditor should look for stunned birds that have wings close to the body, a convulsive movement, and no signs of righting reflex, vocalization or voluntary movement. Each processing line should be evaluated to ensure compliance with the stunning expectation.
Animal Welfare Tips

STUNNING & SLAUGHTERING
19
COBB PROCESSING M
ANAGEMENT GUIDE
Under Stunning Can Cause:
✓ Wing flapping that may result in defects, bruises, and breaks
✓ Mis-aligned birds that do not enter further processing equipment lines properly
✓ Wings caught and cut in auto blade machine causing downgrades and losses in yield value
✓ Birds may require manual slaughter by back up personnel stationed immediately after the automatic knife location.
✓ Birds that are not correctly cut
✓ Birds regaining consciousness
✓ Internal carcass damage
✓ Blood splatter in the breast meat and tenders from broken bones and shoulders from high voltage
✓ Lack of bleed out in the extremities leading to red tips on wings
✓ Causes feather picking problems due to early onset of rigor
✓ Broken wish bones embed in the fillet causing excessive trim and yield loss
Improper electrical stunning can cause wing bruising
Over Stunning Can Cause:
Over stunning can cause blood splatter in the breast
Over stunning can cause blown shoulders

STUNNING & SLAUGHTERING
20
COBB
PRO
CESS
ING
MAN
AGEM
ENT G
UIDE
3.2 Non-reversible Electrical StunningDue to the high voltage, non-reversible electrical stunning can cause carcass damage. This damage can be minimized if the stunning system is adjusted on an outcome based method. Start by decreasing the voltage to the lowest possible setting that will supply the amperage per bird that will meet regulations. Adjust the frequency upward to achieve a proper stun and limit physical damage.
3.3 Controlled Atmosphere Stunning (C.A.S.)
The CAS system uses specific gases with carbon dioxide (CO2) being the most common. Many systems utilize a gas recovery system to reduce the total amount of gas used during the process. This system can be costly because it requires a very large and specialized room. A specialized bird handling system used with CAS does provide some benefits over other stunning systems:
✓ Uniform stun regardless of bird size
✓ Ergonomically friendly for staff responsible for shackling birds
✓ Full lighting can be used in shackling area
✓ Improved bird carcass quality if performed correctly
✓ Fewer hemorrhages
✓ Improved meat quality
To optimize a CAS system:
✓ Ensure correct gas / oxygen mixtures at each stage of the stunning process to induce unconsciousness and eliminate excessive wing flapping which can cause bruising and breakage.
✓ Minimize time from gas stunning to shackling.
While CAS stunning has animal welfare advantages since manual handling, tipping and shackling of live birds are eliminated, staff working in the shackling area must still be trained in correct bird handling and shackling to minimize bruising and damage to the birds. Staff must also be trained to identify rigor in birds that died prior to stunning so that these will not be shackled.
Animal Welfare Tips

STUNNING & SLAUGHTERING
21
COBB PROCESSING M
ANAGEMENT GUIDE
✓ The rigor process can begin in the birds when using non-recoverable stunning if excessive time is allowed before the slaughter blade, which will make the feathers harder to pick. This will also require higher scalding temperatures and picking pressure which will cause downgrades and yield loss.
✓ Staff should be trained to identify and remove birds that died before exposure to the CAS stunning process.
3.4 Religious Slaughtering
This method uses a deep, large cut through all the blood vessels of the neck causing acute blood loss and hemorrhagic shock. Cutting of both the veins and arteries is called a Halal or ventral cut. A standard ventral cut requires 90 to 120 seconds of bleed time. The traditional Halal cut requires 180 seconds or follows local regulations. The side or lateral cut on one or both sides of the neck requires approximately 150 seconds of bleed time.
✓ Use of restraining barriers to reduce struggle and damage located in the blood tunnel where the birds will pass between them after cutting. Barriers should be close enough to the birds to restrict their flapping and body movement (like breast rubs on front and back of the birds). The reduction in damage with this method is very effective.
✓ Other facilities use post stunners immediately after the cut. This can reduce the damage significantly with the right type of post stunner and the proper cut.
✓ A third method uses low voltage pre-stun prior to the neck cut. Voltages that range from 20 mA to 40 mA are used to render the bird immediately unconscious (anesthetic coma), but fully recoverable (head up and alert within 3 minutes).
3.5 Best Practices in Slaughter for Animal Welfare, Quality Yield and Shelf Life
✓ The position of the birds for proper neck cutting is crucial to bird welfare.
✓ Ensure that the equipment is adjusted to the correct height and angle for efficient and effective cutting.
✓ Blades should be sharp for a smooth and fast cut. The height of the blade must be set to cut the veins and arteries without completely removing the head of the bird unless decapitation is part of the process.
Due to some religious requirements, slaughtering may not allow stunning prior to the neck cut. In these situations, a sharp blade or knife must be used to effectively and efficiently cut the vessels of the neck. In slaughtering without stunning, the birds will experience contractions and convulsions caused by the loss of blood flow to the brain. The convulsions and contractions can cause wing breakage, bruises and joint damage in the bird. Some efforts to reduce the damage include:

STUNNING & SLAUGHTERING
22
COBB
PRO
CESS
ING
MAN
AGEM
ENT G
UIDE
✓ Trained personnel should be available as back-up and should be stationed immediately after the auto-knife or blade.
✓ Adjust the guide bar to the proper setting so that necks enter the line correctly and deflect wings from the blade.
✓ It is important that arteries are opened completely and a sufficient amount of time is allowed for blood draining. Birds that enter the scalder that are not adequately bled will be condemned.
✓ Required bleed times depends on the type of cut made in the process and can range from 90 seconds to 3 minutes. In some religious slaughter process the time can be up to 3.5 minutes. However, to optimize quality during scalding and picking, bleed times should not exceed 3 minutes. Adjust the line speed to maximize the setting and then then reduce the amount of track to achieve a bleed time of 3 minutes.
Welfare auditingWelfare programs should include expectations and evaluation of outcome-based measures, facility-based measures, and protocol-based measures. Depending on company standards and supply chain demands, audit requirements may vary. Here are some examples of welfare improvements that are commonly evaluated at the processing plant:
✓ Outcome-based measures: % DOA; % broken wings; % leg damage; % severe bruising; % stunning efficiency; footpad scores
✓ Facility-based measures: lairage area provisions (shelter, fans, etc.) for bird comfort; condition and repair of transport containers; condition and maintenance of stunning equipment; duration of time in lairage; bird unloading process
✓ Protocol-based measures: new team members and annual training for animal welfare; transport standards (density in transport containers; transport precautions during hot/cold weather; total time for feed withdrawal); settings for stunning equipment; procedure for neck cut for exsanguination at slaughter; documentation of corrective actions

SCALDING & PICKING
23
COBB PROCESSING M
ANAGEMENT GUIDE
Scalding and Picking
Scalding
Scalding has the greatest yield loss potential in the facility. Heat can destroy the underlying tissue and collagen. Hotter than optimum temperatures are frequently used to compensate for poor picking. When meat is over scalded, there will be noticeable white coloration or streaking which creates a customer quality issue and yield loss. Cooking the breast meat changes the texture, the amount of natural juices, weight, and lowers the yield.
4.1 Water Scalding Best Practices
Treat the scalding, picking, and manual pinning as one interdependent operation that combines the correct amount of time, temperature and picking power. For best practice, use a multiple zone, multiple pass, scalding system. Set the temperature in the first stage of the scalding system to the lowest possible setting that will allow effective picking. Do not go below 50ºC (122ºF) in any stage due to microbiological risks. When the scalder temperature is adjusted, the picker will also require adjustments. If the facility has adequate pickers (sufficient number to remove all feathers), then level the scalder temperatures in all stages by bringing the temperature settings closer. The goal of the scalder is to prevent white streaks that result from over scalding of the breast.
Overscalding cooks the breast meat, which changes the texture, reduces the amount of moisture, and lowers the yield. The breast on the left has been scalded at the proper time and temperature and time combination. The breast on the right has been severely over scalded.
SCALDING & PICKING
24
COBB
PRO
CESS
ING
MAN
AGEM
ENT G
UIDE
Perform test trials with carcasses to determine the correct temperature of the scald water. In general:
✓ Scald as low as picking will allow. Pick as gentle as possible
✓ Optimum scald water temperatures range from 50°C to 53°C (122°F to 127°F) for a soft scald that leaves the cuticle intact
✓ Optimum scald water temperatures range from 51°C to 57°C (123°F to 134°F) for a hard scald that removes the cuticle
✓ The optimum dwell time is 2.5 to 3.5 minutes. Shorter dwell times require hotter temperatures which can create yield loss
✓ There should be enough pickers to remove nearly all the feathers in 45 to 60 seconds to achieve a quality product. Lower temperatures will require more time picking
✓ Excessive scald temperatures will result in both bird damage and yield loss. The product mix or customer acceptance should determine scald time, temperature, and picking
✓ Agitation in the scalder is critical to prevent carcasses from floating and to completely wet the carcasses
✓ Install a good counterflow in the scalders to keep the cleanest water on the cleanest birds
4.2 Troubleshooting and Maintenance of Scald Water
✓ Calibrate temperature probes to ensure they are consistent with scalder control displays. Use hand-held devices that have been calibrated to ensure that the internal probes installed in the scalders are correct and so that there are no hot or cold spots in the scalding tank.
✓ Check zone temperatures with calibrated manual temperature probes to reduce hot / cold spots.
✓ Ensure proper counterflow of scald water to keep the cleanest water
on the cleanest birds using an entrance overflow.
✓ Pre-heated fresh water should be added in conjunction with using counterflow scalders to help clean the water and remove solids and bacteria on the birds.
✓ Utilize the equipment manufacturers’ guidelines for machine adjustments, maintenance and repairs.
4.3 Alternative Scalding Methods
Moisturized hot air scalders use a combination of hot water, air, and steam to heat and to humidify the air. The same best practice principles that apply to water scalding also apply to air scalding methods. Hot air scalders are typically 2-stage chambered systems. In the first chamber, the air is heated and humidified and the second chamber applies the humidified air to scald the birds. No direct steam is applied. Air scalders lower the risk of cross-contamination and settings can be adjusted for a
SCALDING & PICKING
25
COBB PROCESSING M
ANAGEMENT GUIDE
soft, medium, and hard scald on the birds based on customer requirements. Other benefits include, a large reduction of water usage compared to a water immersion scalder and energy cost savings.
Cascade water scalders target the hard to pick feathers around the wing areas of the birds. Hot water is fed into a cascading waterfall reservoir and mixes with steam to create a cascade of water to scald the wings as the shackles travel through the waterfall. Water temperatures range between 150°F and 180°F (65°C and 82°C) degrees. The dwell time is variable depending on the system design, but in most cases, 5 to 10 seconds are recommended for best results. Excess water can be recycled to reduce freshwater usage.
Hot air scalders use a combination of hot water, air, and steam. The same best practice principles that apply to water scalding also apply to this method.
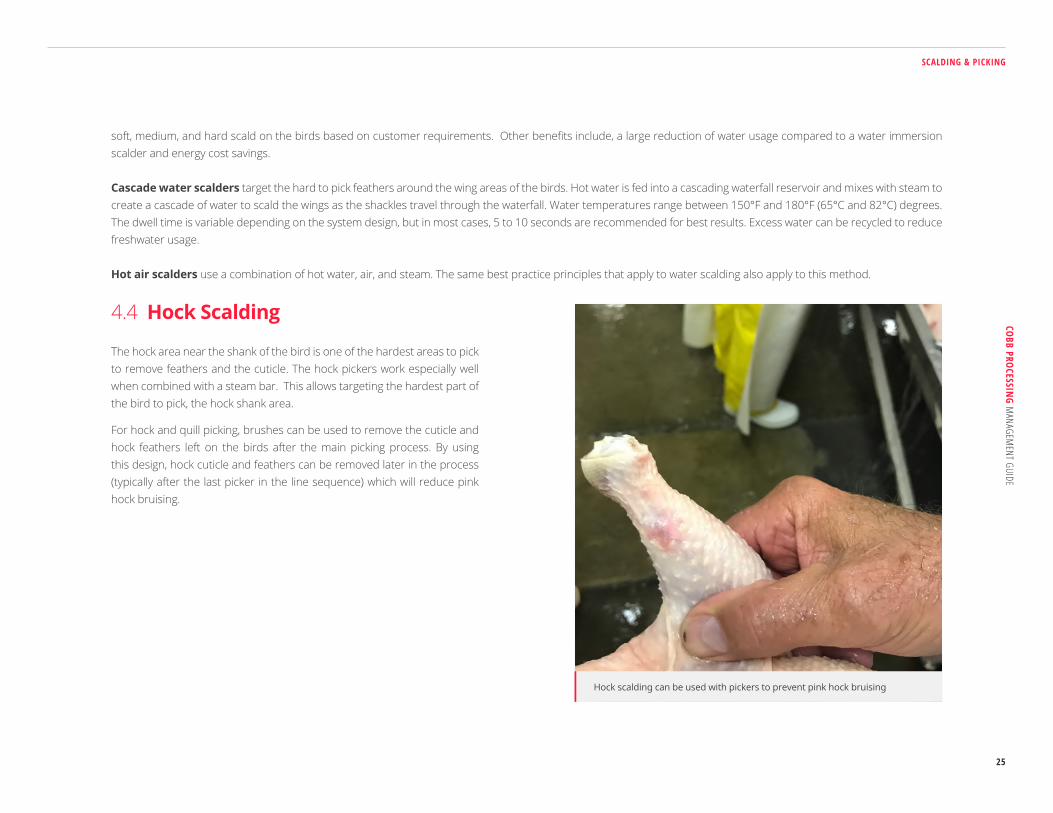
4.4 Hock Scalding
The hock area near the shank of the bird is one of the hardest areas to pick to remove feathers and the cuticle. The hock pickers work especially well when combined with a steam bar. This allows targeting the hardest part of the bird to pick, the hock shank area.
For hock and quill picking, brushes can be used to remove the cuticle and hock feathers left on the birds after the main picking process. By using this design, hock cuticle and feathers can be removed later in the process (typically after the last picker in the line sequence) which will reduce pink hock bruising.
Hock scalding can be used with pickers to prevent pink hock bruising

SCALDING & PICKING
26
COBB
PRO
CESS
ING
MAN
AGEM
ENT G
UIDE
4.5 Picking
Pickers are typically arranged in a line with each picker targeting a specific area of the bird. The first picker should have the hardest fingers progressing to softer fingers in the last picker. Never pick hock feathers with the first picker. This can cause blood to flow into the hock resulting in splash bruising. Other best practice procedures include:
✓ Dwell time through all pickers should be approximately 45 to 60 seconds.
✓ The water temperature of the picker rails should range from 27 to 32°C (80 to 89°F) to provide a consistent flair of fingers when pickers are operating. Colder water results in harder fingers (more damage to the fingers) and hotter water results in softer fingers (increasing wear and breakage of the fingers).
✓ On a daily basis, ensure that pickers are correctly aligned (plumb) with respect to over-head slaughter line, finger rotation, and guide bar settings for proper gap and height.
✓ The first picker should remove 80 to 85% of the feathers with little to no carcass damage.
✓ In general, there should be no more than 2% of broken wings for birds 2.8kg (6.2lb) and heavier and less than 1% on smaller sized birds. If the number of broken wings exceeds this range, it can indicate broken or missing fingers.
✓ When checking the pickers, 1/3rd of picker fingers should appear new, 1/3rd not new, but functional, and the remaining 1/3rd are ready to be replaced.
✓ The finger selection should be used to match the size of the birds being processed.
✓ Pluckers set too close together will cause birds to “ride over” picking fingers causing carcass defects.
Evaluate the inside of a picker before and after operating. Broken or missing fingers can cause damage to carcasses, therefore, replace damaged and missing fingers immediately.
The quill picker targets tail feathers and should be the first or second position in the line.

SCALDING & PICKING
27
COBB PROCESSING M
ANAGEMENT GUIDE
✓ The number of pickers and the picker finger hardness required will depend on the line speed and product requirements.
✓ Adjust the pickers at the end of each flock to optimize performance using the biggest birds in the flock as a standard.
A B C D
Torn skin
Barked elbow
Whole birds and legs picked out of shackles
A
B
C
D
The quill picker targets tail feathers and should be in the first or second position in the line for the best results. In this way, picker pressure can be set to put less pressure on the tail and hip area reducing damage to these areas.Picking issues can include
Fat pockets and bubbles from scald temperatures that are too hot or friction from picking pressure settings that are too tight.
✓ Broken Wings
✓ One legged birds (disjointed birds)

EVISCERATION
28
COBB
PRO
CESS
ING
MAN
AGEM
ENT G
UIDE
Critical factors to the evisceration process which impact yield include:
✓ Correctly hung birds
✓ Product that has been dropped on the floor (floor loss)
✓ Employee performance of manual steps
✓ Machine adjustment of automatic steps
✓ Leaf (abdominal) fat retention and giblet recovery
✓ Bird uniformity
✓ Carcass trimming
✓ Neck removal
✓ Effective part salvage programs
✓ Contamination control
✓ Proper carcass wash
Evisceration
The goal of evisceration is to efficiently clean and prepare the carcasses for chilling while maintaining quality and yield. There are many different levels of automation in the evisceration operation and range from fully manual to fully automated. When using automation, it is critical to have a preventive maintenance program to keep equipment in proper working order. Predictive programs are the most effective which schedule maintenance and repairs prior to machines reaching poor performance levels. Identify and maintain an inventory of critical spare parts for each machine.
Spray washers with good nozzles, sufficient pressure and direction are critical to keep equipment probes, vent and opener blades, evisceration spoons and other contact surfaces clean.

EVISCERATION
29
COBB PROCESSING M
ANAGEMENT GUIDE
Measure performance and adjust equipment, as necessary, at a minimum frequency of every flock change. Expect 98% performance from each machine. Each machine should have a written program that identifies correct operations and errors. A system to stop the line and to make adjustments or corrective actions is critical for optimizing the process. Proper performance and preventing contamination are fundamental factors of a good program.
✓ Flock uniformity is critical to optimize equipment adjustments. Even with good uniformity adjustment is necessary to maximize performance potential.
✓ Shackle condition is critical and should be checked daily. The facility should have a program that includes new and repaired shackles that can be used as replacements.
✓ Effective spray washers with good nozzles, pressure and direction are critical to keep equipment probes, vent and opener blades, evisceration spoons and other contact surfaces clean.
✓ Where permitted the use of chlorine in the spray water is recommended at 20 to 50 ppm and are effective to control microbiological issues. It is also effective to have stand-alone dips or cabinets after the final bird wash.
✓ The final bird wash must be effective with good pressure and volume and, where permitted, antimicrobial intervention application. The final bird wash is a primary tool to achieve the zero tolerance fecal standards.
✓ The final bird wash pressure and water temperature can also be a valuable tool to influence moisture absorption. More pressure and higher water temperatures will open feather follicles and increase hydration.
✓ Where permitted, it is best practice and very effective to use a chemical intervention in the bird washer for microbiological control.
✓ A high pressure inside-outside bird washer with booster pump can be a very effective cleaning tool. If using a cabinet type, use an adequate amount of well-directed sprays with sufficient volume and pressure to clean the bird.
✓ The cabinets must be designed with a top-down wash process with some shower heads positioned to wash inside the bird.
5.1 Equipment and Adjustments

EVISCERATION
30
COBB
PRO
CESS
ING
MAN
AGEM
ENT G
UIDE
Knowing how much product was lost and what caused the loss is required for an effective recovery program. Create a written program for salvage operations to save all edible parts and pieces. The written protocol should be very clear on how to recover these parts, how they should be processed and a detailed description of the monitoring system for the program.
5.2 Product and Parts Recovery
Recovery of livers, hearts, gizzards, and feet
The importance of recovering livers, hearts, gizzards, and feet varies and is usually dictated by the market demand. When in demand, livers, hearts and gizzards should have a recovery rate of greater than 80%, each. Feet and paws should have a recovery rate of 3% and 2.5% of the live weight, respectively. Recovery rate can be measured by packed weight of these products versus live weight. Measuring recovery while lines are operating will provide real-time data to make any necessary adjustments to increase recovery.
Recovery of leaf (abdominal) fat
Leaf fat retention is one of the biggest areas of unidentified yield loss. Recovery rate depends on the individual facility process. In a manual evisceration process, the recovery rate can be up to 90%. In facilities with a product mix primarily based on whole bird sales, it is worth the investment to buy equipment for leaf fat retention. Leaf fat retention should be measured at the end of the evisceration line prior to the chillers.

EVISCERATION
31
COBB PROCESSING M
ANAGEMENT GUIDE
Recovery of necksNeck length and recovery method is usually determined by the process and product mix being produced. In a typical process the goal is to remove the neck at a length that is even with the shoulders and leave neck skin length adequate to overlap to the mid shoulders on the back side. In full debone operations with mechanically separated chicken /mechanically deboned meat (MSC/MDM) operations, the neck can be auto skinned in evisceration and remain with carcass to be recovered with the shell at the meat debone/separation operations.
5.3 Salvage and Rework Program
Salvaging programs must be compliant with local regulations and defined by company requirements. Ideally, scheduling sessions with the production management, quality assurance department and regulatory leaders will promote an understanding of the company needs and facilitate modifications to the program. For a highly efficient salvage program to work, all loss must be measured. Documentation is also crucial to an effective program and should include the following:
✓ Develop a strong program of corrective actions for contamination and defect issues. Include a verification system that includes departments outside of production such as quality control.
✓ Establish a quality assurance program that measures defects and loss during production and includes a detailed plan of corrective actions.
✓ Any whole carcasses, floor loss, and parts that are condemned should be identified by defect, weighed and recorded. Establish specific criteria for these losses, measure them and develop corrective actions to reduce losses.
✓ Develop and implement a sales program for all giblets and feet (paws) and measure the recovery rate.
Floor loss should be measured. Develop corrective actions to reduce this loss.
Preventing rework and doing trimming on the line will reduce condemnation, costs and salvage. Product that leaves the line will have a much higher risk of being lost to contamination or poor quality due to microbiological growth.

EVISCERATION
32
COBB
PRO
CESS
ING
MAN
AGEM
ENT G
UIDE
5.4 Contamination IssuesContamination with gastrointestinal tract material is the most common issue occurring during the evisceration process. This contamination occurs during mechanical evisceration if part of the tract is ruptured. Intestinal, gall, proventriculus, and crop contents are the most common sources of contamination during the process. The contents that are released can contaminate the carcass from which the contents were derived as well as other carcasses and equipment. If equipment is contaminated, the potential for many subsequent carcasses to be contaminated increases greatly.
Issues that can lead to contamination and their corrective actions include:
Improper feed withdrawal
It is important to work with farm production personnel for a goal of 8 to 12 hours of feed withdrawal (see section 1.1) prior to slaughter with at least 2 hours of water available on the farm prior to catch but after feed withdrawal.
Poor equipment adjustment or repair
Evaluate the equipment every flock change for performance. Check machine spray washers to ensure proper volume, pressure and direction to prevent cross-contamination. Calibrate and maintain all equipment on a scheduled basis. Evaluate equipment regularly by measuring evisceration contamination. Establish a corrective action plan for any contamination.
If the intestinal tract is ruptured in one bird because the evisceration machine is out of adjustment, many birds processed on the same line can be contaminated. Bent probes can also cause physical damage to the carcasses leading to lost yield. Some evisceration issues include:
✓ Probes that are bent, damaged, or out of alignment can damage carcasses and lead to breast meat yield loss.
✓ Spray bars, wash probes, and/or contact surfaces that are out of alignment.
Bent or damaged cropper teeth can cause yield loss and improper removal. of the crop. Spray nozzles and brushes are critical for cleaning the probe before re-entering the carcass, which will help prevent contamination.

EVISCERATION
33
COBB PROCESSING M
ANAGEMENT GUIDE
Contamination in manual operations
Improper technique when opening vent cuts, not removing the vent to the outside of the bird or cutting intestines are common issues in manual evisceration operations. Other issues that can occur include improper presentation of viscera, breaking the gall bladder or improper removal of the gastrointestinal tract (the pack) by breaking the gizzard loose from proventriculus. Additionally, not closing off the proventriculus using pressure prior to the pack being pulled out of the cavity can lead to contamination. These issues can contaminate the carcass source as well as equipment and employees’ gloves. Employees should be properly trained on the correct methods and have hand washing facilities near the evisceration line.
Accumulations of carcasses
Accumulations can lead to distorted carcasses that no longer fit on the line properly, causing issues that may require rework, manual operations, delays and misfeeds. Adjust the line speed to prevent accumulations.
Poor uniformity
The equipment performance is optimal when the birds are uniform in size. Poor uniformity can cause contamination issues at the evisceration line. Measure uniformity and share the data with the farm production personnel to improve uniformity for future flocks.
When out of alignment, spray bars to wash probes and contact surfaces can cause product damage or loss.
CHILLING
34
COBB
PRO
CESS
ING
MAN
AGEM
ENT G
UIDE
Chilling Process
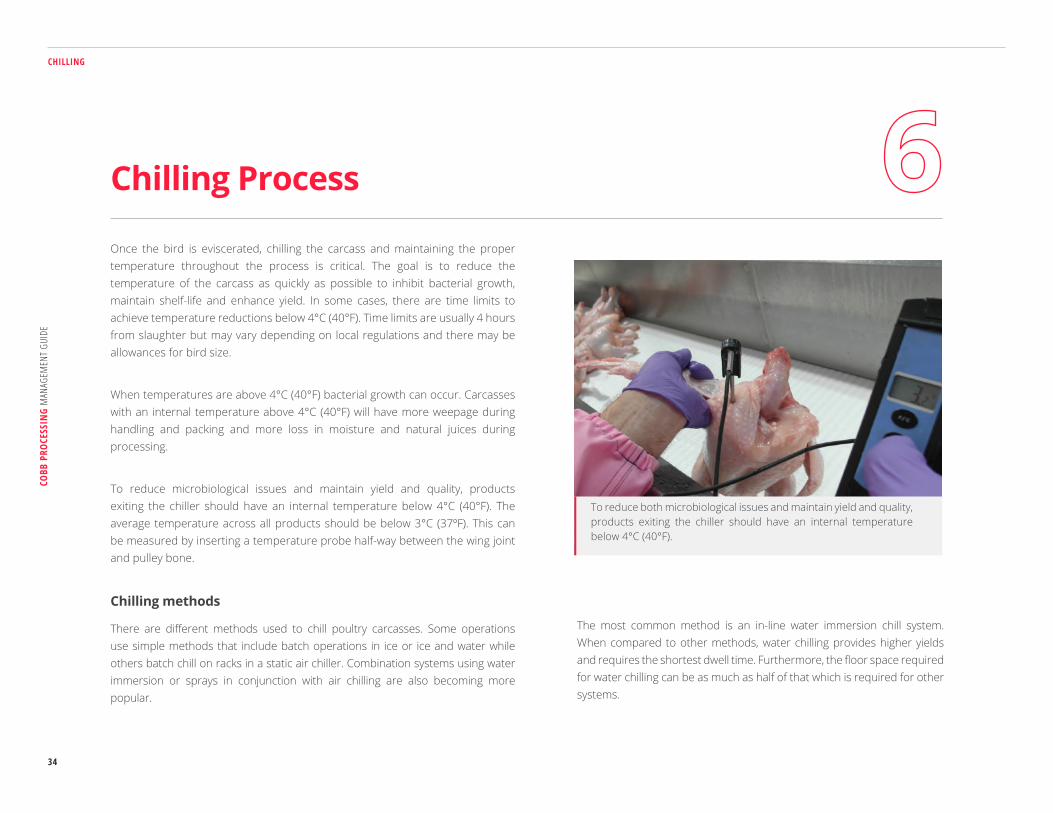
Once the bird is eviscerated, chilling the carcass and maintaining the proper temperature throughout the process is critical. The goal is to reduce the temperature of the carcass as quickly as possible to inhibit bacterial growth, maintain shelf-life and enhance yield. In some cases, there are time limits to achieve temperature reductions below 4°C (40°F). Time limits are usually 4 hours from slaughter but may vary depending on local regulations and there may be allowances for bird size.
When temperatures are above 4°C (40°F) bacterial growth can occur. Carcasses with an internal temperature above 4°C (40°F) will have more weepage during handling and packing and more loss in moisture and natural juices during processing.
To reduce microbiological issues and maintain yield and quality, products exiting the chiller should have an internal temperature below 4°C (40°F). The average temperature across all products should be below 3°C (37ºF). This can be measured by inserting a temperature probe half-way between the wing joint and pulley bone.
Chilling methods
There are different methods used to chill poultry carcasses. Some operations use simple methods that include batch operations in ice or ice and water while others batch chill on racks in a static air chiller. Combination systems using water immersion or sprays in conjunction with air chilling are also becoming more popular.
To reduce both microbiological issues and maintain yield and quality, products exiting the chiller should have an internal temperature below 4°C (40°F).
The most common method is an in-line water immersion chill system. When compared to other methods, water chilling provides higher yields and requires the shortest dwell time. Furthermore, the floor space required for water chilling can be as much as half of that which is required for other systems.

CHILLING
35
COBB PROCESSING M
ANAGEMENT GUIDE
Air chilling uses a first-in first-out process and has labor and technology integration benefits. In-line air chilling produces dryer products with relatively little water in the packaging. The European Union and other local area regulations have made air chilling the only option due to water absorption regulations. With very few process exceptions, the best practice components, temperature goals, and needs for all methods are the same:
✓ The most efficient systems are multi-stage systems.
✓ There must be sufficient dwell time based on the size of the largest carcasses and volume of carcasses.
✓ There must be an adequate refrigeration system for the maximum expected volume and size based on the largest carcasses and not average live weight.
✓ Adequate water flow is required for convective cooling and agitation in water chilling.
✓ In air chilling, adequate air flow with good direction and velocity is critical for convective cooling and BTU exchange.
Water immersion chill systems usually include a pre-chiller unit and one or more final chill units. The source of refrigeration is usually ice and chilled water, slush ice systems or red water heat exchange systems. The red water heat exchange (re-chiller) systems are the most effective systems in bird chilling, are energy efficient, and get the products cleaner using high volume water flow.
Pre-chiller units will usually comprise 25% to 33% of total dwell time. The pre-chiller is usually an auger or rocker type system. In most operations, the temperature of the pre-chiller is 20°C (68°F) to ambient unless regulated by local legislation and should be verified. The pre-chill temperature can be lowered to reduce moisture absorption or shorten dwell time.
6.1 Water Chilling
Bird Flow
Agitation
Agitation
Water Flow
Add Refrigeration
Here
Pre-ChillerPre-Chiller Final ChillerFinal Chiller
Typical Total Counter Flow Chill System
AddRefrigeration
Here

CHILLING
36
COBB
PRO
CESS
ING
MAN
AGEM
ENT G
UIDE
Water chilling benefits and challenges
Benefits Challenges
Moisture fluctuation
Market perception
Product co-mingles (contamination)
Packaging leakage
Labor cost to re-shackle
Not simple for technology integration
Water cost and availability
Traceability of product
Increases yield
Initial cost (lower)
Maintenance cost (lower)
Utility cost (lower)
Microbial intervention (feasible)
Floor space size (smaller)
Dwell time (shorter)
Improved BTU transfer
Consistent temperatures
Pre-chiller best practices ✓ The pre-chiller unit should rinse away any residual blood and debris
prior to the final chiller.
✓ The pre-chiller will reduce some heat and make the final chiller more efficient and reduce refrigeration cost.
✓ An efficient pre-chiller system can lower product temperatures by 20% or more when compared to initial carcass temperature.
✓ Focus savings on energy cost for final chill refrigeration, which is a much more expensive energy source than those energy sources used in the pre-chiller.
✓ The pre-chiller water temperature and agitation operation is a critical tool to achieve moisture absorption goals.
✓ New technology in deep massage and rocker type pre-chillers can add over 1% moisture in deep muscle yield in breast meat.

CHILLING
37
COBB PROCESSING M
ANAGEMENT GUIDE
Water chiller projected dwell times needed to reduce product temperature to 1.5°C (35°F)
*The times assume adequate refrigeration capacity, air movement, water spray temperature and rates. If weights vary considerably, additional time may be required.
Without Giblets Kg (lbs) *Time (min.)
60-65
70-75
75-80
80-85
85-90
90-95
95-100
100-105
105-120
1.13-1.38 (2.5-3.0)
1.4-1.58 (3.1-3.5)
1.63-1.81 (3.6-4.9)
1.85-2.04 (4.1-4.5)
2.08-2.26 (4.6-5.0)
2.31-2.49 (5.1-5.5)
2.54-2.72 (5.6-6.0)
2.76-2.94 (6.1-6.5)
2.99-3.17 (6.6-7.0)
Final chiller best practice
✓ Final chiller units are where most of the temperature decrease takes place.
✓ Provide adequate dwell time, water flow, agitation and water temperature to reduce product temperature to 4°C (40ºF) or below.
✓ Water temperature at the entrance of the final chiller should be 2°C (36ºF) or less. Temperatures at the exit should be less than 0.5°C (33ºF).
✓ The system should provide constant flow with no surges that would cause accumulations and subsequent product damage and yield loss.

CHILLING
38
COBB
PRO
CESS
ING
MAN
AGEM
ENT G
UIDE
Water temperature for the chiller system can be ambient in the pre-chiller and should be 1°C (34°F) or below in the final chiller. The amount of water may be subject to local regulations. Expectations are to use 1.5 to 2 liters per bird (1/3 to 1/2 gallon) but red water rechill systems use less. In a red water rechilled recirculating process, the replacement chill water should be added close to the sump pump so that water is discharged back to the red water heat exchanger. This will allow the water to pass through the heat exchanger and be rechilled before passing over the birds. In all other systems, chiller water should be added at the chiller exit. It is best to use a total backflow system where the coldest water flows over the coldest birds and passes across almost all the birds in the system. Overflow from final chiller should be pumped to the previous chiller tank.
In a three-tank chill system, the overflow water from final chiller will be pumped to the middle chiller tank and overflow water from the middle chiller tank will be pumped to pre-chiller tank. This is the most efficient use of refrigeration and will result in a colder product. Input location of refrigeration is important to maximize product temperatures and refrigeration use. In systems using ice, the majority of refrigerant should be added in the final third of the chiller unit. This will move the flow of refrigerated water across all the birds and back to the overflow. Confirm with local regulations prior to pumping water back as some agencies do not allow the clean back to dirty concept.
6.2 Chiller Refrigeration Systems
The majority of refrigeration should be added in the final third of the chiller
Factors in chilling that affect moisture absorption include water temperature, flow, and agitation

CHILLING
39
COBB PROCESSING M
ANAGEMENT GUIDE
In facilities that use anti-microbial interventions as part of the chiller system, the most common chemical used is chlorine at a concentration of 5ppm (free measurable) at the overflow. In many countries, the use of other chemical interventions include application into one or both chiller stages and a separate short dwell application section after the final chiller. Most chemicals used are acidic with a low pH, but if not used properly can reduce the yield. Furthermore, extremely low or high pH values will antagonize the effectiveness of chlorine. Antimicrobial interventions can be very effective, but a buffer system is required to keep a stable pH and prevent yield loss. Use all chemicals according to the manufacturer’s directions.
6.3 Anti-microbial Interventions
Moisture absorption goals are based on product specifications and government regulations. A major part of moisture absorption is related to the scalding and picking operation as well as opening cuts in evisceration. Factors in chilling that affect moisture absorption include water temperature, flow, and agitation. Moisture absorption can be reduced by adjusting the water temperature in the pre-chiller unit to a lower temperature or by reducing the air agitation. However, agitation is also critical to the BTU exchange so be cautious with reductions. Do not confuse water pockets for moisture absorption (see page 27). Water pockets are a picking and process problem that distorts moisture absorption and sizing. Use an adequate drip line time or dewater screening to remove loose moisture that can cause cross contamination and packaging leakage.
6.4 Moisture Absorption (Up-Take)
Commercial air chill systems are used in many parts of the world. The decision to use air chilling may be based on government requirement or customer preferences. In many parts of the world air chilling is used due to water availability, cost, and treatment.
6.5 Air Chilling
Use an adequate drip line time or dewater screening to remove loose moisture that can distort sizing and cause package leakage.

CHILLING
40
COBB
PRO
CESS
ING
MAN
AGEM
ENT G
UIDE
There are 3 types of in-line air chilling that are commonly used. The most common is the multi-tier down flow system that uses moderate air speed. Another system, the single tier directional flow system, directs air inside the empty cavity and provides a much faster chill time while preventing frozen extremities. Finally, a multi-tiered maturation system is part of a very effective in-line aging process that incorporates CAS, electrical stimulation, and extended time in air chilling. Products from this system have tenderness values that are equal to traditional aging for several hours in holding coolers.
Critical points in air chilling include:
✓ Maintain adequate humidity or use water spray cabinets to keep the skin moist to promote heat (BTU) transfer.
✓ Prevent the skin from drying, cuticle damage, and prevent excess dehydration (yield loss).
✓ Keep chill room air temperatures at 0°C (32°F) or slightly above to prevent frozen extremities, inconsistent chilling and excess yield loss from dehydration.
Air chilling has some benefits including reduced labor cost, but preventing dehydration of products can be challenging.

CHILLING
41
COBB PROCESSING M
ANAGEMENT GUIDE
Air chilling benefits and challenges
Benefits Challenges
Initial cost (higher)
Yield loss from dehydration
Increased dwell time
Requires larger floor space
Product appearance (dehydration spots)
Inconsistent chill temperatures
Labor reduction (cost)
Product identity (first-in first-out) and traceability
No co-mingling (contamination)
Market perception
No excess water in packaging
Technology integration (adaptable)
Possible application for in-line maturation
Utility costs (lower)
Air chilling projected dwell times needed to reduce product temperature to 1.5°C (35°F)
*The times assume adequate refrigeration capacity, air movement, water spray temperature and rates. If weights vary considerably, additional time may be required.
Without Giblets Kg (lbs) *Time (min.)
95-100
100-105
105-110
110-115
115-120
120-125
125-130
130-135
135-140
1.13-1.38 (2.5-3.0)
1.4-1.58 (3.1-3.5)
1.63-1.81 (3.6-4.9)
1.85-2.04 (4.1-4.5)
2.08-2.26 (4.6-5.0)
2.31-2.49 (5.1-5.5)
2.54-2.72 (5.6-6.0)
2.76-2.94 (6.1-6.5)
2.99-3.17 (6.6-7.0)
No moisture uptake

CHILLING
42
COBB
PRO
CESS
ING
MAN
AGEM
ENT G
UIDE
Many facilities use combination systems consisting of both water immersion or sprays and air chill. One type of system consists of a traditional immersion type water chiller with product subsequently hung on a traditional air chiller system. A second option is a system that is designed with water baths inside and underneath the air chill room where the carcasses can transfer from the evisceration line to water chill tanks and then into the air chiller. Combination systems have some distinct benefits:
6.6 Combination Systems
✓ Decreases dwell time in traditional air chill operations.
✓ Variable settings available for each section.
✓ Consistency among internal product temperatures.
✓ Promotes low temperatures deep in muscles without freezing of small product parts.
✓ Minimal weight losses ranging from slight weight gain to moisture absorption.
✓ No water in tray or package.
✓ Fewer brown spots as a result of dehydration and cuticle damage.
✓ Hygienic design that inhibits microbial growth by maintaining a water barrier.
✓ Product identity (first-in first-out) and traceability.
Issue Possible Causes Possible Solutions
Product temperature is too warm Chiller system dwell time too short; Chill tank is overloaded
Design the system (volume and dimensions) to match carcass size and speed per hour
Water (or air temperature in air chill) in chiller system not cold
Increase refrigeration to achieve proper temperature; check for equipment issues
Not enough water flow or agitation (air movement in air chiller)
Increase water flow or agitation or air movement
The pH in chiller is too low usually due to antimicrobial acidity
Add buffering agent to control pH; change location of antimicrobial application to before or after the
chiller
Product is exiting the chill system with black wing tips and tails
6.7 Common Issues and Solutions in Chilling

CHILLING
43
COBB PROCESSING M
ANAGEMENT GUIDE
Issues Causes Possible Solutions
Product is excessively dehydrated Temperature of air chiller is too cold Set the temperature at 0°C
Skin is dry due to low humidity or lack of water cabinets
Correct humidity and add water cabinets
Improper air conditions for dwell time Correct air flow and speed
Main cuticle is damaged from scalding and pickingReduce picking pressure and add more
humidity and water to spray cabinets to prevent dehydration
Air chilled product skin has large brown and dry spots
Scalding and picking operations are too aggressive causing underlying membrane and fat to liquefy
becoming solid during chilling
Reduce picking pressureLarge fat deposits under the back skin
Too much moisture absorption Excessive picking pressure
Improper opening cut during evisceration Evaluate and correct if the cut is too long
Agitation in the pre-chiller is excessive Reduce agitation
Water temperature in the pre-chiller is too warm Reduce temperature in pre-chiller unit
Poor final wash in the evisceration process Check the wash cabinet to ensure there are enough nozzles and they are properly directed
Water in the chilling system is very heavy with organic particles or blood
6.7 Common Issues and Solutions in Chilling (cont.)
Reduce picking pressure
Check the rate and volume of water flowInsufficient water volume or flow
Sufficient volume of water and good pressure, but not enough replacement water

PRODUCT PROCESSING
44
COBB
PRO
CESS
ING
MAN
AGEM
ENT G
UIDE
Product Processing
The process after the chiller is dictated by the product mix, customer specification, labor availability, cost, and facility volume. The goal of this area is to produce high quality and safe products that meet customer specifications at a cost that will generate profits for the producer. The key is to maximize the yield and yield value of all the products from the chiller. Yield value improves by developing a good sales market and putting as many of the products as possible into the highest value-added category.To increase high value product volume, focus on sizing and grading
carcasses from the chiller system. Separate the carcasses by size, and those sizes which are in high demand without defects, should be directed to lines producing the prime, high-value products. Maximizing profit then will depend on the quality of further processing of carcasses that are not prime sizes or have defects. In the most effective operations, suboptimal carcasses will increase in yield value by processing them into cut parts and deboned products. Value can be further increased with processes including portioning, marinating, glazes and coatings or by using preferred packaging such as tray packs incorporating modified atmosphere technology.

PRODUCT PROCESSING
45
COBB PROCESSING M
ANAGEMENT GUIDE
With today’s technology in meat separation, low value trim and deboned carcasses can be upgraded to very high value products. These products then can be used to produce sausages, nuggets, patties and other specialty products. Yield value can also be further enhanced by temperature processes including individual quick freezing (IQF) and partially frying or even fully cooked through ovens or smokehouse operations.
In many facilities the operations can be completely manual while in some facilities processing is highly automated. The best practice goals for processing include:
✓ Controlling the environmental temperature, operational sanitation and Good Manufacturing Practices (GMPs) are critical.
✓ After the chiller process, best practice is to have line speeds at least 10% faster than slaughter speed.
✓ Always operate the process as an in-line operation and not a batch operation.
✓ While processing, handle the product as little as possible to prevent microbiological issues.
✓ Avoid accumulations of product at any one point to keep product out of tubs.
✓ Reduce variation of products going to automation as much as possible.
✓ For marinated products, have well-written programs for the marinade and strictly follow the program.
✓ Always keep product going to the marinade process below 4°C (40°F) and keep the marinade solution as cold as possible (-1°C; 30°F).
✓ Monitor marinade absorption (be aware of any local legislation for marinade absorption).
✓ Use intelligent scales and check weighing to reduce waste and improve specification compliance.
✓ Measure the efficiency of each process daily. If the goal is not achieved, use collected data to determine and correct any variance.

PRODUCT PROCESSING
46
COBB
PRO
CESS
ING
MAN
AGEM
ENT G
UIDE
7.1 Cutting and Packaging Environment
Control of the cutting and packing environment is critical to produce high yields of high quality and safe products. Design of the environment should be food safety and regulatory agency compliant and allow for proper cleaning and sanitation. Pre-operational and post-sanitation cleaning checks are vital to producing product in a high quality environment.
✓ Pre-operational sanitation should clean both direct contact and indirect contact surfaces including conveyor frames, table legs, overhead-line turn wheels and track. Areas including walls and ceilings that are not cleaned every day should be on a regular cleaning schedule.
✓ Inspect equipment and surfaces with a “look clean, smell clean, feel clean test”, and validate as part of a standard microbiological validation program.
✓ Control the cutting-packing area temperatures keeping them as cold as possible to help maintain the product temperature and prevent microbiological growth.
✓ Areas after the chiller should have positive pressure (when the door is opened the air blows out) to prevent airborne contaminants from entering.
✓ Have written GMPs and Standard Sanitation Operating Procedures (SSOP) for employee practices. Rigorously and continuously train the team to ensure proper employee practices.
✓ Support materials such as tubs, racks, and cutting utensils must have a good cleaning program to remove any organic accumulation and biofilm. In-line tub washers must have good pressure, proper water temperature (above 55°C; 131°F) and use an effective sanitizer. The facility floors should be designed to drain well, prevent standing water
and free of cracks and holes. Here, cracks and chips in the floor hold water and prevent the floor from completely drying.

PRODUCT PROCESSING
47
COBB PROCESSING M
ANAGEMENT GUIDE
7.2 In-line Operations and Best Practice
The design of an in-line operation with good workflow will minimize the number of times a product is handled and maximize labor as the product moves at a regulated rate. This allows management to control the work pace and output of the labor force. With batch processing, employees can work at their own speed and thus control the process efficiency. While working on static surfaces such as conveyor side tables and cutting boards, it is not feasible to apply the first-in first-out concept that can be readily used with moving conveyor belts and lines. Static surface work is conducive to product accumulations. Increased moisture loss and microbiological issues may occur in accumulated product that sits for an extended period.
✓ Ensure the line speed after the chiller process is at least 10% faster than the slaughtering lines to prevent product accumulations.
✓ Use overhead lines to transport product to the different process lines. Use belt conveyors to transport the product through the process to packaging. Then use conveyors to transport product to the staging areas for freezing or cooling.
✓ Total process from chiller exit to product into the cooler, freezer, or heat process, should be designed and operated to minimize product temperature abuse. Best practice is to keep product temperature below 7°C (45°F).
Processing operations can be manual or almost fully automated. However, both manual and automation have challenges and benefits. The manual lines will usually have a higher yield, less mis-cuts and rework. Automated lines maximize labor, have higher volumes of product, less handling (contamination) and maximize floor space. Automation is usually the best option in situations with high volume production and rapid line speeds.
Manual operations will have fewer mis-cuts.
Automated lines maximize labor, have higher volumes of product, less handling (contamination) and maximize floor space.

PRODUCT PROCESSING
48
COBB
PRO
CESS
ING
MAN
AGEM
ENT G
UIDE
7.3 Sizing and Grading
A critical factor of using fully automated cutting or deboning equipment is the amount of variation in the carcasses processed through the equipment. Variation is an issue when carcasses have a wide range of sizes, are distorted from accumulations in tubs, or are damaged. Reducing variation in carcasses always results in better performance, less rework, and increased yield.
Much of the new automatic cut-up and debone technology is equipped with scanning vision, laser or mechanical means to measure the dimensions of the product and self-adjusts which significantly increases the efficiency of the equipment.
✓ The product mix and volume will determine the number of automated machines and hand operations needed.
✓ From the chill system, incorporate sizing with manual or automated vision to sort by weight and defect to determine which operation the product will be sent to maximize yield value.
✓ With automation, use a multiple line approach that includes a hand operation to remove the wrong size, defective, and accumulated product from the conveyor or line system.
✓ Most manufactures of automated equipment have a recommended size range. Many cut-up systems will allow a variation of plus or minus 20% or plus or minus 225 grams (0.5lb) from a weight set point. It is very important to understand the range of variation when considering purchases of equipment.
✓ Size and grade product based on standards that do not exceed manufacturer’s recommendations.
From the chill system, incorporate sizing with manual or automated vision to sort by weight and defect to determine which operation the product will be sent to maximize yield value (Smart Scale).

PRODUCT PROCESSING
49
COBB PROCESSING M
ANAGEMENT GUIDE
7.4 Cut-up and Deboning
The deboned breast and leg meat process is usually used to increase yield value, but there are several types of deboning processes. To determine which process is optimal, consider yield and yield value, labor availability, local legislation for labor, labor cost, production rate and physical space in the facility.
Manual Debone
Manual debone will always have a major advantage if the mix includes products with the rib meat, shoulder tab and eye meat. These will increase yield as parts of fillets and tenders. Proper cuts and pulling meat from the shell as opposed to cutting the meat from the shell will increase yield.
The highest yielding debone operations are always the manual moving cone lines that start with wing-on front halves or whole birds. Overhead shackle manual debone lines with carcasses hung by the neck usually have lower yield because it is difficult to extract eye and scapula meat. Overhead shackle lines do have advantages of line speed, staffing and line lay-out for distributing parts for further processing and packaging.
Manual lines must have a well-trained staff, support system, the right size and type of knives with knife sharpeners to achieve high yields. Manual processes should always include a monitoring system with zero based scrape tests (see section 7.5), evaluation of trim for excess and skin evaluation for breast meat loss.
✓ Send product that is too large or too small, has parts missing, or is damaged or distorted to a manual line. This will allow the automated equipment to operate optimally and will produce better cuts, less rework and higher yield.
PRODUCT PROCESSING
50
COBB
PRO
CESS
ING
MAN
AGEM
ENT G
UIDE
1. The first step is the shoulder cut. Ideally, use a short 2.5 to 3-inch (in length) thinner knife to make this cut, because the cut is made with the tip of the knife across the pulley bone. Next, turn the knife and cut through the joint while twisting the wing. The cut must be deep enough to release the joint and cut the tendon allowing the eye meat to be pulled from inside the shell. The cut should continue down the back, pressing flat against the scapula bone to scrape and release the rib meat. Finally, pull the wing and breast straight down half-way until the breast separation is below the fan bone.
2. Next, cut around the wing joint while starting on the wide side of the meat using a 6-inch knife, while rolling the wing with the other hand. The amount of meat left on the wing will depend on the product mix and yield value. If wings are in high demand or costumer requests, make the wing cut in a larger circle. If breast meat is more valuable, make a smaller cut rolling around the knuckle leaving as much meat as possible on the fillet.
3. Skin pulling should leave all breast meat attached to the fillet. Special care must be taken around the shoulder tab meat which must be squeezed to reduce loss.
4. Removing the butterfly breast from the carcass must be a down-and-out pull process making sure not to leave any meat and making sure all bones remain on the shell and not in the fillet. The primary bone trimming should be done after the fillet and carcass are separated. If the bones are missing from the carcass, then they are in the fillet and should be removed.
5. Tender removal should use a cross-cut (X-cut) scoring method with a single bladed knife starting above the tendon and scraping along the keel on the opposite side. The side score is then made from the top of the tender down to the bottom tip of the tender, and is deep enough to cut through the membrane. Tenders should be removed by running a thumb up along the pulley bone and pulling with a downward and outward motion.
6. Many facilities send fillets to a final trim station for inspection, cutting, and trimming. Any trim should be sorted into two categories, edible or discard which includes bruised meat, bones and cartilage sent to pet food or rendering. If the facility has an MDM operation, good bone in trim can proceed along with the carcass through the operation to increase yield value.
Manual Debone (cont.)

PRODUCT PROCESSING
51
COBB PROCESSING M
ANAGEMENT GUIDE
Deboning Dark Meat
Automated systems are superior to manual system for deboning dark meat based on yield and efficiency. Many of the new systems have self-adjustment features based on weight and measurements of the product (leg bone length) as part of the process. Monitoring and adjustment of the equipment is critical for automated systems, while training and evaluating job performance are an essential part of a manual system. When deboning dark meat, assess any leg or hock damage and check for properly cut thighs.
✓ The supply of birds in compliance with machine manufacture guidelines is critical.
✓ The manual loading of machines must be consistent and done by trained team members.
✓ With some automated deboners the shoulder cut is done manually for better yield but increases labor cost and decreases the line speed.
✓ A common problem is accumulation of meat at the module cutting stations and take away conveyors. This must be constantly monitored and corrected.
✓ Trimming and bone removal from fillets is more difficult due to line speed and the process of removing the pulley bones. It is recommended to incorporate X-ray and vision technology as part of the system to make removal more efficient.
Automated DeboningThe new automated systems are designed to process up to 100 birds/fronts per minute, while manual lines will range from 20 to 70 birds per minute depending on the cut. Automation is a good solution if the labor force is not available, unstable, or compensation costs are not feasible. Automation is also an excellent solution when demands are for prime fillet or customers will not accept the rib meat, flank skirt, shoulder tab or eye meat.
As with any technology the repair and maintenance of equipment is critical. Follow the manufacturer’s recommendation on preventative and predictive maintenance.
Adjustments should be based on a continuous monitoring program that identifies defects, excess rework and excess yield loss. The debone and cut-up equipment should have dedicated well-trained technicians to identify and make these adjustments. Operational efficiency and performance of automated deboners are dependent on several key factors:

PRODUCT PROCESSING
52
COBB
PRO
CESS
ING
MAN
AGEM
ENT G
UIDE
For Breast Meat1. Collect 10 consecutive shells from one deboning line – The data collector should not prepare the line for the
data collecting to prevent bias. Do not collect shells that are broken or mutilated.2. Standardize neck lengths of shells – Inspect shells and make sure all necks are cut level with the shoulder joints.3. Record the weights of all 10 shells – Weigh all 10 shells together and record the weight.4. Scrape Shells – Place one shell at a time on a stationary cone and remove all the meat from scapula bone to
scapula bone. Make sure the scapula bones, pulley bones, keel bones, and ribs are scraped clean and that all meat (including the eye meat) is removed from the shell (do not scrape the back of the shell behind the scapula bones). Repeat for all 10 shells.
5. Record the weight of the meat scraped from the shells – Weigh all the meat together and do not to include bones or cartilage.
6. Divide the meat weight by the unscraped shell weight – This is the scrape yield percentage. Use this formula to calculate scrape yield:
meat weight / (un-scraped shell weight + meat weight)
Best practices include a formal process to measure and communicate results of the debone operations. There are many real time yield control programs that are available, but the most widely used is the Manual Debone Zero-Based Scrape Test. This data is a good tool to monitor yield. Post the results where they can be seen, so that team members can work to improve their part in the efficiency of the process.
7.5 Evaluating the Deboning System
For Leg Meat1. Collect 10 consecutive leg bones from the debone station – The data collector should not prepare the line for the data collecting to prevent bias. Do not collect legs
that are broken or mutilated.2. Record the weight of all 10 leg bones – Weigh all 10 bones together and record the weight.3. Scrape bones – Remove all the meat including the meat that cannot be removed in the manual system and scrape the bones clean.4. Record the weight of the meat scraped from the bones – Weigh all the meat together and do not to include bones or cartilage.5. Divide the meat weight by the unscraped bone weight – This is the scrape yield percentage. Use this formula to calculate scrape yield:
meat weight / (unscraped bone weight + meat weight).

PRODUCT PROCESSING
53
COBB PROCESSING M
ANAGEMENT GUIDE
7.6 Marinade
General Considerations ✓ All marinated products should have written, detailed programs and standard documentation forms that are used for every batch of marinade.
✓ Always mix the water and phosphates first before other ingredients in the marinade solution.
✓ Always keep the marinade temperature less than 4°C (39ºF).
✓ The holding tanks should constantly mix.
✓ Monitor, record, and track marinade absorption.
✓ Use a central mixing system that meters the volume of solution when the facility has multiple lines using the same marinade formulation.
Vacuum Tumbling ✓ Vacuum tumble marinating is usually used in boneless meats but can be part of a 2-step process after a needle injector to maximize absorption. Ideally, marinade
meat within 48 hours of slaughter as increasing age makes absorption more difficult.
✓ Load tumblers with pumps and / or conveyors to reduce floor loss of product and marinade.
✓ Always maximize vacuum and dwell time to increase absorption and retention.
✓ Rotation speed in the barrel must be optimal for the product. A higher rotation speed will allow more marinade absorption but can cause damage to fragile product.
✓ Minimize the time that vacuum marinated meat is retained in tubs or tanks as marinade will seep out of the muscle. If product is held more than 2 hours, it should
be vacuum tumbled again.
Needle Marinating ✓ Needle injection is an in-line application and is effective for bone-in parts and whole products.
✓ The type of conveyors used, needle patterns, and product flow rates should be based on manufacture recommendations. The best injection marinade practices
often are equipment and product specific.
✓ Make sure needle diameter and gauge are correct for each marinade.
✓ Monitor hoses and connections to prevent leaks.
✓ Cleaning of screens and filters is critical.
✓ A needle clean-in-place system for sanitation is essential.
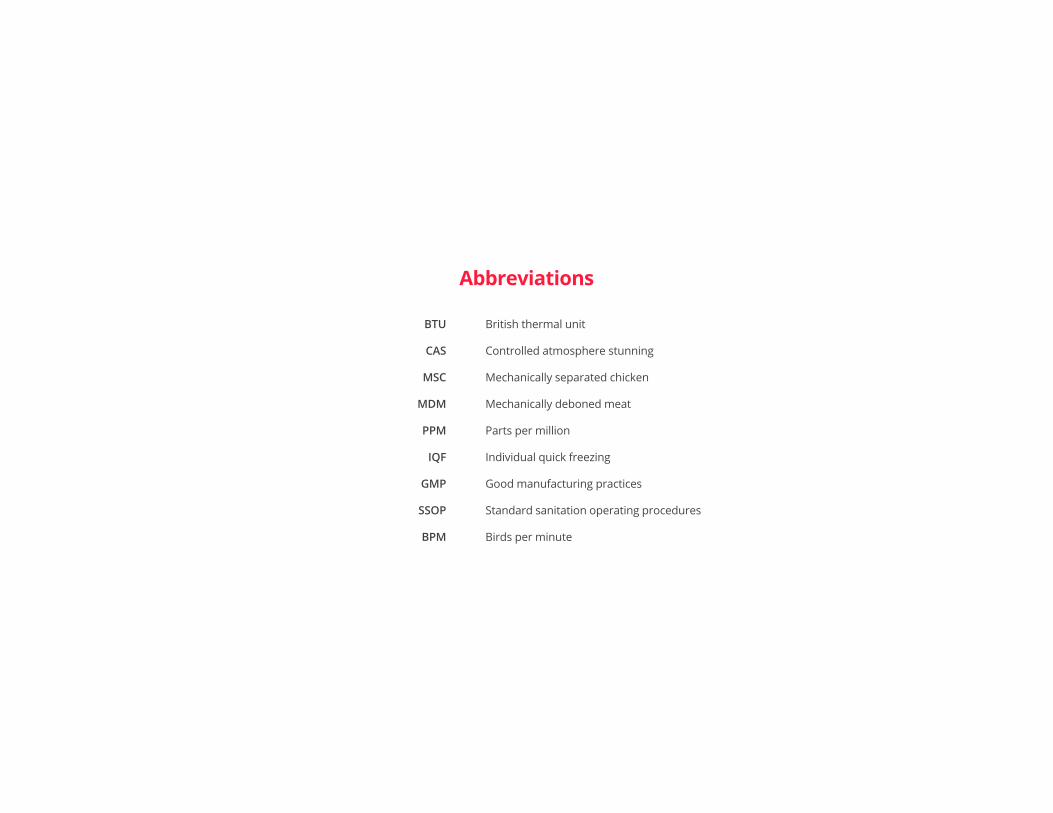
Abbreviations
BTU
CAS
MSC
MDM
PPM
IQF
GMP
SSOP
BPM
British thermal unit
Controlled atmosphere stunning
Mechanically separated chicken
Mechanically deboned meat
Parts per million
Individual quick freezing
Good manufacturing practices
Standard sanitation operating procedures
Birds per minute


www.cobb-vantress.comL-008-01-20 EN