clothier guide - squarespace · thank you for investing the time to read the ustyylit m4u clothier...
TRANSCRIPT

Clothier Guide Garment Measurements & Observations

Page 2
Table of Contents
Overview ................................................................................................................................................................................. 4
Introduction to USTYYLIT M4U .................................................................................................................................. 5
Garment Measurements vs. Body Measurements .................................................................................................... 6
Observations vs. Fit Tools .......................................................................................................................................... 6
Garment Measurements ......................................................................................................................................................... 7
Jacket GMs ................................................................................................................................................................. 8
Trouser GMs ............................................................................................................................................................... 9
Waistcoat GMs ......................................................................................................................................................... 11
Shirt GMs ................................................................................................................................................................. 12
Body Observations ................................................................................................................................................................ 14
Perkins Tools in USTYYLIT ........................................................................................................................................ 15
Perkins Shoulder Readings ....................................................................................................................................... 15
Shoulder Description................................................................................................................................................ 16
Perkins Incline Reading ............................................................................................................................................ 17
Posture ..................................................................................................................................................................... 18
Posture (continued) ................................................................................................................................................. 19
Chest Stature ............................................................................................................................................................ 20
Stomach Stature....................................................................................................................................................... 21
Seat Stature .............................................................................................................................................................. 22
Stance ....................................................................................................................................................................... 23
Jacket Observations .............................................................................................................................................................. 24
Collar Position .......................................................................................................................................................... 25
Collar Length ............................................................................................................................................................ 26
Shoulder Position ..................................................................................................................................................... 27
Arm Position ............................................................................................................................................................. 28
Armhole Depth ......................................................................................................................................................... 29
Upperarm Circumference ........................................................................................................................................ 30
Sleeve End Circumference ....................................................................................................................................... 31
1/2 Front Chest ........................................................................................................................................................ 32
1/2 Front Waist ........................................................................................................................................................ 33
1/2 Seat .................................................................................................................................................................... 34
Lapel Length ............................................................................................................................................................. 35
Top Button Position ................................................................................................................................................. 36
Trouser Observations ............................................................................................................................................................ 37
Front Rise ................................................................................................................................................................. 38
Back Rise .................................................................................................................................................................. 39
Hip Adjustment ........................................................................................................................................................ 40
Crotch Adjustment ................................................................................................................................................... 41
Page 3
Shirt Observations ................................................................................................................................................................. 42
Shoulder Description................................................................................................................................................ 43
Chest Stature ............................................................................................................................................................ 44
Armhole ................................................................................................................................................................... 45
½ Upperarm ............................................................................................................................................................. 46
Collar Position .......................................................................................................................................................... 47
Front Length ............................................................................................................................................................. 48
Advanced Topics ................................................................................................................................................................... 49
Garment Measurement Ranges ............................................................................................................................... 50
Selecting Observation Values – Min / Avg / Max explained .................................................................................... 51
Picking The Right Pattern Size For Each Garment Type ........................................................................................... 52
Jacket Size Details .................................................................................................................................................... 53
Trouser Size Details .................................................................................................................................................. 54
Waistcoat Size Details .............................................................................................................................................. 55

Page 4
Overview
Page 5
Introduction to USTYYLIT M4U
Thank you for investing the time to read the USTYYLIT M4U Clothier Guide. In case you’re wondering, USTYYLIT is
pronounced “you-style-it”.
USTYYLIT M4U represents a ground-breaking new way to look at selling Customized Tailored Clothing. Terms like
Bespoke, Custom, Made-to-Measure and Made-to-Order are often incorrectly interchanged.
Rather than getting caught up in deciding which one of the terms above applies to USTYYLIT, the acronym ‘M4U’
simplifies the conversation, since it stands for “Made-for-You”.
What’s the difference? USTYYLIT offers the choice of TWO methods to provide the measurements for your orders;
FT: Using USTYYLIT Try-On Garments and specifying + / - ‘Fit Tool’ Adjustments
GM: Using any garment and/or body measurements to specify ‘Garment Measurements’ & Observations
Regardless of how YOU want to work, the price is the same. The Fit Tool method (FT) offers unparalleled precision and
control of the pattern for those who are very detail oriented when it comes to fitting. The Garment Measurement
method (GM) allows Clothiers to specify the standard finished measurements desired, and choose from an extensive list
of alterations called Observations to adjust the pattern to meet your client’s needs.
Whether you choose the FT or GM method, the list of Design Options available are exactly the same and you can sell up
to SIX different garments on a single-page printed worksheet. The printed worksheet is setup in the same order as the
online order entry system. As a result, entering orders online while referencing the worksheet couldn’t be simpler.
Once you decide which USTYYLIT M4U method you like best, you can easily setup your favorite design options as Models
within your online shop. It is recommended to start with your 3 best-selling styles in each product category (Jacket,
Trouser, Waistcoat, Shirt).
USTYYLIT M4U supports entering measurements in Centimeters AND Inches. It’s important to note that the heart of the
USTYYLIT system operates in CENTIMETERS using European Sizing. However, Euro / Inch conversions are displayed on all
literature and within the online program wherever size selection takes place. You should have no trouble selecting a size
if your preference is to work with inches.
USTYYLIT M4U offers you, our valued professional Clothiers, all of the Fit and Design tools necessary to sell Customized
Tailored Clothing to nearly any man. It’s called USTYYLIT M4U for a reason…
“You-Style-It… (with a system) Made-For-You”.
It’s not just about customized clothes made for clients. It’s an ordering platform made for professional Clothiers. Just as
you take the art of Sartorial dressing seriously with your clients, we take our role in your business just as seriously and
have made every effort to make USTYYLIT M4U the finest manufacturing platform available for you.
Please take the time to understand this Clothier Guide and make the most of this powerful system. Your clients will look
fantastic!

Page 6
Garment Measurements vs. Body Measurements
As the names suggest, the differences are:
Garment Measurements (GMs) are the FINISHED measurements of the physical garments
Body Measurements (BMs) are the SKIN measurements of your client
Whether using the FT or GM method, USTYYLIT M4U works from Garment Measurements. For this reason, it is strongly
recommended that you own a set of USTYYLIT Try-On garments for the best results. (If you don’t already own a set,
please reach out to your sales contact to inquire about pricing and how to order).
Having said that, it is known that a Try-On garment is not always available in the right size. Your client may be too large
or small for your Try-On inventory, or your selling appointment may take place at the client’s home or office. Whatever
the case, the GM method allows you to observe any garment on your client to record the finished Garment
Measurements, and determine the alteration Observations that apply to your client’s needs.
If no garment is available for observation, USTYYLIT offers extensive Garment Measurement charts. The charts will help
you reference your client’s body measurements to determine the Pattern Size you want the order to be made with and
the Garment Measurements your client requires.
The USTYYLIT M4U worksheet provides space for you to record your client’s Body Measurements, however please note
that ONLY Garment Measurements are requested by the online system when placing orders.
Observations vs. Fit Tools
Both are used to adjust the pattern with great detail, however the differences are:
Observations can be based on ANY garment or conclusions derived from body measurements
Fit Tools are adjustments specifically derived from using USTYYLIT Try-On garments
Which method is for you? Observations are part of the Garment Measurements (GM) method. The Fit Tool (FT) method
is specifically intended to be used with our Try-Ons. So if you don’t have USTYYLIT Try-Ons, you should use the GM &
Observations method. If you do have USTYYLIT Try-Ons, you can use whichever method suits your preference.
In General, the GM & Observation method is intended to be more simplified, and allows you to adjust the pattern based
on more objective observations, rather than being focused on specific adjustment amounts. The Fit Tool method
requires you to specify exactly how much you want to adjust the pattern.
The Fit Tool method is best suited to Clothiers with several years of Fitting experience and want finite accuracy. The GM
method is suited to Clothiers who recognize that most consumers are NOT that hard to fit, and when it comes to
alterations… less is more.
You can achieve a fantastic fit with both methods, and you can still handle “hard-to-fit” clients with the GM &
Observation method.
The following pages outline how to take Garment Measurements for Jackets, Trousers, Waistcoats and Shirts.

Page 7
Garment Measurements

Page 8
Jacket GMs
1/2 Shoulder 1/2 Back 1/2 Girth
Best to measure with garment on client or mannequin. Measure from Shoulder & Sleeve seam intersection to center back seam.
Best to measure with garment on client or mannequin. Measure from back Sleeve seam intersection to center back seam.
Garment should be laid on flat surface. Measure from center back seam to front edge, approximately 7cm | 2 3/4” above the front pocket.
Back Length Outsleeves 1/2 Upperarm
Easiest to measure with garment on client or mannequin. Measure from bottom of collar Melton down to end of jacket along the center seam.
Easiest to measure with garment on client or mannequin. Measure from top of shoulder to end of sleeve. May be easier for some to measure from the sleeve end upward.
Garment must be laid on a flat surface. Measure from armpit and chest intersection straight across the sleeve.

Page 9
Trouser GMs
1/2 Waist 1/2 Seat 1/2 Thigh
Lay garment on flat surface with fly and waistband fastened. Measure waistband from end-to-end. Add 1-1.5cm | or ½” to client’s waist BM, then divide by 2.
Lay garment on flat surface with fly and waistband fastened. Measure across the seat at the bottom of the front pockets and fly. Add 5.5cm | 2” to client’s Seat BM, then divide by 2.
Lay garment on flat surface, folded so that the pressed leg creases are the outside edges. Measure 10cm down from the crotch, straight across.
1/2 Knee 1/2 Foot Outseam
Measure straight across from front-to-back leg crease, approximately 33cm | 13” down from the crotch for Regular Length. (30cm Short | 35cm Long)
Measure straight across from front-to-back leg crease (or from seam-to-seam if laid flat as shown) at the end of the pant leg.
Measure from top of waistband straight down to end of leg along the side seam.

Page 10
Rise (US Rise) Inseam
Rise cannot be directly measured. It is calculated by subtracting Outseam minus Inseam.
Lay garment on flat surface folded with pressed creases as the outside edges. Measure from crotch intersection to the end of the leg, along the inside seam.
(Note: Inseam is not required for order entry. Only measure inseam if you want to calculate the rise from an existing trouser)

Page 11
Waistcoat GMs
Back Length 1/2 Waist 1/2 Back
Measure from center back neck down to the bottom following the center seam.
Lay garment on a flat surface and measure from center back seam to front edge, at the height of the front pocket.
Measure straight across the back to the center seam at the intersection where the armhole meets the front and back seam.

Page 12
Shirt GMs
Collar 1/2 Chest 1/2 Waist
Lay shirt flat with front placket unbuttoned. Measure from center of neckband buttonhole to the button thread stem on the other side.
Lay shirt flat with front placket unbuttoned. Measure from center of neckband buttonhole to the button thread stem on the other side.
Lay shirt flat. Measure from side-to-side at the midpoint of the torso between armpit and bottom hem.
1/2 Hips 1/2 Shoulder Back Length
Lay shirt flat. Measure from side-to-side at the bottom of the torso, approximately 2.5cm above the bottom hem.
Lay shirt flat. Measure from sleeve intersection to the center of the shirt along the yoke seam (or measure all the way across and divide by two)
Lay shirt flat. Measure from the bottom of the neckband to the bottom hem.

Page 13
Sleeve Length Cuff 1/2 Upperarm
Lay shirt flat. Measure from the shoulder/sleeve intersection down to the end of the cuff.
Lay shirt flat. Measure from cuff end-to-end where the cuff is sewn to the sleeve.
Lay shirt flat. Measure 10cm down from the chest/armpit intersection, parallel to the sleeve.

Page 14
Body Observations

Page 15
Perkins Tools in USTYYLIT
Perkins Tools are hand-held instruments that help Custom Clothiers determine various alteration and/or pattern
adjustments. If you do not use Perkins Tools you can ignore this page. While there are several Perkins Tools available,
USTYYLIT offers support for TWO of them; the Shoulder Reading Device and the Incline Device.
USTYYLIT allows you to enter the readings from the devices, and automatically maps them to the corresponding
Shoulder Description and Posture observations and selects them for you. If you do not agree with the auto-selections,
or just need to change them for whatever reason, you can override them by simply manually changing the selection.
USTYYLIT does not endorse or promote the use of Perkins Tools, nor do we guarantee the accuracy of the readings. The
support offered in the system is for the convenience of those who use them on a regular basis and wish to record the
readings along with all of the other observations.
Perkins Shoulder Readings
Perkins Shoulder Readings
What to look for How the adjustment corrects it
Used to determine the slope of the shoulder. The tool's slope
angle reading predicts the vertical drop from top to end of shoulder.
The reading is matched to the appropriate Shoulder Description
(see next page)
Place the device's curved end at the top of the shoulder, and allow the device to rest naturally without applying any downward pressure
The reading itself is not used. It is converted to a Shoulder Description that is used to alter the shoulder slope of the jacket
Reading Values Available
(tools not available with centimeters)
1” 2 1/2”
1 1/4” 2 3/4”
1 1/2” 1 3/4”
2” 2 1/4”
3” 3 1/4” 3 1/2”
Back to Top

Page 16
Shoulder Description
Shoulder Description High
What to look for How the adjustment corrects it
End of Shoulder is raised to better match the slope of the client's
shoulder
Fabric will roll or gather below the collar. The larger the roll, the more adjustment needed
Raising the end of the jacket's shoulder relieves the upward pressure from the client's shoulder, allowing the collar to rest naturally
Adjustment Values cm
Adjustment Values in
Min 1cm Min 3/8”
Avg 1.5cm Avg 5/8”
Max 2.5cm Max 7/8”
Shoulder Description Sloping
What to look for How the adjustment corrects it
End of Shoulder is lowered to better match the slope of the
client's shoulder
Fabric will gather as creases around the armpit area at the back and front of the jacket
Lowering the end of the jacket's shoulder allows it to lay more directly against the client's shoulder, which helps remove the creases
Adjustment Values cm
Adjustment Values in
Min 1cm Min 3/8”
Avg 1.5cm Avg 5/8”
Max 2.5cm
Back to Top
Max 7/8”

Page 17
Perkins Incline Reading
Perkins Incline Reading
What to look for How the adjustment corrects it
Used to determine client's posture. The tool's incline angle reading predicts the horizontal
indent of the client's neck vs. their shoulder blades. The reading is
matched to the appropriate Posture description
(see next page)
Ensure the client is standing naturally and place the device against their back with the curve of the top piece resting against their shirt collar (or neck if not wearing a shirt with collar)
The reading itself is not used. It is converted to a Posture Description that is used to alter the balance of the jacket to better match the client’s posture
Reading Values Available
(tools not available with centimeters)
1” 2 1/2” 4”
1 1/4” 2 3/4” 4 1/4”
1 1/2” 1 3/4”
2” 2 1/4”
3” 3 1/4” 3 1/2” 3 3/4”
4 1/2” 4 3/4”
5”
Back to Top

Page 18
Posture
Posture Erect
What to look for How the adjustment corrects it
The jacket's balance is shifted by shortening the back and
lengthening the front at the height of the chest and blades
From a side view the front of the jacket will be shorter than the back. It may also "float away" from the client's torso at the front and appear tight against his seat
Shifting the balance at the top of the jacket allows it to rest more naturally on the client's torso, and corrects the length difference at the bottom
Adjustment Values cm
Adjustment Values in
Min 1cm Min 1/4”
Avg 1.5cm Avg 1/2”
Max 2cm
Max 3/4”
Posture Stooping
What to look for How the adjustment corrects it
The jacket's balance is shifted by lengthening the back and
shortening the front at the height of the chest and blades
From a side view the front of the jacket will be longer than usual than the back. It may also "float away" from the client's torso at the back and appear tight against his stomach
Shifting the balance at the top of the jacket allows it to rest more naturally on the client's torso, and corrects the length difference at the bottom
Adjustment Values cm
Adjustment Values in
Min 1cm Min 1/4”
Avg 1.5cm Avg 1/2”
Max 2cm
Back to Top
Max 3/4”

Page 19
Posture (continued)
Posture Head Forward
What to look for How the adjustment corrects it
Jacket collar is shortened and raised to remove any gaping
(empty space) and make it rest directly against the shirt collar
From a side view the length of the jacket looks normal, however the collar sits away from the client's neck and may appear low in comparison to the shirt collar
Shortening and raising the collar makes it rest properly against the shirt collar
Adjustment Values cm
Adjustment Values in
Min 0.5cm Min 1/8”
Avg 1cm Avg 3/8”
Max 1.5cm
Max 5/8”
Back to Top

Page 20
Chest Stature
Chest Stature Flat
What to look for How the adjustment corrects it
Front Chest is reduced to remove vertical creases where chest
meets sleeve seam and armpit
While the garment may fit well elsewhere, the front chest area is loose, causing vertical creases
Reducing the front chest makes the garment lay more closely to the client's chest
Adjustment Values cm
Adjustment Values in
Yes Yes
No No
Chest Stature Full
What to look for How the adjustment corrects it
Front Chest is let out to relieve pressure against the chest and remove horizontal creases and
lapel “popping”
While the garment may fit well elsewhere, the front chest area is tight, possibly causing the lapels to "pop open" and create a gap
Letting out the Front Chest creates the necessary room to accommodate the client's chest. In extreme cases, you can also shorten the lapel or use the “Prominent Dart” design option
Adjustment Values cm
Adjustment Values in
Yes Yes
No No
Back to Top

Page 21
Stomach Stature
Stomach Stature Stout
What to look for How the adjustment corrects it
Lower jacket fronts are reduced via the seam from pocket to
bottom hem. Pocket dart is also modified to bring jacket closer to
client’s body.
Client's large, round stomach causes jacket to lay loosely immediately below the stomach.
Modified darts reduce the excess fabric in the lower front area, allowing the jacket to lay more closely to the body below the stomach
Adjustment Values cm
Adjustment Values in
Yes Yes
No No
Back to Top

Page 22
Seat Stature
Seat Stature Prominent
What to look for How the adjustment corrects it
Trouser back rise is made longer to accommodate client's prominently-shaped seat
Seat is tight across the "cheeks" and the waistband does not rest in the appropriate spot at the back
In combination with a larger seat measurement, lengthening the back rise provides more coverage over the seat and allows the waistband to rest in its natural position
Adjustment Values cm
Adjustment Values in
Yes Yes
No No
Seat Stature Flat
What to look for How the adjustment corrects it
Trouser back rise is made shorter to remove excess fabric due to
client's flatly-shaped seat
Seat is loose across the "cheeks" with excess creasing against the back of the upper thighs
In combination with a smaller seat measurement, a shorter back rise will help reduce the excess creases.
Adjustment Values cm
Adjustment Values in
Yes Yes
No
Back to Top
No

Page 23
Stance
Stance Sway Back
What to look for How the adjustment corrects it
Center back seam is reduced at the seat area to bring the jacket
closer to the client's body
The jacket does not lay flat against the seat, despite the length being fine.
Reducing additional fabric from the center back seam helps the jacket lay closer to the client's seat
Adjustment Values cm
Adjustment Values in
Yes Yes
No No
Back to Top

Page 24
Jacket Observations

Page 25
Collar Position
Collar Position Raise
What to look for How the adjustment corrects it
Jacket collar is raised to rest appropriately against the shirt
collar
More than the usual amount of shirt collar showing above the jacket collar. Often caused by a long neck or round back. Use sparingly when combined with Sloping Shoulders.
Raising the collar allows it to rest properly against the shirt collar.
Adjustment Values cm
Adjustment Values in
Min 0.5cm Min 1/8”
Avg 1cm Avg 3/8”
Max 1.5cm
Max 5/8”
Collar Position Lower
What to look for How the adjustment corrects it
Jacket collar is lowered, usually to remove a roll under the collar
Horizontal ridge(s) of fabric gather under the collar. Often caused by a short neck or prominent blades. Use sparingly, especially when combined with the High Shoulder adjustment.
Lowering the collar relieves the downward pressure caused by the jacket collar resting too high against the shirt collar
Adjustment Values cm
Adjustment Values in
Min 0.5cm Min 1/8”
Avg 1cm Avg 3/8”
Max 1.5cm
Back to Top
Max 5/8”

Page 26
Collar Length
Collar Length Shorten
What to look for How the adjustment corrects it
Jacket collar is shortened to remove any gaping (empty space) and make it rest directly against
the shirt collar
Gaping or empty space is seen between the jacket collar and shirt collar. Usually caused by a Head Forward posture or slim neck
Shortening the collar makes it rest more directly against the shirt collar. Do not use this in combination with Head Forward posture.
Adjustment Values cm
Adjustment Values in
Min 0.5cm Min 1/8”
Avg 1cm Avg 3/8”
Max 1.5cm
Back to Top
Max 5/8”

Page 27
Shoulder Position
Shoulder Position Forward
What to look for How the adjustment corrects it
Front and back panels are adjusted at the shoulder seam to relieve pressure against the front
of the client's shoulders
Pressure against the front of the client's shoulder may create a ridge of fabric along the top of the shoulder and behind the collar
Repositioning the shoulder seams allows the jacket to follow the client's shoulder contours better
Adjustment Values cm
Adjustment Values in
Yes Yes
No No
Shoulder Position Back
What to look for How the adjustment corrects it
Front and back panels are adjusted backward at the
shoulder seam to reduce excess fabric gathering vertically
between the blades
Excess fabric gathering between the blades and sleeves due to client’s shoulders pushing backward against the jacket’s shoulders.
Lowering the collar relieves the downward pressure caused by the jacket collar resting too high against the shirt collar
Adjustment Values cm
Adjustment Values in
Yes Yes
No No
Back to Top

Page 28
Arm Position
Arm Position Forward
What to look for How the adjustment corrects it
Sleeves are rotated to better match the forward pitch of the
client's arms
Fabric will gather as creases across the front of the sleeves due to forward pressure from the client's natural arm position
Pitching the sleeves forward relieves the pressure. Use pins just below the front pocket to determine the before & after adjustment amount.
Adjustment Values cm
Adjustment Values in
Min 1cm Min 1/8”
Avg 2cm Avg 1/4”
Max 3cm
Max 3/8”
Arm Position Back
What to look for How the adjustment corrects it
Sleeves are rotated to better match the backward pitch of the
client's arms
Fabric will gather as wrinkles across the back of the sleeves due to backward pressure from the client's natural arm position.
Pitching the sleeves backward relieves the pressure. Use pins just below the front pocket to determine the before & after adjustment amount.
Adjustment Values cm
Adjustment Values in
Min 1cm Min 1/8”
Avg 2cm Avg 1/4”
Max 3cm
Back to Top
Max 3/8”
Page 29
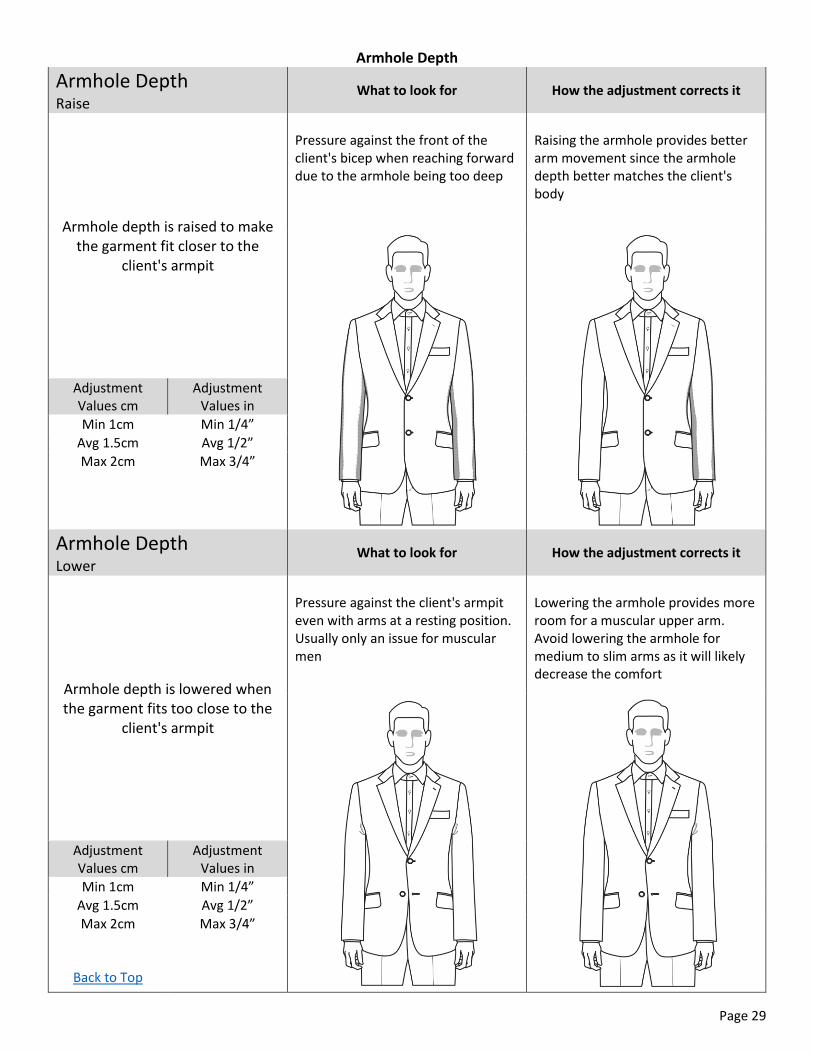
Armhole Depth
Armhole Depth Raise
What to look for How the adjustment corrects it
Armhole depth is raised to make the garment fit closer to the
client's armpit
Pressure against the front of the client's bicep when reaching forward due to the armhole being too deep
Raising the armhole provides better arm movement since the armhole depth better matches the client's body
Adjustment Values cm
Adjustment Values in
Min 1cm Min 1/4”
Avg 1.5cm Avg 1/2”
Max 2cm
Max 3/4”
Armhole Depth Lower
What to look for How the adjustment corrects it
Armhole depth is lowered when the garment fits too close to the
client's armpit
Pressure against the client's armpit even with arms at a resting position. Usually only an issue for muscular men
Lowering the armhole provides more room for a muscular upper arm. Avoid lowering the armhole for medium to slim arms as it will likely decrease the comfort
Adjustment Values cm
Adjustment Values in
Min 1cm Min 1/4”
Avg 1.5cm Avg 1/2”
Max 2cm
Back to Top
Max 3/4”

Page 30
Upperarm Circumference
Upperarm Circumference Let Out
What to look for How the adjustment corrects it
Sleeve circumference is increased making room for a larger upper
arm. Usually combined with Lowering Armhole
Sleeve is visibly tight against client's upper arm area even at resting position, or client simply prefers a looser fit
Letting Out the Upperarm provides more room for the client's arm
Adjustment Values cm
Adjustment Values in
Min 1cm Min 3/8”
Avg 1.5cm Avg 5/8”
Max 2cm
Max 7/8”
Upperarm Circumference Take In
What to look for How the adjustment corrects it
Sleeve circumference is reduced offering a more modern look,
especially for slim men. Usually combined with Raising Armhole
Sleeve is visibly loose around client's upper arm area, or client simply prefers a slimmer fit
Taking In the Upperarm provides a more modern look, and removes unnecessary excess fabric
Adjustment Values cm
Adjustment Values in
Min 0.5cm Min 1/8”
Avg 1cm Avg 3/8”
Max 1.5cm
Back to Top
Max 5/8”

Page 31
Sleeve End Circumference
Sleeve End Circumference Let Out
What to look for How the adjustment corrects it
Sleeve End is increased making room for a large wrist or watch and for men who prefer double cuff shirts with large cuff links
Sleeve is visibly tight against client's shirt cuff or client simply prefers a looser fit around the wrist.
Letting Out the sleeve end provides more room for the client's shirt cuff and wrist.
Adjustment Values cm
Adjustment Values in
Min 1cm Min 1/4”
Avg 1.5cm Avg 1/2”
Max 2cm
Max 3/4”
Sleeve End Circumference Take In
What to look for How the adjustment corrects it
Sleeve End is decreased to provide a more modern,
fashionable look. Often combined with Take In Upperarm
Sleeve is visibly loose around client's shirt cuff, or client simply prefers a slimmer fit
Taking In the sleeve end provides a more modern look. Use this adjustment in moderation to avoid making the sleeve tight and cumbersome
Adjustment Values cm
Adjustment Values in
Min 1cm Min 1/4”
Avg 1.5cm Avg 1/2”
Max 2cm
Back to Top
Max 3/4”
Page 32
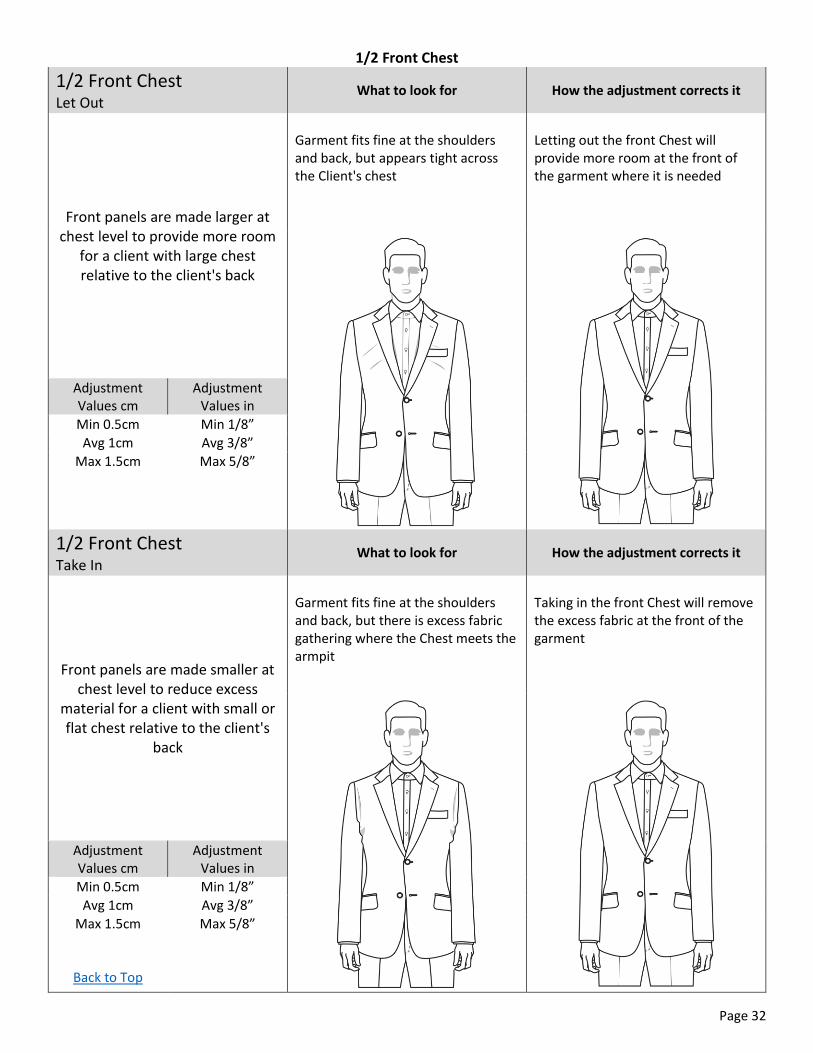
1/2 Front Chest
1/2 Front Chest Let Out
What to look for How the adjustment corrects it
Front panels are made larger at chest level to provide more room
for a client with large chest relative to the client's back
Garment fits fine at the shoulders and back, but appears tight across the Client's chest
Letting out the front Chest will provide more room at the front of the garment where it is needed
Adjustment Values cm
Adjustment Values in
Min 0.5cm Min 1/8”
Avg 1cm Avg 3/8”
Max 1.5cm
Max 5/8”
1/2 Front Chest Take In
What to look for How the adjustment corrects it
Front panels are made smaller at chest level to reduce excess
material for a client with small or flat chest relative to the client's
back
Garment fits fine at the shoulders and back, but there is excess fabric gathering where the Chest meets the armpit
Taking in the front Chest will remove the excess fabric at the front of the garment
Adjustment Values cm
Adjustment Values in
Min 0.5cm Min 1/8”
Avg 1cm Avg 3/8”
Max 1.5cm
Back to Top
Max 5/8”

Page 33
1/2 Front Waist
1/2 Front Waist Let Out
What to look for How the adjustment corrects it
Front panels are made larger at Waist level to provide better
coverage over a large stomach without affecting the back of the
jacket
Client's back and seat seem proportional but has a large, protruding, round stomach causing the fronts to be small
Letting out the Front Waist only will provide the coverage needed over the stomach without increasing the back panels
Adjustment Values cm
Adjustment Values in
Min 1cm Min 1/4”
Avg 1.5cm Avg 5/8”
Max 2.5cm
Max 1”
1/2 Front Waist Take In
What to look for How the adjustment corrects it
Front panels are made smaller at Waist level to compliment a
client's slim waistline without affecting the back of the jacket
Client's back and seat seem proportional but waist and chest are very slim causing the fronts to be too large
Taking in the Front Waist will provide a flattering shape for the slim client without potentially affecting comfort at the back of the jacket
Adjustment Values cm
Adjustment Values in
Min 1cm Min 1/4”
Avg 1.5cm Avg 5/8”
Max 2.5cm
Back to Top
Max 1”

Page 34
1/2 Seat
1/2 Seat Let Out
What to look for How the adjustment corrects it
Front & Back panels are made larger at the bottom section of
the jacket
Jacket appears tight over the seat / hips due to client's large seat. (even though bottom button is usually not fastened, it should be able to fasten when the jacket fits correctly)
Letting out the Seat will provide more coverage over the seat. This adjustment is often combined with letting out the ½ waist
Adjustment Values cm
Adjustment Values in
Min 1cm Min 1/2”
Avg 2.5cm Avg 1”
Max 4cm
Max 1 1/2”
1/2 Seat Take In
What to look for How the adjustment corrects it
Front & Back panels are made smaller at the bottom section of
the jacket
Jacket appears loose over the seat / hips due to client's flat seat. (If client has Stooping posture jacket may appear loose at seat due to balance… check for Stooping posture first)
Taking in the Seat will remove excess fabric over the seat. This adjustment is often combined with taking in the ½ waist
Adjustment Values cm
Adjustment Values in
Min 1cm Min 1/2”
Avg 2.5cm Avg 1”
Max 4cm
Back to Top
Max 1 1/2”

Page 35
Lapel Length
Lapel Length Lengthen
What to look for How the adjustment corrects it
Lapels are lengthened to provide better coverage over a large,
round torso
Client's posture is normal but fronts seem short due to large, round torso
Lengthening the lapel provides more front length where needed to better cover large torso
Adjustment Values cm
Adjustment Values in
Min 0.5cm Min 1/8”
Avg 1cm Avg 3/8”
Max 1.5cm
Max 5/8”
Lapel Length Shorten
What to look for How the adjustment corrects it
Lapels are shortened to make jacket rest better against a flat
chest and overall slim torso
Client's posture is normal but fronts seem long due to flat, slim torso. This adjustment can also be useful for a Full Chest to alleviate the “popping” lapels.
Shortening the lapel reduces the front length over the torso making the coat lay more flatteringly against a slim torso
Adjustment Values cm
Adjustment Values in
Min 0.5cm Min 1/8”
Avg 1cm Avg 3/8”
Max 1.5cm
Back to Top
Max 5/8”

Page 36
Top Button Position
Top Button Position Raise
What to look for How the adjustment corrects it
Top Fastening Button is raised to meet client's preference
The client has advised a preference for a higher fastening button position
It is recommended to only use this adjustment when the client requests it
Adjustment Values cm
Adjustment Values in
Min 1cm Min 3/8”
Avg 2cm Avg 3/4”
Max 3cm
Max 1 1/8”
Top Button Position Lower
What to look for How the adjustment corrects it
Top Fastening Button is lowered to meet client's preference
The client has advised a preference for a lower fastening button position
It is recommended to only use this adjustment when the client requests it
Adjustment Values cm
Adjustment Values in
Min 1cm Min 3/8”
Avg 2cm Avg 3/4”
Max 3cm
Back to Top
Max 1 1/8”

Page 37
Trouser Observations

Page 38
Front Rise
Front Rise Raise
What to look for How the adjustment corrects it
Front Rise is made longer from top of front waistband to crotch
seam intersection
Client wants to wear pants higher in the front than the standard rise will allow for. Raise Front Rise if client’s seat is Normal or Prominent. Lower Back Rise for a man with a Flat Seat
Lengthening the front rise allows the client to wear the pants higher while maintaining a comfortable fit at the crotch area
Adjustment Values cm
Adjustment Values in
Min 1cm Min 3/8”
Avg 2cm Avg 3/4”
Max 3cm
Max 1 1/8”
Front Rise Lower
What to look for How the adjustment corrects it
Front Rise is made shorter from top of front waistband to crotch
seam intersection
Client wants or needs to wear pants lower in the front, usually due to a large, round stomach
Shortening the front rise enables the client to wear the pants lower in the front while minimizing the excess horizontal creases across the front panels
Adjustment Values cm
Adjustment Values in
Min 1cm Min 3/8”
Avg 2cm Avg 3/4”
Max 3cm
Back to Top
Max 1 1/8”

Page 39
Back Rise
Back Rise Raise
What to look for How the adjustment corrects it
Back Rise is made longer from top of back waistband to crotch seam
intersection
Client wants or needs to wear pants higher at the back, usually to cover their prominently shaped seat
Raising the back rise provides more coverage over a large seat and allows the waistband to rest comfortably in it's natural position
Adjustment Values cm
Adjustment Values in
Min 1cm Min 3/8”
Avg 2cm Avg 3/4”
Max 3cm
Max 1 1/8”
Back Rise Lower
What to look for How the adjustment corrects it
Back Rise is made shorter from top of back waistband to crotch
seam intersection
Clients wants or needs to wear pants lower at the back, usually due to a flatly shaped seat, or forward hip stance
Lowering the back rise helps remove excess wrinkles across the back of the thighs while wearing the pants at a lower position that is comfortable for the client
Adjustment Values cm
Adjustment Values in
Min 1cm Min 3/8”
Avg 2cm Avg 3/4”
Max 3cm
Back to Top
Max 1 1/8”

Page 40
Hip Adjustment
Hip Adjustment Take In
What to look for How the adjustment corrects it
Fabric is taken away at the side seams over the hip area
Trousers look loose at the hips and outer thigh area while seat looks fine at the center seam
Taking in the hips removes the excess fabric at the side seams without affecting the fit at the center seam
Adjustment Values cm
Adjustment Values in
Min 1cm Min 3/8”
Avg 2cm Avg 3/4”
Max 3cm
Back to Top
Max 1 1/8”

Page 41
Crotch Adjustment
Crotch Adjustment Let Out
What to look for How the adjustment corrects it
Pant Leg is made wider at the crotch intersection
Trousers are tight at the crotch and inner thigh area while the rise looks fine
Letting out the crotch provides more width at the top of the leg without increasing the depth of the rise
Adjustment Values cm
Adjustment Values in
Min 1cm Min 1/4”
Avg 2cm Avg 5/8”
Max 2.5cm
Max 1”
Crotch Adjustment Take In
What to look for How the adjustment corrects it
Pant Leg is made narrower at the crotch intersection
Trousers are loose at the crotch and inner thigh area while the rise looks fine
Taking in the crotch removes excess fabric at the crotch and upper thigh without shortening the depth of the rise
Adjustment Values cm
Adjustment Values in
Min 1cm Min 1/4”
Avg 2cm Avg 5/8”
Max 2.5cm
Back to Top
Max 1”
Page 42
Shirt Observations

Page 43
Shoulder Description
Shoulder Description High
What to look for How the adjustment corrects it
End of Shoulder is raised to better match the slope of the client's
shoulder
Fabric will roll or gather below the collar. The larger the roll, the more adjustment needed
Raising the end of the shirt's shoulder relieves the upward pressure from the client's shoulder, allowing the collar to rest naturally
Adjustment Values cm
Adjustment Values in
Min 1cm Min 3/8”
Avg 1.5cm Avg 5/8”
Max 2.5cm Max 7/8”
Shoulder Description Sloping
What to look for How the adjustment corrects it
End of Shoulder is lowered to better match the slope of the
client's shoulder
Fabric will gather as creases around the armpit area at the back and front of the shirt
Lowering the end of the shirt's shoulder allows it to lay more directly against the client's shoulder, which helps remove the creases
Adjustment Values cm
Adjustment Values in
Min 1cm Min 3/8”
Avg 1.5cm Avg 5/8”
Max 2.5cm
Back to Top
Max 7/8”

Page 44
Chest Stature
Chest Stature Flat
What to look for How the adjustment corrects it
Front Chest is reduced to remove vertical creases where chest
meets sleeve seam and armpit
While the shirt may fit well elsewhere, the front chest area is loose, causing vertical creases
Reducing the front chest makes the shirt lay more closely to the client's chest
Adjustment Values cm
Adjustment Values in
Yes Yes
No No
Chest Stature Full
What to look for How the adjustment corrects it
Front Chest is increased to accommodate the client’s prominent chest shape.
While the shirt may fit well elsewhere, the front chest area is tight, causing the front button(s) to pull
Increasing the front chest makes the shirt lay more comfortably against the client’s chest
Adjustment Values cm
Adjustment Values in
Yes Yes
No No
Back to Top

Page 45
Armhole
Armhole Raise
What to look for How the adjustment corrects it
Armhole is raised to bring the shirt’s armhole closer to the
client’s armpit
Client has small upperarms and shirt appears loose. May also be needed if client complains shirt is restrictive when moving his arms forward.
Raising the armhole brings the shirt closer to the client’s body and provides better mobility. Also reduces excess fabric on men with smaller upperarms.
Adjustment Values cm
Adjustment Values in
Min 1cm Min 3/8”
Avg 1.5cm Avg 5/8”
Max 2.5cm Max 7/8”
Armhole Lower
What to look for How the adjustment corrects it
Armhole is lowered to bring the shirt’s armhole away from the
client’s armpit
Client has large upperarms and shirt appears tight at the armpit even when arms at down at a relaxed position.
Lowering the armhole brings the shirt away from the client’s armpit providing more comfort. Almost always combined with letting out upperarm.
Adjustment Values cm
Adjustment Values in
Min 1cm Min 3/8”
Avg 1.5cm Avg 5/8”
Max 2.5cm
Back to Top
Max 7/8”

Page 46
½ Upperarm
½ Upperarm Let Out
What to look for How the adjustment corrects it
Upperarm is let out to make room for client’s large arms. Usually combined with Lowering the
armhole
Client has large upperarms and shirt appears tight. (Refer to GM specs to determine if the shirt’s upperarm is large enough for your client’s upperarm)
Increasing the sleeve circumference allows more room for the client’s large biceps
Adjustment Values cm
Adjustment Values in
Min 1cm Min 3/8”
Avg 1.5cm Avg 5/8”
Max 2.5cm Max 7/8”
½ Upperarm Take In
What to look for How the adjustment corrects it
Upperarm is taken in to reduce excess fabric around the client’s upperarms. Usually combined
with Raise the armhole
Client has small upperarms and shirt appears loose. (Refer to GM specs to determine which size has a small enough upperarm for your client)
Decreasing the sleeve circumference removes the excess fabric around the client’s smaller biceps
Adjustment Values cm
Adjustment Values in
Min 0.5cm Min 1/8”
Avg 1cm Avg 3/8”
Max 2cm
Back to Top
Max 5/8”

Page 47
Collar Position
Collar Position Raise
What to look for How the adjustment corrects it
Shirt collar is raised to rest more naturally against the client’s neck
(rarely needed)
Collar may appear to be pulling downward and/or away from the client’s neck, usually due to a long neck and/or round back
Raising the collar allows it to rest more naturally against the client’s neck and removes potential gaping
Adjustment Values cm
Adjustment Values in
Min 1cm Min 3/8”
Avg 1.5cm Avg 5/8”
Max 2.5cm Max 3/4”
Collar Position Lower
What to look for How the adjustment corrects it
Shirt collar is lowered to rest more naturally against the client’s neck
(more commonly needed)
Fabric is gathering below the collar, often caused by prominent shoulder blades or high shoulders. Do not lower the collar on top of using the high shoulder observation. (only do that for extreme cases)
Lowering the collar removes the excess gathered fabric and allows the collar to lay more naturally against the client’s neck
Adjustment Values cm
Adjustment Values in
Min 1cm Min 3/8”
Avg 1.5cm Avg 5/8”
Max 2.5cm
Back to Top
Max 3/4”

Page 48
Front Length
Front Length Lengthen
What to look for How the adjustment corrects it
ONLY the Front Length is lengthened. Adjustment has no effect on the back length of the
shirt
Front length may appear too short in relation to the back due to a large, round stomach and / or erect posture.
Lengthening the front helps level out the imbalance between the front and back length (be default, the front length will be shorter than the back)
t
Adjustment Values cm
Adjustment Values in
Min 1cm Min 3/8”
Avg 1.5cm Avg 5/8”
Max 2.5cm Max 7/8”
Front Length Shorten
What to look for How the adjustment corrects it
ONLY the Front Length is shortened. Adjustment has no effect on the back length of the
shirt
This is rarely needed. Usually preferred by a client who wears their shirt untucked, and wants the front length shorter than the back by more than the standard amount.
Shortening the front changes the balance between the front and back lengths, usually only needed to meet the client’s preference
Adjustment Values cm
Adjustment Values in
Min 1cm Min 3/8”
Avg 1.5cm Avg 5/8”
Max 2.5cm
Back to Top
Max 7/8”

Page 49
Advanced Topics
Page 50
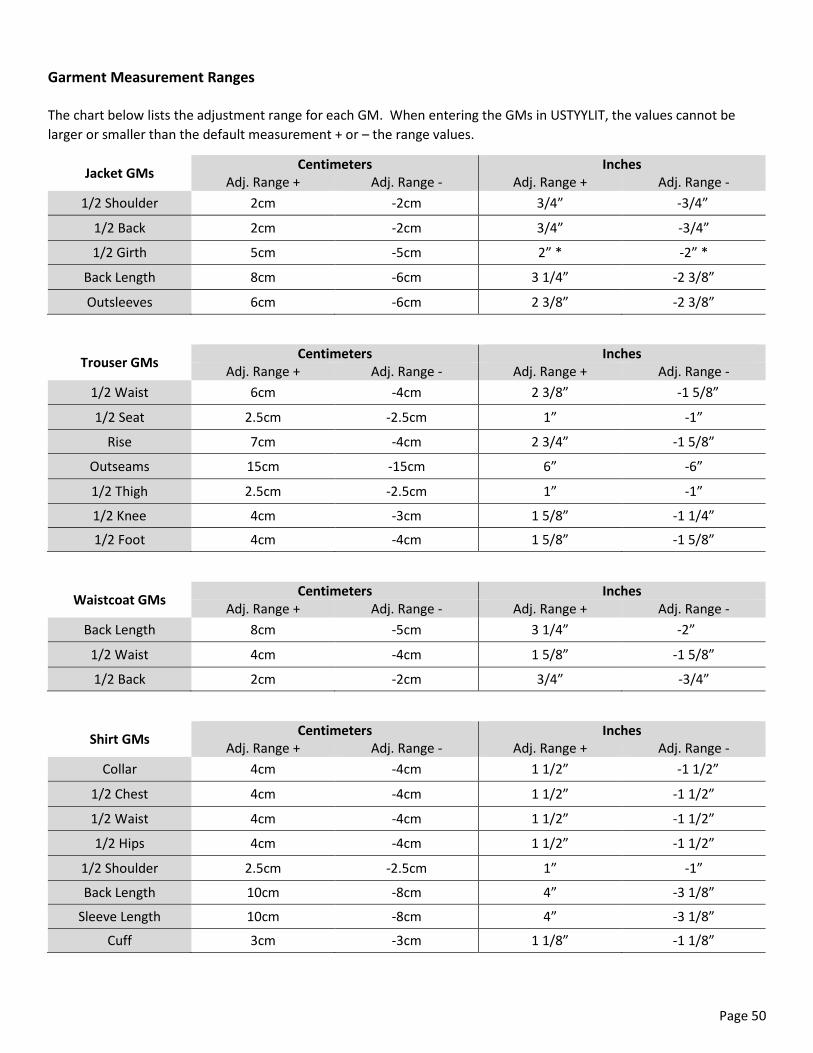
Garment Measurement Ranges The chart below lists the adjustment range for each GM. When entering the GMs in USTYYLIT, the values cannot be
larger or smaller than the default measurement + or – the range values.
Jacket GMs Centimeters Inches
Adj. Range + Adj. Range - Adj. Range + Adj. Range -
1/2 Shoulder 2cm -2cm 3/4” -3/4”
1/2 Back 2cm -2cm 3/4” -3/4”
1/2 Girth 5cm -5cm 2” * -2” *
Back Length 8cm -6cm 3 1/4” -2 3/8”
Outsleeves 6cm -6cm 2 3/8” -2 3/8”
Trouser GMs Centimeters Inches
Adj. Range + Adj. Range - Adj. Range + Adj. Range -
1/2 Waist 6cm -4cm 2 3/8” -1 5/8”
1/2 Seat 2.5cm -2.5cm 1” -1”
Rise 7cm -4cm 2 3/4” -1 5/8”
Outseams 15cm -15cm 6” -6”
1/2 Thigh 2.5cm -2.5cm 1” -1”
1/2 Knee 4cm -3cm 1 5/8” -1 1/4”
1/2 Foot 4cm -4cm 1 5/8” -1 5/8”
Waistcoat GMs Centimeters Inches
Adj. Range + Adj. Range - Adj. Range + Adj. Range -
Back Length 8cm -5cm 3 1/4” -2”
1/2 Waist 4cm -4cm 1 5/8” -1 5/8”
1/2 Back 2cm -2cm 3/4” -3/4”
Shirt GMs Centimeters Inches
Adj. Range + Adj. Range - Adj. Range + Adj. Range -
Collar 4cm -4cm 1 1/2” -1 1/2”
1/2 Chest 4cm -4cm 1 1/2” -1 1/2”
1/2 Waist 4cm -4cm 1 1/2” -1 1/2”
1/2 Hips 4cm -4cm 1 1/2” -1 1/2”
1/2 Shoulder 2.5cm -2.5cm 1” -1”
Back Length 10cm -8cm 4” -3 1/8”
Sleeve Length 10cm -8cm 4” -3 1/8”
Cuff 3cm -3cm 1 1/8” -1 1/8”

Page 51
Selecting Observation Values – Min / Avg / Max explained
USTYYLIT M4U is a CAD-based system. CAD (computer-aided design) software is used by architects, engineers, drafters,
artists, and others to create precision drawings or technical illustrations. In the apparel industry, the leading CAD
software provider is Gerber Technology.
USTYYLIT utilizes Gerber’s professional software applications to digitize their European-designed patterns, and apply an
extensive list of alteration adjustments to the pattern. The results are as close to a Bespoke pattern that you can create
using technology.
The GM & Observation method puts the power of USTYYLIT’s system in your hands in a way that is less intimidating. It
allows people with less experience, or those who just like to keep things simple, to observe the client and compare them
to other people you see every day using a Min / Avg / Max comparison method.
Each alteration adjustment has a limit to how much the garment can be adjusted before the pattern will take an unusual
shape and be difficult to sew without puckering. Rather than make you memorize the limits for each alteration, the Min
/ Avg / Max approach allows you to think of every Observation the same way.
For Example:
Let’s say the limit (or MAX value) of a specific alteration is 3cm. By splitting 3cm three ways, you end up with 1cm / 2cm
/ 3cm as shown below:
1cm Min
2cm Avg
3cm Max
Similarly, if an alteration has a 1.5cm limit, you can split it up as follows:
0.5cm Min
1cm Avg
1.5cm Max
(If your shop is setup for use in Inches, the Observations have been converted to inches for your convenience)
By looking at every Observation this way, you can forget about the alteration numbers and just decide whether your
client needs a “Minimal”, “Average” or “Maximum” adjustment. So if you were deciding whether your client needs the
“High Shoulder” Observation, look at his body and if possible look at the symptoms with a garment on.
Then ask yourself “Is this man’s shoulders just a little higher than most, a fair amount, or REALLY high compared to most.
Once you think of each observation this way, it makes the fitting process much simpler and allows you to work through
your selling appointment efficiently without focusing on precise alteration values.
When you bring your printed worksheet to the computer to enter the order in USTYYLIT, if you feel you need a different
Observation amount based on the adjustment values shown on the screen, just override your choice on the worksheet.
If you have USTYYLIT Try-On garments and feel that this approach is not accurate enough for your needs, we
recommend you use the Fit Tool method. Give either way a try and figure out what’s best for you.

Page 52
Picking The Right Pattern Size For Each Garment Type
Whether you prefer the Fit Tool or Garment Measurement method, you need to specify a base Pattern Size for the order
to be made with.
If you have USTYYLIT Try-Ons, picking the Pattern Size is usually as easy as asking the client which size they normally
wear and put him in a try on garment in the closest size. If it doesn’t fit to the client’s liking, try a size up or down and
use the size that fits best overall, regardless of their body measurements.
If you don’t have USTYYLIT Try-Ons, we recommend that you follow the guidelines below:
Jacket Trouser Waistcoat
Euro Sizing
Chest BM divided by two then find closest size in the GM
charts
Size Up for large Shoulders Size Down for small Shoulders
Seat BM + Ease divided by two then find closest size
Size Up for large Thighs Size Down for small Thighs
Chest BM divided by two then find closest size in the GM charts
Size Up for large Stomach Size Down for small Stomach
Inch Sizing
Find closest size in GM charts to match the Chest BM
Size Up for large Shoulders
Size Down for small Shoulders
Seat BM + Ease divided by two then find closest size
Size Up for large Thighs
Size Down for small Thighs
Find closest size in GM charts to match the Chest BM
Size Up for large Stomach
Size Down for small Stomach
Please note that the guidelines above offer a brief overview. For detailed information on selecting sizes without Try-Ons
please continue on to the following pages.

Page 53
Jacket Size Details
In most cases, the client’s Chest Body Measurement (BM) will dictate the pattern size. For Euro Sizing, divide the client’s
Chest BM by two and find the closest size number to match.
Examples: Chest BM is 100cm - Divide by two = 50. Choose Size 50
Chest BM is 101cm – Divide by two = 50.5. Choose Size 50
Chest BM is 102cm – Divide by two = 51.
Choose 50 for smaller shoulders, Choose 52 for larger shoulders. Then use the Fit Tools or Observations
to adjust as needed.
For Inch Sizing, simply match your client’s Chest BM to the closest Inch size.
Chest BM is 40” – Choose size 50/40R
Chest BM is 40 ½” – Choose size 50/40R
Chest BM is 41”
Choose 50/40R for smaller shoulders, Choose 52/42R for larger shoulders. Then use Fit Tools or
Observations to adjust the pattern accordingly.
The charts below show a snippet of the Jacket Garment Measurements (GMs). If your client’s Chest BM puts him in
between sizes, go with the size that has a closer 1/2 Shoulder to what he needs. If your client has narrow shoulders, but
a very large stomach, go with a size that is as close to the middle as possible and then adjust the pattern up for the
stomach, and down for the shoulders.
Centimeter Example
Size
Euro / Inch Back
Length 1/2
Shoulder 1/2
Blades
42 | 34R 74.0 21.7 20.6
44 | 35R 75.0 22.2 21.2
46 | 37R 76.0 22.7 21.8
48 | 38R 77.0 23.2 22.4
50 | 40R 78.0 23.8 23.0
52 | 42R 79.0 24.3 23.6
54 | 43R 80.0 24.8 24.2
56 | 44R 81.0 25.4 24.8
Inch Example
Size
Euro / Inch Back
Length 1/2
Shoulder 1/2
Blades
42 | 34R 29 1/8 8 5/8 8 1/8
44 | 35R 29 1/2 8 3/4 8 3/8
46 | 37R 29 7/8 9 8 5/8
48 | 38R 30 3/8 9 1/8 8 7/8
50 | 40R 30 3/4 9 3/8 9
52 | 42R 31 1/8 9 5/8 9 1/4
54 | 43R 31 1/2 9 3/4 9 1/2
56 | 44R 31 7/8 10 9 3/4

Page 54
Trouser Size Details
In most cases, the client’s Waist BM will dictate the Pattern Size. However, in many cases the client’s Seat BM will
overrule the Waist if his Seat is particularly large or small. For this reason, we recommend that you use the Seat BMs
when selecting a Trouser Size.
The simplest ½ Seat formula is (SEAT BM + 5cm) divided by two. (5cm = 2”)
Then use the GM spec charts to find the closest size with that ½ Seat
It is also VERY IMPORTANT to note the following:
all circumference GMs are entered as 1/2 Measurements
there is EASE built into the 1/2 Waist and 1/2 Seat GMs. They are FINISHED Measurements
Why use 1/2 Measurements? When a pattern is developed, the designer or technician will develop one half of the
pattern first, and then clone it (and flip it) to create the other half. For this reason, the true pattern specs are best
represented with 1/2 Measurements.
Since Body Measurements are always taken as a full circumference measurement with a tape measure, using 1/2
Measurements for the GMs makes it 100% clear whether a measurement provided is a BM or GM.
How much EASE should you add to your client’s Waist and Seat BMs? As a professional Clothier, that is ultimately up to
you and your client, however the following are some suggested guidelines:
Suggested Ease Values:
Centimeter Example Fit Waist Seat
Regular + 2.5cm + 6cm Slim + 1.25cm + 5cm
Super Slim + 0cm + 4cm
Once you’ve determined how much ease to add to your client’s BMs, you now have your Finished Measurements (FMs):
For Euro Sizing, divide the Finished Waist measurement by two and find the closest Pattern Size number.
Examples: Waist BM is 87.5cm - Add 2.5cm for Reg Fit = 90 - Divide by two = 45 - Choose size 50
Waist BM is 88.5cm - Add 2.5cm for Reg Fit = 91 - Divide by two = 45.5 - Choose size 50
Waist BM is 89.5cm - Add 2.5cm for Reg Fit = 92 - Divide by two = 46
Choose 50 for a smaller Seat, Choose 52 for a larger Seat. Then use the Fit Tools or Observations to
adjust as needed.
For Inch Sizing, the concept is the same. BM + Ease = FM. Then divide FM by two and find the closest size:
Waist BM is 34 ½” - Add 1” for Reg Fit = 35 ½” - Divide by two = 17 ¾” - Choose 50/34R
Waist BM is 35” - Add 1” for Reg Fit = 36” - Divide by two = 18” - Choose 50/34R
Waist BM is 35 ½” - Add 1” for Reg Fit = 36 ½” - Divide by two = 18 ¼”
Choose 50/34R for a smaller Seat, Choose 52/36R for a larger Seat. Then use Fit Tools or Observations
to adjust the pattern accordingly. As previously mentioned, ALWAYS reference the client’s Seat BM for
size selection. Waist examples provided above are for the convenience of the US market.
Inch Example Fit Waist Seat
Regular + 1” + 2 1/4” Slim + 1/2” + 2”
Super Slim + 0” + 1 3/4”

Page 55
Trouser GM Size Chart Examples:
Centimeter Example
Size
Euro / Inch 1/2
Waist 1/2
Seat 1/2
Thigh
42 | 28R 37.0 47.0 31.4
44 | 30R 39.0 49.0 32.5
46 | 32R 41.0 51.0 33.5
48 | 33R 43.0 53.0 34.6
50 | 34R 45.0 55.0 35.6
52 | 36R 47.0 57.0 36.7
54 | 38R 49.0 59.0 37.7
56 | 40R 51.0 61.0 38.8
Inch Example
Size
Euro / Inch 1/2
Waist 1/2
Seat 1/2
Thigh
42 | 28R 14 5/8 18 1/2 11 3/8
44 | 30R 15 3/8 19 1/4 11 3/4
46 | 32R 16 1/8 20 1/8 12 1/8
48 | 33R 16 7/8 20 7/8 12 1/2
50 | 34R 17 3/4 21 5/8 12 3/4
52 | 36R 18 1/2 22 1/2 13 1/8
54 | 38R 19 1/4 23 1/4 13 1/2
56 | 40R 20 1/8 24 13 7/8
Waistcoat Size Details
Unlike Jackets, since Waistcoats do not have sleeves and shoulder pads selecting a size is only based on the client’s
Chest BM.
For Euro Sizing divide the client’s Chest BM by two, and pick the closest Pattern Size number
For Inch Sizing match the client’s Chest BM to the nearest Pattern Size number
If your client’s Chest BM puts them in between sizes, size up for a larger stomach and size down for a smaller stomach.