clearing admin guide - the ice · 2.2.2 advanced filters for account summary information the...
TRANSCRIPT

Clearing Admin Account Management User Guide
This material may not be reproduced or redistributed in whole or in part without the express, prior written consent of IntercontinentalExchange, Inc.
© Copyright Intercontinental Exchange, Inc. 2009. All Rights Reserved.

www.theice.com
webTS User Guide v1.0 – 06/05/2009
2
Table of Contents
1 OVERVIEW.......................................................................................................................................... 3 2 ACCOUNT MANAGEMENT................................................................................................................ 4
2.1 PARTICIPANT LIST OVERVIEW ......................................................................................................... 4 2.2 ACCOUNT LIST OVERVIEW .............................................................................................................. 5
2.2.1 Account Summary Information................................................................................................. 5 2.2.2 Advanced Filters for Account Summary Information................................................................ 6 2.2.3 Account Product and Limit Detailed Information...................................................................... 7
2.3 CREATING AN ACCOUNT ................................................................................................................. 8 2.3.1 Assigning Account Summary Information ................................................................................ 8 2.3.2 Adding Products to an Account................................................................................................ 9 2.3.3 Adding Limits to Products ...................................................................................................... 11 2.3.4 Deleting Products................................................................................................................... 12 2.3.5 Saving Account Updates........................................................................................................ 13
2.4 COPYING AN ACCOUNT ................................................................................................................. 13 3 REPORTS.......................................................................................................................................... 14
3.1 TRADES ....................................................................................................................................... 14 3.1.1 Activity Report ........................................................................................................................ 14 3.1.2 Mass Export ........................................................................................................................... 14
3.2 SETTLEMENT PRICES.................................................................................................................... 15 3.2.1 Outrights................................................................................................................................. 15 3.2.2 Options................................................................................................................................... 15

www.theice.com
webTS User Guide v1.0 – 06/05/2009
3
1 Overview ICE’s Clearing Admin application is used by Clearing Firms to create and manage accounts for trading clearable OTC and Futures products on the ICE’s electronic marketplace (The Exchange). Participants must first initiate contact with the Clearing Firm by requesting an initial account using ICE’s Credit Management application. The Clearing Firm has ultimate say as to whether an account will be created or not. The setup process for clearing accounts on The Exchange requires that the Clearing Firm provide an account ID and various other account attributes, add products to the account, and establish limits for order entry and maximum net positions for these products. Once this is complete, the Participant can assign the account to traders who can begin using the account to enter clearable orders on The Exchange. Clearing Admin also allows Clearing Firms to monitor and track a Participant’s cleared trading on the system. The Trading Activity Report offered in the Clearing Admin is a real-time account management tool that allows Clearing Firms to pull real-time queries from the system regarding a Participant’s cleared trades. This feature allows Clearing Firms the ability to monitor Participants accounts throughout the day. Also, the Settlement Report is available to users in order to query settlement prices and specific market information for cleared products traded on the Exchange. Both historical and current day information is available by selecting the trade date from the menu. In addition, both reports can be exported.
www.theice.com
webTS User Guide v1.0 – 06/05/2009
4
2 Account Management 2.1 Participant List Overview
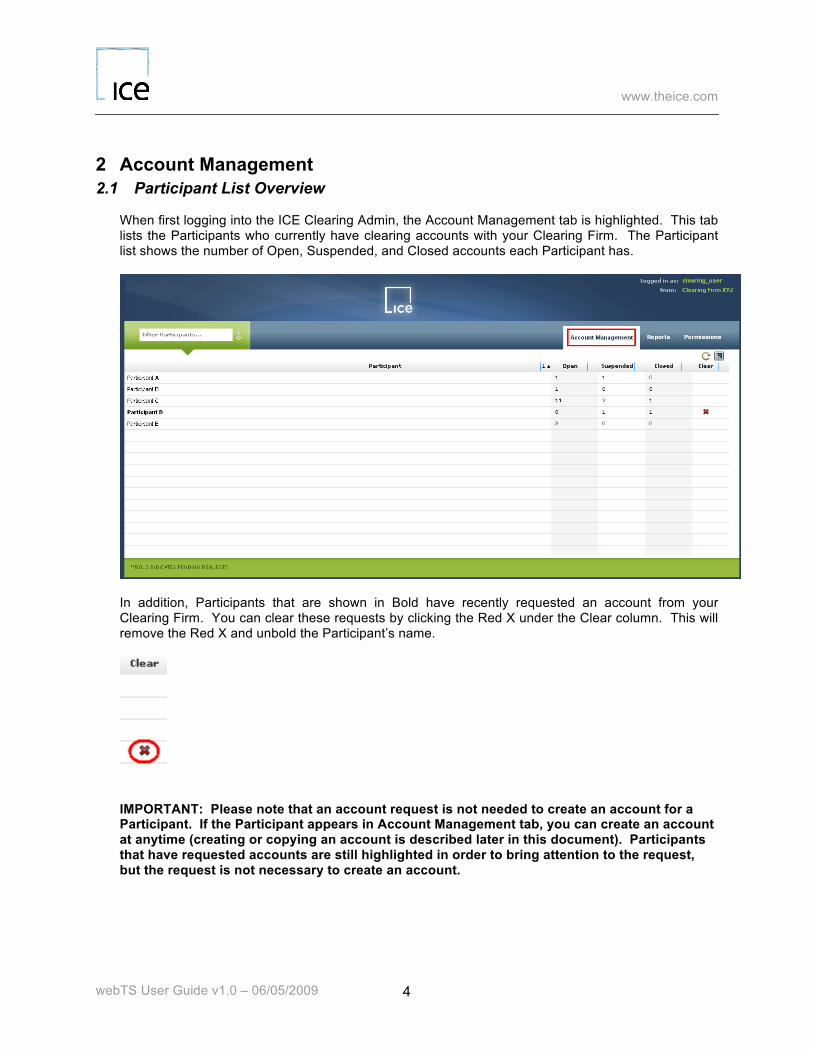
When first logging into the ICE Clearing Admin, the Account Management tab is highlighted. This tab lists the Participants who currently have clearing accounts with your Clearing Firm. The Participant list shows the number of Open, Suspended, and Closed accounts each Participant has.
In addition, Participants that are shown in Bold have recently requested an account from your Clearing Firm. You can clear these requests by clicking the Red X under the Clear column. This will remove the Red X and unbold the Participant’s name.
IMPORTANT: Please note that an account request is not needed to create an account for a Participant. If the Participant appears in Account Management tab, you can create an account at anytime (creating or copying an account is described later in this document). Participants that have requested accounts are still highlighted in order to bring attention to the request, but the request is not necessary to create an account.

www.theice.com
webTS User Guide v1.0 – 06/05/2009
5
You can easily find a Participant in this list by typing into the “Filter by Participant” field. It is a “contains” search meaning it will dynamically return any Participant that contains the text you are typing.
You can export all Accounts for all Participants into Excel by clicking the Export icon. You will be prompted to Open or Save the file.
You can also refresh your Participant List view by clicking the Refresh icon.
2.2 Account List Overview
2.2.1 Account Summary Information Once a Participant name is selected (it will be highlighted in aqua), the screen resizes, and all accounts for the Participant selected are displayed to the right of the Participant List. The top portion of the screen displays an Account Summary as shown below.
www.theice.com
webTS User Guide v1.0 – 06/05/2009
6
For all Clearing Firms, the Account Summary at the top of the screen displays: • Account ID • Status
In addition, each Clearing Firm will ONLY see its respective Clearing House related fields for:
• Code • RIM • CTI
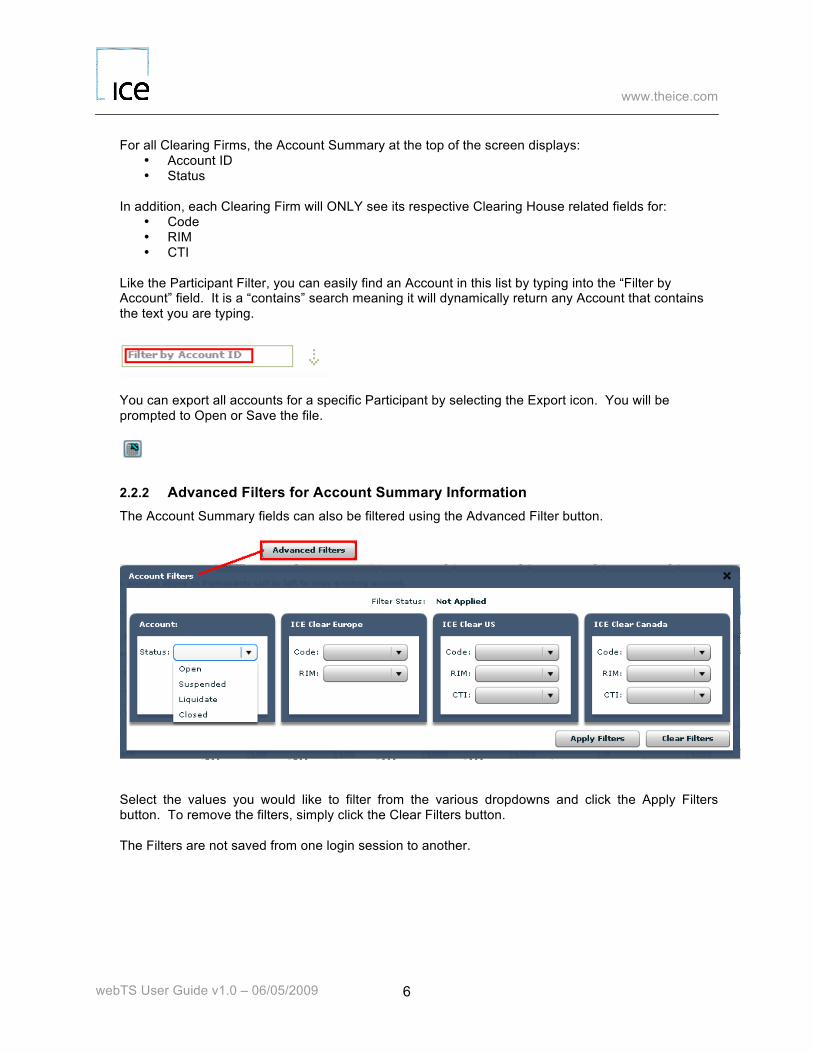
Like the Participant Filter, you can easily find an Account in this list by typing into the “Filter by Account” field. It is a “contains” search meaning it will dynamically return any Account that contains the text you are typing.
You can export all accounts for a specific Participant by selecting the Export icon. You will be prompted to Open or Save the file.
2.2.2 Advanced Filters for Account Summary Information The Account Summary fields can also be filtered using the Advanced Filter button.
Select the values you would like to filter from the various dropdowns and click the Apply Filters button. To remove the filters, simply click the Clear Filters button. The Filters are not saved from one login session to another.
www.theice.com
webTS User Guide v1.0 – 06/05/2009
7
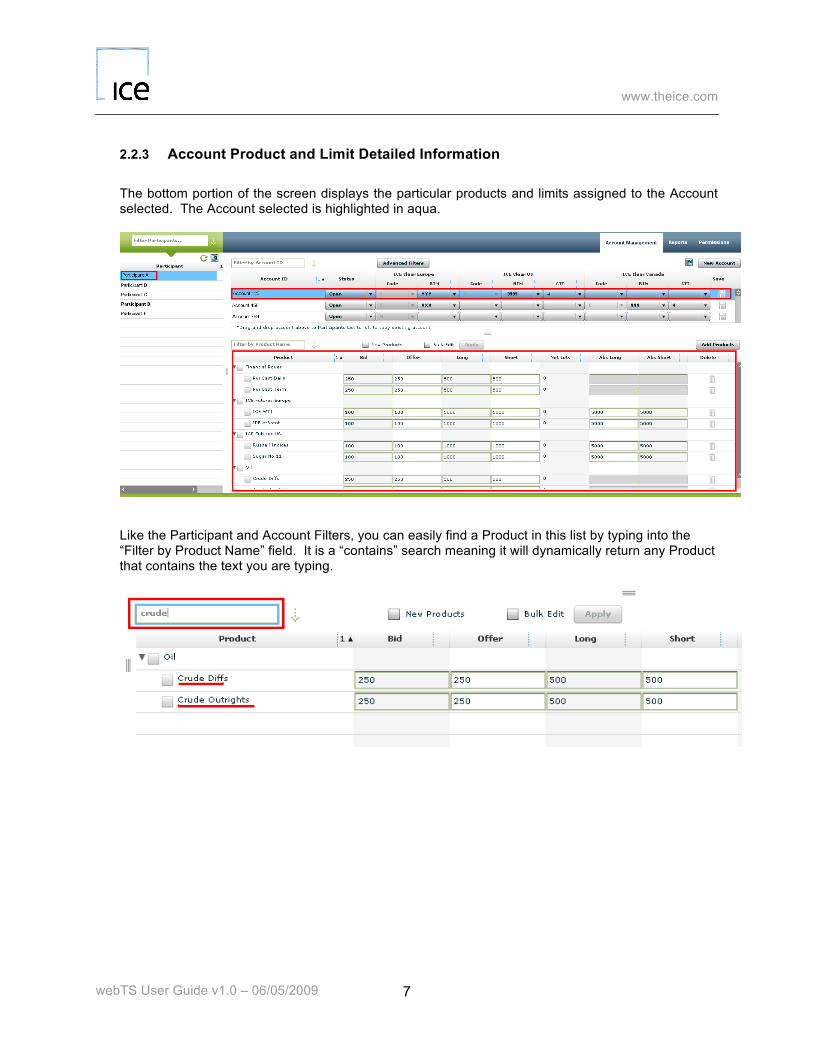
2.2.3 Account Product and Limit Detailed Information The bottom portion of the screen displays the particular products and limits assigned to the Account selected. The Account selected is highlighted in aqua.
Like the Participant and Account Filters, you can easily find a Product in this list by typing into the “Filter by Product Name” field. It is a “contains” search meaning it will dynamically return any Product that contains the text you are typing.

www.theice.com
webTS User Guide v1.0 – 06/05/2009
8
2.3 Creating an Account
2.3.1 Assigning Account Summary Information To add an account for a Participant, simply click the New Account button. This will deploy a window where you can enter the Account ID.
As mentioned previously, a new account can be created for ANY Participant in the Clearing Firm’s list. An account request from the Participant is not necessary.
Once the Account ID is entered, click Create. This will insert a new row into the Account List, and you can further assign other account summary information.
• Account ID o Account IDs for ICE Clear Europe can be up to 14 characters and Account IDs for
ICE Clear US and ICE Clear Canada can be up to 12 characters o All Clearing Houses all alphanumeric characters, spaces, hyphens (-), dollar signs ($)
and forward slashes (/) • Status
o Dropdown selections are: Open – Account is open for trading Suspend – Account is currently unavailable for use (but can be reopened) Liquidate – Participant only allowed to enter orders that offset the current
day’s net position Closed – Account is closed, archived, and unavailable for use
www.theice.com
webTS User Guide v1.0 – 06/05/2009
9
• Code o Dropdown selections vary by Clearing House:
N - Non-Segregated; Single Customer Account S – Segregated; Account used to hold and separate customers' assets from
those of the Clearing Firm H – House; Clearing Firm’s Proprietary Account C – Customer; Customer’s Account
• RIM o The Responsible Individual Mnemonic (RIM) assigned to the account to enable
Futures trading. Values vary by Clearing Firm and Clearing House. • CTI
o Customer Type Indicator o Dropdown selections vary by Clearing House:
1 – Self Account 2 – House Account 4 - Customer Account
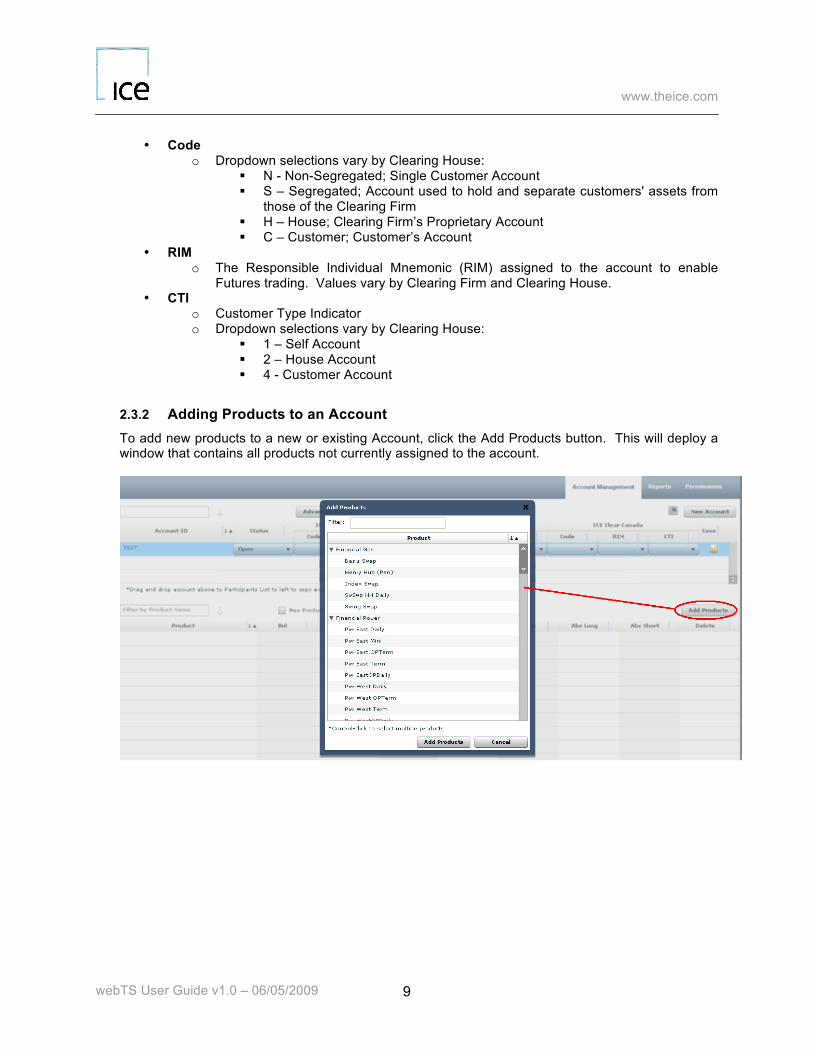
2.3.2 Adding Products to an Account To add new products to a new or existing Account, click the Add Products button. This will deploy a window that contains all products not currently assigned to the account.

www.theice.com
webTS User Guide v1.0 – 06/05/2009
10
Select a single product by clicking it or select multiple products by using the Control key. Once the products are selected, click the Add Products button.
Once Add Products is clicked, the window will be closed, and the products will be placed in their respective “Product Group” with zero limits. The next section describes how to quickly add limits.

www.theice.com
webTS User Guide v1.0 – 06/05/2009
11
2.3.3 Adding Limits to Products Once products are added to an account, limits for these products need to be established.
2.3.3.1 Limit Overview A product can be assigned a combination of six values to regulate OTC and Futures trading. All values are enforced for a single trading day for the product:
• Bid/Offer - The maximum number of lots a user can bid/offer on order entry. • Long/Short – The maximum number of lots the net position can go long or short.
Outright buys and sells, as well as intra-commodity spreads, are netted across all contracts when determining a product’s net position.
• Abs Long/Abs Short – Only applicable to Futures products. The total number of long and short positions allowed. Only buys and sells in the same contract are netted when determining a product’s Absolute Long and Absolute Short position. Intra-commodity spreads are not netted. If Abs Long and Abs Short limits are left blank, they are ignored by the system.
For Futures products, working order limits are used in conjunction with the limits to ensure an orderly market by “pre-qualifying” all orders in the system. Under working order limit checking, each order entered in the system is “assumed executed”. Specifically, when floating/consummating an outright order, working order limit calculations tally your active outright orders in the market, measure this total against your net position and determine your ability to float/consummate based on your Long and Short limits. When floating/consummating a spread order, working order limit calculations tally your active outright and spread orders in the market, measure this total against your Abs Long and Abs Short positions and determine your ability to float/consummate based on your Abs Long and Abs Short limits.
2.3.3.2 New Products Checkbox Functionality When products are newly added to an account, you can filter for only these products by clicking the New Products checkbox as shown below. This is helpful to narrow down only the products that you need to add limits for, especially when using the Bulk Edit feature described in the next section.
www.theice.com
webTS User Guide v1.0 – 06/05/2009
12
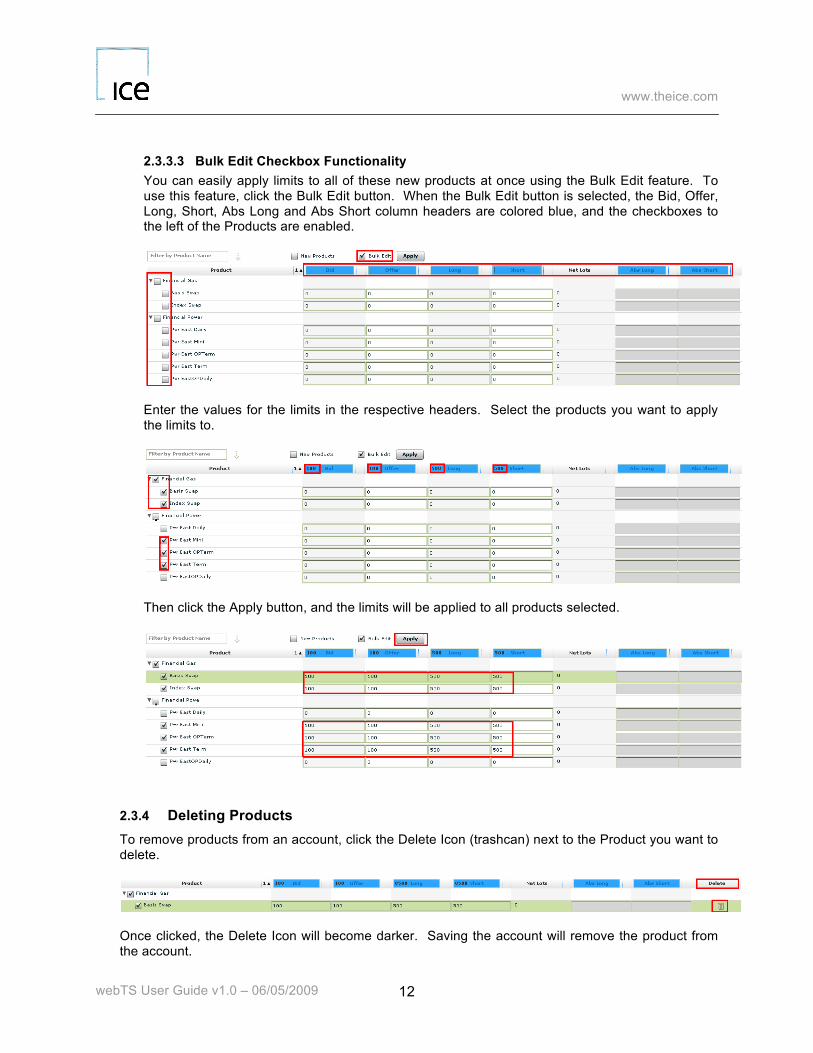
2.3.3.3 Bulk Edit Checkbox Functionality You can easily apply limits to all of these new products at once using the Bulk Edit feature. To use this feature, click the Bulk Edit button. When the Bulk Edit button is selected, the Bid, Offer, Long, Short, Abs Long and Abs Short column headers are colored blue, and the checkboxes to the left of the Products are enabled.
Enter the values for the limits in the respective headers. Select the products you want to apply the limits to.
Then click the Apply button, and the limits will be applied to all products selected.
2.3.4 Deleting Products To remove products from an account, click the Delete Icon (trashcan) next to the Product you want to delete.
Once clicked, the Delete Icon will become darker. Saving the account will remove the product from the account.
www.theice.com
webTS User Guide v1.0 – 06/05/2009
13
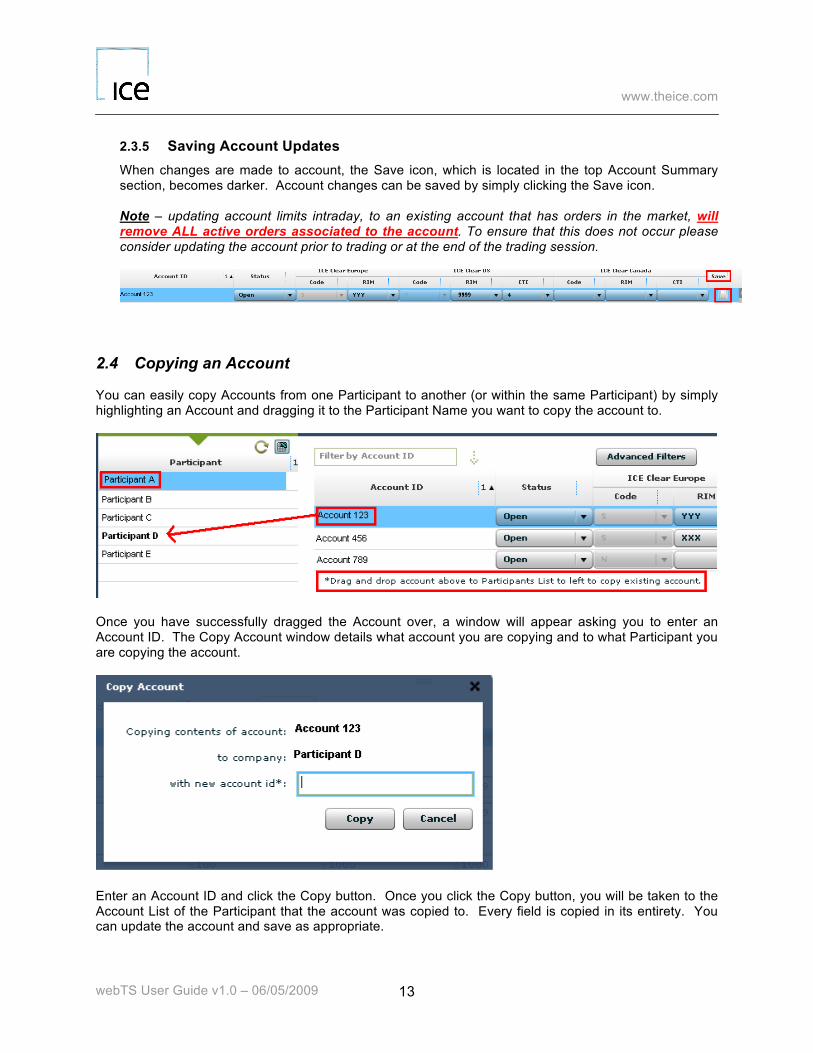
2.3.5 Saving Account Updates When changes are made to account, the Save icon, which is located in the top Account Summary section, becomes darker. Account changes can be saved by simply clicking the Save icon. Note – updating account limits intraday, to an existing account that has orders in the market, will remove ALL active orders associated to the account. To ensure that this does not occur please consider updating the account prior to trading or at the end of the trading session.
2.4 Copying an Account
You can easily copy Accounts from one Participant to another (or within the same Participant) by simply highlighting an Account and dragging it to the Participant Name you want to copy the account to.
Once you have successfully dragged the Account over, a window will appear asking you to enter an Account ID. The Copy Account window details what account you are copying and to what Participant you are copying the account.
Enter an Account ID and click the Copy button. Once you click the Copy button, you will be taken to the Account List of the Participant that the account was copied to. Every field is copied in its entirety. You can update the account and save as appropriate.

www.theice.com
webTS User Guide v1.0 – 06/05/2009
14
3 Reports Several reports are available to track trading activity and settlement prices.
3.1 Trades
3.1.1 Activity Report The Activity Report gives Clearing Firms the ability to monitor their customer’s trading on the Exchange in real-time. Trade queries are available by Participant, Product, Account, and Date.
Once you have chosen the Participant, Product, Account, and Date, click the Submit button. The trades are sorted by Contract (Month/Year), and within the Contract, the trades are sorted in ascending order by Time Stamp of execution.
The report can be exported to an Excel (.xls) file by clicking the Export button.
3.1.2 Mass Export The Mass Export gives the Clearing Firm the ability to export all trades for all Participants for a particular date range. Choose a date range and click the Export button, and you will be prompted to open or save the file in Excel.
www.theice.com
webTS User Guide v1.0 – 06/05/2009
15
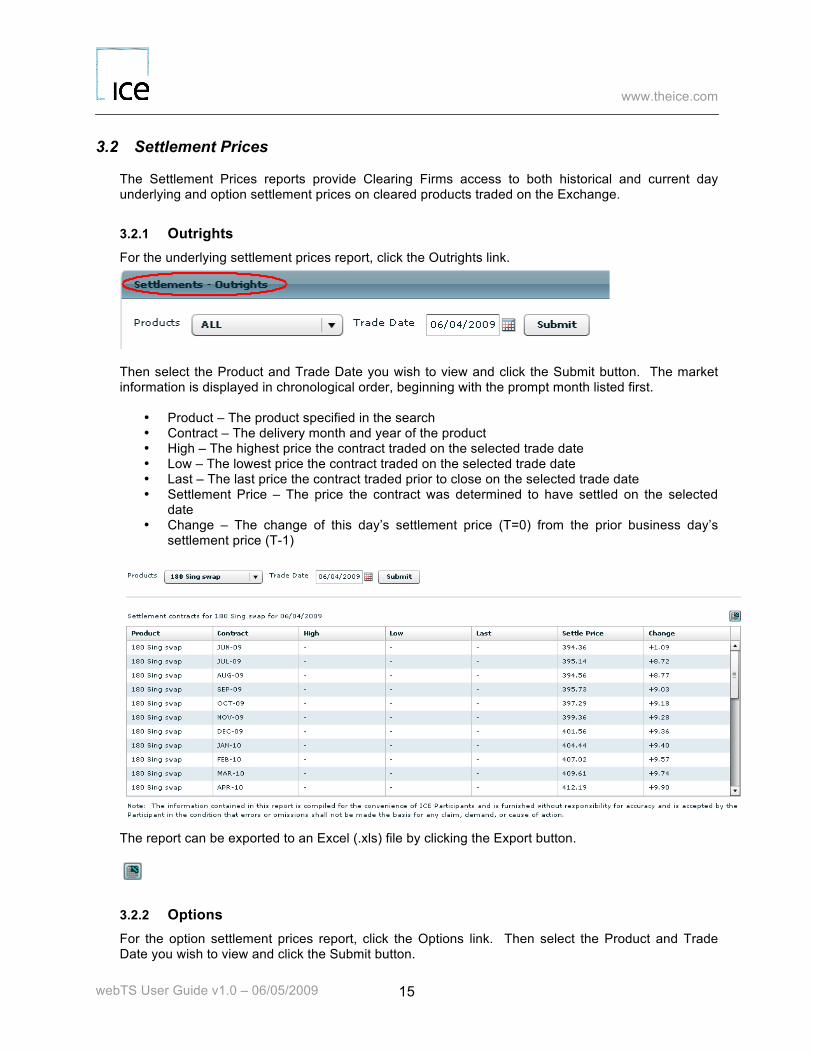
3.2 Settlement Prices The Settlement Prices reports provide Clearing Firms access to both historical and current day underlying and option settlement prices on cleared products traded on the Exchange.
3.2.1 Outrights For the underlying settlement prices report, click the Outrights link.
Then select the Product and Trade Date you wish to view and click the Submit button. The market information is displayed in chronological order, beginning with the prompt month listed first.
• Product – The product specified in the search • Contract – The delivery month and year of the product • High – The highest price the contract traded on the selected trade date • Low – The lowest price the contract traded on the selected trade date • Last – The last price the contract traded prior to close on the selected trade date • Settlement Price – The price the contract was determined to have settled on the selected
date • Change – The change of this day’s settlement price (T=0) from the prior business day’s
settlement price (T-1)
The report can be exported to an Excel (.xls) file by clicking the Export button.
3.2.2 Options For the option settlement prices report, click the Options link. Then select the Product and Trade Date you wish to view and click the Submit button.

www.theice.com
webTS User Guide v1.0 – 06/05/2009
16
The market information is displayed in chronological order, beginning with prompt month listed first.
Clicking an individual contract will display its option settlement information.
• Call Settlement Price – The price the contract’s call was determined to have settled on the selected date
• Call Previous Settlement Price - The price the contract’s call was determined to have settled on the previous date
• Call Change – The change of this day’s call settlement price (T=0) from the prior business day’s call settlement price (T-1)
• Strike Price – The strike price for the contract on the selected date. • Put Settlement Price – The price the contract’s put was determined to have settled on the
selected date • Put Previous Settlement Price - The price the contract’s put was determined to have settled
on the previous date • Put Change – The change of this day’s put settlement price (T=0) from the prior business
day’s put settlement price (T-1)