clavister virtual series getting started guide for kvm · getting started guide for kvm version:...
TRANSCRIPT

Clavister Virtual Series
Getting Started Guide for KVM
Version: 11.02.00
Clavister ABSjögatan 6J
SE-89160 ÖrnsköldsvikSWEDEN
Phone: +46-660-299200www.clavister.com
Published 2015-12-14Copyright © 2015 Clavister AB

Clavister Virtual SeriesGetting Started Guide for KVMVersion: 11.02.00
Published 2015-12-14
Copyright © 2015 Clavister AB
Copyright Notice
This publication, including all photographs, illustrations and software, is protected underinternational copyright laws, with all rights reserved. Neither this manual, nor any of the materialcontained herein, may be reproduced without the written consent of Clavister.
Disclaimer
The information in this document is subject to change without notice. Clavister makes norepresentations or warranties with respect to the contents hereof and specifically disclaims anyimplied warranties of merchantability or fitness for a particular purpose. Clavister reserves theright to revise this publication and to make changes from time to time in the content hereofwithout any obligation to notify any person or parties of such revision or changes.
Limitations of Liability
UNDER NO CIRCUMSTANCES SHALL CLAVISTER OR ITS SUPPLIERS BE LIABLE FOR DAMAGES OFANY CHARACTER (E.G. DAMAGES FOR LOSS OF PROFIT, SOFTWARE RESTORATION, WORKSTOPPAGE, LOSS OF SAVED DATA OR ANY OTHER COMMERCIAL DAMAGES OR LOSSES)RESULTING FROM THE APPLICATION OR IMPROPER USE OF THE CLAVISTER PRODUCT ORFAILURE OF THE PRODUCT, EVEN IF CLAVISTER IS INFORMED OF THE POSSIBILITY OF SUCHDAMAGES. FURTHERMORE, CLAVISTER WILL NOT BE LIABLE FOR THIRD-PARTY CLAIMS AGAINSTCUSTOMER FOR LOSSES OR DAMAGES. CLAVISTER WILL IN NO EVENT BE LIABLE FOR ANYDAMAGES IN EXCESS OF THE AMOUNT CLAVISTER RECEIVED FROM THE END-USER FOR THEPRODUCT.
2

Table of Contents
Preface . . . . . . . . . . . . . . . . . . . . . . . . . . . . . . . . . . . . . . . . . . . . . . . . . . . . . . . . . . . . . . . . . . . . . . . . . . . . . . . . . . . . . . . . . . . . . . . . . . . . . . . . . . . . . . . . 41. Overview & Requirements . . . . . . . . . . . . . . . . . . . . . . . . . . . . . . . . . . . . . . . . . . . . . . . . . . . . . . . . . . . . . . . . . . . . . . . . . . . . . . . . . . . 62. Installation . . . . . . . . . . . . . . . . . . . . . . . . . . . . . . . . . . . . . . . . . . . . . . . . . . . . . . . . . . . . . . . . . . . . . . . . . . . . . . . . . . . . . . . . . . . . . . . . . . . . . . 103. Importing Virtual Machines . . . . . . . . . . . . . . . . . . . . . . . . . . . . . . . . . . . . . . . . . . . . . . . . . . . . . . . . . . . . . . . . . . . . . . . . . . . . . . . . 18
3.1. Manual Setup . . . . . . . . . . . . . . . . . . . . . . . . . . . . . . . . . . . . . . . . . . . . . . . . . . . . . . . . . . . . . . . . . . . . . . . . . . . . . . . . . . . . . . . . 183.2. Script Setup . . . . . . . . . . . . . . . . . . . . . . . . . . . . . . . . . . . . . . . . . . . . . . . . . . . . . . . . . . . . . . . . . . . . . . . . . . . . . . . . . . . . . . . . . . 243.3. The Management Interface . . . . . . . . . . . . . . . . . . . . . . . . . . . . . . . . . . . . . . . . . . . . . . . . . . . . . . . . . . . . . . . . . . . . . . 26
4. Configuring Virtual Machines . . . . . . . . . . . . . . . . . . . . . . . . . . . . . . . . . . . . . . . . . . . . . . . . . . . . . . . . . . . . . . . . . . . . . . . . . . . . . 305. Adding Extra Interfaces . . . . . . . . . . . . . . . . . . . . . . . . . . . . . . . . . . . . . . . . . . . . . . . . . . . . . . . . . . . . . . . . . . . . . . . . . . . . . . . . . . . . . 336. Configuring cOS Core . . . . . . . . . . . . . . . . . . . . . . . . . . . . . . . . . . . . . . . . . . . . . . . . . . . . . . . . . . . . . . . . . . . . . . . . . . . . . . . . . . . . . . . . 36
6.1. Management Workstation Connection . . . . . . . . . . . . . . . . . . . . . . . . . . . . . . . . . . . . . . . . . . . . . . . . . . . . . . 366.2. Web Interface and Wizard Setup . . . . . . . . . . . . . . . . . . . . . . . . . . . . . . . . . . . . . . . . . . . . . . . . . . . . . . . . . . . . . . . 396.3. Manual Web Interface Setup . . . . . . . . . . . . . . . . . . . . . . . . . . . . . . . . . . . . . . . . . . . . . . . . . . . . . . . . . . . . . . . . . . . . 476.4. CLI Setup . . . . . . . . . . . . . . . . . . . . . . . . . . . . . . . . . . . . . . . . . . . . . . . . . . . . . . . . . . . . . . . . . . . . . . . . . . . . . . . . . . . . . . . . . . . . . . 636.5. Installing a License . . . . . . . . . . . . . . . . . . . . . . . . . . . . . . . . . . . . . . . . . . . . . . . . . . . . . . . . . . . . . . . . . . . . . . . . . . . . . . . . . 716.6. Setup Troubleshooting . . . . . . . . . . . . . . . . . . . . . . . . . . . . . . . . . . . . . . . . . . . . . . . . . . . . . . . . . . . . . . . . . . . . . . . . . . . 736.7. System Management . . . . . . . . . . . . . . . . . . . . . . . . . . . . . . . . . . . . . . . . . . . . . . . . . . . . . . . . . . . . . . . . . . . . . . . . . . . . . . 74
7. High Availability Setup . . . . . . . . . . . . . . . . . . . . . . . . . . . . . . . . . . . . . . . . . . . . . . . . . . . . . . . . . . . . . . . . . . . . . . . . . . . . . . . . . . . . . . 768. SR-IOV Setup . . . . . . . . . . . . . . . . . . . . . . . . . . . . . . . . . . . . . . . . . . . . . . . . . . . . . . . . . . . . . . . . . . . . . . . . . . . . . . . . . . . . . . . . . . . . . . . . . . . 809. FAQ . . . . . . . . . . . . . . . . . . . . . . . . . . . . . . . . . . . . . . . . . . . . . . . . . . . . . . . . . . . . . . . . . . . . . . . . . . . . . . . . . . . . . . . . . . . . . . . . . . . . . . . . . . . . . . . . 83A. Windows XP IP Setup . . . . . . . . . . . . . . . . . . . . . . . . . . . . . . . . . . . . . . . . . . . . . . . . . . . . . . . . . . . . . . . . . . . . . . . . . . . . . . . . . . . . . . . . 85B. Vista IP Setup . . . . . . . . . . . . . . . . . . . . . . . . . . . . . . . . . . . . . . . . . . . . . . . . . . . . . . . . . . . . . . . . . . . . . . . . . . . . . . . . . . . . . . . . . . . . . . . . . . . 87C. Windows 7 IP Setup . . . . . . . . . . . . . . . . . . . . . . . . . . . . . . . . . . . . . . . . . . . . . . . . . . . . . . . . . . . . . . . . . . . . . . . . . . . . . . . . . . . . . . . . . . 89D. Windows 8/8.1/10 IP Setup . . . . . . . . . . . . . . . . . . . . . . . . . . . . . . . . . . . . . . . . . . . . . . . . . . . . . . . . . . . . . . . . . . . . . . . . . . . . . . . . 91E. Apple Mac IP Setup . . . . . . . . . . . . . . . . . . . . . . . . . . . . . . . . . . . . . . . . . . . . . . . . . . . . . . . . . . . . . . . . . . . . . . . . . . . . . . . . . . . . . . . . . . . 93
3

Preface
Target Audience
The target audience for this guide is the administrator who wants to run the cOS Core networkoperating system under a KVM virtual environment with QEMU as the hypervisor on a Linuxplatform. The guide takes the user from the installation of cOS Core through to startup of thesoftware, including network connections and initial cOS Core configuration.
Text Structure
The text is divided into chapters and subsections. Numbered subsections are shown in the tableof contents at the beginning of the document.
Text links
Where a "See section" link is provided in the main text, this can be clicked on to take the readerdirectly to that reference. For example, see Section 6.6, “Setup Troubleshooting ”.
Web links
Web links included in the document are clickable. For example, http://www.clavister.com.
Notes to the main text
Special sections of text which the reader should pay special attention to are indicated by iconson the left hand side of the page followed by a short paragraph in italicized text. There are thefollowing types of such sections:
NoteThis indicates some piece of information that is an addition to the preceding text. It mayconcern something that is being emphasized or something that is not obvious orexplicitly stated in the preceding text.
TipThis indicates a piece of non-critical information that is useful to know in certainsituations but is not essential reading.
CautionThis indicates where the reader should be careful with their actions as an undesirablesituation may result if care is not exercised.
ImportantThis is an essential point that the reader should read and understand.
4

WarningThis is essential reading for the user as they should be aware that a serious situationmay result if certain actions are taken or not taken.
Trademarks
Certain names in this publication are the trademarks of their respective owners.
cOS Core is the trademark of Clavister AB.
Windows, Windows XP, Windows Vista and Windows 7 are either registered trademarks ortrademarks of Microsoft Corporation in the United States and/or other countries.
Apple, Mac, Mac OS, and Macintosh are trademarks of Apple Inc.
Preface
5

Chapter 1: Overview & Requirements
cOS Core with KVM
By using the open source Kernel-based Virtual Machine (KVM) software, it is possible to have asingle computer running multiple, virtual Clavister Security Gateways with each virtual gatewayrunning a separate copy of cOS Core. This technique is referred to as virtualization and eachvirtual Clavister Security Gateway can be said to be running in its own virtual machine. This is thebasis for the Clavister Virtual Series of products which also includes cOS Core running under thecommercial VMware™ environment.
cOS Core is an Operating System
cOS Core is a network security operating system that is not built on a pre-existing operatingsystem like Linux. Instead, it is itself both the operating system and security gateway. This meanscOS Core has modest resource requirements under KVM, such as only needing a very small diskspace footprint of under 64 megabytes. A detailed list of resource requirements can be foundlater in this chapter.
cOS Core Management
Not only can cOS Core run in its own virtual machine under KVM, the management workstationthat is used to administer cOS Core can also run under the same KVM installation or it can be on aseparate, external computer. To perform management tasks, the management workstation mayrun InControl, the Web Interface or a CLI console through a secure shell client.
KVM Runs Under Linux With QEMU
KVM itself is not a hypervisor but provides an infrastructure for creating virtual machines. It is theQuick EMUlator (QEMU) that provides the hypervisor functions under the Linux operation systemand this is also required when using KVM to create cOS Core virtual machines. The combinationis known as QEMU-KVM and is distributed as a single package so that the two can be installedtogether.
Referencing KVM Documentation
This guide describes the steps involved when installing cOS Core with KVM on x86 basedhardware as well as covering many of the issues that may be encountered with cOS Core runningin a KVM virtual environment.
6
The guide tries to deal specifically with the subject of cOS Core running under KVM and, unlessrelevant, does not detail the installation of KVM itself or issues which are related only to KVM.Pure KVM subjects are best explained by other, KVM specific, documentation.
Server Hardware Requirements
The server running KVM must satisfy the following criteria:
• The hardware architecture must be 64-bit x86.
• It must support virtualization using Intel VT-x or AMD-V architectures.
• Intel processors must be from either the Intel Core (or later) workstation or Intel server familyof products.
• It must support a ratio of 1-to-1 for threads to defined virtual CPU.
• It must support at least one core per virtual CPU.
Intel Hardware Drivers
The following additional hardware driver requirements should be noted:
• If used, the IXGBE (Intel 10 Gigabit network) driver should be version 3.21.2 or later.
• Also note that if used, the IXGBE driver should be recompiled with the LRO (Large PacketReceive) feature disabled. Information about how to do this can be found in the README fileincluded with the driver distribution.
• If used, the IGB (Intel Network) driver should be version 5.2.5 or later.
cOS Core Resource Requirements
A single installation of cOS Core as a virtual security gateway will require the following resourcerequirements:
• Minimum of 1 x virtual CPU.
• Minimum 128 Mbytes RAM (512 recommended, depending on features used).
• Maximum 4096 Mbytes RAM. Requirements differ according to cOS Core license.
• 64 Mbytes of free disk space for cOS Core installation.
Supported Linux Distributions
KVM with QEMU will run under the Linux operating system and will require one of the followingLinux distributions:
• Ubuntu version 13.04 or later.
• openSUSE version 12.2 or later.
• Centos version 6.4 or later.
Chapter 1: Overview & Requirements
7

• Red Hat Enterprise Linux 6.4 or later.
Other Linux distributions might be used successfully but have not been tested by Clavister withcOS Core. The installation of Linux will not be discussed further in this guide. It is assumed theadministrator is familiar with basic Linux networking.
Supported KVM Distributions
cOS Core can run under the latest distribution of KVM. These distributions also include QEMU.The QEMU release (or later) that must be used for cOS Core to function properly:
• QEMU emulator version 2.0.0 (Debian 2.0.0+dfsg-2ubuntu1.17) © 2003-2008 Fabrice Bellard.
Other distributions might be used successfully but have not been tested by Clavister. Theinstallation of QEMU with KVM will not be discussed further in this guide and the administratorshould refer to the software's own documentation. The QEMU/KVM binaries for a particular Linuxdistribution can normally can normally be installed from the repositories of the distribution.
Note that the SeaBIOS version used with KVM for guest x86 operating systems should be version1.7.4 or later.
Additional Linux Software
The following should also be installed on the base Linux system:
• The libvirt virtualization API must be installed under Linux. This is needed for the libvirtdaemon (libvirtd) and the virsh command.
• The vhost-net enhancement for networking is required. This moves packets between cOSCore and the host system using the Linux kernel instead of QEMU and provides a significantperformance boost to throughput. The Clavister setup script described later will terminatewith an error message if this is not installed.
• Either bridge-utils or Open vSwitch must be installed to provide networking functions. It is notpossible to install both. If the virtual machine will be part of a cOS Core HA cluster, then OpenvSwitch must be installed.
If a high availability (HA) cluster is to be set up, Open vSwitch must be installed. HA will notfunction with bridge-utils and this must be removed. HA setup is discussed further inChapter 7, High Availability Setup.
Software Tools for Management
The following are the software requirements for management:
• KVM virtual machine management software must be installed under Linux. This guideassumes that the Virtual Machine Manager (virt-manager) software is installed.
• Optionally use a VNC client on a separate computer workstation to access the Linuxenvironment. This guide assumes UltraVNC Viewer is used but other clients may be suitable.
The installation of these software tools will not be discussed further in this guide. Theadministrator should refer to the tool's own documentation for guidance.
Chapter 1: Overview & Requirements
8

The cOS Core installation files for these servers can be downloaded from the Clavister websitehttps://www.clavister.com. KVM files and further information can be found by going tohttp://www.linux-kvm.org.
Chapter 1: Overview & Requirements
9

Chapter 2: Installation
This section describes the overall installation steps of cOS Core in a virtual environment. Itincludes details of customer registration and license installation. The steps are organized into thefollowing stages:
A. Register as a User and Download cOS Core
B. Create a cOS Core Virtual Machine
C. Configure cOS Core for Management Access
D. Register a License and Bind it to cOS Core
A. Register as a User and Download cOS Core
1. Open a web browser, surf to http://www.clavister.com and select the Log in option.
2. The customer login page is presented. It is assumed that a new customer is accessing thesite for the first time so they should press the Register button.
10

3. The registration webpage is presented. The required information should be filled in. In theexample below, a user called John Smith registers. The company details must be entered aswell if licenses are to be created and downloaded.
4. When the registration is accepted, an email is sent to the email address given so that theregistration can be confirmed.
5. Below is an example of the email that John Smith would receive.
6. When the email link is clicked, the new customer is taken to a webpage to indicate thatconfirmation has been successful. The customer should now log in to the Clavister websitewith the credentials they have submitted during registration.
Chapter 2: Installation
11

7. After login, the website toolbar will show the name of the currently logged in customer.
8. To download cOS Core for all platforms, select Downloads.
9. Select cOS Core under downloads.
10. Select and download the ZIP file containing the relevant cOS Core distribution to the localdisk.
Chapter 2: Installation
12

B. Create a cOS Core Virtual Machine
Unzip the downloaded file and follow the instructions for creating the relevant cOS Core virtualmachine using the instructions in Chapter 3, Importing Virtual Machines.
C. Configure cOS Core for Management Access
1. cOS Core can now be configured using the CLI for public Internet access and to allowmanagement access via the If1 interface. The CLI steps are as follows:
i. The cOS Core address book is automatically filled with address objects for the IPv4address and network of all the Ethernet interfaces. Assign the IPv4 address of the If1interface. This will be used for remote management:
Device:/> set Address IP4AddressInterfaceAddresses/If1_ipAddress=203.0.113.10
Next, assign the IPv4 network for the If1 interface:
Device:/> set Address IP4AddressInterfaceAddresses/If1_netAddress=203.0.113.0/24
ii. An all-nets default route needs to be added to the main routing table which includesthe gateway address of a router for public Internet access. Unless there is a narrowerroute that matches for traffic, this route will be used. To add the route, the CLI contextneeds to be changed to be the main routing table:
Device:/> cc RoutingTable main
The command prompt will change to show that the current context is the main routingtable:
Device:/main>
Now, routes can be added to the main table. Assuming that the If1 interface isconnected to a router with the IPv4 address 203.0.113.1 then a default route is addedwith the following CLI:
Device:/main> add Route Interface=If1 Network=all-netsGateway=203.0.113.1
iii. Next, restore the CLI context to the default:
Device:/> cc
iv. For management access, the RemoteManagement object needs to be changed so it
Chapter 2: Installation
13

allows the source IP to connect. This could be a specific IPv4 address or network buthere it is set to all-nets so any source IP will be acceptable:
Device:/> set RemoteManagement HTTP_If1 Network=all-nets
Normally, an IP Rule configuration object should be created for any data traffic to beallowed to flow to or from cOS Core but management access does not require aseparate rule.
v. The cOS Core configuration changes now needs to be activated:
Device:/> activate
Following activation, the changes must be committed permanently within 30 secondsotherwise the configuration will revert back to the original configuration and thechanges will be lost. This is a check by cOS Core that the administrator has not beenlocked out by the changes:
Device:/> commit
6. Finally, open a web browser and surf to the IP address of the If1 interface. The cOS Corelogin dialog should appear and the default administrator credentials of username adminwith password admin can be used to log in. By default, only the HTTPS protocol can be usedso the connection will be encrypted. With HTTPS, cOS Core will send a self-signed certificateand the browser will prompt for that certificate to be accepted.
Ít is possible to enable unencrypted HTTP for the management connection but this is notrecommended.
When connecting through the Web Interface for the first time, the cOS Core Setup Wizard willautomatically try to start as a browser popup window. Browser popups may be disallowedso the browser will ask if the wizard popup should be allowed. For this section, the wizard isnot used and its popup window can be dismissed. Using the wizard is described inSection 6.2, “Web Interface and Wizard Setup”.
Chapter 2: Installation
14

D. Register a License and Bind it to cOS Core
1. A cOS Core license for VMware must be associated with a MAC address on the virtualmachine. To get a MAC address, open the cOS Core Web Interface and go to Status >Run-time Information > Interfaces and make a note of the MAC address for the If1interface.
Alternatively, the following CLI command can be used to obtain the MAC address:
Device:/> ifstat If1
2. Now, log in to the Clavister website and select Register License.
3. The registration page is displayed. Select the option License Number and MAC addressthen enter the MAC address noted earlier with the license number and click RegisterLicense. The license number will be given to you by your Clavister reseller.
Chapter 2: Installation
15

4. After the license is registered and associated with the MAC address, select Licenses, thenLicense List and select the newly registered license from the displayed list.
5. Now, select the Download option to download a license file to the local disk.
6. Finally, go back to the cOS Core Web Interface and go to Status > Maintenance > License.Select Upload to upload the license file from the management computer to cOS Core.
Chapter 2: Installation
16

The 2 hour evaluation time limit will now be removed and cOS Core will only be restricted by thecapabilities defined by the license.
Chapter 2: Installation
17

Chapter 3: Importing Virtual Machines
• Manual Setup, page 18
• Script Setup, page 24
• The Management Interface, page 26
This chapter describes importing a disk image distribution of a virtual machine running cOS Core.It is assumed that KVM software with QEMU has been installed and is running in the appropriateenvironment and the relevant software tools have also been installed. This initial setup has beendescribed previously in Chapter 1, Overview & Requirements.
Virtual machine creation can be done in one of the following ways:
• Manually using virtual machine manager. This is described next in Section 3.1, “ManualSetup”.
• Automatically using a script. An example script is supplied by Clavister and this is describednext in Section 3.2, “Script Setup”.
cOS Core Memory Requirements
The minimum amount of memory required for cOS Core to run is 128 Mbytes and memoryshould not be reduced below this level. However, certain memory demanding features cannotrun in this ammount of memory so a minimum of 512 Mbytes is recommended. This allocationmay need to be increased depending on the cOS Core license available and the number ofconnections/tunnels that will be open simultaneously. The maximum memory allocationpossible for cOS Core is 4096 Mbytes. Anything available above this will not be used.
If the allocated memory is insufficient during operation, cOS Core will output console messagesindicating this while trying to reduce the number of open connections/tunnels. Eventually, cOSCore will enter safe mode where only management access is possible.
3.1. Manual Setup
This section describes using Virtual Machine Manager to manually create a cOS Core virtualmachine.
1. Start Virtual Machine Manager and select the menu options File > Add Connection.
18

2. Double click on the new host to open it. You will be prompted for the password.
3. Select Create new virtual machine to start the new VM wizard. Give the new virtualmachine a name and select Import existing disk image then Forward.
Chapter 3: Importing Virtual Machines
19

4. Select the cOS Core image file and select Choose Volume. For this description, it is assumedthat the image file has the name cOS_Core.qcow2 but the actual filename will include aversion number.
5. In the next step, leave the OS type and Version as Generic and select Forward.
Chapter 3: Importing Virtual Machines
20

6. Set the amount of RAM and the number of CPUs that are required. Only one CPU is required.cOS Core requires 128 Mbytes of memory as an absolute minimum. However, some memorydemanding cOS Core features such as Anti-Virus scanning, IDP and Application Control willnot be able to function in 128 Mbytes. For this reason, 512 Mbytes is recommended. Themaximum possible is 4096 Mbytes. such as
7. Check the option Customize configuration before install and then select Finish to exitthe wizard.
Chapter 3: Importing Virtual Machines
21

8. Select the disk from the navigation menu and make sure the following values are enteredfor the disk driver:
• Disk bus: VirtIO• Cach mode: none• IO mode: Hypervisor default
9. Set the Source device to the defined WAN bridge and set the Device model to virtio. SelectApply, then select Add Hardware.
Chapter 3: Importing Virtual Machines
22

10. Select Network in the navigation menu and then set Host device to the defined LAN bridgeand Device model to virtio.
Repeat this process for the third interface.
11. There are now three network interfaces attached to the virtual machine so Begininstallation can now be selected. This will also boot up the virtual machine.
Chapter 3: Importing Virtual Machines
23

3.2. Script Setup
An example script for this setup called prepare.sh can be downloaded from:
http://github.com/Clavister
This script is written in bash and is not supported by Clavister. It is provided only as a referencescript for cOS Core setup under KVM and it can be freely used, modified or redistributed underthe GPL open source license. As far as Clavister is aware, the script is suitable for KVM runningunder most Linux distributions.
The process for creating the virtual machine with the script can be summarized as follows:
• Run the script prepare.sh. This go through a series of questions to create an XML file for initialconfiguration of the virtual machine. The script will optionally create the virtual machineusing this file. One of the key tasks performed by the script is to map cOS Core's virtualEthernet interfaces to networking bridges.
• Use the virsh define command to create the virtual machine using the created XML file asinput if the administrator chose not to do it with the script.
Install bridge-utils or Open vSwitch
Either bridge-utils or Open vSwitch must be installed for networking functions. Both cannot beinstalled at the same time. If the virtual security gateway is going to be part of a cOS Core HAcluster then Open vSwitch must be installed. However, Open vSwitch can also be used forstandalone virtual security gateways.
The prepare.sh script will ask which of the two is installed and configure the networkingaccordingly.
Detailed Steps for Virtual Machine Definition
Once the Linux system has been set up with the required software installed, the series of stepsfor creating a cOS Core virtual machine are as follows:
1. Download the cOS Core distribution package file from the Clavister Customer Web to a localworkstation computer. The Clavister website will require customer login credentials.
2. Upload the following files to the Linux computer's disk using the Secure Copy (SCP) protocoland make a note of their location.
i. The cOS Core image file for KVM which can be downloaded by logging in to theClavister website.
ii. The script prepare.sh or a modified version of it.
Many SCP clients can be used for this. For example, open source puTTY.
3. Open a console to access Linux. Note that the script must be run as root and the script willcheck that this is the case.
4. Change the working directory to be the location of the uploaded files then run the scriptprepare.sh using the command:
Chapter 3: Importing Virtual Machines
24

[root@linux]# ./prepare.sh
Optionally, the filename of the cOS Core virtual machine image can also be specified in thecommand line:
[root@linux]# ./prepare.sh <vm_image_filename>
When it runs, the script will prompt for the following:
i. The Clavister product: The script can be used with all Clavister's security products.Select cOS Core for this question.
ii. The security gateway name: The name of the virtual machine and also the name ofthe XML generated by the script. This is the name that will be displayed when usingVirtual Machine Manager.
iii. Networking: The administrator must tell the script if bridge-utils or Open vSwitch isbeing used for networking. If the selected networking package is not detected, thescript will terminate.
iv. The interface mapping: A default mapping of cOS Core virtual Ethernet interfaces tonetworking bridges will be performed by the script and displayed. The script will ask ifthis mapping should be changed, allowing the administrator to select an alternativemapping.
v. Creating the virtual security gateway: A virtual machine running cOS Core can becreated by the script. If the administrator chooses not to do this, it must be donemanually using the virsh utility as described later. A reason not to let the script createthe virtual machine is if the XML configuration file is to be checked and possibly alteredmanually.
6. After the script completes and if the administrator chose not to create the virtual machine,an XML file will have been created which is then used to create it manually. Assume that thename chosen for the gateway is my_security_gateway. The XML configuration file created bythe script will be my_security_gateway.xml. The following Linux command will create thevirtual machine:
[root@linux]# virsh define my_security_gateway.xml
The XML file can be examined and edited manually before this step but it is recommendedto make changes later.
Changing the Virtual Machine Configuration
The initial configuration parameters of the virtual machine created will be those specified in theconfiguration XML file created by the script but these can be changed later as required. Forexample, the amount of RAM memory allocated may need to be increased. Making thesechanges on an existing virtual machine is described in Chapter 4, Configuring Virtual Machines.
Chapter 3: Importing Virtual Machines
25

3.3. The Management Interface
The KVM Console
When cOS Core starts, KVM will display a console which represents the console that is normallydirectly connected to the local console port of a physical Clavister Security Gateway. This consoleis accessed by using VNC to connect to the IP address and port previously specified whenrunning the script prepare.sh.
This console displays output from cOS Core exactly as it would be displayed with a non-virtualClavister Security Gateway. It will show the initial startup sequence output and this can beinterrupted, if required, by key presses in order to enter the boot menu. After startup, the KVMconsole can be used to issue CLI commands to configure cOS Core further and this is described inSection 6.4, “CLI Setup”.
Tip: Changing focus back from the KVM consoleKVM will keep focus in the console window after clicking it. Use the key combinationCtrl-Alt to release this focus.
The Default Virtual Ethernet Interfaces
By default, the standard cOS Core installation provides three virtual Ethernet interfaces. Tofunction, these virtual NICs must be mapped to the correct bridge or physical Ethernet interfaceby changing the Source device property for the interface using Virtual Machine Manager(virt-manager). Doing this is described in Chapter 4, Configuring Virtual Machines. The Devicemodel property will remain as the default value of virtio
cOS Core assigns the following default logical names to the virtual interfaces:
• Interface names: Ifn. For example, the first interface is If1.
• IP address objects: Ifn_ip. For example, the first address object is If1_ip.
• Netmask IP objects: Ifn_net. For example, the first netmask is If1_net.
Connecting to the Virtual Clavister Security Gateway
The first virtual Ethernet interface, If1, will be assigned the IP address 192.168.1.1 by cOS Core.This is the default cOS Core management interface and connection to it can be done from a webbrowser (using the cOS Core Web Interface) or SSH client (using the cOS Core CLI) just as it isdone with a non-KVM installation.
The workstation running the web browser or SSH client can be one of the following:
• A virtual workstation running under the same KVM host.
In this case, a Linux or Open vSwitch bridge can be used to connect the virtual Ethernetinterface with a virtual Ethernet interface on the virtual workstation. The virtual workstationmight be, for example, a Windows XP installation as shown below.
For this option to function, KVM must be configured so that the virtual Ethernet interface onboth cOS Core and the workstation are on the same bridge.
Chapter 3: Importing Virtual Machines
26

• A physically separate workstation computer.
In this case, a macvtap adapter can be configured to connect the virtual Ethernet interface toa physical interface. Physical connection is then made between that physical interface and aninterface on a physically separate workstation computer.
In both the above cases, the real or virtual workstation PC needs its connecting Ethernetinterface configured with an IP address on the same network as the cOS Core interface. Once thisis done, the management workstation and the Clavister Security Gateway can communicate andinitial cOS Core setup can then be performed in exactly the same way as a non-virtual securitygateway. This is described next in Chapter 6, Configuring cOS Core.
Setup with Multiple Virtual Clavister Security Gateways
When there are multiple virtual machines running cOS Core under one KVM host, the IP addressof the management virtual Ethernet interface must be different for the different virtual machinesif administration is to be done through the Web Interface or SSL client.
The recommended way to change the management interface IP address is to enter CLIcommands into the cOS Core console which is displayed by KVM after cOS Core starts. Thecommands to do this are as follows:
Chapter 3: Importing Virtual Machines
27

1. Set the IP address of the default management interface If1_ip. In this example, it will be setto 10.0.0.1:
Device:/> set Address IP4Address If1_ip Address=10.0.0.1
2. Now set the network of the interface. This object has the name If1_net.
Device:/> set Address IP4Address If1_net Address=10.0.0.0/24
3. As a check, the current management rule for HTTP access can be displayed:
Device:/> show RemoteManagement RemoteMgmtHTTP
These steps should then be followed by an activate and then a commit command to deploy thechanges.
These same steps could be performed through the Web Interface but as soon as the changes arecommitted, the administrator has 30 seconds to log back in to cOS Core before the changes areundone and cOS Core reverts to the previous configuration.
Chapter 3: Importing Virtual Machines
28

Chapter 3: Importing Virtual Machines
29

Chapter 4: Configuring Virtual Machines
Once the cOS Core virtual machine disk image is imported (this is described in the previouschapter), the KVM virtual machine environment will have a set of default parameters. Forexample, the virtual interfaces available to cOS Core. This section describes how theseparameters should be configured.
Important: Read the previous chapter first
This chapter deals with changing the default virtual machine configuration after it hasbeen imported. Importing is described in Chapter 3, Importing Virtual Machines andthat should be read first.
Displaying the Current Configuration
The current KVM configuration of a virtual machine can be displayed with the following steps:
1. Use a client console to access Linux and start the virt-manager software.
2. Start the virt-manager software. The virt-manager virtual machine manager software will beused throughout this guide but alternative virtual management software may be used.
3. Connect to KVM by right-clicking on localhost (QEMU) and selecting the Connect menuoption (or double-click on the localhost line).
30

4. A list of currently defined virtual machines will be shown.
Changing the Configuration
1. To display and edit the currently selected virtual machine's configuration, first press theOpen button in the toolbar.
2. The status dialog for this virtual machine will display. Press the information button in thetoolbar.
3. The configuration of the virtual machine will now be displayed.
Chapter 4: Configuring Virtual Machines
31

4. To change a configuration parameter, select it in the left hand navigation list and then alterthe displayed values. For example, changing the default RAM memory allocation is shownbelow.
5. Save any configuration changes by pressing the Apply button.
Chapter 4: Configuring Virtual Machines
32

Chapter 5: Adding Extra Interfaces
The default virtual machine created by the script prepare.sh has three virtual interfacesconfigured for cOS Core. These have logical cOS Core names If1, If2 and If3.
If more virtual interfaces are required, these can be added later but must be manuallyconfigured. This chapter explains how extra interfaces can be added so they are correctlyconfigured.
The steps are as follows:
1. Open virt-manager and open the configuration dialog for the virtual machine. Doing this isdescribed previously in Chapter 4, Configuring Virtual Machines.
2. Press the Add Hardware button at the bottom of the configuration dialog.
3. The Add New Virtual Hardware dialog will be displayed. Select Network from the options onthe left.
33

4. Now select the Host Device which will be the physical interface or bridge to be mapped tothis virtual interface. In the screenshot below, a physical Ethernet interface called eth9 willbe selected for the mapping.
5. Next, select the Device Model to have the value Virtio.
6. Close the new hardware dialog by pressing the Finish button.
7. The new interface will now appear in the list at the left of the configuration dialog. Press theApply button to save the changed configuration.
8. Although the virtual interface has now been added to the virtual machine, cOS Core will notautomatically add it to the current configuration. To add the interface, run the following cOSCore CLI command:
Device:/> pciscan -cfgupdate
The output from this command will confirm that a new interface has been added. If it is thefirst added and no previous ones have been deleted it should have the logical name If4.
Follow the pciscan command with the activate and commit CLI commands to save theconfiguration changes.
Chapter 5: Adding Extra Interfaces
34

Caution: Adding and deleting cOS Core interfaces
cOS Core allows logical interfaces to be deleted. If this is done the ordering ofsubsequently added logical interfaces can become unpredictable and may notnecessarily have the first logical name that is available. For example, if cOS Coreinterface If2 is deleted from the configuration, the next interface added using pciscanmay not become If2.
Chapter 5: Adding Extra Interfaces
35

Chapter 6: Configuring cOS Core
• Management Workstation Connection, page 36
• Web Interface and Wizard Setup, page 39
• Manual Web Interface Setup, page 47
• CLI Setup, page 63
• Installing a License, page 71
• Setup Troubleshooting , page 73
• System Management, page 74
6.1. Management Workstation Connection
The Default Management Interface
After first time startup, cOS Core scans the available Ethernet interfaces and makes managementaccess available on the first interface found and assigns the IPv4 address 192.168.1.1 to it.
With installation under KVM, the default management interface is the cOS Core If1 interface.
Alternative cOS Core Setup Methods
Initial cOS Core software configuration can be done in one of the following ways:
• Through a web browser.
A standard web browser running on a standalone computer (also referred to as themanagement workstation) can be used to access the cOS Core Web Interface. This provides anintuitive graphical interface for cOS Core management. When this interface is accessed forthe first time, a setup wizard runs automatically to guide a new user through key setup steps.The wizard can be closed if the administrator wishes to go directly to the Web Interface toperform setup manually.
The wizard is recommended for its simplification of initial setup and is described in detail inSection 6.2, “Web Interface and Wizard Setup”.
36

• Through a terminal console using CLI commands.
The setup process can alternatively be performed using console CLI commands and this isdescribed in Section 6.4, “CLI Setup”. The CLI allows step by step control of setup and shouldbe used by administrators who fully understand both the CLI and setup process.
CLI access can be remote, across a network to a cOS Core interface using a similar connectionto that used with the Web Interface. Alternatively, CLI access can be direct, through the KVMconsole window.
Network Connection Setup
For setup using the Web Interface or using remote CLI, a management workstation computermust be first physically connected to cOS Core across a network. This connection is describedpreviously in Chapter 3, Importing Virtual Machines.
The logical cOS Core management interface with KVM is If1 and the corresponding physicalEthernet port associated with this should be connected to the same network as the managementworkstation (or a network accessible from the workstation via one or more routers). Typically theconnection is made via a switch or hub in the network using a regular straight-through Ethernetcable as illustrated below.
For connection to the public Internet, one of the other interfaces should be connected to an ISPand this interface is sometimes referred to below and in the setup wizard as the WAN interface.
Workstation Ethernet Interface Setup
Traffic is able to flow between the designated workstation interface and the Clavister SecurityGateway interface because they are on the same IP network. This means the workstationinterface must be first assigned the following static IPv4 addresses:
• IP address: 192.168.1.30
• Subnet mask: 255.255.255.0
• Default gateway: 192.168.1.1
Chapter 6: Configuring cOS Core
37

Tip: Using another workstation interface IP address
The IPv4 address assigned to the management workstation's Ethernet interface, couldbe any address from the 192.168.1.0/24 network. However, the IP chosen must bedifferent from 192.168.1.1 which is used by cOS Core's default management interface.
The following appendices at the end of this guide describe how to set up the managementworkstation IP with different platforms:
• Appendix A, Windows XP IP Setup.
• Appendix B, Vista IP Setup.
• Appendix C, Windows 7 IP Setup.
• Appendix D, Windows 8/8.1/10 IP Setup.
• Appendix E, Apple Mac IP Setup.
Chapter 6: Configuring cOS Core
38

6.2. Web Interface and Wizard Setup
This chapter describes the setup when accessing cOS Core for the first time through a webbrowser. The user interface accessed in this way is called the Web Interface (also known as theWebUI).
NoteMany of the screenshots in this chapter have had whitespace removed from the originalimage to improve the readability. However, all of the informational content in theimages has been preserved.
Connect By Surfing to https://192.168.1.1
Using a web browser, enter the address https://192.168.1.1 into the navigation window as shownbelow.
Check for a proxy server and turn off popup blocking.
Make sure the web browser doesn't have a proxy server configured.
Any popup blocking in the browser should also be temporarily turned off to allow thesetup wizard to run.
If there is no response from cOS Core and the reason is not clear, refer to the help checklist inSection 6.6, “Setup Troubleshooting ”.
Note: HTTP access is disabled for cOS Core 11.01 and later
For cOS Core version 11.01 and later, HTTP management access is disabled in thedefault configuration and HTTPS must be used. HTTP access can be enabled by theadministrator but this is not recommended.
The cOS Core Self-signed Certificate
When responding to an https:// request, cOS Core sends a self-signed certificate which will not beinitially recognized so it will be necessary to tell the browser to accept the certificate for this andfuture sessions. Different browsers handle this in slightly different ways. In Microsoft InternetExplorer the following error message will be displayed in the browser window.
To continue, tell IE to accept the certificate by clicking the following link which appears near thebottom of the browser window.
Chapter 6: Configuring cOS Core
39

In Firefox, this procedure is called "Add a security exception".
It is possible to configure cOS Core to use a CA signed certificate instead of self-signed certificatefor the management login and doing this is described in the cOS Core Administration Guide.
The Login Dialog
cOS Core will next respond like a web server with the initial login dialog page as shown below.
The available Web Interface language options are selectable at the bottom of this dialog. Thisdefaults to the language set for the browser if cOS Core supports that language.
Logging In and the Setup Wizard
Now login with the username admin and the password admin. The Web Interface will appear andthe cOS Core setup wizard should begin automatically. The first wizard dialog is the wizardwelcome screen which should appear as shown below.
Cancelling the Wizard
The setup wizard can be cancelled at any point before the final Activate screen and run again bychoosing the Setup Wizard option from the Web Interface toolbar. Once any configurationchanges have been made and activated, either through the wizard, Web Interface or CLI, thenthe wizard cannot be run since the wizard requires that cOS Core has the factory defaults.
Chapter 6: Configuring cOS Core
40
The Wizard Assumes Internet Access will be Configured
The wizard assumes that Internet access will be configured. If this is not the case, for example ifthe Clavister Security Gateway is being used in Transparent Mode between two internal networks,then the configuration setup is best done with individual Web Interface steps or through the CLIinstead of through the wizard.
Advantages of the Wizard
The wizard makes setup easier because it automates what would otherwise be a more complexset of individual setup steps. It also reminds you to perform important tasks such as setting thedate and time and configuring a log server.
The steps that the wizard goes through after the welcome screen are listed next.
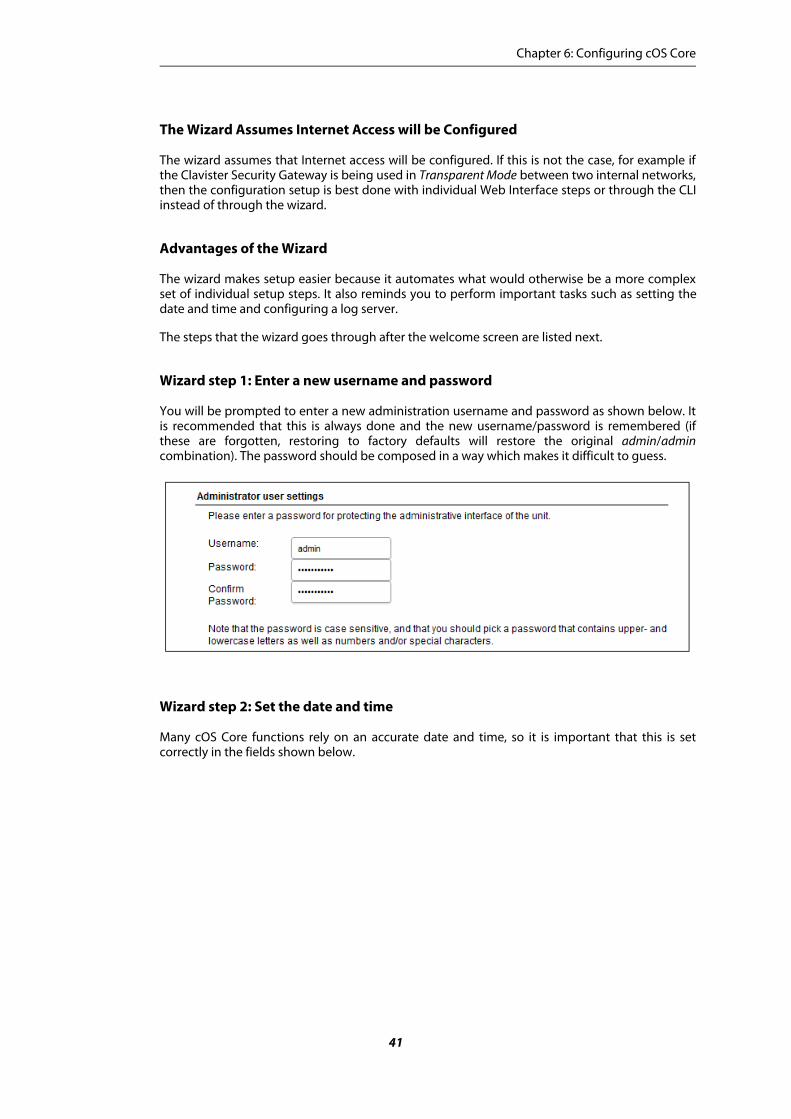
Wizard step 1: Enter a new username and password
You will be prompted to enter a new administration username and password as shown below. Itis recommended that this is always done and the new username/password is remembered (ifthese are forgotten, restoring to factory defaults will restore the original admin/admincombination). The password should be composed in a way which makes it difficult to guess.
Wizard step 2: Set the date and time
Many cOS Core functions rely on an accurate date and time, so it is important that this is setcorrectly in the fields shown below.
Chapter 6: Configuring cOS Core
41

Wizard step 3: Select the WAN interface
Next, you will be asked for the WAN interface that will be used to connect to your ISP for Internetaccess.
Wizard step 4: Select the WAN interface settings
This step selects how the WAN connection to the Internet will function. It can be one of Manualconfiguration, DHCP, PPPoE or PPTP as shown below.
Chapter 6: Configuring cOS Core
42

These four different connection options are discussed next in the following subsections 4A to4D.
• 4A. Static - manual configuration
Information supplied by the ISP should be entered in the next wizard screen. All fields needto be entered except for the Secondary DNS server field.
• 4B. DHCP - automatic configuration
All required IP addresses will automatically be retrieved from the ISP's DHCP server with thisoption. No further configuration is required for this so it does not have its own wizard screen.
• 4C. PPPoE settings
The username and password supplied by your ISP for PPPoE connection should be entered.The Service field should be left blank unless the ISP supplies a value for it.
Chapter 6: Configuring cOS Core
43

DNS servers are set automatically after connection with PPPoE.
• 4D. PPTP settings
The username and password supplied by your ISP for PPTP connection should be entered. IfDHCP is to be used with the ISP then this should be selected, otherwise Static should beselected followed by entering the static IP address supplied by the ISP.
DNS servers are set automatically after connection with PPTP.
Wizard step 5: DHCP server settings
If the Clavister Security Gateway is to function as a DHCP server, it can be enabled here in thewizard on a particular interface or configured later.
For example, the private IPv4 address range might be specified as 192.168.1.50 - 192.168.1.150with a netmask of 255.255.255.0.
Chapter 6: Configuring cOS Core
44

Wizard step 6: Helper server settings
Optional NTP and Syslog servers can be enabled here in the wizard or configured later. NetworkTime Protocol servers keep the system date and time accurate. Syslog servers can be used toreceive and store log messages sent by cOS Core.
For the default gateway, it is recommended to specify the IP address 192.168.1.1 and the DNSserver specified should be the DNS supplied by your ISP.
When specifying a hostname as a server instead of an IP address, the hostname should beprefixed with the string dns:. For example, the hostname host1.company.com should be enteredas dns:host1.company.com.
Wizard step 7: Activate setup
The final step is to activate the setup by pressing the Activate button. After this step the Web
Chapter 6: Configuring cOS Core
45

Interface returns to its normal appearance and the administrator can continue to configure thesystem.
Running the Wizard Again
Once the wizard has been successfully finished and activated, it cannot be run again. Theexception to this is if the Clavister Security Gateway has its factory defaults restored in whichcase the unit will behave as though it were being started for the first time.
Uploading a License
Without a valid license installed, cOS Core operates in demo mode (demonstration mode) andwill cease operations 2 hours after startup. To remove this restriction, a valid license must beuploaded to cOS Core. Doing this is described in Section 6.5, “Installing a License”
Chapter 6: Configuring cOS Core
46

6.3. Manual Web Interface Setup
This section describes initial cOS Core configuration performed directly through the WebInterface, without using the setup wizard. Configuration is done as a series of individual steps,giving the administrator more direct control over the process. Even if the wizard is used, thissection can also be read as a good introduction to using the Web Interface for configuring keyaspects of cOS Core.
Ethernet Interfaces
The physical connection of external networks to the Clavister Security Gateway is through thevarious Ethernet interfaces which are provided by the hardware platform. In a virtualenvironment, these are the virtual interfaces provided by the hypervisor. On first-time startup,cOS Core scans for these interfaces and determines which are available and allocates theirnames. The first interface detected in the scan always becomes the initial default managementinterface and this cannot be changed beforehand.
All cOS Core interfaces are logically equal for cOS Core and although their physical capabilitiesmay be different, any interface can perform any logical function. With cOS Core under KVM, thevirtual If1 interface is always the management interface. Assuming the normal KVM total of 3virtual interfaces, the other two virtual interfaces will automatically be given the names If2 andIf3 by cOS Core. For this section, we will assume that the If2 interface will be used for connectionto the public Internet and the If3 interface will be used for connection to a protected, localnetwork.
Setting the Date and Time
Many cOS Core functions rely on an accurate date and time, so it is important that this is setcorrectly. Even when running in a virtual environment, each virtual security gateway maintainsits own date and time and it is still important that this is set correctly for each gateway. To dothis, select System > Device > Date and Time .
By pressing the Set Date and Time button, a dialog appears that allows the exact time to be set.
A Network Time Protocol (NTP) servers can optionally be configured to maintain the accuracy
Chapter 6: Configuring cOS Core
47

of the system date and time and this will require public Internet access. Enabling this option isstrongly recommended since it ensures the accuracy of the date and time. A typical NTP setup isshown below.
Note: The time server URL requires the "dns:" prefix
When specifying a URL in cOS Core for the time server, the URL must have the prefix"dns:".
Once the values are set correctly, we can press the OK button to save the values while we moveon to more steps in cOS Core configuration. Although changed values like this are saved by cOSCore, they do not become active until the entire saved configuration becomes the current andactive configuration. We will look at how to do this next.
Activating Configuration Changes
To activate any cOS Core configuration changes made so far, we need to select the Save andActivate option from the Configuration menu (this process is also sometimes referred to asdeploying a configuration).
A dialog is then presented to confirm that the new configuration is to become the runningconfiguration.
After clicking OK, cOS Core reconfiguration will take place and, after a short delay, the WebInterface will try and connect again to the security gateway.
Chapter 6: Configuring cOS Core
48

If no reconnection is detected by cOS Core within 30 seconds (this length of time is a setting thatcan be changed) then cOS Core will revert back to the original configuration. This is to ensurethat the new configuration does not accidentally lock out the administrator. Afterreconfiguration and successful reconnection, a success message is displayed indicatingsuccessful reconfiguration.
Reconfiguration is a process that the cOS Core administrator may initiate often. Normally,reconfiguration takes a brief amount of time and causes only a slight delay in traffic throughput.Active user connections through the Clavister Security Gateway should rarely be lost.
Tip: How frequently to commit changes
It is up to the administrator to decide how many changes to make before activating anew configuration. Sometimes, activating configuration changes in small batches canbe appropriate in order to check that a small set of changes work as planned. It is,however, not advisable to leave changes uncommitted for long periods of time, such asovernight, since any system outage will result in these edits being lost.
Automatic Logout
If there is no activity through the Web Interface for a period of time (the default is 15 minutes),cOS Core will automatically log the user out. If they log back in through the same web browsersession then they will return to the point they were at before the logout occurred and no saved(but not yet activated) changes are lost.
Setting Up Internet Access
Next, we shall look at how to set up public Internet access. The setup wizard described in theprevious chapter, provides the following four options:
A. Static - manual configuration.
B. DHCP - automatic configuration.
C. PPPoE setup
D. PPTP setup
The individual manual steps to configure these connection alternatives with the Web Interfaceare discussed next.
A. Static - manual configuration
Manual configuration means that there will be a direct connection to the ISP and all the relevantIP addresses for the connecting interface are fixed values provided by the ISP which are enteredinto cOS Core manually.
Chapter 6: Configuring cOS Core
49

Note: The interface DHCP option should be disabled
For static configuration of the Internet connection, the DHCP option must be disabled(the default) in the properties of the interface that will connect to the ISP.
The initial step is to set up a number of IP address objects in the cOS Core Address Book. Let usassume for this section that the physical interface used for Internet connection is If2 the static IPaddress for this interface is to be 10.5.4.35, the ISP's gateway IP address is 10.5.4.1, and thenetwork to which they both belong is 10.5.4.0/24.
Note: Private IP addresses are used for example only
Each installation's IP addresses will be different from these IP addresses but they areused here only to illustrate how setup is done. Also, these addresses are private IPaddresses and in reality an ISP would use public IP addresses instead.
Let's now add the gateway IP4 Address object which we will call wan_gw and assign it the IPaddress 10.5.4.1. The ISP's gateway is the first router hop towards the public Internet from theClavister Security Gateway. Go to Objects > Address Book in the Web Interface.
The current contents of the address book will be listed and will contain a number of predefinedobjects automatically created by cOS Core after it scans the interfaces for the first time. Thescreenshot below shows the initial address book for the KVM.
Note: The all-nets address object represents any address
The IPv4 address object all-nets (0.0.0.0/0) is an object that should never be changedand can be used in many types of cOS Core rules to refer to any IPv4 address or networkrange. The address object all-net6 (::/0) is the IPv6 equivalent and represents any IPv6address or network range.
For the KVM, all the Ethernet interface related address objects are gathered together in anaddress book folder called InterfaceAddresses. By clicking on this folder, it will be opened and theindividual address objects it contains can be viewed. The first few addresses automatically addedto the folder are shown below.
Chapter 6: Configuring cOS Core
50

On initial startup, two IP address objects are create automatically for each interface detected bycOS Core. The first IP address object is named by combining the physical interface name with thesuffix _ip and this is used for the IP address assigned to that interface. The other address object isnamed by combining the interface name with the suffix _net and this is the network to which theinterface belongs.
Tip: Creating address book folders
New folders can be created when needed and provide a convenient way to grouptogether related IP address objects. The folder name can be chosen to indicate thefolder's contents.
Now click the Add button at the top left of the list and choose the IP4 Address option to add anew address to the folder.
Enter the details of the object into the properties fields for the IP4 Address. Below, we haveentered the IP address 10.5.4.1 for the address object called wan_gw. This is the IP of the ISP'srouter which acts as the gateway to the Internet.
Click the OK button to save the values entered.
Then set up If2_ip to be 10.5.4.35. This is the IP address of the If2 interface which will connect tothe ISP's gateway.
Chapter 6: Configuring cOS Core
51

Lastly, set the IP4 Address object If2_net to be 10.5.4.0/24. Both If2_ip and wan_gw must belongto this network in order for the interface to communicate with the ISP.
Together, these 3 IP address objects will be used to configure the interface connected to theInternet which in this example is If2. Select Network > Interfaces and VPN > Ethernet to displaya list of the physical interfaces.
Click on the interface in the list which is to be connected to the Internet. The properties for thisinterface will now appear and the relevant settings can be entered or changed.
Press OK to save the changes. Although changes are remembered by cOS Core, the changedconfiguration is not yet activated and won't be activated until cOS Core is told to activate thechanged configuration.
Remember that DHCP should not be enabled when using static IP addresses and also that the IPaddress of the Default Gateway (which is the ISP's router) must be specified. As explained in moredetail later, specifying the Default Gateway also has the additional effect of automatically addinga route for the gateway in the cOS Core routing table.
At this point, the connection to the Internet is configured but no traffic can flow to or from theInternet since all traffic needs a minimum of the following two cOS Core configuration objects toexist before it can flow through the Clavister Security Gateway:
• An IP rule defined in a cOS Core IP rule set that explicitly allows traffic to flow from a givensource network and source interface to a given destination network and destinationinterface.
• A route defined in a cOS Core routing table which specifies on which interface cOS Core canfind the traffic's destination IP address.
If multiple matching routes are found, cOS Core uses the route that has the smallest (in otherwords, the narrowest) IP range.
We must therefore first define an IP rule that will allow traffic from a designated source interfaceand source network. In this case let us assume we want to allow web surfers on the internalnetwork If3_net connected to the interface If3 to be able to access the public Internet.
To do this, we first go to Policies > Firewalling > Main IP Rules.
The empty main IP rule set will now appear. Press the Add button at the top left and select IPRule from the menu.
Chapter 6: Configuring cOS Core
52

The properties for the new IP rule will appear. In this example, we will call the rule lan_to_wan.The rule Action is set to NAT (this is explained further below) and the Service is set to http-allwhich is suitable for most web surfing (it allows both HTTP and HTTPS connections). Theinterface and network for the source and destinations are defined in the Address Filter section ofthe rule.
The destination network in the IP rule is specified as the predefined IP4 Address object all-nets.This is used since we don't know to which IP address the web surfing will be done and this allowssurfing to any IP address. IP rules are processed in a top down fashion, with the first matchingrule being obeyed. An all-nets rule like this should be placed towards the bottom of the rule setsince other rules with narrower destination addresses should trigger before it does.
Only one rule is needed since any traffic controlled by a NAT rule will be controlled by the cOSCore state engine. This means that the rule will allow connections that originate from the sourcenetwork/destination and also implicitly allow any returning traffic that results from thoseconnections.
In the above, we selected the service called http_all which is already defined in cOS Core. It isadvisable to make the service in an IP rule as restrictive as possible to provide the best securitypossible. Custom service objects can be created and new service objects can be created whichare combinations of existing services.
We could have specified the rule Action to be Allow, but only if all the hosts on the protectedlocal network have public IP addresses. By using NAT, cOS Core will use the destinationinterface's IP address as the source IP. This means that external hosts will send their responsesback to the interface IP and cOS Core will automatically direct the traffic back to the originatinglocal host. Only the outgoing interface therefore needs to have a public IP address and theinternal network topology is hidden.
To allow web surfing, DNS lookup also needs to be allowed in order to resolve URLs into IPaddresses. The service http_all does not include the DNS protocol so we need a similar IP rulethat allows this. This could be done with one IP rule that uses a custom service which combinesthe HTTP and DNS protocols but the recommended method is to create an entirely new IP rule
Chapter 6: Configuring cOS Core
53

that mirrors the above rule but specifies the service as dns-all. This method provides the mostclarity when the configuration is examined for any problems. The screenshot below shows a newrule called lan_to_wan_dns being created to allow DNS.
This IP rule also specifies that the action for DNS requests is NAT so all DNS request traffic is sentout by cOS Core with the outgoing interface's IP address as the source IP.
For the Internet connection to work, a route also needs to be defined so that cOS Core knows onwhich interface the web browsing traffic should leave the Clavister Security Gateway. This routewill define the interface where the network all-nets (in other words, any network) will be found. Ifwe open the default main routing table by going to Network > Routing > Routing Tables >main, the route needed should appear as shown below.
This required all-nets route is, in fact, added automatically after specifying the Default Gatewayfor a particular Ethernet interface which we did earlier after setting up the required IP4 Addressobjects.
Note: Disabling automatic route generation
Automatic route generation is enabled and disabled with the setting "Automaticallyadd a default route for this interface using the given default gateway" which canbe found in the properties of the interface.
As part of the setup, it is also recommended that at least one DNS server is also defined in cOSCore. This DSN server or servers (a maximum of three can be configured) will be used when cOSCore itself needs to resolve URLs which is the case when a URL is specified in a configurationinstead of an IP address.
Let's assume an IP address object called wan_dns1 has already been defined in the address bookwhich is the IP address for the first DNS server. By choosing System > Device > DNS, the DNSserver dialog will open and this object from the address book can be assigned as the first server.
Chapter 6: Configuring cOS Core
54

B. DHCP - automatic configuration
All the required IP addresses for Internet connection can, alternatively, be automatically retrievedfrom an ISP's DHCP server by enabling the DHCP Client option for the interface connected to theISP. We enable this option by first selecting Network > Interfaces and VPN > Ethernet todisplay a list of all the interfaces.
Click the If2 interface in the list to display its properties.
In the above screenshot, DHCP is enabled for this interface and this is the required setting if IPaddresses are to be retrieved automatically. Usually, a DHCP Host Name does not need to bespecified but can sometimes be used by an ISP to uniquely identify this Clavister SecurityGateway as a particular DHCP client to the ISP's DHCP server.
On connection to the ISP, all required IP addresses are retrieved automatically from the ISP viaDHCP and cOS Core automatically sets the relevant address objects in the address book with thisinformation.
For cOS Core to know on which interface to find the public Internet, a route has to be added tothe main cOS Core routing table which specifies that the network all-nets can be found on theinterface connected to the ISP and this route must also have the correct Default Gateway IPaddress specified. This all-nets route is added automatically by cOS Core during the DHCPaddress retrieval process.
After all IP addresses are set via DHCP and an all-nets route is added, the connection to theInternet is configured but no traffic can flow to or from the Internet since there is no IP ruledefined that allows it. As was done in the previous option (A) above, we must therefore define anIP rule that will allow traffic from a designated source interface and source network. (in thisexample, the network If3_net and interface If3) to flow to the destination network all-nets and thedestination interface If2.
C. PPPoE setup
Chapter 6: Configuring cOS Core
55

For PPPoE connection, we must create a PPPoE tunnel interface associated with the physicalEthernet interface. Assume that the physical interface is If2 and the PPPoE tunnel object createdis called wan_pppoe. Go to Network > Interfaces and VPN > PPPoE and select Add > PPPoETunnel. These values can now be entered into the PPPoE Tunnel properties dialog.
Your ISP will supply the correct values for pppoe_username and pppoe_password in the dialogabove.
The PPPoE tunnel interface can now be treated exactly like a physical interface by the policiesdefined in cOS Core rule sets.
There also has to be a route associated with the PPPoE tunnel to allow traffic to flow through it,and this is automatically created in the main routing table when the tunnel is defined. If we go toNetwork > Routing > Routing Tables > main we can see this route.
If the PPPoE tunnel object is deleted, this route is also automatically deleted.
At this point, no traffic can flow through the tunnel since there is no IP rule defined that allows it.As was done in option A above, we must define an IP rule that will allow traffic from a designatedsource interface and source network (in this example, the network If3_net and interface If3) toflow to the destination network all-nets and the destination interface which is the PPPoE tunnelwe have defined.
D. PPTP setup
For PPTP connections, a PPTP client tunnel interface object needs to be created. Let us assumethat the PPTP tunnel will be called wan_pptp with a remote endpoint 10.5.4.1 which has beendefined as the IP4 Address object pptp_endpoint. Go to Network > Interfaces and VPN >PPTP/L2TP Clients and select Add > PPTP/L2TP Client. The values can now be entered into theproperties dialog and the PPTP option should be selected.
Chapter 6: Configuring cOS Core
56

Your ISP will supply the correct values for pptp_username, pptp_password and the remoteendpoint. An interface is not specified when defining the tunnel because this is determined bycOS Core looking up the Remote Endpoint IP address in its routing tables.
The PPTP client tunnel interface can now be treated exactly like a physical interface by thepolicies defined in cOS Core rule sets.
There also has to be an associated route with the PPTP tunnel to allow traffic to flow through it,and this is automatically created in the main routing table when the tunnel is defined. Thedestination network for this route is the Remote Network specified for the tunnel and for thepublic Internet this should be all-nets.
If we go to Network > Routing > Routing Tables > main we can see this route.
If the PPTP tunnel object is deleted, this route is also automatically deleted.
At this point, no traffic can flow through the tunnel since there is no IP rule defined that allows it.As was done in option A above, we must define an IP rule that will allow traffic from a designatedsource network and source interface (in this example, the network If3_net and interface If3) toflow to the destination network all-nets and the destination interface which is the PPTP tunnelthat we have defined.
DHCP Server Setup
If the Clavister Security Gateway is to act as a DHCP server then this can be set up in the followingway:
First, create an IP4 Address object which defines the address range to be handed out. Here, wewill assume this is called dhcp_range. We will also assume that an IP4 Address objectdhcp_netmask has been created which specifies the netmask.
We now create a DHCP server object called dhcp_lan which will only be available only on the If3interface. To do this, go to Network > Network Services > DHCP Servers and select Add >DHCP Server. We can now specify the server properties.
Chapter 6: Configuring cOS Core
57

An example IP pool range might be 196.168.1.10 - 192.168.1.20 with a netmask of 255.255.0.0.
In addition, it is important to specify the Default gateway for the server. This will be handed outto DHCP clients on the internal networks so that they know where to find the public Internet. Thedefault gateway is always the IP address of the interface on which the DHCP server is configured.In this case, If3_ip
Also in the Options tab, we should specify the DNS address which is handed out with DHCPleases. This could be set, for example, to be the IP address object dns1_address.
Syslog Server Setup
Although logging may be enabled, no log messages are captured unless at least one log server isset up to receive them and this is configured in cOS Core. Syslog is one of the most commonserver types.
First we create an IP4 Address object called, for example, syslog_ip which is set to the IP addressof the server. We then configure the sending of log messages to a Syslog server from cOS Core byselecting System > Device > Log and Event Receivers and then choosing Add > SyslogReceiver.
The syslog server properties dialog will now appear. We give the server a name, for examplemy_syslog, and specify its IP address as the syslog_ip object.
Chapter 6: Configuring cOS Core
58

Tip: Address book object naming
The cOS Core address book is organized alphabetically so when choosing names for IPaddress objects it is best to have the descriptive part of the name first. In this case, usesyslog_ip as the name and not ip_syslog.
Allowing ICMP Ping Requests
As a further example of setting up IP rules, it can be very useful to allow ICMP Ping requests toflow through the Clavister Security Gateway. As discussed earlier, the cOS Core will drop anytraffic unless an IP rule explicitly allows it. Let us suppose that we wish to allow the pinging ofexternal hosts with the ICMP protocol by computers on the internal If3_net network.
There can be several rule sets defined in cOS Core but there is only one rule set defined bydefault and this is called main. To add a rule to it, first select Policies > Firewalling > Main IPRules.
The main rule set list contents are now displayed. Press the Add button and select IP Rule.
The properties for a new IP rule will appear and we can add a rule, in this case calledallow_ping_outbound.
Chapter 6: Configuring cOS Core
59

The IP rule again has the NAT action and this is necessary if the protected local hosts have privateIP addresses. The ICMP requests will be sent out from the Clavister Security Gateway with the IPaddress of the interface connected to the ISP as the source interface. Responding hosts will sendback ICMP responses to this single IP and cOS Core will then forward the response to the correctprivate IP address.
Adding a Drop All Rule
The top-down nature of the IP rule set scanning has already been discussed earlier. If nomatching IP rule is found for a new connection then the default rule is triggered. This rule ishidden and cannot be changed and its action is to drop all such traffic as well as generate a logmessage for the drop.
In order to gain control over the logging of dropped traffic, it is recommended to create a dropall rule as the last rule in the main IP rule set. This rule has an Action of Drop with the source anddestination network set to all-nets and the source and destination interface set to any.
The service for this rule must also be specified and this should be set to all_services in order tocapture all types of traffic.
If the this rule us the only one defined, displaying the main IP rule set will be as shown below.
Chapter 6: Configuring cOS Core
60

Logging can now be enabled on this rule with the desired severity. Click the Log Settings tab,and click the Enable logging box. All log messages generated by this rule will be given theselected severity and which will appear in the text of the log messages. It is up to theadministrator to choose the severity and depends on how they would like to classify themessages.
Deleting Configuration Objects
If information is deleted from a configuration during editing then these deletes are indicated bya line scored through the list entry while the configuration is still not yet activated. The deletedentry only disappears completely when the changes are activated.
For example, we can delete the drop all IP rule created in the previous paragraph by rightclicking the rule and selecting Delete in the context menu.
The rule now appears with a line scored through it.
We can reverse the delete by right clicking the rule again and choosing Undo Delete.
Chapter 6: Configuring cOS Core
61

Uploading a License
Without a valid license installed, cOS Core operates in demo mode (demonstration mode) andwill cease operations 2 hours after startup. To remove this restriction, a valid license must beuploaded to cOS Core. Doing this is described in Section 6.5, “Installing a License”
Chapter 6: Configuring cOS Core
62

6.4. CLI Setup
This chapter describes the setup steps using CLI commands instead of the setup wizard.
The CLI is accessible in two ways:
• Across the local network at default IP address 192.168.1.1 using an SSH (Secure Shell) client.The network connection setup is the same as that described in Section 6.2, “Web Interface andWizard Setup” as is the way the workstation interface's static IP address must be set up so it ison the same network as the Clavister Security Gateway's interface.
If there is a problem with workstation connection, a help checklist can be found in Section 6.6,“Setup Troubleshooting ”.
• Via the local cOS Core console. In a virtual environment, the cOS Core console is the same asthe virtual machine console.
The CLI commands listed below are grouped so that they mirror the options available in thesetup wizard.
Confirming the Connection
Once connection is made to the CLI, pressing the Enter key will cause cOS Core to respond. Theresponse will be a normal CLI prompt if you are using the local console of the virtual machineand a username/password combination will not be required (a password for this console can beset later).
Device:/>
If connecting remotely through an SSH (Secure Shell) client, an administrationusername/password must first be entered and the initial default values for these are usernameadmin and password admin. When these are accepted by cOS Core, a normal CLI prompt willappear and CLI commands can be entered.
Changing the Password
To change the administration username or password, use the set command to change thecurrent CLI object category (sometimes referred to as the object context) to be theLocalUserDatabase called AdminUsers.
Device:/> cc LocalUserDatabase AdminUsersDevice:/AdminUsers>
Tip: Using tab completion with the CLI
The tab key can be pressed at any time so that cOS Core gives a list of possible options ina command.
Now set the username/password, which are case sensitive, to be the new chosen values for theuser called admin. In the example below, we change to the username new_name and passwordnew_pass.
Device:/AdminUsers> set User Admin Name=new_name Password=new_pass
The new username/password combination should be remembered and the password should be
Chapter 6: Configuring cOS Core
63

composed in a way which makes it difficult to guess. The next step is to return the CLI to thedefault top level of object categories.
Device:/AdminUsers> ccDevice:/>
Setting the Date and Time
Many cOS Core functions rely on an accurate date and time, so it is important that this is setcorrectly using the time command. A typical usage might be:
Device:/> time -set 2008-06-24 14:43:00
Notice that the date is entered in yyyy-mm-dd format and the time is stated in 24 hour hh:mm:ssformat.
Ethernet Interfaces
The connection of external networks to the Clavister Security Gateway is via the various Ethernetinterfaces which are provided by the hardware platform. In a virtual environment, connection ismade via the virtual interfaces provided by the hypervisor. On first-time startup, cOS Core scansfor these interfaces and determines which are available and allocates their logical configurationnames. The first interface detected in the scan always becomes the initial default managementinterface and this cannot be changed beforehand.
All cOS Core interfaces are logically equal for cOS Core and although their physical capabilitiesmay be different, any interface can perform any logical function. With cOS Core in a virtualenvironment, the virtual If1 interface is always the management interface. Assuming that a totalof 3 virtual interfaces is configured, the other two interfaces will be given the names If2 and If3 bycOS Core. For the sake of example, we will assume that the If2 interface will be used forconnection to the public Internet and the If3 interface will be used for connection to a protected,local network.
Setting Up Internet Access
Next, we shall look at how to set up public Internet access with the CLI. The setup wizarddescribed previously, provides the following four options:
A. Static - manual configuration.
B. DHCP - automatic configuration.
C. PPPoE setup
D. PPTP setup
The individual manual steps to configure these connection alternatives with the CLI arediscussed next.
A. Static - manual configuration
We first must set or create a number of IP address objects. It's assumed here that the interfaceused for Internet connection is If2, the ISP gateway IP address is 10.5.4.1, the IP address for theconnecting interface will be 10.5.4.35 and the network to which they belong is 10.5.4.0/24.
Chapter 6: Configuring cOS Core
64

Note: Private IP addresses are used for example only
Each installation's IP addresses will be different from these IP addresses but they areused here only to illustrate how setup is done. Also, these addresses are private IPaddresses and in reality an ISP would use public IP addresses instead.
We first add the gateway IP address object which we will call wan_gw:
Device:/> add Address IP4Address wan_gw Address=10.5.4.1
This is the address of the ISP's gateway which is the first router hop towards the public Internet. Ifthis IP object already exists, it can be given the IP address with the command:
Device:/> set Address IP4Address wan_gw Address=10.5.4.1
Now use this object to set the gateway on the If2 interface which is connected to the ISP:
Device:/> set Interface Ethernet If2 DefaultGateway=wan_gw
Next, set the IP object If2_ip which will be the IP address of the interface connected to the ISP:
Device:/> set IP4Address InterfaceAddresses/If2_ip Address=10.5.4.35
Note: Qualifying the names of IP objects in folders
On initial startup of the KVM, cOS Core automatically creates and fills theInterfaceAddresses folder in the cOS Core address book with the interface related IPaddress objects.
When we specify an IP address object which is located in a folder, we must qualify theobject's name with the name of the folder. For example, when we specify the addressIf2_ip, we must qualify it with the folder name InterfaceAddresses so the qualifiedname becomes InterfaceAddresses/If2_ip.
If an object is not contained in a folder and is therefore at the top level of the addressbook then no qualifying folder name is needed.
Now set the IP object If2_net which will be the IP network of the connecting interface:
Device:/> set IP4Address InterfaceAddresses/If2_net Address=10.5.4.0/24
It is recommended to verify the properties of the If2 interface with the command:
Device:/> show Interface Ethernet If2
The typical output from this will be similar to the following:
Property Value-------------------------- --------------------------
Name: If2IP: InterfaceAddresses/If2_ip
Network: InterfaceAddresses/If2_netDefaultGateway: wan_gw
Broadcast: 10.5.4.255PrivateIP: <empty>
NOCHB: <empty>MTU: 1500
Metric: 100DHCPEnabled: No
Chapter 6: Configuring cOS Core
65

EthernetDevice: 0:If2 1:<empty>AutoSwitchRoute: No
AutoInterfaceNetworkRoute: YesAutoDefaultGatewayRoute: YesReceiveMulticastTraffic: Auto
MemberOfRoutingTable: AllComments: <empty>
Setting the default gateway on the interface has the additional effect that cOS Coreautomatically creates a route in the default main routing table that has the network all-netsrouted on the interface. This means that we do not need to explicitly create this route.
Even though an all-nets route is automatically added, no traffic can flow without the addition ofan IP rule which explicitly allows traffic to flow. Let us assume we want to allow web surfing fromthe protected network If3_net. on the interface If3. A simple rule to do this would have an Actionof Allow and would be defined with the following commands.
Firstly, we must change the current CLI context to be the default IPRuleSet called main using thecommand:
Device:/> cc IPRuleSet main
Additional IP rule sets can be defined which is why we do this, with the rule set main existing bydefault. Notice that the CLI prompt changes to reflect the current context:
Device:/main>
Now add an IP rule called lan_to_wan to allow the traffic through to the public Internet:
Device:/main> add IPRuleAction=AllowSourceInterface=If3SourceNetwork=If3_netDestinationInterface=InterfaceAddresses/If2DestinationNetwork=all-netsService=http-allName=lan_to_wan
This IP rule would be correct if the internal network hosts have public IP addresses but in mostscenarios this will not be true and internal hosts will have private IP addresses. In that case, wemust use NAT to send out traffic so that the apparent source IP address is the IP of the interfaceconnected to the ISP. To do this we simply change the Action of the above command from Allowto NAT:
Device:/main> add IPRuleAction=NATSourceInterface=If3SourceNetwork=InterfaceAddresses/If3_netDestinationInterface=If2DestinationNetwork=all-netsService=http-allName=lan_to_wan
The service used in the IP rule is http-all which will allow most web surfing but does not includethe DNS protocol to resolve URLs into IP addresses. To solve this problem, a custom service couldbe used in the above rule which combines http-all with the dns-all service. However, therecommended method which provides the most clarity to a configuration is to create a separateIP rule for DNS:
Device:/main> add IPRuleAction=NATSourceInterface=If3SourceNetwork=InterfaceAddresses/If3_net
Chapter 6: Configuring cOS Core
66

DestinationInterface=If2DestinationNetwork=all-netsService=dns-allName=lan_to_wan_dns
It is recommended that at least one DNS server is also defined in cOS Core. This DSN server orservers (a maximum of three can be configured) will be used when cOS Core itself needs toresolve URLs which is the case when a URL is specified in a configuration instead of an IP address.If we assume an IP address object called dns1_address has already been defined for the first DNSserver, the command to specify the first DNS server is:
Device:/> set DNS DNSServer1=dns1_address
Assuming a second IP object called dns2_address has been defined, the second DNS server isspecified with:
Device:/> set DNS DNSServer2=dns2_address
B. DHCP - automatic configuration
All required IP addresses can alternatively be automatically retrieved from the ISP's DHCP serverby enabling DHCP on the interface connected to the ISP. If the interface on which DHCP is to beenabled is If2 then the command is:
Device:/> set Interface Ethernet If2 DHCPEnabled=Yes
Once the required IP addresses are retrieved with DHCP, cOS Core automatically sets the relevantaddress objects in the address book with this information.
For cOS Core to know on which interface to find the public Internet, a route has to be added tothe main cOS Core routing table which specifies that the network all-nets can be found on theinterface connected to the ISP and this route must also have the correct Default Gateway IPaddress specified. This all-nets route is added automatically by cOS Core during the DHCPaddress retrieval process. Automatic route generation is a setting for each interface that can bemanually enabled and disabled.
After all IP addresses are set via DHCP and an all-nets route is added, the connection to theInternet is configured but no traffic can flow to or from the Internet since there is no IP ruledefined that allows it. As was done in the previous option (A) above, we must therefore manuallydefine an IP rule that will allow traffic from a designated source interface and source network. (inthis example, the network If3_net and interface If3) to flow to the destination network all-netsand the destination interface If2.
C. PPPoE setup
For PPPoE connection, create the PPPoE tunnel interface on the interface connected to the ISP.The interface If2 is assumed to be connected to the ISP in the command shown below whichcreates a PPPoE tunnel object called wan_ppoe:
Device:/> add Interface PPPoETunnel wan_ppoeEthernetInterface=If2username=pppoe_usernamePassword=pppoe_passwordNetwork=all-nets
Your ISP will supply the correct values for pppoe_username and pppoe_password.
The PPPoE tunnel interface can now be treated exactly like a physical interface by the policies
Chapter 6: Configuring cOS Core
67

defined in cOS Core rule sets.
There also has to be a route associated with the PPPoE tunnel to allow traffic to flow through it,and this is automatically created in the main routing table when the tunnel is defined. If thePPPoE tunnel object is deleted, this route is also automatically deleted.
At this point, no traffic can flow through the tunnel since there is no IP rule defined that allows it.As was done in option A above, we must define an IP rule that will allow traffic from a designatedsource interface and source network (in this example, the network If3_net and interface If3) toflow to the destination network all-nets and the destination interface which is the PPPoE tunnelthat we have defined.
D. PPTP setup
For PPTP connection, first create the PPTP tunnel interface. It is assumed below that we willcreate a PPTP tunnel object called wan_pptp with the remote endpoint 10.5.4.1:
Device:/> add Interface L2TPClient wan_pptpNetwork=all-netsusername=pptp_usernamePassword=pptp_passwordRemoteEndpoint=10.5.4.1TunnelProtocol=PPTP
Your ISP will supply the correct values for pptp_username, pptp_password and the remoteendpoint.
Your ISP will supply the correct values for pptp_username, pptp_password and the remoteendpoint. An interface is not specified when defining the tunnel because this is determined bycOS Core looking up the Remote Endpoint IP address in its routing tables.
The PPTP client tunnel interface can now be treated exactly like a physical interface by thepolicies defined in cOS Core rule sets.
There also has to be an associated route with the PPTP tunnel to allow traffic to flow through it,and this is automatically created in the main routing table when the tunnel is defined. Thedestination network for this route is the Remote Network specified for the tunnel and for thepublic Internet this should be all-nets.
As with all automatically added routes, if the PPTP tunnel object is deleted then this route is alsoautomatically deleted.
At this point, no traffic can flow through the tunnel since there is no IP rule defined that allows it.As was done in option A above, we must define an IP rule that will allow traffic from a designatedsource interface and source network (in this example, the network If3_net and interface If3) toflow to the destination network all-nets and the destination interface which is the PPTP tunnelthat we have defined.
Activating and Committing Changes
After any changes are made to a cOS Core configuration, they will be saved as a newconfiguration but will not yet be activated. To activate all the configuration changes made sincethe last activation of a new configuration, the following command must be issued:
Device:/> activate
Although the new configuration is now activated, it does not become permanently activateduntil the following command is issued within 30 seconds following the activate:
Chapter 6: Configuring cOS Core
68

Device:/> commit
The reason for two commands is to prevent a configuration accidentally locking out theadministrator. If a lock-out occurs then the second command will not be received and cOS Corewill revert back to the original configuration after the 30 second time period (this time period is asetting that can be changed).
DHCP Server Setup
If the Clavister Security Gateway is to act as a DHCP server then this can be set up in the followingway:
First define an IP address object which has the address range that can be handed out. Here, wewill use the IP range 192.168.1.10-192.168.1.20 as an example and this will be available on the If3interface which is connected to the protected internal network If3_net:
Device:/> add Address IP4Address dhcp_rangeAddress=192.168.1.10-192.168.1.20
The DHCP server is then configured with this IP address object on the appropriate interface. Inthis case we will call the created DHCP server object dhcp_lan and assume the DHCP server willbe available on the If3 interface:
Device:/> add DHCPServer dhcp_lanIPAddressPool=dhcp_rangeInterface=If3Netmask=255.255.255.0DefaultGateway=InterfaceAddresses/If3_ipDNS1=dns1_address
In addition, it is important to specify the Default gateway for the DHCP server since this will behanded out to DHCP clients on the internal network so that they know where to find the publicInternet. The default gateway is always the IP address of the interface on which the DHCP serveris configured. In this case, If3_ip.
NTP Server Setup
Network Time Protocol (NTP) servers can optionally be configured to maintain the accuracy of thesystem date and time. The command below sets up synchronization with the two NTP servers athostname pool.ntp.org and IP address 10.5.4.76:
Device:/> set DateTimeTimeSyncEnable=YesTimeSyncServer1=dns:pool.ntp.orgTimeSyncServer2=10.5.4.76
The prefix dns: is added to the hostname to identify that it must resolved to an IP address by aDNS server (this is a convention used in the CLI with some commands).
Syslog Server Setup
Although logging may be enabled, no log messages are captured unless a server is set up toreceive them and Syslog is the most common server type. If the Syslog server's address is195.11.22.55 then the command to create a log receiver object called my_syslog which enableslogging is:
Device:/> add LogReceiverSyslog my_syslog IPAddress=195.11.22.55
Chapter 6: Configuring cOS Core
69

Allowing ICMP Ping Requests
As a further example of setting up IP rules, it can be useful to allow ICMP Ping requests to flowthrough the Clavister Security Gateway. As discussed earlier, the cOS Core will drop any trafficunless an IP rule explicitly allows it. Let us suppose that we wish to allow the pinging of externalhosts with the ICMP protocol by computers on the internal If3_net network. The commands toallow this are as follows.
First, we must change the current CLI context to be the IPRuleSet called main using thecommand:
Device:/> cc IPRuleSet main
Now, add an IP rule called allow_ping_outbound to allow ICMP pings to pass:
Device:/main> add IPRuleAction=NATSourceInterface=If3SourceNetwork=InterfaceAddresses/If3_netDestinationInterface=If2DestinationNetwork=all-netsService=ping-outboundName=allow_ping_outbound
The IP rule again has the NAT action and this is necessary if the protected local hosts have privateIP addresses. The ICMP requests will be sent out from the Clavister Security Gateway with the IPaddress of the interface connected to the ISP as the source interface. Responding hosts will sendback ICMP responses to this single IP and cOS Core will then forward the response to the correctprivate IP address.
Adding a Drop All Rule
Scanning of the IP rule set is done in a top-down fashion. If no matching IP rule is found for anew connection then the default rule is triggered. This rule is hidden and cannot be changed andits action is to drop all such traffic as well as generate a log message for the drop.
In order to gain control over the logging of dropped traffic, it is recommended to create a dropall rule as the last rule in the main IP rule set. This rule has an Action of Drop with the source anddestination network set to all-nets and the source and destination interface set to any.
The service for this rule must also be specified and this should be set to all_services in order tocapture all types of traffic. The command for creating this rule is:
Device:/main> add IPRuleAction=DropSourceInterface=anySourceNetwork=anyDestinationInterface=anyDestinationNetwork=all-netsService=all_servicesName=drop_all
Uploading a License
Without a valid license installed, cOS Core operates in demo mode (demonstration mode) andwill cease operations 2 hours after startup. To remove this restriction, a valid license must beuploaded to cOS Core. Doing this is described in Section 6.5, “Installing a License”
Chapter 6: Configuring cOS Core
70

6.5. Installing a License
Each virtual copy of cOS Core running under KVM requires a unique license file to be installed.Without a license, cOS Core will function for only 2 hours from startup in demo mode(demonstration mode). To end demo mode, a license file must be downloaded to a local diskfrom the Clavister website and then uploaded to cOS Core through the Web Interface or usingSCP.
Installing a cOS Core License
To install a license, perform the following steps:
1. Obtain a license code from a cOS Core reseller for a virtual environment license.
2. Create a cOS Core virtual machine in the virtual environment.
3. Make a note of the MAC address of one of the cOS Core virtual Ethernet interfaces. A MACaddress can be found through the Web Interface or with the following CLI command:
Device:/> ifstat If1
Note that this MAC address will be associated with the license and cannot be changed later.
4. If not already done, register as a user and enter your organization details, by choosing theLogin link at https://www.clavister.com.
5. Log in to the Clavister website and go to Licenses > Register License then select theregistration option License Number and MAC Address.
6. Enter the license code and MAC address. This will cause a new license to be generated andstored on the website. This license will appear in the user's license list on the site.
7. Download the created license from the website to the local disk of the managementcomputer by clicking on the entry in the license list.
8. Upload the license from the management computer to cOS Core using the Web Interface orSCP. In virtual environments, cOS Core cannot automatically fetch the license. In the WebInterface, go to Status > Maintenance > License and press the Upload button to select thelicense file on disk.
9. After upload, perform a restart or reconfigure on cOS Core to complete installation of thelicense. A restart is recommended in case memory requirements have changed.
10. Following a restart, the 2 hour demo mode will end and the cOS Core capabilities will onlybe restricted by the installed license.
Examining the License Contents
The contents of a Clavister license (.lic) file can be examined by opening it in a standard texteditor. cOS Core licenses for virtual environments contain the line:
Virtual Hardware: Yes
The license contents also specifies how many virtual interfaces are available on one virtualmachine. The default value can be upgraded by purchasing the appropriate license.
Chapter 6: Configuring cOS Core
71

KVM and cOS Core Lockdown Mode
When cOS Core is run in demo mode (that is to say, without a valid license), it will operate for twohours before it enters lockdown mode.
When cOS Core enters lockdown mode under KVM, it will consume all KVM resources. When thishappens it is necessary to shut down the cOS Core virtual machine instance since nothing furthercan be done with cOS Core itself until it is restarted. In other words, restarting cOS Core shouldonly be done via the KVM management interface once lockdown mode is entered.
General information about cOS Core licensing can be found in the cOS Core Administration Guide.
Chapter 6: Configuring cOS Core
72

6.6. Setup Troubleshooting
This appendix deals with connection problems that might occur when connecting amanagement workstation to a Clavister Security Gateway.
If the management interface does not respond after the Clavister Security Gateway has poweredup and cOS Core has started, there are a number of simple steps to troubleshoot basicconnection problems:
1. Check that the correct interface is being used.
The most obvious problem is that the wrong interface has been used for the initial connection tothe management workstation. Only the first interface found by cOS Core is activated for theinitial connection from a browser after cOS Core starts for the first time.
2. Check that the workstation IP is configured correctly.
The second most obvious problem is if the IP address of the management workstation runningthe web browser is not configured correctly.
3. Using the ifstat CLI command.
To investigate a connection problem further, use the KVM console after cOS Core starts. Whenyou press the enter key with the console, cOS Core should respond with the a standard CLIprompt. Now enter the following command once for each interface:
Device:/> ifstat <if-name>
Where <if-name> is the name of the cOS Core management interface. By default this is the KVMIf1 interface. This command will display a number of counters for that interface. The ifstatcommand on its own can list the names of all the KVM interfaces.
If the Input counters in the hardware section of the output are not increasing then the error islikely to be in the cabling. However, it may simply be that the packets are not getting to theClavister Security Gateway in the first place. This can be confirmed with a packet sniffer if it isavailable.
If the Input counters are increasing, the management interface may not be attached to thecorrect physical network. There may also be a problem with the routing information in anyconnected hosts or routers.
4. Using the arpsnoop CLI command.
A final diagnostic test is to try using the console command:
Device:/> arpsnoop -all
This will show the ARP packets being received on the different interfaces and confirm that thecorrect connections have been made to the correct interfaces.
Chapter 6: Configuring cOS Core
73

6.7. System Management
Upgrades Under KVM
When running under KVM, upgrades of cOS Core are done just as they are on a non-virtualizedcOS Core installation, by installing upgrade packages through the normal cOS Core userinterfaces. It is not necessary to create a new virtual machine for a new version.
Increasing IPsec Performance with AES-NI
If the underlying hardware platform supports AES-NI acceleration, this can be made use of by cOSCore to significantly accelerate IPsec throughput when AES encryption is used. This accelerationis enabled by default.
If disabled, this feature can be enabled in the Web Interface by going to Network > Interfacesand VPN > Advanced Settings and clicking the checkbox Enable AES-NI acceleration. In theCLI, use the command:
Device:/> set Settings IPsecTunnelSettings AESNIEnable=Yes
After enabling, cOS Core must be rebooted for this option to take effect.
To check if the underlying platform supports AES-NI, use the CLI command:
Device:/> cpuid
If AES-NI is supported, aes will appear in the Feature flags list in the output from the command.
Chapter 6: Configuring cOS Core
74

Chapter 6: Configuring cOS Core
75

Chapter 7: High Availability Setup
This section provides the extra information needed to correctly set up a cOS Core highavailability (HA) cluster under KVM. A cOS Core cluster consists of two Clavister SecurityGateways, one is the master, the other the slave. Each of these security gateways will run its ownseparate virtual machine. The interfaces of the two gateways in a cluster need to be connectedtogether in matching pairs through switches. It is the creation and connection of virtual switchesfor the cluster that is described in this section.
Important: Interface pairs should have matching bus, slot, port
In an HA cluster made up of two virtual Clavister Security Gateways, the bus, slot andport numbers of the two virtual interfaces in each HA interface pairing should be thesame. If they are not, unexpected behavior could occur.
Open vSwitch Installation
HA setup with KVM requires that Open vSwitch is installed on the Linux system. Open vSwitch willbe used to provide virtual switches so that matching interfaces of the master and slave in thecluster can be connected together. The installation of Open vSwitch itself will not be discussedfurther here. Refer to the software's own documentation for help with installation.
Open vSwitch is open source software that can be used in situations other than high availabilityto implement various networking solutions with KVM.
Note: The bridge-utils package must be removed
Before installing Open vSwitch, the package bridge-utils must be removed from theLinux system.
A Single Physical Server is Assumed
This section assumes that both the virtual security gateways in the HA cluster are installed on thesame hardware server. In practice, two servers will probably be used for hardware redundancyand both will have KVM and Open vSwitch installed on them.
The configuration of the connections between two separate servers will not be discussed in thissection and it is up to the administrator to choose the most appropriate way of doing this. Oneapproach is to use VLAN tagging with Open vSwitch so internal bridge traffic can pass between
76

the physical servers that make up the HA cluster.
Setup of cOS Core
The initial setup of the two separate virtual security gateways is done as normal so they areinitially working as separate gateways. Before running the HA Setup Wizard on each unit to createthe HA cluster, it is necessary to first correctly configure the virtual networking to emulate thehardware connections that would normally be present between the master and slave units.
Configuring Open vSwitch for HA
Assuming Open vSwitch has been installed, it is necessary to create KVM separate virtual switchesso that the pairs of matching interfaces from the security gateways in the cluster are connectedtogether on each switch.
This is done with the following steps:
A. Define an Open vSwitch bridge for each interface pair.
B. Configure the HA master and slave virtual machines to connect the cOS Core interfaces to therelevant bridge.
These two steps are described next.
A. Define an Open vSwitch bridge for each interface pair.
Assuming that all of the three default virtual interfaces (If1, If2 and If3) on each security gatewayare to be connected together, three Open vSwitch bridges must be created:
• br1-internal - Connecting together the If1 interfaces. This is created using the Linuxcommand:
[root@linux]# ovs-vsctl add-br br1-internal
• br2-external - Connecting together the If2 interfaces and also connected to the publicInternet via a physical interface called eth0 (this name will vary between configurations). Thisis created using the Linux commands:
[root@linux]# ovs-vsctl add-br br2-external[root@linux]# ovs-vsctl add-port br2-external eth0
• br3-internal - Connecting together the If3 interfaces. This is created using the Linuxcommand:
[root@linux]# ovs-vsctl add-br br3-internal
B. Connect interface pairs to the relevant bridge.
It is assumed that virt-manager will be used to configure each of the two virtual machines in theHA cluster.
Assume that the interface If1 is to be associated with Open vSwitch bridge br1-internal on bothmaster and slave gateways. The intuitive approach is to select the NIC entry in the navigationmenu that corresponds to the If1 interface and enter the Bridge name:
Chapter 7: High Availability Setup
77

However, if this is now applied and the virtual machine started, it will give an error message:
To get around this issue, allocate the Open vSwitch bridge using the following steps:
1. Open the properties of the HA cluster's master security gateway in virt-manager. Change theSource device to be something using macvtap so that the Type of the Virtual port can be set:
2. Set the Type to be openvswitch.
3. Save this setting by selecting the Apply button.
4. Now, change the Source device setting back to Specify shared device name and set it to be theOpen vSwitch bridge connected to the interface. In this case, br1-internal.
Chapter 7: High Availability Setup
78

5. Now select the Apply button and repeat the process with the remaining interfaces If2 andIf3, connecting them to the bridges br2-external and br3-internal.
6. Repeat the process for the slave security gateway.
The networking for an HA cluster on a single hardware server is now complete. When thesecurity gateways are on different servers, the procedure is similar. However, the administratorshould then decide how they want to connect the Open vSwitch bridges on each servertogether. VLAN tagging can be used to separate the internal bridges on each server. Each pair ofcluster interfaces uses a different VLAN ID to separate its traffic from the other pairs of interfaces.
Chapter 7: High Availability Setup
79

Chapter 8: SR-IOV Setup
Overview
Single Root I/O Virtualization (SR-IOV) is a specification that can allow direct access to an externalPCI Ethernet interface by cOS Core running under KVM. It is only available on Intel basedhardware.
The direct access provided by SR-IOV can give dramatically higher traffic throughput capabilityfor a virtual Clavister Security Gateway since it circumvents the overhead involved with normalvirtual interfaces. A disadvantage of using SR-IOV is the static nature of configurations that use it.
Important: SR-IOV consumes an entire coreWhen SR-IOV is enabled, cOS Core will consume virtually all the resources of theprocessor core on which it runs. This is true even if cOS Core has no traffic load. Thereason for this is that SR-IOV uses continuous interface polling to check for new traffic.
SR-IOV Interfaces for cOS Core
By default, cOS Core provides three virtual Ethernet ports with the logical cOS Core names I1, I2and I3. The setup procedure described in this section adds hardware PCI Ethernet ports asadditional interfaces with logical cOS Core names I4, I5 and so on.
Once the setup is complete, only traffic routed through these additional ports will benefit fromthe throughput increases provided by SR-IOV.
Prerequisites for SR-IOV
In order to make use of SR-IOV with cOS Core under KVM, the following is required:
• Support for IOMMU with IOMMU enabled in the BIOS.
• Hardware support for SR-IOV with Intel™ VT-d or AMD-Vi.
• Support for SR-IOV enabled in the BIOS.
• Available slots supporting PCI Express v2.0 (5.0GT/s) x8 Lanes with ARI and ACS.
• An Intel Ethernet Converged Network Adapter x520/X540 with Intel 82599 chipsets (10 Gb) oran Intel i350 adapter (1 Gb).
80

Set up of the hardware platform for virtualization is not discussed further here. For details on thissubject refer to the Intel document entitled: Using Intel Ethernet and the PCI-SIG Single Root I/OVirtualization (SR-IOV) and Sharing Specification on Red Hat Enterprise Linux .
Adding SR-IOV Interfaces
The following are the steps for SR-IOV interface setup with cOS Core:
1. If it is running, stop the cOS Core virtual machine.
2. In virt-manager, select Add Hardware.
3. Select PCI Host Device and the correct virtual function. For the first PCI device, the finaldigit in the numeric designation on the left should be even (below it is 1D:10:0). PressFinish to add the device.
4. The same is repeated if a second PCI device is added but the final digit of the selected virtualfunction should be odd.
5. The new adapters are now listed in virt-manager.
Chapter 8: SR-IOV Setup
81

6. Start the cOS Core virtual machine.
7. Start cOS Core again and issue the following console CLI command:
Device:/> pciscan -cfgupdate
cOS Core will scan the available interfaces and include the added PCI interfaces into theconfiguration. Some example output is shown below.
8. Finally, save the configuration changes using the following commands:
Device:/> activate
Device:/> commit
Note: Do not pre-assign the SR-IOV MAC addressFor any usage of SR-IOV interfaces with cOS Core, the MAC address should not bepreassigned by the hypervisor so that it is fixed. This will prevent cOS Core fromcontrolling the MAC address which can be needed in certain circumstances.
Achieving Maximum Throughput
Once the SR-IOV interfaces exist as logical interfaces in cOS Core they can used for both receivingand sending in traffic as well as being part of rule sets and other cOS Core objects.
On order to reach much higher throughput speeds, traffic must both enter and leave the securitygateway via SR-IOV interfaces. Having the traffic enter or leave on a normal interface will create abottleneck, reducing throughput back to non-SR-IOV speeds.
Features Not Supported by SR-IOV Interfaces
The following cOS Core features are not supported by SR-IOV interfaces:
• Proxy ARP/ND using XPUBLISH is not supported.
• Multicast is not supported.
Chapter 8: SR-IOV Setup
82

Chapter 9: FAQ
This appendix collects together answers to a selection of Frequently Asked Questions that can behelpful in solving various issues with cOS Core running under KVM.
Question Summary
1. The 2 hour cOS Core demo mode time limit has expired. What do I do?2. Are upgrades of cOS Core done differently under KVM?3. How do I release the focus from the KVM console window?4. Do all virtual interfaces have to be configured as virtio NICs?5. How do I manage multiple virtual security gateways?6. How much increase in throughput can SR-IOV provide?
Questions and Answers
1. The 2 hour cOS Core demo mode time limit has expired. What do I do?
cOS Core will not respond after it enters lockdown mode after 2 hours and will consume all theKVM resources. In this situation, the KVM virtual machine must be stopped and then restarted sothat cOS Core restarts and enters a new 2 hour evaluation period.
2. Are upgrades of cOS Core done differently under KVM?
No. cOS Core upgrades are performed under KVM just as they would be in non-KVMenvironments.
3. How do I release the focus from the KVM console window?
KVM keeps focus in the console window. To click outside the console window, press the keycombination Ctrl-Alt .
4. Do all virtual interfaces have to be configured as virtio NICs?
Yes. cOS Core will not work with virtual interfaces that are not configured to use the virtio driver.Any added interfaces must have the Device model property set to virtio.
5. How do I manage multiple virtual security gateways?
The IP address of the management virtual Ethernet interface for cOS Core must be different forthe different virtual security gateways running under a single hypervisor.
6. How much increase in throughput can SR-IOV provide?
83

The performance increase provided by SR-IOV can be dramatic if traffic both enters and leavesvia SR-IOV interfaces. A quadrupling of maximum throughput is possible.
Chapter 9: FAQ
84

Appendix A: Windows XP IP Setup
If a PC running Microsoft XP™ is being used as the cOS Core management workstation, thecomputer's Ethernet interface connected to the Clavister Security Gateway must be configuredwith an IPv4 address which belongs to the network 192.168.1.0/24 and is different from thesecurity gateway's address of 192.168.1.1.
The IPv4 address 192.168.1.30 will be used for this purpose and the steps to set this up withWindows XP are as follows:
1. Click the Start button.
2. Right click on My Network Places and select Properties.
3. Right click the chosen Ethernet interface and select Properties.
4. Select Internet Protocol (TCP/IP) and click Properties.
5. Enter the IPv4 addresses given above and click OK.
85

Note: DNS addresses can be entered later
To browse the Internet from the management workstation via the security gateway, it ispossible to go back to the last step's properties dialog later and enter DNS server IPaddresses. For now, they are not required.
Appendix A: Windows XP IP Setup
86

Appendix B: Vista IP Setup
If a PC running Microsoft Vista is being used as the cOS Core management workstation, thecomputer's Ethernet interface connected to the Clavister Security Gateway must be configuredwith an IP address which belongs to the network 192.168.1.0/24 and is different from the securitygateway's address of 192.168.1.1.
The IP address 192.168.1.30 will be used for this purpose and the steps to set this up with Vistaare as follows:
1. Press the Windows Start button.
2. Select the Control Panel from the start menu.
3. Select Network & Sharing Center from the control panel.
4. Select the Manage network connections option.
5. A list of the Ethernet interface connections will appear. Select the interface that will connectto the security gateway.
6. The properties for the selected interface will appear.
87

Select and display the properties for Internet Protocol Version 4 (TCP/IPv4).
7. In the properties dialog, select the option Use the following IP address and enter thefollowing values:
• IP Address: 192.168.1.30
• Subnet mask: 255.255.255.0
• Default gateway: 192.168.1.1
DNS addresses can be entered later once Internet access is established.
8. Click OK to close this dialog and close all the other dialogs opened since step (1).
Appendix B: Vista IP Setup
88

Appendix C: Windows 7 IP Setup
If a PC running Microsoft Windows 7 is being used as the cOS Core management workstation, thecomputer's Ethernet interface connected to the Clavister Security Gateway must be configuredwith an IP address which belongs to the network 192.168.1.0/24 and is different from the securitygateway's address of 192.168.1.1.
The IP address 192.168.1.30 will be used for this purpose and the steps to set this up withWindows 7 are as follows:
1. Press the Windows Start button.
2. Select the Control Panel from the start menu.
3. Select Network & Sharing Center from the control panel.
4. Select the Change adapter settings option.
5. A list of adapters will appear and will include the Ethernet interfaces. Select the interfacethat will connect to the security gateway.
6. The properties for the selected interface will appear.
89

Select and display the properties for Internet Protocol Version 4 (TCP/IPv4).
7. In the properties dialog, select the option Use the following IP address and enter thefollowing values:
• IP Address: 192.168.1.30
• Subnet mask: 255.255.255.0
• Default gateway: 192.168.1.1
DNS addresses can be entered later once Internet access is established.
8. Click OK to close this dialog and close all the other dialogs opened since step (1).
Appendix C: Windows 7 IP Setup
90

Appendix D: Windows 8/8.1/10 IP Setup
If a computer running Windows is being used as the cOS Core management workstation and aDHCP server is not enabled on the cOS Core management interface, the managementcomputer's Ethernet interface connected to the Clavister Security Gateway should be configuredwith an IPv4 address which belongs to the network 192.168.1.0/24. That address must bedifferent from the security gateway's default management interface address of 192.168.1.1.
The IPv4 address 192.168.1.30 will be used for this purpose and the steps to set this up withWindows 8, 8.1 or 10 are as follows:
1. Open the Windows Control Panel (the Category view is assumed here).
2. Select Network & Internet from the control panel.
3. Then, select the Network & Sharing Center option.
4. Now, select the Change adapter settings option.
5. A list of adapters will appear and will include the Ethernet interfaces. Select the interfacethat will connect to the security gateway.
91

6. The properties for the selected interface will appear.
Select and display the properties for Internet Protocol Version 4 (TCP/IPv4).
7. In the properties dialog, select the option Use the following IP address and enter thefollowing values:
• IP Address: 192.168.1.30
• Subnet mask: 255.255.255.0
• Default gateway: 192.168.1.1
DNS addresses can be entered later once Internet access is established.
8. Click OK to close this dialog and close all the other dialogs opened since step (1).
Appendix D: Windows 8/8.1/10 IP Setup
92

Appendix E: Apple Mac IP Setup
An Apple Mac can be used as the management workstation for initial setup of a Clavister SecurityGateway. To do this, a selected Ethernet interface on the Mac must be configured correctly with astatic IP. The setup steps for this with Mac OS X are:
1. Go to the Apple Menu and select System Preferences.
2. Click on Network.
3. Select Ethernet from the left sidebar menu.
4. Select Manually in the Configure pull down menu.
93

5. Now set the following values:
• IP Address: 192.168.1.30
• Subnet Mask: 255.255.255.0
• Router: 192.168.1.1
6. Click Apply to complete the static IP setup.
Appendix E: Apple Mac IP Setup
94

Clavister ABSjögatan 6JSE-89160 ÖrnsköldsvikSWEDEN
Phone: +46-660-299200www.clavister.com