clash manager
DESCRIPTION
Clash ManagerTRANSCRIPT
Clash Manager
Installation Guide
DisclaimerInformation of a technical nature, and particulars of the product and its use, is given by AVEVASolutions Ltd and its subsidiaries without warranty. AVEVA Solutions Ltd and its subsidiaries disclaimany and all warranties and conditions, expressed or implied, to the fullest extent permitted by law.
Neither the author nor AVEVA Solutions Ltd, or any of its subsidiaries, shall be liable to any person orentity for any actions, claims, loss or damage arising from the use or possession of any information,particulars, or errors in this publication, or any incorrect use of the product, whatsoever.
CopyrightCopyright and all other intellectual property rights in this manual and the associated software, and everypart of it (including source code, object code, any data contained in it, the manual and any otherdocumentation supplied with it) belongs to AVEVA Solutions Ltd or its subsidiaries.
All other rights are reserved to AVEVA Solutions Ltd and its subsidiaries. The information contained inthis document is commercially sensitive, and shall not be copied, reproduced, stored in a retrievalsystem, or transmitted without the prior written permission of AVEVA Solutions Ltd. Where suchpermission is granted, it expressly requires that this Disclaimer and Copyright notice is prominentlydisplayed at the beginning of every copy that is made.
The manual and associated documentation may not be adapted, reproduced, or copied, in any materialor electronic form, without the prior written permission of AVEVA Solutions Ltd. The user may also notreverse engineer, decompile, copy, or adapt the associated software. Neither the whole, nor part of theproduct described in this publication may be incorporated into any third-party software, product,machine, or system without the prior written permission of AVEVA Solutions Ltd, save as permitted bylaw. Any such unauthorised action is strictly prohibited, and may give rise to civil liabilities and criminalprosecution.
The AVEVA products described in this guide are to be installed and operated strictly in accordance withthe terms and conditions of the respective licence agreements, and in accordance with the relevantUser Documentation. Unauthorised or unlicensed use of the product is strictly prohibited.
First published September 2007
© AVEVA Solutions Ltd, and its subsidiaries
AVEVA Solutions Ltd, High Cross, Madingley Road, Cambridge, CB3 0HB, United Kingdom
TrademarksAVEVA and Tribon are registered trademarks of AVEVA Solutions Ltd or its subsidiaries. Unauthoriseduse of the AVEVA or Tribon trademarks is strictly forbidden.
AVEVA product names are trademarks or registered trademarks of AVEVA Solutions Ltd or itssubsidiaries, registered in the UK, Europe and other countries (worldwide).
The copyright, trade mark rights, or other intellectual property rights in any other product, its name orlogo belongs to its respective owner.
AVEVA Solutions Ltd
Clash Manager Installation Guide
Contents Page
Clash Manager Installation Guide
Clash ManagerIntroduction . . . . . . . . . . . . . . . . . . . . . . . . . . . . . . . . . . . . . . . . . . . . . 1:1Purpose of this Guide . . . . . . . . . . . . . . . . . . . . . . . . . . . . . . . . . . . . . . . . . . . . . . 1:1Overview of Clash Manager Installation . . . . . . . . . . . . . . . . . . . . . . . . . . . . . . . 1:1Structure of this Guide . . . . . . . . . . . . . . . . . . . . . . . . . . . . . . . . . . . . . . . . . . . . . 1:1
Prerequisites . . . . . . . . . . . . . . . . . . . . . . . . . . . . . . . . . . . . . . . . . . . . 2:1Environment Required for Clash Manager . . . . . . . . . . . . . . . . . . . . . . . . . . . . . 2:1Preparation . . . . . . . . . . . . . . . . . . . . . . . . . . . . . . . . . . . . . . . . . . . . . . . . . . . . . . . 2:1
Installing Clash Manager . . . . . . . . . . . . . . . . . . . . . . . . . . . . . . . . . . 3:1How the Clash Manager is Supplied . . . . . . . . . . . . . . . . . . . . . . . . . . . . . . . . . . 3:1Installation - the Basic Steps . . . . . . . . . . . . . . . . . . . . . . . . . . . . . . . . . . . . . . . . 3:1Previous Installations . . . . . . . . . . . . . . . . . . . . . . . . . . . . . . . . . . . . . . . . . . . . . . . . . . . . . . 3:1Installing with Setup.exe. . . . . . . . . . . . . . . . . . . . . . . . . . . . . . . . . . . . . . . . . . . . . . . . . . . . 3:1Locating the Installation on the CD . . . . . . . . . . . . . . . . . . . . . . . . . . . . . . . . . . . . . . . . . . . 3:1
Installing from the AVEVA Support Web Site . . . . . . . . . . . . . . . . . . . . . . . . . . . 3:2Running the Setup File to Install Clash Manager . . . . . . . . . . . . . . . . . . . . . . . . 3:2Disk Space Requirements Screen . . . . . . . . . . . . . . . . . . . . . . . . . . . . . . . . . . . . . . . . . . . . 3:9
Connecting and Configuring Clash Manager . . . . . . . . . . . . . . . . . . 4:1PDMS/Marine Without Clash Manager . . . . . . . . . . . . . . . . . . . . . . . . . . . . . . . . . 4:1Adding Clash Manager to PDMS/Marine . . . . . . . . . . . . . . . . . . . . . . . . . . . . . . . 4:1Starting Clash Manager without PDMS/Marine . . . . . . . . . . . . . . . . . . . . . . . . . . 4:2
12 Seriesi
Clash Manager Installation Guide
Clash Manager Wizard. . . . . . . . . . . . . . . . . . . . . . . . . . . . . . . . . . . . . . . . . . . . . . 4:2
Summary Installation Instructions . . . . . . . . . . . . . . . . . . . . . . . . . .A:1Installing the Environment and Products for Clash Manager Operation . . . . .A:1Actions to Install and Setup to Run . . . . . . . . . . . . . . . . . . . . . . . . . . . . . . . . . . .A:1After Installation. . . . . . . . . . . . . . . . . . . . . . . . . . . . . . . . . . . . . . . . . . . . . . . . . . .A:1
Default Locations . . . . . . . . . . . . . . . . . . . . . . . . . . . . . . . . . . . . . . . .B:1
Help with Oracle Activities . . . . . . . . . . . . . . . . . . . . . . . . . . . . . . . . .C:1Installing Oracle 10g Client . . . . . . . . . . . . . . . . . . . . . . . . . . . . . . . . . . . . . . . . . .C:1Additional Components . . . . . . . . . . . . . . . . . . . . . . . . . . . . . . . . . . . . . . . . . . . . . . . . . . . . C:1
Checking the Oracle Connection . . . . . . . . . . . . . . . . . . . . . . . . . . . . . . . . . . . . .C:2Checking if a connection exists . . . . . . . . . . . . . . . . . . . . . . . . . . . . . . . . . . . . . . . . . . . . . . C:2Checking if SQL Plus Can Use the Connection . . . . . . . . . . . . . . . . . . . . . . . . . . . . . . . . . . C:3
Summary Explanation of Entries (& Nomenclature) in Oracle Definition Files C:4sqlnet.ora . . . . . . . . . . . . . . . . . . . . . . . . . . . . . . . . . . . . . . . . . . . . . . . . . . . . . . . . . . . . . . C:4tnsnames.ora . . . . . . . . . . . . . . . . . . . . . . . . . . . . . . . . . . . . . . . . . . . . . . . . . . . . . . . . . . . . C:4
Help with MS SQL Server Activities . . . . . . . . . . . . . . . . . . . . . . . . .D:1
Changed Environment Variables for Clash Manager. . . . . . . . . . . .E:1Clash Manager . . . . . . . . . . . . . . . . . . . . . . . . . . . . . . . . . . . . . . . . . . . . . . . . . . . . E:1Clash Manager Wizard . . . . . . . . . . . . . . . . . . . . . . . . . . . . . . . . . . . . . . . . . . . . . E:1
Silent/Unattended Installation . . . . . . . . . . . . . . . . . . . . . . . . . . . . . .F:1MSI Command Line Parameters . . . . . . . . . . . . . . . . . . . . . . . . . . . . . . . . . . . . . . F:1Controlling Feature Selection . . . . . . . . . . . . . . . . . . . . . . . . . . . . . . . . . . . . . . . . F:1
12 Seriesii
Clash Manager Installation GuideIntroduction
1 Introduction
1.1 Purpose of this GuideThis guide is intended for IT managers and support staff who are planning to implementClash Manager. It describes the installation and software configuration of Clash Manager ona user workstation.
For the installation of Clash Manager onto an AVEVA Marine system, this guide assumesthat Marine Outfitting has already been installed.
For the installation of Clash Manager onto an AVEVA PDMS system, this guide assumesthat PDMS has already been installed.
The guide also assumes some understanding of the configuration of PDMS/Marine -particularly the use of environment variables and searchpaths.
Clash Manager requires that Oracle or Microsoft SQL Server has been installed before itcan be installed itself. Refer to Prerequisites. After installation, running the Clash ManagerWizard provides the required database setup. Refer to Clash Manager User Guide.
If the user is already familiar with PDMS/Marine installations, they may be able tosatisfactorily complete the Clash Manager installation following the summary given inSummary Installation Instructions.
If the user is not familiar with these installations, they are strongly advised to read Chapters1-4 of this Guide before starting installation.
Note: The licensing of Clash Manager is managed by AVEVA’s Flexman security system. Aseparate licence key must be obtained from AVEVA for Clash Manager.
1.2 Overview of Clash Manager InstallationInstallation of Clash Manager has three major streams:
1. Install the base environment required for Clash Manager.2. Install and configure the product software.3. Create and configure projects data and connections using the Clash Manager Wizard,
refer to the Clash Manager User Guide for more information.
1.3 Structure of this GuideThis guide does not describe Oracle, MS SQL Server, AVEVA PDMS or Marine installations- they are considered to be pre-requisites for a Clash Manager installation. Details of theseinstallations can be found in the Installation Guides for each of those products.
12 Series 1:1
Clash Manager Installation GuideIntroduction
Prerequisites describes the environment required for a successful installation of ClashManager.
Installing Clash Manager describes the recommended method of installing Clash Manageron an individual workstation.
Connecting and Configuring Clash Manager describes how PDMS, Marine and ClashManager are combined to form a Clash Management system.
Summary Installation Instructions is a summary of the Installation process for ClashManager. The default locations for installation are presented in Default Locations.
12 Series 1:2
Clash Manager Installation GuidePrerequisites
2 Prerequisites
2.1 Environment Required for Clash ManagerIn addition to the Windows operating system, other AVEVA and non-AVEVA products arerequired for the operating environment for Clash Manager.
• Oracle or MS SQL Server• PDMS (Plant) or Outfitting (Marine)
2.2 PreparationBefore starting to install Clash Manager, make sure that the following has been installed:
• Oracle (V9 or V10) or MS SQL Server as the database server.
1. For each workstation accessing Oracle hosted projects:• Make sure Oracle 10g (10.2.0.3 Client), including Application User option with
Oracle Windows Interfaces, is present.• Make sure Microsoft Data Access - OLE DB Provider for Oracle is present• Make sure that the Oracle runtime library path is in the %path% environment
variable. The file tnsnames.ora needs to contain the required Oracle connect(string).
2. On workstations which will be used to configure SQL Server hosted projects (using theClash Manager Wizard), make sure that the SQL Distributed Management Objects(SQL-DMO) application is also installed.
3. In non-English environments, install MDAC 2.6 or later (For English environments, ifthe Clash Manager install does not detect MDAC 2.6 or later on the workstation, it willbe installed during the Clash Manager installation).
4. In non-English environments, install XML Parser 3 or later (For English environments, ifthe Clash Manager install does not detect XML Parser 3 or later on the workstation, itwill be installed during the Clash Manager installation).
5. Install PDMS or Marine 12.0.6. When installing for a Clash Manager/PDMS/Marine Project Administrator, install
Microsoft Excel.
12 Series 2:1
Clash Manager Installation GuidePrerequisites
12 Series 2:2
Clash Manager Installation GuideInstalling Clash Manager
3 Installing Clash Manager
Clash Manager can be installed separately for either PDMS or Marine Outfitting.
The process of installing Clash Manager involves copying files to a suitable location on theworkstation and making appropriate records of file locations.
3.1 How the Clash Manager is SuppliedClash Manager may be delivered on one CD or on a number of CDs or, often for upgrades,via the AVEVA Support website.
3.2 Installation - the Basic Steps
3.2.1 Previous InstallationsAll previous versions of Clash Manager need to be un-installed before installing ClashManager 12.0.
During installation Clash Manager 12.0 does not uninstall previous versions however,previous versions are not compatible with Clash Manager 12.0, and this installation hasbeen designed to fail if it detects a previous Clash Manager installation on the system.
3.2.2 Installing with Setup.exeSetup.exe supports non silent installations and is the easiest way to begin an installation.However, the MSI can be run directly, in the usual manner for an MSI.
3.2.3 Locating the Installation on the CDIf using the CD directly on a workstation where ‘autorun’ is not enabled the user will need tolocate the product’s setup.exe using Explorer.
The steps the user needs to take are:
1. Open a Windows Explorer.2. Load the CD, and select the CD drive folder (usually D:)3. Select the int folder, then the install folder {tnnnnn} for the product of interest, as
listed in the aareadme.txt file.4. In the product folder, {product_code}{version}, below the int folder, the user
should find a file setup.exe.5. Either execute this file from the CD, or copy the complete setup folder onto the
workstation and run setup.exe from there.
12 Series 3:1
Clash Manager Installation GuideInstalling Clash Manager
6. Alternatively, run start.htm in the root folder of the CD.7. Click on Contents of CD. This will display a list of the products on the CD.8. Click on the product to install (e.g. Clash Manager 12.0). The Release Documents
screen for the product will be displayed.9. Read the Release Notes for any specific installation instructions. This is important, as
there may be release-specific instructions in the Release Notes.10. Click INSTALL. The user will be offered a choice of installing directly from the CD or
downloading a setup.exe file from the CD.11. If the user decides to download setup.exe then click Save on the File Download dialog
box.12. Use the Save As dialog box to specify a folder where the product’s setup.exe file will
be stored, then click Save.
3.3 Installing from the AVEVA Support Web SiteOnly product updates are available for downloading from the AVEVA Support website. If aproduct update is delivered via the AVEVA Support website, then the Release Letter willinform the user of the location of the self-extracting file containing the product. The user willneed to:
1. Copy the self-extracting file from the website onto the users workstation.2. Extract the contents. 3. Locate setup.exe as directed in the Release Letter.
3.4 Running the Setup File to Install Clash ManagerTo install Clash Manager:
Navigate to the product’s ClashManager.msi file and double-click it.
The Clash Manager Setup Welcome window is displayed.
12 Series 3:2

Clash Manager Installation GuideInstalling Clash Manager
During the installation process the user can click Back to step back a stage, Next tocontinue the installation or Cancel to terminate the Setup Wizard. Clicking Cancel willdisplay a window asking the user to confirm the cancellation.
Click Yes to cancel the installation or No to continue the installation.
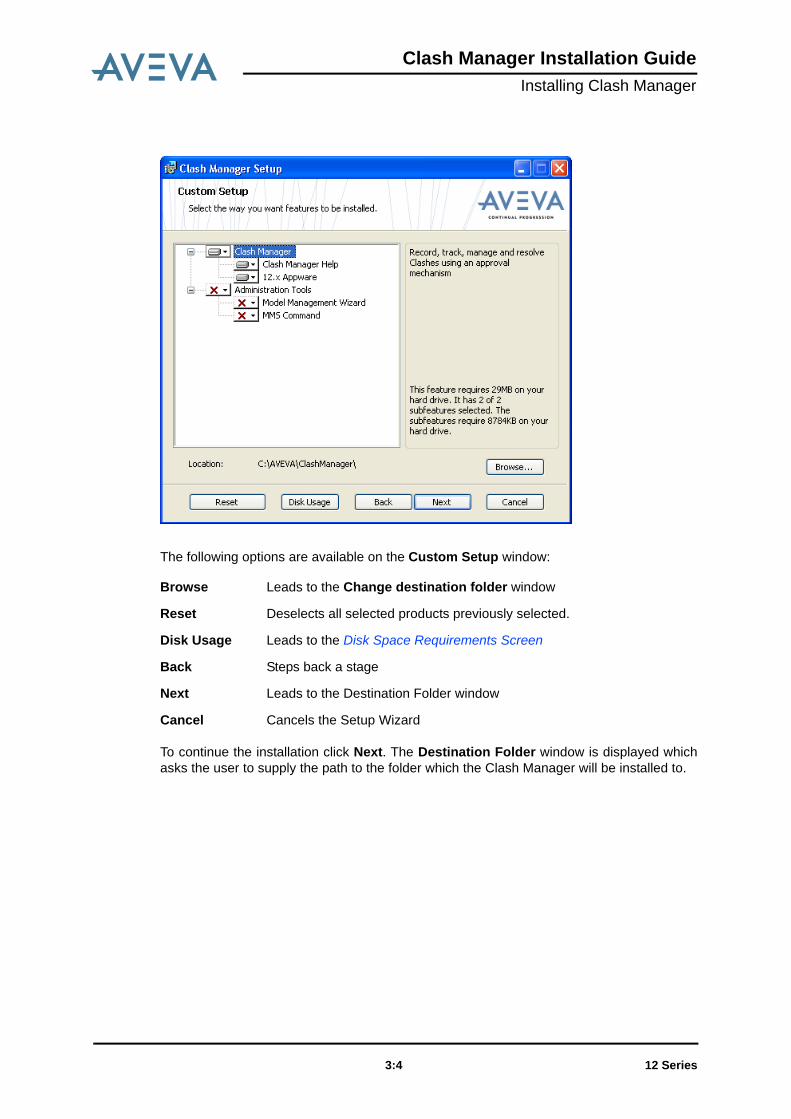
To start the installation click Next on the Clash Manager Setup window. The CustomSetup window is displayed allowing the user to select the features to be installed.
12 Series 3:3
Clash Manager Installation GuideInstalling Clash Manager
The following options are available on the Custom Setup window:
To continue the installation click Next. The Destination Folder window is displayed whichasks the user to supply the path to the folder which the Clash Manager will be installed to.
Browse Leads to the Change destination folder window
Reset Deselects all selected products previously selected.
Disk Usage Leads to the Disk Space Requirements Screen
Back Steps back a stage
Next Leads to the Destination Folder window
Cancel Cancels the Setup Wizard
12 Series 3:4
Clash Manager Installation GuideInstalling Clash Manager
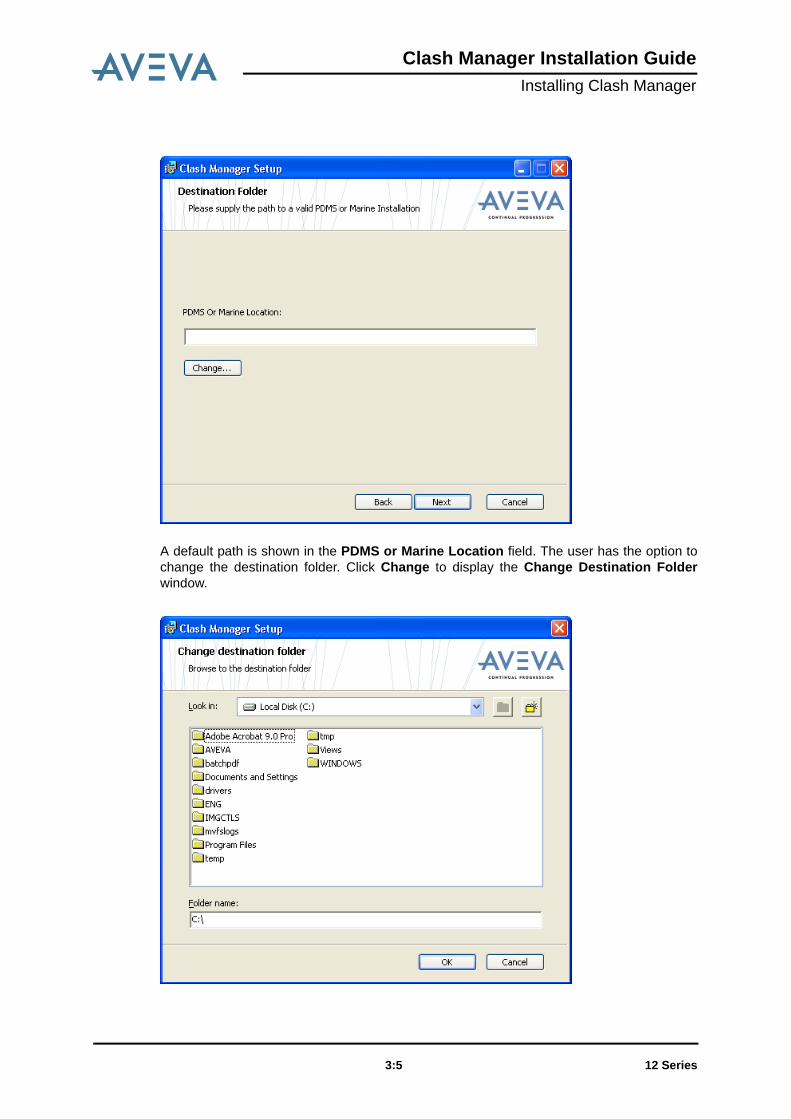
A default path is shown in the PDMS or Marine Location field. The user has the option tochange the destination folder. Click Change to display the Change Destination Folderwindow.
12 Series 3:5
Clash Manager Installation GuideInstalling Clash Manager
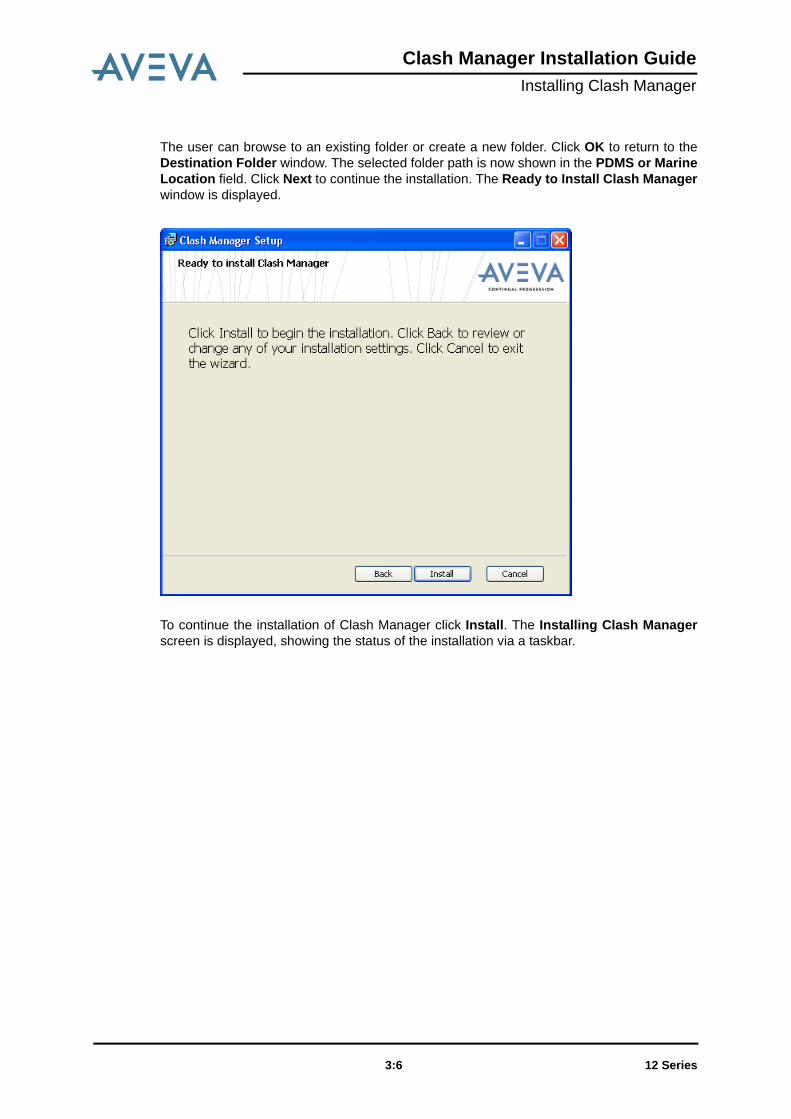
The user can browse to an existing folder or create a new folder. Click OK to return to theDestination Folder window. The selected folder path is now shown in the PDMS or MarineLocation field. Click Next to continue the installation. The Ready to Install Clash Managerwindow is displayed.
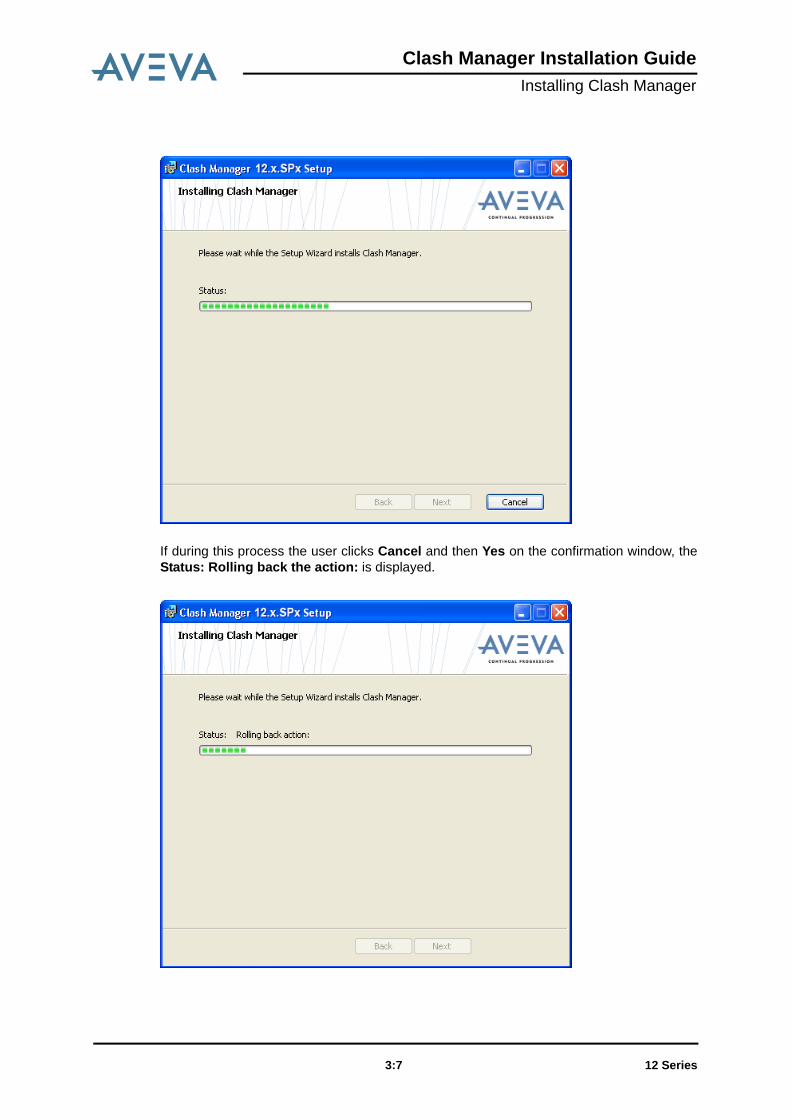
To continue the installation of Clash Manager click Install. The Installing Clash Managerscreen is displayed, showing the status of the installation via a taskbar.
12 Series 3:6
Clash Manager Installation GuideInstalling Clash Manager
If during this process the user clicks Cancel and then Yes on the confirmation window, theStatus: Rolling back the action: is displayed.
12 Series 3:7
Clash Manager Installation GuideInstalling Clash Manager
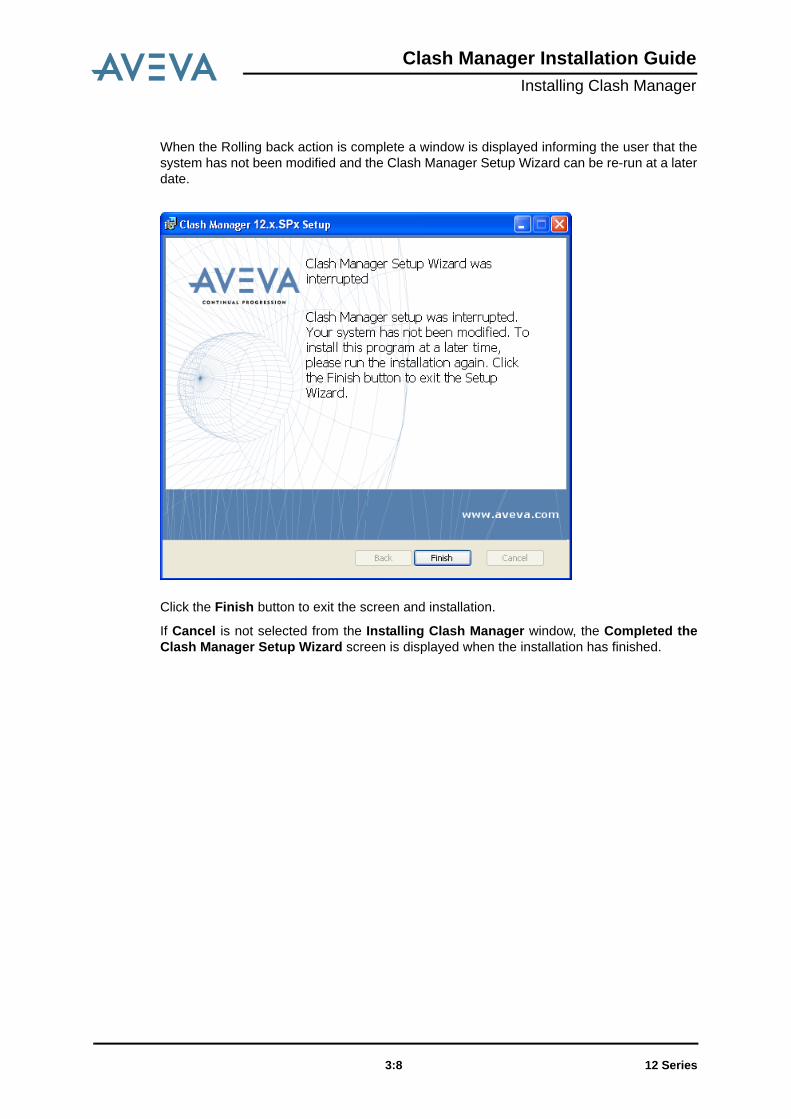
When the Rolling back action is complete a window is displayed informing the user that thesystem has not been modified and the Clash Manager Setup Wizard can be re-run at a laterdate.
Click the Finish button to exit the screen and installation.
If Cancel is not selected from the Installing Clash Manager window, the Completed theClash Manager Setup Wizard screen is displayed when the installation has finished.
12 Series 3:8

Clash Manager Installation GuideInstalling Clash Manager
Click Finish to exit the screen and installation.
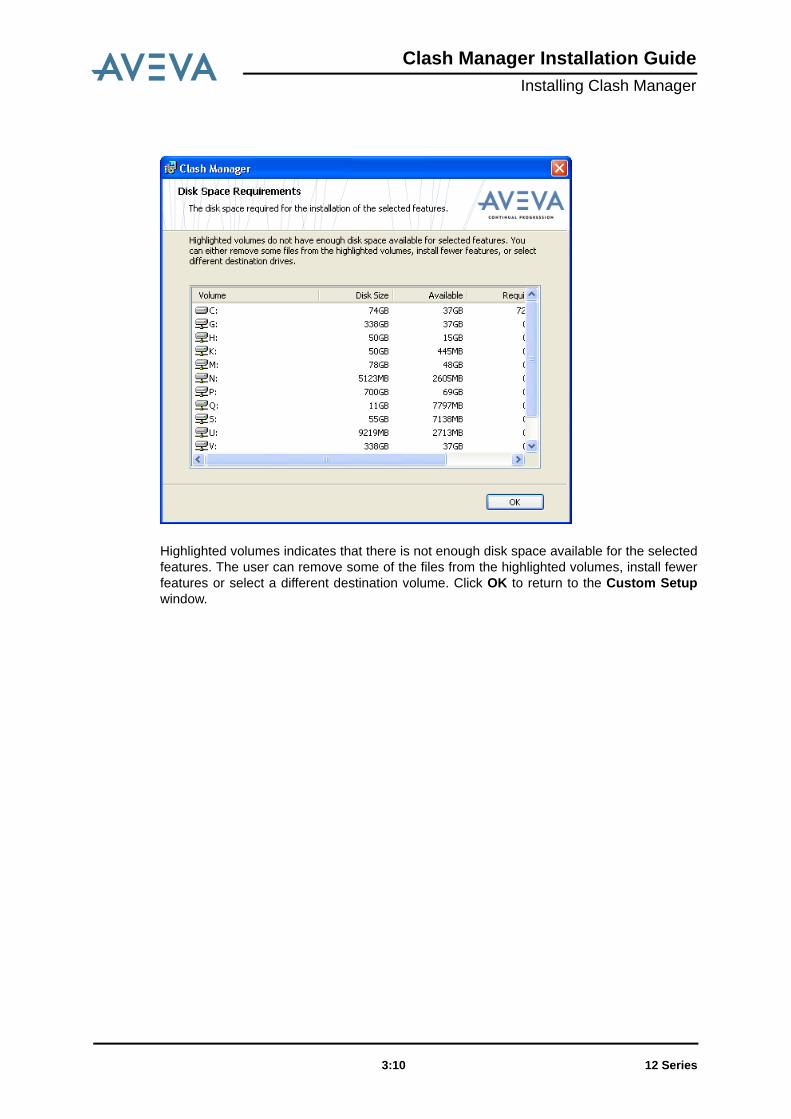
3.4.1 Disk Space Requirements ScreenThe Disk Space Requirement screen displays the amount of disk space required for theselected install.
12 Series 3:9
Clash Manager Installation GuideInstalling Clash Manager
Highlighted volumes indicates that there is not enough disk space available for the selectedfeatures. The user can remove some of the files from the highlighted volumes, install fewerfeatures or select a different destination volume. Click OK to return to the Custom Setupwindow.
12 Series 3:10
Clash Manager Installation GuideConnecting and Configuring Clash Manager
4 Connecting and Configuring Clash Manager
PDMS, Marine and Clash Manager all rely on the setting of environment variables toconfigure the system. An administrator who understands how these environment variablesare used can operate a more flexible installation policy for his/her company.
Clash Manager requires both program environment variables and project environmentvariables. Clash Manager installation will create files which set the program environmentvariables. Administrators are responsible for ensuring required project environmentvariables are set.
4.1 PDMS/Marine Without Clash ManagerPDMS and Marine rely on a number of environment variables to define and “connect” thesoftware and projects databases. Some environment variables define product softwarelocations, some user output folders and some project-specific folders/data. The environmentvariables can be set to represent alternative locations that should be searched in a presetsequence to find the required items. In this case the values of the environment variables arecalled search-paths.
Scripts (called batfiles because the files have extension .bat) are provided with PDMS/Marine to set the environment variables for a standard installation.
The significant PDMS/Marine batfiles are pdms.bat and evars.bat. The scriptpdms.bat is the script called when PDMS/Marine is invoked from the Start menu. It callsevars.bat to set all the environment variables required by standard PDMS/Marine, basedon the installed product location. The PDMS/Marine evars.bat file allows for presetenvironment variables, and if any environment variable is already set it is not reset byevars.bat.
4.2 Adding Clash Manager to PDMS/MarineTo maintain the ability to run PDMS/Marine in non-Clash Manager mode, Clash Managertakes a copy of the standard PDMS/Marine scripts and only alters this renamed copy. Thebase PDMS/Marine pdms.bat (and evars.bat) is unchanged. This protects the baseversions.
The modified version of the PDMS script is cm_pdms.bat and the modified version of theMarine script is cm_marine.bat. These call the evars.bat to set the essential environmentvariables (including PDMS environment variables) in the same way that pdms.bat callsevars.bat to set the essential PDMS environment variables.
The modified start-up script, cm_pdms.bat or cm_marine.bat, is called when PDMS/Marine is invoked from the Clash Manager option of the Start menu. The installed locationof Clash Manager is recorded here, enabling it to call other batfiles to make sure product
12 Series 4:1
Clash Manager Installation GuideConnecting and Configuring Clash Manager
environment variables are set. However the installation process does not know aboutPDMS/Marine projects which also require relevant environment variables to be set.
For Clash Manager, as for PDMS, the project environment variables are set by a batfile onprogram start-up. An example of an environment variable modified for Clash Manager isPDMSUI. PDMSUI is the searchpath for files containing PDMS/Marine applicationware. In adefault PDMS/Marine installation this may be set to:
set PDMSUI=C:\AVEVA\PDMS12.0\PDMSUI
For Model Object Manager:
set PDMSUI=C:\AVEVA\ModelManagement12.0\pdmsui %PDMSUI%
Single blanks separate the values in environment variables.
Note: Each folder name’s path in the searchpath must not contain any blanks (else PDMS/Marine fails). Therefore the paths to the locations where Clash Manager is installedmust not have blanks in them.
Each product requires different environment variables to be set. Changed EnvironmentVariables for Clash Manager summarises these.
It is possible to install Clash Manager physically into the same group name folder in thePDMS/Marine folder. Then modifying the environment variables and .bat files isunnecessary. However installing Clash Manager in the same folders as PDMS/Marine itselfis not recommended because it complicates the uninstall procedure; uninstalling ClashManager in this situation would result in an incomplete PDMS/Marine.
4.3 Starting Clash Manager without PDMS/MarineIt is possible to start Clash Manager without having PDMS/Marine running, although onlythe Clash Manager Wizard is usually run in this mode.
Note: Some tasks require Clash Manager to be linked to an active PDMS/Marine session,so there may be reduced functionality if Clash Manager is started without PDMS/Marine running.
4.4 Clash Manager WizardBefore Clash Manager can be used, an administrator must run the Clash Manager Wizard.The Clash Manager Wizard is supplied with Clash Manager, and can be installed as anoption when installing if the Custom setup type is selected. Only administrators need toinstall Clash Manager Wizard.
The Clash Manager Wizard performs some administration tasks, refer to the Clash ManagerUser Guide.
12 Series 4:2
Clash Manager Installation GuideSummary Installation Instructions
A Summary Installation Instructions
A.1 Installing the Environment and Products for Clash Manager OperationThis appendix provides a summary of the installation and configuration for Clash Manager.It simply lists objects/settings.
Before starting make sure that following has been installed on the users network and visiblefrom the users Workstation:
• Oracle DB server or MS SQL Server.
and on Workstations using Oracle,• Oracle 10g Runtime Client plus Oracle Windows Interfaces• Oracle 10 OLE DB Provider• the Oracle Runtime library path added to the users environment variable %path%.
Using the Clash Manager Wizard a Project Administrator must have created theconfiguration file CLASH_{project}.cfg in the Project Defaults Directory.
A.2 Actions to Install and Setup to Run1. Set up the environment for PDMS or Marine, including all required project environment
variables.2. Make sure that for Oracle hosted projects, the SQL Net configuration is in place, and
that configuration files such as tnsname.ora and sqlnet.ora are consistent and correct. 3. Install PDMS.4. Check/Create the start-up bat files.
A.3 After InstallationAfter the installation is complete, on reboot selecting:-Start>Programs>AVEVA>Clash Manager>Run PDMS/Marine(Clash Manager)
starts PDMS/Marine with Clash Manager enabled - the user can start Clash Manager fromDESIGN/Outfitting.
Selecting:Start>Programs>AVEVA>Clash Manager>Run Clash Manager
starts Clash Manager in ‘Oracle/SQL Server-only’ mode - without PDMS/Marine running.
The install will have created a working setup which can be run. However, users may wellwish to recreate the environment setup for specific projects working.
12 Series A:1
Clash Manager Installation GuideSummary Installation Instructions
12 Series A:2
Clash Manager Installation GuideDefault Locations
B Default Locations
The AVEVA Clash Manager products will be installed in the following locations (where “C” isreally the disk on which the Windows operating system was installed) unless these areoverridden during the installation process:
Product Default Location
Clash Manager 12.0 C:\Aveva\ModelManagement
CM Administration Functions C:\Aveva\ModelManagement
12 Series B:1
Clash Manager Installation GuideDefault Locations
12 Series B:2
Clash Manager Installation GuideHelp with Oracle Activities
C Help with Oracle Activities
This Appendix contains hints which some installers have found useful when difficultiesrelated to Oracle.
C.1 Installing Oracle 10g Client The user can begin installing the Oracle 10g Client in one of two ways.
1. Start from the Oracle CD screens invoked from autorun, and then select Oracle10g…Install/Deinstall Products and then click Next on the Welcome screen.
2. Or, if autorun hasn’t run or isn’t enabled, browse the CD and navigate to{Oracle}\install\win32\setup.exe.
When the installation program starts follow through the dialog boxes as follows:
Install patches to Oracle client as recommended in the product Release Letter.
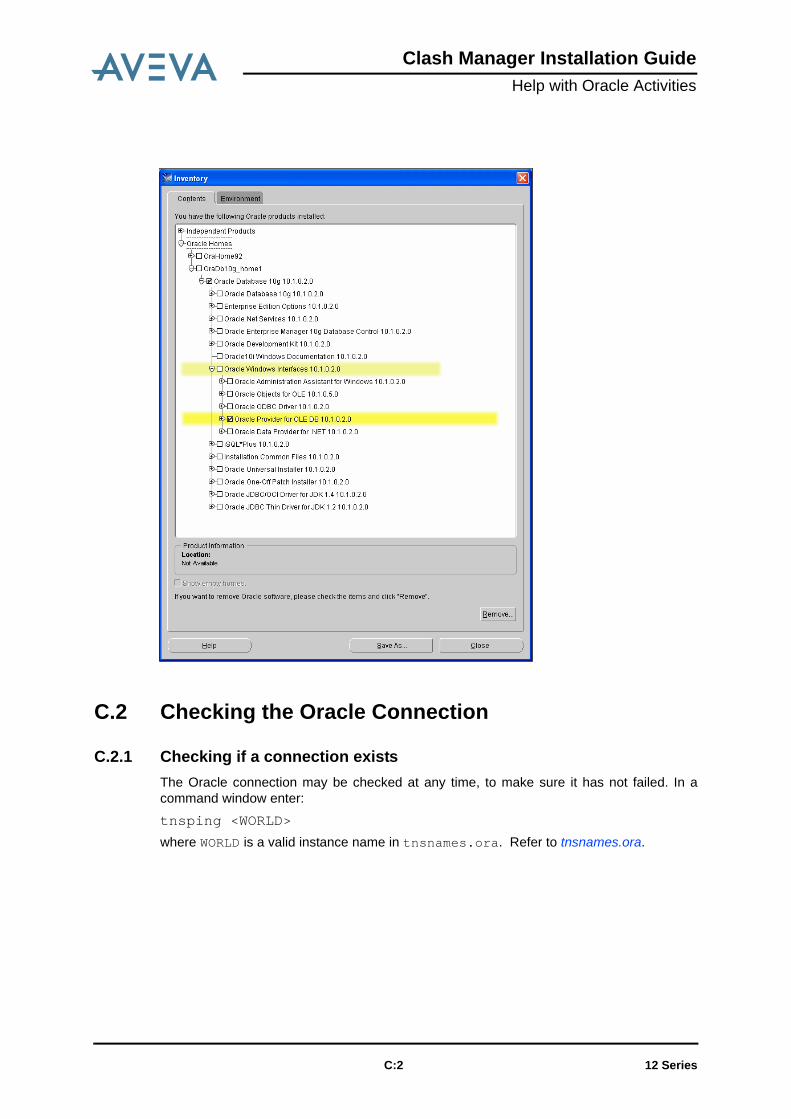
C.1.1 Additional ComponentsIn addition to the default Oracle components the user will also need to install the OracleProvider for OLE DB. This component appears under the Oracle Windows Interfacessection:
Dialog Box Purpose and Selections
Specify File Locations Self-explanatory
Select Installation Types Custom.
Select the option to install Windowscomponents
Summary Install
Oracle Net Configuration Assistant Click CANCEL, and continue exitingthrough a number of checks.
12 Series C:1
Clash Manager Installation GuideHelp with Oracle Activities
C.2 Checking the Oracle Connection
C.2.1 Checking if a connection existsThe Oracle connection may be checked at any time, to make sure it has not failed. In acommand window enter:
tnsping <WORLD>
where WORLD is a valid instance name in tnsnames.ora. Refer to tnsnames.ora.
12 Series C:2
Clash Manager Installation GuideHelp with Oracle Activities
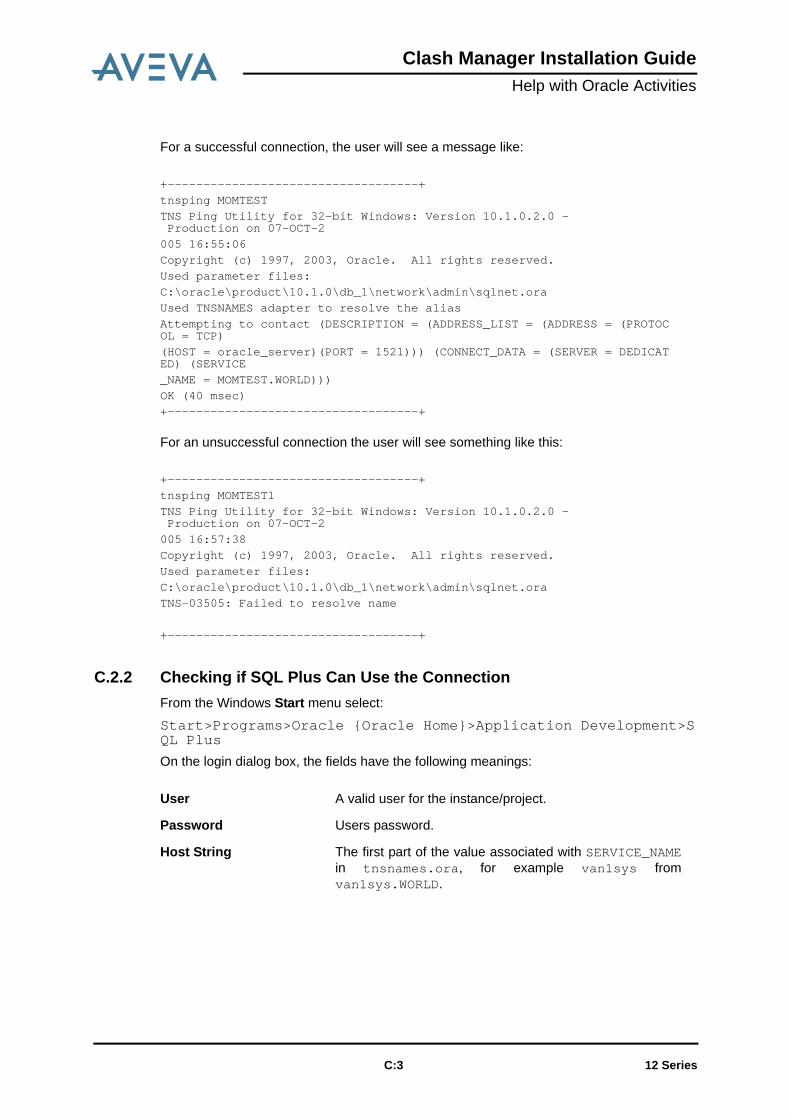
For a successful connection, the user will see a message like:
For an unsuccessful connection the user will see something like this:
C.2.2 Checking if SQL Plus Can Use the ConnectionFrom the Windows Start menu select:
Start>Programs>Oracle {Oracle Home}>Application Development>SQL Plus
On the login dialog box, the fields have the following meanings:
+-----------------------------------+tnsping MOMTESTTNS Ping Utility for 32-bit Windows: Version 10.1.0.2.0 -Production on 07-OCT-2
005 16:55:06Copyright (c) 1997, 2003, Oracle. All rights reserved.Used parameter files:C:\oracle\product\10.1.0\db_1\network\admin\sqlnet.oraUsed TNSNAMES adapter to resolve the aliasAttempting to contact (DESCRIPTION = (ADDRESS_LIST = (ADDRESS = (PROTOCOL = TCP)(HOST = oracle_server)(PORT = 1521))) (CONNECT_DATA = (SERVER = DEDICATED) (SERVICE_NAME = MOMTEST.WORLD)))OK (40 msec)+-----------------------------------+
+-----------------------------------+tnsping MOMTEST1TNS Ping Utility for 32-bit Windows: Version 10.1.0.2.0 -Production on 07-OCT-2
005 16:57:38Copyright (c) 1997, 2003, Oracle. All rights reserved.Used parameter files:C:\oracle\product\10.1.0\db_1\network\admin\sqlnet.oraTNS-03505: Failed to resolve name
+-----------------------------------+
User A valid user for the instance/project.
Password Users password.
Host String The first part of the value associated with SERVICE_NAMEin tnsnames.ora, for example van1sys fromvan1sys.WORLD.
12 Series C:3
Clash Manager Installation GuideHelp with Oracle Activities
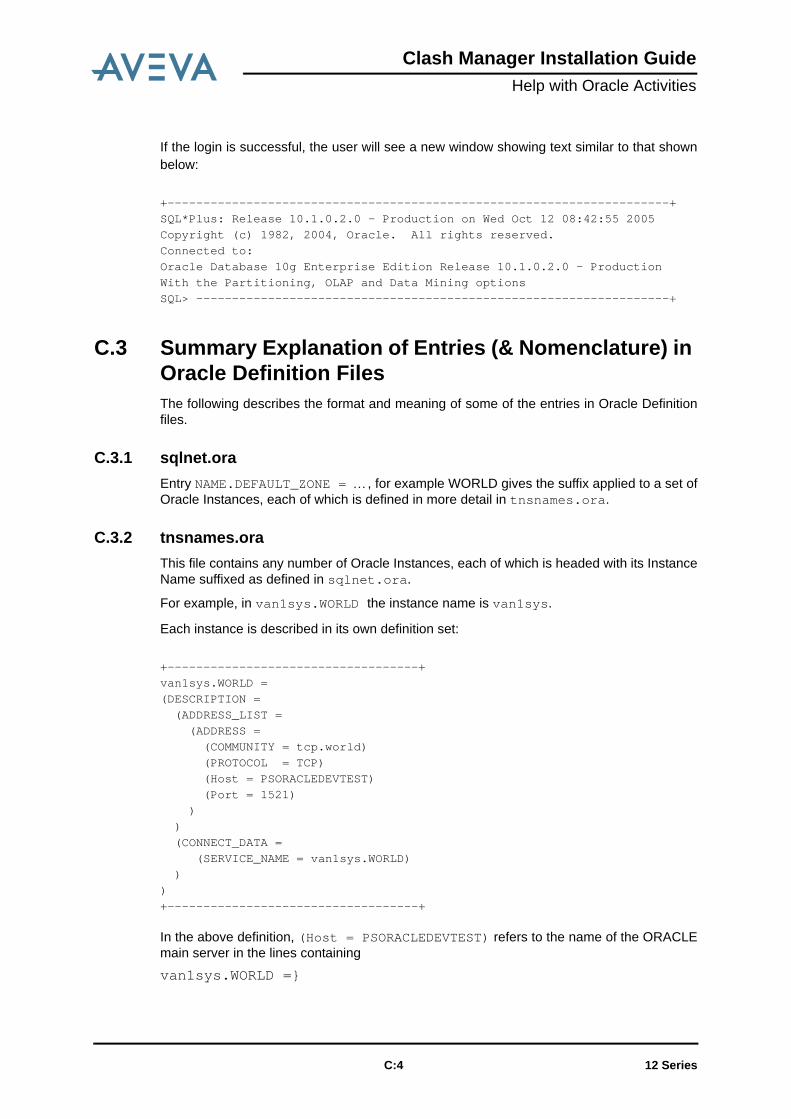
If the login is successful, the user will see a new window showing text similar to that shownbelow:
C.3 Summary Explanation of Entries (& Nomenclature) in Oracle Definition FilesThe following describes the format and meaning of some of the entries in Oracle Definitionfiles.
C.3.1 sqlnet.oraEntry NAME.DEFAULT_ZONE = …, for example WORLD gives the suffix applied to a set ofOracle Instances, each of which is defined in more detail in tnsnames.ora.
C.3.2 tnsnames.oraThis file contains any number of Oracle Instances, each of which is headed with its InstanceName suffixed as defined in sqlnet.ora.
For example, in van1sys.WORLD the instance name is van1sys.
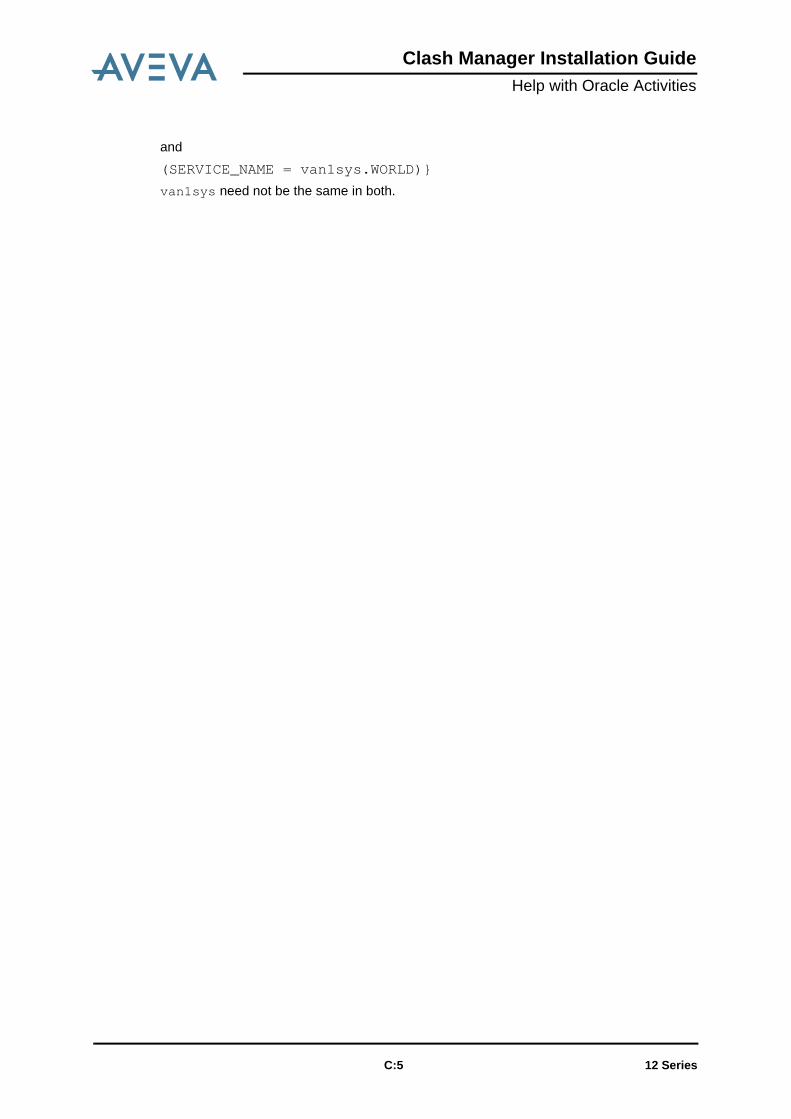
Each instance is described in its own definition set:
In the above definition, (Host = PSORACLEDEVTEST) refers to the name of the ORACLEmain server in the lines containing
van1sys.WORLD =}
+----------------------------------------------------------------------+SQL*Plus: Release 10.1.0.2.0 - Production on Wed Oct 12 08:42:55 2005Copyright (c) 1982, 2004, Oracle. All rights reserved.Connected to:Oracle Database 10g Enterprise Edition Release 10.1.0.2.0 - ProductionWith the Partitioning, OLAP and Data Mining optionsSQL> ------------------------------------------------------------------+
+-----------------------------------+van1sys.WORLD =(DESCRIPTION =
(ADDRESS_LIST =(ADDRESS =(COMMUNITY = tcp.world)(PROTOCOL = TCP)(Host = PSORACLEDEVTEST)(Port = 1521)
))(CONNECT_DATA =
(SERVICE_NAME = van1sys.WORLD))
)+-----------------------------------+
12 Series C:4
Clash Manager Installation GuideHelp with Oracle Activities
and
(SERVICE_NAME = van1sys.WORLD)}
van1sys need not be the same in both.
12 Series C:5
Clash Manager Installation GuideHelp with Oracle Activities
12 Series C:6
Clash Manager Installation GuideHelp with MS SQL Server Activities
D Help with MS SQL Server Activities
When using the Clash Manager application with MS SQL Server the following actionsshould be taken by a Database Administrator prior to launching Clash Manager for the firsttime:
• If installing an MS SQL Server for the first time, the default SA account passwordshould be changed. A password should be set for a user account for Clash Manager towork correctly.
• Create a new Empty Database, there is no need to populate this with data, this will bedone by the Clash Manager Wizard.
Note: The name of the database must not contain embedded spaces.
• Server Authentication must be set to SQL Server and Windows Authentication mode • Remote Connections should include TCP/IP for Local and remote connection • Remote Server Connections should be Allowed• SQL Server Browser should generally be Enabled
Note: The Clash Manager Wizard requires that the SQL Distributed Management Objects(SQL-DMO) application is also installed.
12 Series D:1

Clash Manager Installation GuideHelp with MS SQL Server Activities
12 Series D:2
Clash Manager Installation GuideChanged Environment Variables for Clash Manager
E Changed Environment Variables for Clash Manager
To run the Clash Manager certain environment variables used by PDMS/Marine need to bechanged. These environment variables and the necessary changes are given below.
In the paths {Clash Manager location} denotes the location where Clash Manager wasinstalled. The default values for these locations are given in Default Locations.
E.1 Clash Manager To run Clash Manager, the following environment variables need to be setPDMSEXE={Clash Manager location}\exe %PDMSEXE%PDMSUI={Clash Manager location}\pdmsui %PDMSUI%PMLLIB={Clash Manager location}\pmllib %PMLLIB%PDMSDFLTS={Clash Manager location}\pdmsui\dflts %PDMSDFLTS%
E.2 Clash Manager Wizard The Clash Manager Wizard requires a full PDMS/Marine, including project, environment.
12 Series E:1
Clash Manager Installation GuideChanged Environment Variables for Clash Manager
12 Series E:2
Clash Manager Installation GuideSilent/Unattended Installation
F Silent/Unattended Installation
Clash Manager is installed using the Microsoft® Installer (MSI). The user can invoke MSIdirectly from the command line allowing the user to install Clash Manager on a machinewithout user interaction. This process is called Silent/Unattended installation.
The Msiexec command uses parameters to give MSI some or all of the information thatwould normally be specified as part of an interactive installation using the Clash ManagerInstaller.
F.1 MSI Command Line ParametersStandard MSI Command Line Switches apply.
F.2 Controlling Feature SelectionFeatures can be included and excluded by the use of two Generic MSI Properties:
• ADDLOCAL• REMOVE
These properties are comma separated lists of the Internal Identifiers of any features whichwill be included or excluded. Features in the REMOVE list take precedence over those inthe ADDLOCAL list.
The following diagram displays the Clash Managers Feature selection dialog. The InternalIdentifiers of the features are not displayed, but the Titles and Descriptions of thoseFeatures are.
12 Series F:1

Clash Manager Installation GuideSilent/Unattended Installation
The internal Identifiers of the Features are:
Examples of performing a Silent/Unattended installation are shown below.
Complete Installation
Example 1
ADDLOCAL=ALL
Example 2
ADDLOCAL=CLASHHLP,CLASHMAN12AW,MMWIZ,MMSCMD
Note: CLASHMAN and ADMTOOLS will be installed if any of their child Features are.
Installation Without Administration ToolsADDLOCAL=ALL REMOVE=ADMTOOLS
Internal Identifier Title
CLASHMAN Clash Manager
CLASHHLP Clash Manager Help
CLASHMAN12AW 12.x Appware
ADMTOOLS Administration Tools
MMWIZ Model Management Wizard
MMSCMD MMS Command
12 Series F:2
Clash Manager Installation GuideSilent/Unattended Installation
Note: MMWIZ and MMSCMD are excluded by excluding their parent feature ADMTOOLS
Installation Without MMS CommandADDLOCAL=ALL REMOVE=MMSCMD
Note: It is essential that all the Properties and Feature Identifiers are in uppercase.
Note: There are no spaces around the commas (,) and the equals (=) signs.
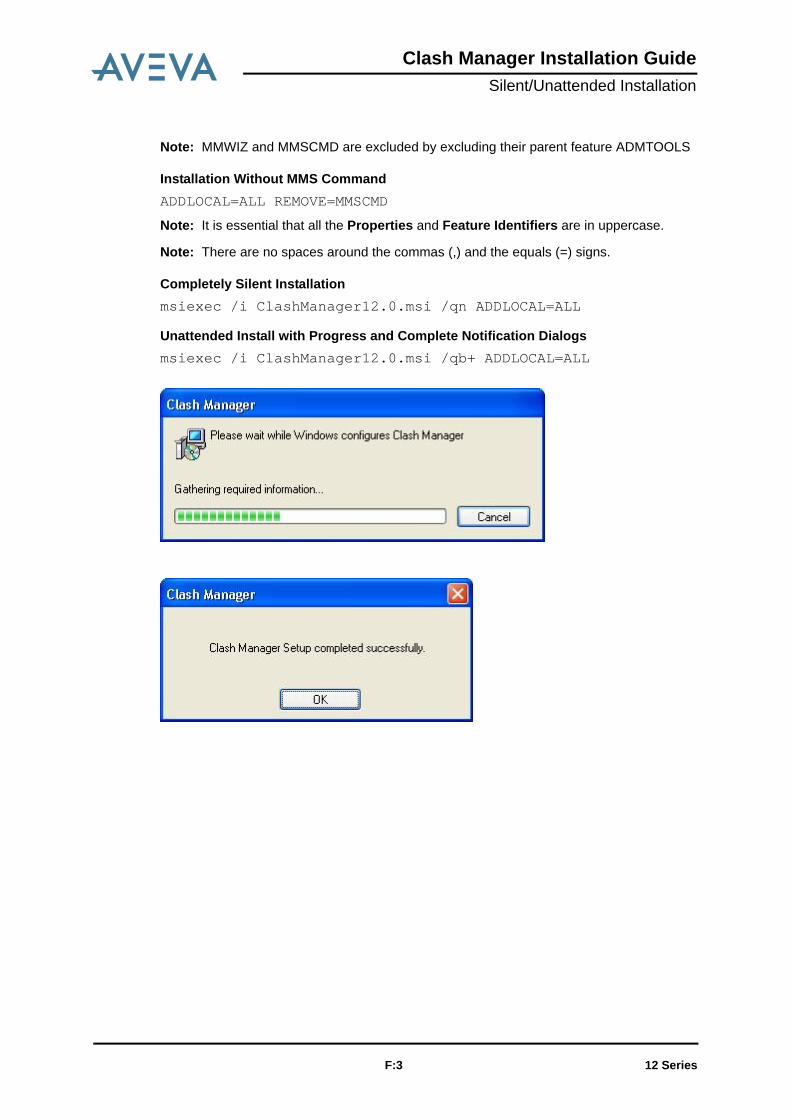
Completely Silent Installationmsiexec /i ClashManager12.0.msi /qn ADDLOCAL=ALL
Unattended Install with Progress and Complete Notification Dialogsmsiexec /i ClashManager12.0.msi /qb+ ADDLOCAL=ALL
12 Series F:3

Clash Manager Installation GuideSilent/Unattended Installation
12 Series F:4
Index
Clash Manager Installation Guide
CClash Manager . . . . . . . . . . . . . . . . . . . . E:1
adding to PDMS/Marine . . . . . . . . . . 4:1configuring . . . . . . . . . . . . . . . . . . . . 4:1connecting . . . . . . . . . . . . . . . . . . . . 4:1installation . . . . . . . . . . . . . . . . . . . . 3:1starting without PDMS/Marine . . . . . 4:2without PDMS/Marine . . . . . . . . . . . . 4:1
Clash Manager Wizard . . . . . . . . . . . . . . E:1
DDefault Locations . . . . . . . . . . . . . . . . . . B:1Disk Space Requirements Screen . . . . . 3:9
EEnvironment . . . . . . . . . . . . . . . . . . . . . . 2:1
variables . . . . . . . . . . . . . . . . . . . . . . E:1
IInstallation
Silent/Unattended . . . . . . . . . . . . . . . F:1
MMS SQL Server . . . . . . . . . . . . . . . . . . . .D:1MSI . . . . . . . . . . . . . . . . . . . . . . . . . . . . . F:1
OOracle Connection
checking . . . . . . . . . . . . . . . . . . . . . .C:2
PPreparation . . . . . . . . . . . . . . . . . . . . . . . 2:1Prerequisites . . . . . . . . . . . . . . . . . . . . . 2:1
SSetup File . . . . . . . . . . . . . . . . . . . . . . . . 3:2Support Web Site
installing from . . . . . . . . . . . . . . . . . . 3:2
Ttnsnames . . . . . . . . . . . . . . . . . . . . . . . . C:4
12 SeriesIndex page i
Clash Manager Installation Guide
12 SeriesIndex page ii