choosing and using a miter saw - finehomebuilding.com · today's chopsaws are available in...
TRANSCRIPT
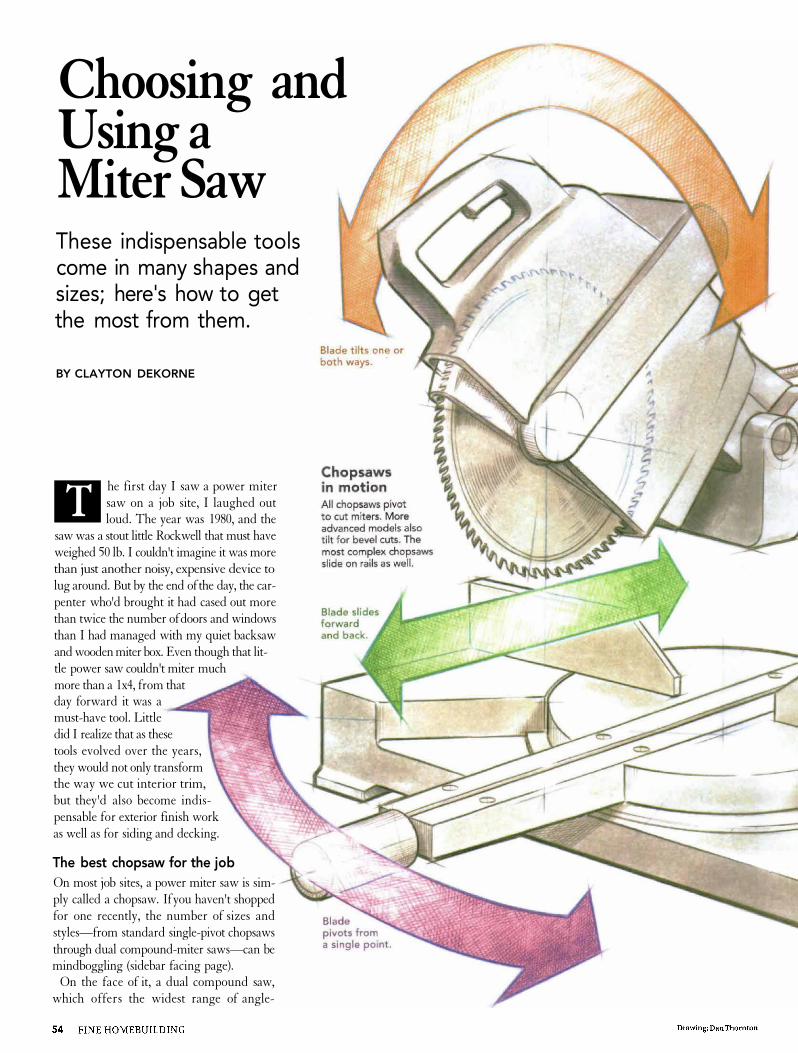
Blade tilts one orboth ways.
Chopsawsin motionAll chopsaws pivotto cut miters. Moreadvanced models alsotilt for bevel cuts. Themost complex chopsawsslide on rails as well.
Blade slidesforwardand back
Bladepivots froma single point.
Choosing andUsing aMiter SawThese indispensable toolscome in many shapes andsizes; here's how to getthe most from them.
BY CLAYTON DEKORNE
T
he first day I saw a power mitersaw on a job site, I laughed outloud. The year was 1980, and the
saw was a stout little Rockwell that must haveweighed 50 lb. I couldn't imagine it was morethan just another noisy, expensive device tolug around. But by the end of the day, the car-penter who'd brought it had cased out morethan twice the number of doors and windowsthan I had managed with my quiet backsawand wooden miter box. Even though that lit-tle power saw couldn't miter muchmore than a 1x4, from thatday forward it was amust-have tool. Littledid I realize that as thesetools evolved over the years,they would not only transformthe way we cut interior trim,but they'd also become indis-pensable for exterior finish workas well as for siding and decking.
The best chopsaw for the jobOn most job sites, a power miter saw is sim-ply called a chopsaw. If you haven't shoppedfor one recently, the number of sizes andstyles—from standard single-pivot chopsawsthrough dual compound-miter saws—can bemindboggling (sidebar facing page).
On the face of it, a dual compound saw,which offers the widest range of angle-
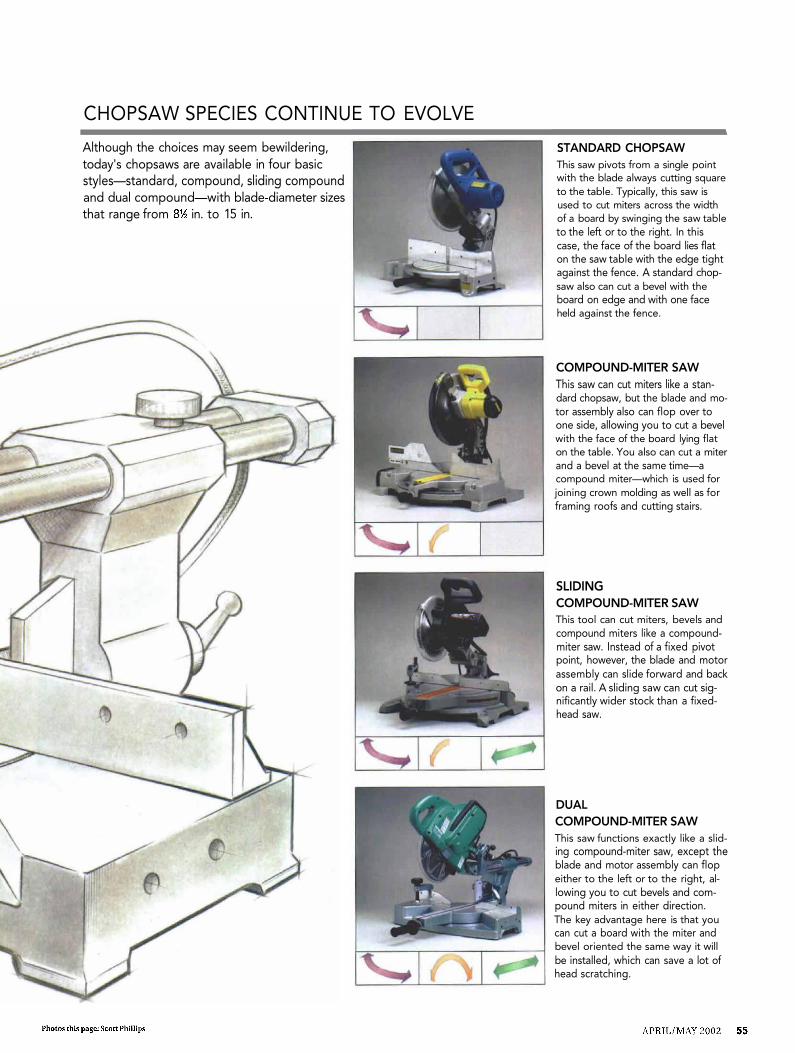
CHOPSAW SPECIES CONTINUE TO EVOLVE
Although the choices may seem bewildering,today's chopsaws are available in four basicstyles—standard, compound, sliding compoundand dual compound—with blade-diameter sizesthat range from in. to 15 in.
STANDARD CHOPSAWThis saw pivots from a single pointwith the blade always cutting squareto the table. Typically, this saw isused to cut miters across the widthof a board by swinging the saw tableto the left or to the right. In thiscase, the face of the board lies flaton the saw table with the edge tightagainst the fence. A standard chop-saw also can cut a bevel with theboard on edge and with one faceheld against the fence.
COMPOUND-MITER SAWThis saw can cut miters like a stan-dard chopsaw, but the blade and mo-tor assembly also can flop over toone side, allowing you to cut a bevelwith the face of the board lying flaton the table. You also can cut a miterand a bevel at the same time—acompound miter—which is used forjoining crown molding as well as forframing roofs and cutting stairs.
SLIDINGCOMPOUND-MITER SAWThis tool can cut miters, bevels andcompound miters like a compound-miter saw. Instead of a fixed pivotpoint, however, the blade and motorassembly can slide forward and backon a rail. A sliding saw can cut sig-nificantly wider stock than a fixed-head saw.
DUALCOMPOUND-MITER SAWThis saw functions exactly like a slid-ing compound-miter saw, except theblade and motor assembly can flopeither to the left or to the right, al-lowing you to cut bevels and com-pound miters in either direction.The key advantage here is that youcan cut a board with the miter andbevel oriented the same way it willbe installed, which can save a lot ofhead scratching.
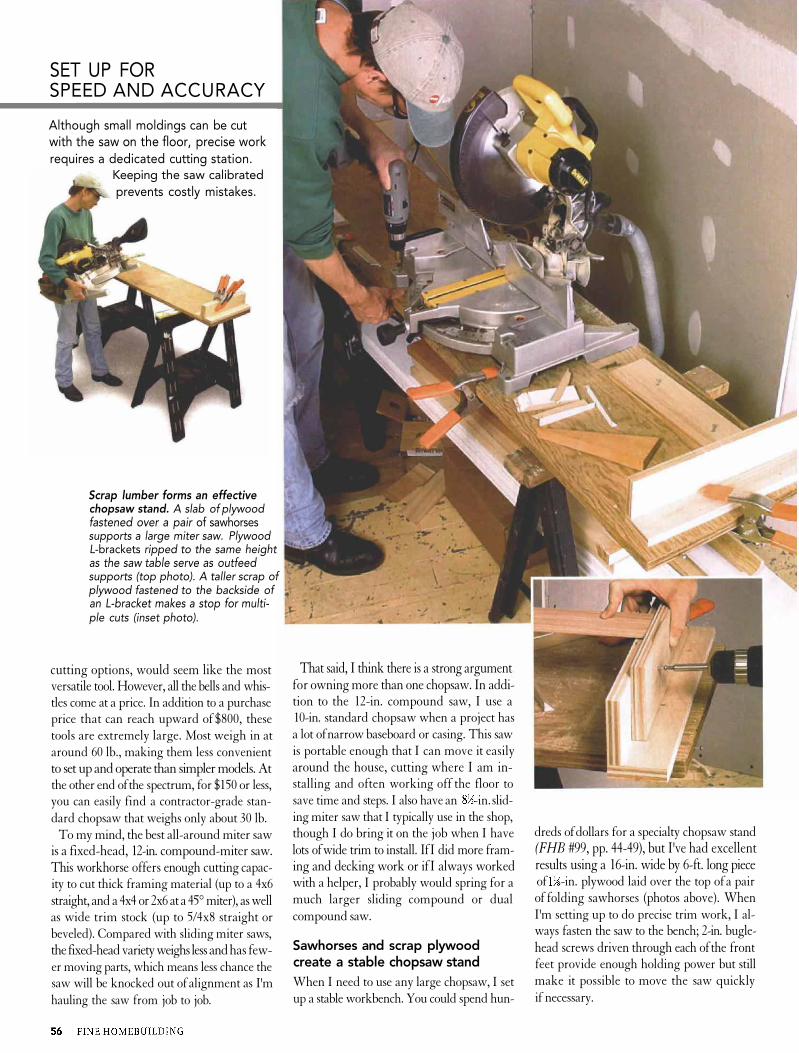
SET UP FORSPEED AND ACCURACY
Although small moldings can be cutwith the saw on the floor, precise workrequires a dedicated cutting station.
Keeping the saw calibratedprevents costly mistakes.
Scrap lumber forms an effectivechopsaw stand. A slab of plywoodfastened over a pair of sawhorsessupports a large miter saw. PlywoodL-brackets ripped to the same heightas the saw table serve as outfeedsupports (top photo). A taller scrap ofplywood fastened to the backside ofan L-bracket makes a stop for multi-ple cuts (inset photo).
cutting options, would seem like the mostversatile tool. However, all the bells and whis-tles come at a price. In addition to a purchaseprice that can reach upward of $800, thesetools are extremely large. Most weigh in ataround 60 lb., making them less convenientto set up and operate than simpler models. Atthe other end of the spectrum, for $150 or less,you can easily find a contractor-grade stan-dard chopsaw that weighs only about 30 lb.
To my mind, the best all-around miter sawis a fixed-head, 12-in. compound-miter saw.This workhorse offers enough cutting capac-ity to cut thick framing material (up to a 4x6straight, and a 4x4 or 2x6 at a 45° miter), as wellas wide trim stock (up to 5/4x8 straight orbeveled). Compared with sliding miter saws,the fixed-head variety weighs less and has few-er moving parts, which means less chance thesaw will be knocked out of alignment as I'mhauling the saw from job to job.
That said, I think there is a strong argumentfor owning more than one chopsaw. In addi-tion to the 12-in. compound saw, I use a10-in. standard chopsaw when a project hasa lot of narrow baseboard or casing. This sawis portable enough that I can move it easilyaround the house, cutting where I am in-stalling and often working off the floor tosave time and steps. I also have an -in. slid-ing miter saw that I typically use in the shop,though I do bring it on the job when I havelots of wide trim to install. If I did more fram-ing and decking work or if I always workedwith a helper, I probably would spring for amuch larger sliding compound or dualcompound saw.
Sawhorses and scrap plywoodcreate a stable chopsaw standWhen I need to use any large chopsaw, I setup a stable workbench. You could spend hun-
dreds of dollars for a specialty chopsaw stand(FHB #99, pp. 44-49), but I've had excellentresults using a 16-in. wide by 6-ft. long pieceof -in. plywood laid over the top of a pairof folding sawhorses (photos above). WhenI'm setting up to do precise trim work, I al-ways fasten the saw to the bench; 2-in. bugle-head screws driven through each of the frontfeet provide enough holding power but stillmake it possible to move the saw quicklyif necessary.
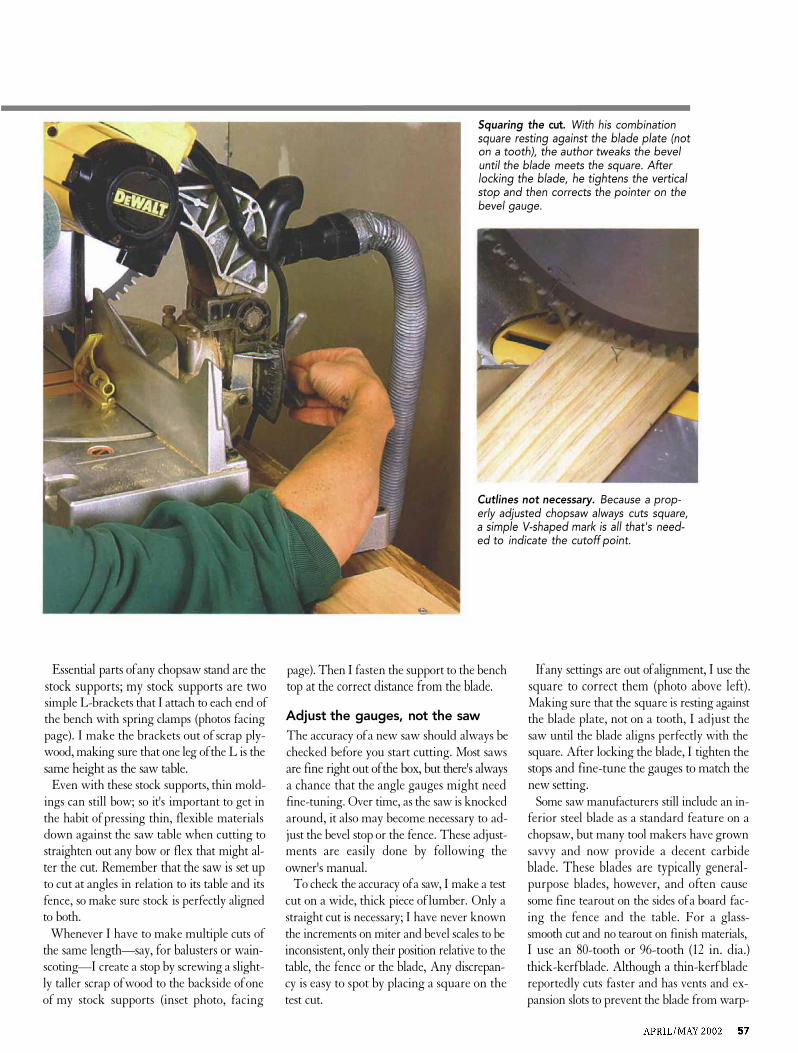
Squaring the cut. With his combinationsquare resting against the blade plate (noton a tooth), the author tweaks the beveluntil the blade meets the square. Afterlocking the blade, he tightens the verticalstop and then corrects the pointer on thebevel gauge.
Cutlines not necessary. Because a prop-erly adjusted chopsaw always cuts square,a simple V-shaped mark is all that's need-ed to indicate the cutoff point.
Essential parts of any chopsaw stand are thestock supports; my stock supports are twosimple L-brackets that I attach to each end ofthe bench with spring clamps (photos facingpage). I make the brackets out of scrap ply-wood, making sure that one leg of the L is thesame height as the saw table.
Even with these stock supports, thin mold-ings can still bow; so it's important to get inthe habit of pressing thin, flexible materialsdown against the saw table when cutting tostraighten out any bow or flex that might al-ter the cut. Remember that the saw is set upto cut at angles in relation to its table and itsfence, so make sure stock is perfectly alignedto both.
Whenever I have to make multiple cuts ofthe same length—say, for balusters or wain-scoting—I create a stop by screwing a slight-ly taller scrap of wood to the backside of oneof my stock supports (inset photo, facing
page). Then I fasten the support to the benchtop at the correct distance from the blade.
Adjust the gauges, not the sawThe accuracy of a new saw should always bechecked before you start cutting. Most sawsare fine right out of the box, but there's alwaysa chance that the angle gauges might needfine-tuning. Over time, as the saw is knockedaround, it also may become necessary to ad-just the bevel stop or the fence. These adjust-ments are easily done by following theowner's manual.
To check the accuracy of a saw, I make a testcut on a wide, thick piece of lumber. Only astraight cut is necessary; I have never knownthe increments on miter and bevel scales to beinconsistent, only their position relative to thetable, the fence or the blade, Any discrepan-cy is easy to spot by placing a square on thetest cut.
If any settings are out of alignment, I use thesquare to correct them (photo above left).Making sure that the square is resting againstthe blade plate, not on a tooth, I adjust thesaw until the blade aligns perfectly with thesquare. After locking the blade, I tighten thestops and fine-tune the gauges to match thenew setting.
Some saw manufacturers still include an in-ferior steel blade as a standard feature on achopsaw, but many tool makers have grownsavvy and now provide a decent carbideblade. These blades are typically general-purpose blades, however, and often causesome fine tearout on the sides of a board fac-ing the fence and the table. For a glass-smooth cut and no tearout on finish materials,I use an 80-tooth or 96-tooth (12 in. dia.)thick-kerf blade. Although a thin-kerf bladereportedly cuts faster and has vents and ex-pansion slots to prevent the blade from warp-
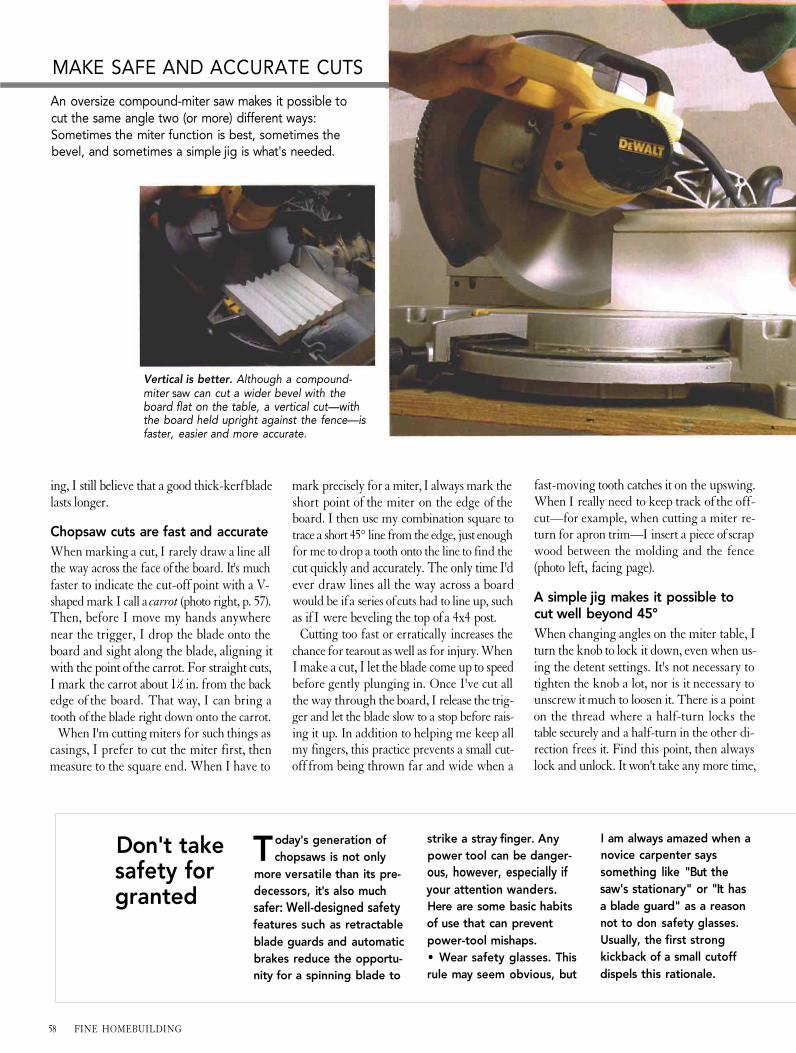
MAKE SAFE AND ACCURATE CUTS
An oversize compound-miter saw makes it possible tocut the same angle two (or more) different ways:Sometimes the miter function is best, sometimes thebevel, and sometimes a simple jig is what's needed.
Vertical is better. Although a compound-miter saw can cut a wider bevel with theboard flat on the table, a vertical cut—withthe board held upright against the fence—isfaster, easier and more accurate.
ing, I still believe that a good thick-kerf bladelasts longer.
Chopsaw cuts are fast and accurateWhen marking a cut, I rarely draw a line allthe way across the face of the board. It's muchfaster to indicate the cut-off point with a V-shaped mark I call a carrot (photo right, p. 57).Then, before I move my hands anywherenear the trigger, I drop the blade onto theboard and sight along the blade, aligning itwith the point of the carrot. For straight cuts,I mark the carrot about in. from the backedge of the board. That way, I can bring atooth of the blade right down onto the carrot.
When I'm cutting miters for such things ascasings, I prefer to cut the miter first, thenmeasure to the square end. When I have to
mark precisely for a miter, I always mark theshort point of the miter on the edge of theboard. I then use my combination square totrace a short 45° line from the edge, just enoughfor me to drop a tooth onto the line to find thecut quickly and accurately. The only time I'dever draw lines all the way across a boardwould be if a series of cuts had to line up, suchas if I were beveling the top of a 4x4 post.
Cutting too fast or erratically increases thechance for tearout as well as for injury. WhenI make a cut, I let the blade come up to speedbefore gently plunging in. Once I've cut allthe way through the board, I release the trig-ger and let the blade slow to a stop before rais-ing it up. In addition to helping me keep allmy fingers, this practice prevents a small cut-off from being thrown far and wide when a
fast-moving tooth catches it on the upswing.When I really need to keep track of the off-cut—for example, when cutting a miter re-turn for apron trim—I insert a piece of scrapwood between the molding and the fence(photo left, facing page).
A simple jig makes it possible tocut well beyond 45°When changing angles on the miter table, Iturn the knob to lock it down, even when us-ing the detent settings. It's not necessary totighten the knob a lot, nor is it necessary tounscrew it much to loosen it. There is a pointon the thread where a half-turn locks thetable securely and a half-turn in the other di-rection frees it. Find this point, then alwayslock and unlock. It won't take any more time,
Don't takesafety forgranted
Today's generation ofchopsaws is not only
more versatile than its pre-decessors, it's also muchsafer: Well-designed safetyfeatures such as retractableblade guards and automaticbrakes reduce the opportu-nity for a spinning blade to
strike a stray finger. Anypower tool can be danger-ous, however, especially ifyour attention wanders.Here are some basic habitsof use that can preventpower-tool mishaps.• Wear safety glasses. Thisrule may seem obvious, but
I am always amazed when anovice carpenter sayssomething like "But thesaw's stationary" or "It hasa blade guard" as a reasonnot to don safety glasses.Usually, the first strongkickback of a small cutoffdispels this rationale.
58 FINE HOMEBUILDING
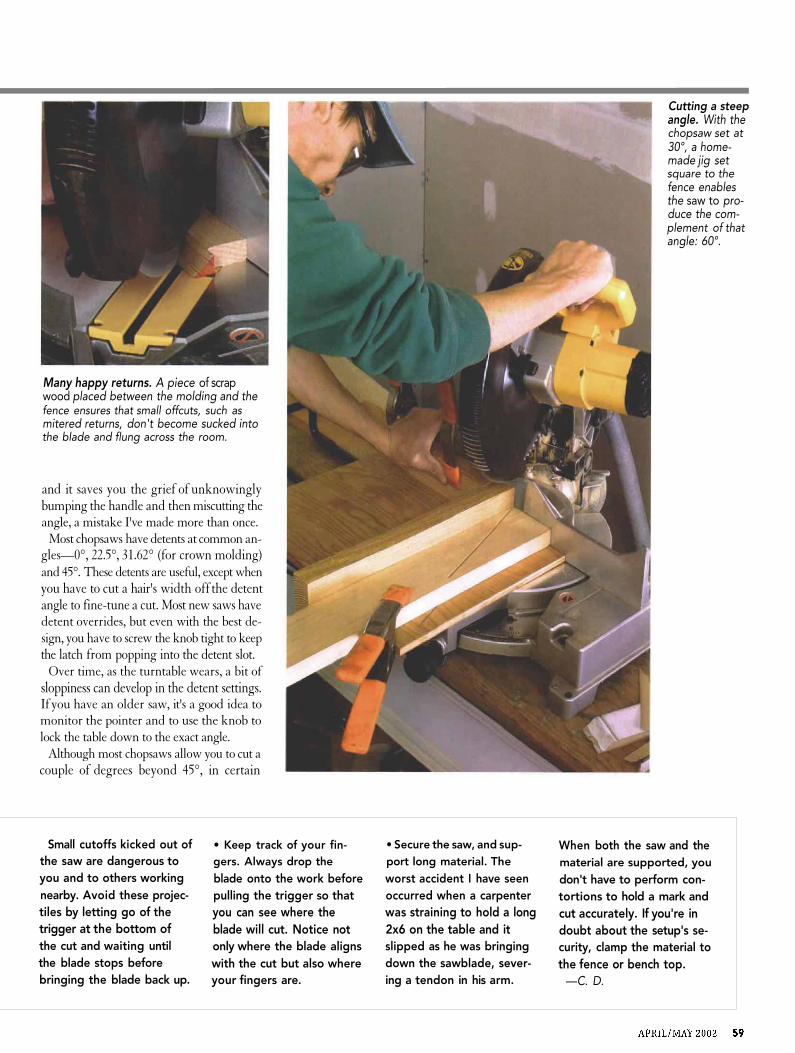
Many happy returns. A piece of scrapwood placed between the molding and thefence ensures that small offcuts, such asmitered returns, don't become sucked intothe blade and flung across the room.
and it saves you the grief of unknowinglybumping the handle and then miscutting theangle, a mistake I've made more than once.
Most chopsaws have detents at common an-gles—0°, 22.5°, 31.62° (for crown molding)and 45°. These detents are useful, except whenyou have to cut a hair's width off the detentangle to fine-tune a cut. Most new saws havedetent overrides, but even with the best de-sign, you have to screw the knob tight to keepthe latch from popping into the detent slot.
Over time, as the turntable wears, a bit ofsloppiness can develop in the detent settings.If you have an older saw, it's a good idea tomonitor the pointer and to use the knob tolock the table down to the exact angle.
Although most chopsaws allow you to cut acouple of degrees beyond 45°, in certain
Cutting a steepangle. With thechopsaw set at30°, a home-made jig setsquare to thefence enablesthe saw to pro-duce the com-plement of thatangle: 60°.
Small cutoffs kicked out ofthe saw are dangerous toyou and to others workingnearby. Avoid these projec-tiles by letting go of thetrigger at the bottom ofthe cut and waiting untilthe blade stops beforebringing the blade back up.
• Keep track of your fin-gers. Always drop theblade onto the work beforepulling the trigger so thatyou can see where theblade will cut. Notice notonly where the blade alignswith the cut but also whereyour fingers are.
• Secure the saw, and sup-port long material. Theworst accident I have seenoccurred when a carpenterwas straining to hold a long2x6 on the table and itslipped as he was bringingdown the sawblade, sever-ing a tendon in his arm.
When both the saw and thematerial are supported, youdon't have to perform con-tortions to hold a mark andcut accurately. If you're indoubt about the setup's se-curity, clamp the material tothe fence or bench top.
—C. D.
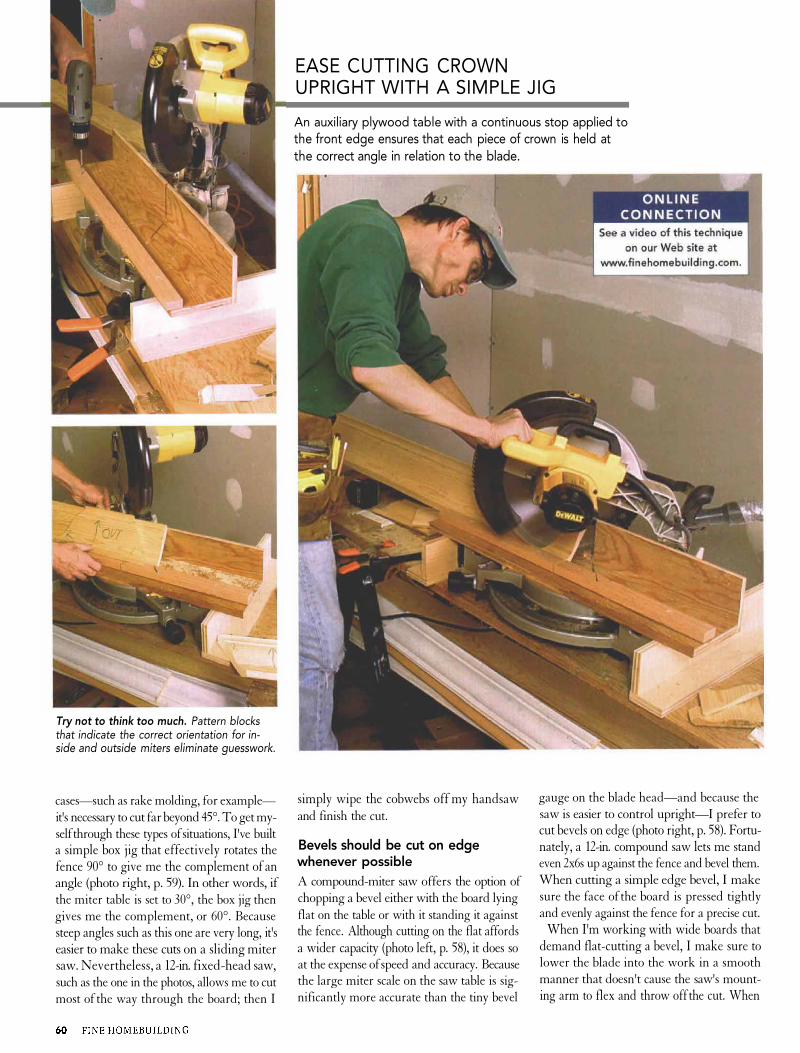
EASE CUTTING CROWNUPRIGHT WITH A SIMPLE JIG
An auxiliary plywood table with a continuous stop applied tothe front edge ensures that each piece of crown is held atthe correct angle in relation to the blade.
Try not to think too much. Pattern blocksthat indicate the correct orientation for in-side and outside miters eliminate guesswork.
cases—such as rake molding, for example—it's necessary to cut far beyond 45°. To get my-self through these types of situations, I've builta simple box jig that effectively rotates thefence 90° to give me the complement of anangle (photo right, p. 59). In other words, ifthe miter table is set to 30°, the box jig thengives me the complement, or 60°. Becausesteep angles such as this one are very long, it'seasier to make these cuts on a sliding mitersaw. Nevertheless, a 12-in. fixed-head saw,such as the one in the photos, allows me to cutmost of the way through the board; then I
simply wipe the cobwebs off my handsawand finish the cut.
Bevels should be cut on edgewhenever possibleA compound-miter saw offers the option ofchopping a bevel either with the board lyingflat on the table or with it standing it againstthe fence. Although cutting on the flat affordsa wider capacity (photo left, p. 58), it does soat the expense of speed and accuracy. Becausethe large miter scale on the saw table is sig-nificantly more accurate than the tiny bevel
gauge on the blade head—and because thesaw is easier to control upright—I prefer tocut bevels on edge (photo right, p. 58). Fortu-nately, a 12-in. compound saw lets me standeven 2x6s up against the fence and bevel them.When cutting a simple edge bevel, I makesure the face of the board is pressed tightlyand evenly against the fence for a precise cut.
When I'm working with wide boards thatdemand flat-cutting a bevel, I make sure tolower the blade into the work in a smoothmanner that doesn't cause the saw's mount-ing arm to flex and throw off the cut. When
I have to flat-cut a bevel that must be precise,I don't rely on the bevel gauge. To ensure ac-curacy, I set up the proper miter angle usingthe saw's miter scale; then I use a sliding bev-el square to establish the proper bevel setting.
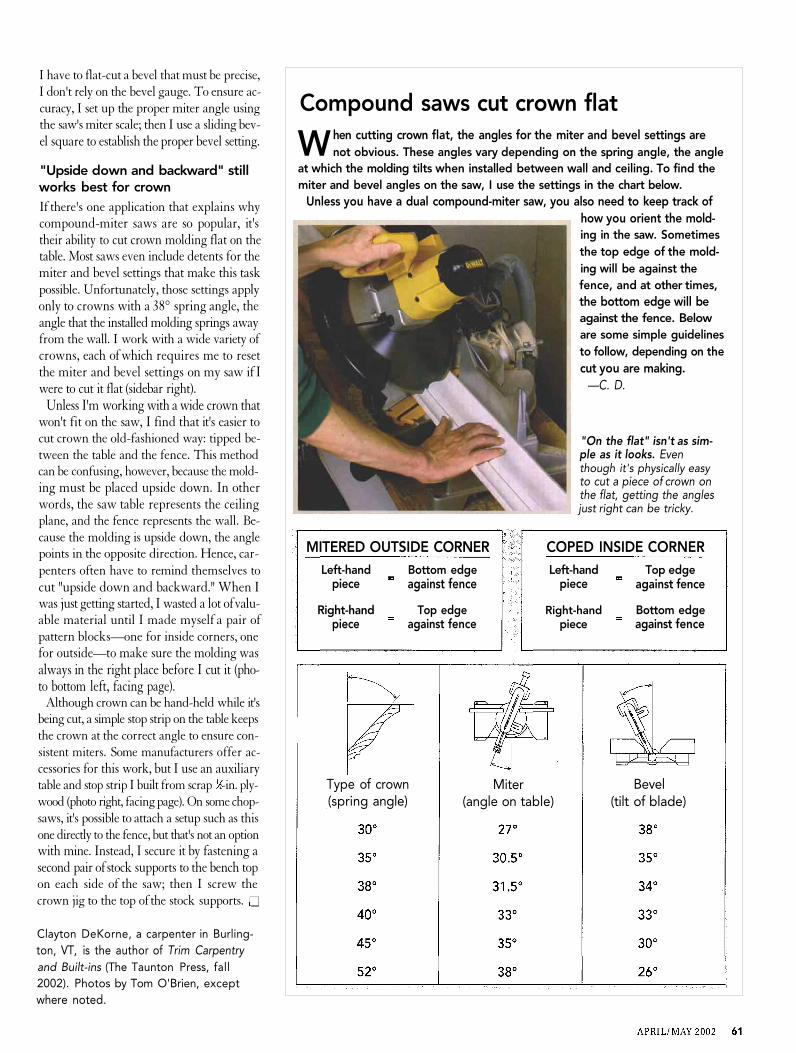
"Upside down and backward" stillworks best for crownIf there's one application that explains whycompound-miter saws are so popular, it'stheir ability to cut crown molding flat on thetable. Most saws even include detents for themiter and bevel settings that make this taskpossible. Unfortunately, those settings applyonly to crowns with a 38° spring angle, theangle that the installed molding springs awayfrom the wall. I work with a wide variety ofcrowns, each of which requires me to resetthe miter and bevel settings on my saw if Iwere to cut it flat (sidebar right).
Unless I'm working with a wide crown thatwon't fit on the saw, I find that it's easier tocut crown the old-fashioned way: tipped be-tween the table and the fence. This methodcan be confusing, however, because the mold-ing must be placed upside down. In otherwords, the saw table represents the ceilingplane, and the fence represents the wall. Be-cause the molding is upside down, the anglepoints in the opposite direction. Hence, car-penters often have to remind themselves tocut "upside down and backward." When Iwas just getting started, I wasted a lot of valu-able material until I made myself a pair ofpattern blocks—one for inside corners, onefor outside—to make sure the molding wasalways in the right place before I cut it (pho-to bottom left, facing page).
Although crown can be hand-held while it'sbeing cut, a simple stop strip on the table keepsthe crown at the correct angle to ensure con-sistent miters. Some manufacturers offer ac-cessories for this work, but I use an auxiliarytable and stop strip I built from scrap -in. ply-wood (photo right, facing page). On some chop-saws, it's possible to attach a setup such as thisone directly to the fence, but that's not an optionwith mine. Instead, I secure it by fastening asecond pair of stock supports to the bench topon each side of the saw; then I screw thecrown jig to the top of the stock supports.
Compound saws cut crown flat
W hen cutting crown flat, the angles for the miter and bevel settings arenot obvious. These angles vary depending on the spring angle, the angle
at which the molding tilts when installed between wall and ceiling. To find themiter and bevel angles on the saw, I use the settings in the chart below.
Unless you have a dual compound-miter saw, you also need to keep track ofhow you orient the mold-ing in the saw. Sometimesthe top edge of the mold-ing will be against thefence, and at other times,the bottom edge will beagainst the fence. Beloware some simple guidelinesto follow, depending on thecut you are making.
—C. D.
"On the flat" isn't as sim-ple as it looks. Eventhough it's physically easyto cut a piece of crown onthe flat, getting the anglesjust right can be tricky.
Clayton DeKorne, a carpenter in Burling-ton, VT, is the author of Trim Carpentryand Built-ins (The Taunton Press, fall2002). Photos by Tom O'Brien, exceptwhere noted.
MITERED OUTSIDE CORNERLeft-hand
piece
Right-handpiece
Bottom edgeagainst fence
Top edgeagainst fence
COPED INSIDE CORNERLeft-hand
piece
Right-handpiece
Top edgeagainst fence
Bottom edgeagainst fence
Type of crown(spring angle)
Miter(angle on table)
Bevel(tilt of blade)