choose and book guide - inps.co.uk and book user guide.pdf · 5 choose and book introduction to...
TRANSCRIPT
Copyright © INPS Ltd 2013
The Bread Factory, 1A Broughton Street, Battersea, London, SW8 3QJ T: +44 (0) 207 501700 F:+44 (0) 207 5017100 W: www.inps.co.uk
Vision 3
Choose and Book User Guide
England

Copyright Notice
© 2013 INPS
All Rights Reserved.
No part of this document may be photocopied, reproduced, stored in a retrieval system or
transmitted in any form or by any means, whether electronic, mechanical, or otherwise,
without the prior written permission of INPS.
No warranty of accuracy is given concerning the contents of the information contained in
this publication. To the extent permitted by law, no liability (including liability to any person
by reason of negligence) will be accepted by INPS, its subsidiaries or employees for any
direct or indirect loss or damage caused by omissions from or inaccuracies in this
document.
INPS reserves the right to change without notice the contents of this publication and the
software to which it relates.
Product and company names herein may be the trademarks of their respective owners.
INPS Ltd.
The Bread Factory
1a Broughton Street
London
SW8 3QJ
Website: www.inps.co.uk
iii
Contents
CHOOSE AND BOOK 5
Introduction to Choose and Book 5 Setting up Choose & Book 8 Access Choose and Book via Vision using a smartcard 8 Failure to connect 9
Add a referral and request a booking 10
Referral Message Digest 14 Referral Message Digest replaces Message problem 14 Switching on Referral Message Digest 14 Auto Selection Options 16
The Auto Selection Options Screen 17 The Referral Message Digest screen 18
Status/Control Area 18 Accompanying Text 19 Accompanying Data 19 Accompanying Documents, Letters and Attachments 20 Send 20 Save 21 Cancel/Close 21 Closing the consultation and sending the message 21 Journal entry once sent 21 Subsequent Actions on RMDs 22 Editing and RMD 23 Previously sent versions 24 Attachments 25 Removal of unused unique booking reference numbers (UBRNs) 26 Update Your Referral Letter 27
Referral Message Problem 28 Editing the Referral Message Problem 29 Send a Referral Letter/Message Later 32
Troubleshooting online booking 33 Online Booking checkbox is disabled on Referral Add 33 Patient does not consent to on-line booking 33 Try and exit from Referral form without making eBooking 33
Edit a referral booking 34 Returning to the Choose and Book referral 35
Send an electronic referral letter on behalf of your GP by admin staff 35
Attaching Vision referrals in web-based Choose and Book 37

iv
Access Choose and Book Home Page and select patient 38
Checking the referral message in Mail Manager 40
INDEX 45

5
Choose and Book
Introduction to Choose and Book Choose and Book is a national service that will, for the first time, combine electronic
booking (eBooking) and a choice of time, date and place for first outpatient
appointment. By the end of 2005 it should be available to all patients in England
requiring elective care (over 10 million each year). See also:
http://www.chooseandbook.nhs.uk/ (http://www.chooseandbook.nhs.uk/)
Choose and Book enables a GP to refer or book a patient to a service commissioned by
their primary care trust (PCT), and to send an electronic referral letter with that
referral or booking
User guides and training material can be found at:
http://www.chooseandbook.nhs.uk/staff/training/index_html#endusermanuals
(http://www.chooseandbook.nhs.uk/staff/training/index_html%23endusermanuals)

6
GP functions in Choose and Book
The functions that a GP can do in Choose and Book when completing a referral and
booking are:
Booking a hospital appointment
With Choose and Book, there is the facility to book a hospital outpatient appointment
electronically following your decision to refer. You make the referral in Vision as
normal and you are then offered the opportunity to book an appointment. If you
answer yes, the Choose and Book system is automatically launched, and the patient
details are automatically verified against the Personal Demographic Service (PDS).
A unique booking reference number (UBRN) is allocated to this referral.
You can now choose from four or five local hospitals and enter the specialty. This
should give a list of available appointments, from which you can book directly
following which an appointment confirmation letter can be printed. The clinical
referral details are transferred automatically in the form of pre-defined XML message
which can be updated later if required.

7
Booking done by administrative staff
This process does not have to be done by the doctor, though normally he or she would
instigate the original referral. It can be done by administrative staff or, if the GP has
exited Referral-Add without booking an appointment, once the UBRN has been
allocated, the patient will in future be able to make the appointment themselves at
their convenience via the internet. If the patient is unable to make a decision there
and then, perhaps because they need to check with family, friends and at work, then
once they have been given a unique booking reference number (UBRN), if preferred,
they will also be able to ring the Booking Management Service and book an
appointment through them.
The functions that a Practice Administrator can do in Choose and Book when
completing a referral and booking are:
Conditions for making an electronic booking
The conditions that must be met before making an electronic booking are:
The GP must be a "referring clinician" with authority to refer. This implies the
business function of "Initiate Referral" (see Example - GP who also makes
Choose and Book Referrals). If the GP makes a referral but prefers that the
receptionist completes the eBooking at the reception desk, then that
receptionist must be authorised to login and have a business function of "Proxy initial referral" and "Perform clinical booking management service."
The referring clinician or receptionist must use Single Sign-on with a smart
card to the national services. If accessed from an unsecured workstation,
then all Choose and Book functionality is disabled. If a GP makes a referral
from an unsecured workstation, then the receptionist/GP, if signed on with the
smart card, can edit the referral later and make an eBooking.
The patient must not have expressed dissent to eBooking - this is checked via
a flag in PDS (Personal Demographic Service), and it is assumed that the
default status on eBooking is consent. If dissent is expressed, then the

8
eBooking option is still available (ie is not greyed out) but an attempt to make a booking will result in an error explaining the reason.
PDS details must be up-to-date - At the point of selection of an electronic
referral, the user is reminded of the importance of ensuring that demographic details are up-to-date.
Setting up Choose & Book
When a GP is given the role of General Medical Practitioner within the NHS CfH, this
allows him to carry out a number of business functions, which translated means
access to specific functions within Vision. Initiating a Choose & Book referral is NOT
one of the basic GP functions and must therefore be added to a GP's role profile as an
additional business function (see GP - Permitted areas and functions within Vision).
This is done by the practice's "sponsor" using the RA01 form (the initial request to the
Registration Authority) or the RA02 form (update request to the RA).
The Choose and Book functions are:
B1101 Initiate patient referral (Choose & Book)
B1102 'Proxy' Initiate patient referral (Choose & Book)
B1103 Manage Appointment Bookings (Choose & Book)
Similarly, a role of receptionist will need two additional business functions:
B1102 'Proxy' Initiate patient referral (Choose & Book) - For patients
associated with the organisation of the user: manage appointment requests
and referral letters, and request advice and guidance on behalf of a clinical
user within the organisation, manage patient demographics and manage bookings.
B1103 Manage Appointment Bookings (Choose & Book) - For patients
associated with the organisation of the user: Manage patient demographics and manage bookings.
Access Choose and Book via Vision using a smartcard
If you want to access Choose and Book without opening a patient
consultation, see "Access Choose and Book Home Page and select
patient (page 38)", which explains how to access using Internet
Explorer.
To access Choose and Book via Vision, you must first use your Smartcard to connect
you to the Spine of the NHS Connecting for Health programme.
The Smartcard looks much like a credit card, with a picture of the user, together with
their Unique Identification number (UID) and a gold chip where all the information is
held.
To access Choose and Book, you should already be logged on to your computer, so
you see your desktop on your screen
1. Put your smartcard into the smartcard reader
2. Type in your PIN number (also called Pass Code) and click on Yes I accept
and wish to proceed, or press Enter on the keyboard.
3. You will now see a box in the bottom right corner of the screen with a progress
bar, detailing the remaining time before the card will be authenticated. You
may (or may not) now see a security alert.

9
4. Click Yes to proceed if you see a security alert.
5. Answer Yes to Do you want to close this window?
6. You are now logged on to the spine
7. If you have a problem logging on, see Failure to connect (page 9).
8. Double click on the Vision icon.
9. If you have more than one role set up for you, you will now see the Select Role
box for Vision. Select your Role from the pick list of roles and click in the
Assigned Profiles box.
10. Click OK.
11. The Vision home page will be displayed.
Failure to connect
If your login to the Spine fails, an error message will display and you will be offered
the choices to Retry the logon, Cancel the logon or to Work Offline in Vision.
1. Click Retry.
2. If the logon still fails, click Details>>> to check that there is not a problem with
the Smartcard reader connection.
3. If you still have problems logging on, contact your usual Help Desk.

10
Add a referral and request a booking
Note - This is a long section. You may want to print it out. (If viewing
in on-screen help, click on the Print icon on the toolbar).
1. You need to sign on to Vision using the single sign-on with a smart card. If
you have not used your smartcard when logging into Vision, the on-line
booking functions will not be enabled.
2. Select the patient and start a consultation.
3. Start a referral in one of the normal ways:
Add - Referral
Select a referral from Default Referrals
Click on
Drag a medical history entry on to the bow-tie icon on the floating
toolbar.
4. On Referral Add, make sure you make these three entries of on-line booking,
Read Term for Referral Reason and TP Speciality:
Tick the Online Booking box (only enabled if there is a valid Single Sign On). This enables the E-booking button.
The Read Term for Referral Reason is a required field but it can be
added either before or after the Choose and Book process. The Read
term should be as specific as possible as it will form the title of the
problem which becomes the referral message. Generic terms such as "Referral for further care" should be avoided.
Select the Urgency - Routine, Stat (Immediately), Urgent, 2 week Wait.
This should be selected before pressing the eBooking button. If left at <None>, you will be reminded "An Urgency value must be selected".
5. Complete the Referral Add as you would normally do.
All other fields on Referral Add are optional in terms of Choose and Book
but you would normally enter them. Many of the items detailed will be
selected during the Choose and Book process anyway, so it makes sense
to complete them after that process. Choices made in Choose and Book
are not fed back to fill the Vision fields. The only field filled automatically is the UBRN (unique booking reference number).

11
The Provider Unit will be left blank as you select this from the Choose and Book screen.
The TP Specialty is optional. Note that the TP Specialty is not carried
forward into Choose and Book.
Click on Notes if you want to include some free text to accompany the
referral; or to make an Advice and Guidance Request, type in Advice Only.
6. Once a tick is put in the Online Booking box, this leads to a prompt to check
the patient details: Before invoking the online booking process, it is essential to
ensure that patient demographics are correct. If you think these details may
be incorrect, press Cancel and check them.
12
Note - We strongly advise that the receptionist booking patients in is
signed on with their smart card and makes this check of demographic
details with the patient beforehand, so that it does not hold up a GP in
consultation.
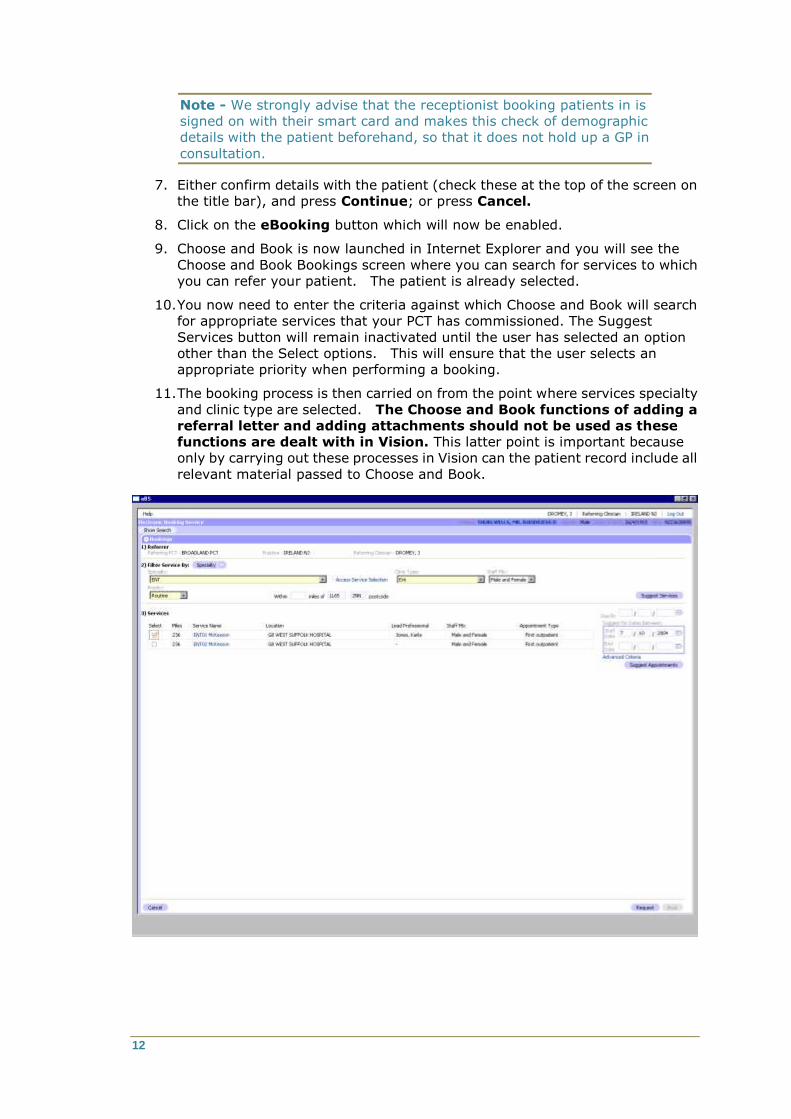
7. Either confirm details with the patient (check these at the top of the screen on
the title bar), and press Continue; or press Cancel.
8. Click on the eBooking button which will now be enabled.
9. Choose and Book is now launched in Internet Explorer and you will see the
Choose and Book Bookings screen where you can search for services to which
you can refer your patient. The patient is already selected.
10. You now need to enter the criteria against which Choose and Book will search
for appropriate services that your PCT has commissioned. The Suggest
Services button will remain inactivated until the user has selected an option
other than the Select options. This will ensure that the user selects an
appropriate priority when performing a booking.
11. The booking process is then carried on from the point where services specialty
and clinic type are selected. The Choose and Book functions of adding a
referral letter and adding attachments should not be used as these
functions are dealt with in Vision. This latter point is important because
only by carrying out these processes in Vision can the patient record include all
relevant material passed to Choose and Book.

13
Note - immediately after opening Choose and Book, all that is achieved
by this is the provision of a UBRN - a unique booking reference number.
It is possible for the GP to close the Choose and Book screen at this
point - the UBRN fills in automatically in Referral Add, and the GP clicks
OK, and chooses Send Later. An admin member of staff then returns to
edit the referral later to complete the Choose and Book screen, perhaps
with the patient at reception.
12. You can search for services by different means. If you continue with the
booking process, you must select at least the yellow mandatory fields of Clinic
Type, Specialty and Priority (eg Routine, Urgent). This is a strongly
recommended option as it keeps all the clinical judgments in the hands of the
clinician and leaves the remaining work to admin staff. This option would
include the clinician initiating an Appointment Request and the patient a
print-out of the details to enable them to carry on the booking process later
with other staff.
You should now refer to the Choose and Book training guides which give the
latest features and functions for a Choose and Book referral.
http://www.chooseandbook.nhs.uk/staff/training/index_html#endusermanuals
(http://www.chooseandbook.nhs.uk/staff/training/index_html%23endusermanuals)
1. Once you have completed either the Appointment Request or Appointment
Booking, return to the Referrals Add screen and click OK.
2. On accepting a CaB referral, the Referral Message Digest (RMD) will
automatically appear as a tab in the consultation pane. See "Referral
Message Digest (page 14)".
Note - To send a referral letter, you have to have completed an
appointment request, but you do not have to have made a booking of
date and time. See also "Send an electronic referral letter on behalf of
your GP by admin staff (page 35)"

14
Referral Message Digest
Referral Message Digest replaces Message problem
Referral Message Digest (RMD) was introduced in DLM 235. This no longer relies
on the use of problems. It will now be much easier to maintain and update a referral
message for Choose and Book referrals.
The Referral Message Digest screen (page 18) appears in the ‘consultation pane’ of
the Vision 3 framework allowing it to be viewed side by side with other Vision 3 views
and allowing easier drag and drop data.
The structure of the RMD is such that it easily allows you to choose what information
is sent in the referral message, including Free text, Accompanying Data from
Structured data areas, and Accompanying documents (eg referral letter)
You can choose whether or not to pre-populate the structured data area (using right
click within a RMD and selecting Management Options - see "Auto Selection Options
(page 16)"), and adding or removing data from this area is easier.
Switching on Referral Message Digest
You are now able to switch on the RMD functionality yourself. To do this, you must
be logged in as a System Administrator.
1. From the front screen of Vision, click on Options – Setup.
2. Select the System tab.

15
3. Under Other Options, tick Referral Message Digest.
You are now able to configure the data selection options for the Referral Message
Digest for your practice. See Auto Selection Options (page 16).

16
Auto Selection Options
You can decide what data to include automatically in the Referral Message Digest. At
the time of the consultation, you can add or remove data as you wish.
Note that this applies practice wide and not on an individual basis.
Only a user with administrative rights can access Auto Selection Options.
There are three ways to access the Auto Selection Options - the first two do not
require a patient record to be open:
From Consultation - Options - Setup - Management tab, select the Options button under Auto Selection.

17
From List - Default Referrals/Requests, click on the Options tab, then under RMD Automatic Population Options, click on the Options button.
If you have a patient record open displaying the Referral Message Digest
screen, you can right click within the RMD and select Management Options
for Auto Selection Options. Note that any change to Auto Selection via this option during a consultation will not take effect until the consultation is closed.
The Auto Selection Options Screen
On the Auto Selection Options screen, select which data you want to be
automatically included in the Referral Message Digest (or electronic letter as it is
termed on this screen).
The top right pane relates to Choose & Book and the Referral Message Digest.
Link to auto selected items - If this is checked, the RMD screen will be
populated with data selected from the left-hand Auto Selection Criteria list. If
you want to use this option, then tick those criteria you want included in the
left-hand pane, or you can use Select All to check all the options (and then
uncheck those you do not want). Clear Selections removes all ticks. If all items are unchecked, then the RMD will be blank.
Link to items in the referral's consultation - This will populate the RMD
with the current consultation data as well as those selected in Auto Selection Criteria. This can be ticked in addition to Link to auto selected items.

18
Click OK to finish.
The Referral Message Digest screen
Start a Choose & Book Referral in the usual way. Check Online Booking, enter the
Urgency and click the eBooking button.
On accepting a CaB referral, the Referral Message Digest (RMD) will automatically
appear as a tab in the consultation pane. If the consultation pane is not already
visible on this initial view of the Patient Record, then it will be made visible.
You can resize the vertical and horizontal boundaries of the RMD.
The RMD screen has four major areas:Status/Control Area (page 18), Accompanying
(free) Text (page 19), Accompanying Data (page 19) and Attachments (page 25).
Status/Control Area
The Status area appears at the top of the screen and relates back to the Vision
referral record. The referral may have one of the following states:
Referral Pending - This is the initial state after saving the referral and indicates that the referral message is yet to be sent.
19
Referral Sent - The referral message has been sent. Any changes to the
RMD will change the status to Referral Pending indicating that the changes have yet to be sent.
Awaiting Send - This indicates that a request has been made to send the
message but the messaging engine has not yet processed it.
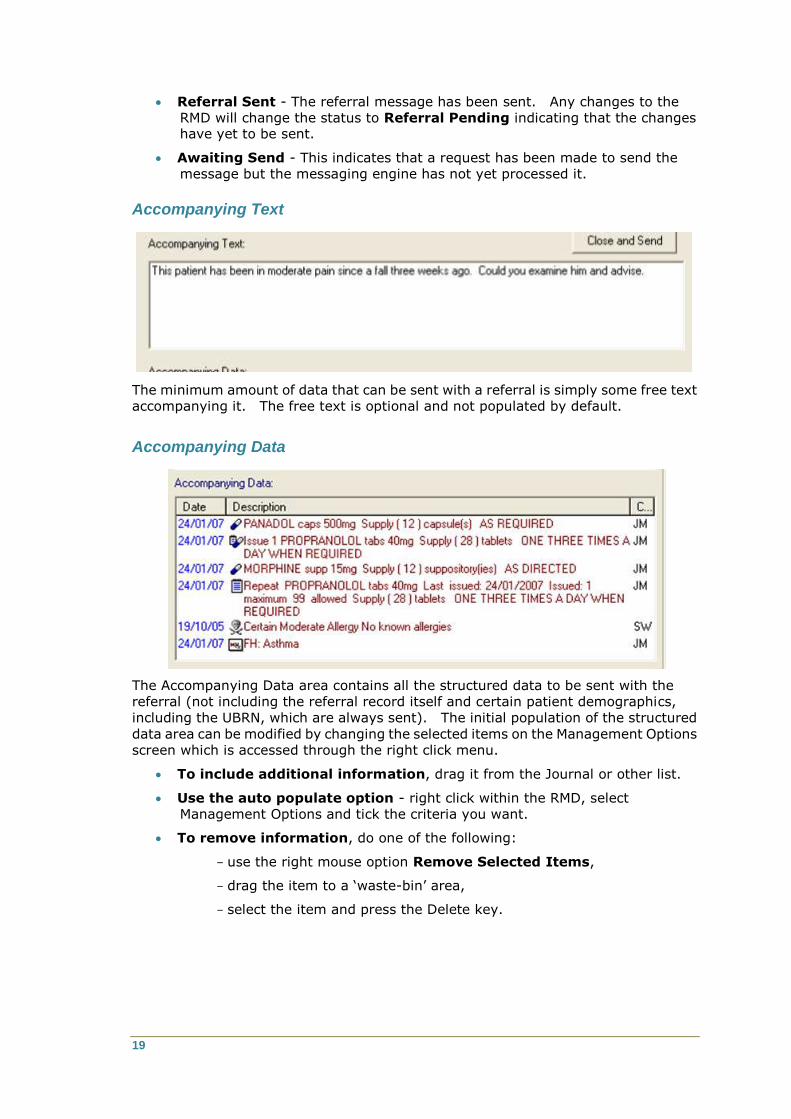
Accompanying Text
The minimum amount of data that can be sent with a referral is simply some free text
accompanying it. The free text is optional and not populated by default.
Accompanying Data
The Accompanying Data area contains all the structured data to be sent with the
referral (not including the referral record itself and certain patient demographics,
including the UBRN, which are always sent). The initial population of the structured
data area can be modified by changing the selected items on the Management Options
screen which is accessed through the right click menu.
To include additional information, drag it from the Journal or other list.
Use the auto populate option - right click within the RMD, select
Management Options and tick the criteria you want.
To remove information, do one of the following:
use the right mouse option Remove Selected Items,
drag the item to a ‘waste-bin’ area,
select the item and press the Delete key.

20
Accompanying Documents, Letters and Attachments
Letters and attachments occupy a separate screen area in order to emphasise that
they are treated separately within CaB but the functionality is much the same as for
any other structured data. Any letters or attachments dropped on the structured
data area will be directed automatically to the Accompanying Documents area and
vice versa.
A maximum of four attachments can be added to an RMD
Each attachment is limited to 745 kilobytes.
Attachments must not total more than 5mB.
If you try to add attachments that exceed these limits, an error message is displayed,
stating which attachments could not be added and why.
See "Attachments (page 25)".
Send
In order to enable the Send button:
You must be online.
The patient must be synchronised or mismatched.
The data must be different from the currently saved data.
You must have rights to edit a C&B referral.
There must be an open consultation.
The Send button is enabled only if the status is Pending.
Pressing Send will set the status to Referral Awaiting Send and close the RMD
dialog.
Note - If you change a 'Sent' message and press Save or Send, this will
set the message back to Referral Pending or Referral Awaiting Send
and activate the Previous button to allow you to view the last message.

21
Save
In order to enable the Save button, the RMD must contain at least one item in any of
the areas: Free text, Accompanying Data, Accompanying Documents. In addition:
The data must be different from the currently saved data.
You must have rights to edit a C&B referral.
There must be an open consultation.
Pressing the Save button will save the data, but not close the dialog. The button will
then become disabled.
An "Electronic Letter" line is created in the Journal with a status of Referral Pending.
Cancel/Close
Pressing the Cancel button will discard any changes from this session, leave the status
unchanged and close the RMD. If there are any unsaved changes then a dialog will be
shown at this point:
"Do you wish to save changes to the RMD?” <Yes> <No><Cancel>
If the data in the list does not differ from the saved selections, then the Cancel button
will be renamed Close.
If this is the only tab in the consultation pane, then closing this will result in the
consultation pane being hidden.
If the consultation is closed without taking either action on the RMD, then it will be
saved in its current state with no further prompts.
Closing the consultation and sending the message
Closing a consultation sends the message if it is at 'Referral Awaiting Send' status.
Reopening the consultation will show the 'Electronic Letter' with a status of 'Sent'.
Journal entry once sent
On the Journal entry, the RMD is called an Electronic Letter. Single click on this to
re-display the RMD in order to edit it.
Note - Both the referral and the electronic letter show the UBRN so it is
easy to relate the two.

22
Subsequent Actions on RMDs
Having closed an RMD, it can be edited in the normal way by right clicking on the
Journal line and selecting Edit. In addition:
All pending RMDs will appear in the Alerts pane under the navigation pane on
the left-hand side
On opening a consultation for a patient with pending RMDs, these will be automatically opened.
Figure 1: A pending referral is shown on the Alerts pane under the navigation pane
23
Editing and RMD
Any changes to an RMD will automatically change the status to Pending (if it is not
already pending) and enable the Send option. It is possible to send multiple RMDs
for a single referral; each one will replace the previous instance on CaB.
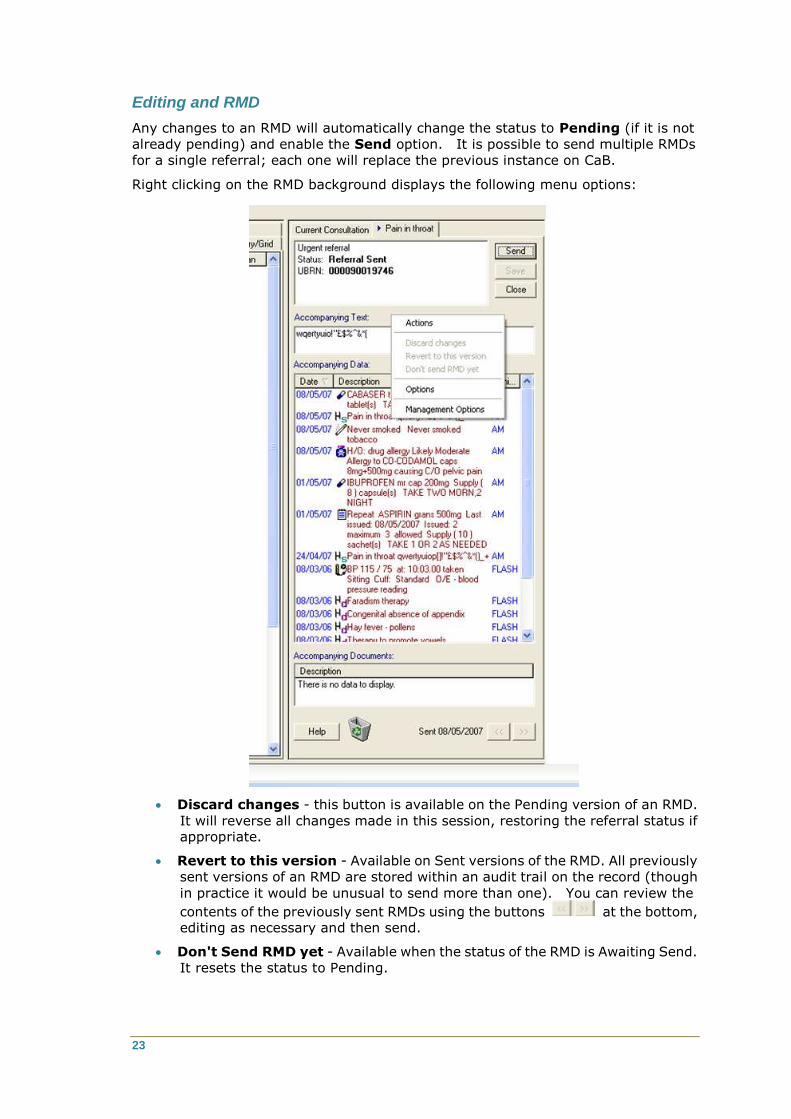
Right clicking on the RMD background displays the following menu options:
Discard changes - this button is available on the Pending version of an RMD.
It will reverse all changes made in this session, restoring the referral status if appropriate.
Revert to this version - Available on Sent versions of the RMD. All previously
sent versions of an RMD are stored within an audit trail on the record (though
in practice it would be unusual to send more than one). You can review the
contents of the previously sent RMDs using the buttons at the bottom, editing as necessary and then send.
Don't Send RMD yet - Available when the status of the RMD is Awaiting Send.
It resets the status to Pending.

24
Previously sent versions
You can review the contents of the previously sent RMDs using the buttons at the
bottom of the screen . These arrows are not enabled until you have one sent
version and have generated a further RMD. The left arrows show the previous sent
version to the current one, and the right arrows the next version.
This allows you to edit the current Pending version and then Send.
You can also display a previously sent version and right click and select Revert to
this version before pressing Send.

25
Attachments
Referral Letters
A conventional referral letter can be added from Referral Edit by clicking on . The
letter can then be moved into the Accompanying Documents section of RMD.
Correspondence
All letters added to Vision as correspondence are stored with extension .cli regardless
of what they were originally (.doc, .hed (HiEdit), .txw (VizEdit)). Now .cli letters that
were originally .hed or .txw are converted to .rtf before sending.
Correspondence
Note that there are certain rules:
Word documents (.doc) are allowed as attachments so you can either send a
referral letter, generated in the usual way on the Referral Add screen, or send
a Word document as an attachment. You can also write free text notes on
Referral Add to make your request or draw attention to something.
Remember that the patient's clinical history is already on the spine so there is no need to repeat it.
You can send files formatted as .gif, .tif, .doc, xml, jpg:
Permitted formats for attachments for Choose and Book
Attachments formats not permitted for Choose and Book
txt mp3 xstt dot
rtf pdf csv tiff
htm xml dat au
gif html giff snd
doc mpe xsl wmy
jpg mpeg bmp wma
tif mpg png
jpeg
You can send up to five attachments per referral booking.
Each attachment must be less than 1 mB.
The total attachments cannot exceed 5 mB.

26
Guidelines sent as attachments
Many people attach guidelines with referral letters.
There is an icon in Guidelines on the toolbar which when pressed lets you save
the currently displayed guideline as a .gif attachment in Attachments - Add.
This is especially useful for practices making Choose and Book referrals to which
attachments are added.
Note that it works best in terms of display for guidelines with the standard black or
blue on white background. Coloured guidelines do not display well.
Note too that if the guideline has a category of Report, then it will go straight to the
printer before you can use this attachment icon. Should you wish to attach a report,
make a copy of the report as a Local Guideline: in Select Guidelines, call up the report,
click on Copy, then at the Plan Header - Copy screen, type in a new Guideline
Mnemonic (10 characters), and make sure the Category is Local Guideline. Add it to
the Local Guideline or Report Index. When you select it from the Local Index, it will
be displayed on screen, giving you a chance to save it as an attachment.
Removal of unused unique booking reference numbers (UBRNs)
In order to stop unused UBRNs lingering on the system (ie where a choose and book
referral has been started but not completed and is no longer required), from now on
when you delete a Choose and Book referral, the associated UBRN is also removed
from the patient’s record and the Spine. This now allows you to have a view of only
valid Choose and Book Referrals for the patient.
You can delete a Choose and Book Referral by either deleting the Referral or RMD
entry from Consultation Manager. The associated UBRN is removed from both entries
when one of either entry is deleted.

27
Update Your Referral Letter
You can update and change the attachments you have sent as referral letters once
you have submitted the original for Directly Bookable Services up until the freeze time
is reached.
Freeze time is the number of days ahead of the appointment after
which no further changes to the referral letter will be accepted. After
that time, the referral is "frozen". In Referral Letter Details in Choose
and Book, you can define the referral letter lead time and freeze time.
Lead time is the number of days ahead of the appointment time that
the referral letter must be submitted by a referrer.
Each time you change the referral letter attachments and resend them, they will
appear in the hospital clinician’s worklist for them to review once again.
If the appointment is booked to an indirectly bookable service, the freeze time is
enforced immediately (ie, once a referral letter has been attached, it cannot be
updated).
1. Open the patient’s record.
2. Find the referral item.
3. Right click on the referral and select Edit… This will re-open the referral
entry.
4. Click OK on the Referral – Add screen.
5. Click on the letter icon to re-open the referral letter and make any
amendments.
6. Save and close.
7. Click OK.
8. You will be given the choice to Resend.
9. Click Yes.
10. If you want, add or remove any items from the referral message digest
11. A message displays warning that the message will Recompile.
12. Click OK.
Note - All previous Problems, Journal entries etc. will be reset back to
original i.e. you will need to repeat tasks from the first send.
28
Referral Message Problem This section is for those who continue to use the former Referral Message Problem
rather than the newer Referral Message Digest. Our advice is that the advantages of
Referral Message Digest outweigh the continued use of the former Referral Message
Problem (see "Referral Message Digest (page 14)").
When you click OK on the Referral Add screen in Vision, you are asked if you wish to
send a referral message on deselecting the patient.
If you click Yes, when you deselect that patient and close the consultation:
1. The appointment booking request is sent.
2. A Referral message problem is created (viewable from the Problems tab),
called MSG:[Read Term for Referral], eg MSG:Asthma.
3. Vision gathers up sets of information from within your patient record of the
previous 3 months
the UBRN (unique booking reference number)
All data entered in the current consultation, including the referral Read Term for Referral Reason
Current medication, defined as all repeat issues and all acute therapy issued in
the last three months
Allergies and intolerances (drug and non-drug)
High priority medical history - marked priority 1,
The latest records for smoking, alcohol, height, weight, blood pressure
All test results within the last 3 months
All active problems - the Read code from the problem header will be extracted
and send as a 'Conditions' item
All active disease registers - ie those with a start date but no end date. These are exported as 'Conditions' in the same way as active problems.
For Example:
The current problem is ‘Bowel Cancer’ and contains the diagnosis of bowel
cancer and any other data that the GP considers pertinent to this problem.
After entering the referral (make booking):
There are now two current problems, ‘Bowel Cancer’ and ‘Bowel Cancer
Referral Message’. The latter problem contains the referral, all other data in
the consultation, summary of relevant clinical items, and all the data in the ‘Bowel Cancer’ problem.
The ‘Bowel Cancer’ problem contains the data it previously contained along
with the referral and a link to the message digest problem.
Any data subsequently entered in the consultation will automatically be included in both problems (although it may be removed).
29
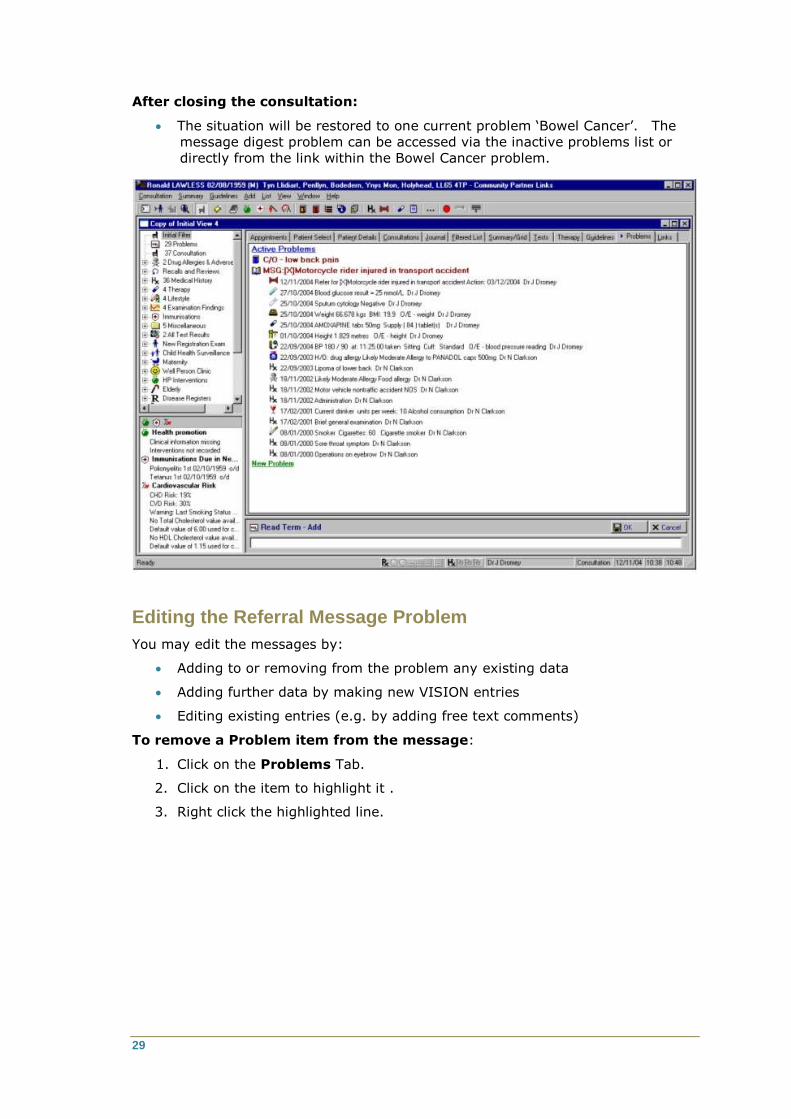
After closing the consultation:
The situation will be restored to one current problem ‘Bowel Cancer’. The
message digest problem can be accessed via the inactive problems list or
directly from the link within the Bowel Cancer problem.
Editing the Referral Message Problem
You may edit the messages by:
Adding to or removing from the problem any existing data
Adding further data by making new VISION entries
Editing existing entries (e.g. by adding free text comments)
To remove a Problem item from the message:
1. Click on the Problems Tab.
2. Click on the item to highlight it .
3. Right click the highlighted line.
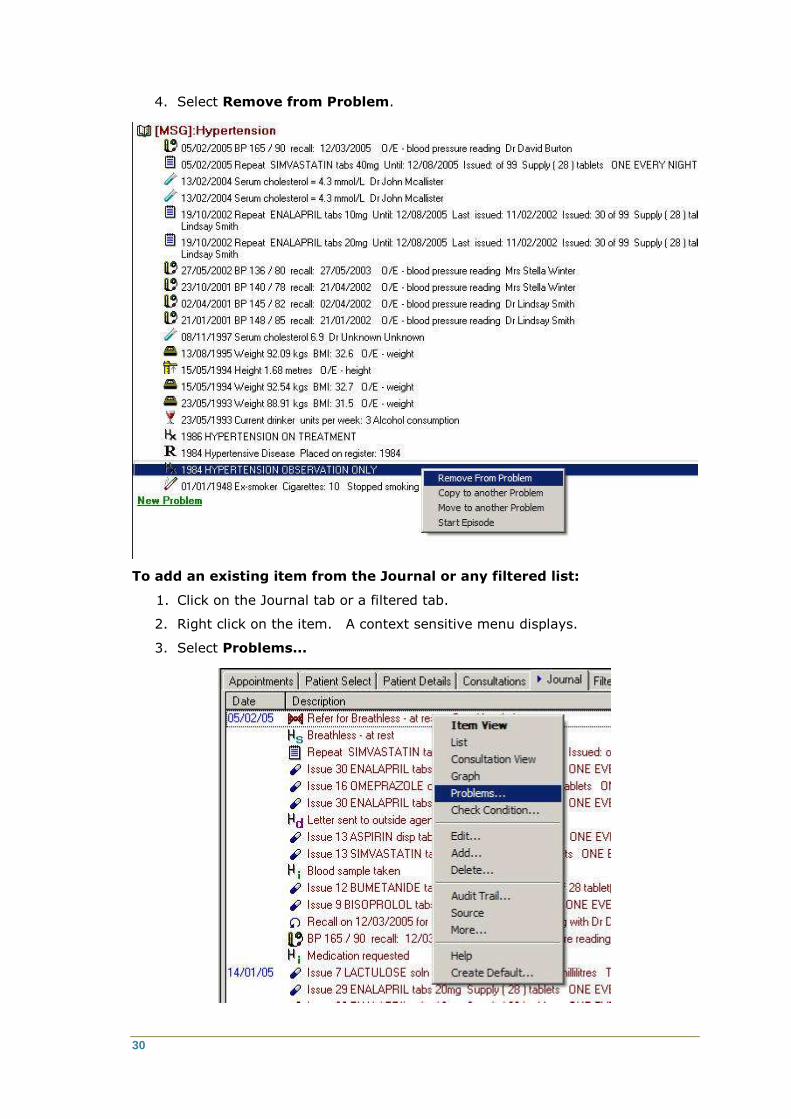
30
4. Select Remove from Problem.
To add an existing item from the Journal or any filtered list:
1. Click on the Journal tab or a filtered tab.
2. Right click on the item. A context sensitive menu displays.
3. Select Problems...
31
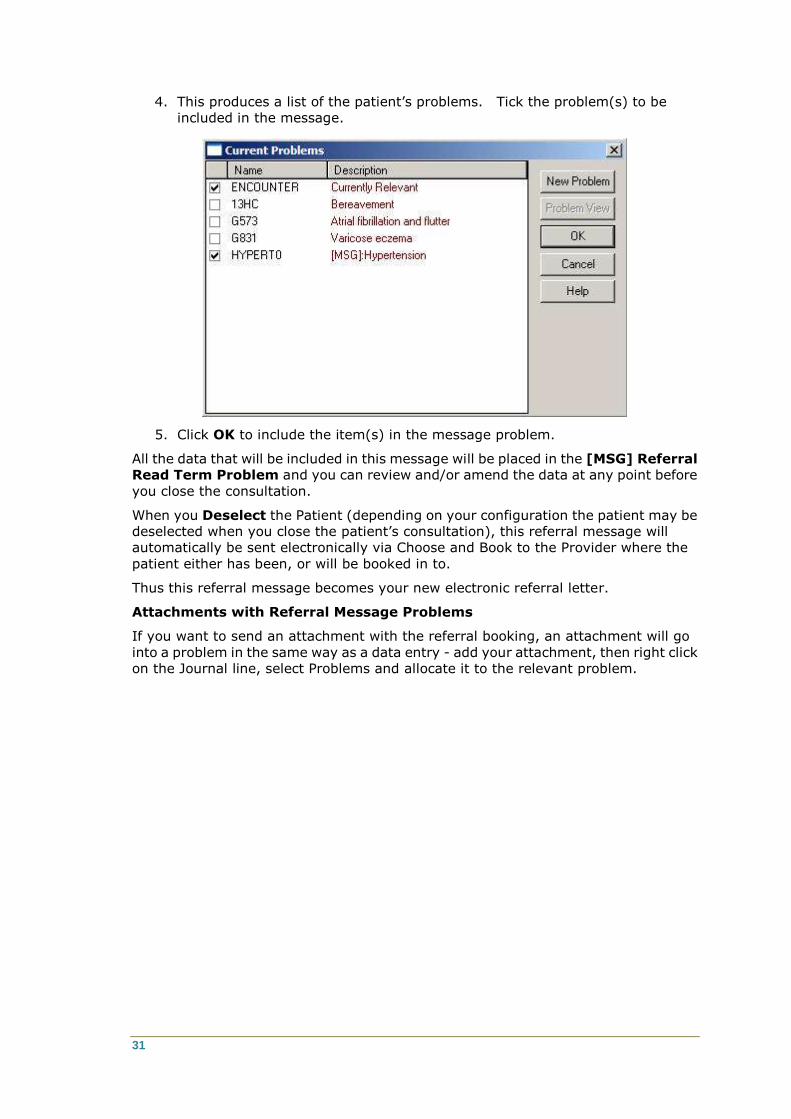
4. This produces a list of the patient’s problems. Tick the problem(s) to be
included in the message.
5. Click OK to include the item(s) in the message problem.
All the data that will be included in this message will be placed in the [MSG] Referral
Read Term Problem and you can review and/or amend the data at any point before
you close the consultation.
When you Deselect the Patient (depending on your configuration the patient may be
deselected when you close the patient’s consultation), this referral message will
automatically be sent electronically via Choose and Book to the Provider where the
patient either has been, or will be booked in to.
Thus this referral message becomes your new electronic referral letter.
Attachments with Referral Message Problems
If you want to send an attachment with the referral booking, an attachment will go
into a problem in the same way as a data entry - add your attachment, then right click
on the Journal line, select Problems and allocate it to the relevant problem.

32
Send a Referral Letter/Message Later
Once you have either created an Appointment Request, or you have submitted a
Booking via Choose and Book, you are returned to the Referral - Add screen in Vision.
Click OK and you are asked if you wish to send a referral message on deselecting the
patient.
Answer No if you wish to send the referral letter/message later in order to review the
data, add data, remove data, include a referral letter etc. Then finish and close the
consultation as normal.
The referral message problem [MSG] Referral Read Term Problem will not yet be
created. You can then edit the booking later.
Any other data you then enter during the consultation is then added to the referral
message problem, which remains open, until you close the consultation.
You can edit the referral (and eBooking to add or change the hospital appointment
time). When you have completed your tasks, you click on Referral-Edit, this time
you can choose Send Now (or Yes), creating the referral message problem and
sending it when the patient is deselected and the consultation is closed.
To create and send the message subsequently
1. Open the patient record in Consultation Manager.
2. Find the referral item on the Journal.
3. Right click on the item, and select Edit…
4. This will re-open the referral entry.
5. You may now create a letter in Vision in the conventional method (click Letter
, choose template, complete the letter). A red tick displays on the Letter
button once the letter has been completed.
6. You can add attachments (page 25).
7. You can amend the referral letter (see Update Your Referral Letter (page 27)).
8. A receptionist can complete the booking on the GP's behalf - see Send an
electronic referral letter on behalf of your GP by admin staff (page 35).
33
9. When you click OK having edited Referral Add, a message asks: "Do you wish
to send a referral message when this patient is deselected?".
10. This time, choose Yes and follow the procedure described above to deal with
the resulting message problem.
11. If you want to add any data to the referral message problem, right click on that
data line (eg, from the Journal), select Problems... then tick the box of the
Referral Message Problem.
12. If you want to remove any item from the referral message problem, go to the
Problems tab, left click on the item to highlight it, then right click and select
Remove from Problem.
13. When you Deselect the Patient (depending on your configuration the patient
may be deselected when you close the patient’s consultation), this referral
message will automatically be sent electronically via Choose and Book to the
Provider where the patient either has been, or will be booked in to.
Troubleshooting online booking
Online Booking checkbox is disabled on Referral Add
The user has not made a valid successful login with their smart card and PIN.
Patient does not consent to on-line booking
Patients can withhold consent from on-line booking. If you attempt an on-line
booking/referral, the following message is shown if the patient dissents:
"This patient has not allowed access to their record for the purpose of
electronic booking. This booking cannot be made online. Consult the manual
or online help for details of consent mechanisms."
You are then returned to the referral form with Online Booking unchecked. The
consent status can be changed through tools provided by NASP (details currently
unavailable). If changed, you may try the booking again.
Try and exit from Referral form without making eBooking
If you try to click OK to exit from the Referral form when Online Booking has been
checked, and you have not invoked the booking process, you will be warned and
returned to the Referral form. You must then either uncheck Online Booking or click
on the eBooking button.

34
Edit a referral booking A referral booking may need to be updated by the receptionist:
if the patient cannot now make the original booking date
or if the GP does not have time in consultation to complete the eBooking process, and has selected Send Later when clicking OK on Referral Add,
or if the referral was added at an unsecured workstation without access to
Choose and Book.
To edit a referral created by the GP without eBooking:
1. Select the patient in Consultation Manager.
2. Open the existing Consultation that the GP used to add the referral. Look on
List - Referrals to find the date of the referral. Close any consultation that
has opened for today (you will first have to uncheck the option Deselect the
patient when closing a consultation, in Consultation - Options -
Setup). Click on Consultation - List consultations. Find the consultation
on the date of the referral. Select Consultation - Open Existing
consultation. Click on the Consultation Line for that date to expand the
entries.
3. Right click on the referral line on the Journal tab and select Edit.
4. Tick the Online Booking box.
5. Click on the eBooking button and when the Choose and Book screen is
displayed, select a relevant appointment, hospital, department, male/female
staff mix etc.
6. Click on Request.
7. Click OK on Referral-Update.
The data in that consultation will be included in the referral, together with the list of
data normally included in a referral message: Read Term for Referral Reason, all
active problems, current medication (all acute therapy and repeat issues in last three
months), allergies and intolerances (drug and non-drug), high priority 1 medical
histories, the latest record for smoking, alcohol, height, weight, blood pressure.
Note - If you want to send an attachment with the edited referral
booking, this will overwrite any original attachment sent when the
referral booking was made.
If the referral has already been made online:
1. Select the patient in Consultation Manager.
2. Open the existing Consultation. Look on List - Referrals to find the date of
the referral. Close any consultation that has opened for today (you will first
have to uncheck the option Deselect the patient when closing a
consultation, in Consultation - Options - Setup). Click on Consultation
- List consultations. Find the consultation on the date of the referral.
Select Consultation - Open Existing consultation. Click on the
Consultation Line for that date to expand the entries.
3. Right click on the referral line on the Journal tab and select Edit.
4. Tick the Online Booking box.
5. The eBooking button is enabled and will connect to the eBooking system using
the previously stored UBRN.

35
6. List the appointments and book.
7. Click OK on Referral-Update and continue with your amendment.
Returning to the Choose and Book referral
Choose and Book can also be accessed either through the Patient Links tab on the
Patient Record View in Consultation Manager (using the Links tab, select ‘eBooking
Home’ from the drop down address list); or from Consultation Manager - Add -
External Applications - Launch - Choose and Book.
This takes you to the Choose and Book home page from which patients can be found
using the UBRN, NHS number or demographic details. This can be used to browse
Choose and Book worklists but it is important to remember that one particular patient
record is open. If details of other patients are viewed in Choose and Book, they must
not be confused with the patient open in Consultation Manager.
Send an electronic referral letter on behalf of your GP by admin staff To write a referral letter, the GP must have completed an appointment request, but
not necessarily have made a booking of date and time. The GP should write the
referral letter or they may have dictated the referral letter for the Practice
Administrator to enter on their behalf.
Building the Referral Letter contents
1. Open the patient record in Vision Consultation Manager.
2. List - Referrals and find the referral item.

36
3. Right click on it, selecting Edit.
4. This will re-open the referral entry.
5. You may now create a letter in Vision in the conventional method (Click Letter
, choose template, complete the letter). A red tick displays on the Letter
button once the letter has been completed.
6. Click OK.
7. Drag the newly created letter from the Journal into Accompanying Documents
on the Referral Message Digest.
8. Press Send on RMD to send the referral.

37
Attaching Vision referrals in web-based Choose and Book It is best to use Choose and Book through Vision in the fully integrated way. This
maintains the integrity of the Clinical Record and maximises confidentiality.
However, if web-based use of Choose and Book is unavoidable, then the following
method is recommended for practices with local servers.
Note - this method is not suitable for practices using remote servers as
Choose & Book will not find files on the remote server and so access to
local drives will be needed.
1. Preparation - Create a folder on the server, on the global G: drive if there is one
or else on the P: drive. Name the folder Referral Letters or something similar.
2. Attaching - The referral letter should be produced in Vision in the normal way
and saved as usual. After saving in the normal way, and while still in Word, go
to the File menu and use the Save As option to save a second copy of the file in
the folder you have created for this purpose. This additional copy should be
given a recognisable file name, for example, the patient's surname, forename
and date of birth, eg Smith John 20050116.
3. Subsequently when using Choose and Book web based, this separate copy of
the letter can be attached using the Add Referral Letter button on the Referral
Request summary page of Choose and Book.
4. File management - The temporary copy of the referral letter should be deleted
once it is known that the attachment has been successfully lodged with Choose
and Book. This minimises the risk to patient confidentiality and makes best
use of disk space.

38
Access Choose and Book Home Page and select patient The Vision system can be configured in a number of ways, and you can access Choose
and Book through Vision without opening a patient consultation via External
Applications. Otherwise the user can access Choose and Book direct via the Internet.
Access CAB from Consultation Manager using External Applications
You can access Choose and Book home page from Consultation Manager – Add –
External Applications – Launch – Choose and Book without need to select
patient first. This means access to C&B without a consultation or patient needing to be
open.
Before launching for the first time, go into Consultation Manager – Add – External
Applications - Configure and tick the Choose and Book box. Then use the Launch
option.
Access from Links tab in Consultation Manager
Make sure your Patient Record view has a Links tab. If it does not, create one by
right clicking on any of the tab headers (eg Journal, Therapy, Patient Select) and
select Organise Tabs. Click on Add, and select Patient Links Browser. Move it up
above the Guidelines tab. Click OK. On the Links tab, one of the options will be the
e-Booking home page.
If you have a Choose and Book icon on your desktop
Double-click on the Choose and Book icon on the desktop to launch Choose and Book.
39
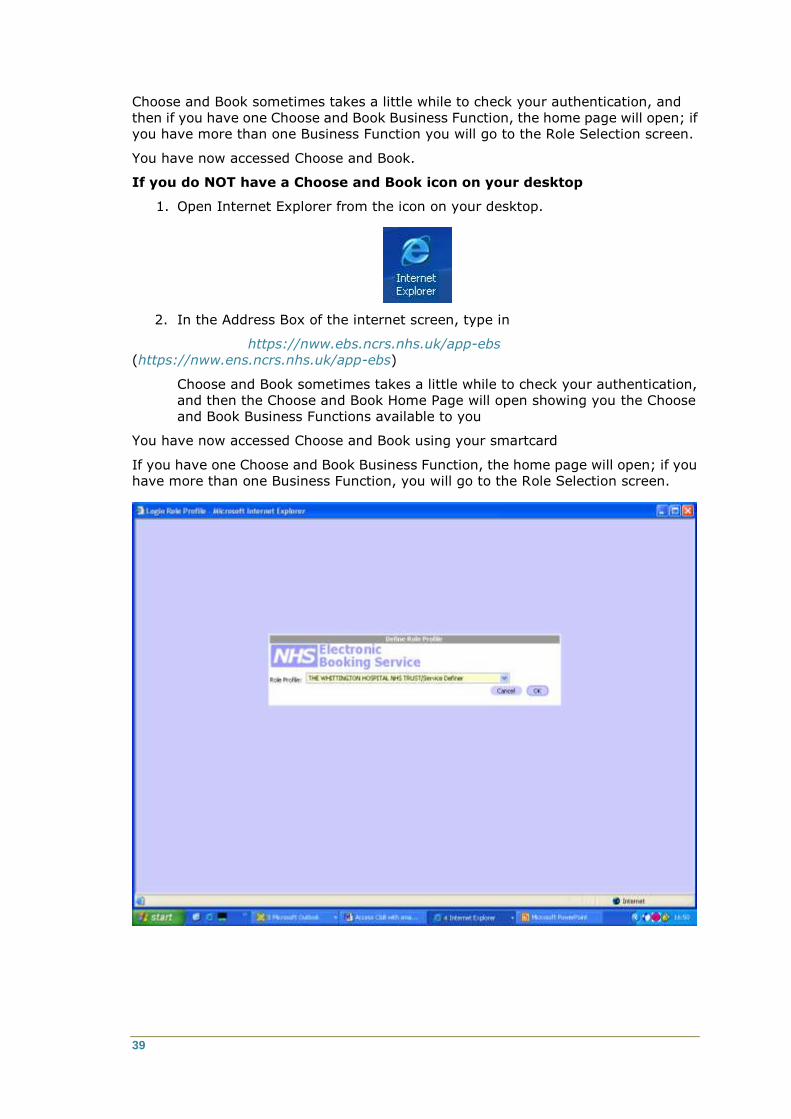
Choose and Book sometimes takes a little while to check your authentication, and
then if you have one Choose and Book Business Function, the home page will open; if
you have more than one Business Function you will go to the Role Selection screen.
You have now accessed Choose and Book.
If you do NOT have a Choose and Book icon on your desktop
1. Open Internet Explorer from the icon on your desktop.
2. In the Address Box of the internet screen, type in
https://nww.ebs.ncrs.nhs.uk/app-ebs
(https://nww.ens.ncrs.nhs.uk/app-ebs)
Choose and Book sometimes takes a little while to check your authentication,
and then the Choose and Book Home Page will open showing you the Choose
and Book Business Functions available to you
You have now accessed Choose and Book using your smartcard
If you have one Choose and Book Business Function, the home page will open; if you
have more than one Business Function, you will go to the Role Selection screen.
40
NOTE: Your Smartcard must remain in the smartcard reader for the
whole time that you are using the system. If you pull your Smartcard
out of the reader, your session will end.
As a GP, within Choose and Book, you will have been given the Business Function of
"Referring Clinician".
Select Referring Clinician from the pick list and click OK.
Checking the referral message in Mail Manager Mail Manager is accessed from the Messaging menu from the Vision front menu.
Mail Manager can be used to track referral messages for Choose and Book. In Control
Panel (Management Tools menu) - Mail Maintenance, one user can be set up to
be able to access the mail for all mailboxes (right click on user and select Add All).
To check a referral message has been sent successfully:
1. Go into Mail Manager.
2. Outgoing Mail messages are listed in Mail Manager within the originators
mailbox. The display can be refreshed using an icon on the toolbar. You
should find the referral under a C&B Referral message type. Different
aspects of the message can be viewed by selecting the message in the list and
using the tabs at the foot of the page.
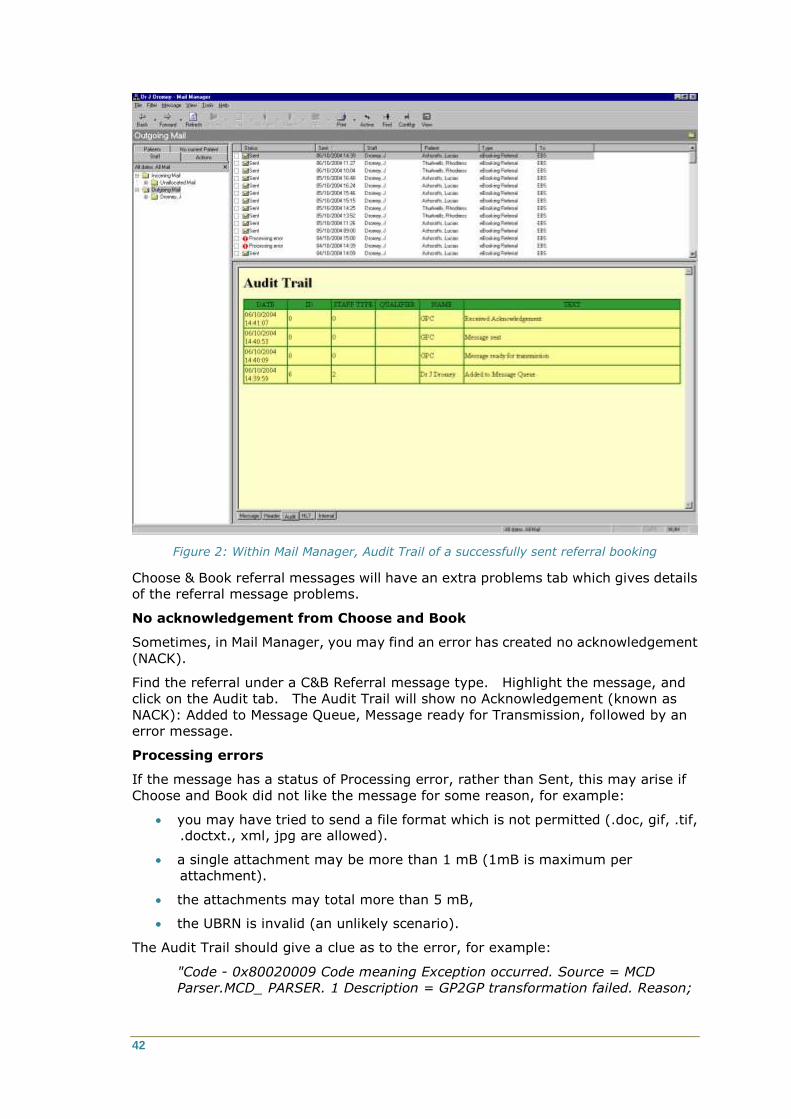
3. Highlight the message, and click on the Audit tab. The progress of the
message and acknowledgement of it is displayed in the Audit.
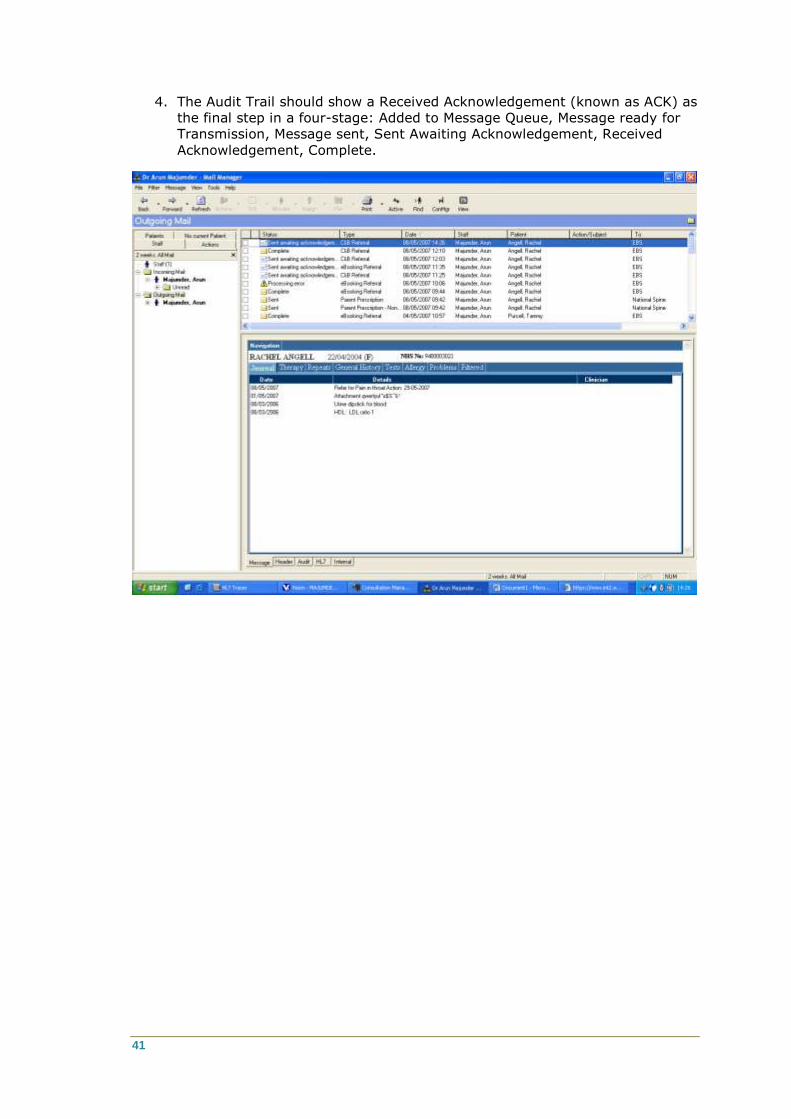
41
4. The Audit Trail should show a Received Acknowledgement (known as ACK) as
the final step in a four-stage: Added to Message Queue, Message ready for
Transmission, Message sent, Sent Awaiting Acknowledgement, Received
Acknowledgement, Complete.
42
Figure 2: Within Mail Manager, Audit Trail of a successfully sent referral booking
Choose & Book referral messages will have an extra problems tab which gives details
of the referral message problems.
No acknowledgement from Choose and Book
Sometimes, in Mail Manager, you may find an error has created no acknowledgement
(NACK).
Find the referral under a C&B Referral message type. Highlight the message, and
click on the Audit tab. The Audit Trail will show no Acknowledgement (known as
NACK): Added to Message Queue, Message ready for Transmission, followed by an
error message.
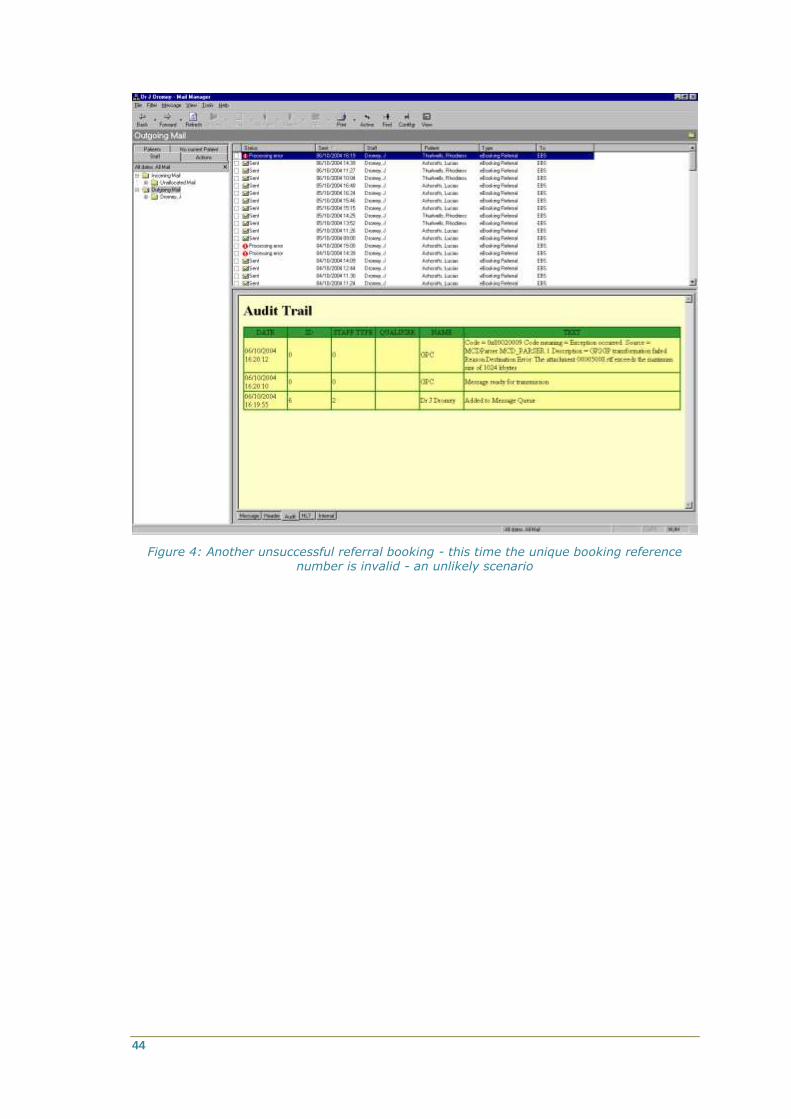
Processing errors
If the message has a status of Processing error, rather than Sent, this may arise if
Choose and Book did not like the message for some reason, for example:
you may have tried to send a file format which is not permitted (.doc, gif, .tif, .doctxt., xml, jpg are allowed).
a single attachment may be more than 1 mB (1mB is maximum per
attachment).
the attachments may total more than 5 mB,
the UBRN is invalid (an unlikely scenario).
The Audit Trail should give a clue as to the error, for example:
"Code - 0x80020009 Code meaning Exception occurred. Source = MCD
Parser.MCD_ PARSER. 1 Description = GP2GP transformation failed. Reason;

43
Destination Error. The attachment 0005008.rtf exceeds the maximum size of
1024 kbytes."
Figure 3: An unsuccessful referral booking - the attachment was more than 1 mb
44
Figure 4: Another unsuccessful referral booking - this time the unique booking reference number is invalid - an unlikely scenario

45
Index
A
Access Choose and Book Home Page and select patient • 8, 38
Access Choose and Book via Vision using a smartcard • 8 Accompanying Data • 18, 19 Accompanying Documents, Letters and Attachments •
20 Accompanying Text • 18, 19 acknowledgement
received • 40 Add a referral and request a booking • 10 Attaching Vision referrals in web-based Choose and
Book • 37 attachment
overwriting • 34 Attachments • 18, 20, 25, 32 Auto Selection Options • 14, 15, 16
C
Cancel/Close • 21 Checking the referral message in Mail Manager • 40 Choose and Book • 5
overview • 5 Closing the consultation and sending the message • 21 Copyright Notice • ii
E
eBooking • 5 EBS screen • 10 Edit a referral booking • 34
and make into eBooking • 34 if already made online • 34
Editing and RMD • 23 Editing the Referral Message Problem • 29
F
Failure to connect • 9
I
Introduction to Choose and Book • 5
J
Journal entry once sent • 21
M
Mail Manager successful booking request • 40
O
Online Booking box • 10 Online Booking checkbox is disabled on Referral Add •
33
P
Patient does not consent to on-line booking • 33 Previously sent versions • 24 problem
referral message created • 28 data contained in • 28 summary • 28
R
referral booking add • 10 edit • 34
referral message check in Mail Manager • 40
Referral Message Digest • 13, 14, 28 Referral Message Digest replaces Message problem • 14 referral message problem
created • 28 data contained in • 28 summary • 28
Referral Message Problem • 28 Removal of unused unique booking reference numbers
(UBRNs) • 26 Returning to the Choose and Book referral • 35
S
Save • 21 Send • 20 Send a Referral Letter/Message Later • 32 Send an electronic referral letter on behalf of your GP by
admin staff • 13, 32, 35 Setting up Choose & Book • 8 Status/Control Area • 18 Subsequent Actions on RMDs • 22 Switching on Referral Message Digest • 14

46
T
The Auto Selection Options Screen • 17 The Referral Message Digest screen • 14, 18 Troubleshooting online booking • 33 Try and exit from Referral form without making
eBooking • 33
U
Update Your Referral Letter • 27, 32