chep portfolio+plus 1plus user guide.pdf · 2 1.1 welcome welcome to portfolio+plus - version 1.3...
TRANSCRIPT
CHEP
Portfolio+Plus 1.3
User Guide
V 1.0
17 March 2010
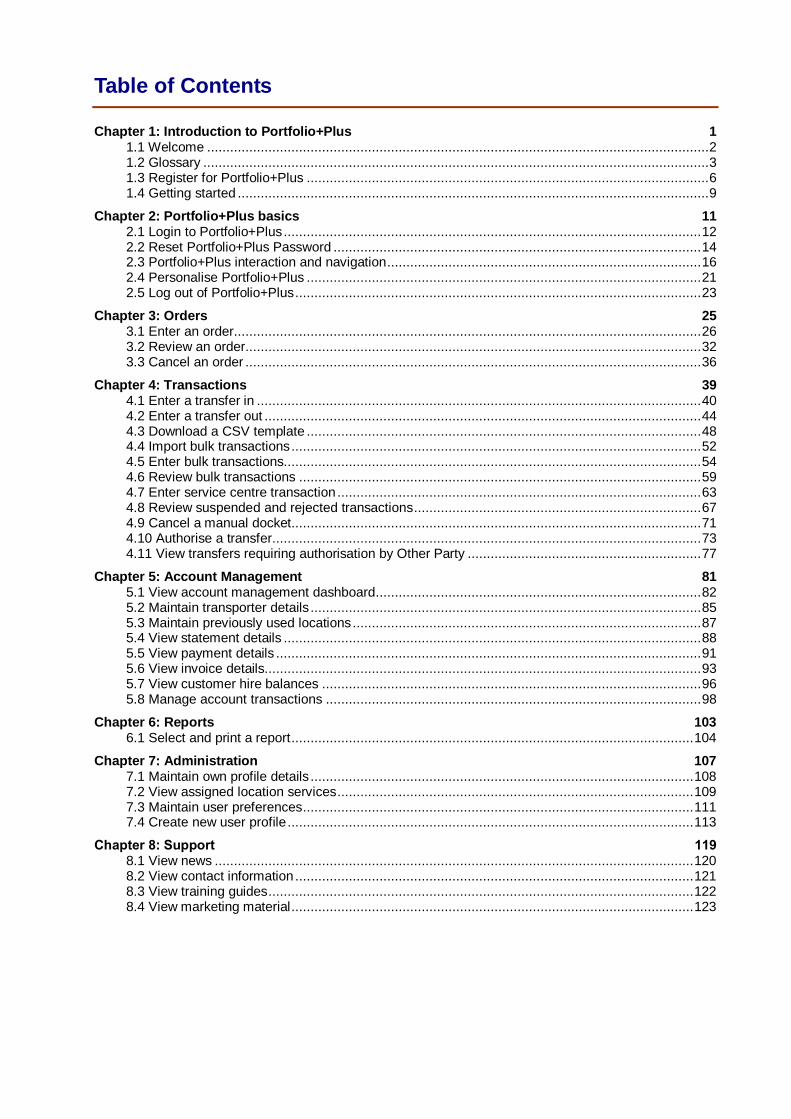
Table of Contents
Chapter 1: Introduction to Portfolio+Plus 1 1.1 Welcome ................................................................................................................................... 2 1.2 Glossary .................................................................................................................................... 3 1.3 Register for Portfolio+Plus ......................................................................................................... 6 1.4 Getting started ........................................................................................................................... 9
Chapter 2: Portfolio+Plus basics 11 2.1 Login to Portfolio+Plus ............................................................................................................. 12 2.2 Reset Portfolio+Plus Password ................................................................................................ 14 2.3 Portfolio+Plus interaction and navigation .................................................................................. 16 2.4 Personalise Portfolio+Plus ....................................................................................................... 21 2.5 Log out of Portfolio+Plus .......................................................................................................... 23
Chapter 3: Orders 25 3.1 Enter an order .......................................................................................................................... 26 3.2 Review an order....................................................................................................................... 32 3.3 Cancel an order ....................................................................................................................... 36
Chapter 4: Transactions 39 4.1 Enter a transfer in .................................................................................................................... 40 4.2 Enter a transfer out .................................................................................................................. 44 4.3 Download a CSV template ....................................................................................................... 48 4.4 Import bulk transactions ........................................................................................................... 52 4.5 Enter bulk transactions............................................................................................................. 54 4.6 Review bulk transactions ......................................................................................................... 59 4.7 Enter service centre transaction ............................................................................................... 63 4.8 Review suspended and rejected transactions ........................................................................... 67 4.9 Cancel a manual docket ........................................................................................................... 71 4.10 Authorise a transfer ................................................................................................................ 73 4.11 View transfers requiring authorisation by Other Party ............................................................. 77
Chapter 5: Account Management 81 5.1 View account management dashboard ..................................................................................... 82 5.2 Maintain transporter details ...................................................................................................... 85 5.3 Maintain previously used locations ........................................................................................... 87 5.4 View statement details ............................................................................................................. 88 5.5 View payment details ............................................................................................................... 91 5.6 View invoice details.................................................................................................................. 93 5.7 View customer hire balances ................................................................................................... 96 5.8 Manage account transactions .................................................................................................. 98
Chapter 6: Reports 103 6.1 Select and print a report ......................................................................................................... 104
Chapter 7: Administration 107 7.1 Maintain own profile details .................................................................................................... 108 7.2 View assigned location services ............................................................................................. 109 7.3 Maintain user preferences ...................................................................................................... 111 7.4 Create new user profile .......................................................................................................... 113
Chapter 8: Support 119 8.1 View news ............................................................................................................................. 120 8.2 View contact information ........................................................................................................ 121 8.3 View training guides ............................................................................................................... 122 8.4 View marketing material ......................................................................................................... 123

Chapter 1: Introduction to Portfolio+Plus
Overview
This chapter provides an introduction to Portfolio+Plus.
Contents
This chapter contains the following topics:
Topic See page
1.1 Welcome 2
1.2 Glossary 3
1.3 Register for Portfolio+Plus 6
1.4 Getting started 9

22
1.1 Welcome
Welcome to PORTFOLIO+PLUS - Version 1.3
Our latest version of Portfolio+Plus makes managing your account convenient and secure. The online portal for your CHEP transactions gives you real-time access that allows you to create, track, edit, reverse and correct transactions instantly. Plus with its comprehensive features and recently added functionality, Portfolio+Plus gives you more visibility and greater control of your CHEP equipment.
Get the most out of Portfolio+Plus
This User Guide provides easy step-by-step instructions that will help you familiarise yourself with Portfolio+Plus 1.3 and all its functionality. It will guide you through examples of screens organised to follow Portfolio+Plus‟ pull-down tab menu and its respective sub-menus, all divided into chapters to help you find information quickly.
You can go directly to a specific page and/or content via the Table of Contents or Chapter index by holding down the “control” button and clicking on the topic to access the link – this will take you directly to the relevant page.
The same can also be done throughout the Guide when another section is referred to – again, simply hold down the “control” button, move your mouse over the „refer to‟ words and this will take you the section mentioned.
You‟ll also find number of other helpful resources within Portfolio+Plus portal in the Support section such as:
Quick reference guides;
Frequently asked questions
Online tutorials providing instructions for navigating around the portal, which are great for someone that is just beginning to use PORTFOLIO+PLUS
We are sure you‟ll find Portfolio+Plus an invaluable tool that will save you time and help you gain more control of your equipment transactions.
Important
You may find while using Portfolio+Plus that you are not able to access a particular area and/or perform a particular task. This could be due to any of the following reasons:
The functionality is not available in your market
Your company does not have access to the function
You have not been given permission to use the function
If you have queries regarding this, please speak to your User Manager or contact CHEP customer service.
33
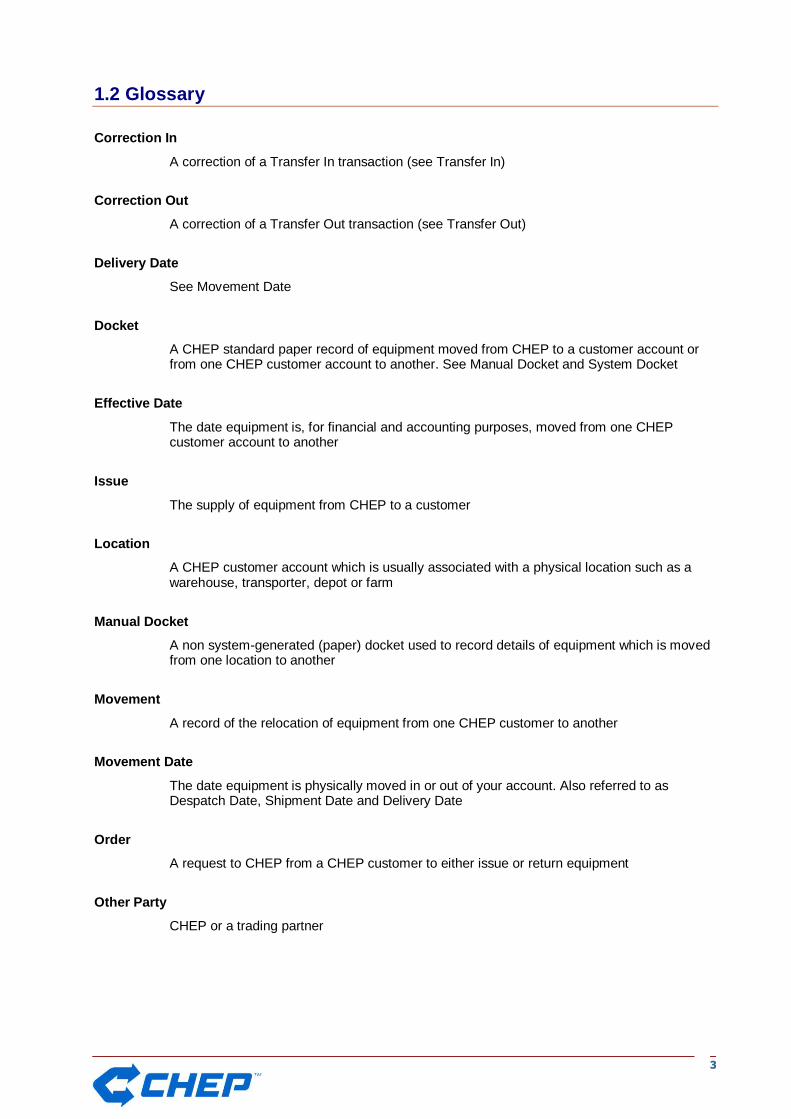
1.2 Glossary
Correction In
A correction of a Transfer In transaction (see Transfer In)
Correction Out
A correction of a Transfer Out transaction (see Transfer Out)
Delivery Date
See Movement Date
Docket
A CHEP standard paper record of equipment moved from CHEP to a customer account or from one CHEP customer account to another. See Manual Docket and System Docket
Effective Date
The date equipment is, for financial and accounting purposes, moved from one CHEP customer account to another
Issue
The supply of equipment from CHEP to a customer
Location
A CHEP customer account which is usually associated with a physical location such as a warehouse, transporter, depot or farm
Manual Docket
A non system-generated (paper) docket used to record details of equipment which is moved from one location to another
Movement
A record of the relocation of equipment from one CHEP customer to another
Movement Date
The date equipment is physically moved in or out of your account. Also referred to as Despatch Date, Shipment Date and Delivery Date
Order
A request to CHEP from a CHEP customer to either issue or return equipment
Other Party
CHEP or a trading partner
44
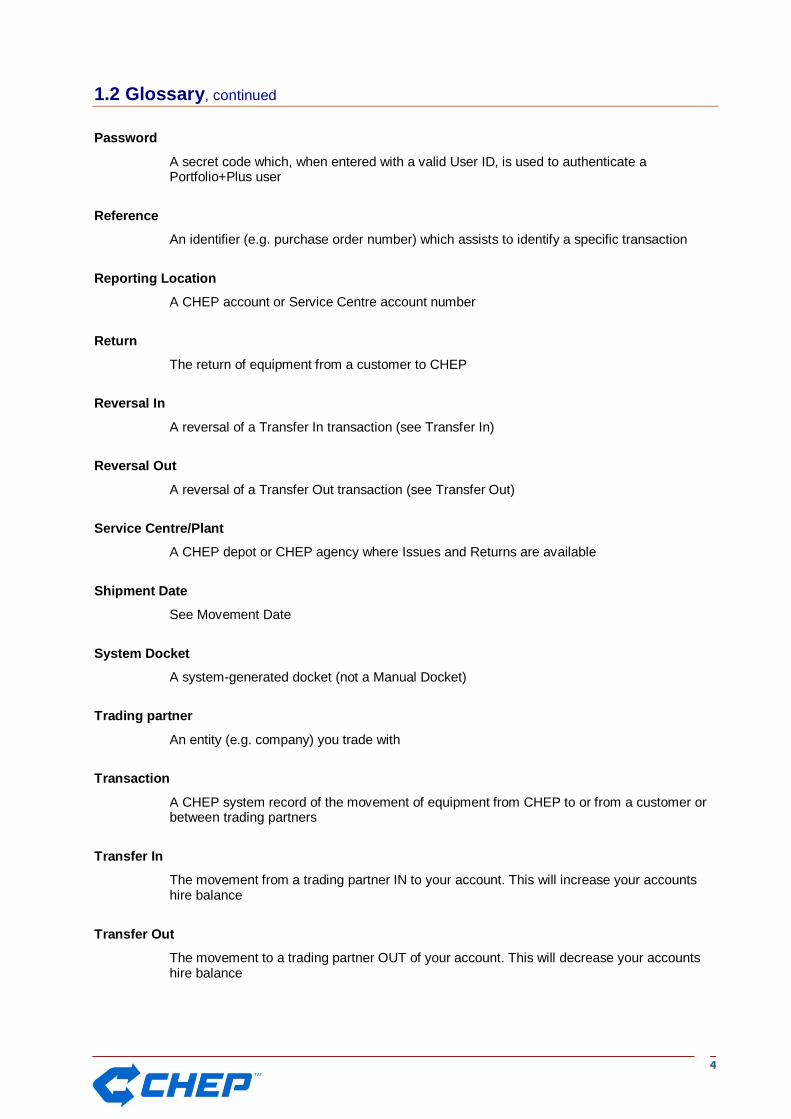
1.2 Glossary, continued
Password
A secret code which, when entered with a valid User ID, is used to authenticate a Portfolio+Plus user
Reference
An identifier (e.g. purchase order number) which assists to identify a specific transaction
Reporting Location
A CHEP account or Service Centre account number
Return
The return of equipment from a customer to CHEP
Reversal In
A reversal of a Transfer In transaction (see Transfer In)
Reversal Out
A reversal of a Transfer Out transaction (see Transfer Out)
Service Centre/Plant
A CHEP depot or CHEP agency where Issues and Returns are available
Shipment Date
See Movement Date
System Docket
A system-generated docket (not a Manual Docket)
Trading partner
An entity (e.g. company) you trade with
Transaction
A CHEP system record of the movement of equipment from CHEP to or from a customer or between trading partners
Transfer In
The movement from a trading partner IN to your account. This will increase your accounts hire balance
Transfer Out
The movement to a trading partner OUT of your account. This will decrease your accounts hire balance

55
1.2 Glossary, continued
User ID
A unique code used to identify a Portfolio+Plus user
66
1.3 Register for Portfolio+Plus
Overview
This topic details the procedure to register for Portfolio+Plus.
Explanation
New users are required to register at www.chep.com
Procedure
Follow these steps to register for Portfolio+Plus:
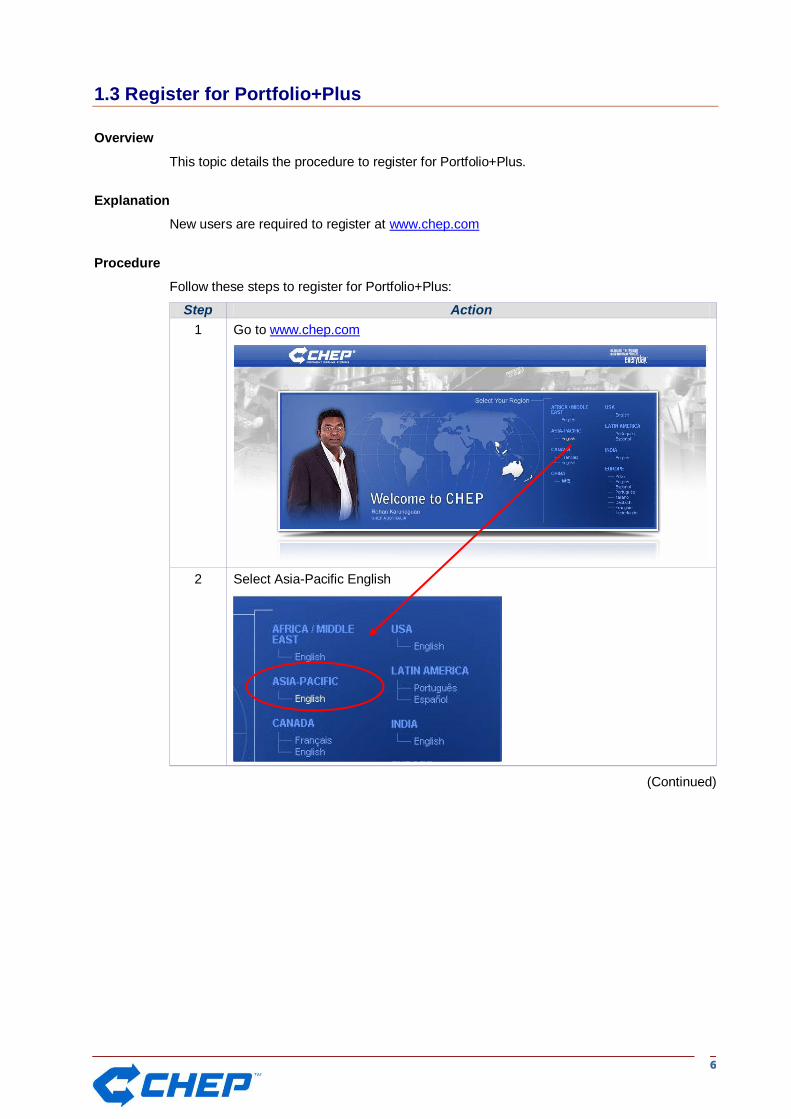
Step Action
1 Go to www.chep.com
2 Select Asia-Pacific English
(Continued)
77
1.3 Register for Portfolio+Plus, continued
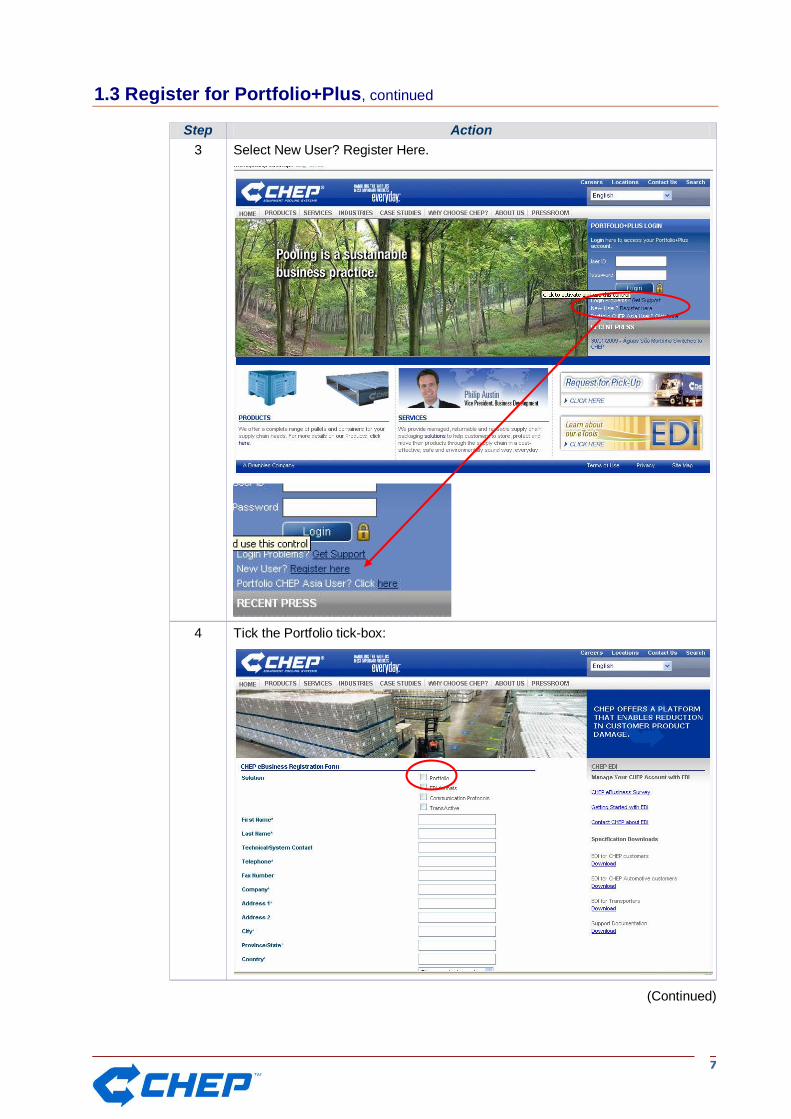
Step Action
3 Select New User? Register Here.
4 Tick the Portfolio tick-box:
(Continued)

88
1.3 Register for Portfolio+Plus, continued
Step Action
5 Enter/select the required user details:
Note: Mandatory fields are indicated by *
First Name *
Last Name *
Technical/System contact
Telephone *
Fax Number
Company *
Address 1 *
Address 2
City *
Province/State *
Country *
Region *
Email Address *
CHEP Code or Global ID (10-digit CHEP account number) *
6 Click the Submit button.
Result: The new user registration details will be submitted and a comfirmation message will be displayed:
Within 24 business hours you will receive an email (like the example below) with your Portfolio+Plus login details
When logging in for the first time, you will be prompted to change your password. Copy and paste the password into the „Old Password‟ field when prompted. You can then change your password to something easier to remember
Also when logging in for the first time, you will be presented with the Portfolio+Plus Access Services Agreement. You will not be granted access to Portfolio+Plus until conditions have been accepted. Please take the time to read through this document
Your User Name cannot be changed

99
1.4 Getting started
Portfolio+Plus Home Page
Favourites
First-time users may add the Portfolio+Plus Home Page to their “Favourites”. This will enable users to launch Portfolio+Plus from their list of Favourite websites:

1100
This page left blank intentionally.
1111
Chapter 2: Portfolio+Plus basics
Overview
This chapter details the procedures for logging in to, navigating, interacting and logging out of Portfolio+Plus.
Contents
This chapter contains the following topics:
Topic See page
2.1 Login to Portfolio+Plus 12
2.2 Reset Portfolio+Plus Password 14
2.3 Portfolio+Plus interaction and navigation 16
2.4 Personalise Portfolio+Plus 21
2.5 Log out of Portfolio+Plus 23
1122
2.1 Login to Portfolio+Plus
Overview
This topic details the procedure to login to Portfolio+Plus
Explanation
Each Portfolio+Plus user is assigned a unique User ID and password. A user must enter their User ID and password in order to access the system.
Procedure
Follow these steps to login to Portfolio+Plus:
Step Action
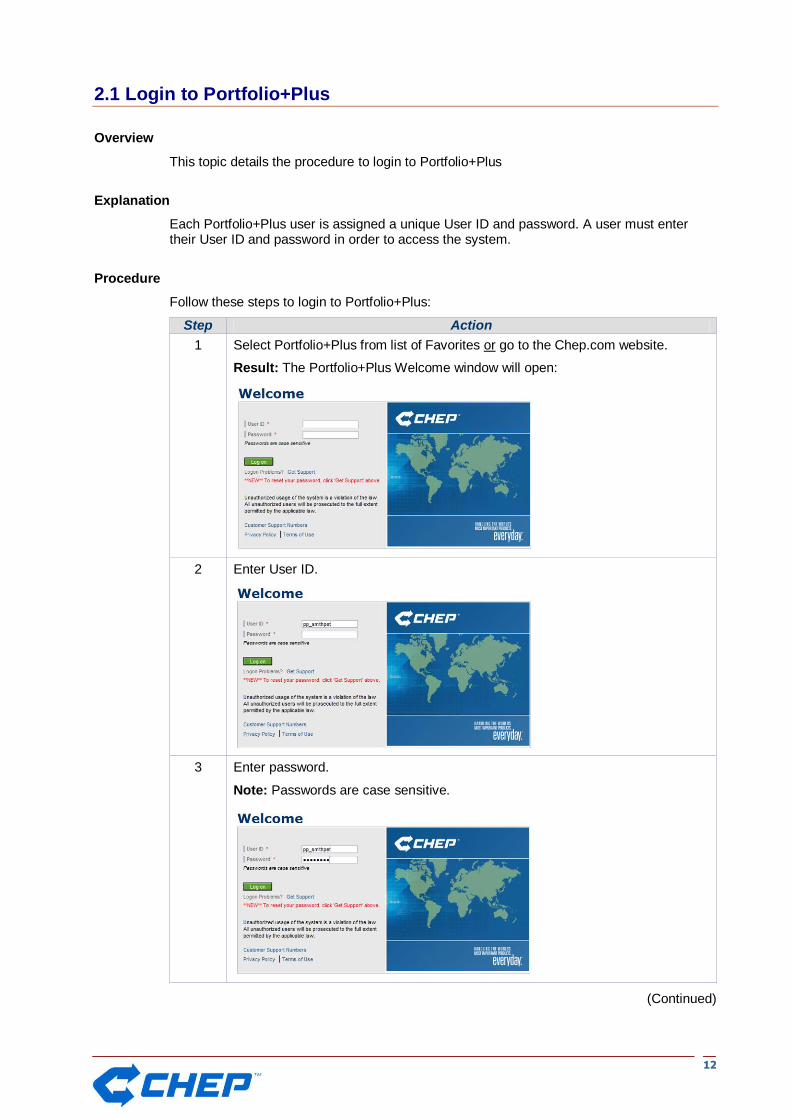
1 Select Portfolio+Plus from list of Favorites or go to the Chep.com website.
Result: The Portfolio+Plus Welcome window will open:
2 Enter User ID.
3 Enter password.
Note: Passwords are case sensitive.
(Continued)

1133
2.1 Login to Portfolio+Plus, continued
Step Action
4 Click the Log on button.
Result: Portfolio+Plus will authenticate the User ID and password.
If authentication is... Then...
Successful Portfolio+Plus home page will display.
Unsuccessful The following system message will display:
Refer to procedure 2.2 Reset Portfolio+Plus Password, or
Contact User Manager, or
Contact CHEP customer service
1144
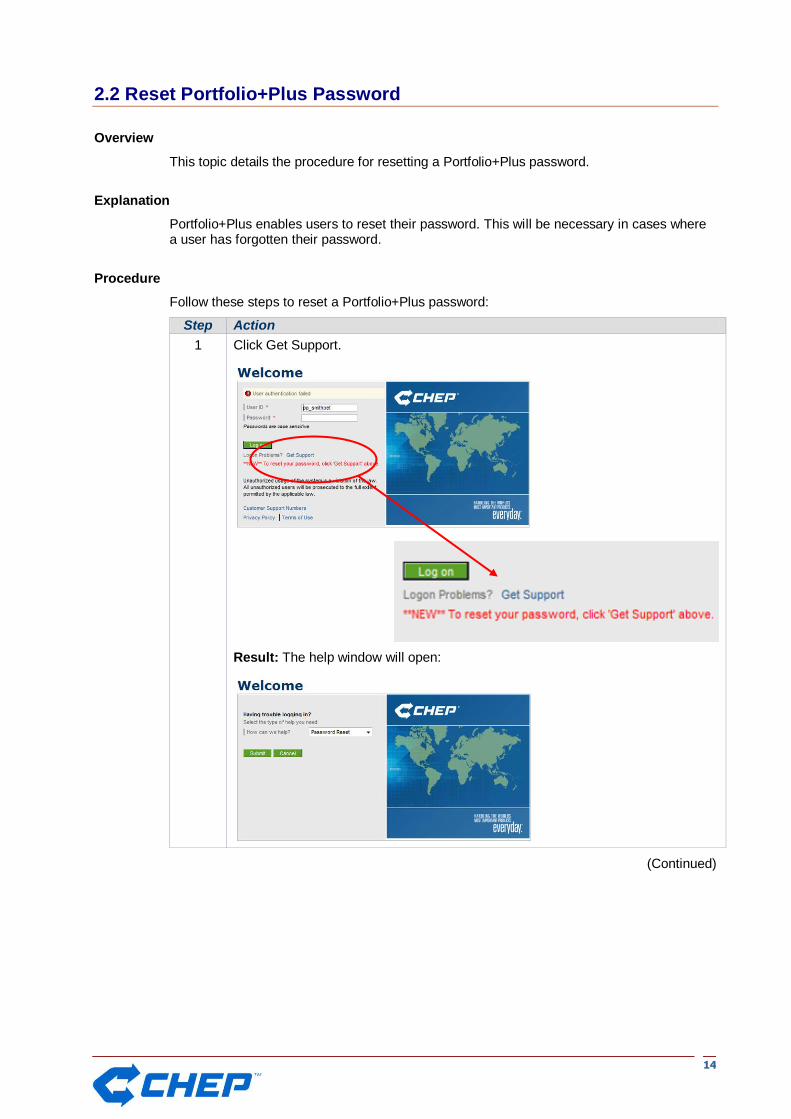
2.2 Reset Portfolio+Plus Password
Overview
This topic details the procedure for resetting a Portfolio+Plus password.
Explanation
Portfolio+Plus enables users to reset their password. This will be necessary in cases where a user has forgotten their password.
Procedure
Follow these steps to reset a Portfolio+Plus password:
Step Action
1 Click Get Support.
Result: The help window will open:
(Continued)
1155
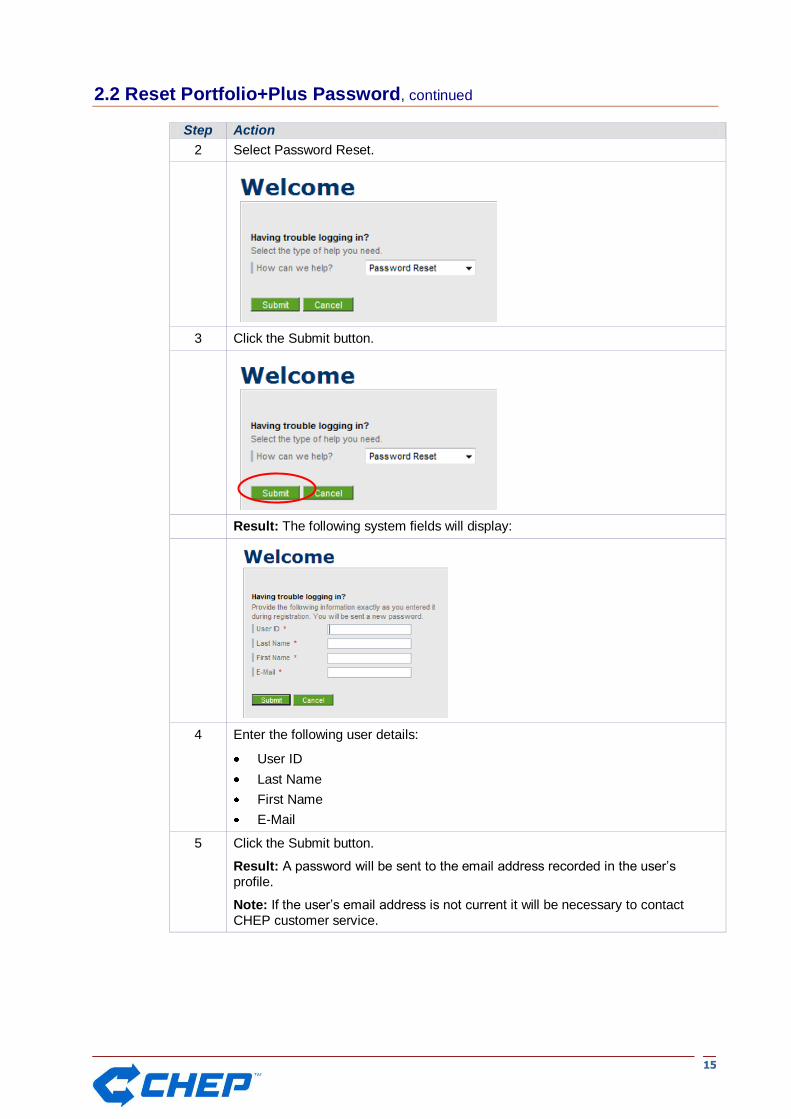
2.2 Reset Portfolio+Plus Password, continued
Step Action
2 Select Password Reset.
3 Click the Submit button.
Result: The following system fields will display:
4 Enter the following user details:
User ID
Last Name
First Name
5 Click the Submit button.
Result: A password will be sent to the email address recorded in the user‟s profile.
Note: If the user‟s email address is not current it will be necessary to contact CHEP customer service.

1166
2.3 Portfolio+Plus interaction and navigation
Overview
This topic details key interaction and navigation features in Portfolio+Plus.
Home Page
The Portfolio+Plus Home Page contains several features to assist user interaction and navigation:
Banner
The Banner displays User details and links to important contact information, personalisation options, as well as the Log Off link.
Menu tabs
Menu tabs act as “gateways” to system functions (e.g. Enter Order, Authorise Transfer). Users may select a required menu tab from anywhere in Portfolio+Plus:

1177
2.3 Portfolio+Plus interaction and navigation, continued
Orders: Use this tab to request, review, print and cancel an order.
To... Tab Select… Page
Request a new Issue or Return order
Orders > Enter Order >
Issue
Return
26
Review, print or cancel an existing order
Orders > Review Orders >
Cancel
32
36
Transactions: Use this tab to enter a transfer, enter bulk transactions, review a suspended or rejected transaction, authorise a transfer and cancel a manual docket.
To... Tab… Select... Page
Enter a Transfer In or Transfer out
Transactions > Enter Transaction >
Transfer In
Transfer Out
40 44
Import, enter and review bulk transactions
Transactions > Bulk Transaction Entry
48
Enter an Issue or Return transaction (reconciliation customers only)
Transactions > Enter service centre transaction
63
Review a suspended or rejected transaction
Transactions > Review transactions
67
Cancel a manual docket Transactions > Cancel manual docket
71
Authorise a transfer or view a transfer awaiting authorisation
Transactions > Authorise transfer 73
Run and Print a report Transactions > Reports > Report Selection
104
1188
2.3 Portfolio+Plus interaction and navigation, continued
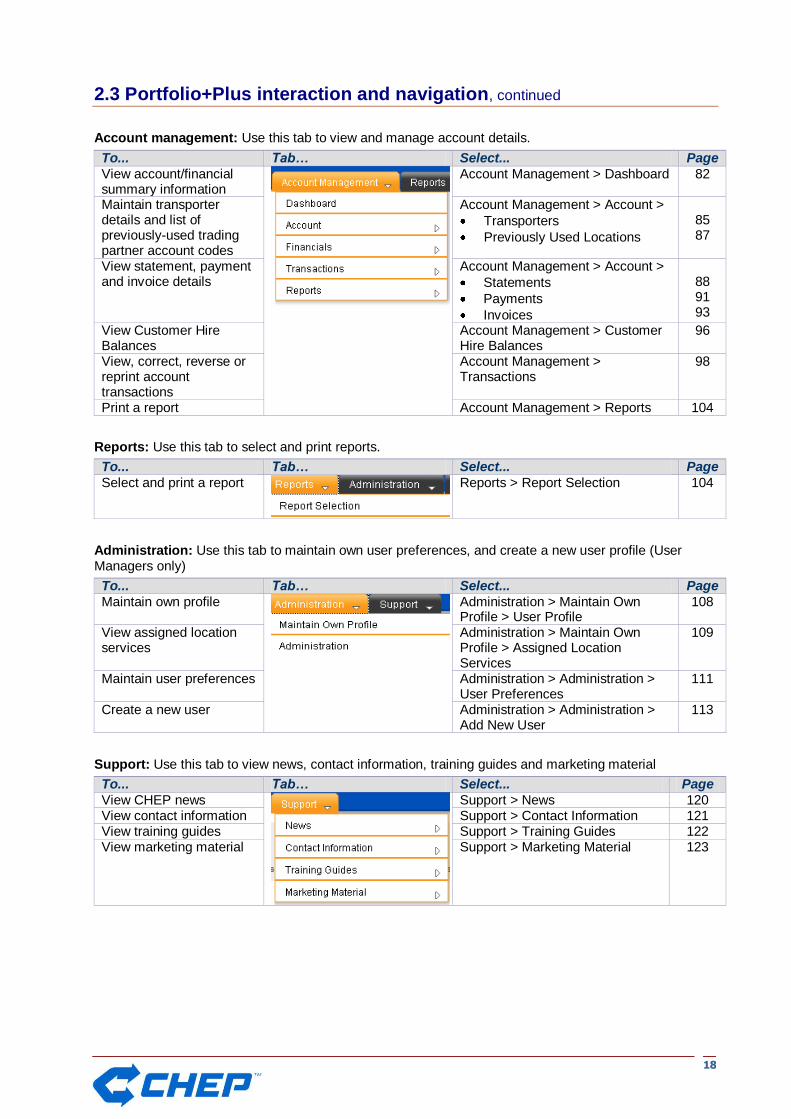
Account management: Use this tab to view and manage account details.
To... Tab… Select... Page
View account/financial summary information
Account Management > Dashboard 82
Maintain transporter details and list of previously-used trading partner account codes
Account Management > Account >
Transporters
Previously Used Locations
85 87
View statement, payment and invoice details
Account Management > Account >
Statements
Payments
Invoices
88 91 93
View Customer Hire Balances
Account Management > Customer Hire Balances
96
View, correct, reverse or reprint account transactions
Account Management > Transactions
98
Print a report Account Management > Reports 104
Reports: Use this tab to select and print reports.
To... Tab… Select... Page
Select and print a report
Reports > Report Selection 104
Administration: Use this tab to maintain own user preferences, and create a new user profile (User Managers only)
To... Tab… Select... Page
Maintain own profile
Administration > Maintain Own Profile > User Profile
108
View assigned location services
Administration > Maintain Own Profile > Assigned Location Services
109
Maintain user preferences Administration > Administration > User Preferences
111
Create a new user Administration > Administration > Add New User
113
Support: Use this tab to view news, contact information, training guides and marketing material
To... Tab… Select... Page
View CHEP news
Support > News 120 View contact information Support > Contact Information 121 View training guides Support > Training Guides 122 View marketing material Support > Marketing Material 123
1199
2.3 Portfolio+Plus interaction and navigation, continued
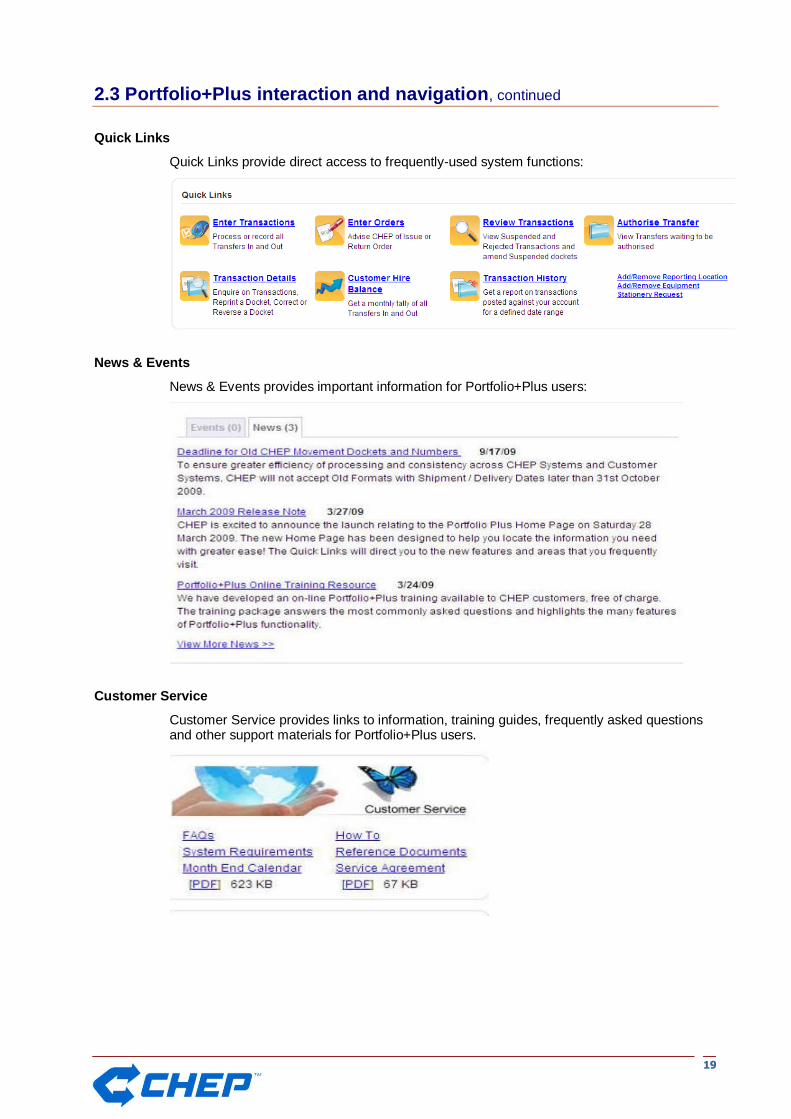
Quick Links
Quick Links provide direct access to frequently-used system functions:
News & Events
News & Events provides important information for Portfolio+Plus users:
Customer Service
Customer Service provides links to information, training guides, frequently asked questions and other support materials for Portfolio+Plus users.
2200
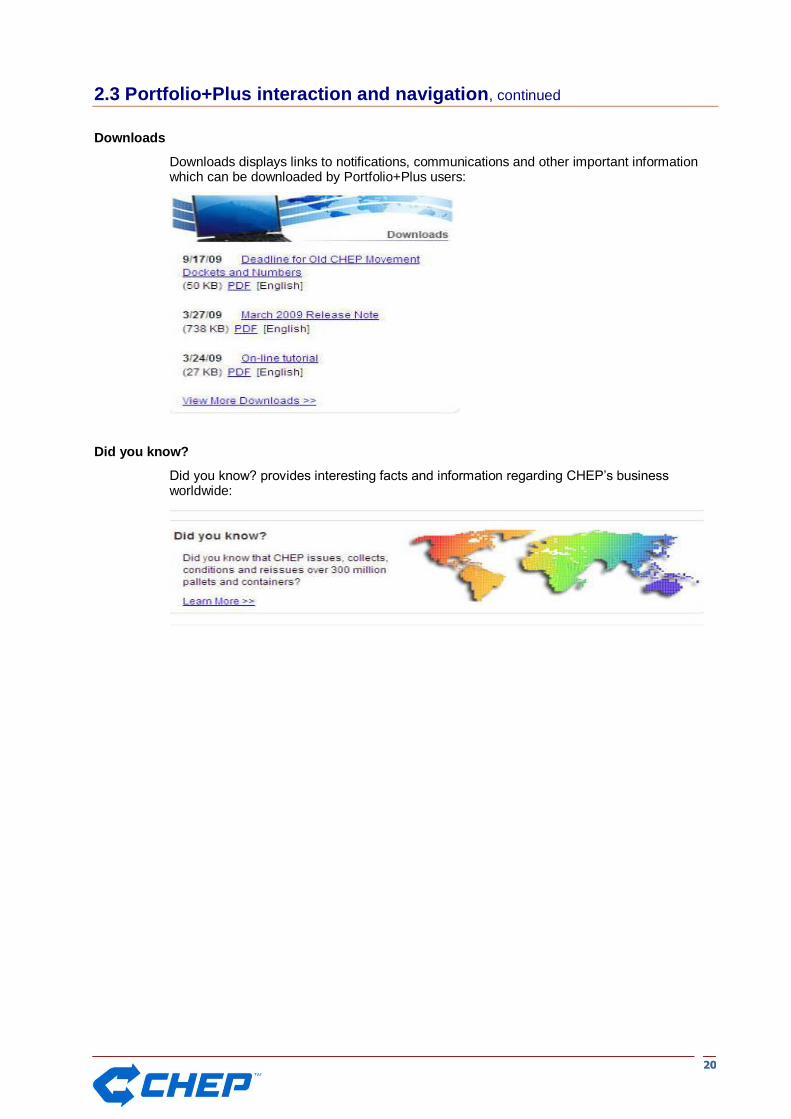
2.3 Portfolio+Plus interaction and navigation, continued
Downloads
Downloads displays links to notifications, communications and other important information which can be downloaded by Portfolio+Plus users:
Did you know?
Did you know? provides interesting facts and information regarding CHEP‟s business worldwide:
2211
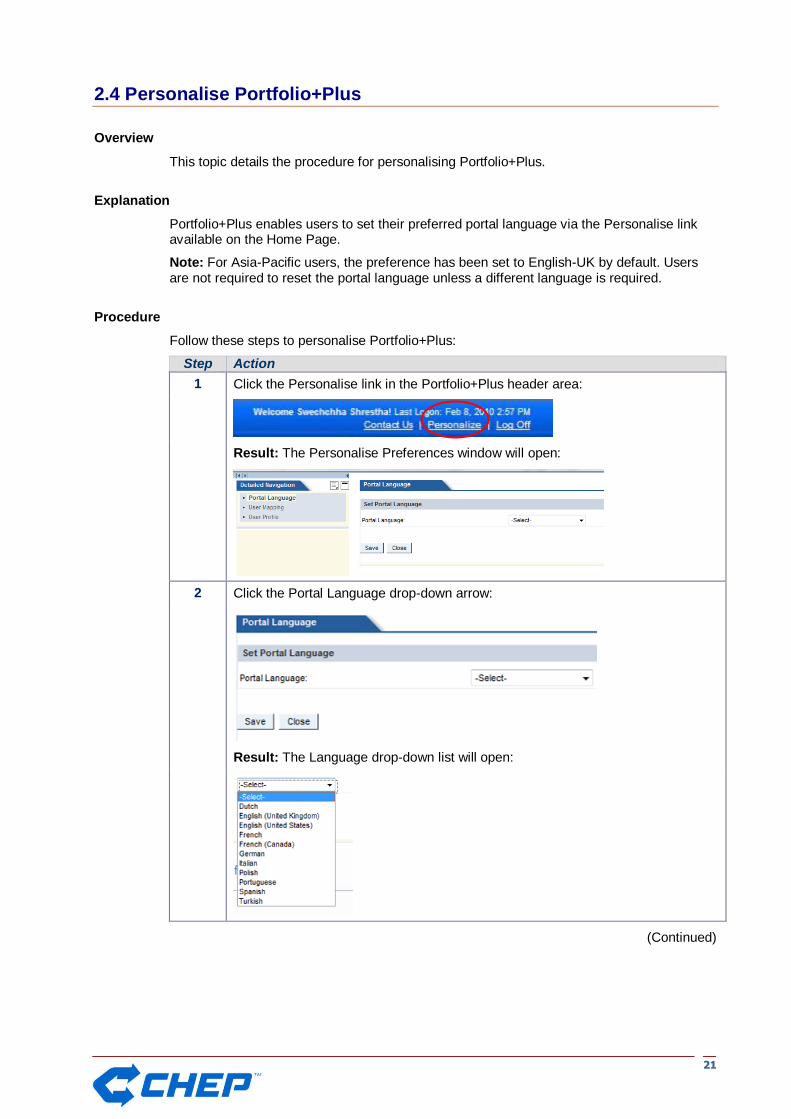
2.4 Personalise Portfolio+Plus
Overview
This topic details the procedure for personalising Portfolio+Plus.
Explanation
Portfolio+Plus enables users to set their preferred portal language via the Personalise link available on the Home Page.
Note: For Asia-Pacific users, the preference has been set to English-UK by default. Users are not required to reset the portal language unless a different language is required.
Procedure
Follow these steps to personalise Portfolio+Plus:
Step Action
1 Click the Personalise link in the Portfolio+Plus header area:
Result: The Personalise Preferences window will open:
2 Click the Portal Language drop-down arrow:
Result: The Language drop-down list will open:
(Continued)
2222
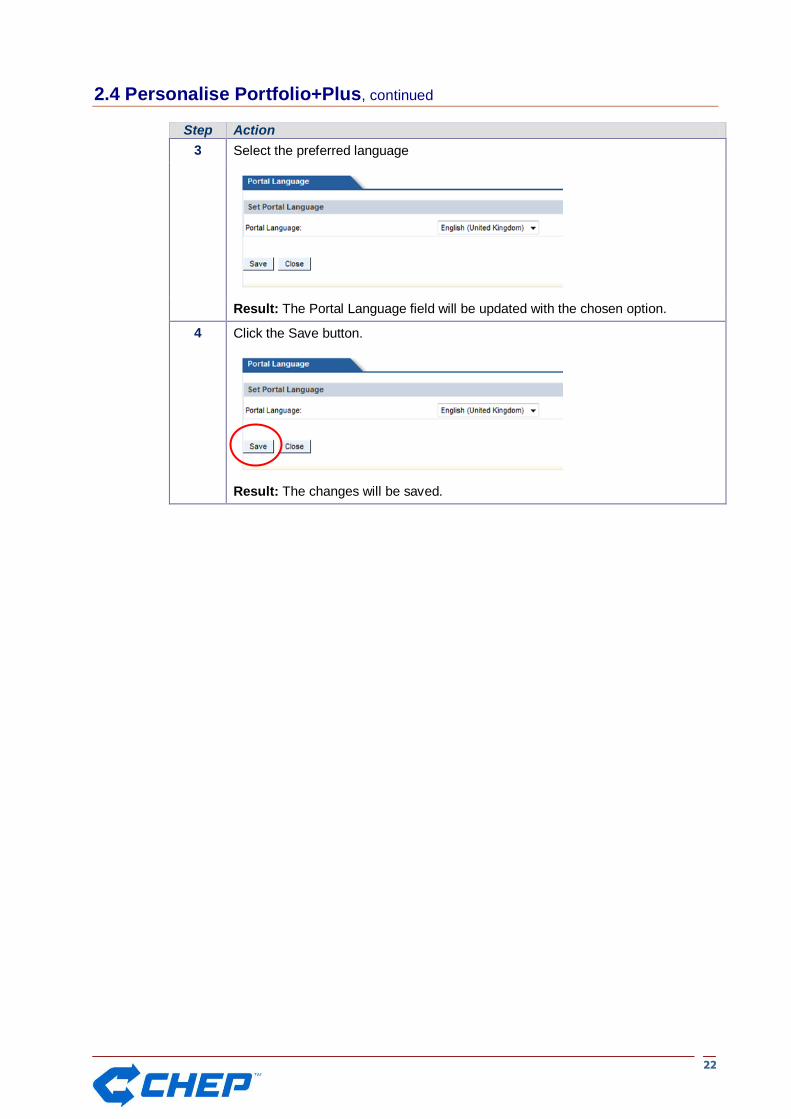
2.4 Personalise Portfolio+Plus, continued
Step Action
3 Select the preferred language
Result: The Portal Language field will be updated with the chosen option.
4 Click the Save button.
Result: The changes will be saved.

2233
2.5 Log out of Portfolio+Plus
Overview
This topic details the procedure for logging out of Portfolio+Plus.
Explanation
It is recommended that users log out of Portfolio+Plus whenever they are not required to use the system. This will ensure the accuracy and security of data entered into Portfolio+Plus.
Procedure
Follow these steps to log out of Portfolio+Plus:
Step Action
1 Click Log Off.
Result: The following system message window will open:
2 Click Yes.
Result: Portfolio+Plus will log off and the Welcome window will be displayed:

2244
This page left blank intentionally.
2255
Chapter 3: Orders
Overview
This chapter details the Order functions available in Portfolio+Plus.
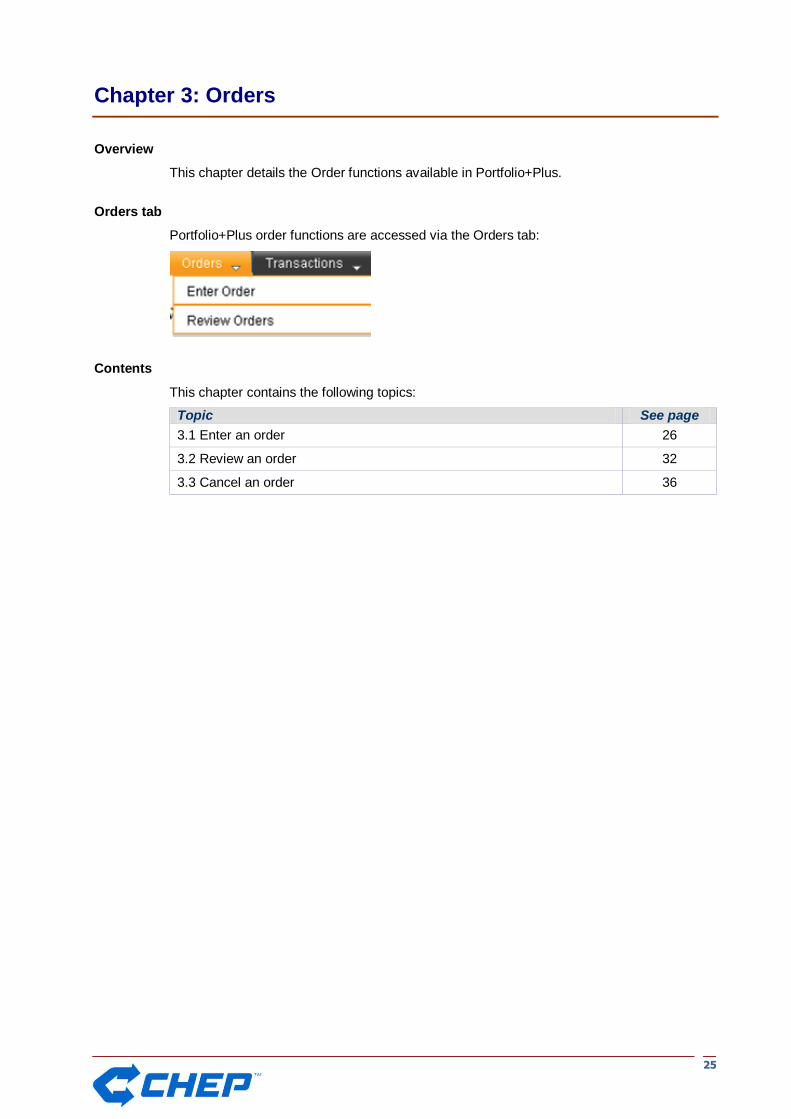
Orders tab
Portfolio+Plus order functions are accessed via the Orders tab:
Contents
This chapter contains the following topics:
Topic See page
3.1 Enter an order 26
3.2 Review an order 32
3.3 Cancel an order 36
2266
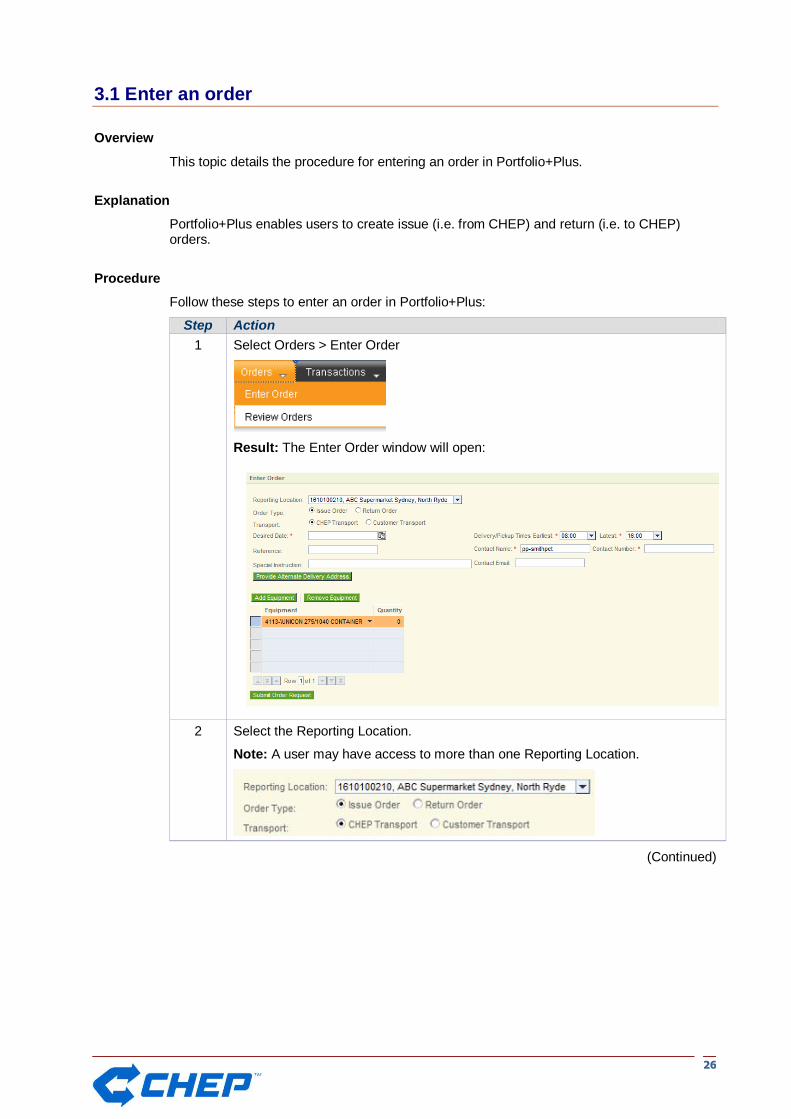
3.1 Enter an order
Overview
This topic details the procedure for entering an order in Portfolio+Plus.
Explanation
Portfolio+Plus enables users to create issue (i.e. from CHEP) and return (i.e. to CHEP) orders.
Procedure
Follow these steps to enter an order in Portfolio+Plus:
Step Action
1 Select Orders > Enter Order
Result: The Enter Order window will open:
2 Select the Reporting Location.
Note: A user may have access to more than one Reporting Location.
(Continued)

2277
3.1 Enter an order, continued
Step Action
3 Select the Order Type.
If... Then select...
Issue
Return
4 Select the Transport method.
If... Then...
CHEP transport Select CHEP transport, then
Go to step 6
Customer transport Select Customer Transport, then
Go to step 5
5 Select the CHEP Service Centre/Plant code.
Note: Portfolio+Plus will display a list of previously used codes for this field.
If the code is... Then...
Shown Select the required code from the list
Not shown Click the Search Service Center/Plant button, then
Locate the required code
(Continued)
2288
3.1 Enter an order, continued
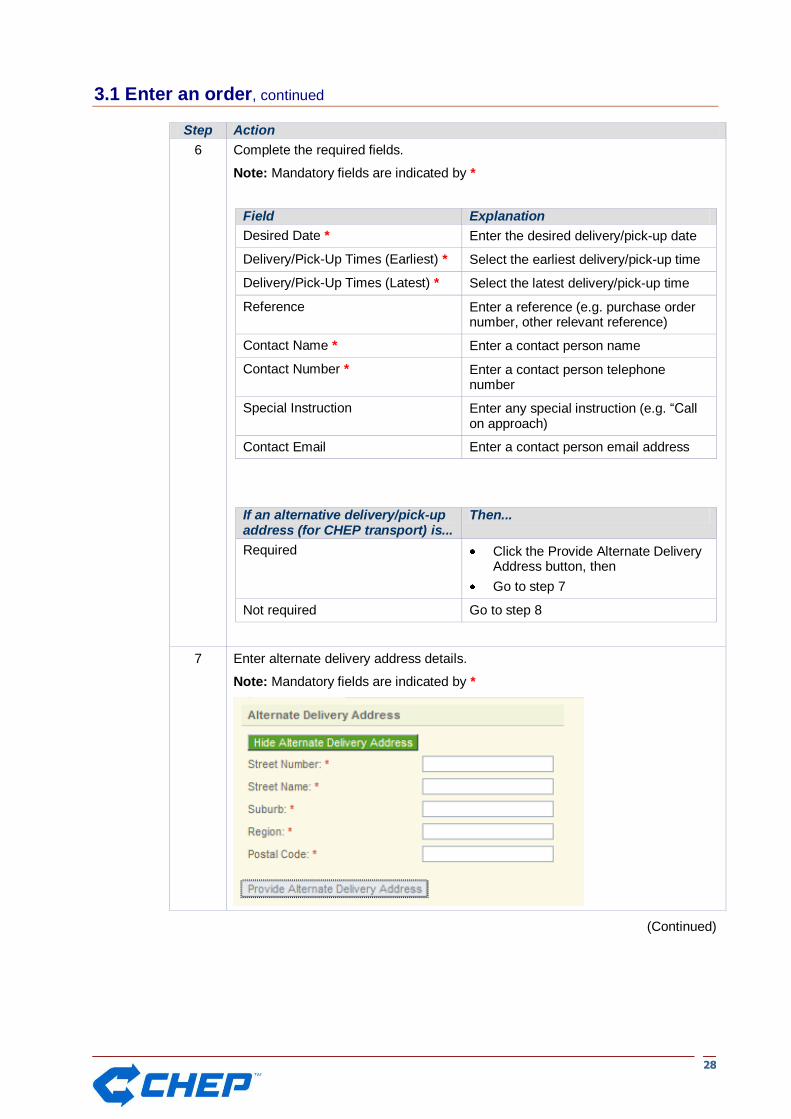
Step Action
6 Complete the required fields.
Note: Mandatory fields are indicated by *
Field Explanation
Desired Date * Enter the desired delivery/pick-up date
Delivery/Pick-Up Times (Earliest) * Select the earliest delivery/pick-up time
Delivery/Pick-Up Times (Latest) * Select the latest delivery/pick-up time
Reference Enter a reference (e.g. purchase order number, other relevant reference)
Contact Name * Enter a contact person name
Contact Number * Enter a contact person telephone number
Special Instruction Enter any special instruction (e.g. “Call on approach)
Contact Email Enter a contact person email address
If an alternative delivery/pick-up address (for CHEP transport) is...
Then...
Required Click the Provide Alternate Delivery Address button, then
Go to step 7
Not required Go to step 8
7 Enter alternate delivery address details.
Note: Mandatory fields are indicated by *
(Continued)
2299
3.1 Enter an order, continued
Step Action
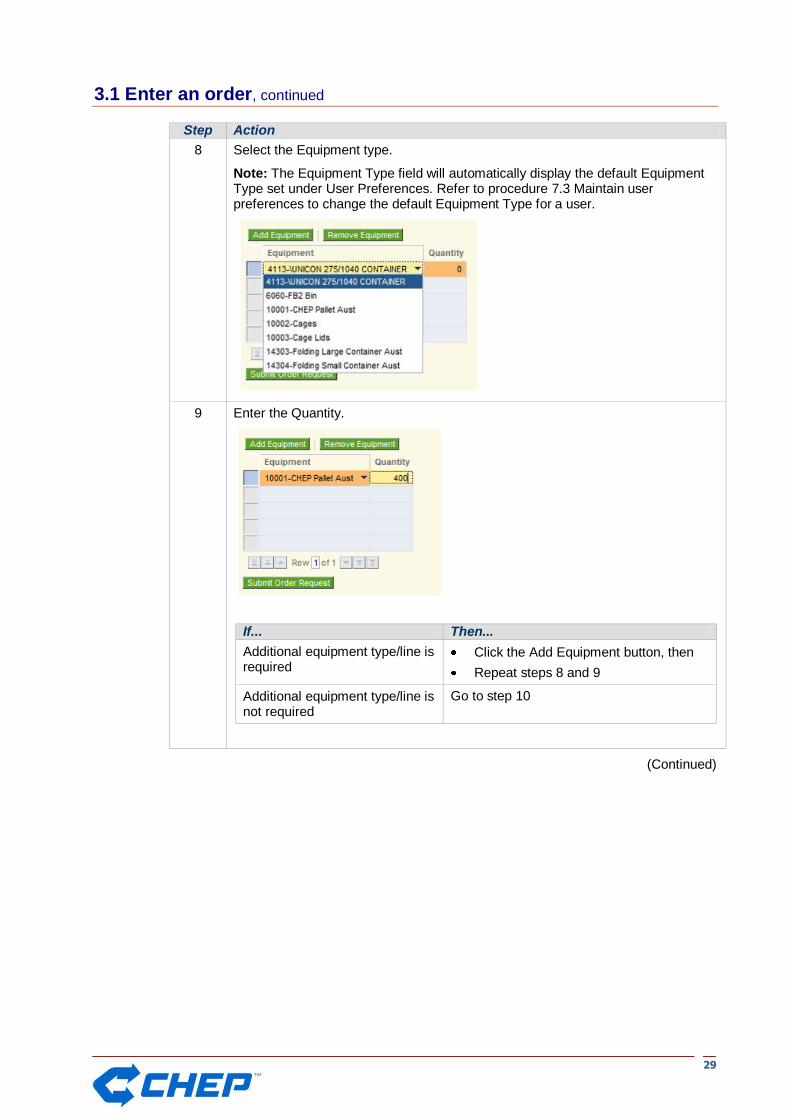
8 Select the Equipment type.
Note: The Equipment Type field will automatically display the default Equipment Type set under User Preferences. Refer to procedure 7.3 Maintain user preferences to change the default Equipment Type for a user.
9 Enter the Quantity.
If... Then...
Additional equipment type/line is required
Click the Add Equipment button, then
Repeat steps 8 and 9
Additional equipment type/line is not required
Go to step 10
(Continued)

3300
3.1 Enter an order, continued
Step Action
10 Click the Submit Order Request button.
If... Then...
CHEP transport Order Summary details will display. Go to step 11
Customer transport Transport Terms and Conditions will display. Go to step 13
11 Review Order Summary details.
Note: Please be aware of any system message displayed in the top left-hand corner of the window:
If you wish to... Then...
Edit/amend the order Click the Edit Order button, then
Repeat steps 8 to 11
Create the order Click the Create Order(s) button, then
Go to step 12
(Continued)
3311
3.1 Enter an order, continued
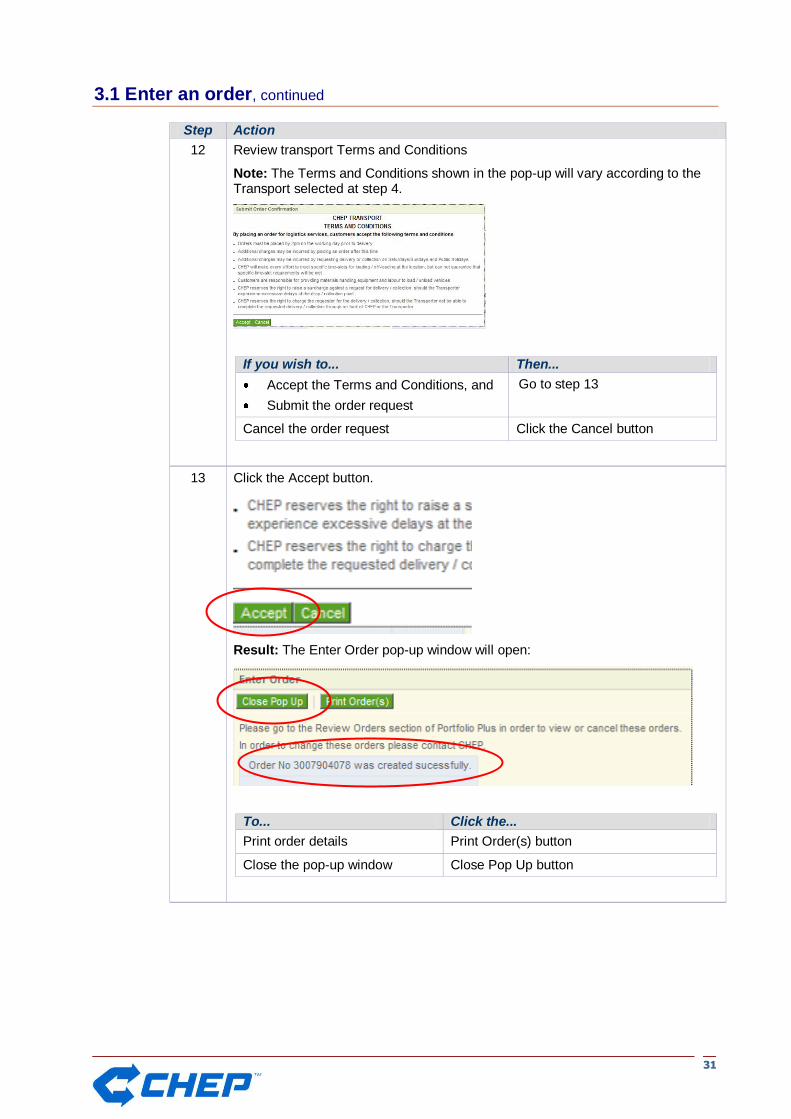
Step Action
12 Review transport Terms and Conditions
Note: The Terms and Conditions shown in the pop-up will vary according to the Transport selected at step 4.
If you wish to... Then...
Accept the Terms and Conditions, and
Submit the order request
Go to step 13
Cancel the order request Click the Cancel button
13 Click the Accept button.
Result: The Enter Order pop-up window will open:
To... Click the...
Print order details Print Order(s) button
Close the pop-up window Close Pop Up button

3322
3.2 Review an order
Overview
This topic details the procedure to review order details in Portfolio+Plus.
Explanation
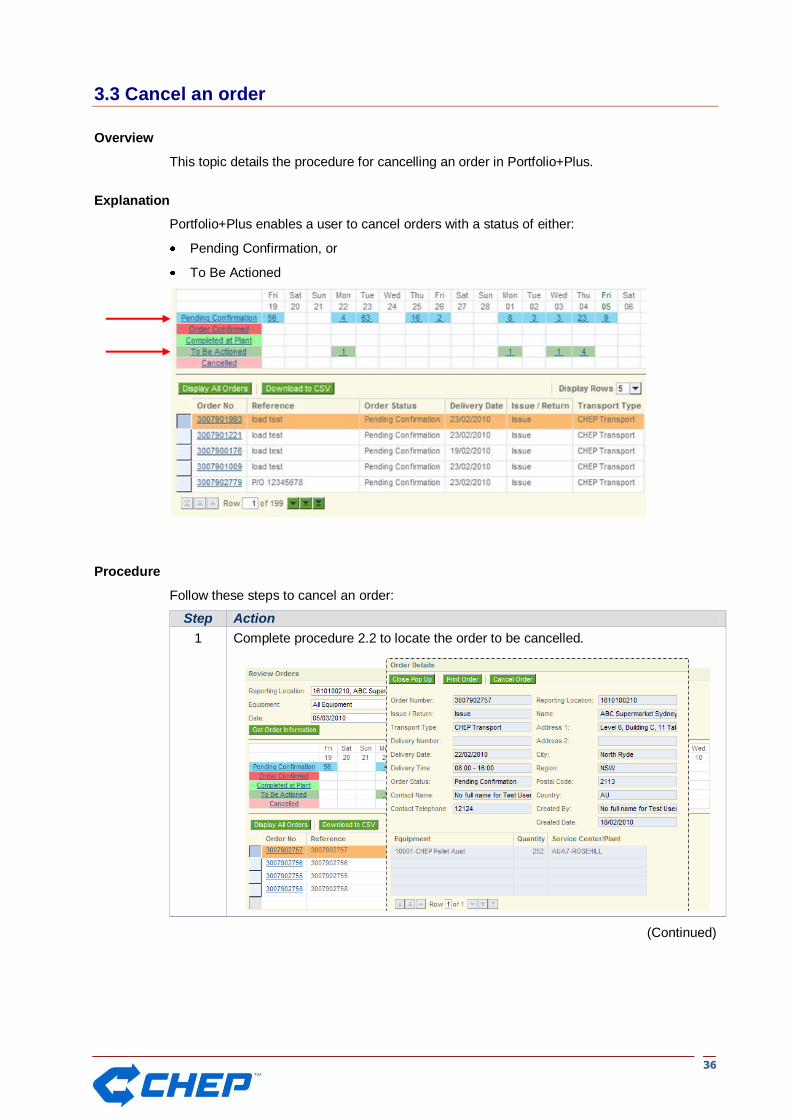
Portfolio+Plus enables a user to retrieve and review details of all orders placed via Portfolio+Plus, telephone, email and fax. Orders will be displayed according to:
Order date (i.e. the date on which the order was originally placed), and
Status
The following table explains the status types used in Portfolio+Plus:
Status Explanation
The order has yet to be confirmed by CHEP.
The order has been confirmed by CHEP.
The order has been completed by CHEP.
The order has gone past the Preferred Date and has yet to be Confirmed or Completed at Plant.
The order has been cancelled.
Procedure
Follow these steps to review an order in Portfolio+Plus:
Step Action
1 Select Orders > Review Orders
Result: The Review Orders window will open:
(Continued)
3333
3.2 Review an order, continued
Step Action
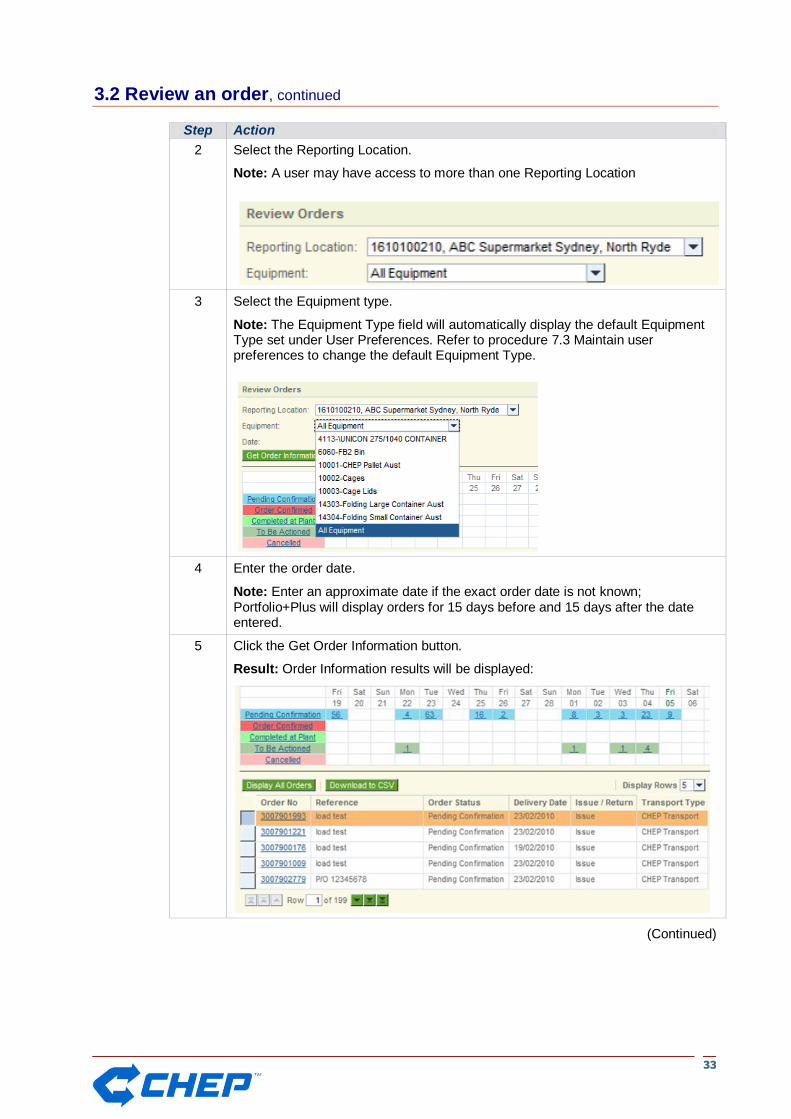
2 Select the Reporting Location.
Note: A user may have access to more than one Reporting Location
3 Select the Equipment type.
Note: The Equipment Type field will automatically display the default Equipment Type set under User Preferences. Refer to procedure 7.3 Maintain user preferences to change the default Equipment Type.
4 Enter the order date.
Note: Enter an approximate date if the exact order date is not known; Portfolio+Plus will display orders for 15 days before and 15 days after the date entered.
5 Click the Get Order Information button.
Result: Order Information results will be displayed:
(Continued)

3344
3.2 Review an order, continued
Step Action
6 View search results.
Note: Search results may be filtered and displayed by:
Order date, or
Status
To display... Click the...
Orders placed on a specific date Specific date
Orders pending confirmation link
Orders which have been confirmed link
Orders completed at plant link
Orders to be actioned link
Cancelled orders link
All orders button
Result: Orders will be displayed:
(Continued)
3355
3.2 Review an order, continued
Step Action
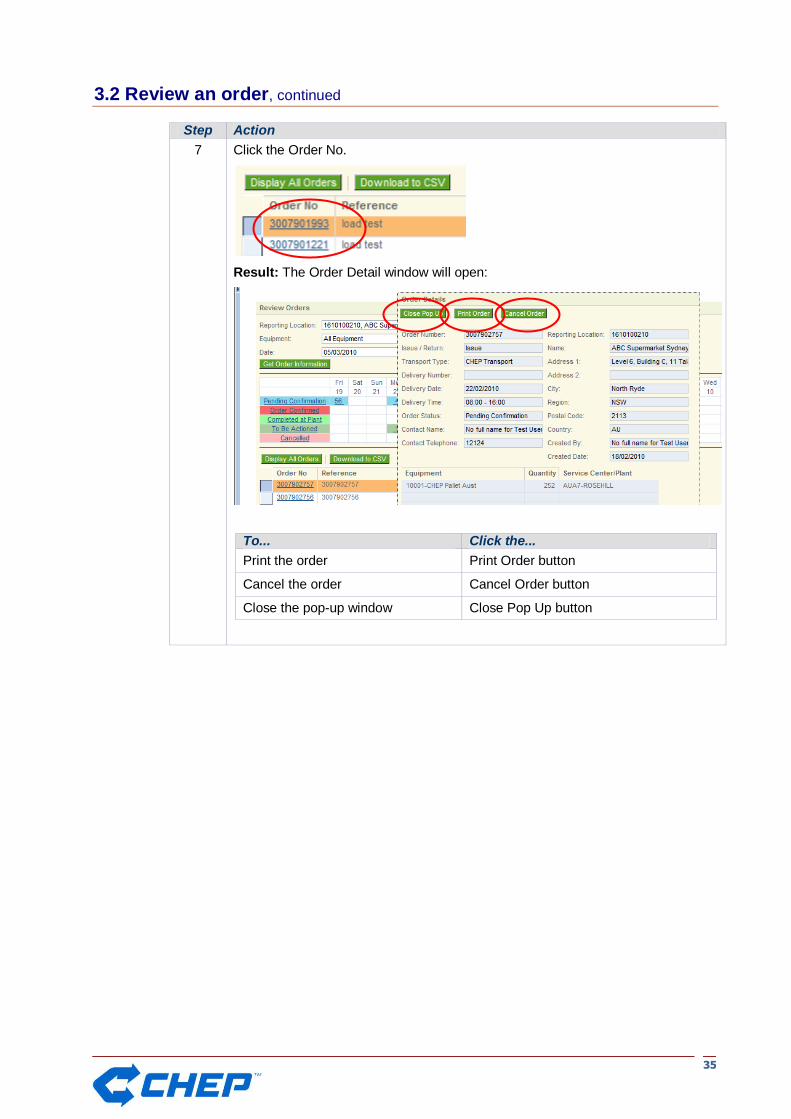
7 Click the Order No.
Result: The Order Detail window will open:
To... Click the...
Print the order Print Order button
Cancel the order Cancel Order button
Close the pop-up window Close Pop Up button
3366
3.3 Cancel an order
Overview
This topic details the procedure for cancelling an order in Portfolio+Plus.
Explanation
Portfolio+Plus enables a user to cancel orders with a status of either:
Pending Confirmation, or
To Be Actioned
Procedure
Follow these steps to cancel an order:
Step Action
1 Complete procedure 2.2 to locate the order to be cancelled.
(Continued)
3377
3.3 Cancel an order, continued
Step Action
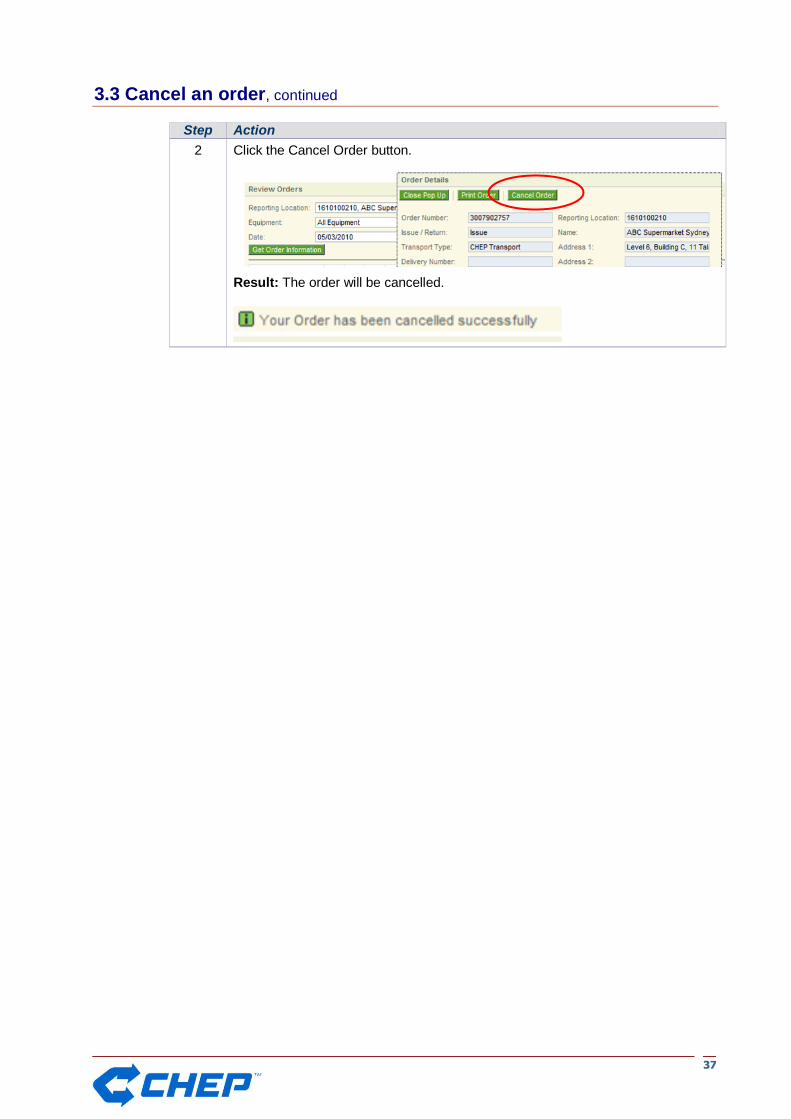
2 Click the Cancel Order button.
Result: The order will be cancelled.

3388
This page left blank intentionally.
3399
Chapter 4: Transactions
Overview
This chapter details the transaction functions available in Portfolio+Plus.
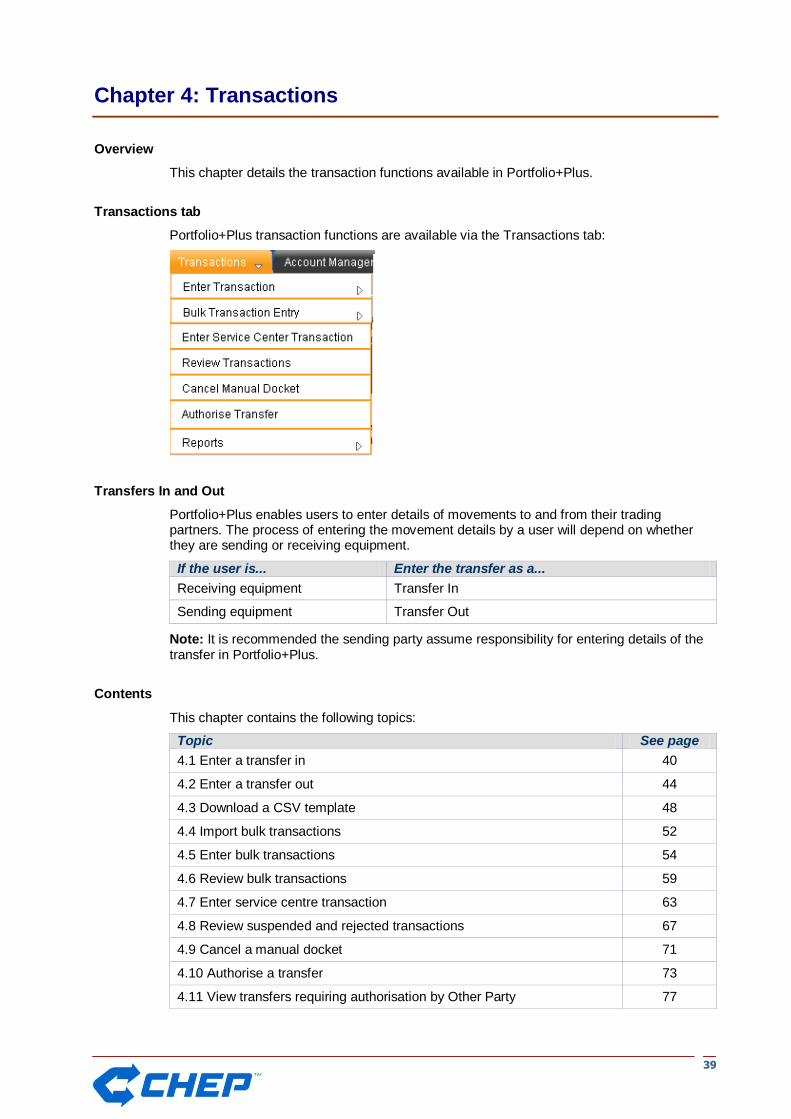
Transactions tab
Portfolio+Plus transaction functions are available via the Transactions tab:
Transfers In and Out
Portfolio+Plus enables users to enter details of movements to and from their trading partners. The process of entering the movement details by a user will depend on whether they are sending or receiving equipment.
If the user is... Enter the transfer as a...
Receiving equipment Transfer In
Sending equipment Transfer Out
Note: It is recommended the sending party assume responsibility for entering details of the transfer in Portfolio+Plus.
Contents
This chapter contains the following topics:
Topic See page
4.1 Enter a transfer in 40
4.2 Enter a transfer out 44
4.3 Download a CSV template 48
4.4 Import bulk transactions 52
4.5 Enter bulk transactions 54
4.6 Review bulk transactions 59
4.7 Enter service centre transaction 63
4.8 Review suspended and rejected transactions 67
4.9 Cancel a manual docket 71
4.10 Authorise a transfer 73
4.11 View transfers requiring authorisation by Other Party 77
4.1 Enter a transfer in
Overview
This topic details the procedure for entering a transfer in.
Explanation
Portfolio+Plus enables users to enter details of inward transfers to assist with managing and accounting for movements from trading partners.
Portfolio+Plus users will typically enter a “transfer in” where a sending party has not already entered the movement as a “transfer out”, or has not provided a docket number.
Important: Do not enter a “transfer in” if a trading partner has already entered the movement as a “transfer out” in Portfolio+Plus as this will display a duplicate transaction error.
Procedure
Follow these steps to enter a transfer in:
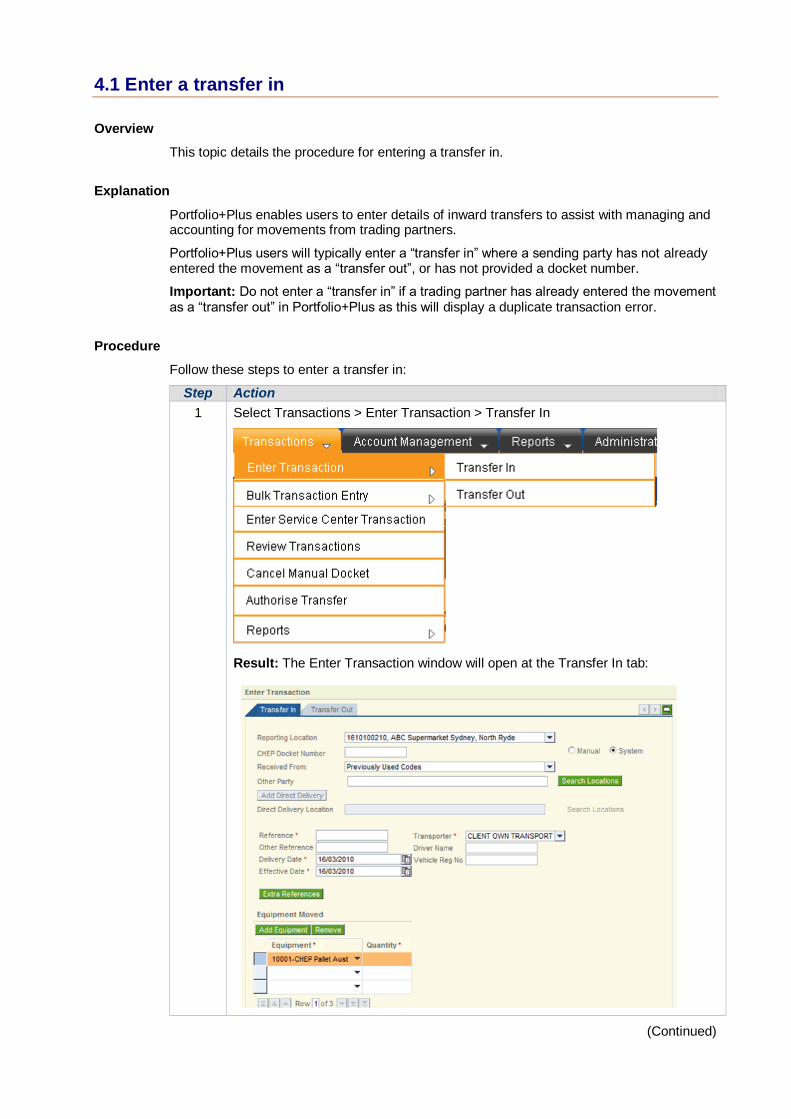
Step Action
1 Select Transactions > Enter Transaction > Transfer In
Result: The Enter Transaction window will open at the Transfer In tab:
(Continued)
4411
4.1 Enter a transfer in, continued
Step Action
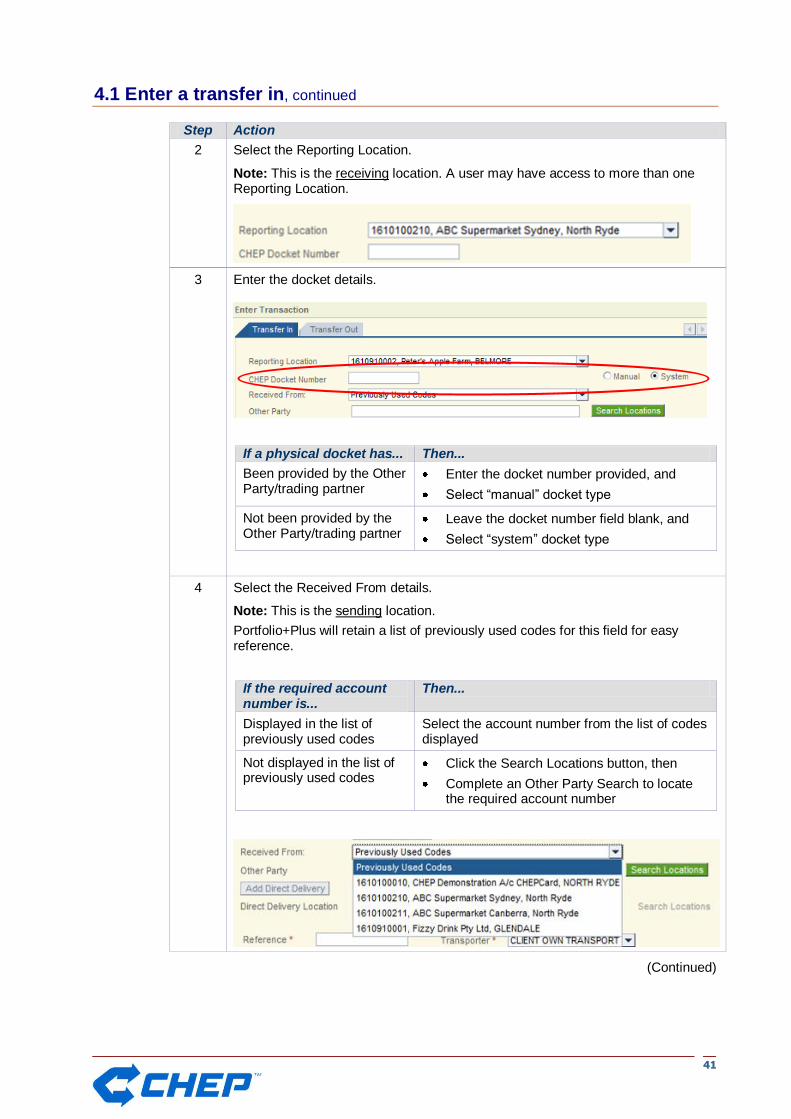
2 Select the Reporting Location.
Note: This is the receiving location. A user may have access to more than one Reporting Location.
3 Enter the docket details.
If a physical docket has... Then...
Been provided by the Other Party/trading partner
Enter the docket number provided, and
Select “manual” docket type
Not been provided by the Other Party/trading partner
Leave the docket number field blank, and
Select “system” docket type
4 Select the Received From details.
Note: This is the sending location.
Portfolio+Plus will retain a list of previously used codes for this field for easy reference.
If the required account number is...
Then...
Displayed in the list of previously used codes
Select the account number from the list of codes displayed
Not displayed in the list of previously used codes
Click the Search Locations button, then
Complete an Other Party Search to locate the required account number
(Continued)
4422
4.1 Enter a transfer in, continued
Step Action
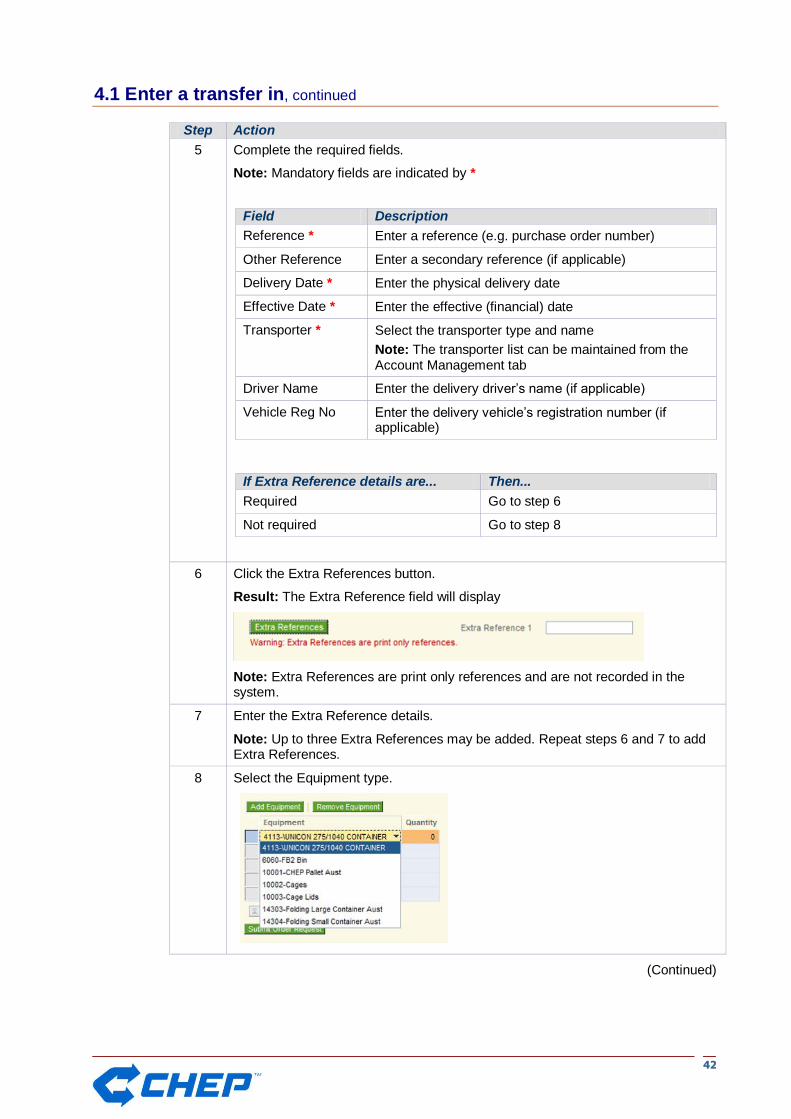
5 Complete the required fields.
Note: Mandatory fields are indicated by *
Field Description
Reference * Enter a reference (e.g. purchase order number)
Other Reference Enter a secondary reference (if applicable)
Delivery Date * Enter the physical delivery date
Effective Date * Enter the effective (financial) date
Transporter * Select the transporter type and name
Note: The transporter list can be maintained from the Account Management tab
Driver Name Enter the delivery driver‟s name (if applicable)
Vehicle Reg No Enter the delivery vehicle‟s registration number (if applicable)
If Extra Reference details are... Then...
Required Go to step 6
Not required Go to step 8
6 Click the Extra References button.
Result: The Extra Reference field will display
Note: Extra References are print only references and are not recorded in the system.
7 Enter the Extra Reference details.
Note: Up to three Extra References may be added. Repeat steps 6 and 7 to add Extra References.
8 Select the Equipment type.
(Continued)

4433
4.1 Enter a transfer in, continued
Step Action
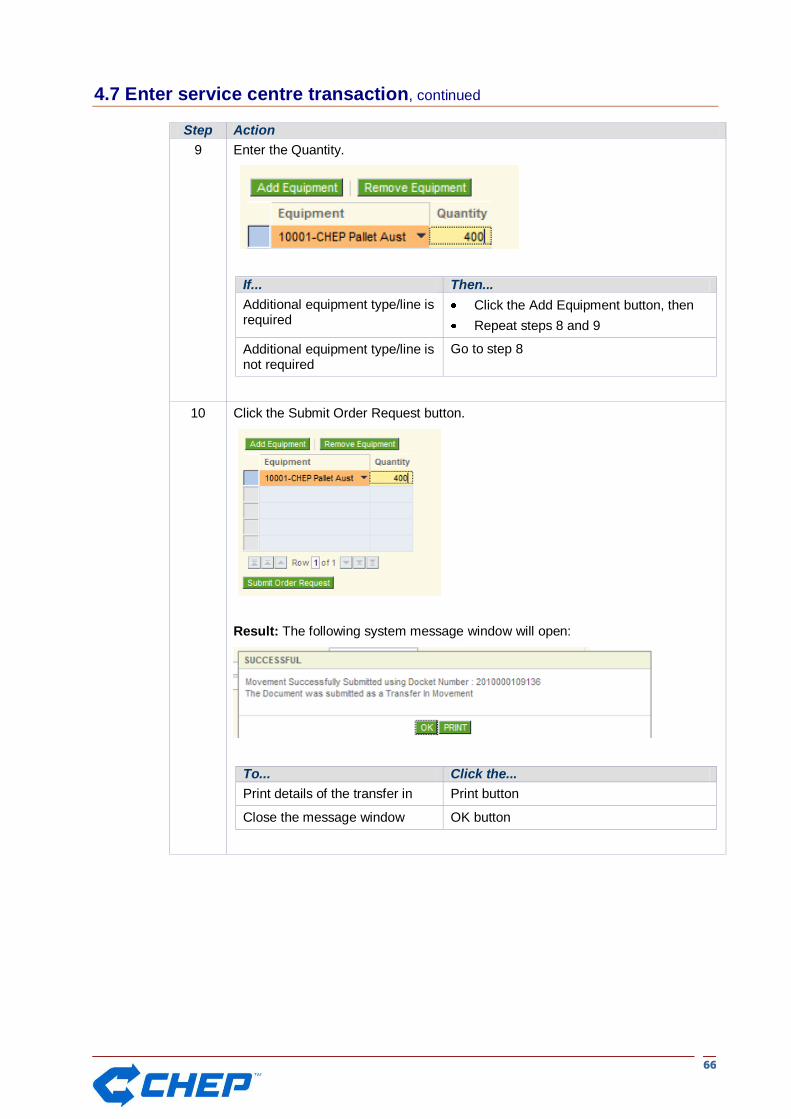
9 Enter the Quantity.
If... Then...
Additional equipment type/line is required
Click the Add Equipment button, then
Repeat steps 8 and 9
Additional equipment type/line is not required
Go to step 10
10 Click the Submit Order Request button.
Result: The following system message window will open:
Note: Portfolio+Plus will display an error message if the docket has already been notified.
To... Click the...
Print details of the transfer in Print button
Close the message window OK button

4444
4.2 Enter a transfer out
Overview
This topic details the procedure for entering a transfer out.
Explanation
Portfolio+Plus enables users to enter details of outward transfers to assist with managing and accounting for movements from trading partners.
Portfolio+Plus users will typically enter a movement as a “transfer in” where a sending party has not entered the movement as a “transfer out” or does not use Portfolio+Plus.
Important: Receiving parties with a “Receiver Must Declare” account indicator must also authorise the inward transfer to their account. Refer to procedure 4.10 Authorise a transfer for details.
Procedure
Follow these steps to enter a transfer out:
Step Action
1 Transactions > Enter Transaction > Transfer Out
Result: The Enter Transaction window will open at the Transfer Out tab:
(Continued)
4455
4.2 Enter a transfer out, continued
Step Action
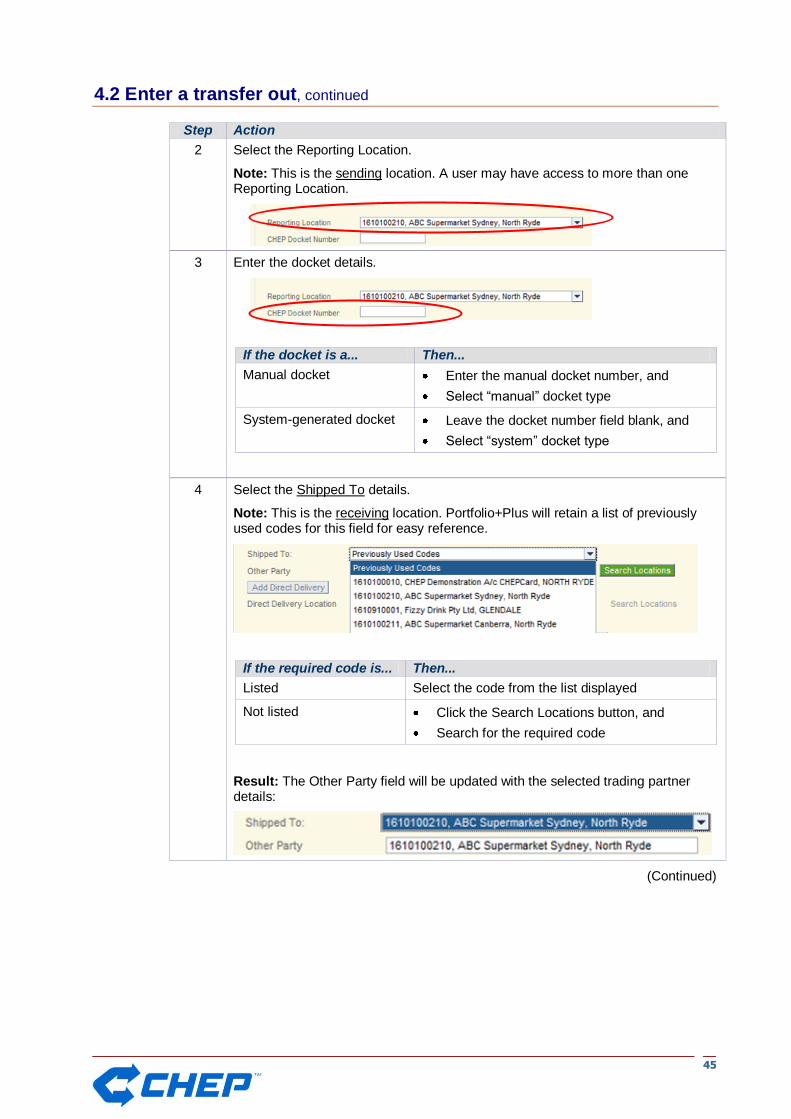
2 Select the Reporting Location.
Note: This is the sending location. A user may have access to more than one Reporting Location.
3 Enter the docket details.
If the docket is a... Then...
Manual docket Enter the manual docket number, and
Select “manual” docket type
System-generated docket Leave the docket number field blank, and
Select “system” docket type
4 Select the Shipped To details.
Note: This is the receiving location. Portfolio+Plus will retain a list of previously used codes for this field for easy reference.
If the required code is... Then...
Listed Select the code from the list displayed
Not listed Click the Search Locations button, and
Search for the required code
Result: The Other Party field will be updated with the selected trading partner details:
(Continued)

4466
4.2 Enter a transfer out, continued
Step Action
5 Complete the required fields.
Note: Mandatory fields are indicated by *
Field Description
Reference * Enter a reference (e.g. purchase order number)
Other Reference Enter a secondary reference (if applicable)
Shipment Date * Enter the physical delivery date
Effective Date * Enter the effective (financial) date
Transporter * Select the transporter type and name
Driver Name Enter the delivery driver‟s name (if applicable)
Vehicle Reg No Enter the delivery vehicle‟s registration number (if applicable)
If Extra Reference details are... Then...
Required Go to step 6
Not required Go to step 8
6 Click the Extra References button.
Result: The Extra Reference field will display
Note: Extra References are print only references and are not recorded in the system.
7 Enter the Extra Reference details.
Note: Up to three Extra References may be added. Repeat steps 6 and 7 to add Extra References.
8 Select the Equipment type.
(Continued)
4477
4.2 Enter a transfer out, continued
Step Action
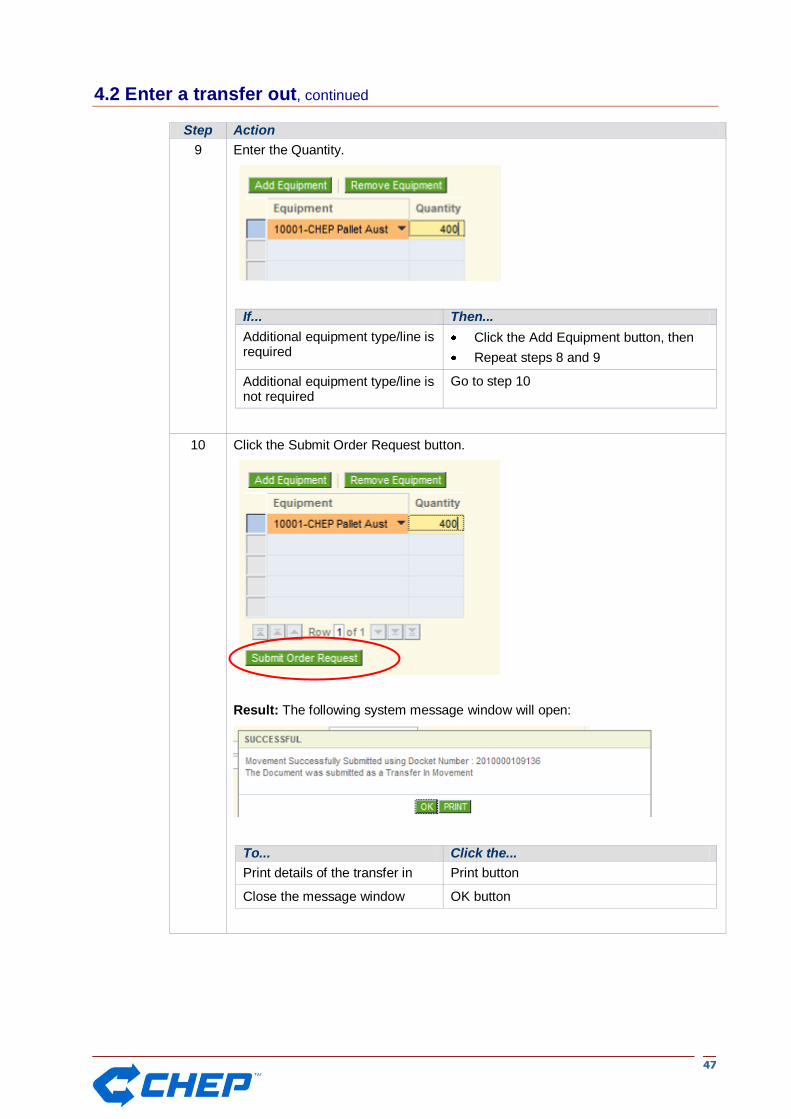
9 Enter the Quantity.
If... Then...
Additional equipment type/line is required
Click the Add Equipment button, then
Repeat steps 8 and 9
Additional equipment type/line is not required
Go to step 10
10 Click the Submit Order Request button.
Result: The following system message window will open:
To... Click the...
Print details of the transfer in Print button
Close the message window OK button

4488
4.3 Download a CSV template
Overview
This topic details the procedure for downloading a Comma Separated Values (CSV) template for capturing offline transactions.
Explanation
Portfolio+Plus enables users to download a CSV template for capturing offline transactions in bulk. These offline transactions may then be uploaded to Portfolio+Plus at a later time.
Note: The most commonly-used CSV template is a MS Excel spreadsheet.
Procedure
Follow these steps to download a CSV template:
Step Action
1 Select Transactions > Bulk Transaction Entry > Import
Result: The Bulk Transaction Entry Import window will open:
(Continued)

4499
4.3 Download a CSV template, continued
Step Action
2 Click the CSV Template link
Result: The File Download message window will open:
3 Click the Save button.
Result: The Save As window will open:
(Continued)
5500
4.3 Download a CSV template, continued
Step Action
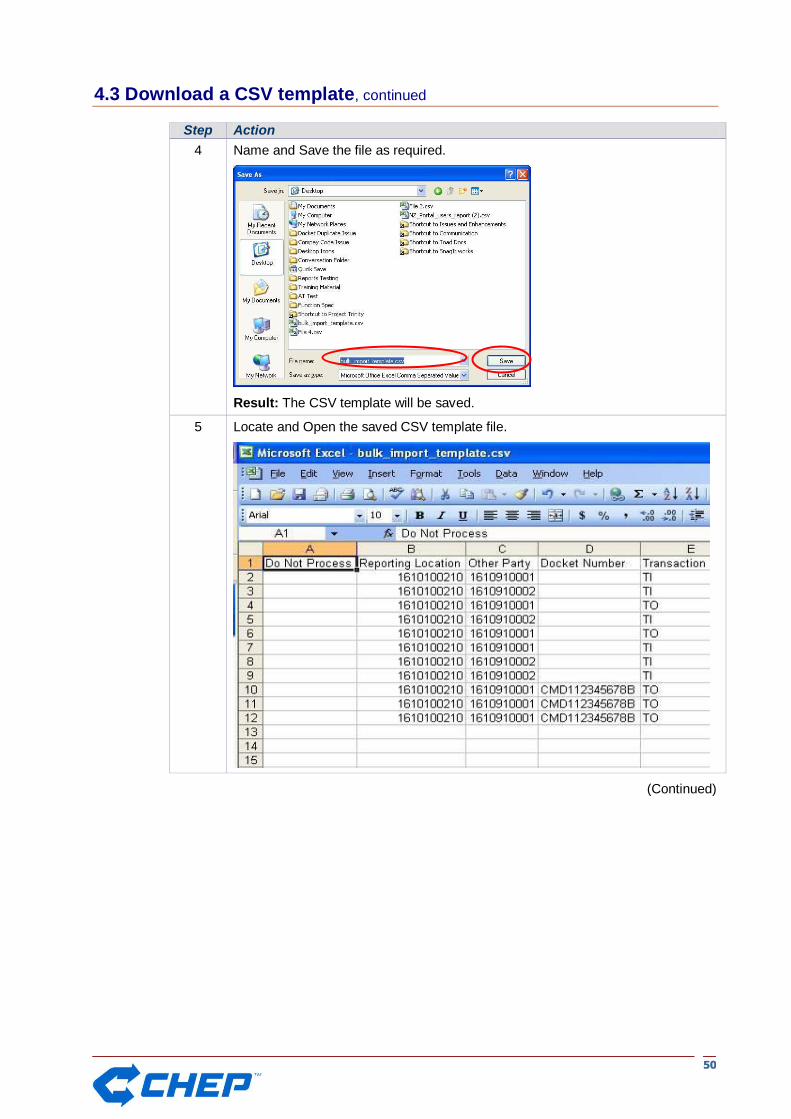
4 Name and Save the file as required.
Result: The CSV template will be saved.
5 Locate and Open the saved CSV template file.
(Continued)
5511
4.3 Download a CSV template, continued
Step Action
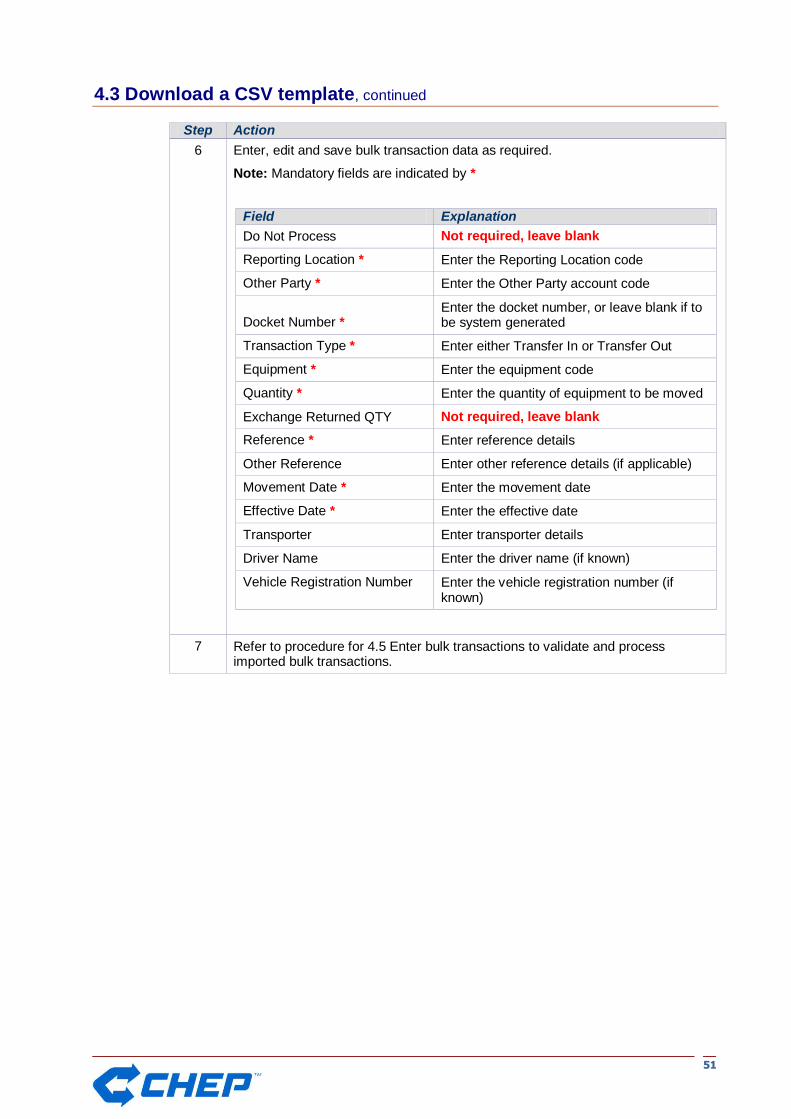
6 Enter, edit and save bulk transaction data as required.
Note: Mandatory fields are indicated by *
Field Explanation
Do Not Process Not required, leave blank
Reporting Location * Enter the Reporting Location code
Other Party * Enter the Other Party account code
Docket Number * Enter the docket number, or leave blank if to be system generated
Transaction Type * Enter either Transfer In or Transfer Out
Equipment * Enter the equipment code
Quantity * Enter the quantity of equipment to be moved
Exchange Returned QTY Not required, leave blank
Reference * Enter reference details
Other Reference Enter other reference details (if applicable)
Movement Date * Enter the movement date
Effective Date * Enter the effective date
Transporter Enter transporter details
Driver Name Enter the driver name (if known)
Vehicle Registration Number Enter the vehicle registration number (if known)
7 Refer to procedure for 4.5 Enter bulk transactions to validate and process imported bulk transactions.
5522
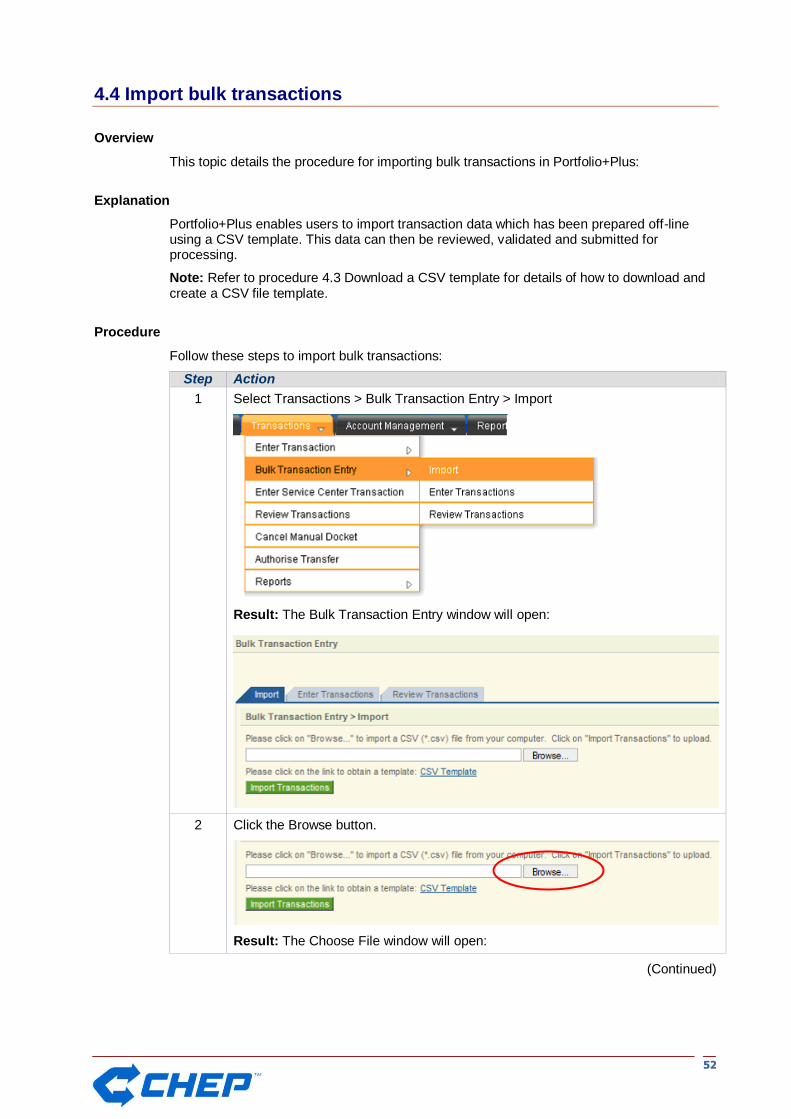
4.4 Import bulk transactions
Overview
This topic details the procedure for importing bulk transactions in Portfolio+Plus:
Explanation
Portfolio+Plus enables users to import transaction data which has been prepared off-line using a CSV template. This data can then be reviewed, validated and submitted for processing.
Note: Refer to procedure 4.3 Download a CSV template for details of how to download and create a CSV file template.
Procedure
Follow these steps to import bulk transactions:
Step Action
1 Select Transactions > Bulk Transaction Entry > Import
Result: The Bulk Transaction Entry window will open:
2 Click the Browse button.
Result: The Choose File window will open:
(Continued)

5533
4.4 Import bulk transactions, continued
Step Action
3 Locate the CSV file to be uploaded
4 Click the Open button
Result: The file path details will be updated in Portfolio+Plus:
5 Click the Import Transactions button.
Result: The CSV file data will be imported to Portfolio+Plus.
6 Complete procedure 4.6 Review bulk transactions to validate and submit the imported transactions for processing.

5544
4.5 Enter bulk transactions
Overview
This topic details the procedure for entering bulk transactions.
Explanation
Portfolio+Plus enables users to enter multiple transactions in “bulk”. This can help save time when a user needs to enter multiple transactions during the same session.
Procedure
Follow these steps to enter bulk transactions in Portfolio+Plus:
Step Action
1 Select Transactions > Bulk Transaction Entry > Enter Transactions
Result: The Bulk Transaction Entry window will open:
2 Select the Reporting Location.
Note: A user may have access to more than one Reporting Location.
(Continued)
5555
4.5 Enter bulk transactions, continued
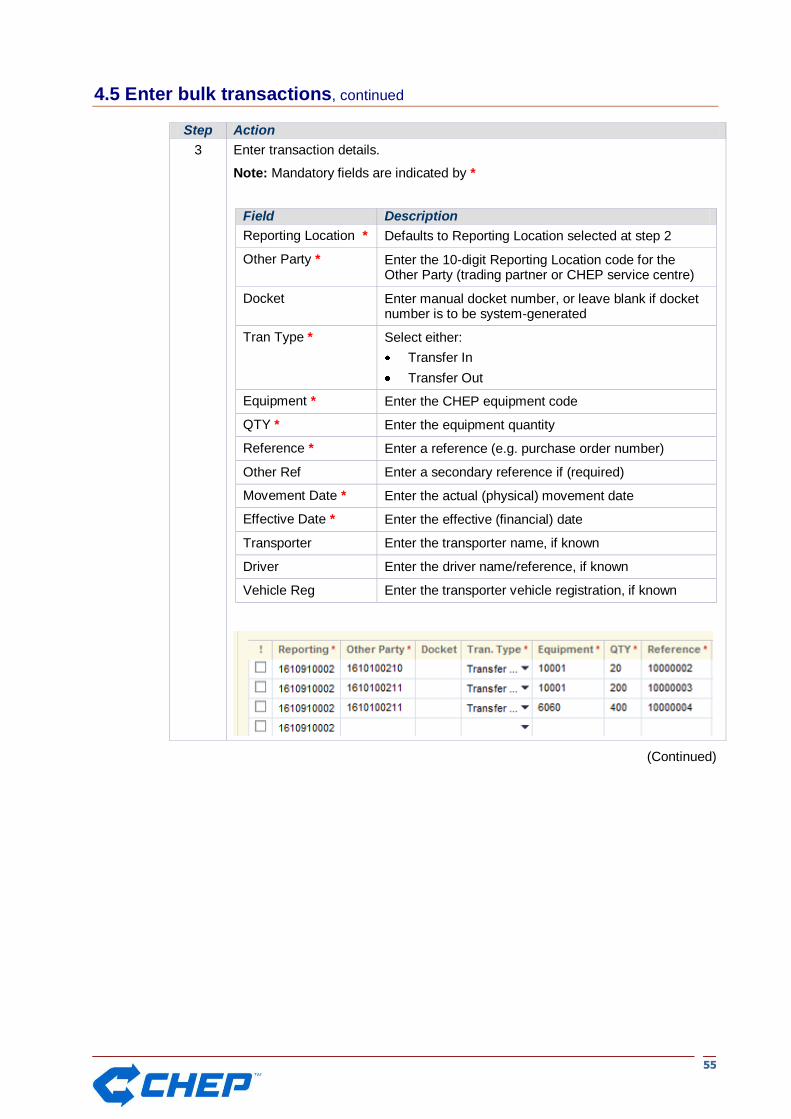
Step Action
3 Enter transaction details.
Note: Mandatory fields are indicated by *
Field Description
Reporting Location * Defaults to Reporting Location selected at step 2
Other Party * Enter the 10-digit Reporting Location code for the Other Party (trading partner or CHEP service centre)
Docket Enter manual docket number, or leave blank if docket number is to be system-generated
Tran Type * Select either:
Transfer In
Transfer Out
Equipment * Enter the CHEP equipment code
QTY * Enter the equipment quantity
Reference * Enter a reference (e.g. purchase order number)
Other Ref Enter a secondary reference if (required)
Movement Date * Enter the actual (physical) movement date
Effective Date * Enter the effective (financial) date
Transporter Enter the transporter name, if known
Driver Enter the driver name/reference, if known
Vehicle Reg Enter the transporter vehicle registration, if known
(Continued)

5566
4.5 Enter bulk transactions, continued
Step Action
4 Click the Validate button.
Result: Portfolio+Plus will validate the information entered and confirm the pre-processing status of each transaction. The pre-processing status confirms whether a transaction is free of errors and therefore able to be submitted for processing:
Pre-processing status Explanation
Clean The transaction is free from errors and may be submitted for processing
Error The transaction contains invalid data or is missing data. The transaction may not be submitted for processing until the error is fixed\
Warning The transaction contains a discrepancy but may be submitted for processing (e.g. the transaction is future-dated)
Tip: Click the “All” radio button to display all transactions, regardless of pre-processing status, in the same window.
(Continued)
5577
4.5 Enter bulk transactions, continued
Step Action
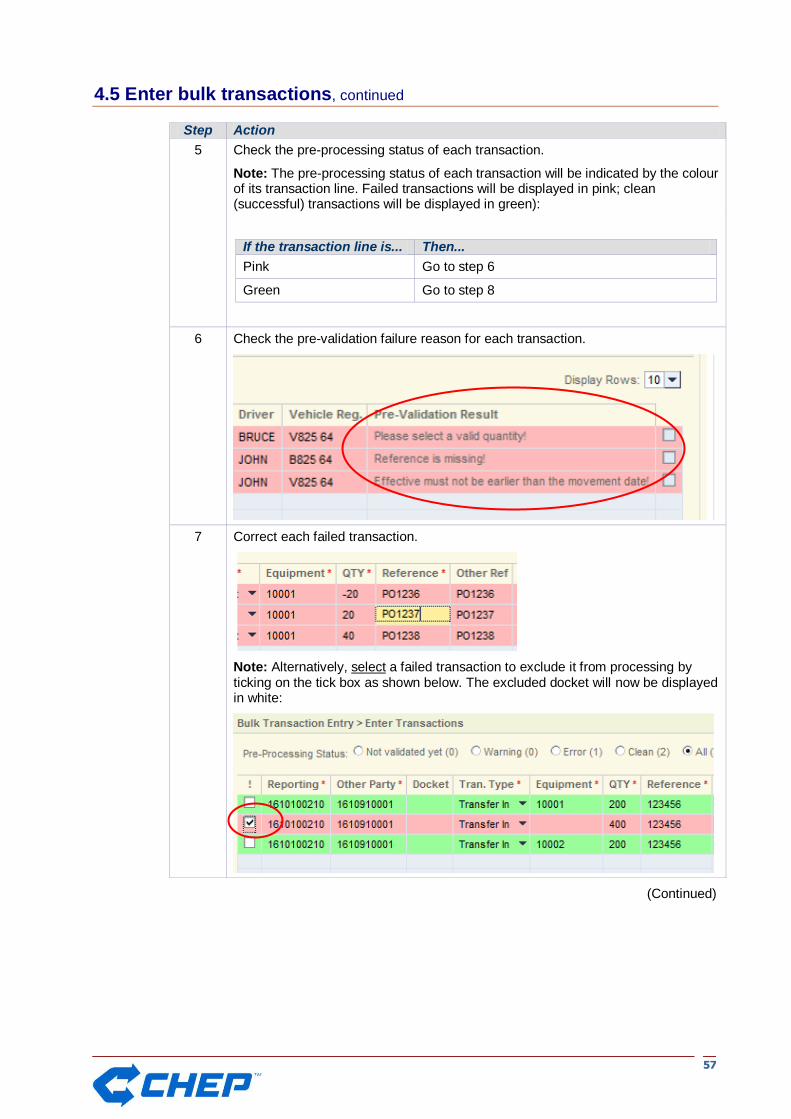
5 Check the pre-processing status of each transaction.
Note: The pre-processing status of each transaction will be indicated by the colour of its transaction line. Failed transactions will be displayed in pink; clean (successful) transactions will be displayed in green):
If the transaction line is... Then...
Pink Go to step 6
Green Go to step 8
6 Check the pre-validation failure reason for each transaction.
7 Correct each failed transaction.
Note: Alternatively, select a failed transaction to exclude it from processing by ticking on the tick box as shown below. The excluded docket will now be displayed in white:
(Continued)

5588
4.5 Enter bulk transactions, continued
Step Action
8 Click the Submit for Processing button.
Result: The clean transactions will be assigned a Bulk ID and submitted for processing.
Note: Click the Download to CSV button to download bulk transaction details in CSV format:
9 Refer to procedure 4.6 Review bulk transactions to review the status of bulk transaction processing.
Note: Users will received an automatically-generated confirmation email when bulk transaction processing has been successfully completed.
To... Click the...
Authorise the selected transfer(s) Authorise button
Reject the selected transfer(s) Reject button
Edit the selected transfer(s) Edit button

5599
4.6 Review bulk transactions
Overview
This topic details the procedure for reviewing bulk transactions.
Explanation
Portfolio+Plus enables users to review details of bulk transactions including:
Bulk ID number
Created (i.e. the date bulk transactions were created)
Status (e.g. submitted, processed)
Note: Portfolio+Plus may also print details of all transactions, including future-dated transactions with a status of “suspended”.
Procedure
Follow these steps to review bulk transactions in Portfolio+Plus:
Step Action
1 Select Transactions > Bulk Transaction Entry > Review Transactions
Result: The Review Transactions window will open:
(Continued)
6600
4.6 Review bulk transactions, continued
Step Action
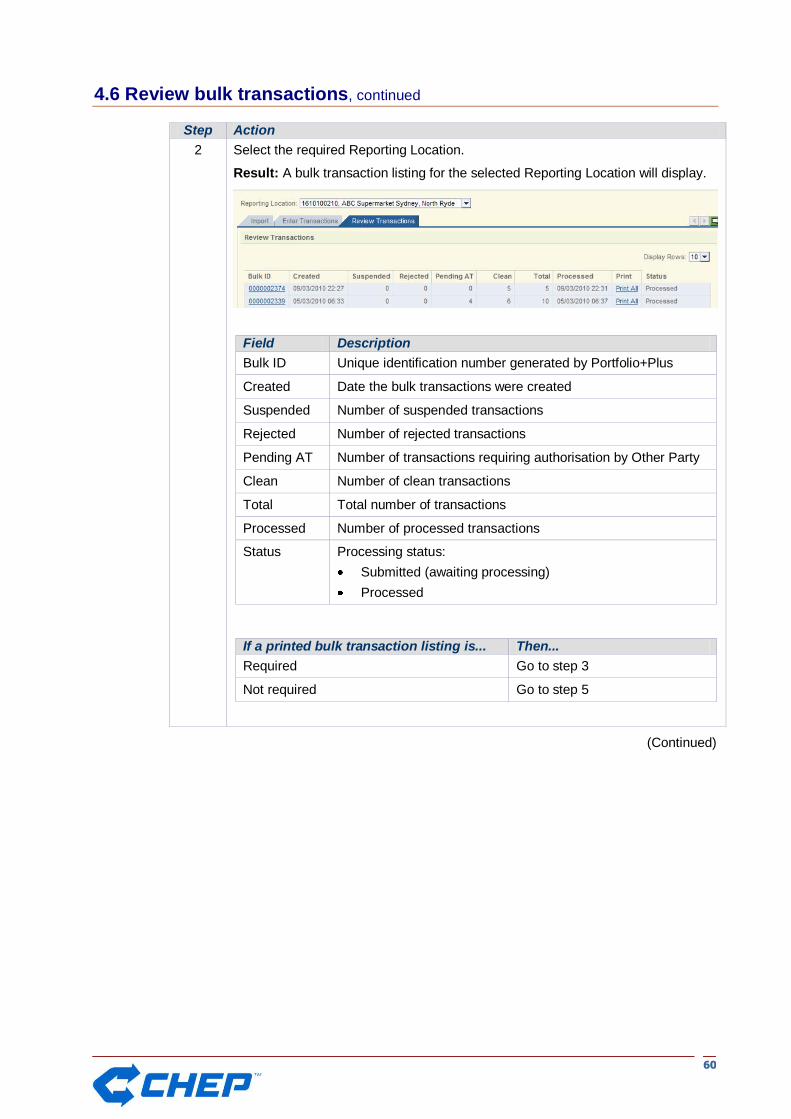
2 Select the required Reporting Location.
Result: A bulk transaction listing for the selected Reporting Location will display.
Field Description
Bulk ID Unique identification number generated by Portfolio+Plus
Created Date the bulk transactions were created
Suspended Number of suspended transactions
Rejected Number of rejected transactions
Pending AT Number of transactions requiring authorisation by Other Party
Clean Number of clean transactions
Total Total number of transactions
Processed Number of processed transactions
Status Processing status:
Submitted (awaiting processing)
Processed
If a printed bulk transaction listing is... Then...
Required Go to step 3
Not required Go to step 5
(Continued)
6611
4.6 Review bulk transactions, continued
Step Action
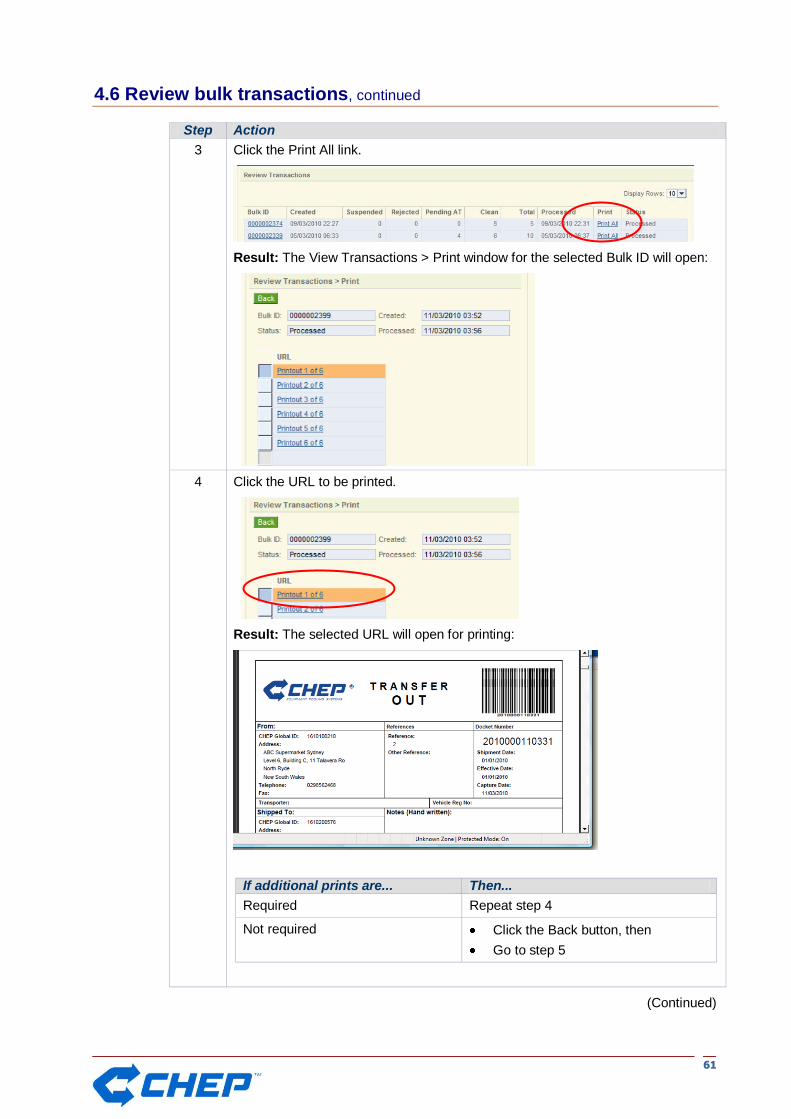
3 Click the Print All link.
Result: The View Transactions > Print window for the selected Bulk ID will open:
4 Click the URL to be printed.
Result: The selected URL will open for printing:
If additional prints are... Then...
Required Repeat step 4
Not required Click the Back button, then
Go to step 5
(Continued)

6622
4.6 Review bulk transactions, continued
Step Action
5 Click back from the Review Transaction > Print Screen. Then click the Bulk ID to display bulk entry transaction details.
Result: The Review Transactions Details window will open:
6 Click a Docket No to view docket details.
Result: The selected docket will open in a new window:
6633
4.7 Enter service centre transaction
Overview
This topic details the procedure for entering a service centre transaction.
Explanation
Portfolio+Plus enables selected users to enter docket details for issues and returns processed by a CHEP service centre.
Note: The ability to enter service centre transactions is only available to users with access to the reconciliation function.
Procedure
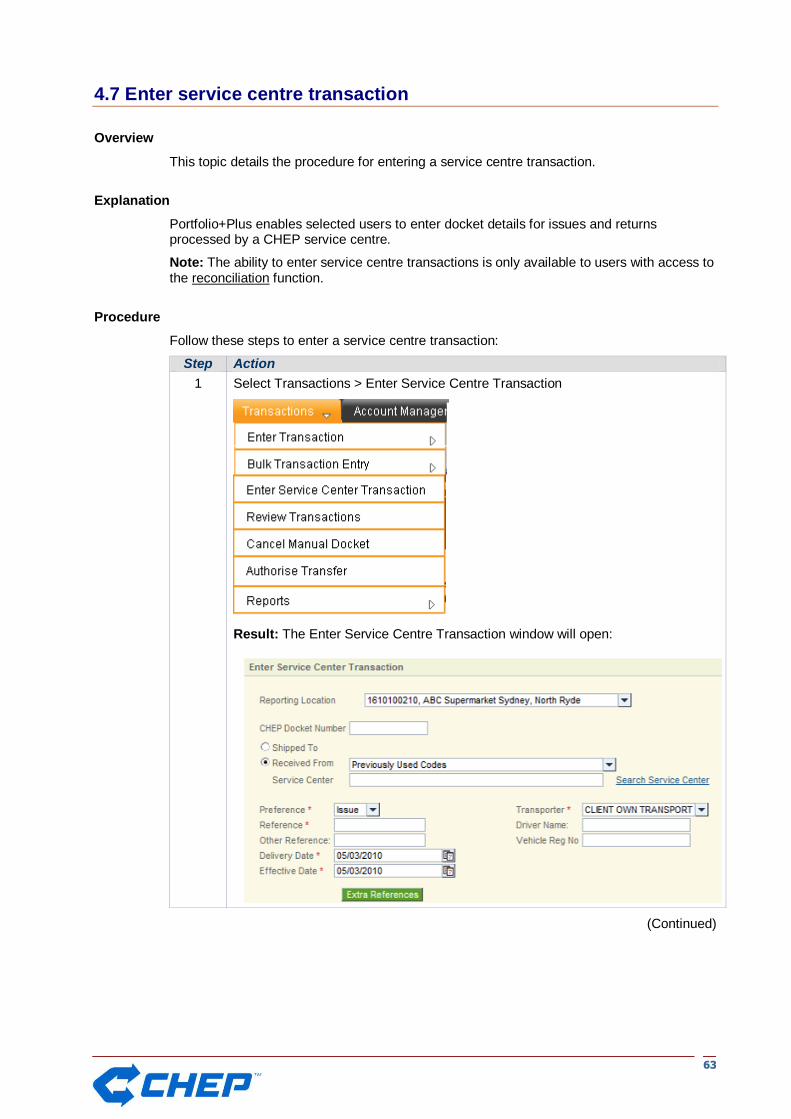
Follow these steps to enter a service centre transaction:
Step Action
1 Select Transactions > Enter Service Centre Transaction
Result: The Enter Service Centre Transaction window will open:
(Continued)
6644
4.7 Enter service centre transaction, continued
Step Action
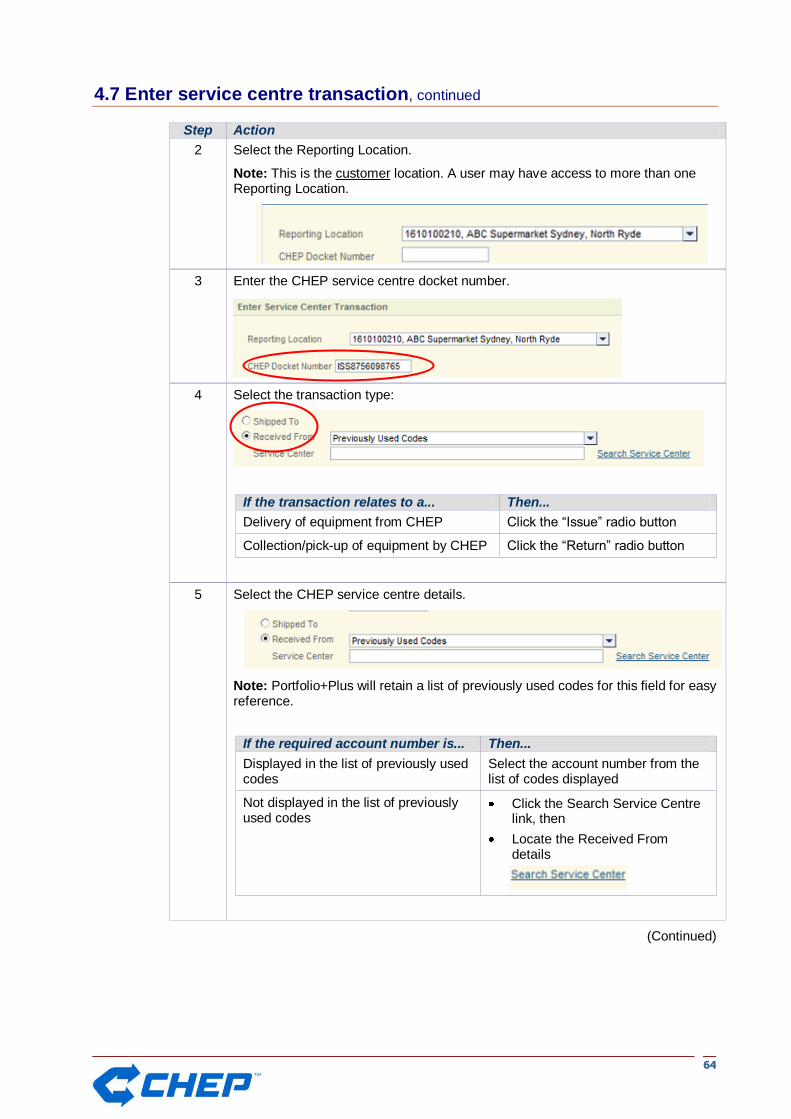
2 Select the Reporting Location.
Note: This is the customer location. A user may have access to more than one Reporting Location.
3 Enter the CHEP service centre docket number.
4 Select the transaction type:
If the transaction relates to a... Then...
Delivery of equipment from CHEP Click the “Issue” radio button
Collection/pick-up of equipment by CHEP Click the “Return” radio button
5 Select the CHEP service centre details.
Note: Portfolio+Plus will retain a list of previously used codes for this field for easy reference.
If the required account number is... Then...
Displayed in the list of previously used codes
Select the account number from the list of codes displayed
Not displayed in the list of previously used codes
Click the Search Service Centre link, then
Locate the Received From details
(Continued)
6655
4.7 Enter service centre transaction, continued
Step Action
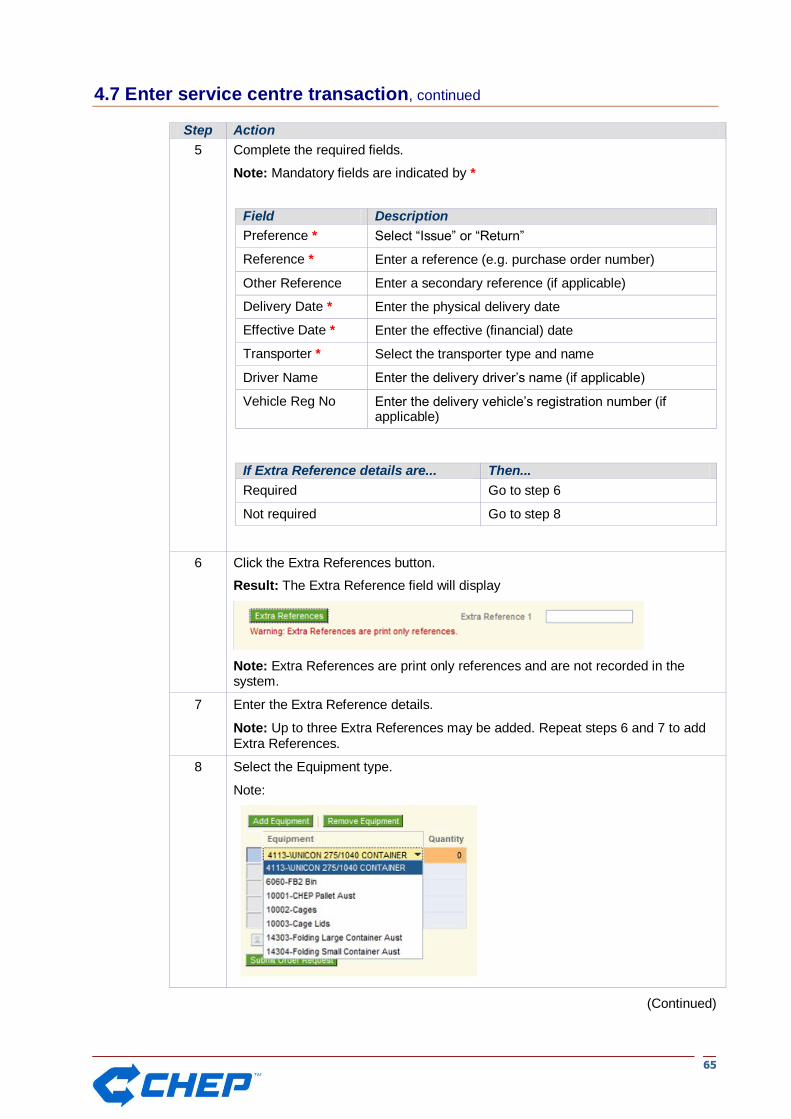
5 Complete the required fields.
Note: Mandatory fields are indicated by *
Field Description
Preference * Select “Issue” or “Return”
Reference * Enter a reference (e.g. purchase order number)
Other Reference Enter a secondary reference (if applicable)
Delivery Date * Enter the physical delivery date
Effective Date * Enter the effective (financial) date
Transporter * Select the transporter type and name
Driver Name Enter the delivery driver‟s name (if applicable)
Vehicle Reg No Enter the delivery vehicle‟s registration number (if applicable)
If Extra Reference details are... Then...
Required Go to step 6
Not required Go to step 8
6 Click the Extra References button.
Result: The Extra Reference field will display
Note: Extra References are print only references and are not recorded in the system.
7 Enter the Extra Reference details.
Note: Up to three Extra References may be added. Repeat steps 6 and 7 to add Extra References.
8 Select the Equipment type.
Note:
(Continued)
6666
4.7 Enter service centre transaction, continued
Step Action
9 Enter the Quantity.
If... Then...
Additional equipment type/line is required
Click the Add Equipment button, then
Repeat steps 8 and 9
Additional equipment type/line is not required
Go to step 8
10 Click the Submit Order Request button.
Result: The following system message window will open:
To... Click the...
Print details of the transfer in Print button
Close the message window OK button
6677
4.8 Review suspended and rejected transactions
Overview
This topic details the procedure for reviewing transaction details in Portfolio+Plus.
Explanation
Portfolio+Plus enables users to view details of rejected and suspended movements made against their account. Users may edit suspended movements to process as clean, or review details of rejected movements.
Note: Reconciliation customers may also view details of suspended and rejected movements against their Master Control Card.
Procedure
Follow these steps to review suspended and rejected transactions:
Step Action
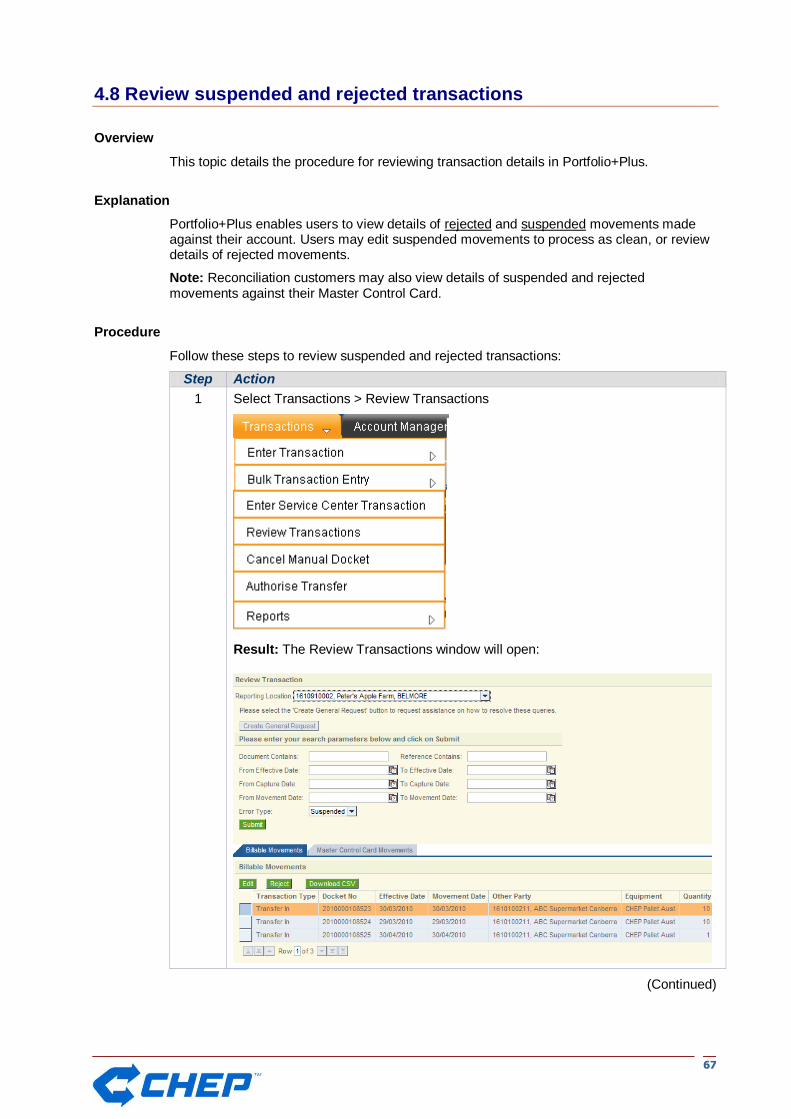
1 Select Transactions > Review Transactions
Result: The Review Transactions window will open:
(Continued)
6688
4.8 Review suspended and rejected transactions, continued
Step Action
2 Select the Reporting Location
Note: A user may have access to more than one Reporting Location.
3 Enter search parameters as required.
Note: Enter multiple parameters to narrow the range of transactions to be displayed.
Result: Transactions matching the selected search criteria will be displayed.
To view… Click the…
Billable movements Billable Movements tab
Master Control Card movements
Master Control Card Movements tab
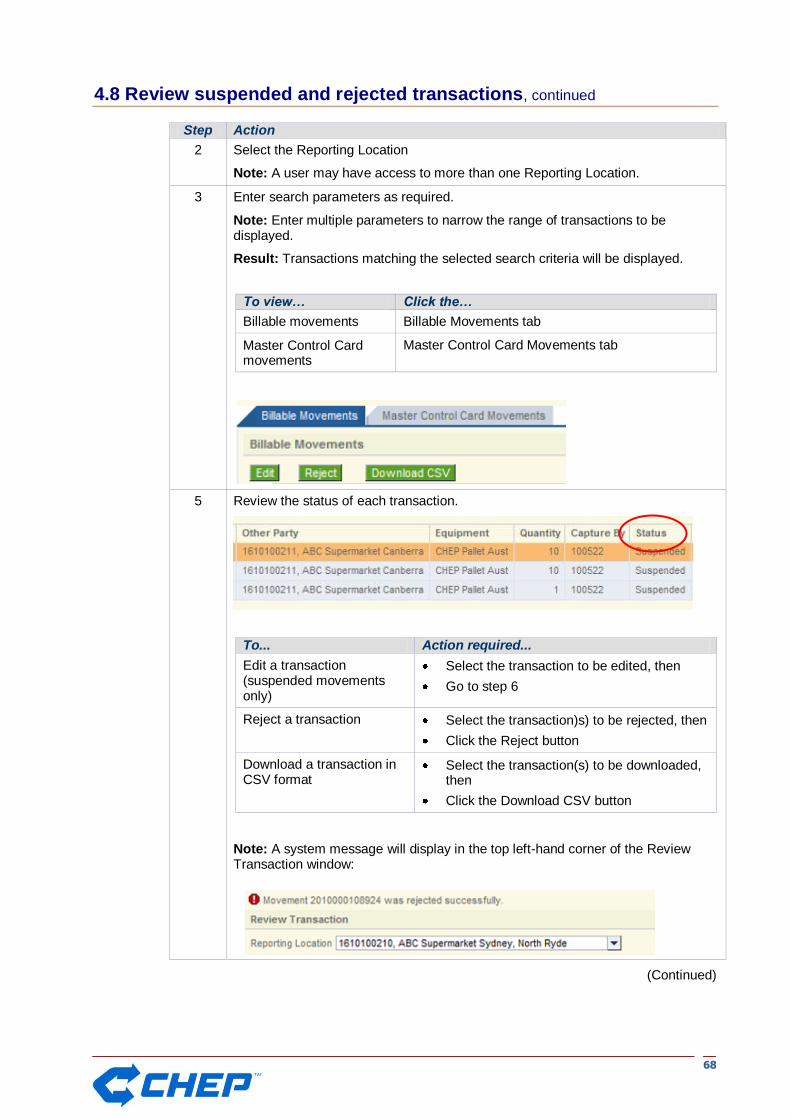
5 Review the status of each transaction.
To... Action required...
Edit a transaction (suspended movements only)
Select the transaction to be edited, then
Go to step 6
Reject a transaction Select the transaction)s) to be rejected, then
Click the Reject button
Download a transaction in CSV format
Select the transaction(s) to be downloaded, then
Click the Download CSV button
Note: A system message will display in the top left-hand corner of the Review Transaction window:
(Continued)
6699
4.8 Review suspended and rejected transactions, continued
Step Action
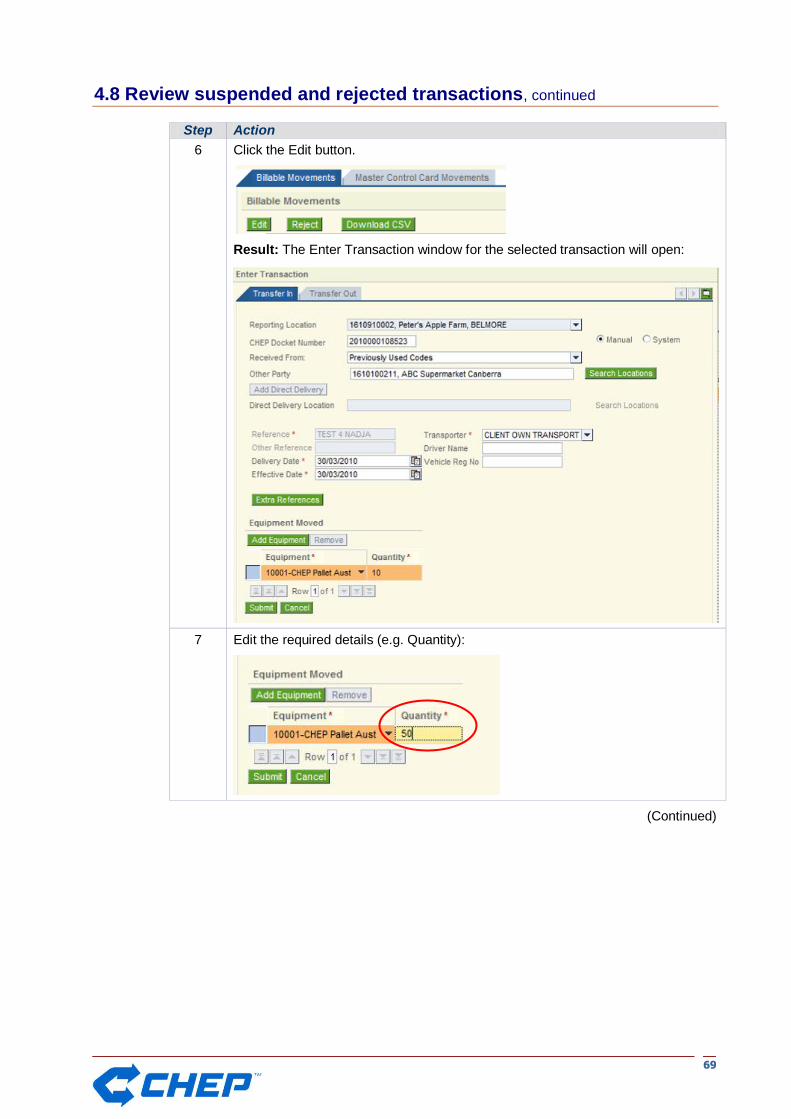
6 Click the Edit button.
Result: The Enter Transaction window for the selected transaction will open:
7 Edit the required details (e.g. Quantity):
(Continued)
7700
4.8 Review suspended and rejected transactions, continued
Step Action
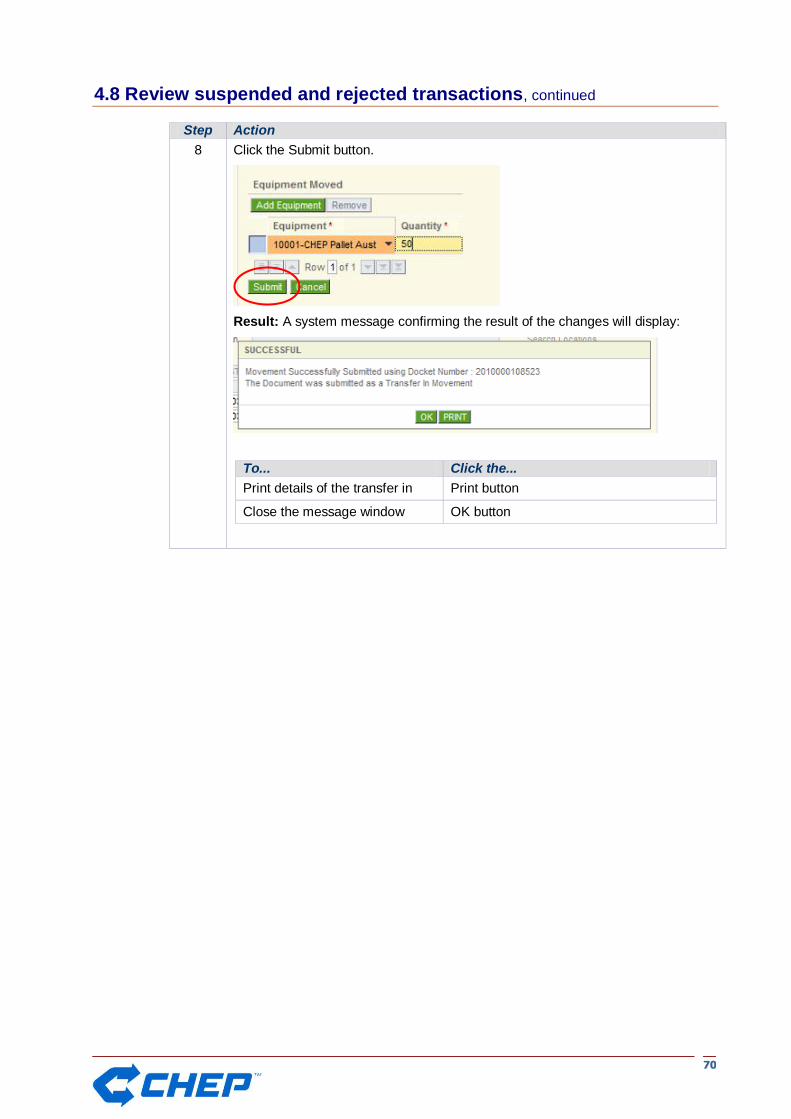
8 Click the Submit button.
Result: A system message confirming the result of the changes will display:
To... Click the...
Print details of the transfer in Print button
Close the message window OK button
7711
4.9 Cancel a manual docket
Overview
This topic details the procedure for cancelling a manual docket in Portfolio+Plus.
Explanation
Portfolio+Plus enables users to cancel manual docket numbers. This may assist with the accounting and management of manual dockets.
Procedure
Follow these steps to cancel a manual docket:
Step Action
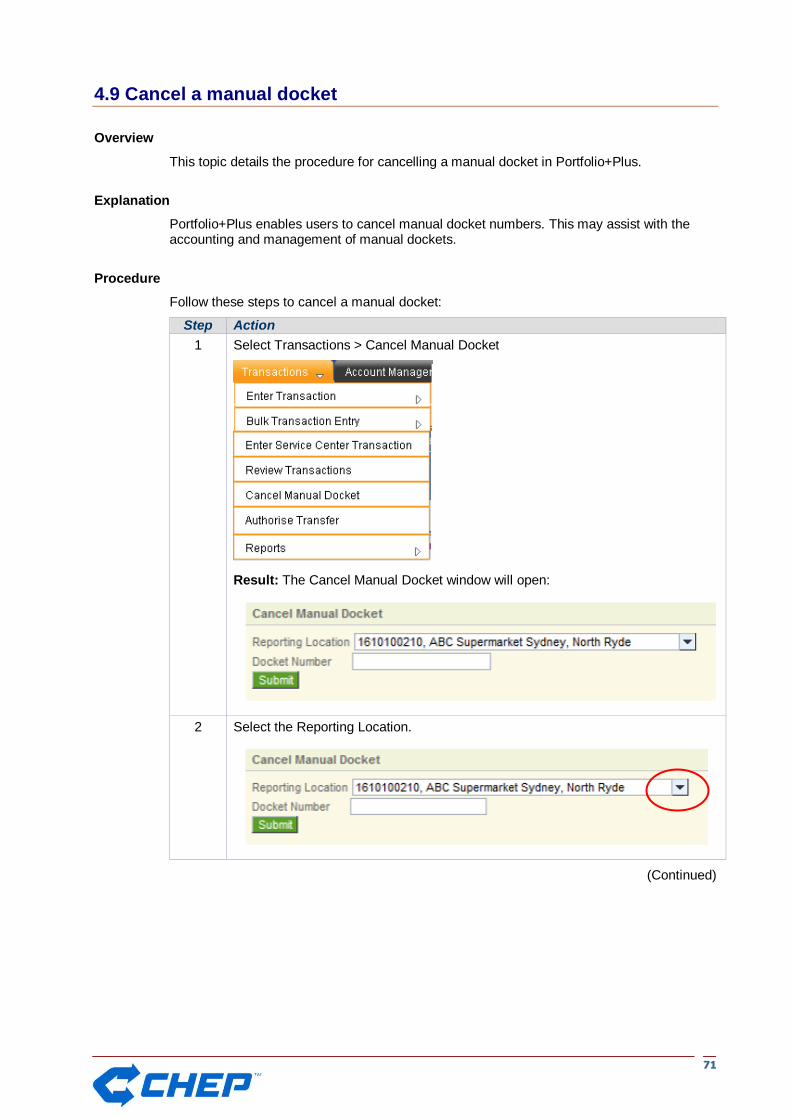
1 Select Transactions > Cancel Manual Docket
Result: The Cancel Manual Docket window will open:
2 Select the Reporting Location.
(Continued)

7722
4.9 Cancel a manual docket, continued
Step Action
3 Enter the Docket Number to be cancelled.
4 Click the Submit button.
Result: The docket will be cancelled and the following system message will display:
7733
4.10 Authorise a transfer
Overview
This topic details the procedure for authorising a transfer from a trading partner.
Explanation
Portfolio+Plus enables users with a “Receiver to Declare” account indicator to check and authorise (or reject) all transfers made to their account by trading partners. Suppliers to such receivers can also view details of outstanding transfers awaiting authorisation.
Procedure
Follow these steps to authorise a transfer:
Step Action
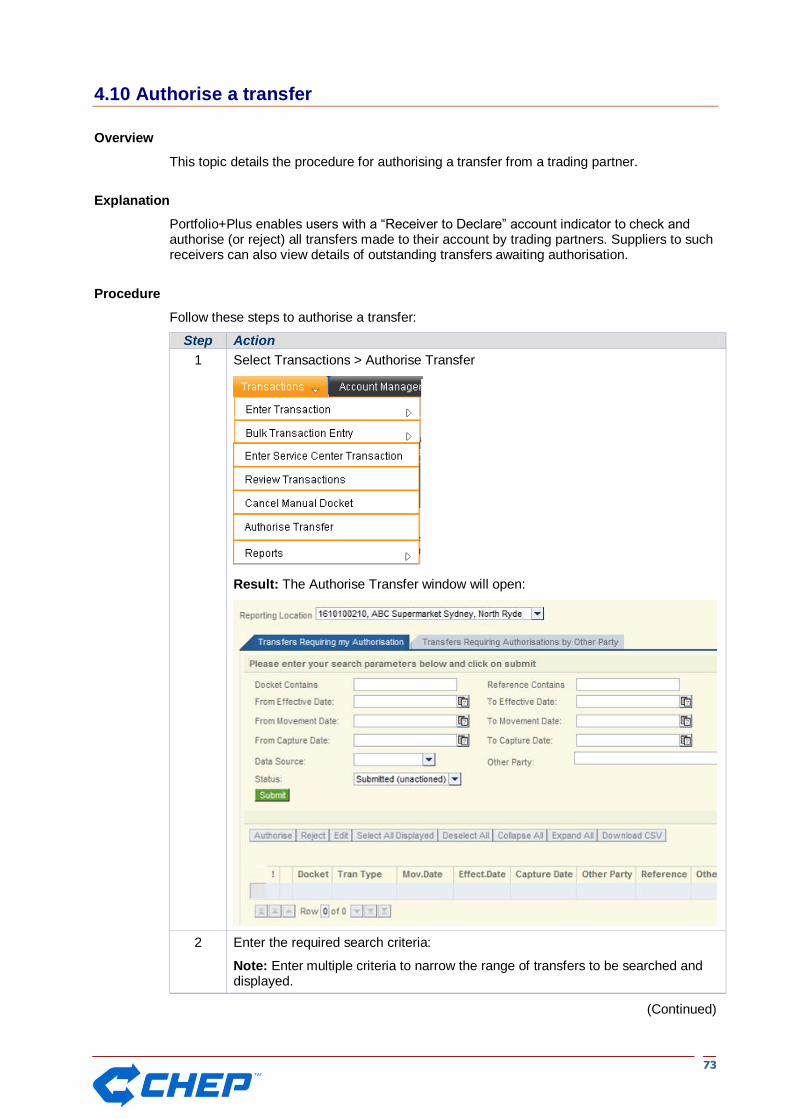
1 Select Transactions > Authorise Transfer
Result: The Authorise Transfer window will open:
2 Enter the required search criteria:
Note: Enter multiple criteria to narrow the range of transfers to be searched and displayed.
(Continued)

7744
4.10 Authorise a transfer, continued
Step Action
3 Select the required status.
Note: Select “Submitted (unactioned)” to view transfers awaiting authorisation.
4 Click the Submit button.
Result: A list of transfers awaiting authorisation will be displayed:
5 Select the transfer(s) to be actioned.
Note: Multiple transfers may be selected and authorised at the same time however CHEP recommends users review individual dockets before authorising them. Transfers may only be individually edited or rejected.
(Continued)

7755
4.10 Authorise a transfer, continued
Step Action
6 Complete the required action.
To... Action required...
Authorise the selected transfer Click the Authorise button
Reject the selected transfer Click the Reject button
Edit the selected transfer Go to step 7
Result: A Summary of Actions Performed message window will open:
Note: Multiple transfers have been authorised in this example:
7 Click the Edit button.
Result: The Enter Transfer window for the selected transfer will open:
8 Edit the transfer as required.
(Continued)

7766
4.10 Authorise a transfer, continued
Step Action
9 Click the Submit button.
Result: The following system message will display:
10 Click the OK button.
Result: You will be returned to the list of transfers requiring authorisation by other parties:
7777
4.11 View transfers requiring authorisation by Other Party
Overview
This topic details the procedure for viewing transfers requiring authorisation by other parties.
Explanation
Portfolio+Plus enables users to view details of transfers made to and awaiting authorisation by other parties, such as trading partners with a “receiver must declare” account indicator. Users may, if required, edit or cancel transfers made to other parties.
Procedure
Follow these steps to view transfers requiring authorisation by other parties:
Step Action
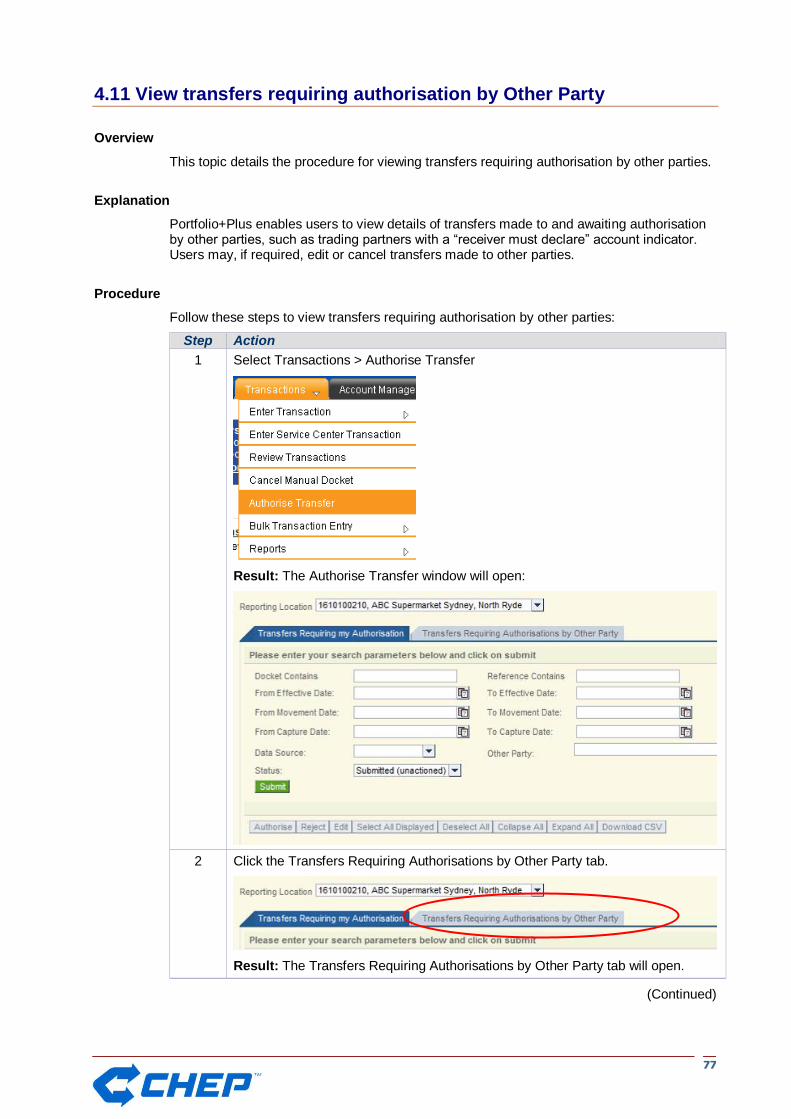
1 Select Transactions > Authorise Transfer
Result: The Authorise Transfer window will open:
2 Click the Transfers Requiring Authorisations by Other Party tab.
Result: The Transfers Requiring Authorisations by Other Party tab will open.
(Continued)

7788
4.11 View transfers requiring authorisation by Other Party, continued
Step Action
3 Select the Reporting Location.
Note: Users may have access to more than one Reporting Location.
4 Enter required search parameters.
Note: Enter multiple parameters to narrow the range of the search.
5 Click the Submit button.
Result: A list of transfers which match the entered search criteria will be displayed:
(Continued)

7799
4.11 View transfers requiring authorisation by Other Party, continued
Step Action
6 Select the required action.
To... Action required...
Cancel a transfer Select the transfers to be cancelled,
Click the Cancel button, then
Follow the prompts
Edit a transfer Select the transfer to be edited, then
Go to step 7
Note: Multiple transfers may be cancelled however only one transfer may be edited at a time.
7 Click the Edit button.
Result: The Enter Transfer window for the selected transfer will open:
8 Edit the transfer as required.
(Continued)
8800
4.11 View transfers requiring authorisation by Other Party, continued
Step Action
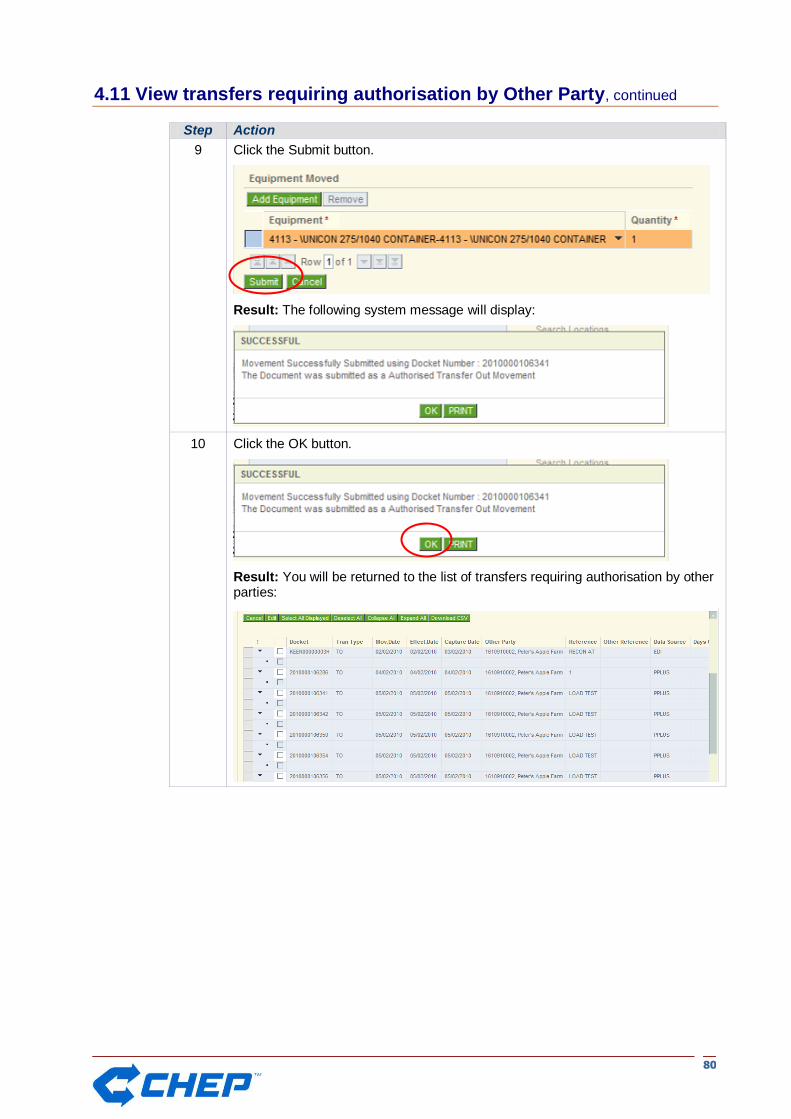
9 Click the Submit button.
Result: The following system message will display:
10 Click the OK button.
Result: You will be returned to the list of transfers requiring authorisation by other parties:

8811
Chapter 5: Account Management
Overview
This chapter details the Account Management functions available in Portfolio+Plus.
Account Management tab
The Account Management functions are available via the Account Management tab:
Note: If you do not have access to this function, please contact CHEP Customer Service.
Contents
This chapter contains the following topics:
Topic See page
5.1 View account management dashboard 82
5.2 Maintain transporter details 85
5.3 Maintain previously used locations 87
5.4 View statement details 88
5.5 View payment details 91
5.6 View invoice details 93
5.7 View customer hire balances 96
5.8 Manage account transactions 98
8822
5.1 View account management dashboard
Overview
This topic details the procedure for viewing the account management dashboard.
Explanation
The account management dashboard enables Portfolio+Plus users to view important account management information including:
CHEP credit/account management contact
Billing cycle
Aged balance (see below)
Location service centre
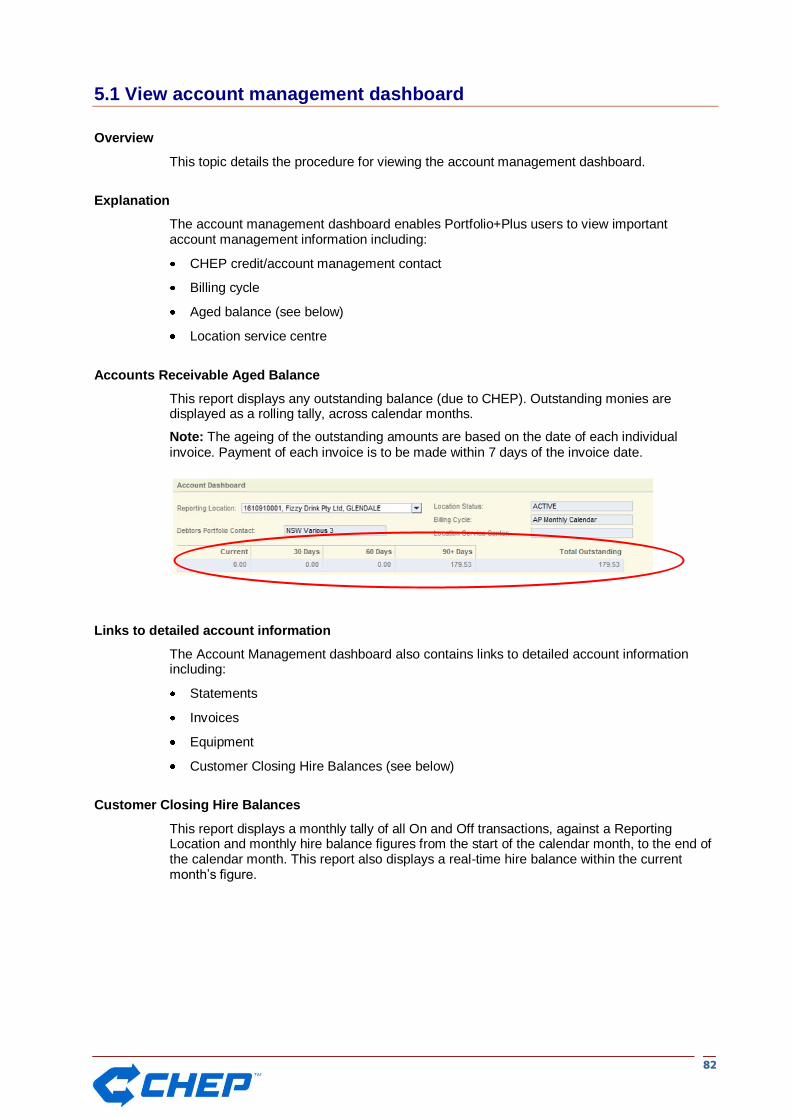
Accounts Receivable Aged Balance
This report displays any outstanding balance (due to CHEP). Outstanding monies are displayed as a rolling tally, across calendar months.
Note: The ageing of the outstanding amounts are based on the date of each individual invoice. Payment of each invoice is to be made within 7 days of the invoice date.
Links to detailed account information
The Account Management dashboard also contains links to detailed account information including:
Statements
Invoices
Equipment
Customer Closing Hire Balances (see below)
Customer Closing Hire Balances
This report displays a monthly tally of all On and Off transactions, against a Reporting Location and monthly hire balance figures from the start of the calendar month, to the end of the calendar month. This report also displays a real-time hire balance within the current month‟s figure.

8833
5.1 View account management dashboard, continued
Procedure
Follow these steps to view the account management dashboard:
Step Action
1 Click Account Management > Dashboard
Result: The Account Dashboard will open:
Note: Users may have access to more than one Reporting Location.
If you have access to... Then...
One reporting location Go to step 3
More than one reporting location Go to step 2
(Continued)
8844
5.1 View account management dashboard, continued
Step Action
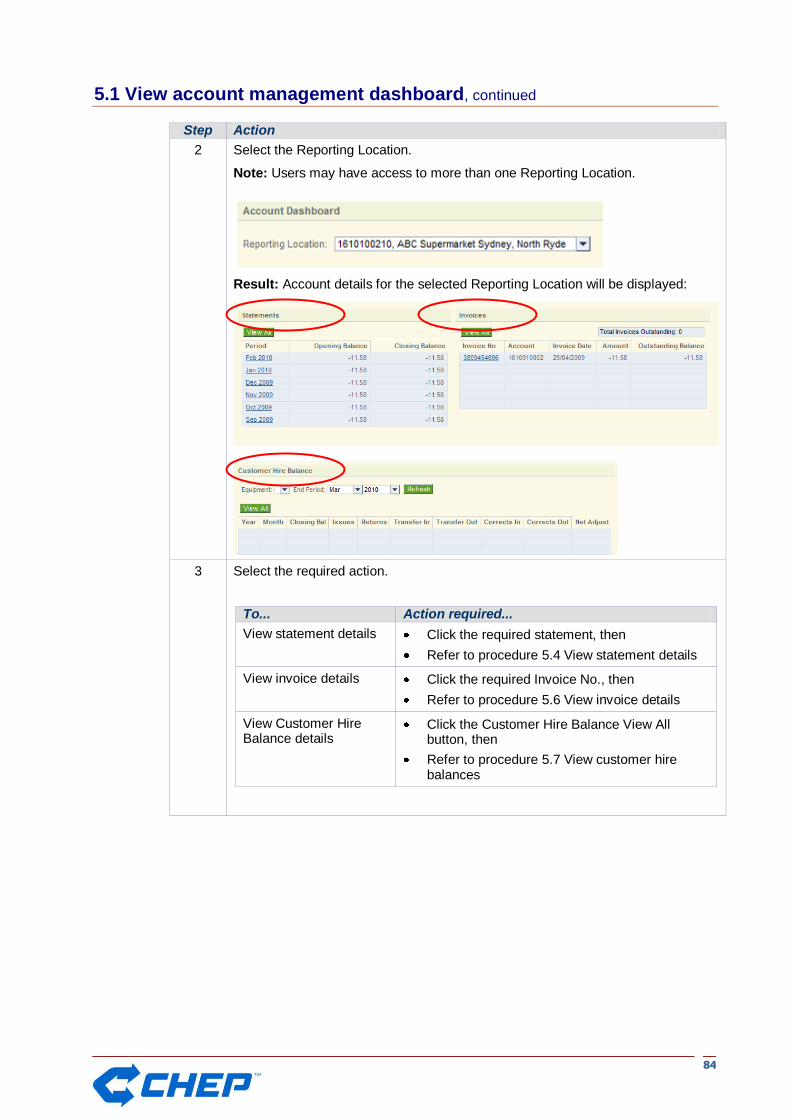
2 Select the Reporting Location.
Note: Users may have access to more than one Reporting Location.
Result: Account details for the selected Reporting Location will be displayed:
3 Select the required action.
To... Action required...
View statement details Click the required statement, then
Refer to procedure 5.4 View statement details
View invoice details Click the required Invoice No., then
Refer to procedure 5.6 View invoice details
View Customer Hire Balance details
Click the Customer Hire Balance View All button, then
Refer to procedure 5.7 View customer hire balances
8855
5.2 Maintain transporter details
Overview
This topic details the procedure for maintaining details of frequently used transporters in Portfolio+Plus.
Explanation
Portfolio+Plus enables users to maintain transporter details, such as transporter names, which are visible in other Portfolio+Plus transaction windows (e.g. Enter an Order).
Procedure
Follow these steps to maintain transporter details in Portfolio+Plus:
Step Action
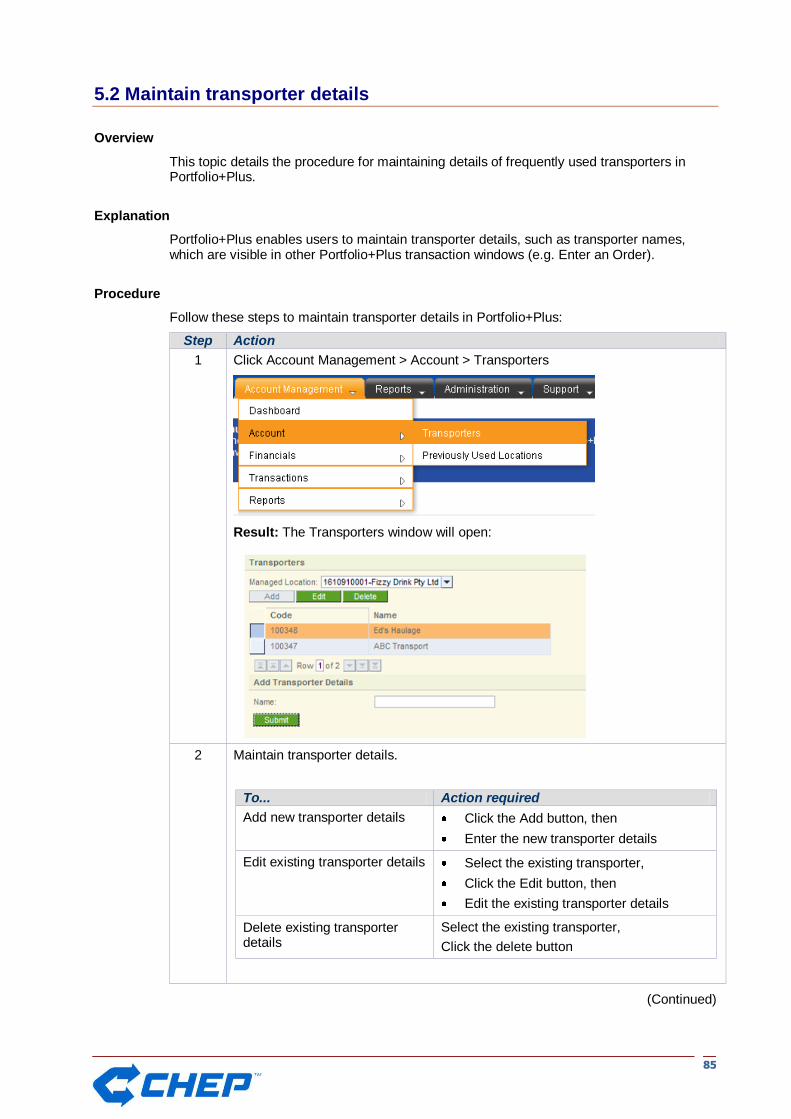
1 Click Account Management > Account > Transporters
Result: The Transporters window will open:
2 Maintain transporter details.
To... Action required
Add new transporter details Click the Add button, then
Enter the new transporter details
Edit existing transporter details Select the existing transporter,
Click the Edit button, then
Edit the existing transporter details
Delete existing transporter details
Select the existing transporter,
Click the delete button
(Continued)

8866
5.2 Maintain transporter details, continued
Step Action
3 Click the Submit button.
Result: The changes will be submitted.

8877
5.3 Maintain previously used locations
Overview
This topic details the procedure for maintaining details of previously used locations.
Explanation
Portfolio+Plus enables users to maintain details of previously used locations such as trading partner locations. This will ensure the trading partner details visible when performing other system tasks, such as creating transfers, are accurate and up-to-date.
Procedure
Follow these steps to maintain trading partner details:
Step Action
1 Click Account Management > Account > Previously Used Locations
Result: The Previously Used Locations window will open:
To... Action required
Add new location details Click the Add button, then
Follow the prompts to enter new location details
Delete existing location details Select the existing location, then
Click the delete button
8888
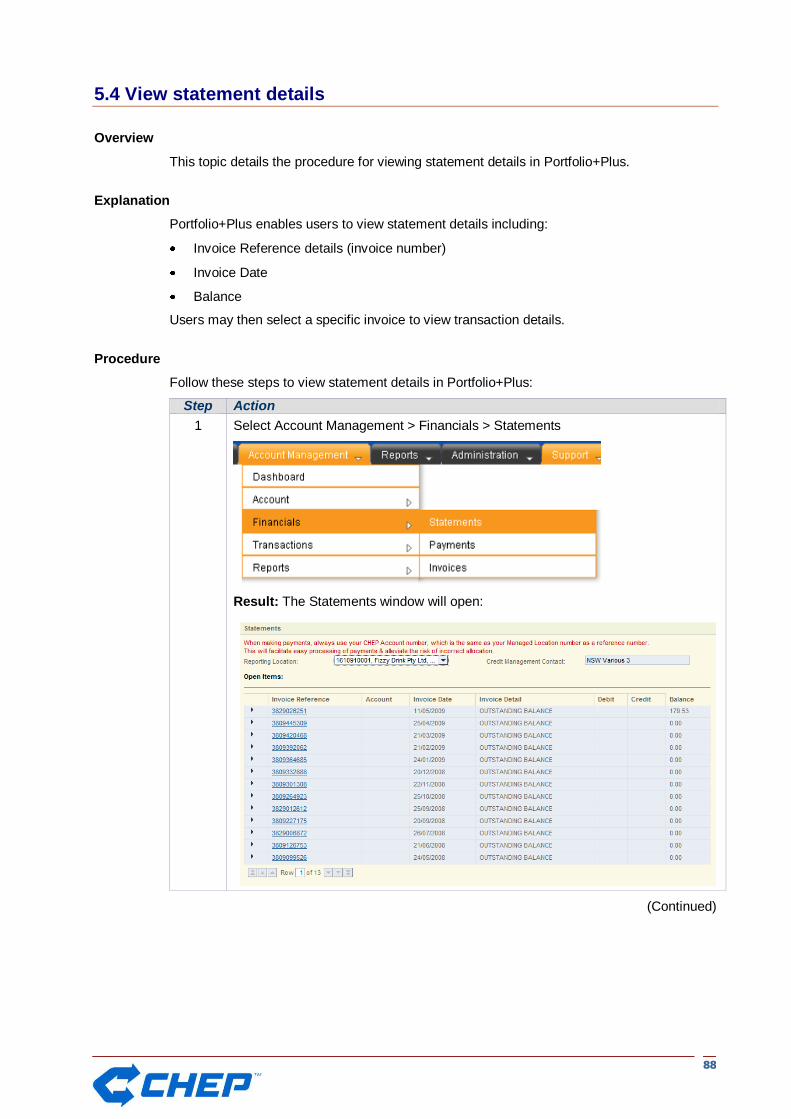
5.4 View statement details
Overview
This topic details the procedure for viewing statement details in Portfolio+Plus.
Explanation
Portfolio+Plus enables users to view statement details including:
Invoice Reference details (invoice number)
Invoice Date
Balance
Users may then select a specific invoice to view transaction details.
Procedure
Follow these steps to view statement details in Portfolio+Plus:
Step Action
1 Select Account Management > Financials > Statements
Result: The Statements window will open:
(Continued)
8899
5.4 View statement details, continued
Step Action
2 Scroll to the statement details listed at the bottom of the window:
3 Select the required Statement.
(Continued)
9900
5.4 View statement details, continued
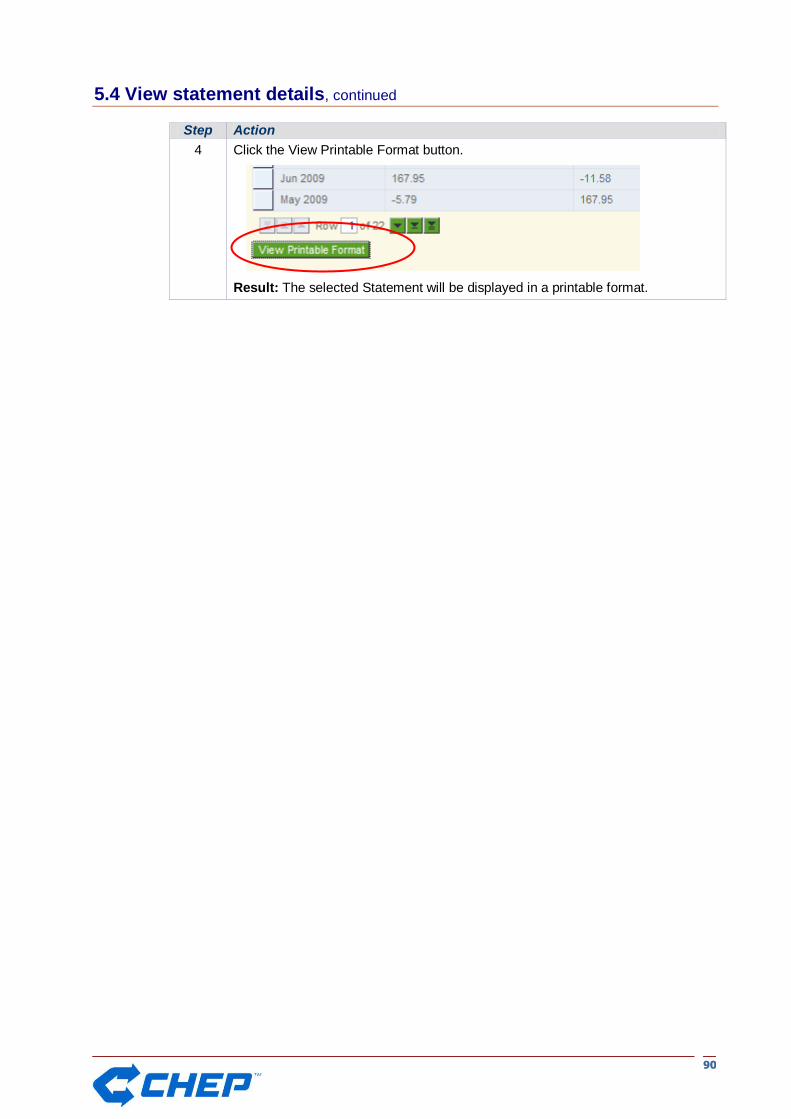
Step Action
4 Click the View Printable Format button.
Result: The selected Statement will be displayed in a printable format.
9911
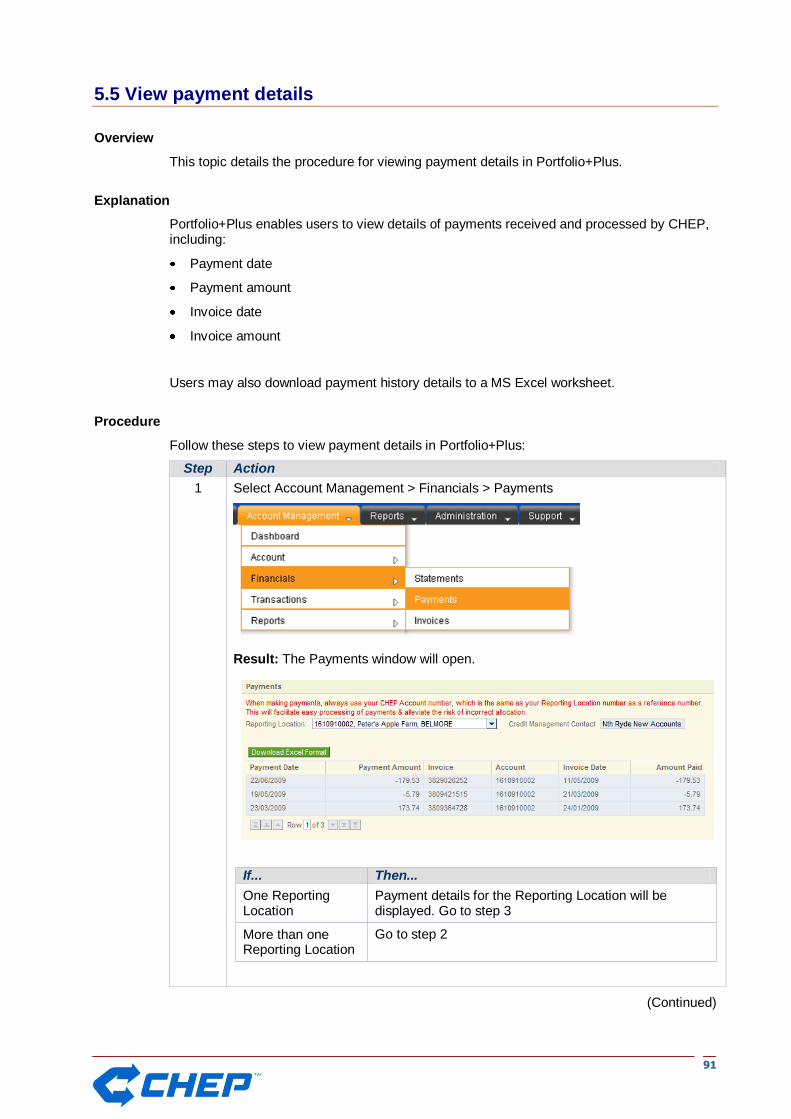
5.5 View payment details
Overview
This topic details the procedure for viewing payment details in Portfolio+Plus.
Explanation
Portfolio+Plus enables users to view details of payments received and processed by CHEP, including:
Payment date
Payment amount
Invoice date
Invoice amount
Users may also download payment history details to a MS Excel worksheet.
Procedure
Follow these steps to view payment details in Portfolio+Plus:
Step Action
1 Select Account Management > Financials > Payments
Result: The Payments window will open.
If... Then...
One Reporting Location
Payment details for the Reporting Location will be displayed. Go to step 3
More than one Reporting Location
Go to step 2
(Continued)

9922
5.5 View payment details, continued
Step Action
2 Select the required Reporting Location
Result: Payment details for the selected Reporting Location will be displayed:
Field Description
Payment Date Date payment was made
Payment Amount Total payment amount received by CHEP
Invoice Invoice No(s) against which payment has been applied
Account Invoice Reporting Location
Invoice Date Date invoice was issued by CHEP
Amount Paid Amount of payment applied against Invoice No.
3 Click the Download Excel Format button (if required).
Result: The payment details will download in MS Excel format.
9933
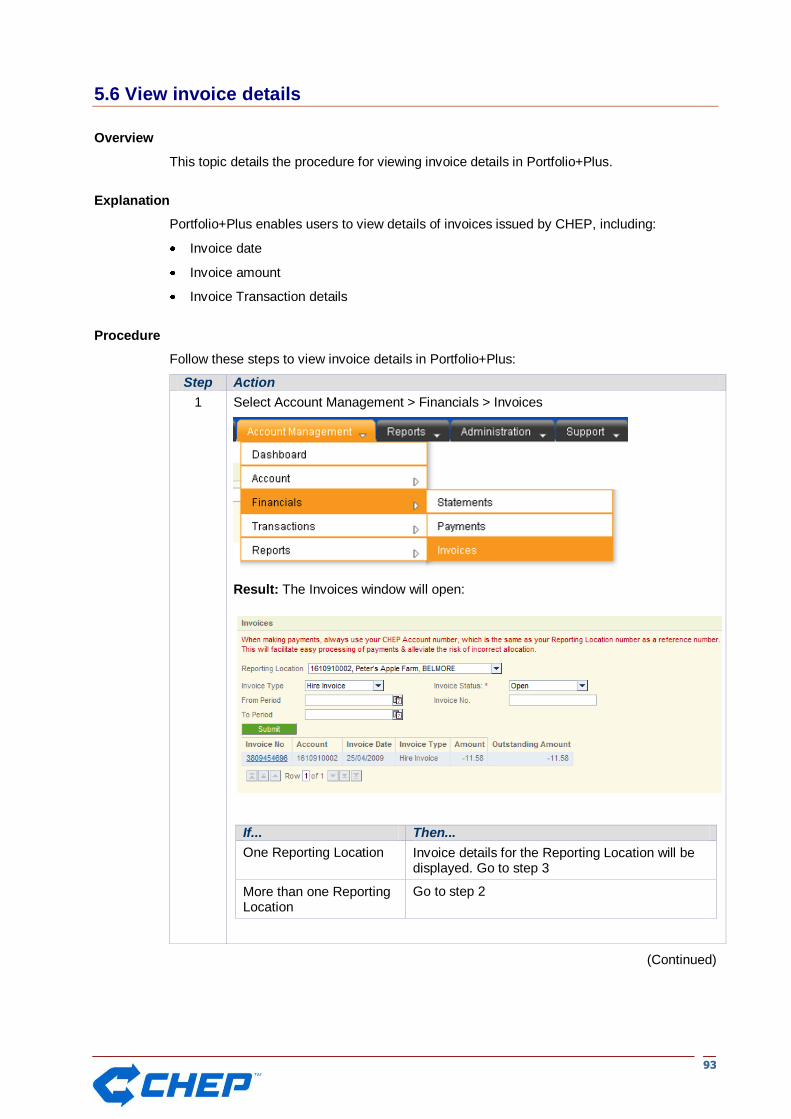
5.6 View invoice details
Overview
This topic details the procedure for viewing invoice details in Portfolio+Plus.
Explanation
Portfolio+Plus enables users to view details of invoices issued by CHEP, including:
Invoice date
Invoice amount
Invoice Transaction details
Procedure
Follow these steps to view invoice details in Portfolio+Plus:
Step Action
1 Select Account Management > Financials > Invoices
Result: The Invoices window will open:
If... Then...
One Reporting Location Invoice details for the Reporting Location will be displayed. Go to step 3
More than one Reporting Location
Go to step 2
(Continued)
9944
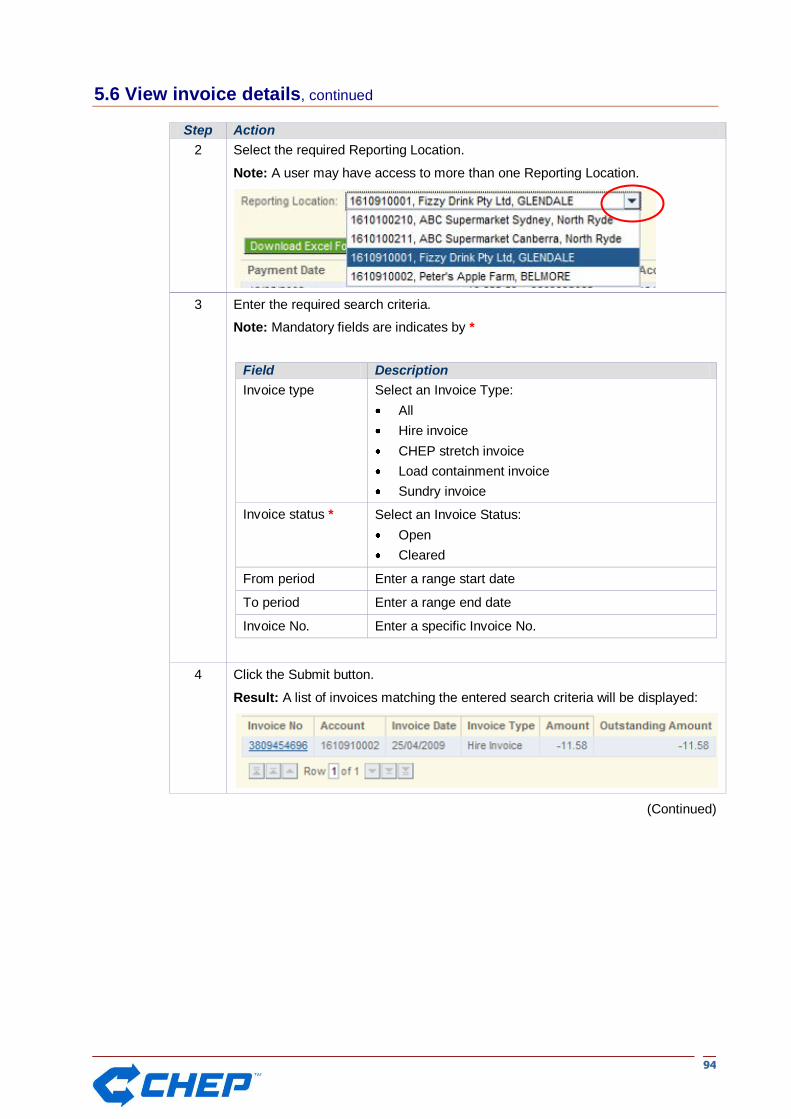
5.6 View invoice details, continued
Step Action
2 Select the required Reporting Location.
Note: A user may have access to more than one Reporting Location.
3 Enter the required search criteria.
Note: Mandatory fields are indicates by *
Field Description
Invoice type Select an Invoice Type:
All
Hire invoice
CHEP stretch invoice
Load containment invoice
Sundry invoice
Invoice status * Select an Invoice Status:
Open
Cleared
From period Enter a range start date
To period Enter a range end date
Invoice No. Enter a specific Invoice No.
4 Click the Submit button.
Result: A list of invoices matching the entered search criteria will be displayed:
(Continued)

9955
5.6 View invoice details, continued
Step Action
5 Click an Invoice No. to view invoice details.
Result: The Invoice Details window for the selected Invoice No. will open:
To... Click the...
View invoice details in a printable format
View Printable Format button
Download invoice transaction details in MS Excel format
Download Excel Format button
Go back to the previous invoice listing Back button
9966
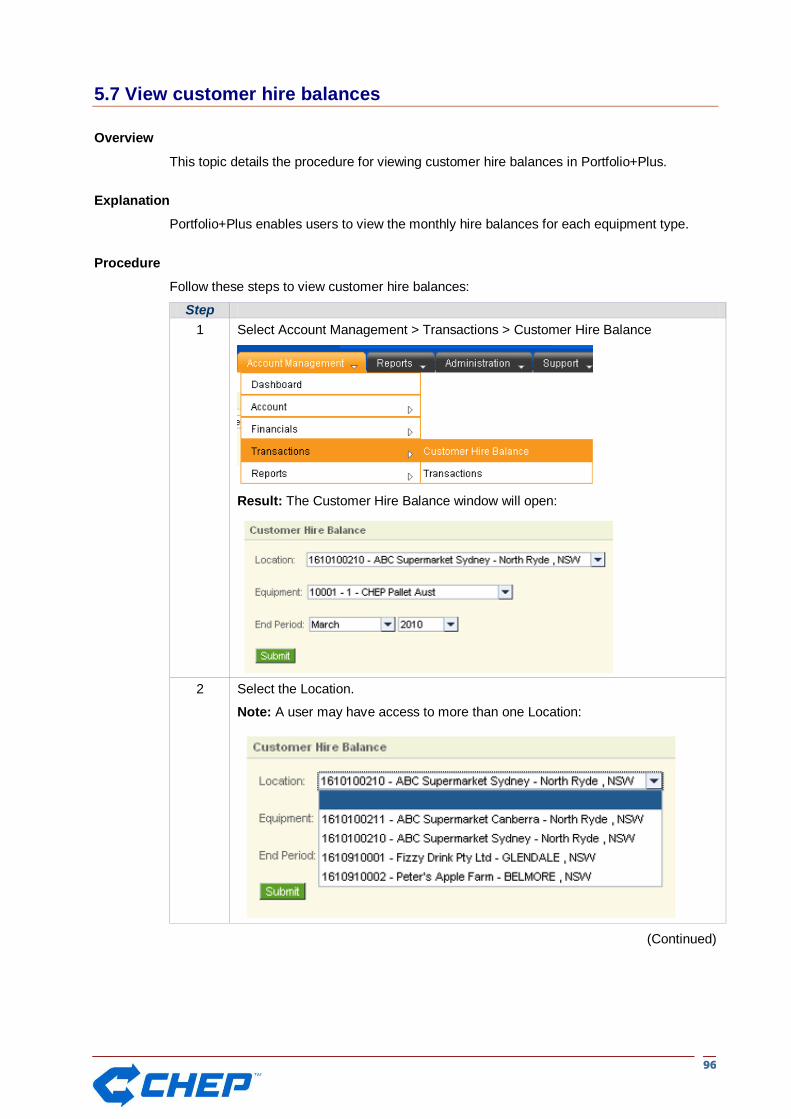
5.7 View customer hire balances
Overview
This topic details the procedure for viewing customer hire balances in Portfolio+Plus.
Explanation
Portfolio+Plus enables users to view the monthly hire balances for each equipment type.
Procedure
Follow these steps to view customer hire balances:
Step
1 Select Account Management > Transactions > Customer Hire Balance
Result: The Customer Hire Balance window will open:
2 Select the Location.
Note: A user may have access to more than one Location:
(Continued)
9977
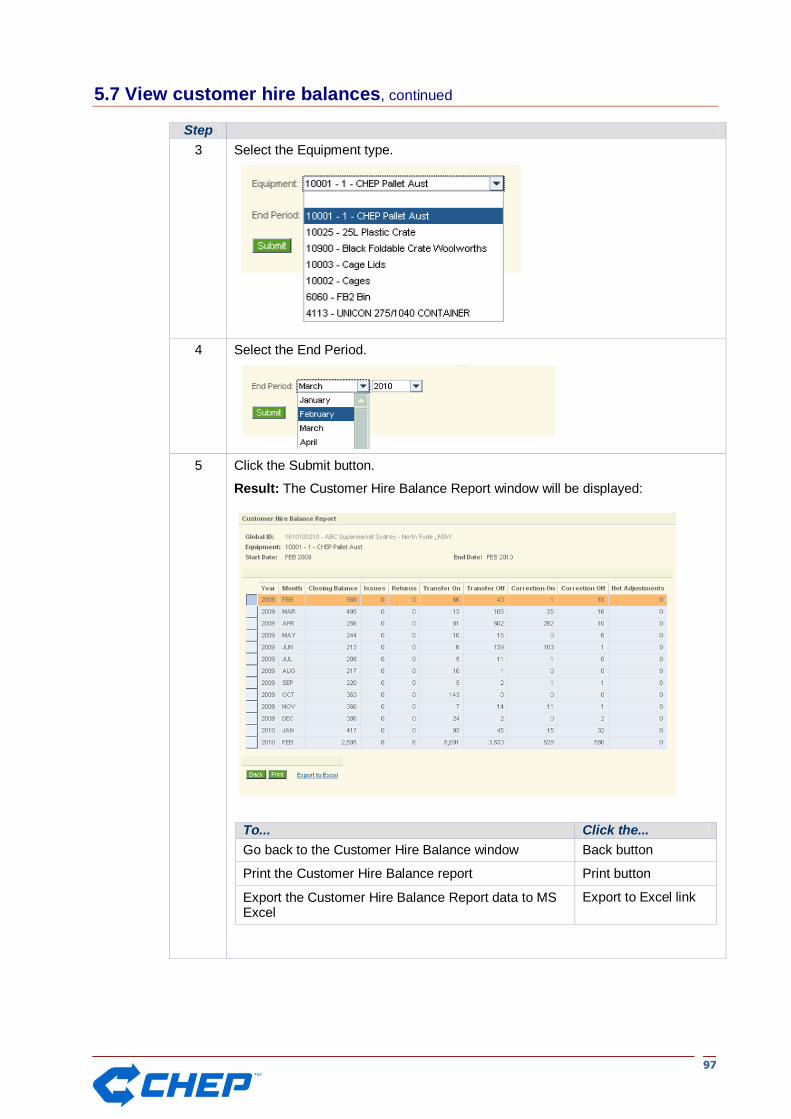
5.7 View customer hire balances, continued
Step
3 Select the Equipment type.
4 Select the End Period.
5 Click the Submit button.
Result: The Customer Hire Balance Report window will be displayed:
To... Click the...
Go back to the Customer Hire Balance window Back button
Print the Customer Hire Balance report Print button
Export the Customer Hire Balance Report data to MS Excel
Export to Excel link

9988
5.8 Manage account transactions
Overview
This topic details the procedure for managing account transaction details in Portfolio+Plus.
Explanation
Portfolio+Plus enables users to view details of transactions made against their CHEP account. Users may also correct or reverse transactions within 28 days of the invoice date.
Procedure
Follow these steps to review transaction details in Portfolio+Plus:
Step Action
1 Select Account Management > Transactions > Transactions
Result: The Transactions window will open.
2 Select the Reporting Location.
Note: A user may have access to more than one Reporting Location.
(Continued)

9999
5.8 Manage account transactions, continued
Step Action
3 Enter the relevant search criteria.
Note: Portfolio+Plus requires users to enter either:
Capture Date (From/To), or
Effective Date (From/To), or
Shipment/Delivery Date (From/To), or
Reference, or
Docket No.
4 Click the Submit button.
Result: A list of transactions matching the entered search criteria will be displayed:
Note: All processed dockets will include a “T1” transaction indicator at the end of the docket number. Additional transaction indicators (e.g. “T2”. T3”, etc) indicate a correction or reversal to the original docket.
(Continued)
110000
5.8 Manage account transactions, continued
Step Action
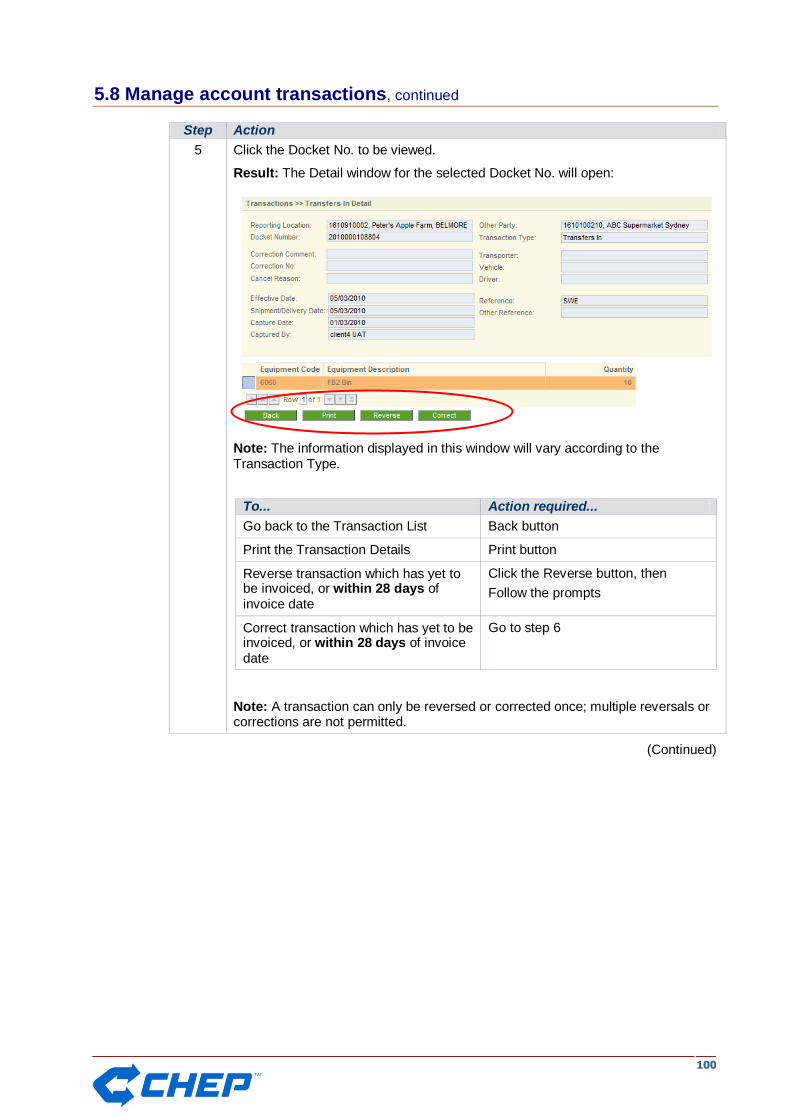
5 Click the Docket No. to be viewed.
Result: The Detail window for the selected Docket No. will open:
Note: The information displayed in this window will vary according to the Transaction Type.
To... Action required...
Go back to the Transaction List Back button
Print the Transaction Details Print button
Reverse transaction which has yet to be invoiced, or within 28 days of invoice date
Click the Reverse button, then
Follow the prompts
Correct transaction which has yet to be invoiced, or within 28 days of invoice date
Go to step 6
Note: A transaction can only be reversed or corrected once; multiple reversals or corrections are not permitted.
(Continued)
110011
5.8 Manage account transactions, continued
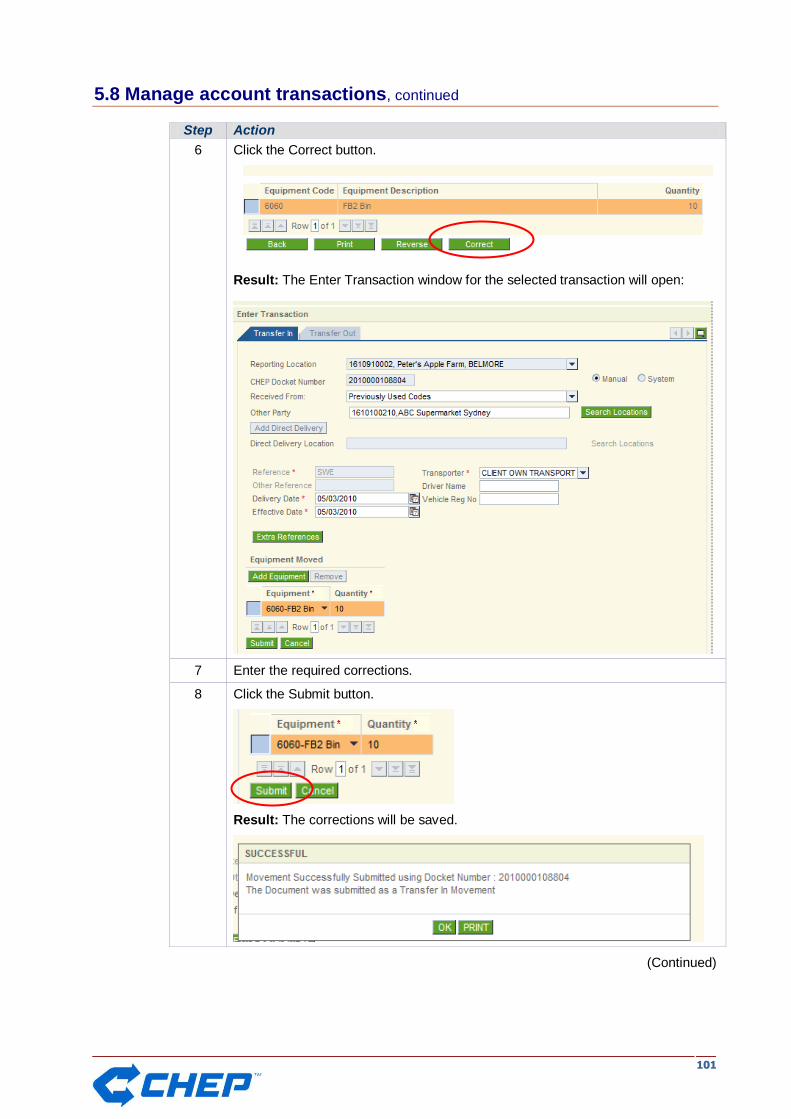
Step Action
6 Click the Correct button.
Result: The Enter Transaction window for the selected transaction will open:
7 Enter the required corrections.
8 Click the Submit button.
Result: The corrections will be saved.
(Continued)
110022
5.8 Manage account transactions, continued
Step Action
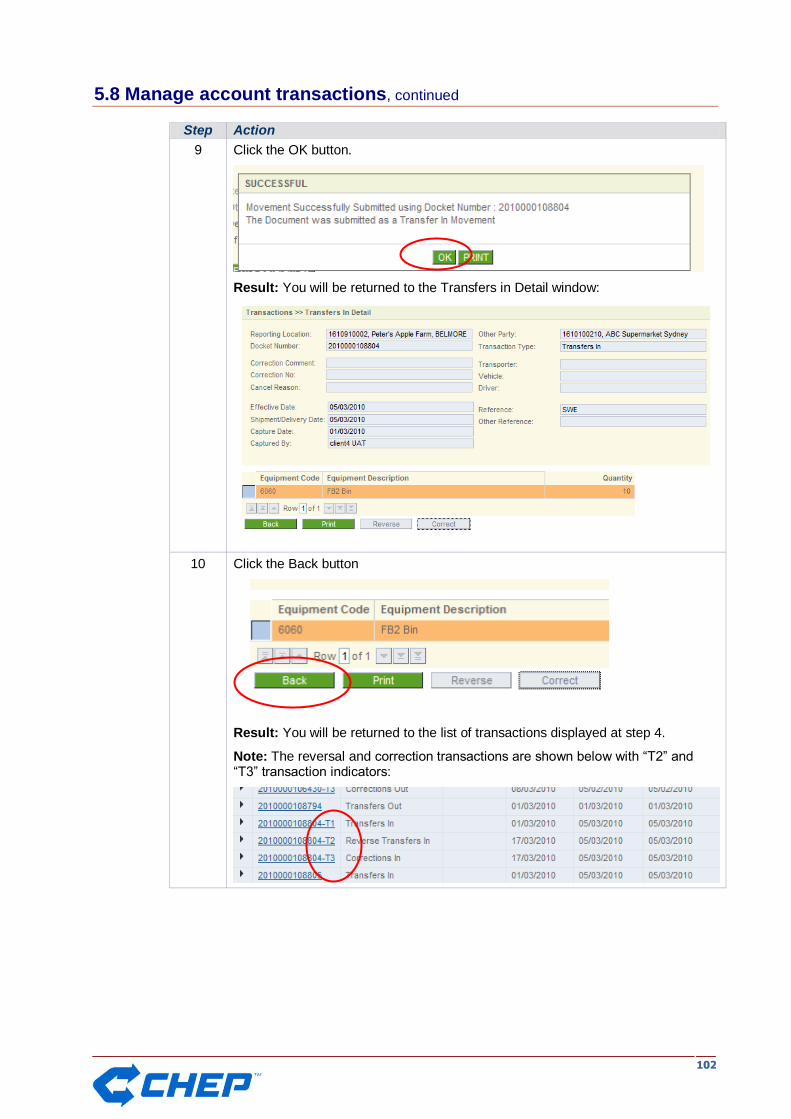
9 Click the OK button.
Result: You will be returned to the Transfers in Detail window:
10 Click the Back button
Result: You will be returned to the list of transactions displayed at step 4.
Note: The reversal and correction transactions are shown below with “T2” and “T3” transaction indicators:
110033
Chapter 6: Reports
Overview
This chapter details the procedure for selecting and printing a report.
Selecting reports
Reports may be selected and printed via the:
Reports tab, or
Reports option available under other Portfolio+Plus tabs
Reports tab
The Reports tab enables users to select, run and print a report.
Reports menu options
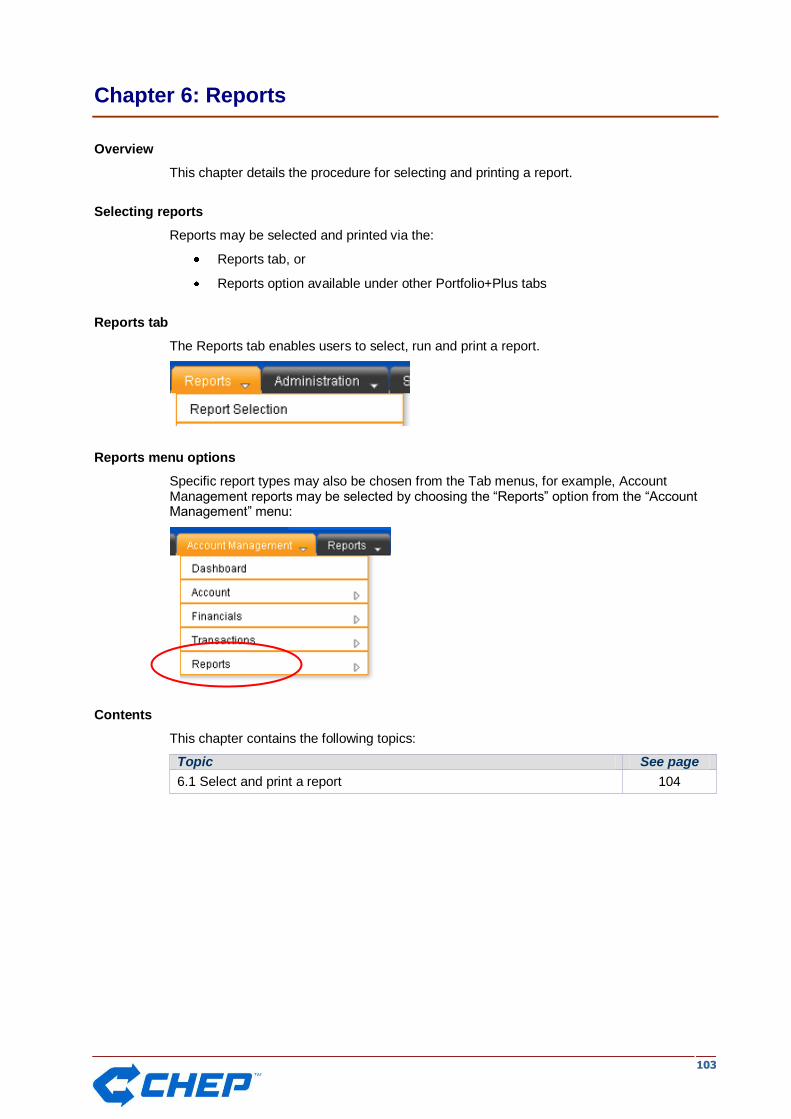
Specific report types may also be chosen from the Tab menus, for example, Account Management reports may be selected by choosing the “Reports” option from the “Account Management” menu:
Contents
This chapter contains the following topics:
Topic See page
6.1 Select and print a report 104
110044
6.1 Select and print a report
Overview
This topic details the procedure for selecting and printing a report.
Explanation
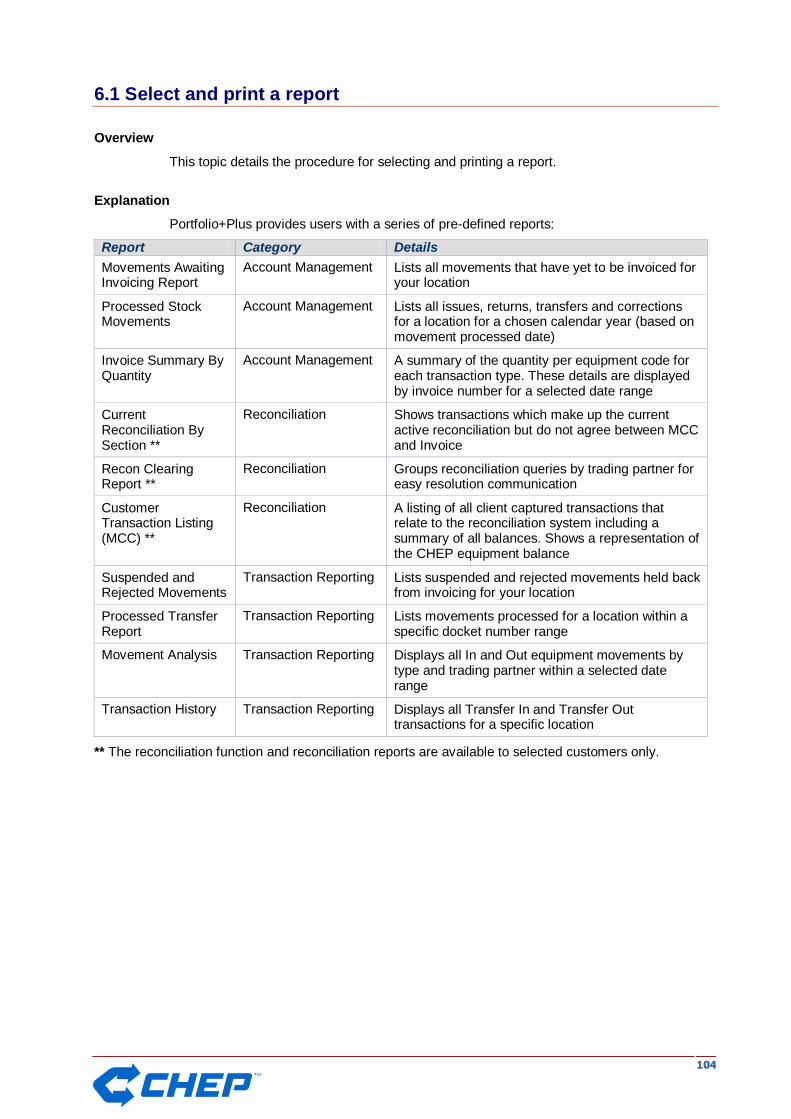
Portfolio+Plus provides users with a series of pre-defined reports:
Report Category Details
Movements Awaiting Invoicing Report
Account Management Lists all movements that have yet to be invoiced for your location
Processed Stock Movements
Account Management Lists all issues, returns, transfers and corrections for a location for a chosen calendar year (based on movement processed date)
Invoice Summary By Quantity
Account Management A summary of the quantity per equipment code for each transaction type. These details are displayed by invoice number for a selected date range
Current Reconciliation By Section **
Reconciliation Shows transactions which make up the current active reconciliation but do not agree between MCC and Invoice
Recon Clearing Report **
Reconciliation Groups reconciliation queries by trading partner for easy resolution communication
Customer Transaction Listing (MCC) **
Reconciliation A listing of all client captured transactions that relate to the reconciliation system including a summary of all balances. Shows a representation of the CHEP equipment balance
Suspended and Rejected Movements
Transaction Reporting Lists suspended and rejected movements held back from invoicing for your location
Processed Transfer Report
Transaction Reporting Lists movements processed for a location within a specific docket number range
Movement Analysis Transaction Reporting Displays all In and Out equipment movements by type and trading partner within a selected date range
Transaction History Transaction Reporting Displays all Transfer In and Transfer Out transactions for a specific location
** The reconciliation function and reconciliation reports are available to selected customers only.
110055
6.1 Select and print a report, continued
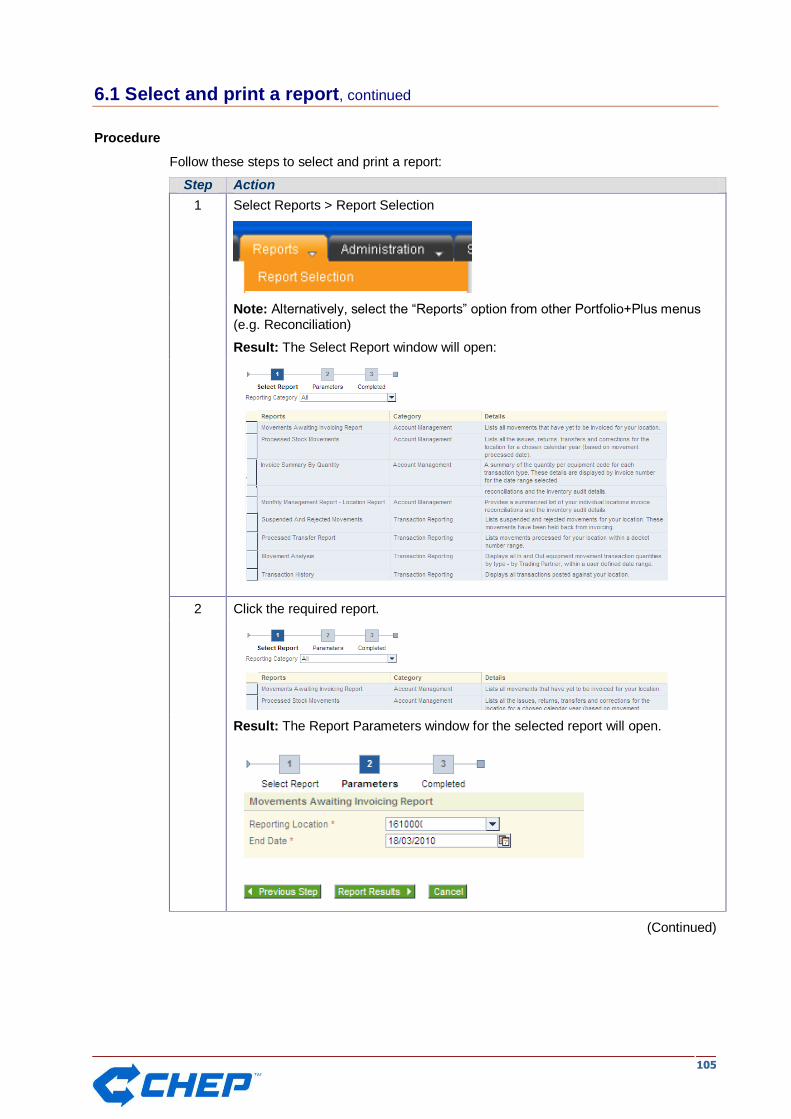
Procedure
Follow these steps to select and print a report:
Step Action
1 Select Reports > Report Selection
Note: Alternatively, select the “Reports” option from other Portfolio+Plus menus (e.g. Reconciliation)
Result: The Select Report window will open:
2 Click the required report.
Result: The Report Parameters window for the selected report will open.
(Continued)

110066
6.1 Select and print a report, continued
Step Action
3 Set the report parameters.
Note: Report parameters are used to define the information to be displayed in a report, for example, a specific date range. The actual report parameters will vary according to the type of report selected at step 2.
4 Click the Report Results button.
Result: The report results window will open:
Note: The actual results displayed will vary according to the selected report type.
To... Click the...
Export report data to MS Excel XLS button
Export report data in CSV format CSV button
Export report data to a PDF file PDF button
Send report data as an email Email button
Select a new report Select a New Report link
110077
Chapter 7: Administration
Overview
This chapter details the procedures for managing user profiles in Portfolio+Plus.
Administration tab
Portfolio+Plus administration functions are available via the Administration tab:
Note: A new user profile may only be added by a User Manager.
Contents
This chapter contains the following topics:
Topic See page
7.1 Maintain own profile details 108
7.2 View assigned location services 109
7.3 Maintain user preferences 111
7.4 Create new user profile 113
110088
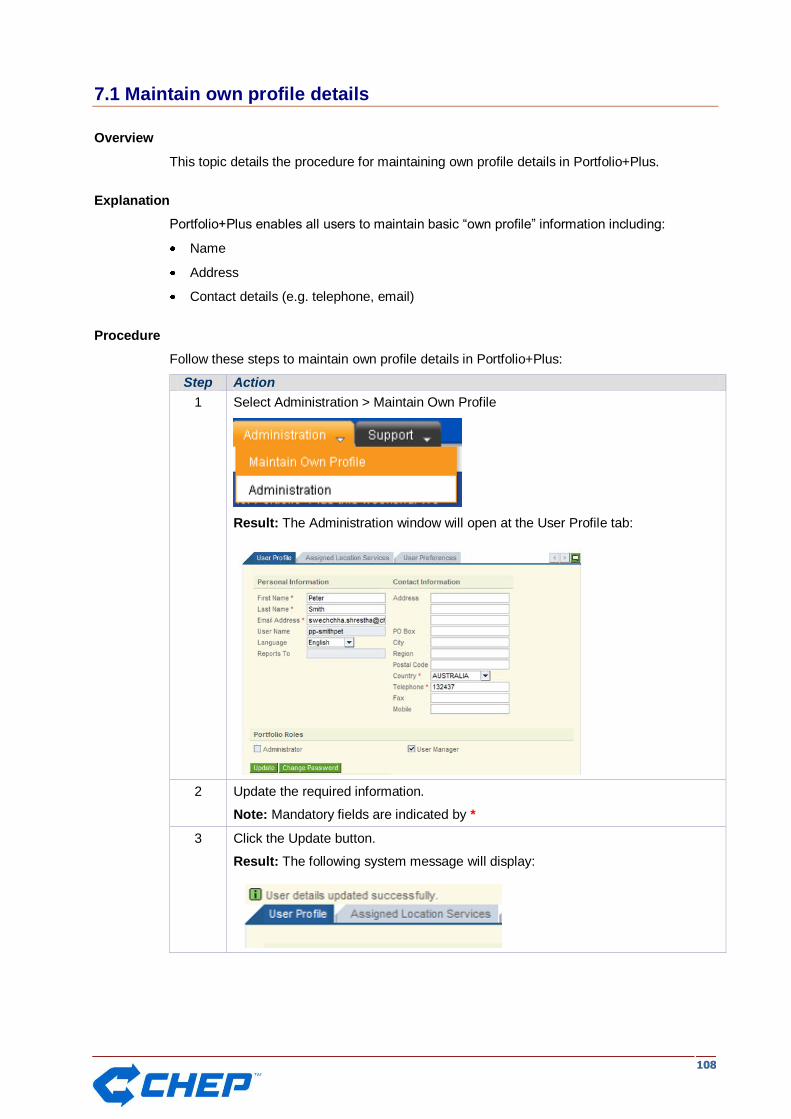
7.1 Maintain own profile details
Overview
This topic details the procedure for maintaining own profile details in Portfolio+Plus.
Explanation
Portfolio+Plus enables all users to maintain basic “own profile” information including:
Name
Address
Contact details (e.g. telephone, email)
Procedure
Follow these steps to maintain own profile details in Portfolio+Plus:
Step Action
1 Select Administration > Maintain Own Profile
Result: The Administration window will open at the User Profile tab:
2 Update the required information.
Note: Mandatory fields are indicated by *
3 Click the Update button.
Result: The following system message will display:
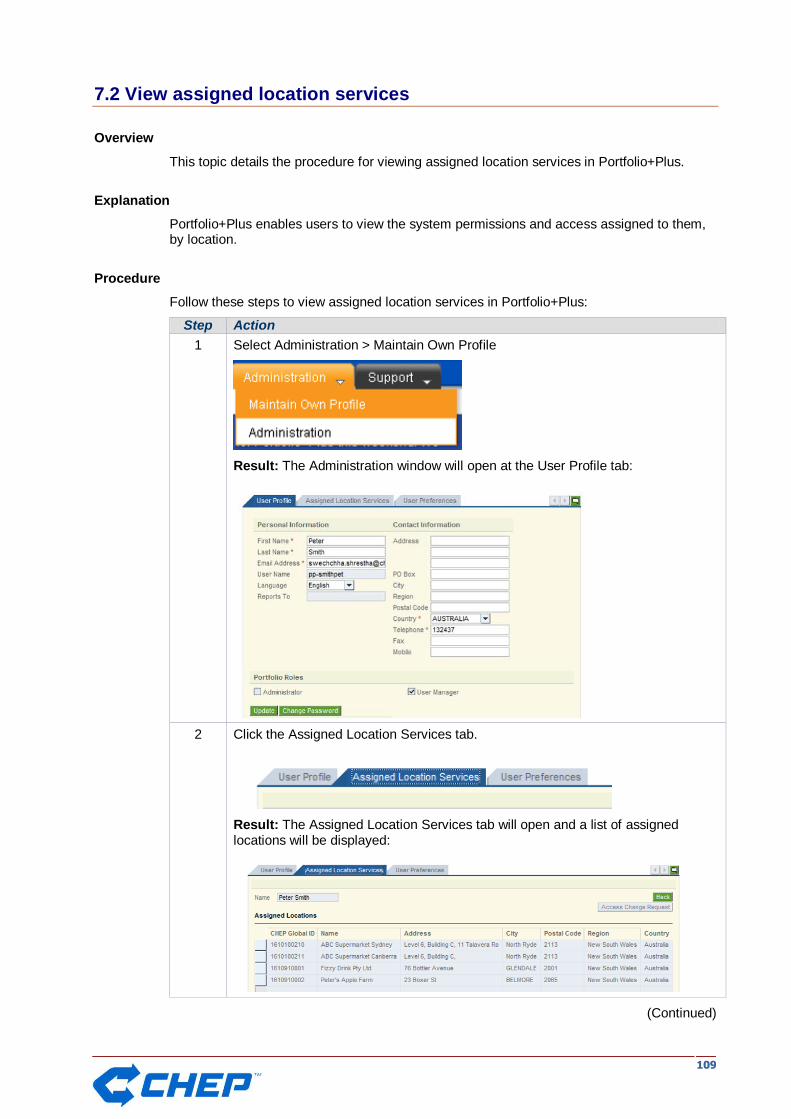
110099
7.2 View assigned location services
Overview
This topic details the procedure for viewing assigned location services in Portfolio+Plus.
Explanation
Portfolio+Plus enables users to view the system permissions and access assigned to them, by location.
Procedure
Follow these steps to view assigned location services in Portfolio+Plus:
Step Action
1 Select Administration > Maintain Own Profile
Result: The Administration window will open at the User Profile tab:
2 Click the Assigned Location Services tab.
Result: The Assigned Location Services tab will open and a list of assigned locations will be displayed:
(Continued)
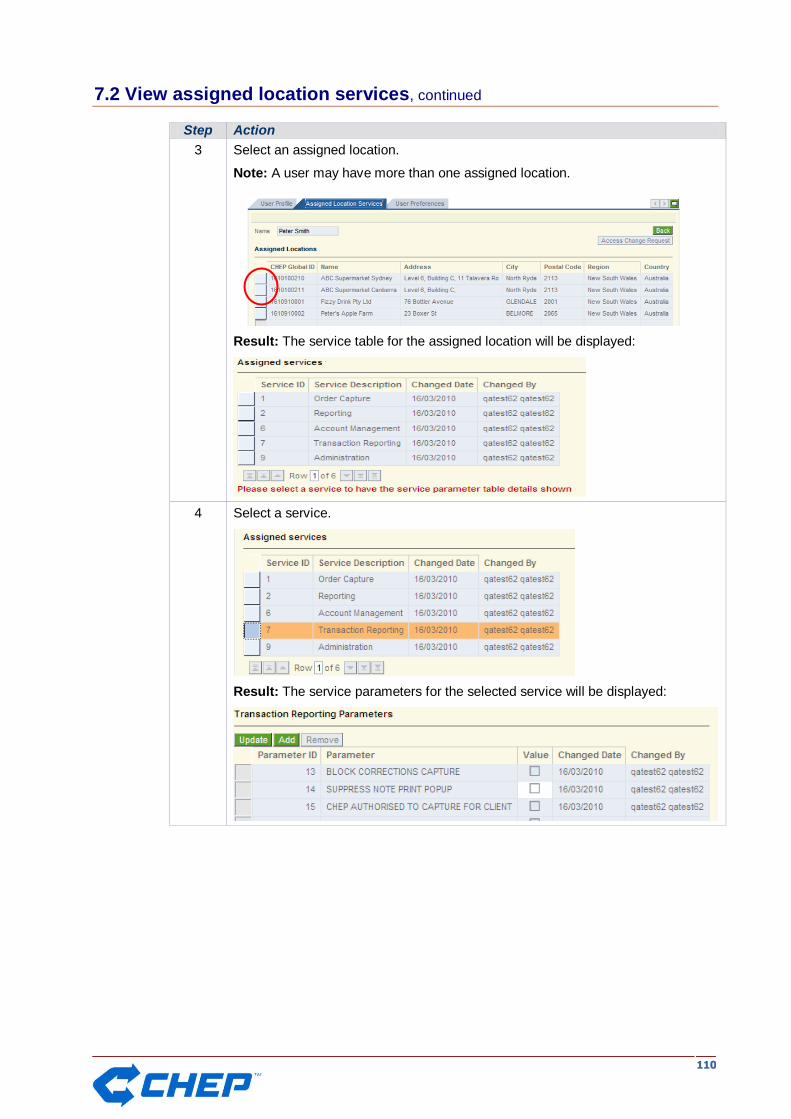
111100
7.2 View assigned location services, continued
Step Action
3 Select an assigned location.
Note: A user may have more than one assigned location.
Result: The service table for the assigned location will be displayed:
4 Select a service.
Result: The service parameters for the selected service will be displayed:
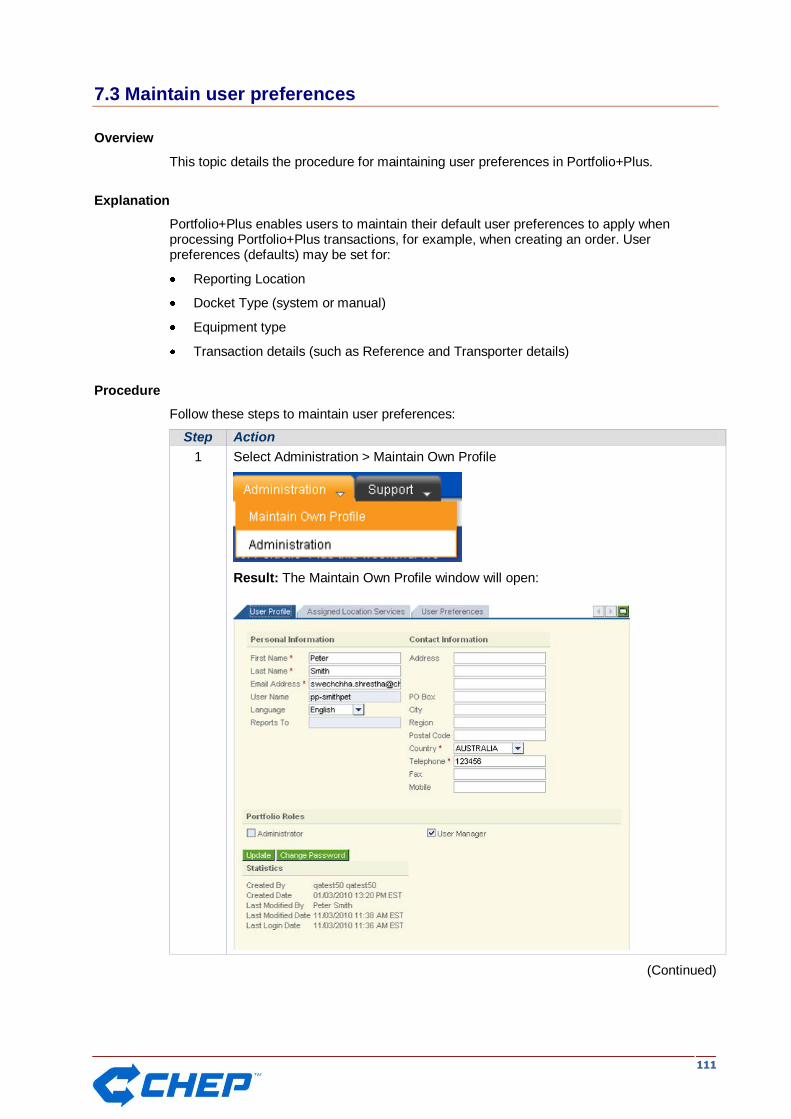
111111
7.3 Maintain user preferences
Overview
This topic details the procedure for maintaining user preferences in Portfolio+Plus.
Explanation
Portfolio+Plus enables users to maintain their default user preferences to apply when processing Portfolio+Plus transactions, for example, when creating an order. User preferences (defaults) may be set for:
Reporting Location
Docket Type (system or manual)
Equipment type
Transaction details (such as Reference and Transporter details)
Procedure
Follow these steps to maintain user preferences:
Step Action
1 Select Administration > Maintain Own Profile
Result: The Maintain Own Profile window will open:
(Continued)

111122
7.3 Maintain user preferences, continued
Step Action
2 Click the User Preferences tab.
Result: The User Preferences tab will open:
3 Enter the required user preferences.
Note: Selecting “Remember Previous Transaction” options (e.g. Equipment, Effective Date) will prompt Portfolio+Plus to remember the selected details for the first transaction created during each login session. This will be particularly useful when entering multiple transactions with the same details.
4 Click the Update Preferences button.
Result: The following system message will display:
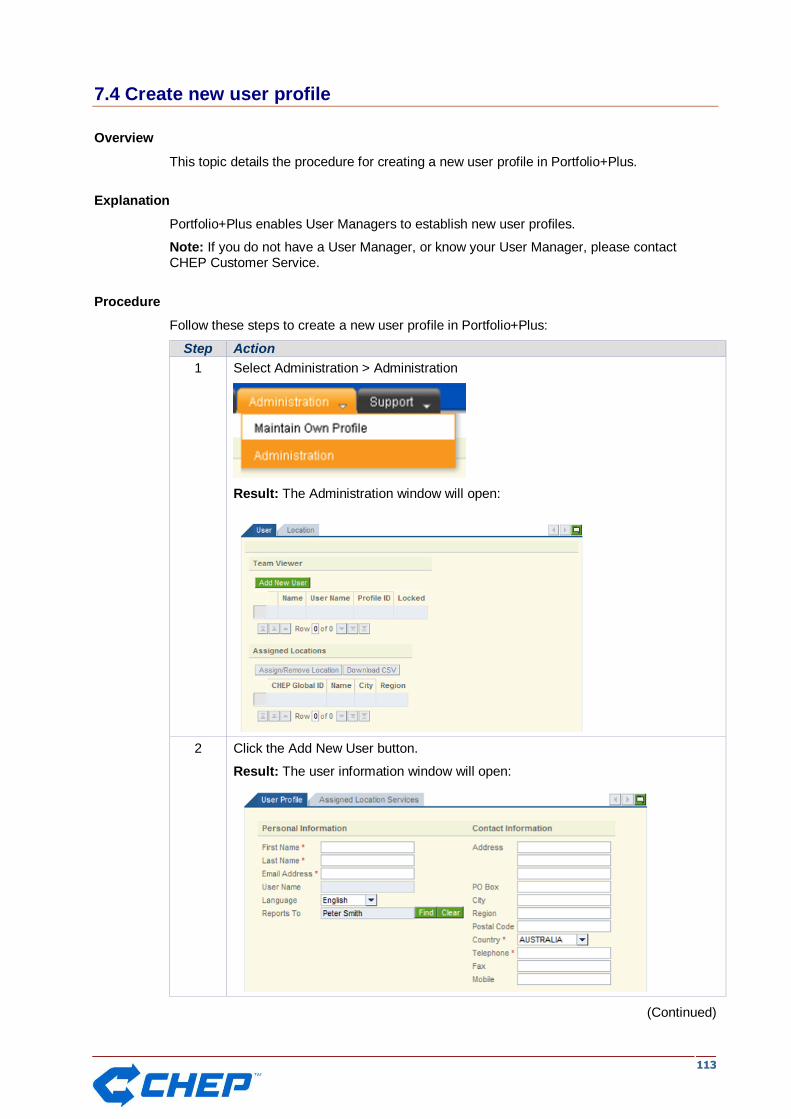
111133
7.4 Create new user profile
Overview
This topic details the procedure for creating a new user profile in Portfolio+Plus.
Explanation
Portfolio+Plus enables User Managers to establish new user profiles.
Note: If you do not have a User Manager, or know your User Manager, please contact CHEP Customer Service.
Procedure
Follow these steps to create a new user profile in Portfolio+Plus:
Step Action
1 Select Administration > Administration
Result: The Administration window will open:
2 Click the Add New User button.
Result: The user information window will open:
(Continued)
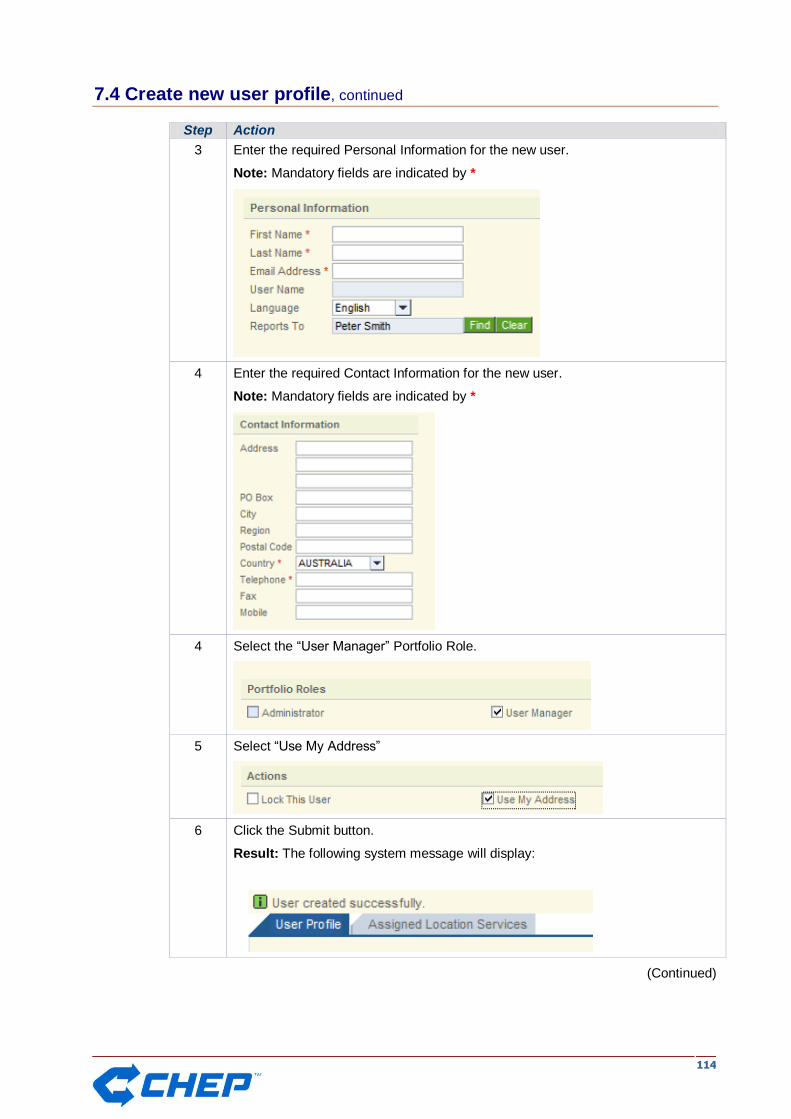
111144
7.4 Create new user profile, continued
Step Action
3 Enter the required Personal Information for the new user.
Note: Mandatory fields are indicated by *
4 Enter the required Contact Information for the new user.
Note: Mandatory fields are indicated by *
4 Select the “User Manager” Portfolio Role.
5 Select “Use My Address”
6 Click the Submit button.
Result: The following system message will display:
(Continued)
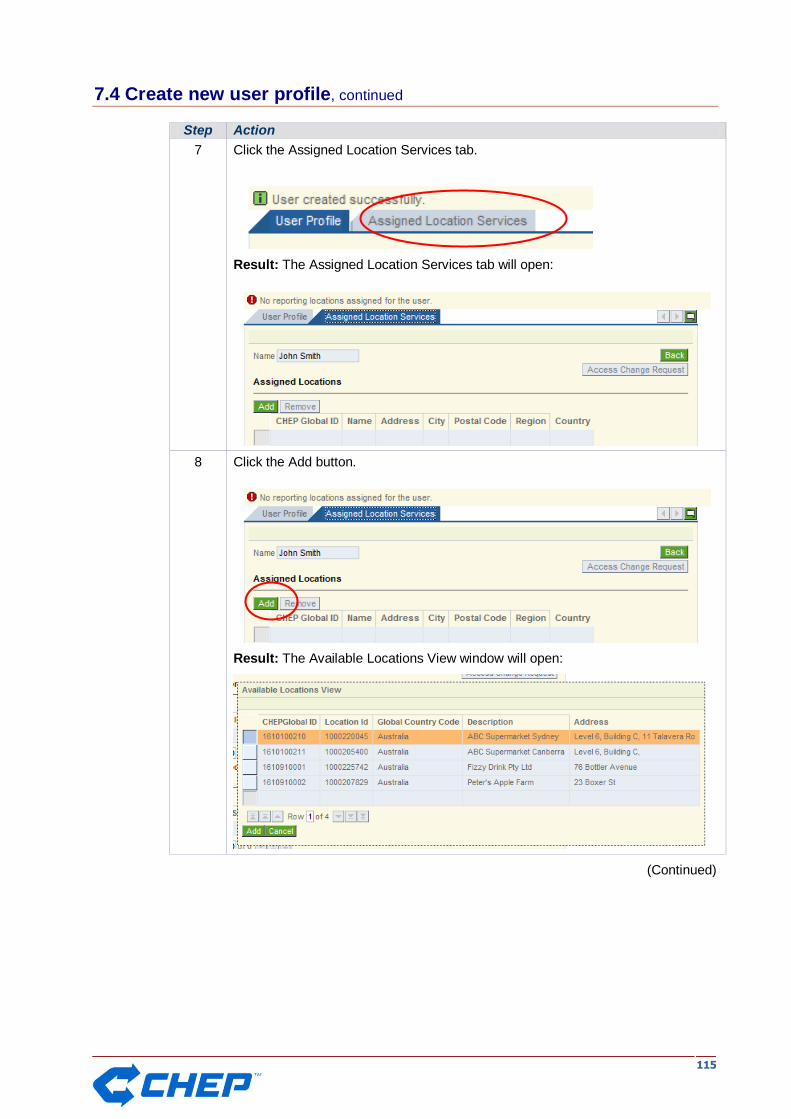
111155
7.4 Create new user profile, continued
Step Action
7 Click the Assigned Location Services tab.
Result: The Assigned Location Services tab will open:
8 Click the Add button.
Result: The Available Locations View window will open:
(Continued)
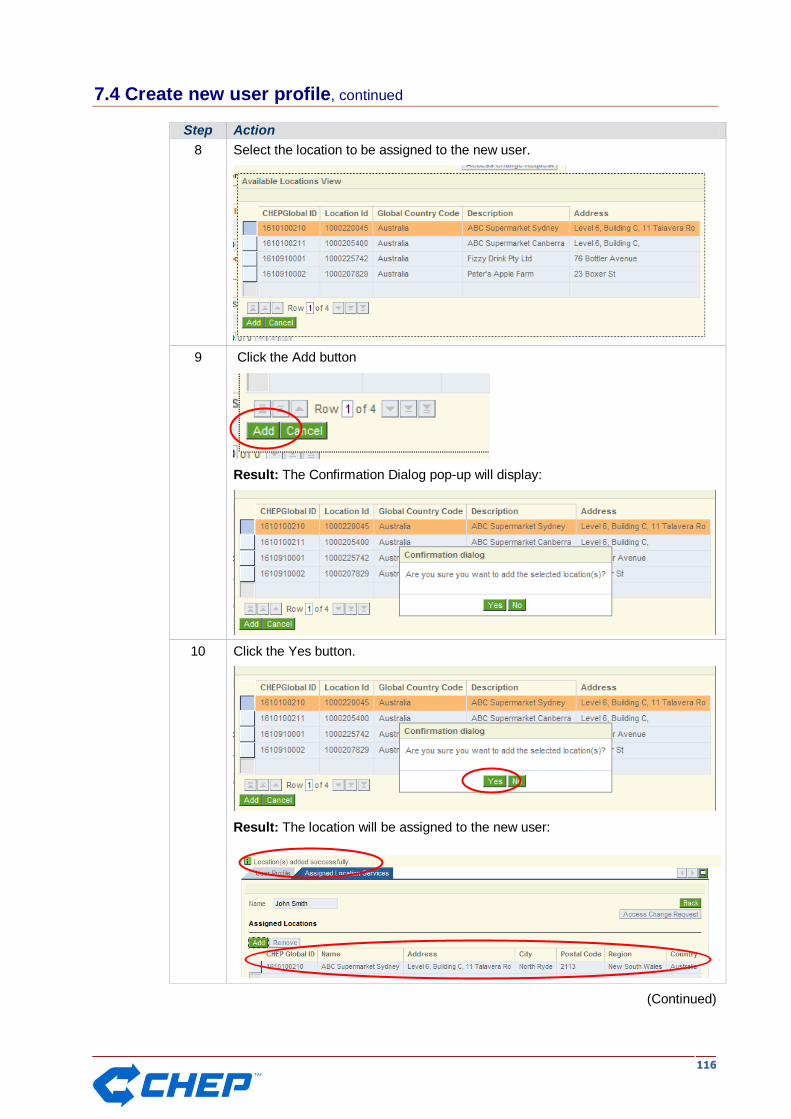
111166
7.4 Create new user profile, continued
Step Action
8 Select the location to be assigned to the new user.
9 Click the Add button
Result: The Confirmation Dialog pop-up will display:
10 Click the Yes button.
Result: The location will be assigned to the new user:
(Continued)
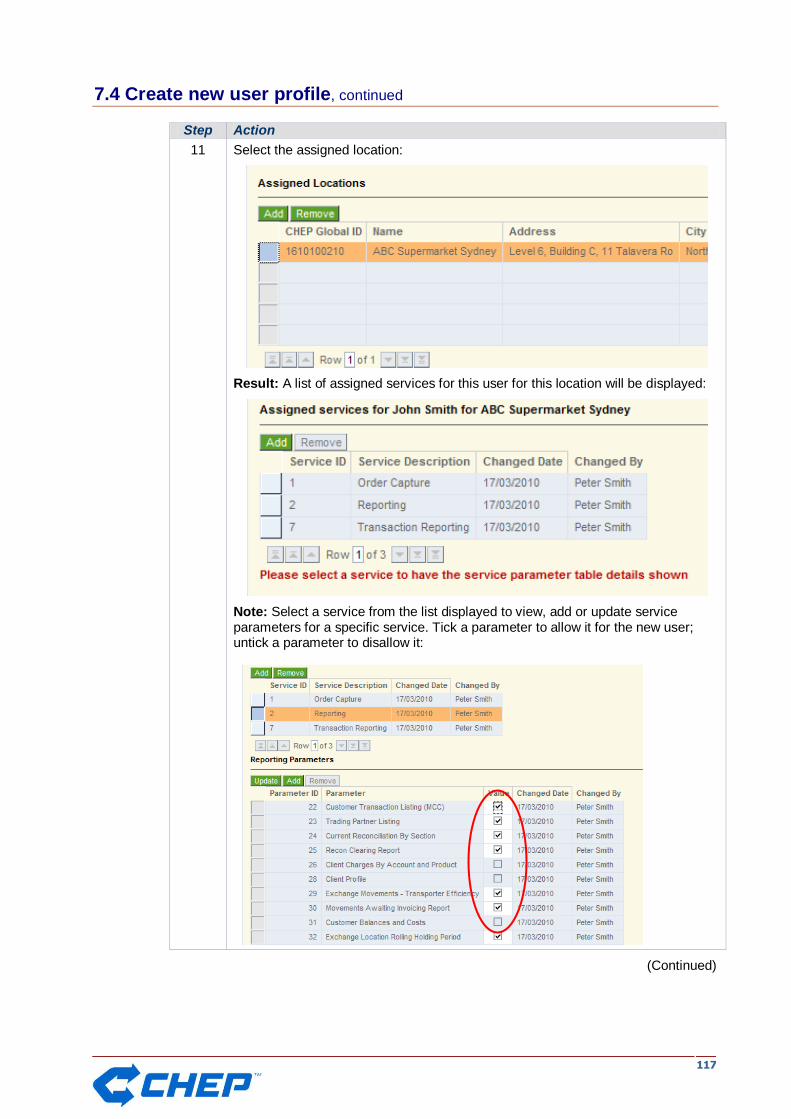
111177
7.4 Create new user profile, continued
Step Action
11 Select the assigned location:
Result: A list of assigned services for this user for this location will be displayed:
Note: Select a service from the list displayed to view, add or update service parameters for a specific service. Tick a parameter to allow it for the new user; untick a parameter to disallow it:
(Continued)

111188
7.4 Create new user profile, continued
Step Action
12 Once the required changes have been made, click the Back button.
Result: You will be returned to the User Profile tab:
13 Click the Update button.
Result: The changes you have been made will be saved:

111199
Chapter 8: Support
Overview
This chapter details the procedures for accessing support information in Portfolio+Plus.
Support tab
Support information is accessed using the Support tab in Portfolio+Plus:
Contents
This chapter contains the following topics:
Topic See page
8.1 View news 120
8.2 View contact information 121
8.3 View training guides 122
8.4 View marketing material 123

112200
8.1 View news
Overview
This topic details the procedure for viewing event, news and system update details in Portfolio+Plus.
Explanation
Portfolio+Plus enables users to view important CHEP-related news, events and updates.
Procedure
Follow these steps to view news, events and updates:
Step Action
1 Select Support > News > Asia-Pacific
Result: The Asia-Pacific News window will open:
Note: News items will display, by title, as hyperlinks in this window. Click a hyperlink to view a news item.

112211
8.2 View contact information
Overview
This topic details the procedure for viewing customer service contact information.
Explanation
Portfolio+Plus enables users to view current contact information for CHEP customer service including:
Telephone number
Email address
Users may also submit an electronic service request to CHEP from the contact information window in Portfolio+Plus
Procedure
Follow these steps to view contact details:
Step Action
1 Select Support > Contact Information > Asia-Pacific
Result: The Contact Information window will open:
2 Click the Here link to submit an electronic service request to CHEP.
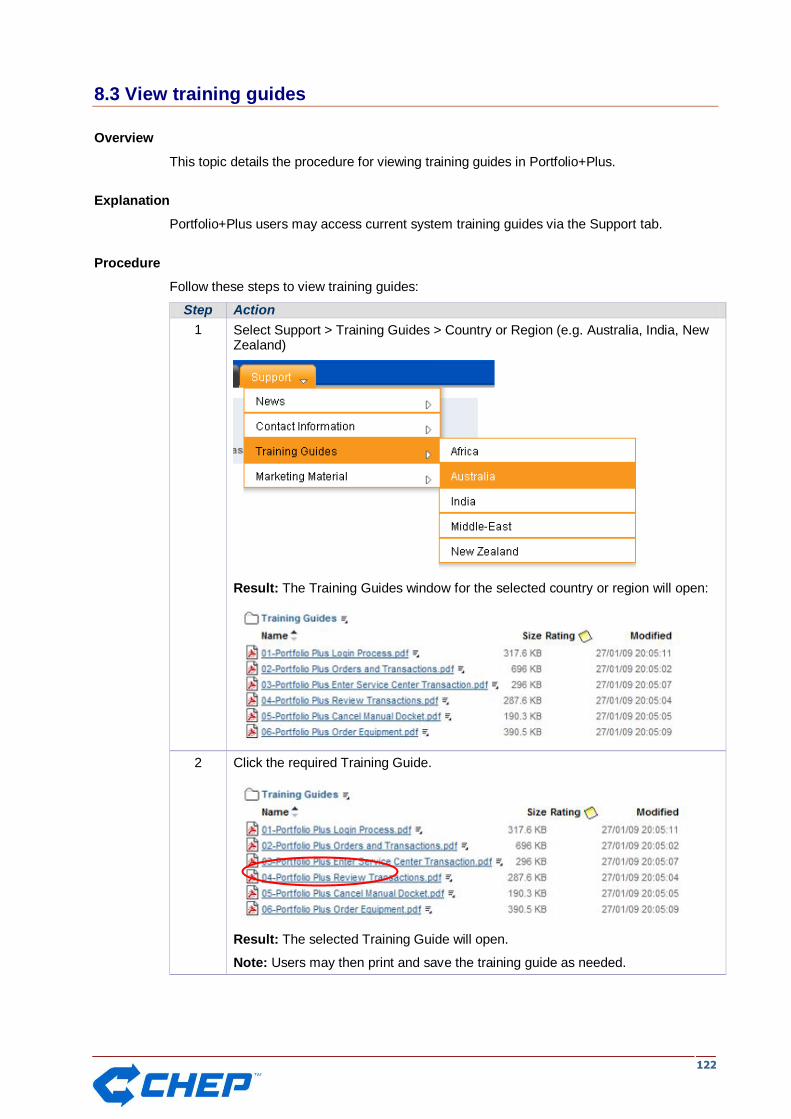
112222
8.3 View training guides
Overview
This topic details the procedure for viewing training guides in Portfolio+Plus.
Explanation
Portfolio+Plus users may access current system training guides via the Support tab.
Procedure
Follow these steps to view training guides:
Step Action
1 Select Support > Training Guides > Country or Region (e.g. Australia, India, New Zealand)
Result: The Training Guides window for the selected country or region will open:
2 Click the required Training Guide.
Result: The selected Training Guide will open.
Note: Users may then print and save the training guide as needed.
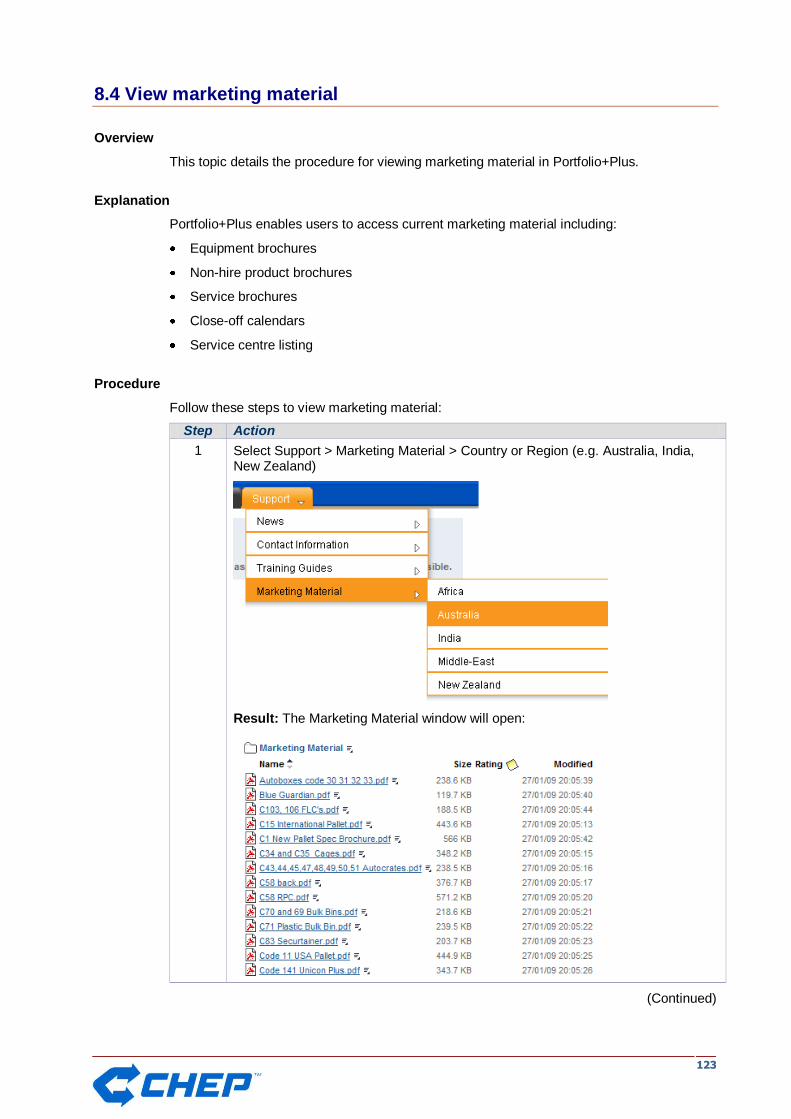
112233
8.4 View marketing material
Overview
This topic details the procedure for viewing marketing material in Portfolio+Plus.
Explanation
Portfolio+Plus enables users to access current marketing material including:
Equipment brochures
Non-hire product brochures
Service brochures
Close-off calendars
Service centre listing
Procedure
Follow these steps to view marketing material:
Step Action
1 Select Support > Marketing Material > Country or Region (e.g. Australia, India, New Zealand)
Result: The Marketing Material window will open:
(Continued)
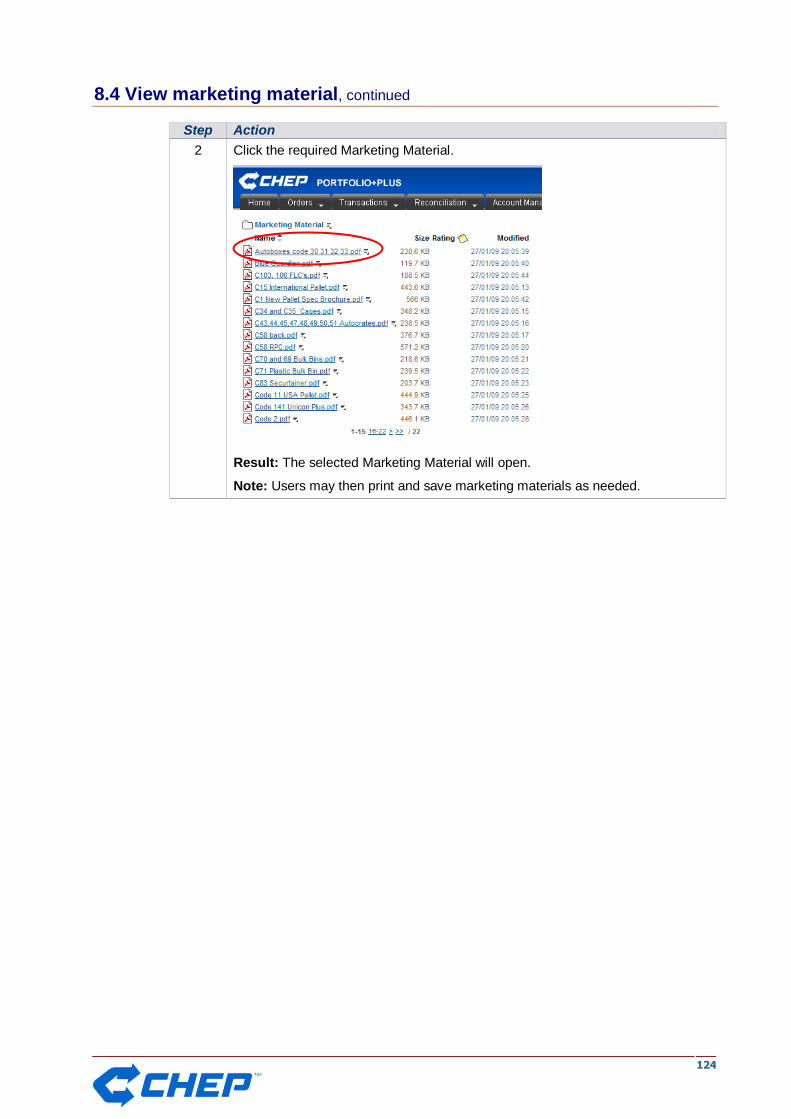
112244
8.4 View marketing material, continued
Step Action
2 Click the required Marketing Material.
Result: The selected Marketing Material will open.
Note: Users may then print and save marketing materials as needed.