chemistry lab report format - lhs...
TRANSCRIPT

1
Chemistry Lab Report Format
Lab reports will be handwritten in your notebook. Pre-labs are due the day we perform the lab. Every section should be written in complete sentences and have a heading in bold, caps, or underlining to distinguish between sections.
“Prelab”
o Heading- upper left hand corner (include name, name of lab and date(s) the lab will be performed o The purpose - written in one or two sentences. This is a statement of the problem to be investigated. It provides the
overall direction for the laboratory investigation and must be addressed in the conclusion. o Safety warnings - written out in one or two sentences. After reading the procedure, list all safety issues that need to be
kept in mind while performing the lab. This includes but is not limited to acids, bases, other dangerous chemicals, hot objects, open flames, and broken glass.
o All pre-lab questions must be answered in complete sentences. Calculations for math problems must be shown. You do not have to write the question but number them like they are in the lab for easy reference.
o The procedure should be read and then summarized in paragraph form. You do not have to rewrite the entire thing word-for-word. SUMMARIZE AND PARAPHRASE! Copying word-for-word will result in a grade penalty.
*All of the above is to be turned in the day you start a lab. If you do not have the pre-lab to turn in on the day of the lab, you
will not do the lab in class.* “Postlab”
o Data and observations: This section will include all data that was measured and observations that were made. Data should be neatly organized in a data table, and graphs should be included when applicable. Tables and graphs should be drawn with a ruler and include titles/labels.
o Calculations/Results should be included here. This section may include a “results table.” If you did multiple trials, always show calculations for each individual trial, and you include any averages at the end if applicable.
o Post-Lab Questions should be answered. Calculations for math problems must be shown. o Conclusion – Very briefly restate the purpose of the lab, then discuss how you addressed the purpose. State and discuss
results. A good conclusion for a lab is between 5 & 7 sentences. This section is not a summary of the lab procedure. It is a place for you to discuss the main point of the lab, what was learned, surprising results, and anything else relevant to the purpose of the lab.
o Error Analysis: Discuss possible sources of error in the lab. Never cite reasons such as “we measured wrong” or “we calculated wrong.” If you did a math-based lab and have not already calculated percent error or percent yield, you must do so here.
See next page for example of lab report formatting.

2
Katy Lyles Flame Test Lab 8/23/2016 I. Purpose The purpose of this lab is to….. II. Safety In today’s lab, students should be aware that… III. Pre-lab Questions
1. Answers…
2. Answers… IV. Procedure In this section you will summarize and paraphrase the lab procedure. Do not copy word-for-word! (all of the above sections are considered the “pre-lab” and should be completed before the lab is done) V. Data and Observations
Chemistry Is So Awesome
VI. Calculations & Results
1. Calculate the mass of …..
87 g – 82 g = 5 g VII. Post-lab Questions 1. Answers… VIII. Conclusion Here you will write your organized and well thought-out conclusion. IX. Error Analysis Discuss sources of error and calculate % error or % yield if not done in a previous section.

3
Lab Safety
Instructions:
Welcome to Pre-AP Chemistry! Today you will be completing your first graded lab. With a partner complete each question at your lab table. Return all papers to the folder when finished.
1. The Texas Hazard Communication Act requires that Material Safety Data Sheets (MSDS which are also known as SDS) detailing information about hazardous chemicals be available for each hazardous chemical stored in the school facility. These sheets must be readily available for reference for teachers and students. They can be accessed online at http://www.flinnsci.com. Go to this website and select “chemicals”. Under teacher resources select “Flinn SDS Search”. In the search box you can type in any chemical we will be using in the lab and find important safety information about it. Type in Isopropyl Alcohol and select the first option. Use the information to complete the following:
a. Chemical Formula: b. Appearance: c. Reactivity: d. Health hazards: e. Fire hazards: f. Special precautions: g. Disposal:
h. Where might you see an NFPA label at your local Walmart?
2. Read the following true story that took place in a high school in California. (Kaufman, J.A., Chemical Accidents, 1989) In a high school in California, a lab assistant mixed phosphorus and potassium chlorate in a gas-collecting bottle with
a rubber stopper. He started to shake the bottle. The bottle exploded, blowing off one finger on his right hand. Unlabeled bottles and stored glass containers in the storeroom where the accident occurred were pierced with flying glass. Ether was ignited by the flying phosphorus. The ether was not being stored in a flammables cabinet. A student in the adjoining classroom sprayed the shirt of the assistant with a fire extinguisher. The fire continued to burn for approximately fifteen minutes until the fire department arrived. The building was evacuated. All the fingers on the victim’s right hand were eventually amputated. The big toe from one foot was grafted onto the thumb position so that it could press against the pad of the rest of the hand. This incident, although tragic, had potential to be catastrophic. List three facts that the MSDS provided the lab assistant that could have saved his fingers and prevented the accident - if he had read them!
a. b. c.
*INSTRUCTIONS*
Flinn Scientific website

4
3. The National Fire Protection Association (NFPA) “hazard diamond” also appears on many of the chemicals used in the lab. The diamond is divided into four sections each with a number, 0 to 4. (0 least severe hazard, 4 most severe). Based on your knowledge of the NFPA hazardous material identification system, choose one (your partner should choose a different one) of the following and create an appropriate hazard label for that chemical. Use the diagram below to help you.
Option 1: Vinegar
Known information/properties:
Clear or brown liquid with strong acetic acid smell Irritating to the eyes Soluble in water Non-flammable Stable
Option 2: 30% Hydrogen Peroxide
Known information/properties:
Clear, colorless liquid Soluble in water Severe irritant (even vapors are irritant); causes severe burns Oxidizer Non-flammable Unstable
Option 3: Acetone
Known information/properties:
Colorless liquid with sweet odor Highly flammable Irritating to body tissues; somewhat toxic by ingestion Somewhat stable; possible explosions with strong oxidizers Good shelf life if properly stored Severe eye irritant

5
4. You have a copy of your lab safety contract. Read through this with your lab partner and answer the following questions: a. Write a statement that describes the general rule for conduct in a lab setting. b. In the case of a spill, accident, or injury, what should you do? c. When lighting a flame, what should you be careful of? d. What are some important disposal tips when a lab is completed and you are cleaning your work space? e. Which piece of lab safety equipment must be worn anytime heat, chemicals, or glassware are being used, without exception? f. Name 2 important hygiene practices that will keep you safe during lab. g. What is the procedure for diluting (adding water to) an acid? h. What should be done with unused chemicals? 5. When you have completed these questions walk around the room and determine the location of the following safety equipment in our classroom. Draw a quick sketch of the room and label their locations. 1. Fire extinguisher 2. Emergency shower 3. Eyewash 4. First aid kit 5. Goggle cabinet / sterilizer 6. Fume hood 7. Emergency power and gas shut-off
6
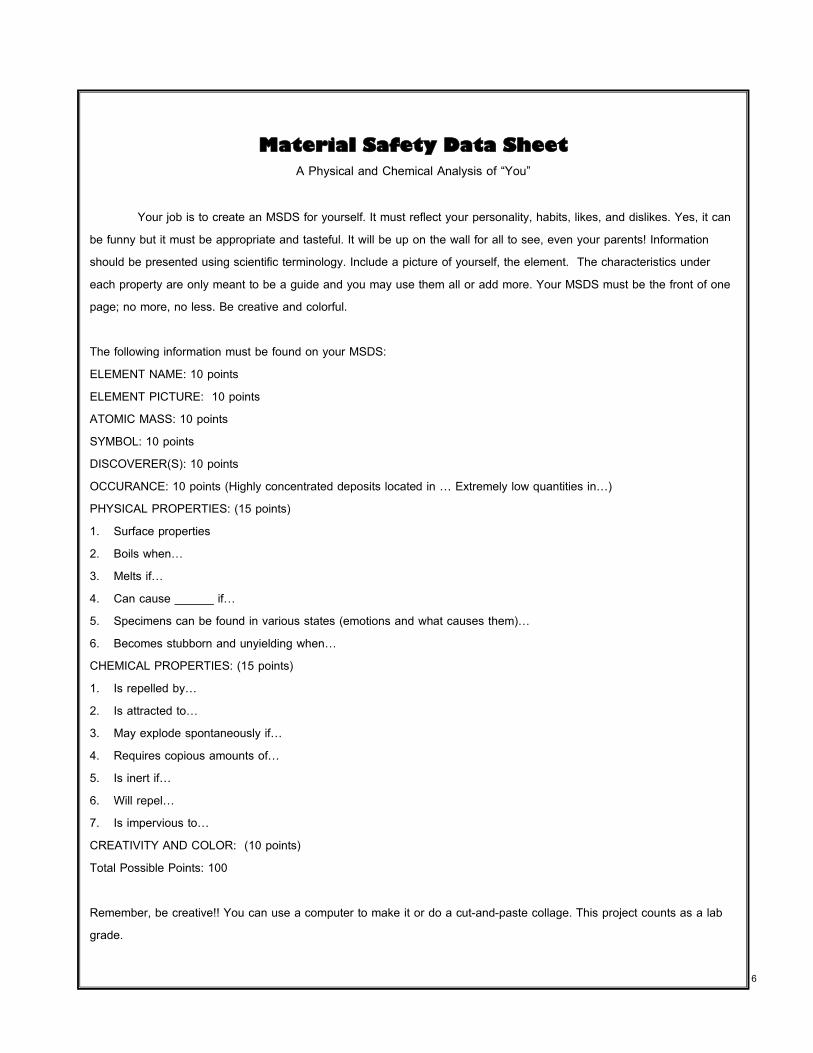
Material Safety Data Sheet
A Physical and Chemical Analysis of “You”
Your job is to create an MSDS for yourself. It must reflect your personality, habits, likes, and dislikes. Yes, it can be funny but it must be appropriate and tasteful. It will be up on the wall for all to see, even your parents! Information should be presented using scientific terminology. Include a picture of yourself, the element. The characteristics under each property are only meant to be a guide and you may use them all or add more. Your MSDS must be the front of one page; no more, no less. Be creative and colorful.
The following information must be found on your MSDS: ELEMENT NAME: 10 points ELEMENT PICTURE: 10 points ATOMIC MASS: 10 points SYMBOL: 10 points DISCOVERER(S): 10 points OCCURANCE: 10 points (Highly concentrated deposits located in … Extremely low quantities in…) PHYSICAL PROPERTIES: (15 points) 1. Surface properties 2. Boils when… 3. Melts if… 4. Can cause ______ if… 5. Specimens can be found in various states (emotions and what causes them)… 6. Becomes stubborn and unyielding when… CHEMICAL PROPERTIES: (15 points) 1. Is repelled by… 2. Is attracted to… 3. May explode spontaneously if… 4. Requires copious amounts of… 5. Is inert if… 6. Will repel… 7. Is impervious to… CREATIVITY AND COLOR: (10 points) Total Possible Points: 100 Remember, be creative!! You can use a computer to make it or do a cut-and-paste collage. This project counts as a lab grade.

7
Chemical and Physical Changes Purpose: Identify changes as chemical or physical. Pre-Lab Questions: 1. Identify the following as either chemical or physical changes:
a. Striking a match d. Mowing the grass b. Food spoiling e. Leaves decaying c. Breaking a glass f. Boiling water
2. In your own words, state the Law of Conservation of Mass. 3. List the indicators of a chemical change. Procedure: USING A RULER, draw a data chart with three columns and 7 rows. One column is for Experiment #, one is for recording mass and observations, and the last one is for labeling the experiment as chemical or physical change.
Experiment #1: Place a weigh paper or plastic dish on the balance. Press the “tare” button. This zeros out the balance. Place an unused match on the weigh paper. The mass displayed is the mass of only the match. Record the mass. Carefully strike the match and allow it to burn halfway, and then blow it out. Allow the match to cool. Measure and record the mass of the burned match. Wet the match and throw it in the waste container.
Experiment #2: Fill an empty film canister ½ full with water. Put ½ alka seltzer tablet into the water and very
quickly put the cap on the film canister (hold cap down tight for 5 seconds). Quickly set on table and stand back a few feet and observe changes. Discuss with your lab group what you observed that indicates a chemical change and record observations.
Experiment #3: Place a small piece of magnesium in a clean, dry test tube. Add 10 drops of 6M HCl
(hydrochloric acid). Record observations. Touch the bottom of the test tube to check for a temperature changes. Be careful not to inhale the fumes. Wash contents into the sink with plenty of water.
Experiment #4: Transfer a small amount of sodium bicarbonate to a clean dry test tube. Add 10 drops
of 3M HCl, one drop at a time. Touch the bottom of the tube. Record all observations and wash the rest down the sink. Experiment #5: In one well of a reaction plate, mix 2 drops of barium chloride solution with 5 drops of sodium
sulfate solution. Record all observations and rinse down the sink. Experiment #6: Mix a small scoop of sodium chloride with 2 mL of water in a test tube. Record all observations
and rinse down the sink.

8
Post-Lab Questions: (answer by listing # of experiment): Use COMPLETE Sentences for full credit! 1. In which lab did you observe a precipitate form? 2. In which did you observe energy changes? 3. In which did you observe a color change? 4. In which did you observe the formation of a gas? 5. In which was there a mass change? 6. Explain the mass change (Remember the Law of Conservation of Mass is always true). Conclusion: Using your prior knowledge of physical and chemical changes, write a conclusion explaining how you classified each change as either chemical or physical. Sources of error: This section includes any errors that could have occurred in this lab. For instance, what do you think would have happened if you forgot to add the sodium sulfate solution? How would that affect the outcome of the lab?
9
SEPARATION OF MIXTURES
Pre-lab questions 1. You are presented with a container of gray powder. Discuss how you can tell if it is a mixture of a pure substance. 2. Describe how you would accomplish the following separations: a. salt and pepper b. egg white from unbroken egg yolk c. colored beads by color Introduction One characteristic that distinguishes a mixture from a pure substance is the ability to separate the mixture into its components by simple physical means. Whether a mixture is homogeneous or heterogeneous, its components will have properties that can be used to affect this separation. Some of the properties that can aid in the isolation of components are: particle size; color; density; solubility in water; ability to sublime; and magnetism. You will take advantage of these properties during the procedures below. Procedure I. Obtain one small scoop of Mixture 1 (fine sand, SiO2, and table salt, NaCl) and place it in a medium test tube. a. What does Mixture 1 look like? After completing the visual inspection, add approximately 5 mL of distilled water to the mixture. Agitate the contents to insure complete mixing. b. What does this new mixture with the water mixture look like? c. Has anything happened to the original mixture? Explain. After allowing any material to settle, carefully pour off the water collecting it in a small evaporating dish. Keep the solid component in the test tube. d. What do you think is the identity of the solid left in the test tube? This technique that separates a liquid from an insoluble solid by carefully pouring off the liquid is called decanting or decantation. Now heat the water solution in the dish to dryness on a hot plate. e. What is the purpose of the heating? f. What is the identity of the solid remaining in the dish? g. Why do you think the solid did not evaporate away?

10
You have just done a separation through evaporation of one component. PLACE ISOLATED MATERIALS IN THE PROPER WASTE CONTAINERS. II. Obtain one scoop of Mixture 1 (fine sand and table salt) and place it in a medium test tube. Add water as before and mix. Set up a filtration apparatus as shown here. Below is an illustration on how to fold the filter paper for use in the funnel.
Pour the entire contents of the tube into the funnel. Collect the liquid passing through the funnel in a small evaporating dish. Rinse the material in the funnel with a few milliliters of distilled water from your wash bottle and collect the additional liquid in the same evaporating dish. a. Why do you rinse the filter paper while it is in the funnel? This separation process is called gravity filtration. The liquid in the evaporating dish is called the filtrate. b. What is the composition of the filtrate? c. Is it a pure substance or a mixture? Place the dish on a hot plate and evaporate off the water. Describe the isolated mixture components as before. Dispose of waste in the proper containers. d. Why might you choose to use gravity filtration rather than decantation?

11
III. Obtain a clear plastic cup, pre-cut straw, and a pre-cut strip of paper. Place about 1 cm of distilled water in the bottom of the cup and balance the straw on the top edge. Cut one end of the strip in a V shape. Fold the top edge so that the point of the V will be in the water when the paper hangs from the straw. DO NOT PUT THE PAPER IN THE WATER AT THIS TIME. Place a small spot of Mixture 4 (ink from a marker) on the paper at a point that will be just above the water level when placed in the cup. It is important that no part of the spot be submerged when you begin. Carefully hang the paper from the straw so that the point is now in the water. Allow the separation to proceed, observing occasionally, until you can identify and describe distinct components in the mixture. a. Why is this separation occurring? When the separation is complete, remove and dry the paper. Dry and replace the cup and straw. Record the description of the components. This technique which separates components based on their relative attraction to moving and non-moving phases is called paper chromatography.

12
Significant figures and measurement
Scientists do a lot of measuring. When scientists use an instrument (such as a ruler, graduated cylinder, spectrophotometer or balance) to measure something, it is important to take full advantage of the instrument. However, they can’t cheat and record a better measurement than the instrument is capable of. There is an understanding among scientists of the proper way to record valid measurements from any instrument. When you are the scientist, you must record data in this way. When you are reading other scientists’ work, you must assume they recorded their data in this way.
Model 1
1. What distances can you be certain of on the ruler in Model 1?
2. Six students used the ruler in Model 1 to measure the length of a metal strip. Their measurements are shown at the right. Were all of the students able to agree on a single value (1, 2, 3…) for any digit (ones place, tenths place, etc.) in the measurement? If yes, which value and digit did they agree on?
3. The ruler in Model 1 is not very useful, but a measurement can be estimated. Discuss in your group how each student might have divided up the ruler “by eye” in order to get the measurement that he or she recorded.
Model 2
4. The students obtained a better ruler, shown in Model 2. What distances can you be certain of on this ruler?
5. Were the students able to agree on a single value (1, 2, 3…) for any digit (ones place, tenths place, etc.) in their measurements using the ruler in Model 2? If yes, what value in what digit did they agree on?
6. What feature of the ruler in Model 2 made it possible for the students to agree on a value in that digit?

13
7. There will always be uncertainty in any measurement. This causes variation in measurements even if people are using the same instrument. Compare the variation in the measurements made by the six students using the rulers in Models 1 and 2. Which ruler resulted in greater variation? Explain why that ruler caused more variation.
Model 3
8. The students obtained an even better ruler, shown above in Model 3. a. Were the students able to agree on a single value for any of the digits in their measurements using the new ruler? If yes, what value(s) did they agree on in which digits? b. What feature of the ruler in Model 3 made it possible for the students to agree on the values in those digits?
**In your lab notebook write down what a significant digit is, how they are recorded and how you determine the number of significant digits in a measurement. Use the following information as a guide.**
1. Using side A of the ruler, record the length of the wooden block using correct significant digits and units.
2. Using side B of the ruler, record the length of the wooden block using correct significant digits and units.
3. Using side C of the ruler, record the length of the wooden block using correct significant digits and units.
4. Using side D of the ruler, record the length of the wooden block using correct significant digits and units.
5. When any measurements are taken this year significant figures must be paid attention to. When using an electronic device, such as an electronic balance, the measurement displayed on the screen is assumed to have one estimated digit included. In fact, you’ll often see the estimated digit changing rapidly, because there is fluctuation in the estimate. Explain why it is important to record the zero in the measurement shown to the right.
6. Consider a 1000-mL graduated cylinder with marks every 100 mL. a. A student records the volume of liquid in the cylinder as 750 mL. Is this a correct measurement? Explain. b. Are all of the digits in the described measurement of 750 mL significant? Explain.
When a measurement is recorded properly, all of the digits that are read directly (certain) and one estimated (uncertain) digit are called significant digits. The number of allowable significant digits is determined by the marks or gradations of the instrument.
Sometimes a “0” is the estimated digit and must be recorded.

14
DIMENSIONAL ANALYSIS Remember these two ideas: 1. Any number can be multiplied by 1 without changing its value. 2. Multiplying by a conversion factor is like multiplying by 1 because the numerator and the denominator are equal. In your notebook show your work for the following problems: 1. Convert 23.9 km to m.
2. Convert 4.7 L to mL.
3. Convert 22.8 cm to m.
4. Convert 85 mL to L.
5. Convert 16 x 105 g to kg.
6. Convert 34.89 m x 10-6 m to km.
7. Convert your weight in pounds to kilograms if 1 kg= 2.2 lbs.
8. Measure your height in centimeters using the meter stick. Convert your height to kilometers.
9. Measure your arm span in inches. Convert your arm span to centimeters using this conversion factor: 2.54 cm=1 inch.
10. Find the length of a pencil in miles. 1.6 km =1 mi 100 cm =1 m 1,000 m =1 km
11. Find the mass of the paper clip in tons. 2.2 lbs =1 kg 2,000 lbs =1 ton 1kg =1,000g
12. Find the maximum length of time you can hold your breath, in years.
365 days =1 year 24 hours =1 day 60 min =1 hour 60 s =1 min
13. A cheetah can run 72 miles per hour. What is their speed in kilometers per minute.
14. If an object has a density of 15 grams per milliliter, what is it’s density in pounds per gallon.

15
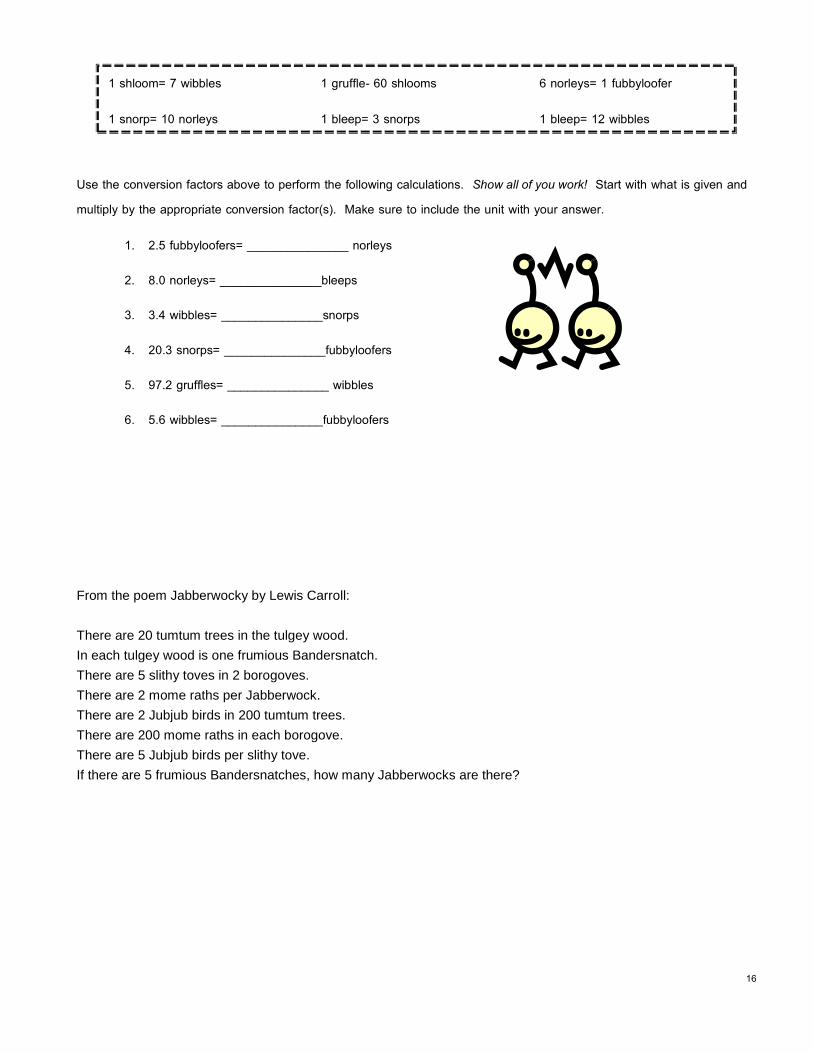
In a very foreign country, units of time have some very odd sounding names. In the box below, the relationships between units have been given.
16
Use the conversion factors above to perform the following calculations. Show all of you work! Start with what is given and multiply by the appropriate conversion factor(s). Make sure to include the unit with your answer.
1. 2.5 fubbyloofers= _______________ norleys
2. 8.0 norleys= _______________bleeps
3. 3.4 wibbles= _______________snorps
4. 20.3 snorps= _______________fubbyloofers
5. 97.2 gruffles= _______________ wibbles
6. 5.6 wibbles= _______________fubbyloofers
From the poem Jabberwocky by Lewis Carroll:
There are 20 tumtum trees in the tulgey wood.
In each tulgey wood is one frumious Bandersnatch.
There are 5 slithy toves in 2 borogoves.
There are 2 mome raths per Jabberwock.
There are 2 Jubjub birds in 200 tumtum trees.
There are 200 mome raths in each borogove.
There are 5 Jubjub birds per slithy tove.
If there are 5 frumious Bandersnatches, how many Jabberwocks are there?
1 shloom= 7 wibbles 1 gruffle- 60 shlooms 6 norleys= 1 fubbyloofer
1 snorp= 10 norleys 1 bleep= 3 snorps 1 bleep= 12 wibbles

17
Name: _______________________________
Type of Candy: _________________________________________________
The NET WEIGHT (in grams) printed on the bag of candy: __________________
Purpose: In this lab, define accuracy as the net weight ±0.10 grams. Define precision as having a variance ≤ 0.20 grams. All measurements need to be to two decimal places and must include units.
Calculate the acceptable range for accuracy:
Bag's net weight + 0.10 grams = _____________
Bag's net weight = _____________
Bag's net weight - 0.10 grams = _____________
Procedure:
1. Please label your bag of candy with a random 3 digit number before you start to weigh it. 2. Weigh the unopened bag individually. This is the gross weight. 3. Open the bag and dump the contents onto a paper towel. You may eat the contents. Weigh the empty bag. This is the tare
weight. 4. Calculate the net weight for the bag by subtracting the tare weight from the gross weight. 5. Determine if the bag's content is/isn't accurate. 6. Share your gross weight and tare weight on the class spreadsheet. 7. Determine if all the bags together are precise.
Bag # Gross weight Tare weight Net weight Is this bag accurate? Y/N
Post lab questions:
Calculate how precise the bags of candy are.
Largest net weight = __________________
Smallest net weight = __________________
Variance = __________________
Do you consider the bags of candy to be precise? Explain your reasoning with a complete thought.

18
In this experiment, you will practice many of the measurement procedures and calculations that you will do later as you do chemistry labs. You will:
o Determine the volume of a liquid in two different ways and compare the results. o Calculate the density of a metal and compare to the accepted value found in a reference book o Calculate percent error (a measure of accuracy) and average deviation (a
measure of precision) o Volume measurements can be expressed in milliliters (mL) or cubic centimeters
(cm3 or cc). o When recording data, always record one decimal place past
the graduations (lines) on the instrument. On a digital instrument, record all the numbers exactly as displayed.
Materials: Ruler calibrated in millimeters 100 mL graduated cylinder thermometer centigram balance metal shot room temperature water
Pre-lab questions: Read the entire lab. Then come back and answer these questions. 1. A thermometer has lines for every 0.1°C. Write a sample temperature that someone might record from this thermometer.
(Include correct number of decimal places and units.) 2. a. Pick a temperature between 0°C and 100°C. ______________ b. At this temperature, the density of liquid water is ___________. (Find the answer to this question) c. Calculate the volume of 65.0 grams of water at your temperature. Show work.
Part 1 1. Using the ruler, measure the inside diameter of the 100 mL graduated
cylinder. Similarly, measure the inside height of the cylinder to the 50 mL mark. Record these measurements in Data Table 1. Remember to record the correct number of decimal places and include units for all measurements.
Part 2 2. a. Examine the gram scale of the balance. In terms of grams, what are the smallest graduations? b. To what fraction of a gram can you make measurements with this balance? 3. a. Examine the scale on the 100-mL graduated cylinder. In milliliters, what are the smallest graduations? b. To what fraction of a mL can you make measurements with a 100-mL graduated cylinder?
Data Table 1
inside diameter
inside height
Volume
massDensity

19
4. Using the balance, determine the mass of the dry 100-mL cylinder. Record mass in Data Table 2. 5. Fill your graduated cylinder with room temperature tap water to a level between 50 and 100 mL. Determine the
temperature of the water inside the graduated cylinder. Look up the density of water at that temperature and record both the temperature and density in Data Table 2. Accurately read the volume of water in the cylinder and record the volume. Determine the mass of the cylinder with the water in it. Save this water in the graduated cylinder for use in Part 3.
Data Table 2
Mass of empty graduated cylinder
Temperature of water
Density of water at recorded temp (from book or internet)
Measured volume of water
Measured mass of water + graduated cylinder
Part 3
6. Add all of the metal shot at your table to the graduated cylinder containing the water (saved from Part 2). In Data Table 3, accurately record the new volume and the new mass of the cylinder, water, and metal.
Data Table 3
Measured volume of water (from Part 2)
Measured mass of water + graduated cylinder (from Part 2)
Measured volume of metal + water
Measured mass of metal + water + graduated cylinder
7. Clean all equipment and return it to its proper place. Dispose of chemicals and solutions as designated by your teacher. Wash your hands thoroughly with soap before you leave the lab and after all work is finished.
20
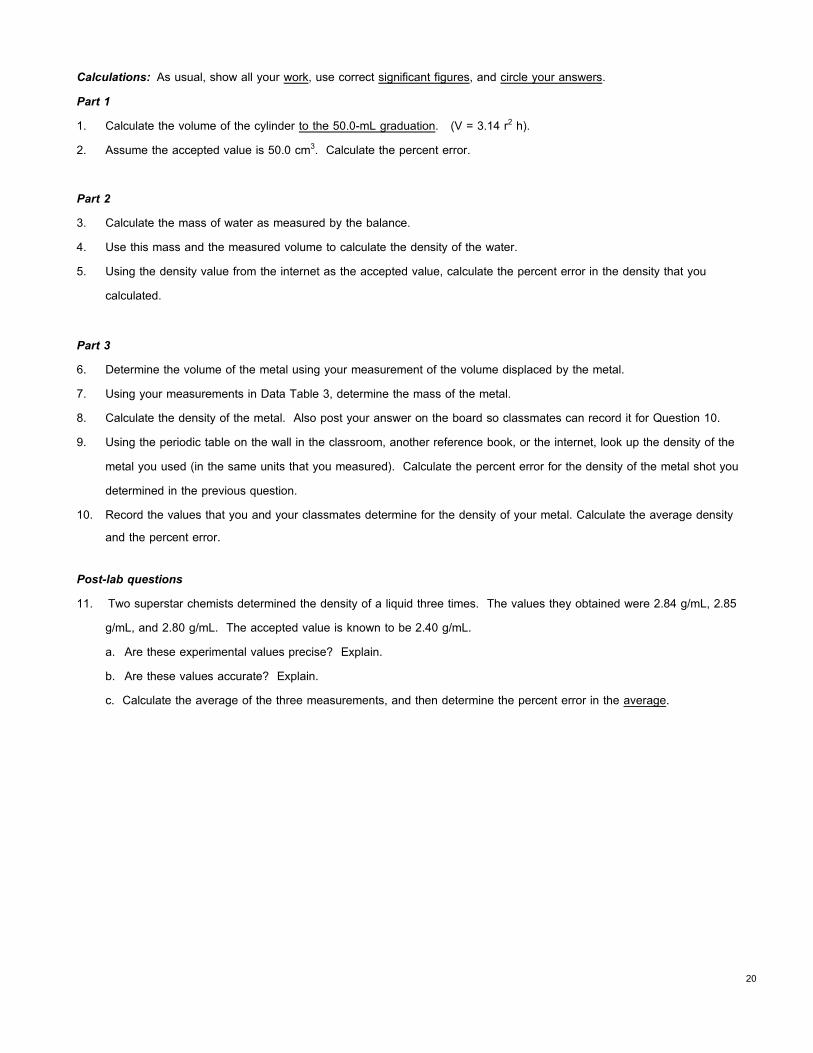
Calculations: As usual, show all your work, use correct significant figures, and circle your answers. Part 1 1. Calculate the volume of the cylinder to the 50.0-mL graduation. (V = 3.14 r2 h). 2. Assume the accepted value is 50.0 cm3. Calculate the percent error. Part 2 3. Calculate the mass of water as measured by the balance. 4. Use this mass and the measured volume to calculate the density of the water. 5. Using the density value from the internet as the accepted value, calculate the percent error in the density that you
calculated.
Part 3 6. Determine the volume of the metal using your measurement of the volume displaced by the metal. 7. Using your measurements in Data Table 3, determine the mass of the metal. 8. Calculate the density of the metal. Also post your answer on the board so classmates can record it for Question 10. 9. Using the periodic table on the wall in the classroom, another reference book, or the internet, look up the density of the
metal you used (in the same units that you measured). Calculate the percent error for the density of the metal shot you determined in the previous question.
10. Record the values that you and your classmates determine for the density of your metal. Calculate the average density and the percent error.
Post-lab questions 11. Two superstar chemists determined the density of a liquid three times. The values they obtained were 2.84 g/mL, 2.85
g/mL, and 2.80 g/mL. The accepted value is known to be 2.40 g/mL. a. Are these experimental values precise? Explain. b. Are these values accurate? Explain.
c. Calculate the average of the three measurements, and then determine the percent error in the average.
21
Purpose: To determine the thickness of aluminum foil. The density of aluminum is 2.70 g/cm3.
Procedure: Cut a section of aluminum foil about the size of a note card, and determine its thickness.
Post lab questions:
1. Which measurement limited the number of significant figures in your answer?
2. Obtain the correct thickness from teacher: ____________ cm.
a. Calculate your percent error.
3. Write a statement discussing the accuracy and precision of your calculations.
Neatly show your data, calculations, and answer in this box.

22

23
Purpose: In this lab we will identify 10 unknown substances by following a qualitative analysis flow chart. We will also use a variety of chemical and physical tests to identify 10 common household substances, all of which are white solids.
Background: The process of determining the identities of unknown substances is called qualitative analysis. This can be contrasted to quantitative analysis, which is the process of determining how much of a given component is present in a sample. A qualitative analysis scheme using simple chemical and physical tests is designed, in this laboratory experiment, for the identification of 10 common household white solids. Qualitative analysis schemes are generally summarized by a flow diagram, like the one shown. A flow diagram is designed with procedural steps on the vertical lines, the possible test results on the horizontal lines, and the resulting identifications in the boxes. Qualitative analysis procedures include physical tests as well as chemical tests. The physical tests in this lab are melting point determination and solubility in water or in alcohol. The chemical reactions or tests in this lab are with iodine, vinegar, sodium hydroxide, phenolphthalein, and Benedict’s solution. All of the chemical tests involve either formation of a precipitate, a color change, or evolution of gas bubbles.
Materials: Possible Unknown Samples (in alphabetical order): Boric acid, H3BO3 Levulose, C6H12O6 Sodium Chloride, NaCl Calcium carbonate, CaCO3 Magnesium sulfate, MgSO4 Sucrose, C12H22O11 Calcium sulfate, CaSO4 Sodium bicarbonate, NaHCO3 Cornstarch Sodium carbonate, Na2CO3 Chemicals/Test Reagents: Iodine tincture, 6 drops Sodium hydroxide solution, 0.2 M 18 drops Isopropyl alcohol solution, 12 mL White vinegar, 4 mL Bendedict's qualitative solution, 2 mL Deionized water Phenolphthalein solution, 1% 1 mL
Test tubes, 13x100 mm 10 stirring rod ring stand & ring Test tube rack graduated cylinder, 10 mL 250 mL beaker Marking pen bunsen burner
Safety: Sodium hydroxide is corrosive both as the solid and in solution; skin burns are possible; avoid all body tissue contact. Iodine tincture, phenolphthalein solution, and isopropyl alcohol solution are flammable liquids and are toxic by ingestion and inhalation. All other reagents and unknowns are considered non-hazardous; however, all may cause slight irritation to the skin, eyes, or respiratory tract; avoid all body tissue contact. Wear chemical splash goggles and a chemical resistant apron.

24
Pre-lab notes: The steps of the procedure written below correspond to the qualitative analysis flow chart provided. As each step is followed, record detailed observation of your results in the data table you have created in your lab book. Examine the flow chart that has been provided. The numbers 1-18 are provided next to each of the possible results. Write the corresponding number in your data table as you go through the flow chart. For example, if unknowns A, B, And C are water-insoluble (which is result #1) and unknowns D-K are water-soluble (which is result#2), then write a "1" by A, B, and C and record "Insoluble in H2O". Next record a "2" by D-K and record "Soluble" in H2O" on your data sheet. To further explain, if unknown "X" is found to be 1, 4, and 6 then the observations would read "1: Insoluble in H2O; 4: orange-brown (NR) with I2; 6:NR with vinegar" in your data table. Following 1 to 4 to 6 on the flow chart, the unknown "X" is then clearly identified as CaSO4.
Procedure: 1. Label test tubes with the letters of the unknowns with a marking pen and place the tubes in a test tube rack. 2. Place a small scoop of each of the unknown substances, into the appropriate test tube. (Note: Results will be affected if you use too much of a sample!) 3. Add approximately 5 mL of deionized water to each tube. (Note: This can be efficiently accomplished by measuring 5 mL once using a 10-mL graduated cylinder. Pour the 5 mL of water into test tube A and then add water to each of the 10 remaining tubes to the same height of the liquid in tube A.) 4. a. Stir the contents of each tube with the stirring rod. Be sure to rinse the stirring rod with deionized water between tubes. b. Record observations of which substances are soluble and which are insoluble in water. Remember to record both the result # (1 or 2) as well as the written observation. (Note: some soluble solids may take longer to dissolve than others.) Only three on the unknowns - cornstarch, calcium sulfate, and calcium carbonate - will not readily dissolve in water and are considered insoluble. 5. Following the flow chart, take the test tubes containing the insoluble substances and add 2 drops of iodine tincture to each. The tubes will show no reaction with iodine or will be an orange-brown color. The deep blue color is a starch-iodine complex with positively indicates cornstarch. 6. a. Dispose of the contents of the tubes that did not react with iodine. Rinse out the tubes. Prepare fresh tubes of these two unknowns by placing a small scoop of the solid into the appropriate tube. Do not add water. b. Add approximately 10 drops of vinegar to these two tubes and note whether gas bubbles are produced. The evolution of carbon dioxide gas positively identifies calcium carbonate. The remaining solid must be calcium sulfate. Record the numbers and observations. 7. The other solids are water soluble. To each of the tubes from step 4, add 3-4 drops of phenolphthalein solution. One of the unknowns, sodium carbonate, will dissolve in water to produce alkaline solutions basic enough to give a bright pink color upon addition of phenolphthalein. Do not be concerned with precipitate (solid) formation or a faint pink color at this point. 8. a. Dispose of the contents of the tubes containing the solids that remain to be identified. Rinse out the tubes. Prepare fresh tubes of these unknowns by placing a small scoop into the appropriate tube. b. Add 5 mL of distilled or deionized water to the six tubes and stir as in step 4 to dissolve the solids. 9. Add 3 drops of 0.2 M NaOH to each tube. If a white precipitate forms it positively identifies magnesium sulfate, which forms an insoluble hydroxide upon addition of sodium hydroxide.

25
10. a. Fill a 250 mL beaker half full with water and begin heating it. b. Take the remaining tubes from step 9 and add 10 drops of Benedict’s qualitative solution to each tube. c. Place the test tubes in water. As the water warms up, an orange precipitate may form while the remaining tubes will stay blue in color. The color change to orange indicates that the copper ions in the Benedict’s solution are being reduced to copper by a reducing sugar group. Levulose (fructose) is a reducing sugar; thus, this test is a positve identification for levulose. 11. a. Dispose of the contents of the tubes containing the solids that remain to be identified. Rinse out the tubes. Prepare fresh tubes of these four unknowns. Do not add water. b. Add approximately 10 drops of vinegar to each tube and note whether gas bubbles are produced. The evolution of carbon dioxide gas positively identifies sodium bicarbonate. 12. a. Dispose of the contents of the remaining tubes. Rinse out the tubes and prepare fresh tubes of these three unknowns. Do not add water. b. Add approximately 5 mL of isopropyl alcohol to each tube. Stir the contents of each tube to attempt to dissolve the solids. Of the three solids, only boric acid dissolves readily in alcohol; thus, this test is a positive identification for boric acid. 13. a. Dispose of the contents of the remaining tubes. Rinse out the tubes. Prepare fresh tubes of these unknowns. Do not add water. b. Hold each tube with a test tube holder and heat each tube gently with a Bunsen burner flame. If the solid starts to turn brown, has a sweet smell and begins to melt in 1-2 minutes it is sucrose. DO NOT CONTINUE HEATING ONCE YOU HAVE DETERMINED THE CONTENTS ARE CHANGING! This change is an indication that the material has a low melting point and that it is sucrose. Other solids will not change as heated. This indicates that the solid has a high melting point and is sodium chloride.
Data: All observations must include a number (see your flow chart) and the result. For example: 1-not soluble.
Unknown Observations Identity A B C D E

26
F Post-lab questions: 1. Identify what each of the following observations are from the flow chart and then classify them as physical or chemical changes: 2,3,5,7,11,13,17. Make sure you include the number, observation, and whether it is physical or chemical change. 2. List the four indicators of a chemical change and identify which ones were observed in this lab. Use complete sentences.

27
Isotopes Lab Name ________________________________ Purpose: to understand the structure of isotopes and what is similar/different between isotopes of an element. Procedure: Look at each of the Petri dishes at your table. Assume the dark beads are protons and the light beads are neutrons. Answer the following questions about each Petri dish using the periodic table. Petri Dish A 1. What is the atomic number of this isotope? _____
2. How many neutrons does it have? ______
3. What element is it? _____ Petri Dish B 1. What is the mass number of this isotope? _________
2. How many protons does it have? ______
3. Write the subscript/superscript symbol of this isotope. ________ Petri Dish C 1. What element is this? ______
2. What is the atomic mass of this element? _____
3. What is the mass number of this isotope? _____
4. Explain why the atomic mass and the mass number are not equal. ___________________________________________________ Petri Dish D 1. What is the mass number of this isotope? _____
2. What element is it? ______
3. How many electrons does it have? _____
4. Write the hyphen-notation symbol of this isotope. _______ Petri Dish E 1. What is the atomic number? ____
2. How many electrons does this isotope have? ____
3. What is the mass number of this isotope? ____
Write a conclusion. Discuss the three subatomic particles, atomic mass, atomic number, and what determines an atom’s elementa l identity. Be sure to discuss the actual lab and connect it to the science.

28
Average Atomic Mass of Pennies
Background: You will be given a film canister containing a mixture of 10 pre-1982 pennies and post-1982 pennies. These pennies represent the two isotopes of the element “Pennium.” The canister is labeled with a number and the mass of the container itself. Your canister might hold any combination of the two different isotopes. The average mass of a pre-1982 isotope is 3.1 g. The average mass of a post-1982 isotope is 2.5 g. Necessary Vocabulary:
o Atomic Number – the number of protons in the nucleus of the atom o Mass Number – the sum of protons and neutrons in the nucleus of the atom. o Atomic Mass – sometimes referred to as atomic weight. The weighted average of naturally occurring isotopes of an
element o Isotope – atoms of the same element that have the same atomic number but different mass numbers due to a different
number of neutrons. Purpose: In this activity you will determine the number of each type of penny in the canister. Opening the canister is not allowed – that will result in an automatic zero on the lab! Procedure: the mass of the film canister is recorded on the label. Determine the mass of the ten pennies contained in the canister. Record your results. Data and Observations: Sample Number Mass of Container Mass of Container + Pennies Mass of Pennies in Container
Calculations: 1. Let’s call the number of pre-1982 pennies “x” and the number of post-1982 pennies “y.” Write a mathematical equation showing that the total pennies add up to 10. 2. Write another equation showing that the total mass of atoms is equal to “x” times its average mass added to “y” times its average mass. 3. You now have two equations and two unknowns, x and y. Use algebra to solve the system of equations for both x and y. Round your results to the nearest whole number (because pennies are quantized). Post-lab Questions: 1. Number of pre-1982 pennies ____________ Number of post-1982 pennies ____________ 2. There are three naturally occurring isotopes of magnesium: Mg-24 (23.98 amu) which is found in 78.70% abundance; Mg-25 (24.99 amu) which is found in 10.13% abundance; and Mg-26 (25.98 amu) which is found in 11.17% abundance. Calculate the average atomic mass of Magnesium. 3. The average atomic mass of boron is 10.81 amu. The naturally occurring isotopes of boron are B-10 (10.01 amu) and B-11 (11.01 amu). Determine the percent of naturally occurring B-10.

29
M&M Half Life Lab Purpose: To simulate the transformation of a radioactive isotope over time and to graph the data and relate it to radioactive decay and half-lives. Time will be analogous to trials for our experiment. Materials: 100 pieces of candy (M&M’s), cup, paper towel, pen/pencil Pre-lab questions: 1. Define half-life. 2. Why were candies used for this lab? What made the specific candy a good example? 3. For the process of flipping candy, what do the “m-side” and “blank” side represent respectively? Procedure: 1. With a partner count out 100 pieces of candy. 2. Place candy in cup and roll like Yahtzee. (Be careful to stay on napkin) 4. Set aside any candies facing down (blank side up) by placing them on the side. These face-down candies will represent atoms of the isotope that have decayed, or daughter atoms. The parent atoms are the side with the “M” on them. 5. Count the remaining face up candies on the napkin and record in your data table. 6. Repeat steps 3-5 until all of your candies have “decayed”. You may add to your data table. 7. Repeat steps 1-6 for second trial. 8. You may then eat your candies when both trials are completed.
Data Table:
Trial 1 Trial 2 Average
Half-Life Number of candies remaining Number of candies remaining Fraction radioactive candy remaining Theoretical Fraction Remaining Time zero 100 100 100% 1/1
1st half-life 1/2
2nd half-life
3rd half-life
4th half-life
5th half-life
6th half-life
7th half-life
8th half-life

30
Graphs: Construct a graph using the data in your table. You should have both trials plotted and identified easily. This type of graph will plot a
smoother curve and is a general representation of the data rather than a “connect the dot” type graph. This type of curve fitting is called a “curve of best fit”. This creates a line that summarizes the data into a general curve and averages the entire data set. Post-lab questions: 1. If you were dealing with the decay of radioactive Carbon-14 to the stable Nitrogen-14
a. Which element would the candies that landed m-side up represent? b. Which element would the candies that landed blank side up represent?
2. Was the rate of decay change of m-side to blank side uniform from shake to shake?
a. What is it about your graph that caused you to answer question 2a as you did? 3. In your lab, you stopped after reaching zero. How accurate is this when talking about half-lives? 4. Do you think your graph would have been different if you had started with more pieces of candy, for example 1000 rather than 100? Explain by drawing a small sketch of what the two graphs would look like in comparison and explain your reasoning. 5. Examine your graph plots. Is the rate of the number of m-sides produced over time linear on nonlinear? Is the rate constant over time or does it vary over time? How well did the tossing candies simulate half-lives? Explain.

31
Moles in…..Aluminum
Materials: aluminum sample, balance
Procedure and calculations: (show all work and use correct
significant figures and units)
1. Find and record the mass of one mole of aluminum.
2. Find and record the mass of the aluminum can.
3. Does the aluminum sample contain more than, less than,
or exactly one mole of aluminum?
4. How many moles of aluminum atoms are in one aluminum can?
5. How many individual atoms of aluminum are in one aluminum can?
6. How many cans would you need to have one mole of aluminum?
Moles in…..Carbon
Materials: carbon sample, balance
Procedure and calculations: (show all work and use correct significant
figures and units)
1. Find and record the molar mass of carbon.
2. Find and record the mass of the carbon sample.
3. Does the carbon sample contain more than, less than, or exactly one mole
of carbon?
4. How many moles of carbon atoms are in the carbon sample?
5. How many individual atoms of carbon are in the carbon sample?
6. A person weighing about 78 kg is about 18% carbon by mass. What is the mass (in grams) of carbon in this
person? How many moles of carbon are in this person?
7. Graphite is one allotropic form of the element carbon. Do some research to define allotrope, and describe the
structure and properties of graphite and of other carbon allotropes.

32
Moles in…..Copper
Materials: copper sample, balance
Procedure and calculations: (show all work and
use correct significant figures and units)
1. Find and record the molar mass of copper.
2. Find and record the mass of the copper sample.
3. Does the copper sample contain more than, less
than, or exactly one mole of copper?
4. How many moles of copper atoms are in the copper sample?
5. How many pre-1982 pennies (mass of 1 penny is 2.463g) are needed to make a mole of copper?
6. Why would these calculations be invalid for post-1982 pennies?
Moles in…..Iron
Materials: iron sample, balance
Procedure and calculations: (show all work and
use correct significant figures and units)
1. Find and record the molar mass of iron.
2. Find and record the mass of the iron sample.
3. Does the sample contain more than, less than,
or exactly one mole of iron?
4. How many moles of iron atoms are in the 10
nails (1 nail has a mass of 1.39g)?
5. How many individual atoms of iron are in the 10 nails?
6. How many iron nails are needed to get one mole of iron atoms?

33
Work these problems in your notebook. Show your work. Name __________________________________
Questions Answers (show work) Words
1. A helium laser emits light with a wavelength of
6.33 x 10⁻⁷ m. What is the frequency of the light?
2. What is the frequency of an x-rays that has a
wavelength of 6.25 x 10⁻¹⁰ m?
3. A FM radio station broadcasts at a frequency of
1.079 x 10⁸ Hz. What is the wavelength of the radio
signal?
4. Calculate the energy of a photon of radiation
with a frequency of 8.5 x 10¹⁴ Hz.
5. Calculate the energy of a gamma ray photon
whose frequency is 5.02 x 10²⁰ Hz?
6. Violet light has a wavelength of 4.10 x 10⁻⁷ m.
What is the frequency?
7. Green light has a frequency of 6.01 x 10¹⁴ Hz.
What is the wavelength?
8. What is the frequency of the wave transmitted by
a radio station whose wavelength is 469 m?
9. Calculate the wavelength of radiation with a
frequency of 8.0 x 10¹⁴ Hz.
10. What is the wavelength of light with a
frequency of 7.66 x 10¹⁴ Hz?
11. What is the energy of light whose wavelength
is 4.06 x 10⁻¹¹ m?
12. Calculate the energy of a photon of radiation
with a wavelength of 6.4 x 10⁻⁷ m.
34
Use the terms below to answer the next three questions. Name _________________________________
Gamma Infrared Microwave Radio Visible Ultraviolet X-ray
13. Rank the parts of the electromagnetic spectrum from lowest energy to highest.
14. Rank the parts of the electromagnetic spectrum from lowest frequency to highest.
15. Rank the parts of the electromagnetic spectrum from shortest wavelength to longest.
16. A. What is the relationship between frequency and wavelength? (Direct or Inverse) ____________________
B. What is the relationship between frequency and energy? (Direct or Inverse) ____________________
17. Identify the wave that matches these three descriptions.
a. Has a shorter wavelength than infrared waves.
b. Has a lower frequency than gamma rays.
c. Has more energy than ultraviolet.
18. Identify the wave that matches these three descriptions.
a. Has less energy than ultraviolet
b. Has a longer wavelength than violet light
c. Has a slightly greater frequency than infrared
19. Write your own question similar to number 17 and 18 and provide the answer.
20. Write the sentence below that was created from the words in questions 1-12.

35
Learning the Periodic Table
Purpose: to identify specific parts of the periodic table and relate the periodic table to electron configurations. Materials Needed: pen, pencil, map pencils or markers, notes, scissors Procedure: **Neatness counts**
1. Cut the periodic table along the outside lines only. Glue the periodic table back together in your notebook (leave the rare earth elements at the bottom of the page).
2. Label the four blocks with s, p, d, or f with a black marker.
3. Number the groups (vertical columns) with group numbers 1-18.
4. Above the group numbers 1, 2, & 13-18, write the charge of ions that form from these elements.
5. Number the periods (horizontal rows) with period numbers 1-7.
6. In BLACK, draw the stair case line that separates the metals from the nonmetals.
7. Identify and color the following groups using a different color/design/marking for each:
a. Transition metals b. Alkali metals c. Halogens d. Alkaline earth metals e. Noble gases f. Rare earth elements (also known as lanthanide & actinide series) g. Metalloids h. Gases (other than noble and halogens) i. Other metals
8. On your paper, make a NEAT color key for all the groups listed in question number 7 above (like a map key). 9. In your notebook, write a fact about each of the groups in number 7. You may use your notes, textbook of the internet for help.

36

37
Investigating the Periodic Table
Purpose: In this activity you will graph various periodic properties and look for trends on the periodic table of the elements. Using graph paper and properties provided, construct the following line graphs. If the value is not given, skip that number – do not assume a value of zero. Do not forget to include a descriptive title and to label the axes.
Graph 1: Boiling Points vs. atomic number Graph 2: Melting Points vs. atomic number Graph 3: Ionization Energy vs. atomic number Graph 4: Electronegativity vs. atomic number

38
1. Predict which element should have the lowest boiling point: bromine or krypton. Explain you prediction. 2. Predict which element should have the highest melting point: arsenic or antimony. Explain your prediction.
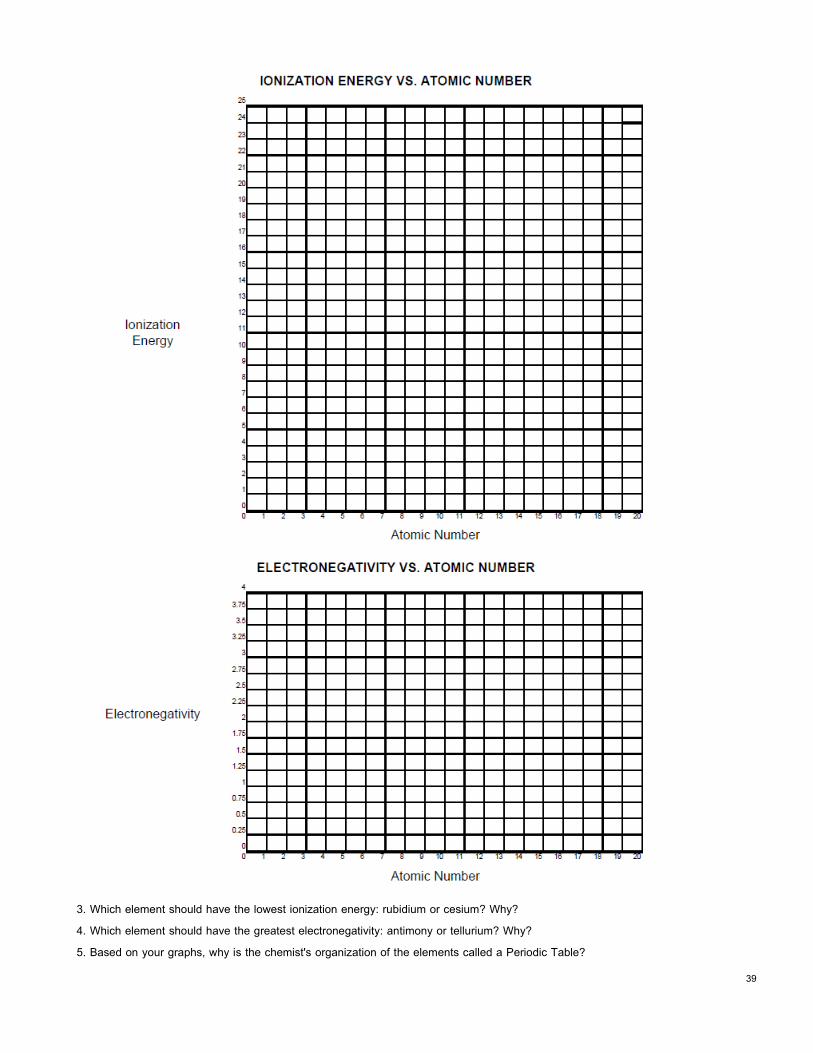
39
3. Which element should have the lowest ionization energy: rubidium or cesium? Why? 4. Which element should have the greatest electronegativity: antimony or tellurium? Why? 5. Based on your graphs, why is the chemist's organization of the elements called a Periodic Table?

40
Flame Test Lab
Purpose: To observe the colors produced when compounds are introduced into a flame and the electrons become excited. To estimate the wavelength of light produced, then calculate the frequency and energy of the light. Safety: Both barium chloride and cupric chloride are toxic by inhalation and ingestion. Use tiny amounts and WASH HANDS when leaving the lab. Do not rub eyes or face without washing hands first. Pre-Lab questions: 1. Go to the following link: https://www2.chemistry.msu.edu/faculty/reusch/virttxtjml/spectrpy/uv-vis/spectrum.htm. Color and label a wavelength chart showing all colors (Red, Orange, Yellow, Green, Blue, Indigo and Violet.) Remember: The colors blend into each other). Procedure: Write the following procedure in narrative form in your lab notebook. 1. Dip the inoculating loop in one chemical at a time. 2. Hold the end of the loop with the compound in the burner flame and observe the first color you see. If it changes to orange we don’t care about that color. 3. Use your chart from your prelab to estimate the wavelength of the color being produced. 4. Obtain an unknown from your teacher, record the letter of the unknown, and do a flame test on the unknown. It will be one of the chemicals you have already tested. *Alternately- Bottles containing liquid forms of the compounds may be used. Carefully squeeze the solution into the flame and observe colors produced* Data and Observations: copy this table into the Data and Observations section of your lab report.
Chemical Color produced Estimate wavelength (nm) Lithium chloride Sodium chloride Potassium chloride Calcium chloride Strontium chloride Barium chloride Cupric chloride Unknown _____
Chemical Hazards Lithium chloride Moderately toxic by ingestion. Potassium chloride Slightly toxic by ingestion. Calcium chloride Slightly toxic. Barium chloride HIGHLY toxic by ingestion. Use extreme caution. Cupric chloride HIGHLY toxic by ingestion and inhalation. Use extreme caution.

41
Calculations: For each chemical, do the following calculations. 1. Using the estimated wavelength, calculate the frequency of the light produced. 2. Using the frequency of the light, calculate the energy of each photon of light produced. Conclusion: Write a paragraph explaining why the different metal ions produce colors in a flame test and why the colors are different. Use the following terms (not necessarily in this order) to write a conclusion to this lab: energy, wavelength, color, energy level, ground state, excited state. Sources of Error: What could have caused your data to be interpreted incorrectly? What could have gone wrong?

42
Moles in Lab
Purpose: Use the mole to calculate the mass and number of atoms/ions/molecules in a given substance. Materials: sample of copper, aluminum foil, an iron nail, water, sugar (C12H22O11), and salt (NaCl). Procedure: 1. Examine each of your substances. Record physical properties in your table. Here is a scanning electron microscopic view of salt and sugar to use for your observations.
2. Record the mass of each sample except the water (don’t forget units). 3. Read the volume of the water and use this to determine its mass. (Density of water = 1.00 g/mL.)
Substance Physical properties Mass (grams) Copper Aluminum Iron Water (H2O) Sugar (C12H22O11) Salt (NaCl)
Post-lab questions: (show your work!) 1. Which of the substances in this lab are elements?
2. Which of the substances are compounds?
3. How many moles of copper were in your sample?
4. How many atoms of copper were in your sample?
5. How many moles of aluminum were in your sample?
6. How many atoms of iron were in your nail?
7. How many moles of water were in your sample?
8. How many molecules of water is this?
9. How many sugar molecules were in you sample?
10. How many molecules of salt were in your sample?

43
Percent Water in a Hydrate Introduction:
Water is an integral part of many ionic solids, and these are known as hydrates. The water in these solids is called water of hydration. A familiar example is plaster of paris, which is the monohydrate of calcium sulfate, CaSO4·H2O. When water is added to plaster of paris and the material is allowed to set, it is transformed into a hard crystalline solid, calcium sulfate dehydrate. The water of hydration is not as tightly bound as the ions are, and it can usually be separated out by heating the substance. The material that is left after heating is called the anhydrous salt.
Remember, it is not always obvious to the naked eye that a compound has water in it. Frequently, hydrates are actually more stable than the anhydrous compound. An example of a change from a hydrate to an anhydrate is shown here:
CaSO4·2H2O + heat → CaSO4 + 2H2O Purpose: To observe the heating process of a hydrate and calculate the percent water in a hydrate with experimental data. Pre-Lab Questions: 1. Using the example above as a guide, write the equation for the heating decomposition of sodium carbonate decahydrate. 2. If you have 2.50 grams of a hydrate, and after heating, the anhydrous salt has a mass of 1.94 grams, what is the % water in the hydrate? Remember the water is leaving the compound as you heat it. Procedure: 1. Take the mass of a clean, DRY, test tube and record. 2. Add three scoops of the known hydrate and determine the mass of the test tube and sample together. 3. Calculate and record the exact mass of the sample by subtracting the mass of the test tube. 4. Using test tube tongs, heat the test tube gently over a Bunsen burner for about three minutes. Observe the sample and the walls of the test tube during heating. Record observations. 5. Let the test tube cool completely, then measure and record its mass. Heat again for one more minute and if mass is constant then all the water has been driven off. If mass not constant keep heating in 1 minute intervals until it is. 6. Calculate the mass of the sample after heating. Record. 7. Wash out your test tube and leave it inverted on the test tube rack. 8. Wash your hands.
Data and Observations: (copy this date table into your lab report) Mass of empty test tube Mass of test tube with sample Mass of sample before heating Mass of test tube and sample after heating Mass of sample after heating Grams of water in sample % water in sample Observations while heating
Calculations: Show ALL of your work for calculating the percent water in your hydrate. There are no post lab questions. Remember to write a conclusion and sources of error. Read your purpose for assistance on what to include in your conclusion.

44
Formation and Decomposition of Zinc Iodide
Background: Compounds are chemical combinations of elements. Many chemical reactions of elements to form compounds are spectacular, but must be run under special lab conditions because they are dangerous. The reaction of sodium and chlorine to form salt is a good example, it is violently explosive! If elements react spontaneously to form compounds, this is a good indication that the compound state is more stable than the free element state. To break a stable compound down into its component elements, energy must be put into the compound. Electricity is often used as this energy source, and the process is called electrolysis. Purpose:
o Compare a compound with its component elements. o Observe and monitor a chemical reaction. o Observe and understand the decomposition of the compound back into its elements.
Safety: Iodine crystals are toxic and will stain skin. Use care when handling the iodine. Reaction between zinc and iodine releases heat. Use test tube holder. Procedure: 1. Obtain a medium-sized test tube and Petri dish. Place the test tube upright in a test tube rack. 2. Carefully add 1 g of zinc dust and 10 mL of distilled water to the test tube. 3. Carefully add 1 g of iodine to the test tube and begin to stir with a stir rod. Record any evidence of a chemical or physical change in your table. 4. Continue stirring with a stirring rod until there is no more evidence of a reaction. Record observations after you are done stirring. 5. Allow the reaction mixture to settle for several minutes. Using the test tube tongs, carefully pick up the test tube and pour off the solution phase (liquid only) into the Petri dish. 6. Add about 15 mL of water to the Petri dish and place the Petri dish on a white paper towel. 7. Obtain a 9-V battery with wire leads and two nails. Attach the nails to the wire leads from the battery. 8. Dip the wires into opposite sides of the Petri dish and hold for at least 20 seconds. Record your observations in your data table. 9. After two minutes, remove the wires from the solution and examine the nails. Again, record your observations. 10. As the final part of your prelab, go ahead and make a data chart for recording the observations taken in Post lab questions: 1. What evidence was there that a chemical reaction occurred? 2. How did you know the reaction was complete? 3. What term is used to describe a reaction that gives off heat? 4. After reading the background information, why do you think this reaction gave off heat? 5. What evidence do you have that the compound was decomposed by electrolysis. 6. Why do you think the reaction between zinc and iodine stopped? 7. Is zinc iodide is an ionic or covalent compound? How do you know? 8. What would be different in this reaction if water was not used? Don’t forget to write a conclusion and sources of error in your lab report.

45
Percent Composition of Smarties Name: _______________________ Background: Every compound has a specific ratio of atoms bonded together. This ratio of atoms can be written as its CHEMICAL FORMULA. In this activity, we are going to use a package of Smarties® and consider each pack as a specific compound. You will be counting each atom (different color candy) to determine its chemical formula. From this information, you will calculate the formula mass and chemical composition of your “compound”. Purpose:
o To simulate the construction of a chemical compound and its chemical formula. o To determine the formula mass (also called _______________ mass) of a compound. o To determine the percentage composition of a compound.
Materials: Package of Smarties® Procedure: 1. Obtain a package of Smarties® and count the number of each color in your pack. Enter in data table. 2. Use the data entered to determine the “compound’s” CHEMICAL FORMULA. (Use the first letter of the color as its element symbol & be sure to use the proper subscripts.) Ex. W5Y3G2 etc… 3. If your package does not contain a particular color, DO NOT put it into the chemical formula. 4. Determine the total masses for each color for the compound (so if you have 3 atoms of green times the molar mass given which is 7g the total mass would be 21g) 5. Use the formula for % composition to calculate the percentage composition of each “atom” (color) in the compound (candy pack). You must show the math equation for each and remember to round to the hundreds place! 6. Now “dispose” of your Smarties! Remember to Share! Data & Conclusions: Table 1: Total Mass and Number of Atoms in Smarties Package
Total Formula Mass of Compound (g) = _______________

46
Calculate the percent composition for the specified element: 1. Hydrogen in hydrochloric acid. 2. Fluorine in phosphorus trifluoride. 3. Oxygen in calcium phosphate. Calculate the percent composition of each element in each of the following compounds: 4. C2H6 5. NaHSO4 6. Ca(C2H3O2)2 7. HCN

47
% sugar in bubble gum Purpose: To determine the percent of sugar in an ordinary piece of bubble gum. Materials: Bubble gum in wrapper Balance Procedure: 1. Unwrap gum and tare paper on the balance. 2. Put gum on paper and determine the mass. Record below. Save the wrapper! 3. Chew gum during class. 4. During the last 10-15 minutes of class, tare paper again and determine the mass of the chewed gum. Record below. 5. Using data collected, determine the percent sugar in gum. Data:
Calculations: 1. What is the percent sugar in your gum? Show calculations. 2. How many moles of sugar, C6H12O6, did you chew? Show calculations. 3. How many molecules of sugar were in your gum? Show calculations below.
Mass (g) Unchewed gum Chewed gum Sugar in gum

48
Unknown Carbonate
Purpose: To determine the identity of an unknown carbonate by measuring the mass of the CO2 produced when the carbonate reacts with HCl. Safety: 6 M hydrochloric acid is caustic and will damage skin and eye tissues. Wear goggles and apron at all times to prevent harm from splashes. Wash hands. Prelab: 1. Using the information in the background section, write the chemical equation for the reaction between sodium carbonate and hydrochloric acid. The products are carbon dioxide, water, and sodium chloride. 2. Write the equation for the reaction between calcium carbonate and hydrochloric acid. 3. Calculate the percent mass of carbon in carbon dioxide. 4. Calculate the % carbon in the following:
a. Potassium carbonate b. Sodium bicarbonate c. Sodium carbonate
5. If you had 2.25 grams of each of the above compounds, how many grams of carbon would you have in each? Show work. Materials: 6 M hydrochloric acid, an unknown carbonate, pipet, balance, small beaker, graduated cylinder. Procedure: 1. Record the letter of your unknown. 2. Mass the small beaker and record. 3. Add about 0.90 grams of the unknown to the beaker. Mass and record! 4. Measure 4 mL of HCl in a graduated cylinder. 5. On a balance, measure the mass of the beaker with the carbonate together with the graduated cylinder with the HCl. Record as total mass before reaction.
Background: Carbonates are ionic compounds containing a metal plus the carbonate or bicarbonate ion. For example, limestone is calcium carbonate. Limestone is identified by its fizzy reaction with hydrochloric acid. All carbonates react with acid to produce carbon dioxide, water, and a metal chloride.
MCO3 + HCl → CO2 + H2O + MCl M = any metal
In this experiment you will react an unknown carbonate with HCl to determine the % carbon in the unknown by knowing the amount of carbon dioxide released.

49
6. At your lab station, not on the balance, slowly pour the HCl into the carbonate and observe the reaction. Swirl the beaker until the reaction is complete. 7. Put both the beaker and empty graduated cylinder back on the balance. Record the mass as the total mass after reaction. 8. The change in mass is the mass of CO2 gas released. 9. Repeat twice. 10. Calculate the mass of carbon in your unknown and decide which unknown you had of the choices given by your teacher. 11. Leave everything clean. Invert the glassware on a paper towel to dry. Data: (copy this data table into your lab report) Letter of Unknown: ____________ Trial 1 Trial 2 Trial 3 Mass of beaker Mass of beaker and sample Mass of sample Total mass before reaction Total mass after reaction Mass of carbon dioxide % carbon in carbon dioxide (from prelab) Mass of carbon in your sample % carbon in you sample
You must show the following in your calculations section:
o Calculations for mass of carbon dioxide in each trial. o Calculations for mass of carbon in your sample for each trial. o Calculations for % Carbon in your sample for each trial. o Average % Carbon from all 3 trials.
Post-Lab Questions:
1. Your unknown was one of the substances from prelab question 4. Based on your average percent carbon from your calculations, identify your unknown. Give both the name and chemical formula of the substance. Don’t forget to write a conclusion! Include key concepts/background information and results as part of your writing. Don’t forget to include sources of error.
50
Synthesis and Decomposition Reactions Name ______________________________
Background: A synthesis or combination reaction occurs when two elements or compounds combine to produce a new compound with different properties. Copper would combine with chlorine to produce copper (II) chloride. Decomposition reactions occur when a single compound is broken apart. One way to initiate the decomposition of a compound is to heat it. Another way is to add a catalyst to the reaction. A catalyst is something that helps the reaction along without becoming part of the reaction, such as the sulfuric acid in Part II of this lab. Purpose: to observe synthesis and decomposition reactions, and to prove the law of conservation of mass to be true. Materials: 1 large, old test tube Sulfur powder table sugar (sucrose; C6H12O6) 100 mL beaker Sulfuric acid balance Bunsen burner iron filings Safety: Goggles and aprons must be worn at all times. There will be no warnings during this lab. You will be dismissed if you fail to wear goggles or apron. Be careful around broken glass. Use caution with concentrated sulfuric acid. Tie back loose hair and clothing. Procedure: Part I 1. Mass a large empty test tube. Record _____________. 2. Measure 2.00 grams of iron filings, and then measure separately 1.00 grams of sulfur powder. Mix the iron and sulfur together on a piece of weigh paper very thoroughly with a spatula. Record the properties of each reactant. _____________________________________________________________________________________ _____________________________________________________________________________________ 3. Transfer the mixture into the large test tube and take the mass again. Record _____________. 4. Carefully heat the iron and sulfur mixture over the Bunsen burner until it glows and you see the two elements have combined. 5. Cool the test tube on a rack for a few minutes. Once it has cooled, re-mass and record. _____________. 6. **Roll the test tube in a paper towel so it’s completely wrapped up. Carefully tap the bottom of the test tube (where the compound formed) with a magnet until the test tube breaks.** 7. Carefully unroll the paper towel that contains the broken glass and compound. Record observations. ________________________________________________________________________________________ ________________________________________________________________________________________ 8. Pass a magnet over the compound and record observations. ________________________________________________________________________________________ 9. Throw the entire paper towel and contents into the designated trash receptacle; NOT THE TRASH CAN.

51
Part II 1. Obtain a 100 mL glass beaker. 2. Measure 10 grams of table sugar. 3. Transfer the sugar to the 100 mL glass beaker. 4. Using the pipette on your table, measure 10.0 mL of concentrated sulfuric acid. **Caution: concentrated sulfuric acid will burn your skin. Do not, for any reason, allow the acid to come into contact with your skin at any point during the lab.** 5. Carefully add all of the sulfuric acid to the beaker containing the sugar. 6. Use a glass stirring rod to quickly and completely mix the sugar and acid. Be careful not to get any of the mixture onto your skin. 7. Place the beaker on a paper towel and step back to observe the reaction. Be sure to wash the glass stirring rod before setting it back down. 8. Wait a few minutes for the reaction to complete, be sure to watch and not look away. If you do, you will miss the majesty of chemistry. Record detailed observations. _________________________________________________________________________________________ _________________________________________________________________________________________ 9. Discard as much of the solid as you can into the trash with a spatula. Don’t touch it with your skin because there may be excess acid present. Rinse the remaining contents of the beaker with water. Be careful not to let any of the solid go down the sink. If you do spill some of the solid in the sink, pick it up with a paper towel and throw it in the trash. Write a conclusion that would make your Chemistry and English teachers proud. Be sure to re-read the purpose before attempting the conclusion.

52
Reactions of Magnesium Lab Name _____________________________
Purpose: To observe several reactions of magnesium and be able to write the equations that represent those reactions. Materials: magnesium strips, HCl, test tubes, test tube rack, test tube tongs, crucible tongs, Bunsen burner. Safety: wear goggles and apron. Tie back hair and loose clothing near flame. Use caution with acid. Procedure:
1. Holding a short piece of magnesium ribbon with crucible tongs, ignite the Mg in a burner flame. **Caution: do not stare at the burning magnesium.**
2. Examine the product of the burning of magnesium and record properties below:
3. Now take another short piece of Mg and roll it into a loose coil that will fit into the test tube. Do not put it in yet. 4. Fill a test tube about ¼ full of hydrochloric acid. Put it in a test tube rack and hold another test tube inverted
(upside down) with test tube tongs nearby. 5. Drop the Mg in the HCl and immediately move the inverted test tube over the test tube with the reaction. You want
to trap the gas that is produced in the inverted test tube. 6. When the reaction is complete, do not turn over the inverted test tube or you will lose the gas that you collected.
Someone should continue holding it upside down. 7. The other lab partner should light a match and move the lit match to the opening of the upside down test tube.
Describe what you observe, using more than one sense.
8. The test tube with the HCl in it now contains a soluble magnesium salt that you cannot see because it is dissolved in solution. Evaporate the excess water and excess HCl over a burner. Be sure to point the test tube away from all people and avoid inhaling the fumes, they are very irritating to your respiratory system.
9. Describe the magnesium salt that remains:
10. Leave all test tubes clean and inverted in the test tube rack. All other equipment should also be clean and organized.

53
Post-Lab questions:
1. When anything burns, it reacts with oxygen in the air. Write and balance the reaction for the burning of magnesium
2. Describe how the physical properties of the reactants (Mg and O) are different from the properties of the product (MgO) in the above reaction.
3. Write a balanced equation for the single replacement reaction between magnesium and hydrochloric acid.
4. What is the gas that is produced in the reaction above?
5. When that gas is burned, it reacts with what other gas? (See #1 above)
6. Write the balanced equation for the synthesis between these two gases.
7. What condensed on the inside of the test tube when these gases reacted?
8. Describe what was left in the test tube after you evaporated the water from the solution.
9. Identify it by its chemical formula.

54
Lab: Double replacement reactions
Purpose: To observe double replacement reactions, describe the products and write balanced equations for these reactions.
Procedure: Using spot plates, place 3 (and only 3) drops of the nitrate solutions in the wells. Each column is used for only one nitrate solution.
Repeat the process for the sodium solutions, using horizontal rows so that every nitrate solution reacts with every sodium solution. Record the results
in the chart provided. Write the balanced equations representing each reaction and indicate the precipitate in each case by referring to the solubility
table. It is possible for no precipitate to form: write No Reaction as your product.
*Write the balanced equation for each reaction. Indicate which product is the precipitate with a (↓). Also, indicate the color of the precipitate.*
Column 1 Column 2 Column 3 Column 4
AgNO3 Ba(NO3)2 Cu(NO3)2 Pb(NO3)2
Row
A
Na2CO3
Row
B
NaI
Row
C
NaOH
Row
D
Na3PO4

55
Electroplating and Redox Name ______________________________
Background: Batteries provide electricity by acting as a source for electrons. Electrons are pushed out of the negative end of the battery, move through a device, and come back to the positive end of the battery. Wires and electronic devices can serve to transfer these electrons, but an electrolytic solution can also provide a path for these electrons. A cleverly designed device, called an “electrolytic cell,” can serve a useful purpose – it can electroplate a metal (deposit a fine layer of metal onto another metal). Electrolytic cells are designed with two metal electrodes dipping into solution, and a solution containing that metal’s ion. (An example is silver in a silver nitrate solution, or zinc in a zinc nitrate solution). In today’s lab we will use copper electrodes in a copper (II) sulfate solution. Prelab Questions
1. Let’s consider the electrode connected to the negative side of the battery. Electrons are supplied to the electrode, so you have the following substances present.
o Electrons o Copper Metal o Copper Ions
a. Which of these three substances are likely to combine, based on their charges? _______
b. Is this likely to remove mass from the electrode or add mass to the electrode? ______________________________
2. Consider the electrode connected to the positive side of the battery. Electrons need to move toward the battery. a. Electrons can be removed from either the copper atoms or the copper ions. Which is more likely to lose
electrons? __________ b. Is this likely to remove mass from the electrode or add mass to the electrode? _____________________
In this lab you will set up an electrolytic cell and plate a piece of copper with more copper. This is similar to procedures used to plate metals in real-life (silver plated jewelry, etc). Materials: Electrolyte Solution (1.0 M CuSO4 solution mixed with a small amount of sulfuric acid) Vinegar and Salt solution 2 Copper Strips 9-V battery 250-mL beaker 2 wire leads Safety: Sulfuric acid can cause severe burns – do not touch the electrolytic solution. Wear goggles and apron throughout the experiment. Electrodes and wires should not be touched while the cell is hooked up.
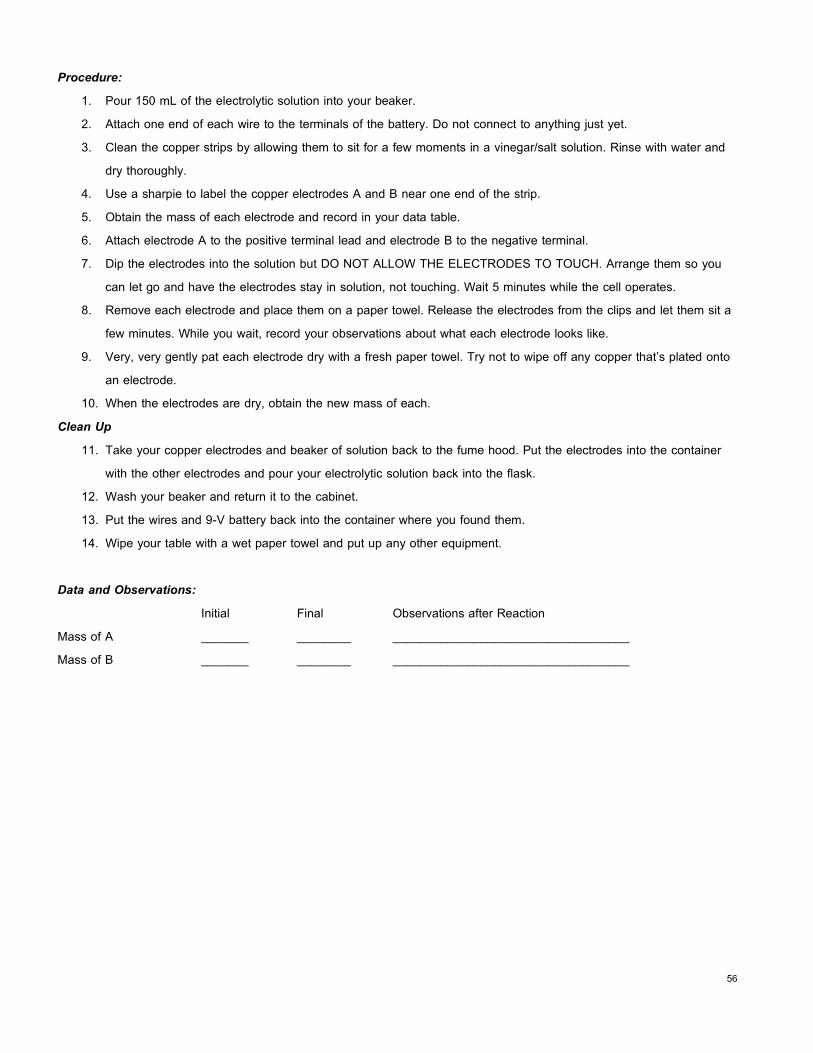
56
Procedure: 1. Pour 150 mL of the electrolytic solution into your beaker. 2. Attach one end of each wire to the terminals of the battery. Do not connect to anything just yet. 3. Clean the copper strips by allowing them to sit for a few moments in a vinegar/salt solution. Rinse with water and
dry thoroughly. 4. Use a sharpie to label the copper electrodes A and B near one end of the strip. 5. Obtain the mass of each electrode and record in your data table. 6. Attach electrode A to the positive terminal lead and electrode B to the negative terminal. 7. Dip the electrodes into the solution but DO NOT ALLOW THE ELECTRODES TO TOUCH. Arrange them so you
can let go and have the electrodes stay in solution, not touching. Wait 5 minutes while the cell operates. 8. Remove each electrode and place them on a paper towel. Release the electrodes from the clips and let them sit a
few minutes. While you wait, record your observations about what each electrode looks like. 9. Very, very gently pat each electrode dry with a fresh paper towel. Try not to wipe off any copper that’s plated onto
an electrode. 10. When the electrodes are dry, obtain the new mass of each.
Clean Up 11. Take your copper electrodes and beaker of solution back to the fume hood. Put the electrodes into the container
with the other electrodes and pour your electrolytic solution back into the flask. 12. Wash your beaker and return it to the cabinet. 13. Put the wires and 9-V battery back into the container where you found them. 14. Wipe your table with a wet paper towel and put up any other equipment.
Data and Observations: Initial Final Observations after Reaction Mass of A _______ ________ ___________________________________ Mass of B _______ ________ ___________________________________

57
Black Snakes and Moles
Pre-Lab questions: Convert the following ingredients from moles to grams. Show your conversions below. 0.347 moles of powdered sugar C2H5OH = ______________ g 0.06 moles of baking soda NaHCO3 = ______________ g Materials: ethanol (10 mL) foil 0.06 moles of Baking soda NaHCO3 sand 0.347 Moles Powdered sugar C2H5OH Procedures: 1. Measure out each of the ingredients.
2. Mix the baking soda and powdered sugar together in a small beaker.
3. Lay out some tin foil on a table. Put a hand full of sand on the tin foil.
4. Make a small depression in the center of the sand (big enough to hold sugar and baking soda).
5. Pour 10 mL of ethanol into the sand depression.
6. Pour the powdered sugar and baking soda on top of the ethanol (in the sand depression).
7. Light a match and place it on the ethanol or wet looking sand.
8. The sand should ignite and the sugar and baking soda will ignite as well.
9. Observe the sugar mixture to see what is formed. Conclusions: Convert 56.78g of Ca(OH)2 to moles. You have 3.45 moles of (NH4)2SO4. How many grams is this?

58
Moles to the Moon Each group will be given a different candy bar. Using your ruler, you need to measure the length of your candy. From the Internet, determine how far away the earth is from the moon. Then calculate how many times (1 trip = 1 way) you need to go to the moon to get the length of a mole of your candy. Data: 1. Group member names: ________________________________________________________ 2. Type of Candy Bar: _______________________________ 3. Length of Candy Bar: _________________________cm (make sure to use rules for showing correct number of sig figs) 4. Distance from here to moon: ________________________ (from Internet search) Reference: ____________________ Calculations: How many trips (one way equals one trip): _______________________ Show all work. Remember to use dimensional analysis.

59
Moles of Chalk in your name
1. Record the mass of a piece of sidewalk chalk. ________________________________________
2. Write your first and last name on the sidewalk.
3. Record the mass of your piece of chalk after writing your name. ___________________________________
4. What is the molar mass of calcium carbonate (CaCO3)? _____________________________________
5. How many grams of chalk did you leave on the ground? _____________________________________
6. How many moles of chalk did you leave on the ground? _____________________________________
7. How many formula units of chalk did you leave on the ground? _________________________________
8. How many individual atoms of oxygen did you leave on the ground? ________________________________

60
Background: Studies show that working airbags along with wearing a seatbelt can dramatically increase your chance for survival in a car accident (up to 40%). For most current airbag systems, the gas generant is a solid mixture of sodium azide, NaN3, plus an oxidizer. The signal from the deceleration sensor ignites the gas-generator mixture by an electrical impulse, creating the high-temperature condition necessary for NaN3 to decompose. The gas that inflates the bag is almost entirely nitrogen gas, N2, which is produced in the following decomposition reaction:
2 NaN3(s) 2 Na(s) + 3 N2(g) (reaction 1)
However, this reaction alone cannot inflate the bag fast enough, and the sodium metal produced is a dangerously reactive substance (it explodes in water!) Oxidizers such as potassium nitrate, KNO3, are included in the gas generant so that they can immediately react with the sodium metal to oxidize it to an oxide. This exothermic reaction also raises the temperature more than a hundred degrees so that the gas fills the bag faster.
10 Na(s) + 2 KNO3(s) K2O(s) + 5 Na2O(s) + N2(g) (reaction 2)
But even the oxides produced are unsafe because they are extremely basic. SiO2 is also available in an airbag to react with the oxides to form alkaline silicate, which is glass, and therefore not toxic.
2 Na2O(s) + SiO2 Na4SiO4(s) (reaction 3a)
2 K2O(s) + SiO2 K4SiO4(s) (reaction 3b)
The volume of gas needed to fill an airbag of a certain volume depends on the amount of gas available and the density of the gas. To calculate the amount of gas generant (sodium azide) needed, airbag designers must know the stoichiometry of the reactions and account for energy changes in the reaction, which may change the temperature, and thus the density of the gas. Be thankful, chemistry can save your life!
Purpose: To use stoichiometry to predict the amount of baking soda to produce 1 quart of gas.
Safety: Wear goggles and apron. Use caution with acetic acid.
Pre-lab Questions:
After reading the article, answer these questions:
1. A standard airbag has 130.0 g of sodium azide. How many moles of nitrogen can be produced from this amount in reaction 1?
2. How many moles of the dangerous metal, sodium, would be produced along with the nitrogen in reaction 1? 3. How many grams of sodium are produced from 130.0 g of sodium azide in reaction 1? 4. Round your answer from question 3 to the nearest whole number. Using this as your starting amount of sodium in
reaction 2, calculate how many grams of Na2O will be produced? 5. If you have 3.2 grams of SiO2 for reaction 3a and 2.6 grams of SiO2 for reaction 3b, how much total glass in grams
(Na4SiO4+K4SiO4) is produced?
Airbag Stoichiometry
Lab

61
6. In question 3 you calculated how many grams of sodium are produced in reaction 1. If you experimentally determined the actual yield to be 41.65 g of sodium, what is your percent yield?
7. Briefly explain the purpose of the following reactants and products: a. N2 C. KNO3 b. SiO2 d. NaN3
8. Write the balanced equation for the reaction of baking soda (sodium bicarbonate or sodium hydrogen carbonate) with vinegar (acetic acid).
9. The volume of a 1-quart Ziploc bag is roughly 0.945 liters. Calculate the mass of baking soda that will fill the bag with 1 quart of CO2 gas when the compound reacts with excess acetic acid. Use stoichiometry.
Procedure:
1. Record the temperature and pressure in the classroom today. 2. Weigh out the calculated amount of baking soda and place it in the bottom corner of your Ziploc bag. Twist the bag so
that the baking soda is isolated and sealed off. 3. Measure out 60mL of acetic acid and pour it into the other bottom corner of the bag. Be careful not to allow the
reactants to mix. Squeeze the bag and seal the zipper top. 4. Hold the bag over the sink, release the twisting, and allow the reaction to proceed. Set the bag in the sink. 5. Record all observations.
Data and observations:
Temperature_____________ Pressure _______________
Record the exact mass of baking soda used: ________________
Observations:
________________________________________________________________________________________________________
Post-lab questions:
1. What mass of baking soda would be required to react with acetic acid to produce 20,000 L of carbon dioxide at STP for a water-treatment plant? 2. Were the classroom conditions equal to STP? 3. How do you think the classroom affected your results? If your bag exploded or did not inflate completely, how do you think the room conditions affected your outcome? Be specific?
Write a conclusion that addresses the purpose, states your conclusion (results), and uses data to support your conclusion. Address sources of error, and give any ideas for a follow up experiment.
62
Stoichiometry with Iron and Copper Name __________________________
Pre-lab questions: 1. Iron reacts with cupric sulfate pentahydrate in a single replacement reaction to produce ferrous sulfate and copper. Write the balanced equation. 2. What is the % copper in cupric sulfate pentahydrate? Show work. 3. Why does iron replace copper? 4. If 1.25 g of iron reacts, how many grams of cupric sulfate pentahydrate would be needed for a complete reaction of all the iron? Show work. 5. Calculate an excess of 10% cupric sulfate pentahydrate. Show work. (*Use this amount for step 1 in the procedure*) 6. Calculate the grams of copper that will be produced if 1.25 g of iron completely reacts. Show work.
Purpose: To observe the reaction between iron and cupric sulfate pentahydrate, and to determine if the reaction obeys the laws of stoichiometry.
Materials: hot plate, beakers, magnetic stirrer and stir bar, funnel, filter paper, iron filings, cupric sulfate pentahydrate, distilled water
Procedure: 1. In a small beaker mass the amount of cupric sulfate pentahydrate needed to react completely with 1.25 g of iron + 10%. 2. Add 50 mL of distilled water to the cupric sulfate pentahydrate. 3. Add a stir bar and place on hot plate/stirrer. Let completely dissolve. 4. Mass 1.25 g of iron filings on a piece of weighing paper. 5. When the cupric sulfate has completely dissolved, take the beaker off hot plate, remove stir bar and add the iron filings. 6. While the reaction is taking place, prepare a funnel with filter paper, which has been massed. 7. After the reaction is complete, filter the copper, and set aside to dry overnight. 8. Mass copper on filter paper the next day and calculate the % yield of this reaction. Data and Observations: Mass of Fe
Mass of CuSO4 H2O
Mass of Cu expected (from prelab) Mass of filter paper Mass of filter paper + Cu (next day after drying) Mass of Cu % yield= mass of Cu recovered/mass of Cu expected x 100%
Results: Tell me what you saw happen. Conclusion: Convince me you understand the chemistry. Include a thoughtful discussion of sources of error.

63
You and your team of medical examiners are called to the scene of a plane crash. The plane shows evidence of a pre-crash explosion. The site of the explosion has a compound with the following analysis: 37.01% Carbon, 2.22% Hydrogen, 18.5% Nitrogen, and 42.27% Oxygen.
The victims are found in and around the crash and must be identified by the substances found in their belongings or in their bodies since dental records are not available. Initial analysis determines that one passenger was probably murdered because their time of death was established as 1 hour before the crash. Your job is to:
1. Use the percent composition data to determine formulas and identities for compounds found on the victims. 2. Use personal data to make a probable identification of each victim. 3. Determine who was murdered and who was the most probable murderer(s).
VICTIM ANALYSIS OF COMPOUND (%)
WHERE FOUND C H N O
1 67.31 6.98 4.62 21.20 Blood and luggage
2 63.15 5.30 0 31.55 Briefcase
46.66 4.48 31.1 17.76 Stomach
3 72.15 7.08 4.68 16.03 Pockets
4 15.87 2.22 18.15 63.41 Blood &
pockets
5 75.42 6.63 8.38 9.57 Blood
37.01 2.22 18.5 42.27 Luggage
6 57.14 6.16 9.52 27.18 Briefcase
7 80.48 7.45 9.39 2.68 Briefcase
81.58 8.90 9.52 0 Luggage
8 60.00 4.48 0 35.53 Pocket & Briefcase
63.56 6.00 9.27 21.17

64
POSSIBLE COMPOUNDS:
NAME Empirical FORMULA NOTES
CODEINE C18H21NO3 Painkiller, prescription, controlled
COCAINE C17H21NO4 Narcotic, illegal
ASPIRIN C9H804 Painkiller
ASPARTAME C14H18N2O5 Artificial sweetener
VANILLA C8H803 Flavoring
TRINITROTOLUENE C7H5N306 Explosive
NITROGLYCERIN C3H5N3O9 Explosive, heart medication
CURARE C40H44N4O Poison
THIOBROMINE C7H8N4O2 Chocolate flavoring
STRYCHNINE C21H22N2O2 Rat poison
DIMETACRINE C10H13N* Antidepressant, prescription
ACETAMINOPHEN C8H9N02 Painkiller (Tylenol)
THE FLIGHT LIST OF PASSENGERS AND CREW:
Amadeo Oldere : Pilot ( has a heart condition)
Connie Majors: Pharmacist
Jim LeClaire: Baker
Archie Starr: Teacher (addicted to sugar-free drinks)
Bob (Reno) Henderson: Pro athlete suspended for drug violations
Lisa Jo Smith: Environmental engineer (severely depressed)
Iselle Ubuye: Suspected Drug Dealer
Norm Anderson: Suspected leader of a terrorist organization

65
Background: In this lab you will be reacting sodium hydrogen carbonate, which is baking soda, with 3 M HCl. The carbon dioxide gas will go into the atmosphere immediately, then you will evaporate the water and any excess HCl. Left in your beaker will be the metal chloride, NaCl. The mass of the NaCl produced can be predicted in a stoichiometric calculation, and the % yield can be determined. This is a very “clean” lab, and any % yield not close to 100% will be due to lab technique. Pre-lab questions: 1. Write the balanced equation for the reaction between sodium hydrogen carbonate (NaHCO3) and hydrochloric acid. The products are NaCl, H2O, and CO2. 2. Calculate the number of grams of NaCl that would be produced if you reacted 8.45 g of NaHCO3 with an excess of acid. Show work. 3. If 4.71 g of NaCl is produced, what is the % yield? Use the formula: % yield = actual yield/theoretical yield x 100 4. Explain why it is good lab technique to mass your reactant directly into the reaction beaker rather than on weighing paper. Purpose: To use stoichiometry to predict the amount of salt that will be produced by a chemical reaction and compare your actual results to your prediction. Safety: Wear goggles and lab apron. Use caution with 3 M HCl, it is corrosive to tissues. Wash hands before leaving the lab. Procedure 1. Place a clean & dry 250 mL beaker on the balance and measure the mass. Press tare. 2. In the beaker, mass about 3.00 g sodium hydrogen carbonate. It doesn’t have to be exactly 3.00 g, but you should record its exact mass. 3. Use a graduated cylinder to measure 12 mL of 3M HCl and slowly add the HCl by pouring it down the side of the beaker and swirling the mixture in the beaker. 4. When the reaction is complete (all the CO2 escaped), place the beaker on a hot plate set on medium (to drive off the H2O that was produced). When the product in the beaker appears dry, let it dry for another 5 minutes. 5. Take the beaker off the hot plate and place it on wire gauze to cool. 6. While you wait on steps 4&5, use stoichiometry to calculate your theoretical yield using the mass of baking soda that you reacted. 7. When the beaker is cool, record the mass of the beaker. The substance in the beaker is the NaCl. 8. Clean your beaker and lab station. Date and Observations: Mass of empty beaker Mass of baking soda in beaker before reaction Mass of beaker + NaCl after cooling Mass of NaCl in beaker after reaction (subtract mass of beaker)

66
Calculations & Analysis: 1. What mass of NaCl was produced? This is your actual yield. 2. Show your work for your theoretical yield of NaCl. Use stoichiometry. 3. Calculate your percent yield using the formula from the background questions. Conclusion: Discuss how stoichiometry was used to predict the amount of product in this reaction. Discuss how you isolated the product (NaCl) to measure its mass. Sources of Error: Discuss the reasons why your percent yield might be above or below 100%. Did anything happen in the lab that could have led to some error in your measurements?

67
S’mores Lab Name _____________________________________________________ Purpose: The purpose of this activity is to use the making of S’mores as an analogy to understand stoichiometric conversions. Background: Today we will be making S’mores while actually doing chemistry! We will use the values of reactants (graham crackers, marshmallows and chocolate) to determine the maximum amount of product (S’mores) that can be produced. Your group will be given a baggie that contains all of the S’more ingredients and you will need to make as many S’mores as you can. Each of the S’more ingredients will have its own symbol:
Graham cracker halves= Gc Marshmallow = Ma Chocolate square = Cs
In order to make 1 S’more, you will need 2 Graham cracker halves, 1 marshmallow and 1 chocolate square. Using the symbols from above, write the balanced chemical formula for a S’more below: Procedure: 1. Lay down a double layer of paper towels. DO NOT EAT ANYTHING THAT HITS THE LAB BENCH TOP (think about the experiments we’ve done this semester in lab if you are unsure why this is a bad idea). 2. Count the number of S’more ingredients (reactants) your group was given and list them here: a. Gc: _____________ b. Ma: _____________ c. Cs: _____________
3. Based on the balanced “chemical formula” from above, predict which of the reactants is limiting (will run out first) and explain your prediction. 4. On the paper towels, cluster your reactants together according to the formula. Were you correct in which reactant would be limiting? 5. How much of each of the remaining reactants are still available to react? 6. If you were given a bag that had 13 Gc, 12 Ma and 6 Cs, determine which reactant is limiting and the maximum number of s’mores that you can produce. 7. If you were given a bag that had 35 Gc, 18 Ma and 20 Cs, determine which reactant is limiting and the maximum number of S’mores that you can produce. 8. While doing the experiment described in question 7 above someone comes and steals some of your ingredients and you are only able to make 7 S’mores. What is your percent yield? 9. Using the balance, find the “molar mass” of a graham cracker half, marshmallow, and chocolate square (weigh everything on a paper towel). a. Gc: _____________ b. Ma: _____________ c. Cs: _____________
10. If you started with 20.5 g of graham cracker halves, 12.4 g of marshmallows, and 62.0 g of chocolate squares, which one would be your limiting reactant? How much product is made? 11. In question 10, which reactants are in excess? Calculate the amount of excess for each of these reactants.

68
12. Once all calculations are done, you may enjoy your S’mores. Place the chocolate on the graham cracker, skewer the marshmallows on the hangers and toast them over the Bunsen burner, 1 person at a time. Please do not light the building on fire! Don’t Flip Your Lid (comparing Intermolecular Forces) Name ___________________________
Background: The forces that hold one molecule to another molecule are referred to as intermolecular forces. These forces arise from
unequal distribution of the electrons in the molecule and the electrostatic attraction between oppositely charged portions of molecules.
The weakest IMF are London Dispersion forces, which is a function of the number of electrons in a molecule and how tightly those electrons are held. In nonpolar molecules, the electron cloud should be perfectly symmetric, but as it interacts with other molecules the electron cloud becomes distorted. This leads to momentary dipoles in the molecules. The amount of distortion in the molecule is referred to as polarizability. Molecules with more electrons have a higher polarizability. When atoms are momentarily polarized, they can be attracted to other molecules. This attractive force caused by momentary dipoles is a London dispersion force.
Some molecules are naturally polar, such as molecules that have different types of atoms around the central atom or molecules with lone pairs on the central atom. These molecules have a permanent dipole, and experience dipole-dipole IMFs with other molecules. These are stronger than London forces.
A third type of IMF is hydrogen-bonding. It is a special strong type of dipole-dipole bond that only exists in molecules that have an H-F, a H-O bond, or a H-N bond. Ionic bonds are not IMFs, but they are a type of bond that holds atoms together. Ionic bonds form between charged particles held together in a crystal. The electrostatic attractions are strong and omnidirectional.
Purpose: First you will observe the relative melting points of three substances. You will then use your knowledge of intermolecular forces (IMFs) to explain the relative differences in melting points. Your three substances include salt (ionic solid), paraffin (a medium-sized nonpolar molecule) and sucrose (a medium-size polar molecule).
Safety: Wear goggles and an apron at all times. Tie back hair and loose items of clothing while using the Bunsen burner. Allow the can lid to cool before handling it.
Prelab Questions: 1. Use a dictionary and look up omnidirectional. What does it mean to say that in an ionic crystal, electrostatic attractions between ions are omnidirectional?

69
2. Write a statement predicting in which order the salt, paraffin, and sucrose will melt. Be sure to read the background information before making your prediction. Procedure: 1. Obtain a can lid with sections labeled 1, 2, and 3. 2. Use a wooden splint to transfer small samples of each of the four compounds to the outermost groove of the can lid. You only need a very small sample – just enough to be able to see the substance. 3. Set up a ring stand, but do not light the burner yet. 4. Carefully lift the can lid to the ring on the ringstand. Once the lid is in place, light the Bunsen burner and place it so that the flame is directly in the middle of the can lid. 5. Watch carefully as the substances melt. You will need to record the relative order of melting. As soon as two of the compounds melt, turn off the burner. 6. Allow the can lid to cool, then wash it off in the sink. Dry the lid. Data and Observations: Your data section should include the relative order in which the substances melted. Postlab Questions: 1. Based on the melting data, which substance has the weakest IMFs? 2. Glucose (C6H12O6) and sucrose (C12H22O11) are both sugars with similar polarities. Which do you think would have the highest melting point? Justify your answer with an explanation. 3. Hydrogen sulfide is a gas at room temperature, while water is a liquid, yet hydrogen sulfide has more electrons than water. Explain this anomaly. 4. Consider the halogens at room temperature. Why are fluorine and chlorine gases, while bromine is a liquid and iodine a solid? 5. Iodine (I2) is a large nonpolar molecule. How would it’s melting point compare to the other 3 substances that were tested. Explain your reasoning. Don’t forget to include a conclusion and sources of error in your lab report!

70
Looking at Oxygen
Purpose: to practice collecting a gas through a pneumatic trough (gas collecting pan) and investigate the chemical and physical properties of oxygen. Prelab Questions: 1. What is a catalyst? 2. Write a balanced equation showing hydrogen peroxide decomposing into water and oxygen. Show manganese dioxide (MnO2) as a catalyst. Procedure: 1. Place about 2.5 g of manganese dioxide in a flask. Place a rubber stopper with tubing in the flask. 2. Fill a pneumatic trough ¾ full of water. 3. Fill two flasks to overflowing with water, seal the opening with your hand, and invert them into the water. There should be no air bubble or a tiny air bubble in the upside-down flask. If you have a big air bubble, try again. 4. When the MnO2 comes into contact with the H2O2, the oxygen will bubble through the tubing and through the opening in the bottom of the pan. Place one of the upside down flasks over the hole. 5. Check with your teacher to make sure you have the correct setup. 6. Pour about 50 mL of H2O2 in the flask and immediately re-stopper the flask. 7. Bubbles should begin coming out of the tube into the inverted flask. 8. When the inverted flask #1 is full, move flask #2 over the hole to fill it as well. 9. When both flasks are full, remove the stopper from the reaction flask. 10. Being very careful to not bring the mouth of the inverted flasks above the water line, slide a glass plate under the mouth of each flask. Once the plate is in place, remove it from the pan, leaving the glass plate on the bottle. If you are careful to keep contact between the flask and glass plate, the contents of the flasks will be almost 100% oxygen! 11. Observe the oxygen in the flask and record your observations. 12. Ignite a wood splint, let it burn until it’s glowing orange, blow out the flame. Quickly remove the glass plate of flask #1 and insert the glowing splint. Recover with the glass plate. Try again! 13. Record Observations. 14. Create your data table in your lab book to record your observations. Post-lab Questions: 1. What are some physical properties of oxygen that you observed? 2. What are some chemical properties of oxygen that you observed? 3. What was the catalyst in this reaction? Why is the title of this lab misleading? Narrative Lab Report
o Paragraph style written in first person. o 1st Paragraph is an introduction about what you already knew about the reactants and products in the lab. o 2nd Paragraph tells what you did in the experiment and what happened (materials should be described). o 3rd Paragraph tells WHY these things happened. Explain the chemistry. o Narrative lab reports should be 1 page, legible handwriting (typing OK), proper grammar and spelling.

71
Molar Mass of a Gas
Purpose: To calculate the molar mass of the gas contained in a “canned air” product (products used to clean electronics with compressed gases). Pre-lab Questions: 1. Calculate the molar mass of each of the following gases.
a. Propane, C2H8 c. Dichlorodifluoromethane, CCl2F2 b. Butane, C4H10 d. Tetrafluoroethane, C2H2F4
2. Calculate the following molar masses at STP (remember to convert to the correct units). a. 0.40 g of a gas with a volume of 125 mL. b. 1.24 g of a gas with a volume of 450. mL c. 0.67 g of a gas with a volume of 232 mL.
ATTENTION: How to earn a zero on this lab: spray the canned air onto your skin or waste the canned air by spraying it for no good reason. This is a limited resource. Procedure: 1. Record the temperature and pressure in the room. 2. Fill your pneumatic trough ½ full with water. Fill a 250 mL graduated cylinder with water, cover the top tightly with your hand, and invert it into the water in the trough. If there is a large air bubble, try again. 3. Move the inverted graduated cylinder over the hole in the trough. 4. Assign the job of “inverted graduated cylinder” protector – this person is to hold the graduated cylinder at all time to prevent it from falling over. 5. Take the mass of a can of air and record. 6. Connect the can of air to the red plastic straw. 7. GENTLY pull the trigger on the can to fill the graduated cylinder. Fill the cylinder to anywhere between 200 and 225 mL of gas. Record the exact amount. 8. Note any perceptible changes in the temperature of the can. 9. Mass the can of air and record. 10. Repeat the experiment twice. 11. Copy your data table into your lab book. Data:
Trial 1 Trial 2 Trial 3 Mass of can before expelling gas Mass of can after expelling gas Total mass of gas expelled Volume of gas collected
Calculations: use MM = dRT/P to determine the molar mass of each trial. Show work for each trial separately, then determine an average molar mass. Average Molar mass _______________ Correct Molar Mass (read can or compare to prelab) ______________ % Error _____________________

72
Heating curve of water
Procedure
Use the picture to the right to set up your experiment. Your goal is to investigate the phase changes of water by recording temperature at different times while heating the ice in the beaker.
1. In your composition notebook make a data table to record time (s) and temperature (°C) of your water at 30 second intervals. MAKE SURE YOU RECORD THE TEMPERATURE AT TIME = 0 seconds. 2. Turn your hot plate on high for 5 minutes. 3. While waiting on hot plate to heat up, fill your beaker with 300 mL of ice. If the hot plate has been on high for 5 minutes, put the beaker of ice water on the hot plate and begin recording data (don’t forget to record temperature at time 0). 4. Record the temperature every 30 seconds until the water has boiled vigorously for 5 minutes. When you are done with your experiment, graph your results in your lab notebook. Remember, the independent variable goes on the x-axis and the dependent goes on the y-axis. Make sure you scale your graph accordingly! On your graph label the states of matter present (solid, liquid and gas) and the phase changes (melting, boiling and vaporization) taking place. Also, label the boiling point and melting point of the water. After you have graphed the data, answer the questions below.
Write a conclusion paragraph in your notebook answering the following questions:
Describe in your own words what this graph shows.
What happened to the temperature of the water as the ice melted? As the water boiled?
Where do you think that the energy from the burner was going?
Between what times was a phase change from solid to liquid occurring? Why is the temperature constant?
Don’t forget to include sources of error.
73
Unsaturated, Saturated and Supersaturated Name _________________________
Purpose: To observe and distinguish between unsaturated, saturated, and supersaturated solutions. Materials: test tube, burner, test tube tongs, balance, sodium thiosulfate (Na2S203) Procedure: Part 1–Supersaturation 1. Mass 7.50 g of sodium thiosulfate onto a weigh paper and take to your station. 2. Put exactly 1.0 mL of water from a dropper into a clean, dry test tube. 3. Dissolve the entire 7.50 g of sodium thiosulfate in the 1 mL of water by heating the contents of the tube. Do not let the solution boil over. 4. When the solution process is complete you will have a clear solution with nothing on the bottom. 5. What can you infer about the solubility of sodium thiosulfate as the temperature increases? How do you know this? Answer here: 6. Place the solution in a beaker of cold water and do not disturb for 10-15 minutes. Do Part 2 while you wait. 7. Remove the test tube from the cold water and tap it several times. 8. If movement does not cause the solute to crystallize out, drop a single crystal of the solute in the solution. THIS IS COOL. DON'T BE CHATTING WITH SOMEONE AND MISS IT. 9. Feel the tube when crystallization occurs. Observation: 10. Heat the tube to redissolve the crystals and wash down the drain with lots of water. Part 2 – Making a Saturated Solution 1. Mass 5 g of sodium thiosulfate on weighing paper and take to your lab station. 2. Using a dropper, put 1 mL of water in a small test tube. 3. Add 2 or three crystals of sodium thiosulfate. You may use your fingers. 4. Shake and observe. Discuss with your lab partner whether you have an unsaturated, saturated, or supersaturated solution at this point. 5. Continue to add 2 or 3 crystals, shake, and observe. 6. What happens to the rate of solution as you add more and more solute? 7. Continue to add crystals and shake until some solute remains undissolved on the bottom of the test tube no matter how much you shake. Discuss with your lab partner whether your solution is now unsaturated, saturated, or supersaturated. What do you think? Answer here. 8. Check your answer by decanting (pouring the liquid only) the solution into a new test tube and adding a crystal of the solute.

74
9. What do you expect to happen to the crystal in the decanted solution if it is unsaturated? Answer Here: 10. What do you expect to happen to the crystal in the decanted solution if it is saturated? Answer Here: 11. What did happen? Answer Here:
12. Rinse both test tubes down the drain. 13. Go back to step 7 of Part 1 and finish. Don’t forget to write a conclusion and sources of error. Remember your conclusion should address the following points:
o What was the purpose? o How did you achieve the purpose? Give a brief rundown of the experiment but do not rehash the full procedure! o Interpret your results. At what points during the lab did you have saturated, unsaturated, and supersaturated solutions?

75
Background Questions Sports drinks are often advertised as “Electrolyte Replacement Drinks”. These drinks are generally mixtures of
water, sugars, and salt. Which of these ingredients is responsible for the electrolytic nature of sports drinks? We use physical properties to identify and describe matter. Physical properties of matter include color, density,
odor, boiling point, melting point, solubility, and conductivity (among others). This investigation uses conductivity to differentiate between different types of matter. Electrical conductivity is a measure of how easily electric current can flow through a substance. Solutions that conduct electricity are called electrolyte solutions. These solutions conduct electricity because they contain a solute that has dissociated into ions (charged particles). Solutions that do not conduct electricity are called non-electrolyte solutions. The solutes in these solutions dissolve as molecules (neutral particles, neither positively nor negatively charged). A conductivity probe measures the conductivity of a solution. We measure the electrical current created in units of microsiemens per centimeter (µS/cm). The more ions present in the solution, the greater the conductivity values. Purpose: To investigate the relationship between conductivity and concentration in a solution. Safety: Wear goggles and a lab apron. Procedure: Part 1 – Sodium chloride (salt) solutions 1. Label the test tubes “0.00 M NaCl”, “0.02 M NaCl”, “0.04 M NaCl”, “0.06 M NaCl”, “0.08 M NaCl”, and “0.10 M NaCl”. 2. Use a funnel to pour 25 mL of distilled water into the test tube labeled 0.00 M. 3. Use a funnel to pour 25 mL of 0.02 M NaCl into its labeled test tube. 4. Rinse the funnel with distilled water. 5. Continue to fill each test tube with the appropriate solution, and rinse the funnel between each solution. 6. Test the conductivity of each salt solution starting with 0.00 M and moving up in concentration. To test the conductivity
follow these steps: 7. Place the conductivity sensor in the test tube containing the sample you are testing. 8. Record the conductivity of the sample. 9. Remove the conductivity sensor from the sample and clean the sensor by thoroughly rinsing it with distilled water. 10. Repeat the steps above to test the conductivity of the next sample. 11. Copy the salt solutions conductivity data from your data collection system to Table 1 in the Data Analysis section. 12. Dispose of your solutions according to your teacher’s instructions. 13. Clean all of your test tubes by rinsing them thoroughly with distilled water so that they can be used in the next part of
this investigation.

76
Part 2 – Sucrose (sugar) solutions 14. Label the test tubes “0.00 M sucrose”, “0.02 M sucrose”, “0.04 M sucrose”, “0.06 M sucrose”, “0.08 M sucrose”, and
“0.10 M sucrose”. 15. Use a funnel to fill each test tube with 25 mL of the indicated sucrose solution. 16. Start a new manually sampled data set. 17. Record the conductivity of each sugar solution. Be sure to rinse the conductivity sensor with distilled water after each
test. 18. Copy the sucrose solutions conductivity data from your data collection system to Table 1 in the Data Analysis section. 19. Dispose of your solutions according to your teacher’s instructions. 20. Clean all of your test tubes by rinsing them thoroughly with distilled water so that they can be used in the next part of
this investigation. Part 3 – Sports drink 21. Use a funnel to fill a test tube approximately halfway with a sports drink (at room temperature). 22. Place the conductivity sensor in the test tube containing the sports drink and allow the conductivity reading to stabilize. 23. Record the brand and flavor of sports drink tested and its conductivity below. Table 1: Measured conductivity of salt and sucrose solutions
Concentration of Salt and Sugar Solutions (M)
Conductivity of Salt Solutions (µS/cm)
Conductivity of Sucrose Solutions (µS/cm)
0.00 0.02 0.04 0.06 0.08 0.10
Analysis Questions: 1. Explain the difference between an electrolytic solution and a non-electrolytic solution. 2. Which compounds in a sports drink are electrolytes? Which compounds in a sports drink are non-electrolytes? 3. What is the approximate concentration of electrolytes in the sports drink you tested? 4. Explain the difference at the molecular level between what happens when salt and sugar dissolve. 5. Does crystalline table salt (sodium chloride) conduct an electric current? 6. Which type of compounds (ionic or covalent) generally makes better electrolyte solutions? Why? 7. Is human blood an electrolyte or non-electrolyte solution? Explain your answer.

77
Solutions, Colloids, Suspensions
Purpose: to identify liquid mixtures as solutions, colloids, and suspensions by observing their physical properties. Materials: various substances, water, test tubes & rack, laser pointer, filter paper and funnel, beakers. Pre-lab Questions: 1. Is a solution a homogeneous mixture or a heterogeneous mixture? Explain and give an example of a solution that is not in your notes. 2. Is a colloid a homogeneous mixture or a heterogeneous mixture? Explain and give an example of a colloid that is not in your notes. 3. Is a suspension a homogeneous mixture or a heterogeneous mixture? Explain and give an example of a colloid that is not in your notes. 4. Put solutions, suspensions, and colloids in order from smallest particle size to largest particle size. 5. What is the Tyndall Effect and which of the 2 mixtures will it help you distinguish between? 6. Which of the 3 mixtures will separate when undisturbed? 7. Which of the 3 mixtures will leave particles on filter paper?
Procedure: 1. Add a very small sample of each substance into test tubes that are half-filled with water. 2. Place your finger over the top of each one and shake for at least 20 seconds. Let settle for 3 minutes and observe. 3. If necessary, check for the Tyndall Effect with a laser pointer. 4. Separate the mixture using either filter paper, settling or evaporation (use an evaporating dish with a hot plate on low). Tell which separation method was successful and what you observed.
Substance Observation after settling Tyndall effect? Successful separation method Observations after separation
Conclusion: Write a conclusion in which you say which of the three types of mixtures each sample was. Give your reasons for each sample. More than one reason needs to be cited for each substance.

78
THE COLORS OF KOOL AID
Background: All foods we consume are mixtures of substances. The nutrients that make up foods are compounds. In addition, manufacturers of food products often add substances such as vitamins, minerals, artificial colors, and preservatives to food to improve their nutrient value, taste, texture, or keeping ability. In this experiment, you will separate and compare the dyes that make up the food colors used in the production of Kool-Aid. One way to separate the substance in a mixture is by the use of paper chromatography. In this technique, a drop of the mixture is placed on a piece of filter paper; the filter paper is then dipped like a wick into the solvent, a liquid in which the substance in the mixture will dissolve. When the solvent, moving along the wick-like filter paper reaches the mixture, each of the substances in the mixture dissolves and moves along the filter paper also. However, some substances are more soluble than others. This difference in combination with other factors make the dissolved substances move along the filter paper at different rates. If the substances are colored, separated spots of different color, each a different substance, appear on the filter paper. The rate at which a substance travels is a property of the substance and can be used in identification. This property is known as its “rate of flow” or Rf. Purpose:
-up is similar in both kinds of Kool-Aid
Materials: different kinds of Kool Aid centimeter ruler solvent 3 beral pipettes (chambers) capillary tubes goggles filter paper scissors pencil Procedure: o Obtain capillary tubes with 3 different colors of Kool Aid inside o Obtain 3 pre-cut strips of filter paper o Make a PENCIL line 1cm from one end of the filter paper. At the opposite end label the strip in a way that it will
somehow help you recognize which color of Kool Aid it is. o Using a capillary tube, place a SINGLE drop of dye in the middle of the pencil line. Let dry and reapply another spot on
top of the last. Repeat about five times. You want the dot to be small and very concentrated in color. Allow spots to dry.
o Repeat the first steps for each of the different Kool Aids, using a new strip of filter paper for each one. o Add enough solvent to each chamber so that when the filter paper is inserted (dot down) into it, the solvent touches the
paper but remains UNDER to pencil line.

79
o Keeping the chambers straight up, insert filter papers into them and watch solvent rise to the top. o When the solvent front reaches to about 0.5 cm from the top of the paper, take the paper out and mark the solvent
front with a pencil before it dries and disappears. o For each strip, measure the distance from the pencil line to the center of each colored dot separately. Record these
values in data table (in cm). o For each strip, also measure the distance from the pencil line to the farthest point the solvent has traveled. Record
these values in table. o Dispose the liquid as instructed by teacher. The distance the dye spot moves divided by the distance the solvent
moves is its rate of flow (Rf). If the two spots have the same color and the same Rf value, they are the same compound.
o Calculate the Rf for each of the dyes from each of the Kool Aids. Record values in the data table. Rf= Distance dye spot moved/Distance solvent front moved
Data: (Keep in mind that each Kool-Aid may have 1, 2 or 3 colors produced from different dyes. Therefore, you might not need to use all 3 rows for each different colored Kool-Aid)
Post-lab questions: 1. Were any of the colors made up of a single dye? If so, which one? 2. If a dye is very soluble in the solvent, what will be true about the distance it will move on the paper? 3. Which dye was the most soluble in the solvent? Which was the least? 4. Using your answers from #3, what will be true about the size of the Rf value for the dye that is not soluble in the solvent? What would be true about the size of the Rf value for the dye that is very soluble in the solvent? 5. It is also known that "like dissolves like". Polar molecules tend to hang out with polar molecules, while nonpolar molecules hang out with nonpolar molecules. a. How would you classify the polarity of the solvent that was used, NH3? (Show Lewis structure) b. Also draw and classify the polarities of: CF4 XeCl4 SCl4 OF2 6. Why would the experiment NOT work if the beginning sample drop on the paper was immersed directly into the liquid rather than having it above the surface of the liquid on the pencil line?

80
pH of Household Substances Name ___________________________ Purpose: the purpose of this lab is to determine whether several household substances are acids, bases, or neutral substances. We will test liquids directly. If you want to test a solid, it should be dissolved in water and then tested. Pre-lab Questions: 1. What are acid/base indicators? Why are they useful? 2. You will need to test at least 3 beverages. Do you think they will be mostly acids, bases, or a combination? 3. You will need to test at least 3 cleaners. Do you think they will be mostly acids, bases, or a combination? Procedure: 1. List all of the substances that you want to test in the data table under “substances.” You must test 10 substances. 2. For each one, predict in the 2nd column whether you think it will be acidic, basic, or neutral. This is your hypothesis. 3. Use your indicator paper to test small samples of the substances. Based on what color the indicator becomes, list whether the substance is acidic, basic, or neutral. Substance Predicted outcome (acidic, basic or neutral) Actual outcome (acidic, basic or neutral)
In the space below, write your conclusion. First discuss the purpose of the lab and how you carried out the lab. Then discuss your results. Did you notice any patterns? Think back to the prelab questions about beverages and cleaners. Did any of the pH values that you determined surprise you? Which of your predictions were wrong?
81
Alka Selzer Lab
Background: Most solids are more soluble in hot water than in cold water, but gases obey an opposite rule. Gases are most soluble in cold water. Alka seltzer reacts with when added to water to produce carbon dioxide. Most of the carbon dioxide escapes into the atmosphere, but some is dissolved in the water solution. The dissolved carbon dioxide affects the pH of the solution. The rate of the reaction is also affected by the temperature of the solution. Purpose: To study the differences in reaction rate, gas solubility, and pH caused by different temperatures. Pre-lab Questions: 1. What gas is produced by alka seltzer? 2. Write the equation for the reaction that occurs between this gas and water. 3. Based on your answer in #2, predict what will happen to the pH of the water after Alka Seltzer is added. 4. Predict what will happen to the indicator bromothymol blue (BTB) as the Alka Seltzer reacts. 5. What is a neutralization reaction? 6. Write the equation for the reaction between carbonic acid and sodium hydroxide. Procedure: 1. Get 3 beakers and add 100 mL of water to each beaker. Place one beaker in an ice bath and heat the second on a hot plate. Leave the third beaker at room temperature. 2. Using a pH meter, measure the pH of the room temperature water so that you will know the starting pH of all the water samples. Record the starting pH in the data table. 3. Mass two separate 0.50 g samples of Alka Seltzer. 4. When the water on the hot plate has reached 70°C – 80°C, remove it from the heat and put it on some wire gauze. Remove the cold water from the ice bath. 5. Add 2 mL of BTB to each beaker. 6. Get a timer ready to go! You are going to record the time it takes for the alka seltzer reactions to occur. When you are ready, simultaneously drop the two 0.50 g samples of Alka Seltzer into the hot and cold beakers, but do not added anything to the room temperature water. Record each reaction time in seconds. 7. Record the color and pH of each solution. Use the pH meter. 8. Measure 25 mL from each beaker into three flasks. Make sure you remember which is which. 9. Titrate (add drops and count the drops as you go) the hot and cold samples with the sodium hydroxide solution, swirling to mix between drops. The endpoint is reached when the solution color matches the room temperature “control.” This is best done on a white piece of paper to compare colors. Record the number of drops. 10. Clean up all glassware and your lab station.

82
Data and Observations:
Cold Solution Hot Solution pH of solution before reaction Time for reaction to be completed pH of solution after reaction Color of solution after reaction Number of drops of NaOH needed to neutralize
Your post-lab should include the following: Results (a summary of your data in sentence form) Conclusion: should include a discussion of temperature and reaction rate, change of pH due to the reaction, the BTB as an indicator, the control, the solubility of CO2 in the two solutions, and the neutralization of the two samples. Be sure to explain why the hot and cold solution behaved differently. Sources of Error
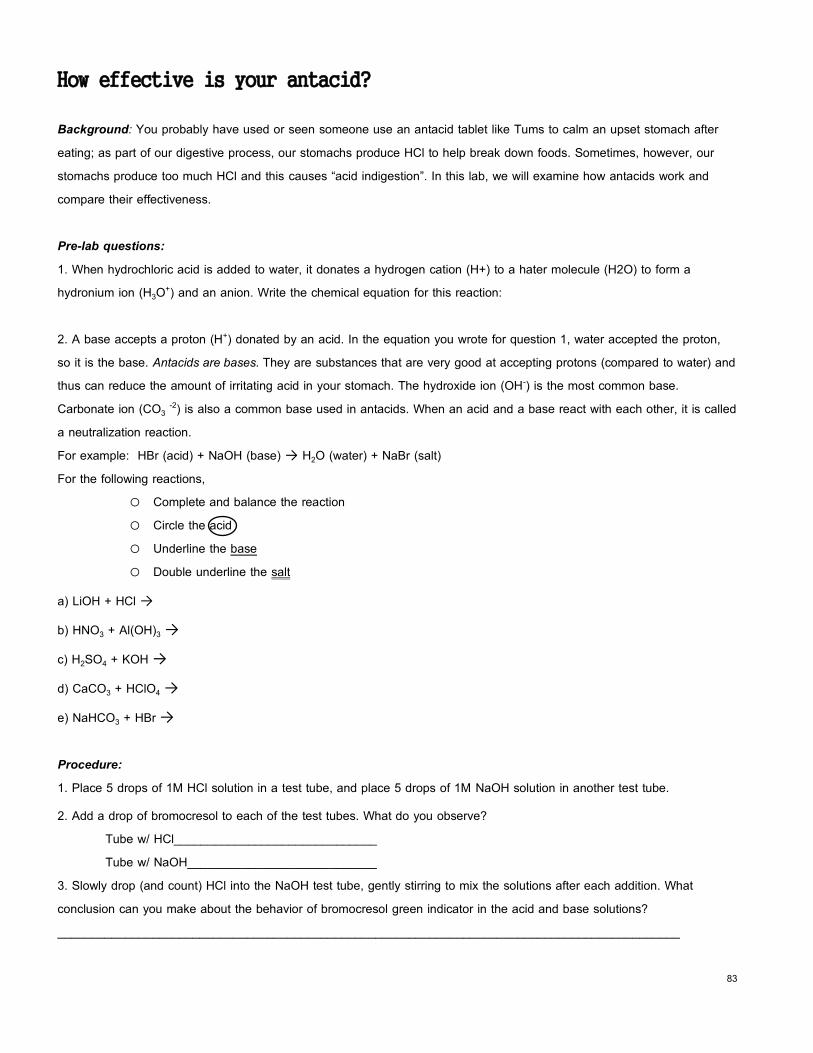
83
How effective is your antacid? Background: You probably have used or seen someone use an antacid tablet like Tums to calm an upset stomach after eating; as part of our digestive process, our stomachs produce HCl to help break down foods. Sometimes, however, our stomachs produce too much HCl and this causes “acid indigestion”. In this lab, we will examine how antacids work and compare their effectiveness. Pre-lab questions: 1. When hydrochloric acid is added to water, it donates a hydrogen cation (H+) to a hater molecule (H2O) to form a hydronium ion (H3O+) and an anion. Write the chemical equation for this reaction: 2. A base accepts a proton (H+) donated by an acid. In the equation you wrote for question 1, water accepted the proton, so it is the base. Antacids are bases. They are substances that are very good at accepting protons (compared to water) and thus can reduce the amount of irritating acid in your stomach. The hydroxide ion (OH-) is the most common base. Carbonate ion (CO3 -2) is also a common base used in antacids. When an acid and a base react with each other, it is called a neutralization reaction. For example: HBr (acid) + NaOH (base) → H2O (water) + NaBr (salt) For the following reactions,
o Complete and balance the reaction o Circle the acid o Underline the base o Double underline the salt
a) LiOH + HCl →
b) HNO3 + Al(OH)3 →
c) H2SO4 + KOH →
d) CaCO3 + HClO4 →
e) NaHCO3 + HBr → Procedure: 1. Place 5 drops of 1M HCl solution in a test tube, and place 5 drops of 1M NaOH solution in another test tube.
2. Add a drop of bromocresol to each of the test tubes. What do you observe? Tube w/ HCl______________________________ Tube w/ NaOH____________________________
3. Slowly drop (and count) HCl into the NaOH test tube, gently stirring to mix the solutions after each addition. What conclusion can you make about the behavior of bromocresol green indicator in the acid and base solutions? ____________________________________________________________________________________________

84
4. Mass out approximately 0.10 grams of a crushed up antacid, and record the EXACT mass in your data table. Be sure to record the brand and active ingredient(s).
5. Return to your table and pour the powder into a test tube. Put some sort of mark on the test tube to help you remember which antacid is in the tube. (Ex: a P for Pepcid)
6. Repeat steps #4&5 for two more different antacids.
7. Fill each test tube ¼ full with deionized/distilled water and mix well. It doesn’t matter if you add a little more or a little less water. Record your observations of each test tube.
8. Add several drops of bromocresol green indicator to each antacid solution, enough drops so that the color is vivid and not too pale. . Record the colors.
Solution 1__________ Solution 2___________Solution 3__________ What do these colors mean about the pH, acidity or basicity of the solutions? ___________
9. Add 5 drops of HCl solution to each test tube and mix thoroughly using a stirring rod. Make sure the solid at the bottom of the tube is mixed well. Observe the color and texture of the mixtures as you add the HCl.
10. Continue adding HCl in 5 drop increments, keeping track of the number of drops added. When the color changes become more permanent, add the HCl drop by drop, and stir after each drop. Stop adding when the color change remains for at least 30 seconds. Record the total number of drops added in the table below.
Antacid brand and active ingredients
Mass (g) # of drops of HCl required to neutralize
*Neutralizing power Observations
*Calculate the neutralizing power by dividing the number of drops of HCl by the mass of the antacid. This is the amount of acid that 1 gram of the antacid could neutralize.* Post-Lab questions: 1. Why is a substance that reacts with and dissolves in a strong acid, but doesn’t dissolve in water, useful for an application like an antacid for the stomach?
2. Based on the results of this lab, order the brands tested from most effective to least effective.
3. Do the more effective antacids require more or less HCl to titrate (neutralize) compared to the less effective brands? EXPLAIN WHY. Don’t forget a conclusion and sources of error!
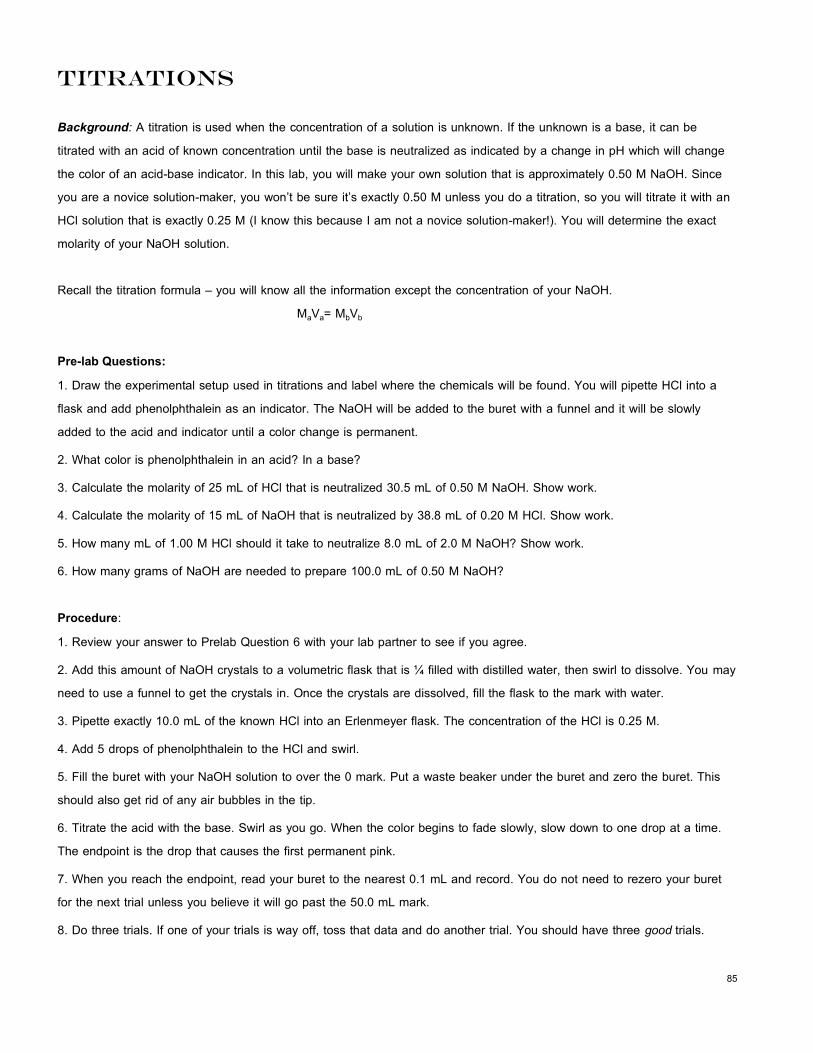
85
Titrations
Background: A titration is used when the concentration of a solution is unknown. If the unknown is a base, it can be titrated with an acid of known concentration until the base is neutralized as indicated by a change in pH which will change the color of an acid-base indicator. In this lab, you will make your own solution that is approximately 0.50 M NaOH. Since you are a novice solution-maker, you won’t be sure it’s exactly 0.50 M unless you do a titration, so you will titrate it with an HCl solution that is exactly 0.25 M (I know this because I am not a novice solution-maker!). You will determine the exact molarity of your NaOH solution. Recall the titration formula – you will know all the information except the concentration of your NaOH.
MaVa= MbVb Pre-lab Questions: 1. Draw the experimental setup used in titrations and label where the chemicals will be found. You will pipette HCl into a flask and add phenolphthalein as an indicator. The NaOH will be added to the buret with a funnel and it will be slowly added to the acid and indicator until a color change is permanent.
2. What color is phenolphthalein in an acid? In a base?
3. Calculate the molarity of 25 mL of HCl that is neutralized 30.5 mL of 0.50 M NaOH. Show work.
4. Calculate the molarity of 15 mL of NaOH that is neutralized by 38.8 mL of 0.20 M HCl. Show work.
5. How many mL of 1.00 M HCl should it take to neutralize 8.0 mL of 2.0 M NaOH? Show work.
6. How many grams of NaOH are needed to prepare 100.0 mL of 0.50 M NaOH? Procedure: 1. Review your answer to Prelab Question 6 with your lab partner to see if you agree.
2. Add this amount of NaOH crystals to a volumetric flask that is ¼ filled with distilled water, then swirl to dissolve. You may need to use a funnel to get the crystals in. Once the crystals are dissolved, fill the flask to the mark with water.
3. Pipette exactly 10.0 mL of the known HCl into an Erlenmeyer flask. The concentration of the HCl is 0.25 M.
4. Add 5 drops of phenolphthalein to the HCl and swirl.
5. Fill the buret with your NaOH solution to over the 0 mark. Put a waste beaker under the buret and zero the buret. This should also get rid of any air bubbles in the tip.
6. Titrate the acid with the base. Swirl as you go. When the color begins to fade slowly, slow down to one drop at a time. The endpoint is the drop that causes the first permanent pink.
7. When you reach the endpoint, read your buret to the nearest 0.1 mL and record. You do not need to rezero your buret for the next trial unless you believe it will go past the 50.0 mL mark.
8. Do three trials. If one of your trials is way off, toss that data and do another trial. You should have three good trials.
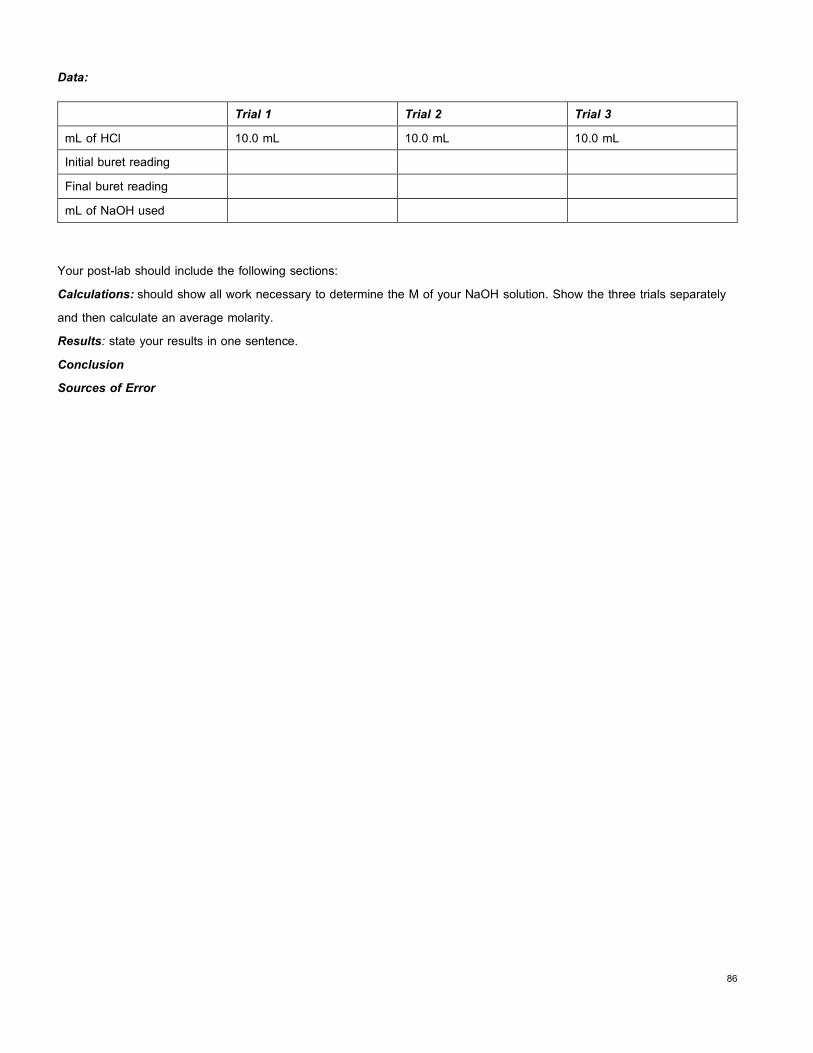
86
Data:
Trial 1 Trial 2 Trial 3 mL of HCl 10.0 mL 10.0 mL 10.0 mL Initial buret reading Final buret reading mL of NaOH used
Your post-lab should include the following sections: Calculations: should show all work necessary to determine the M of your NaOH solution. Show the three trials separately and then calculate an average molarity. Results: state your results in one sentence. Conclusion Sources of Error

87
Le’Chatelier Equilibrium Lab Purpose: To study the affect of temperature & concentration changes on systems in equilibrium. Safety: Many of the solutions in this lab are toxic. The hydrochloric acid is very concentrated and dangerous. Wash any spills immediately. Background:
In aqueous solution, the iron(III) ions will react with thiocyanate ions according to the equation: Fe3+ + SCN- <-----> [FeSCN]2+
An equilibrium is established among these species of ions. An established equilibrium may be altered by applying a stress to the system. One such stress that can be applied to an ionic equilibrium in solution is a decrease or increase in the concentrations of one of the species of ions.
The principle of Le Châtelier states: When a stress is brought to bear on a system in equilibrium, the system tends to change so as to relieve the stress." Thus we would then expect anything that changes the concentration of any of the components of a system in equilibrium to alter the equilibrium.
Since Fe3+ is yellow, SCN- is colorless, and the [FeSCN]2+ is a very deep blood red, we would expect to notice changes in color if there are changes in the concentration of the red [FeSCN]2+ ion. IF it decreases, we would expect a lighter red to be produced and if it increases, a darker red. You will investigate the effects upon this equilibrium of the addition of several compounds which will have the effect of increasing or decreasing one of the component ions of the equilibrium mixture.
Another equilibrium system that you will investigate is one involving the sparingly soluble calcium oxalate: CaC2O4(s) <-------> Ca2+(aq) + C2O4
2-(aq) Any substance added to this system which can tie up the C2O4
2-, thereby decreasing its concentration, will cause more calcium oxalate to dissolve. You will see the effects of addition of hydrochloric acid on this equilibrium. Temperature changes may also affect equilibria. We will discuss the affect of temperature on the following equilibrium:
[Co(H2O)6]2+ + 4 Cl- <-----> [CoCl4]2- + 6 H2O
Procedure: A. Iron-thiocyanate equilibrium 1. Into a clean 250-mL beaker, put 8 drops of 1 M iron (III) nitrate, Fe(NO3)3, and 8 drops of 1 M ammonium thiocyanate, NH4SCN. Add approximately 75 mL of distilled water. Mix well. 2. Divide the solution, just prepared, into approximately equal portions into four 6-inch test tubes and number the test tubes, 1 through 4. 3. To tube number 1, add 5 drops of distilled water. Stopper this tube and invert it several times to mix it. Use this tube for comparison as your control. 4. To tube number 2, add 5 drops of 1 M iron (III) nitrate. Put a cork stopper in the tube and mix it by inverting several times. Note and record any change in color.

88
5. To tube number 3, add, 5 drops of 1 M ammonium thiocyanate. Mix as before. Note and record any color changes. 6. To tube number 4, add, 5 drops of 1 M ammonia solution (NH3). Mix as before. Note any change from the original color. B. Calcium oxalate equilibrium 1. In a clean 6-inch test tube, put 5 mL of 0.1 M calcium chloride, CaCl2, and add 5 mL of 0.1 M sodium oxalate, Na2C2O4. Mix by stoppering and inverting the tube several times. Note the formation of a white precipitate of calcium oxalate. The following equilibrium is established. Ca2+ + C2O4
2- <----> CaC2O4 (s) 2. The test tube now contains a white precipitate of calcium oxalate. Add concentrated hydrochloric acid to the test tube, 5 drops at a time. DO NOT GET HCl ON SKIN. Shake the tube after each addition of acid. Add acid until you note a change. Data and Observations: A. Iron(III) thiocyanate equilibrium Color of control tube ________________ Color change in tube 2 ______________ Color change in tube 3 ______________ Color change in tube 4 ______________ B. Calcium oxalate equilibrium Change observed__________________________________________________ Post-Lab Questions These questions are to be answered when you have completed the lab report. 1. Fe3+ in the presence of hydroxide ions forms an insoluble gelatinous precipitate. Did this happen when you added the ammonia solution (remember ammonia is a weak base and forms hydroxide ions) to the equilibrium system? How do you know? 2. How did this affect the equilibrium? Think about how the hydroxide is removing iron (III) ions from solution and tying them up in the precipitate. 3. Hydrogen ions tie up oxalate ions by forming oxalic acid molecules. Explain how this is related to what you saw in Part B. 4. If you were given the information that the [CoCl4]2- ion is blue, how is the equilibrium in Part C altered by heating? Do you think the reaction is endothermic or exothermic? 5. If a chemical added to the equilibrium in Part A causes the color to go from deep red to orange, how has the equilibrium been altered? 6. If calcium ions (Ca+2) were added to the equilibrium in Part B, would you expect an increase in the precipitate or a decrease in the amount of precipitate?
Do not forget to write a conclusion and sources of error!

89
Enthalpy of Reaction (abbreviated version of AP chemistry lab #13) Purpose: The purpose of this experiment is to learn how to determine the heat of reaction. An acid-base reaction is conducted in aqueous solution. The heat absorbed by the water is assumed to come from the reacting molecules. Using data for the moles of acid and base, and the kJ of energy absorbed by the water, we can determine the enthalpy of reaction. Background: The release or absorption of heat energy is a unique value for every reaction. In this experiment, the enthalpy change for the reaction of hydrochloric acid and sodium hydroxide is calculated.
NaOH (aq) + HCl (aq) → NaCl (aq) + H2O (l) ΔH = ?? kJ o We cannot directly measure the enthalpy or heat involved in a reaction, but if the reaction occurs in solution we
can use the mass, temperature change, and specific heat of the solution to determine the heat gained or lost. The solution is mostly water, so we use the specific heat of water, 4.18 J/gºC.
qsol = (grams of solution) x (specific heat of solution) x ΔT Equation 1
o Because all of the heat gained by the water is lost by the reaction, the following is true: -qsol = qrxn Equation 2
o Last, if we use the following formula to determine the moles of one of the reactants, we can divide the qrxn (J) by moles to determine ΔHrxn, a value that corresponds to kJ/mol.
M = mol/L ( use this formula to determine moles of acid and base) Equation 3 Safety: The hydrochloric acid solution is toxic by ingestion or inhalation; it is severely corrosive to the skin and eyes. The sodium hydroxide solution is severely corrosive to the skin and eyes. Wear chemical splash goggles and a chemical resistant lab coat. Wash hands before leaving lab. Pre-lab questions: 1. Define ΔHrxn. 2. In today’s lab you will be using 50.0 mL of 2.0 M HCl. Using Equation 3 from above, calculate the number of moles of acid used. 3. You will also be using 50.0 mL of 2.0 M NaOH. How many moles of base are used?
Consider the following reaction to answer #4-6. A (aq) + B (aq) → AB (aq) 4. The specific heat of a solution is 4.18 J/gºC. The solution is formed by combining 25.0 g of solution A with 25.0 g of solution B, with each solution initially at 21.4 ºC. The final temperature of the combined solutions is 25.3 ºC. Calculate the qsol, using equation 1 from above. Answer in kJ. 5. What is the qrxn? Use Equation 2 from above. 6. If the reaction described in #4 used 0.15 moles of A and 0.15 moles of B, calculate ΔHrxn by dividing kJ by moles.
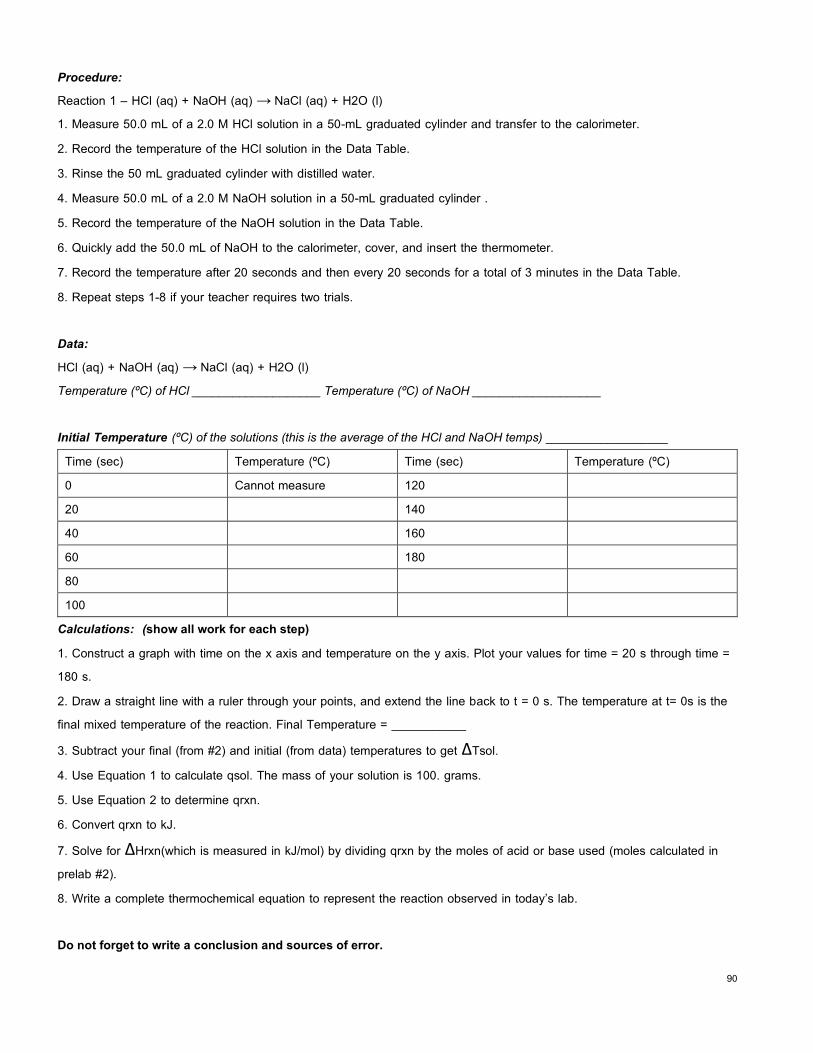
90
Procedure: Reaction 1 – HCl (aq) + NaOH (aq) → NaCl (aq) + H2O (l) 1. Measure 50.0 mL of a 2.0 M HCl solution in a 50-mL graduated cylinder and transfer to the calorimeter. 2. Record the temperature of the HCl solution in the Data Table. 3. Rinse the 50 mL graduated cylinder with distilled water. 4. Measure 50.0 mL of a 2.0 M NaOH solution in a 50-mL graduated cylinder . 5. Record the temperature of the NaOH solution in the Data Table. 6. Quickly add the 50.0 mL of NaOH to the calorimeter, cover, and insert the thermometer. 7. Record the temperature after 20 seconds and then every 20 seconds for a total of 3 minutes in the Data Table. 8. Repeat steps 1-8 if your teacher requires two trials. Data: HCl (aq) + NaOH (aq) → NaCl (aq) + H2O (l) Temperature (ºC) of HCl ___________________ Temperature (ºC) of NaOH ___________________ Initial Temperature (ºC) of the solutions (this is the average of the HCl and NaOH temps) __________________ Time (sec) Temperature (ºC) Time (sec) Temperature (ºC) 0 Cannot measure 120 20 140 40 160 60 180 80 100
Calculations: (show all work for each step) 1. Construct a graph with time on the x axis and temperature on the y axis. Plot your values for time = 20 s through time = 180 s. 2. Draw a straight line with a ruler through your points, and extend the line back to t = 0 s. The temperature at t= 0s is the final mixed temperature of the reaction. Final Temperature = ___________ 3. Subtract your final (from #2) and initial (from data) temperatures to get ΔTsol. 4. Use Equation 1 to calculate qsol. The mass of your solution is 100. grams. 5. Use Equation 2 to determine qrxn. 6. Convert qrxn to kJ. 7. Solve for ΔHrxn(which is measured in kJ/mol) by dividing qrxn by the moles of acid or base used (moles calculated in prelab #2). 8. Write a complete thermochemical equation to represent the reaction observed in today’s lab. Do not forget to write a conclusion and sources of error.

91
Background:
The rate of decay of radioisotopes is measured in half-lives. One half-life is the time it takes for one half of the atoms in a sample of radioactive material to decay. If we know the amount of original radioactive material that remains in a sample (the parent isotope), the rate of radioactive decay, and the amount of the new elements formed (the daughter products), then we can calculate the time elapsed since the radioactive decay began.
In this lab, you will use M&Ms to simulate the relationship between the passage of time and the number of radioactive nuclei that will decay. As with real nuclei, the passage of time will be measured in half-lives.
Materials: M&Ms A clean container to hold the pieces of candy A clean sheet of paper
Procedure:
1. Your M&Ms represent radioactive atoms. The printed "M" will represent a radioactive atom (parent isotope) and the blank side will represent a stable atom (daughter product).
2. Count the total number of pieces of candy and put all of it into the container. These represent parent isotopes.
3. Give them a good shake then dump them out onto the sheet of paper. One minute has just elapsed!
4. Write down how many stable and radioactive atoms you have DURING THAT TRIAL (it is NOT cumulative). If the "M" side is up, then the candy has remained as the parent isotope and needs to go back into the cup. If the "M" side is down, then the candy has decayed into the more stable daughter product (and should be eaten!!).
5. Repeat the steps until you have no radioactive atoms left or until 10 half lives have passed.
Results: # Parent isotopes ___________
Minutes # daughter products # parent isotopes Natural log of parent isotopes % decay per trial 0 0 1 2 3 4 5 6 7 8 9 10

92
Post-lab questions:
1. What does it mean when we say an atom has “decayed”?
2. Define the term half-life.
3. How long is the half-life of your sample?
4. How many atoms of the parent isotope did you end with? Is this realistic? Why or why not?
5. Plot the total results on a graph with the number of candies on the vertical axis and trial number on the horizontal axis. Is the result a straight or a curved line? What does the line indicate about the nature of decay of radionuclides?
6. How do scientists use radioactive decay to date fossils and artifacts?