chembiodraw2010_e
TRANSCRIPT

ChemBioO
ffice.Com®
Chem & Bio DrawChem & Bio Drawing Standard
®

Product Registration
Name
Title
Firm
Street
City State Zip
Country
Tel Fax
Serial No. Purchase Date
USER INFORMATION
For faster response and accuracy, use the Web:www.cambridgesoft.com/register/
1. Product you are registering (check one): ❏ Chem & Bio O fÞce ❏ Chem & BIo Draw ❏ Chem & Bio 3D ❏ Inventory
❏ Bio O ffice ❏ BioDraw ❏ BioAssay ❏ E-Notebook
❏ Chem & Bio O ffice Enterprise ❏ Chem & Bio O ffice W orkgroup
❏ Other
2. System running CS software (check one): ❏ Microsoft Windows ❏ Apple Macintosh ❏ Other
3. Please check one that best describes you: ❏ Commercial ❏ Academic ❏ Student ❏ Gov’t/Non Profit ❏ Other
4. Your discipline: ❏ Analytical Chem. ❏ Inorganic Chem. ❏ Biochemistry ❏ Chemical Engineering ❏ Physical Chem. ❏ Organic Chem. ❏ Pharmacology ❏ Biology ❏ Proteomics ❏ Genomics ❏ Information ❏ Other
QUESTIONNAIRE (OPTIONAL)
Register today and receive free:
· Warranty technical support
· ChemBioNews.Com publication for Scientists with Computers
· Information on new releases
Thank You! Enjoy your software!
Please remove this portion before mailing.
Please copy serial number from CS Installation Instructions.
Register your CambridgeSoft Product.
Please complete the registration card at right.
Registering your prod-uct makes you eligible to receive update and upgrade information,
technical support, and a free subscription to ChemBioNews.Com, a
publication for Scientists with Computers.
www.cambridgesoft.comVisit our homepage for
more information about CS products and services.
Technical SupportWarranty technical
support available. For details please see:
www.cambridgesoft.com/ services/contact/
US 1 617 588-9300 FAX 1 617 588–9390 Web www.cambridgesoft.comEU 00 800 875 20000 FAX +44 1223 464990 EMAIL [email protected] 03-3502-7800 FAX 03-3502-7890MAIL 100 CambridgePark Drive Cambridge, MA 02140 USA
✁
✁

NO
PO
STAG
E N
ECES
SARY
IF
MAI
LED
IN T
HE
UNIT
ED S
TATE
S
BUSI
NES
S RE
PLY
MA
ILFI
RST-C
LASS
PER
MIT
NO
. 506
7 C
AMBR
IDG
E, M
A
POST
AGE
WILL
BE
PAID
BY
ADDR
ESSE
E
Prod
uct
Regi
stra
tion
Cam
brid
geSo
ft C
orpo
ratio
n10
0 C
ambr
idge
Park
Driv
eC
ambr
idge
, MA
021
40–9
802
USA
PERF.

License InformationAll resources and application files in ChemBioOffice, ChemOffice, BioOffice, ChemBioDraw, ChemDraw, BioDraw, ChemBio3D, Chem3D, ChemFinder, BioViz, Inventory, E-Notebook, BioAs-say, ChemINDEX, ChemFinder, and ChemInfo programs, all resources in the ChemOffice, ChemDraw, Chem3D, ChemFinder, and ChemInfo application files, and this manual are Copyright © 1986-2009 by CambridgeSoft Corporation (“CS”) with all rights reserved worldwide. MOPAC 2002 is Copyright © 1993-2006 by Fujitsu Limited with all rights reserved.Information in this document is subject to change without notice and does not represent a commit-ment on the part of CS. Both these materials and the right to use them are owned exclusively by CS. Use of these materials is licensed by CS under the terms of a software license agreement; they may be used only as provided for in said agreement.ChemBioOffice, ChemOffice BioOffice, ChemBioDraw, ChemDraw, BioDraw, ChemBio3D, Chem3D, CS MOPAC, ChemFinder, BioViz, Inventory, E-Notebook, and BioAssay, and ChemInfo are not supplied with copy protection. Do not duplicate any of the copyrighted materials except for your personal backups without written permission from CS. To do so would be in violation of federal and international law, and may result in criminal as well as civil penalties. You may use ChemBioOf-fice, ChemOffice BioOffice, ChemBioDraw, ChemDraw, BioDraw, ChemBio3D, Chem3D, CS MOPAC, ChemFinder, BioViz, Inventory, E-Notebook, and BioAssay ChemOffice, ChemDraw, Chem3D, CS MOPAC, ChemFinder, Inventory, E-Notebook, BioAssay, and ChemInfo on any com-puter owned by you; however, extra copies may not be made for that purpose. Consult the CS License Agreement for Software and Database Products for further details.
Trademark Notices ChemBioOffice, ChemOffice, BioOffice, ChemBioDraw. ChemDraw, BioDraw,ChemBio3D, Chem3D, ChemINDEX, ChemFinder, ChemInfo and ChemACX are registered trademarks of CambridgeSoft Corporation (Cambridge Scientific Computing, Inc.).The Merck Index is a registered trademark of Merck & Co., Inc. ©2006 All rights reserved.MOPAC 2002 is a trademark of Fujitsu Limited.Microsoft Windows, Windows 2000, Windows XP, and Microsoft Word, Microsoft Excel, Microsoft PowerPoint, Microsoft Access, and SQL Server 2005 are registered trademarks of Microsoft Corpo-ration.Apple Events, Macintosh, Laserwriter, Imagewriter, QuickDraw and AppleScript are registered trademarks of Apple Computer, Inc. Geneva, Monaco, and TrueType are trademarks of Apple Com-puter, Inc.InChI™ is a trademark of the International Union of Pure and Applied Chemistry.Jaguar is a trademark of Schrödinger, LLC.THE MERCK INDEX® is a trademark of Merck & Company Incorporated, Whitehouse Station, New Jersey, USA and is registered in the United States Patent and Trademark Office.

Oracle® is a registered trademark of Oracle Corporation and/or its affiliates. Other names may be trademarks of their respective owners.All other trademarks are the property of their respective holders. Any use of the marks in connection with the sale, offering for sale, distribution or advertising of any goods and services, including any other Web site, or in connection with labels, signs, prints, packages, wrappers, receptacles or adver-tisements used for the sale, offering for sale, distribution or advertising of any goods and services, including any other Web site, which is likely to cause confusion, to cause mistake or to deceive, is strictly prohibited.
Copyright NoticeThe materials contained in CambridgeSoft Database Products, including but not limited to, Che-mACX, ChemIndex, and The Merck Index, are protected by copyright laws and international copy-right treaties, as well as other intellectual property laws and treaties. Copyright in the materials contained on the CD and internet subscription products, including, but not limited to, the textual material, chemical structures representations, artwork, photographs, computer software, audio and visual elements, is owned or controlled separately by CS.CS is a distributor (and not a publisher) of information supplied by third parties. Accordingly, CS has no editorial control over such information. Database Suppliers (“Supplier”) individually own all right, title, and interest, including copyright, in their database—and retain all such rights in providing information to Customers.The materials contained in The Merck Index are protected by copyright laws and international copy-right treaties, as well as other intellectual property laws and treaties. Copyright in the materials con-tained on the CD and internet subscription products, including, but not limited to, the textual material, chemical structures representations, artwork, photographs, computer software, audio and visual elements, is owned or controlled separately by Merck & Co., Inc., (“Merck”) and CambridgeSoft Corporation (“CS”).The ChemReact68, ChemSynth, ChemReact500, and ChemSelect Reaction Database is copyrighted © by InfoChem GmbH 1997.AspTear is copyrighted © by Softwing.InChI™ is a trademark of the International Union of Pure and Applied Chemistry. InChI™ Material in ChemDraw is © IUPAC 2005.schrödinger® JaguarGAMESS is copyrighted © by Ames LaboratoryCopyright © 1986-2009 CambridgeSoft Corporation (Cambridge Scientific Computing, Inc.) All Rights Reserved.Printed in the United States of America.All other trademarks are the property of their respective holders.CambridgeSoft End-User License Agreement for Software Products

Important: This CambridgeSoft Software License Agreement (“Agreement”) is a legal agreement between you, the end user (either an individual or an entity), and CambridgeSoft Corporation (“CS”) regarding the use of CS Software and Database Products, which may include computer software, the associated media, any printed materials, and any “online” or electronic documentation. By installing, copying, or otherwise using any CS Software Product, you signify that you have read the CS End User License Agreement and agree to be bound by its terms. If you do not agree to the Agreement’s terms, promptly return the package within 30 days of purchase and all its contents to the place of pur-chase for a full refund.
CambridgeSoft Software and Database License1. Grant of License. CambridgeSoft (CS) Software Products are licensed, not sold. CS grants and you hereby accept a nonexclusive license to use one copy of the enclosed Software Product (“Soft-ware”) in accordance with the terms of this Agreement. This licensed copy of the Software may only be used on a single computer, except as provided below.You may physically transfer the Software from one computer to another for your own use, provided the Software is in use (or installed) on only one computer at a time. If the Software is permanently installed on your computer (other than a network server), you may also use the Software on a porta-ble or home computer, provided that you use the software on only one computer at a time. You may not (a) electronically transfer the Software from one computer to another, (b) distribute copies of the Software to others, or (c) modify or translate the Software without the prior written consent of CS, (d) place the software on a server so that it is accessible via a public network such as the Internet, (e) sublicense, rent, lease or lend any portion of the Software or Documentation, (f) modify or adapt the Software or merge it into another program, (g) modify or circumvent the software activation, or (h) reverse engineer the software activation so as to circumvent it. The Software may be placed on a file or disk server connected to a network, provided that a license has been purchased for every computer with access to that server. You may make only those copies of the Software which are necessary to install and use it as permitted by this agreement, or are for purposes of backup and archival records; all copies shall bear CS’s copyright and proprietary notices. You may not make copies of any accom-panying written materials.With a fixed license, the software cannot be installed on more than the number of computers equiva-lent to the number of fixed licenses purchased. For example, a 10-user fixed license means the soft-ware can be installed on no more than 10 different computers. A fixed license cannot be installed on a server. With a concurrent license, the software can be installed on any number of computers at the organization, but the number of computers using the software at any one time cannot exceed the number of concurrent licenses purchased. For example, a 10-user concurrent license can be installed on 20 computers, but no more than 10 users can be using it at any one time. If the number of users of the software could potentially exceed the number of licensed copies, then Licensee must have a rea-sonable mechanism or process in place to assure that the number of persons using the software does not exceed the number of copies. CambridgeSoft reserves the right to conduct periodic audits no

more than once per year to review the implementation of this agreement at the Licensee’s site. At CambridgeSoft’s request, Licensee will provide a knowledgeable employee to assist in said audit2. Ownership. The Software is and at all times shall remain the sole property of CS. This ownership is protected by the copyright laws of the United States and by international treaty provisions. Upon expiration or termination of this agreement, you shall promptly return all copies of the Software and accompanying written materials to CS. You may not modify, decompile, reverse engineer, or disas-semble the Software.3. Assignment Restrictions. You may not rent, lease, or otherwise sublet the Software or any part thereof. You may transfer on a permanent basis the rights granted under this license provided you transfer this Agreement and all copies of the Software, including prior versions, and all accompany-ing materials. The recipient must agree to the terms of this Agreement in full and register this transfer in writing with CS.4. Use of Included Data. All title and copyrights in and to the Software product, including but not limited to any images, photographs, animations, video, audio, music, text, applets, Java applets, and data files and databases (the “Included Data”), are owned by CS or its suppliers.
• You may not copy, distribute or otherwise make the Included Data publicly available.• Licensed users of ChemOffice Enterprise and Workgroup and the accompanying Plug-in software
products may access, search, and view the Included Data and may transmit the results of any search of the Included Data to other users of the licensed ChemOffice Enterprise and Workgroup software products within your organization only, provided that such transmission is via an internal corporate (or university) network and is not accessible by the public.
• You may not install the Included Data on non-licensed computers nor distribute or otherwise make the Included Data publicly available.
• You may use the Software to organize personal data, and you may transmit such personal data over the Internet provided that the transmission does not contain any Included Data.
• All rights not specifically granted under this Agreement are reserved by CS.
5. Limitations on Use. (a) Desktop versions of E-Notebook, Inventory, and BioAssay are licensed for use with SQL Server Express, and are not licensed for use with SQL Server. Licenses for use with SQL Server are available separately. (b) Workgroup versions of E-Notebook, Inventory, and BioAs-say are licensed for use with SQL Server and SQL Server Express. (c) Except as expressly provided by copyright law, copying, redistribution, or publication, whether for commercial or non-commercial purposes, must be with the express permission of CS, Merck, or other CS partner. In any copying, redistribution, or publication of copyrighted material, any changes to or deletion of author attribution or copyright notice, or any other proprietary notice of CS, Merck, or other Database producer are prohibited.6. Separation of Components. The Software is licensed as a single product. Its component parts may not be separated for use on more than one computer, except in the case of ChemBioOffice Enterprise. ChemBioOffice Enterprise includes licenses for ChemBioDraw ActiveX and licenses for

ChemBio3D ActiveX. The ActiveX software products may be installed on computers other than that one on which ChemBioOffice Enterprise is installed. However, each copy of the ActiveX is individ-ually subject to the provisions of Paragraphs 1 through 4 of this Agreement.7. Educational Use Only of Student Licenses. If you are a student enrolled at an educational institu-tion, the CS License Agreement grants to you personally a license to use one copy of the enclosed Software in accordance with the terms of this Agreement. In this case the CS License Agreement does not permit commercial use of the Software nor does it permit you to allow any other person to use the Software.8. Modification of Databases, Web sites, or Subscription Services. CS reserves the right to change, modify, suspend or discontinue any or all parts of any Paid Subscription Services and databases at any time.9. Termination. You may terminate the license at any time by destroying all copies of the Software and documentation in your possession. Without prejudice to any other rights, CS may terminate this Agreement if you fail to comply with its terms and conditions. In such event, you must destroy all copies of the Software Product and all of its component parts.10. Revocation of Subscription Access. Any use which is commercial and/or non-personal is strictly prohibited, and may subject the Subscriber making such uses to revocation of access to this Paid Sub-scription Service, as well as any other applicable civil or criminal penalties. Similarly, sharing a Sub-scriber password with a non-Subscriber or otherwise making this Paid Subscription Service available to third parties other than the Authorized User as defined above is strictly prohibited, and may sub-ject the Subscriber participating in such activities to revocation of access to the Paid Subscription Services; and, the Subscriber and any third party, to any other applicable civil or criminal penalties under copyright or other laws. In the case of an authorized site license, a Subscriber shall cause any employee, agent or other third party which the Subscriber allows to use the Paid Subscription Service materials to abide by all of the terms and conditions of this Agreement. In all other cases, only the Subscriber is permitted to access the Paid Subscription Service materials. Should CambridgeSoft become aware of any use that might cause revocation of the license, they shall notify the Subscriber. The Subscriber shall have 90 days from date of notice to correct such violation before any action will be taken.11. Confidentiality. The Software contains trade secrets and proprietary know-how that belong to CS and are being made available to you in strict confidence. ANY USE OR DISCLOSURE OF THE SOFT-WARE, OR USE OF ITS ALGORITHMS, PROTOCOLS OR INTERFACES, OTHER THAN IN STRICT ACCORDANCE WITH THIS LICENSE AGREEMENT, MAY BE ACTIONABLE AS A VIOLATION OF OUR TRADE SECRET RIGHTS.
CS Limited WarrantySoftware Limited Warranty. CS’s sole warranty with respect to the Software is that it shall be free of errors in program logic or documentation, attributable to CS, which prevent the performance of

the principal computing functions of the Software. CS warrants this for a period of thirty (30) days from the date of receipt.CS’s Liability. In no event shall CS be liable for any indirect, special, or consequential damages, such as, but not limited to, loss of anticipated profits or other economic loss in connection with or arising out of the use of the software by you or the services provided for in this agreement, even if CS has been advised of the possibility of such damages.CS’s entire liability and your exclusive remedy shall be, at CS’s discretion, either (A) return of any license fee, or (B) correction or replacement of software that does not meet the terms of this limited warranty and that is returned to CS with a copy of your purchase receipt.Database Representations and Limited Warranty. The User shall indemnify, defend and hold CS, Merck, and/or other Supplier harmless from any damages, expenses and costs (including reasonable attorneys’ fees) arising out of any breach or alleged breach of these Terms and Conditions, represen-tations and/or warranties herein, by the User or any third party to whom User shares her/his password or otherwise makes available this Subscription Service. The User shall cooperate in the defense of any claim brought against CambridgeSoft, Merck, and/or other Database Suppliers. In no event shall CS, Merck, and/or other Supplier be liable for any indirect, special, or consequential damages, such as, but not limited to, loss of anticipated profits or other economic loss in connection with or arising out of the use of the software by you or the services provided for in this agreement, even if CS, Merck, and/or other Supplier has been advised of the possibility of such damages. CS and/or Merck’s entire liability and your exclusive remedy shall be, at CS’s discretion a return of any pro-rata portion of the subscription fee. The failure of either party to assert a right hereunder or to insist upon compli-ance with any term or condition of this Agreement shall not constitute a waiver of that right or excuse a similar subsequent failure to perform any such term or condition by the other party.NO OTHER WARRANTIES. CS DISCLAIMS OTHER IMPLIED WARRANTIES, INCLUDING, BUT NOT LIM-ITED TO, IMPLIED WARRANTIES OF MERCHANTABILITY OR FITNESS FOR A PARTICULAR PURPOSE, AND IMPLIED WARRANTIES ARISING BY USAGE OF TRADE, COURSE OF DEALING, OR COURSE OF PERFORMANCE. NOTWITHSTANDING THE ABOVE, WHERE APPLICABLE, IF YOU QUALIFY AS A “CONSUMER” UNDER THE MAGNUSONMOSS WARRANTY ACT, THEN YOU MAY BE ENTITLED TO ANY IMPLIED WARRANTIES ALLOWED BY LAW FOR THE PERIOD OF THE EXPRESS WARRANTY AS SET FORTH ABOVE. SOME STATES DO NOT ALLOW LIMITATIONS ON IMPLIED WARRANTIES, SO THE ABOVE LIMITATION MIGHT NOT APPLY TO YOU. THIS WARRANTY GIVES YOU SPECIFIC LEGAL RIGHTS, AND YOU MAY ALSO HAVE OTHER RIGHTS WHICH VARY FROM STATE TO STATE.
No Waiver. The failure of either party to assert a right hereunder or to insist upon compliance with any term or condition of this Agreement shall not constitute a waiver of that right or excuse a similar subsequent failure to perform any such term or condition by the other party.Governing Law. This Agreement shall be construed according to the laws of the Commonwealth of Massachusetts.Export. You agree that the Software will not be shipped, transferred, or exported into any country or used in any manner prohibited by the United States Export Administration Act or any other export laws, restrictions, or regulations.

End-User License Agreement for CambridgeSoft Database ProductsImportant: This CambridgeSoft End-User License Agreement is a legal agreement between you (either an individual or a single entity) and CambridgeSoft Corporation for the CambridgeSoft sup-plied database product(s) and may include associated media, printed materials, and “online” or elec-tronic documentation. By using the database product(s) you agree that you have read, understood and will be bound by this license agreement.
Database Product License1. Copyright Notice. The materials contained in CambridgeSoft Database Products, including but not limited to, ChemACX, ChemIndex, and The Merck Index, are protected by copyright laws and international copyright treaties, as well as other intellectual property laws and treaties. Copyright in the materials contained on the CD and internet subscription products, including, but not limited to, the textual material, chemical structures representations, artwork, photographs, computer software, audio and visual elements, is owned or controlled separately by CambridgeSoft Corporation (“CS”).CS is a distributor (and not a publisher) of information supplied by third parties. Accordingly, CS has no editorial control over such information. Database Suppliers (“Supplier”) individually own all right, title, and interest, including copyright, in their database—and retain all such rights in providing information to Customers.The materials contained in The Merck Index are protected by copyright laws and international copy-right treaties, as well as other intellectual property laws and treaties. Copyright in the materials con-tained on the CD and internet subscription products, including, but not limited to, the textual material, chemical structures representations, artwork, photographs, computer software, audio and visual elements, is owned or controlled separately by the Merck & Co., Inc., (“Merck”) and CambridgeSoft Corporation (“CS”).2. Limitations on Use. Except as expressly provided by copyright law, copying, redistribution, or publication, whether for commercial or non-commercial purposes, must be with the express permis-sion of CS and/or Merck. In any copying, redistribution, or publication of copyrighted material, any changes to or deletion of author attribution or copyright notice, or any other proprietary notice of CS, Merck, or other Database producer are prohibited.3. Grant of License, CD/DVD Databases. CambridgeSoft Software Products are licensed, not sold. CambridgeSoft grants and you hereby accept a nonexclusive license to use one copy of the enclosed Software Product (“Software”) in accordance with the terms of this Agreement. This licensed copy of the Software may only be used on a single computer, except as provided below. You may physi-cally transfer the Software from one computer to another for your own use, provided the Software is in use (or installed) on only one computer at a time. If the Software is permanently installed on your computer (other than a network server), you may also use the Software on a portable or home com-puter, provided that you use the software on only one computer at a time. You may not (a) electroni-cally transfer the Software from one computer to another, (b) distribute copies of the Software to
others, or (c) modify or translate the Software without the prior written consent of CambridgeSoft, (d) place the software on a server so that it is accessible via a public network such as the Internet, (e) sublicense, rent, lease or lend any portion of the Software or Documentation, or (f) modify or adapt the Software or merge it into another program. The Software may be placed on a file or disk server connected to a network, provided that a license has been purchased for every computer with access to that server. You may make only those copies of the Software which are necessary to install and use it as permitted by this agreement, or are for purposes of backup and archival records; all copies shall bear CambridgeSoft’s copyright and proprietary notices. You may not make copies of any accompa-nying written materials.4. Assignment Restrictions for CD/DVD databases. You may not rent, lease, or otherwise sublet the Software or any part thereof. You may transfer on a permanent basis the rights granted under this license provided you transfer this Agreement and all copies of the Software, including prior versions, and all accompanying materials. The recipient must agree to the terms of this Agreement in full and register this transfer in writing with CambridgeSoft.5. Revocation of Subscription Access. Any use which is commercial and/or non-personal is strictly prohibited, and may subject the Subscriber making such uses to revocation of access to this Paid Sub-scription Service, as well as any other applicable civil or criminal penalties. Similarly, sharing a Sub-scriber password with a non-Subscriber or otherwise making this Paid Subscription Service available to third parties other than the Authorized User as defined above is strictly prohibited, and may sub-ject the Subscriber participating in such activities to revocation of access to the Paid Subscription Services; and, the Subscriber and any third party, to any other applicable civil or criminal penalties under copyright or other laws. In the case of an authorized site license, a Subscriber shall cause any employee, agent or other third party which the Subscriber allows to use the Paid Subscription Service materials to abide by all of the terms and conditions of this Agreement. In all other cases, only the Subscriber is permitted to access the Paid Subscription Service materials. Should CambridgeSoft become aware of any use that might cause revocation of the license, they shall notify the Subscriber. The Subscriber shall have 90 days from date of notice to correct such violation before any action will be taken.6. Trademark Notice. THE MERCK INDEX ® is a trademark of Merck & Company Incorporated, Whitehouse Station, New Jersey, USA and is registered in the United States Patent and Trademark Office. CambridgeSoft ® and ChemACX are trademarks of CambridgeSoft Corporation, Cambridge, Massachusetts, USA and are registered in the United States Patent and Trademark Office, the Euro-pean Union (CTM), Japan, and other markets.Any use of the marks in connection with the sale, offering for sale, distribution or advertising of any goods and services, including any other Web site, or in connection with labels, signs, prints, pack-ages, wrappers, receptacles or advertisements used for the sale, offering for sale, distribution or advertising of any goods and services, including any other Web site, which is likely to cause confu-sion, to cause mistake or to deceive, is strictly prohibited.

7. Modification of Databases, Web sites, or Subscription Services. CS reserves the right to change, modify, suspend or discontinue any or all parts of any Paid Subscription Services and databases at any time.8. Representations and Warranties. The User shall indemnify, defend and hold CS, Merck, and/or other Supplier harmless from any damages, expenses and costs (including reasonable attorneys’ fees) arising out of any breach or alleged breach of these Terms and Conditions, representations and/or warranties herein, by the User or any third party to whom User shares her/his password or otherwise makes available this Subscription Service. The User shall cooperate in the defense of any claim brought against CambridgeSoft, Merck, and/or other Database Suppliers.In no event shall CS, Merck, and/or other Supplier be liable for any indirect, special, or consequential damages, such as, but not limited to, loss of anticipated profits or other economic loss in connection with or arising out of the use of the software by you or the services provided for in this agreement, even if CS, Merck, and/or other Supplier has been advised of the possibility of such damages. CS and/or Merck’s entire liability and your exclusive remedy shall be, at CS’s discretion a return of any pro-rata portion of the subscription fee.The failure of either party to assert a right hereunder or to insist upon compliance with any term or condition of thisAgreement shall not constitute a waiver of that right or excuse a similar subsequent failure to per-form any such term or condition by the other party.This Agreement shall be construed according to the laws of the Commonwealth of Massachusetts, United States of America.


Q: IS IT OK TO COPY MY COLLEAGUE’SSOFTWARE?NO, it’s not okay to copy your colleague’s
software. Software is protected by federal copyright law,which says that you can't make such additional copieswithout the permission of the copyright holder. Byprotecting the investment of computer softwarecompanies in software development, the copyright lawserves the cause of promoting broad public availability ofnew, creative, and innovative products. These companiesdevote large portions of their earnings to the creation ofnew software products and they deserve a fair return ontheir investment. The creative teams who develop thesoftware–programmers, writers, graphic artists andothers–also deserve fair compensation for their efforts.Without the protection given by our copyright laws, theywould be unable to produce the valuable programs thathave become so important to our daily lives: educationalsoftware that teaches us much needed skills; businesssoftware that allows us to save time, effort and money;and entertainment and personal productivity softwarethat enhances leisure time.
Q: That makes sense, but what do I get out ofpurchasing my own software?
A: When you purchase authorized copies of softwareprograms, you receive user guides and tutorials, quickreference cards, the opportunity to purchaseupgrades, and technical support from the softwarepublishers. For most software programs, you can readabout user benefits in the registration brochure orupgrade flyer in the product box.
Q: What exactly does the law say about copyingsoftware?
A: The law says that anyone who purchases a copy ofsoftware has the right to load that copy onto a singlecomputer and to make another copy “for archivalpurposes only” or, in limited circumstances, for“purposes only of maintenance or repair.” It is illegalto use that software on more than one computer or tomake or distribute copies of that software for anyother purpose unless specific permission has beenobtained from the copyright owner. If you piratesoftware, you may face not only a civil suit fordamages and other relief, but criminal liability as well,including fines and jail terms of up to one year
Q: So I'm never allowed to copy software for any otherreason?
A: That’s correct. Other than copying the software youpurchase onto a single computer and making anothercopy “for archival purposes only” or “purposes only ofmaintenance or repair,” the copyright law prohibitsyou from making additional copies of the software forany other reason unless you obtain the permission ofthe software company.
Q: At my company, we pass disks around all the time.We all assume that this must be okay since it wasthe company that purchased the software in thefirst place.
A: Many employees don’t realize that corporations arebound by the copyright laws, just like everyone else.Such conduct exposes the company (and possibly thepersons involved) to liability for copyrightinfringement. Consequently, more and morecorporations concerned about their liability havewritten policies against such “softlifting”. Employeesmay face disciplinary action if they make extra copiesof the company’s software for use at home or onadditional computers within the office. A good rule toremember is that there must be one authorized copyof a software product for every computer upon whichit is run
Q: Can I take a piece of software owned by mycompany and install it on my personal computer athome if instructed by my supervisor?
A: A good rule of thumb to follow is one softwarepackage per computer, unless the terms of the licenseagreement allow for multiple use of the program. Butsome software publishers’ licenses allow for “remote”or “home” use of their software. If you travel ortelecommute, you may be permitted to copy yoursoftware onto a second machine for use when you arenot at your office computer. Check the license care-fully to see if you are allowed to do this.
Q: What should I do if become aware of a companythat is not compliant with the copyright law or itssoftware licenses?
A: Cases of retail, corporate and Internet piracy or non-compliance with software licenses can be reported onthe Internet at http://www.siia.net/piracy/report.aspor by calling the Anti-Piracy Hotline:(800) 388-7478.

Q: Do the same rules apply to bulletin boards and usergroups? I always thought that the reason they gottogether was to share software.
A: Yes. Bulletin boards and user groups are bound by thecopyright law just as individuals and corporations.However, to the extent they offer shareware or publicdomain software, this is a perfectly acceptablepractice. Similarly, some software companies offerbulletin boards and user groups special demonstrationversions of their products, which in some instancesmay be copied. In any event, it is the responsibility ofthe bulletin board operator or user group to respectcopyright law and to ensure that it is not used as avehicle for unauthorized copying or distribution.
Q: I'll bet most of the people who copy software don'teven know that they're breaking the law.
A: Because the software industry is relatively new, andbecause copying software is so easy, many people areeither unaware of the laws governing software use orchoose to ignore them. It is the responsibility of eachand every software user to understand and adhere tocopyright law. Ignorance of the law is no excuse. Ifyou are part of an organization, see what you an do toinitiate a policy statement that everyone respects.Also, suggest that your management considerconducting a software audit. Finally, as an individual,help spread the word that users should be “softwarelegal.”
Q: What are the penalties for copyright infringement?
A: The Copyright Act allows a copyright owner torecover monetary damages measured either by: (1) itsactual damages plus any additional profits of theinfringer attributable to the infringement, or (2)statutory damages, of up to $150,000 for each copy-righted work infringed. The copyright owner also hasthe right to permanently enjoin an infringer fromengaging in further infringing activities and may beawarded costs and attorneys’ fees. The law alsopermits destruction or other reasonable disposition ofall infringing copies and devices by which infringingcopies have been made or used in violation of thecopyright owner’s exclusive rights. In cases of willfulinfringement, criminal penalties may also be assessedagainst the infringer.
SIIA also offers a number of other materials designed tohelp you comply with the Federal Copyright Law. Thesematerials include:
"It's Just Not Worth the Risk" video.This 12–minute video, available $10, has helped over20,000 organizations dramatize to their employees theimplications and consequences of software piracy.
“Don’t Copy that Floppy” videoThis 9 minute rap video, available for $10, is designedto educate students on the ethical use of software.
Other education materials including, “Software Useand the Law”, a brochure detailing the copyright lawand how software should be used by educationalinstitutions, corporations and individuals; and severalposters to help emphasize the message that unauthorizedcopying of software is illegal.
To order any of these materials, please send your request to:
“SIIA Anti-Piracy Materials”Software & Information Industry Association1090 Vermont Ave, Sixth Floor,Washington, D.C. 20005(202) 289-7442
We urge you to make as many copies as you would likein order to help us spread the word that unauthorizedcopying of software is illegal.

Chem & Bio Draw Chem & Bio OfficeManuals:
Includes:
Data
base
sDe
skto
p Ap
plic
atio
nsSo
ftwar
eW
orkg
roup
Sol
utio
ns
A Guide to CambridgeSoft ManualsWorkgroup Solutions
Chem & Bio Office
ChemBio 3D and DatabasesFinder & BioViz
Chem & BioDrawing Standard
Chem & Bio Draw ■
Chem & Bio 3D ■
Chem & Bio Finder ■
BioAssay Desktop ■
BioViz Desktop ■
Inventory Desktop ■
E-Notebook Desktop ■
ChemDraw/Excel ■
Struct = Name ■
ChemNMR ■
CombiChem/Excel ■
ChemFinder/Office ■
MOPAC, GAMESS, MM2 ■
CS Gaussian, Jaguar Interface ■
CombiChem/E-Notebook ■
BioAssay Workgroup ■
BioSAR Enterprise ■
Inventory Workgroup ■
Formulations & Mixtures ■
Compliant SDMS ■
The Merck Index ■
R&D Insight/Chemists ■
ChemINDEX Database, NCI, AIDS & Cancer ■
Traditional Chinese Medicines ■
Drugs: Synonyms & Properties ■
Nanogens Index; Medicinal Chemistry ■
ChemACX, ChemMSDS Database ■
Sigma-Aldrich MSDS ■
ChemReact500, ChemReact68 & ChemSynth ■
Including E-Notebook
Desktop Software

Chem & Bio Draw 12.0 iUser Guide
ContentsWhat’s New ..............................................1
Chapter 1Introduction..............................................3
The ChemDraw Series............................... 3The BioDraw Series .................................. 3
About This Manual .................................4Conventions for this guide......................... 4Additional Information.............................. 4
Learning Chem & Bio Draw...................5Chemical structures in Excel..................... 5Converting Structures to Names ............... 5About ChemNMR....................................... 5
Chapter 2Getting Started.........................................7
Installing Chem & Bio Draw ..................7System Requirements................................. 7Site License Networks................................ 7
The Work Area .......................................7Toolbars ..................................................8
The Main Toolbar...................................... 8Tearing Off Toolbars................................. 8Docking and Floating................................ 9BioDraw Toolbar ...................................... 9
Documents ..............................................9Creating Documents.................................. 9Opening Documents .................................. 9Discarding Changes.................................. 9Undo, Redo, and Repeat............................ 9Saving Documents ................................... 10Selecting an open document.................... 10
Windows ...............................................10
The Info Window ......................................10Periodic Table..........................................10Character Map.........................................11
Chapter 3Basic Drawings....................................... 13
Bonds .................................................... 13Fixed Bonds..............................................13Bond Types...............................................14Editing Bonds...........................................15
Captions and Atom labels ..................... 16Formatting captions and labels ...............17Hotkeys and Nicknames ...........................18Expanding Nicknames..............................19Annotations ..............................................20Setting Preferences ..................................20
Rings ..................................................... 21Spiro and sprout rings..............................21Aromatic Structures .................................22
Acyclic Chains...................................... 22Arrows and Shapes ............................... 23
Arrows......................................................23Drawing Elements....................................25The Bracket Tools palette ........................26Framing Objects ......................................27Pen Tools..................................................27Selecting Objects......................................27Resizing Objects.......................................29Rotating Objects.......................................29Moving Objects ........................................30Copying Objects.......................................30Deleting Objects.......................................30Joining Objects ........................................31Grouping Objects.....................................31Scaling Objects ........................................32

ii Contents
Centering Objects.................................... 32Aligning Objects...................................... 32Distributing Objects ................................ 32
Check Structure.....................................32Checking copied structures ..................... 33
Chemical Warnings...............................33Disabling chemical warnings.................. 33Warning Preferences............................... 33
Chapter 4BioDraw ..................................................35
BioDraw Tools......................................35BioDraw Templates................................. 35Customizable Objects.............................. 36
Drawing sequences ...............................40Nonlinear sequences ............................... 41Bonding from sequences.......................... 42IUPAC codes ........................................... 42Peptides ................................................... 43Disulfide Bridges..................................... 43
Chapter 5Tutorials..................................................45
Overview...............................................45Tutorial 1: Drawing a Structure ............45Tutorial 2: Using Rings.........................46Tutorial 3: Fischer Projections..............48Tutorial 4: Perspective Drawings .........51Tutorial 5: Newman Projections ...........54Tutorial 6: Stereochemistry ..................56Tutorial 7: Templates............................57
Chapter 6Advanced Drawing Techniques ............59
Mirror Images .......................................59
Coloring objects.................................... 59Coloring groups .......................................60
Labels.................................................... 60Expanding Labels.....................................60Contracting Labels...................................61Multiple atoms..........................................61
Clean Up Structure ............................... 62Attachment Points................................. 63
Multi-Center Bonds..................................63Variable Attachment Points .....................64Viewing Attachment Points ......................64
Atom Numbering .................................. 64Showing Atom Numbers ...........................64Hiding atom numbers...............................64Editing Atom Numbers .............................65Positioning Atom Numbers ......................65
Structure Perspective ............................ 65Flatten Command.....................................66
Mass Fragmentation.............................. 66Synthesis and Retrosynthesis ...................67
Drawing Reactions................................ 67The Reaction Interpreter..........................70
Drawing an Intermediate ...................... 70Templates.............................................. 73
Selecting a template .................................73New Drawings..........................................73Fusing a Template....................................74Customizing Templates ............................74
Defining Nicknames ............................. 75Attachment points.....................................75Deleting Nicknames .................................76Troubleshooting Nicknames.....................76
3D Viewing........................................... 773D Model..................................................77Chem & Bio 3D Preview options.............77
ChemScript ........................................... 78

Chem & Bio Draw 12.0 iiiUser Guide
Chapter 7Naming Structures .................................79
Struct=Name ........................................79Unsupported structures ........................... 79Supported Structures ............................... 79Auto Update............................................. 81
Name=Struct .........................................82Converting Names to Structures ............. 82
Chapter 8Chemistry Features................................85
Chemical Analysis ................................85ChemBioFinder HotLink ......................86
Using the ChemBioFinder HotLink......... 86Stereochemistry ....................................86
Displaying Stereochemistry Indicators ... 86Relative Stereochemistry ......................... 88
Chemical Annotations...........................89Orbitals.................................................... 89Chemical Symbols ................................... 90
Chemical Properties .............................91Viewing Chemical Properties.................. 92
Stoichiometry Grid ..............................92TLC.......................................................93
Rf Display ................................................ 95Resizing Spots.......................................... 95 Custom Spots .......................................... 95
ChemNMR............................................95NMR Shifts............................................... 95Assigning Structures to Spectra .............. 96Viewing Spectral Assignments ................ 96Removing Spectral Assignments.............. 97Custom Shift Correction Data................. 97
Chapter 9ChemDraw/Excel .................................103
Setting Up ChemDraw/Excel ............. 103Importing Tables................................. 103Converting Worksheets ...................... 104
Upgrading Workbooks ...........................104Importing Hit Lists ............................. 104
Error Messages ......................................104Exporting Tables................................. 104Adding Structures ............................... 105
Adding a Structure From a File.............105SMILES Strings ......................................105Adding Structures by Name....................105
Saving Structures ................................ 106Searching ............................................ 106
Opening a database ...............................106Normal Searches ....................................106Similarity Searches ................................106
R-Group Analysis ............................... 107Interpreting Analysis Results .................107
Working with Structures..................... 107Naming Structures..................................107Using the Clipboard...............................108Displaying Structures.............................108
ChemDraw/Excel Functions ............... 108
Chapter 10Query Structures ................................. 119
Search limitations ..................................119Generic Nicknames............................. 119
Generic Nickname Hotkeys....................120Defining Generic Nicknames .................120
Atom Properties .................................. 120Assigning atom properties .....................121Query Indicators ....................................121Removing Atom Properties ....................122Atom Property Options ..........................122
Bond Properties .................................. 127
iv Contents
Assigning Bond Properties.................... 127Viewing Bond Properties ...................... 128Removing Bond Properties.................... 128Bond Property Options.......................... 128
Element Lists ......................................130Element Not-Lists .................................. 130
Polymers .............................................131Setting Bracket Properties .................... 131Bracket Usage ....................................... 132Repeat Pattern....................................... 133
Link Nodes..........................................134Flip Type ............................................... 134
Alternative Groups..............................134Multiple Attachment Points................... 136
Attachment Rank Indicators ...............137Attachment Point Numbering ................ 137
Anonymous Alternative Groups .........138Expand Generic Structures .................138
R-Logic Queries .................................... 139Atom-to-Atom Mapping .....................140Stereochemical Symbols.....................1423D Properties ......................................142Export Compatibility ..........................144
Chapter 11Sharing Information ............................147
The Clipboard .....................................147Text Line Notation................................. 147Drag-and-Drop ..................................... 149
Transferring Objects ...........................149Embedding Objects (Windows) ..........150Exporting ............................................151Importing ............................................152
ISIS™ compatibility .............................. 153Graphics export border preference....... 153File Formats.......................................... 153
Transferring Across Platforms............ 154Macintosh to Windows ...........................155Windows to Macintosh ...........................155
Appendix APreferences and Settings ..................... 157
Theme Options.................................... 157I/Draw ................................................. 157Setting Preferences ............................. 157
Setting the Default Tool .........................158Autosave ................................................158New Lines and Closing Text Boxes ........158Highlight Box Tolerance........................159The ChemDraw Items Folder.................159Accessing Documents Quickly ...............159
Customizing Toolbars......................... 159The toolbar schema................................159The toolbar XML files ............................160Editing the XML files .............................160Editing toolbar icons..............................160
Document and Object Settings ........... 160Default Styles .........................................160Saving Customized Styles.......................161Settings From Other Documents............161Drawing Settings....................................161
Analysis and Properties ...................... 163Formatting Captions ........................... 163
Setting Font parameters.........................163Setting the Baseline Style .......................163Style Indicators ......................................164Specifying Line Spacing .........................164Aligning Text ..........................................164Changing the Default Format ................165
Customizing Hotkeys.......................... 167Working with Color ............................ 168
What you can color ................................169Changing colors.....................................169

Chem & Bio Draw 12.0 vUser Guide
The Color palette................................... 169Removing Colors ................................... 170Templates and Color ............................. 171Saving Color palette Settings ................ 171Printing Background Color................... 171
Document Settings ..............................172Publishing Documents........................... 173
Appendix BPage Layout ..........................................183
The Drawing Area...............................183Setting up Pages..................................183
Paged Document Setup ......................... 183Poster Documents Setup........................ 184Headers and Footers............................. 184Page Setup............................................. 184
Printing................................................184Print Options ......................................... 185Scaling................................................... 185
Saving Page Setup Settings.................18535mm Slide Boundary Guides ............185Viewing Drawings ..............................186
Magnification ........................................ 186The Magnification Control.................... 187Rulers .................................................... 187The Crosshair........................................ 187
Appendix CChemical Interpretation......................189
Chemical Intelligence .........................189Database Conventions.........................189
Bond Conventions ................................. 190Atom Labels........................................... 191Chemically Significant Text .................. 192Charges ................................................. 192Isotopes and Elements........................... 193Radicals................................................. 193
H-Dot/H-Dash........................................194Complexes ..............................................194Multi-center Attachments.......................194Cahn-Ingold-Prelog ...............................194Stereochemical Flags.............................195Polymer Representations .......................196Analysis Messages..................................197
Appendix DProperty Calculations.......................... 201
LogP.......................................................201Henry’s Law...........................................201Molar Refractivity ..................................202CLogP and CMR....................................202Topological Polar Surface Area ............202Other Properties ....................................202
Appendix EChemNMR............................................ 203
ChemNMR Limitations...........................203NMR References.....................................204
Appendix FTechnical Support................................ 205
Locating your serial number..................205
Appendix GShortcuts and Hotkeys ........................ 207
Atom Keys .......................................... 207Bond Hotkeys ..................................... 208Function Hotkeys................................ 208Shortcuts ............................................. 209
File .........................................................209Edit .........................................................209View........................................................209Object .....................................................209Structure.................................................210

vi Contents
Text ........................................................ 210Drawing................................................. 210
Nicknames ..........................................212
Appendix HThe CambridgeSoft Web Site .............215
Registering Online................................. 215User’s Guide ......................................... 215Technical Support ................................. 215
Suppliers on ACX.com ...........................216ACX Structures and Numbers ................216Chem & Bio 3D ActiveX Control...........216SciStore.com...........................................216CambridgeSoft.com ...............................216Using the ChemOffice SDK....................217
Index .......................................... 219

Chem & Bio Draw 12.0 1User Guide
What’s NewChem & Bio Draw has long been the preferred tool for illustrating chemical concepts. Chem & Bio Draw 12.0 introduces a variety of improvements and new features not found in earlier versions. The new features in this latest version of Chem & Bio Draw are briefly described below. You can find more informa-tion on these and other features throughout the manual and online Help.Disulfide Bridges. When you create a disul-fide bond between cysteine residues, Chem & Bio Draw 12.0 will create the disulfide bridge for you. For information, see “Disulfide Bridges” on page 43.Bonding from Sequence Atoms. In Chem & Bio Draw 12.0, you can create bonds from spe-cific atoms in DNA, RNA, and protein sequences. The bonds are retained even if you expand or collapse the sequence labels. See “Bonding from sequences” on page 42.Rotation Centers. Using Chem & Bio Draw 12.0, you can rotate your drawing around an atom, an arbitrary center, or any other location on screen. See “Rotating Objects” on page 29.Export to SVG. In Chem & Bio Draw 12.0, you can export your drawings in the Scalable Vector Graphics (SVG) format. SVG is an XML-based format often used to describe two-dimensional vector graphics. To save a draw-ing as an SVG file, go to File>Save As.Struct>Name Improvements. Ring structure recognition has been greatly improved in the Struct>Name feature for Chem & Bio 12.0. You can now apply Struct>Name to more
complex ring assemblies, fused ring systems, and bridged fused ring systems than was possi-ble with earlier versions of Chem & Bio Draw:
• Struct>Name supports ring assemblies that consist of two or more rings or ring sys-tems.
• Struct>Name in earlier versions of the Chem & Bio Draw supported fused ring systems that consisted of only 2-3 rings. In Chem & Bio Draw 12.0, Struct>Name has been enhanced to recognize much more complex systems.
• Struct>Name supports bridged fused ring systems in Chem & Bio Draw 12.0.
For information on Struct>Name, see “Struct=Name” on page 79.Name>Struct Improvements. Name>Struct in Chem & Bio Draw 12.0 reports whether a chemical name is ambiguous. For example, if you enter “dichloronaphthalene”, Chem & Bio Draw 12.0 displays an isomer of the structure but also report that the name is ambiguous. This new feature is quite useful in an auto-mated environment (such as with ChemScript) where many names are converted at the same time.Enhanced Color Palette. Chem & Bio Draw 12.0 supports 16 million colors.Advanced BioDraw Templates. BioDraw and ChemBioDraw Ultra include a set of high-color templates for creating publication-quality illustrations of biological systems. To open the Advanced BioDraw and other templates, go to

2 What’s New
File>Open Templates>Advanced BioDraw or go to View>Templates.
Just a few of the BioDraw templates that are new in Chem & Bio Draw 12.0.
For more on drawing biological structures, see “BioDraw” on page 35.More Versatile Nicknames. Nicknames have long been a useful feature in Chem & Bio Draw. With new enhancements for version 12.0, the nickname library includes structures that can have an unlimited number of connec-tion points or no connection points at all.ChemScript Support. You can now execute ChemScript scripts in ChemBioDraw Ultra 12.0. Use any of the sample scripts that are provide or create your own. See “ChemScript” on page 78.Customize NMR Data. Chem & Bio Draw 12.0 lets you supplement the ChemNMR data for proton found in Chem & Bio Draw 12.0 with your own data.

Chem & Bio Draw 12.0 3User Guide
IntroductionDesigned for scientists, students, and scientific authors, Chem & Bio Draw 12.0 is a powerful yet easy-to use tool for producing a nearly unlimited variety of biological and chemical drawings. You can create your own drawings or use those provided in the vast library of available templates. Having completed a draw-ing, you can export it to a desktop publishing program, post it on a Web page, or store it in a database.You can use Chem & Bio Draw 12.0 with other CambridgeSoft products:
• ChemBioFinder & BioViz 12.0• Chem & Bio 3D 12.0• Chem & Bio Draw 12.0/Excel• Chem & Bio Office 2009
The ChemDraw SeriesCambridgeSoft is proud to offer ChemDraw, a series of applications designed to help you cre-ate high-quality chemical drawings. The ChemDraw series includes ChemBioDraw Ultra 12.0, ChemDraw Ultra 12.0, ChemDraw Pro 12.0, and ChemDraw Standard 12.0. ChemDraw Standard 12.0 is designed for users who only need a fundamental method for drawing structures. However, if you need a more powerful application, one that is designed for creating advanced chemical struc-tures and analysis, you may consider ChemDraw Pro 12.0 or ChemDraw Ultra 12.0.
If you need an advanced drawing application that also includes the ability to draw biological structures and pathways, you will want to refer to ChemBioDraw Ultra 12.0. ChemBioDraw Ultra 12.0 includes all features that are avail-able in the Chem & Bio Draw 12.0 Series and BioDraw Series.For more information on Chem & Bio Draw 12.0, see www.cambridgesoft.com.
The BioDraw SeriesDesigned to complement the Chem & Bio Draw 12.0 Series, the BioDraw series of appli-cations has been developed specifically for the biology and biochemistry communities of users. The BioDraw series includes:
• BioDraw Pro 12.0• BioDraw Ultra 12.0• ChemBioDraw Ultra 12.0 (also part of the
Chem & Bio Draw 12.0 series)
In addition to all the standard chemical draw-ing tools, the BioDraw series also includes tools specifically designed to illustrate biologi-cal pathway and biochemical structure. For example, use the BioDraw tools to describe binding sites for enzyme inhibitors, illustrate a tRNA structure, or create virtually any other biological drawing. Then, just as in the Chem & Bio Draw 12.0 series, you can export your BioDraw series drawings to your presenta-tions, grant proposals, and publications.
1

4 IntroductionChapter 1
About This ManualThis manual describes all the drawing features in Chem & Bio Draw 12.0 and how to use them. The chapters are organized by task are intended to help you familiarize yourself with Chem & Bio Draw so that you can start using it as quickly as possible.If you are a new user, you may want to first read “Getting Started” on page 7. Then, con-tinue with “Tutorials” on page 45. This section demonstrates most of the features of Chem & Bio Draw 12.0.Some of the material in this manual describes tasks that must be performed in conjunction with other software. For example, instructions for the ChemDraw/Excel describes tasks that must be performed in conjunction with Microsoft Excel. For assistance, consult the Excel online help or user’s guide.
Conventions for this guideThis guide uses several basic conventions to help you quickly learn Chem & Bio Draw 12.0.INSTRUCTIONSInstructions are designed to help you navigate through menus and screens. Items on screen appear in bold. For example, to open a new drawing template:
1. Go to File>Open Templates>Amino Acids.This step asks you to select the File menu, select Open Templates (in the File menu), and then select Amino Acids (in the Open Tem-plates submenu).
TEXTThe manual also uses formatting for different types of information:
NOTE: Notes such as this highlight important information.
TIP: Tips supply useful, “nice to know”, infor-mation supplemental to the main text.
CAUTION
These indicate important information that, if ignored, may lead to data loss or other serious problems.
FEATUREAn asterisk (*) indicates that a feature is avail-able in ChemBioDraw Ultra 12.0, ChemDraw Ultra 12.0, and ChemDraw Pro 12.0 only.A note indicates which features are available in ChemBioDraw Ultra 12.0, BioDraw Ultra 12.0, and BioDraw Pro 12.0 only. Features not identified with a note or asterisk are available in all versions.SHORTCUT KEYSWhen a shortcut key sequence is given, the Windows OS sequence is listed first, followed by the Macintosh OS sequence (example: “Use Shift+Ctrl+G or Shift+Command+G to ungroup objects”).
Additional InformationThese resources are available to help you get started with Chem & Bio Draw 12.0:

Chem & Bio Draw 12.0 5User Guide
QUICK REFERENCE CARDThe QRCs summarize commands and features. The cards are in the back of the Chem & Bio Draw 12.0 printed manual.ONLINE HELPIn Chem & Bio Draw 12.0, press F1 or go to Help>Contents.TOOL TIPSThis is the name or a short description of a tool. To see a tool tip, point to a tool.STATUS BARSee the lower left corner of the Chem & Bio Draw 12.0 window for useful information.
Learning Chem & Bio DrawPerhaps the best way to learn Chem & Bio Draw is to follow the tutorials found in this guide. As you advance beyond the basics, you will find many powerful features to be quite useful in drawing structures. Just a few of the advanced features are described below:
Chemical structures in ExcelChem & Bio Draw 12.0/Excel® provides a unique plug-in to help you manage chemical
structures in Microsoft© Excel© for Windows. Chem & Bio Draw 12.0/Excel enables you to:
• Add structures and data from Chem & Bio Draw 12.0 or a ChemFinder database to an Excel spreadsheet.
• Search using the same features in Chem-Finder.
• Perform calculations on chemical struc-tures.
Converting Structures to NamesOne of the most significant and useful features in Chem & Bio Draw is Struct=Name. Draw or open a chemically correct structure and Chem & Bio Draw displays the IUPAC name. See Chapter 7: “Naming Structures” for more information.
About ChemNMRUse this powerful feature to estimate proton and carbon-13 chemical shifts in molecules you draw. See “ChemNMR” on page 203.

6 IntroductionChapter 1
Chem & Bio Draw 12.0 7User Guide
Getting StartedThis section will help you install Chem & Bio Draw 12.0 and become familiar with the user interface.
Installing Chem & Bio DrawBefore installing Chem & Bio Draw, see the ReadMe.html file and other ReadMe docu-ments on the installation CD-ROM.
System RequirementsRequirements for installing Chem & Bio Draw 12.0 on a Windows® system:Operating System. Windows 2000, XP Pro (32-bit only), Vista (32-bit only).Browsers. Microsoft Internet Explorer 7.x or 6.x, Mozilla Firefox 1.5 and higher, Netscape 7.x, Mozilla 1.xMicrosoft Office. Microsoft Office 2000, Office XP, Office 2003, Office 2007.Screen Resolution. Chem & Bio 3D supports a PC screen resolution of 800 x 600 or higher.
Requirements for install Chem & Bio Draw 12.0 on a Macintosh® system:Operating System. Mac OS X 10.4 PowerPC, Mac OS X 10.4 Intel, Mac OS X 10.5 Pow-erPC/IntelBrowsers. Safari 1.4 and higher, Firefox 1.x, Mozilla 1.7.5 and higher, Netscape 7.0.xScreen Resolution. Chem & Bio 3D supports a screen resolution of 800 x 600 or higher.
Site License NetworksIf you have a site license, see the network installation instructions at:http://www.cambridgesoft.com/services/Desk-topSupport/Documentation/NetworkInstalls/
The Work AreaThe work area appears whenever you launch Chem & Bio Draw 12.0. By default, the work area displays commonly used toolbars, the
2

8 Getting StartedChapter 2
main menu, and document status bar. The work area appears below:
Figure 2.1 ChemBioDraw Ultra work area
ToolbarsTo display or hide a toolbar, select it in the View menu. A check mark appears next to the toolbar name when it is visible.
The Main ToolbarMost common tools are on the main toolbar. These include all tools necessary to draw and edit structures, reactions, and shapes. Go to View>Show Main Toolbar.
Tearing Off ToolbarsThe main toolbar has other toolbars extending from it. You can “tear off” these smaller tool-bars and place them anywhere on your screen.To tear off a toolbar:
1. Click the arrow on the lower right of a tool in the main toolbar.
2. While holding the mouse button down, point to the title bar, and release the button.
a. title barb. Menu barc. BioDraw toolbard. magnification controls
e. document windowf. Main toolbarg. status bar
Chem & Bio Draw 12.0 9User Guide
Docking and FloatingYou can dock or float any of the standard tool-bars. When you dock a toolbar, it becomes attached to the drawing window. Whereas floating toolbars appear in front of the docu-ment window and you can move them where you want.To dock a toolbar, do one of the following:
• Click and drag the toolbar to any edge out-side the drawing window.
• Right-click the toolbar and select Dock Toolbar.
To float a toolbar, do one of the following:
• Click and drag the docked toolbar into the drawing window.
• Right-click the toolbar and select Float Tool-bar.
BioDraw ToolbarThe BioDraw toolbar contains drawing tools for adding biological and biochemical ele-ments to your drawings. BioDraw is available in ChemDraw ActiveX Pro, ChemBioDraw Ultra, and BioDraw (Pro and Ultra versions). See Chapter 4: “BioDraw” for more informa-tion.
DocumentsA document is a workspace where you create and edit structures.
Creating DocumentsYou can create a new document using the default settings, or use a Style Sheet or Statio-nery Pad with customized settings. To create a document, go to File>New Document.
Using StylesTo create a new document using a different style sheet or stationery pad:
1. Go to File>Open Style Sheets.2. Choose a Style Sheet or Stationery Pad
from the list.
Chem & Bio Draw 12.0 provides pre-defined style sheets or stationary pads in the ChemDraw Items folder. For example, the ACS Document 1996 is configured to create documents that are set with the bond lengths, bond width, spacing, and fonts used in the 2-column format of all ACS journals.For a list of the settings stored in these docu-ments, see Appendix A: “Preferences and Set-tings”.
NOTE: Predefined style sheets or stationary pads may restrict your options in unexpected ways. For example, not all Save As... format options are available. For general use, keep the default settings.
Opening DocumentsTo open a document, do one of the following:
• Go to File>Open. In the Open dialog box, select the name and location of the file and click Open.
• In the File menu, choose the document from the list at the bottom.
Discarding ChangesTo retrieve the last saved version of a file, go to File>Revert.
Undo, Redo, and RepeatChem & Bio Draw 12.0 tracks your actions. To undo, redo, or repeat your last action, select the

10 Getting StartedChapter 2
appropriate option in the Edit menu. The num-ber of actions that can be tracked is limited only by the amount of memory (RAM and vir-tual memory) available.
NOTE: Chem & Bio Draw 12.0 tracks only those actions you have performed since you last saved the document.
Saving Documents
1. Go to File>Save.2. Choose a folder in which to store the file.3. Type a file name in the Save As text box.4. Select a file format.5. Click Save.
CAUTION
Chem & Bio Draw 12.0 uses the CDX file for-mat by default. Other formats store a picture of your drawing but may not retain relevant infor-mation. For example, the EPS format does not store the chemical significance of the connec-tions between atoms and bonds.
Selecting an open documentThe Window menu lists all open documents and templates. The document you choose from the list becomes the active window.
WindowsWindows are useful for viewing information about your drawing and even adding informa-tion to it. To show or hide a window, select it in the View menu. Windows cannot be docked. Three commonly used windows are described
below. Other windows are described through-out this guide.
The Info WindowThis window shows the size and position of the pointer and anything you have selected. To show or hide the window, go to View>Show Info Window.Pointer. X and Y display the current mouse coordinates. dX and dY indicate the change in X and Y of a moved selection.Selection. X and Y display the position of a selection. W and H are the width and height.Other. Angle is the angle of a bond or rotation of a selection. Dist is the bond length or the distance a selection has moved. When resizing an object, % indicates the current percentage of the original size.
Periodic TableUse the periodic table to insert atoms into structures. Go to View>Show Periodic Table Window.Click a symbol to highlight the atom and acti-vate the Text tool. Drag across the table to highlight each atom.TO ADD AN ATOMSelect it in the periodic table and click an empty space in the document. The atom appears in its chemically neutral form. For example, carbon appears as CH4 and hydrogen appears as H2.TO LABEL AN ATOMClick an existing unlabeled atom.TO CHANGE THE OXIDATION STATEUsing the symbol for the atom, click the atom in the document window.

Chem & Bio Draw 12.0 11User Guide
TO CHANGE TO A DIFFERENT ATOMSelect the new atom in the periodic table and click the atom in the document you want to change.TO EDIT A LABELTo modify the atom label, double-click the atom in the document window.
NOTE: Some element names conflict with Chem & Bio Draw 12.0 Hotkeys and may not be interpreted correctly.
Character MapUse the character map to add ASCII and other symbols to your document in various font styles. To show or hide the map, go to View>Show Character Map Window.The character map is active only when a text box is open for editing. With a text box open,
mouse over the character map to view a larger version of the characters in the top right corner of the window. Click any character in the table to enter it in the text box. The selected font (shown in the character map window) is applied to that character only. It does not change the active font in the text box.
NOTE: To cancel a selection, drag it to another character before releasing.
The eight most recently used characters appear at the top of the window. These characters retain their font and are not affected by changes to the window. A character may appear more than once in this section if the versions use different fonts. Click the back but-ton to toggle among all the displayed charac-ters.

12 Getting StartedChapter 2
Chem & Bio Draw 12.0 13User Guide
Basic DrawingsChem & Bio Draw 12.0 provides a variety of tools for drawing everything from simple chemical structures to complex reactions. In this section, we introduce basic drawing tech-niques to help you create your first structures. We also explain how to add features such as arrows and shapes to enhance structures and reactions. For more drawing features, see “BioDraw” on page 35 and “Advanced Draw-ing Techniques” on page 59.
BondsThe Main toolbar and Multiple Bonds toolbar offer numerous options for drawing bonds. Some of the tools are for drawing specific types of bonds while others represent nonspe-cific bonds for drawing structures for database queries.
Drawing bondsTo draw the first bond of your structure, select the solid bond tool in the Main toolbar and click in the document window. To draw another bond, click either end of the first bond.
Figure 3.1 Adding a bond to an atom
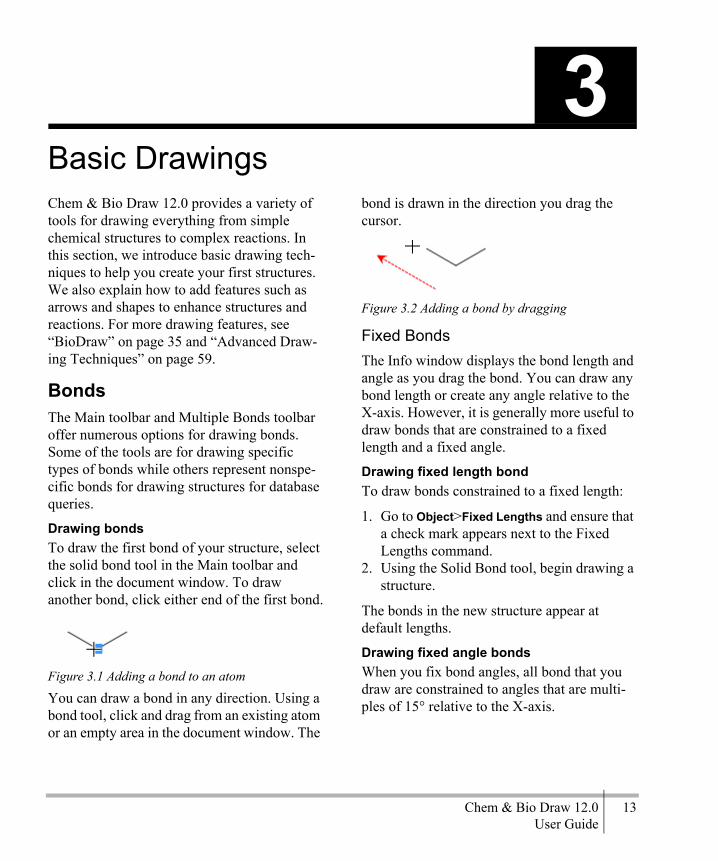
You can draw a bond in any direction. Using a bond tool, click and drag from an existing atom or an empty area in the document window. The
bond is drawn in the direction you drag the cursor.
Figure 3.2 Adding a bond by dragging
Fixed BondsThe Info window displays the bond length and angle as you drag the bond. You can draw any bond length or create any angle relative to the X-axis. However, it is generally more useful to draw bonds that are constrained to a fixed length and a fixed angle.
Drawing fixed length bondTo draw bonds constrained to a fixed length:
1. Go to Object>Fixed Lengths and ensure that a check mark appears next to the Fixed Lengths command.
2. Using the Solid Bond tool, begin drawing a structure.
The bonds in the new structure appear at default lengths.
Drawing fixed angle bondsWhen you fix bond angles, all bond that you draw are constrained to angles that are multi-ples of 15° relative to the X-axis.
3
14 Basic DrawingsChapter 3
1. Go to Object>Fixed Angles and ensure that a check mark appears next to the Fixed Angles command.
2. Select a bond tool.3. Begin drawing a structure.The bonds in the new structure appear at stan-dard 120° angles (relative to the X-axis).
Changing fixed valuesBy default, bond lengths are drawn at .4167 in and bond angles in a chain are shown at 120° by default.To change the default fixed values:
1. Go to File>Document Settings and click the Drawing tab.
2. Enter a value in the Fixed Length text box. Use in, cm, pt, or iu for units (default is .4167 in.).
3. Enter a value in the Chain Angle text box.4. Click OK.
NOTE: To suppress fixed lengths and fixed angles, press the ALT (Windows) or Option (Macintosh) key as you drag the bond.
Bond Types
Double BondsThere are four ways to draw a double bond:
• Draw a bond using the Double bond tool.• Draw a single bond over an existing single
bond.• Using any bond or selection tool, point to
an existing bond and type ‘2’.
• Right-click any bond and select Dou-ble>Plain in the context menu.
Double Either BondsTo draw a double either bond, use the double either bond tool from the Multiple Bonds tool-bar or:
1. Draw a bond using the Wavy Bond tool.2. Click the center of the bond to create a dou-
ble bond.3. Click again to create a double either bond.
Triple BondsThere are three ways to draw a triple bond:
• Draw a bond using the Triple bond tool.• Using the Solid, Dashed, or Bold bond tool,
drag from one end of an existing double bond to the other end.
• Using any bond or selection tool, point to an existing bond and type ‘3’.
Quadruple BondsThere are four ways to draw a quadruple bond:
• Draw a bond using the quadruple bond tool.• Using the Solid, Dashed, or Bold bond tool,
drag from one end of an existing triple bond to the other end.
• Using any bond or selection tool, point to an existing bond and type ‘4’.
To change a quadruple bond into a single bond:
1. Select any bond tool.2. Drag from one end of an existing quadruple
bond to the other. The quadruple bond changes into a single bond corresponding to the tool used to draw over the bond.
You can also draw multiple bonds by right-clicking a bond and selecting the bond type from the shortcut menu, using the bond

Chem & Bio Draw 12.0 15User Guide
properties dialog box, or using Hotkeys. See “Bond Properties” on page 127.
NOTE: To reduce the bond order, select the Eraser tool and click the bond.
Dative and Wedged BondsDative bonds and wedged bonds are drawn with a fixed orientation in a document window.To draw a dative bond:
1. Select the Dative Bond tool.2. Drag from the positive to the negative end
(arrow head) of the dative bond.
To draw a wedged bond:
1. Click one of the wedged bond tools.2. Drag from the narrow end of the wedged
bond to the wide end of the wedged bond.
3.BOND ORIENTATION
• To change the orientation of the wedged bond, click the center of the bond using the wedged bond tool.
• To change the orientation of a dative bond, click the center using the dative bond tool.
NOTE: Chem & Bio Draw 12.0 treats hashed wedged bonds with the narrow end in the plane of the screen and the wide end behind the plane.
Editing BondsYou can modify the appearance of chemical bonds by:
• Changing bond types• Changing bond alignment and orientation• Moving Atoms• Layering bonds
Changing Bond TypesChange a single bond from one type to another by doing either of the following:
• Select a bond tool and click the center of an existing bond.
• Right-click and select the new type from the context menu.
• Ctrl+click the bond.
Changing Double BondsTo change one type of double bond to another:
1. Select the Bold, Dashed, or Solid Bond tool.
2. Click a double bond.
The double bond changes to the new bond type. One of the bonds in the double bond is always a solid or dashed bond.
NOTE: If you click a tautomeric bond (solid/dashed) a second time with the dashed bond tool, you create an aromatic double bond (dashed/dashed).
HO
COOH
CH3
H
HO
COOH
CH3
H
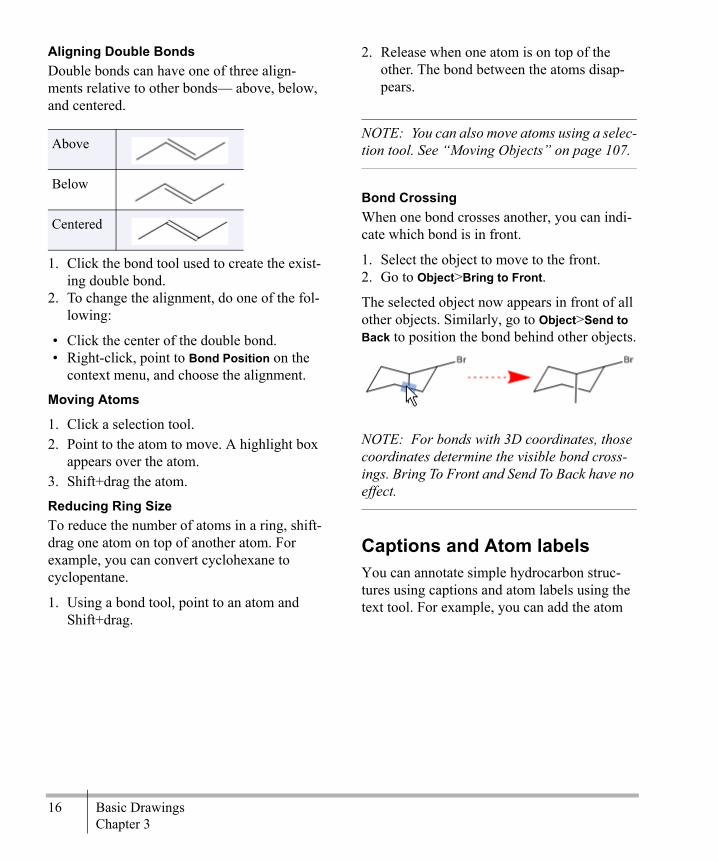
16 Basic DrawingsChapter 3
Aligning Double BondsDouble bonds can have one of three align-ments relative to other bonds— above, below, and centered.
1. Click the bond tool used to create the exist-ing double bond.
2. To change the alignment, do one of the fol-lowing:
• Click the center of the double bond.• Right-click, point to Bond Position on the
context menu, and choose the alignment.
Moving Atoms
1. Click a selection tool.2. Point to the atom to move. A highlight box
appears over the atom.3. Shift+drag the atom.
Reducing Ring SizeTo reduce the number of atoms in a ring, shift-drag one atom on top of another atom. For example, you can convert cyclohexane to cyclopentane.
1. Using a bond tool, point to an atom and Shift+drag.
2. Release when one atom is on top of the other. The bond between the atoms disap-pears.
NOTE: You can also move atoms using a selec-tion tool. See “Moving Objects” on page 107.
Bond CrossingWhen one bond crosses another, you can indi-cate which bond is in front.
1. Select the object to move to the front.2. Go to Object>Bring to Front.
The selected object now appears in front of all other objects. Similarly, go to Object>Send to Back to position the bond behind other objects.
NOTE: For bonds with 3D coordinates, those coordinates determine the visible bond cross-ings. Bring To Front and Send To Back have no effect.
Captions and Atom labelsYou can annotate simple hydrocarbon struc-tures using captions and atom labels using the text tool. For example, you can add the atom
Above
Below
Centered

Chem & Bio Draw 12.0 17User Guide
label “OH” and the caption “Phenol” to a drawing of toluene to create:.
1. Using the Benzene tool, click in the docu-ment window. A benzene ring appears.
2. Using the Solid Bond tool, click one of the benzene carbons to create toluene.
3. Using the Text tool, click the end carbon on the methyl group of toluene. A text box appears.
4. In the text box, type OH.5. Click outside the text box.6. Using the Text tool, click below the draw-
ing and type “Phenol” in the text box.7. Click outside the text box.
To edit the caption or atom label, click in the text box with the text tool and begin typing.
Repeating atom labelsYou can repeat an atom label using the text, bond, or ring tools.
1. Click the Text tool.2. Label a single atom.3. Do one of the following:
• Using the Text tool, double-click another atom.
• Using a bond, ring, or acyclic chain tool, triple-click another atom.
Formatting captions and labelsYou can change a variety of text properties such as color, font, size, and style.
1. Select the text object with a selection tool.2. Go to Object>Object Settings. The object
dialog box opens.3. Click the Captions or Atom Labels tab.4. Select or modify the settings and click OK.5. The change affects only the selected cap-
tion or atom label.
Coloring textYou can color some or all captions and atom labels before or after you type them.
1. Select the Text tool.2. Click where to place the text.3. Choose a color from the Color menu.4. Type the caption or atom label.
You can also color one or more captions or labels or selected parts of them.
1. Select the text to color.2. Choose a color from the Color menu.
Caption widthTo edit the width of a caption:
1. Set a caption using the Text tool. A resize handle appears on the right side of the cap-tion.
2. Drag the resize handle to change the width of the caption.
Deleting LabelsTo delete an atom label, leaving the underlying bonds unchanged, do one of the following:
• Select the Eraser tool and click the atom label.
OH
Phenol

18 Basic DrawingsChapter 3
• With a selection, bond, or ring tool selected, point to the atom label and press the space-bar, Backspace, or Delete key.
About FontsChem & Bio Draw 12.0 uses the fonts installed on your computer. If you open a document that uses fonts that are not installed, the missing fonts are replaced with the installed fonts.
Hotkeys and NicknamesFor simple structures, typing the atomic sym-bol in a text box is easy. However, for compli-cated structures using Hotkeys and Nicknames is easier.
Using HotkeysUsing Hotkeys, you can add functional groups to your structures with one keystroke. For example, to add tert-butyl to the end of a hydrocarbon chain:
1. Draw the chain.2. Hover the cursor where you want the func-
tional group.3. Press ‘3’ (the hotkey for tert-butyl) on the
keyboard. ‘t-Bu’ is added to the structure.4. Select ‘t-Bu’ in the structure and go to
Structure>Expand Label.
Using the Hotkeys n (nitrogen), O (oxygen), and I (iodine), you can turn ethylbenzene into pyridin-2-yl hypoiodite.
You can also label several atoms at a time. For example, you can change neopentane (figure A below) into methanetetraamine (figure B):
To change neopentane into methanetetraamine:
1. Create the neopentane structure.2. Use Shift-click to select all the terminal car-
bon atoms and press n on the keyboard.
For a complete list of Hotkeys, see Shortcuts and Hotkeys in the online Help.
NOTE: The Automatically Rectify Hydrogens in Atom Labels feature (see “Setting Preferences” on page 20) does not affect Hotkeys. To add a substructure, press a hotkey. To change how many hydrogens are added to the substructure, select the hotkey again.
Using NicknamesUsing Nicknames, you can add short names for functional groups to use as an atom label or part of a label. When you label an atom with a nickname, the expanded structure retains its chemical significance.Commonly used nicknames, such as Me, Et, and Ph are stored in your ChemDraw Items folder. You can edit this list within the GUI

Chem & Bio Draw 12.0 19User Guide
(however, you should not attempt to edit this file directly).
NOTE: Nicknames may be edited in ChemDraw Pro, ChemDraw Ultra, or Chem-BioDraw Ultra 12.0 only. See “Generic Nick-names” on page 119.
You can assign Hotkeys to Nicknames. For example, in the Nicknames and Hotkeys pro-vided, the Hotkey “4” labels an atom with “Ph”, which represents a phenyl group.
Applying NicknamesYou may select a nickname from the Nick-names list or type it in manually.To select from the list:
1. Point to an atom.2. Press the Hotkey “=” (equal sign). The
Nickname list appears.3. Select a nickname from the list.
TIP: You can jump to the approximately cor-rect place in the Nickname list by typing the first letter of the Nickname.
4. Click OK.
To type the nickname:
1. Double click an atom with a bond tool or click an atom with the Text tool.
2. Type the nickname in the text box.
NOTE: Nicknames are tokens and do not flip orientation when applied to the left side of a structure when using Automatic Justification. For example, in the absence of a defined Nick-name, the label “OTHP” appears as “PHTO”.
However, since the Nickname “THP” is defined, the label appears as “THPO”. See “Aligning Text” on page 164.
Expanding NicknamesA nickname is a type of label. Therefore, you expand and contract nicknames the same way. When you expand a nickname into its struc-ture, the nickname itself disappears (unless the nickname represents an amino acid or nucleic acid). Trifluoroacetone is shown here:
You can use nicknames to select and help you modify the functional groups they represent. For example, assume you have a chain of three amino acids– glycine, isoleucine, and leucine:
After you expand the nicknames, you can select any of the amino acids by double-click-ing its nickname, as shown:

20 Basic DrawingsChapter 3
To contract nickname, go to Structure>Con-tract Label.
AnnotationsAnnotations are useful for adding text informa-tion that helps to identify your drawing in a database search. Annotations are categorized using keywords. There are several default key-words- Name, Description, Type, and Other Info. You can also add your own keywords.
NOTE: Annotations are available in ChemBio-Draw Ultra 12.0, ChemDraw Ultra 12.0, and ChemDraw Pro 12.0 only.
To annotate an object:
1. Select the object.2. Go to Object>Annotate. The Annotate dia-
log box opens.3. In the Keyword list, do one of the follow-
ing:
• Select a keyword.
• Select Add New Keyword.4. In the Content text box, enter the notes to
apply to the object or drawing.5. Click OK.
Deleting a keywordWhen you delete a keyword, all the notes for that keyword are also deleted.
1. In the Annotate dialog box, select from the Keyword list the keyword.
2. Click Delete Keyword.3. Click OK.
Setting PreferencesYou can specify how the captions and labels look each time you use Chem & Bio Draw 12.0. Go to File>Preferences and click the Building/Display tab. Then, choose from these options:Automatic Atom Label Alignment. when this feature is selected, the alignment of atom labels will adjust according to the positions of any bonds attached to the atom labels. For example, ‘CH3’at the left end of a horizontal bond changes to ‘H3C’.Automatically Rectify Hydrogens in Atom Labels. When this feature is selected, hydro-gens are added or removed from atom labels to preserve standard valences when you change your drawing. For example, if you increase the bond order in ethane to make ethylene, the ‘CH3’ changes to ‘CH2’.
NOTE: The Automatically Rectify Hydrogens in Atom Labels feature does not affect Hotkeys. To add a substructure, press a hotkey. To change how many hydrogens are added to the substruc-ture, select the hotkey again.
Formatting Atom LabelsTo set the default character style for atom labels, go to File>Document Settings and click the Atom Labels tab. You can modify the font
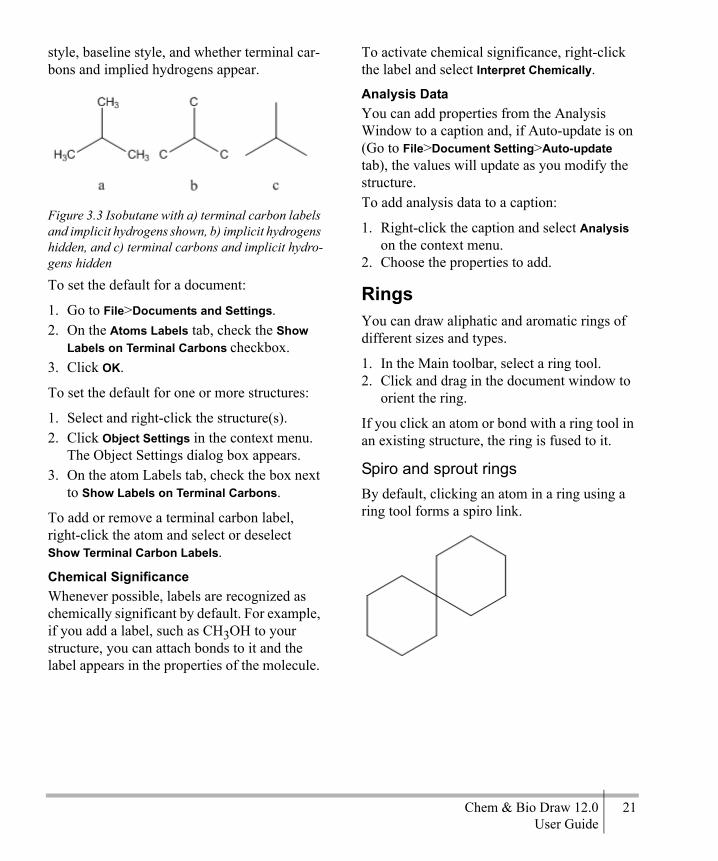
Chem & Bio Draw 12.0 21User Guide
style, baseline style, and whether terminal car-bons and implied hydrogens appear.
Figure 3.3 Isobutane with a) terminal carbon labels and implicit hydrogens shown, b) implicit hydrogens hidden, and c) terminal carbons and implicit hydro-gens hidden
To set the default for a document:
1. Go to File>Documents and Settings.2. On the Atoms Labels tab, check the Show
Labels on Terminal Carbons checkbox.3. Click OK.
To set the default for one or more structures:
1. Select and right-click the structure(s).2. Click Object Settings in the context menu.
The Object Settings dialog box appears.3. On the atom Labels tab, check the box next
to Show Labels on Terminal Carbons.
To add or remove a terminal carbon label, right-click the atom and select or deselect Show Terminal Carbon Labels.
Chemical SignificanceWhenever possible, labels are recognized as chemically significant by default. For example, if you add a label, such as CH3OH to your structure, you can attach bonds to it and the label appears in the properties of the molecule.
To activate chemical significance, right-click the label and select Interpret Chemically.
Analysis DataYou can add properties from the Analysis Window to a caption and, if Auto-update is on (Go to File>Document Setting>Auto-update tab), the values will update as you modify the structure.To add analysis data to a caption:
1. Right-click the caption and select Analysis on the context menu.
2. Choose the properties to add.
RingsYou can draw aliphatic and aromatic rings of different sizes and types.
1. In the Main toolbar, select a ring tool.2. Click and drag in the document window to
orient the ring.
If you click an atom or bond with a ring tool in an existing structure, the ring is fused to it.
Spiro and sprout ringsBy default, clicking an atom in a ring using a ring tool forms a spiro link.

22 Basic DrawingsChapter 3
You can change this behavior so that a sprout bond appears instead:
1. Go to File>Preferences.2. On the Building/Display tab, check the box
next to Sprout Rings Instead of Spiro When Clicking.
Aromatic Structures
Delocalized ringsYou can draw a resonance delocalized ring using any ring tool except for the cyclohexane chairs.
1. Click a ring tool.2. Press the Ctrl (Windows) or Command
(Macintosh) key and drag or click in the document window.
Resonance structuresYou can draw cyclopentadiene or benzene in either of their two orientations:
To draw, click in the document window with either the cyclopentadiene or benzene drawing tool. To draw a different orientation, Shift-click in the drawing window.
Acyclic ChainsTo draw long hydrocarbon chains:
1. Select the Acyclic Chain tool.2. Click and drag in the document window in
the direction you want the chain to grow. The number at the end of the chain indi-cates how many atoms you have drawn.
Changing Chain DirectionTo change the direction as you draw, press the Ctrl or Command key while drawing in the direction you want.
NOTE: Release the mouse button before you release the Ctrl or Command key.
Figure 3.4 Reversing chain direction
NOTE: If Fixed Lengths is off, use Ctrl+Alt or Command+Option to reverse chain direction. Fixed Angles must be on to reverse direction.

Chem & Bio Draw 12.0 23User Guide
FIXED LENGTHWhen Fixed Lengths is on, you can drag the pointer on the acyclic chain tool to make any angle relative to the X-axis. At a constant chain length, the positions of the first bond and all subsequent odd-numbered atoms depend on the direction you drag. Before releasing the mouse button, you can change this position by dragging in the opposite direction.FIXED ANGLEWhen Fixed Angles is on, the angle the acyclic chain makes relative to the X-axis is con-strained to 15-degree increments.
Adding chains to structuresTo add an acyclic chain to an existing struc-ture, click an atom in the structure. Click and drag in the direction you want to draw the chain.
Specifying chain lengthTo specify the exact length of a chain before you draw it:
1. Select the Acyclic Chain tool.2. Click an existing atom or an empty area in a
document window. The Add Chain dialog box appears.
3. Type the number of atoms in the chain.4. Click Add.
To add another chain of the same length any-where in a document window, Alt-click (Win-dows) or Option-click (Macintosh) where you want the chain to begin.
Arrows and ShapesUse the tools and tool palettes on the main toolbar to add shapes to your documents (A tool palette is indicated on the main toolbar by an arrow). You can tear off the palettes and place them where you want.
Objects, except for daggers and some symbols, can be rotated and scaled.
ArrowsYou can customize arrows not only for length and angle, but for arrowhead width and shape. You can also drag an arrow from its middle to create an arc of any length.When you mouse-over an arrow with the Lasso, Marquee, or an Arrow tool selected, the application switches to edit mode and adjust-ment handles appear on the arrow.
Figure 3.5 Arrow adjustment handles
Drag the adjustment handles to change the arrow length, angle, or shape. When changing the angle of an arrow, you are restricted to multiples of 15° if the Fixed Angles is selected. Hold down the Alt or Option key to drag to any angle.
Arrow TypesThere are many arrows types available, letting you add a wide variety of reactions and annota-tions to your drawings.Chem & Bio Draw 12.0 offers a variety of arc types and arrow types, such as crossed (no-go)

24 Basic DrawingsChapter 3
arrows, equilibrium arrows of unequal lengths, and elliptical arcs.ARROW HEADSThere are three arrow head shapes available, solid, hollow, and angled. To change the shape, right-click an existing arrow and choose the new shape from the context menu.ARC ARROWSYou can create an arc arrow one of two ways:
• Click and drag the arc adjustment handle of a straight arrow.
• Select an arc arrow from the Arrows pal-ette.
You can customize arc arrows as easily as straight arrows. Here are a few examples:
Click a modified arrow (with the same arrow tool) to undo all changes to the shape, but not length, of the arrow.
NOTE: Click an unmodified arrow, or one that has had only its length changed, to reverse its direction.
HOLLOW ARROWSYou can rotate hollow arrows as well as change their length and width. Changing the arrowhead width also changes the width of the line segment.You can modify arrows with a context menu. Some of the context menu commands are also available on the Curves menu. Use the Context menu to create arrows for which there are no tools, such as bold-dashed or dipole.CONNECTING ARROWSYou can connect a new arrow to an existing arrow at either end or at the midpoint.
NOTE: The terms “left” and “right” in the context menu are relative, and refer to the direction the arrowhead is pointing.
For example, to draw a new arrow starting at the midpoint of an existing arrow:
1. Select from the Arrows palette an arrow type for the new arrow.
2. Place your cursor over the midpoint of the existing arrow and hold down the Shift key.
3. With the shift key held down, draw the new arrow starting from the existing arrow’s midpoint.

Chem & Bio Draw 12.0 25User Guide
You can also drag existing arrows and connect them. Here are a few examples:
Finally, arrows can be rotated with the Struc-ture Perspective tool as well as the Lasso or Marquee. Combining these methods lets you draw an unlimited number of arrows that are otherwise difficult to create.EQUILIBRIUM ARROWSFor equilibrium arrows, changing the length changes both arrows proportionately; changing the shape of the arrowhead changes both arrowheads identically. To change the length of only one arrow, hold down the Alt or Option key. Two new adjustment handles appear. When you have created a unbalanced equilib-rium arrow, only the shorter side can be adjusted further..
Drawing ElementsDrawing elements are simple shapes such as circles and rectangles that you can add to your drawing. Drawing elements cannot belong to a structure. Therefore, if you double-click on a bond, atom, or atom label with a drawing tool, they are not selected. To group drawing ele-ments with a structure, go to Object>Group. See “Grouping Objects” on page 31.The Info window indicates the length and angle relative to the X-axis while you use any of the drawing element types.
1. Select a rectangle tool from the Drawing Elements toolbar.
2. Click and drag the box to the size you want.
Circles and OvalsTo draw a circle or oval:
1. Select one of the circle or oval tools.2. Point to where you want the center of the
circle.3. Drag outward from the center.RESIZING AND ROTATINGYou can modify rectangles, circles, and ovals the way you modify arrows.
1. Point to a shape with its drawing tool or a selection tool to display adjustment han-dles.
2. Click and drag to modify the shape.
Circles have only a radius adjustment, but you can resize and reshape ovals and rectangles for both length and width. Rectangles also have corner handles that adjust length and width proportionately.
LinesLines drawn with the line tool differ in two sig-nificant ways from bonds drawn with the bond tools:

26 Basic DrawingsChapter 3
• Lines are not included in chemical interpre-tation of the drawing
• Lines that cross appear solid, bonds do not.
To draw a line:
1. In the Drawing Elements toolbar, select a line tool.
2. Click and drag in the drawing window where you want the line.
ArcsUse the Arc tools to draw solid or dashed arcs of different angles: 90°, 120°, 180°, and 270°.To draw an arc:
1. Do one of the following:
• In ChemDraw Standard, point to an Arc tool and drag in the palette to select the angle.
• In other Chem & Bio Draw 12.0 applica-tions, point to the Drawing Elements tool and drag in the tool palette to select the angle.
2. Drag from left to right (for a convex arc) or from right to left (for a concave arc).
EDITING ARCSTo resize or rotate an arc.
1. Position the Arc tool over the arc. Drag points appear on the ends and in the middle.
2. Drag either end of the arc to change its length.
3. Drag the center point to change the curva-ture.
4. Use a selection tool to change its size or ori-entation.
The Info window indicates the distance between the ends of the arc and the angle the clockwise end makes with the X-axis.
When you drag the resize handle, the Info win-dow indicates the percentage enlarged or reduced. When you drag the Rotation handle, the Info window indicates the degree rotated.
The Bracket Tools paletteBrackets includes braces { }, brackets [ ], and parentheses ( ).
Single BracketsYou can draw a single bracket in any orienta-tion. Select a single bracket tool from the Drawing Elements palette.
1. Point where you want the bracket to start.2. Drag from one end of the bracket to the
other end.
Paired BracketsPaired brackets can only be placed in a vertical orientation. A rectangle or box defines their position.To draw a paired brackets:
1. Select a paired bracket tool from the Draw-ing Elements palette.
2. Point where you want a corner of the bracket.
3. Drag from one corner of the box diagonally to the opposite corner.
DaggersTo draw a dagger:
1. Select a dagger tool from the Brackets pal-ette.
2. Click in the drawing window.
NOTE: To change the size of the dagger size edit the Atom Label font size in the Text Settings dialog box.

Chem & Bio Draw 12.0 27User Guide
Framing ObjectsYou can enclose your drawings or group struc-tures with a rectangle, brackets, parentheses, or braces.To enclose your object:
1. Select the drawing to enclose.2. Go to Object>Add Frame
Pen ToolsThe pen tools are useful for drawing freehand curves and shapes. To draw a curve, select the Draw curve tool on the Main toolbar (or go to View>Other Toolbars>Pen Tools). Then, click and drag your cursor across the drawing win-dow.
NOTE: The pen tools are available in ChemBioDraw Ultra 12.0, ChemDraw Ultra 12.0, and ChemDraw Pro 12.0 only.
Editing curvesTo edit a curve, click it using the Edit Curve tool. To change the shape, click and drag a handle. You can also change its size and color.
Freehand ShapesTo create a closed freehand shape, draw a curve and go to Curves>Closed. To add curve
properties, select Filled, Faded, or Shaded under the Curve menu. To add color, select a color in the Color menu.
Figure 3.6 A freehand curve with different proper-ties applied; A) A simple curve; B) enclosed; C) filled; D) faded; E) shaded.
Selecting ObjectsUse the Lasso or the Marquee tool to select any object. You use the Lasso for freehand selec-tion and the Marquee to select rectangular regions.To set one selection tool to behave like the other, click the Lasso or Marquee tool while holding the Alt or Option key down.To toggle a selection tool and the last drawing tool used, press Ctrl+Alt+Tab or Com-mand+Option+tab.If you haven’t used either selection tool, it defaults to the Lasso tool.When you select a structure or object, the selection is displayed with a light blue frame

28 Basic DrawingsChapter 3
around it with three types of selection handles. with a resize handle on each side and corner.
Figure 3.7 A) Drag this handle to rotate the object; B) Drag any corner to resize; C) Drag any side handle to distort.
The Lasso ToolUse the Lasso tool to make freehand selection of irregular areas.To select objects using the Lasso tool:
1. Select the Lasso tool.2. Press the mouse button while the pointer is
not over any object.3. Drag around part of a structure or other
object.
As you drag, a line appears that defines the selection area. Bonds, structures, or other objects are selected only if they are entirely within this area. The end points of the Lasso are connected when you release the mouse but-ton.
The Marquee ToolUse the Marquee tool to select objects and structures within a rectangular area.
1. Select the Marquee tool.2. Click and drag diagonally over the struc-
tures or other object.
As you drag, a rectangle appears that defines the selection area. Bonds and other objects are
selected only if they are entirely within the rectangle.
Selecting entire structuresTo select an entire chemical structure, dou-ble-click a bond or atom in the structure using a selection tool.If the chemical structure or other object is part of a group, the group is selected.
Selecting objects by clicking
1. Select the Lasso or the Marquee tool.2. Point to an object in a document window.A highlight box appears over the selected object. If you point at a bond, the highlight box appears over the length of the bond.3. Click the object.
The selected objects appear within the Selec-tion Rectangle and the cursor changes to a hand.
NOTE: If the bond or other object is part of a group you can select it as an individual object. See “Grouping Objects” on page 31.
Selecting multiple objectsWhen you select multiple objects, each object displays a selection box, so that you can see exactly what is chosen.To add more objects to the selection, press Shift and select the other objects.To select all objects, go to Edit>Select All.
Deselecting all objectsTo deselect all objects, do one of the follow-ing:
• Click an empty area outside the selection rectangle.
• Press Esc.

Chem & Bio Draw 12.0 29User Guide
• Select a different tool.• Select another object without holding down
Shift.
Deselecting one objectTo deselect only one of several selected objects, hold down the Shift key and click the object with a selection tool.
NOTE: As shown in the figure below, objects may appear within the borders of the selection rectangle but not be selected.
Figure 3.8 Removing selected objects. Blue dots on the surrounding rings indicate these rings have been selected. The center ring has not been selected.
Resizing ObjectsTo resize a selected object, click and drag a handle.
• resize proportionately by dragging any cor-ner.
• resize with either X-axis or Y-axis distor-tion by dragging any side.
• resize freely (X and Y axis distortion) by holding the Shift key down while dragging.
Rotating Objects
1. Select an object to rotate. The Rotation han-dle is at the top of the selection rectangle.
2. Drag the Rotation handle clockwise or counterclockwise.
To rotate an atom label with a structure, press the Ctrl or Command key while dragging the structure.
NOTE: If an atom is unselected when a struc-ture is rotated, the structure rotates around the unselected atom.
To rotate a selected object by a specified angle:
1. Do one of the following:
• Go to Object>Rotate.• Double-click the rotation handle. The
Rotate Objects dialog box appears.
2. Enter a number and click either degrees CW for a clockwise rotation or degrees CCW for counterclockwise rotation.
3. (Optional) To rotate the atom label text, select Rotate Atom Labels.
4. Click Rotate. Objects are rotated around the center of the selection rectangle.
30 Basic DrawingsChapter 3
To repeat the same rotation on any object in the document window:
1. Immediately after rotating an object, select the other objects to rotate.
2. Go to Edit>Repeat Rotate.
Moving the center of rotationBy default, an object turns around its center when you rotate it. However, you can move the center of rotation so that the object rotates around an atom or some other location on the page.To move the center of rotation:
1. Select the object. A center of rotation indi-cator (‘+’) appears in the center of the object.
2. While pressing the ALT key, click and drag the indicator to another location.
3. To rotate the object, click and drag the rota-tion handle.
To reset the center of rotation to its default position, deselect the object.
Moving Objects
1. Select an object to move using a selection tool.
2. Click and drag the object to a new location.To constrain the movement to the horizontal or vertical direction, Shift+drag the selected objects.Small incremental movements are often useful for aligning objects.To move an object a incre-mentally:
1. Select the object.
2. Press an arrow key. The selected object moves 1 point in the direction of the arrow.
NOTE: To move in a larger increment, hold down the Alt or Option key while dragging the object. The selected objects move 10 points in the direction of the arrow.
Moving AtomsYou can move an atom in a chemical structure, click and drag it using a selection tool. The bonds connected to the atom stretch.To move multiple atoms, select only the bonds that have atoms on both ends that you want to move. The unselected bonds attached to the selected atoms are stretched.
NOTE: You can also move atoms using the bond tool used to draw the atom. See “Moving Atoms” on page 16.
Copying Objects
1. Select one or more objects.2. Ctrl+drag or Option+drag the object(s) to
create a copy and position it.
To constrain the copy to move only vertically or horizontally while positioning it, hold down the Shift+Ctrl or Shift+Option keys.
Deleting ObjectsTo delete selected objects, do one of the fol-lowing:
• Press the Delete key.• Go to Edit>Clear.

Chem & Bio Draw 12.0 31User Guide
Joining ObjectsTo join two structures so that they share a bond:
1. Select a bond in the first structure.2. Shift+click to select the bond in the second
structure.3. Go to Object>Join.
To join two structures so that they share an atom:
1. Position the two chemical structures so that the atoms you wish to fuse are oriented near each other.
2. Select the two atoms to be joined.3. Go to Object>Join.
NOTE: Attempts to fuse atoms that are not approximately lined up will lead to incorrect results.
NOTE: When you join two differently colored bonds or atom labels, the color of the front object becomes the color of the resulting joined object. When you join two atoms that are labeled, the front atom label becomes the atom label of the resulting atom. For more informa-tion about front to back ordering of objects, see Chapter : “Page Layout”.
Grouping ObjectsA group is a collection of objects that act as a single object. You can select all grouped objects by double-clicking with a selection tool. Objects within a group can be selected individually and manipulated while still remaining part of the group.
To group objects so that the individual objects in the group cannot be selected, you create an integral group. When you select any object in an integral group, the entire group is selected.Grouping does not lock the position or orienta-tion of objects. Grouped objects maintain their relative positions when they are centered on the page, aligned or distributed.Atoms and bonds making up a single chemical structure are always grouped. If you group part of a structure with other objects, the resulting group contains the entire structure. If you add atoms or bonds to a grouped structure, the new atoms and bonds are part of the group.To group several objects:
1. Select the objects to group using a selection tool.
2. Go to Object>Group.
To select an individual object within a group, move the selection tool over an object until it is highlighted and click once.The object is selected, not the group.To select grouped objects, move the selection tool over an object until it is highlighted and double click it.
Ungrouping ObjectsTo ungroup objects:
1. Select a group.2. Go to Object>Ungroup or right-click the
group and select Group>Ungroup.
Integral GroupsTo create a group so that individual objects cannot be accessed:
1. Select the objects.2. Go to Object>Group.3. Right-click the group and select
Group>Integral.

32 Basic DrawingsChapter 3
To restore an integral group to a regular group:
1. Select the integral group.2. Right-click the group and deselect
Group>Integral.
Scaling ObjectsTo resize objects:
1. Select the object(s).2. Do one of the following:
• Go to Object>Scale.• Double-click a resize handle. The Scale
Objects dialog box appears.
3. Do one of the following
• Select the first option to resize the object so that the bonds are the default length.
• Select the second option to resize the object so that the bonds are the length specified in the text box (you must enter a value.)
• Select the third option to resize the object to a percentage of the current size. A value greater than 100% enlarges it; a value less than 100% reduces it.
4. Click Scale.
Centering ObjectsTo center an object (or group of objects) on the page:
1. Select the object.2. Go to Object>Center on Page.
The selected objects move so that the center of the Selection rectangle is positioned at the cen-ter of the page.
Aligning ObjectsYou can align objects vertically and horizon-tally along their centers or edges.
NOTE: Objects are aligned with the selected object that appears highest on the page.
To align two or more objects:
1. Select the objects.2. Go to Object>Align.
NOTE: If you select only part of a structure or group with a selection tool, only that part is used for the alignment operation, but the entire structure or group is moved.
Distributing ObjectsUse the distribute commands to position three or more objects an equal distance apart.To distribute objects:
1. Select the objects. For reactants and prod-ucts with different shapes, select the parts of the objects to distribute.
2. Go to Object>Distribute, and choose Verti-cally or Horizontally.
Check StructureYou can check structures for errors in valences, atom labels and defined nicknames.
1. Select a structure, part of a structure, or caption.
2. Go to Structure>Check Structure.

Chem & Bio Draw 12.0 33User Guide
If a structure is incorrect, a message win-dow appears.
3. To continue checking the structure, click Ignore. To ignore all subsequent errors, click Ignore All. To stop checking for errors, click Stop.
Checking copied structuresTo analyze a structure on the Clipboard:
1. Go to File>Preferences.2. On the General tab, click the Check Struc-
ture When Copying to Clipboard or Exporting check box.
This change affects all documents.
Chemical WarningsChem & Bio Draw 12.0 checks for correct chemical syntax as you draw. If it finds an error in your structure such as improper valences, a wavy red box appears around the questionable object. The box is displayed on-screen only and does not print.
Disabling chemical warningsWarnings are displayed by default; however, you can turn them off. To disable the automatic display of chemical warnings, go to View>Show Chemical Warnings.To disable the automatic error checking on a specific object, right-click the object and dese-lect Display Warnings on the context menu.When Display Warnings is deselected for an object:
• Red boxes are not displayed for question-able objects.
• Problems are reported by the Check Struc-ture command (Go to Structure>Check Structure).
To view a description of the problem, do one of the following:
• Point at the warning with the mouse to dis-play a tool tip that describes the error.
• Right-click the warning and choose Explain This Warning.
• Select the structure and go to Structure>Check Structure.
Warning PreferencesTo select which types of chemical warnings to display:
1. Go to File>Preferences.2. Click the Warnings tab.3. Select the types of warnings and click OK.

34 Basic DrawingsChapter 3
Chem & Bio Draw 12.0 35User Guide
BioDrawChem & Bio Draw provides a variety of tools for you to create biology related drawings. Before reading this section, you should famil-iarize yourself with the general behavior of Chem & Bio Draw 12.0 drawing tools. See “Basic Drawings” on page 13.
BioDraw ToolsThe BioDraw toolbar contains tools to draw metabolic pathways, such as enzymes and receptors. To display the BioDraw toolbars, go to View>Show BioDraw Toolbar.Standard shapes, such as circles, ellipses, and arrows, can be added from the Drawing Ele-ments tool palette or the Arrows tool palette. You can also use the Curve tool to create cus-tom shapes.As with Chem & Bio Draw 12.0 Drawing Ele-ments, you can change the color of an object with the Color menu, and the line and fill prop-erties with the Curves menu. You can also rotate, or change the size.You create a BioDraw object by either clicking or dragging on the page where you want it to appear. Clicking gives you the default size and shape, dragging allows you to not only to enlarge the object, but also to distort it by drag-ging on the x and y axes. Linear objects elon-gate in the direction they are dragged. The membrane and protein tools (DNA and helix)
add more subunits as they are dragged and dis-play the subunit count.
NOTE: BioDraw tools are available in Chem-BioDraw Ultra 12.0, BioDraw Ultra 12.0, and BioDraw Pro 12.0 only.
BioDraw TemplatesBioDraw and ChemBioDraw Ultra include a variety of templates that are useful for illustrat-ing biological systems in full color for publica-tion. To view the templates, go to File>Open Templates and select the template toolbar you want. A few of the available templates are shown below.
Anatomy templates
4

36 BioDrawChapter 4
Animals
Bio Instruments
Organelles
Microorganisms
For more information on using templates, see “Templates” on page 73.
Customizable ObjectsThe table below describes which BioDraw objects you can customize.When customizing
a BioDraw object, you must use a selection tool or the same tool used to create it.
Tool Customization Options
1-Substrate Enzyme size of the enzyme “mouth”
Receptor width
G-protein, gamma subunit
shape
Helix Protein height, width of the strands, width of the cylin-ders, spacing
DNA height, width of the strands, offset of the second strand, spacing
Membrane (line) size of subunit (The overall length remains constant, and the number of subunits changes in inverse propor-tion to the size.)
Membrane (arc) length, arc, size of subunit
Membrane (ellipse)
size of subunit
Micelle size of subunit
Plasmid map Add/adjust markers and regions
Ribosomes resize, color
tRNA resize, color

Chem & Bio Draw 12.0 37User Guide
These tools cannot be customized:
Membrane Line
1. Select the membrane line tool.2. Click and drag to draw a membrane line of
the size you want or just click for the default size.
When orienting the membrane, note that if Fixed Angles is selected, you are constrained to 15 degree increments. To override the con-straint, hold down the Alt or Option key as you drag.
The membrane line has one adjustment handle, at its center, that you can drag to change the size of the membrane subunits.
Figure 4.1 Drag the cursor to change the size of the membrane subunits.
TIP: To change the length of the membrane, select it and drag the left or right handle of the selection box. You may then deselect it and readjust the subunit size.
Membrane ArcTo create a membrane arc, click and drag in a curve using the Membrane Arc tool.The membrane arc tool has three adjustment handles:
• the handle at the starting point controls the length
• the center handle controls the subunit size• the handle at the leading edge controls the
arc
Helix ProteinsTo create a helix protein:
1. Select the Helix Protein tool.2. Drag in the document window or click to
draw the default size.
When orienting the protein, note that if the Fixed Angles option on the Object menu is selected, you are constrained to 15 degree
2-Substrate Enzyme G-protein, alpha subunit
Ion channel G-protein, beta subunit
Immunoglobulin Golgi body
Endoplasmic reticulum
Mitochondrion
Cloud resize, color

38 BioDrawChapter 4
increments. To override the constraint, hold down the Alt or Option key as you drag.The helix protein has four adjustment handles: height, width of the strands, width of the cylin-ders, and spacing.
Figure 4.2 Adjustment handles on a helix protein. A) height adjustment; B) width of strands; C) width of cylinder; D) spacing between cylinders.
DNA MoleculesTo create a DNA molecule:
1. Select the DNA tool.2. Drag in the work space or click to draw the
default size.
When orienting the DNA, note that if the Fixed Angles option on the Object menu is selected, you are constrained to 15 degree increments. You can override the default by holding down the Alt or Option key as you drag.
DNA has four adjustment handles: height, width of the strands, offset of the second strand, and spacing
Figure 4.3 DNA adjustment handles. A) height adjustment; B) spacing; C) width; D) offset.
Coloring ResiduesAfter you draw a protein or DNA strand, you can color each residue using any of the color-ing options-Shading, Fading, or Filled.
1. Using the Marquee or Lasso tool, select a residue to color.
2. Select the desired color from the Color menu.
3. On the Curves menu, select either Filled, Shaded, or Faded.
tRNATo create a tRNA molecule:
1. Select the tRNA tool.2. Click and drag in the workspace until the
tRNA object is the desired size.
Having drawn the tRNA molecule, you can modify it as desired
Ribosomes A and BThese are two separate tools, available on the BioDraw toolbar.To draw either Ribosome A or Ribosome B:

Chem & Bio Draw 12.0 39User Guide
1. On the BioDraw toolbar, select a Ribosome tool.
2. Click and drag in the workspace until the Ribosome object is the desired size.
Having drawn the object, you can modify its appearance.
Plasmid MapsTo draw a plasmid map, you first enter the number of base pairs you want your map to represent and then add markers.A simple plas-mid map of an infectious R factor is shown below.
NOTE: The tRNA and Plasmid Map tools require ChemBioDraw Ultra or BioDraw Ultra.
CREATING A PLASMID MAP
1. On the BioDraw Toolbar, select the Plasmid Map tool.
2. Click in the drawing window where you want to draw the plasmid map. The Insert Plasmid Map dialog box opens.
3. In the dialog box, enter the number of base pairs you want in the map and click OK. The plasmid map is drawn.
ADDING REGIONSRegions represent the fragments in the plas-mid. You can add as many regions to you map as you want or have none at all.To add regions:
1. Right-click the plasmid map and select Regions in the context menu.
2. In the Regions dialog box, enter in the Start and End text boxes the base pair numbers for a fragment. For example, if a fragment includes all base pairs from 1 to 1000, type 1 and 1000 in the text boxes.
3. If you want the Start and End base pair numbers for the fragment to appear in the drawing, select Add Markers At Region Ends.
4. Click Add.5. To add more regions, repeat steps 2-4.6. Click OK.ADDING MARKERSMarkers let you annotate base pairs in the plas-mid map. For example, to label a specific base pair or fragment, you add a marker to it.To add a marker:
1. Right-click the plasmid map and select Markers in the context menu.
2. In the Markers dialog box, enter in the Posi-tion text box the number for the base pair to which you want to add a marker.
3. In the Label text box, enter the text to iden-tify the marker.
4. click Add.5. Click OK.MOVING MARKERSTo move a marker label, click and drag the label.

40 BioDrawChapter 4
RESIZING REGIONSyou can resize region arrows to indicate differ-ent base pairs or extend them outward to emphasize them.
1. Hover over the end of the region’s arrow using a selection tool. The arrow’s resize handles appear and the cursor changes to a double-arrow ( ).
2. Click and drag a resize handle to adjust the size of the arrow.
You can extend a region’s arrow outward as shown below:
To extend an arrow, click and drag its center handle as indicated by the cursor ( ) in the figure above.ENHANCING THE DRAWINGA plasmid map is like any other drawing. You can add color and shading to it, changing line widths, or modifying its text. You can modify all or part of it.
Drawing sequencesYou can draw protein and RNA sequences using labels assigned to nucleic and amino
acids. Then, you can expand, contract, or remove labels to complete the drawing.To draw a sequence:
1. On the Main Toolbar, click the Sequence icon and choose one of the following sequence tools:
Single-letter amino acid tool. Create a protein chain using a one-letter label to represent each amino acid.Three-letter amino acid tool. Create a protein chain using three-letter amino acid labels.DNA tool. Create a DNA chain using labels that represent each of the nucleic acids.RNA tool. Create an RNA chain using nucleic acid labels.2. Click in the drawing window where you
want to start the sequence. A text box appears.
3. In the text box, enter the single- or three-letter label for the residue.
NOTE: For a list of all residue labels, see “IUPAC codes” on page 42.
4. Repeat step 3 for each residue.5. When your chain is complete, click any-
where in the drawing window or choose a different tool.
EXPANDING SEQUENCESAfter creating a sequence, you can expand the whole sequence or just specific labels.
1. Select one or more labels in the sequence. (Hold down the Shift key to select more than one.)
2. Go to Structure>Expand Label.When you expand a label into its structure, the label appears below the structure.

Chem & Bio Draw 12.0 41User Guide
COLLAPSING LABELSTo collapse the structure back to its label (in the sequence):
1. Double-click the label to select the struc-ture.
2. Go to Structure>Contract Label.
REMOVING RESIDUESWhen you remove a residue, the adjacent labels close, keeping the sequence intact.
1. If the label is expanded, collapse the struc-ture back to its label.
2. Using a sequence tool, double-click the label.
3. Press DELETE on your keyboard.REPLACING RESIDUESTo replace a residue, select the Marquee tool and hover your mouse over it. Then, type the new hotkey.ADDING RESIDUESYou can add one or more residues to an exist-ing sequence.To add a residue:
1. Choose the appropriate sequencing tool.2. Select an existing label you want the new
label to be adjacent to.3. Type the new label. The new label is added
to the right of the existing label.
NOTE: To add a label so that it is the farthest left in the sequence, select the amino group (protein sequence) or 3’ group (DNA/RNA sequence)
CHANGING AMINO ACID TERMINIYou can change the termini in the sequence or even hide them altogether.
To change the termini:
1. Using a selection tool, select the whole sequence.
2. Go to Object>Object Settings.3. In the Object Settings dialog box, select the
Atom Labels tab.4. Under Amino-acid Termini, select either
NH2/COOH or H/OH.5. Click OK.To hide or display the termini:
1. Using a selection tool, select the whole sequence.
2. Go to Object>Object Settings.3. In the Object Settings dialog box, select the
Atom Labels tab.4. Under Amino-acid Termini, select or dese-
lect Show Sequence Termini.5. Click OK.
Nonlinear sequencesBy default, Chem & Bio Draw builds a sequence from left to right across the page as you continue to enter residue codes. However, you can add a carriage return to a sequence so that it continues on the next line, such as:
To create a nonlinear sequence:
1. Draw the sequence.2. Use the sequencing tool to select the resi-
due you want at the end of the first line (such as ‘His’ in the example above).
3. Press ENTER on your keyboard.

42 BioDrawChapter 4
Bonding from sequencesSequence labels typically have two attachment points. However, you can add attachment points so that the sequence branches.For exam-ple:
When you add an attachment point, you spec-ify the atom in the expanded label to which the bond will attach.To bond from a sequence:
1. Draw a bond starting at the sequence label from which you want to create a branch. The Modify Nickname dialog box appears, displaying the sequence structure you selected.
2. In the Modify Nickname dialog box, dou-ble-click the atom in the structure on which you want to add the attachment point. A new attachment point appears.
3. Click OK.
Although you modify the sequence in the Modify Nickname dialog box, the structure for the label in the nickname library does not change.
IUPAC codesUse these codes to enter nucleotides and amino acids in your sequence:
IUPAC nucle-otide code
Base IUPAC amino acid code
Three letter code
Amino acid
A Adenine A Ala AlanineC Cytosine C Cys CysteineG Guanine D Asp Aspartic AcidT (or U) Thymine (or
Uracil)E Glu Glutamic Acid
R A or G F Phe PhenylalanineY C or T G Gly GlycineS G or C H His HistidineW A or T I Ile IsoleucineK G or T K Lys LysineM A or C L Leu LeucineB C or G or T M Met MethionineD A or G or T N Asn AsparagineH A or C or T P Pro Proline
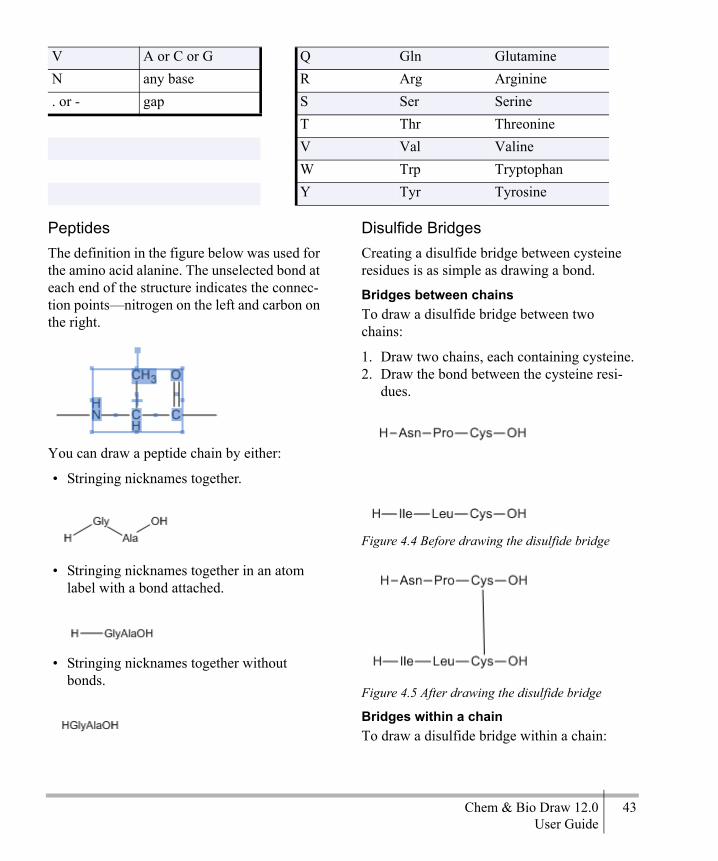
Chem & Bio Draw 12.0 43User Guide
PeptidesThe definition in the figure below was used for the amino acid alanine. The unselected bond at each end of the structure indicates the connec-tion points—nitrogen on the left and carbon on the right.
You can draw a peptide chain by either:
• Stringing nicknames together.
• Stringing nicknames together in an atom label with a bond attached.
• Stringing nicknames together without bonds.
Disulfide BridgesCreating a disulfide bridge between cysteine residues is as simple as drawing a bond.
Bridges between chainsTo draw a disulfide bridge between two chains:
1. Draw two chains, each containing cysteine.2. Draw the bond between the cysteine resi-
dues.
Figure 4.4 Before drawing the disulfide bridge
Figure 4.5 After drawing the disulfide bridge
Bridges within a chainTo draw a disulfide bridge within a chain:
V A or C or G Q Gln GlutamineN any base R Arg Arginine. or - gap S Ser Serine
T Thr ThreonineV Val ValineW Trp TryptophanY Tyr Tyrosine

44 BioDrawChapter 4
1. Draw a chain that includes two cysteine res-idues, such as the one below:
2. Using the single bond tool, draw a bond from one cysteine residue to the other.
The bonded residues appear below:
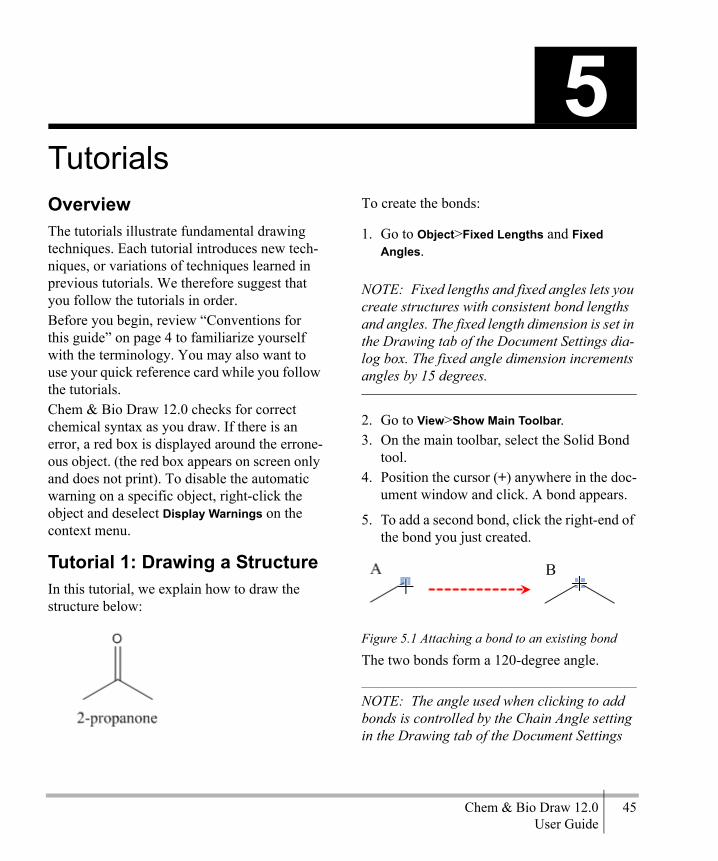
Chem & Bio Draw 12.0 45User Guide
TutorialsOverviewThe tutorials illustrate fundamental drawing techniques. Each tutorial introduces new tech-niques, or variations of techniques learned in previous tutorials. We therefore suggest that you follow the tutorials in order.Before you begin, review “Conventions for this guide” on page 4 to familiarize yourself with the terminology. You may also want to use your quick reference card while you follow the tutorials.Chem & Bio Draw 12.0 checks for correct chemical syntax as you draw. If there is an error, a red box is displayed around the errone-ous object. (the red box appears on screen only and does not print). To disable the automatic warning on a specific object, right-click the object and deselect Display Warnings on the context menu.
Tutorial 1: Drawing a StructureIn this tutorial, we explain how to draw the structure below:
To create the bonds:
1. Go to Object>Fixed Lengths and Fixed Angles.
NOTE: Fixed lengths and fixed angles lets you create structures with consistent bond lengths and angles. The fixed length dimension is set in the Drawing tab of the Document Settings dia-log box. The fixed angle dimension increments angles by 15 degrees.
2. Go to View>Show Main Toolbar.3. On the main toolbar, select the Solid Bond
tool.4. Position the cursor (+) anywhere in the doc-
ument window and click. A bond appears.
5. To add a second bond, click the right-end of the bond you just created.
Figure 5.1 Attaching a bond to an existing bond
The two bonds form a 120-degree angle.
NOTE: The angle used when clicking to add bonds is controlled by the Chain Angle setting in the Drawing tab of the Document Settings
5

46 TutorialsChapter 5
dialog box. If this bond angle cannot be estab-lished, the next smaller and logical bond angle is used.
6. To create a tertiary carbon, click in the same place as you did in step 5.
.
Figure 5.2 Adding a third bondCHANGING BOND ORDERTo create the double bond, either click and drag over the vertical bond you drew in step 6 or simply double-click it.
Figure 5.3 Adding a double bond ADDING ATOM LABELS
1. Using the Text tool, click the end of the double-bond shown below. A text box appears at the end of the bond.
2. Type an uppercase O in the text box.3. Close the text box by either pressing the
Esc key or choosing another tool.
ADDING A CAPTIONWe also want to name the molecule.
1. Using the Text tool, click below and to the left of the structure. A text box appears.
2. In the text box, type “2-propanone”.3. Press Esc or choose another tool.
Tutorial 2: Using RingsIn this tutorial you use rings to create the struc-ture below:
Create a new document:
1. Go to File>New Document.2. Go to File>Save As.3. Type tut2.cdx in the appropriate text box.4. Select a folder in which to save the file.5. Click Save.
Create the ring system:
1. Click the Benzene tool.2. Shift-click in an empty area of the docu-
ment.
NOTE: Hold down the shift key to change resonance structures when using the cyclopentadiene or benzene tools.
3. Point to the center of the lower right bond in the benzene ring.

Chem & Bio Draw 12.0 47User Guide
4. Click to fuse another ring.
Figure 5.4 Fusing rings
5. In the final structure, there is supposed to be only one double bond in the second ring. To correct the current structure, hover the mouse over one of the double bonds in the second ring and type ‘1’. Do the same for the other double bond.
Figure 5.5 To change the bond order, type ‘1’.
6. The create the double bond in the second ring, hover the mouse over the bond and type ‘2’ or simply click it.
7. Using the bond tool, click the carbon atoms circled in the figure below. Three new bonds will appear.
8. Hover your mouse over one of the bond shown below and type ‘2’. Do the same for the other bond.
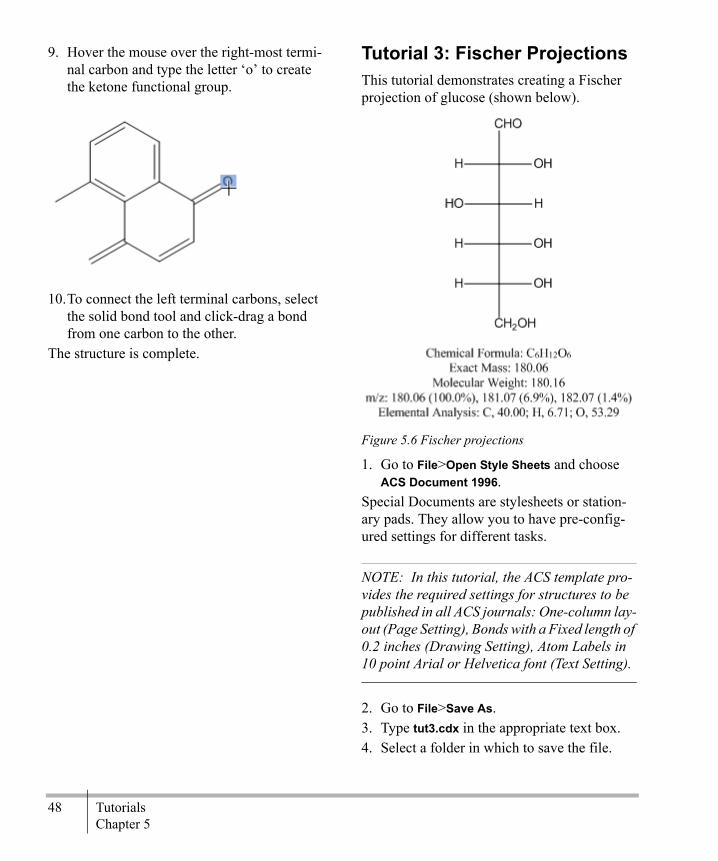
48 TutorialsChapter 5
9. Hover the mouse over the right-most termi-nal carbon and type the letter ‘o’ to create the ketone functional group.
10.To connect the left terminal carbons, select the solid bond tool and click-drag a bond from one carbon to the other.
The structure is complete.
Tutorial 3: Fischer ProjectionsThis tutorial demonstrates creating a Fischer projection of glucose (shown below).
Figure 5.6 Fischer projections
1. Go to File>Open Style Sheets and choose ACS Document 1996.
Special Documents are stylesheets or station-ary pads. They allow you to have pre-config-ured settings for different tasks.
NOTE: In this tutorial, the ACS template pro-vides the required settings for structures to be published in all ACS journals: One-column lay-out (Page Setting), Bonds with a Fixed length of 0.2 inches (Drawing Setting), Atom Labels in 10 point Arial or Helvetica font (Text Setting).
2. Go to File>Save As.3. Type tut3.cdx in the appropriate text box.4. Select a folder in which to save the file.

Chem & Bio Draw 12.0 49User Guide
5. Click Save.
To draw the first bond:
1. Click the Solid Bond tool.2. Point in the document window. Drag down-
ward vertically to draw the first bond.3. Point to the lower atom, and drag down-
ward again to draw the second bond.The red wavy box appears because Show Chemical Warnings is selected. We will keep it selected for now.4. Repeat step 3 three more times to draw a
total of five bonds.
Figure 5.7 Drawing the backbone
NOTE: When you drag the pointer along the length of the bonds, the pointer alternates between an arrow and a cross. The arrow indi-cates you are pointing over the center of a bond, and the cross indicates you are pointing to an atom.
Add horizontal bonds to the second atom in the string of bonds you created:
1. To add a perpendicular bond, point to the uppermost Chemical Warning box and click it.
Note that the red wavy box disappears as soon as you add a bond.2. Click again to add a horizontal bond in the
opposite direction.3. Repeat steps 1 and 2 with each successive
Chemical Warning box until all horizontal bonds are added.
Figure 5.8 Adding horizontal bonds to the backbone
Add labels to the first and last carbon atoms:
1. Select the Text tool.2. Click the uppermost carbon atom to create a
text box, and type CHO.3. Click the lower-most carbon atom, and type
CH2OH.
Figure 5.9 Adding atom labels

50 TutorialsChapter 5
Add the repeating labels for the hydrogens and hydroxyls:
1. Click the atom shown in A below and type the letter H.
2. Double-click each of the other atoms labeled as hydrogen in B.
Figure 5.10 Adding repeating atom labels
TIP: Double clicking with the text tool repeats the last label.
3. Click one of the remaining atoms and type O.oooo
4. Double-click the remaining atoms to repeat the label.
Figure 5.11 Completing the drawing
View the basic properties of the structure and paste the information into your document:
1. Click a selection tool to select the last struc-ture drawn. If the structure is not selected, double-click the structure.
2. Go to View>Show Analysis Window.3. In the Analysis window, click Paste. The
analysis information appears as a caption below the structure.
Figure 5.12 Fischer projection with analysis
Save and close the document:
1. Go to File>Save.2. Go to File>Close.

Chem & Bio Draw 12.0 51User Guide
Tutorial 4: Perspective DrawingsIn this tutorial, we explain how to create a per-spective drawing by creating a model of !–D–glucose as a Haworth projection.
Figure 5.13 Perspective drawings
Create a new document using the default style:
1. Go to File>Open Style Sheets>New Docu-ment.
NOTE: If you are following the tutorials in order, Chem & Bio Draw 12.0 will remember your last drawing used the ACS style sheet and open it as the default. Step 1 resets the default to New Document.
2. Go to File>Save As.3. Type tut4.cdx in the appropriate text box.4. Select a folder in which to save the file.5. Click Save.
Draw a ring:
1. Click the Cyclohexane Ring tool.2. Click in an empty area of a document win-
dow. A cyclohexane ring appears.
Rotate the ring:
1. Go to Edit>Select All (or type Ctrl-A).
2. Go to Object>Rotate (or type Ctrl-R)
3. In the Rotate Objects dialog box, enter 30 degrees for an angle and click Rotate. The cyclohexane ring is rotated.
Change cyclohexane to tetrahydropyran:
1. Click outside the structure to deselect it.2. Point to the atom indicated in the figure
below, and type the letter o.
Figure 5.14 Adding an atom label with a HotKey
Resize horizontally:
1. Go to Edit>Select All (or type Ctrl-A).2. Using a selection tool, click-drag the right
side handle to resize the ring horizontally. Release the mouse button when the ring is is stretched about 200%.
Resize the ring:

52 TutorialsChapter 5
1. Go to Edit>Select All (or type Ctrl-A).2. Click-Drag the ring a corner adjustment
handle increase the size of the ring to 150%. A dialog box appears, asking you whether you want to scale the drawing and text settings.
3. In the dialog box, click No.Add vertical bonds:
1. Click the Solid Bond tool.2. Point to the atom shown in the figure below
and drag upward to create a bond.
3. Point to the same atom, and drag downward to create another bond.
4. Repeat this procedure four more times, add-ing the pairs of vertical bonds shown below:
Create OH labels:You can use the repeating bond label technique in Tutorial 4, or use Hotkeys. For the HotKey method, just point and type “o”. The Text tool
method is repeated here, with a slight varia-tion.
1. Select the Solid Bond tool, point to the atom shown in the figure below and double-click to open a text box.
2. Type OH.
Figure 5.15 Adding the OH labels
3. Move the pointer to the other atoms as shown, and triple-click to repeat the atom label.
TIP: If placing the labels is difficult because of the drawing size, go to View> Magnify.
Add the CH2OH label:
1. Triple-click the upper atom of C5.

Chem & Bio Draw 12.0 53User Guide
2. Press the Enter (Windows) or Return (Mac-intosh) key to open the atom label text box. Type CH2 before the OH.
Figure 5.16 Adding the CH2OH label
NOTE: When used with a bond tool active, Enter (Windows) or Return (Macintosh) is a Hotkey that opens a text box for the last atom labeled.
Change the type of the front bonds:
1. Click the Bold Bond tool.2. Point to the center of the bond shown
below.
3. Click to change to the new bond type.4. The cursor changes to a bold arrow as you
point at the bond.5. Click the Bold Wedge bond tool.6. Click each of the ring bonds adjacent to the
bold bond.
For each bond, point slightly off center in the direction that you want the wide end of the wedge to be oriented and click.
TIP: If you move the pointer too far, the high-light box disappears. If you find placing the pointer difficult, go to View>Magnify.
NOTE: If the wedge is pointed in the wrong direction, click the bond again to flip its orien-tation.
The resulting structure is shown in below:
Save and close the document:
1. Go to File>Save.2. Go to File>Close.
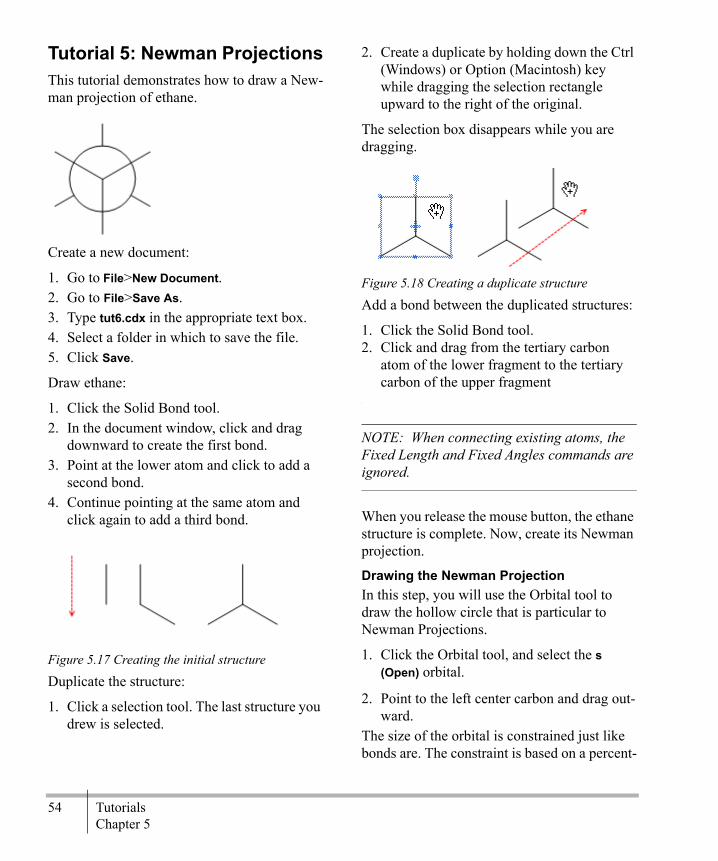
54 TutorialsChapter 5
Tutorial 5: Newman ProjectionsThis tutorial demonstrates how to draw a New-man projection of ethane.
Create a new document:
1. Go to File>New Document.2. Go to File>Save As.3. Type tut6.cdx in the appropriate text box.4. Select a folder in which to save the file.5. Click Save.
Draw ethane:
1. Click the Solid Bond tool.2. In the document window, click and drag
downward to create the first bond.3. Point at the lower atom and click to add a
second bond.4. Continue pointing at the same atom and
click again to add a third bond.
Figure 5.17 Creating the initial structure
Duplicate the structure:
1. Click a selection tool. The last structure you drew is selected.
2. Create a duplicate by holding down the Ctrl (Windows) or Option (Macintosh) key while dragging the selection rectangle upward to the right of the original.
The selection box disappears while you are dragging.
Figure 5.18 Creating a duplicate structure
Add a bond between the duplicated structures:
1. Click the Solid Bond tool.2. Click and drag from the tertiary carbon
atom of the lower fragment to the tertiary carbon of the upper fragment
:
NOTE: When connecting existing atoms, the Fixed Length and Fixed Angles commands are ignored.
When you release the mouse button, the ethane structure is complete. Now, create its Newman projection.
Drawing the Newman ProjectionIn this step, you will use the Orbital tool to draw the hollow circle that is particular to Newman Projections.
1. Click the Orbital tool, and select the s (Open) orbital.
2. Point to the left center carbon and drag out-ward.
The size of the orbital is constrained just like bonds are. The constraint is based on a percent-
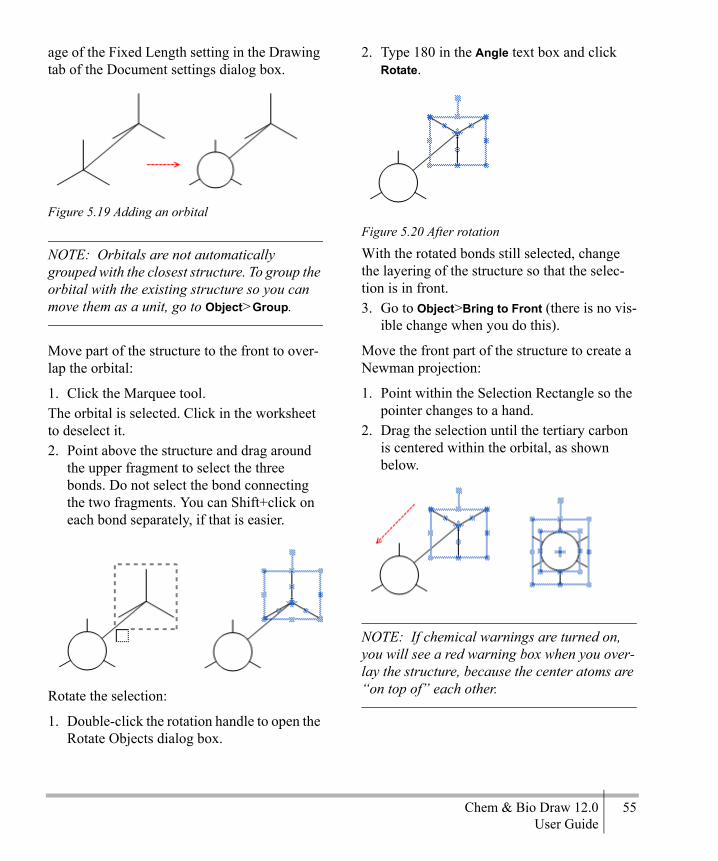
Chem & Bio Draw 12.0 55User Guide
age of the Fixed Length setting in the Drawing tab of the Document settings dialog box.
Figure 5.19 Adding an orbital
NOTE: Orbitals are not automatically grouped with the closest structure. To group the orbital with the existing structure so you can move them as a unit, go to Object>Group.
Move part of the structure to the front to over-lap the orbital:
1. Click the Marquee tool.The orbital is selected. Click in the worksheet to deselect it.2. Point above the structure and drag around
the upper fragment to select the three bonds. Do not select the bond connecting the two fragments. You can Shift+click on each bond separately, if that is easier.
Rotate the selection:
1. Double-click the rotation handle to open the Rotate Objects dialog box.
2. Type 180 in the Angle text box and click Rotate.
Figure 5.20 After rotation
With the rotated bonds still selected, change the layering of the structure so that the selec-tion is in front.3. Go to Object>Bring to Front (there is no vis-
ible change when you do this).
Move the front part of the structure to create a Newman projection:
1. Point within the Selection Rectangle so the pointer changes to a hand.
2. Drag the selection until the tertiary carbon is centered within the orbital, as shown below.
NOTE: If chemical warnings are turned on, you will see a red warning box when you over-lay the structure, because the center atoms are “on top of” each other.
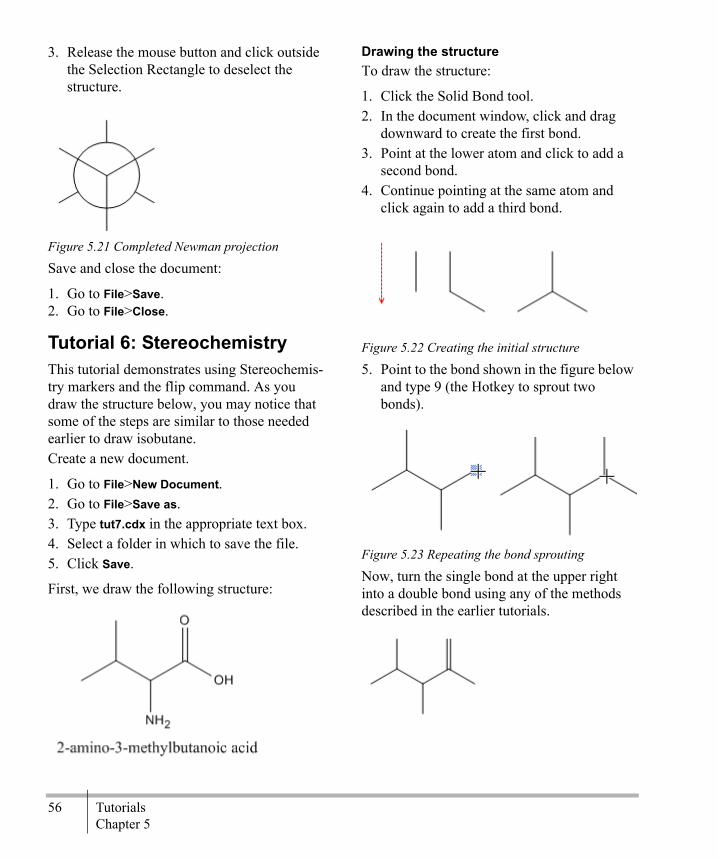
56 TutorialsChapter 5
3. Release the mouse button and click outside the Selection Rectangle to deselect the structure.
Figure 5.21 Completed Newman projection
Save and close the document:
1. Go to File>Save.2. Go to File>Close.
Tutorial 6: StereochemistryThis tutorial demonstrates using Stereochemis-try markers and the flip command. As you draw the structure below, you may notice that some of the steps are similar to those needed earlier to draw isobutane.Create a new document.
1. Go to File>New Document.2. Go to File>Save as.3. Type tut7.cdx in the appropriate text box.4. Select a folder in which to save the file.5. Click Save.
First, we draw the following structure:
Drawing the structureTo draw the structure:
1. Click the Solid Bond tool.2. In the document window, click and drag
downward to create the first bond.3. Point at the lower atom and click to add a
second bond.4. Continue pointing at the same atom and
click again to add a third bond.
Figure 5.22 Creating the initial structure
5. Point to the bond shown in the figure below and type 9 (the Hotkey to sprout two bonds).
Figure 5.23 Repeating the bond sprouting
Now, turn the single bond at the upper right into a double bond using any of the methods described in the earlier tutorials.
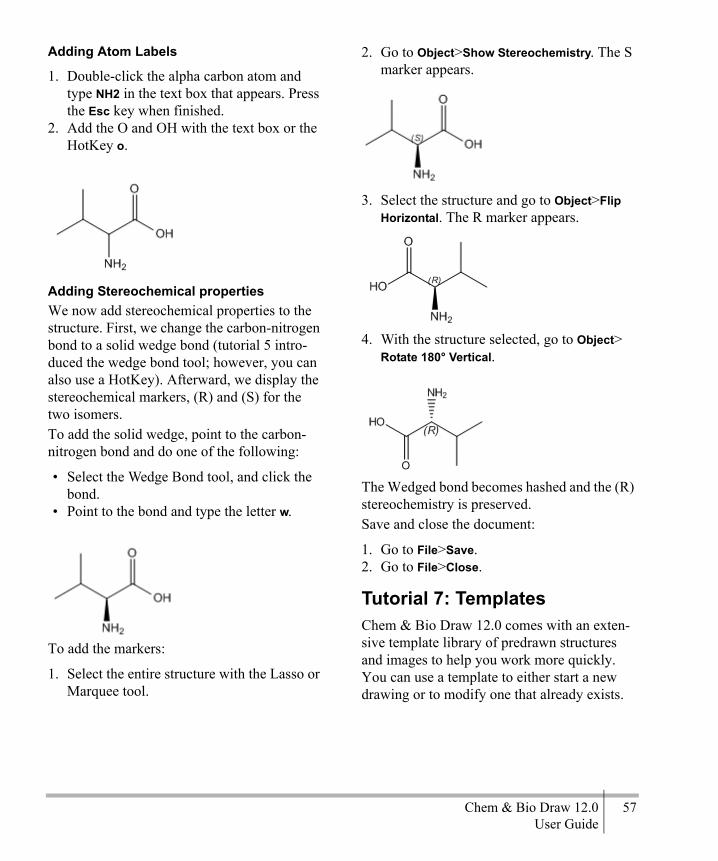
Chem & Bio Draw 12.0 57User Guide
Adding Atom Labels
1. Double-click the alpha carbon atom and type NH2 in the text box that appears. Press the Esc key when finished.
2. Add the O and OH with the text box or the HotKey o.
Adding Stereochemical propertiesWe now add stereochemical properties to the structure. First, we change the carbon-nitrogen bond to a solid wedge bond (tutorial 5 intro-duced the wedge bond tool; however, you can also use a HotKey). Afterward, we display the stereochemical markers, (R) and (S) for the two isomers.To add the solid wedge, point to the carbon-nitrogen bond and do one of the following:
• Select the Wedge Bond tool, and click the bond.
• Point to the bond and type the letter w.
To add the markers:
1. Select the entire structure with the Lasso or Marquee tool.
2. Go to Object>Show Stereochemistry. The S marker appears.
3. Select the structure and go to Object>Flip Horizontal. The R marker appears.
4. With the structure selected, go to Object> Rotate 180° Vertical.
The Wedged bond becomes hashed and the (R) stereochemistry is preserved.Save and close the document:
1. Go to File>Save.2. Go to File>Close.
Tutorial 7: TemplatesChem & Bio Draw 12.0 comes with an exten-sive template library of predrawn structures and images to help you work more quickly. You can use a template to either start a new drawing or to modify one that already exists.

58 TutorialsChapter 5
In this tutorial, we use the phenanthrene tem-plate to create peroxydibenzene. The template and final drawing are shown below:
There are two simple steps to follow when using a template. First, add the template to your drawing; second, modify the template to look the way you want.To add the template for phenanthrene:
1. Go to File>Open Style Sheets>New Docu-ment.
2. In the Main toolbar, select the template tool. The list of template palettes appears.
3. In the Aromatics palette, select the phenan-threne template (it is in the fourth row, third column).
4. Click anywhere in the document window. Phenanthrene appears.
Now that phenanthrene is in the document, you will want to remove two bonds from the center ring and add two oxygen atoms.To modify phenanthrene:
1. In the Main toolbar, select the Eraser tool.2. Click the bottom bond in the center ring.3. Click the double bond at the top of the ring.
It is now a single bond.4. In the Main toolbar, select the Text tool.5. Select one of the carbon atoms in the hydro-
carbon chain (what was the middle ring).6. Type O to change it to an oxygen atom.7. Select the other carbon atom and change it
to an oxygen.
Peroxydibenzene is now shown.

Chem & Bio Draw 12.0 59User Guide
Advanced Drawing TechniquesThe advanced features in Chem & Bio Draw are designed to either help you save time or to perform functions that simply can’t be accom-plished using the basic tools. For example, you can see your drawing as 3D models or create stereoisomers at the click of your mouse. With the Chem & Bio Draw 12.0 advanced drawing features, you can:• Create mirror images• Clean up structures• Add bonds to characters in atom labels• Create bonds whose attachment is not
explicitly defined• Add atom numbers• Contract and expand sections of structures• View structure perspective• Create mass fragmentation, retrosynthesis,
and synthesis drawings• Draw with templates• Create and edit templates• Label functional groups with nicknames.
NOTE: The Clean Up Structure and template features are available in ChemBioDraw Ultra 12.0, ChemDraw Ultra 12.0, and ChemDraw Pro 12.0 only
Mirror ImagesYou can reflect structures through planes per-pendicular to the X-axis or Y-axis. By copying a structure, you can create its mirror image to represent racemic mixtures and other stereoi-somers. You can also create a mirror image of a structure that has defined stereochemistry by duplicating and rotating it.To create a mirror image:
1. Draw a structure with defined stereochem-istry, for example, wedged bonds.
2. Select the structure and make a copy using Ctrl+Drag or option+drag.
3. With the copy still selected, go to Object>Flip Horizontal or Flip Vertical.
To preserve the absolute stereochemistry while flipping, go to Object>Rotate 180º.
Coloring objectsYou can select and color objects—specific bonds, part or all of a chemical structure, boxes, curves, arrows, orbitals and reaction mechanism symbols.The border of objects that are shaded or filled, such as white filled s-orbitals in the Orbitals palette, are the same color as the shading or fill. The border of objects that are hollow, such as circles and hollow boxes in the Drawing Elements palette can be colored, but the inside of the object cannot.
6

60 Advanced Drawing TechniquesChapter 6
To color an object:
1. Select the object.2. Do one of the following:
• Click the Color button on the Style tool-bar, and select the color from the menu that appears.
• Choose a color from the Color menu.• Go to Object>Object Settings and select
the color in the Drawing tab. Click OK when finished.
Coloring groupsChem & Bio Draw colors groups differently from integral groups. When you color an inte-gral group, its objects acquire the new color but retain the original shading. When you color a normal group, the new color is applied and the original shading is ignored.
Figure 6.24 A) The mitochondrion structure in its default color; B) The structure colored blue as a group; C) The structure colored blue as an integral group.
The new color applies to all structures in the group, even if the original colors of the objects in the group are not the same.
LabelsYou can use labels to represent atoms, and define nicknames that help you draw struc-
tures. For example, you can use the label “Ph” to represent a phenyl functional group rather than having to draw it. Labels are useful for drawing structures quickly or emphasizing a part of your structure.
NOTE: You can define nicknames in ChemBio-Draw Ultra, Chem & Bio Draw 12.0 Ultra, and Chem & Bio Draw 12.0 Pro only.
You first add a label to part of your structure. You can then expand the label to show the part of the structure the label represents or reduce it back to the label.
Expanding LabelsIf your structures contain defined nicknames, long atom labels, or contracted labels, you can restore your structures to the expanded form.Contracted:
Expanded:
When you expand a label that contains a diva-lent nickname, for example H-Ala-OH, the first attachment is to the character to the left of the nickname (H). The second attachment is to the character to the right of the nickname (OH).To expand atom labels:
1. Select a selection tool.

Chem & Bio Draw 12.0 61User Guide
2. Select the label to expand or double-click the structure to expand all possible labels.
3. Go to Structure>Expand Label. Your struc-ture is redrawn in its expanded form.
Contracting LabelsYou can compress an area of a structure and replace it with a text label. Contracted labels are similar to nicknames, but they are for one-time use only, in the current document.To create a contracted label:
1. Select the area of the structure to contract.
Figure 6.1 Selecting a structure to contract
2. Go to Structure>Contract Label. The Con-tract Label dialog box appears.
3. Type a label for the contracted structure and click OK.
The label replaces the selected portion of the structure.
Figure 6.2 Contracted label
NOTE: If the area of the structure you contract contains errors, an error dialog box appears. Click Ignore to view other errors. Click Ignore All to ignore all errors or Stop to end the con-tract process.
Multiple atomsLabels can comprise a group of atoms. When you expand the label, it expands to create the structure.Expanded:
Contracted:

62 Advanced Drawing TechniquesChapter 6
Adding a Label of multiple atoms
1. Using the text tool, click an atom in the structure where to place the label.
2. Type the formula (such as “CH2NHC3”).3. Using a selection tool, select the formula.4. Right-click the formula and select Expand
Label or go to Structure>Expand Label.
Figure 6.3 Adding bonds to a label
After the label expands, it behaves the same way as any other part of the structure.
Clean Up StructureYou may find it difficult to draw atoms in the sterically correct position. Use the Clean Up Structure command to redraw the structure so that bond lengths are fixed and atoms are in the correct location. Clean Up Structure does not position molecules relative to other objects. So, some overlap may occur.For some compounds, the Clean Up Structure command produces a structure that extends beyond the bounds of the page. To view the entire structure, scale the structure or increase the size of the printed page. See “Scaling
Objects” on page 32 and “Page Setup” on page 184.
NOTE: The Clean up Structure command is available in ChemBioDraw Ultra 12.0, ChemDraw Ultra 12.0, and ChemDraw Pro 12.0 only.
The Clean Up Structure feature follows these rules:
• The Fixed Length setting on the Drawing tab of the Document Settings dialog box determines optimum bond lengths.
• A ring is redrawn only if all of its bonds are selected.
• Multi-attached atom labels, variable attach-ment points, and multi-center bonds cannot be cleaned.
• Structures are rotated so that as many bonds as possible are directed at a multiple of 15 degrees.
• Clean Up Structure preserves stereochemi-cal meaning rather than the precise identity of wedged or hashed bonds, as shown below.
Figure 6.4 Preservation of stereochemical meaning

Chem & Bio Draw 12.0 63User Guide
Using Clean Up Structure:
1. Select the structure or part of the structure to clean up.
2. Go to Structure>Clean Up Structure or type Shift+Ctrl+K.
NOTE: The Clean Up Structure command redraws your structure in iterations. Therefore, you may need to select the command more than once.
Attachment PointsYou can draw polyhapto structures such as fer-rocene ((Cp)2Fe), or an abbreviated notation for different positional isomers of a compound, using attachment centers. The procedure is similar, and in both cases, the structure retains chemical significance.
Figure 6.5 Drawing a polyhapto structure
Isomers of dibromobenzene can be represented as:
Multi-Center BondsTo create a multi-center attachment point:
1. Select the structure whose center you want defined as a multi-center attachment point.
2. Go to Structure>Add Multi-Center Attach-ment.
An asterisk indicates a multi-center node.The asterisk is not visible once a bond is drawn to it. However, you can view the attachment point using a bond or selection tool. See “Viewing Attachment Points” on page 64.To draw a bond to a multi-center attachment point:
1. Click the Bond tool.
Abbreviated notation for:

64 Advanced Drawing TechniquesChapter 6
2. Point to the asterisk and either click or drag to create a bond.
TIP: Go to Object>Fixed Lengths to either dis-able or toggle Fixed Lengths to draw the bond so that it extends from the ring.
Variable Attachment PointsTo create a variable attachment point:
1. Draw the structural fragment to which to assign a variable attachment node.
2. Select the fragment.3. Go to Structure>Add Variable Attachment.4. Point to the asterisk in the structure and
drag to draw a bond.
NOTE: Either disable or toggle Fixed Lengths to draw the bond so that it extends from the ring.
Figure 6.6 Using a variable attachment point
Viewing Attachment PointsAfter you draw a bond from a variable or multi-center attachment point, the asterisk dis-appears. To view an attachment point, position the cursor over the attachment point with either
a bond tool or a selection tool. The attachment point is highlighted.
Atom NumberingYou can add sequential numbering indicators to atoms. The types of indicators are:
• Numbers (1, 2, 3, and so on)• Text ending with a number (atom1)• Greek letters in the Symbol font• Letters (a, b, c, and so on)
The default indicator is numbers.
TIP: To use text instead of numbers, number an atom then edit the number. See “Editing Atom Numbers” on page 65.
Showing Atom Numbers
1. Select one or more atoms to number.2. While pointing to the selected atoms or
structure, do one of the following:
• Right-click or Control+click, point to Atom on the context menu, and click Show Atom Number.
• Type the HotKey ‘ (single quote).
3. For a single atom, do one of the following:
• Right- click and click Show Atom Number from the context menu.
• Type the HotKey ‘ (single quote).
Hiding atom numbers
1. Select the atoms or structure.2. Right-click or Control+click, point to Atom,
and deselect Show Atom Number.

Chem & Bio Draw 12.0 65User Guide
To remove an atom number indicator, do one of the following:
• Click the indicator with the Eraser tool.• Point to the indicator with the Marquee or
Lasso tool and type Backspace or Delete.
Editing Atom NumbersTo edit the atom number text and style:
1. Select the Text tool.2. Select the atom number indicator and type
the changes.
NOTE: When you type in a new indicator, you reset the counter for that structure to a new style. You may then continue numbering in that style with the standard means. For example, if you type ! in a text box, then point to another atom and use the context menu or HotKey, the atom will be labeled "#$Switching to another structure resets the counter.
3. To edit the atom number style, select the atom number indicator with the Text tool and use the Text menu or Text formatting toolbar.
Positioning Atom NumbersAtom number indicators are positioned auto-matically and move appropriately when you modify a structure. You can reposition them by dragging them to the desired position or use the Position Indicators dialog box.To reposition an indicator:
1. Right-click the indicator to move and click the Position command on the context menu. The Position Indicators dialog box appears.
2. Click the appropriate position option, and enter a value.
Structure PerspectiveYou can tilt molecules or portions of mole-cules through three dimensions with the Struc-ture Perspective tool.
To tilt a structure:
1. Select the structure by dragging over it with the Structure Perspective tool.
2. Place the cursor inside the marked rectangle and drag in any direction.
3. Use Shift+drag to limit the rotation to the X or Y axes only.
To position … Type a value for Position …
from the atom or bond center to the indicator center
by angle or by clock
from the atom or bond center to bottom left of indicator baseline
by offset—hori-zontal and vertical
at specified coordinates absolute—horizon-tal and vertical
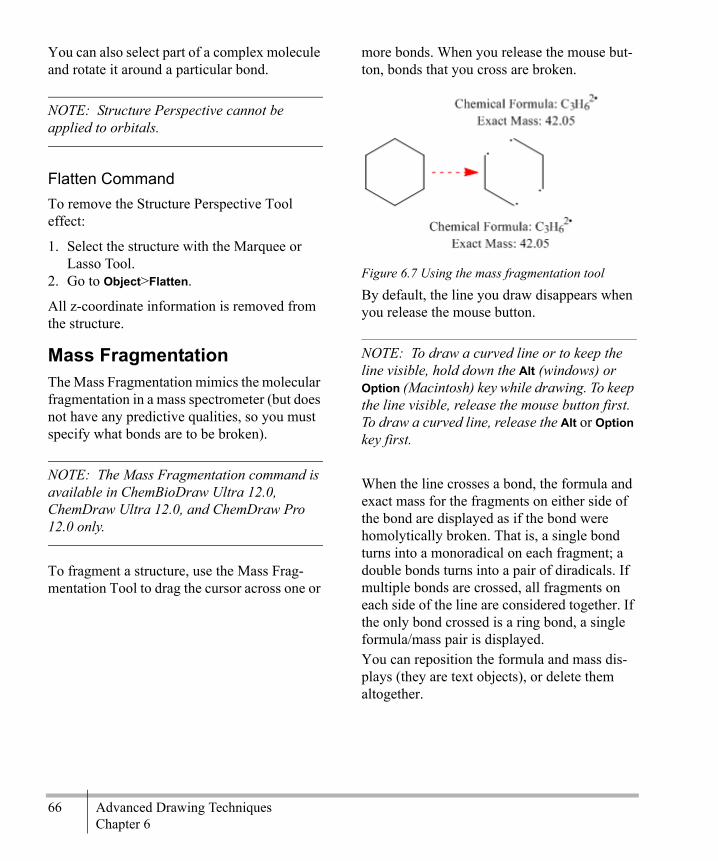
66 Advanced Drawing TechniquesChapter 6
You can also select part of a complex molecule and rotate it around a particular bond.
NOTE: Structure Perspective cannot be applied to orbitals.
Flatten CommandTo remove the Structure Perspective Tool effect:
1. Select the structure with the Marquee or Lasso Tool.
2. Go to Object>Flatten.
All z-coordinate information is removed from the structure.
Mass FragmentationThe Mass Fragmentation mimics the molecular fragmentation in a mass spectrometer (but does not have any predictive qualities, so you must specify what bonds are to be broken).
NOTE: The Mass Fragmentation command is available in ChemBioDraw Ultra 12.0, ChemDraw Ultra 12.0, and ChemDraw Pro 12.0 only.
To fragment a structure, use the Mass Frag-mentation Tool to drag the cursor across one or
more bonds. When you release the mouse but-ton, bonds that you cross are broken.
Figure 6.7 Using the mass fragmentation tool
By default, the line you draw disappears when you release the mouse button.
NOTE: To draw a curved line or to keep the line visible, hold down the Alt (windows) or Option (Macintosh) key while drawing. To keep the line visible, release the mouse button first. To draw a curved line, release the Alt or Option key first.
When the line crosses a bond, the formula and exact mass for the fragments on either side of the bond are displayed as if the bond were homolytically broken. That is, a single bond turns into a monoradical on each fragment; a double bonds turns into a pair of diradicals. If multiple bonds are crossed, all fragments on each side of the line are considered together. If the only bond crossed is a ring bond, a single formula/mass pair is displayed.You can reposition the formula and mass dis-plays (they are text objects), or delete them altogether.

Chem & Bio Draw 12.0 67User Guide
Synthesis and RetrosynthesisChem & Bio Draw 12.0 includes two tools to help you draw synthesis reactions. The Synthe-sis tool draws synthesis reaction based on a product structure that you specify. Alterna-tively, the Retrosynthesis tool draws the reac-tion with the product on the left and a broad arrow pointing to the reactants. These tools are in the fragmentation tools palette of the main tools palette.To demonstrate these features, we use the Beyer Method for quinolines, starting with the structure below.
You can create either type of reaction using the appropriate tool and dragging through bonds indicated by the dotted line. For example, if you use the retrosynthesis tool, you will create the reaction:
Figure 6.8 Reaction created with the Retrosynthesis tool
Figure 6.9 Reaction created with the Synthesis tool
By dragging through the bonds in the structure below (as indicated by the dashed lines), we can create either of two reactions, depending on the tool that is used.
Drawing ReactionsTo demonstrate how to draw reactions, we will use this example:
Drawing an arrowStarting with 2-propanone, draw the reaction arrow:
1. On the Main Tool toolbar, click the Arrow tool to display the Arrow toolbar.
2. While holding the mouse button down, move the mouse to the palette title bar, then release the button. The palette becomes a floating toolbar.
3. Click the third arrow from the left in the top row.
4. In the document window, click and drag the mouse horizontally to the right of the 2-pro-panone structure. The arrow appears.
5. Select the Text tool.6. Click above the arrow. A text box appears.7. Type OH and press Esc. Realign the text
box as necessary using a selection tool.
NOTE: If Show Chemical Warnings is turned on (the default), a red box will appear around the OH label when change tools or open another text box indicating an error. Ignore this for now.
Add a charge symbol using the specialized symbols available in the Chemical Symbols tool palette:

68 Advanced Drawing TechniquesChapter 6
1. In the Main Tool toolbar, click the Chemi-cal Symbol tool.
2. Holding the mouse button down, select the circled Circle Minus symbol.
3. Point to the center of the OH label. Move the cursor slightly right or left to select the O.
4. With the oxygen atom selected, drag the charge symbol around the atom to the desired position.
Objects added from the Chemical Symbols palette are associated chemically with the structure they are near. Note that the red valence error warning disappears when you add the minus charge.CURVED ARROWSFor some reactions, you may not want to be limited to drawing simple, straight arrows. In fact, you may need a variety of curved or col-ored arrows to enhance your drawings. You can curve most arrows found on the Arrows toolbar. After you paste an arrow in your draw-ing, click and drag the selection point in the middle of the arrow.As you drag the selection point, the size of the arc appears, measured in degrees.COLORED ARROWSTo color an arrow:
1. In the drawing window, select the arrow to color.
2. Select a color from the Color menu.COLORING BLOCK ARROWSFor block arrows (those that aren’t made of just simple lines), you can create various col-
ored effects using the filled, faded, and shaded options. To use these effects:
1. Select a block arrow from the Arrows pal-ette and right-click it.
2. Select a color from the Color menu.3. On the context menu, choose either Filled,
Faded, or Shaded.
Drawing the productWe now create 4-hydroxy-4-methyl-2-pen-tanone using a copy of the 2-propanone struc-ture. You can also create the product from scratch but you may find copying another structure more convenient.Copy the structure:
1. Select the 2-propanone structure and its caption.
2. Press and hold the Ctrl (windows) or Option (Macintosh) key.
The hand pointer with a plus sign indicates that you are in the duplication mode of a selection tool.3. Drag the selection rectangle to the right and
release the mouse button.
Figure 6.10 Duplicating a structure
NOTE: To keep the copy aligned with the orig-inal, hold Shift while dragging.
Modify the duplicate structure:

Chem & Bio Draw 12.0 69User Guide
1. Select the Solid Bond tool.2. Click the far right bond of the copied struc-
ture (Figure A).3. Point to a terminal carbon, shown in A
below.4. Click the carbon atom until three bonds
appear, allowing a pause between each click.
NOTE: If you click too fast, the click is inter-preted either as a double-click, which opens a text box or a triple-click, which duplicates your last atom label.
Figure 6.11 Adding multiple bonds to an atom
5. Point to a terminal carbon atom, shown in Figure A below.
6. Type capital OH.
Figure 6.12 Adding an atom label
Replace the product caption:
1. To update the product’s caption, select the caption with the Text tool and type 4-
hydroxy-4-methyl-2-pentanone, press the Enter or Return key, and type 1 mole.
2. Using the Text tool, add 2 Mole to the cap-tion for the reactant.
If the captions are not aligned properly under their structures, move them using a selection tool.
Adding a frameTo complete the drawing, add a shadowed box around it:
1. Click the Drawing Elements tool.2. In the Drawing Elements toolbar, select the
Rectangle (shadowed) tool.3. Point to the upper left corner of the reaction
scheme. Click and drag diagonally down-ward to the right to draw the box.
Grouping ObjectsSome objects, such as arrows, are not associ-ated with each other automatically. You can manually group the objects together using the Group command. You can then manipulate or move them as a single object.To group objects:
1. Click the Marquee tool.2. Do one of the following:
• Draw a box around the arrow, caption and symbol to select them.
• Click the arrow, then hold the shift key down while you click the OH caption and the charge symbol.
The Shift key lets you add objects to a selec-tion without deselecting other objects.
NOTE: If you click a selected object while holding Shift, that object is deselected.

70 Advanced Drawing TechniquesChapter 6
3. Go to Object>Group.
NOTE: You can select individual objects within a group by clicking them.
Aligning the structuresTo align the structures:
1. Select both structures with the Lasso or Marquee.
2. Go to Object>Align>T/B centers.
The Reaction InterpreterThe reaction interpreter identifies the reactants, products, catalysts, and annotations in a reac-tion. The interpreter color-codes each part to help you identify them.
NOTE: The Reaction Interpreter is available in ChemBioDraw Ultra 12.0, ChemDraw Ultra 12.0, and ChemDraw Pro 12.0 only.
To use the reaction interpreter:
1. Go to View>Show Reaction Interpretation.2. Hover your cursor over the reaction arrow.
The various parts of a reaction are color-coded as follows:
• Red–reactants
• Magenta–products
• Cyan–Anything above the reaction arrow
• Blue–Anything below the reaction arrow
GuidelinesFor a reaction to be interpreted:
• Each reactant and product must contain at least one atom.
• Each reactant and product must be described using a single label.
• Multiple reactants and products must be linked by a “+” sign.
• Reaction conditions must reside completely within the left and right boundaries of the reaction arrow.
• The reaction cannot include a curved arrow.
Drawing an IntermediateIn this tutorial, you draw the intermediate structure shown below starting from a ring and add arrows with the arrow and Draw Curve tools.
Create a new document:
1. Go to the File>New Document.2. Go to File>Save As command.3. Type tut2.cdx in the appropriate text box.4. Select a folder in which to save the file.5. Click Save.
Draw a ring:
1. Select the Cyclohexane Ring tool.

Chem & Bio Draw 12.0 71User Guide
2. Click in the document window to add a ring.
Delete an atom and its bonds from the ring:
1. Click the Eraser tool.2. Click any atom, as shown in Figure 6.13 A.
Figure 6.13 Erasing an atom
NOTE: Click the center of a bond to delete it or drag the eraser across multiple bonds to make multiple deletions.
Add a bond:
1. Click the Solid Bond tool.2. Point to an atom, as shown in Figure 6.14.3. Click to add a bond.
Figure 6.14 Adding a bond
Add second and third bonds:
4. Point to the same atom as in Step 2, (shown in Figure 6.15), and click twice (slowly) to add two more bonds.
Figure 6.15 Adding two bonds to an atom
Create a double bond:5. Point to a bond, as shown in Figure 6.16,
and click.
The double bond will initially form to the inside. Click twice more to move it to the out-side, as shown in Figure 6.16 B..
Figure 6.16 Creating a double bond
Add an atom label using a hotkey:6. Point to the atom to label shown in figure A
below and type the letter o.
7. Without moving the cursor, type a “-” (minus). The OH label changes to O–.
Complete the intermediate structure by adding another OH:

72 Advanced Drawing TechniquesChapter 6
1. Point to the atom shown in Figure A below.
2. Do one of the following:• Type the letter o.• Double–click the atom to open a text box,
and type OH.The next step is to add arrows to indicate elec-tron flow. You add the first arrow using the adjustable Arrows tool and the others using the Draw Curve tool.
1. Choose an upward curved arrow from the Arrows palette.
2. Point near the double bond where to indi-cate the start of electron flow.
3. Drag to the right.
Figure 6.17 Dragging an arrow
4. Point to the arrow. Adjustment handles appear at the ends and in the middle.
5. Drag the center up to decrease the curve. You may also drag the ends or the point-
width adjustment handles to adjust the arrow as necessary.
Figure 6.18 Adjusting an arrow
Create the remaining arrows:
1. Select the Draw Curve tool.2. Click just to the right of the O– atom label
and drag to draw the arrow. Release the mouse button.
Figure 6.19 Drawing custom arrows
Refine the shape of the arrow:
1. If the arrow isn’t exactly how you want it, select the Edit curve tool to change its shape and position.When you use the Edit curve tool to select a curve, control handles appear that let you change the shape of the curve.
2. Click and drag a terminal control handle (at the end of the dotted line) to change the shape of the curve at a particular location.

Chem & Bio Draw 12.0 73User Guide
3. Click and drag a midpoint control handle (at the middle of the dotted line) to move a particular point in the curve.
Figure 6.20 Adjusting a curve
4. To add an arrow head, go to Curves>Full Arrow at End.
5. Press Esc when you are finished.
6. Create the remaining arrow as described above to complete the intermediate as shown below.
TemplatesChem & Bio Draw 12.0 includes an extensive library of templates to help you quickly create your own structures and reactions. You can use a template either as a starting point for a new drawing or to fuse structural features to an existing drawing.
NOTE: Templates are available in ChemBio-Draw Ultra 12.0, ChemDraw Ultra 12.0, and ChemDraw Pro 12.0 only.
The templates you define are not limited to atoms and bonds. Templates can contain any features such as captions, colors, boxes, arcs, orbitals, arrows, reaction mechanism symbols, and curves. You can also paste pictures from other applications into a template pane.
Selecting a templateChem & Bio Draw 12.0 provides several ways for you to select a template.
1. Go to File>Open Templates.2. Select a template toolbar from the Main
toolbar.3. Go to View>Templates> and select a tem-
plate toolbar from the list.
New Drawings
1. Select the template to use.2. In the document window, click and drag the
mouse until the template is oriented the way you want or simply click in the window.
TIP: To modify template size while drawing it, hold down the ALT key.

74 Advanced Drawing TechniquesChapter 6
Fusing a TemplateIn addition to starting new drawings, you can use templates to add structural features to existing drawings. To fuse a template to a drawing, first select the template you want using the template tool. Then, click a bond in the existing drawing to add the template struc-ture.
Customizing TemplatesYou can modifying any of the template pal-ettes and creating your own palette.
Creating templates and palettesWhen you create a palette, a set of empty tem-plate panes appear above the document win-dow. The templates you draw for your palette appear in these panes. After you save your pal-ette, it will contain the templates you have drawn. You can then select your palette from the palette list in the Templates tool.To create a template palette:
1. Go to File>Open Style Sheets>New Tem-plates.
2. Click in a template pane.
3. In the document window, draw a new struc-ture. This will become a template in the new palette.
4. Click another template pane and draw another structure as desired.
5. After you draw all the templates in your palette, go to File>Save.
NOTE: Save your palette in the Chem & Bio Draw 12.0 Items folder to ensure that it appears in the Main toolbar.
6. In any drawing, select the Template tool on the Main toolbar to use you palette.
Modifying templates and palettesMODIFYING A TEMPLATE
1. Go to File>Open Templates and choose the palette from the list.
2. To modify a template, click in its template pane and modify it in the document window as desired.
ADDING AND DELETING ROWS AND COLUMNS
1. in the palette, click in a pane where to add the new column or row or select the one to delete.
2. Select the appropriate option in the Edit menu.
ADDING A TEMPLATETo add a template, click in an empty template pane and begin drawing the template in the document window. Go to File>Save.DELETING A TEMPLATE
1. Select the template pane for the template to delete.
2. In the document window, select the entire drawing.
3. Go to Edit>Clear.4. Go to File>Save.
Orienting TemplatesTo make templates that you create simple to use, orient the template structure so that you can modify the bonds you use most often.
Resizing Template Panes To resize the Template panes in the Template panel, drag the lower right corner of the Tem-plate panel. If needed, first click and drag the resize handle.
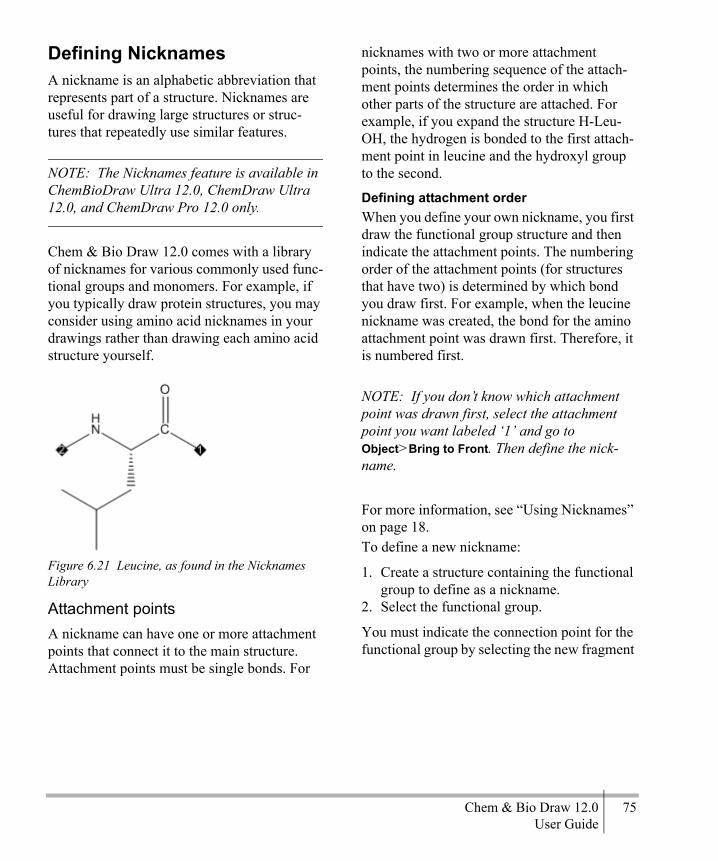
Chem & Bio Draw 12.0 75User Guide
Defining NicknamesA nickname is an alphabetic abbreviation that represents part of a structure. Nicknames are useful for drawing large structures or struc-tures that repeatedly use similar features.
NOTE: The Nicknames feature is available in ChemBioDraw Ultra 12.0, ChemDraw Ultra 12.0, and ChemDraw Pro 12.0 only.
Chem & Bio Draw 12.0 comes with a library of nicknames for various commonly used func-tional groups and monomers. For example, if you typically draw protein structures, you may consider using amino acid nicknames in your drawings rather than drawing each amino acid structure yourself..
Figure 6.21 Leucine, as found in the Nicknames Library
Attachment pointsA nickname can have one or more attachment points that connect it to the main structure. Attachment points must be single bonds. For
nicknames with two or more attachment points, the numbering sequence of the attach-ment points determines the order in which other parts of the structure are attached. For example, if you expand the structure H-Leu-OH, the hydrogen is bonded to the first attach-ment point in leucine and the hydroxyl group to the second.
Defining attachment orderWhen you define your own nickname, you first draw the functional group structure and then indicate the attachment points. The numbering order of the attachment points (for structures that have two) is determined by which bond you draw first. For example, when the leucine nickname was created, the bond for the amino attachment point was drawn first. Therefore, it is numbered first.
NOTE: If you don’t know which attachment point was drawn first, select the attachment point you want labeled ‘1’ and go to Object>Bring to Front. Then define the nick-name.
For more information, see “Using Nicknames” on page 18.To define a new nickname:
1. Create a structure containing the functional group to define as a nickname.
2. Select the functional group.
You must indicate the connection point for the functional group by selecting the new fragment

76 Advanced Drawing TechniquesChapter 6
without the bond connected to the attachment point.
Figure 6.22 Adding a nickname. The arrow indi-cates the bond connected to the attachment point of the nicknamed functional group.
3. Go to Structure>Define Nickname.The number of connection points is shown by radicals in the formula.4. Type a short name for the nickname.5. Click OK.
If you use a nickname that is the same as an element name, a message indicates that the ele-ment is replaced with the nickname. For exam-ple, using Ac for an acetyl group replaces the element Actinium. The Check Structure com-mand recognizes the label as an acetyl group rather than Actinium. The Nicknames list provides the following default Nickname/Element conflicts:
To remove the overriding Nicknames, go to File>List Nicknames and delete the overriding nickname definition.
Deleting NicknamesYou can also delete nicknames from the Nick-names dialog box. To delete a nickname:
1. Go to File>List Nicknames.2. Select the nickname and click Delete.
Troubleshooting NicknamesIf the Define Nicknames command is disabled, check for the following:
• A connection point that is not present.• More than two connection points that are
defined.• A connection point that is not a single bond.
In Figure a below, the entire functional group was selected. Because there is no atom that indicates a connection point, you cannot define a nickname. When a sulfonamide group is attached to an unselected bond, you can define a nickname.
Symbol Nickname Element
Ac Acetyl Actinium
Am Amyl Americium
Np para-Nitrophenyl Neptunium
Pr Propyl Praeseodymium
Symbol Nickname Element

Chem & Bio Draw 12.0 77User Guide
In Figure b, there is more than one attachment point on a single atom in a nickname.
3D ViewingAs you create your drawing, you may be curi-ous to see it in three-dimensions. There are two features in Chem & Bio Draw that let you do just that.
NOTE: Chem & Bio 3D must be installed on your computer to preview structures in three dimensions. Chem& Bio 3D Preview is avail-able only in ChemBioDraw Ultra and Chem & Bio Draw 12.0 Ultra.
3D ModelUse a 3D model to paste a 3D version of the structure into your drawing.
1. Select the structure.2. Go to Edit>Get 3D Model. The 3D structure
appears in the document window.
To view the model in Chem 3D, double-click it.
NOTE: 3D Objects inserted in this way cannot be transferred between platforms. For more information see “File Formats” on page 153.
Chem & Bio 3D Preview optionsThe preview window displays structures in 3D that you have selected (all structures if none are selected). Chem& Bio 3D Preview works only for chemical structures (not biological structures). To view, go to View>Show Chem3D Preview Window.
NOTE: For molecules that cannot be viewed in the Chem & Bio 3D Preview window, “No pre-view available” appears.
With the preview window open, you can change the structure’s appearance several ways, in either the document window the pre-view window.
In the document windowEven with the preview window open, you can still change your drawing in the document win-dow to look how you want. You can alter the structure, rotate it, or add new structures. The preview window updates to reflect the changes.
Incorrect Correct
a
b
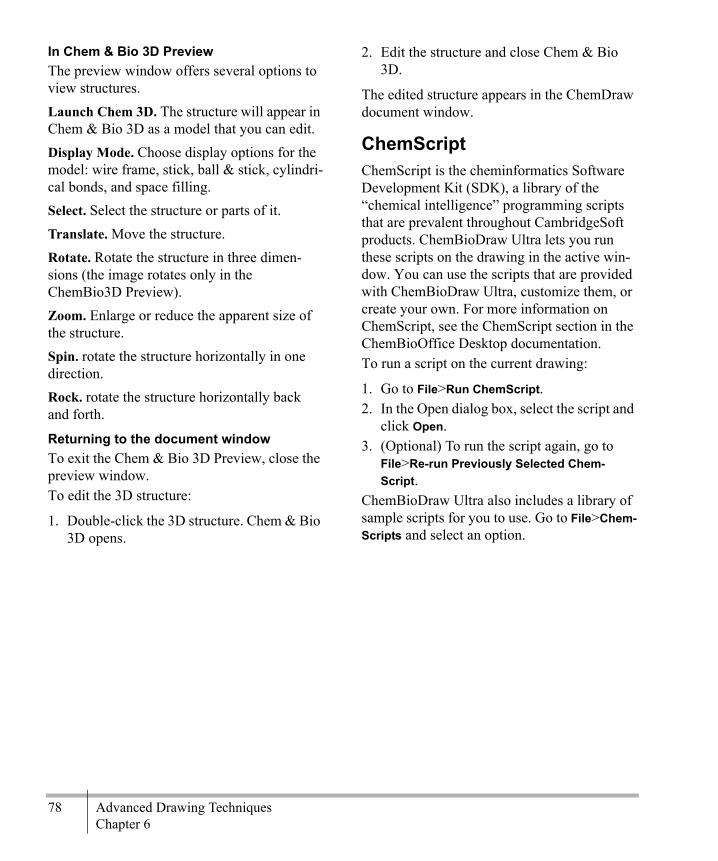
78 Advanced Drawing TechniquesChapter 6
In Chem & Bio 3D PreviewThe preview window offers several options to view structures.Launch Chem 3D. The structure will appear in Chem & Bio 3D as a model that you can edit.Display Mode. Choose display options for the model: wire frame, stick, ball & stick, cylindri-cal bonds, and space filling.Select. Select the structure or parts of it.Translate. Move the structure.Rotate. Rotate the structure in three dimen-sions (the image rotates only in the ChemBio3D Preview).Zoom. Enlarge or reduce the apparent size of the structure.Spin. rotate the structure horizontally in one direction.Rock. rotate the structure horizontally back and forth.
Returning to the document windowTo exit the Chem & Bio 3D Preview, close the preview window.To edit the 3D structure:
1. Double-click the 3D structure. Chem & Bio 3D opens.
2. Edit the structure and close Chem & Bio 3D.
The edited structure appears in the ChemDraw document window.
ChemScriptChemScript is the cheminformatics Software Development Kit (SDK), a library of the “chemical intelligence” programming scripts that are prevalent throughout CambridgeSoft products. ChemBioDraw Ultra lets you run these scripts on the drawing in the active win-dow. You can use the scripts that are provided with ChemBioDraw Ultra, customize them, or create your own. For more information on ChemScript, see the ChemScript section in the ChemBioOffice Desktop documentation.To run a script on the current drawing:
1. Go to File>Run ChemScript.2. In the Open dialog box, select the script and
click Open.3. (Optional) To run the script again, go to
File>Re-run Previously Selected Chem-Script.
ChemBioDraw Ultra also includes a library of sample scripts for you to use. Go to File>Chem-Scripts and select an option.

Chem & Bio Draw 12.0 79User Guide
Naming StructuresChem & Bio Draw 12.0 incudes two features to help you generate structures and chemical names—Name>Struct and Struct>Name. These two features provide unprecedented ability and convenience to create and name structures. Collectively, these features are called Struct=Name.Struct>Name generates systematic names for chemical structures. using the Cahn-Ingold-Prelog rules for stereochemistry. Using this option, you can generate the name of structures you have drawn.Name>Struct is a comprehensive algorithm for converting English chemical names into chem-ical structure diagrams. It is designed to inter-pret chemical names as they are actually used by chemists. In other words, it recognizes the shorthand and slang of everyday usage, in addition to recognizing most of the official IUPAC, IUBMB, and CAS rules and recom-mendations. In addition, it has an extensive algorithm for identifying common typing errors to help accurately generate structures.
NOTE: Struct>Name and Name>Struct are available only in ChemBioDraw Ultra and ChemDraw Ultra.
Struct=Name Struct=Name is designed to interpret a wide variety of chemical structures. This means that you can draw a structure in the document win-dow and, using the Convert Structure to Name command, Struct=Name will provide its name. It also updates the name whenever you modify the structure.
NOTE: Struct=Name is available only in ChemBioDraw Ultra and ChemDraw Ultra.
Unsupported structuresAlthough quite useful, this feature has a few limitations for interpreting some structures such as:
• Sulfones and chalcogen analogs
• Polymers
• Isotopically modified compounds
• Radicals, ions, and radical ions
Supported StructuresHowever, the nomenclature types Struct=Name will interpret include:
• Stereochemistry
Principal group in rings and chains
• Carboxylic Acids
7

80 Naming StructuresChapter 7
• Peroxy acids • Amide derivatives of acids • Carbonic acids • Nitric acids • Acid Halides • Carboxylic Esters • Salts • Anhydrides • Hydrazides • Imides • Amides • Hydrazines • Nitriles • Amines and Imines • S, Se, and Te Acids • S, Se, and Te Esters • S, Se, and Te Acid Halides • S, Se and Te Amides • Sulfides and chalcogen analogs • Sulfoxides and chalcogen analogs • Heteroatomic acids (P, B, As) • Heteroatomic esters • Heteroatomic acid halides • Aldehydes and chalcogen analogs • Ketones and chalcogen analogs • Alcohols and chalcogen analogs • Hydroperoxides • Peroxides
Non-ringed structures
• Isolating and naming the functional groups
• Identifying the base chain of the molecule • Identifying and building substituents • Nomenclature of groups cited only by pre-
fixes • Heteroacyclic compounds • Naming of substituent groups • Locants • Name generation (alphabetization, punctua-
tion, etc.)
Ringed structuresStruct>Name supports the these types of ringed structures:
• Carbomonocyclic structures • Heteromonocyclic structures • Fused polycyclic structures
• Fused polycyclic trivially-named struc-tures
• Ring fusions of multiple rings • Ring fusions of two multiple ring systems • Ring fusions of more than two ring sys-
tems • Bridged monocyclic structures • Spiro ring systems
Some of these ring structures are defined below.RING ASSEMBLIESA ring assembly consists of two or more cyclic systems that are directly joined to each other by single or double bonds. All the cyclic sys-tems are the same and are either a single ring, fused system, alicyclic von Baeyer system, spiro system, phane system, or fullerene. Also,
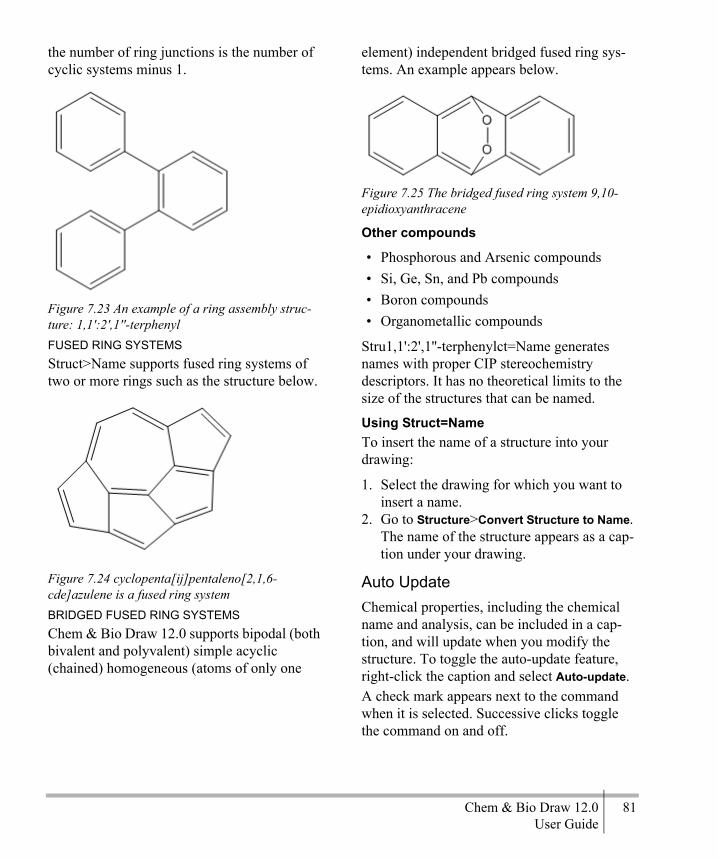
Chem & Bio Draw 12.0 81User Guide
the number of ring junctions is the number of cyclic systems minus 1.
Figure 7.23 An example of a ring assembly struc-ture: 1,1':2',1''-terphenylFUSED RING SYSTEMSStruct>Name supports fused ring systems of two or more rings such as the structure below.
Figure 7.24 cyclopenta[ij]pentaleno[2,1,6-cde]azulene is a fused ring systemBRIDGED FUSED RING SYSTEMSChem & Bio Draw 12.0 supports bipodal (both bivalent and polyvalent) simple acyclic (chained) homogeneous (atoms of only one
element) independent bridged fused ring sys-tems. An example appears below.
Figure 7.25 The bridged fused ring system 9,10-epidioxyanthracene
Other compounds
• Phosphorous and Arsenic compounds • Si, Ge, Sn, and Pb compounds • Boron compounds• Organometallic compounds
Stru1,1':2',1''-terphenylct=Name generates names with proper CIP stereochemistry descriptors. It has no theoretical limits to the size of the structures that can be named.
Using Struct=NameTo insert the name of a structure into your drawing:
1. Select the drawing for which you want to insert a name.
2. Go to Structure>Convert Structure to Name. The name of the structure appears as a cap-tion under your drawing.
Auto UpdateChemical properties, including the chemical name and analysis, can be included in a cap-tion, and will update when you modify the structure. To toggle the auto-update feature, right-click the caption and select Auto-update.A check mark appears next to the command when it is selected. Successive clicks toggle the command on and off.

82 Naming StructuresChapter 7
When auto-update is on (default) the label updates each time you modify the structure.
NOTE: For large complex structures, it may take the new label a few seconds to appear on the screen, depending on the speed of your pro-cessor. You do not have to wait for the new label to appear before continuing to modify your structure.
Name=StructName=Struct creates structures from chemical names you provide.
NOTE: Name=Struct is available only in ChemBioDraw Ultra and ChemDraw Ultra.
Name=Struct recognizes most organic nomen-clature. It also recognized inorganic chemistry, especially when the rules closely match those for organic chemistry. However, there area few types that are not supported:
• Coordination complexes• Polyboranes• Polymers• Some highly-bridged ring systems, includ-
ing fullerenes and porphyrins/porphines• Some stereochemistry designators: +, -, +/-
, +-, D, L, DL, endo, exo, syn, anti, r, t, c
Although some trade names are supported, Name=Struct is not intended to interpret trade or common names. A chemical database, such as ChemBioFinder.com, is more appropriate
for obtaining structures for trade or common names.
NOTE: Because the syntax of German is simi-lar to that of English, Name=Struct can also interpret many German names.
Converting Names to StructuresTo place a structure into the document window using the structure name, you can either type the name or paste the name from the clipboard.
converting typed namesTo type the name and convert it to its structure:
1. Go to Structure>Convert Name to Structure.The Insert Structure dialog box appears.2. Type the name (example: 2-bromobenzoic
acid).
NOTE: You can also copy a name to the clip-board and type Crtl+V or Command+V to paste the name into the dialog box.
3. To place the name below the structure, select Paste name below structure.
4. Click OK.
Converting Clipboard namesTo paste a name on the clipboard as a struc-ture:
1. Click in the document window.2. Go to Edit>Paste Special>Name as Struc-
ture. The structure appears in your docu-ment.
Converting captionsYou can convert a caption in the drawing area to a structure.

Chem & Bio Draw 12.0 83User Guide
1. Select the caption.2. Go to Structure>Convert Name to Structure.
Supported StructuresStruct=Name can name compounds in the fol-lowing classes of structures:
Principal groups in rings and chains
Acid Halides Amide derivatives of acids
Alcohols and chalcogen analogs
Anhydrides
Aldehydes and chalcogen analogs
Carbonic acids
Amides Imides
Amines and Imines Nitric acids
Carboxylic Acids Peroxy acids
Carboxylic Esters Salts
Heteroatomic acid halides Sulfides and chal-cogen analogs
Heteroatomic acids (P, B, As)
Sulfoxides and chalcogen analogs
Heteroatomic esters Peroxides
Hydrazides S, Se and Te Amides
Hydrazines S, Se, and Te Acid Halides
Hydroperoxides S, Se, and Te Acids
Ketones and chalcogen analogs
S, Se, and Te Esters
Nitriles
Ringed structures
Bridged monocyclic struc-tures
Heteromonocy-clic structures
Carbomonocyclic structures Ring fusions of only two rings
Fused polycyclic trivially-named structures
Ring fusions of two multiple ring systems
Other compounds
Boron compounds Si, Ge, Sn, and Pb compounds
Organometallic compounds Phosphorous and Arsenic compounds

84 Naming StructuresChapter 7

Chem & Bio Draw 12.0 85User Guide
Chemistry FeaturesChemical AnalysisThe Analysis window displays the chemical formula, exact mass, molecular weight, m/z, and elemental analysis for the entire document, a structure, part of a structure, or a caption in Formula style.To view analysis information, go to View>Show Analysis Window.Values for selected objects in the document window are shown. If no structure is selected in your document, values for the entire docu-ment are shown.You can have this window open as you draw in the document. It shows the current values as you draw.The Decimals setting applies to Exact Mass, Molecular Weight, and m/z only.Formula. The molecular formula showing the exact number of atoms of each element in the molecule and charges, radicals, and isotopes.Exact Mass. The exact molecular mass of the structure, where atomic masses of each atom are based on the most common isotope for the element.
Molecular Weight. The average molecular mass of the structure, where atomic masses are based on the natural abundance of all isotopes of the element.
m/z. Mass/charge, where charge =1. The weights of the most common isotopes and a graphical representation of the isotopic abun-dance is shown.The molecular weight shown takes the isotopes for each atom and their natural abundance into account. Where there is more than one abun-dant isotope, this feature computes multiple molecular weights. Low abundance combina-tions (whether because the isotope is in low abundance or because it includes many moder-ate-abundance contributions) are not taken into account. Elemental Analysis. The percent by weight of each element in the structure.To paste information about a structure as a caption:
1. Click the check boxes for the information that you want.
2. Click Paste.
8
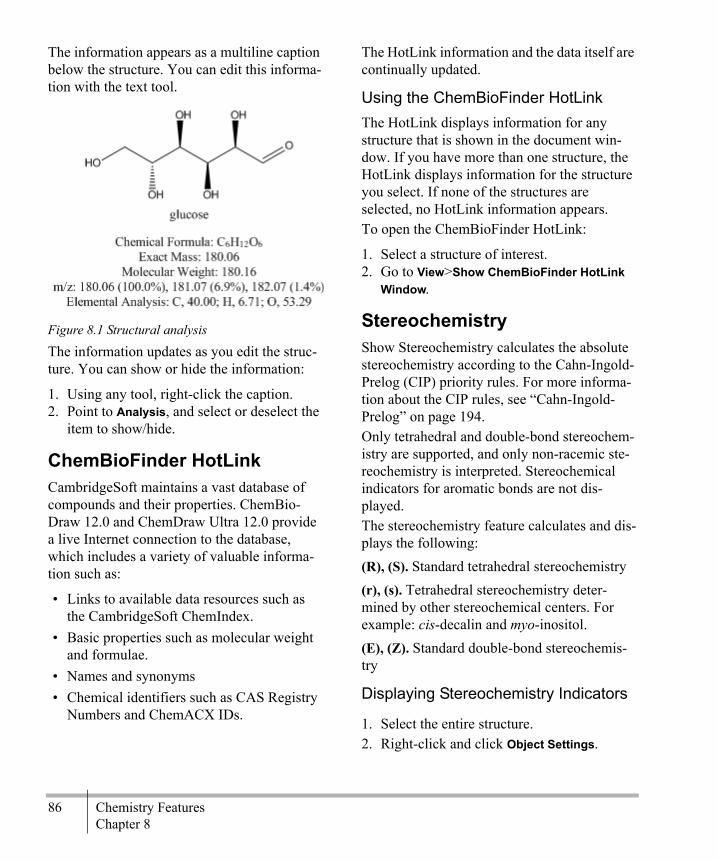
86 Chemistry FeaturesChapter 8
The information appears as a multiline caption below the structure. You can edit this informa-tion with the text tool.
Figure 8.1 Structural analysis
The information updates as you edit the struc-ture. You can show or hide the information:
1. Using any tool, right-click the caption.2. Point to Analysis, and select or deselect the
item to show/hide.
ChemBioFinder HotLinkCambridgeSoft maintains a vast database of compounds and their properties. ChemBio-Draw 12.0 and ChemDraw Ultra 12.0 provide a live Internet connection to the database, which includes a variety of valuable informa-tion such as:
• Links to available data resources such as the CambridgeSoft ChemIndex.
• Basic properties such as molecular weight and formulae.
• Names and synonyms • Chemical identifiers such as CAS Registry
Numbers and ChemACX IDs.
The HotLink information and the data itself are continually updated.
Using the ChemBioFinder HotLinkThe HotLink displays information for any structure that is shown in the document win-dow. If you have more than one structure, the HotLink displays information for the structure you select. If none of the structures are selected, no HotLink information appears.To open the ChemBioFinder HotLink:
1. Select a structure of interest.2. Go to View>Show ChemBioFinder HotLink
Window.
StereochemistryShow Stereochemistry calculates the absolute stereochemistry according to the Cahn-Ingold-Prelog (CIP) priority rules. For more informa-tion about the CIP rules, see “Cahn-Ingold-Prelog” on page 194.Only tetrahedral and double-bond stereochem-istry are supported, and only non-racemic ste-reochemistry is interpreted. Stereochemical indicators for aromatic bonds are not dis-played.The stereochemistry feature calculates and dis-plays the following:(R), (S). Standard tetrahedral stereochemistry(r), (s). Tetrahedral stereochemistry deter-mined by other stereochemical centers. For example: cis-decalin and myo-inositol.(E), (Z). Standard double-bond stereochemis-try
Displaying Stereochemistry Indicators
1. Select the entire structure.2. Right-click and click Object Settings.

Chem & Bio Draw 12.0 87User Guide
3. In the Drawing tab, under Atom Indicators and Bond Indicators, select Show Stere-ochemistry.
The stereo-centers are marked as shown in the following example.
Figure 8.2 Stereochemistry indicators
If you make changes to the drawing that affect the stereochemistry, the stereochemistry is recalculated.
Hiding Indicators
1. Select the indicator to hide.2. Right-click and choose Hide Indicator.
Formatting IndicatorsThe atom label settings determine the font style and size of the terms. A setting on the Building/Display tab of the Preferences dialog box determines whether or not the term will be displayed in parentheses. (The default is to dis-play parentheses.)
Removing IndicatorsTo remove an indicator, click it using the Eraser tool.
Positioning IndicatorsStereochemistry indicators are positioned auto-matically and move appropriately if a structure is modified. However, you can move them either by dragging them or by indicating an exact location.To indicate an exact location:
1. Select the indicator to move.2. Right-click and choose Position. The Posi-
tion Indicator dialog box appears.3. Click the appropriate option, and type a
value, described below:
To Position … Type a value for the position by…
from the atom or bond center to indicator center
angle, in degrees orclock, in clock time
from the atom or bond center to bottom left of indicator baseline
offset, horizontal and vertical
at specified coordinates absolute, horizontal and vertical

88 Chemistry FeaturesChapter 8
Relative StereochemistryYou can specify relationships between groups of stereocenters within a molecule.
NOTE: ChemBioDraw Ultra, Chem & Bio Draw 12.0 Ultra, and Chem & Bio Draw 12.0 Pro support ISIS-compatible stereochemistry.
This notation enables you to describe stere-ochemical properties and individual stereo-centers rather than the entire molecule. As a result, you can illustrate properties of several enantiomers using only a few (or even just one) structure. The notation is illustrated below:
To add stereochemical notation to a structure, go to Structure>Enhanced Stereochemistry. The power of this notation becomes clear when you draw complex enantiomers. For example, beta-cypermethrin is a mixture of four distinct stereoisomers consisting of two enantiomeric
pairs. However, drawing this requires only one structure:
Figure 8.3 beta-Cypermethrin
Two stereo-centers have the &1 designation because of their fixed relative configuration: when one is (R) the other must be (S). As a result, they form a group. The third stereo-center varies independently and is designated &2. Group numbers are incremented automati-cally. To see all the beta-cypermethrin stereoi-somers, go to File>Open Samples>b-Cypermethrin.To indicate stereochemistry for a group:
1. Select all atoms in the group using Shift+click.
2. Go to Structure>Enhanced Stereochemistry and select a stereochemistry marker.
See “Displaying Stereochemistry Indicators” on page 86 for information on showing and hiding indicators.

Chem & Bio Draw 12.0 89User Guide
You can save enhanced stereochemistry nota-tion in any of these formats: CDX, CDXML, MOL V3000, RXN V3000, SKC, TGF.
NOTE: Mol V3000, SKC, and TGF are avail-able in ChemBioDraw Ultra, Chem & Bio Draw 12.0 Ultra and Chem & Bio Draw 12.0 Pro only.
When saving to SKC or TGF format, the indi-cators are converted into corresponding Data SGroups. Whenever you open SKC or TGF files containing such Data SGroups, they are converted into true Enhanced Stereochemistry values.
Chemical AnnotationsChem & Bio Draw 12.0 provides the following tools and tool palettes that enable you to add chemical annotations to your documents:Orbital tools palette. Draw orbitals.Chemical Symbol Tools palette. Draw charges, radicals, and other symbols.
OrbitalsYou draw orbitals so that the node appears first. Then you can change the background color, shading, and solid color using the Color menu.Display the Info window to view the orbital’s length and angle relative to the X-axis while you draw it. To constrain the length and angle of an orbital, go to Object>Fixed Lengths or Fixed Angles.
NOTE: Orbitals are not normally part of the structure they are drawn near and are not selected when you double-click a bond, atom,
or atom label with a selection tool. To group the orbitals with the structure, go to Object>Group. See “Grouping Objects” on page 31.
S-orbitalsTo draw an s orbital:
1. Hold down the mouse button over the Orbital tool and drag to select the s-orbital tool from the palette.
2. Click an atom in the drawing where the orbital will be centered.
Sigma OrbitalsTo draw a %-orbital:
1. Hold down the mouse button over the Orbital tool and drag to select the %-orbital tool from the palette.
2. Click an atom in the drawing where the orbital will be centered.
Single Lobe OrbitalsTo draw a single lobe orbital:
1. Hold down the mouse button over the Orbital tool and drag to select the single lobe orbital tool from the palette.
2. Click an atom where the narrow end of the orbital is to be attached.
p-orbitalsTo draw a p orbital:
1. Hold down the mouse button over the Orbital tool and drag to select the p-orbital tool from the palette.
2. Click an atom where the node of the orbital is to be attached.
Hybrid OrbitalsTo draw a hybrid orbital(‘sp3’):

90 Chemistry FeaturesChapter 8
1. Hold down the mouse button over the Orbital tool and drag to select the hybrid-orbital tool from the palette.
2. click an atom where the node of the orbital is to be attached.
d-orbitalsTo draw a d orbital(‘dxy’):
1. Hold down the mouse button over the Orbital tool and drag to select the d-orbital tool from the palette.
2. Click an atom where the node of the orbital is to be attached.
dz2-orbitalsTo draw a dz2-orbital:
1. Hold down the mouse button over the Orbital tool and drag to select the dz
2-orbital tool from the palette.
2. Click an atom where the node of the orbital will be attached.
Chemical SymbolsWhen you attach a symbol (other than H-dot or H-dash) to an atom, it remains at a fixed dis-tance from the central character of the atom label, even when you move the symbol. However, you can place unattached symbol anywhere and resize them.
H–dot and H–dashTo represent a hydrogen atom that is coming out of the plane toward you along the Z axis, use the H–dot symbol.To represent a hydrogen atom that is directed backwards into the plane away from you along the Z axis, use the H–dot symbol. To insert H–dots and H–dashes, click an atom.
Lone Pair Use the lone pair symbol to indicate a lone pair of electrons common in Lewis structures.
1. Hold down the mouse button over the Chemical Symbols tool and drag to select the lone pair from the palette.
2. Click and drag the atom to where you want the lone pair. The lone pair is offset from the atom at a fixed position.
Radical Use the radical symbol to indicate a single non-bonded electron.
1. Hold down the mouse button over the Chemical Symbols tool and drag to select the radical from the palette.
2. Click and drag the atom to where you want the radical symbol.
Radical Cation and Radical AnionUse the charge radical symbols to represent radicals that are charged.
1. Hold down the mouse button over the Chemical Symbols tool and drag to select the symbol from the palette.
2. Click and drag the atom to where you want the symbol.
To add a radical cation or radical anion symbol in a horizontal orientation, click an atom.
Charge SymbolsTo draw a charge and associate it with a struc-ture:
1. Hold down the mouse button over the Chemical Symbols tool and drag to select the charge symbol from the palette.
2. Click and drag the atom to which you want the charge to correspond.

Chem & Bio Draw 12.0 91User Guide
The number of hydrogen atoms increases or decreases as appropriate for the addition of the charge.
Attachment PointsThe ability to indicate an attachment point is useful in polymer-bound combinatorial synthe-sis, protein chemistry, and other situations. The Chemical Symbols toolbar includes four stan-dard attachment point drawing tools that allow you to indicate a point of attachment while maintaining chemical meaning.
Figure 8.4 Attachment point symbols
The bead tool are specifically intended to indi-cate attachment to a resin. Any of these tools may be used for variable attachments in que-ries (see “Attachment Points” on page 63); but, only the diamond tool shows rank numbers. This means that, as you add diamond symbols to a structure, the points will have sequential numbers.
Rotating a SymbolYou can rotate the radical anion, cation, and lone pair symbols around the same end from which they were originally drawn. For exam-ple, the radical cation symbol is rotated and resized from the charge. The Info window shows the angle that one of the ends of a sym-bol makes with the X–axis as you rotate. To rotate a chemical symbol:
1. Select the chemical symbol.2. Drag the rotation handle on the chemical
symbol.
See “Rotating Objects” on page 29.
Chemical Properties You can enter predicted values for the physical and thermodynamic properties of a chemical structure of up to 100 atoms.
NOTE: Chemical properties are available in ChemBioDraw Ultra 12.0, ChemDraw Ultra 12.0, and ChemDraw Pro 12.0 only.
The properties are calculated using the most reliable methods for the given structure. Log P and CMR values based on literature values rather than a calculation are included in the report file.The reported properties are:Boiling Point. Reported in Kelvin at 1 atm. Melting Point. Reported in Kelvin at 1 atm. Critical Temperature. The temperature above which the gas form of the structure cannot be liquefied, no matter the applied pressure (Tc). Reported in Kelvin.Critical Pressure. The minimum pressure that must be applied to liquefy the structure at the critical temperature (Pc). Reported in bars.Critical Volume. The volume occupied at the compound’s critical temperature and pressure (Vc). Reported in cm3/mol.Gibbs Energy. The Gibbs free energy, &G, for the structure. Reported in kJ/mol at 1 atm and 298.15K.Henry’s Law. The inverse of the logarithm of Henry’s law constant [-log (H)] (no units).

92 Chemistry FeaturesChapter 8
Heat of Formation. &Hf, for the structure. Reported in kJ/mol at 1 atm and 298.15K.tPSA. Calculation of polar surface area based on fragment contributions.CLogP. /CMR. Use CLogP to calculate n-octanol/water partition coefficient (log Pow). LogP values based on literature rather than cal-culations are included in the report file.Use CMR to calculated Molar Refractivity. MR values based on literature rather than cal-culations are included in the report file.
NOTE: CLogP and CMR values appear only in ChemBioDraw Ultra and ChemDraw Ultra.
Viewing Chemical Properties
1. Select the structure whose properties you want to view.
2. Go to View>Show Chemical Properties Win-dow. The Chemical Properties window appears.
3. To paste the basic properties into your doc-ument, click Paste.
4. To create a report and view results for other fragmentation methods click Report. The report is produces as a text file.
Stoichiometry Grid Use the Stoichiometry Grid to calculate sto-ichiometric data for a reaction. The grid is filled in as you modify a reaction drawing.
NOTE: The stoichiometry grid is available in ChemBioDraw Ultra 12.0, ChemDraw Ultra 12.0, and ChemDraw Pro 12.0 only.
To create a stoichiometry grid:
1. Draw a reaction, or open a file containing a reaction, and select the entire reaction.
2. Go to Structure>Analyze Stoichiometry. The grid appears under the reaction.
NOTE: If a catalyst or condition label is dis-played above the reaction arrow, right+click the label and deselect Interpret Chemically in the context menu before creating the grid.
To enter data in the grid:
1. Select the Text tool, and click where to enter the data.
Figure 8.5 Entering data in the Grid
2. Set the limiting compound. If the default setting is incorrect, right-click or control-click the word ‘No’ in the limiting row, and select Set Limiting from the context menu.
3. Enter values for all reactants, as applicable. If you are using units other than the

Chem & Bio Draw 12.0 93User Guide
defaults, type in the units along with the values (no space required).
After you enter the minimum amount of infor-mation required, the values are calculated. As you continue entering information, or edit inputs, the values are recalculated.
NOTE: Entered values are in bold-face; calcu-lated values are in normal font.
Figure 8.6 Calculated stoichiometric values
You can edit the grid for presentation with the context menu, showing or hiding either rows or columns. You can also change the color of the text.
TLCThe TLC Tool lets you depict thin layer chro-matography plates. The tool creates a rectangu-lar plate with an origin line, solvent front, and one or more lanes. The lanes can be populated with spots of different Rf, size, shape, or color.
NOTE: The TLC tool available in ChemBio-Draw Ultra 12.0, ChemDraw Ultra 12.0, and ChemDraw Pro 12.0 only.
To create a TLC plate:
1. Select the TLC tool from the Main toolbar.2. Drag in any direction from the point of ori-
gin. The number of lanes is a function of the width of the plate you create.
Value Comments
Limiting? Indicates the limiting reactant. Only one reactant may be speci-fied as limiting.
Sample Mass Mass of reactant. Default units: g.
%Weight Reactant purity. Defaults to 100%.
Volume Default units: ml. Requires either a molarity or a density to also be entered.
Molarity Default units: M
Density Default units: g/ml
R e a c t a n t s P r o d u c t sFormulaMWLimiting?EquivalentsSample Mass%WeightMolarityDensityVolumeReactant MolesReactant Mass
FormulaMWEquivalentsExpected MassExpected MolesMeasured MassPurityProduct MassProduct Moles%Yield
C3H6O2S106.14Yes
807.50g/l100.00ml760.76mmol
80.75g
C2H4O44.05
No
788.00g/l
760.76mmol
33.51g
C5H10O3S150.20
114.26g
760.76mmolEntered values

94 Chemistry FeaturesChapter 8
You can modify the plate as follows:
If you want to... then...
Change the height or width of the plate.
Drag a border or corner.
Move the origin or solvent front.
Click and drag the origin or solvent front line.
Show or hide the origin, solvent front, borders, or side ticks.
Right-click or Control-click in the plate and select the appropriate action.
Use the Transparent option to overlay the TLC plate on a scanned plate.
Change the order of lanes.
Drag the origin tick to the new location.
Add, delete, or duplicate a lane.
1. Position the cursor on the lane you want to delete or duplicate (or between lanes to add).
2. Right-click or Control-click in the plate.
3. Select the appropriate action.
You can also delete lanes with the Eraser tool.
Move a spot. Drag the spot. The Rf displays as you drag.
Duplicate a spot. Ctrl+drag or Option-drag the spot.
Delete a spot. Click the spot with the Eraser tool.
If you erase all spots in a lane, the lane will be deleted.
Display or set the Rf for a spot; add a custom spot
1. Right-click or Control-click on a spot.
2. Point to TLC Spots, and take the appropri-ate action.
To display Rf for all spots, right-click or Control-click in the plate and select Show Rf from the TLC Spots submenu.
Change the style or color of a spot.
1. Right-click or Control-click in a spot.
2. Choose the style or color.
To change the style for all spots, Right-click or Control-click in the plate and choose the style from the TLC Spots submenu.
If you want to... then...

Chem & Bio Draw 12.0 95User Guide
Rf Display
Right-click a spot and select Show Rf to indi-cate the spot’s retention value. By default, the value is set to Rf to two decimal places.
To move the tagEither click and drag the tag using a selection tool or Right-click or Control-click the tag and choose Position. Then edit the values in the Position Indicators box.
Editing the Rf value
Select the tag with the Text tool and edit the value.If you change the Rf the spot will move to the new position indicated. If you edit the Rf to have different precision, that precision will be preserved.
Resizing SpotsYou can resize spots by holding down the Shift key while pointing at an edge of the spot. Drag the left or right sides of the spot to adjust the width only. Drag from the top to adjust the height. Drag from the bottom to adjust the tail. Dragging from any of the other four corners will scale all three values.
Custom SpotsThe TLC tool can create the most common spot shapes. Other types of spots, such as smears, can be reproduced as custom spots. The Set Custom Spot command lets you insert a graphic file for a spot. Typically, these files would be produced by scanning a TLC plate and saving the spots in a library of spot shapes.
ChemNMRChemBioDraw Ultra and ChemDraw Ultra include ChemNMR as an optional add-on fea-ture. Using ChemNMR, you can estimate and display proton and Carbon-13 chemical shifts for a selected molecule.
NMR ShiftsTo view 1H or 13C NMR information:
1. Select a structure.2. Go to Structure>Predict 1H-NMR Shifts or
Predict 13C-NMR Shifts.
ChemNMR redraws the molecule with the esti-mated shifts and displays the information and
Enlarge or “smear” a spot.
Shift+drag the spot. When you position the cursor on a spot and press “Shift”, the cursor assumes one of three shapes, depending on how it is positioned:
• Cross arrows, used to enlarge a spot.
• Horizontal arrow, used to widen a spot.
• Vertical arrow, used to elongate a spot or cre-ate a crescent.
If you want to... then...
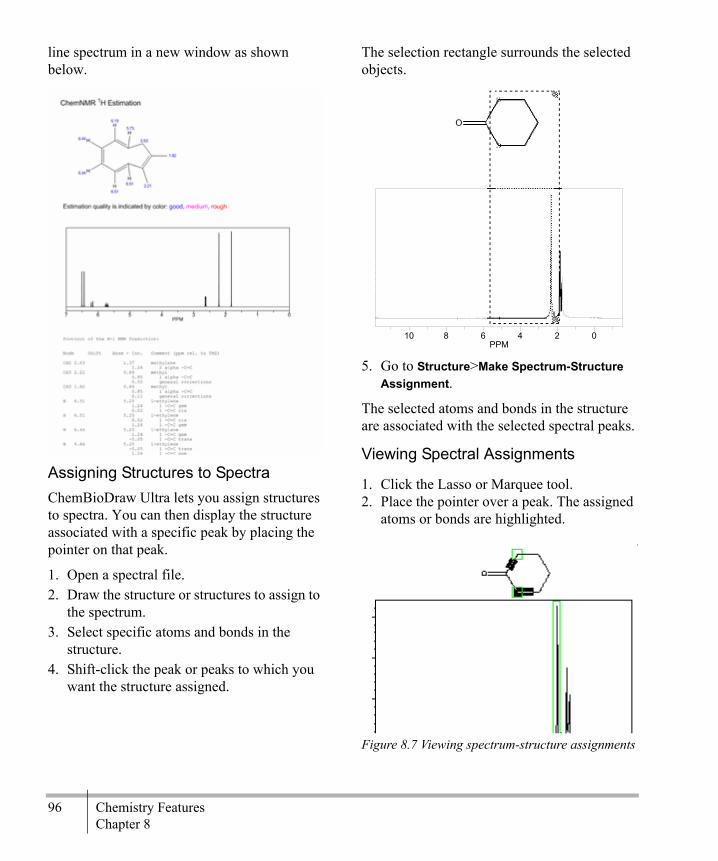
96 Chemistry FeaturesChapter 8
line spectrum in a new window as shown below.
Assigning Structures to SpectraChemBioDraw Ultra lets you assign structures to spectra. You can then display the structure associated with a specific peak by placing the pointer on that peak.
1. Open a spectral file.2. Draw the structure or structures to assign to
the spectrum.3. Select specific atoms and bonds in the
structure.4. Shift-click the peak or peaks to which you
want the structure assigned.
The selection rectangle surrounds the selected objects.
5. Go to Structure>Make Spectrum-Structure Assignment.
The selected atoms and bonds in the structure are associated with the selected spectral peaks.
Viewing Spectral Assignments
1. Click the Lasso or Marquee tool.2. Place the pointer over a peak. The assigned
atoms or bonds are highlighted.
Figure 8.7 Viewing spectrum-structure assignments
0246810PPM
O
Chem & Bio Draw 12.0 97User Guide
Removing Spectral AssignmentsTo remove spectrum to structure assignments:
1. Click the Lasso or Marquee tool.2. Select the objects from which to remove the
assignment.3. Go to Structure>Clear Spectrum-Structure.
Custom Shift Correction DataYou can add your own shift correction data for proton prediction to supplement the existing data that the ChemNMR algorithm uses. You provide your data in an SDF file and then use the file to update the Chem & Bio Draw Chem-NMR database. Using a third-party tool, such as ACD Labs software or MestreNova, you may be able to create your SDF file with the supplementary data already included (Consult your applica-tion’s user manual for instructions). Alterna-tively, you can use ChemBioFinder to add your data to an SDF file.NMR DATA FORMATThe correction data that you add to your SDF file must be in this format:> <SHIFT>
<atom_id>,<shift_value>,<ignored>
For example:> <SHIFT1>2,9.61,0.0
> <SHIFT2>3,8.92,0.0
The correction data for each molecule must appear after the molecule’s structural data. For example, if your SDF file includes benzene, the NMR data must immediately follow the benzene structural data.
Updating the ChemNMR databaseOnce you have an SDF file that contains the supplementary, follow these steps to update the ChemNMR database:
1. Exit Chem & Bio Draw.2. Locate the Chem & Bio Draw ChemNMR
directory. By default, the directory is at:C:\Documents and Settings\All Users\Application Data\ CambridgeSoft\ChemOffice2010\ ChemDraw\ChemNMR
3. Open a DOS prompt:• In Windows XP, go to Start>Run and
enter cmd in the Run window. Click OK.• In Windows Vista, go to Start and enter
cmd in the search field. Press the Enter key.
4. at the DOS prompt, navigate to the Chem-NMR directory in step 2.
5. Enter the command:MakeChemNMRUserDB.exe <input file> <resource directory> <output directory>where
• <input file> is the full path and filename of the SDF file that contains the correction data.
• <resource directory> and <output direc-tory> are the full path to the ChemNMR directory.
6. Restart Chem & Bio Draw.
Restoring Default NMR DataIf you want to stop using your own data, you can restore Chem & Bio Draw to its original settings.To restore the original settings:
1. Exit Chem & Bio Draw.2. Locate the ChemNMR directory.
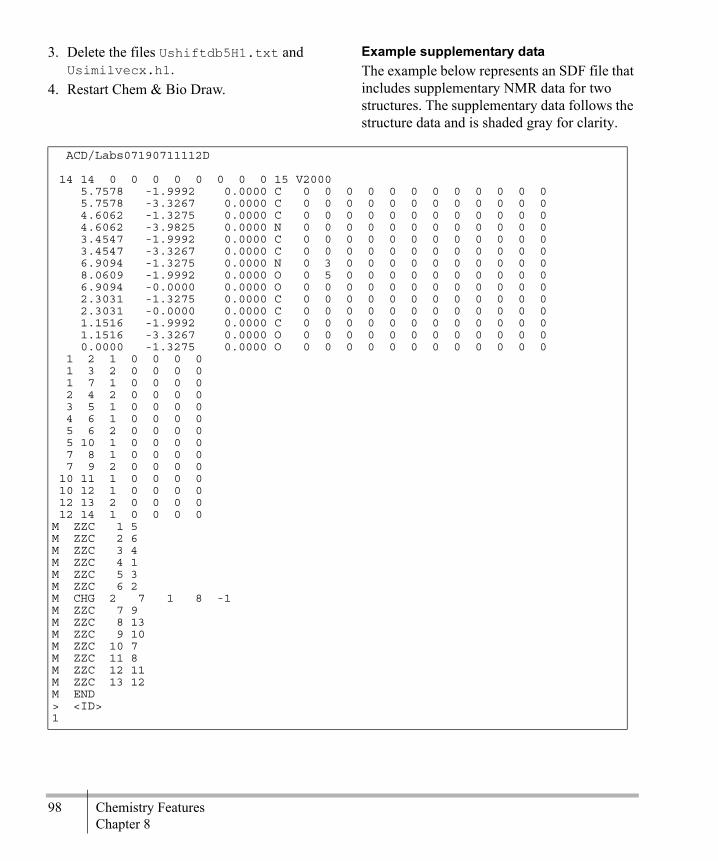
98 Chemistry FeaturesChapter 8
3. Delete the files Ushiftdb5H1.txt and Usimilvecx.h1.
4. Restart Chem & Bio Draw.
Example supplementary dataThe example below represents an SDF file that includes supplementary NMR data for two structures. The supplementary data follows the structure data and is shaded gray for clarity.
ACD/Labs07190711112D
14 14 0 0 0 0 0 0 0 0 15 V2000 5.7578 -1.9992 0.0000 C 0 0 0 0 0 0 0 0 0 0 0 0 5.7578 -3.3267 0.0000 C 0 0 0 0 0 0 0 0 0 0 0 0 4.6062 -1.3275 0.0000 C 0 0 0 0 0 0 0 0 0 0 0 0 4.6062 -3.9825 0.0000 N 0 0 0 0 0 0 0 0 0 0 0 0 3.4547 -1.9992 0.0000 C 0 0 0 0 0 0 0 0 0 0 0 0 3.4547 -3.3267 0.0000 C 0 0 0 0 0 0 0 0 0 0 0 0 6.9094 -1.3275 0.0000 N 0 3 0 0 0 0 0 0 0 0 0 0 8.0609 -1.9992 0.0000 O 0 5 0 0 0 0 0 0 0 0 0 0 6.9094 -0.0000 0.0000 O 0 0 0 0 0 0 0 0 0 0 0 0 2.3031 -1.3275 0.0000 C 0 0 0 0 0 0 0 0 0 0 0 0 2.3031 -0.0000 0.0000 C 0 0 0 0 0 0 0 0 0 0 0 0 1.1516 -1.9992 0.0000 C 0 0 0 0 0 0 0 0 0 0 0 0 1.1516 -3.3267 0.0000 O 0 0 0 0 0 0 0 0 0 0 0 0 0.0000 -1.3275 0.0000 O 0 0 0 0 0 0 0 0 0 0 0 0 1 2 1 0 0 0 0 1 3 2 0 0 0 0 1 7 1 0 0 0 0 2 4 2 0 0 0 0 3 5 1 0 0 0 0 4 6 1 0 0 0 0 5 6 2 0 0 0 0 5 10 1 0 0 0 0 7 8 1 0 0 0 0 7 9 2 0 0 0 0 10 11 1 0 0 0 0 10 12 1 0 0 0 0 12 13 2 0 0 0 0 12 14 1 0 0 0 0M ZZC 1 5M ZZC 2 6M ZZC 3 4M ZZC 4 1M ZZC 5 3M ZZC 6 2M CHG 2 7 1 8 -1M ZZC 7 9M ZZC 8 13M ZZC 9 10M ZZC 10 7M ZZC 11 8M ZZC 12 11M ZZC 13 12M END> <ID>1

Chem & Bio Draw 12.0 99User Guide
> <solvent>d6-DMSO
> <SHIFT1>2,9.61,0.0
> <SHIFT2>3,8.92,0.0
> <SHIFT3>6,9.01,0.0
> <SHIFT4>10,3.11,0.0
> <SHIFT5>11,1.16,0.0
> <SHIFTS>5
$$$$ TH
> <solvent>d6-DMSO
> <SHIFT1>2,9.6,0.0
> <SHIFT2>3,8.91,0.0
> <SHIFT3>6,9.11,0.0
> <SHIFT4>10,2.75,0.0
> <SHIFT5>11,1.17,0.0
> <SHIFT6>12,2.41,0.0
> <SHIFTS>6
$$$$

100 Chemistry FeaturesChapter 8
ACD/Labs07190711112D
15 15 0 0 0 0 0 0 0 0 16 V2000 7.1683 -1.9521 0.0000 C 0 0 0 0 0 0 0 0 0 0 0 0 7.1683 -3.2484 0.0000 C 0 0 0 0 0 0 0 0 0 0 0 0 6.0438 -1.2962 0.0000 C 0 0 0 0 0 0 0 0 0 0 0 0 6.0438 -3.8887 0.0000 N 0 0 0 0 0 0 0 0 0 0 0 0 4.9194 -1.9521 0.0000 C 0 0 0 0 0 0 0 0 0 0 0 0 4.9194 -3.2484 0.0000 C 0 0 0 0 0 0 0 0 0 0 0 0 8.2927 -1.2962 0.0000 N 0 3 0 0 0 0 0 0 0 0 0 0 9.4171 -1.9521 0.0000 O 0 5 0 0 0 0 0 0 0 0 0 0 8.2927 -0.0000 0.0000 O 0 0 0 0 0 0 0 0 0 0 0 0 3.7950 -1.2962 0.0000 C 0 0 0 0 0 0 0 0 0 0 0 0 3.7950 -0.0000 0.0000 C 0 0 0 0 0 0 0 0 0 0 0 0 2.2489 -2.1708 0.0000 C 0 0 0 0 0 0 0 0 0 0 0 0 1.1401 -1.5149 0.0000 C 0 0 0 0 0 0 0 0 0 0 0 0 0.0000 -2.1552 0.0000 O 0 0 0 0 0 0 0 0 0 0 0 0 1.1401 -0.2186 0.0000 O 0 0 0 0 0 0 0 0 0 0 0 0 1 2 1 0 0 0 0 1 3 2 0 0 0 0 1 7 1 0 0 0 0 2 4 2 0 0 0 0 3 5 1 0 0 0 0 4 6 1 0 0 0 0 5 6 2 0 0 0 0 5 10 1 0 0 0 0 7 8 1 0 0 0 0 7 9 2 0 0 0 0 10 11 1 0 0 0 0 10 12 1 0 0 0 0 12 13 1 0 0 0 0 13 14 2 0 0 0 0 13 15 1 0 0 0 0M ZZC 1 5M ZZC 2 6M ZZC 3 4M ZZC 4 1M ZZC 5 3M ZZC 6 2M CHG 2 7 1 8 -1M ZZC 7 9M ZZC 8 14M ZZC 9 10M ZZC 10 7M ZZC 11 8M ZZC 12 11M ZZC 13 12M ZZC 14 13M END> <ID>2

Chem & Bio Draw 12.0 101User Guide
> <solvent>d6-DMSO
> <SHIFT1>2,9.6,0.0
> <SHIFT2>3,8.91,0.0
> <SHIFT3>6,9.11,0.0
> <SHIFT4>10,2.75,0.0
> <SHIFT5>11,1.17,0.0
> <SHIFT6>12,2.41,0.0
> <SHIFTS>6
$$$$

102 Chemistry FeaturesChapter 8

Chem & Bio Draw 12.0 103User Guide
ChemDraw/ExcelChemDraw/Excel is an add-in for Microsoft© Excel© for Windows. ChemDraw/Excel enables you to:
• Add chemical structures and other data from Chem & Bio Draw 12.0 or a Chem-Finder database to an Excel spreadsheet.
• Search using the same search features as ChemFinder.
• Perform calculations on chemical struc-tures.
When you install the add-in, a ChemOffice menu is added to the Excel menu and a toolbar appears.
Setting Up ChemDraw/ExcelWhen you install ChemDraw or Chem & Bio Draw, ChemDraw/Excel is also installed. To open a ChemOffice worksheet, go to ChemOffice12>New ChemOffice Worksheet. When a worksheet is active, ChemDraw/Excel appears in the title bar and the Chem & Bio Draw 12.0 toolbar is active.
Importing TablesChemDraw/Excel lets you import from:
MDL SDFiles. Imports all records in the file. Each structure is given the name stored in the
SD file. MDL SDFiles are supported only in ChemBioDraw Ultra 12.0, ChemDraw Ultra 12.0, and ChemDraw Pro 12.0 onlyChem & Bio Draw 12.0 databases. Imports all fields stored in the main form. Molecular weight and formula fields are not imported because ChemDraw/Excel calculates them. Each structure is named Structure <n>, where n is a unique number.
NOTE: To import CFW files into Excel, save them with the “allow CAL/OLE Automation access” security setting checked. See “Setting Security Options” in Chapter 3 of the Chem-Finder manual for details.
When you import a table, structure data are transformed into structure drawings in the first column, and all other fields are imported in separate columns.To import a table:
1. In Excel, select the cell where you want the import to start. The upper left corner of the import is at this cell. Data is filled down and to the right.
2. Go to ChemOffice12>Import/Export>Import Table. The Import Table dialog box appears.
9

104 ChemDraw/ExcelChapter 9
3. Type or select the file name to import and click Open. All records are added to your spreadsheet.
NOTE: You can import a table only into a new ChemOffice worksheet.
Converting WorksheetsYou can convert a normal Excel worksheet into a ChemDraw/Excel worksheet. Go to ChemOffice12 >Convert Worksheet. “ChemDraw for Excel” appears in the Excel title bar.
Upgrading WorkbooksOlder ChemDraw/Excel workbooks may be incompatible with the latest add-in. Therefore, you may need to upgrade them. To upgrade, go to ChemOffice12>Upgrade Workbook.
Importing Hit ListsYou can search records in ChemFinder and import the hit list structures with data into Excel using the Import ChemFinder List com-mand. ChemFinder must be open with a hit list present.To import a hit list:
1. Go to ChemOffice12>Import/Export>Import ChemFinder List.
2. In the message box, click Yes to import the hit list. The records are imported into Excel.
Error MessagesIf all conditions required to use the Import ChemFinder List command are not met, one of the following error messages may appear.
Error. “ChemFinder is not running, would you like to start it up?”Do the following:
1. Click Yes. The message “After loading your desired database and performing your search, return to Excel and redo the opera-tion.” appears.
2. Click OK. ChemFinder opens. 3. Open a database and perform a search.4. Return to Excel and go to
ChemOffice12>Import/Export>Import Chem-Finder List.
Error. “No database loaded in ChemFinder. Load a database and perform your search. Then return to Excel and redo the operation.”ChemFinder is running, but no database is loaded. Do the following:
1. Click OK. ChemFinder moves to the front. 2. Open a database and perform a search.3. Return to Excel and go to
ChemOffice12>Import/Export>Import Chem-Finder List.
Error. “Form has no database or hit list has no records. Load a database and perform your search. Then return to Excel and redo the oper-ation.”
1. Click OK. ChemFinder moves to the front. 2. Open a database and perform a search.3. Return to Excel and go to
ChemOffice12>Import/Export>Import Chem-Finder List.
Exporting TablesChemDraw/Excel lets you export tables to MDL SDFiles. The first column of the area to export must have the word “Structure” in its

Chem & Bio Draw 12.0 105User Guide
top cell. Structures outside the first column will be discarded.To export data:
1. Select the cells to export, including the cell that contains the word “Structure”.
2. Go to ChemOffice12>Import/Export>Export Table.
3. In the Save Table To dialog box, type the file name and click Save.
Adding StructuresYou can add chemical structures from any file format supported by Chem & Bio Draw 12.0 to a spreadsheet. The names of added structures are retained. If the structure does not have a name, Chem & Bio Draw 12.0 assigns the name: “Structure <n>”, where n is a number unique to the worksheet.The simplest way to insert a new structure in a cell is by using Chem & Bio Draw 12.0.
1. Double-click in a cell. The ChemDraw for Excel dialog box appears.
2. Click Yes. Chem & Bio Draw 12.0 opens.3. Draw the structure.4. In Chem & Bio Draw 12.0, go to File>Exit
and Return to New Molecule. The new struc-ture appears in the cell.
Adding a Structure From a File
1. In Excel, select the cell into which you want to add the structure.
2. Go to ChemOffice12>Molecule>Load. The Choose Molecule To Load dialog box appears.
3. Type or select the file name of the structure to add and click Open.
SMILES StringsYou can insert SMILES strings into cells and convert them to structures.
NOTE: This feature is available in ChemBio-Draw Ultra 12.0, ChemDraw Ultra 12.0, and ChemDraw Pro 12.0 only.
1. Type or paste the SMILES strings into one or more cells.
2. Select the cells to convert.
NOTE: (Optional) To keep the original text, copy and paste it elsewhere.
3. Go to ChemOffice12>Convert>SMILES to Molecule. The cell will display a text string starting with “Structure” followed by a number.
4. To display the structure, click the Show Pictures icon. If the cell did not contain a valid SMILES string, the string remains.
Adding Structures by NameYou can type or paste the names of chemicals into cells and convert them into structures.
1. Enter the names into cells.2. Select the cells to convert.
NOTE: (Optional) To keep the original text, copy and paste it elsewhere. This command can also convert names generated from Excel for-mulas.
3. Select ChemOffice12>Convert>Name To Molecule.

106 ChemDraw/ExcelChapter 9
If the cell contains a name supported by Name=Struct, the structure appears with the given name as the name of the cell. 4. To show the structure, select the cell and
choose ChemOffice12>Picture>Show.
Saving StructuresYou can save a chemical structure to a separate file.
1. In the spreadsheet, select the cell containing the structure.
2. Go to ChemOffice12>Molecule>Save. The Save to File dialog box appears.
3. Select an existing file or enter a new file name and click Save.
SearchingYou can search for structures based on the cri-teria and search function you use. ChemDraw/Excel offers three basic search functions:
• Normal search• Similarity search• R-Group Analysis
Opening a databaseBefore searching, you must open the structure database.
1. In Excel, go to ChemOffice12>New ChemOffice Worksheet.
2. Go to ChemOffice12>Import/Export>Import Table or Import ChemFinder list and select the file to import.
After you open a database, you can search for structures.
Normal SearchesUse a normal search to find full structures and substructures that match the one you define in the search dialog box.
1. Select a cell containing the label Structure.2. Go to ChemOffice12>Search>Normal.3. The ChemDraw for Excel dialog box
appears.4. Select the Search Tab.5. Click in the empty window and draw the
structure for which you want to search.6. Select the Normal tab at the bottom of the
dialog box.7. For Search Type, select either Full Structure
or Sub Structure.8. For Filter Type, select to either include or
exclude hits.9. Enter a formula query.10.Click Search. The hit list is displayed in a
column named Match. Items matching the search criteria are labeled as TRUE.
Similarity SearchesPerform a similarity search to find structures with features corresponding to a structure of your choosing. For more information about similarity searching, see the ChemFinder User’s Guide.To search for similarity:
1. Select a cell containing the label Structure.2. Go to ChemOffice12>Search>Similarity. The
ChemDraw for Excel dialog box appears.3. Select the Search Tab.4. Click in the empty window and draw the
structure for which you want to search.5. Select the Similarity tab.6. Select the Search Type.

Chem & Bio Draw 12.0 107User Guide
7. Select the Sort Results order.8. Select the Similarity Percent value.9. Click Search. The hit list is displayed in a
column named Similarity. Items matching the search criteria are labeled as TRUE.
R-Group AnalysisAn R-group analysis returns all molecules in the query database that include a template structure that you provide. For example, assume you want to find all molecules in the database that include toluene in its structure, such as p-cresol or o-xylene (assuming your database includes these molecules). Simply draw toluene as your template and the analysis will return all molecules that contain at least one toluene structure.
Interpreting Analysis ResultsTo illustrate, we will assume that you have a small database that consists of four molecules: o-, m-, and p-cresol, and bromobenzene. Fur-ther assume you want to run an R-group analy-sis on this database to find all the molecules that contain toluene in its structure. You will find that the results include three main parts:
• The list of molecules that contain the tolu-ene template. In this example, the results include o-, m-, and p-cresol. Bromobenzene is not included because it does not contain the template.
• The toluene template with all variations of R-group attachments that were found in the database. In this example, the attachments are represented by functional groups. These are the locations of the R-groups found in
the analysis results; the hydroxyl groups for o-, m-, and p-cresol.
• The functional group found at each Rn posi-tion for each search result. For a given returned molecule, view across its row to view the functional group at each R-group position. In this example, the search results consist of a hydrogen and hydroxyl group for R1, R2, and R3.
Working with StructuresChemDraw/Excel lets you rename structures and use the clipboard to cut, copy, and paste structures.
Naming StructuresExcel recognizes certain characters as formu-las. To prevent the system from interpreting a chemical structure name as an Excel formula, you can rename a structure.To name a structure:
1. Select the structure.2. Go to ChemOffice12>Molecule>Name All
Selected. The Name Molecule dialog box appears.
3. Type the name and click OK.

108 ChemDraw/ExcelChapter 9
Using the ClipboardYou can cut, copy, and paste structures using the clipboard.To cut a structure from a cell:
1. Select the structure.2. Go to ChemOffice12>Molecule>Cut. The
structure is removed from the cell and is placed on the clipboard.
To copy a structure from a cell:
1. Select the structure.2. Go to ChemOffice12>Molecule>Copy.The structure remains in the cell and a copy is placed on the clipboard.To paste a structure:
1. Select the area where you want to paste the structure.
2. Go to ChemOffice12>Molecule>Paste. The structure is pasted from the clipboard.
Displaying StructuresChemDraw/Excel lets you select whether to display structures. You can also adjust the size of cells to display their entire contents.To show structures:
1. Select the cells in which you want to dis-play or hide structures.
2. Select ChemOffice12>Picture>Show or Hide.
Aligning StructuresA structure may be too big for its cell or be improperly positioned. To correct the problem, select the Align All Pictures command.To align structures, go to ChemOffice12>Pic-ture>Align Pictures. The cells adjust to display their entire contents.
Resizing Structures1. Select the cells whose pictures you want to
resize. 2. Select Resize Picture on the ChemOffice
menu. Resize handles appear on the selected structures.
3. Click-drag the resize handles to resize a picture. Any changes you make to a picture is proportionately reflected in the other pic-tures.
4. To end resizing, click a cell and the pictures are deselected.
NOTE: When pictures are resized larger than their cells, use Align Pictures to enlarge the cells. Align Pictures does not make cells smaller.
ChemDraw/Excel FunctionsChemDraw/Excel supplies a variety of func-tions that return information about chemistry objects in a specified cell.
NOTE: Functions that report chemical proper-ties are available in ChemBioDraw Ultra 12.0, ChemDraw Ultra 12.0, and ChemDraw Pro 12.0 only.
NOTE: The surface area and volume calcula-tions are performed with Michael Connolly's program for computing molecular surface areas and volume (M.L. Connolly. The Molecu-lar Surface Package. J. Mol. Graphics 1993, 11).

Chem & Bio Draw 12.0 109User Guide
To insert a ChemDraw/Excel function into your worksheet:
1. Select an empty cell. 2. Go to Insert>Function. The Insert Functions
dialog box appears.3. In the Category dropdown list, select
ChemDraw Functions.4. Select the function to insert from the list
and click OK. A dialog box appears.5. Enter the structure cell reference for which
you want to calculate properties in the Structure box.
6. If the function takes a second argument, enter it in the Element type box. Element type arguments are optional.
7. Click OK.
Each property is calculated using the “best available” method. If the cell reference argu-ment does not point to a valid structure cell, #N/A appears in the cell.All ChemDraw/Excel functions are described below.
Chemical nameDisplays systematic names for chemical struc-tures with support for the Cahn-Ingold-Prelog rules for stereochemistry.
FunctionCFW_CHEMICAL_NAME(cell ref)
ExampleIn cell: =CFW_CHEMICAL_NAME(A2)
Result: 1-(2,3-dihydro-1H-inden-2-yl)propan-2-one
NOTE: Some CambridgeSoft product pack-ages and levels allow unlimited structure-to-name conversions, while others impose a daily limit on conversions.
Chemical compositionWhen this function is called with just a cell ref-erence, it displays the elemental percent by weight for all elements in the structure. When this function is called with a cell reference and an atomic symbol, it displays the fraction by weight of the given element in the structure.
FunctionsCHEM_COMPOSITION(cell ref)
CHEM_COMPOSITION(cell ref, atomic sym-bol)
ExamplesIn cell: =CHEM_COMPOSITION(A2) Result: C,82.72;H,8.10;O,9.18 In cell: =CHEM_COMPOSITION(A2, "C") Result: 0.827188133
Chemical formulaDisplays the chemical formula for the struc-ture(s) in the cell.
FunctionsCHEM_FORMULA(cell ref) CHEMPROPSTD_MOL_FORMULA(cell ref)
ExamplesIn cell: =CHEM_FORMULA(A2) Result: C12H14O In cell: =CHEMPROPSTD_MOL_FORMULA(A2)

110 ChemDraw/ExcelChapter 9
Result: C12H14O
Molecular weightDisplays the average molecular mass of the structure, where atomic masses are based on the weighted average of all isotope masses for the element.
Unitsatomic mass units
FunctionsCHEM_MOLWEIGHT(cell ref) CHEMPROPSTD_MOL_WEIGHT(cell ref) CHEMPROPSTD_MASS(cell ref)
ExamplesIn cell: =CHEM_MOLWEIGHT(A2)Result: 174.23896 In cell: =CHEMPROPSTD_MOL_WEIGHT(A2)Result: 174.238960 In cell: =CHEMPROPSTD_MASS(A2)Result: 174.238960
Exact massDisplays the exact molecular mass of the mole-cule, where atomic masses of each atom are based on the most common isotope for the ele-ment.
Unitsg/mole
FunctionCHEMPROPSTD_EXACT_MASS(cell ref)
ExampleIn cell: =CHEMPROPSTD_EXACT_MASS(A2)Result: 174.104465
Number of atomsWhen this function is called with just a cell ref-erence, it displays the total number of atoms in the structure. When this function is called with a cell reference and an atomic symbol, it dis-plays the number of atoms of the given ele-ment in the structure.
FunctionsCHEM_NUM_ATOMS(cell ref) CHEM_NUM_ATOMS(cell ref, atomic symbol)
ExamplesIn cell: =CHEM_NUM_ATOMS(A2)Result: 27 In cell: =CHEM_NUM_ATOMS(A2, "C")Result: 12
Number of hydrogen-bond acceptorsDisplays the number of hydrogen-bond accep-tors based on topology.
FunctionCHEM_NUM_HBACCEPTORS(cell ref)
ExampleIn cell: =CHEM_NUM_HBACCEPTORS(A2) Result: 1
Number of hydrogen-bond donorsDisplays the number of hydrogen-bond donors based on topology.
FunctionCHEM_NUM_HBDONORS(cell ref)
ExampleIn cell: =CHEM_NUM_HBDONORS(A2) Result: 0

Chem & Bio Draw 12.0 111User Guide
SMILES stringDisplays the SMILES string for the structure.
FunctionCHEM_SMILES(cell ref)
ExampleIn cell: =CHEM_SMILES(A2)Result: O=C(C)CC(C1)Cc2c1cccc2
Formal chargeDisplays the net charge on the molecule.
FunctionCHEMPROPSTD_FORMAL_CHARGE(cell ref)
ExampleIn cell: =CHEMPROPSTD_FORMAL_CHARGE(A2Result: -1
Does cell have a structure drawing?Returns TRUE if the cell has a ChemOffice/Excel structure drawing (including reaction drawings), returns FALSE otherwise.
FunctionISSTRUCTURE(cell ref)
ExampleIn cell: =ISSTRUCTURE(A2)Result: False
Does cell have reaction drawing?Returns TRUE if the cell has a ChemOffice/Excel structure drawing of a reaction drawings, returns FALSE otherwise.
FunctionISREACTION(cell ref)
ExampleIn cell: =ISREACTION(A2Result: True
Boiling pointThe boiling point for the molecule at one atm.
UnitsKelvin
FunctionsCHEMPROP_BOILING(cell ref) CHEMPROPPRO_BOILING_POINT(cell ref)
ExamplesIn cell: =CHEMPROP_BOILING(A2)Result: 540.059 In cell: =CHEMPROPPRO_BOILING_POINT(A2)
Result: 540.059
Melting/freezing pointThe melting/freezing point for the structure at 1 atm.
UnitsKelvin
FunctionsCHEMPROP_FREEZING(cell ref)CHEMPROPPRO_MELTING_POINT(cell ref)
ExamplesIn cell: =CHEMPROP_FREEZING(A2)Result: 331.31 In cell: =CHEMPROPPRO_MELTING_POINT(A2)
Result: 331.31

112 ChemDraw/ExcelChapter 9
Vapor pressureThe vapor pressure for the structure at 25° C.
UnitsPa
FunctionCHEMPROPPRO_VAPOR_PRESSURE(cell ref)
ExampleIn cell: =CHEMPROPPRO_VAPOR_PRESSURE(A2)
Result: 0
Critical pressureThe minimum pressure that must be applied to liquefy the structure at the critical temperature.
Unitsbar
FunctionsCHEMPROP_CRITICAL_PRESSURE(cell ref) CHEMPROPPRO_CRITICAL_PRESSURE(cell ref)
ExamplesIn cell: =CHEMPROP_CRITICAL_PRESSURE(A2)
Result: 49.8035 In cell: =CHEMPROPPRO_CRITICAL_PRESSURE(A2) Result: 49.804
Critical temperatureThe temperature above which the gas form of the structure cannot be liquefied, no matter the applied pressure.
UnitsKelvin
FunctionsCHEMPROP_CRITICAL_TEMP(cell ref) CHEMPROPPRO_CRITICAL_TEMPERATURE(cell ref)
ExamplesIn cell: =CHEMPROP_CRITICAL_TEMP(A2) Result: 615.351 In cell: =CHEMPROPPRO_CRITICAL_TEMPERATURE(A2) Result: 615.351
Critical volumeThe volume occupied at the compound's criti-cal temperature and pressure.
Unitscm3/mole
FunctionsCHEMPROP_CRITICAL_VOLUME(cell ref) CHEMPROPPRO_CRITICAL_VOLUME(cell ref)
ExamplesIn cell: =CHEMPROP_CRITICAL_VOLUME(A2)Result: 562.5 In cell: =CHEMPROPPRO_CRITICAL_VOLUME(A2)
Result: 562.5
Gibbs Free EnergyThe Gibbs free energy for the structure at 298.15 K and 1 atm.
UnitskJ/mole
FunctionsCHEMPROP_GIBBS(cell ref)

Chem & Bio Draw 12.0 113User Guide
CHEMPROPPRO_GIBBS_FREE_ENERGY(cell ref)
ExamplesIn cell: =CHEMPROP_GIBBS(A2) Result: 84.77 In cell: =CHEMPROPPRO_GIBBS_FREE_ENERGY(A2) Result: 84.77
Henry's Law ConstantThe inverse of the logarithm of Henry's Law constant.
FunctionsCHEMPROP_HENRY_LAW_CONSTANT(cell ref)
ExampleIn cell: =CHEMPROP_HENRY_LAW_CONSTANT(A2) Result: 4.78182
Heat of FormationThe heat of formation for the structure at 298.15 K and 1 atm.
Unitskcals/mole
FunctionsCHEMPROP_HOF(cell ref) CHEMPROPPRO_HEAT_OF_FORMATION(cell ref)
ExamplesIn cell: =CHEMPROP_HOF(A2) Result: ^-105.73 In cell: =CHEMPROPPRO_HEAT_OF_FORMATION(A2) Result: -105.73
Ideal Gas Thermal CapacityThe constant pressure (1 atm) molar heat capacity at 298.15 K for an ideal gas com-pound.
UnitsJ/[mole K]
FunctionsCHEMPROP_IDEAL_GAS(cell ref) CHEMPROPPRO_IDEAL_GAS_THERMAL_CAPACITY(cell ref)
ExamplesIn cell: =CHEMPROP_IDEAL_GAS(A2) Result: 201.036 In cell: =CHEMPROPPRO_IDEAL_GAS_THERMAL_CAPACITY(A2) Result: 201.036
LogPThe logarithm of the partition coefficient for n-octanol/water.
FunctionsCHEMPROPPRO_LOGP(cell ref) CLOGP_DRIVER_PARTITION_COEFFICIENT(cell ref)
ExamplesIn cell: =CHEMPROPPRO_LOGP(A2) Result: 2.233 In cell: =CLOGP_DRIVER_PARTITION_COEFFICIENT(A2) Result: 2.243
Molar refractivityThe molar refraction index.

114 ChemDraw/ExcelChapter 9
Unitscm3/mole
FunctionsCHEMPROPPRO_MOL_REFRACTIVITY(cell ref) CLOGP_DRIVER_MOL_REFRACTIVITY(cell ref)
ExamplesIn cell: =CHEMPROPPRO_MOL_REFRACTIVITY(A2)
Result: 53.305 In cell: =CLOGP_DRIVER_MOL_REFRACTIVITY(A2) Result: 5.3297
Water solubilityPrediction of the water solubility of the struc-ture at 25° C.
Unitsmg/L
FunctionCHEMPROPPRO_WATER_SOLUBILITY(cell ref)
ExampleIn cell: =CHEMPROPPRO_WATER_SOLUBILITY(A2) Result: 0
Connolly Solvent Accessible Surface AreaThe locus of the center of a spherical probe (representing the solvent) as it is rolled over the molecular model.
UnitsAngstroms2
FunctionCHEMPROPSTD_CONNOLLY_ACCESSIBLE_AREA(cell ref)
ExampleIn cell: =CHEMPROPSTD_CONNOLLY_ACCESSIBLE_AREA(A2) Result: 428.557
NOTE: The default probe radius used in the calculations is 1.4 angstroms.
Connolly Molecular Surface AreaThe contact surface created when a spherical probe (representing the solvent) is rolled over the molecular model.
UnitsAngstroms2
FunctionCHEMPROPSTD_CONNOLLY_MOLECULAR_AREA(cell ref)
ExampleIn cell: =CHEMPROPSTD_CONNOLLY_MOLECULAR_AREA(A2) Result: 212.294
NOTE: The default probe radius used in the calculations is 1.4 angstroms.
Connolly Solvent-Excluded VolumeThe volume contained within the contact molecular surface.

Chem & Bio Draw 12.0 115User Guide
UnitsAngstroms3
FunctionCHEMPROPSTD_CONNOLLY_SOLVENT_EXCLUDED_VOLUME(cell ref)
ExampleIn cell: =CHEMPROPSTD_CONNOLLY_SOLVENT_EXCLUDED_VOLUME(A2) Result: 170.277
OvalityThe ratio of the molecular surface area to the minimum surface area. The minimum surface area is the surface area of a sphere having a value equal to the solvent-excluded volume of the molecule. Computed from the Connolly Molecular Surface Area and Solvent-Excluded Volume properties.
FunctionCHEMPROPSTD_OVALITY(cell ref)
ExampleIn cell: =CHEMPROPSTD_OVALITY(A2) Result: 1.428947
Principal Moments of Inertia (X, Y, Z)The moments of inertia when the Cartesian coordinate axes are the principal axes of the molecule.
Unitsgrams/mole Angstroms2
FunctionCHEMPROPSTD_PRINCIPAL_MOMENT(cell ref)
ExampleIn cell: =CHEMPROPSTD_PRINCIPAL_MOMENT(A2) Result: 249.546 1409.279 1658.824
Balaban index
FunctionMOLECULAR_TOPOLOGY_BALABAN_INDEX(cell ref)
ExampleIn cell: =MOLECULAR_TOPOLOGY_BALABAN_INDEX(A2) Result: 29909
Cluster count
FunctionMOLECULAR_TOPOLOGY_CLUSTER_COUNT(cell ref)
ExampleIn cell: =MOLECULAR_TOPOLOGY_CLUSTER_COUNT(A2) Result: 13
Topological index
FunctionMOLECULAR_TOPOLOGY_MOLECULAR_TOPOLOGICAL_INDEX(cell ref)
ExampleIn cell: =MOLECULAR_TOPOLOGY_MOLECULAR_TOPOLOGICAL_INDEX(A2) Result: 1998

116 ChemDraw/ExcelChapter 9
Number of rotatable bonds
FunctionMOLECULAR_TOPOLOGY_NUM_ROTATABLE_BONDS(cell ref)
ExampleIn cell: =MOLECULAR_TOPOLOGY_NUM_ROTATABLE_BONDS(A2) Result: 2
Polar surface area
FunctionMOLECULAR_TOPOLOGY_POLAR_SURFACE_AREA(cell ref)
ExampleIn cell: =MOLECULAR_TOPOLOGY_POLAR_SURFACE_AREA(A2) Result: 17.07
Radius
FunctionMOLECULAR_TOPOLOGY_RADIUS(cell ref)
ExampleIn cell: =MOLECULAR_TOPOLOGY_RADIUS(A2) Result: 4
Shape attribute
FunctionMOLECULAR_TOPOLOGY_SHAPE_ATTRIBUTE(cell ref)
ExampleIn cell: =MOLECULAR_TOPOLOGY_SHAPE_ATTRIBUTE(A2) Result: 11.076923
Shape coefficient
FunctionMOLECULAR_TOPOLOGY_SHAPE_COEFFICIENT(cell ref)
ExampleIn cell: =MOLECULAR_TOPOLOGY_SHAPE_COEFFICIENT(A2) Result: 0
Sum of degrees
FunctionMOLECULAR_TOPOLOGY_SUM_OF_DEGREES(cell ref)
ExampleIn cell: =MOLECULAR_TOPOLOGY_SUM_OF_DEGREES(A2) Result: 28
Sum of valence degrees
FunctionMOLECULAR_TOPOLOGY_SUM_OF_VALENCE_DEGREES(cell ref)
ExampleIn cell: =MOLECULAR_TOPOLOGY_SUM_OF_VALENCE_DEGREES(A2) Result: 40

Chem & Bio Draw 12.0 117User Guide
Topological diameter
FunctionMOLECULAR_TOPOLOGY_TOPOLOGICAL_DIAMETER(cell ref)
ExampleIn cell: =MOLECULAR_TOPOLOGY_TOPOLOGICAL_DIAMETER(A2) Result: 7
Total connectivity
FunctionMOLECULAR_TOPOLOGY_TOTAL_CONNECTIVITY(cell ref)
ExampleIn cell: =MOLECULAR_TOPOLOGY_TOTAL_CONNECTIVITY(A2) Result: 0.009821
Total valence connectivity
FunctionMOLECULAR_TOPOLOGY_TOTAL_VALENCE_CONNECTIVITY(cell ref)
ExampleIn cell: =MOLECULAR_TOPOLOGY_TOTAL_VALENCE_CONNECTIVITY(A2) Result: 0.001157
Wiener index
FunctionMOLECULAR_TOPOLOGY_WIENER_INDEX(cell ref)
ExampleIn cell: =MOLECULAR_TOPOLOGY_WIENER_INDEX(A2)
Result: 249

118 ChemDraw/ExcelChapter 9

Chem & Bio Draw 12.0 119User Guide
Query StructuresA query is simply a search for information that is stored in a database. If you have ever searched the Internet using a Web browser, then you have performed a simple query. The query parameter is the alphanumeric text you enter in the search engine text field and the list of Web sites that are returned is the query result.A query structure is a parameter you use to search chemical databases (the database must include structures for the query to be useful). The query structure can include bond and atom properties that you specify to narrow or broaden the list of search results. Here are two query structure examples:
Figure 10.1 Two example structure queries. A) The results will include any connected atom at the loca-tion specified by ‘R’; B) The results will include either a single or double bond at the location speci-fied by ‘S’D’.
To perform a query, you first draw the query structure in Chem & Bio Draw. You then enter the structure in a database application such as ChemBioFinder 12.0. The application then searches one or more databases that you spec-ify and returns the query results.
Search limitationsSeveral factors determine the search results that are returned. To get the results you expect, you must first ensure that the structure you draw accurately represents the query you want to perform. For example, if your query struc-ture requires that no carbon atoms in an aro-matic structure can be part of any ring, you are likely to return no results or an error, depend-ing on the query system used. Your search application you use can also affect your query. If the application does not accu-rately interpret your query structure or the structures in the database, you may receive inaccurate results.
Generic NicknamesA generic nickname represents a nonspecific attachment. It can be either an unspecified atom, functional group, or structural feature. When you perform a query, the query will look for structures based on the type of generic nickname you use and where it is located in the
10

120 Query StructuresChapter 10
query structure. Records that match the query structure are returned in the search results.
NOTE: The nicknames feature is available in ChemBioDraw Ultra 12.0, ChemDraw Ultra 12.0, and ChemDraw Pro 12.0 only.
For example, the query structure below uses the letter ‘Q’ to indicate that a nonhydrogen, noncarbon atom must appear at the specified location.
Other generic nicknames may be used to indi-cate other types of query criteria. The generic nicknames that Chem & Bio Office 12.0 sup-ports is listed below (all are recognized as chemically significant).
• A: represents one atom only.• M: represents metal.• Q: represents an atom that is neither hydro-
gen nor carbon.• X: represents any halide.• R: unrestricted; represents zero or more
connected atoms of any kind.
To label an atomic position with a generic nickname, do one of the following:
• Double-click the atom to open a text box, and type in the nickname.
• Right-click the atom, point to Insert Generic Label on the context menu, and click the label you wish to insert on the sub-menu.
Generic Nickname HotkeysYou can assign hotKeys to generic nicknames just like other nicknames. For information on assigning a Hotkey to a nickname, see “Cus-tomizing Hotkeys” on page 167.
Defining Generic NicknamesYou cannot define the meaning of a generic nickname because generic nicknames can rep-resent multiple (and perhaps an infinite num-ber of) substituents. Generic nicknames have meaning only in the context of the search sys-tem you are using.The generic nicknames recognized as chemi-cally meaningful are listed in the Generic Nicknames file in the ChemDraw Items folder. To edit the generic nickname files, open the Generic Nicknames file in a text editor and make your changes. Follow examples in the file for the correct format.
NOTE: If you check a structure that has a generic nickname, a message is displayed because the structure contains variable substit-uents. If you ignore this message, the generic nicknames are ignored and the chemical for-mula, mass, etc. are reported as if the atom label containing the generic nickname were not selected.
Atom PropertiesAtom properties determine what structural fea-tures are allowed at the site of an atom. For example, you can specify that a carbon atom must be part of a ring, have at least two attach-

Chem & Bio Draw 12.0 121User Guide
ments, have no attachments, or perhaps be a specific isotope. You can specify a wide vari-ety of properties for any atoms in your query structure.
NOTE: The atom properties feature is avail-able in ChemBioDraw Ultra 12.0, ChemDraw Ultra 12.0, and ChemDraw Pro 12.0 only.
Assigning atom propertiesTo assign properties to selected atoms in a structure:
1. Select one or more atoms.2. To open the Atom Properties dialog box, do
one of the following:
• Right-click, select Atom Properties. • Go to Structure>Atom Properties.• Press the Hotkey “/ ”.
3. In the Atom Properties dialog box, select the properties to associate with the selected atom(s).
4. Click OK.
Query IndicatorsQuery indicators display the atom properties that you assign to a structure, as the figure below illustrates. If more than one property is
assigned, a character for each property appears adjacent to the atom.
Figure 10.1 This structure illustrates a variety of possible atom properties that can be assigned. The icons in the structure are described throughout this guide.
The list below describes the query property for each indicator. For more information, see “Query Indicators” on page 121.*—Substituents: Free Sites (followed by the number of free sites)U—Substituents: Up to (followed by the maxi-mum number of substituents)X—Substituents: Exactly (followed by the number of substituents)H—Implicit HydrogensR—Ring Bond CountS—UnsaturationC—Reaction ChangeT—Reaction StereoL—Translation(none)—Abnormal Valence
Viewing indicators for an atom or bondExcept for the substituents query properties, the characters indicate that a given property is applied, but not the value of that property. To find the value of a query property setting:
1. Select the atom.2. Do one of the following:
• Right-click, point to an atom, and point to the appropriate property.

122 Query StructuresChapter 10
• Go to Structure>Properties and view the settings on the Atom Properties tab.
Showing indicators for a structureTo display query indicators for a structure:
1. Select the structure.2. Right-click and go to Atom> or Bond>Show
Query Indicator on the context menu.
To display query indicators for an atom or bond:
1. Right-click the atom or bond.2. Choose Show Query Indicator on the context
menu.
Positioning Query IndicatorsQuery indicators are positioned automatically and move appropriately if a structure is modi-fied. You can reposition them by dragging them to the desired position or with the Indica-tor Position dialog box.To reposition an indicator numerically:
1. With a selection tool, click the indicator to move.
2. Right-click and choose Position. The Posi-tion Indicator dialog box appears.
3. Click the appropriate Position option, and type a value:
Hiding a query indicatorsTo hide an indicator:
1. Right-click the indicator.2. Choose Hide Indicator on the context menu.
Removing Atom PropertiesTo remove all properties from an atom:
1. Select the atom.2. Go to Structure>Atom Properties.3. Click Use Defaults.
To remove specific properties from an atom, do one of the following:
• Right-click the atom. In the context menu, select Atom Properties and choose the prop-erties to remove.
• Go to Structure>Atom Properties and click the atom properties to remove.
• With query indicators shown, click the appropriate query indicator with the eraser tool.
Atom Property OptionsThe properties you can assign to atoms are described below.
NOTE: These features are available in Chem-BioDraw Ultra 12.0, ChemDraw Ultra 12.0, and ChemDraw Pro 12.0 only.
SubstituentsA substituent is defined as a non-hydrogen atom connected by a bond of any order. The substituents properties specify the number of substituents that may be bonded to the selected atoms. For example, in the figure below, the carbonyl carbon (B) has a substituents count of two, the
To Position … Type a value for…
from the atom or bond center to indicator cen-ter
angle, degrees or clock, o’clock
from the atom or bond center to bottom left of indicator baseline
offset, horizontal and vertical
at specified coordi-nates
absolute, horizontal and vertical

Chem & Bio Draw 12.0 123User Guide
alpha carbon (A) and the aldehyde oxygen. (hydrogen atoms are not counted). The alde-hyde oxygen has only one substituent.
Figure 10.2 Substituent count.
The substituent count atom property lets you specify the number of bonds to an atom in the target structure. This includes bonds already drawn in the query structure. The various substituent options are described below.Unspecified. This is the default. The target base determines the search. Some databases find compounds with any substitution at this atom; other databases (including DARC) find only compounds with substitution exactly as drawn.Free Sites. Finds compounds in which the selected atoms may contain a range of substitu-ents up to the number specified plus the num-ber of bonds as drawn. A value of zero finds a substituent count as drawn. You can also use the Free Sites symbol in the Query toolbar to apply free sites.Up to. Finds compounds in which the selected atoms may contain a range of substituents up to the number specified.Exactly. Finds compounds in which the selected atoms contain the exact number of substituents as specified, up to 15 substituents.
Implicit Hydrogens An implicit hydrogen is a hydrogen atom in which it or its bond is implied but is not visi-
ble. An explicit hydrogen and its bond are visi-ble.
Figure 10.3 A) examples of implicit hydrogens; B) an explicit hydrogen.
The Implicit Hydrogens property specifies whether additional, implicit hydrogen atoms may be attached to the selected atoms. If implicit hydrogen atoms are not allowed, all valences to that atom must be filled by bonds to non-hydrogen atoms.
NOTE: The implicit hydrogens property is available in ChemBioDraw Ultra 12.0, ChemDraw Ultra 12.0, and ChemDraw Pro 12.0 only.
Ring Bond CountThe Ring Bond Count specifies the number of bonds attached to an atom that are part of rings of any size. For simple cases, this also speci-
Option Search Result
Allowed Default. Finds compounds regardless of whether hydrogen atoms are attached to the selected atoms.
Not allowed
Finds compounds with no additional hydrogen atoms attached to the selected atoms.

124 Query StructuresChapter 10
fies the maximum number of rings in which an atom can reside.
UnsaturationThe Unsaturation property specifies whether a multiple bond is attached to the selected atoms.
Reaction ChangeThe Reaction Change property specifies whether a change occurs at selected atoms after a reaction. This property is meaningful only when searching a database that contains chemical reactions. In ChemFinder, only the
Option Search Result
Any Default. Finds compounds in which the selected atoms can be a member of any type of ring, or a member of no ring at all.
No ring bonds
Finds compounds in which the selected atoms are acyclic.
As drawn Finds compounds in which the selected atoms reside in the same type and number of rings as drawn.
Simple ring Finds compounds in which the selected atoms is a member of only one ring (the atom has two ring bonds).
Fusion Finds compounds in which the selected atoms lies at ring fusions (the atom has three ring bonds).
Spiro or higher
Finds compounds in which the selected atoms is a member of a spiro or higher linkage (the atom has four or more ring bonds).
Option Search Result
Unspecified Default. Finds compounds regardless of whether a multiple bond is attached to the selected atoms.
Must be absent
Finds compounds that do not have a multiple bond attached to the selected atoms.
Must be present
Finds compounds that have at least one multiple bond (double, triple or aromatic) attached to the selected atoms.

Chem & Bio Draw 12.0 125User Guide
product atom is checked. The stereo designa-tion is ignored on reactants.
NOTE: The reaction change property is avail-able in ChemBioDraw Ultra 12.0, ChemDraw Ultra 12.0, and ChemDraw Pro 12.0 only
Figure 10.4 The reaction change indicator is circled in the figure above.
Free SitesA free site query lets you specify the maximum number of substituents a result can have. How-ever, it also requires that the bonds in the results appear exactly as they appear in the query structure.
NOTE: The Free Sites feature is available in ChemBioDraw Ultra 12.0, ChemDraw Ultra 12.0, and ChemDraw Pro 12.0 only.
To increase the number of free sites:
1. To display the Query tools, go to View>Other Toolbars>Query Tools or click the Query Tools icon on the Main Tool pal-ette.
2. Click the Free Site tool on the Query tools palette.
3. Click the atom to which you want to apply free sites.
4. Continue to click the atom to increase the free site number.
To reduce the number of free sites, hold the Alt or Option key while clicking the atom.You can also change the free sites using the Atom Properties dialog box or the shortcut menu. See “Atom Properties” on page 120.
Reaction StereoThe Reaction Stereo property specifies that the selected atoms are stereocenters in a reaction. This property is only meaningful when search-ing a database containing chemical reactions.
Figure 10.5 The reaction stereo indicator is circled in this example.
Option Search Result
May be anything
Default. Finds all reactions regardless of any change to selected atoms after a reaction.
Must be as specified
Finds all reactions that are changed at the selected atoms exactly as specified by the reac-tion center property in the Atom Properties dialog box.
Option Search Result
Any Default. Finds all compounds regardless of the stereochemistry at the selected atoms.
Inversion Finds compounds in which the selected atoms have an inverted stereo configuration after a reac-tion.

126 Query StructuresChapter 10
TranslationThe Translation property specifies what is required to match in the structure query and possible database hits in a Markush DARC query.
For more information, see the Markush DARC User Manual.
Isotopic AbundanceThe Isotopic Abundance property lets you dis-tinguish between different isotopic com-pounds—for example between mono- and
hexa-deuterobenzene—by specifying a nuclide at any location.
NOTE: The isotopic abundance property is available in ChemBioDraw Ultra 12.0, ChemDraw Ultra 12.0, and ChemDraw Pro 12.0 only.
Abnormal ValenceThe Abnormal Valence property specifies whether selected atoms can have a valence other than normal. “Normal” valences for each
Retention Finds compounds whose selected atoms have an unchanged stereo configuration after a reaction.
Option Definition
Equal Default. Matches specific to specific or generic to generic terms.
Broad Translates specific query atoms to corresponding superatoms in the database.
Narrow Translates query superatoms to corresponding specific atoms or groups in the database.
Any Translates generic or specific terms to any term.
Option Search Result
Option Search results
Unspeci-fied
Default
Any For ChemFinder, the same as default. Included for compati-bility with other systems where the default may be different.
Natural Indicates an isotopically unmodified nuclide.
Enriched Indicates a mixture of isotopi-cally substituted and isotopi-cally unmodified nuclides.
Deficient Indicates a depleted label, that is, the nuclide is present in less than the natural ratio.
Nonnatural Indicates an isotopically substituted nuclide, that is, essentially all the molecules of the compound have only the indicated nuclide.

Chem & Bio Draw 12.0 127User Guide
element are defined in the Isotopes Table file in the Chem & Bio Draw 12.0 Items folder.
NOTE: The Abnormal Valence atom property does not provide a visual indicator.
.
NOTE: If Abnormal Valence is Allowed, any Invalid Valence messages for those atoms are ignored by the Check Structure command.
Bond PropertiesAssigning query properties to bonds is similar to assigning query properties to atoms. Bond query indicators that appear next to a bond
show the properties that have been assigned to it.
NOTE: The bond property feature is available in ChemBioDraw Ultra 12.0, ChemDraw Ultra 12.0, and ChemDraw Pro 12.0 only.
Assigning Bond PropertiesTo define bond properties:
1. Select one or more bonds in a structure.2. Do one of the following:
• Right-click, point to Bond on the context menu, point to the property you want, and choose the desired options.
• Go to Structure>Properties. On the Bond Properties tab, select the desired properties from the drop-down lists and click OK.
• Point to bond and press the Hotkey “/ ”. The Bond Properties dialog box appears.
In the Bond Properties dialog box, select the properties to associate with the selected atoms. Click OK.
The character that appears depends on which query properties have been assigned. If more than one property is assigned, more than one indicator appears adjacent to the atoms. See “Query Indicators” on page 121.The indicators are:.
Option Search Result
Not allowed Default. Finds compounds where the selected atoms only have valences that are normal for that element. If necessary, hydrogen atoms are added to or removed from the atom before transferring it to the chemical database. If the Check Structure When Copying to Clipboard or Exporting preference is turned on, an error message warns of abnormal valences.
Allowed Finds compounds with the specific valence drawn.
Indicator Bond Query Property
Any Bond Types: Any
S/D Bond Types: Single/Double
D/A Bond Types: Double/Aromatic

128 Query StructuresChapter 10
Viewing Bond PropertiesThe descriptor for the Reaction Center query property indicates that the property is applied, but not the value of the property. To find the value of a query bond property set-ting:
1. Select the bond.2. Do one of the following:
• Right-click, point to Bond Properties, and select to a property.
• Go to Structure>Bond Properties.
Removing Bond PropertiesTo remove all query properties from one or more bonds:
1. Select the bonds.2. Go to Structure>Bond Properties.3. Click Use Defaults.
The bond properties are removed and the indi-cators do not appear.To remove specific bond properties:
1. Select the bond.2. Do one of the following:
• Right-click, point to the appropriate prop-erty, and click the property to remove.
• Go to Structure>Bond Properties and click the bond property to remove.
Bond Property OptionsThe properties you can assign to bonds are described below.
Bond TypesThis property specifies the bond type of the selected bonds. The default bond type corre-
S/A Bond Types: Single/Aromatic
Rng Topology: Ring
Chn Topology: Chain
R/C Topology: Ring or Chain
Rxn Reaction Center
Indicator Bond Query Property
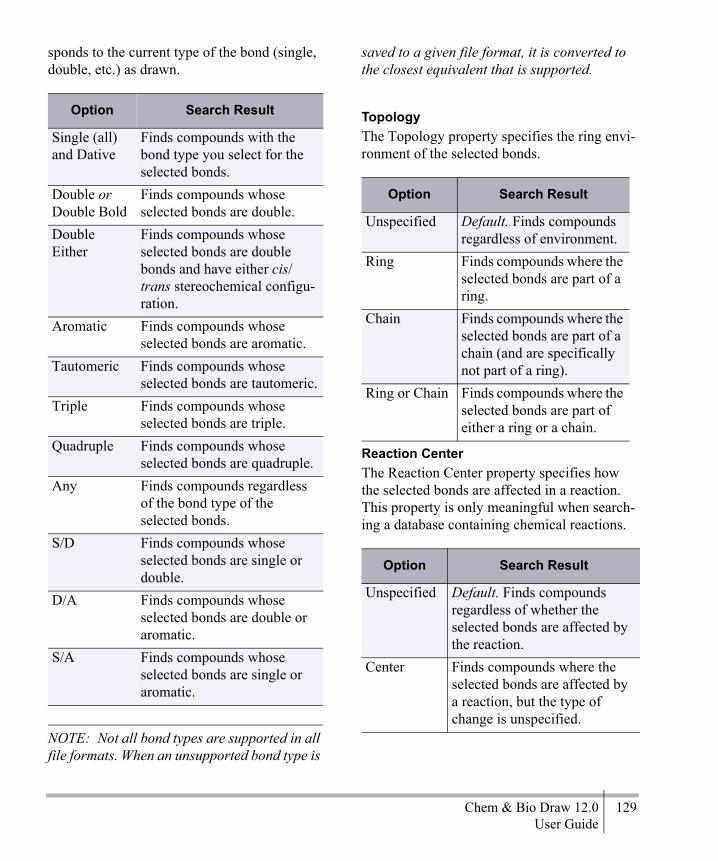
Chem & Bio Draw 12.0 129User Guide
sponds to the current type of the bond (single, double, etc.) as drawn.
NOTE: Not all bond types are supported in all file formats. When an unsupported bond type is
saved to a given file format, it is converted to the closest equivalent that is supported.
TopologyThe Topology property specifies the ring envi-ronment of the selected bonds.
Reaction CenterThe Reaction Center property specifies how the selected bonds are affected in a reaction. This property is only meaningful when search-ing a database containing chemical reactions.
Option Search Result
Single (all) and Dative
Finds compounds with the bond type you select for the selected bonds.
Double or Double Bold
Finds compounds whose selected bonds are double.
Double Either
Finds compounds whose selected bonds are double bonds and have either cis/trans stereochemical configu-ration.
Aromatic Finds compounds whose selected bonds are aromatic.
Tautomeric Finds compounds whose selected bonds are tautomeric.
Triple Finds compounds whose selected bonds are triple.
Quadruple Finds compounds whose selected bonds are quadruple.
Any Finds compounds regardless of the bond type of the selected bonds.
S/D Finds compounds whose selected bonds are single or double.
D/A Finds compounds whose selected bonds are double or aromatic.
S/A Finds compounds whose selected bonds are single or aromatic.
Option Search Result
Unspecified Default. Finds compounds regardless of environment.
Ring Finds compounds where the selected bonds are part of a ring.
Chain Finds compounds where the selected bonds are part of a chain (and are specifically not part of a ring).
Ring or Chain Finds compounds where the selected bonds are part of either a ring or a chain.
Option Search Result
Unspecified Default. Finds compounds regardless of whether the selected bonds are affected by the reaction.
Center Finds compounds where the selected bonds are affected by a reaction, but the type of change is unspecified.

130 Query StructuresChapter 10
Element ListsBy labeling an atom position with a list of ele-ments, you specify that one of these elements must match in the structure for which you are searching. An example of an element list is:
The elements in the list must be separated by commas. A space after each comma and brack-ets are optional.
NOTE: An element list may contain only atomic symbols, plus D (deuterium) and T (tri-tium).
To create an element list:
1. Open an atom label text box.2. Type an open bracket (“[“) followed by a
list of elements separated by commas (“Cl, Br, I”), followed by a close bracket (“]”).
3. Close the text box.
Figure 10.6 An element list as an atom label
The figure below shows a query structure cre-ated to find compounds matching the follow-ing criteria:
(A) indicates that the atom must match any atom except hydrogen. The indicator (B) near the bond indicates that the bond must be single or double, S/D. The element list (C) specifies that one of these elements must match in the target structures.
Element Not-ListsThe element not-list specifies that the elements in the list match must not match in the struc-ture for which you are searching. Commas must separate the elements in the element not-list. A space after each comma and brackets are optional.
Make/Break Finds compounds where the selected bonds are either bro-ken or created in a reaction.
Change Finds compounds where the bond order of the selected bonds changes in a reaction.
Make&Change
Finds compounds where the selected bonds are formed, bro-ken, or undergo a change in bond order.
Not Center Finds compounds where the selected bonds are not part of the reaction center.
Not Modi-fied
Finds compounds where the selected bond’s orders do not change, but which may or may not be part of the reaction cen-ter.
Unmapped Finds all compounds.
Option Search Result

Chem & Bio Draw 12.0 131User Guide
The word NOT must be in all-caps and must be followed by a space. Alternatively, the word NOT may be replaced with a minus sign.For example:
Figure 10.7 Element NOT lists
NOTE: An element not-list may contain only atomic elements, plus D (deuterium) and T (tri-tium).
To create an element not-list:
1. Open an atom label text box.2. Type an open bracket, the word NOT, and a
space (“[NOT”) followed by a list of ele-ments separated by commas (“Cl, Br, I”), followed by a close bracket (“]”).
PolymersPolymers are indicated by brackets, parenthe-ses, and braces that enclose repeating struc-tures or structural fragments. The bracket properties lets you specify the context and ori-entation of the repeating units.
NOTE: The polymer feature is available in ChemBioDraw Ultra 12.0, ChemDraw Ultra 12.0, and ChemDraw Pro 12.0 only.
For example:
To enclose structures with brackets:
1. To display to Bracket toolbar, go to View>Other Toolbars>Bracket.
2. On the Bracket toolbar, select one of the double bracket tools.
3. To draw the brackets, click and drag across the structure you want to enclose.
This method will give a default value for com-ponent order, multiple group repeat count, or SRU label.
Setting Bracket PropertiesYou can change the properties of brackets by the context menus or Bracket Properties dialog box.To use the Bracket Properties dialog box:
1. Select a bracket using a selection tool.2. Go to Structure>Bracket Properties. The
Bracket Properties dialog box appears.
The Flip Type option appears only for ladder polymers. See “Flip Type” on page 134.You can customize the text that appears to the bottom right of the bracket for the following bracket types.• Component (c#)—the component order
must be a non-negative integer, and is dis-played as the letter “c” followed by an inte-ger (or “c” alone if an order of zero is specified).
• Multiple Group (#)—the repeat count must be a positive integer.
• SRU (n)—the SRU label can be any text.
You can also edit the text for these bracket usage types directly in the document using the Text tool. You cannot edit the text displayed for other bracket usage types.

132 Query StructuresChapter 10
Bracket UsageRepresentations of polymers are either struc-ture-based or source-based. The type of bracket you use depends on which type of rep-resentation you need.
Structure-based PolymersStructure-based representations enclose only part of a structure within brackets. One or more bonds cross each of the enclosing brackets. The crossing bonds “match up”, making the polymer structure more explicit. You create a structure-based polymer represen-tation by enclosing a portion of a structure in brackets with a bracket type of SRU (n). The subscript “n” is recommended by IUPAC to denote structure-based representations of unknown size, but you can edit the text using the text tool.A structure-based representation of poly(vinyl chloride) is shown in below:
You can also use the bracket usage types “Crosslink (xl)”, “Graft (grf)”, and “Modifica-tion (mod)” to represent specific types of repeating units in a structure-based representa-tion.
Source-based PolymersSource-based polymer representations enclose an entire discrete chemical substance in brack-ets. The mode of polymerization may be obvi-ous from context, or it might be unknown. Source-based representations are useful when describing processes where the starting materi-
als are known, but the exact structure of the reaction product is not. You can create a source-based representation by enclosing a structure in “Monomer (mon)” brackets.A source-based representation of poly(vinyl chloride) is shown in below:
You can use “Mer (mer)” brackets for compo-nents of a copolymer where those individual components are known not to repeat them-selves or they alternate with the other compo-nents. For example:
Copolymers represent substances with more than one repeating unit. In general, you can use bracket type “Component (co)”. You can also use “Copolymer, alternating (alt)”, “Copoly-mer, random (ran)”, and “Copolymer, block (blk)” to represent different specific types of copolymers in a source-based representation.The bracket type, “Mixture, unordered (mix)” may be used to represent a collection of sub-stances that may all be present, but not neces-sarily in known amounts. Bracket type

Chem & Bio Draw 12.0 133User Guide
“Component (c)” indicates individual mixture elements, as shown below.
Figure 10.8 Brackets used to indicate mixtures
Bracket type “Mixture, ordered (f)” is prima-rily used to describe manufacturing processes, where the ordering of components is a critical part of the process (and where a different ordering might produce a different final prod-uct. As with unordered mixtures, individual elements of an ordered mixture should be sur-rounded by brackets with a bracket usage of “Component (c)”. Unlike with unordered mix-tures, however, components of ordered mix-tures must represent their ordering. You can do this by editing the “c” label with the text tool to include a number (“c1”, “c2”, and so on.)You use the bracket type, “Multiple Group (#)” to indicate that the enclosed items are repeated a specific known number of times. Multiple group brackets may enclose entire structures, or may enclose a portion of the structures only.
You can edit the numeric repeat count with the text tool. Examples are shown in below.
Figure 10.9 Brackets to indicate multiple groupsANALYSISBecause multiple group brackets represent a specific repeat count (unlike the unknown repeat count of the other bracket types), it is possible to calculate accurate molecular weights (and related data) for such structures. That data is displayed in the Analysis window as with any other structure.
Repeat PatternFor simple linear polymers, the repeating units may connect head-to-tail or head-to-head (or their repeat pattern might be a mixture or unknown). You can also assign this property to brackets.Because of its prevalence, the head-to-tail type is assumed to be the default Repeat Pattern,

134 Query StructuresChapter 10
and does not receive any special annotation on the brackets, as shown below.
Figure 10.10 Head-to-tail repeat pattern. A and B represent the polymers shown. C represents a mixture of A and B.
Link NodesYou can specify a variable-length chain or ring by indicating that one of the atoms can be repeated some number of times using link nodes.
NOTE: The link nodes feature is available in ChemBioDraw Ultra 12.0, ChemDraw Ultra 12.0, and ChemDraw Pro 12.0 only.
Link nodes must have exactly two connecting bonds. The atom label must conform to the fol-lowing conditions:
• It must consist of a generic name or no more than a single element symbol.
• The last part of the label in the form: num-ber hyphen number, with the number and hyphen subscripted
• Parentheses or braces may be used instead of brackets
• Brackets can be omitted if not needed for clarity, for example with O1-3
To create a link node:
1. Open an atom label text box.2. Type in the following format:
[CH2]3-7
Flip TypeFor ladder polymers (those polymers with two connecting bonds on each side), the connection order may be undefined. You can assign the Flip Type property to define it. This property is appropriate only for brackets with exactly two crossing bonds.Because of its prevalence, the No Flip type does not receive special annotation. The figure below illustrates a flip type in ladder polymers.
Alternative GroupsYou can create a search query that contains variable functional groups or substructures. Instead of submitting multiple queries on structures that share a common substructure, you can submit a single query with the parent structure. The parent structure can have attach-

Chem & Bio Draw 12.0 135User Guide
ment points to a list of alternative groups that you can define.
NOTE: The alternative groups feature is avail-able in ChemBioDraw Ultra 12.0, ChemDraw Ultra 12.0, and ChemDraw Pro 12.0 only.
Alternative groups, sometimes called R-Groups or G-Groups (Generic Groups), are shown below.
Defining Alternative GroupsYou can create alternative group definitions (R, G, etc.) that represent a set of substituents, each of which is used in the query.
To define an alternative group:
1. Go to View>Other Toolbars>Query Tools to open the Query toolbar.
2. Click the Alternative Group query tool and drag with the tool to create an area large enough to draw the alternative groups.
3. Type a title, such as R1, in the Alternative Group Title box, then draw the substructure fragments in the Alternative Group box.
Figure 10.11 Defining an alternative group
Specify where the fragments should bond to the parent structure on the alternative group label by defining Attachment Points.
1. Do one of the following:
• Select the diamond shaped Attachment Point tool on the Chemical Symbols palette (View>Other Toolbars>Chemical Symbols), and click a substructure fragment where you want to place the attachment point.
• Point to a substructure fragment where you want to place the attachment point and press the Hotkey “.” (period).
An attachment point symbol appears.

136 Query StructuresChapter 10
2. Repeat for all fragments.
Figure 10.12 Adding attachment points. An attach-ment point symbol has been applied to the nitrogen atom.
When you create a parent compound that con-tains an alternative group you defined, an attachment point symbol appears next to the label. The attachment point number matches that found in the definition.
Figure 10.13 Structure with R-group table
The number displayed in the attachment point symbol is the attachment rank order. See the example in Multiple Attachment Points.
Multiple Attachment PointsYou can also use R-groups that contain more than one attachment point, such as the one below:
For this type of R-group, you will need to indi-cate in your table the attachment point order. If you have well-defined multiple attachment points on your structure fragments, you can search for specific materials. This type of search is especially useful for searching for conformationally similar structures. For example, assume you want to find the two compounds in figure A below but not the two compounds in figure B.
Figure 10.14 Multiple attachment points
By specifying the attachment point order, you can exclude the unwanted compounds. To specify the attachment points order:

Chem & Bio Draw 12.0 137User Guide
1. Draw the parent structure shown below
2. Create an alternative group box labeled “R1”.
3. Draw the structure fragments and label them with attachment points.
When the alternative group definition is com-plete, the attachment point symbols appear in the parent compound.
Figure 10.15 R-groups with multi-attachment points
By numbering your attachment points, you have unambiguously specified that the methyl group must be adjacent to the amine group. The conformations that are not of interest are excluded.
Attachment Rank IndicatorsYou can hide the attachment rank indicators if required. For example, in publication-quality
drawings the numbering of attachment points is implicit and the numbered attachment rank indicators are superfluous.
NOTE: Attachment rank indicators are avail-able in ChemBioDraw Ultra 12.0, ChemDraw Ultra 12.0, and ChemDraw Pro 12.0 only.
To hide the attachment rank indicators and remove the numbers from the attachment points:
1. Go to File>Preferences.2. In the Preferences dialog box, click Build-
ing/Display.3. Deselect Show Attachment Rank Indicators.
This change affects all documents. The figure below shows an alternative group definition and a parent structure with the attachment rank indicators hidden.t
Figure 10.16 Hidden attachment indicators
Attachment Point NumberingNumbered attachment points let you specify precisely how the structure fragments are con-nected to your parent structure.
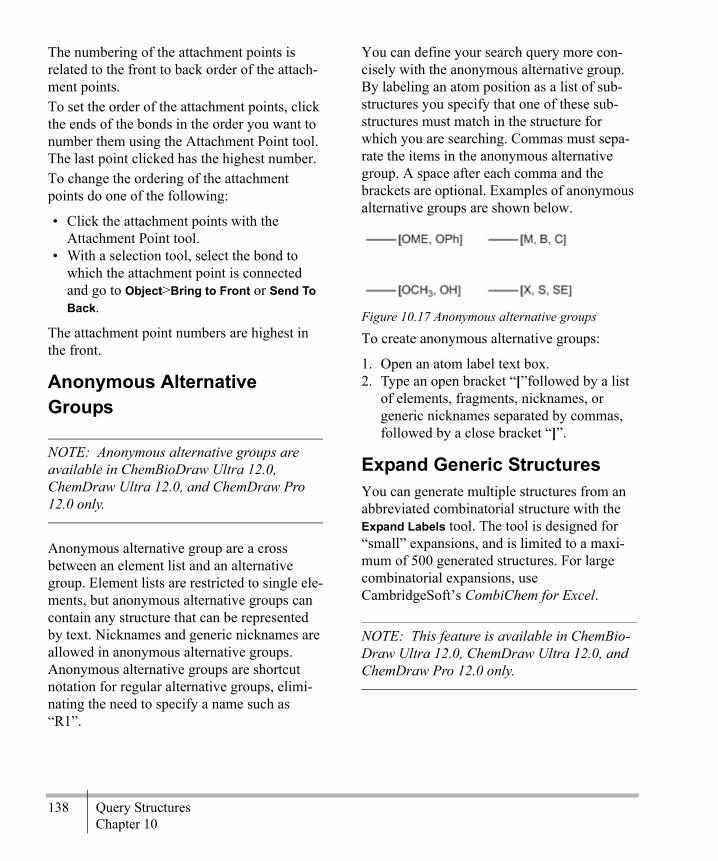
138 Query StructuresChapter 10
The numbering of the attachment points is related to the front to back order of the attach-ment points.To set the order of the attachment points, click the ends of the bonds in the order you want to number them using the Attachment Point tool. The last point clicked has the highest number.To change the ordering of the attachment points do one of the following:
• Click the attachment points with the Attachment Point tool.
• With a selection tool, select the bond to which the attachment point is connected and go to Object>Bring to Front or Send To Back.
The attachment point numbers are highest in the front.
Anonymous Alternative Groups
NOTE: Anonymous alternative groups are available in ChemBioDraw Ultra 12.0, ChemDraw Ultra 12.0, and ChemDraw Pro 12.0 only.
Anonymous alternative group are a cross between an element list and an alternative group. Element lists are restricted to single ele-ments, but anonymous alternative groups can contain any structure that can be represented by text. Nicknames and generic nicknames are allowed in anonymous alternative groups. Anonymous alternative groups are shortcut notation for regular alternative groups, elimi-nating the need to specify a name such as “R1”.
You can define your search query more con-cisely with the anonymous alternative group. By labeling an atom position as a list of sub-structures you specify that one of these sub-structures must match in the structure for which you are searching. Commas must sepa-rate the items in the anonymous alternative group. A space after each comma and the brackets are optional. Examples of anonymous alternative groups are shown below.
Figure 10.17 Anonymous alternative groups
To create anonymous alternative groups:
1. Open an atom label text box.2. Type an open bracket “[”followed by a list
of elements, fragments, nicknames, or generic nicknames separated by commas, followed by a close bracket “]”.
Expand Generic StructuresYou can generate multiple structures from an abbreviated combinatorial structure with the Expand Labels tool. The tool is designed for “small” expansions, and is limited to a maxi-mum of 500 generated structures. For large combinatorial expansions, use CambridgeSoft’s CombiChem for Excel.
NOTE: This feature is available in ChemBio-Draw Ultra 12.0, ChemDraw Ultra 12.0, and ChemDraw Pro 12.0 only.

Chem & Bio Draw 12.0 139User Guide
Four kinds of abbreviated combinatorial defi-nitions may be used:
Definitions are expanded into multiple com-plete molecules. If more than one site is present in the selection, the expansion will include all permutations of substitutions. Expansions are generated in a new document.To expand a generic structure:
1. Select one or more generic structures to expand.
NOTE: For alternative group/R-tables, both the alternative group label and the table must be selected. If the label is selected but not the table, the label will not be modified by the expansion, and will appear as a label in all gen-erated structures.
2. Go to Structure>Expand Generic Structure.
The structures are generated in a new docu-ment.
R-Logic QueriesAfter you have your generic structure and a set of R-groups, you can use them to run queries against a structure database. This is called an R-Logic query.When you run an R-Logic query, you search for structures that all have the generic structure and a combination of your R-groups. The com-binations are based on a Boolean expression that you define. To prepare an R-Logic search, go to Structure>R-Logic Query to open the R-Logic Query dialog box.To define a query, select one or more R-groups in your structure and how many times it must occur. You can also indicate that, if the first R-group condition is met, another R-group must also be found before the structure is returned as
definition example
Alternative Groups and R-tables
Anonymous Alternative Groups
Element Lists
Variable Attachment

140 Query StructuresChapter 10
a result. For example, consider the following structure:
This structure indicates that both R1 sites must consist of either a fluorine or chlorine atom and that the R2 site must be either a bromine or iodine atom.Assume you want to find all structures in your database that have either a F or Cl atom at both R1 locations and either Br or I at R2:
1. Go to Structure>R-Logic Query.2. In the R-Group dropdown list, select R1.3. For Occurrence range, select 2. This indi-
cates that two instances of an R1 group must occur in a structure for it to be returned as a result.
4. For If R(i), select R2. This indicates that the R2 location must consist of either Br or I.
5. Click Add.6. Click OK.
Rest HSelect Rest H in the R-Logic Query dialog box to indicate that, if you have two possible R-group locations, and only one is filled, the
other must be a hydrogen to return a positive result.
Atom-to-Atom MappingYou can create correspondences between atoms in different structures for use in creating queries for searching a reaction database. The reactions mapped can be single or multi-step. You can assign atom-to-atom mapping for cre-ating records for a reaction database and for creating queries for searching a reaction data-base.
NOTE: Atom-to-atom mapping is available in ChemBioDraw Ultra 12.0, ChemDraw Ultra 12.0, and ChemDraw Pro 12.0 only.
You can assign atom mapping in two ways:
• Automatic mapping (go to Structure>Map Reaction Atoms).
• Manual mapping, using the Reaction Atom-Atom Map tool on the main tools palette.
During either type of mapping process, the mapping algorithm perceives and assigns a reaction center for the reactants and products.When a reaction map is established, you can point to an atom in one structure with the Reaction Atom-Atom Map tool selected to highlight the mapped atom in the other struc-ture.
Displaying and PrintingTo make the symbols always appear and print on the atoms when mapping reactions:
1. Go to File>Preferences.2. In the Preferences dialog box, click the
Building/Display tab.

Chem & Bio Draw 12.0 141User Guide
3. Select Always Display and Print Reaction Mapping.
4. Click OK.
Deselect Always Display and Print Atom Map-ping to show the symbols only when you select the Reaction Atom-Atom Map tool. When this option is deselected, atom mapping symbols do not print, even though a reaction map has been created.
Automatic MappingTo create a reaction map:
1. Draw the reaction you want to map and select the reaction.
TIP: Double-click the arrow with a selection tool to select the entire reaction.
2. Go to Structure>Map Reaction Atoms.
The symbol Rxn appears next to the bonds in the reactant and product that are perceived by the algorithm as being modified by the reac-tion. These symbols are bond properties that are applied. For more information about the Reaction Center bond property, see “Bond Properties” on page 127.
Figure 10.18 Automatic reaction mapping
Manual MappingIn situations that require manual mapping of atoms, you can use the Reaction Atom-Atom Map tool. This might be necessary when the automatic mapping is applied to complicated reactions, and gives incorrect results. In these cases you can manually readjust the reaction mapping.The figure below shows the initial mapping being amended by using the Reaction Atom-Atom Map tool.
Figure 10.19 Automatic mapping to be amended
When you manual map reactions with the Reaction Atom-Atom Map tool, you can sup-press automatic re-mapping of atoms other than your target atom. To suppress automatic re-mapping:
1. Go to File>Preferences.2. On the General tab, select Automatic Reac-
tion Mapping.3. Click OK.
To use the Reaction Atom-Atom Map tool to supplement the automatic mapping:
1. Click the Reaction Atom-Atom Map tool on the Query toolbar.
2. Point to the atom in the reactant whose mapping you want to establish. For exam-ple, in the following drawing you would point to the acyclic carbon adjacent to the ether oxygen.
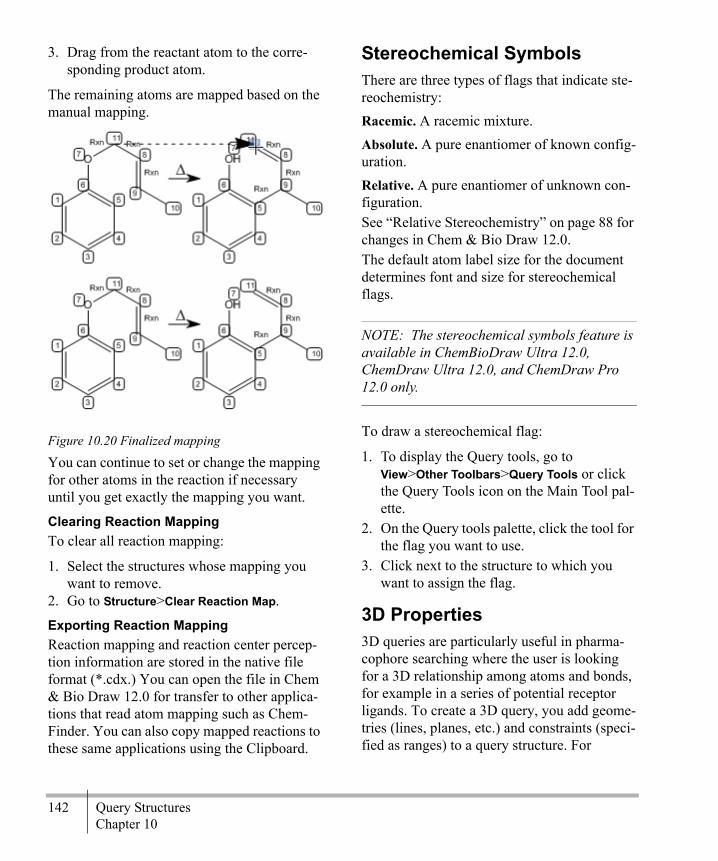
142 Query StructuresChapter 10
3. Drag from the reactant atom to the corre-sponding product atom.
The remaining atoms are mapped based on the manual mapping.
Figure 10.20 Finalized mapping
You can continue to set or change the mapping for other atoms in the reaction if necessary until you get exactly the mapping you want.
Clearing Reaction MappingTo clear all reaction mapping:
1. Select the structures whose mapping you want to remove.
2. Go to Structure>Clear Reaction Map.
Exporting Reaction MappingReaction mapping and reaction center percep-tion information are stored in the native file format (*.cdx.) You can open the file in Chem & Bio Draw 12.0 for transfer to other applica-tions that read atom mapping such as Chem-Finder. You can also copy mapped reactions to these same applications using the Clipboard.
Stereochemical SymbolsThere are three types of flags that indicate ste-reochemistry:Racemic. A racemic mixture. Absolute. A pure enantiomer of known config-uration.Relative. A pure enantiomer of unknown con-figuration.See “Relative Stereochemistry” on page 88 for changes in Chem & Bio Draw 12.0.The default atom label size for the document determines font and size for stereochemical flags.
NOTE: The stereochemical symbols feature is available in ChemBioDraw Ultra 12.0, ChemDraw Ultra 12.0, and ChemDraw Pro 12.0 only.
To draw a stereochemical flag:
1. To display the Query tools, go to View>Other Toolbars>Query Tools or click the Query Tools icon on the Main Tool pal-ette.
2. On the Query tools palette, click the tool for the flag you want to use.
3. Click next to the structure to which you want to assign the flag.
3D Properties3D queries are particularly useful in pharma-cophore searching where the user is looking for a 3D relationship among atoms and bonds, for example in a series of potential receptor ligands. To create a 3D query, you add geome-tries (lines, planes, etc.) and constraints (speci-fied as ranges) to a query structure. For
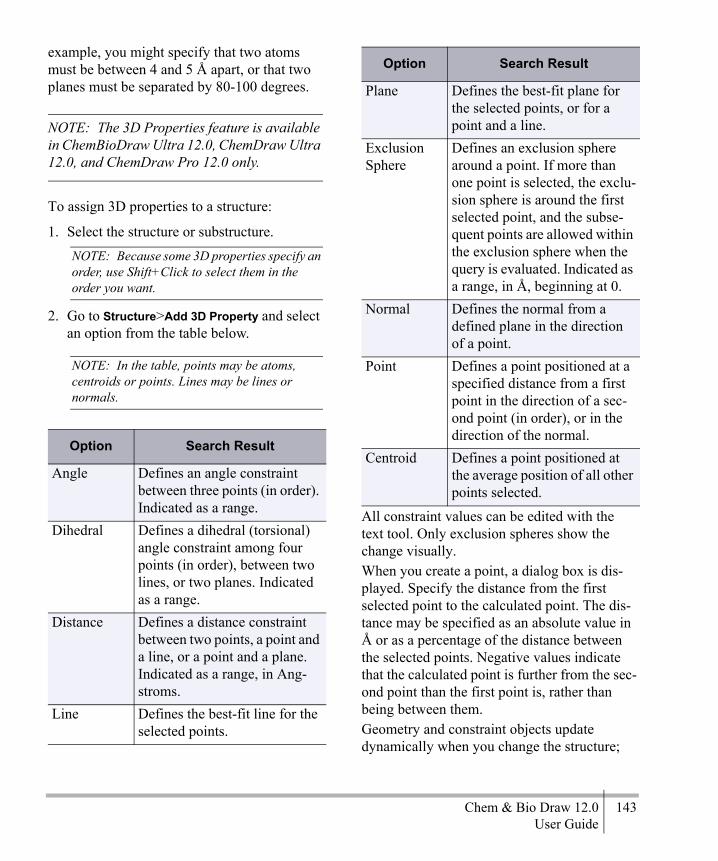
Chem & Bio Draw 12.0 143User Guide
example, you might specify that two atoms must be between 4 and 5 Å apart, or that two planes must be separated by 80-100 degrees.
NOTE: The 3D Properties feature is available in ChemBioDraw Ultra 12.0, ChemDraw Ultra 12.0, and ChemDraw Pro 12.0 only.
To assign 3D properties to a structure:
1. Select the structure or substructure.NOTE: Because some 3D properties specify an order, use Shift+Click to select them in the order you want.
2. Go to Structure>Add 3D Property and select an option from the table below.
NOTE: In the table, points may be atoms, centroids or points. Lines may be lines or normals.
All constraint values can be edited with the text tool. Only exclusion spheres show the change visually.When you create a point, a dialog box is dis-played. Specify the distance from the first selected point to the calculated point. The dis-tance may be specified as an absolute value in Å or as a percentage of the distance between the selected points. Negative values indicate that the calculated point is further from the sec-ond point than the first point is, rather than being between them.Geometry and constraint objects update dynamically when you change the structure;
Option Search Result
Angle Defines an angle constraint between three points (in order). Indicated as a range.
Dihedral Defines a dihedral (torsional) angle constraint among four points (in order), between two lines, or two planes. Indicated as a range.
Distance Defines a distance constraint between two points, a point and a line, or a point and a plane. Indicated as a range, in Ang-stroms.
Line Defines the best-fit line for the selected points.
Plane Defines the best-fit plane for the selected points, or for a point and a line.
Exclusion Sphere
Defines an exclusion sphere around a point. If more than one point is selected, the exclu-sion sphere is around the first selected point, and the subse-quent points are allowed within the exclusion sphere when the query is evaluated. Indicated as a range, in Å, beginning at 0.
Normal Defines the normal from a defined plane in the direction of a point.
Point Defines a point positioned at a specified distance from a first point in the direction of a sec-ond point (in order), or in the direction of the normal.
Centroid Defines a point positioned at the average position of all other points selected.
Option Search Result

144 Query StructuresChapter 10
they cannot be moved independently. They may be used with CDX, MOL, SKC, and TGF files (full read-write compatibility); they are not compatible with other formats. They can, however, be saved in print-only formats such as TIFF.
Export CompatibilityBecause query properties are useful only in a chemical database, you must transfer your structures from Chem & Bio Draw 12.0 into your search system. Not all file formats sup-port the same query properties and not all chemical databases support the same file for-mats. Consult the documentation for your data-base to see which file formats are supported.The following table lists the query properties that Chem & Bio Draw 12.0 writes to SKC, TGF, and Clipboard file formats. The CDX is the preferred format to use to retain all query properties in a drawing..
Exported Query Properties
ISIS™ Mol Rxn
Atom Properties
Substituents
Unspecified X X X
• Free Sites b b b
• Up to a a a
• Exactly Xc Xc Xc
Implicit Hydrogens
• Not allowed X X X
• Allowed X X X
Ring Bond Count
• Any X X X
• No ring bonds X X X
• As drawn X X X
• Simple ring X X X
• Fusion X X X
• Spiro or higher X X X
Unsaturation
• Unspecified X X X
• Must be absent
• Must be present X X X
Reaction Change
• May be any-thing
X X
• Must be as specified
X X
Reaction Stereo
• Any X X
• Inversion X X
• Retention X X
Translation
Exported Query Properties
ISIS™ Mol Rxn

Chem & Bio Draw 12.0 145User Guide
• Equal
• Broad
• Any
• Narrow
Abnormal Valence
• Not Allowed X X X
• Allowed X X X
Bond Properties
Bond Type
• Single X X X
• Dashed X d X
• Hashed d d d
• Wedged Hashed X X X
• Bold X e e
• Wedged X X X
• Wavy X X X
• Hollow Wedged e e e
• Dative f f f
• Double Xg X X
• Double Either X X X
Exported Query Properties
ISIS™ Mol Rxn
• Double Bold h h h
• Aromatic X X X
• Tautomeric i i i
• Triple X X X
• Quadruple l l l
• Any X X X
• S/D X X X
• D/A X X X
• S/A X X X
Topology
• Unspecified X X X
• Ring X X X
• Chain X X X
Reaction Center
• Unspecified X X
• Center X X
• Make/Break X X
• Change X X
• Make&Change X X
• Not Center X X
Exported Query Properties
ISIS™ Mol Rxn
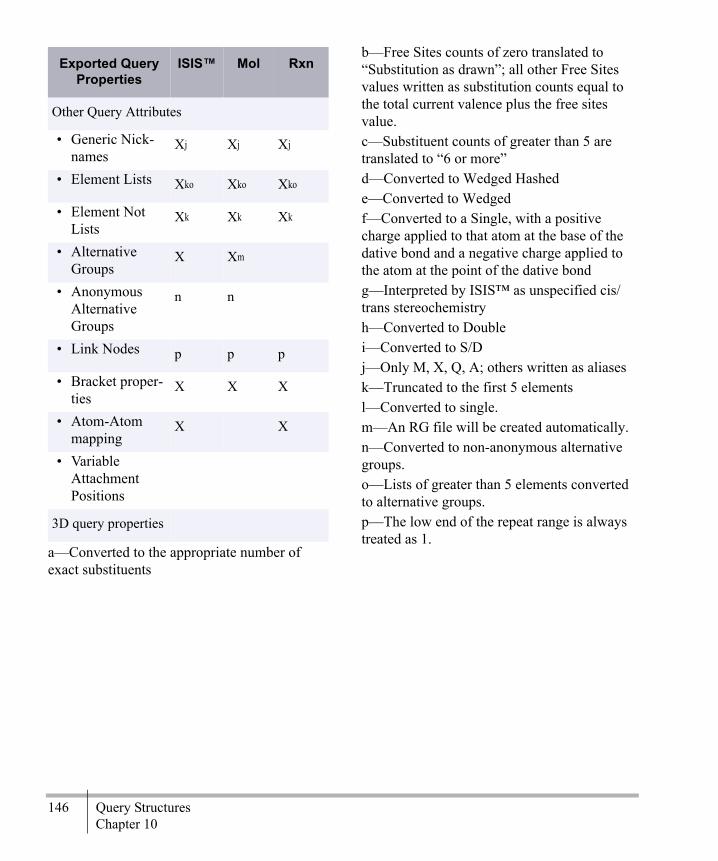
146 Query StructuresChapter 10
a—Converted to the appropriate number of exact substituents
b—Free Sites counts of zero translated to “Substitution as drawn”; all other Free Sites values written as substitution counts equal to the total current valence plus the free sites value.c—Substituent counts of greater than 5 are translated to “6 or more”d—Converted to Wedged Hashede—Converted to Wedgedf—Converted to a Single, with a positive charge applied to that atom at the base of the dative bond and a negative charge applied to the atom at the point of the dative bondg—Interpreted by ISIS™ as unspecified cis/trans stereochemistryh—Converted to Doublei—Converted to S/Dj—Only M, X, Q, A; others written as aliasesk—Truncated to the first 5 elementsl—Converted to single.m—An RG file will be created automatically.n—Converted to non-anonymous alternative groups.o—Lists of greater than 5 elements converted to alternative groups.p—The low end of the repeat range is always treated as 1.
Other Query Attributes
• Generic Nick-names
Xj Xj Xj
• Element Lists Xko Xko Xko
• Element Not Lists
Xk Xk Xk
• Alternative Groups
X Xm
• Anonymous Alternative Groups
n n
• Link Nodes p p p
• Bracket proper-ties
X X X
• Atom-Atom mapping
X X
• Variable Attachment Positions
3D query properties
Exported Query Properties
ISIS™ Mol Rxn

Chem & Bio Draw 12.0 147User Guide
Sharing InformationChem & Bio Draw 12.0 includes many of the standard system commands for transferring information within and between documents, and between Chem & Bio Draw 12.0 and doc-uments created using other applications. You can transfer information using:
• the Clipboard• drag and drop• file formats
When you drag-and-drop Chem & Bio Draw 12.0 information, or use the clipboard, the object you are copying can be edited.
The ClipboardYou can use the clipboard to transfer part or all information within an active document win-dow between applications on the same com-puter or on a network. Use the standard copy-and-paste or cut-and-paste tools to transfer information to any application that supports these tools. The information is transferred as a drawing object. Double-click the object to edit it in Chem & Bio Draw 12.0You may also use the Copy As tool to translate a selected structure to a SMILES, SLN, or InChI™ string.If the Clipboard contains structures and you are pasting into another Chem & Bio Draw 12.0 document, the pasted information is scaled to the settings in the current document.
For more information, see “Autoscaling” on page 149.If you are pasting the Chem & Bio Draw 12.0 drawing into a document from which you are planning to print to a PostScript printer, see “Transferring PostScript (Macintosh)” on page 151.
Text Line NotationUse text line notation to expand a line of text into the structure that it represents. A SMILES string is a line of text that represents the struc-ture of a molecule. Several software packages use SMILES strings to enter and store chemi-cal structure information.
NOTE: Text line notation is available in Chem-BioDraw Ultra 12.0, ChemDraw Ultra 12.0, and ChemDraw Pro 12.0 only.
A SMIRKS string describes chemical reactions in text. If you select a reaction and use the Copy As SMILES command, a SMIRKS string is copied to the clipboard. If you use the Paste Special SMILES command when a SMIRKS string is on the clipboard, a reaction is pasted into your document.
Creating SMILES StringsTo create the SMILES string for a structure:
1. Select the structure.
11

148 Sharing InformationChapter 11
2. Go to Edit>Copy As>SMILES.
The SMILES string is transferred to the Clip-board.
Figure 11.1 Using SMILES strings
To display the SMILES string, paste the string in a document window.When the SMILES string is on the Clipboard, you can transfer it to another application that can interpret SMILES strings.If you copy more than one structure from Chem & Bio Draw 12.0 to the Clipboard, the SMILES string are separated by a period. SMILES supports an alternate notation for aro-matic structures using lowercase letters. Chem & Bio Draw 12.0 generates this type of SMILES string for any structure drawn with explicit aromatic bonds, either by using the Aromatic bond type in the Atom Properties dialog box, or by placing a circle within any ring structure.
Figure 11.2 Aromatic SMILES notation
Pasting SMILESYou can convert that text string into a struc-ture.To paste a SMILES string as a structure:
1. In the source file where the SMILES string is located, select the SMILES string and press Ctrl+C.
2. In Chem & Bio Draw 12.0, go to Edit>Paste Special> SMILES.
Creating SLN StringsYou can copy a structure to the Clipboard as an SLN string for export to a Tripos application. To copy a structure as an SLN string:
1. Select a structure.2. Go to Edit>Copy As>SLN.
The Structure is copied to the clipboard as an SLN String.
Figure 11.3 SLN strings
Creating InChI™ Strings
Chem & Bio Draw 12.0 supports* the IUPAC International Chemical Identifier (InChI™) protocol.
*. InChI™ is a trademark of the International Union of Pure and Applied Chemistry. InChI™ Material in Chem & Bio Draw 12.0 is © IUPAC 2005.
Chem & Bio Draw 12.0 149User Guide
To copy structures as InChI™ strings to other documents.
1. Select the structure.2. Go to Edit>Copy As>InChI.
You may copy only legitimate InChI™ struc-tures. If you attempt to copy a structure not supported by the InChI™ protocol, a warning informs you that the structure is not supported.
Creating InChIKey stringsChem & Bio Draw 12.0 supports Standard InchIKey, available in InChI 1.02. An InChIKey string is a condensed digital repre-sentation of an InChI string. All InChiKey strings are the same length whereas InChI strings are not. This standard makes InChIKey strings useful for Web searching and database indexing. To copy a structure as an InChIKey string to other documents:
1. Select the structure.2. Go to Edit>Copy As>InChIKey.
For more information on InChI™ and InChIKey, see www.iupac.org/inchi/.
Drag-and-Drop
You can use drag-and-drop to copy objects to other documents. To use this feature in other applications, they must support drag-and-drop. The object is transferred as a Chem & Bio Draw 12.0 object and can be edited.
Scrap and clipping FilesYou can use clipping files (Macintosh) and scrap files (Windows) to copying parts of a drawing to other applications without having to save the file in Chem & Bio Draw 12.0.To create a scrap or clipping file:
1. Select an object in a document.
2. Drag the selection out of the document win-dow onto the desktop. The file appears on the desktop.
To view the file contents, double-click its icon. To use contents in a document, drag the file into an open window of an application that supports drag-and-drop.
Transferring ObjectsIn this section, we explain how some features in Chem & Bio Draw 12.0 behave when you transfer objects using the Clipboard or drag and drop from one document to another.AUTOSCALINGWhen you transfer objects, the objects are scaled to match the document settings of the destination document. BONDSWhen a structure is copied (or moved) to another document, the structure adopts the new document’s fixed length value. However, it retains its scaling factor.For example, assume the Fixed Length is set to 1.0 cm in a source document. A benzene ring is resized to 200%. The bond length is then 2.0 cm. In the destination document, the Fixed Length set to 1.7 cm. When the benzene ring is pasted into the destination document, the bonds are scaled by a factor of 2 to a final bond length of 3.4 cm.ATOM LABELSAtom labels are scaled the same way as bonds. For example, in the source document, the atom label font size is set to 16 points. One or two atom labels in the source document are resized to 8 points, a ratio of 8:16 or a scale factor of 0.5. The destination document has an atom label font size is set to 14 points. When the atom label is pasted into the destination docu-

150 Sharing InformationChapter 11
ment, the font size is scaled by a factor of 0.5 to give a final atom label font size of 7 points. CAPTIONSChem & Bio Draw 12.0 autoscales captions using the ratio of the fixed length in the desti-nation document to the fixed length in the source document times the caption font size. The font size of the caption can be any size and is not related to the setting in the Settings dia-log box. This assures that captions are always in proportion to the bonds with which they are pasted. For example, if the source document has a fixed length of 1.0 cm and the destination doc-ument has a fixed length of 2.0 cm, and the caption you are pasting is 12 points, then the resulting caption size after autoscaling is (2.0 cm /1.0 cm) x 12 points = 24 points.NON-BOND OBJECTS AND COLORAll objects that are not affected by settings in the Document Settings dialog boxes, such as arrows and boxes, are scaled to maintain the same proportions to bonds that were present in the source document. With the exception of the foreground and background color, the colors present in the selection to be pasted are added to the destina-tion document’s Color palette if they are not already present (up to a maximum of 20 total colors). The background color in the destina-tion document is unchanged, and all objects colored using the foreground color are changed to match the foreground color in the destina-tion document. PASTING TO AN EMPTY DOCUMENTIf you paste a Chem & Bio Draw 12.0 drawing into an empty document and the settings between the documents are different, the Change Settings dialog box appears.
To change the settings in the destination docu-ment to match the settings in the source docu-ment, click Change Settings.All of the settings in the destination document are changed to match those of the source docu-ment. All of the colors in the Color palette of the destination document are changed to those specified in the source document. To scale the objects from the source document to the settings in the destination document, click Don’t Change Settings.The settings from the source document are scaled to those in the destination document using the ratios given above.
NOTE: If the source document was created in a ChemDraw version earlier than 3.0, the name of the document appears as “Unknown” in the dialog box.
Embedding Objects (Windows)Chem & Bio Draw 12.0 supports the Object Linking and Embedding (OLE) protocol on Windows. This lets you edit structures that are pasted in other types of documents. Chem & Bio Draw 12.0 is an OLE server, which means it can create OLE objects that can you can copy and paste into other OLE client applica-tions.When you transfer drawing from Chem & Bio Draw 12.0 into another document type that supports OLE, you can open the drawing and edit it from within the client application. For example, to edit a drawing inserted into Microsoft Word for Windows version 6.0 or later, do one of the following:
• In Word, select the drawing and go to Edit>CS ChemDraw Drawing Object.

Chem & Bio Draw 12.0 151User Guide
• Double-click the drawing.
The Chem & Bio Draw 12.0 tools and menus replace those of Word. Use the tools to edit the drawing. When you have finished making changes, click in another area of the Word document. The Word tools and menus are restored.
Edit Graphic Object (Macintosh)Chem & Bio Draw 12.0 supports the Edit Graphic Object (EGO) protocol for editing structures pasted into other types of docu-ments. When you drag an object from Chem & Bio Draw 12.0 into another type of document that supports the EGO protocol, or copy it with the clipboard, you can double-click the object and it appears in a Chem & Bio Draw 12.0 document window. When you close the docu-ment window, any changes you made are reflected in the other document.
NOTE: As of this writing, versions of Microsoft Word after 5.0 do not support EGO.
Transferring PostScript (Macintosh)To obtain the highest quality drawings possible on a PostScript printer, Chem & Bio Draw 12.0 creates a screen representation and a Post-Script representation of your drawing.For best print quality under all circumstances, you will want to leave the Include PostScript and Include ChemDraw Laser Prep preferences selected (default) when you copy and paste to other applications.If you never plan to print to a PostScript printer or never plan to give your document to some-
one who uses a PostScript printer, you can turn the preferences off.To deselect the PostScript preferences:
1. Go to File>Preferences.2. Deselect Include PostScript and Include
ChemDraw LaserPrep.
To transfer only a few drawings to another document, select Include PostScript and Include ChemDraw Laser Prep in the Preferences dialog box.The PostScript commands and the ChemDraw Laser Prep are transferred with each drawing. The transferred drawings can be printed inde-pendently of Chem & Bio Draw 12.0. If you do not check the Include PostScript check box when printing to a PostScript printer Chem & Bio Draw 12.0 sends QuickDraw commands to the printer. For more informa-tion, see “Printing Background Color” on page 171.
NOTE: You can also transfer drawings to a document in a remote location whose printer cannot be initialized.
To print to a non-PostScript printer, deselect Include PostScript and Include ChemDraw Laser Prep on the General tab of the Preferences dia-log box.
ExportingYou can export Chem & Bio Draw 12.0 draw-ings in various file formats and open them in other applications. Conversely, Chem & Bio Draw 12.0 recognizes a variety of file formats and can open documents created in other appli-cations.To export a file:

152 Sharing InformationChapter 11
1. Go to File>Save As.2. In the Save As dialog box, do the follow-
ing:
a. Type a name for the file and choose a location in which to save it. Use “Go To ChemDraw Items” to quickly locate the ChemDraw Items folder.
b. Select a file format.c. Click OK or Save.
Some file formats do not support atom labels that contain nicknames or structural fragments. When you save in these formats, Chem & Bio Draw 12.0 expands all atom labels and saves the file using the expanded form.The following formats do not support nick-names or structural fragments:
• Connection Table• MSI MolFile• SMD
NOTE: Some versions of Chem & Bio Draw 12.0 do not support all the formats listed.
Some formats can be saved with different options. If a format has no save options, Options is grayed out. The following text-based formats can use the Text Options:
• ChemDraw XML• CML• Connection Table• ISIS/TGF• ISIS/Reactions• MDL MolFile• Accelrys MolFile• SMD
Other format options are noted in format descriptions.
ImportingYou can import graphics or documents from other applications into Chem & Bio Draw 12.0.
ObjectsInserted objects are OLE files and can be resized and rotated but cannot be flipped. Since an object is embedded, you can edit it in its native application from within the drawing window.
FilesWhen you insert a file, the file becomes part of the drawing. You can edit it only if it is in a Chem & Bio Draw 12.0 format.To insert a file:
1. Go to Edit>Insert File.2. In the Open dialog box, select the file type
from the drop down menu.3. Select the file and click Open. The file is
embedded in the drawing.
To insert an object:
1. Go to Edit>Insert Object.2. In the Insert Object dialog box, click Create
from File.3. Browse to the file you want to insert and
click OK.
NOTE: If you select file type “All files” and choose a file type that Chem & Bio Draw 12.0 does not support (such as TXT) you will get an error message, and the file will not be embed-ded.

Chem & Bio Draw 12.0 153User Guide
To create a new object:
1. Go to Edit>Insert Object.
1. Click Create New.2. Select the Object Type.3. Click OK.
ISIS™ compatibilityChemBioDraw Ultra 12.0, ChemDraw Ultra 12.0, and ChemDraw Pro 12.0 support ISIS/Sketch including R-Logic and leaving groups.
Attached DataChem & Bio Draw 12.0 supports associating text fields with objects such as atoms and bonds by defining a “field name”. The feature is compatible with the “Data SGroup” in MDL formats, and will be converted to Data SGroups when saved in MDL formats if a field name is specified and it is attached to:
• a collection of atoms and bonds, or• a single set of brackets
If it is attached to a collection of atoms and bonds and a set of brackets, it will be converted to two different Data SGroups.To attach data to objects:
1. Select an object.2. Go to Object>Attach Data.The Attach Data dialog box appears.3. Enter the field name and click OK.
NOTE: Field names cannot be edited in Chem & Bio Draw 12.0 after they are created. While Chem & Bio Draw 12.0 will allow any field name length, MDL formats have restrictions that users should be aware of before creating names. Likewise, Chem & Bio Draw 12.0 will
allow data to be attached to any object. When saving to MDL formats, this data will be lost unless the object meets the rules noted above.
4. Enter the data in the text box under the object.
Modifying Attached DataChem & Bio Draw 12.0 treats attached data as normal text for most purposes. However, two additional commands appear on the context menu when attached data is selected.
• Select Linked Objects changes the selection to include all of the objects associated with the data.
• Position opens up the same dialog that is used to position ObjectTags, allowing you to position the data relative to the associ-ated structure.
NOTE: Positioning information is lost when saving to MDL formats.
Graphics export border preferenceYou can specify the size of the border when exporting pictures. This preference affects the output of all graphical formats, including but not necessarily limited to: WMF, PICT, EPS, TIFF, GIF, BMP, and PNG. It applies to the clipboard and saved files. The default value is 2 points (0.278 in; 0.071 cm).
File FormatsChem & Bio Draw 12.0 supports importing and exporting the file formats listed below. To export in one of these formats, use the Save As... option. Not all formats are supported in all
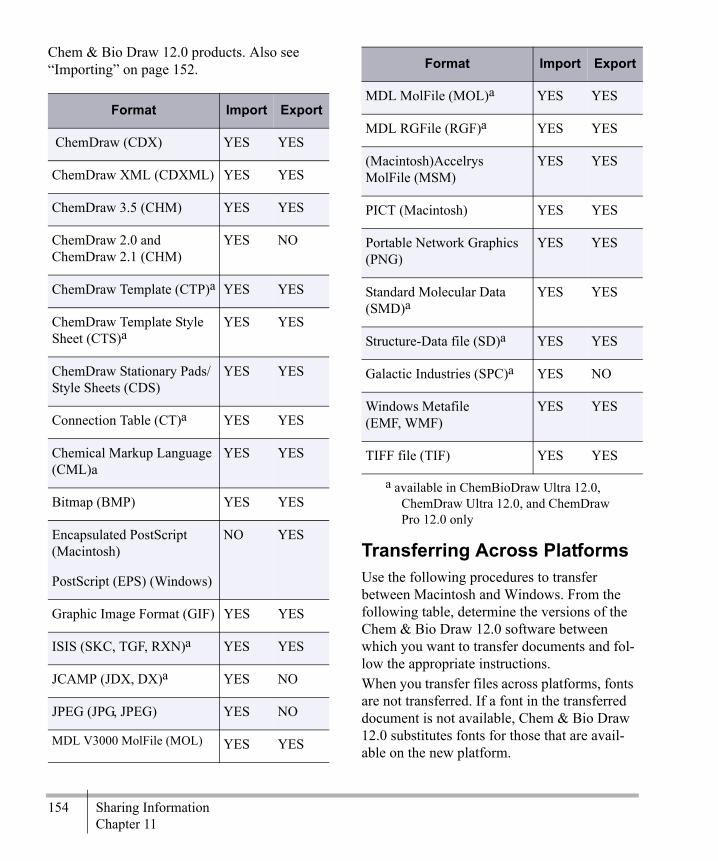
154 Sharing InformationChapter 11
Chem & Bio Draw 12.0 products. Also see “Importing” on page 152.
a available in ChemBioDraw Ultra 12.0, ChemDraw Ultra 12.0, and ChemDraw Pro 12.0 only
Transferring Across PlatformsUse the following procedures to transfer between Macintosh and Windows. From the following table, determine the versions of the Chem & Bio Draw 12.0 software between which you want to transfer documents and fol-low the appropriate instructions.When you transfer files across platforms, fonts are not transferred. If a font in the transferred document is not available, Chem & Bio Draw 12.0 substitutes fonts for those that are avail-able on the new platform.
Format Import Export
ChemDraw (CDX) YES YES
ChemDraw XML (CDXML) YES YES
ChemDraw 3.5 (CHM) YES YES
ChemDraw 2.0 and ChemDraw 2.1 (CHM)
YES NO
ChemDraw Template (CTP)a YES YES
ChemDraw Template Style Sheet (CTS)a
YES YES
ChemDraw Stationary Pads/Style Sheets (CDS)
YES YES
Connection Table (CT)a YES YES
Chemical Markup Language (CML)a
YES YES
Bitmap (BMP) YES YES
Encapsulated PostScript (Macintosh)
PostScript (EPS) (Windows)
NO YES
Graphic Image Format (GIF) YES YES
ISIS (SKC, TGF, RXN)a YES YES
JCAMP (JDX, DX)a YES NO
JPEG (JPG, JPEG) YES NO
MDL V3000 MolFile (MOL) YES YES
MDL MolFile (MOL)a YES YES
MDL RGFile (RGF)a YES YES
(Macintosh)Accelrys MolFile (MSM)
YES YES
PICT (Macintosh) YES YES
Portable Network Graphics (PNG)
YES YES
Standard Molecular Data (SMD)a
YES YES
Structure-Data file (SD)a YES YES
Galactic Industries (SPC)a YES NO
Windows Metafile(EMF, WMF)
YES YES
TIFF file (TIF) YES YES
Format Import Export
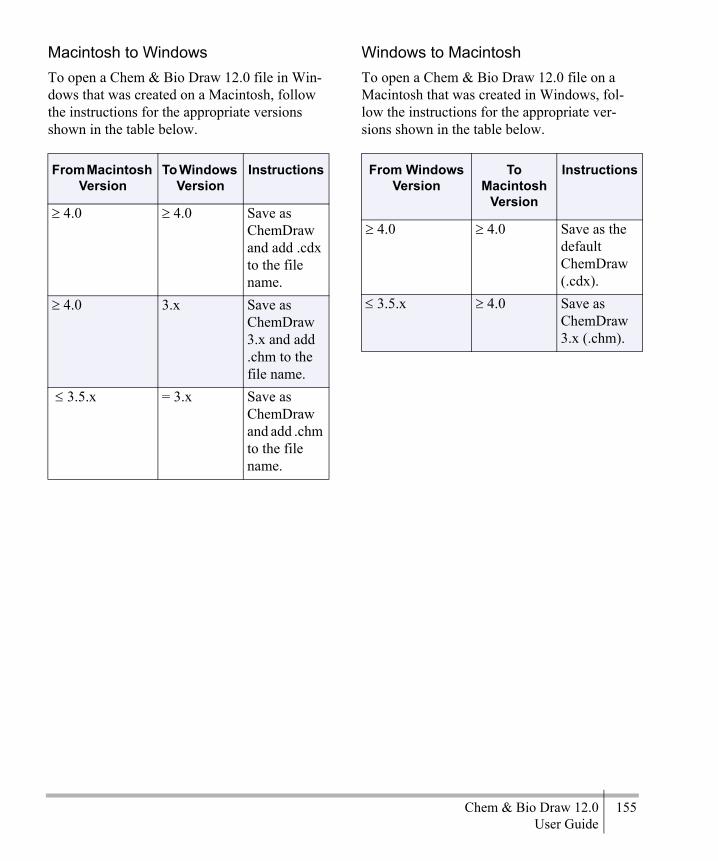
Chem & Bio Draw 12.0 155User Guide
Macintosh to WindowsTo open a Chem & Bio Draw 12.0 file in Win-dows that was created on a Macintosh, follow the instructions for the appropriate versions shown in the table below.
Windows to MacintoshTo open a Chem & Bio Draw 12.0 file on a Macintosh that was created in Windows, fol-low the instructions for the appropriate ver-sions shown in the table below.
From Macintosh Version
To Windows Version
Instructions
'$4.0 ' 4.0 Save as ChemDraw and add .cdx to the file name.
' 4.0 3.x Save as ChemDraw 3.x and add .chm to the file name.
($3.5.x = 3.x Save as ChemDraw and add .chm to the file name.
From Windows Version
To Macintosh
Version
Instructions
' 4.0 ' 4.0 Save as the default ChemDraw (.cdx).
($3.5.x ' 4.0 Save as ChemDraw 3.x (.chm).

156 Sharing InformationChapter 11
Chem & Bio Draw 12.0 157User Guide
Preferences and SettingsYou can customize Chem & Bio Draw 12.0 by configuring Preferences and Document Set-tings for the way you work.Preferences allow you to change the default behavior of certain options that apply to every open document. Document Settings allow you to change the default behavior of options that will affect only the active document.
Theme OptionsThe theme defines the appearance of the Chem & Bio Draw GUI but does not affect any of the functions. By default, Chem & Bio Draw 12.0 is installed with the version 12.0 theme. How-ever, other themes such as Classic and I/Draw are also available. To change themes:
1. Go to File>Preferences and select the Gen-eral tab.
2. Select a theme in the Theme dropdown list.3. Click OK.4. (Macintosh only) Exit and relaunch Chem
& Bio Draw 12.0.
I/DrawThe I/Draw theme changes the look of the Main and Ring toolbars. However, in addition to changing these toolbars, you can select the I/Draw mode to activate two other helpful fea-tures:
• Sprout rings (as opposed to spiro rings).
• The default style sheet is changed to I/Draw Styles.cds.
To activate the I/Draw mode, go to File>Prefer-ences and click I/Draw.
Setting PreferencesPreferences affect how Chem & Bio Draw 12.0 works, regardless of the document with which you are working.
1. To open the Preferences dialog box, go to File>Preferences.
2. To restore the default settings, click Use Defaults.
Default Document LocationYou can set the default file directory shown in the Open dialog box each time you want to open a file.
1. Go to File>Preferences. The Preferences dialog box appears.
2. Click the Directories tab.3. Click the Use Documents Location check-
box and type in or browse to the location to use.
Default Open File Format To set the default file format in the Open dia-log box:
A

158 Preferences and SettingsAppendix A
1. Go to File>Preferences. The Preferences dialog box appears.
2. Click the Open/Save tab.3. Click Use Default File Format in the Opening
Files section, and choose the desired file format.
Setting the Default ToolYou can choose which tool is selected when you open documents.
1. Go to File>Preferences. The Preferences dialog box appears.
2. Click the Open/Save tab.3. Under Opening Files, select a tool.
Autosave You can configure Chem & Bio Draw 12.0 to periodically save an open documents at a spec-ified time interval you set.
1. Go to File>Preferences. The Preferences dialog box appears.
2. Click the Open/Save tab.3. Click the Autosave Every checkbox and
enter the minutes to use.
The time starts counting down after the first change is made.
Default File Format
1. Go to File>Preferences. The Preferences dialog box appears.
2. Click the Open/Save tab.3. Click the checkbox next to Use Default File
Format in the Saving Files section and choose a format from the list.
New Lines and Closing Text BoxesThe default way to create a new line in a cap-tion text box is with the Enter or Return key. The default way to create a new line in an atom
label is with Alt+Enter or Option+Return. To close the text box, click outside the text box or select another tool. To change the default:
1. Go to File>Preferences.
TIP: In Macintosh OS X, the Preferences dia-log box is on the ChemDraw menu.
2. Choose the appropriate option on the Build-ing/Display tab:
3. Click OK.
Bitmap Fonts (Macintosh)When text appears in a document on the screen, it can appear using either a bitmap or a TrueType font.To use bitmap fonts, if they are available:
1. Go to File>Preferences.2. Select Use Bitmap Fonts When Available.
Text drawn using Bitmap fonts looks better and appears more quickly than text drawn using TrueType fonts. However, the size and position of text drawn using Bitmap fonts change somewhat when printed.
To change the default for …
Select …
Atom Label text Require Alt+Enter or Option+Return to Cre-ate New Line in Atom Labels
Caption text Require Alt+Enter or Option+Return to Cre-ate New Line in Cap-tions

Chem & Bio Draw 12.0 159User Guide
For accurate correspondence between what you see on the screen and what is printed, dese-lect Use Bitmap Fonts When Available.This change affects all documents.
Highlight Box ToleranceYou determine the size of the highlight box and how close you must get to activate an object by setting the Tolerance. The default setting for the Tolerance is 5 pixels. At this set-ting, the highlight box appears on bonds if the pointer is located 5 pixels or less from any point on the bond. To set the Tolerance:
1. Go to File>Preferences.2. On the General tab, select or type the toler-
ance. This change affects all documents.
The ChemDraw Items FolderThe location of the ChemDraw Items folder is based on your operating system. If you are using ChemOffice 2009, the folder is at:Windows XP. C:\Documents and Settings\All Users\ApplicationData\CambridgeSoft\ChemOffice2009\ChemDraw\Windows Vista. C:\Program Data\CambridgeSoft\ChemOffice2009\ChemDrawMacintosh. By default, the ChemDraw Items Folder is in the same folder as your Chem & Bio Draw 12.0 application.The folder contains the preferences, Hotkeys, nicknames, and isotopes files; scripts, and the generic nicknames file. It also contains tem-plate documents and template Stationery Pads. You can have multiple ChemDraw Items fold-ers. This is useful in corporate installations for maintaining personal files such as nicknames and standard templates.
To add a path to a ChemDraw Items folder:
1. Go to File>Preferences. The Preferences dialog box appears.
2. Click the Directories tab.3. Click Add New, browse to a location, and
click OK. A new path is added to the list.4. To rearrange the search order, click Move
Up and Move Down.5. To delete a path, click Remove. To delete all
added paths, click Default Paths.
Accessing Documents QuicklyIf have a file that you always want readily available to you whenever you launch Chem & Bio Draw 12.0, save the file in the ChemDraw Items directory. Files in this directory appear in the Templates list. By default, the directory is at:C:\Documents and Settings\All Users\Application Data\ CambridgeSoft\ ChemOffice2010\ ChemDraw\ChemDraw Items.
Whenever you need to open the file, go to File>Open Templates and select the file name from the list.
Customizing ToolbarsThe look and arrangement of toolbars are defined by a set of XML files. If you are famil-iar with editing XML files, your can modify the toolbar for the way you work. You can remove, rename, and resize buttons; change button icons, or move them from one toolbar to another. You can also create or delete toolbars.
The toolbar schemaThe Toolbars.xsd file, located in the Toolbars directory, contains the schema definitions for all the toolbars. These include definitions (but

160 Preferences and SettingsAppendix A
not the content) for the toolbars, the pop-up text, and the status bar text.
The toolbar XML filesThe Toolbars directory contains the subdirec-tory where the toolbars xml files are stored. The files are stored according to the skins in which they are used. These are the files you will most commonly edit to customize the tool-bars.
Editing the XML filesSince the files are xml-based, you can edit them using any xml or text editor. After you save them, exit and restart Chem & BioDraw. Your changes will take effect.
CAUTION
Create a backup of all XML files that you intend to edit.
Editing toolbar iconsIn addition to customizing the toolbars, you can also replace the icons themselves. For example, you can replace the eraser icon with the word “Erase”.
NOTE: All images files you use as icons must be in .png format.
Document and Object SettingsDocument and object settings are user-defin-able settings that are applied to the current doc-ument. Settings include:Drawing settings. set drawing options such as the fixed length used to draw bonds
Caption and label text settings. set text options such as the font used for atom labels and captionsColor settings. set available colors for objects and the document background Print/Page Setup. set options such as the page size used and text displayed in footersYou can apply document settings in the fol-lowing ways:
• Customize settings for the entire document using the Document Settings dialog box
• Apply settings to the entire current docu-ment from an existing document.re
• Apply settings to selected objects in the current document from an existing docu-ment
Default StylesChem & Bio Draw 12.0 saves default styles as either a style sheet (Windows) or stationary pad (Macintosh). When you launch Chem & Bio Draw 12.0, the last style sheet or stationery pad used opens as the default. If you choose different one, that file becomes the default.You can set a default that is not changed:
1. Go to File>Preferences(Macintosh: ChemDraw).
2. On the Open/Save tab, browse to the default style sheet (stationery pad).
3. Deselect Opening Any Style Sheet(Statio-nery Pad) Changes Default.
4. Click OK.
To view the default style, click the File menu. The New menu item displays the name of the Style Sheet or Stationery Pad.

Chem & Bio Draw 12.0 161User Guide
Saving Customized StylesEvery new document created with Chem & Bio Draw 12.0 uses a style sheet or stationary pad file to obtain its document settings. These files can also contain predefined objects. When you create a new document, you actually create an untitled copy of the style sheet or stationary pad. Any changes you make to the copy do not affect the file itself.You can create a style sheet or stationary pad with your own customized setting by saving it as a CDS file. If you store the CDS file in the ChemDraw Items folder, it appears in the Open Templates menu (under the File menu).To save a document’s setting as a Style Sheet or Stationery Pad:
1. Go to File>Save As. The Save As dialog box appears.
2. Name the file and change the type (in OS X: format) to CD Style Sheet (cds) or ChemDraw Stationery pad.
3. To save the file in the ChemDraw items folder, click Go To ChemDraw Items.
4. Click Save.
Settings From Other DocumentsTo apply document settings to the active win-dow that are contained in a different document, go to File>Apply Document Settings from and choose the document from which to apply the settings.
The settings in the active document window change to those found in the style sheet or sta-tionery pad that you choose.
NOTE: Applied settings are for the current document only. To make them the default set-tings for all documents you open, go to File>Open Style Sheets.
To apply the document settings from a docu-ment or style sheet not listed in the menu:
1. Go to File>Apply Document Settings from>Other. The select document dialog box appears.
2. Open the appropriate folder and select a document or Style Sheet/Stationery Pad.
3. Click Open.
Applying Object SettingsYou can apply settings from another document to selected objects in the current document. You can apply the chosen settings to the selected objects only, or to all new objects drawn in the current document.To apply object settings:
1. Select the object.2. Go to Object>Apply Object Settings from
and choose the document from which to apply the settings. A dialog box appears:
3. Do one of the following:
• To selected object only, click No.• To selected an object and any new objects
you draw, click Yes.
Drawing SettingsDrawing settings affect how bonds and other objects are drawn. You can configure the drawing settings for an entire document or for a particular object as follows:

162 Preferences and SettingsAppendix A
• For the entire document, go to File>Docu-ment Settings and select the Drawing tab.
• For an object, use the Object Settings dialog box.
Changes made to the drawing settings affect the active document window only. Drawing settings can be saved in style sheets or station-ary pads.To apply settings from other documents to your document, go to File>Apply Document Settings.Chain Angle. Set the angle (from 1 to 179 degrees) between bonds created by the Acyclic chain tool or modified by the Clean Up Struc-ture command.See, “Acyclic Chains” on page 22 and “Clean Up Structure” on page 62.Bond Spacing. Set the distance between the lines in double or triple bonds. The distance is set either as:
• The percent of the length of the bond (between 1 and 100). This allows for pro-portional spacing if different bond lengths are used.
• An absolute value you choose in the units specified for your document.
Fixed Length. Constrain the bonds drawn to the length you specify. This also adjusts the preferred bond length when you use the Clean Up Structure command.See “Drawing fixed length bond” on page 13 and “Clean Up Structure” on page 62.Bold Width. Set the width of the line used when bold and wedge bonds are drawn. The
Bold Width setting must be greater than the Line Width setting. The end of a wedge is 1.5 times the bold widthLine Width. Set the width of all bonds, lines, and arrowheads in the drawing.Margin Width. Change the amount of space surrounding all atom labels that will erase por-tions of the bonds to which they are attached. The margin width also determines the amount of white space surrounding the front bonds in a bond crossing. See “Bond Crossing” on page 16.Hash Spacing. Set the spacing between the hashed lines used when wedged hashed bonds, hashed bonds, dashed bonds, dashed arrows, or dashed curves are drawn.
Units. Set the units used in the Object Settings dialog box to centimeters, inches, points, or picas.Atom and Bond Indicators. Set which indica-tors to display. See “Atom Numbering” on page 64 and “Stereochemistry” on page 86.
Configuring Documents
1. Go to File>Document Settings.2. Click the Drawing tab and configure the set-
tings.3. Click OK.TERMINAL CARBON LABELSBy default, Chem & Bio Draw 12.0 does not display terminal carbons. To display them:
1. Go to File>Document Settings.2. Select the Atom Labels tab.

Chem & Bio Draw 12.0 163User Guide
3. Check the box next to Show Labels On Ter-minal Carbons.
Configuring ObjectsTo configure the drawing settings for a selected object:
1. Select the object.2. Go to Object>Object Settings.3. Configure the settings and click OK. The
settings you chose are applied only to the selected object.
Analysis and PropertiesYou can paste fundamental structure properties directly into your drawing.There may be a time where you may decide to change the names of these properties. For instance, you may consider using “MW” rather than “Molecular Weight” to save room on the page. How these properties are named and updated is controlled by the document settings. The changes you make apply only to the prop-erties you paste in your drawing. The names in the Analysis and Chemical Properties dialog boxes remain unaffected.To change the names of the properties:
1. Go to File>Document Settings.2. Select the Auto-update tab.3. In the Analysis window, select the property
whose name you want to change.4. In the Label text box, type the new name.5. Repeat steps 3-4 as desired for the Chemi-
cal Properties window.6. Select Automatically update upon chemistry
changes if you want the property values to be updated when you modify your drawing.
7. Click OK.
Formatting CaptionsText settings affect how captions and atom labels for the current document are drawn and formatted.Formatting options include:
• font (font type)• size (font size)• style (font and baseline style)• line spacing• alignment
Setting Font parametersChanging text formats in the Document Set-tings dialog box affects the current document only. You can also change settings for individ-ual objects by using the Object Settings dialog box, the Text menu, or the Style toolbar.To edit the document text settings for captions and atom labels:
1. Click File>Document Settings.2. In the Document Settings dialog box, click
Captions or Atom Labels.3. Change the settings as desired. The options
are described in the following sections.4. Click OK.5. The formatting is applied to the current
document.
Setting the Baseline StyleYou can specify the following baseline styles:Normal. Use this for standard text.Superscript. Reduces the text size by about 25 percent and raises its baseline.Subscript. Reduces the text by about 25 percent and lowers the baseline.

164 Preferences and SettingsAppendix A
Formula. Formats in a way that is appropriate for most chemical formulas, that is, numbers are subscripted. You must, however, capitalize manually.You can apply several styles to the same selected caption. You can also apply multiple styles to different portions of a single caption.
Style IndicatorsSelect any text in the document window and go to Text>Style to view the styles that have been applied to it. A check indicates the style applies to all the selected text. A hyphen indi-cates the style applies to only some of the selected text.
Specifying Line SpacingYou can specify the three types of line spacing:Automatic. Consistently spaced lines of text based on the height of the tallest character in the entire caption. This is the default line spac-ing.Variable. Lines of text with different spacing based on the tallest character and the lowest descender in each line.Fixed. Consistently spaced lines using a spac-ing that you specify.
Aligning TextYou can set the alignment of captions and atom labels to justify text to suit your needs. The options available depend on whether you are aligning captions or atom labels. Apply set-tings in the Object Settings dialog box.
To open the object settings dialog box, do the following:
1. Select a caption or atom label.2. Go to Object>Object Settings. The Object
Settings dialog box appears.
CaptionsYou specify the caption justification and line spacing on the Captions tab of the Object Set-tings dialog box. All text in a single caption must have the same justification and line Spac-ing.There are four available justifications:Flush Left. creates left-justified caption text.Centered. creates centered caption text.Flush Right. creates right-justified caption text.Justified. creates right-left justified caption text.
Atom LabelsUse the Centered, Flush Left, Flush Right, Stacked Above, or Automatic justifications to create labels that identify atoms and functional groups in your chemical structure without obscuring bonds or other atom labels.
NOTE: When using Stacked Above justifica-tion, enter the tokens from top to bottom using Alt+Enteror Option+Return to go to a new line. If you change the justification after the label is entered, it will in most cases generate a warn-ing.

Chem & Bio Draw 12.0 165User Guide
Examples of the atom label justifications are shown below.
Figure A.1 Atom label justification. A) stacked above; B) centered; C) flush left; D) flush right.
Automatic AlignmentWhen you justify atom labels automatically, Chem & Bio Draw 12.0 breaks the label into tokens. A token consists of an uppercase letter followed by any numbers or lowercase letters. The first token is attached to the atom and the rest of the label appears without obscuring other parts of the chemical structure.For example, to create N-methylpiperidine, label an atom in cyclohexane with the atom label NCH3, which contains the three tokens, N, C and H3. If you label C3, the tokens are placed from left to right because there are bonds to the left of the atom.
If you label C5, the tokens are placed from right to left because there are bonds to the right of the atom:
You can force an entire multi-atom label to be a token by defining it as a nickname. This pre-vents the label from flipping when applied to the left side of a structure. For example, if you define the Nickname CH3, and label C5 with the combined label and nick-name NCH3, the final orientation is CH3N instead of H3CN. In this case, the Nickname, CH3, is a token.If you label C1, the second and third tokens are placed above the first token since there are bonds below the atom.If you label C4, the second and third tokens are placed below the first token.
Changing the Default FormatEach new caption or atom label uses default document settings for the font, size, and style of captions and atom labels.You can change the format by:
• Changing the document settings for subse-quent drawings in the current document.

166 Preferences and SettingsAppendix A
• Choosing a new format for an individual caption or label from the Text menu or tool-bar before you type.
• Selecting text and applying a new format to an individual label after you type.
Settings for New TextTo specify the text settings for new captions and atom labels in the current document:
1. Go to File>Document Settings.2. Click Captions or Atom Labels in the Docu-
ment Settings dialog box.3. Select the appropriate options. 4. Click OK.
These settings affect all new captions or atom labels in the current document. To use these settings in new documents save them in a style sheet (Windows) or stationery pad (Macin-tosh). For more information, see “Saving Cus-tomized Styles” on page 161.
Formatting a Caption or LabelYou can set the text format for an individual caption or atom label before you type. The for-mat change is applied to the current text only. To set the text format before you type:
1. Select the Text tool and click in the docu-ment window. A text box appears.
2. To set the text format do one of the follow-ing:• Go to Text> Font, Style or Size.• Set the format options on the Style toolbar.
3. Type the text in the text box.
The format is applied to the typed text. Any subsequent text you type is formatted accord-ing to the default document settings for the current document.
Changing Text SpacingYou can change the text settings for a specific caption or atom label. The setting change is applied to the selected object only. You can also choose whether to have the settings applied to the selected text and to all subse-quent text you type.To change the text settings for a specific cap-tion or atom label:
1. Select the text to change with a selection tool.
2. Set the appropriate options on the Text menu.
To change only part of a single caption, select the part you want to change with the Text tool.To specify a font and size for selected text, do one of the following:
• Choose the font and size from the Text menu.
• Right-click and choose the font and size from the right-click menu.
• Select the font and size from the drop-down menus on the Style Toolbar.
Fractional Character WidthsOn the Macintosh, you can choose to have the spacing between characters as close to propor-tional as possible. If you are printing to a Post-Script printer, this option improves the font appearance.To set fractional widths:
1. Go to File>Document Settings.2. Click the Hdr/Ftr tab in the Document Set-
tings dialog box.3. Click Fractional Widths.

Chem & Bio Draw 12.0 167User Guide
Specifying the Margin WidthYou can adjust the white space surrounding the atom label so that some of the attached bond is hidden.
To adjust the white space:
1. Go to File>Document Settings. The Docu-ment Settings dialog box appears.
2. Click the Drawing tab. 3. Type a new Margin Width value.4. Click OK.
The margin width is applied to all subsequent drawings in the current document.
Customizing HotkeysIf you are familiar with XML, you can custom-ize the set of Chem & Bio Draw Hotkeys. You can modify the existing Hotkeys and even cre-ate your own. To customize Hotkeys, you must open the Chem & Bio Draw Hotkeys text file hot-keys.xml in a text editor. By default, this file is in the folder:C:\Documents and Settings\ All Users\Application Data\ CambridgeSoft\ChemOffice2010\ ChemDraw\ChemDraw Items
The Hotkeys in the file are organized by object type:
• “Atom”: Hotkeys used to modify atoms
• “Bond”: Hotkeys used to modify bonds• “Generic”: Hotkeys used to select tools and
open dialog boxes
Each Hotkey is encoded in this format:<Hotkey key="{key}" command="{command}" value="{value}" description="{description}”/>
keyKey is the keyboard key that invokes the com-mand. You can assign a particular key to dif-ferent functions as long as the functions are defined in different object types. For example, ‘b’ changes an atom to Boron in the Atom object type, a bond to bold in the Bond object type, and could be assigned to the Benzene tool in the Generic object type. You can use any key except the hard-coded keys: function keys, Enter, Space, Backspace, and arrow keys.When you edit the xml file, remember that, if you create capital and lowercase Hotkeys for the same object type, the Hotkey will be case-sensitive. If a key appears more than once in the file for the same object type, the one closest to the end of the file takes precedence.
commandCommand is any one of the predefined com-mand names. All available commands are described in the hotkeys.xml file.
NOTE: You cannot add to the command list.
valueThis is the parameter value associated with the command. For example, if the command is LABELTEXT, the value is the label that appears. If the command is BONDDISPLAY, the value corresponds to the bond display type.

168 Preferences and SettingsAppendix A
To create a hotkey that switches to a particular tool, choose TOOLMODE for a command and use any of these command names for a value:
• LASSO• MARQUEE• 3DTRACKBALL• MASSFRAG• ERASER• TEXT• SOLIDBOND• MULTIBOND• DASHEDBOND• PEN• HASHEDBOND• ARROW• HASHEDWEDGEDBOND• ORBITAL• BOLDBOND• DRAWINGELEMENTS• WEDGEDBOND• BRACKET• HOLLOWWEDGEDBOND• CHEMICALSYMBOLS• WAVYBOND• ARC• TABLE• QUERY• ACYCLICCHAIN• SNAKINGCHAIN• TEMPLATE• CYCLOPROPANE• CYCLOBUTANE• CYCLOPENTANE
• CYCLOHEXANE• CYCLOHEPTANE• CYCLOOCTANE• CYCLOHEXANECHAIR1• CYCLOHEXANECHAIR2• CYCLOPENTADIENE• BENZENE• TLCPLATE
NOTE: The features that are available depends on the level of Chem & Bio Draw 12.0 you are using.
descriptionThis text is useful for whenever you edit the hotkey.xml file. The tool description explains what each Hotkey does.
Editing the hotkeys.xml fileTo customize Chem & Bio Draw Hotkeys:
1. Determine whether you want to create or edit an Atom, Bond, or Generic Hotkey type.
2. Open the hotkeys.xml file in a text editor.3. Navigate to the appropriate Hotkey list in
the hotkeys.xml file.4. Either add or a new Hotkey entry using the
appropriate format and values or edit an existing hotkey in the list.
5. Save the hotkeys.xml file.6. Close and reopen Chem & Bio Draw 12.0.
Working with ColorYou can create full color presentations of your chemical drawings to appear on your monitor, print on a color printer, or create 35mm slides using a film printer.

Chem & Bio Draw 12.0 169User Guide
Most computers can display any of 16 million colors, but the number of colors that can appear at any one time may be limited by your monitor and display card.
What you can colorIn Chem & Bio Draw 12.0, you can change the color of the background, foreground, or indi-vidual objects:Background Color. The color of the document window. By default, the background color is white.Foreground Color. The color of object you draw. By default, the foreground color is black.Individual objects. You can assign colors to objects to help then stand out against other parts of your drawing.
Changing colorsYou can change the color of the background, foreground, groups, or objects to emphasize parts of your drawing.
Background and foregroundThe background and foreground define the col-ors used in your drawing. To change the col-ors:
1. Go to File>Document Settings and select the Colors tab.
2. Select the Background and Foreground col-ors.
3. Click OK.
NOTE: Changing the foreground color does not affect objects you have colored.
The Color paletteUse the color palette to specify the color of objects and text in the document in the active window. A palette is stored in every document and style sheet (called a “stationery pad” for Macintosh users). You can use style sheets or stationary pads to create a series of documents with the same color scheme.
Customizing Colors Changes you make to the color palette affect the current document only. You can save up to 20 colors. For more information, see “Saving Customized Styles” on page 161.
NOTE: If you select an object or group that contains multiple colors, a check mark appears next to each of the colors in the Color menu. The check mark alerts you that a change would affect more than one color.
To change the color palette in the current docu-ment:
1. Go to File>Document Settings. The Docu-ment Settings dialog box appears.
2. Click the Colors tab.3. Click the color to change (either Back-
ground or Foreground) and select Other. The Color dialog box opens.
4. Click the new color in the Basic Colors or the Custom Colors section.
5. Click OK. The color is changed to the new color and added to the Color menu.
To add a customized color:

170 Preferences and SettingsAppendix A
1. In the Color dialog box, click Define Cus-tom Colors.
Figure A.2 Setting custom colors. A) Color refiner box; B) Luminosity box.
2. Click a color in the Color Refiner box to set the hue and saturation.
The pointer turns into a cross hair when you click. You can drag to a different region to change the hue and saturation.3. Click in the Luminosity box to set the
brightness of the color.4. If necessary, change the hue, saturation,
luminosity, and RGB components by typing the values in the text boxes.
5. Click Add to Custom Colors.6. Click OK.
Macintosh Color SettingsTo change the palette of colors used in the cur-rent document:
1. Go to File>Document Settings. The Docu-ment Settings dialog box appears.
2. Click the Colors tab.
3. Click New Color.
Figure A.3 The Macintosh Color Picker dialog box
4. Use one of the icons on the left to select a method of defining your color, then select a color.
For more information about the Macintosh color options, see your System documentation.5. Click OK. The new color appears in the
Colors tab in place of the original color and is added to the color menu.
To add a new color to the Color menu:
1. Click New Color or Set Other Color on the Color tab. The Color Picker dialog box appears.
2. Click a color in the Color Wheel.3. If necessary, adjust the hue, saturation,
brightness, and RGB components by typing in the values.
4. Click OK. The new color is added to the list of Other Colors.
Removing ColorsTo remove a color from the Color menu:
1. Click the color. A highlight box appears around the color.
2. Click Remove Color.

Chem & Bio Draw 12.0 171User Guide
Objects that were drawn in the removed color are changed to the foreground color.
Templates and ColorThe background and foreground colors used in a template from the template pop-up palette are not used when the template is drawn in a docu-ment window. However, any other colors used in the template are added to the color palette of the current document if they are not already present. This is part of the autoscale feature. For more information, see “Autoscaling” on page 149.
Saving Color palette SettingsYou can save the Color palette in a style sheet or stationery pad. The Color palette is saved in addition to other document settings such as page setup settings, text settings, and drawing settings.
Printing Background ColorPrint Background Color controls whether the background color contained in your document is printed.To change whether the background color is printed:
1. Go to File>Preferences.2. Click Print Background Color.3. Click OK.
Macintosh Print Preferences When you print a document, Chem & Bio Draw 12.0 creates a QuickDraw representation and a PostScript representation of the docu-ment contents. If you are transferring information to another application from which you print Chem & Bio Draw 12.0 pictures, you include PostScript
commands and the ChemDraw LaserPrep File with the pictures. The Macintosh High Resolution Clipboard supports high-resolution printers. Most appli-cations support the High Resolution Clipboard. Because this was not always the case in the past, this preference continues to be available for users to turn off if an application being used does not support the High Resolution Clipboard.If you are unsure if the application uses a High Resolution Clipboard, try transferring pictures with this check box selected and deselected, and see which picture prints with higher qual-ity. If you are printing to a non-PostScript printer, deselect Include ChemDraw LaserPrep and Include PostScript to reduce the size of each picture. Do not deselect this option if the docu-ment will ever be printed to a PostScript printer.Printers that use the PostScript page definition language use the PostScript representation. The PostScript representation describes objects by using mathematical shapes that can be pre-cisely imaged at whatever resolution is used by your printer. The PostScript representation cre-ated by Chem & Bio Draw 12.0 is composed of two parts, the PostScript commands and the ChemDraw Laser Prep. The ChemDraw Laser Prep contains specific instructions that enable the printer to interpret the PostScript com-mands contained in a Chem & Bio Draw 12.0 document. INCLUDE POSTSCRIPT To transfer Chem & Bio Draw 12.0 pictures to another document that will be printed on a PostScript printer:
1. Go to File>Preferences.2. Click Include PostScript.

172 Preferences and SettingsAppendix A
3. Click OK.
When Include PostScript is deselected, no PostScript commands are generated. This usu-ally results in lower quality printing, particu-larly of drawings cut and pasted into other applications. However, because the representa-tion used for printing when Include PostScript is not selected is the same as that used for drawing to the screen, better correspondence between the screen and printed output may be observed. INCLUDE CHEMDRAW LASER PREP Selecting the include ChemDraw Laser Prep lets you print to a printer that cannot be initial-ized using Chem & Bio Draw 12.0. If you cre-ate drawings with this option off, they will not print on PostScript printers without the use of Chem & Bio Draw 12.0.To include ChemDraw Laser Prep:
1. Go to File>Preferences.2. Click Include ChemDraw Laser Prep.3. Click OK.
When you select Include ChemDraw Laser Prep, you should also select Include Post-Script.
Document SettingsChem & Bio Draw 12.0 includes a library of document settings based on those found in many well-known scientific publications. For example, some journals may require submitted articles be formatted with specific margins, fonts, page size, etc. If you plan to submit your document to a specific journal, open in Chem & Bio Draw 12.0 the style sheet for that jour-nal. If you want, you can also create style sheets of your own.
NOTE: “Style sheets” are called “stationary pads” in the Macintosh operating system.
To create your own style sheet:
1. Create a new document. 2. Enter the settings in the Page Setup, Draw-
ing, Text Settings, and Color palette dialog boxes.
3. Go to File>Save As. 4. In the Save As dialog box:
a. Select the Chem & Bio Draw 12.0 style sheets or stationary pads file format.
b. Type a name for the document.c. Select the ChemDraw Items folder as
the location for saving the template.5. Click OK or Save.

Chem & Bio Draw 12.0 173User Guide
Publishing DocumentsThis following table contains a sample struc-ture for each of the style sheets used in many popular publications.
ACS Document 1996
• Fixed Length: 14.4 pt• Bold Width: 2 pt• Line Width: 0.6 pt• Margin Width: 1.6 pt• Hash Spacing: 2.5 pt• Chain Angle (degrees): 120• Bond Spacing (% of length): 18• Atom Label Font (Win/Mac): /• Atom Label Size: 10 pt• Caption Font (Win/Mac): /• Caption Size: 10 pt• Drawing Area (Width x Height): 540 pt x 720 pt• Page Size: US Letter• Reduction (%): 100

174 Preferences and SettingsAppendix A
Adv. Synth Catal.
• Fixed Length: 17 pt• Bold Width: 2 pt• Line Width: 1 pt• Margin Width: 1.6 pt• Hash Spacing: 2.5 pt• Chain Angle (degrees): 120• Bond Spacing (% of length): 18• Atom Label Font (Win/Mac): /• Atom Label Size: 10 pt• Caption Font (Win/Mac): /• Caption Size: 12 pt• Drawing Area (Width x Height): 540 pt x 720 pt• Page Size: US Letter• Reduction (%): 100
J.Chin. Chem. Soc.
• Fixed Length: 18 pt• Bold Width: 2.5 pt• Line Width: 1 pt• Margin Width: 2 pt• Hash Spacing: 2.5 pt• Chain Angle (degrees): 120• Bond Spacing (% of length): 20• Atom Label Font (Win/Mac): /• Atom Label Size: 12 pt• Caption Font (Win/Mac): /• Caption Size: 12 pt• Drawing Area (Width x Height): 693 pt x 918 pt• Page Size: US Letter• Reduction (%): 80
HO
O
HO
H
N

Chem & Bio Draw 12.0 175User Guide
J. Mol. Mod. (1 column)
• Fixed Length: 14.4 pt• Bold Width: 2 pt• Line Width: 0.6 pt• Margin Width: 1.6 pt• Hash Spacing: 2.5 pt• Chain Angle (degrees): 120• Bond Spacing (% of length): 18• Atom Label Font (Win/Mac): Times New Roman/
Times• Atom Label Size: 10 pt• Caption Font (Win/Mac): Times New Roman/
Times• Caption Size: 10 pt• Drawing Area (Width x Height): 8.5 cm x 25.4 cm
(1 column); 17 cm x 25.4 cm (2 column)• Page Size: US Letter• Reduction (%): 100
HO
O
HO
H
N

176 Preferences and SettingsAppendix A
New Document
• Fixed Length: 30 pt• Bold Width: 2 pt• Line Width: 1 pt• Margin Width: 2 pt• Hash Spacing: 2.7 pt• Chain Angle (degrees): 120• Bond Spacing (% of length): 12• Atom Label Font (Win/Mac): /• Atom Label Size: 10 pt• Caption Font (Win/Mac): /• Caption Size: 12 pt • Drawing Area (Width x Height): 7.5 in x 10 in• Page Size: US Letter or A4 (as selected)• Reduction (%): 100
New Slide
• Fixed Length: 30 pt• Bold Width: 4 pt• Line Width: 1.6 pt• Margin Width: 2 pt• Hash Spacing: 2.7 pt• Chain Angle (degrees): 120• Bond Spacing (% of length): 15• Atom Label Font (Win/Mac): /• Atom Label Size: 12 pt• Caption Font (Win/Mac): /• Caption Size: 16 pt• Drawing Area (Width x Height): 7.5 in x 10 in• Page Size: US Letter• Reduction (%): 100
HO
O
HO
H
N

Chem & Bio Draw 12.0 177User Guide
Phytomedicine
• Fixed Length: 20 pt• Bold Width: 1.33 pt• Line Width: 1pt• Margin Width: 1.25 pt• Hash Spacing: 3 pt• Chain Angle (degrees): 120• Bond Spacing (% of length): 8• Atom Label Font (Win/Mac): /• Atom Label Size: 12 pt• Caption Font (Win/Mac): /• Caption Size: 12 pt• Drawing Area (Width x Height): 540 pt x 720 pt• Page Size: US Letter• Reduction (%): 100
HO
O
HO
H
N

178 Preferences and SettingsAppendix A
RSC
• Fixed Length: 0.43 cm• Bold Width: 0.056 cm• Line Width: 0.016 cm• Margin Width: 0.044 cm• Hash Spacing: 0.062 cm• Chain Angle (degrees): 120• Bond Spacing (% of length): 20• Atom Label Font (Win/Mac): /• Atom Label Size: 9 pt• Caption Font (Win/Mac): /• Caption Size: 9 pt• Drawing Area (Width x Height): 8.9 cm x 25.4 cm
(1 column); 19 cm x 27.7 cm• Page Size: US Letter• Reduction (%): 100
HO
O
HO
H
N

Chem & Bio Draw 12.0 179User Guide
Science of Synthesis
; • Fixed Length: 17 pt• Bold Width: 2 pt• Line Width: 0.8 pt• Margin Width: 2.25 pt• Hash Spacing: 2.5 pt• Chain Angle (degrees): 120• Bond Spacing (% of length): 18• Atom Label Font (Win/Mac): /• Atom Label Size: 10 pt• Caption Font (Win/Mac): /• Caption Size: 10 pt• Drawing Area (Width x Height): 19.79 cm x 27.15
cm• Page Size: A4• Reduction (%): 100
HO
O
HO
H
N

180 Preferences and SettingsAppendix A
Synthesis, Synlett
• Fixed Length: 17 pt• Bold Width: 2 pt • Line Width: 0.8 pt• Margin Width: 1.3 pt• Hash Spacing: 2.5 pt• Chain Angle (degrees): 120• Bond Spacing (% of length): 18• Atom Label Font (Win/Mac): /• Atom Label Size: 10 pt• Caption Font (Win/Mac): /• Caption Size: 10 pt• Drawing Area (Width x Height): 12 cm x 26.7 cm• Page Size: A4• Reduction (%): 100
Verlag Helvetica Chimica Acta
• Fixed Length: 17 pt• Bold Width: 2.9 pt• Line Width: 0.54 pt• Margin Width: 2 pt• Hash Spacing: 2 pt• Chain Angle (degrees): 120• Bond Spacing (% of length):14• Atom Label Font (Win/Mac): /• Atom Label Size: 10 pt• Caption Font (Win/Mac): /• Caption Size: 12 pt• Drawing Area (Width x Height): 368 x 720 pts• Page Size: US Letter• Reduction (%): 100
HO
O
HO
H
N
HO
O
HO
H
N

Chem & Bio Draw 12.0 181User Guide
Wiley Document
; • Fixed Length: 17 pt• Bold Width:2.6 pt• Line Width:0.75 pt• Margin Width: 2 pt• Hash Spacing: 2.6 pt• Chain Angle (degrees): 120• Bond Spacing (% of length):18• Atom Label Font (Win/Mac): /• Atom Label Size: 12 pt• Caption Font (Win/Mac): /• Caption Size: 12 pt• Drawing Area (Width x Height): 19.79 x 27.15 cm• Page Size: A4• Reduction (%): 100
HO
O
HO
H
N

182 Preferences and SettingsAppendix A

Chem & Bio Draw 12.0 183User Guide
Page LayoutThe presentation quality of your document is affected by how chemical structures and other objects are placed on the page. Effective layout of a drawing includes proper alignment of chemical structures and other objects, appro-priate page size, and page orientation. The page layout tools include setup of the page and the use of the ruler, tables, layering, aligning, and distributing commands.
The Drawing AreaThe document window is not necessarily the same size as the drawing area of the page. A document window, in most cases, actually cov-ers only a portion of the drawing area.The following options allow you to set the drawing area displayed on your screen.
• Document Settings and Page Setup let you modify the page, margins, headers, footers, document type, and size.
• View menu options: Actual Size, Show Document, Magnify, and Reduce.
• Magnification Controls: enlarge and reduce• Dragging to enlarge the drawing area.
• Windows: Point to a border or corner of a document window and drag to resize.
• Macintosh: Drag the Size box in the lower right corner of the document window.
The size of drawing area displayed depends on the size and resolution of your monitor. In some cases you can see the entire document.If you magnify a document, the drawing area size and drawing objects become bigger. If you increase the magnification so that the page size becomes bigger than the screen, scroll bars become available.
Setting up PagesYou can create two types of documents:Pages. A single document containing one or more sheets, each of which is printed on a sin-gle piece of paper.Posters. A single large document, composed of as many pieces of paper as necessary.
Paged Document SetupTo create a document with one or more pages:
1. Go to File>Document Settings. The Docu-ment Settings dialog box appears.
2. On the Layout tab, check that Pages is selected.
3. Specify the number of pages in the Docu-ment Size section. The size of the pages is determined by the Page Setup settings. For more information, see “Page Setup” on page 184.
4. Type the Margin settings. The units of the margins are set in the Preferences dialog
B
184 Page LayoutAppendix B
box. The paper size minus the margins determines the drawing area.
5. Create Headers and Footers as described in Headers and Footers.
6. Click OK. A new document opens, using your settings.
Poster Documents SetupYou can create a poster by creating a single large drawing area, which will be printed on as many separate pages as necessary. When you set the document size and how much each page overlaps, Chem & Bio Draw 12.0 calculates the number of pages needed and the margin sizes. You can set registration marks, which mark the overlap setting on each page, to use as a guide when assembling the poster from the separate pages.To create a poster document:
1. Go to File>Document Settings.2. On the Layout tab, click Poster.3. Type the Height, Width, and Page Overlap.
The number of pages and the margin dimensions are calculated.
4. Select whether to Print Registration Marks.5. Create Headers and Footers.6. Click OK.
Headers and FootersIn poster documents, only one header and footer appear for the entire document.To create headers and footers:
1. Go to File>Document Settings.2. Click the Hdr/Ftr tab.3. Enter the position from the edge of the page
that you want the header or footer to appear.4. Type the text to appear in the header or
footer.
5. Type additional information in the Text box from the following:
file name. &fpage number. &pdate printed. &dtime printed. &t6. Position the text horizontally by typing the
appropriate characters listed below. Any text following these characters is appropri-ately aligned.
centered. &cright. &rleft (default). &l
Page SetupYou can customize the size, orientation and margins for the document page. To setup the page, go to File>Page Setup. Options for cus-tomizing the page appear below:Paper. Choose the size of the paper on which you want to print the document and the printer tray where the paper is located.Orientation. Select either Portrait or Land-scape.Margins. By default, all margins are set to 0.5 inches.Printer. Click to select a printer and set prefer-ences. You can also choose the printer in the Print Options dialog box, as described below.
PrintingChem & Bio Draw 12.0 uses the standard sys-tem commands to print documents. The options that you have available to you depend on the printer that you are using. See your printer’s documentation for more information.

Chem & Bio Draw 12.0 185User Guide
In general, to print a document:
1. Go to File>Page Setup.2. Make all appropriate selections for the
printer you are using and click OK.3. Go to File>Print.4. Make your selections in the Print dialog
box and click OK.
To print a document from Windows Explorer or from the Finder:
1. Select the document you want to print. 2. Go to File>Print. The Chem & Bio Draw
12.0 application is opened and the Print dia-log box appears.
3. Make your selections in the Print dialog box and click OK.
Print Options
Select Printer. This window lists all printers connected to your computer. You can either use the default printer or select another printer.Print to File. The document is saved as a .prn file that also includes your printer preferences. The document can then be sent later to a printer.Find Printer. Click to map to a printer that is not currently listed in the Select Printer win-dow.Page Range. Select the pages you want to print. If you wan to print only specific parts of your document, select the parts using the selec-tion tool and then choose Selection in the Print Options dialog box to print.Number of copies. By default, only one copy is printed.
ScalingSome printers include an option to reduce or enlarge your drawings by a variable percentage (25-400%). This option scales all objects and text in the document window by the percentage specified. This is not a change in magnifica-tion. The size of objects is changed relative to the paper size, margins, and orientation you have specified. The enlarge or reduce option is useful for changing the size of the available drawing area, while keeping the images on the screen at the normal size when you are drawing. If your document is set so that the drawing fills the page on one printer and you use another printer that requires larger margins, the drawing my disappear off the edge of the document win-dow. You can reduce the size of the drawing with the reduce option so that it fits in the doc-ument window.
Saving Page Setup SettingsYou can save page setup settings in a style sheet or stationary pad. Whenever you open a style sheet or stationery pad, these settings are used. The settings are saved in addition to the text settings, drawing settings, and the color palette.
35mm Slide Boundary GuidesIf you make 35mm slides from a hard copy of a document or from a screen shot, you can dis-play boundary lines that appear on your screen positioned at 7 inches and 10.5 inches to match the 2:3 ratio for the 35 mm slide format. These guides help you keep your drawing within this region to maintain the proper ratio, but are not printed. The drawing area of the page must be at least 7 x 10.5 inches for these boundary lines to be visible.

186 Page LayoutAppendix B
To display the 35mm slide boundary lines:
1. Go to File>Preferences.2. Select the Building/Display tab.3. Select the Show 35mm Slide Boundary
Guides check box.4. Click OK.
Two 35mm Slide Boundary Guides appear in the same orientation you have chosen in the Page Setup dialog box. These guides appear in every document.
Viewing DrawingsYou can use a close-up view of objects in your reaction scheme to make sure they are properly positioned. At times, you may want to reduce your view so that you can move groups of objects around the page. You can change the magnification to perform these functions using the Magnify and Reduce commands in the View menu, the Zoom tool, or the magnifica-tion controls.
MagnificationMagnifying your drawings changes how large or small it appears without changing its actual dimensions. You can either select a value in the magnification dropdown list or enter your own value between 1% and 999%.
Magnify
1. Select an object you want to keep in view as you magnify the drawing.
NOTE: If you do not select an object, the last object drawn is the center point of the magnifi-cation.
2. Go to View>Magnify or press F7.
The magnification occurs around the center of the selected object. The magnification percent-age appears in the Magnification control on the General toolbar.
Actual SizeTo return to the actual size from any other magnification, go to View>Actual Size.
ReduceTo reduce the magnification:
1. Select an object around which you want to reduce the magnification.
NOTE: If you do not select an object, the last object drawn is the center point of the magnifi-cation.
2. Go to View>Reduce.
The reduction in magnification appears in the Magnification drop-down list. You can reduce the magnification until the entire page fits on the screen. In the reduced view, you can continue to use all of the draw-ing tools. In particular, you can use a selection tool to rearrange the drawing to take better advantage of the space available.
Show DocumentShow Document reduces the magnification until the entire page is visible in the document window.To view the entire drawing area in a document window at once, go to View>Show Document.The Magnification control shows the reduction in magnification that was required to have the entire page appear on the screen.

Chem & Bio Draw 12.0 187User Guide
The Magnification ControlWhere the magnify and reduce commands let you quickly increase or decrease the magnifi-cation, the magnification control lets you be more precise using a numeric value. To use the magnification controls in Windows, select a value from the dropdown list or type a value.To use the Magnification controls in the Mac-intosh, do one of the following:
• Select a value from the drop-down list.• Select Other from the drop-down list. In the
dialog box that appears, type a value and click OK.
RulersUse the rulers to position objects a measured distance away from a reference point or create objects of an approximate size. To set the ruler units, go to File>Preferences and select the General tab.
Displaying RulersTo toggle rulers on and off, go to View>Show Rulers. The rulers appear along the top and left edges of the document window.
As you move the pointer, ruler guides appear on each ruler, indicating the position of the pointer.
Figure B.4 How rulers indicate position. A) The cursor; B) Ruler guides indicating vertical and hori-zontal location of the cursor.
When you select an object, two guides appear in each ruler. The four guides together show the height and width of the selected object.
The CrosshairUse the crosshair to align objects relative to each other and to space objects an equidistant apart. The axes of the crosshair can be moved within a document window.
Displaying the CrosshairTo toggle the Crosshair on and off, go to View>Show Crosshair.To assist you in aligning objects, the Crosshair includes grid lines that extend from the major division marks on each axis.You can also show the rulers while the crosshairs are displayed so that you can see the unit measurement associated with each divi-sion on the crosshair axes.

188 Page LayoutAppendix B
Moving the Crosshair
1. Position the pointer where the Crosshair axes intersect.
The pointer changes to an arrow when it is near the center of the crosshair. 2. Click and drag the crosshair.
To constrain crosshair to move in the X- or Y-direction, shift+drag the crosshair.
Positioning ObjectsTo align two or more objects do anyone of the following:
• Move the Crosshair axes and align it with the object.
• Select an object and drag it until it is aligned with either axis of the Crosshair, or a grid line.
In either case, if a bond or side of the object is parallel to one of the axis, it disappears when it is exactly positioned over a Crosshair axis.3. Select a second object.4. Drag the second object to the crosshair axis
or grid line and align it to the first.
You can also move selected objects in small increments to align them with the Crosshair using the arrow keys available on some key-boards:To move 1 point, select the objects and press an arrow key. To move in 10pt increments, hold down the Alt key (Windows) or the Option key (Macintosh) while you press the arrow key.

Chem & Bio Draw 12.0 189User Guide
Chemical InterpretationChem & Bio Draw 12.0 converts lines, charac-ters, and other symbols into chemically mean-ingful figures as you work. This occurs in the background, but you can also choose to view this chemical data. Chem & Bio Draw 12.0 uses the data when exporting to file formats that support only a subset of the notations that Chem & Bio Draw 12.0 does.This section describes how Chem & Bio Draw 12.0 interprets what you draw.
Chemical IntelligenceChem & Bio Draw 12.0 was designed as a tool to aid in chemical communication. Most chem-ists would understand AcOo-C6H4COOH immediately, whether or not they recognized it as aspirin. Most computer programs, however, require what is known as a “complete connec-tion table,” in this case, a collection of 21 atoms connected by 5 double bonds and 16 sin-gle bonds in a specific pattern. Chem & Bio Draw 12.0 takes what makes sense to a chemist and converts it into what makes sense to another application.This chemical intelligence can be used as a sophisticated “spelling” checker for chemical
compounds. For example, if you’re investigat-ing organic acids, a compound with the struc-tural formula CH3COO would probably represent acetic acid. Present the same formula in a paper on transition metal chemistry, and you might be describing a novel methylated cobalt oxide. If you had asked Chem & Bio Draw 12.0 to interpret it beforehand, you would have received a message reporting a valence error, and you might have been prompted either to add a negative charge or to change the capitalization. Chem & Bio Draw 12.0 can offer only sugges-tions. If you and your audience understand what you are trying to depict, then you can ignore these suggestions. In many cases, you can teach Chem & Bio Draw 12.0 to under-stand the notation you’re using. For more information, see “Applying Nicknames” on page 19.
Database ConventionsMost databases require not only that you draw a structure in a way that makes sense, but that you draw it in the way that the database expects it. Consider ferrocene, which is repre-
C

190 Chemical InterpretationAppendix C
sented in at least four different ways in major databases:
Figure C.5 Representations of ferrocene
A successful search in one database might not produce any results in another. When in doubt, consult the documentation for the conventions your database uses.
Bond ConventionsThe following table describes the chemical conventions Chem & Bio Draw 12.0 recog-nizes.
Bond Description
Single bond, unspecified stereo-chemistry.
Single bond, “down” stereochem-istry (into the plane of the paper, away from the viewer), from the first drawn atom to the second drawn atom.
Single bond, “up” stereochemistry (out of the plane of the paper, toward the viewer), from the first drawn atom to the second drawn atom.
Single bond, mixture of “up” and “down” stereochemistries in some unspecified proportion.
Dative bond. Often used to indicate polar bonds, such as the N-O bond in pyridine N-oxide.
Double bond, with cis/trans stere-ochemistry as drawn.
Double bond, with cis/trans stere-ochemistry unknown.
Tautomeric bond, either single or double according to rules of tautomerism.
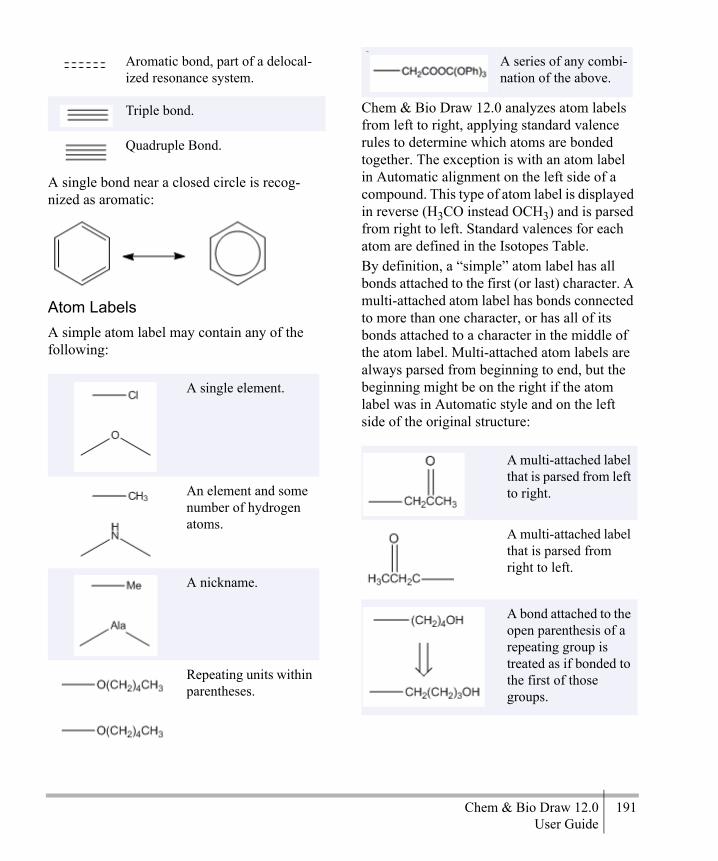
Chem & Bio Draw 12.0 191User Guide
A single bond near a closed circle is recog-nized as aromatic:
Atom LabelsA simple atom label may contain any of the following:
Chem & Bio Draw 12.0 analyzes atom labels from left to right, applying standard valence rules to determine which atoms are bonded together. The exception is with an atom label in Automatic alignment on the left side of a compound. This type of atom label is displayed in reverse (H3CO instead OCH3) and is parsed from right to left. Standard valences for each atom are defined in the Isotopes Table.By definition, a “simple” atom label has all bonds attached to the first (or last) character. A multi-attached atom label has bonds connected to more than one character, or has all of its bonds attached to a character in the middle of the atom label. Multi-attached atom labels are always parsed from beginning to end, but the beginning might be on the right if the atom label was in Automatic style and on the left side of the original structure:
Aromatic bond, part of a delocal-ized resonance system.
Triple bond.
Quadruple Bond.
A single element.
An element and some number of hydrogen atoms.
A nickname.
Repeating units within parentheses.
+*/
A series of any combi-nation of the above.
A multi-attached label that is parsed from left to right.
A multi-attached label that is parsed from right to left.
A bond attached to the open parenthesis of a repeating group is treated as if bonded to the first of those groups.

192 Chemical InterpretationAppendix C
Multiple fragments within a single label can be specified in the following ways:
Chemically Significant TextOften, it is simpler to write a chemical formula like MeOH or H2O than it is to draw out an entire atoms-and-bonds structure. Chem & Bio Draw 12.0 correctly interprets any unambigu-ous structural formula. For example, CH3COCH2CH3 is recognized as methyl ethyl ketone and MeOH is recognized as methanol. On the other hand, C6H6 might mean benzene, or it might mean one of over 200 other iso-mers. C6H6 is not recognized by Chem & Bio
Draw 12.0, and generates an error message if you try to analyze it. Generally, empirical for-mulas (C2H6 and H2SO4) are not recognized, but structural formulas (CH3CH3 and HOSO2OH) are.Molecular weight and elemental analyses of empirical structures is possible, but the Expand Label command does not work with them. Empirical structures are discarded when they are transferred to other applications that require unambiguous structures.Chemically-significant text must be entirely in formula or, for isotopes and charges, super-script style. Chem & Bio Draw 12.0 does not recognize a chemical formula embedded within a larger block of text.
ChargesCharges may be created as part of a textual atom label or with the appropriate symbol from the Chemical Symbols palette. Charges are always assigned to a specific element in the atom label, whose acceptable valences become
A bond attached to the close parenthesis or repeat count of a repeating group is treated as if bonded to the last of those groups.
Implicitly, using standard valence rules.
Explicitly, using a space, period (unsuperscripted or unsubscripted), bullet, or combination.
An unsuperscripted, unsub-scripted integer at the start of a fragment is recognized as a stoichiometric multiplier and is treated as if the appropriate number of fragments were drawn explicitly.
If you draw a bond, add an atom label, and then delete the bond, you have a chemically meaningful text block whose font, size, and style match other atom labels.
If you create a caption with the text tool and set it to Formula style, you have a chemically meaningful text block whose font, size, and style match other captions.

Chem & Bio Draw 12.0 193User Guide
those of the similar isoelectronic neutral ele-ment.
Isotopes and ElementsBy default, all isotopes are recognized in the full Table of the Elements. This data is pro-vided by CRC Press, Inc. Isotopes are defined in the Isotopes Table file. You can edit this file in any text editor to add new isotopes.
RadicalsRadicals are indicated with the appropriate symbol from the Chemical Symbols palette. As with charges, they are assigned to the nearest atom. Radicals always occupy one free
A charge following an element is assigned to that element.
A charge that does not follow an element is assigned to the next element.
Charges that follow a monova-lent element with a repeat count are assigned to the element before that element.
Charges that follow other repeating units are distributed among those units.
Charges may be superscripted.
Multiple charges are recog-nized appropriately.
Charges may have repeat counts as long as both the charge and the repeat count are superscripted.
A “floating” charge placed with the Chemical Symbols Tool is assigned to the nearest atom. If no atom is within the distance set as the Fixed Length, the charge is ignored and not assigned to any atom.
A “floating” charge placed within a delocalized system is recognized by the Analyze Structure function, but is discarded when saved to formats that require all charges to be associated with specific atoms.
A superscripted number before the element symbol indi-cates isotope numbers.
Isotopes can be included anywhere that regular elements can.
Deuterium and Tritium can be indicated by their one-letter symbols.
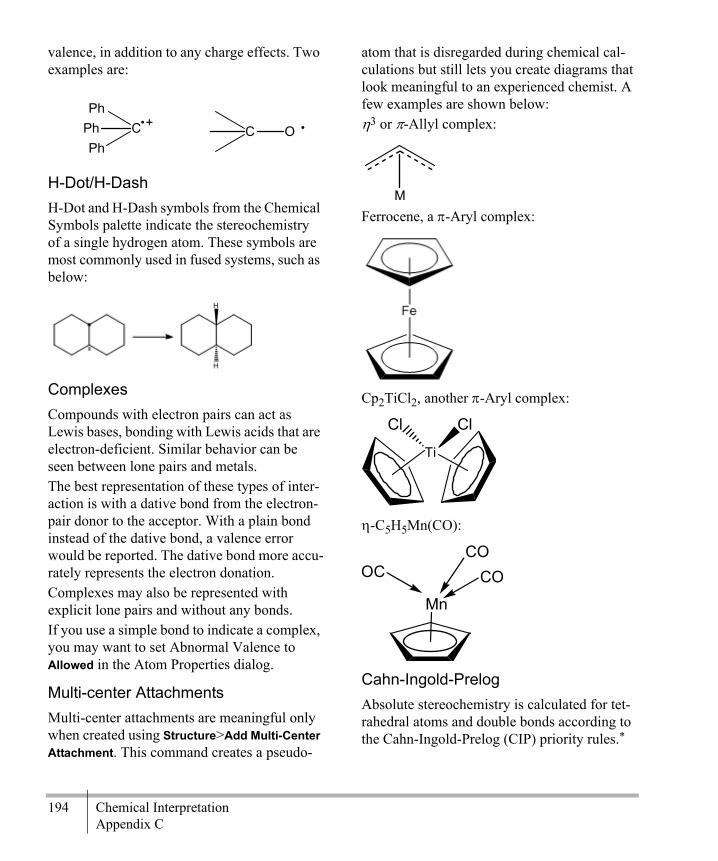
194 Chemical InterpretationAppendix C
valence, in addition to any charge effects. Two examples are:
H-Dot/H-DashH-Dot and H-Dash symbols from the Chemical Symbols palette indicate the stereochemistry of a single hydrogen atom. These symbols are most commonly used in fused systems, such as below:
ComplexesCompounds with electron pairs can act as Lewis bases, bonding with Lewis acids that are electron-deficient. Similar behavior can be seen between lone pairs and metals. The best representation of these types of inter-action is with a dative bond from the electron-pair donor to the acceptor. With a plain bond instead of the dative bond, a valence error would be reported. The dative bond more accu-rately represents the electron donation.Complexes may also be represented with explicit lone pairs and without any bonds.If you use a simple bond to indicate a complex, you may want to set Abnormal Valence to Allowed in the Atom Properties dialog.
Multi-center AttachmentsMulti-center attachments are meaningful only when created using Structure>Add Multi-Center Attachment. This command creates a pseudo-
atom that is disregarded during chemical cal-culations but still lets you create diagrams that look meaningful to an experienced chemist. A few examples are shown below:)3 or *-Allyl complex:
Ferrocene, a *-Aryl complex:
Cp2TiCl2, another *-Aryl complex:
)-C5H5Mn(CO):
Cahn-Ingold-PrelogAbsolute stereochemistry is calculated for tet-rahedral atoms and double bonds according to the Cahn-Ingold-Prelog (CIP) priority rules.*
PhCPh
PhC O
M
Ti
Cl Cl
Mn
OCCO
CO

Chem & Bio Draw 12.0 195User Guide
The CIP rules are designed to order ligands by their priority and determine a descriptor based on the orientation of the ordered ligands in space.A ligand is an entity attached to a stereocenter. For example, a tetrahedral carbon has four ligands corresponding to its four substituents. When a tetrahedral carbon is in a ring, it still has four ligands: the two ligands outside the ring, a third consisting of the ring “unpeeled” clockwise, and a fourth consisting of the ring “unpeeled” counterclockwise.Five rules used to determine the priority of ligands are summarized below in simplified form. For more detailed information, see the references. They are checked sequentially as follows:Rule 1. Higher atomic number precedes lowerRule 2. Higher atomic mass precedes lowerRule 3. cis precedes transRule 4. Like pairs of descriptors precede unlike pairs
Rule 5. R precedes SChem & Bio Draw 12.0 checks differences up to 15 atoms distant from the stereocenter.
Stereochemical IndicatorsAfter the ligands are ranked, an indicator is assigned as shown in the following table.
Stereochemical FlagsWhile the chirality of a specific stereocenter can be indicated with the appropriate wedged, hashed, or plain bond, sometimes it is useful to indicate the relative stereochemistry of a mole-cule as a whole, considering the relationship between all stereo-centers. Stereochemical flags apply to the nearest structure; if no struc-ture is within the distance specified by the
*. R.S. Cahn, C.K. Ingold, and V. Prelog, “Specification of Molecular Chirality”, Angew. Chem., Int. Ed. Engl. 1966, 5, 385-414 (errata: 1966, 5, 511); Angew. Chem. 1966, 78, 413-447.
V. Prelog and G. Helmchen, “Basic Principals of the CIP-System and Proposals for a Revi-sion”, Angew. Chem. 1982, 94, 614-631; Angew. Chem. Int. Ed. Engl. 1982, 21, 567-583.
P. Mata, A.M. Lobo, C. Marshall, and A.P. Johnson, “The CIP Sequence Rules: Analy-sis and Proposal for a Revision.” Tetrahe-dron:Asymmetry. 1993, 4, 657-668.
Stereo-center
Indicator
Double bond Z if the highest ranking ligand of each pair are on the same side of the bond; otherwise E.
Tetrahedral atom
When the lowest-ranking ligand is located behind the central atom:
• R when remaining 3 ligands are arranged clockwise in descending order
• S when remaining 3 ligands are arranged counterclock-wise in descending order
• r or s is used for pseudo asymmetric atoms

196 Chemical InterpretationAppendix C
Fixed Length value, the stereochemical flag is not assigned to any structure.
Figure C.6 The Absolute flag indicates the exact stereoisomer as drawn.
Figure C.7 The Relative flag indicates the exact stereoisomer as drawn, or its enantiomer.
Figure C.8 The Racemic flag indicates a mixture of the exact stereoisomer as drawn and its enantiomer.
Polymer RepresentationsPolymers are represented by brackets used to enclose repeated structures or structural frag-ments. Bracket properties specify the orienta-tion and context of the repeating units. An explanation of the bracket properties is given in “Setting Bracket Properties” on page 131.
NOTE: The polymer drawing feature is avail-able in ChemBioDraw Ultra 12.0, ChemDraw Ultra 12.0, and ChemDraw Pro 12.0 only.
References “Graphic Representations (Chemical Formu-lae) of Macromolecules (Recommendations 1994)” Pure Appl. Chem., 66, 2469-2482 (1994).“Source-Based Nomenclature for Copolymers (Recommendations 1985)” Pure Appl. Chem., 57, 1427-1440 (1985). Also available at: http://www.iupac.org/publications/books/pbook/Pur-pleBook-C7.pdf.
Chem & Bio Draw 12.0 197User Guide
“Basic Definitions of Terms Relating to Poly-mers (1974)” Pure Appl. Chem., 40, 479-491 (1974) Also available at: http://www.iupac.org/reports/1996/6812jenkins/index.html.Also see the Guide for the authors of papers and reports in polymer science and technology from IUPAC.
Analysis MessagesWhen a structure cannot be analyzed fully, two general types of messages are displayed:
• Status messages that report a problem that may not affect the final analysis
• Critical messages that may affect the final analysis
Message Description
There are too many bonds to this unlabeled Carbon.
Displayed for every unlabeled atom with more than four filled valences. Filled valences include sum of bond orders, charge, radicals, and free sites. Aromatic bonds count 1.5 each, rounded down unless it is the only bond to the atom. Charge is signed and includes charge implied by dative bonds. The Substit-uents query property treats free sites, up to and exactly the same way: an atom with two explicit bonds and “Substituents: Up To 3” or “Substituents: Exactly 3” or “Substituents: Free Sites 1” has three filled valences.
An atom in this label has an invalid valence.
Displayed in cases where a place cannot be found to place a bond or a bond cannot be found to place an atom. Valid valences for each element are listed in the Isotopes Table file.
ChemDraw can’t interpret this label.
Displayed when text is found that cannot be identified as an element, nickname, generic nickname, or alternative group name.
Parentheses don’t match.
Displayed when parentheses cannot be matched into nested open-close pairs.
This label has conflicting or unassignable charges.
Displayed when a plus and minus charge have been assigned to the same element, charges have been assigned in more than one way, or a charge has been assigned to a nickname, generic nickname, or Alternative Group name.
Formula cannot be computed for queries.
Displayed for every label that contains a generic nickname, an element list or an alterna-tive group. This is a status message only; analysis continues as if the problem-atic label were not selected.
Message Description

198 Chemical InterpretationAppendix C
Text not in Formula style won’t be inter-preted.
Displayed for the first caption that is not an atom label or Alternative Group name, and which contains any text not in Formula, Subscript, or Super-script style. This is a status message only, and appears only once regardless of how many captions are in the selection.
This named alternative group contains no attachment point.
Displayed for any structure within an Alternative Group Box where the structure lacks an attachment point. This is a status message only.
This named alternative group contains fragments with inconsistent valences.
Displayed for any Alternative Group Box whose contained structures have varying numbers of attachment points. Since all structures within an Alternative Group Box are to be used inter-changeably, they must have the same number of attach-ments. This is a status message only.
This named alternative group contains no fragment.
Displayed for any Alternative Group Box that is empty. This is a status message only.
Part of a mole-cule is outside of the alternative group definition.
Displayed for any Alternative Group Box whose border crosses part of a structure. This is a status message only.
Message Description
This isolated bond is probably not intended to have chemical significance.
Displayed for unlabeled single bonds unattached to other bonds. All bonds are interpreted chemically, usually as C2H6, and may cause unexpected results if intended as a graphical line only. This is a status message only.
The atom is very close to another atom or bond.
Displayed for any atom that is nearly touching another atom or bond but not bound to it. If a bond really was intended, the analysis of the structure produces incorrect results. This is s status message only.
The stereocenter has no stereo-bonds specified.
Displayed for any asymmetric center without attached wedged, hashed, dashed, or bold bonds. This is a status message only, and appears only when Show Stereochem-istry is tuned on and there is at least one other wedged, hashed, dashed, or bold bond in the structure.
There is a valence and charge error somewhere in this aromatic system.
Displayed for any odd-membered ring drawn as a delocalized system (with a circle in the middle), where there is no corresponding associated charge. For example, a delocalized repre-sentation of cyclopentadiene must include either a negative charge or a multicenter attachment.
Message Description
Chem & Bio Draw 12.0 199User Guide
The stereocenter has conflicting or ambiguous stereobonds specified.
Displayed for any stereo-center (tetrahedral atom, asymmetric double bond, etc.) where the absolute stere-ochemistry cannot be deter-mined from the structure as drawn. For example, this message would be shown for a carbon atom attached by bold bonds to four different ligands. This message is displayed only when Show Stereochemistry is also turned on.
This label has an unrecognized isotopic mass.
Displayed for every label that has a numeric superscript immediately preceding an atomic symbol, where the superscripted number does not correspond to a recog-nized isotope. For example, 24CH3.
Message Description

200 Chemical InterpretationAppendix C

Chem & Bio Draw 12.0 201User Guide
Property CalculationsYou can calculate predicted values of selected physical and thermodynamic properties for structures of up to 100 atoms. The following topics describe how the values are determined.
NOTE: The property calculations plug-in is available for ChemBioDraw Ultra, ChemDraw Ultra, and ChemDraw Pro only.
LogPThree fragmentation methods are used to pre-dict the logP values.
• Method one is based on 94 atomic contribu-tions evaluated from 830 molecules by least squares analysis. This method works with a standard deviation of 0.47 logP units and can handle molecules containing hydrogen, oxygen, nitrogen, sulfur and halogens.
• Method two is an extension of method one but is based on 120 atomic contributions evaluated from 893 molecules by least squares analysis. In addition to the atoms introduced for method one, it can handle molecules that contain phosphorus and selenium atoms. This method works with a standard deviation of 0.50 logP units.
• Method three is based on 222 atomic contri-butions calculated from 1868 molecules by
least squares analysis. This method allows a calculation of logP with a standard devia-tion of 0.43 logP units and can handle mol-ecules containing hydrogen, oxygen, nitrogen, sulfur, halogens and phosphorus atoms. If this method is applied to mole-cules with internal hydrogen bonds, the standard deviation is 0.83 LogP units.
Henry’s LawTwo methods are used to predict Henry’s Law constant.
• The first is an approach based on the bond contribution method. This method uses 59 bond contribution values and 15 correction factors. The contributions were calculated by least squares analysis using a data set of 345 chemicals. This method estimates with a mean error of 0.30 units and a standard deviation of 0.45 units and can handle mol-ecules containing carbon, hydrogen, oxy-gen, nitrogen, sulfur, phosphorus and halogens.
• In the second method, Henry’s Law con-stant is estimated from an equation found using linear regression. Multifunctional compounds were omitted from this study. This method should not be used for com-pounds where distant polar interaction is present.
D

202 Property CalculationsAppendix D
Molar RefractivityMolar refractivity—Two fragmentation methods are used to estimate the molar refrac-tivity value.
• Method one includes 93 atomic contribu-tions evaluated from 504 molecules by using a constrained least squares technique. This method works with a standard devia-tion 1.27 cm3/mol and can handle mole-cules containing hydrogen, oxygen, nitrogen, sulfur and halogens.
• The second method is an extension of method one that includes 120 atomic contri-butions evaluated from 538 molecules by using a constrained least squares analysis technique. In addition to the atoms intro-duced for method one, this method can han-dle molecules with phosphorus and selenium atoms. This method works with a standard deviation of 0.77 cm3/mol.
CLogP and CMRSpecific algorithms for calculating LogP and molar refractivity from fragment-based meth-ods developed by the Medicinal Chemistry Project and BioByte.
NOTE: CLog P and CMR are available in ChemBioDraw Ultra and ChemDraw Ultra only.
Topological Polar Surface AreaThe polar surface area of a molecule (mea-sured in square angstroms) can be used to pre-dict of pharmaceutical transport properties in the body. Historically, this property has been calculated using time-consuming 3D tech-niques. However, but a recent paper has pro-vided a remarkably accurate way of predicting it very rapidly. Chem & Bio Draw 12.0 imple-ments a more innovative algorithm*.
Other Properties
Normal Boiling Point and Melting Point. Esti-mated in K using two methods.
• Joback's fragmentation method.• The Joback method as modified by Stein.
All boiling points are estimated for a pres-sure of 1 atm.
Miscellaneous properties. Heat of Formation, Gibbs Free Energy, Ideal Gas Thermal Capac-ity, Freezing Point, Critical Temperature, Criti-cal Pressure, and Critical Volume are estimated using Joback’s fragmentation method.
*. The algorithm is based on:Ertl, P., Rohde, B., and Selzer, P., 2000. Fast Calculation of Molecular Polar Surface Area as a Sum of Fragment Based Contribu-tions and Its Application to the Prediction of Drug Transport Properties. J.Med. Chem.43: 3714-3717.

Chem & Bio Draw 12.0 203User Guide
ChemNMR
NOTE: The ChemNMR Feature is available in ChemBioDraw Ultra and ChemDraw Ultra only.
ChemNMR estimates chemical shifts for all hydrogen or carbon atoms for which additivity rules are available. Following a hierarchical list, it first identifies key substructures of a molecule. A substructure provides the base value for the estimated shift. For example, ben-zene would be identified as the key substruc-ture of trinitrotoluene.When a substructure is a ring system not avail-able in the data, ChemNMR approximates its base shift using embedded rings and, if neces-sary, it will disassemble the ring into acyclic substructures.ChemNMR views remaining parts of the mole-cule as substituents of a substructure. Each substituent adds to or subtracts from the base shift of the substructure to which it is attached. Additivity rules determine the increment of each contribution. If an increment for a substit-uent cannot be determined, ChemNMR uses embedded substituents—smaller structural units with the same neighboring atoms. Or, it will use increments of identical or embedded substituents of a corresponding substructure by assuming that the effects of the substituents are of the same magnitude.
ChemNMR provides a detailed protocol of the estimation process applied. It gives substruc-tures as names, compound classes in most cases, substituents in form of a linear code, respectively.The data set for the 1H NMR Shift tool cur-rently contains 700 base values and about 2000 increments. The 13C NMR Shift tool is based on 4000 parameters. It also implements models for ethylenes (cis/trans) and cyclohexanes (equatorial/axial).
ChemNMR LimitationsThe program handles the following elements: H, D, He, Li, Be, B, C, N, O, F, Ne, Na, Mg, Al, Si, P, S, Cl, Ar, K, Ca, Sc, Ti, V, Cr, Mn, Fe, Co, Ni, Cu, Zn, Ga, Ge, As, Se, Br, Kr, Rb, Sr, Y, Zr, Nb, Mo, Tc, Ru, Rh, Pd, Ag, Cd, In, Sn, Sb, Te, I, Xe, Cs, Ba, La, Ce, Pr, Nd, Pm, Sm, Eu, Gd, Tb, Dy, Ho, Er, Tm, Yb, Lu, Hf, Ta, W, Re, Os, Ir, Pt, Au, Hg, Tl, Pb, Bi, Po, At, Rn, Fr, Ra, Ac, Th, Pa, U, Nep, Pu, Am, Cm, Bk, Cf, Es, Fm, Md, No, Lr. Functional groups are expanded automatically.In the case of 1H NMR, it estimates shifts of about 90% of all CHx-groups with a standard deviation of 0.2.-0.3 ppm. The use of polar sol-vents may strongly increase these deviations. It does not estimate shifts of hydrogen atoms bonded to heteroatoms because they are signif-icantly affected by solvents, concentration, impurities, and steric effects.
E

204 ChemNMRAppendix E
In case of 13C NMR, it estimates over 95% of the shifts with a mean deviation of -0.29 ppm and standard deviation of 2.8 ppm.
NMR ReferencesSources for Chem & Bio Draw 12.0 NMR data include the following publications:Fürst, A.; Pretsch, E. Anal. Chim. Acta 1990, 229, 17.
Pretsch, E.; Fürst, A.; Badertscher M.; Bürgin, R.; Munk, M. E. J. Chem. Inf. Comp. Sci. 1992, 32, 291-295.Bürgin Schaller, R.; Pretsch, E. Anal. Chim. Acta 1994, 290, 295.Bürgin Schaller, R.; Arnold, C.; Pretsch, E. Anal. Chim. Acta 1995, 312, 95-105.Bürgin Schaller, R.; Munk, M. E.; Pretsch, E. J. Chem. Inf. Comput. Sci.1996, 36, 239-243.

Chem & Bio Draw 12.0 205User Guide
Technical SupportTelephone and Internet technical support is available to registered users. Be sure to provide your serial number.Technical Support on the internet includes answers to frequently asked questions (FAQs) and general information. You can find it at:http://www.CambridgeSoft.com/services/Other resources are also available:
1. Chem & Bio Draw 12.0 Readme file. This file includes known limitations or conflicts.
2. Review System requirements. See the beginning of this manual for minimum requirements for installing and running Chem & Bio Draw 12.0.
3. If you still need assistance, fill out a copy of the CS Software Problem Report Form at:
http://www.cambridgesoft.com/services/mail.When you fill out the form:
• Try to reproduce the problem before con-tacting us. If you can reproduce the prob-lem, please record the exact steps that you took to do so.
• Record the exact wording of error mes-sages.
• Record what you have tried to correct the problem.
You can deliver your form to Technical Sup-port using either of:Online: www.cambridgesoft.com/services/mailE-mail: [email protected]
Locating your serial numberFor Windows users, the serial number is on the outside of the Chem & Bio Draw 12.0 box. For Macintosh users, the serial number is on a card inside the box. You can also find the serial number online or in the Chem & Bio Draw menu:ONLINEIf you have downloaded Chem & Bio Draw 12.0, you can find your serial number at the CambridgeSoft Web site.
1. Go to www.cambridgesoft.com.2. Log into your CambridgeSoft account.3. Click My Downloads in the list of Services.WINDOWSIn Chem & Bio Draw for Windows, go to Help>About. The serial number is under the license name.MACINTOSHIn Chem & Bio Draw 12.0 for Macintosh, choose About CS ChemDraw in the Apple menu. The serial number appears at the bottom left.
F

206 Technical SupportAppendix F

Chem & Bio Draw 12.0 207User Guide
Shortcuts and HotkeysHotkeys are organized into atom labels, bond types, and functions such as adding a charge or displaying a bond. Shortcuts are organized by the menu on which the command is found.Nicknames are listed alphabetically by abbre-viation in two tables. Each listing is a link to a page that displays the structure and full name. A navigation bar at the bottom of the page lets you step through the section or return to the listings.
NOTE: You can modify Hotkeys and Nick-names. The tables in this section refer to the default values.
Atom KeysUse atom keys to insert atoms in a drawing using your keyboard. For example, place your mouse over an atom and press ‘3’ to add a tert-butyl group.
G
Atom Label Key
A a
F f
Ph P or 4
Ac A or 5
H h
Q* q
Br b
I i
R r
n-Bu 1
K k
S s
s-Bu 2
Me m
Si S
t-Bu 3
N n
TMS t
C c
Na N
X x
Atom Label Key
208 Shortcuts and HotkeysAppendix G
Bond HotkeysTo modify a bond, place your mouse over the bond and select a key listed below.
Function Hotkeys
Cl C or l
O o
COOCH3 E
D d
OTs T
CH2OH 6
Et e
P p
B B
Function Key
Change to single bond 1
Change to dashed bond d
Change to double bond 2
Change to wavy bond y
Change to triple bond 3
Position a double bond to the left
l
Change to quadruple bond 4
Center a double bond c
Change to bold bond b
Atom Label Key
Position a double bond to the right
r
Change to wedged bond w
Bring bond to front f
Change to hashed bond H
Open a bond properties text box / (slash) or ?
Change to hashed-wedged bond h
Function Key
Add an attachment point
. (period)
Add an atom number ‘ (single quote)
Add a negative charge
-
Add a positive charge
+
Sprout one bond 0
Sprout two bonds 9
Sprout three bonds 8
Display the Atom Properties dialog box
/ (slash) or ?
Display the Choose Nickname dialog box
= (equals)
Function Key
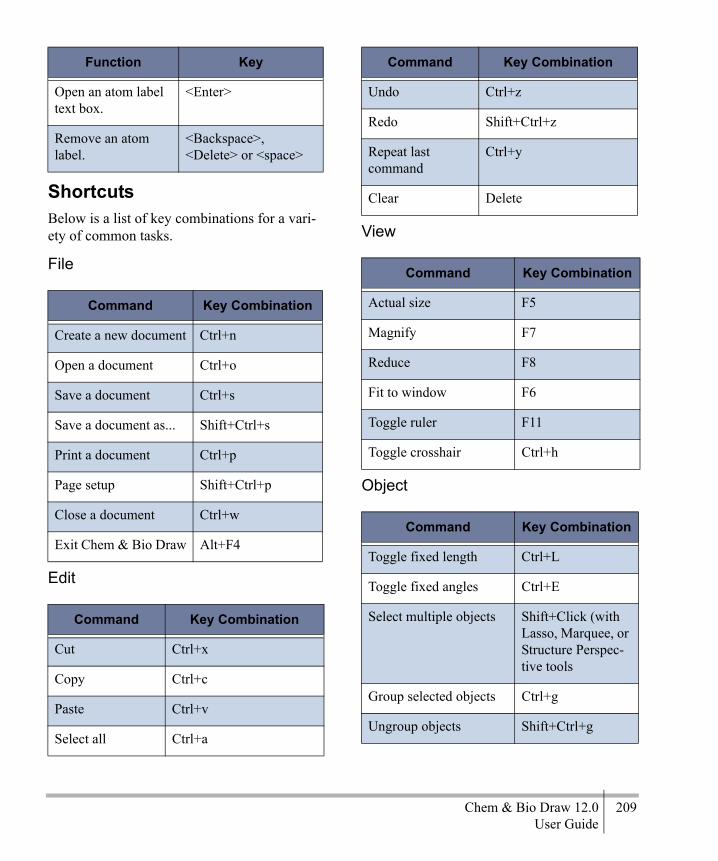
Chem & Bio Draw 12.0 209User Guide
ShortcutsBelow is a list of key combinations for a vari-ety of common tasks.
File
Edit
View
Object
Open an atom label text box.
<Enter>
Remove an atom label.
<Backspace>, <Delete> or <space>
Command Key Combination
Create a new document Ctrl+n
Open a document Ctrl+o
Save a document Ctrl+s
Save a document as... Shift+Ctrl+s
Print a document Ctrl+p
Page setup Shift+Ctrl+p
Close a document Ctrl+w
Exit Chem & Bio Draw Alt+F4
Command Key Combination
Cut Ctrl+x
Copy Ctrl+c
Paste Ctrl+v
Select all Ctrl+a
Function Key
Undo Ctrl+z
Redo Shift+Ctrl+z
Repeat last command
Ctrl+y
Clear Delete
Command Key Combination
Actual size F5
Magnify F7
Reduce F8
Fit to window F6
Toggle ruler F11
Toggle crosshair Ctrl+h
Command Key Combination
Toggle fixed length Ctrl+L
Toggle fixed angles Ctrl+E
Select multiple objects Shift+Click (with Lasso, Marquee, or Structure Perspec-tive tools
Group selected objects Ctrl+g
Ungroup objects Shift+Ctrl+g
Command Key Combination
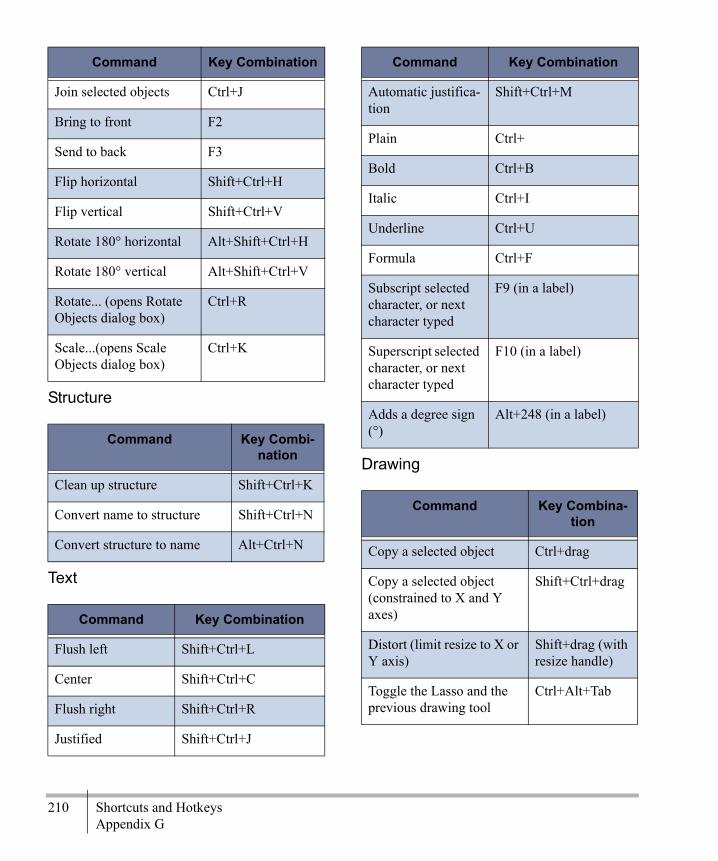
210 Shortcuts and HotkeysAppendix G
Structure
Text
Drawing
Join selected objects Ctrl+J
Bring to front F2
Send to back F3
Flip horizontal Shift+Ctrl+H
Flip vertical Shift+Ctrl+V
Rotate 180° horizontal Alt+Shift+Ctrl+H
Rotate 180° vertical Alt+Shift+Ctrl+V
Rotate... (opens Rotate Objects dialog box)
Ctrl+R
Scale...(opens Scale Objects dialog box)
Ctrl+K
Command Key Combi-nation
Clean up structure Shift+Ctrl+K
Convert name to structure Shift+Ctrl+N
Convert structure to name Alt+Ctrl+N
Command Key Combination
Flush left Shift+Ctrl+L
Center Shift+Ctrl+C
Flush right Shift+Ctrl+R
Justified Shift+Ctrl+J
Command Key Combination
Automatic justifica-tion
Shift+Ctrl+M
Plain Ctrl+
Bold Ctrl+B
Italic Ctrl+I
Underline Ctrl+U
Formula Ctrl+F
Subscript selected character, or next character typed
F9 (in a label)
Superscript selected character, or next character typed
F10 (in a label)
Adds a degree sign (°)
Alt+248 (in a label)
Command Key Combina-tion
Copy a selected object Ctrl+drag
Copy a selected object(constrained to X and Y axes)
Shift+Ctrl+drag
Distort (limit resize to X or Y axis)
Shift+drag (with resize handle)
Toggle the Lasso and the previous drawing tool
Ctrl+Alt+Tab
Command Key Combination

Chem & Bio Draw 12.0 211User Guide
Change direction of a chain Ctrl+Drag (with alkane chain tool)
Change orientation of double bonds
Shift+Click (with saturated double-bond ring tools)
Create resonance delocal-ized ring
Ctrl+Click (with ring tools except chairs)
Remove a curve segment Alt+Shift+Click (with the pen tool)
Command Key Combina-tion
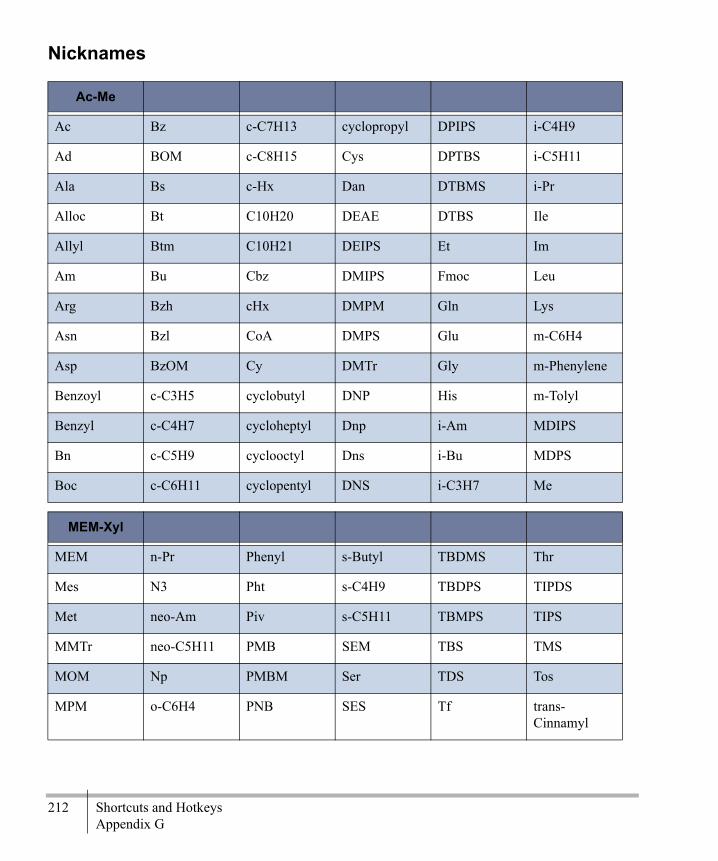
212 Shortcuts and HotkeysAppendix G
Nicknames
Ac-Me
Ac Bz c-C7H13 cyclopropyl DPIPS i-C4H9
Ad BOM c-C8H15 Cys DPTBS i-C5H11
Ala Bs c-Hx Dan DTBMS i-Pr
Alloc Bt C10H20 DEAE DTBS Ile
Allyl Btm C10H21 DEIPS Et Im
Am Bu Cbz DMIPS Fmoc Leu
Arg Bzh cHx DMPM Gln Lys
Asn Bzl CoA DMPS Glu m-C6H4
Asp BzOM Cy DMTr Gly m-Phenylene
Benzoyl c-C3H5 cyclobutyl DNP His m-Tolyl
Benzyl c-C4H7 cycloheptyl Dnp i-Am MDIPS
Bn c-C5H9 cyclooctyl Dns i-Bu MDPS
Boc c-C6H11 cyclopentyl DNS i-C3H7 Me
MEM-Xyl
MEM n-Pr Phenyl s-Butyl TBDMS Thr
Mes N3 Pht s-C4H9 TBDPS TIPDS
Met neo-Am Piv s-C5H11 TBMPS TIPS
MMTr neo-C5H11 PMB SEM TBS TMS
MOM Np PMBM Ser TDS Tos
MPM o-C6H4 PNB SES Tf trans-Cinnamyl
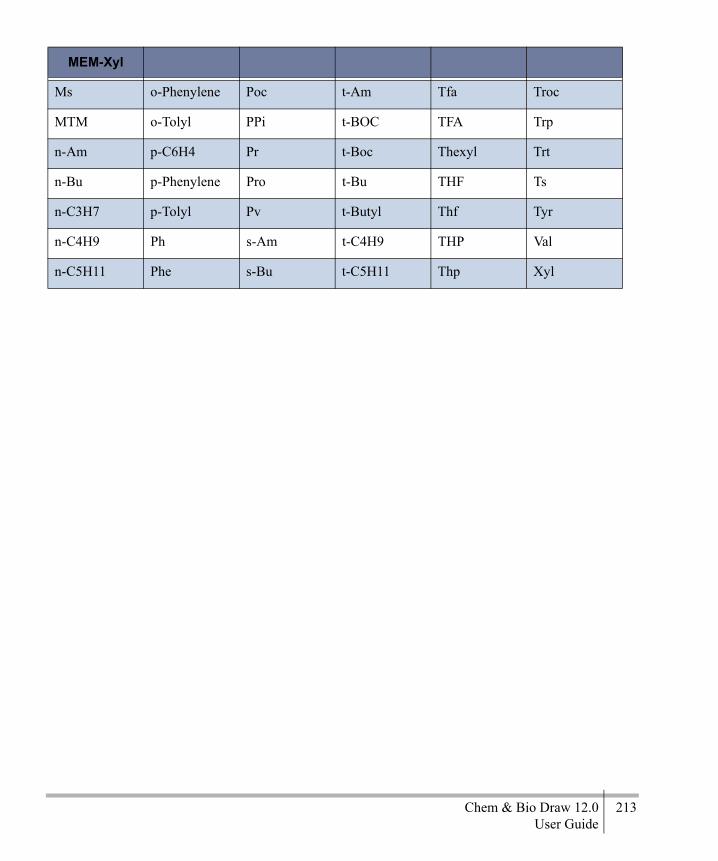
Chem & Bio Draw 12.0 213User Guide
Ms o-Phenylene Poc t-Am Tfa Troc
MTM o-Tolyl PPi t-BOC TFA Trp
n-Am p-C6H4 Pr t-Boc Thexyl Trt
n-Bu p-Phenylene Pro t-Bu THF Ts
n-C3H7 p-Tolyl Pv t-Butyl Thf Tyr
n-C4H9 Ph s-Am t-C4H9 THP Val
n-C5H11 Phe s-Bu t-C5H11 Thp Xyl
MEM-Xyl

214 Shortcuts and HotkeysAppendix G

Chem & Bio Draw 12.0 215User Guide
The CambridgeSoft Web SiteThe CambridgeSoft Web site is a valuable source of helpful information. There you can:
• Register your software.• Search for chemical information by name
or ACX number; or, insert a structure into a worksheet.
• Get technical support, documentation, soft-ware downloads, and more.
You can navigate to the site directly from Chem & Bio Draw by selecting the appropriate option in the Online menu.
Registering OnlineTo activate any Chem & Bio Office 2009 application, register with the CambridgeSoft Web site to receive a registration code. Upon filling out a registration form, you will receive the registration code by e-mail (this registra-tion scheme does not apply to site licenses).If your serial number is invalid or you do not have an internet connection, contact CambridgeSoft Support to receive a registra-tion code.You may use your Chem & Bio Office 12.0 application a limited number of times while waiting for the registration process to finish. After you reach the limit, you must register the software.In addition to registering your software, you can request literature, or register for limited
free access to ChemBioFinder.com, Che-mACX.com, ChemClub.com, and the e-mail edition of ChemNews. To register online, go to Online>Register Online. The CambridgeSoft Professional Services page opens in your browser.
User’s GuideThe Online menu also provides a way for you to easily find current and previous versions of all CambridgeSoft documentation. To access the CambridgeSoft Manuals page, go to Online> Browse CambridgeSoft Documentation.The Desktop Manuals Web page appears. You can select PDF versions of the CambridgeSoft manuals from the dropdown list.
NOTE: If you do not have a CambridgeSoft User account, you will be directed to a sign-up page first.
Technical SupportThe online menu link Browse CambridgeSoft Technical Support also opens the CambridgeSoft Professional Services page. Here you can find a variety of Desktop Support resources including the CambridgeSoft Knowledge Base, product Downloads, Q&A, FAQ, Documentation, and so on.
H

216 The CambridgeSoft Web SiteAppendix H
1. Go to Online>Browse CambridgeSoft Tech-nical Support. The Professional Services Web page opens.
2. Click Desktop Support.
Suppliers on ACX.comChemACX (Available Chemicals Exchange) is a Webserver application that accesses a data-base of commercially available chemicals. The database contains catalogs from research and industrial chemical vendors. You can use Chem & Bio Draw 12.0 to link to the chemacx.com database record of suppliers for compounds that you draw.
1. In Chem & Bio Draw 12.0, select a struc-ture you have drawn that you want to look up.
2. Go to Online>Find Suppliers on Che-mACX.com.
The ChemACX.Com page opens in your browser with information on the selected struc-ture. For more information on using the ChemACX Web site, see the ChemOffice Enterprise Workgroup & Databases Manual.
ACX Structures and NumbersChem & Bio Draw 12.0 searches ACX and returns information about related structures and numbers. You can place the returned infor-mation in your document.
ACX StructuresThere are two ways to find ACX structures, by ACX number or by name.To find a structure by ACX number:
1. Go to Online>Find Structure from ACX Num-ber.
The Find Structure from ACX number dialog box appears.2. Type the ACX registry number.3. Click OK. The structure appears in your
document.
To find a structure by name:
1. Go to Online>Find Structure from Name at ChemACX.com.
2. In the dialog box, type either a chemical name or trade name.
3. Click OK. The structure appears in your document.
ACX Numbers
1. To Find an ACX number for a structure:
1. Select the structure.2. Go to Online>Find ACX Numbers from
Structure.
The ACX number appears in the Find ACX Numbers from Structure dialog box.
Chem & Bio 3D ActiveX Controlhttp://www.cambridgesoft.com/services/Desk-topSupport/Documentation/Chem3DControl/
SciStore.comSciStore offers life science desktop software, enterprise solutions, chemical databases, and consulting services to biotechnology, pharma-ceutical, and chemical industries. Visit SciS-tore at www.scistore.com.
CambridgeSoft.com To open the CambridgeSoft Home Page, go to Online>Browse CambridgeSoft.com. Check the CambridgeSoft Web site for new product information. You can also get to Chem-News.Com, and other pages through CambridgeSoft.Com.

Chem & Bio Draw 12.0 217User Guide
Using the ChemOffice SDKThe ChemOffice Software Developer’s Kit (SDK) lets to customize your applications.To browse the ChemOffice SDK, go to Online> Browse ChemOffice SDK.
The ChemOffice SDK page contains docu-mentation, sample code, and other resources for the Application Programming Interfaces (APIs).

218 The CambridgeSoft Web SiteAppendix H

Chem & Bio Draw 12.0 219User Guide
IndexNumerics13C, 1H shifts, estimating 9535 mm slide boundary lines 1853D model 773D query properties 1423D viewing 77
Aabnormal valence 126absolute flag, drawing 142accessing documents 159ACS Document 1996 173ACX information, finding 216acyclic chains
changing direction 22drawing 23
adding3D query property 142a template 74chemical names 79frames 69rows and columns 74structures 105structures by name 105structures in ChemDraw/Excel 105
adjustment handles 23Adv. Synth.Catal. 174advanced drawing techniques 59aligning objects
align submenu 32overview 32rulers 187with crosshair 188
aligning structures 70, 108aligning text 164alignment, automatic 165
alternative groups 134attachment point numbering 137attachment point symbol 136attachment rank indicators 136defining 135description 134multiple attachment points 136
analysis 133information 85messages 197
analysis and properties 163analysis messages 197analysis results, interpreting 107analysis window 85anion, drawing 90anonymous alternative groups 138apply settings command 161applying object settings 161arcs 26
drawing 26resizing 26
arrowsadjustment handles 23autoscaling 150changing direction 24cursor types 23hollow arrows 24rotating 25undo 24
assigningatom mapping 140
asymmetry, see stereochemistry indicators 195atom
numbers 64, 65query properties 120
atom label text boxes, closing 158

220 Index
atom labels 164, 191automatic justification 165justification 164layering 167margin width 167multi-attached 61specification 191text boxes, creating new line 158white space 167
atom labels, adding 10atom numbers
editing 65showing and hiding 64
atom propertiesabnormal valence 126description 120, 122, 128implicit hydrogens 123in query structures 120options 122reaction changes 124reaction stereo 125resetting defaults 122ring bond count 123substituents 122unsaturation 124viewing 121
atom, changing to a different 11atom, to add an 10atoms
moving 30atom-to-atom mapping 140attached data 153attachment point
defining 135numbering 137symbol 136tool 91, 135
attachment points 63, 75attachment order 75numbering 137
attachment points, multiple 136
attachment points, viewing 64attachment rank indicators, showing 137auto update 81automatic
alignment 165drawing of structure 82justification, atom labels 165
autosave 158autoscale
template color 171when transferring 149
Bbackground and foreground 169background color, printing 171Balaban index 115baseline style, captions 163benzene ring
changing orientation 22drawing 22
BioDraw 9drawing a helix protein 37drawing a membrane arc 37drawing a membrane line 37drawing DNA 38templates 73
BioDraw objectscolor 35customizing 36line and fill properties 35
BioDraw templates 1, 35bitmap fonts (Macintosh) 158bitmap fonts, using when available 158bitmapped
printing quality 161boiling point 111
calculation 202definition 91
bold width 162bond crossings
changing 16

Chem & Bio Draw 12.0 221User Guide
white space 162bond properties
defining 127query indicators 127reaction center 129removing 128topology 129types 128viewing 128
bond spacing, description 162bond types
in queries 128bonding from sequences 42bonds
adding to an atom label 62autoscaling 149changing type 15double either 129drawing 13editing 15fixed angle 13layering 16margin width 162multi center attachment 63orientation for dative or wedged bonds 15quadruple 14selecting 28types 190
border of page 183braces 26brackets
drawing 26paired 26single 26tool 26usage 132
CCahn-Ingold-Prelog 194calculating
chemical properties 91elemental analysis 85
exact mass 85formula 85molecular weight 85
CambridgeSoft Web site, accessing 216CambridgeSoft.com 216caption text boxes
closing 158creating new line 158
captions 164analysis information 85autoscaling 150formatting 163, 166formula 163inserting from structure 79justification 164setting font, size and styles 166subscript 163superscript 163
carbon-13 shifts, see 13C, 1H shifts, esti-mating 95cation, drawing 90CDX see file formats 10chain angle, description 162chain length 23
specifying 23changing
default settings 161changing bond type 15character map 11charges
specifications 192symbols, drawing 90, 192
check structureoverview 32
checking chemistry 32Chem & Bio 3D 77, 78Chem & Bio 3D preview 78Chem & Bio 3D preview options 77Chem & Bio 3D, launching 78Chem & Bio Draw

222 Index
SDK 78Chem 3D 78ChemBioFinder hotlink 86ChemBioFinder.com 216ChemClub.com 215ChemDraw
customizing 157Hotkeys file 167
ChemDraw Items folderlocation 159
ChemDraw items folderdescription 159isotope table 126scripts 161templates 73
ChemDraw laser prep 171ChemDraw/Excel 103
adding structure files 105adding structures 105adding structures as SMILES 105adding structures by name 105aligning structures 108converting old worksheets 104exporting to SDFiles 104functions 108get ChemDraw list command 104import hit list error messages 104importing tables 103naming structures 107searching 106starting 103
chemical composition 109chemical formula 109chemical intelligence 189chemical interpretation 189chemical name, structure from 82chemical properties 92
boiling point 202chemical properties 91CLogP 202CMR 202
critical temperature 202critical volume 202freezing point 202Gibbs free energy 202heat of formation 202Henry’s Law 201ideal gas thermal capacity 202LogP 201molar refractivity 202thermal capacity 202TPSA 202using 91
chemical symbolsrotating 91
chemical syntax checking 33chemical warnings 33
suppressing 33, 45chemically significant text 192chemicals, purchasing online 216chemistry
of ChemDraw 189chemistry checking 32ChemNews.Com 216ChemNMR
example supplementary data 95, 98NMR shifts 95using 95
ChemNMR database 97ChemNMR directory 97ChemNMR, about 5ChemOffice SDK, accessing 217ChemProp
critical pressure 202ChemScript 78chirality, see stereochemistry, flags 195clean up structure 62clearing
mapping 142spectrum-structure assignments 97stereochemical markers 86
clearing reaction mapping 142

Chem & Bio Draw 12.0 223User Guide
Clipboard 33, 82, 108, 127, 142, 147, 148, 149clipboard 82, 107, 147clipping files 149CLogP 92, 202closing text boxes 158cluster count 115CMR 92color
autoscaling 150changing 169menu 169overview 168saving settings 171
color palette 169colored arrows 68coloring
block arrows 68colors, customizing 169colors, maximum number of 150, 168, 169commands
new 9open 9save 10
complexes 194configuring documents 162configuring objects 163Connolly molecular surface area 114Connolly solvent accessible surface area 114Connolly solvent-excluded volume 114contracting labels 61conventions
text 4convert name to structure, limitations 82convert structure to name, automatic cap-tions 79converting
name to structure 82
converting names to structures 82converting worksheets 104copy
as SLN command 148with clipboard 147
copying objects 30creating
Hotkeys 167SLN strings 148
critical pressure, calculation 202critical pressure, definition 91critical pressure 112critical temperature, calculation 202critical temperature, definition 91critical temperature 112critical volume, calculation 202critical volume, definition 91critical volume 112crosshair
displaying 187moving 188using to align objects 188
curved arrows 68curves 27
autoscaling 150custom shift correction data 97customized settings, saving 161customizing
ChemDraw 157saving document settings 161
customizing colors 169customizing toolbars 159cycloalkane rings, converting to delocal-ized rings 22cyclohexane chair ring tool 21cyclohexane ring tool 46, 51, 70cyclopentadiene ring tool 21cyclopentadiene ring, changing orientation 22

224 Index
cyclopentadiene rings, drawing 22cyclopropane ring tool 21
Ddaggers 26data Sgroup, support for 153database conventions 189database conventions, in structure drawings 189dative bonds, drawing 15default
atom properties, resetting 122bond properties, resetting 128changing 161document location 157file format 157stationery pad 170
default document location 157default file format 158default format
changing 165default open file format 157default save file format 158default styles 160defining alternative groups 135defining nicknames 75deleting
delete key 30nicknames 76objects 30rows and columns 74
delocalized rings, drawing 22deselecting objects 28, 29deselecting one object 29detecting errors
check structure command 32error checking 33
disable chemical warnings 33, 45displaying
cross hairs 187
rulers 187displaying and printing 140displaying structures 108dissociation tool 67distributing objects 32disulfide bridges 43document
location, default 157posters 184setting up multi-paged 183
document and object settings 160document settings 172
Adv. Synth.Catal. 174J. Mol. Mod. 175new document 176new slide 176overview 160phytomedicine 177RSC document 178Science of Synthesis 179Synthesis/Synlett document 180Verlag Helvetica Chimica Acta 180Wiley document 181
document setupmultiple-paged documents 183posters 184
document windowdrawing area 183enlarging 183reducing 183
documentation web page 215documents
creating 9saving 10
Does cell have a reaction drawing? 111Does cell have a structure drawing? 111d-orbitals, drawing 90DOS prompt 97double bond
changing type 15drawing 14

Chem & Bio Draw 12.0 225User Guide
orientation 16double either bonds, drawing 14drawing
acyclic chains 22arcs 26arrows 67benzene and cyclopentadiene rings 22charge symbols 90, 192curves 27daggers 26database conventions 189d-orbitals 90double bonds 14double either bonds 14dz2-orbitals 90fixed angle bonds 13free sites 125hybrid orbitals 89mirror images 59nonlinear sequences 41p-orbitals 89quadruple bonds 14radicals 90reaction intermediates 70reactions 67resonance delocalized rings 22rings with fixed length 21sequences 40sigma orbitals 89single bonds 13single lobe orbitals 89s-orbitals 89stereochemical symbols 142structure automatically from name 82triple bonds 14
drawing a structure tutorial 45drawing area 183drawing elements
autoscaling 150color 25fill patterns 25
drawing settings
changing defaults 161margin width, effect on atom labels 167margin width, effect on bond crossing 162
duplicating objects 30Dz2- orbitals, drawing 90
Eedit 11editing
atom numbers 65bond type 15bonds 15embedded objects 150generic nickname file 120query indicators 122
elementrecognized 193
element lists 130element Not-lists 130elemental analysis
caption 85description 85
embedding objects 150empirical formulas 192enantiomers, describing 88enlarge
document window 183page size 185
error checking 33error messages 104, 197exact mass
caption 85definition 85
Excel tables, exporting 104expanding labels 60
expanding 60export compatibility 142exporting
compatibility 144mapping 142query properties 144

226 Index
query structures 144using file formats 151
exporting reaction mapping 142
FFAQs
online, accessing 215technical support 205
file formatsCDX 10MDL MolFile V3000 153native 10
file formats, table 153Fischer projections tutorial 48fixed angle bonds 13fixed lengths
description 162scaling 32
flatten command 66flip type 134flush left justification 164flush right justification 164font
imaging speed 158new captions 166
footers, creating 184formal charge 111format
atom labels 164text 163
formula commanddescription 85using 163
fractional character widths 166framing objects 27free energy
calculation 202definition 91
free sitesdrawing 125in queries 123
freezing point, calculation 202fusing a template 74
GG groups 134generic groups 134generic nicknames 119, 120generic structures, expanding 138, 165, 201, 202get ChemDraw/Excel list 104getting started tutorial 45Gibbs free energy, definition 91Gibbs free energy 112grouping objects 31, 69groups
integral 31guidelines 70
Hhash spacing, description 162H-Dot and H-Dash 194
specification 194headers, creating 184heat of formation, definition 92Henry's Law constant 113Henry’s Law 201Henry’s law, definition 91hiding atom numbers 64hiding palettes 8hiding query indicators 122high resolution
non-PostScript printing 161high resolution printing 171highlight box
selecting 28highlight box tolerance 159home page, CambridgeSoft 216Hotkeys 159
creating 167

Chem & Bio Draw 12.0 227User Guide
hotkeys.xml file 167hotkeys .xml file 168hot-linked properties 81how to use this guide 4hybrid orbitals, drawing 89hydrogens, implicit 123hyphens, font submenu 163
II/Draw 157implicit hydrogens 123imported objects, selecting 28importing
using file formats 151importing hit lists 104importing tables 103importing tables to ChemDraw/Excel 103in Chem & Bio 3D preview 78InChI strings, copy as 147InChIKey strings, copy as 149include ChemDraw LaserPrep 151indicators
atom numbering 64query, editing 122query, positioning 122stereochemistry 86, 195stereochemistry, positioning 87
Info window 10displaying fixed angles 13
insert name as structure 82inserting
name as structure 82integral groups, creating 31intermediates 70internet, CambridgeSoft web site 216ISIS
V3000 support 153isotopes
specifications 193isotopes and elements 193
isotopes table file 126isotopes text file 126isotopic abundance 126
JJ. Mol. Mod. 175J. Mol. Mod. (1 column) 175J.Chin. Chem. Soc. 174Joback’s Fragmentation method 202joining objects 31joining structures 31justification
atom labels 164captions 164
KKekule structures 22
Llab supplies, purchasing online 216label, to edit a 11labels 10, 60
automatic terminal carbons 162auto-update 81contracting 61expanding 60
Lasso toolselecting objects 28
launch Chem & Bio 3D 78layering
atom labels 167Lewis dot symbol, see lone pair symbol 90ligand, defined 195limitations, name-to-structure 82line width 162lines, drawing 25link nodes 134LogP 201lone pair symbol 90
228 Index
Mm/z, displaying 85magnification control 183, 186, 187magnifying
with magnification control 187with View menu 186
Main toolbar 8, 13, 21MakeChemNMRUserDB.exe 97manual mapping 141
clearing 142overview 141
mappingatom 140automatic 141clearing 142exporting 142manual 141reaction 140
margin widthadjusting 162description 162effect on bond crossings 162setting 167specifying 167
margin width, specifying 167Marquee tool 27, 28mass fragmentation tool 66, 67mass/charge, displaying 85maximize objects 186melting point, definition 91messages
analysis 197status 197
mirror images, creating 59modifying a template 74modifying templates and palettes 74molar refractivity 202molar refractivity 113molecular mass, definition 85
molecular weightcaption 85definition 85
movingatoms 16, 30crosshair 188objects 30
multi-attached atom labels command 61multi-center attachments 63, 194multi-center attachments, see also variable attachments 63multi-center bonds 63multiple atoms 61multiple atoms, adding a label of 62multiple attachment points 136multiple-paged documents, setup 183
Nname
inserting as structure 82of structure, inserting 79
name to structure see Name=Struct 82name, automatic structure from 82Name=Struct 82
converting 82limitations 82
naming structures 107native file format 10new document 176new drawings 73new lines in captions 158new slide 176Newman projections tutorial 54nicknames 18, 207
defining 75defining peptides 43deleting 76troubleshooting 76
NMR datarestoring default 97
Chem & Bio Draw 12.0 229User Guide
NMR, see ChemNMR, spectra 95nonlinear sequences 41non-PostScript printing
high resolution 161Macintosh 151
non-ringed structures 80normal searches 106number of hydrogen-bond acceptors 110number of hydrogen-bond donors 110number of rotatable bonds 116numbering atoms 64
Oobjects
3D rotation 25aligning 188copying 30deleting 30distributing 32framing 27grouping 31joining 31moving 30selecting 27ungrouping 31using crosshair with 187using rulers with 187
objects ungrouping 31OLE 150Online menu
browse SciStore.com 216CambridgeSoft home page 216ChemBioOffice SDK 217CS Chem3D technical support 215lookup suppliers on SciStore.com 216register online 215, 217
open documents 10open templates 10opening
ChemDraw/Excel 103opening a database 106
or labelsformatting 166
orientationbenzene ring tool 22cyclopentadiene ring tool 22double bonds 16
orienting templates 74ovality 115overlap, multipaged documents 184oxidation state, changing 10
Ppage
border 183overlap 184
page definition languagequickdraw 161
page setupsaving settings 185
paged documents 183paired brackets 26palette
arcs 26brackets 26color 169showing 8single bonds 13tearing off 8
palettes, creating 74parentheses 26pen tools 27peptides, defining with nicknames 43periodic table 10perspective drawings tutorial 51phytomedicine 177picture layers
atom labels 167plasmid map 39
adding markers to 39resizing regions 40

230 Index
polar surface area 116polymer representations 196polymers 131
flip type 134repeat pattern 133source-based 132structure-based 132
p-orbitals, drawing 89positioning
crosshair 187objects 30query indicators 122rulers 187stereochemistry indicators 87
positioning atom numbers 65positioning query indicators 122posters, setup 184PostScript
commands 151printing 161
preferencesdrawing, see Drawing settings 161include ChemDraw LaserPrep 151include PostScript 151initialize PostScript printer 151overview 157print 171require CTRL+ENTER 158require Option+Return 158text, see text settings 161use bitmap fonts when available 158
preferences and settings 157principal moments of inertia (X, Y, Z) 115printing
background color 171ChemDraw laser prep 171drawing elements fill 25effect of PostScript commands 151high-resolution non-PostScript 161overview 184PostScript atom labels 171
preferences 171printing background color 171properties
atom in searching 120atom, abnormal valence 126atom, description 120, 122, 128atom, implicit hydrogens 123atom, query 120atom, reaction changes 124atom, reaction stereo 125atom, resetting defaults 122atom, ring bond count 123atom, substituents 122atom, unsaturation 124bond 127bond query indicators 127bond types 128bond, reaction center 129bond, removing 128bond, topology 129
proton shifts, see 13C, 1H shifts, estimating 95publishing documents 173
Qquadruple bonds 14queries
multiple rings 134query indicators
editing 122query properties
3D 142exported 144
query structures 119exporting 144
quick reference card, description 5QuickDraw
print quality 160quickdraw
bitmapped image 161

Chem & Bio Draw 12.0 231User Guide
RR groups 134racemic flag, drawing 142radicals 193
drawing 90specification 193
radius 116reaction atom-to-atom mapping 140reaction center 129reaction changes 124reaction intermediates 70reaction interpreter 70reaction mapping
automatic 141clearing 142exporting 142manual 141overview 140
reaction stereo 125reactions 67red boxes on objects 33reduce
document window 183object 186page size 185
references 196registration marks 184registration, online 215relative flag, drawing 142relative stereochemistry 88remove
colors 170removing atom properties 121removing bond properties 128removing colors 170repeat command, rotations 29repeat pattern 133repeating actions 9repeating atom labels 17
replacing residues 41repositioning
stereochemistry indicators 87reset defaults
atom properties 122bond properties 128
residuesreplacing 41
resizingarcs 26template panes 74
resizing and rotating 25resizing objects 29resizing structures 108resizing template panes 74resonance delocalized rings, drawing 22resonance structures 22, 46Rest H 140retrosynthesis tool 67returning to the document window 78reversing actions 9Rf display 94, 95R-group analysis 107ribosome 38, 39ribosomes A and B 38ring assemblies 80ring bond count 123ringed structures 80, 83rings
drawing with fixed length 21rings tutorial 46R-logic queries 139rotate
chemical symbols 91command 29dialog box 29objects 29
rotating objects 29RS, see stereochemistry indicators 195

232 Index
RSC 178RSC document 178ruler guides 187rulers
showing 187running scripts 78
Ssample code, SDK web site 217save command
default file format 158saving
defaults 161structures in ChemDraw/Excel 106
saving changes automatically 158saving color palette settings 171saving customized settings 161saving customized styles 161saving documents 10saving page setup settings 185saving structures 106scaling
fixed length 32objects 32when transferring information 149
scaling objects 32Science of Synthesis 179SciStore.com 216scrap files 149scripts 78SDK Online, accessing 217searching 106
ChemDraw/Excel 106export compatibility 144
selectingbonds 28entire structure 28with lasso 28with marquee 28
selecting an open document 10
selecting multiple objects 28selecting objects 27
by clicking 28selection tool
deleting 30deselecting objects 28, 29highlight box 28joining 31
sequencesdrawing 40nonlinear 41
settingpreferences 157
setting bracket properties 131setting font parameters 163setting preferences 20, 157setting the baseline style 163setting up ChemDraw/Excel 103settings
document 160settings for new text 166settings from other documents 161shape attribute 116shape coefficient 116sharing information 147shortcut keys 4
structure 210text 210
shortcuts 207, 209show
atom numbering 64show crosshair 187show document 183, 186show rulers command 187show stereochemistry 86showing atom numbers 64showing palettes 8Sigma orbitals, drawing 89similarity searches in ChemDraw/Excel 106

Chem & Bio Draw 12.0 233User Guide
single bonds, drawing 13single brackets 26single lobe orbitals, drawing 89site license 7SLN strings 148
copy as 147SMILES strings 105
copy as 147creating 147viewing clipboard 148
SMILES string 111SMIRKS, overview 147S-orbitals, drawing 89source-based polymers 132specifying line spacing 164specifying the margin width 167spectra
removing assignments 97spectrum-structure assignments
removing 97viewing 96
spiro and sprout rings 21squiggly bond tool see tools, wavy bond 13starting ChemDraw/Excel 103stationery pad
default 170document settings 170page setup settings 185saving document settings 158
Status 5status bar 5, 8, 160status messages 197stereochemical flags 195stereochemical indicators 195stereochemical symbols, drawing 142stereochemistry
drawing mirror images 59flags 195indicators 86, 195indicators, repositioning 87
relative 88removing markers 87see also indicators 195showing 86terms supported 86
stereochemistry tutorial 56stoichiometry grid 92
editing with the context menu 93setting the limiting compound 92
Struct=Name 5, 79, 82Struct=Name, structure types supported 83structure
checking 32chemical warning 33clean up structure command 62converting to name 79selecting 28shortcut keys 210show stereochemistry 86
structure perspective 65structure perspective tool, using with ob-jects 25structure-based polymers 132structures
adding by name 105displaying 108
style indicators 164style sheet
document settings 160page setup settings 185saving document settings 161
style sheetscolor palette 171
style, caption 163styles, default 160subscript command 163substituents 122sum of valence degrees 116superscript command 163supplier, finding online 216
234 Index
supported structures 79, 83suppress chemical warnings 33, 45SVG 1syntax checking 32Synthesis and retrosynthesis 67Synthesis, Synlett 180Synthesis/Synlett document 180system requirements 7
Ttechnical support 205templates 73
BioDraw 1, 35coloring 171creating 74customizing 74deleting 74new drawings 73orientating 74overview 73resizing panes 74tutorial 57
templates and color 171terminal carbon labels 162text
atom label format 164atom labels, automatic justification 165formatting 163shortcut keys 210
text boxclosing 158creating new line 158
text conventions 4text line notation 147text settings
captions, font, size, and style 166changing defaults 161
text spacing, changing 166theme options 157TLC 93
TLC spotscrescent 95custom, about 95custom, adding 94display or set Rf 94enlarged 95resizing 95Rf, about 95tails 95wide 95
toleranceeffect on highlight box 159
tool tips 5toolbar schema 159toolbar XML files 160toolbars
customizing 159icons, editing 160tearing off 8
toolsacyclic chain 22alternative group 135arc 26attachment point 135BioDraw 9bold bond 13bold wedge bond 13bond 13bracket 26cyclohexane chair 21cyclohexane ring 46, 51, 70cyclooctane ring 21cyclopentadiene ring 21cyclopropane ring 21dashed bond 13dative bond 13dissociation 67hashed bond 13hashed wedge bond 13hollow wedge bond 13lasso 28Marquee 28

Chem & Bio Draw 12.0 235User Guide
mass fragmentation 66, 67reaction atom-to-atom mapping 140retrosynthesis 67setting the default tool 158structure perspective 65wavy bond 13
topological index 115topological polar surface area 202topology 129total connectivity 117total valence connectivity 117trackball tool 65transferring across platforms 154transferring information
across platforms 154keeping in scale 149
transferring objects 149transferring PostScript (Macintosh) 151translation 126translation (query property) 126triple bonds, drawing 14tRNA 3, 38troubleshooting
online 215troubleshooting nicknames 76Tutorial 1 (Drawing a Structure) 45Tutorial 2 (Using Rings) 46Tutorial 3 (Fischer projections) 48Tutorial 4 (Perspective Drawings) 51Tutorial 5 (Newman Projections) 54Tutorial 6 (Stereochemistry) 56Tutorial 7 (Templates) 57tutorials 45types of bonds 190
Uundo, redo, and repeat 9ungroup command 31ungrouping objects 31
unsaturation 124unspecified atom properties, in queries 123unsupported structures 79up to, in queries 123upgrading workbooks 104use defaults
atom properties 122bond properties 128bracket properties 131
user guide, online 215using nicknames 18
VV3000, support for 153vapor pressure 112variable attachment points 64Verlag Helvetica Chimica Acta 180view
shortcut keys 209viewing 92
analysis information 85spectrum-structure assignments 96
viewing drawings 186
Wwarning preferences 33warnings, chemical 33water solubility 114Web site, CambridgeSoft, accessing 216wedged bonds, drawing 15what you can color 169What’s New 1white space, adjusting in atom labels 167Wiener index 117Wiley document 181Window menu 10Windows to Macintosh 155work area 7working with color 168

236 Index
working with structures 107
Xxml files, editing 160
Zzooming, see changing perspectives 186exact mass 110heat of formation 113
ideal gas thermal capacity 113LogP 113melting/freezing point 111molecular weight 110number of atoms 110sum of degrees 116topological diameter 117

DESKTOP SOFTWARE
ENTERPRISE SOLUTIONS
CHEMICAL & BIOLOGICAL
RESEARCH INFORMATICS
KNOWLEDGE MANAGEMENT
SCIENTIF IC DATABASES
featuringE-Notebook
CambridgeSoftSolutions
LABORATORY, DEVELOPMENT &MANUFACTURING INFORMATICS

C A M B R I D G E S O F T
Vision, PassionVision, PassionResearch, Discovery, Development, Research, Discovery, Development,
CambridgeSoft Software, Solutions and Databases

S O L U T I O N S
& Innovation& InnovationTTrials and Manufacturingrials and Manufacturing
Chemists, biologists, scientists, and engineers need timely, convenient access to critical information,whether structured or unrefined. CambridgeSoft, which began by helping scientists manage desktopchemical and biological information with Chem & Bio Draw, now addresses enterprise-wide scientificinformation problems with Chem & Bio Office Enterprise and Workgroup. These solutions are flexibleand powerful to deal with today’s complex projects which span functional organizations and geographi-cal boundaries. Eliminating data barriers and bringing information to all—in the form they need to interpret it—aligns all of the mem-bers of your teams, focusing their collective knowledge and diverse skills toward the common goals of problem solving and innovation.The results can be dramatic:
· Information transparency and group collaboration improve productivity and reduce costs.
· Faster and smarter research decisions cut time to market and increase productive efforts.
· Empowered employees contribute increased value to the research, discovery, development, trials and manufacturing organization.
When your research, discovery, development, trials and manufacturing organization is able to respond swiftly and effectively to opportunities and market changes, promote innovation andaccelerate product delivery, you are working smarter to outpace your competitors. As the speed of busi-ness continues to accelerate, leading organizations constantly seek faster and better informed decisionmaking as well as new business efficiencies. For the individual chemist, biologist, scientist, and engi-
neer who needs to capture, organize, and communicate chemical and biological data, through the complex and widespread workgroupand enterprise scientific information systems needs, CambridgeSoft Solutions can help.
Motivated by Vision
Created with Passion
Advanced through Innovation
Innovation is an organizational must in pharmaceutical, biotechnology, and chemical industries.Effective new ideas, developed through collaboration and communication, free from organizationalboundaries, will determine your long-term success. In today’s connected world, information flowwithin organization can be overwhelming. Large amounts of data—some structured and someunstructured—can cloud an R&D organization’s ability to focus on what is important. Since 1986,
CambridgeSoft has been solving the problem of electronic storage and communication of chemical structures, models, and informa-tion. Starting with ChemDraw, then broadening to ChemOffice in 1992 and BioOffice in 2004, CambridgeSoft extended its software toinclude enterprise wide solutions with ChemOffice Enterprise in 1998, E-Notebook in 2000 and biology with BioAssay in 2001. Today,CambridgeSoft products are used by hundreds of thousands of chemists, biologists, scientists, and engineers who work in pharmaceutical,biotechnology, and chemical industries, including government and academic research. These systems work within your research, discov-ery, development, trials and manufacturing, and information technology to help you capitalize on your organization’s intellectual assets. Byturning information into explicit knowledge, you accelerate innovation and drive organizations forward.

C A M B R I D G E S O F T
ChemChem && BioBio Office Desktop Office Desktop
Process E-Notebook
Chemistry E-Notebook
Enterprise
Biology E-Notebook
WorkflowLIMS
BioAssay &ChemBioViz
KNOWLEDGE MANAGEMENT
CHEMICAL, BIOLOGICAL
Desktop
BioSAREnterprise
KNOWLEDGE MANAGEMENTResearch organizations thrive when information is easily captured, well organized and readily avail-able. E-Notebook Enterprise streamlines record keeping with rigorous security and efficient archiv-ing, and facilitates text and structure searching. E-Notebook provides organizations with a powerfulmechanism to transfer mission criticalwork product from shared drives to a well-organized, compli-ant and searchable Oracle application. MS Office, chemical structures and workflow support modules are provided for the full range of research and development activities.
Chem & Bio Office Enterprise
E-Notebook Enterprise
Chemistry & Biology
Analytical Services
Sample Management
BioAssay Enterprise
BioDraw
BioSAR & BioViz
BIOLOGICAL INFORMATICSFinding structural determinants of biological activity requires processing masses of biologicalassay data. Scientists use BioAssay Enterprise and BioSAR Enterprise to set up biological modelsand visualize information. The BioViz application allows you to create graphical representationsof data.
Workflow LIMS
Compliant DB
Oracle Cartridge
LABORATORY INFORMATICSLaboratory Informatics includes Workflow LIMS for instrumentation automation, Compliant DB for stor-age of your data and the Oracle Cartridge which is the industry’s only enterprise content manage-ment system developed by a large pharmaceutical company.
CHEMICAL INFORMATICSManaging huge data streams is a key challenge. Registration Enterprise organizes informationabout new compounds according to an organization's business rules.
Registration Enterprise
ChemBioFinderEnterprise
ComplianceE-Notebook
DocManagerEnterprise

S O L U T I O N S
to Enterprise Solutionsto Enterprise Solutions
InventoryEnterprise
ChemACXDatabase
LABORATORY &MANUFACTURING
SCIENTIFICDATABASES
Oracle Cartridgeor SQL DB
Sigma-AldrichMSDS
The MerckIndex
GxP Validation
RegistrationEnterprise
ChemBioFinder Gateway
The Merck Index
ChemACX Database
SCIENTIFIC DATABASES
PROFESSIONAL SERVICES
Good research depends on reference information, starting with the structure-searchableChemACX Database of commercially available chemicals and Sigma-Aldrich MSDS. The MerckIndex and other scientific databases provide necessary background about chemicals, their prop-erties, and reactions.
Inventory Enterprise
Materials Management
Compliance Management
CambridgeSoft's scientific staff has the industry experience and the chemical and biologicalknowledge to maximize the effectiveness of your information systems.
ChemDraw & Chem3D
ChemFinder & ChemInfo
BioDraw, BioAssay & BioViz
Inventory & E-Notebook
DESKTOP SOFTWARESuccess begins at the desktop, where scientists use ChemOffice, ChemDraw, BioOffice andBioDraw to pursue ideas and communicate with the natural language of chemical structures,biological pathways, and models. Scientists organize information and manage data with E-Notebook and Inventory. ChemBio3D provides modeling, ChemBioFinder aids searching, whileBioOffice adds BioDraw, BioAssay and BioViz. All are integrated with Microsoft Office to speedresearch tasks.
Development
Training & Support
MANUFACTURING INFORMATICSCambridgeSoft’s Inventory Enterprise application is designed to manage the chemical, reagent, sample and compound tracking needs of large multi-site chemical and pharmaceutical laboratories. Inventory Enterprise is an Oracle-based,ChemOffice Enterprise product that is designed for multiple users with diverse container types, racks, and multi-well plate formats.
CompliantSDMS
ChemBioFinderGateway

E N T E R P R I S E &
Chem & Bio Office EnterpriseChem & Bio Office EnterpriseIntegrated Research, Discovery, Development,Integrated Research, Discovery, Development,
US 1 800 315–7300 INT’L 1 617 588–9300 FAX 1 617 588–9390 EMAIL [email protected]
EU 00 800 875 20000 UK +44 1223 464900 JP 0120 146 700 WWW www.cambridgesoft.com
MAIL CambridgeSof t Corporat ion 100 CambridgePark Dr ive Cambridge, Massachuset ts 02140 USA
ChemOffice, ChemDraw, BioOffice, BioDraw & ChemBioFinder are trademarks of CambridgeSoft Corporation ©2009
Desktop to EnterpriseSince the company's founding, CambridgeSoft's desktop soft-ware, starting with its industry-leading Chem & Bio Draw, hasbeen the cornerstone application for scientists who draw andannotate molecules, reactions, and pathways. This suite of enter-prise applications has developed and now provides solutions in allareas of discovery.
Research and DiscoveryResearchers can record and share their experimental information using E-Notebook, while protecting intellectual prop-erty with digital signatures and 21 CFR Part 11 compliance. Theycan design both single experiments or design combinatoriallibraries of compounds. They can find and purchase reagents inChemACX database, store and use them from Inventory, recordnewly made compounds within a proprietary Registration system,record the results in BioAssay, analyze the results with BioViz, andgenerate reports linking activity and structure with BioSAR.
Virtually every aspect of discovery, from synthesis planning,library enumeration, reagent selection, primary and secondaryscreening, in vivo testing, through to analysis of results and report-ing is covered by this integrated application suite.
Development and TestingBuilding on productivity software, CambridgeSoft created enter-prise applications to meet the needs of an everexpanding researchand development community that relies on data sharing across sci-entific disciplines, research campuses, and even oceans as global-ization has increased demands. Since the software takes advantageof the latest web based technologies, it is deployed readilythroughout a research and development organization. Using theintegrated suite, scientific teams are well armed to solve the daily challenges of development. These teams include scientists whoscale up and design manufacturing procedures,toxicologists whodetermine the metabolic fate of drugcandidates, formulation sci-entists who determine drugdosing and delivery systems, as well asmany others.
TrialsA suitable drug candidate is one that has the desired activity toprovide disease therapy while meeting drug safety requirements,can be manufactured in a cost effective and reproducible fashionunder 21 CFR Part 11 and Good Manufacturing Processes(GMP) guidelines, and is stable under normal formulation andstorage conditions. With a drug candidate in hand, the final chal-lenge is to determine safety and efficacy in a patient population.
All specifications subject to change without notice.

US 1 800 315–7300 INT’L 1 617 588–9300 FAX 1 617 588–9390 EMAIL [email protected]
EU 00 800 875 20000 UK +44 1223 464900 JP 0120 146 700 WWW www.cambridgesoft.com
MAIL CambridgeSof t Corporat ion 100 CambridgePark Dr ive Cambridge, Massachuset ts 02140 USA
ChemOffice, ChemDraw, BioOffice, BioDraw & ChemBioFinder are trademarks of CambridgeSoft Corporation ©2009
W O R K G R O U P
and Workgroup Solutionsand Workgroup SolutionsTTrials and Manufacturing Wrials and Manufacturing Workfloworkflow
ManufacturingManufacturing requires the transfer of data and batch processrecords from the pilot plant studies using Inventory, E-Notebook,and Registration systems under Good Laboratory andManufacturing Processes (GxP).
The handling of materials, including chain of custody require-ments, material documentation, material workflow, such as avail-ability states and recertification dates, are tracked and handled bythe system.
These systems meet the requirements and provide the basis tomanage materials and records during clinical trials. Clinicians candesign and record results from protocols, and all of these webbased software systems provide the access required by clinicianswho are removed from the sponsoring company.
Chem & Bio Office EnterpriseChem & Bio Office Enterprise is a comprehensive knowledge-
management and informatics solution, covering electronic note-books, biological screening and chemical registration over yourintranet. ChemBioOffice Enterprise Ultra includes E-Notebook forrecord keeping, BioAssay for low and high throughput screeningwith integrated plate inventory, BioSAR for SAR reports,Registration System, Inventory for reagents and biologicals, andChemACX database of available chemicals. Technologies includeChemDraw ActiveX and Oracle Cartridge.
Chem & Bio Office WorkgroupChem & Bio Office Workgroup Ultra is a comprehensive knowl-edge management and informatics solution, covering electronicnotebooks, biological screening and more over your intranet.
Chem & Bio Office Workgroup Ultra includes E-Notebookfor record keeping, BioAssay for low and high-throughput screen-ing, BioViz for visualization, Inventory for reagents and ChemACXdatabase of available chemicals. Technologies also include SQLServer for affordability and ease of administration.

US 1 800 315–7300 INT’L 1 617 588–9300 FAX 1 617 588–9390 EMAIL [email protected]
EU 00 800 875 20000 UK +44 1223 464900 JP 0120 146 700 WWW www.cambridgesoft.com
MAIL CambridgeSof t Corporat ion 100 CambridgePark Dr ive Cambridge, Massachuset ts 02140 USA
ChemOffice, ChemDraw, BioOffice, BioDraw & ChemBioFinder are trademarks of CambridgeSoft Corporation ©2009
K N O W L E D G E
Overview &Overview &E-Notebook’s Flexible ArchitectureE-Notebook’s Flexible Architecture
E-NotebookUsed for collaboration and knowledge sharing, regulatory compli-ance, intellectual property protection, LIMS,document manage-ment, project management, and workflow support, E-Notebook isthe leader in a new class ofapplications. Configurable, multi-pur-pose, and enterprise-scalable, it provides a solution to a large set ofrequirements across R&D and manufacturing. E-Notebook's foun-dation layer of features includes support for 21 CFR Part 11, 37CFR and GxP compliance, on top of which a widely configurabledesign interface provides support for specific scientific and regula-tory workflows. Because this diverse portfolio of requirements ismet in a single applicationplatform, E-Notebook both lowers thetotal investment required to meet these needs, and provides a sub-stantial increase in productivity due to a far more integratedenvi-ronment for scientists and technical staff.
E-Notebook ArchitectureCambridgeSoft’s E-Notebook provides a comprehensive, easy-to-use interface designed to replace paper laboratorynotebooks in avariety of settings. Underneath is a fullyconfigurable, secure sys-tem for organizing the flow ofinformation generated by yourorganization. Scientists can enter chemical reactions, Microsoftdocuments (Word, Excel, PowerPoint), spectra, biological dataand images, and other types of information and documents. It alsoallows you to search by text, chemical substructure, metadata tags, organizational hierarchy, or other keys.
E-Notebook ArchitectureE-Notebook Enterprise edition is a globally-deployable, Oracle-based application designed for everyone from small researchgroups to global organizations. Oracle Cartridge manages chemicalstructures and reactions in a common data repository, layered withdetailed security and is 21CFR Part 11 Compliant (audit trails,digital signatures). The enterprise edition works with procurementdatabases and services including ChemACX database and Inventorymanagement systems to save time locating chemicals and enteringstructures.
Flexible and Configurable ArchitectureThe E-Notebook architecture is designed to provide organizationswith an unparalleled level of flexibility. A powerful configurationlayer is provided to make it possible to modify substantially thelook and feel of the application in order to meet very diverse work-flows. Detailed workflow support in the same application is pro-vided for researchers in early stage discovery through early clinicaldevelopment even though the requirements for these groups aretotallydifferent. Beyond configuration, a rich API is provided forcustom development and system integration.
E-Notebook is also in production with integrated inventory sys-tems including CambridgeSoft’s Inventory manager, as well as in-house systems, analytical data capturing systems, and com-pound registration systems. E-Notebook supports limiting access tocertain information at the project or group level if desired, as secu-rity is granular. Information can be shared or secured as desiredthroughout the framework.

US 1 800 315–7300 INT’L 1 617 588–9300 FAX 1 617 588–9390 EMAIL [email protected]
EU 00 800 875 20000 UK +44 1223 464900 JP 0120 146 700 WWW www.cambridgesoft.com
MAIL CambridgeSof t Corporat ion 100 CambridgePark Dr ive Cambridge, Massachuset ts 02140 USA
ChemOffice, ChemDraw, BioOffice, BioDraw & ChemBioFinder are trademarks of CambridgeSoft Corporation ©2009
M A N A G E M E N T
General R&DGeneral R&DIP Protection and Regulatory ComplianceIP Protection and Regulatory Compliance
General R&DCambridgeSoft’s E-Notebook is a solution that enables pharmaceutical and biotechnology companies to improve theefficiency of the process from diseased target identification to prod-uct launch. Its core Oracle database manages the workflow to becompliant with Good Laboratory Practices (GLP), GoodManufacturing Processes (GMP), and the FDA’s 21 CFR Part11; while the client interface is highly configurable and flexible.Anywhere a shared drive is used, E-Notebook can offer a bettersolution.
Through the R&D process, using CambridgeSoft’s E-Notebook ineach subsequent stage adds increasing scientific and economicvalue by providing workflow automation and knowledge sharing.
Research and DiscoveryE-Notebook Enterprise is capable of providing knowledge manage-ment, chemical- and biological-focused solutions in virtually allareas of discovery. Researchers can record and share their experi-mental information, while protecting intellectual property withdigital signatures and 21CFR Part 11 and 37 CFR compliance.
• Chem & Bio Draw—draw and annotate molecules, reactions, and biological pathways
• ChemACX—find and purchase reagents• Inventory—store and track reagents and samples• Registration—record newly made compounds• BioAssay—model complex protocols and record results
from biological testing• BioSAR—generate reports linking activity with structure• BioViz—analyze biological results
Virtually every aspect of discovery process—from synthesis planning, library enumeration, reagent selection, primary and secondary screening, in vivo testing, through to analysis of resultsand the reporting of data—is covered by the integrated E-Notebook solution.
Development and TestingCambridgeSoft’s Enterprise E-Notebook meets the needs of everexpanding research and development communities that rely ondata sharing across scientific disciplines and campuses as globaliza-tion has increased demands.
E-Notebook allows custom integration of a large array of modules,in-house applications, lab instruments, and back-end data storageto provide a true end-to-end solution for development and testing.Designing workflows and calculations is much faster and requiresfar less programming using the E-Notebook than existing lab infor-mation systems. End users include scientists and process chemistswho scale up and design manufacturing procedures, toxicologistswho determine the metabolic fate of drug candidates, formulation scientists who determine drug dosing and delivery systems, as well as many others.
Trials and ManufacturingA suitable drug candidate has the desired activity to provide dis-ease therapy while still meeting safety requirements, can be man-ufactured in a cost effective fashion under 21 CFR Part 11 andGMP guidelines, and is stable under normal formulation and storage conditions. The handling of materials, including chain of custody requirements, material documentation, material workflow, such as availability states andrecertification dates, are tracked and handled by the E-Notebook application. CambrideSoft’s E-Notebook meets theserequirements under Good Laboratory and ManufacturingProcesses (GxP) and provides the basis to manage materials andrecords during clinical trials.
• Replace Shared Drives with Oracle
• DMPK, Screening Biology, Genetics, and Microscopy
• LIMS, Method Execution, 21 CFR Part 11, GxP

US 1 800 315–7300 INT’L 1 617 588–9300 FAX 1 617 588–9390 EMAIL [email protected]
EU 00 800 875 20000 UK +44 1223 464900 JP 0120 146 700 WWW www.cambridgesoft.com
MAIL CambridgeSof t Corporat ion 100 CambridgePark Dr ive Cambridge, Massachuset ts 02140 USA
ChemOffice, ChemDraw, BioOffice, BioDraw & ChemBioFinder are trademarks of CambridgeSoft Corporation ©2009
K N O W L E D G E
Chemistry &Chemistry &Electronic JElectronic Journal and Record Keeping,ournal and Record Keeping,
ChemistryUnder the R&D value chain, chemistry can be further divided into three separate stages: synthetic chemistry(research/discovery), analytical chemistry (pre-clinical) andprocess chemistry (development). The flexibility and configura-bility of E-Notebook enables a successful data repository, analysis,sharing, reporting, and searching efficiently and paper-free.
Synthetic ChemistrySynthetic Chemists take advantage of many features tied into asmooth interface within CambridgeSoft’s Enterprise E-Notebook.Reactions are drawn with in-place editing; a stoichiometry griddynamically fills with the formulas, molecular weights, and chem-ical names. Reagents can also be imported from other systems,such as available chemicals from the ChemACX database orRegistration system.
CombiChem is one important aspect of library generation forSynthetic Chemists. For some, E-Notebook serves as the completeCombiChem solution, taking advantage of features such as theenumeration of products from a virtual library on a flexible platelayout, a multiple reaction site checker, and multiple step parallelsynthesis. Others simply import a list of compounds from anexternal source or SDFile so that they can record and calculatedata on a library-wide stoichiometric table.
Analytical ChemistryE-Notebook serves as a repository for analytical data, and it alsoacts as a communication portal with which scientists and analystscommunicate with each other. Scientists can create and send service requests directly to an analyst with the click of a button.Paper is eliminated: when results are obtained, the analyst cansend the images and chromatograms directly back to the scientist's E-Notebook.
Process ChemistryThe objective of process research is to identify efficient processesfor the synthesis of active pharmaceutical agents at the scalerequired for clinical trials and commercial use. It is necessary toprovide precise descriptions of these processes so that they can beexecuted by different groups in different locations. It is alsorequired that such processes be compliant with Good LaboratoryPractices (GLP), Good Manufacturing Processes (GMP) and theFDA's 21 CFR Part 11 regulation. E-Notebook's process chemistrymodules are designed to support these dual workflow and regulatory compliance needs of process chemists.
• Chemical Synthesis, Scale-up and Analytical
• 37 CFR Electronic Signatures
• Service Requests and Discovery Workflow
Reaction Properties
PowerPoint Integration

US 1 800 315–7300 INT’L 1 617 588–9300 FAX 1 617 588–9390 EMAIL [email protected]
EU 00 800 875 20000 UK +44 1223 464900 JP 0120 146 700 WWW www.cambridgesoft.com
MAIL CambridgeSof t Corporat ion 100 CambridgePark Dr ive Cambridge, Massachuset ts 02140 USA
ChemOffice, ChemDraw, BioOffice, BioDraw & ChemBioFinder are trademarks of CambridgeSoft Corporation ©2009
M A N A G E M E N T
BiologyBiologyDMPK, Screening Biology, MicroscopyDMPK, Screening Biology, Microscopy
Discovery BiologyThese scientists are involved at the very start of the drug discovery process, as genomics and genetics are essential disciplines used when identifying a disease target. This work ismethodical but unscripted, and so requires an electronic note-book pallet that is as free form as its paper predecessor. This iswhere the benefit of E-Notebook's flexibility is unmistakable.While the system can be set up with rigid form based data entryappropriate for later stage research and development, discoverybiology configurations are typically open and boundless. Genomicmap and DNA, RNA and protein sequence files can be dragged-and-dropped into E-Notebook, sequencing results can be sentdirectly from instruments to electronic experiments, and protocolsand data can be managed with familiar tools such as MicrosoftWord and Excel.
The beauty of capturing data in E-Notebook is that information can be compiled and viewed in a meaningful way. Forexample, the creation of a new biological strain entails many steps,potentially involving nonconsecutive workdays of various individ-uals. E-Notebook can generate customized reports that meaning-fully summarize the process in real time. These reports are navigable—clicking on each step will bring you to the corresponding experiment.
Assay & Screening BiologyOne of E-Notebook's strengths is its ability to integrate with exist-ing electronic methods of data capture, including using it withCambridgeSoft’s BioAssay module to provide full screening exper-imental support. In addition to this, Microsoft Word and Excelare also embedded directly in E-Notebook, as is image and moviecapture. Scientists benefit from the functionality of these toolsimplanted in a rich, searchable environment. Biological experi-ments can be managed and organized in a way that is not possi-ble with a traditional file system.
In vivo Experiments/Animal ManagementIn vivo experiments are important aspects of target discovery andvalidation, and are critical paths to determine the efficacy of selective therapeutic candidates. CambridgeSoft’s E-Notebook becomes the centralized location to collect, store andinterpret in vivo experiment results. Again, when used withBioAssay, the full end-to-end experimental workflow is supported,from creation, to data analysis and quality control, to summaryand reporting. In conjunction with in vivo experiments, animalhousing and breeding can also be tracked. Traditionally, the work-flow consists of paper-based record keeping across the animalfacility, lab bench, and researchers desktop. With E-Notebook,paper tracking and recording is eliminated. Instead, form tools canbe designed to:
• Track animal status• Track animal pedigree• Record Genotype• Create mating records • Create litter records
Database Structure
• Chemical Synthesis, Scale-up and Analytical
• DMPK, Screening Biology, Genetics, and Microscopy
• LIMS, Method Execution, 21 CFR Part 11, and GxP

US 1 800 315–7300 INT’L 1 617 588–9300 FAX 1 617 588–9390 EMAIL [email protected]
EU 00 800 875 20000 UK +44 1223 464900 JP 0120 146 700 WWW www.cambridgesoft.com
MAIL CambridgeSof t Corporat ion 100 CambridgePark Dr ive Cambridge, Massachuset ts 02140 USA
ChemOffice, ChemDraw, BioOffice, BioDraw & ChemBioFinder are trademarks of CambridgeSoft Corporation ©2009
K N O W L E D G E
Analytical Services &Analytical Services &Electronic JElectronic Journal and Record Keepingournal and Record Keeping
Formulation and ValidationE-Notebook's formulation module is designed to support the dualworkflows and regulatory compliance needs of formulation engi-neers. The flexibility allows any number of formulations to becreated, and security allows only designated administrators tocreate a new formulation.
Analytical & Quality ControlAnalytical and Quality Control Laboratories must execute definedprocedures to test material that may be administered during pre-clinical and clinical trials. This work must also be compliant withboth GxP and 21 CFR Part 11. Templates for standard analyticaltests are provided and analytical procedures are implemented asE-Notebook forms, which are easily designed and controlled.Equally important, E-Notebook provides workflow enforcementthat monitors data entry and ensures that the forms are complet-ed in sequence for proper method execution.
For example, rules can be configured such that the 'Day 3' formof a multi-day process will not accept any entries unless allrequired fields on the 'Day 2' form are first completed. The formscan contain automatic calculations to compute totals, averages,differences, and much more. E-Notebook can further streamlinethe procedure by allowing for electronic management of solutions,equipment, and other resources that are needed for experiments.
Drug MetabolismE-Notebook supports the DMPK laboratories in testing the metab-olism and longevity of compounds in various in vitro and in vivomodels. DMPK data capture needs can vary significantly, and theflexibility of the E-Notebook solution addresses this. For example,an in vivo enzyme induction test may create relatively smallamounts of data for which scientists utilize E-Notebook integra-tion with Microsoft Excel. Conversely, large quantities of data,such as those generated by in vitro enzyme inhibition studies, areoften collected and analyzed by applications such as BioAssay.Therefore, integration with BioAssay and Excel are fundamental toDMPK E-Notebook usage.
Pharmacokinetics (DMPK)There is a holistic approach to Drug Metabolism andPharmacokinetics. No single study describes the behavior of acompound; it is the combination of data from disparate experi-ments that represents the pharmacological profile for a com-pound. It is here where E-Notebook reveals one of its most signifi-cant capabilities: the reporting feature. E-Notebook reports areflexible: any field (e.g. compound ID, study type, etc.) can be usedto query the system and any field (e.g. conclusion, dose, etc.) orfield aggregate (e.g. average radioactivity) can be displayed in thereport. Reports are dynamic and navigable: results are displayedwith links that provide quick access to experiments.
Reports are viewed directly in the E-Notebook interface, but theycan also be exported to Microsoft Word or PDF to share withthose who do not have E-Notebook access.
Inventory Enterprise
• Service Request Workflow
• Sample Management
• Method Execution Framework

US 1 800 315–7300 INT’L 1 617 588–9300 FAX 1 617 588–9390 EMAIL [email protected]
EU 00 800 875 20000 UK +44 1223 464900 JP 0120 146 700 WWW www.cambridgesoft.com
MAIL CambridgeSof t Corporat ion 100 CambridgePark Dr ive Cambridge, Massachuset ts 02140 USA
ChemOffice, ChemDraw, BioOffice, BioDraw & ChemBioFinder are trademarks of CambridgeSoft Corporation ©2009
M A N A G E M E N T
Drug Safety / ToxicologyPaper notebooks have traditionally been considered to be therecord source for the entirety of an experiment, but they oftenmiss non-experimental information generated shortly after con-ception. For example, toxicology studies are often initiated notby the scientist who ultimately runs the experiment, but insteadby a manager or coordinator who assigns the study to the scien-tist. Important material related to this first step in the process,such as ideas, emails, and other communications are often left outof traditional paper notebooks. The E-Notebook toxicology work-flow addresses this concern: studies are first created by a manager,and subsequently assigned to the scientist for execution.
Compliance ExecutionE-Notebook is also useful for capturing the Standard OperatingProcedure (SOP) corresponding to the experiment. These docu-ments are often stored separately from the actual data, leading toerror and confusion, thus causing risk to the validity of the data.Storing and displaying procedures and other related documents inconcert with the data eliminates this risk and helps build perspec-tive on the study.
Sample Lifecycle ManagementE-Notebook can manage the entire sample lifecycle through tightintegration with Inventory. Sample lifecycle management is essen-tial for the registration, testing, evaluation, and reporting in vari-ous analytical and manufacturing stages. Manual tracking of sam-ples and test results is labor-intensive and time-consuming; andcompliance with GxP guidelines requires expensive manualaudits.
The controlled flexibility of CambridgeSoft’s E-Notebook is wellsuited for these detail and compliance-oriented environments. E-Notebook’s Sample Lifecycle Management module is compliantwith Good Laboratory Practices (GLP), Good ManufacturingProcesses (GMP) and 21 CFR Part 11.
Sample LoginE-Notebook is able to easily configure sample logins (registration ofsample, assignment of barcode label, and initiation of sampletracking) by incorporating CambridgeSoft’s Inventory application.Through E-Notebook, forms can be created to keep track of newlysynthesized or acquired compounds, tracking their physical prop-erties and tests, and assigning unique identifiers. New compoundsare entered directly via the E-Notebook form, and chemical, alongwith non-chemical, data is kept alongside the sample. When aproprietary compound is registered, if desired, it is compared foruniqueness via a configurable, stereoselective duplicate check andassigned a registry number.
Sample TrackingTracking samples, requesting analysis and establishing chain ofcustody can all be simply managed within the E-Notebook inter-face. E-Notebook serves as a repository for analytical data andexperiments, linking such data directly to the sample ID, and itacts as a communication portal with which scientists and analystscommunicate with each other during the service request lifecycle.Scientists create and send service requests directly to an analystwith the click of a button. Paper is eliminated: when results areobtained, the analyst can send the images and chromatogramsdirectly back to the scientist's E-Notebook (which appear in theperson's E-Notebook inbox, and are then accepted into the experi-ment if desired). To establish chain of custody, each step of sam-ple ownership is tracked, recorded and made compliant withFDA's 21 CFR Part 11.
• Track & Barcode Samples
• Create Any Report from Database
• Full Audit Trail
Sample ManagementSample ManagementCompliance Execution and Sample TCompliance Execution and Sample Trackingracking

US 1 800 315–7300 INT’L 1 617 588–9300 FAX 1 617 588–9390 EMAIL [email protected]
EU 00 800 875 20000 UK +44 1223 464900 JP 0120 146 700 WWW www.cambridgesoft.com
MAIL CambridgeSof t Corporat ion 100 CambridgePark Dr ive Cambridge, Massachuset ts 02140 USA
ChemOffice, ChemDraw, BioOffice, BioDraw & ChemBioFinder are trademarks of CambridgeSoft Corporation ©2009
L A B O R AT O RY
Workflow LIMS AutomationCambridgeSoft’s Workflow LIMS is a scientific data and workflow management tool for lab automation and in silicoexperimentation. Workflow LIMS eliminates the need for customprogramming by providing a visual experiment design and work-flow layout with built-in laboratory automation and analytics.
By using Workflow LIMS, researchers can connect their laboratory processes, instruments, and decision points in a conceptual manner that directly couples to instrumentation— forboth automation and data gathering—and provide real-time results. The Workflow LIMS solution enables ascientific team to design procedures, execute those procedures,
capture the results and integrate lab equipment to automate partor all of the process. Procedures typically revolve around lab activ-ities, but may also draw in decision support tools on a scientist'sdesktop, and queries/updates to databases.
Interactivity and Integrity1. The modeling environment, Workshop Configuration Editor,in which the scientific team models the capabilities of the lab - forexample, the kind of basic processes which are available in the lab,and their inputs and outputs.2. The design environment, Workbench, in which researcherscreate workflows from these basic processes.3. The runtime Operations Manager, which manages the assign-ment of tasks to agents, tracks the progress of tasks and workflows,and manages the storage of captured data. 4. The agent tier, made up of a number of applications that han-dle specific types of task, either manually (through a user inter-face), or automatically (by driving equipment through a controlinterface or performing automated data processing). 5. The monitoring tier consists of a reporting tool thatprovides historical utilization information, and a live activity viewer that allows scientists to drill into individual workflows and samples.
Applied Technologies and BenefitsWorkflow management enables discovery teams to rapidly trialnew procedures, capture best practices and scale successful designsfrom a manual prototype right up to a fully automated high-throughput lab. But discovery and research, by its very nature,demands that processes be flexible and that workflow executionrapidly adapt to new techniques and equipment.
Conventional laboratory information workflow applications can-not meet this requirement because of their heavyweight configu-ration needs, their lack of adaptability and the cost and complex-ity of integrating them with rapidly changing lab technology.Workflow LIMS addresses these problems by providing a visual,easy-to-use environment for describing processes and buildingworkflows out of those processes, enabling scientists to rapidlytrial new procedures, and by offering a rapid development tool kitfor equipment integration which supports gradual automation tominimize up-front costs and ongoing risk.
CambridgeSoft’s Workflow LIMS simplifies even manual lab pro-cedures by managing the breakdown of a procedure into tasks, andby automating the majority of data capture and transfer tasks; butby capturing process as well as data, Pathways reduces the costsand risks of implementing discovery techniques, and enables companies to accelerate the entire discovery process.
Workflow LIMS, Workflow LIMS, VVisual LIMS, Lab Automation,isual LIMS, Lab Automation,
• Service Request Workflow allows scientists to communicate as they work
• Direct Communication from E-Notebook to createtasks and send results
• Method Execution Framework to enable standard operation procedures and compliance

US 1 800 315–7300 INT’L 1 617 588–9300 FAX 1 617 588–9390 EMAIL [email protected]
EU 00 800 875 20000 UK +44 1223 464900 JP 0120 146 700 WWW www.cambridgesoft.com
MAIL CambridgeSof t Corporat ion 100 CambridgePark Dr ive Cambridge, Massachuset ts 02140 USA
ChemOffice, ChemDraw, BioOffice, BioDraw & ChemBioFinder are trademarks of CambridgeSoft Corporation ©2009
I N F O R M AT I C S
Compliant DBCompliant DB & Oracle Cartridge& Oracle CartridgeCompliant Storage and Chemical Data ManagementCompliant Storage and Chemical Data Management
Compliant DBCambridgeSoft’s Compliant DB is the industry's enterprise content management system developed by a large pharmaceuticalcompany. It serves as an electronic library that collects, organizes,warehouses, indexes and safely archives all your structured andunstructured electronic records. From raw data and laboratoryreports to compliance records, Compliant DB also will support anyof CambridgeSoft’s workflow solutions, including E-Notebook,BioAssay, and Inventory. As its name implies, Compliant DB is fully compliant with the requirements of 21 CFR Part 11 for electronic records and electronic signatures.
Compliant DB can be used directly over your company's intranet,extranet, or over the Internet with a simple web browser.Complaint DB gives your organization a secure, 21 CFR Part 11compliant centralized electronic library for all electronic data files.Not only can machine-readable instrument data files be stored,but also images, multimedia files, presentations, human-readableword processing and Adobe PDF documents, spreadsheets andhundreds of other formats. This data can serve as source data(instrument data to BioAssay), and also repository. AlthoughCompliant DB can operate as a stand-alone application, onlyCambridgeSoft provides fully-integrated Knowledge Managementand Enterprise Informatics applications integrated with compliantstorage. Compliant DB makes this possible.
Oracle CartridgeThe CambridgeSoft Oracle Cartridge is used by all ChemOfficeEnterprise applications for storing, searching, and analyzing chem-ical data. It can also be used in the development of your customOracle applications. Chemical structure and reaction data is diffi-cult to manipulate without utilizing special software, and Oracledata cartridges define new, recognized data types. CambridgeSoft’sOracle Cartridge utilizes this technology, making it possible tomanipulate chemical structure and reaction data from withinOracle, improving portability and consistency in applications.Since the Oracle Cartridge is accessed through native Oracle SQL,programmers can interact with chemical structure data directly inthe database.
The CambridgeSoft Oracle Cartridge supports CDX, CDXML,MolFile, MolFile v.3000, RXN and SMILES formats, making itflexible enough to be included with both new and legacy dataapplications, without the need for file conversion. Chemical infor-mation can originate from either ChemDraw or ISIS Draw, E-Notebook, Inventory, or Registration. Oracle Cartridge has extensivesupport for stereochemistry, relative stereochemistry, tautomersand structure normalization. There is also a built-in structure enu-merator (for nonspecific structures), basic property predictors,nomenclature algorithms (name=struct), and dynamic utilities formolecular file format conversions.
Workbench Sample
• Develop Centralized Validated Storage and GxP Compliant Storage
• Store Documents, Machine Files & Chemical Objects
• Oracle Cartridge is compatible with Linux, Solaris, AIX and Windows and includes structure searching, property predictions and nomenclature
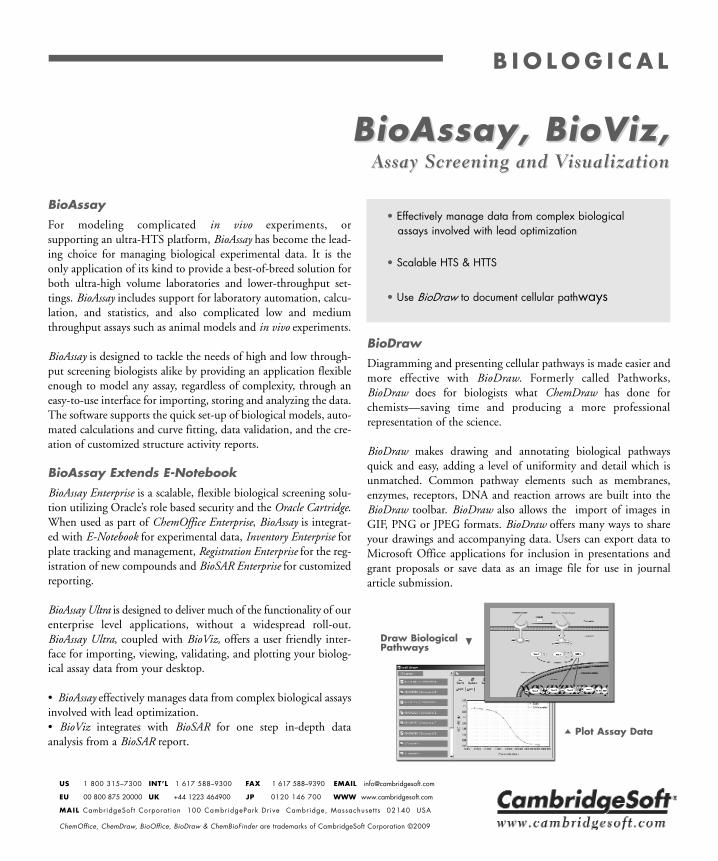
US 1 800 315–7300 INT’L 1 617 588–9300 FAX 1 617 588–9390 EMAIL [email protected]
EU 00 800 875 20000 UK +44 1223 464900 JP 0120 146 700 WWW www.cambridgesoft.com
MAIL CambridgeSof t Corporat ion 100 CambridgePark Dr ive Cambridge, Massachuset ts 02140 USA
ChemOffice, ChemDraw, BioOffice, BioDraw & ChemBioFinder are trademarks of CambridgeSoft Corporation ©2009
BioAssay, BioViz,BioAssay, BioViz,Assay Screening and VAssay Screening and Visualizationisualization
B I O L O G I C A L
BioAssayFor modeling complicated in vivo experiments, or supporting an ultra-HTS platform, BioAssay has become the lead-ing choice for managing biological experimental data. It is theonly application of its kind to provide a best-of-breed solution forboth ultra-high volume laboratories and lower-throughput set-tings. BioAssay includes support for laboratory automation, calcu-lation, and statistics, and also complicated low and mediumthroughput assays such as animal models and in vivo experiments.
BioAssay is designed to tackle the needs of high and low through-put screening biologists alike by providing an application flexibleenough to model any assay, regardless of complexity, through aneasy-to-use interface for importing, storing and analyzing the data.The software supports the quick set-up of biological models, auto-mated calculations and curve fitting, data validation, and the cre-ation of customized structure activity reports.
BioAssay Extends E-NotebookBioAssay Enterprise is a scalable, flexible biological screening solu-tion utilizing Oracle’s role based security and the Oracle Cartridge.When used as part of ChemOffice Enterprise, BioAssay is integrat-ed with E-Notebook for experimental data, Inventory Enterprise forplate tracking and management, Registration Enterprise for the reg-istration of new compounds and BioSAR Enterprise for customizedreporting.
BioAssay Ultra is designed to deliver much of the functionality of ourenterprise level applications, without a widespread roll-out.BioAssay Ultra, coupled with BioViz, offers a user friendly inter-face for importing, viewing, validating, and plotting your biolog-ical assay data from your desktop.
• BioAssay effectively manages data from complex biological assaysinvolved with lead optimization.• BioViz integrates with BioSAR for one step in-depth dataanalysis from a BioSAR report.
BioDrawDiagramming and presenting cellular pathways is made easier andmore effective with BioDraw. Formerly called Pathworks,BioDraw does for biologists what ChemDraw has done forchemists—saving time and producing a more professional representation of the science.
BioDraw makes drawing and annotating biological pathwaysquick and easy, adding a level of uniformity and detail which isunmatched. Common pathway elements such as membranes,enzymes, receptors, DNA and reaction arrows are built into theBioDraw toolbar. BioDraw also allows the import of images inGIF, PNG or JPEG formats. BioDraw offers many ways to shareyour drawings and accompanying data. Users can export data toMicrosoft Office applications for inclusion in presentations andgrant proposals or save data as an image file for use in journal article submission.
Draw BiologicalPathways
Plot Assay Data
• Effectively manage data from complex biological assays involved with lead optimization
• Scalable HTS & HTTS
• Use BioDraw to document cellular pathways
US 1 800 315–7300 INT’L 1 617 588–9300 FAX 1 617 588–9390 EMAIL [email protected]
EU 00 800 875 20000 UK +44 1223 464900 JP 0120 146 700 WWW www.cambridgesoft.com
MAIL CambridgeSof t Corporat ion 100 CambridgePark Dr ive Cambridge, Massachuset ts 02140 USA
ChemOffice, ChemDraw, BioOffice, BioDraw & ChemBioFinder are trademarks of CambridgeSoft Corporation ©2009
BioSAR & BioDrawBioSAR & BioDrawData Mining and PData Mining and Pathway Drawingathway Drawing
I N F O R M AT I C S
BioSARBioSAR Enterprise, a strategic must for any discovery organization interested in serious data mining, is a data dictionarydriven structure-activity analysis program. Users may chooseamong assays registered in the dictionary or search for assaysof interest.
The power of BioSAR lies in the researcher’s freedom fromdependence on IT support for dynamically working with all avail-able scientific data. For example, once an assay is registered intothe data-dictionary, it is automatically included in the powerfulanalysis framework. By reducing the time between question andanswer, BioSAR gives researchers the ability to explore new ideasand avoids this issue by placing SAR report creation in theresearcher’s control.
BioSAR Enterprise allows the researcher to create custom reportsand views of their data. You decide what is displayed, and BioSARtakes care of the rest.
While most SAR tools provide only a table-based interface,BioSAR provides both a form view and table view, and connects toBioViz for high-dimensional analysis. BioSAR merges the sophisti-cation of a powerful data catalog technique with knowledgegained through years of working closely with scientist users. Theresult is a SAR application that is as intuitive as it is powerful.Security within BioSAR Enterprise is highly granular; differentroles exist for administrators, publishers, and browsers.
Administrators may add assays to the data catalog engine, publish-ers may create reports and publish them, and browsers may usedata query and analysis. Most data mining tools provide a mech-anism to store queries, but the interface for creating queries is toocomplex. With BioSAR, each set of assays is a complete reportwith a query form, a view form, and a table view, combining theconvenience of a ChemFinder or ISIS application with the powerand flexibility of a data catalog-driven mining program.
• BioSAR is a catalog driven data-mining and structureactivity analysis program.• BioSAR provides both form and table views within asimple and powerful web interface.• BioDraw makes it easy to draw and annotate biological pathways including common elements such as mem-branes, enzymes, receptors and DNA.
BioVizBioViz with ChemFinder transforms the numbers in your databaseinto graphics on your screen. Retrieve or search for a set of com-pounds, choose the data you want to see, whether it is biologicaltest results in Oracle tables, physical property values calculatedautomatically or prices in a catalog, and BioViz will generate aninteractive window showing a scatterplot, histogram, or other useful data graphic.
The Plot Window, the key to data visualization in BioViz, is ableto show two variables plotted against each other in a scatterplotwith each point representing a structure from the current hit list.If you, for example, modify the list by performing a search, theplot updates to show the new set of points. You can drag a rectan-gle around a set of points to select them or zoom in to see them more closely.
• BioSAR is a catalog driven mining and structure-activity analysis program
• BioSAR provides both form and table views withina simple and powerful web interface
• BioViz provides one-step in-depth analysis of several variables

US 1 800 315–7300 INT’L 1 617 588–9300 FAX 1 617 588–9390 EMAIL [email protected]
EU 00 800 875 20000 UK +44 1223 464900 JP 0120 146 700 WWW www.cambridgesoft.com
MAIL CambridgeSof t Corporat ion 100 CambridgePark Dr ive Cambridge, Massachuset ts 02140 USA
ChemOffice, ChemDraw, BioOffice, BioDraw & ChemBioFinder are trademarks of CambridgeSoft Corporation ©2009
C H E M I C A L
Inventory, Inventory, Registration,Registration,Chemical and Biological Inventory, FChemical and Biological Inventory, Freezer Management,reezer Management,
Chemicals and BiologicalsInventory is an application designed to manage the chemical andbiological reagent tracking needs of laboratories and research cen-ters in multiple contexts: lab reagents, freezers/racks, plate man-agement, proprietary compounds and stockroom are just some ofthe areas where Inventory has been deployed.
The system manages data associated with both commercially pro-cured and internally produced chemical substances from procure-ment or initial production through depletion and disposal.Inventory Enterprise is an Oracle-based ChemOffice Enterpriseproduct and can be used with other modules, such as E-Notebook,to track batch records in manufacturing, or to look up reagentsfrom stockroom when planning a synthesis, BioAssay when sup-porting a high throughput screening environment, Registration fortracking proprietary compounds, DocManager for linking certifi-cates of analyzes, analytical reports, or other documents associat-ed with samples, and ChemACX available chemicals database forsourcing new compounds.
Inventory Enterprise includes plate handling and interfaces to liquid handlers for HTS environments, freezer/rack layout andtargeting for managing biologicals, full chain of custody, audittrails for GxP compliance, request/disbursement workflow for usein both manufacturing and pre-clinical settings, and features tailored to specific material domains.
• Reagent handling and stockroom reporting• Request/disbursement workflow for stockroom and
GxP environments• EH&S module, and links for MSDS data sheets• Freezer/rack layout for biological materials• Extensive plate handling for HTS and uHTS settings
Inventory is also available in two other editions: Workgroup andDesktop. Inventory Workgroup is a rich-client SQL Server-basedproduct geared at managing stockrooms and reagents. InventoryUltra is a desktop edition based on the Workgroup product, andincludes the ChemACX database.
Registration EnterpriseRegistration Enterprise is built around robust data model for purecompounds, batches, salt management, automatic duplicatechecking and unique ID assignments. Built on the OracleCartridge, it handles stereochemistry (including advances in rela-tive stereochemistry), tautomerization and structure normaliza-tion for duplicate checking. Using ChemScript, it also can enforcedrawing business rules, such as orientation around a scaffold andfunctional group normalization. Compounds may be enteredindividually through a user-friendly web form, through the use ofa batch loader, from Inventory, or directly from E-Notebook.
As compounds are registered, regardless of whether through theweb user interface, E-Notebook, or from a batch file, they are com-pared for uniqueness via a configurable, stereoselective duplicatecheck, and assigned a registry number. All information about thecompound, including its test data and other syntheses, is trackedby the registry number, and this is used to link data throughoutChemOffice Enterprise. Registration Enterprise is the only true n-tiered application of its kind that is designed around thin clientsand thin servers, with interfaces directly to Inventory, batch fileregistration and E-Notebook. Oracle is supported on a variety of platforms and operating systems. Using Oracle secures your pro-prietary data through the use of Oracle’s role-based security andallows all chemical and non-chemical data to be stored directly inthe Oracle tables.
• Register and Track Chemicals & Biologicals throughout the enterprise
• Freezer/Rack/Plate Handling--Targeting, Workflow and HTS Support
• Supports Barcoding, Report Generation & Audit Trails
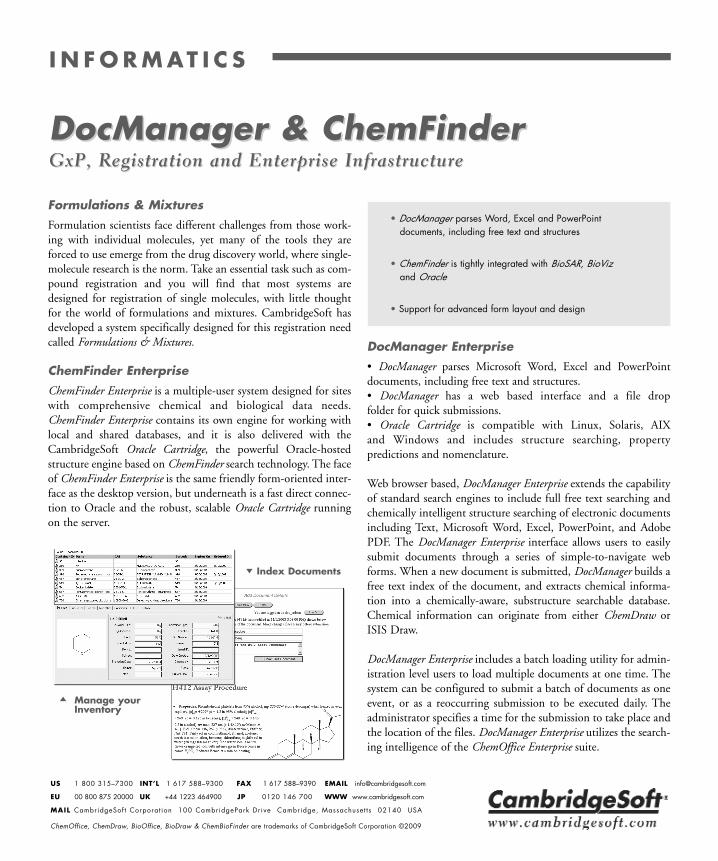
US 1 800 315–7300 INT’L 1 617 588–9300 FAX 1 617 588–9390 EMAIL [email protected]
EU 00 800 875 20000 UK +44 1223 464900 JP 0120 146 700 WWW www.cambridgesoft.com
MAIL CambridgeSof t Corporat ion 100 CambridgePark Dr ive Cambridge, Massachuset ts 02140 USA
ChemOffice, ChemDraw, BioOffice, BioDraw & ChemBioFinder are trademarks of CambridgeSoft Corporation ©2009
I N F O R M AT I C S
DocManager & ChemFinderDocManager & ChemFinderGxP, Registration and Enterprise InfrastructureGxP, Registration and Enterprise Infrastructure
Formulations & MixturesFormulation scientists face different challenges from those work-ing with individual molecules, yet many of the tools they areforced to use emerge from the drug discovery world, where single-molecule research is the norm. Take an essential task such as com-pound registration and you will find that most systems aredesigned for registration of single molecules, with little thoughtfor the world of formulations and mixtures. CambridgeSoft hasdeveloped a system specifically designed for this registration needcalled Formulations & Mixtures.
ChemFinder EnterpriseChemFinder Enterprise is a multiple-user system designed for siteswith comprehensive chemical and biological data needs.ChemFinder Enterprise contains its own engine for working withlocal and shared databases, and it is also delivered with theCambridgeSoft Oracle Cartridge, the powerful Oracle-hostedstructure engine based on ChemFinder search technology. The faceof ChemFinder Enterprise is the same friendly form-oriented inter-face as the desktop version, but underneath is a fast direct connec-tion to Oracle and the robust, scalable Oracle Cartridge runningon the server.
DocManager Enterprise• DocManager parses Microsoft Word, Excel and PowerPointdocuments, including free text and structures.• DocManager has a web based interface and a file dropfolder for quick submissions.• Oracle Cartridge is compatible with Linux, Solaris, AIX and Windows and includes structure searching, propertypredictions and nomenclature.
Web browser based, DocManager Enterprise extends the capabilityof standard search engines to include full free text searching andchemically intelligent structure searching of electronic documentsincluding Text, Microsoft Word, Excel, PowerPoint, and AdobePDF. The DocManager Enterprise interface allows users to easilysubmit documents through a series of simple-to-navigate webforms. When a new document is submitted, DocManager builds afree text index of the document, and extracts chemical informa-tion into a chemically-aware, substructure searchable database.Chemical information can originate from either ChemDraw orISIS Draw.
DocManager Enterprise includes a batch loading utility for admin-istration level users to load multiple documents at one time. Thesystem can be configured to submit a batch of documents as oneevent, or as a reoccurring submission to be executed daily. Theadministrator specifies a time for the submission to take place andthe location of the files. DocManager Enterprise utilizes the search-ing intelligence of the ChemOffice Enterprise suite.
Manage yourInventory
Index Documents
• DocManager parses Word, Excel and PowerPointdocuments, including free text and structures
• ChemFinder is tightly integrated with BioSAR, BioVizand Oracle
• Support for advanced form layout and design

US 1 800 315–7300 INT’L 1 617 588–9300 FAX 1 617 588–9390 EMAIL [email protected]
EU 00 800 875 20000 UK +44 1223 464900 JP 0120 146 700 WWW www.cambridgesoft.com
MAIL CambridgeSof t Corporat ion 100 CambridgePark Dr ive Cambridge, Massachuset ts 02140 USA
ChemOffice, ChemDraw, BioOffice, BioDraw & ChemBioFinder are trademarks of CambridgeSoft Corporation ©2009
M A N U FA C T U R I N G
Reference Standards,Reference Standards,Regulated Materials Management,Regulated Materials Management,
Inventory EnterpriseCambridgeSoft’s Inventory Enterprise application is designed tomanage the chemical, reagent, sample and compound trackingneeds of large multi-site chemical and pharmaceutical laboratories.Inventory Enterprise is an Oracle-based, ChemOffice Enterpriseproduct that is designed for multiple users with diverse containertypes, racks and multi-well plate formats.
Entities in the Inventory system include locations, containers andsubstances. A location is defined as any physical location where acontainer, plate or another location can be stored. An inventorycontainer represents a container capable of storing chemical sub-stances. An inventory substance represents a chemical compound,mixture, sample, etc. Inventory Enterprise manages an unlimitednumber of diverse locations, containers and substances.
Containers are created to represent the actual storage vessels usedby the organization. Each container is assigned a unique barcodeidentifier which can be printed, using customizable report tem-plates, from the Inventory interface. Updating the inventorybecomes as easy as scanning barcodes into the system and adjust-ing parameters for one or multiple containers. Users are able toorder, check-in/out, move, split and merge containers at will.Typicalcontainers include: ttles, vials, tubes, cylinders, boxes,racks, multi-well plates, etc.
Multi-well PlatesInventory Enterprise manages multi-well plate information. Inaddition to creating, storing, moving and deleting plates, theapplication allows users to create daughter plates, reformat platesand utilize plate maps. Inventory also supports user-interfaces ormachine-interfaces for these operations (including reading filesfrom liquid handler robots). Inventory Enterprise has the capabili-ty to import datafiles from other computer systems such as liquiddispensers/handlers, Microsoft Excel spreadsheets, etc. to accom-modate automated updating of information in the Inventory database.
SearchingEvery field in a record is searchable. The application includes anumber of specially designed inventory search forms. Searchresults are returned in list form and can be exported into a docu-ment (PDF, RTF, HTML) via the report engine.
Workflow SupportSupported user transactions include the ability to request, dispense, modify, duplicate, dispose, etc. entities throughout thesystem. These and other transactions are an integral part ofInventory workflows.
For example: a user logs-on, finds the substance(s) they’d like torequest and makes a request entry in the system; the request is ful-filled directly by changing the location the substance or by takingan aliquot and creating a new container of the substance. The newsubstance/container is also tracked in the system and inherits allof the critical properties of its parent container. If a quality con-trol test is run on the parent, then the results are viewable in the daughter’s properties.
The multi-select capability allows the user to select several con-tainers and perform a transaction on all of the selected containerssimultaneously, including check-in/out, move, retire, delete andupdate. For instance, if a request is made of the system that is fulfilled by another user (such as dispensing), the requester canautomatically receive e-mail notification of the progress. Likewise,users can be alerted to pending requests in the system.
• Request/Dispense/Reference Standard Materialsfrom Central Group to Sites
• Certification/Expiration/Certificate of Analysis of Containers and Aliquots
• Create/Manage Container History and Genealogy
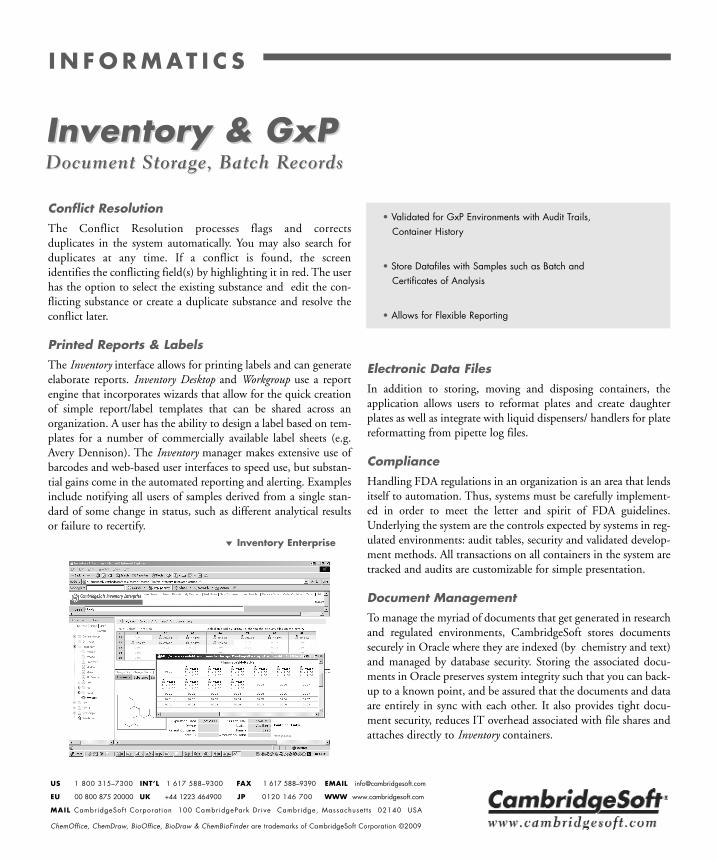
US 1 800 315–7300 INT’L 1 617 588–9300 FAX 1 617 588–9390 EMAIL [email protected]
EU 00 800 875 20000 UK +44 1223 464900 JP 0120 146 700 WWW www.cambridgesoft.com
MAIL CambridgeSof t Corporat ion 100 CambridgePark Dr ive Cambridge, Massachuset ts 02140 USA
ChemOffice, ChemDraw, BioOffice, BioDraw & ChemBioFinder are trademarks of CambridgeSoft Corporation ©2009
I N F O R M AT I C S
Inventory & GxPInventory & GxPDocument Storage, Batch RecordsDocument Storage, Batch Records
Conflict ResolutionThe Conflict Resolution processes flags and corrects duplicates in the system automatically. You may also search forduplicates at any time. If a conflict is found, the screen identifies the conflicting field(s) by highlighting it in red. The userhas the option to select the existing substance and edit the con-flicting substance or create a duplicate substance and resolve theconflict later.
Printed Reports & LabelsThe Inventory interface allows for printing labels and can generateelaborate reports. Inventory Desktop and Workgroup use a reportengine that incorporates wizards that allow for the quick creationof simple report/label templates that can be shared across anorganization. A user has the ability to design a label based on tem-plates for a number of commercially available label sheets (e.g.Avery Dennison). The Inventory manager makes extensive use ofbarcodes and web-based user interfaces to speed use, but substan-tial gains come in the automated reporting and alerting. Examplesinclude notifying all users of samples derived from a single stan-dard of some change in status, such as different analytical resultsor failure to recertify.
Electronic Data FilesIn addition to storing, moving and disposing containers, theapplication allows users to reformat plates and create daughterplates as well as integrate with liquid dispensers/ handlers for platereformatting from pipette log files.
ComplianceHandling FDA regulations in an organization is an area that lendsitself to automation. Thus, systems must be carefully implement-ed in order to meet the letter and spirit of FDA guidelines.Underlying the system are the controls expected by systems in reg-ulated environments: audit tables, security and validated develop-ment methods. All transactions on all containers in the system aretracked and audits are customizable for simple presentation.
Document ManagementTo manage the myriad of documents that get generated in researchand regulated environments, CambridgeSoft stores documentssecurely in Oracle where they are indexed (by chemistry and text)and managed by database security. Storing the associated docu-ments in Oracle preserves system integrity such that you can back-up to a known point, and be assured that the documents and dataare entirely in sync with each other. It also provides tight docu-ment security, reduces IT overhead associated with file shares andattaches directly to Inventory containers.
Inventory Enterprise
• Validated for GxP Environments with Audit Trails, Container History
• Store Datafiles with Samples such as Batch andCertificates of Analysis
• Allows for Flexible Reporting

US 1 800 315–7300 INT’L 1 617 588–9300 FAX 1 617 588–9390 EMAIL [email protected]
EU 00 800 875 20000 UK +44 1223 464900 JP 0120 146 700 WWW www.cambridgesoft.com
MAIL CambridgeSof t Corporat ion 100 CambridgePark Dr ive Cambridge, Massachuset ts 02140 USA
ChemOffice, ChemDraw, BioOffice, BioDraw & ChemBioFinder are trademarks of CambridgeSoft Corporation ©2009
D E S K T O P

US 1 800 315–7300 INT’L 1 617 588–9300 FAX 1 617 588–9390 EMAIL [email protected]
EU 00 800 875 20000 UK +44 1223 464900 JP 0120 146 700 WWW www.cambridgesoft.com
MAIL CambridgeSof t Corporat ion 100 CambridgePark Dr ive Cambridge, Massachuset ts 02140 USA
ChemOffice, ChemDraw, BioOffice, BioDraw & ChemBioFinder are trademarks of CambridgeSoft Corporation ©2009
S O F T WA R E
Chem & Bio OfficeChem & Bio OfficeSoftware Standard for ScientistsSoftware Standard for Scientists
Chem & Bio Office is a powerful suite of software, consisting of ChemDraw, Chem3D, ChemFinder and ChemACXfor chemists, BioDraw, BioAssay and BioViz for biologists and Inventory and E-Notebook for all types of scientists. Chem &Bio Office is available for Microsoft Windows.
Chem & Bio Draw includes Struct=Name, ChemDraw/Excel and ChemNMR, BioDraw, a biological sequence tool,hotlinks to 3D structures, Stoichiometry grid, live linked chemical property calculations, a TLC plate tool and more. TheChemDraw ActiveX/Plugin adds chemical intelligence to your browser for querying databases and displaying information.
ChemBio3D provides state-of-the art visualization and display of protein structures, molecular surfaces, molecularorbitals, electrostatic potentials, charge densities and spin densities. Chem3D provides basic computational tools such as 3DMolecular Overlay and Dihedral Driver and utilizes MOPAC, Jaguar, Gaussian, GAMESS and extended Hückel to com-pute molecular properties. ChemProp computes Connolly surface areas, molecular volumes and properties, including ClogP,molar refractivity, critical temperature and pressure.
ChemFinder is a chemically intelligent database manager and search engine. ChemFinder provides support for a databasesearching, compound profiling, R-Group Analysis, subforms, tight integration with ChemDraw/Excel and Combichem/Excel,statistical analysis and visualization through BioViz all in a friendly form-based environment. ChemFinder/Office searchesdocuments, spreadsheets, and files for chemical structures and references. ChemFinder/Oracle provides enterprise solutionintegration.
BioOffice is the ultimate suite for management, analysis and visualization of biological data using BioDraw for drawingpathways and BioAssay, BioFinder and BioViz for data analysis. Includes Bio3D, Draw/Excel, CombiChem/Excel, Inventory andE-Notebook.
BioDraw provides support for biological pathway drawing and annotation. A wide variety of customizable drawing toolsare available, including membranes, DNA, enzymes, receptors, tRNA, ribosomes, and a plasmid map tool.
BioAssay manages both high and low throughput biological screening data. Designed for complex lead optimizationexperiments, the software supports the quick set-up of biological models.
BioViz offers automated statistical analysis, curve fitting, and customized structure activity reports, including a user-friendlyinterface for importing, viewing, validating and plotting chemical and biological data.
Inventory manages your reagent and biological tracking needs. Using MSDE as the desktop database, you organize, storeand search over your inventory. Inventory integrates with the ChemACX database of available chemicals and ChemMSDXsafety data providing chemical sourcing and purchasing.
E-Notebook is an efficient, accurate way to write notebooks. It stores Microsoft Office documents, ChemDraw structures and reaction drawings, and related data in a notebook searchable by text or chemical structure. Organize pages by project, experiment or in your own style. Use CombiChem/Excel to build libraries.
Databases include ChemINDEX, including the NCI and AIDS databases. The ChemACX database contains nearly 400catalogs from leading suppliers and ChemMSDX Database contains over 20,000 material safety data sheets for commonlyused laboratory chemicals.
The standardachieves the
ultimate
Computationalchemistry made easy
Screening data
The ultimatesoftware suite
for scientists
Handle reagentracking
Efficient notebook keeping
Access info with ease
Draw pathways
Visualize data
Desktop to enterprise searching
Ultimate suite for biologists
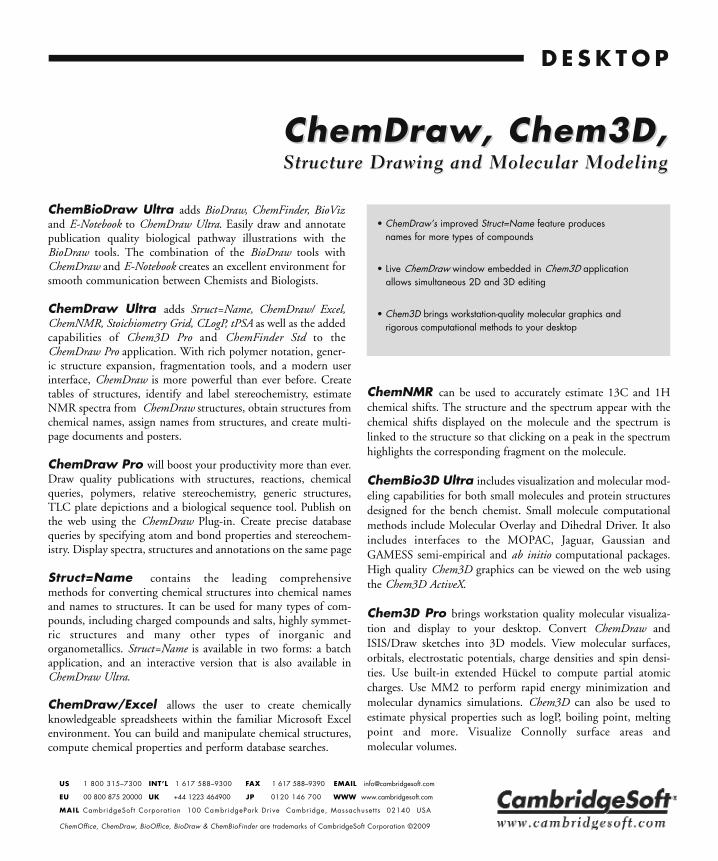
US 1 800 315–7300 INT’L 1 617 588–9300 FAX 1 617 588–9390 EMAIL [email protected]
EU 00 800 875 20000 UK +44 1223 464900 JP 0120 146 700 WWW www.cambridgesoft.com
MAIL CambridgeSof t Corporat ion 100 CambridgePark Dr ive Cambridge, Massachuset ts 02140 USA
ChemOffice, ChemDraw, BioOffice, BioDraw & ChemBioFinder are trademarks of CambridgeSoft Corporation ©2009
ChemDraw, Chem3D,ChemDraw, Chem3D,Structure Drawing and Molecular Modeling Structure Drawing and Molecular Modeling
ChemBioDraw Ultra adds BioDraw, ChemFinder, BioVizand E-Notebook to ChemDraw Ultra. Easily draw and annotatepublication quality biological pathway illustrations with theBioDraw tools. The combination of the BioDraw tools withChemDraw and E-Notebook creates an excellent environment forsmooth communication between Chemists and Biologists.
ChemDraw Ultra adds Struct=Name, ChemDraw/ Excel,ChemNMR, Stoichiometry Grid, CLogP, tPSA as well as the addedcapabilities of Chem3D Pro and ChemFinder Std to theChemDraw Pro application. With rich polymer notation, gener-ic structure expansion, fragmentation tools, and a modern userinterface, ChemDraw is more powerful than ever before. Createtables of structures, identify and label stereochemistry, estimateNMR spectra from ChemDraw structures, obtain structures fromchemical names, assign names from structures, and create multi-page documents and posters.
ChemDraw Pro will boost your productivity more than ever.Draw quality publications with structures, reactions, chemicalqueries, polymers, relative stereochemistry, generic structures,TLC plate depictions and a biological sequence tool. Publish onthe web using the ChemDraw Plug-in. Create precise databasequeries by specifying atom and bond properties and stereochem-istry. Display spectra, structures and annotations on the same page
Struct=Name contains the leading comprehensive methods for converting chemical structures into chemical namesand names to structures. It can be used for many types of com-pounds, including charged compounds and salts, highly symmet-ric structures and many other types of inorganic andorganometallics. Struct=Name is available in two forms: a batchapplication, and an interactive version that is also available inChemDraw Ultra.
ChemDraw/Excel allows the user to create chemicallyknowledgeable spreadsheets within the familiar Microsoft Excelenvironment. You can build and manipulate chemical structures,compute chemical properties and perform database searches.
ChemNMR can be used to accurately estimate 13C and 1Hchemical shifts. The structure and the spectrum appear with thechemical shifts displayed on the molecule and the spectrum islinked to the structure so that clicking on a peak in the spectrumhighlights the corresponding fragment on the molecule.
ChemBio3D Ultra includes visualization and molecular mod-eling capabilities for both small molecules and protein structuresdesigned for the bench chemist. Small molecule computationalmethods include Molecular Overlay and Dihedral Driver. It alsoincludes interfaces to the MOPAC, Jaguar, Gaussian andGAMESS semi-empirical and ab initio computational packages.High quality Chem3D graphics can be viewed on the web usingthe Chem3D ActiveX.
Chem3D Pro brings workstation quality molecular visualiza-tion and display to your desktop. Convert ChemDraw andISIS/Draw sketches into 3D models. View molecular surfaces,orbitals, electrostatic potentials, charge densities and spin densi-ties. Use built-in extended Hückel to compute partial atomiccharges. Use MM2 to perform rapid energy minimization andmolecular dynamics simulations. Chem3D can also be used to estimate physical properties such as logP, boiling point, meltingpoint and more. Visualize Connolly surface areas and molecular volumes.
• ChemDraw’s improved Struct=Name feature producesnames for more types of compounds
• Live ChemDraw window embedded in Chem3D applicationallows simultaneous 2D and 3D editing
• Chem3D brings workstation-quality molecular graphics andrigorous computational methods to your desktop
D E S K T O P

US 1 800 315–7300 INT’L 1 617 588–9300 FAX 1 617 588–9390 EMAIL [email protected]
EU 00 800 875 20000 UK +44 1223 464900 JP 0120 146 700 WWW www.cambridgesoft.com
MAIL CambridgeSof t Corporat ion 100 CambridgePark Dr ive Cambridge, Massachuset ts 02140 USA
ChemOffice, ChemDraw, BioOffice, BioDraw & ChemBioFinder are trademarks of CambridgeSoft Corporation ©2009
ChemFinder & ChemInfoChemFinder & ChemInfoStructure Searching and Scientific DatabasesStructure Searching and Scientific Databases
ChemFinder Ultra is a chemically intelligent database man-agement and search system designed for chemical and biologicaldata. ChemFinder Ultra can be used with local (MSDE) or shared(Oracle) databases. Either way, the face of ChemFinder is thesame friendly form-oriented interface. BioViz, included inChemFinder Ultra, provides data visualization features to helpthe user understand relationships between biological data andchemical structures. These features allow you to plot structuraland biological data in a variety of styles, perform statistical analy-sis, filter plots based on your criteria, highlight intersecting sets onplots, generate histograms of data distributions, and more.
BioViz, included in ChemFinder Ultra, provides statistical analysisand visualization tools for structural and biological data. BioViztransforms ChemFinder database information into easy to under-stand graphics, allowing users to discern structure-activity rela-tionships more easily. With BioViz it is easy to retrieve a set ofcompounds using filters or searching capabilities; and generate aninteractive window showing a wide variety of useful graphicalinformation.
ChemFinder Pro is a fast, chemically intelligent, relationaldatabase search engine for the Desktop. The integration withMicrosoft Excel and Word adds chemical searching and databasecapability to spreadsheets and documents. Compatibility withMDL ISIS databases is provided by SDfile and RDfileimport/export.
ChemACX Database includes over 1 million chemicalproducts available for purchase from 472 supplier catalogs, search-able with a single query by structure, substructure, name, syonym,partial name, and other text and numeric criteria.
ChemMSDX Database provides material safety datasheetsand is integrated into ChemACX, and contains over 23,000Material Safety Data Sheets (MSDS) in PDF format.
ChemINDEX Database includes 100,000 chemicals, publicNCI compounds, AIDS data and more.
NCI Database contains over 200,000 compounds with anti-cancer drug dose-response data.
AIDS Database is an NCI compiled database for AIDS anti-viral compounds.
ChemRXN Database is a collection of 30,000 fully atom-mapped reactions selected and refined from chemical literature. Italso includes reactions from InfoChem’s ChemSelect database andISI’s ChemPrep database.
ChemBioFinder.Com is the award-winning web site with-in formation and WWW links for over 100,000 chemicals. Users can search by name or partial name, view struc-ture drawings, or use the ChemDraw ActiveX/Plugin for structureand substructure searches.
Estimate Spectra
Molecular Modeling
• ChemFinder offers improved searching and hit list management,along with new property generation
• ChemFinder is tightly integrated with CambridgeSoft's Oracle Cartridge
• Search ChemACX and other CambridgeSoft
S O F T WA R E

US 1 800 315–7300 INT’L 1 617 588–9300 FAX 1 617 588–9390 EMAIL [email protected]
EU 00 800 875 20000 UK +44 1223 464900 JP 0120 146 700 WWW www.cambridgesoft.com
MAIL CambridgeSof t Corporat ion 100 CambridgePark Dr ive Cambridge, Massachuset ts 02140 USA
ChemOffice, ChemDraw, BioOffice, BioDraw & ChemBioFinder are trademarks of CambridgeSoft Corporation ©2009
D E S K T O P
BioAssay, BioViz, BioDraw,BioAssay, BioViz, BioDraw,Biological Assay, VBiological Assay, Visualization and Pisualization and Pathwaysathways
BioAssay UltraBioAssay Ultra, the cornerstone of BioOffice, provides flexiblestorge, retrieval and analysis of biological data. BioAssayeasily manages both high and low throughput biological screeningdata.
Designed for complex lead optimization experiments, the soft-ware supports quick set-up of biological protocols, automatedcalculations and curve fitting, and the creation of customizedstructure activity reports. BioAssay brings all of this functionalityto your desktop. BioAssay Ultra, compatible with the MSDEdatabase, offers a user-friendly interface for importing, viewing,validating and plotting your biological assay data.
BioVizCombining biological data with chemical structures is of theutmost importance in any drug discovery environment. BioVizallows you to visually analyze and perform statistical analysis onstructure-related data combined with biological data inChemFinder.
Users can search over structural and biological data and construct various plots such as scatterplots or histograms. Theplots are interactive; allowing you to select subsets of your data,perform statistical analysis, filter plots based on your criteria,highlight lists and intersecting sets on plots, generate histogramsof data distributions and more.
BioDrawReporting on and presenting findings is a task familiar to everybiologist. Making this process easier and more effective benefitseveryone involved. BioDraw is doing for biologists whatChemDraw has done for chemists for years—saving time, andresulting in a more professional representation of the science.BioDraw makes drawing and annotating biological pathwaysquick and easy, adding a level of uniformity and detail which isunmatched. Typical drawings of biological pathways include
many elements that are difficult to draw with the standard presen-tation and word processing software. Common pathway elementssuch as membranes, enzymes, receptors, DNA, tRNA and plas-mid maps are built into the BioDraw toolbar. BioDraw is builtinto the same backbone as ChemDraw, allowing users to takeadvantage of the wide variety of the publishing capabilities avail-able in ChemDraw such as the ability to import and export imagesin GIF, PNG or JPEG formats. In addition, the integration ofChemDraw and BioDraw in Chem & Bio Draw application pro-vides a great communication mechanism between chemists andbiologists.
Data Visualization
Notebook Pages
• BioAssay offers flexible storage, retrieval and analysis of biological data
• BioViz provides statistical analysis and graphical representationsof the data loaded into a ChemFinder form
• BioDraw allows for quick and easy drawing and annotationof biological pathway depictions.
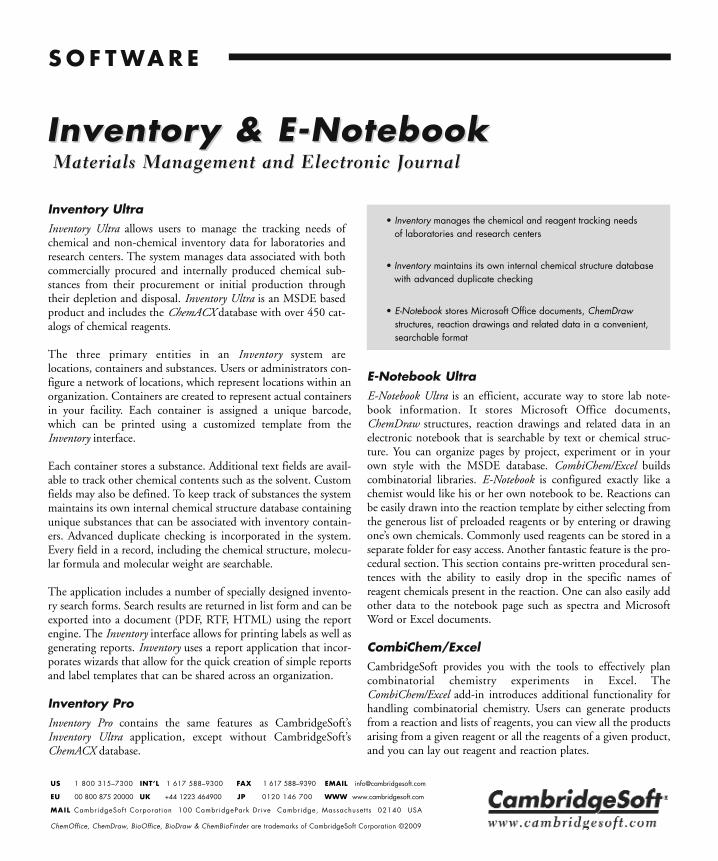
US 1 800 315–7300 INT’L 1 617 588–9300 FAX 1 617 588–9390 EMAIL [email protected]
EU 00 800 875 20000 UK +44 1223 464900 JP 0120 146 700 WWW www.cambridgesoft.com
MAIL CambridgeSof t Corporat ion 100 CambridgePark Dr ive Cambridge, Massachuset ts 02140 USA
ChemOffice, ChemDraw, BioOffice, BioDraw & ChemBioFinder are trademarks of CambridgeSoft Corporation ©2009
S O F T WA R E
Inventory & E-NotebookInventory & E-NotebookMaterials Management and Electronic JMaterials Management and Electronic Journalournal
Inventory UltraInventory Ultra allows users to manage the tracking needs ofchemical and non-chemical inventory data for laboratories andresearch centers. The system manages data associated with bothcommercially procured and internally produced chemical sub-stances from their procurement or initial production throughtheir depletion and disposal. Inventory Ultra is an MSDE basedproduct and includes the ChemACX database with over 450 cat-alogs of chemical reagents.
The three primary entities in an Inventory system are locations, containers and substances. Users or administrators con-figure a network of locations, which represent locations within anorganization. Containers are created to represent actual containersin your facility. Each container is assigned a unique barcode,which can be printed using a customized template from theInventory interface.
Each container stores a substance. Additional text fields are avail-able to track other chemical contents such as the solvent. Customfields may also be defined. To keep track of substances the systemmaintains its own internal chemical structure database containingunique substances that can be associated with inventory contain-ers. Advanced duplicate checking is incorporated in the system.Every field in a record, including the chemical structure, molecu-lar formula and molecular weight are searchable.
The application includes a number of specially designed invento-ry search forms. Search results are returned in list form and can beexported into a document (PDF, RTF, HTML) using the reportengine. The Inventory interface allows for printing labels as well asgenerating reports. Inventory uses a report application that incor-porates wizards that allow for the quick creation of simple reportsand label templates that can be shared across an organization.
Inventory ProInventory Pro contains the same features as CambridgeSoft’sInventory Ultra application, except without CambridgeSoft’sChemACX database.
E-Notebook UltraE-Notebook Ultra is an efficient, accurate way to store lab note-book information. It stores Microsoft Office documents,ChemDraw structures, reaction drawings and related data in anelectronic notebook that is searchable by text or chemical struc-ture. You can organize pages by project, experiment or in yourown style with the MSDE database. CombiChem/Excel buildscombinatorial libraries. E-Notebook is configured exactly like achemist would like his or her own notebook to be. Reactions canbe easily drawn into the reaction template by either selecting fromthe generous list of preloaded reagents or by entering or drawingone’s own chemicals. Commonly used reagents can be stored in a separate folder for easy access. Another fantastic feature is the pro-cedural section. This section contains pre-written procedural sen-tences with the ability to easily drop in the specific names ofreagent chemicals present in the reaction. One can also easily addother data to the notebook page such as spectra and MicrosoftWord or Excel documents.
CombiChem/ExcelCambridgeSoft provides you with the tools to effectively plancombinatorial chemistry experiments in Excel. TheCombiChem/Excel add-in introduces additional functionality forhandling combinatorial chemistry. Users can generate productsfrom a reaction and lists of reagents, you can view all the productsarising from a given reagent or all the reagents of a given product,and you can lay out reagent and reaction plates.
• Inventory manages the chemical and reagent tracking needsof laboratories and research centers
• Inventory maintains its own internal chemical structure databasewith advanced duplicate checking
• E-Notebook stores Microsoft Office documents, ChemDrawstructures, reaction drawings and related data in a convenient,searchable format

US 1 800 315–7300 INT’L 1 617 588–9300 FAX 1 617 588–9390 EMAIL [email protected]
EU 00 800 875 20000 UK +44 1223 464900 JP 0120 146 700 WWW www.cambridgesoft.com
MAIL CambridgeSof t Corporat ion 100 CambridgePark Dr ive Cambridge, Massachuset ts 02140 USA
ChemOffice, ChemDraw, BioOffice, BioDraw & ChemBioFinder are trademarks of CambridgeSoft Corporation ©2009
S C I E N T I F I C
The Merck Index, NCI, AIDS,The Merck Index, NCI, AIDS,Scientific Reference, Chemical Reactions and PScientific Reference, Chemical Reactions and Patentsatents
ChemBioFinder GatewayChemBioFinder Gateway allows searching of the completeCambridgeSoft reference collection of databases with a single query. Search such databases as The Merck Index, R&DInsight for Chemists and Traditional Chinese Medicines with onlyone click of a search button. All results federate back to the spe-cific databases for complete information.
The Merck IndexKnown for its integrity, detail, and longevity, The Merck Indexcontains over 10,000 monographs on drugs, chemicals and otherbiologically active molecules. Each monograph contains informa-tion on the compound and its derivatives; common, trade, andsystematic names; trademarks and associated companies; CASRegistry Numbers, physical and toxicity data, therapeutic andcommercial uses, literature citations, as well as chemical strucures,formulas andmolecular weights. The electronic versions includearchived monographs from previous editions and is updated twice a year.
R&D Insight/ChemistsInformation on current drug products under development isessential for those working in research and development, licensingand marketing at pharmaceutical and healthcare institutions.R&D Insight for Chemists, a collaborative product from WoltersKluwer Health and CambridgeSoft, combines the power of chem-ical structure searching with a wealth of drug development data togive subscribers a competitive edge when making decisions rele-vant to the direction of their research. Updated weekly, users cansearch the collection of over 20,000 compounds by structure, substructure, names, partial names and synonyms.
Patent DatabaseResearchers, chemists and patent analysts are now able to easilysearch full text patents for chemical structures usingCambridgeSoft's powerful search and analysis tools. The newCambridgeSoft Patent Database portal, co-developed byCambridgeSoft and Reel Two, will give users access to all thechemical compounds named in a patent, and enable them tosearch by structure, keyword or chemical name.
Traditional Chinese MedicinesAccess to this wealth of knowledge is now available with theTraditional Chinese Medicines database. The database consists ofmonographs for 10,458 chemicals isolated from 4,625 naturalsources used in traditional Chinese remedies. The monographsfeature bio-activity data for many of the compounds, effects andindications of the medicines, English, Latin, and Chinese namesfor the natural sources, and over 2,000 references.
ChemINDEX, NCI AIDS & CancerScientists have used the award-winning ChemFinder.Com databasesince 1995. Now, the data on ChemFinder.Com is integrated intoChemOffice as ChemINDEX. ChemINDEX contains data fromover 75,000 compounds including structures, names and synonyms, physical properties and Internet links. Additionally,three informative databases have been integrated into one power-ful application with the NCI and AIDS database, a collection ofover 200,000 molecules studied by the National Cancer Institute.
ChemReact and ChemSynth These reaction database collections from InfoChem GmbH com-prising essential information on chemical reactions published inthe literature between 1974 and 2001. The largest isChemReact500, with almost 500,000 reactions selected with aneye toward synthetic utility. ChemSynth is a subset of the reac-tions found in ChemReact500 chosen because they have greaterthan 50% yield and have been sited in leading journals more thanonce. ChemReact68 has 68,000 reactions that have greater than50% yield and have appeared in more than five example reactions.
• The Merck Index offers encyclopedic reference for over 10,000chemicals, drugs and biological agents
• R&D Insight for Chemists has information on more than 20,000drug products in various stages of development world-widefrom over 1,700 sources.
• All databases are updated, contain information unavailable inprint, and are searchable by structure, as well as text and numeric range by structure, as well as text and numeric range

US 1 800 315–7300 INT’L 1 617 588–9300 FAX 1 617 588–9390 EMAIL [email protected]
EU 00 800 875 20000 UK +44 1223 464900 JP 0120 146 700 WWW www.cambridgesoft.com
MAIL CambridgeSof t Corporat ion 100 CambridgePark Dr ive Cambridge, Massachuset ts 02140 USA
ChemOffice, ChemDraw, BioOffice, BioDraw & ChemBioFinder are trademarks of CambridgeSoft Corporation ©2009
D ATA B A S E S
ChemACX & Sigma-Aldrich MSDSChemACX & Sigma-Aldrich MSDSAAvailable Chemicals and Material Safety Data Sheetsvailable Chemicals and Material Safety Data Sheets
ChemACX DatabaseSifting through chemical catalogs is a poor use of time for anyresearcher. ChemACX database solves this problem by offering acomplete tool for research chemical sourcing and purchasing.With an emphasis on up-to-date information of high quality,ChemACX allows you to purchase chemicals fast, efficiently andwithout worry or cumbersome paper catalogs. The database canbe accessed from both desktop and enterprise environments andboasts nearly 500 catalogs from major suppliers, from Alfa Aesarand Aldrich, to TCI and Zeneca, with hundreds in between.
Sigma-Aldrich MSDSEnvironmental, Heath and Safety (EH&S) is an important com-ponent of today’s research institutions. A key document that aidsin the management of EH&S tasks is the Material Safety DataSheet, also commonly referred to as MSDS. In every organization,there are several groups of personnel who require access toMSDSs. Everyone who comes into contact with chemicals needs
to be aware of their proper handling, storage, disposal and emer-gency procedures. Helping to fulfill these diverse needs is theSigma-Aldrich MSDS collection. The database contains over130,000 MSDSs for the products of the Sigma-Aldrich family ofcatalogs (Sigma, Aldrich, Fluka, Supelco, Riedel-de Haën) inHTML format. With a click of a hyperlink, users will be able toview the Sigma-Aldrich MSDS in their preferred browser. Thisinformation is smoothly integrated with the ChemACXdatabase and other enterprise applications.
Drugs: Synonyms and PropertiesDrugs: Synonyms and Properties from Ashgate, provides compre-hensive coverage of the 8,000 drugs currently in common useworldwide. A key component of this reference is the extensive cov-erage given to synonyms. The electronic version adds almost70,000 synonyms and trade names that did not fit into the printversion. This information is also available as an SD file to facilitate in silico research.
Nanogen IndexThe Nanogen Index contains data on over 1,000 pesticides andother environmental contaminants. The database is the up-to-dateand authoritative source for information on all pesticides and agri-cultural chemicals in world wide use, those which are currentlyunder development in R&D pipelines, and compounds whichwere once marketed or reached a development status. Data fieldsinclude chemical structures and SMILES strings, names (CAS,IUPAC, trade), the various registration codes assigned to the com-pounds (RTECS, EINECS/ELINCS, CAS, US EPA, CA DPR,Tarrifs, etc.), Hazard and Safety codes, the developing companyand use.
• ChemACX is fully structure searchable with more than 1 million products from nearly 500 catalogs
• ChemACX and the Sigma-Aldrich MSDS are updated semi-annually to meet the needs of scientists
• Search by name, synonym, partial name, formula, and other criteria
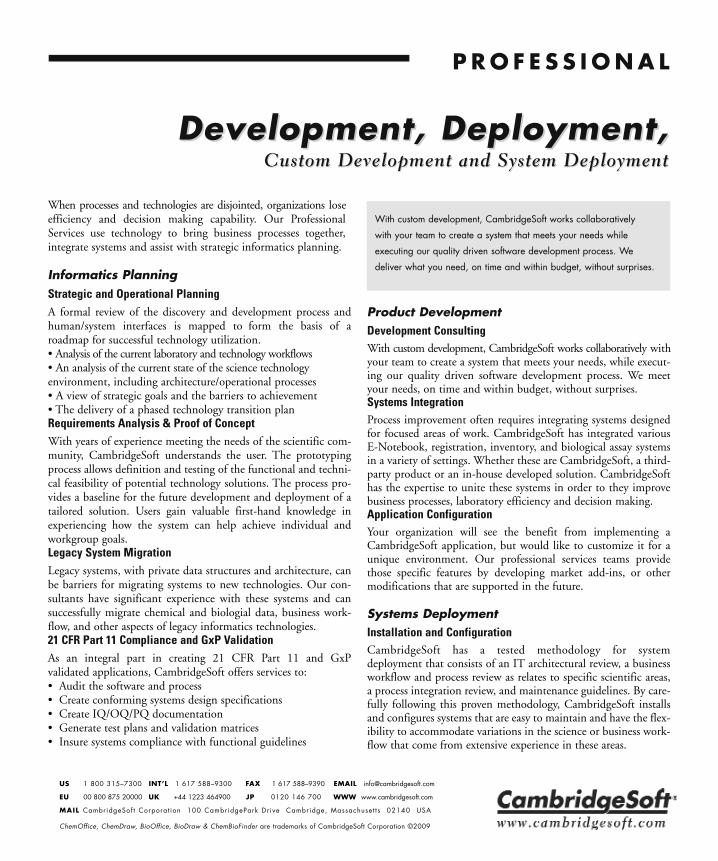
US 1 800 315–7300 INT’L 1 617 588–9300 FAX 1 617 588–9390 EMAIL [email protected]
EU 00 800 875 20000 UK +44 1223 464900 JP 0120 146 700 WWW www.cambridgesoft.com
MAIL CambridgeSof t Corporat ion 100 CambridgePark Dr ive Cambridge, Massachuset ts 02140 USA
ChemOffice, ChemDraw, BioOffice, BioDraw & ChemBioFinder are trademarks of CambridgeSoft Corporation ©2009
P R O F E S S I O N A L
Development, Deployment, Development, Deployment, Custom Development and System DeploymentCustom Development and System Deployment
When processes and technologies are disjointed, organizations loseefficiency and decision making capability. Our ProfessionalServices use technology to bring business processes together,integrate systems and assist with strategic informatics planning.
Informatics Planning Strategic and Operational PlanningA formal review of the discovery and development process andhuman/system interfaces is mapped to form the basis of aroadmap for successful technology utilization. • Analysis of the current laboratory and technology workflows• An analysis of the current state of the science technology environment, including architecture/operational processes• A view of strategic goals and the barriers to achievement• The delivery of a phased technology transition planRequirements Analysis & Proof of ConceptWith years of experience meeting the needs of the scientific com-munity, CambridgeSoft understands the user. The prototypingprocess allows definition and testing of the functional and techni-cal feasibility of potential technology solutions. The process pro-vides a baseline for the future development and deployment of atailored solution. Users gain valuable first-hand knowledge inexperiencing how the system can help achieve individual andworkgroup goals. Legacy System MigrationLegacy systems, with private data structures and architecture, canbe barriers for migrating systems to new technologies. Our con-sultants have significant experience with these systems and cansuccessfully migrate chemical and biologial data, business work-flow, and other aspects of legacy informatics technologies. 21 CFR Part 11 Compliance and GxP ValidationAs an integral part in creating 21 CFR Part 11 and GxP validated applications, CambridgeSoft offers services to:• Audit the software and process• Create conforming systems design specifications• Create IQ/OQ/PQ documentation• Generate test plans and validation matrices• Insure systems compliance with functional guidelines
Product DevelopmentDevelopment ConsultingWith custom development, CambridgeSoft works collaboratively withyour team to create a system that meets your needs, while execut-ing our quality driven software development process. We meetyour needs, on time and within budget, without surprises.Systems IntegrationProcess improvement often requires integrating systems designedfor focused areas of work. CambridgeSoft has integrated variousE-Notebook, registration, inventory, and biological assay systemsin a variety of settings. Whether these are CambridgeSoft, a third-party product or an in-house developed solution. CambridgeSofthas the expertise to unite these systems in order to they improvebusiness processes, laboratory efficiency and decision making.Application ConfigurationYour organization will see the benefit from implementing aCambridgeSoft application, but would like to customize it for aunique environment. Our professional services teams providethose specific features by developing market add-ins, or othermodifications that are supported in the future.
Systems DeploymentInstallation and ConfigurationCambridgeSoft has a tested methodology for system deployment that consists of an IT architectural review, a businessworkflow and process review as relates to specific scientific areas,a process integration review, and maintenance guidelines. By care-fully following this proven methodology, CambridgeSoft installsand configures systems that are easy to maintain and have the flex-ibility to accommodate variations in the science or business work-flow that come from extensive experience in these areas.
With custom development, CambridgeSoft works collaborativelywith your team to create a system that meets your needs whileexecuting our quality driven software development process. Wedeliver what you need, on time and within budget, without surprises.

US 1 800 315–7300 INT’L 1 617 588–9300 FAX 1 617 588–9390 EMAIL [email protected]
EU 00 800 875 20000 UK +44 1223 464900 JP 0120 146 700 WWW www.cambridgesoft.com
MAIL CambridgeSof t Corporat ion 100 CambridgePark Dr ive Cambridge, Massachuset ts 02140 USA
ChemOffice, ChemDraw, BioOffice, BioDraw & ChemBioFinder are trademarks of CambridgeSoft Corporation ©2009
S E R V I C E S
Training & SupportTraining & SupportEducational TEducational Training and Training and Technical Supportechnical Support
Systems OptimizationCambridgeSoft’s systems deployment team will work with you tomake sure that your computing environment has been optimizedfor high performance. Your systems,networks, applications anddatabases are assessed and designed to deliver maximum achieve-ment.Beta and Pre-Release ProgramsCommitted to maximizing your productivity through the use ofour products, as well as exposing you to the newest technologies,our beta and pre-release programs provide you with first-handproduct knowledge and allows CambridgeSoft to improve appli-cations with your feedback.Pilot Software EvaluationsIt makes sense to pilot an application before a major commitmentto an enterprise-wide implementation is made. CambridgeSoftwill work closely with you to plan the evaluation, deploy theapplication, and gather feedback regarding systems design, API’sand technology specifications.TrainingEffective user, administrator and help desk training is often anafterthought in many systems deployments. However, the produc-tivity returns generated by an investment in systems training canbe dramatic. CambridgeSoft offers a complete array of powerful,user-focused training services.
Systems ManagementManaged InformaticsInformatics outsourcing provides the people, processes and tech-nology to develop a unique level of service for your organization.For a monthly fee, CambridgeSoft will deliver the informaticsapplications and the technology staff required to maximize pro-ductivity. This service allows your organization to focus on sci-ence, while CambridgeSoft plans, implements and manages yourtechnology environment.Systems HostingA hosting service that allows customers to use our state-of-the-artenterprise applications over the extranet from any location 24hours a day, seven days a week is available. With this hosting serv-ice, our customers can shift the responsibilities of application devel-opment and IT infrastructure management to CambridgeSoft,allowing more time to focus on core science, research, discoveryand development functions.Ultra ServicesThe Ultra Services program is CambridgeSoft’s personalized, pre-mium service for supporting our customers. Organizations cantake advantage of both telephone and electronic access toCambridgeSoft’s support scientists who can address:• Usage and installation questions• Product compatibility and interoperability questions• Diagnostic review to help isolate the cause of a problem• Configuration assistance• Planning information for software updates and upgrades• Assistance with problem resolution
Technical Support & Remote DBA ServicesTechnical Support and Remote DBA Services for Oracle and SQLServer are also available.
Managed Informatics allows your organization to focus on science,while CambridgeSoft plans, implements and manages your technology environment.
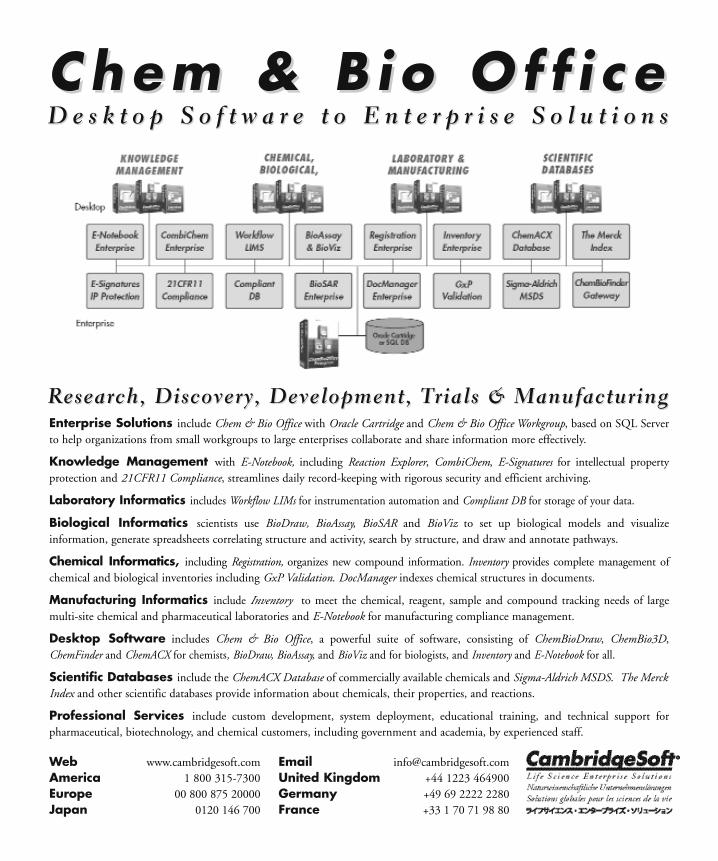
Chem & B io O f f i c eChem & B io O f f i c eD e s k t o p S o f t w a r e t o E n t e r p r i s e S o l u t i o n sD e s k t o p S o f t w a r e t o E n t e r p r i s e S o l u t i o n s
Enterprise Solutions include Chem & Bio Office with Oracle Cartridge and Chem & Bio Office Workgroup, based on SQL Serverto help organizations from small workgroups to large enterprises collaborate and share information more effectively.
Knowledge Management with E-Notebook, including Reaction Explorer, CombiChem, E-Signatures for intellectual property protection and 21CFR11 Compliance, streamlines daily record-keeping with rigorous security and efficient archiving.
Laboratory Informatics includes Workflow LIMs for instrumentation automation and Compliant DB for storage of your data.
Biological Informatics scientists use BioDraw, BioAssay, BioSAR and BioViz to set up biological models and visualize information, generate spreadsheets correlating structure and activity, search by structure, and draw and annotate pathways.
Chemical Informatics, including Registration, organizes new compound information. Inventory provides complete management ofchemical and biological inventories including GxP Validation. DocManager indexes chemical structures in documents.
Manufacturing Informatics include Inventory to meet the chemical, reagent, sample and compound tracking needs of largemulti-site chemical and pharmaceutical laboratories and E-Notebook for manufacturing compliance management.
Desktop Software includes Chem & Bio Office, a powerful suite of software, consisting of ChemBioDraw, ChemBio3D,ChemFinder and ChemACX for chemists, BioDraw, BioAssay, and BioViz and for biologists, and Inventory and E-Notebook for all.
Scientific Databases include the ChemACX Database of commercially available chemicals and Sigma-Aldrich MSDS. The MerckIndex and other scientific databases provide information about chemicals, their properties, and reactions.
Professional Services include custom development, system deployment, educational training, and technical support for pharmaceutical, biotechnology, and chemical customers, including government and academia, by experienced staff.
Research, Discovery, Development, TResearch, Discovery, Development, Trials & Manufacturingrials & Manufacturing
Web www.cambridgesoft.comAmerica 1 800 315-7300Europe 00 800 875 20000Japan 0120 146 700
Email [email protected] Kingdom +44 1223 464900Germany +49 69 2222 2280France +33 1 70 71 98 80

Chem & Bio OfficeD e s k t o p S o f t w a r e t o E n t e r p r i s e S o l u t i o n s
Enterprise Solutions include Chem & Bio Office with Oracle Cartridge and Chem & Bio Office Workgroup, based on SQL Server to help organizations from small workgroups to large enterprises collaborate and share information more effectively.
Knowledge Management with E-Notebook, including Reaction Explorer, CombiChem, E-Signatures for intellectual property protection and 21CFR11 Compliance, streamlines daily record-keeping with rigorous security and efficient archiving.
Laboratory Informatics includes Workflow LIMs for instrumentation automation and Compliant SDMS for storage of your data.
Biological Informatics scientists use BioDraw, BioAssay, BioSAR and BioViz to set up biological models and visualize information, generate spreadsheets correlating structure and activity, search by structure, and draw and annotate pathways.
Chemical Informatics, including Registration, organizes new compound information. Inventory provides complete management of chemical and biological inventories including GxP Validation. DocManager indexes chemical structures in documents.
Manufacturing Informatics include Inventory to meet the chemical, reagent, sample and compound tracking needs of large multi-site chemical and pharmaceutical laboratories and E-Notebook for manufacturing compliance management.
Desktop Software includes Chem & Bio Office, a powerful suite of software, consisting of ChemBioDraw, ChemBio3D, ChemFinder and ChemACX for chemists, BioDraw, BioAssay, and BioViz and for biologists, and Inventory and E-Notebook for all.
Scientific Databases include the ChemACX Database of commercially available chemicals and Sigma-Aldrich MSDS. The Merck Index and other scientific databases provide information about chemicals, their properties, and reactions.
Professional Services include custom development, system deployment, educational training, and technical support for pharmaceutical, biotechnology, and chemical customers, including government and academia, by experienced staff.
Research, Discovery, Development, Trials & Manufacturing
Web www.cambridgesoft.comAmerica 1 800 315-7300Europe 00 800 875 20000Japan 0120 146 700MAE 04980 0902
Email [email protected] Kingdom +44 1223 464900Germany +49 69 2222 2280France +33 1 70 71 98 80
SDMS