chapter windows xp
TRANSCRIPT

� You can customize Windows XP to make it easier to use. You can change the way the taskbarworks, add icons to the Quick Launch toolbar, and pin shortcuts to the Start menu.
� Some customization techniques require administrator privileges that are often not availableon lab machines.
To complete this activity, you will need the following file:� New blank WordPad document
You will save your document as:� x01_Customize_Your_Name
1. Turn on your computer and follow the logon instructions. If you are saving your work ona USB flash drive, be sure that it is inserted into your computer.
2. Move your pointer to the bottom of the screen. In the taskbar, right-click in an open area.Point to Toolbars, and then if there is no check mark next to Quick Launch, click it onetime.
3. Right-click an open area of the taskbar, and then from the shortcut menu, click Properties.In the Taskbar and Start Menu Properties dialog box, under Taskbar appearance, selectthe Auto-hide the taskbar check box, and then compare your screen with Figure 1. Noticethat the Quick Launch toolbar can be accessed from this dialog box also.
Windows XPCHAPTER 1
Copyright © 2009 by Pearson Education, Inc. All rights reserved.From Skills for Success with Windows XP Getting Started by Robert L. Ferrett
More Skills 11 Customize Windows XP
Windows XP | Chapter 1 - Getting Started with Windows XP More Skills: SKILL 11 | Page 1 of 4
Auto-hide thetaskbar check box
Show QuickLaunch check box
Figure 1
Copyright © 2009 by Pearson Education, Inc. All rights reserved.From Skills for Success with Windows XP Getting Started by Robert L. Ferrett
Windows XP | Chapter 1 - Getting Started with Windows XP More Skills: SKILL 11 | Page 2 of 4
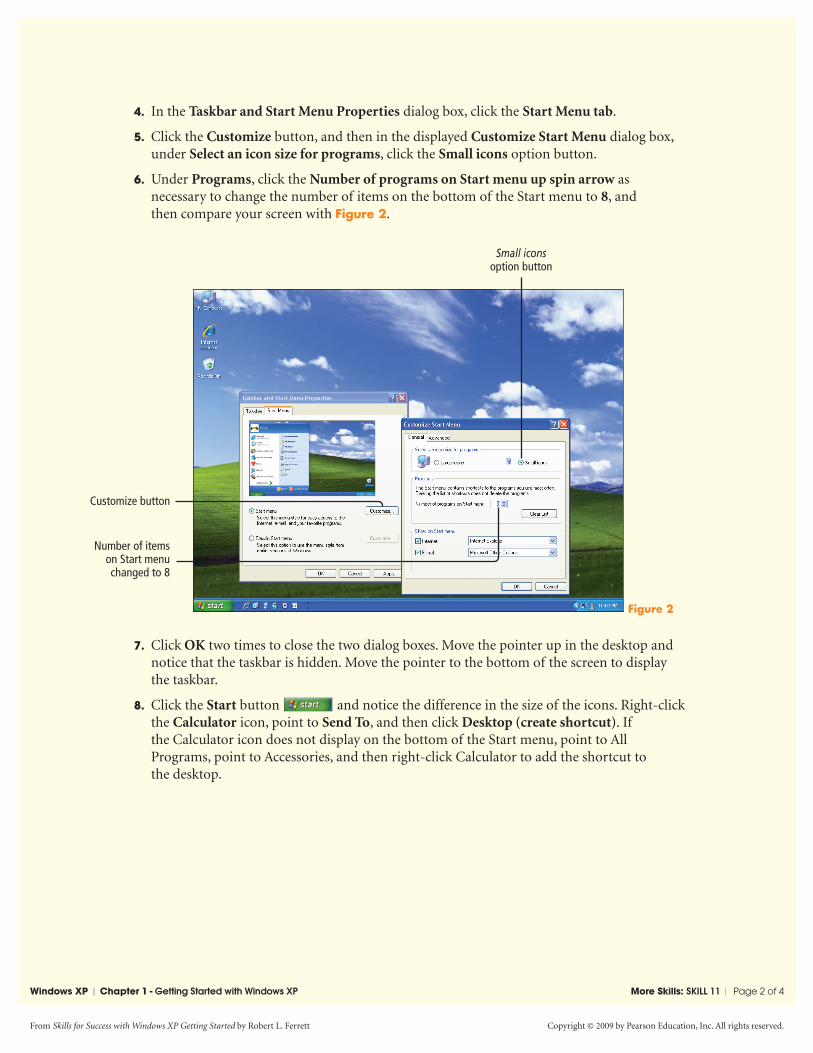
4. In the Taskbar and Start Menu Properties dialog box, click the Start Menu tab.
5. Click the Customize button, and then in the displayed Customize Start Menu dialog box,under Select an icon size for programs, click the Small icons option button.
6. Under Programs, click the Number of programs on Start menu up spin arrow asnecessary to change the number of items on the bottom of the Start menu to 8, andthen compare your screen with Figure 2.
7. Click OK two times to close the two dialog boxes. Move the pointer up in the desktop andnotice that the taskbar is hidden. Move the pointer to the bottom of the screen to displaythe taskbar.
8. Click the Start button and notice the difference in the size of the icons. Right-clickthe Calculator icon, point to Send To, and then click Desktop (create shortcut). Ifthe Calculator icon does not display on the bottom of the Start menu, point to AllPrograms, point to Accessories, and then right-click Calculator to add the shortcut tothe desktop.
Customize button
Small iconsoption button
Number of itemson Start menuchanged to 8
Figure 2

Copyright © 2009 by Pearson Education, Inc. All rights reserved.From Skills for Success with Windows XP Getting Started by Robert L. Ferrett
Windows XP | Chapter 1 - Getting Started with Windows XP More Skills: SKILL 11 | Page 3 of 4
9. Click in an open area of the screen to close the Start menu. Drag the Calculator icon downto the bottom of the screen to display the taskbar, move the pointer to the left edge of theQuick Launch toolbar, and then release the mouse button.
The Calculator icon is now an icon on the desktop and in the Quick Launch toolbar, asshown in Figure 3.
Calculator shortcuton the desktop
Calculator shortcutin the Quick Launch
toolbar
Figure 3
10. Right-click the Calculator icon on the desktop. From the displayed shortcut menu, clickDelete. In the Confirm File Delete message box, click Yes.
The shortcut is removed, but the program is unaffected.
11. Click the Start button , right-click Calculator, and then click Pin to Start menu.Notice that the Calculator shortcut moves from the bottom of the Start menu to the top,and will remain there until you remove it.
12. On your keyboard, press p. Click the Start button , point to All Programs,point to Accessories, and then click WordPad.
13. Type your name, and then press J two times. In the WordPad menu, click Edit, and thenclick Paste.
14. Using the skills you practiced in Skill 6, resize the screen image to about 5.5 inches onthe ruler.

Copyright © 2009 by Pearson Education, Inc. All rights reserved.From Skills for Success with Windows XP Getting Started by Robert L. Ferrett
Windows XP | Chapter 1 - Getting Started with Windows XP More Skills: SKILL 11 | Page 4 of 4
Calculator shortcutpinned to the
Start menu
Figure 4
15. In the menu, click File, click Save, and then using your name, Save the document in yourXP Chapter 1 folder as x01_Customize_Your_Name
16. Close WordPad. Submit the WordPad document as directed. If you want to display thetaskbar all the time, right-click an open area of the taskbar, and then from the shortcutmenu, click Properties. In the Taskbar and Start Menu Properties dialog box, underTaskbar appearance, clear the Auto-hide the taskbar check box, and then click OK.
■ You have completed More Skills 11