chapter 11 weft-backed structures - handweaving.net
TRANSCRIPT

Chapter 11
203
Weft-Backed Structures
Weft-backed structures are compound structures that use one warp system and multiple weft systems. They are mainly used in commercial textiles to make figured fabric on industrial
looms. If you have never heard of them, it is not surprising, since they are not common structures for handweavers. We suggest you visit a fabric store that sells upholstery fabric. If you see a cloth that has a complex, polychrome design on the face, and on the back there are multiple wefts working in a loose structure, sometimes floating, sometimes creating a haze of mixed color, you are probably looking at a weft-backed fabric. There is a possibility you are looking at a lampas, taqueté or samitum, but these fabrics are more costly to manufacture and usually available only through interior designers. If you ask the sales person about the structure, it is doubtful that you will get an informed answer. Better to read on with this chapter and return to the store later with your new knowledge.
We will begin by discussing a simple way to create weft-backed structures, and then move on to a variation that Bhakti has used to make double-sided weavings.
Weft-Backed FabricWeft-backed cloth resembles taqueté and samitum in that it generally
shows all the patterning in the weft yarn, but it can also have the warp show as an element, as in lampas. The main difference between this new type of cloth and the ones we discussed in Chapters 9 and 10 is that it uses one warp system for the binding, not two. This is a big help for textile mills. Weft-backed cloth eliminates the need to fuss with two back beams, and different warp tensions. Weaving with many weft systems that beat down in the cloth to form a single visual line is slower than weaving with one weft system, but the results are wonderful. Designers have figured out ingenious ways to keep the number of weft systems minimal (like changing the color within a weft

204 Chapter 11
system so the cloth looks more complex than it really is), and many mills simply dictate limits to their designers.
It almost seems like the larger the minimum order demanded by a mill, the fewer the design possibilities. In Italy, where a mill might be composed of one loom sitting in the weaver’s garage, sumptuous cloth using many weft systems were, and still are, woven. We know of one instance recently in the United States where a modern mill attempted to weave fabrics of a quality superior to that common in this country. Some of their weft-backed structures had 8 weft systems or more, forcing 8 picks for each face pick. The back of the cloth was a glorious riot of color created by the mass of weft floats that would show alone in specific parts of the design on the face. Holding this fabric was inspiring—it had weight and color and beautiful definition of the motifs. It is sad to report that the company did not stay in business. The cost of their product was too high to sustain the expense of running the mill. Perhaps the only way this type of quality cloth can sustain itself is in the small single-loom production of countries like Japan and Italy, or the model of the court-supported studios, or tiraz, of Western Europe and the Middle East. We hope that contemporary art patronage will enable individual weavers today to attempt this type of cloth.
Explanation of Weft-Backed StructuresA typical weft-backed structure uses a weft-faced structure for the front
picks of the cloth, letting specific weft(s) show, and a warp-faced structure for the back picks that hides these picks from showing on the face. If you turn to the back of the cloth, these weft floats are visible. A single structure has to be constructed considering all the weft systems in the cloth. If there are four weft systems, motifs will be rendered with one weft showing on the front and three wefts weaving at the back. Of course, you can also create structures that allow two or more wefts to work together on the front, blurring color and sometimes design. In order to hide some of the weft systems, the root structure is usually a large satin of 7 or more. You can use 5-end satins, but a larger satin will hide the unseen wefts more effectively.
Making Various 7-end Satin Weft-Backed Structures
Let’s make a weft-backed structure using a 7-end satin (the smallest satin giving adequate floats for hiding several weft systems). First we will create one using two weft systems, then 3, 4, and 5 weft systems. Beyond that number, we will leave the construction for you to make.
Note: If you follow along with the images in color saved on the CD in the Chapter 11 folder these instructions will be easier to understand.
205Weft-Backed Structures
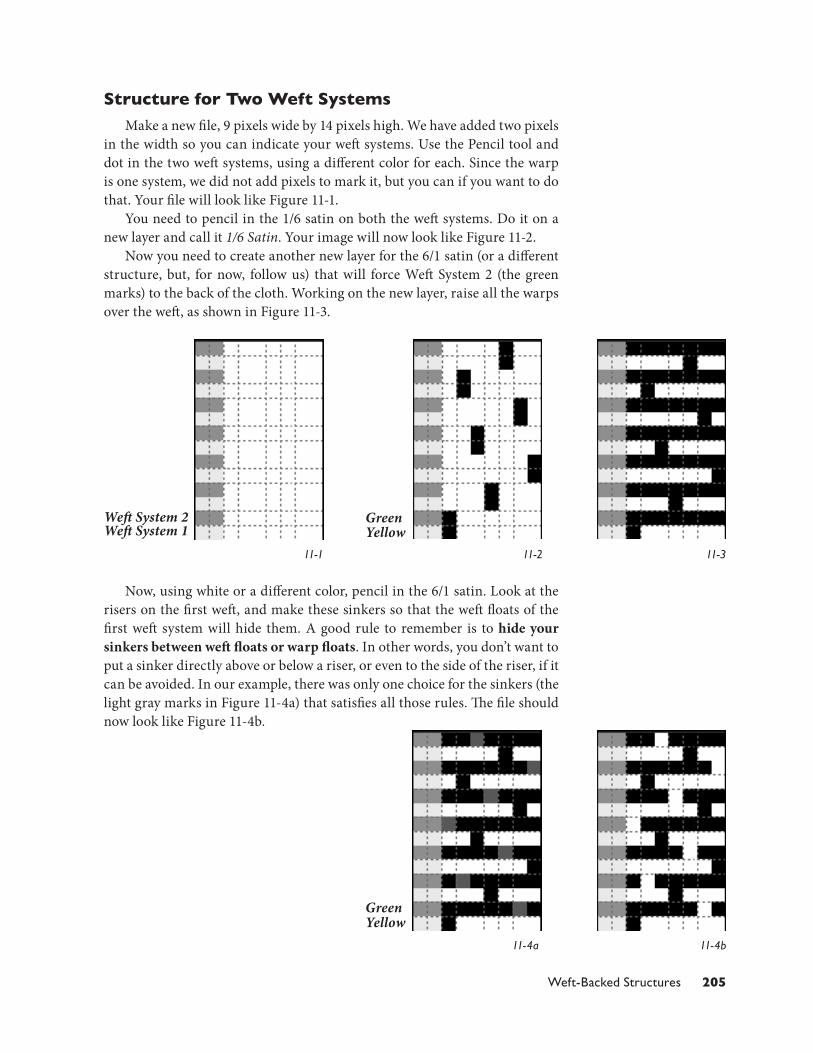
Structure for Two Weft Systems
Make a new file, 9 pixels wide by 14 pixels high. We have added two pixels in the width so you can indicate your weft systems. Use the Pencil tool and dot in the two weft systems, using a different color for each. Since the warp is one system, we did not add pixels to mark it, but you can if you want to do that. Your file will look like Figure 11-1.
You need to pencil in the 1/6 satin on both the weft systems. Do it on a new layer and call it 1/6 Satin. Your image will now look like Figure 11-2.
Now you need to create another new layer for the 6/1 satin (or a different structure, but, for now, follow us) that will force Weft System 2 (the green marks) to the back of the cloth. Working on the new layer, raise all the warps over the weft, as shown in Figure 11-3.
Now, using white or a different color, pencil in the 6/1 satin. Look at the risers on the first weft, and make these sinkers so that the weft floats of the first weft system will hide them. A good rule to remember is to hide your sinkers between weft floats or warp floats. In other words, you don’t want to put a sinker directly above or below a riser, or even to the side of the riser, if it can be avoided. In our example, there was only one choice for the sinkers (the light gray marks in Figure 11-4a) that satisfies all those rules. The file should now look like Figure 11-4b.
11-1 11-2 11-3
11-4b11-4a
Weft System 2Weft System 1
GreenYellow
GreenYellow

206 Chapter 11
Note that there is only one riser on each row of the 1/6 satin, and that each warp in the repeat is lifted only once. The opposite is true for the 6/1 satin—one sinker per row, and each warp in the repeat is lowered only once. It is a good idea to check your work to see if you have done this. If you find you have a warp that rises or sinks more than once in the repeat, then you have made a mistake.
Copy this new layer by dragging it down over the Create a New Layer icon at the bottom of the Layer palette. Name this layer Hide Weft System 1. Turn off the visibility of Hide Weft System 2 layer, and be sure you are working on the new layer, Hide Weft System 1. With the Move tool and your down arrow, move the marks down one row so they fall on the rows for weft system 1 (yellow in our file).
We rearranged our Layers palette so that the layer that hides weft system 1 would be below the one that hides weft system 2. If you do the same, the Layers palette for the completed template is going to look like Figure 11-6.
Save Structures as Pattern PresetsNow you need to save your structures as Pattern
Presets. We have made a new folder in our Weave Presets folder (under Applications>Adobe Photoshop CS>Presets>Patterns>Weave Presets) and called it Weft-backed. We decided to continue with a numbering system for naming our Presets, as we have done in the past, but adding a number to start with that would indicate how many weft systems were in the Pattern Preset.
Be sure your weft-backed template is open (11-5.psd on the CD). Make a Fixed Size Rectangular Marquee 7 pixels wide x 14 pixels high. Position the marquee over the structural part of the template. Have the layer that hides your second weft visible, and the one that hides your first weft invisible, and of course, have the 1/6 Satin layer showing. Save this as a Pattern Preset (Edit>Define Pattern). Then reverse the visibility of the “Hide” layers,
making the Hide Weft System 1 visible and the Hide Weft System 2 invisible. Save this Preset. Now make both the “Hide” layers visible. Save this Preset, which pushes both weft systems to the back of the cloth, having a 6/1 satin in both weft systems on the face of the cloth (two picks are identical). Then turn off the visibility of both the “Hide” layers and save this Preset. This version will allow areas of cloth where both wefts work together on the face of the cloth as a 1/6 satin (again, two picks are identical). Your four weft-backed Presets will look like Figures 11-7a-d shown on the next page.
11-5
11-6
GreenYellow

207Weft-Backed Structures
These Presets are saved in two places for you to access on the CD—in the master Weave Presets folder and also in the Chapter 11 folder.
Modifying the Structures for Three Weft Systems Now we want to make weft-backed structures using the same 6/1 and 1/6
satins, but increasing the weft systems to three.Open up your template (11-5.psd) and duplicate it. Put away the original
and work in the duplicate file. Go to Image>Image Size and have Constrain Proportions unchecked, and Nearest Neighbor selected next to Resample Image. Change the height from 14 to 21. Click OK. If your program worked like ours, you will see that they increased the file by copying every yellow pick (the first weft system). Turn off the visibility of all layers except the Background. Do you still have a weft rotation of 3 colors saved as a pattern? If so, working in the Background layer, select the weft color rotation and fill it with the 3-color rotation. If you have not saved one, either paint in a new color for the first weft or make a new file 1 pixel wide by 3 pixels high, dot in three different colors, and save as a pattern (Edit>Define Pattern). Then Fill with this pattern. Our new weft colors are yellow for system 1, purple for system 2, and green for system 3. It doesn’t matter what colors you choose, just as long as you realize that color is representing a weft system.
Let’s see what is happening with our other layers. Turn on the visibility of the 1/6 Satin layer. Photoshop extended the structure so that it falls on all three weft systems, in three identical rows. This is what we want. Turn off the visibility of that layer and look at the layer labeled Hides Weft System 1. Photoshop duplicated that layer so now there are two identical rows. Turn off that layer for now and let’s look at the layer labeled Hides Weft System 2. In our file, everything is okay (there are marks only on the rows labeled green), except at the bottom of the file, where marks are also placed on the first purple row. We want to eliminate the marks on the purple row. Be sure this is the active layer. With your Pencil tool, make those marks white. Then turn off the visibility of the Background and turn the white marks transparent by using the Magic Eraser tool. By clicking on one white mark, it will erase all of them. Turn back on the visibility of the Background Layer, so you can
11-7a 2WB001 11-7b 2WB002 11-7c 2WB003 11-7d 2WB004

208 Chapter 11
see the color indicators of the weft systems. (A simple alternative to using the Magic Eraser is to select the row you don’t want, and hit Delete.) Do you see that these marks actually fall on the third weft system, but your layer is labeled Hides Weft System 2? Double click on the layer’s name and change 2 to 3.
We want to duplicate the layer you have just fixed. Drag it over the Create a New Layer button at the bottom of the Layers palette. Do this twice. Each time you do this, it will copy the layer and give it a new name with Copy in it. Let’s get rid of the layer labeled Hide Weft System 1, since we don’t want those duplicated rows. Just drag the layer into the Trashcan at the bottom of the Layers palette. Now, turn off the visibility of everything except the Background layer and one of your copies of Hide Weft System 3. Rename it Hides Weft System 1. Select the Move tool, and using your down arrows on the keyboard, move the marks so they fall on the rows that indicate weft system 1 (yellow in our file). Now turn off the visibility of that layer and make the other copy of the Hide Weft System 3 visible and active. Rename the layer to Hide Weft System 2. Again, using your down arrow and the Move tool, move the marks down one row so
they fall on the rows that indicate the second weft system (purple rows). We arranged our layers so that the Layers palette for our new template looks like Figure 11-8.
The final template looks like Figure 11-9, when the Hides Weft System 1 layer is not visible, but all the others layers are visible. We have also saved the templates in their own subfolder in the Chapter 11 folder on the CD to make them easy for you to find.
Save the Pattern PresetsNow we want to save the Presets. Since we have three weft systems,
you can have 8 possible conditions: 3 Presets with single wefts on the face, 3 Presets with two wefts working together on the face, 1 Preset that allows all three wefts to work together on the face, and 1 Preset that puts all the wefts to the back of the cloth while an extended 6/1 satin is seen on the face of the cloth (with sequences of three identical rows weaving in the structure). These weaves will all be 7 pixels wide x 21 pixels high. Your Presets will look like Figures 11-10a-h, shown on the next page.
11-8
11-9
GreenPurpleYellow

209Weft-Backed Structures
Structures with Four and Five Weft SystemsWe also made Presets for the 7-end satin using four and five weft systems,
and you can find them on the CD. In practice, we might find by weaving a weave blanket the floats of the 7-end satin are not hiding this many weft systems adequately. If so, we would use a larger satin for weft-backed structures using 4 and 5 weft systems. Until we actually test the structures with real yarn and sett variations, we don’t know for sure whether we like these 7-end structures.
Let’s continue so we can weave them and find out. If you want to make these Presets yourself, follow our instructions for expanding the template, and save the Pattern Presets. Do this first for four weft systems, then for five weft systems. Again, each time you add a weft system, you increase the number of possible visual combinations of weft. For four weft systems, there are 16 combinations. For five weft systems, there are 31 combinations. Of course, you don’t need to use all the combinations in any one design. In fact, many designers like to stick to the basic structures that reveal only one of the wefts at a time on the face of the cloth, producing distinct color areas in the
11-10a 3WB005 11-10d 3WB00811-10b 3WB006 11-10c 3WB007
11-10h 3WB01211-10e 3WB009 11-10f 3WB010 11-10g 3WB011

210 Chapter 11
cloth. We just thought you would like to have all the possibilities available to you. The Pattern Presets look like the following illustrations.
Four-Weft Systems Pattern Presets
11-11a 4WB013 11-11b 4WB014 11-11c 4WB015 11-11d 4WB016 11-11e 4WB017 11-11f 4WB018
11-11g 4WB019 11-11h 4WB020 11-11i 4WB021 11-11j 4WB022 11-11k 4WB023 11-11l 4WB024

211Weft-Backed Structures
Five-Weft Systems Pattern Presets
11-11m 4WB025 11-11n 4WB026 11-11o 4WB027 11-11p 4WB028
11-12a 5WB029 11-12b 5WB030 11-12c 5WB031 11-12d 5WB032 11-12e 5WB033 11-12f 5WB034

212 Chapter 11
11-12g 5WB035 11-12h 5WB036 11-12i 5WB037 11-12j 5WB038 11-12k 5WB039 11-12l 5WB040
11-12m 5WB041 11-12n 5WB042 11-12o 5WB043 11-12p 5WB044 11-12q 5WB045 11-12r 5WB046

213Weft-Backed Structures
There is one more Pattern Preset on the next page.
11-12s 5WB047 11-12t 5WB048 11-12u 5WB049 11-12v 5WB050 11-12w 5WB051 11-12x 5WB052
11-12y 5WB053 11-12z 5WB054 11-12za 5WB055 11-12zb 5WB056 11-12zc 5WB057 11-12zd 5WB058
214 Chapter 11
An Alternative Way to Make Weft-Backed Structures
In the mid-90s, when Bhakti was teaching at an industrial textile program, she created a series of weavings using weft-backed structures that are displayed as two-sided pieces. In an attempt to pack the multiple wefts tighter than possible with the above method of making weft-backed structures, she came up with an alternative method of making her structures. We will explain this method here.
In the previous structures, you will note that the wefts share common sheds. The ones at the back of the cloth are tacked in place by the same sinking warp thread, and the weft, or wefts on the face of the cloth are tacked by the same rising warp end. You don’t have to worry about differential tension in the warp, because the structure moves the tacking ends consistently through the structures so that all the ends rise or sink a similar number of times—and the weft systems are consistent throughout the cloth.
In Bhakti’s method, the wefts at the back of the cloth are incrementally tacked, so that one weft lies close to the inner cloth, then the next back weft sits over that, and so forth. Rather than all the wefts sharing the same shed, they slide over each other, creating a deeper cloth, and allowing the wefts to be packed closer together. Again, the structures are created so that the tacking points move throughout the structures, equalizing the tension on the warp threads.
A Seven-End Satin Weft-Backed Structure In an Alternative Stitching
Let’s make the 7-end weft-backed structure in the alternative method. For a weft-backed cloth with only two weft systems, you don’t need to make a change. This method works for three or more weft systems. Open up the template for the weft-backed structure using three wefts (11-9.psd on the CD), and duplicate it. Put away the original and work on the duplicate file. Go to Image>Canvas Size, and anchor the image to the bottom left square. Change the width to 16 and the height to 42 (you are doubling the structural area of your design; 9 + 7 = 16, and 21 + 21 = 42). Choose Fill with white in the Canvas Extension Color box. Click OK.
Turn off the visibility of all layers except the Background and the 1/6 Satin layer. With the Magic Wand tool, select the black marks on the 1/6 Satin layer. Be sure this is your active layer. Copy, paste, and move the black marks so you have created a second repeat of the 1/6 satin. Paste and move it three times, so you have filled in the entire file. (If you prefer, you can draw in the repeats using the Pencil tool.) You now have several extra layers, because Paste will place the material on a new layer each time. Turn off the visibility of the Background layer, and go to Layer>Merge Visible. If you have the 1/6 Satin layer highlighted, it will retain that name for the merged layer.
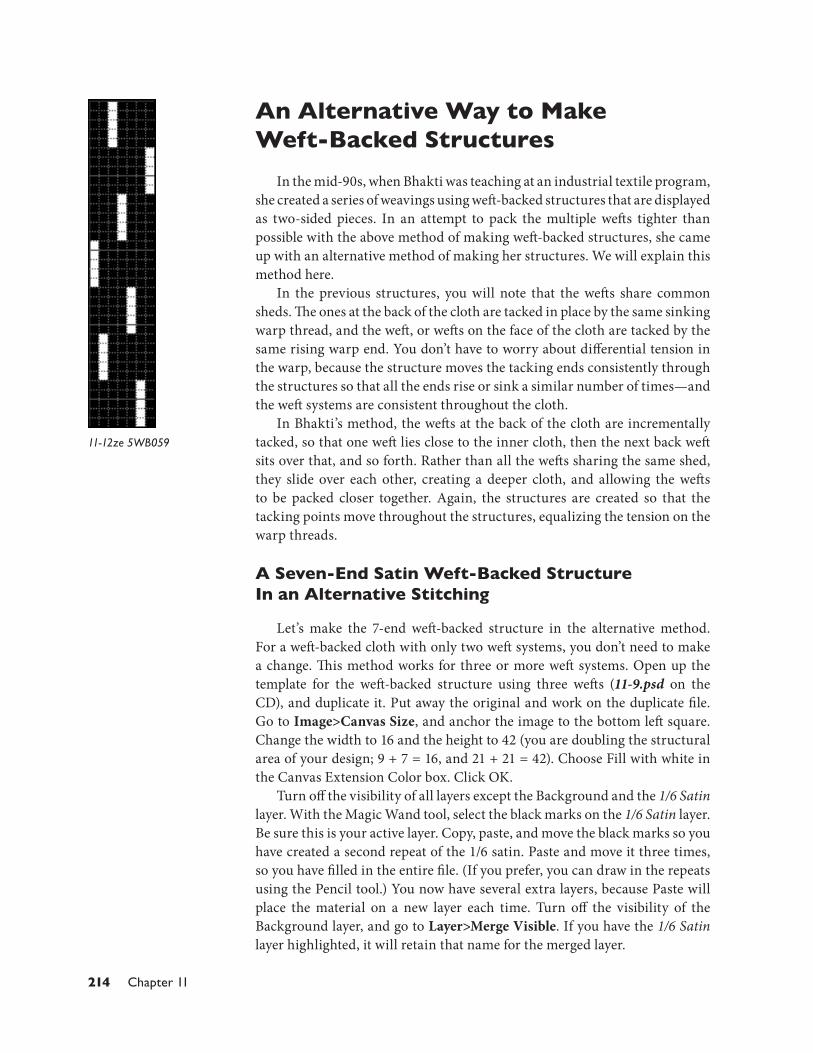
11-12ze 5WB059

215Weft-Backed Structures
Make the Background visible again, and turn off the visibility of the 1/6 Satin layer. Highlight the Hides Weft System 1 layer, so it is the active layer. Again, either through copy and paste, or by directly drawing, make repeats of the structure to fill the expanded area of the file. Be sure and merge these layers when done. We want to rename the new layer to something meaningful. Double click on the name of this layer and change it to Tacks Twice (meaning horizontally there are two repeats of the structure and the weft is tacked in each repeat). We want the structure to fall on the second weft rows. Use your Move tool and keyboard arrows to make sure they are on the rows for the second weft system (purple in our file).
Now we need one other layer that is the same as the one you just made. Drag the Tacks Twice layer down over the Create a New Layer icon at the bottom of the Layers palette. Note that the new layer has the word Copy in its title. At this point, you can drag the original layers, Hides Weft System 2 and Hides Weft System 3, into the Trashcan at the bottom of the Layers palette; we won’t need them. Now, rename the new duplicate layer Tacks Once. Turn off the visibility of everything except the Background and the new Tacks Once layer. Use your Move tool, and the keyboard arrows to move the marks so they fall on the third weft system (green in our file).
We need to modify the marks on the third weft system (Tacks Once layer). Make sure that this is the active layer. Using your Pencil tool and the black color, fill in the second sinker on the first green row (first row of the second weft system). Then follow it up, filling in one sinker in each of the green rows. You are making weft floats that consistently go over 13 ends. The file, with only the Background Layer and the Tacks Once layer visible, will look like Figure 11-13 (but we have filled the new risers with gray so you can see them).
If you turn on the visibility for all the layers, you will see a weft-backed weave structure. What you have created is a structure where the first weft system (yellow) shows on the face of the cloth in a 1/6 satin; the second weft system (purple) is tacked once, in every repeat, as a 6/1 satin (this weft lies close to the plane of the final cloth); and the third weft system (green) is tacked in a 13/1 satin, and it lies to the top of the first weft when the cloth is viewed from the reverse side. It looks like Figure 11-14.
Saving Structures as Pattern PresetsMake a duplicate of the layered file and put the original template
away for future use if necessary. Work in the duplicate file. Flatten the image. Select the structural area (do not include the marks on the left indicating the weft systems) and save as a Pattern Preset (Edit>Define Preset). We called ours 3WB060.
11-13
GreenPurpleYellow
GreenPurpleYellow
11-14

216 Chapter 11
Wrap Feature in PhotoshopPhotoshop has a feature called Offset where you can wrap an image
(Filter>Other>Offset). We will use it to modify the structure we just saved and get the other structures that will show the second and third weft systems on the face of the cloth. Make a duplicate of your flattened file, and work in the duplicate file. You should still have a rectangular marquee selecting the structural area of the file. If not, make one now. We do not want to change the sequence of the weft system marks (yellow, purple, then green in our file), only modify the structure. Go to Filter>Other>Offset. Make sure that Undefined Areas is set to Wrap Around. In the Vertical box, type in “-1” and click OK, The top pick of the original file has been moved to the bottom row, which forces the first and third weft systems to the back of the cloth, but brings weft system two (purple in our file) to the front. Your structure should still be selected. Go to Edit>Define Pattern and save the Preset (we called ours 3WB061).
Make a duplicate of this file and work in the duplicate. Photoshop remembers the last process you did under Filter and puts it at the top of the Filter menu. Go to Filter>Offset and the file will once more be wrapped “-1.” Now you have a structure where the first and second weft systems go to the back of the cloth and the third weft system shows at the front of the cloth. Save this as a Preset. We called ours 3WB062.
In this tacking system, you can still make structures that show two or more weft systems on the face of the cloth. With three weft systems, if you bring two of them to the face of the cloth, you have only one weft system left to go to the back, and you would want it tacked each time. Therefore, using the original Presets (3WB005-3WB012) will suffice, and we don’t need to make new ones. If you are using four or more weft systems, then you might want to create structures that have differential tacking at the back of the cloth.
The three new Presets that we saved, 3WB060, 3WB061, and 3WB062, look like this:
11-15a 3WB060 11-15b 3WB061 11-15c 3WB062

217Weft-Backed Structures
The following charts explain the weave structures found in the Master Preset folder under Weft-backed, which are also saved in the Chapter 11 folder.
Two Weft Systems
Preset NumberNumberOf Wefts
Top WeftSystem
BackWefts
FaceStructure
2WB001 2 1 2 1/6 satin2WB002 2 2 1 1/6 satin2WB003 2 none 1 & 2 1/6 satin2WB004 2 1 & 2 none 6/1 satin
Three Weft Systems
Preset NumberNumberOf Wefts
Top WeftSystem
BackWefts
FaceStructure
3WB005 3 1 2 & 3 1/6 satin3WB006 3 2 1 & 3 1/6 satin3WB007 3 3 1 & 2 1/6 satin3WB008 3 1 & 2 3 1/6 satin3WB009 3 2 & 3 1 1/6 satin3WB010 3 1 & 3 2 1/6 satin3WB011 3 1, 2 & 3 none 1/6 satin3WB012 3 none 1, 2 & 3 6/1 satin
Four Weft Systems
Preset NumberNumberOf Wefts
Top WeftSystem
BackWefts
FaceStructure
4WB013 4 1 2, 3 & 4 1/6 satin4WB014 4 2 1, 3 & 4 1/6 satin4WB015 4 3 1, 2 & 4 1/6 satin4WB016 4 4 1, 2 & 3 1/6 satin4WB017 4 1 & 2 3 & 4 1/6 satin4WB018 4 2 & 3 1 & 4 1/6 satin4WB019 4 3 & 4 1 & 2 1/6 satin4WB020 4 1 & 4 2 & 3 1/6 satin4WB021 4 1 & 3 2 & 4 1/6 satin4WB022 4 2 & 4 1 & 3 1/6 satin4WB023 4 1, 2 & 3 4 1/6 satin4WB024 4 2, 3 & 4 1 1/6 satin4WB025 4 1, 3 & 4 2 1/6 satin4WB026 4 1, 2 & 4 3 1/6 satin4WB027 4 1, 2, 3 & 4 none 1/6 satin4WB028 4 none 1, 2, 3 & 4 6/1 satin

218 Chapter 11
Three Weft Systems (Alternative Stitching)Preset Number Number
Of WeftsTop Weft
SystemBackWefts
FaceStructure
3WB060 3 1 2 & 3 1/6 satin3WB061 3 2 1 & 3 1/6 satin3WB062 3 3 1 & 2 1/6 satin
Five Weft SystemsPreset Number Number
Of WeftsTop Weft
SystemBackWefts
FaceStructure
5WB029 5 1 2, 3, 4 & 5 1/6 satin5WB030 5 2 1, 3, 4 & 5 1/6 satin5WB031 5 3 1, 2, 4 & 5 1/6 satin5WB032 5 4 1, 2, 3 & 5 1/6 satin5WB033 5 5 1, 2, 3 & 4 1/6 satin5WB034 5 1 & 2 3, 4 & 5 1/6 satin5WB035 5 2 & 3 1, 4 & 5 1/6 satin5WB036 5 3 & 4 1, 2 & 5 1/6 satin5WB037 5 4 & 5 1, 2 & 3 1/6 satin5WB038 5 1 & 5 2, 3 & 4 1/6 satin5WB039 5 1 & 3 2, 4 & 5 1/6 satin5WB040 5 1 & 4 2, 3 & 5 1/6 satin5WB041 5 2 & 4 1, 3 & 5 1/6 satin5WB042 5 2 & 5 1, 3 & 4 1/6 satin5WB043 5 3 & 5 1, 2 & 4 1/6 satin5WB044 5 1, 2 & 3 4 & 5 1/6 satin5WB045 5 2, 3 & 4 1 & 5 1/6 satin5WB046 5 3, 4 & 5 1 & 2 1/6 satin5WB047 5 1, 4 & 5 2 & 3 1/6 satin5WB048 5 1, 2 & 5 3 & 4 1/6 satin5WB049 5 2, 3 & 5 1 & 4 1/6 satin5WB050 5 1, 3 & 4 2 & 5 1/6 satin5WB051 5 2, 4 & 5 1 & 3 1/6 satin5WB052 5 1, 3 & 5 2 & 4 1/6 satin5WB053 5 1, 2, 3 & 4 5 1/6 satin5WB054 5 1, 2, 3 & 5 4 1/6 satin5WB055 5 1, 3, 4 & 5 2 1/6 satin5WB056 5 1, 2, 4 & 5 3 1/6 satin5WB057 5 2, 3, 4 & 5 1 1/6 satin5WB058 5 1, 2, 3, 4 &5 none 1/6 satin5WB059 5 none 1, 2, 3, 4 &5 6/1 satin

219Weft-Backed Structures
Weft SystemsWe hope we haven’t confused you by constantly saying weft systems,
rather than first or second or third weft. We want to be clear that we are not discussing a specific weft color, which can change, but a set of picks that consistently act the same—i.e., the first weft system, the second weft system, and so forth. You know that you can have a single weave structure in a cloth, for example plain weave, never modify the structure, yet have the appearance of the cloth vary by simply changing weft colors. You can make consistent stripes in the cloth, or random variations of color, or create an ombré of color that shades from one hue to another. Let’s say you shaded from yellow to blue. If done correctly, there will seem to be an area of green in the middle, where the yellow and blue wefts optically mix. Still, throughout the cloth the structure remains the same, plain weave. In this example, you would have one weft system, but different weft colors.
An Example of Varying the Weft Color Within a Weft System
There is no reason why you can’t change the color of the wefts in a weft-backed structure as you weave the cloth. You just want to be consistent with your structures so that the wefts fall where you intend. Here’s an example. We decided to weave a cloth with three weft systems using a solid color (green) for weft system one. That means as we wove the first of every three picks was a green yarn. For the second weft system, we decided to create even stripes of yellow and orange, 21 picks each (three repeats of the 7-end satin). As we wove the second pick of every three shots was yellow for 21 picks, then orange for 21 picks, then back to yellow. For our third weft system, we shaded the cloth from light brown to dark brown, using four different yarns that varied the tones of the brown. We worked spontaneously, watching what was happening rather than counting picks. We started with the light brown and after awhile threw a pick of the next shade, then went back to the original shade, and kept adding more of the second color until we had moved completely to that color. Then we started adding the third shade, and kept going. It probably sounds complicated, but watching our progress at the loom was exciting and kept us going.
What we were doing as we wove this three weft system was always throwing green as the first pick of three (the first weft system), changing the yellow and orange shuttles every 21 picks for the second of three picks (the second weft system), and changing between four shuttles for the third of every three picks (the third weft system). Here is a visual representation of our three weft systems (Figure 11-16). Each is a vertical line, showing the color changes of that system. As we wove, we threw the first color represented on the first column (first weft system), then the first color represented on the second vertical line (the second weft system), then the first color on the third vertical line (the third weft system). We have also shown how the combined systems look if they are drawn sequentially. Note that each column representing one 11-16
1 2 3Weft Systems
True Weft Color Sequence

220 Chapter 11
of the weft systems has 33 picks and the column representing the true pick color sequence has 99 picks.
A Weft-Backed Design Using Three Weft Systems
Designing for a weft-backed cloth is simple, once you have your weaves saved as Pattern Presets. Determine how many weft systems you will use, and which weave structures you plan to use. Remember, the number of weave structures is going to equal the number of colors in your final design.
When designing for a weft-backed structure, design for the face of the cloth. Since all warps are used, you can design for the full number of ends on the loom. However, your wefts will be reduced for the face design, thinking of all systems as one row in the face design. After cleaning up and reducing the colors, you can expand the design to encompass all the wefts. In our case, we will multiply the height by 3 to account for the three weft systems in this example.
If you are weaving weft-backed structures with a consistent loom set-up, using similar yarns each time, you will become familiar with the true ppi of your work, and be able to design using the correct Custom Pixel Aspect Ratio. Without experience, this will just be guess work, and it will be simpler to just use square pixels, weave a sample of your design and count the true ppi of the cloth, then go back and resize your image. This is what we will do here.
We started with the following image of an old spinning wheel in Konya, Turkey:
11-17

221Weft-Backed Structures
We resized it to the 880 ends of our loom, and reduced it to 7 colors. Our plans are to use the three wefts alone, in combinations of two, and to have a warp-faced area that shows none of the wefts. We used curves first to define the colors, then indexed the image to 7 colors. Our indexed image looks like this:
It was hard to distinguish the colors, so we went into Image>Mode>Color Table and modified the 7 colors of the design. We decided the seven colors would represent the following structures:
The final image before expansion and putting in the weaves looked like this:
11-18
11-19
11-20

222 Chapter 11
We expanded the height of the design by 300 percent, to accommodate all the weft systems. We went back to RGB mode and made separate layers for each color, then added the structures as Pattern Overlays. We saved this file (11-21layers.psd), knowing we would have to resize it once we wove a sample and knew the correct picks per inch. A section of the flattened black and white .tif file (11-21.tif) ready for the loom looks like this:
By adding color to the weft, and changing the warp color to off-white, we made a simulation of the cloth. See Appendix C for more information on color simulation. A section of the file 11-22.psd is shown in Figure 11-22 on the next page.
Using Weft Sequence from Figure 11-16What if we decided to modify the colors of the wefts to reflect the first 99
picks of the weft rotation from Figure 11-16, so that the first weft system was a solid color but the second and third systems became stripes (regular and random)? You can see the full file on the CD as 11-23.psd. A section of the file is shown on the next page as Figure 11-23.
11-21

223Weft-Backed Structures
11-22
11-23

224 Chapter 11
Weaving Face DownIf you are weaving a weft-backed cloth with three or more weft systems,
you will find that you have heavy lifts, since many areas of the cloth have all the warps raised over the back picks. Most textile mills weave weft-backed cloth face down. It is much easier on the loom, and if you try this, you will find it easier on you too.
If your design has a direction to it with elements that must appear the way you drew them, like text, you must flip the design horizontally before applying the weaves. Draw an arrow on a piece of paper, flip it, and hold it to the light so you can see through the paper, and you will see what we mean. Here is a small image to show this. On the left is the file the way we want it to look, and on the right is the file flipped horizontally (Image> Rotate Canvas> Flip Canvas Horizontal), so it can be woven face down:
You also need to invert your weaves. If you are going to work with the same set of weaves for many designs, you might want to call up each Preset in a file the exact size of the structure, invert the file, and save it with a new number as a new Pattern Preset. Or you can put in the weaves, and then invert the whole black and white image (Image>Adjustment>Invert). That is probably the easiest way to do it.
You can always try weaving a fabric face up, and if you find the lifts are too heavy, go back to the final .tif or .bmp file, flip it horizontally, then invert the black and white, and return to the loom.
Two-Sided Cloth in Weft-Backed StructuresWhen Bhakti wove her series of two-sided weavings, she had writing on
one side of the cloth which showed up on a warp-faced ground. The other side was completely covered with weft floats, which showed traces of the writing and imagery, and had lots of color mixing.
11-24a 11-24b

225Weft-Backed Structures
As described above, she designed her cloth with the writing side as the face. Then flipped the image horizontally, before inserting structures that were inverted. The structures were all based on satin weaves, so the direction of the weave was not critical. The reason the work was startling was that when people saw one side of the cloth, they had no clue that the other would be so different. The warp-faced ground completely hid the weft-floats on the back, and the weft-floats on the back, which were quite colorful, completely hid the white warp of the other side. Here are details of the two sides from one of those weavings called History of Fabrics: Barbara’s Song.
11-25a
11-25b
Weft-Backed Structures Using Shaded Structures
Another variation of weft-backed cloth is to use shaded structures for one weft system. Using just two weft systems, you can get details into the imagery, as well as color. If you use a variegated yarn for one weft system, it will act as a ground, using the same structure throughout, but still have some shifts of color, creating an affect that tapestry weavers call abrash. The other weft system will show as steps of a shaded structure. As these structures become more warp-faced, it becomes harder to hide the back picks behind weft floats. Try to find places where you can tack the back pick behind warp floats.
226 Chapter 11
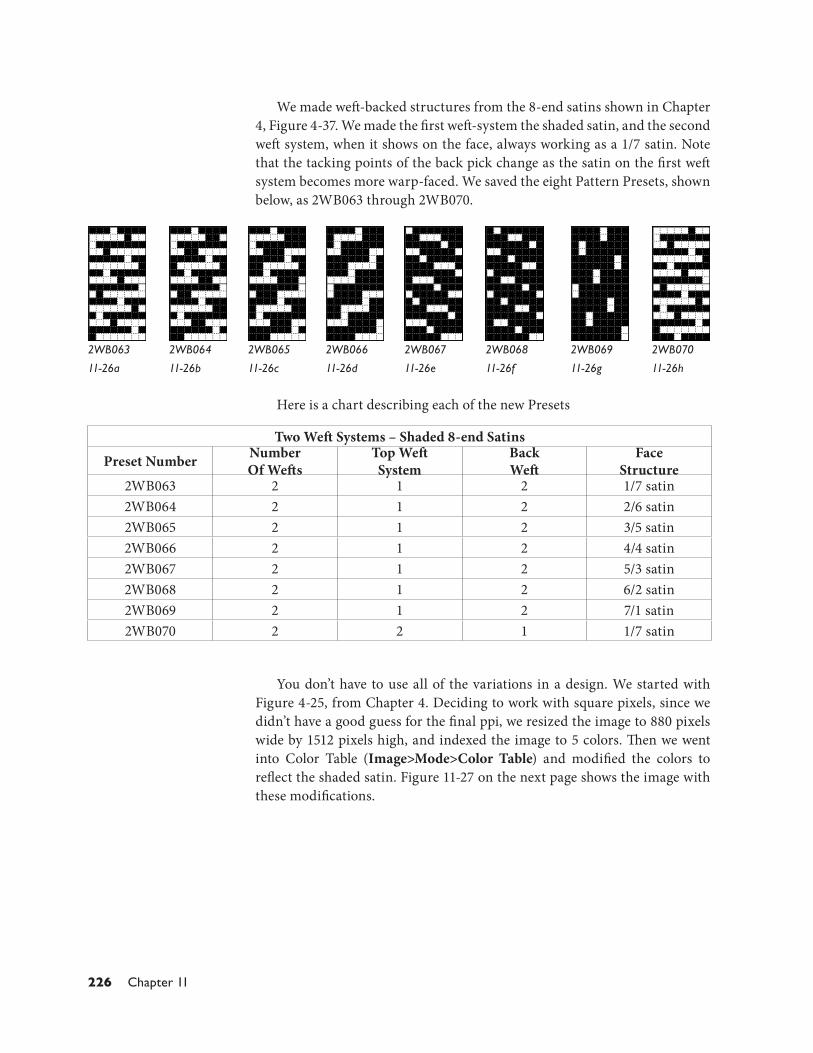
We made weft-backed structures from the 8-end satins shown in Chapter 4, Figure 4-37. We made the first weft-system the shaded satin, and the second weft system, when it shows on the face, always working as a 1/7 satin. Note that the tacking points of the back pick change as the satin on the first weft system becomes more warp-faced. We saved the eight Pattern Presets, shown below, as 2WB063 through 2WB070.
2WB063
11-26a
2WB064
11-26b
2WB065
11-26c
2WB066
11-26d
2WB067
11-26e
2WB068
11-26f
2WB069
11-26g
2WB070
11-26h
Two Weft Systems – Shaded 8-end Satins
Preset Number NumberOf Wefts
Top WeftSystem
BackWeft
FaceStructure
2WB063 2 1 2 1/7 satin2WB064 2 1 2 2/6 satin2WB065 2 1 2 3/5 satin2WB066 2 1 2 4/4 satin2WB067 2 1 2 5/3 satin2WB068 2 1 2 6/2 satin2WB069 2 1 2 7/1 satin2WB070 2 2 1 1/7 satin
Here is a chart describing each of the new Presets
You don’t have to use all of the variations in a design. We started with Figure 4-25, from Chapter 4. Deciding to work with square pixels, since we didn’t have a good guess for the final ppi, we resized the image to 880 pixels wide by 1512 pixels high, and indexed the image to 5 colors. Then we went into Color Table (Image>Mode>Color Table) and modified the colors to reflect the shaded satin. Figure 11-27 on the next page shows the image with these modifications.

227Weft-Backed Structures
11-27
The weaving plan was that the first weft system would be a red yarn, and the second weft system would be a variegated blue yarn (though the variation of tone is not showing in our image). The warp would be black. We planned to use the following Presets for the colors in the image:
11-28

228 Chapter 11
The image was converted to RGB, layers made for each color, then the Presets added as Layer Styles. You can find the completed file in the Chapter 11 folder of the CD, in black and white as well as with a simulation using two weft colors. A section of the simulations is shown in Figure 11-29.
11-29