ce webadvisor instructor manual 2014 - santiago canyon college
TRANSCRIPT

1
Continuing Education Instructor
WebAdvisor Manual
Contents � Logging in to WebAdvisor……………………………………………………………………….....2 � View My Class Roster………………………………………………………………………………....4 � Submit Grades……………………………………………………………………………………….…..8 � Dropping a Student……………………………………………………………………………………11

2
Logging into WebAdvisor
STEPS SCREENSHOT 1. Go to the SCC web page at http//www.sccollege.edu
2. Click on the WebAdvisor link in the top banner.
3. Click on link toWebAdvisor
4. Click the Log In
button.
3
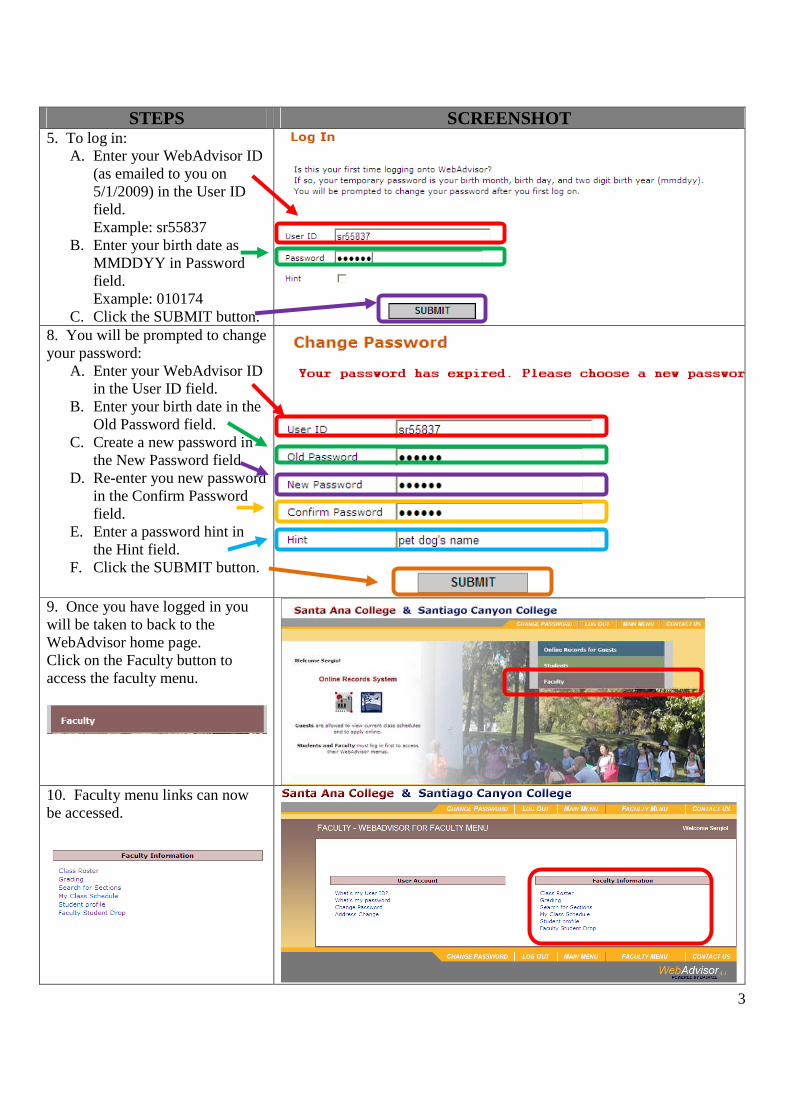
STEPS SCREENSHOT 5. To log in:
A. Enter your WebAdvisor ID (as emailed to you on 5/1/2009) in the User ID field. Example: sr55837
B. Enter your birth date as MMDDYY in Password field. Example: 010174
C. Click the SUBMIT button.
8. You will be prompted to change your password:
A. Enter your WebAdvisor ID in the User ID field.
B. Enter your birth date in the Old Password field.
C. Create a new password in the New Password field.
D. Re-enter you new password in the Confirm Password field.
E. Enter a password hint in the Hint field.
F. Click the SUBMIT button.
9. Once you have logged in you will be taken to back to the WebAdvisor home page. Click on the Faculty button to access the faculty menu.
10. Faculty menu links can now be accessed.

4
View Class Roster
STEPS SCREENSHOT
1. From the Faculty Information menu, click the Class Roster link.
2. To select a roster:
A. Select the Continuing Education term in the drop-down menu
B. Click the SUBMIT button.
3. To select a class section: A. Click the radio button
next to your class section.
B. Click the SUBMIT button.
5
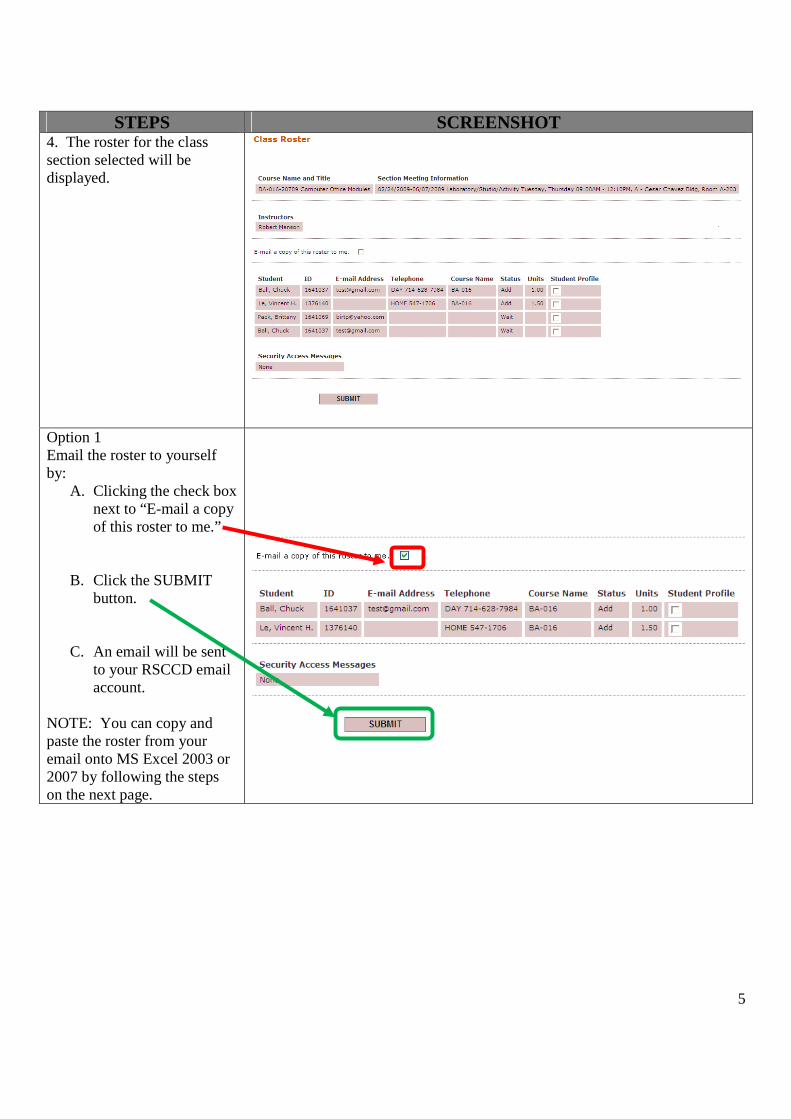
STEPS SCREENSHOT 4. The roster for the class section selected will be displayed.
Option 1 Email the roster to yourself by:
A. Clicking the check box next to “E-mail a copy of this roster to me.”
B. Click the SUBMIT button.
C. An email will be sent to your RSCCD email account.
NOTE: You can copy and paste the roster from your email onto MS Excel 2003 or 2007 by following the steps on the next page.
6
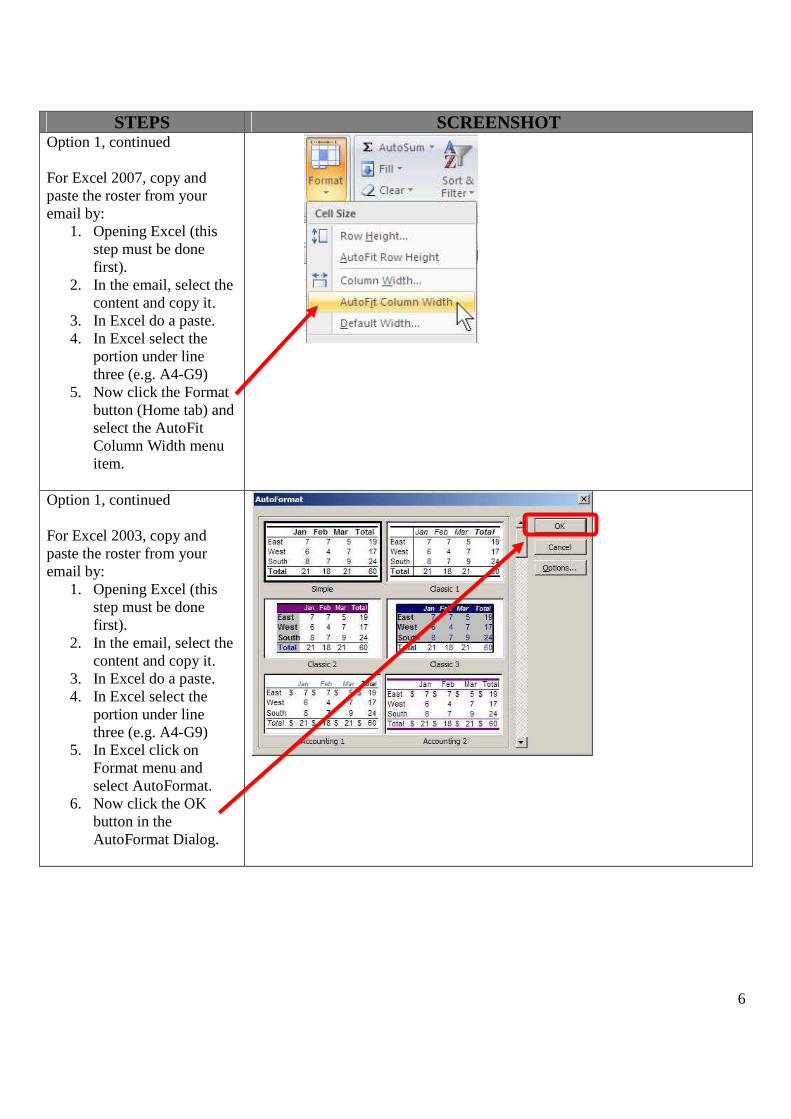
STEPS SCREENSHOT Option 1, continued For Excel 2007, copy and paste the roster from your email by:
1. Opening Excel (this step must be done first).
2. In the email, select the content and copy it.
3. In Excel do a paste. 4. In Excel select the
portion under line three (e.g. A4-G9)
5. Now click the Format button (Home tab) and select the AutoFit Column Width menu item.
Option 1, continued For Excel 2003, copy and paste the roster from your email by:
1. Opening Excel (this step must be done first).
2. In the email, select the content and copy it.
3. In Excel do a paste. 4. In Excel select the
portion under line three (e.g. A4-G9)
5. In Excel click on Format menu and select AutoFormat.
6. Now click the OK button in the AutoFormat Dialog.
7
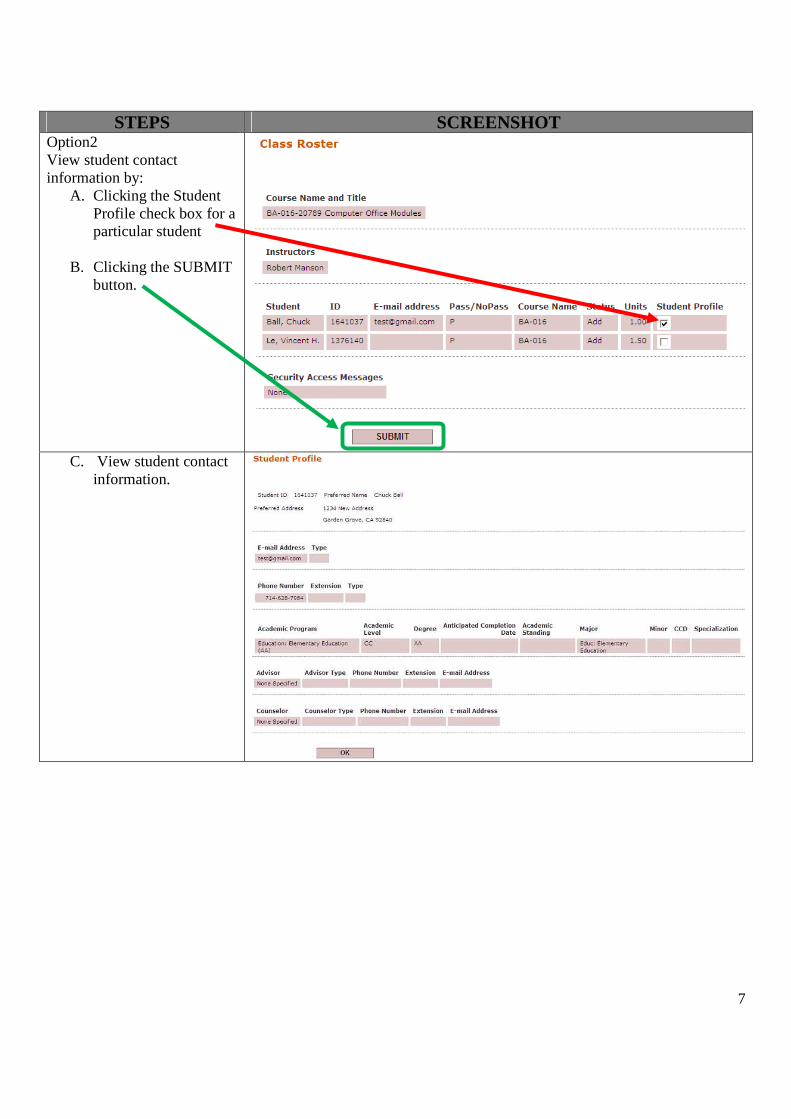
STEPS SCREENSHOT Option2 View student contact information by:
A. Clicking the Student Profile check box for a particular student
B. Clicking the SUBMIT button.
C. View student contact
information.

8
Submitting Grades All students who have attended class must receive a grade.
• You may post a Passing grade at any time during the term if the student completes the course.
• At the end of the term, all students with attendance hours must receive a grade.
• Even dropped students with attendance must receive a grade. • Students with no attendance hours must be dropped (see p. 11).
STEPS SCREENSHOT
1. From the Faculty Information menu, click the “Grading” link.
2. To select a term:
A. Select the Continuing Education term in the drop-down menu
B. Click the SUBMIT button.
3. To select a class section:
A. Click the radio button next to your class section.
B. Click the SUBMIT button.
9
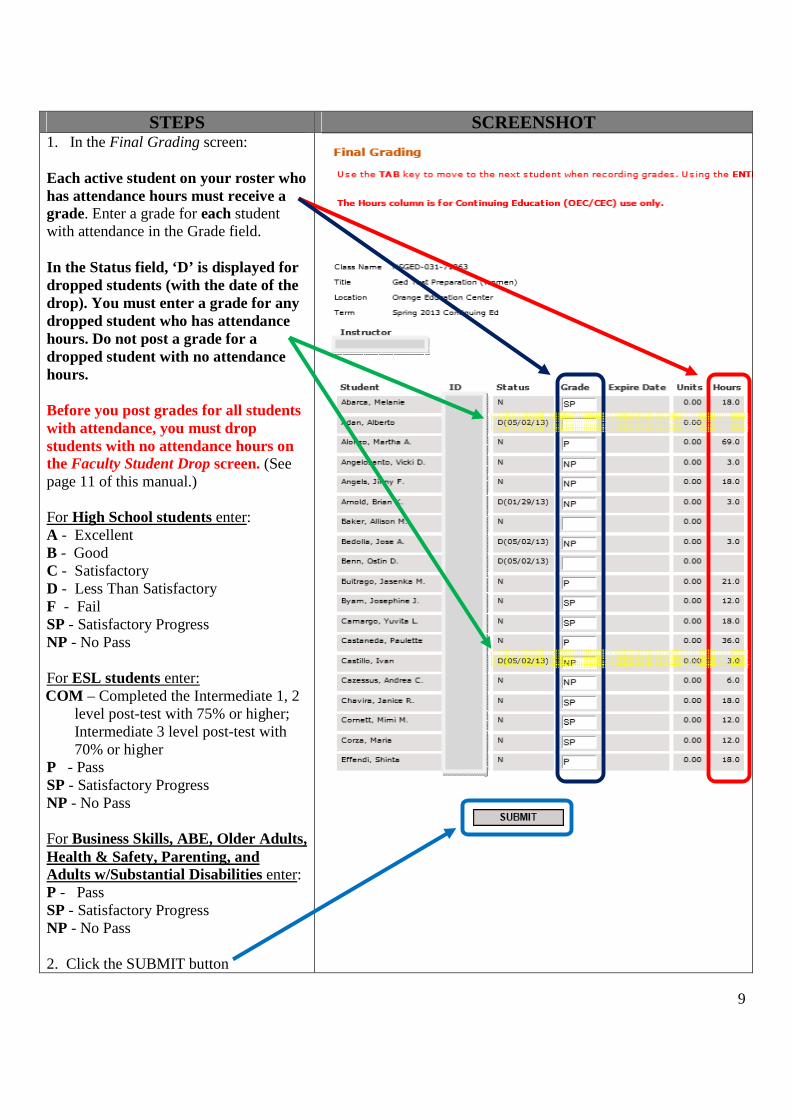
STEPS SCREENSHOT 1. In the Final Grading screen: Each active student on your roster who has attendance hours must receive a grade. Enter a grade for each student with attendance in the Grade field. In the Status field, ‘D’ is displayed for dropped students (with the date of the drop). You must enter a grade for any dropped student who has attendance hours. Do not post a grade for a dropped student with no attendance hours. Before you post grades for all students with attendance, you must drop students with no attendance hours on the Faculty Student Drop screen. (See page 11 of this manual.) For High School students enter: A - Excellent B - Good C - Satisfactory D - Less Than Satisfactory F - Fail SP - Satisfactory Progress NP - No Pass For ESL students enter: COM – Completed the Intermediate 1, 2
level post-test with 75% or higher; Intermediate 3 level post-test with 70% or higher
P - Pass SP - Satisfactory Progress NP - No Pass For Business Skills, ABE, Older Adults, Health & Safety, Parenting, and Adults w/Substantial Disabilities enter: P - Pass SP - Satisfactory Progress NP - No Pass 2. Click the SUBMIT button
10
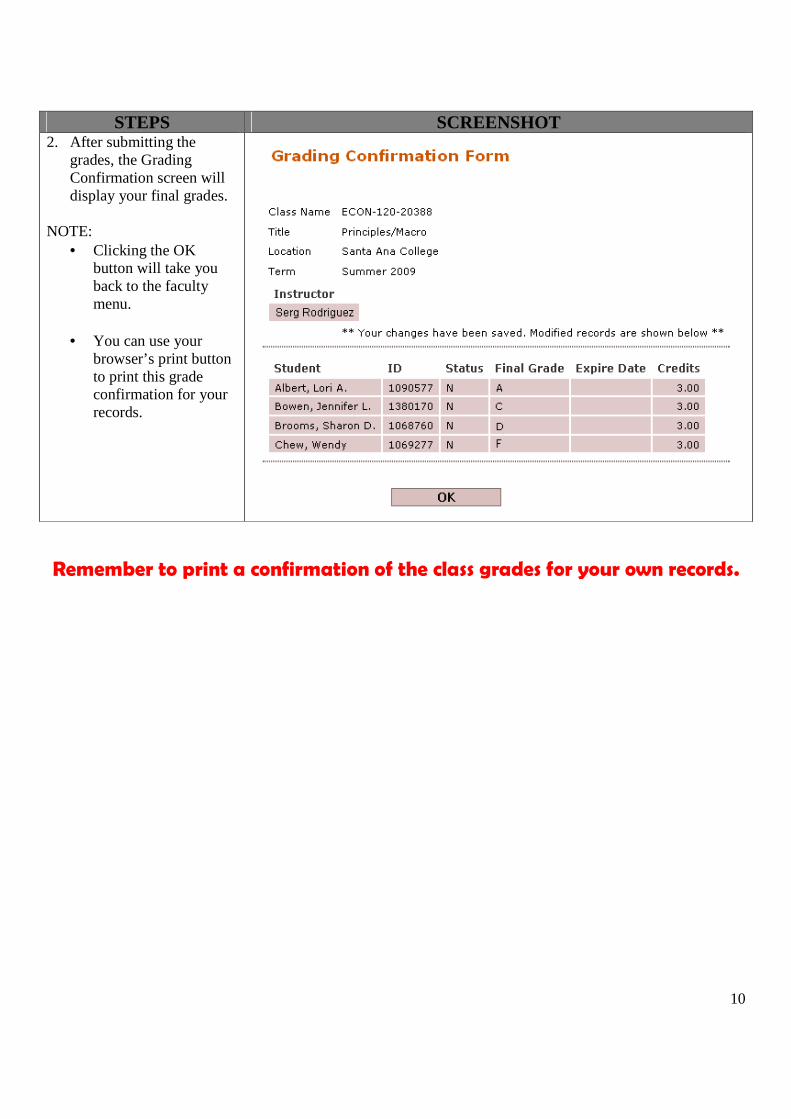
STEPS SCREENSHOT 2. After submitting the
grades, the Grading Confirmation screen will display your final grades.
NOTE:
• Clicking the OK button will take you back to the faculty menu.
• You can use your browser’s print button to print this grade confirmation for your records.
Remember to print a confirmation of the class grades for your own records.

11
Dropping Students with No Attendance
At any time you may drop a student from your roster. • Only drop students with no attendance hours (no shows). • Before the last class meeting, drop all students with no
attendance hours. • All students with attendance hours must receive a grade (see
grading instructions, p. 8).
STEPS SCREENSHOT 1. From the Faculty Information menu, click the “Faculty Student Drop” link.
2. To select a term:
A. Select the Continuing Education term in the drop-down menu.
B. Click the SUBMIT
button.
3. To select a class section:
A. Click the radio button next to your class section.
B. Click the SUBMIT button.
12
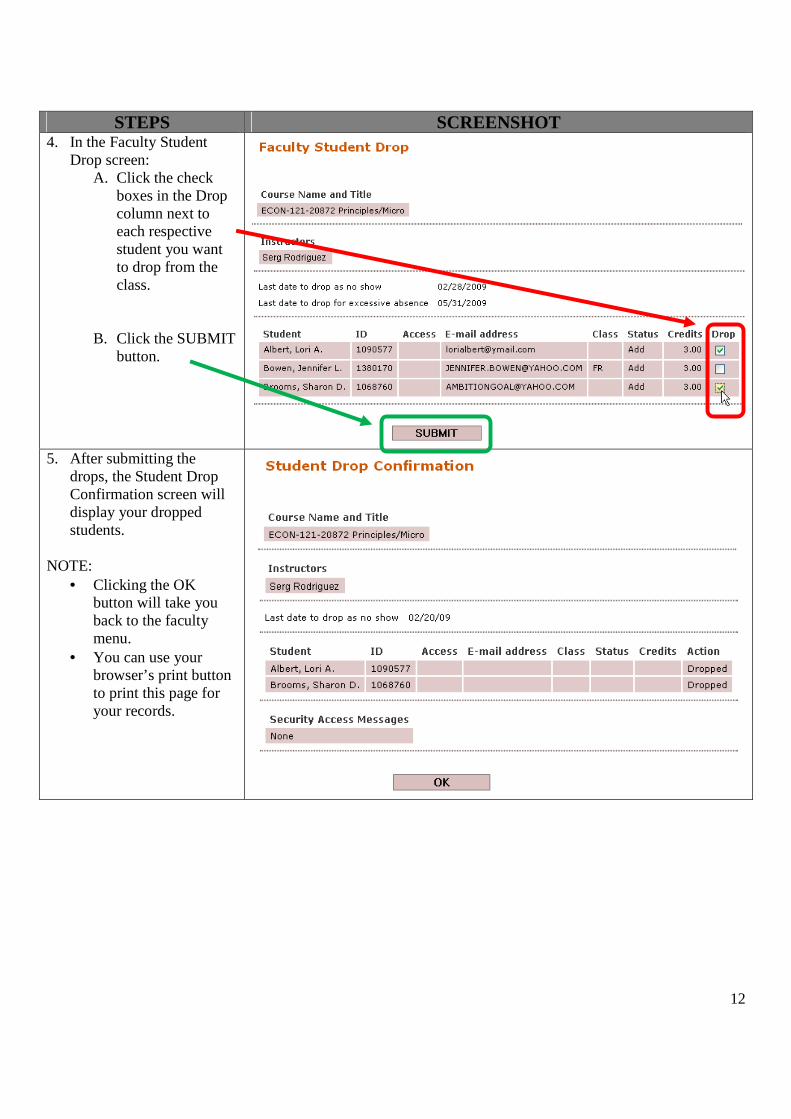
STEPS SCREENSHOT 4. In the Faculty Student
Drop screen: A. Click the check
boxes in the Drop column next to each respective student you want to drop from the class.
B. Click the SUBMIT button.
5. After submitting the
drops, the Student Drop Confirmation screen will display your dropped students.
NOTE:
• Clicking the OK button will take you back to the faculty menu.
• You can use your browser’s print button to print this page for your records.